

Page 1
液晶モニター
GD-W213L
For Customer Use:
Enter below the Serial No. which is located on
the rear of the cabinet.Retain this information
for future reference.
Model No. : GD-W213L
Serial No. :
取扱説明書
The description page of
the European products.
EN DE
日本国内向け
製品の説明
ページです。
JP
Thank you for purchasing this JVC product.
Before putting the device into operation, please read the
instructions carefully to get the best performance to ensure.
B5A-0998-00
1-3121-1771G00
Page 2
Safety Precautions
POWER CONNECTION
For U.S.A. and Canada:
AC 120 V
For European and Asian countries:
AC 220 - 240 V
For United Kingdom:
AC 220 - 240 V
malfunction, electric shock or fire.
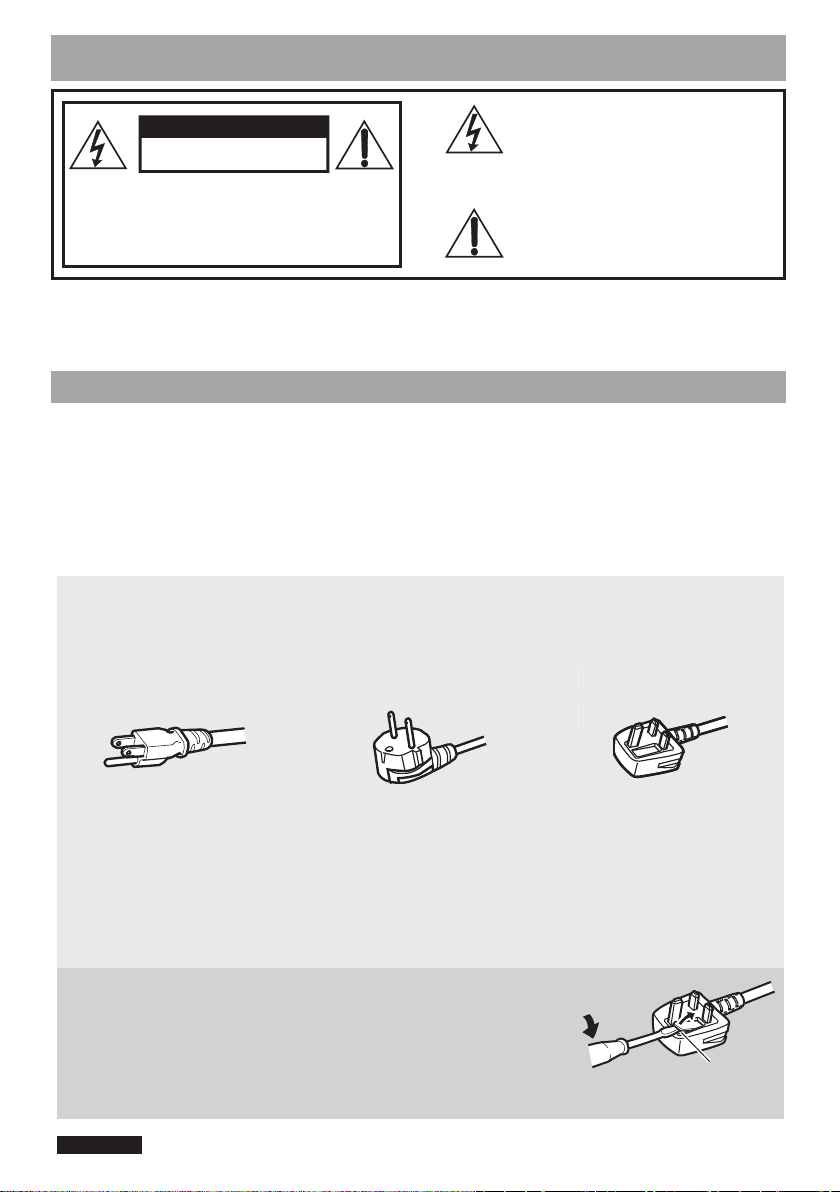
Note for United Kingdom power cord only
fuse.
Fuse
CAUTION
RISK OF ELECTRICAL SHOCK
CAUTION: To reduce the risk of electric shock. Do
DO NOT OPEN
not remove cover (or back). No user
serviceable parts inside. Refer servicing
to qualified service personnel.
The lightning flash with arrowhead symbol,
within an equilateral triangle is intended to
alert the user to the presence of uninsulated
"dangerous voltage" within the product's
enclosure that may be of sufficient
magnitude to constitute a risk of electric
shock to persons.
The exclamation point within an equilateral
triangle is intended to alert the user to the
presence of important operating and
maintenance (servicing) instructions in the
literature accompanying the appliance.
WARNING: TO REDUCE RISK OF FIRE OR ELECTRIC SHOCK, DO NOT EXPOSE THIS
APPARATUS TO RAIN OR MOISTURE. NO OBJECTS FILLED WITH LIQUIDS,
SUCH AS VASES, SHALL BE PLACED ON THE APPARATUS.
IMPORTANT SAFEGUARDS
Electrical energy can perform many useful functions. This unit has been engineered and manufactured to
assure your personal safety. But IMPROPER USE CAN RESULT IN POTENTIAL ELECTRIC SHOCK
OR FIRE. In order not to defeat the safeguards incorporated into this product, observe the following basic
rules for its installation, use. and service. Please read these “IMPORTANT SAFEGUARDS” carefully
before use.
• All the safety and operating instructions should be read be
• The safety and operating instructions should be retained for future reference.
• All warnings on the product and in the operating instructions should be adhered to.
• All operating instructions should be followed.
The power supply voltage rating of this product is AC 100 V - 240 V.
The power cord attached conforms to the following power supply voltage and countries. Use only the
power cord designated to ensure safety and EMC regulations of each country.
fore the
product is operated.
This plug will fit only into a grounded power outlet. If you are unable to insert the plug into the outlet,
contact your electrician to install the proper outlet. Do not defeat the safety purpose of the grounded
plug.
• This product should be operated only with the type of power source indicated on the label. If you are
not sure of the type of power supply of your home, consult your product dealer or local electric power
company.
Warning:
• Do not use the same power cord for AC 120 V as for AC 220 - 240 V. Doing so may cause
The plug of United Kingdom power cord has a built-in fuse. When
replacing the fuse, be sure to use only a correctly rated approved type,
re-fit the fuse cover. (Consult your dealer or qualified personnel.)
How to replace the fuse
Open the fuse compartment with the blade screwdriver, and replace the
EN
- 2 -
Page 3
When using stands for this monitor, use the supplied
monitor to topple over.
• Slots and openings in the cabinet are provided for
• Do not step on or hang on the product.
• Make enough room for inserting or removing the
Do not attempt to service this product yourself, as
service to qualified service personnel.
Do not use the product for a long time if the sound is
distorted.
Under the following conditions,
• Before connecting other products such as VCR's and personal computers, you should turn off the
safety checks to determine that the product is in proper operating condition.
Safety Precautions (cont.)
power of this product for protection against electric shock.
• Do not use attachments not recommended by the manufacturer as they may be hazardous.
• When replacement parts are required, be sure the service technician has used replacement parts
specified by the manufacturer or equivalents. Unauthorized substitutions may result in fire, electric
shock, or other hazards.
• Upon completion of any service or repairs to this product, ask the service technician to perform
1. Turn off the power.
2. Unplug this product from the wall outlet.
3. Refer service to qualified service personnel.
a) When the product emits smoke or unusual smell.
b) When the product exhibits a distinct change in
performance—for example, no picture or no sound.
c) If liquid has been spilled, or objects have fallen on
the product.
d) If the product has been exposed to rain or water.
e) If the product has been dropped or damaged in any
way.
f) When the
• Do not install this product in the following places:
- in a damp or dusty room
- where the product is exposed to soot or steam,
such as near the cooking counter or a humidifier
- near heat sources
- where condensation easily occurs, such as near
the window
• Do not place this product on an unstable cart,
stand, or table. The product may fall, causing
serious injury to a child or adult, and serious
damage to the product.
The product should be mounted a
manufacturer's instructions, and should use a
mount recommended by the manufacturer.
• Do not use this product near water.
• Be sure to install the product in the place where
proper temperature and humidity are kept.
( “Operating conditions” on page 12).
This product becomes hot during its use. Take
enough care when handling the product.
supply cord or plug is damaged.
power
ccordin
g to the
opening or removing covers may expose you to
dangerous voltages and other hazards. Refer all
power plug. Place the product as close to an AC
outlet as possible. The main power supply for the
product is controlled by inserting or removing the
power plug.
• When you install the product in a place where you
cannot easily insert or remove the power plug from
an AC outlet, insert or remove the power cord from
the AC inlet on the product.
• When the product is left unattended and unused for
a long period of time, unplug it from the wall outlet
and disconnect the c
• Do not overload wall outlets, extension cords, or
convenience receptacles on other equipment as
this can result in a risk of fire or electric shock.
• Use only the accessory cord designed for this
product to prevent shock.
ventilation. These ensure reliable operation of the
product and protect it from overheating. These
openings must not be blocked or covered.
• Never push objects of any kind into this product
through openings as they may touch dangerous
voltage points or short-circuit the parts, which could
result in a fire or electric shock.
• Never spill liquid of any kind on the product.
• Never place anything on the product. (Placing
liquids, naked flames, cloths, paper, etc.
product may cause a fire.)
• Do not apply any strong shock to the LCD panel.
(Do not hit any object against it or push it with a
sharp-pointed tool.)
• Do not put heavy objects on the product.
able
system.
on
the
stands and attach them properly.
• Improper use of stands may lead to damages on
the floor or on the monitor, or may cause the
- 3 -
EN
Page 4
Safety Precautions (cont.)
IMPORTANT SAFETY INSTRUCTIONS
1. Read all of these instructions.
2. Save these instructions for later use.
3. Follow all warnings and instructions marked on the product.
4. Unplug this product from the wall outlet before cleaning.
Do not use liquid cleaners or aerosol cleaners.
Use a damp cloth for cleaning.
5. Do not use this product near water.
6. Do not place this product on an unstable cart, stand or table. The product may fall, causing serious
damage to the product and per
7. Slots and openings in the cabinet and the back are provided for ventilation: to ensure reliable
operation of the product, these openings must not be blocked by placing the product on a bed, sofa,
rug or other similar surface.
This product should never be placed near or over a heat register. This product should not be placed
in a built-in installation unless proper ventilation is provided.
8. This product should be operated from the type of power source indicated on the marking label.
If you
9. This product is equipped with a 3-wire grounding type plug having a third (grounding) pin.
This is a safety feature.
If you are unable to insert the plug into the outlet, contact your electrician to replace your obsolete
Do not defeat the purpose of the grounding-type plug.
10. Do not allow anything to rest on the power cord. Do not locate this product where persons will walk on
11
12. Never push objects of any kind into this product through cabinet slots as they may touch dangerous
Never spi
13. Do not attempt to service this product yourself, as opening or removing covers may expose you to
14. Unplug this product from the wall outlet and refer servicing to qualified service personnel under the
15. The Main
16. Be sure to install the monitor securely to prevent the monitor from falling over, which may cause
17. Do not step on or hang on the product.
are not sure of the type of power available, consult your dealer or local power company.
outlet.
ord.
the c
. If an extension cord is used with this product, make sure that the total of the ampere ratings on the
products plugged into the extension cord do not exceed the extension cord ampere rating. Also,
make sure that the total of all products plugged into the wall outlet does not exceed 10 amperes.
voltageoints or short out parts that could result in a risk of fire or electric shock.
ll any kind of liquid on the product.
dangerous voltage points or other risks. Refer all servicing to service personnel.
following conditions.
A. When the power cord or plug is damaged or frayed.
B. If liquid has been spilled into the product.
C. If the product has been exposed to ra
D. If
the Product does not operate normally when the operating instructions are followed.
Adjust only those controls that are covered by the operating instructions since improper adjustment
of other controls may result in damage and will often require extensive work by a qualified technician
to restore normal operation.
E. If the product has been dropped or the cabinet has been damaged.
F. If the product exhibits a distinct change in performance, indicating a need for service.
power plug.
Place the apparatus as close to the outlet as possible.
damage to the monitor or injury.
Plug is used as the disconnect device. Make enough room for inserting and removing the
sons nea
rby.
in or water.
EN
- 4 -
Page 5
Safety Precautions (cont.)
European Union only
Dear Customer,
This apparatus is in conformance with the valid European directives and standards regarding
electromagnetic compatibility and electrical safety.
European representative of JVC KENWOOD Corporation is: JVC Technical Services Europe GmbH
Konrad-Adenauer-Allee 1-11
61118 Bad Vilbel Germany
Operating Precautions
The LCD panel and backlight have life expectancy. Due to the basic characteristics of the
LCD panel, an afterimage or uneven display may occur. It is recommended that you change
images occasionally, activate the power saving function, or often turn off the power to reduce
the load on the LCD panel. Continuous operations of the LCD panel may accelerate the
deterioration.
Maintenance
Screen
To avoid irreparable change in
appearance of the screen such
uneven color, discoloration, scratches,
be careful about the following:
● Do not paste or stick anything using
any glues or adhesive tapes.
● Do not write anything on the screen.
● Do not strike the screen with a hard
object.
● Avoid condensation on the screen.
● Do not wipe the screen with any liquid
such as water. In addition, wiping the
screen with water-diluted neutral
detergent or solvent such as alcohol,
thinner, or benzine may affect th
an
ti-reflection treatment of the screen.
● Do not wipe the screen forcefully.
Wipe stains off the screen with a soft
cloth.
Ventilation openings
Use a vacuum cleaner to get rid of the dust
as
e
around the intakes (all the openings). If a vacuum
cleaner is not available, use a cloth and wipe it
off. Leaving the dust around the intakes may
prevent proper temperature control and cause
damage to the product.
Cabinet
To avoid the deterioration or damages of the
cabinet such as its paint's peeling away, be
careful about the following:
● Do not wipe the cabinet using solvent such as
l, thinner, or benzine.
alcoho
● Do not expose the cabinet to any volatile
substance such as insecticides.
● Do not allow any rubber or plastic in contact for
a long time.
● Do not wipe the cabinet forcefully.
Wipe stains off the cabinet with a soft cloth. If the
cabinet gets heavily stained, wipe it with a soft
cloth soaked in water-diluted neutral detergent
and wrung well, then wipe with a soft dry cloth.
- 5 -
EN
Page 6
Information on Disposal of Old Electrical and Electronic
Equipment and Batteries (applicable for countries that have
adopted separate waste collection systems)
Information sur l’élimination des anciens équipements
électriques et électroniques et piles électriques (applicable
dans les pays de qui ont adopté des systèmes de collecte
sélective)
Información acerca de la eliminación de equipos eléctricos,
electrónicos y baterías al final de la vida útil (aplicable a los
países de la que hayan adoptado sistemas independientes
de recogida de residuos)
Informação sobre a Eliminação de Equipamentos Eléctricos e
Electrónicos e de Baterias usados (aplicável nos países que
adoptam sistemas de recolha diferenciada de lixo)
Products and batteries with the symbol (crossed-out
wheeled bin) cannot be disposed as household waste.
Old electrical and electronic equipment and batteries
should be recycled at a facility capable of handling
these items and their waste by products.
Contact your local authority for details in locating a
recycle facility nearest to you.
Proper recycling and waste disposal will help conserve
resources whilst preventing detrimental effects on our
health and the environment.
Notice: The sign “Pb” below the symbol for batteries
indicates that this battery contains lead.
Les produits et piles électriques sur lesquels le
pictogramme (poubelle barrée) est apposé ne peuvent
pas être éliminés comme ordures ménagères.
Les anciens équipements électriques et électroniques
et piles
électriques doivent être recyclés sur des sites
capables de traiter ces équipements et leurs déchets
par produit.
Contactez vos autorités locales pour connaître le site
de recyclage le plus proche.
Un recyclage adapté et l’élimination des déchets
aideront à conserver les ressources et à nous
préserver des leurs effets nocifs sur notre santé et sur
l’environnement.
Avis: Le symbole “Pb” ci-dessous sur des piles
électrique indique que cette pile contient du plomb.
Los productos y las baterías con el símbolo
(contenedor con ruedas tachado) no podrán ser
desechados como residuos domésticos.
Los equipos eléctricos, electrónicos y baterías
al final de la vida útil, deberán ser reciclados en
instalaciones que puedan dar el tratamiento adecuado
a estos productos y a sus subproductos residuales
correspondientes.
Póngase en contacto con la autoridad local
competente para obtener información sobre
de reciclaje más cercano.
El reciclaje y la disposición adecuada de los desechos
ayuda a conservar los recursos naturales y a reducir
los efectos perjudiciales en la salud y el medio
ambiente.
Nota: El símbolo “Pb” debajo del símbolo en baterías
indica que dicha batería contiene plomo.
Os produtos e baterias com o símbolo (caixote de lixo
com um X) não podem ser deitados fora junto com o
lixo doméstico.
Os equipamentos eléctricos e electrónicos e baterias
usados devem ser reciclados em uma instalação capaz
de manipular esses elementos e seus subprodutos
residuais.
Contacte a autoridade local para os detalhes sobre a
localização da instalação de reciclagem mais próxima.
A reciclagem e eliminação de lixo adequadas ajudarão
a preservar os recursos naturais e prevenir efeitos
prejudiciais à nossa saúde e meio ambiente.
Aviso: O sinal “Pb” abaixo do símbolo pa
indica que esta bateria contém chumbo.
el centro
ra baterias
Informazioni sull’eliminazione dei prodotti elettrici ed
elettronici e delle batterie (per i Paesi che adottano la
raccolta differenziata dei rifiuti)
Entsorgung von gebrauchten elektrischen und elektronischen
Geräten und Batterien (anzuwenden in Ländern mit einem
separaten Sammelsystem für solche Geräte)
Informatie over het weggooien van oude elektrische en
elektronische apparaten en batterijen (voor landen die
gescheiden afvalverzamelsystemen gebruiken)
Πληροφορίες για την Απόρριψη παλιών ηλεκτρικών και
ηλεκτρονικών συσκευών και μπαταριών (όπως ισχύουν
για χώρες που έχουν υιοθετήσει ξεχωριστό σύστημα
αποβλήτων)
I prodotti e le batterie recanti questa icona (bidone
carrellato della spazzatura con il simbolo della croce)
non devono essere eliminati come rifiuti solidi urbani.
I prodotti elettrici ed elettronici e le batterie devono
essere riciclati presso centri idonei alla loro gestione e
a quella dei rispettivi sottoprodotti.
Per informazioni sul centro di riciclaggio più vicino si
suggerisce di rivolgersi alle autorità locali.
Se eseguiti adeguatamente, l’eliminazione e il
riciclaggio dei rifiuti aiutano a conservare le risorse e
al contempo impedire gli effetti nocivi sulla salute e
l’ambiente.
Avviso: Il contrassegno “Pb” che appare sotto il simbolo
delle batterie significa che contengono piombo.
Das
Symbol (durchgestrichene Mülltonne) auf dem
Produkt oder seiner Verpackung weist darauf hin, dass
dieses Produkt nicht als normaler Haushaltsabfall
behandelt werden darf.
Die betreffenden Produkte müssen an einer
Annahmestelle für das Recycling von elektrischen
und elektronischen Geräten und Batterien abgegeben
werden.
Weitere Informationen über das Recycling dieses
Produktes erhalten Sie von Ihrer Gemeinde oder den
kommunalen Entsorgungsbetrieben.
Unsachgemäße oder falsche Entsorgung gefährden
Umwelt und Gesundheit.
Zur Beachtung: Das Zeichen „Pb“ unter dem Symbol
für Batterien zeigt an, dass diese Batterie Blei enthalt.
Producten en batterijen met het (afvalcontainer met
x-teken) symbool mogen niet als normaal huisvuil
worden weggegooid.
Oude elektrische en elektronische apparaten en
batterijen moeten worden gerecycled door een faciliteit
die geschikt is voor het verwerken van dergelijke
voorwerpen.
Raadpleeg de betreffende lokale instantie voor
aangaande in de buurt zijnde recylingfaciliteiten.
Het juist recyclen en weggooien van afval spaart
natuurlijke bronnen en reduceert schadelijke invloed op
uw gezondheid en het milieu.
Opmerking: De “Pb” aanduiding onder het
batterijsymbool betekent dat deze batterij lood bevat.
Τα προϊόντα και οι μπαταρίες με το σύμβολο
(διαγραμμένος κάδος αχρήστων) δεν μπορούν να
απορριφθούν ως οικιακά απορρίμματα.
Οι παλιές ηλεκτρικές και ηλεκτρονικές συσκευές
και οι μπαταρίες θα πρέπει να ανακυκλώνονται
σε εγκαταστάσεις που έχουν τη δυνατότητα
να διαχειριστούν αυτά τα αντικείμενα και τα
υποπροϊόντα της απόρριψής τους.
Επικοινωνήστε με τις τοπικές υπηρεσίες για
λεπτομέρειες σχετικά με την εύρεση
πλησιέστερης εγκατάστασης ανακύκλωσης.
Η σωστή ανακύκλωση και η εξουδετέρωση των
απορριμμάτων συντελεί στη διατήρηση των πόρων
ενώ αποτρέπει τις αρνητικές επιπτώσεις στην υγεία
μας και στο περιβάλλον.
Προσοχή: Το σήμα “Pb” κάτω από το σύμβολο για τις
μπαταρίες δηλώνει πως η μπαταρία περιέχει μόλυβδο.
της
details
EN DE
- 6 -
Page 7
Bu ürün 28300 sayılı Resmi Gazete’de yayımlanan Atik
Elektrikli ve Elektronik Eşyalarin Kontrolü Yönetmeliğe uygun
olarak üretilmiştir.
Eski Elektrikli ve Elektronik Cihazların ve Pillerin İmhası
Hakkında Bilgi (ayrı atık toplama sistemlerine sahip olan
ülkelerde geçerlidir)
Informacije za korisnike o odlaganju stare opreme
Bu sembolü (üzeri çizili çöp bidonu) içeren ürün ve
piller evsel atı k çöpleri ile birlikte atılamaz.
Kullanılmış elektrikli ve elektronik cihaz ve piller, bu tür
maddeleri ve bunların yan ürünlerini iş lemeye elverişli
bir geri kazanım tesisine gönderilmelidir.
Size en yakın geri kazanım tesisinin konumunu
öğrenmek üzere yerel yetkililerinize danışın.
Doğru geri kazanım ve atık uzaklaştırma y öntemleri,
sadece öz kaynakların korunmasına yardımcı olmakla
kalmayıp ayrıca sağlığımıza ve çevreye olacak zararlı
etkilerini engellemeye yardımcı olur.
Uyarı: Pilin alt tarafında bulunan “Pb” işareti, bu pillin
kurşun içerdiğini belirtir.
[primenljivo u zemljama koje su u
sistemima sortiranja I razdvajanja otpada]
Ovi simboli ukazuju da produkt sa ovim simbolom
i baterije ne treba odlagati kao nesortiran kućni
otpad kada im istekne vek trajanja. Umesto toga,
proizvod treba predati važećim otpadima za reciklažu
električne I elektronske opreme (kao i baterija) radi
pravilnog postupanja u skladu sa vašim nacionalnim
zakonodavstvom.
Ispravnim odlaganjem ovog proizvoda pomažete
očuvanju prirodnih resursa i prevenciji potencijalnih
negativnih efekata na okolinu i ljudsko zdravlje koji
bi inače bili prouzrokovani nepravilnim rukovanjem
otpadom od ovih
proizvoda.
Za više informacija o otpadima i reciklaži ovog
proizvoda, molimo vas da kontaktirate vašu lokalnu
opštinsku kancelariju, vaše javno komunalno
preduzeće ili prodavnicu u kojoj ste kupili proizvod.
Ako vaš korišćeni proizvod sadrži baterije ili
akumulatore, molimo vas da ih unapred odložite
zasebno u skladu sa
(Za poslovne korisnike)
Ako želite da odložite ove proizvode, molimo vas da
kontaktirate vašeg prodavca ili dobavljača za više
informacija.
Naznaka: Hemijski simbol Pb ispod simbola za baterije
ukazuje na to da li baterija sadrži olovo.
lokalnim zahtevima.
svojile direktivu o
Информации за Отстранување на стара електрична и
електронска опрема и батерии (важи за земји кои имаат
усвоено посебен отпад системи)
תוללוס ןכו ןשי ינורטקלאו ילמשח דויצ לש הפשאל הכלשה רבדב עדימ
לגוסמה ןקתמב תוללוס ןכו ןשי ינורטקלאו ילמשח דויצ רזחמל שי
הללוסהש ןייצמ תוללוס רובע ןומיסל תחתמש
Производи и батерии со симбол (пречкртана бин)
не може да биде отстранет како домашен отпад.
Стара електрична и електронска опрема и батерии
треба да се рециклираат во еден објект способни
за ракување со овие предмети и нивниот отпад од
производи. Контактирајте го вашиот локален орган
за детали за лоцирање на рециклирање објект
најблиску до вас.
Правилно рециклирање и депонирање на отпадот
ќе ви помогне зачува ресурси додека спречување
на штетните ефекти врз нашето здравје и
животната средина.
Напомена: накот “Pb” под симболот за батерииу
кажува на тоа дека оваа батерија содржи олово.
.(תדרפו
מ הפשא ףוסיא תכרעמב תושמתשמש תונידמל יטנוולר)
X םע הפשא חפ) ןומיסה םע תוללוסו םירצומ ךילשהל ןתינ אל
ןקתמ תודוא םיטרפ תלבקל תימוקמה תושרה םע רשק ורצ
ורזעי םיתואנ הפשאל הכלשהו רוזחימ .םכילא בורקה רוזחימה
לעו ונתואירב לע תוילילש תועפשה עונמלו םיבאשמ רמשל
.םהלש יאוולה ירצותבו הלאכ םיטירפב לפטל
.הליגר תיתיב הפשאכ (וילע
.הביבסה
Pb
ןומיסה :בל ומיש
.תרפוע הליכמ
- 7 -
EN DE
Page 8
Contents
12Specifications
33Avilabel signals
34Dimensions
35Troubleshooting
Model Name
Energy Efficiency Class
Screen Size 21.5 inches (55 cm)
On-mode Power Consumption
Annual Energy Consumption
Stand-by mode Power Consumption
Resolution 1920 × 1080 pixels
*1 based on the power consumption of the television operating 4 hours per day for 365days. The actual energy
consumption will depend on how the television is used.
For easy understanding, pictures and illustrations are shown by being emphasized, omitted or
composed, and may be slightly different from actual products.
Design and specifications are subject to change without notice.
All company names and product names mentioned herein are used for identification purposes
only, and may be the trademarks or registered trademarks of their respective companies
HDMI, the HDMI Logo, and High - Definition Multimedia Interface are trademarks or registered
trademarks of HDMI Licensing LLC in the United States and other countries.
EN
- 8 -
GD-W213L
A
19.7 W
28.7 kWh/annum
0.34 W
*1
Page 9
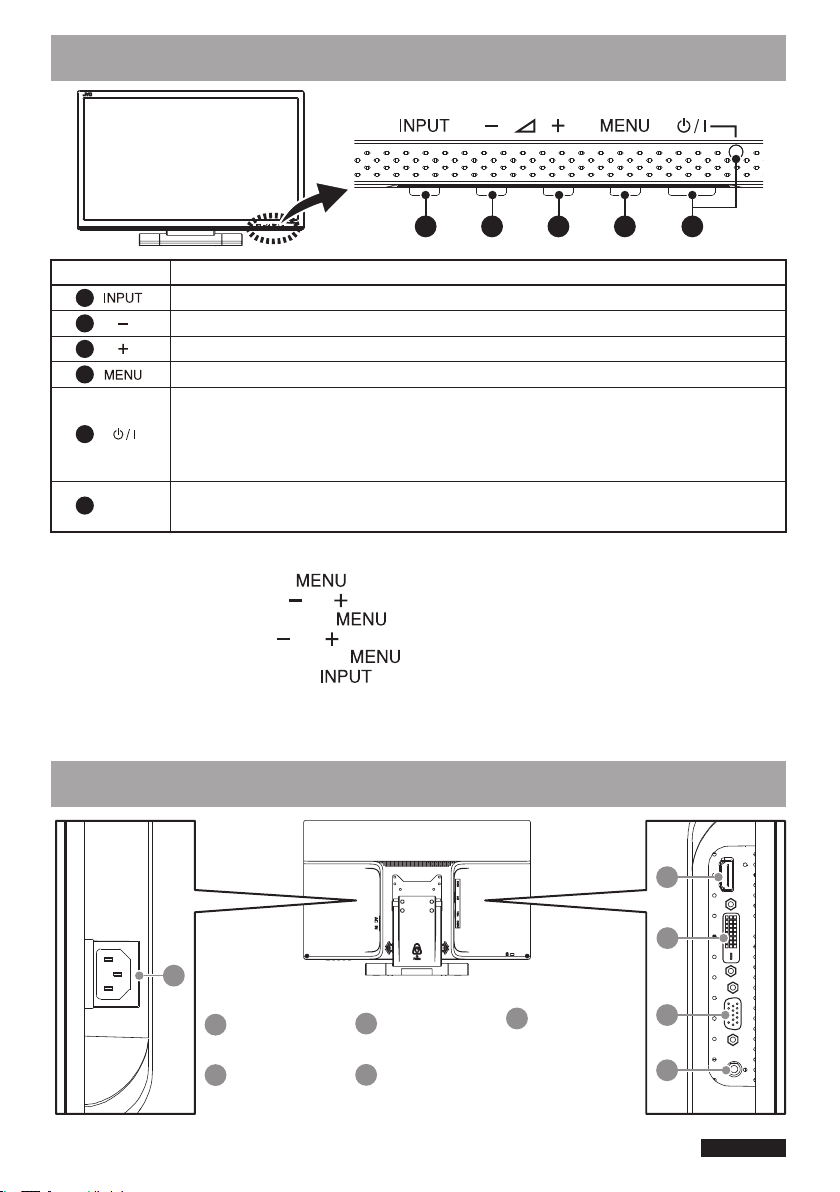
Controls
1
1
2
2
Button Function
1
2
3
4
Select input source.
Decrease the level of volume.
Increase the level of volume.
Activates and exits the OSD.
Turns On and Off (on standby) the monitor.
5
4
+
10sec.
Operation of the power lamp
Picture is displayed by delay of a few seconds from power lamp ON.
*POWER ON : Green On *Standby: Off *Power saving mode : Orange blink
The MENU button is pressed for more than 10 seconds or more, you can turn
ON / OFF the key lock function.
Button operation procedure of MENU
1. Display the menu: Press the button.
2. Move the cursor: Press the and button.
3. Confirm the setting item: Press the button.
4. Set the values: Press the and button.
5. Confirm the setting values: Press the button.
6. End of menu settings: Press the button.
Press once to return to the previous menu.
*"Thepressingtimesofthebutton"and"thechangingnumberonthemenu"maynotmatch.
Connectors
3
3
4
4
5
5
BB
CC
AA
A
AC IN
AC power input
B
HDMI
HDMI digital signal input
(*HDCP 1.1)
C
DVI
DVI-D digital signal input
(*HDCP 1.1)
VGA
D
PC RGB si gnal input
- 9 -
E
AUDIO
Stereo audio input
for VGA , DVI and HDMI
DD
EE
EN
Page 10
First time installation
When you turn on the power and the monitor, “First Time Installation” appears.
Start setting referring to the menu configuration.
For the setting items, see the pages below.
“Language” ☞ “Language” on page 11
“No Sync Action” ☞ “No Sync Action” on page 11
“No Operation Action” ☞ “No Operation Action” on page 11
*When you select the "Japanese" in the language setting, "No Operation Action" and "No Sync Action" First Time Installation setting
menu is not displayed. If you want to change the settings, see page 11, and set the menu operation.
Setting procedure
1 Press / to move the cursor to the setting item.
● Press to button, the setting value was confirmed.
2 Press / to select the setting values
● Each time you press one of / buttons, the setting value changes.
● Press to button, the setting value was confirmed.
3 Move the cursor to “Set”
4 Press to finish setting
● When you change the settings, a confirmation message appears.
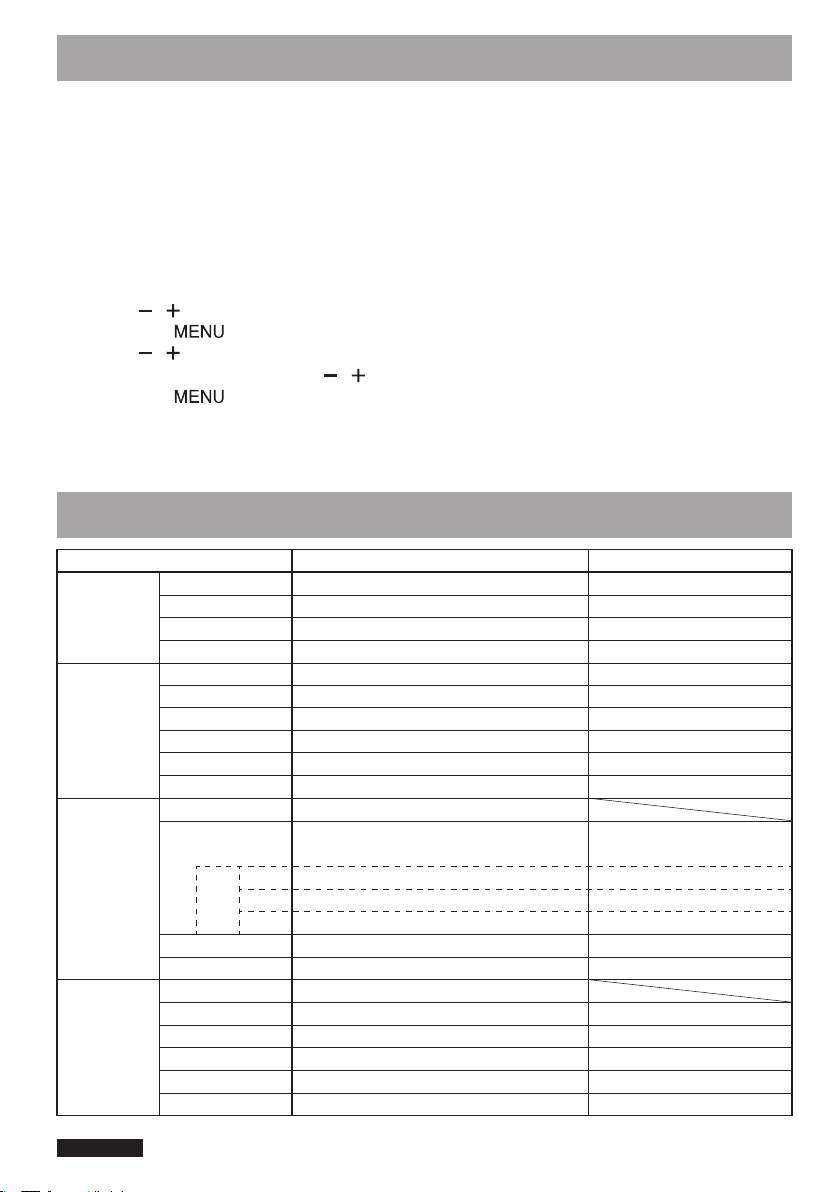
Menu operation function list
Menu items Purpose Settings
Main
*PC-VGA/
DVI/
HDMI(PC)
Main
*HDMI(Video)
Sub
Image
Adjustment
*PC-VGA only
Picture Mode
Contrast
Brightness
DCR
Picture Mode
Contrast
Brightness
Saturation
DCR
Auto Colour
Select the picture modes.
*1
*4
Adjusts the contrast.
*4
*1
Adjusts the brightness.
*1
*4
*1
Select the DCR(Dynamic Contrast Ratio).
*1
*4
Select the picture modes.
Adjusts the contrast.
*1
*4
*1
*4
Adjusts the brightness.
*1
*4
Adjusts the saturation.
*1
*4
*1
Select the DCR(Dynamic Contrast Ratio).
(*VGA only)
Automatic adjustment of the white condition.
Colour Temp. Select the whitebalance.
Adjusts the red level.
Red
User
Backlight Adjusts the backlight level. 0 - 100
Aperture Adjusts the aperture.
Auto Adjust
H Position
V Position
Clock
Adjusts the green level.
Green
Adjusts the blue level.
Blue
*1
*4
*3
Automatic adjustment of the picture position.
Adjusts the horizontal position of the screen.
Adjusts the vertical position of the screen.
Adjusts the clock.
Phase Adjusts the phase.
Sharpness Adjusts the sharpness. 0 - 4
Standard / CCTV / User
0 - 100
0 - 100
Off / On
Standard / CCTV / User
0 - 100
0 - 100
0 - 100
0 - 100Tint Adjusts the tint.
Off / On
Standard / Warm /
User / DICOM SIM. / Cool
0 - 255
0 - 255
0 - 255
0 - 2
0 - 100
0 - 100
0 - 100
0 - 100
EN
- 10 -
Page 11
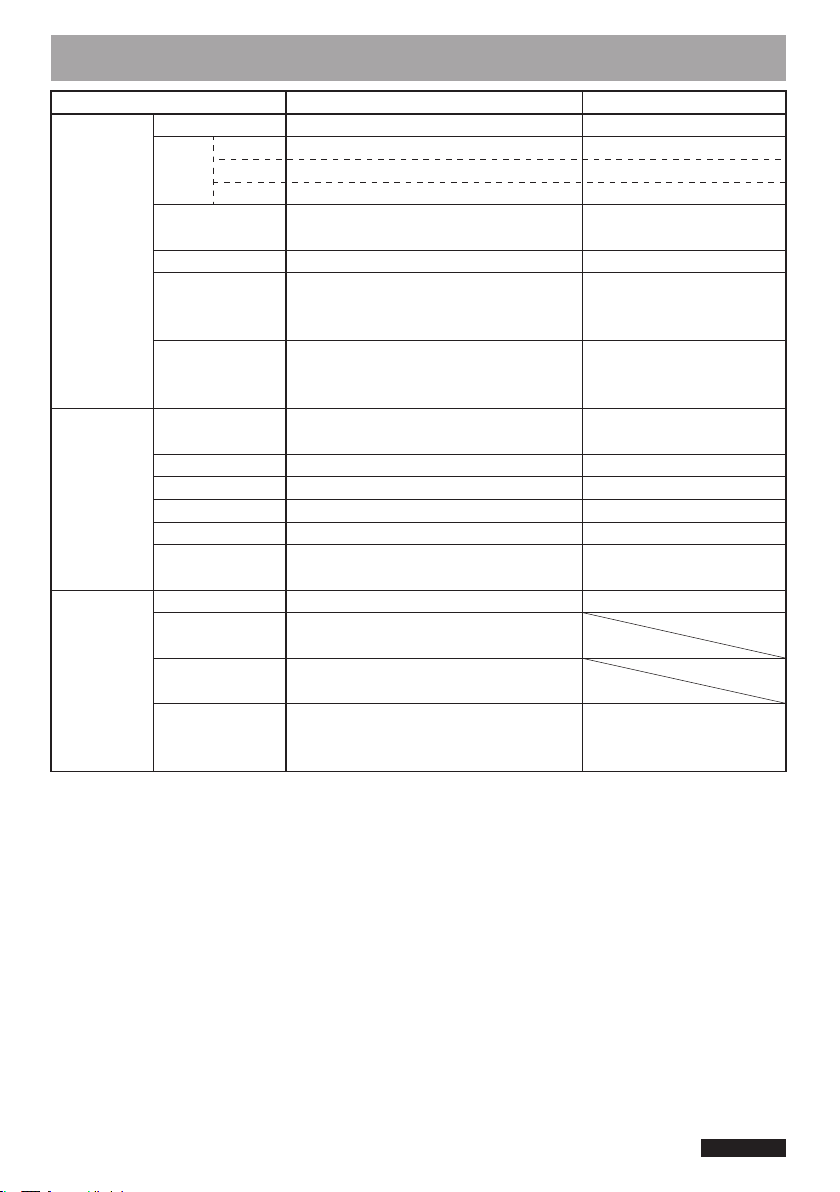
Menu operation function list (cont.)
Menu items Purpose Settings
Signal
Setting
OSD Menu
Other
Source Select
Audio
Assign
PC-VGA
DVI
HDMI
Source Search
Aspect Setting Select the aspect ratio.
No Sync Action
No Operation
Action
Language Select the OSD language.
H Position Adjust the OSD horizontal position.
V Position Adjust the OSD vertical position. 0 - 100
Duration
Transparency
Status Display
Volume
Reset
Information
Power Lamp
Select the signal source.
Select Off to set the monitor to mute sound.
Select Off to set the monitor to mute sound.
Select audio input source.
Select the On to set the monitor is searching
automatically the input source.
Select the On to set the monitor to turn
into Power saving mode , if no sync
condition continues for about 15 seconds.
Select the On to set the monitor to turn
into Stand-by mode if no operation
condition continues for about 4 hours.
*2
Adjust the OSD display time.
Adjust the OSD transparency.
Select for display of the signal input
connector name.
Adjust audio volume level.
Reset the menu settings.
*Reset operation is required for each input source.
Show the input connector name and
signal source name.
Select the power indicator setting.
* ON : In conjunction with the power indicator is lit.
* OFF : The power indicator is not enable.
PC-VGA / DVI / HDMI
On / Off
On / Off
Digital / Analogue / Off
Off / On
Auto / Full / 4:3
On / Off
On / Off
English / Deutsch / Français
/ Español/日本語
*2
0 - 100
3 sec - 60 sec
0 - 7
On / Off
0 - 100
On / Off
*1 This feature dose not work by setting the Color ADJUST to “DICOM SIM”.
*2 If you select except Japanese in the Language setting of the First Time Installation menu,
Language is changed "English".
*3 This feature works , when you are viewing the "HDMI (Video) signal".
This feature does not work , when you are viewing the "HDMI (PC) signal".
*4 This feature dose not work by setting the DCR to “On”.
- 11 -
EN
Page 12

Specifications
Model Name
GD-W213L
Screen Size 21.5 inches (Diagonal 546.9 mm)
Resolution 1920 pixels × 1080 pixels
Pixel Pitch 0.248 mm × 0.248 mm
Brightness (typ.)
Contrast Ratio (typ.)
Aspect Ratio
Viewing Angle (H/V) (typ.)
Display Color
Response Time
Audio output
Outline Dimension (W×H×D)
Weight
Power requirements
Ratedinput current
Operation Temperature
Operation humidity
Accessories
509.8 mm × 351.6 mm × 190 mm
AC 100 V – 240 V , 50 Hz / 60 Hz
250 cd/m
1000 : 1
16 : 9
170°/ 160°
16.7 million
5 ms
0.5 W + 0.5 W
3.5 kg
0.47 A
0 ℃
-
20%
-
80 %
Power cord x 2 pcs
*For United Kingdom(1.8 m) x 1pcs
*For European countries(1.8 m) x 1pcs
VGA cable x1pcs
Audio cable x1pcs
Specifications of the DVI-D terminal
Pin No. Signal name Pin No. Signal name Pin No. Signal name
1
T.M.D.S Data 2–
2
T.M.D.S Data 2+
3
T.M.D.S Data 2
shield
4
NC
5
NC
6
DDC Clock
7
DDC Data
8
NC
2
40 ℃
(non-condensing)
9
T.M.D.S Data 1–
10
T.M.D.S Data 1+
11
T.M.D.S Data 1
shield
12
NC
13
NC
14
+5 V Power
15
GND
16
Hot Plug Detect
17
T.M.D.S Data 0–
18
T.M.D.S Data 0+
19
T.M.D.S Data 0
shield
20
NC
21
NC
22
T.M.D.S Clock shield
23
T.M.D.S Clock+
24
T.M.D.S Clock–
Specifications of the VGA IN terminal
Pin No. Signal name Pin No. Signal name
1
EN
Red
2
Green
3
Blue
4
—
5
GND
6
GND
7
GND
8
GND
9
10
11
12
13
14
15
External
+5 V
GND
—
DDC Data
HD
VD
DDC Clock
GND
- 12 -
Page 13

GD-W213L
The description page of
the European products.
Vielen Dank für den Kauf dieses JVC-Produktes.
Bevor Sie das Gerät in Betrieb nehmen, lesen Sie bitte die
Anweisungen aufmerksam durch, um die bestmögliche
Leistung zu gewährleisten.
13- -
DE
Page 14

Sicherheitsmaßnahmen
USA und Kanada: 120
V Wechselspannung
Europa und Asien:
220 – 240 V Wechselspannung
Großbritannien:
220 – 240 V Wechselspannung
WARNUNG
: UM DIE GEFAHR VON BRÄNDEN ODER ELEKTRISCHEN SCHLÄGEN ZU VERMEIDEN,
DIESES GERÄT NICHT REGEN ODER FEUCHTIGKEIT AUSSETZEN. ES DÜRFEN KEINE MIT
FLÜSSIGKEIT GEFÜLLTEN BEHÄLTER WIE ETWA VASEN AUF DAS GERÄT GESTELLT WERDEN.
Wichtige Sicherheitshinweise
Elektrische Energie kann viele nützliche Funktionen ausführen. Dieses Gerät wurde zur Gewährleistung Ihrer
Sicherheit entwickelt und hergestellt. Dennoch birgt unsachgemäßer Einsatz mögliche Brand- oder
Stromschlaggefahr. Damit die Sicherheitsvorkehrungen in diesem Produkt nicht außer Kraft gesetzt werden,
müssen folgende grundlegende Richtlinien zu Installation, Einsatz und Wartung eingehalten werden. Bitte
lesen Sie diese wichtigen Sicherheitshinweise vor dem Einsatz aufmerksam du
• Vor Inbetriebnahme des Produktes sollten sämtliche Sicherheits- und Bedienungsanweisungen gelesen
werden.
• Die Sicherheits- und Bedienungsanweisungen sollten zum zukünftigen Nachschlagen aufbewahrt werden.
• Befolgen Sie sämtliche Warnungen am Produkt und in der Bedienungsanleitung.
• Befolgen Sie alle Bedienungsanweisungen.
Stromversorgung
Der Spannungswert der Stromversorgung dieses Produktes beträgt 100 bis 240 V Wechselspannung.
Das mitgelieferte Netzkabel stimmt mit folgenden Netzspannungen und Ländern überein. Verwenden Sie
zur Gewährleistung der Sicherheit und Einhaltung der EMV-Richtlinien in den jeweiligen Ländern nur das
zugewiesene Netzkabel.
Dieser Stecker passt nur in eine geerdete Steckdose. Wenn Sie den Stecker nicht in die Steckdose
stecken können, wenden Sie sich an Ihren Elektriker zum Einbau einer richtigen Steckdose. Umgehen Sie
nicht die Sicherheitsfunktion des geerdeten Steckers.
• Dieses Produkt darf nur mit dem auf dem Typenschild angegebenen Netzstrom betrieben werden. Wenn
Sie sich über die in Ihrem Haushalt vorhandene Netzspannung nicht sicher sind, lassen Sie sich von
Ihrem Fachhändler oder beim Energieversorgungsunternehmen beraten.
Achtung:
• Verwenden Sie nicht das gleiche Netzkabel für 120 V Wechselstrom wie für 220 – 240 V Wechselstrom.
Dabei besteht die Gefahr von Fehlfunktionen, elektrischen Schlägen oder Bränden.
Hinweise nur für Netzkabel im Vereinigten Königreich
Der im Netzkabel für das Vereinigte Königreich verwendete Stecker hat eine
eingebaute Sicherung. Bei einem Sicherungswechsel ausschließlich eine
geeignete Sicherung mit der erforderlichen Belastbarkeit einlegen und das
Sicherungsfach schließen. (Lassen Sie sich von Ihrem Fachhändler oder einem
qualifizierten Fachmann beraten.)
Sicherungswechsel
Öffnen Sie das Sicherungsfach mit dem Schlitzschraubenzieher und ersetzen Sie die Sicherung.
DE
14- -
rch.
Sicherung
Page 15

(
Sicherheitsmaßnahmen
• Denken Sie vor Anschluss anderer Produkte wie Videorekorder und Computer daran, diese Geräte zum Schutz
vor Stromschlägen abzuschalten.
• Verwenden Sie kein Zubehör, das nicht vom Hersteller empfohlen wurde; andernfalls kann dies Gefahren bergen.
• Wenn Teile ersetzt werden müssen, achten Sie darauf, dass der Servicetechniker die vom Hersteller
angegebenen bzw. gleichwertige Ersatzteile verwendet. Unautorisierte Auswechselungen können Brände,
St
romschläge und andere Gefahren verursachen.
• Bitten Sie den Servicetechniker bei Abschluss von Wartungs- oder Reparaturarbeiten an diesem
Produkt, Sicherheitsprüfungen zur Bestimmung eines ordnungsgemäßen Betriebszustands des Produktes
durchzuführen.
Unter folgenden Bedingungen
1. Gerät abschalten.
2. Netzstecker des Produktes ziehen.
3. Zur Reparatur an qualifiziertes
Servicepersonal wenden.
a) Wenn das Produkt Rauch oder einen
ungewöhnlichen Geruch abgibt.
b) Wenn das Produkt einen erheblichen
Leistungsunterschied aufweist, z. B. kein Bild oder
keinen Ton ausgibt.
c) Falls Flüssigkeiten über dem Gerät verschüttet
wurden oder Gegenstände auf das Produkt
gefallen sind.
d) Falls das Produkt Regen
war.
e) Falls das Produkt heruntergefallen ist oder auf
irgendeine Weise beschädigt wurde.
f) Bei beschädigtem Netzkabel oder -stecker.
• Installieren Sie dieses Produkt nicht an folgenden
Orten:
- in einer feuchten oder staubigen Umgebung
- an Orten, an denen das Produkt Ruß oder
Dampf ausgesetzt sein kann, z. B. in der Nähe
eines Herdes
- in der Nähe von Hitzequellen
- an Orten, an denen leicht Kondensation auftritt,
z. B. in der Nähe eines Fensters
• Stellen Sie dieses Produkt nicht auf einen
instabilen Wagen, Ständer oder Tisch. Das
Produkt könnte herunterfallen und ernsthafte
Verletzungen bei Kindern und Erwachsenen
verursachen sowie stark beschädigt werden.
Das Produkt sollte entsprechend den
Herstelleranweisungen montiert werden;
verwenden Sie eine vom Her
Halterung.
• Verwenden Sie dieses Produkt nicht in der Nähe
von Wasser.
• Achten Sie darauf, das Produkt an einem Ort
aufzustellen, an dem eine geeignete Temperatur
und Luftfeuchte eingehalten wird.
( „Betriebsbedingungen“ auf Seite 22).
Dieses Produkt wird während des Einsatzes heiß.
Gehen Sie entsprechend vorsichtig mit dem
Produkt um.
Verwenden Sie das Produkt nicht über einen längeren
Zeitraum, falls der Ton verzerrt ist.
oder Wass
Luftbefeuchters
oder
er ausgesetzt
ler empfohlene
stel
Versuchen Sie nicht, das Produkt selber zu warten, wie
etwa durch Öffnen von Abnehmen von Abdeckungen. Im
Inneren befinden sich Teile mit gefährlicher Hochspannung
und andere Gefahrenquellen. Überlassen Sie alle
Wartungsarbeiten dem qualifizierten Kundendienst.
Sorgen Sie für ausreichend Platz zum Einsetzen oder Abziehen
•
des Netzsteckers. Stellen Sie das Produkt so nahe wie möglich
an einer Netzsteckdose auf. Die Hauptstromversorgung für
das Produkt wird durch Einsetzen oder Abziehen des
Netzsteckers hergestellt oder abgebrochen.
Wenn Sie das Produkt an einem Ort aufstellen, wo der
•
Netzstecker nicht leicht eingesteckt oder abgezogen werden
kann, stecken Sie das Netzkabel am Netzeingang ein Produkt
ein und ziehen es dort ab.
Wenn das Produkt längere Zeit unbeaufsichtigt stehengelassen
•
wird, ziehen Sie den Netzstecker ab und trennen die
Kabelverbindungen der Anlage.
Überlasten Sie nicht Wandsteckdosen, Verlängerungskabel,
•
Verteilerstecker oder andere elektrische Teile, da dadurch die
Gefahr von Bränden oder elektrischen Schlägen entstehen kann.
Verwenden Sie nur das für dieses Produkt gedachte
•
Netzkabel, um die Gefahr elektrischer Schläge zu vermeiden.
• Schlitze und Öffnungen im Gehäuse sind zur Lüftung vorhanden.
Die stellen zuverlässigen Betrieb des Produkt sicher und
schützen es vor Überhitzung. Diese Öffnungen dürfen nicht
verstopft oder verdeckt werden.
• Niemals Gegenstände jeglicher Art durch die Öffnungen in das
Produkt drücken, da sie unter Spannung stehende Teile
berühren oder Kurzschlüsse verursachen können, was zu
Bränden oder elektrischen Schlägen führen kann.
• Niemals Flüssigkeiten jeglicher Art auf das Produkt schütten.
• Legen Sie keine Gegenstände auf dem Produkt ab. (Wenn
Flüssigkeiten, nackte Flammen, Kleidungsstücke, Papier usw.
auf dem Produkt abgelegt werden, besteht die Gefahr von
Bränden.)
•
Das LCD-Panel niemals starken Stößen aussetzen. (Nicht an
Gegenstände anstoßen lassen oder mit einem scharfen
Werkzeug drücken.)
• Stellen Sie keine schweren Gegenstände auf das Produkt.
• Treten Sie nicht auf das Produkt oder ziehen sich daran hoch.
Achten Sie beim Einsatz der Ständer mit diesem
Monitor darauf, die mitgelieferten Ständer zu
verwenden und ordnungsgemäß anzubringen.
• Unsachgemäßer Einsatz der Ständer kann Boden
oder Monitor beschädigen und dazu führen, dass
der Monitor umkippt.
Fortsetzung
)
- 15 -
DE
Page 16

Sicherheitsmaßnahmen (Fortsetzung)
Wichtige Sicherheitshinweise
1. Lesen Sie sämtliche Anweisungen.
2. Bewahren Sie diese Anweisungen zur späteren Nutzung auf.
3. Befolgen Sie alle Warnungen und Anweisungen am Produkt.
4. Ziehen Sie vor der Reinigung den Netzstecker.
Verwenden Sie zur Reinigung keine flüssigen oder Sprühreiniger.
Reinigen Sie das Produkt mit einem feuchten Tuch.
5. Verwenden Sie dieses Produkt nicht in der Nähe von Wasser.
6. Stellen Sie dieses Produkt nicht auf instabile Wagen, Ständer oder Tische. Das Produkt könnte
herunterfa
llen
und dabei ernsthaft beschädigt werden bzw. Personen in der Nähe verletzen.
7. Schlitze und Öffnungen im Gehäuse und an der Rückseite dienen der Belüftung. Zur Sicherstellung
eines zuverlässigen Betriebs dürfen diese Öffnungen nicht blockiert werden, beispielsweise durch
Aufstellen des Produktes auf einem Bett, Sofa, Teppich oder vergleichbaren Untergrund.
Dieses Produkt sollte nicht in der Nähe von oder über einem Heizgitter aufgestellt werden. Stellen
Sie das Produkt nicht in einen E
8. Dieses Produkt muss mit dem am Etikett angegebenen Stromversorgungstyp betrieben werden.
Falls Sie sich bezüglich des verfügbaren Stromversorgungstyps nicht sicher sind, wenden Sie sich
an Ihren Händler oder das örtliche Stromversorgungsunternehmen.
9. Dieses Produkt ist mit einem dreipoligen Schukostecker ausgestattet, der über einen dritten
(Erdungs-) Kontakt verfügt.
Dies ist ein Sicherheitsmerkmal.
Falls sich der Stecker nicht in die Steckdose ein
veralteten Steckdose an Ihren Elektriker.
Setzen Sie die Funktion des Erdungssteckers nicht außer Kraft.
10. Achten Sie darauf, dass nichts auf dem Netzkabel steht. Stellen Sie dieses Produkt nicht so auf, dass
jemand auf das Kabel treten könnte.
11. Stellen Sie bei Einsatz einer Mehrfachsteckdose mit diesem Produkt sicher, dass die
Gesamtamperezahl der an der Mehrfachsteckdose angeschlossenen Geräte die Amperezahl der
Mehrfachsteckdose n
icht übe
angeschlossenen Produkte 10 Ampere nicht überschreiten.
12. Schieben Sie niemals Fremdkörper durch die Gehäuseschlitze in dieses Produkt; sie
könnten gefährliche Spannungspunkte berühren oder Komponenten kurzschließen, so einen
Brand oder Stromschlag verursachen.
Verschütten Sie niemals irgendwelche Flüssigkeiten über dem Produkt.
13. Versuchen Sie nicht, dieses Produkt eigenhändig zu reparieren; beim Öffnen oder Entfernen von
Abdeckungen können Sie sich gefährlicher Spannung
Überlassen Sie alle Reparaturarbeiten qualifiziertem Servicepersonal.
14. Trennen Sie dieses Gerät unter folgenden Bedingungen von der Stromversorgung und lassen Sie es
von qualifiziertem Servicepersonal reparieren.
A. Bei beschädigtem oder ausgefranstem Netzkabel oder -stecker.
B. Falls Flüssigkeiten über dem Gerät verschüttet wurden.
C. Falls das Produkt Regen oder Wasser ausgesetzt war.
D. Falls das Produkt auch bei Einhaltung der Bedienungsanweisungen nicht normal funktioniert.
Pass
nur die in den Bedienungsanweisungen angegebenen Steuerelemente an, da
en Sie
unsachgemäße Anpassungen von Steuerelementen Schäden verursachen können, die häufig
zeitaufwändig von qualifizierten Technikern behoben werden müssen.
E. Falls das Produkt heruntergefallen ist oder das Gehäuse beschädigt wurde.
F. Falls das Produkt deutliche Leistungsänderungen aufweist, die auf einen Reparaturbedarf
hindeuten.
15. Der Netzstecker dient als Trennvorrichtung. Sorgen Sie für genügend Platz zum Einstecken und
Ziehen des Netzsteckers.
Stellen
e das Gerät so nah wie möglich an einer Steckdose auf.
Si
16. Achten Sie darauf, den Monitor sicher zu installieren, damit er nicht umkippt und Schäden oder
Verletzungen verursacht.
17. Stellen Sie sich nicht auf das Produkt, hängen Sie sich nicht daran.
inbau
, sofern keine angemessene Belüftung gewährleistet ist.
stecken l
ässt, wenden Sie sich zum Austausch Ihrer
rsteigt. Vergewissern Sie sich außerdem, dass alle an eine Steckdose
und ande
ren Gefahren aussetzen.
DE
- 16 -
Page 17

Sicherheitsmaßnahmen
Nur Europäische Union
Sehr geehrte Kunde, sehr geehrte Kundin,
dieses Gerät stimmt mit den gültigen
europäischen Richtlinien und Normen
bezüglich
Verträglichkeit und elektrischer
Sicherheit überein.
Die europäische Vertretung für die
JVC KENWOOD Corporation ist:
JVC Technical Services Europe GmbH
Konrad-Adenauer-Allee 1 – 11
61118 Bad Vilbel
Deutschland
elektromagnetischer
Information
(
Fortsetzung
)
Vorsichtshinweise zum Betrieb
LCD-Panel und Hintergrundbeleuchtung haben eine beschränkte Lebenserwartung.
Aufgrund der Eigenschaften von LCD-Bildschirmen kann es zu Nachbildern und
ungleichmäßiger Anzeige kommen. Zur Reduzierung der Belastung des LCD-Bildschirms
empfehlen wir, die angezeigten Inhalte regelmäßig zu ändern, die Energiesparfunktion zu
aktivieren oder das Gerät häufig abzuschalten. Kontinuierlicher Betrieb des LCD-Bildschirm
kann die Alterung beschleunigen.
Pflege
Bildschirm
Beachten Sie zur Vermeidung
irreparabler Änderungen am Aussehen
des Bildschirms, z. B. ungleichmäßiger
Farben, Verfärbungen, Kratzer,
Folgendes:
● Bringen Sie nichts mit Flüssigklebstoff
oder Klebeband an.
● Schreiben Sie nichts auf den
Bildschirm.
● Schlagen Sie nicht mit harten
Gegenständen gegen den Bildschirm.
● Vermeiden Sie Kondensation am
Bildschirm.
● Wischen Sie den Bildschirm nicht mit
Flüssigkeiten ab, auch nicht mit Wasser.
Außerdem kann sich die
er
Bildschirmreinigung mit i
verdünntem neutralem Reiniger oder
Lösungsmitteln wie Alkohol,
Verdünner oder Benzin auf die
Antireflexbehandlung des Bildschirms
auswirken.
● Wischen Sie nicht mit zu viel Druck
über den Bildschirm.
Befreien Sie den Bildschirm mit einem
weichen Tuch von Flecken.
n Wass
Belüftungsöffnungen
Beseitigen Sie Staub rund um die
Zuluftöffnungen (sämtliche Öffnungen) mit einem
Staubsauger. Falls kein Staubsauger verfügbar
ist, verwenden Sie ein Tuch. Staub rund um die
Zuluftöffnungen kann eine angemessene
er
Temperaturregelung v
am Produkt verursachen.
Gehäuse
Beachten Sie zur Vermeidung von
Verformungen oder Schäden am Gehäuse, wie
z. B. abblätternder Farbe, Folgendes:
● Reinigen Sie das Gehäuse nicht mit
● Setzen Sie das Gehäuse keinen aggressiven
● Vermeiden Sie längeren Kontakt zwischen
Wisc
●
Befreien Sie das Gehäuse mit einem weichen
Tuch von Flecken. Falls das Gehäuse stark
verschmutzt ist, wischen Sie es mit einem
weichen Tuch ab, das in mit Wasser verdünntem
neutralem Reiniger getränkt und gründlich
ausgewrungen wurde; wischen Sie dann zum
Trocknen mit einem weichen, trockenen Tuch nach.
Lösungsmitteln wie Alkohol, Verdünner oder
Benzin.
Substanzen, wie Insektiziden, aus.
Produkt und Gummi- oder Kunststoffteilen.
hen Sie nicht mit zu viel Druck über das
Gehäuse.
hindern und Schäden
- 17-
DE
Page 18

Inhaltsverzeichnis
22Technische Daten
33Verfügbare Signale
34Abmessungen
35Fehlerbehebung
Modellbezeichnung
Energieeffizienzklasse
Größe des Bildschirms 21,5 Zoll (55 cm)
Stromverbrauch, eingeschaltet
Der Jährliche Energieverbrauch
Stromverbrauch, Bereitschaft
Resolution 1920 × 1080 Bildpunkte
*1 Stromverbrauch basiert auf täglich vierstündigem Einsatz des Fernsehgerätes über 365 Tage. Der tatsächliche
Energieverbrauch hängt von den jeweiligen Einsatzbedingungen ab.
Zum einfachen Verständnis werden Bilder und Illustrationen mit Hervorhebungen, Auslassungen
oder Zusammenstellungen angezeigt; sie können sich leicht vom Aussehen der tatsächlichen
Produkte unterscheiden.
Design und technische Daten können ohne Ankündigung geändert werden.
Alle hierin genannten Firmen- und Produktnamen dienen lediglich der Identifikation, können
Marken oder eingetragene Marken ihrer jeweiligen Unternehmen sein.
HDMI, das HDMI-Logo und High-Definition Multimedia Interface sind Marken oder eingetragene
Marken der HDMI Licensing LLC in den Vereinigten Staaten und anderen Ländern.
DE
18- -
GD-W213L
A
19,7 W
28,7 kWh/annum
0,34 W
*1
Page 19

Bedienung
1
1
2
2
3
3
Taste Funktion
1
2
3
4
Zur Auswahl der Eingangsquelle.
Lautstärke verringern.
Lautstärke erhöhen.
Aktiviert und verlässt OSD.
Schaltet den Monitor ein/aus (auf Bereitschaft).
5
4
+
10sec.
Die Betriebsanzeige
Das Bild erscheint ein paar Sekunden nach Aufleuchten der Betriebsanzeige.
* Eingeschaltet:Grünes Leuchten * Standby:Aus * Energiesparmodus:Orange Blinken
Zum Ein- und Ausschalten der Tastensperre halten Sie die MENU-Taste
mindestens 10 Sekunden lang gedrückt.
Tastenbedienung im Menü
1. Menü anzeigen: Drücken Sie die -Taste.
2. Menüelement wählen: Drücken Sie die Tasten / .
3. Menüeintrag bestätigen: Drücken Sie die -Taste.
4. Einstellungen durchschalten: Drücken Sie die Tasten / .
5. Einstellung bestätigen: Drücken Sie die -Taste.
6. Einstellungsmenü verlassen: Drücken Sie die -Taste.
Mit der Taste gelangen Sie zum vorherigen Bildschirm zurück.
*EskannzuleichtenAbweichungenbeiderAnzahlnötigerTastenbetätigungenundbeiZahleninMenüskommen.
Anschlüsse
4
4
5
5
BB
CC
AA
A
AC IN
Netzanschluss
B
HDMI
Digitaler HDMI-Signaleingang
(*HDCP 1.1)
C
DVI
Digitaler DVI-Signaleingang
(*HDCP 1.1)
VGA
D
PC-RGB-Signaleingang
- 19-
E
AUDIO
Stereoaudioeingang
* VGA, DVI und HDMI
DD
EE
DE
Page 20

Erstinstallation
Beim ersten Einschalten der Stromversorgung und des Monitors erscheint die Meldung
„First Time Installation(Erstinstallation)“.Starten Sie die Einstellung unter Bezug auf die
Menükonfiguration.
Für die Einstellpunkte siehe Seiten unten.
• „Language“ ☞ „Sprache“ auf Seite 21
• „Sleep Mode“ ☞ „Sleep Mode“ auf Seite 21
• „Autom. Abschaltung“ ☞ „Autom. Abschaltung“ auf Seite 21
* Wenn Sie Japanisch als Menüsprache wählen, werden die Einträge „Aktion bei Nichtbedienung“ und „Aktion bei fehlendem Sync“
bei der Erstinstallation nicht im Menü angezeigt. Wenn Sie diese Einstellungen ändern möchten, lesen Sie bitte die entsprechende
Menübedienung auf Seite 11 nach.
Einstellverfahren
1. Bewegen Sie den Cursor mit den Tasten / auf die gewünschte Einstellung.
● Drücken Sie die Taste zur Bestätigung des Einstellungswertes.
2. Ändern Sie den Einstellungswert mit / .
● Der Einstellungswert ändert sich bei jeder Betätigung der Tasten / .
● Drücken Sie die Taste zur Bestätigung des Einstellungswertes.
3. Bewegen Sie den Cursor zum „Bestätigen“-Eintrag.
4. Schließen Sie die Einstellungen mit der Taste ab.
● Wenn Sie die „Aktion bei Nichtbedienung“ ändern, erscheint eine Bestätigung.
Menübedienung Funktionen Liste
Menüpunkte Zweck Einstellungen
Zur Auswahl der Bildmodi.
Hauptmenü
*PC-VGA/
DVI/
HDMI(PC)
Hauptmenü
*HDMI(Video)
Nebenbild
Bild
Anpassung
*nur PC-VGA
Bild Modus
Kontrast
Helligkeit
DCR
Bild Modus
Kontrast
Helligkeit
Sättigung
DCR
Auto Farbe (*nur VGA)
*4
*1
Passt den Kontrast an.
*4
*1
Passt die Helligkeit an.
*1
*4
*1
Zur Auswahl der DCR-Funktion
*1
*4
Zur Auswahl der Bildmodi.
*1
*4
Passt den Kontrast an.
*1
*4
Zum Anpassen der Helligkeit.
*1
*4
Zum Anpassen der Sättigung.
*1
*4
*1
Zur Auswahl der DCR-Funktion
(dynamischer Kontrast)
(dynamischer Kontrast)
Automatische Anpassung des Weißabgleiches.
Farbtemperatur Stellt den Weißabgleich ein.
Passt den Rotanteil an.
Rot
Passt den Grünanteil an.
Benutzer
Beleuchtung Zum Anpassen der Helligkeit. 0 - 100
Auto Abstimmung
Bildlage Horiz.
Bildlage Vert.
Takt
Grün
Passt den Blauanteil an.
Blau
*1
*4
*3Blende Zum Einstellen der Belichtung.
Automatische Anpassung der Bildposition.
Passt die vertikale Bildposition an.
Passt die vertikal Position des Bildschirms an.
Stellt den Bildtakt ein.
Phase Passt die Phase an.
Schärfe Passt die Schärfe an. 0 - 4
Standard / CCTV / Benutzer
0 - 100
0 - 100
Ein / Aus
.
Standard / CCTV / Benutzer
0 - 100
0 - 100
0 - 100
0 - 100Farbton Passt die Farbton an.
.
Ein / Aus
Standard / Warm / Benutzer
/ DICOM SIM. / Kühl
0 - 255
0 - 255
0 - 255
0 - 2
0 - 100
0 - 100
0 - 100
0 - 100
DE
- 20 -
Page 21

Menübedienung Funktionen Liste (Fortsetzung)
Menüpunkte Zweck Einstellungen
Signal
Einstellung
OSD Menu
Andere
Quellen Auswahl
Audio
Zuordnung
PC-VGA
DVI
HDMI
Quelle-Suche
Seitenverhältniss
Sleep Mode
Autom.
Abschaltung
Sprache Stellt die OSD-Sprache ein.
*2
Bildlage Horiz.
Bildlage Vert.
Dauer
Transparenz
Status Anzeige
Lautstärke
Zurücksetzen
Information
Betriebs LED
Wählt die Signalquelle.
Zum Stummschalten des Tons wählen Sie Aus.
Zum Stummschalten des Tons wählen Sie Aus.
Zur Auswahl der gewünschten Audioeingangsquelle.
Bei der Einstellung Ein sucht der Monitor
PC-VGA / DVI / HDMI
Ein / Aus
Ein / Aus
Digital / Analog / Aus
Aus / Ein
automatisch nach einer aktiven Eingangsquelle.
Zur Auswahl des Bildseitenverhältnisses
Auto / Vollbild / 4:3
(Bildformat).
Bei der Einstellung Ein wechselt der
Ein / Aus
Monitor in den Bereitschaftsmodus, wenn
das Gerät etwa 15 Sekunden lang kein
synchronisiertes Signal erkennt.
Bei der Einstellung Ein wechselt der
Ein / Aus
Monitor in den Bereitschaftsmodus,
wenn das Gerät etwa 4 Stunden lang
nicht bedient wird.
English / Deutsch / Français
/ Español/日本語
Passt die horizontale Position die OSD an.
Passt die vertikal Position die OSD an.
Zum Anpassen der OSD-Anzeigezeit.
Zum Anpassen der OSD-Transparenz.
Zum Anzeigen der
0 - 100
0 - 100
3 sec - 60 sec
0 - 7
Ein / Aus
Signaleingangsbezeichnung.
Zum Anpassen der Lautstärke.
0 - 100
Setzt die Menüeinstellungen zurück.
* Die einzelnen Eingangsquellen müssen separat
rückgesetzt werden.
Zeigt Eingangsanschluss- und
Signalquellenbezeichnung.
Zur Auswahl der Betriebsanzeige.
* Ein: Die Betriebsanzeige leuchtet.
* Aus: Die Betriebsanzeige bleibt abgeschaltet.
Ein / Aus
*2
*1 Diese Funktion kann nicht genutzt werden, wenn die Farbanpassung auf „DICOM SIM“ eingestellt wurde.
*2 Wenn Sie bei der Erstinstallation nicht Japanisch als Sprache auswählen, wechselt die Sprache zu Englisch.
*3 Diese Funktion ist für HDMI-Signale vorgesehen.
Bei der Anzeige von HDMI-PC-Signalen kann diese Funktion nicht genutzt werden.
*4 Diese Funktion kann nicht genutzt werden, wenn DCR auf „Ein“ eingestellt wurde.
21- -
DE
Page 22

Technische Daten
Modellbezeichnung
Bildschirmgröße
Auflösung
Effektive Bildschirmgröße
Panelhelligkeit (typ.)
Kontrastverhältnis (typ.)
Seitenverhältnis
Betrachtungswinkel (typ.) (H/V)
Darstellbare Farben
Reaktionszeit
Audioausgabe
Externe Abmessungen (B×H×T)
Gewicht
Netzspannung
Nenneingangsstrom
Betriebstemperatur
Betriebsfeuchtigkeit
Zubehör
21,5 Zoll (Diagonale, 546,9 mm)
1920 Bildpunkte × 1080 Bildpunkte
509,8 mm × 351,6 mm × 190 mm
AC 100 V – 240 V , 50 Hz / 60 Hz
20 % – 80 % (nicht kondensierend)
GD-W213L
0,248 mm × 0,248 mm
250 cd/m
1000 : 1
16 : 9
170 ° / 160 °
16,7 Millionen
5 ms
0,5 W + 0,5 W
3,5 kg
0,47 A
0 °C
-
40 °C
Netzkabel × 2
*Großbritannien(1,8 m) × 1
*Europa(1,8 m) × 1
VGA-Kabel × 1
Audiokabel × 1
Spezifikationen des DVI-D-Anschlusses
Pin-Nr. Signalname Pin-Nr. Signalname Pin-Nr. Signalname
1
T.M.D.S-Daten 2-
2
T.M.D.S-Daten 2+
3
T.M.D.S-Daten 2
(geschirmt)
4
Nicht verbunden
5
Nicht verbunden
6
DDC-Takt
7
DDC-Daten
8
Nicht verbunden
9
10
11
12
13
14
15
16
2
T.M.D.S-Daten 1T.M.D.S-Daten 1 +
T.M.D.S-Daten 1
(geschirmt)
Nicht verbunden
Nicht verbunden
+5 V (Stromversorgung)
Masse
Hot-Plug-Erkennung
17
T.M.D.S-Daten 0-
18
T.M.D.S-Daten 0+
19
T.M.D.S-Daten 0
(geschirmt)
20
Nicht verbunden
21
Nicht verbunden
22
T.M.D.S-Takt (geschirmt)
23
T.M.D.S-Takt +
24
T.M.D.S-Takt -
Spezifikationen des VGA-Eingangs
Pin-Nr. Signalname Pin-Nr. Signalname
1
DE
Rot
2
Grün
3
Blau
4
—
5
Masse
6
Masse
7
Masse
8
Masse
9
10
11
12
13
14
15
Extern
+5 V
Masse
—
DDC-Daten
HD
VD
DDC-Takt
Masse
- 22 -
Page 23

液晶モニター
GD-W213L
ご使用の前にこの取扱説明書をよくお読みのうえ、正しくお使いください。
特に「安全上のご注意」(24〜26ページ)は、必ずお読みいただき、安全にお使いください。
お読みになったあとは、大切に保管し、必要な時お読みください。
取扱説明書
日本国内向け製品用
の説明ページです。
- 23 -
JP
Page 24

安全上のご注意(必ずお守りください)
安
ご使用になるかたや他の人々への危害や損害を防ぐために、必ず守っていただき
たいことを説明しています。
「人が死亡、または重傷を負
うことが想定される」内容
絵表示の説明
注意、警 告 が 必 要 なこと
注意
感電注意一般的
ケガに
注意
手を挟まれ
ないよう
注意
表示された電源電圧(AC
100V)以外で使用しない。
電源プラグやコンセントに、
ほこりや金属が付着したま
ま使用しない。
雷が鳴り出したら、
電源プラグに触れない。
禁止されていること
禁止 分解禁止 ぬれ手
通気孔をふさがない。
じゅうたんや布団などの上に置かない
禁止
テーブルクロスなどを掛けない
横倒し、逆さまの状態で使用しない
内部に物を入れない。
感電の原因となります。特にお子様には
禁止
十分注意してください。
本機の上に水の入ったもの
を置かない。
感電注意
不安定な場所に置かない。
禁止
「人が軽傷を負ったり、物的
損害が想定される」内容
実行して欲しいこと
水場での
使用禁止
プラグを
コンセント
から抜く
アース線
をつなぐ
禁止
禁止
禁止
電源コードを傷つけない。
電源コードを加工しない
電源コードを無理に曲げたり、ね
じったり、ひっぱったりしない
電源コードの上に機器本体や重い
物をのせない
電源コードを熱器具に近づけない
本 機 の 裏 ぶ た 、カ バ ー 、
キャビネットをはずしたり
改 造したりし ない 。
JP
禁止
分解禁止
風呂場などの水のある場
所で使わない。
動作使用条件(温度、湿度)
に注意して設置する。
動作使用条件の範囲内で設置するように
してください。( 32ページ「動作使用条
件 」)
本機は熱を帯びる構造になっています。
取り扱いには十分気をつけてください。
- 24 -
禁止
水場での
使用禁止
一般的
注意
Page 25

安全上のご注意
壁壁にかけるときは、販売店
(専門の業者)に依頼する
壁にかけるときは必ず販売店(専門の業者)
にご依頼ください。一般の方が行うと落下
して本機が破損するだけでなく、けがや
感電の原因となり、大変危険です。
次のことが起こった場合は
煙が出ている、異臭がする。
映像が映らない、音が出ない。
内部に水や物が入った。
落下などにより破損した。
電源コードが傷んだ。
電源プラグはコードの部分
を持って抜かない。
電源プラグはコンセントの
根元まで確実に差し込む。
安全アースを接続する。
安全アースを接続しないと感電の原
因となることがあります。
一般的
注意
電源を
切る。
禁止
一般的
注意
アース線を
つなぐ
他他の機器や周囲との間に
間隔をあけて設置する
放熱をよくするため、周囲との間に距離を
保つようにしてくだ さい。
本機は若干熱を帯びる構造になっていま
す。過熱防止のため空間距離を保つととも
に、取り扱いには十分気をつけてください。
電源プラグをコンセントから抜く。
そのまま使用すると、火災や感電の
原因となります。販売店に修理を依
頼してください。
電源プラグは、根元まで差し
込んでもゆるみがあるコンセ
ントには接続しない。
ぬれた手で電源プラグを抜き
差ししない。
一般的
注意
禁止
ぬれ手
禁止
ACコンセント(3極)
ACコンセントが3極の場合
付属の電源コード(3極)を接続すると、安全アース
も接続されます。
ACコンセント
(アース線付き2極)
アース
ACコンセントが2極の場合
付属の電源コード(アース線付き2極)のプラグから出ている緑色
のアース線を、建物に備えられているアース端子につないでくだ
さい。アース接続は必ず電源プラグをコンセントにつなぐ前に行
なってください。また、アース接続をはずす場合は必ず電源プラ
グをコンセントからはずしてからおこなってください。
- 25 -
JP
Page 26

安全上のご注意(つづき)
付 属 の 電 源 コ ード 以 外 は
使 用し な い 。
付 属 の 電 源 コ ード を 他の
機器に使用しない。
長時間使用しないときは、
電源プラグを抜く。
お手入れをするときは、
電源プラグを抜く。
移 動 す る と き は 、電 源 プ
ラグ や 接 続コード 類 を
はずす。
電 源コードを 抜くときは 、
壁 側 のコンセントから先
に抜く。
AC電源のオン/オフについて
電源プラグを抜き差ししてAC電源
をオン/オフします 。そのとき、本機
をできるだけコンセントの近くに設
置し、電源プラグを抜き差しするの
に十 分 な空間を 確 保し てください 。
確 保 で き な い と き は 、簡 単 に A C 電
源をオン/オフできる遮断装置を屋
内の配線に設置してください。
禁止
禁止
プラグをコンセ
ントから抜く
プラグをコンセ
ントから抜く
プラグをコンセ
ントから抜く
プラグをコンセ
ントから抜く
プラグをコンセ
ントから抜く
一般的
注意
次のような場所に置かない。
湿気やほこりの多いところ
調理台や加湿器のそばなど油
煙や湯気があたるところ
熱器具の近くなど
窓ぎわなど水滴の発生しやす
いところ
直射日光や強い光の当たると
ころ
本機の上に重い物を置かない。
本機の上に乗らない、
ぶら下がらない。
液晶パネルに衝撃を与えない
( も の を 当 て た り 、先 の 尖 っ た
も の で 突 い た り し な い )。
長時間、音が歪んだ状態で
使わない。
5年に1度は内部の点検を販売
店に依頼する。
液晶ディスプレイが破損し、液
状の内容 物 が 流出して皮膚に
付着した場合は、流 水 で 15 分
以 上 洗 浄 し て く だ さ い 。そ の
後 、医 師 に 相 談 し て く だ さ い 。
禁止
禁止
禁止
禁止
禁止
一般的
注意
一般的
注意
スタンドに設置するときは、転倒・落下防止の処置をする。
地震や不慮の事故などで、本機が倒れたり、設置場所から落下したりすると、本機が破損す
るだけでなく、けがや感電の原因となることがあり、大変危険です。スタンドに設置すると
きは、転倒・落下を防止するための処置をしてください。
転倒・落下防止処置を行う場合、壁や柱の強度によっては、その効果が大幅に減少します。
その場合は、適当な補強を施してください。
また、転倒・落下防止処置は、けがなどの危害の軽減を意図するものですが、すべての地震
に対してその効果を保証するものではありません。
JP
- 26 -
一般的
注意
Page 27

正しくお使いいただくためのご注意
液晶パネルおよびバックライトは、有寿命部品です。液晶パネルの基本的な特性により、残像(焼き
つき)や表示ムラが発生することがあります。画像を時々切り換えたり、省電力(パワーセーブ)機能
を使う、こまめに電源を切るなどして、液晶パネルへの負荷を軽減させることをおすすめします。
液晶パネルの連続稼働は、劣化を早めることがあります。
お手入れのしかた
液晶パネル
画面に「ムラ」「 変色」「 キズ」など、修理不可能な外観変化が生じる恐れがありますので、次のことに注
意してください。
のりやテープなどを張らない
ペンなどで書き込みをしない
硬いものにぶつけない
液晶パネルの汚れを取り除くときには、柔らかい布で軽くふき取ってください。汚れがひどい場合は、
水でうすめた中性洗剤にひたした布をよく絞ってふき取り、乾いた布でからぶきしてください。
キャビネット
キャビネットが変質したり、傷ついたり、塗料がはげることがありますので、次のことに注意してく
ださい。
アルコール、シンナー、ベンジンなどの溶剤でふかない
殺虫剤など揮発性のものをかけない
ゴムやビニール製品などを長時間接触させたままにしない
強くこすらない
キャビネットの汚れを取り除くときには、柔らかい布で軽くふき取ってください。汚れがひどい場合
は、水でうすめた中性洗剤にひたした布をよく絞ってふき取り、乾いた布でからぶきしてください
結露させない
アルコール、シンナー、ベンジンなどの溶剤でふかない
強くこすらない
通気孔
通気孔に付着したほこりは、掃除機を使って吸い取ってください。掃除機が使えないときには、布で
ふき取ってください。通気孔にほこりが付着したまま放置すると、内部の温度が調節できなくなり、
故障の原因となることがあります。
27- - JP28- -
Page 28

目次
32主な仕様
33対応信号フォーマット
34外形寸法
35困ったときは
本機を使用できるのは日本国内のみです。外国では電源電圧が異なりますので使用できません。
This monitor set is designed for use in Japan only and cannot be used in any other country.
画面サイズのV型(19V型等)は、有効画面の対角寸法を基準とした目安です。
写真や図は、説明をわかりやすくするために誇張、省略、合成をしていますので、実物とは多少異なる場合
があります。
仕様および外観は、改良のため予告なく変更することがあります。
本機は「JIS C 61000-3-2適合品」です。
その他、一般に会社名、製品名は各社の商標または登録商標です。
HDMI、HDMI ロゴおよび、High-Definition Multimedia Interface は、HDMI Licensing, LLC の
米国及びその他の国における商標または登録商標です。
JP
Page 29

操作
1
1
2
2
ボタン 動作
1
2
3
4
5
入力の切り換 えをします。
音量レベルを下げます。
音量レベルを上げます。
メニュー 画面を表 示します。
電源の入り/ 切りをします。
電源ランプの動作
ランプが点灯してからディスプレイが表示されるまでに数秒の遅れがあります。
電源オン:緑点灯
4
+
MENUボタンを10秒以上長押しすると、キーロック機能をオン/オフできます。10秒
スタンバイ:消灯 省電力モード:オレンジ点滅
メニューのボタン操作手順
1.メニューを表示: ボタンを押します。
2.メニュー項目を選択: 、 ボタンを押します。
3.メニュー項目を確定: ボタンを押します。
4.設定の切り換え: 、 ボタンを押します。
5.設定を確定: ボタンを押します。
6.メニュー設定の終了: ボタンを押します。
1回押すと、一つ前のメニューに戻ります。
※ボタンを押す回数と設定の変化量が一致しない場合があります。
接続
3
3
4
4
5
5
BB
CC
AA
A
AC IN
AC
B
HDMI
HDMI
(*HDCP 1.1)
電源入力
デジタル信号入力
C
DVI
DVI-D
(*HDCP 1.1)
D
デジタル信号入力
VGA
PC RGB
信号入力
- 29 -
E
AUDIO
ステレオ音声入力
(*VGA , DVI , HDMI)
DD
EE
JP
Page 30

初期設定
モニターの電源を入れると、「First Time Installation(初期設定)」が表示されます。
画面に表示されたメニューの各項目を設定します。
設定項目については、下記ページを参照してください。
“Language” ☞ 31ページの“言語”
“No Operation Action” ☞ 31ページの “無操作自動OFF”
“No Sync Action” ☞ 31ページの “無信号自動OFF”
※言語設定で「日本語」を選択すると、“No Operation Action”と“No Sync Action”の初期設定画面は表示されません。
設定を変更したいときは、31ページを参照し、メニュー操作で設定を行います。
設定方法
1 . 、 ボタンを押して、設定項目にカーソルを移動します。
※ ボタンを押して設定値を確定します。
2 . 、 ボタンを押して、設定値を選択します。
※ ボタンを押すたびに設定値が変わります。
※ ボタンを押して設定値を確定します。
3 . 、 ボタンを押して、「セット」にカーソルを移動します。
4 . ボタンを押して、設定を終了します。
※ “No Operation Action”の設定を初期状態から変更する場合は、確認メッセージが
表示されます。
メニュー操作機能一覧
メニュー 項目 内容 設定
メイン調整
*VGA/DVI/
HDMI(PC)
メイン調整
*HDMI(Video)
メイン調整(2)
画面設定
*VGA
JP
画質設定を選択します。
*1
画質
コントラスト
明るさ
DCR
画質
コントラスト
明るさ
彩度
DCR
入力レベル調整 (*VGAのみ)
*4
コントラストを調整します。
*1
*4
明るさを調整します。
*1
*4
*1
DCR
(Dynamic Contrast Ratio)
画質設定を選択します。
*4
*1
コントラストを調整します。
*4
*1
明るさを調整します。
*4
*1
彩度を調整します。
*4
*1
*4
*1
*1
DCR
(Dynamic Contrast Ratio)
入力レベルを自動調整します。
を設定します。
を設定します。 切/入
色温度 色温度を調整します。
赤のレベルを調整します。
User赤緑
バ ックラ イト 調 整
輪郭補正 輪郭補正を調整します。 0 - 2
オート調 整
緑のレベルを調整します。
青のレベルを調整します。
青
*1
*4
バックライトを調整します。 0 - 100
*3
画面位置を自動調整します。
水平位置 画面の水平位置を調整します。 0 - 100
垂直位置 画面の垂直位置を調整します。 0 - 100
クロック
画面のクロックを調整します。
位相 画面の位相を調整します。
シャープ ネス シャープ ネス を調整します。 0 - 4
- 30 -
Standard / CCTV / User
0 - 100
0 - 100
切/入
Standard / CCTV / User
0 - 100
0 - 100
0 - 100
0 - 100色相 色相を調整します。
Cool / Standard / Warm /
User / DICOM SIM.
0 - 255
0 - 255
0 - 255
0 - 100
0 - 100
Page 31

メニュー操作機能一覧(のつづき)
メニュー 項目 内容 設定
信号設定
OSD設定
入力切替
音声選択 VGA
入力サーチ
アスペクト比 画面サイズを設定します。
無信号自動OFF
無操作自動OFF
*2
言語 メニュー表示の言語を選択します。
入力を 切り換えます。
消音に設定するには「切」を選びます。
DVI
消音に設定するには「切」を選びます。
HDMI
HDMI
入力を選んだときの音声を設定します。
「入」に設定すると、接続されている信号を自動
検出して表 示しま す。
「入」に設定すると、無信号状態が約15秒
間続いたときに省電力モードへ移行しま
す。
「入」に設定すると、無操作状態が約4時
間続いたときにスタンバイモードへ移行
します。
VGA / DVI / HDMI
入 / 切
入 / 切
デジタル / アナログ / 切
切/入
オート / フル / 4:3
入 / 切
切/入
日本語 / English / Deutsch /
Français / Español
*2
水平位置 メニュー表示の水平位置を調整します。
0 - 100
垂直位置 メニュー表示の垂直位置を調整します。 0 - 100
表示時間
透明度
ステータス 表 示
その他設定
音量
初期化
インフォメーション
電源ランプ
*1この機能はカラー調整を「DICOMSIM.」に設定すると動作しません。
*2初期設定メニューの言語設定で日本語以外を選択した場合は、初期化を実行すると言語設定が「English」になります。
*3HDMI(Video)映像信号を表示しているときだけ動作します。HDMI(PC)映像信号を表示しているときは動作しません。
*4この機能はDCRを「入」に設定すると動作しません。
メニュー の表示時間を設定します。
メニュー表示の透明度を調整します。
入力端子名の自動表示を設定します。
※「入」を選択すると、入力を切り替えたときや電
源を入れたときに、表示された映像信号が接
続されている端子名が表示されます。
音量を調整します。
メニュー設定を初期化します。
※初期化の作業は入力毎に行います。
入力端子名と信号を表示します。
電源ランプの動作を設定します。
・ 入 : 電源ボタンに連動して点灯します。
・ 切 : 点灯しません 。
3秒 - 60秒
0 - 7
入 / 切
0 - 100
入 / 切
- 31 -
JP
Page 32

主な仕様
型名
画面サイズ
表示画素数
ドットピッチ
パネル輝度(標準値)
コントラスト比(標準値)
アスペクト比
視野角 (H/V) (標準値)
表示色数
応答速度
音声出力
外形寸法 (W×H×D)
質量
使用電源
定格消費電流
動作使用温度
動作使用湿度
付属品
<DVI端子の仕様>
ピン番号
1
2
3
4
5
6
7
8
GD-W213L
21.5 V型 (対角 546.9 mm)
1920 ピクセル × 1080 ピクセル
0.248 mm × 0.248 mm
250 cd/m
2
1000 : 1
16 : 9
170°/ 160°
1670 万色
5 ms
0.5 W + 0.5 W
509.8 mm × 351.6 mm × 190 mm
3.5 kg
AC 100 V , 50 Hz / 60 Hz
0.47 A
0 ℃
-
40 ℃
20%
-
80 %
(非結露)
電源コード(
アース
線付2極、1.8m) x 1 本
電源コード(3極、1.8m) x 1 本
VGA ケーブル x 1 本
オーディオケーブル x 1 本
入力信号
T.M.D.S Data 2–
T.M.D.S Data 2+
T.M.D.S Data 2
shield
NC
NC
DDC Clock
DDC Data
NC
ピン番号
9
10
11
12
13
14
15
16
入力信号
T.M.D.S Data 1–
T.M.D.S Data 1+
T.M.D.S Data 1
shield
NC
NC
+5 V Power
GND
Hot Plug Detect
ピン番号
17
T.M.D.S Data 0–
18
T.M.D.S Data 0+
19
T.M.D.S Data 0
shield
20
NC
21
NC
22
T.M.D.S Clock shield
23
T.M.D.S Clock+
24
T.M.D.S Clock–
入力信号
<VGA端子の仕様>
1
2
3
4
5
6
7
8
JP
入力信号ピン番号 入力信号ピン番号
赤
緑
青
—
GND
GND
GND
GND
9
10
11
12
13
14
15
外面
+5 V
GND
—
DDCデータ
水平同期
垂直同期
DDCクロック
GND
- 32 -
Page 33

Available Signals / Verfügbare Signale / 対応信号フォーマット
Signal Name
Signal-Name
信号名
VGA/60p
VGA/59.94p
480/60i
480/59.94i
576/50i
480/60p
480/59.94p
576/50p
720/60p
720/59.94p
720/50p
1080/60i
1080/59.94i
1080/50i
1080/60p
1080/59.94p
1080/50p
640x480 60Hz
640x480 72Hz
640x480 75Hz
640x480 66Hz
720x400 70Hz
848x480 60Hz
800x600 56Hz
800x600 60Hz
800x600 72Hz
800x600 75Hz
832x624 75Hz
1024x768 60Hz
1024x768 70Hz
1024x768 75Hz
1152x864 75Hz
1152x870 75Hz
1280x960 60Hz
1280x1024 60Hz
1280x1024 75Hz
1280x768 60Hz
1280x768 75Hz
1280x800 60Hz
1280x800 75Hz
INPUT CONNECTOR / Input-Anschluss / 入力端子
VGA DVI HDMI
ー
ー
ー
ー
ー
ー
ー
ー
ー
ー
ー
ー
ー
ー
ー
ー
ー
ー
ー
ー
ー
ー
ー
ー
ー
ー
ー
ー
ー
ー
ー
ー
ー
ー
- 33 -
EN DE
JP
Page 34

Available Signals / Verfügbare Signale / 対応信号フォーマット
Signal Name
Signal-Name
信号名
1360 x 768 60Hz
1366 x 768 60Hz
1440 x 900 60Hz
1440 x 900 75Hz
1600 x 1200 60Hz
1680 x 1050 60Hz
1920 x 1080 60Hz
INPUT CONNECTOR / Input-Anschluss / 入力端子
VGA DVI HDMI
Dimensions / Abmessungen /
GD-W213L
509.8 53.5
312.8
351.6
190
M4 x 6mm
100
外形寸法図
100
EN DE
JP
[ Units : mm / Einheit : mm / 単位 : mm ]
- 34-
Page 35

Troubleshooting
Troubleshooting
1. Make sure if the power supply is connected property.
The screen doesn’t show up
The screen is too light or to dark
The screen size is not fit for the PC signal Select the Auto Adjust in the Image menu. (It is used only in the PC signal)
The screen color shows strange in the
PC signal
No sound Check the Volume level.
Buttons on the monitor do not work.
2. Turn on the power.
3. Select the correct input signal with INPUT button.
Adjusts the Brightness in the Main menu or Backlight in Sub menu.
Adjusts the functions of “Auto colour” in the Sub menu.
Press the “ MENU ” buttons for 10 seconds or more.The key lock is released.
Troubleshooting Tips
Fehlerbehebung
Fehler Tipps zur Fehlerbehebung
1. Stellen Sie sicher, dass das Gerät am Strom angeschlossen ist.
Der Bildschirm wird nicht angezeigt.
Der Bildschirm ist zu hell oder zu dunkel.
Die Bildschirmgröße passt nicht zum
PC-Signal.
Die Bildschirmfarbe sieht beim PC-Signal
seltsam aus.
Kein Ton Überprüfen Sie die Lautstärke.
Die Knöpfe am Monitor funktionieren nicht.
2. Schalten Sie das Gerät an.
3. Wählen Sie das richtige Input-Signal mit dem INPUT-Knopf aus.
Zum Anpassen der Helligkeit im Hauptmenü oder der Beleuchtung im
Nebenbildmenü.
Wählen Sie die Auto-Abstimmung im Bildanpassung-Menü. (Kann nur bei
PC-Signalen genutzt werden.)
Zum Anpassen der „Auto-Farbe“-Funktion im Nebenbildmenü.
Halten Sie die MENU-Taste mindestens 10 Sekunden lang gedrückt – die
Tastensperre wird aufgehoben.
困ったときは
こんなときは
映像が出ない
画面が明るすぎる、暗過ぎる
PC信号で画面のサイズが合わない
色がおかしい
音が出ない
本体ボタンで操作できない
こうしてください
1.ケーブル類を確実に接続してください。
2.接続機器の電源を入れ、正しく設定してください。
3.INPUTボタンを操作して正しい入力に切り換えてください。
メニューを操作し「明るさ」や「バックライト」を調整してください。
メニューを操作し「画面自動調整」を選んでください。
メニューを操作し「入力レベル調整」を選んでください。
音量の設定レベルを確認してください。
MENUボタンを10秒押し続けてキーロック機能を解除してください。
- 35-
EN DE
JP
Page 36

保証とアフターサービス
保証書の記載内容ご確認と保存について
本機には保証書(本書の裏表紙)を添付しております。保証書には「お買い上げ日・販売店名」等の記載内容を
お確かめのうえ、大切に保管してください。保証期間は、お買い上げの日から1年間です。保証書の記載内容
により、お買い上げ販売店が修理いたします。なお、修理保証以外の補償はいたしかねます。故障その他あら
ゆる営業上の機会損失は補償いたしません。その他詳細は保証書をご覧ください。
サービス窓口
右記 をご覧ください。
カスタマーサポートセンター(
サービスについてのお問い合わせ先
修理・保守・設置工事については、お買い上げ販売店、または最寄りのサービス窓口にご相談ください。
修理を依頼されるときは
修理をご依頼になる前に、「 困ったときは」( 35ページ)に従って確認をしてください。それでも不具合や異
常があるときは、本機の電源を切り、電源プラグを抜いてからお買い上げの販売店または「サービス窓口」に
ご連絡ください。
保証期間中は■
修理の際は保証書をご提示ください。
保証書の規定に従って修理させていただ
きます。
ご連絡していただきたい内容■
品 名 表紙参照
型 名 表紙参照
お買い上げ日 年 月 日
故障の状況 できるだけ具体的に
ご 住 所 付近の目印等も合わせて
お 名 前
電話番号 ( ) ‒
訪問ご希望日
)
保証期間が過ぎているときは■
お買い上げ販売店にご相談ください。
修理すれば使用できる場合には、ご希望
により有料で修理させていただきます。
修理料金のしくみ■
技術料
部品代
出張料
故障した製品を正常に修復するための料金です。
+
修理に使用した部品代金です。その他修理に付
帯する部材等を含む場合もあります。
+
製品のある場所へ技術者を派遣する場合の費
用です。別途、駐車料金をいただく場合があり
ます。
商品の廃棄について
本機を廃棄する場合は、法令や地域の条例に従って適切に処理してください。
熱、湿気、ホコリなどの影響や、使用の度合により部品が劣化し、故障したり、時には安全性を損
なって事故につながることもあります。
電源スイッチを入れても映像や音が出ない。
●
●上下、または左右の映像が欠けて映る。
●映像が時々、消えることがある。
●変なにおいがしたり、煙が出たりする。
電源スイッチを切っても、映像や音が消えない。
●
JP
- 36-
故障や事故防止のた
め、スイッチを切り、
コンセントから電源プ
ラグをはずして必ず販
売店にご相談ください。
Page 37

MEMO
- 37-
Page 38

MEMO
- 38-
Page 39

- 39-
JP
Page 40

2015
JP
[代表]
ご相談窓口におけるお客様の個人情報は、お問合せへの
B5A-0998-00
1-3121-1771G00
お客様の同意なく個人情報を第三者に提供または開示す
ることはありません。
対応、修理およびその確認に使用し、適切に管理を行い、
 Loading...