

Page 1
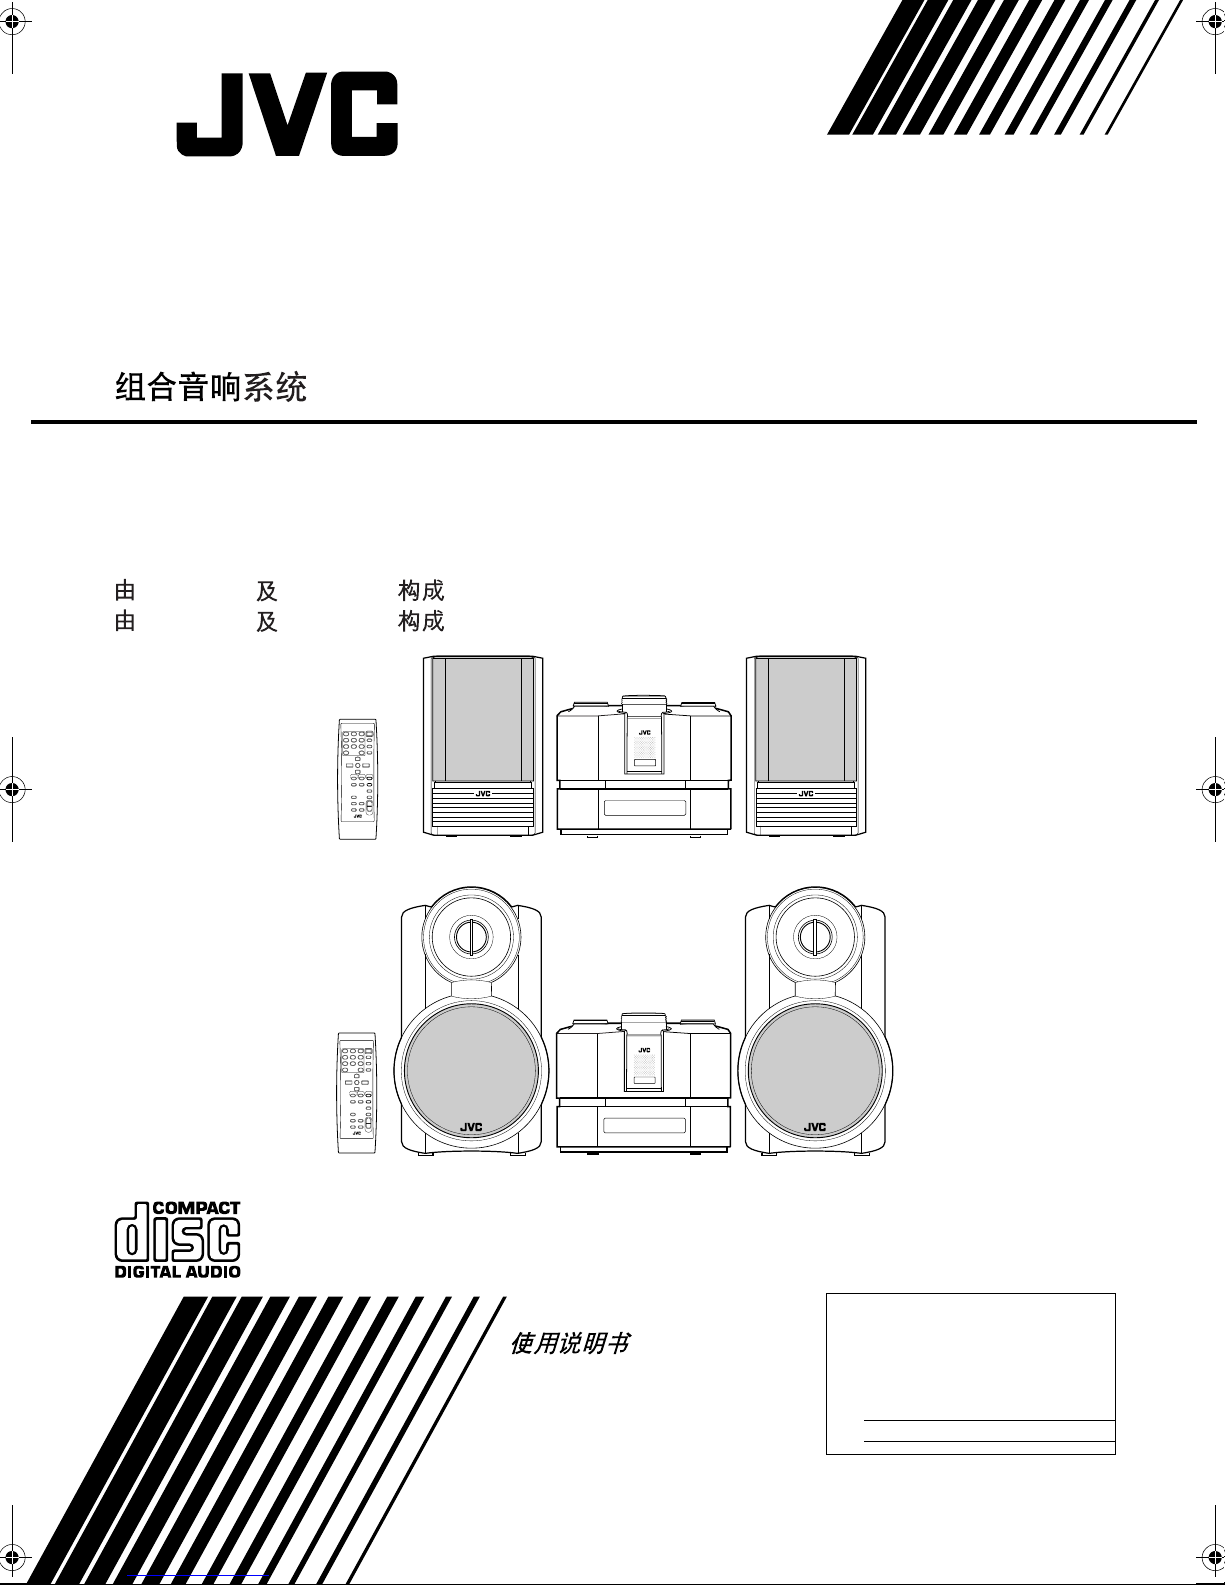
COMPACT COMPONENT SYSTEM
FS-X1/FS-X3
Consists of CA-FSX1 and SP-FSX1
Consists of CA-FSX3 and SP-FSX3
CA-FSX1 SP-FSX1
CA-FSX3 SP-FSX3
SP-FSX1 CA-FSX1 SP-FSX1
SP-FSX3 CA-FSX3 SP-FSX3
INSTRUCTIONS
For Customer Use:
Enter below the Model No. and Serial No.
which are located either on the rear, bottom or side of the cabinet. Retain this
information for future reference.
Mod el No.
Ser ial No.
LVT1040-007A
[US]
Page 2

Warnings, Cautions and Others
CAUTION
To reduce the risk of electrical shocks, fire, etc.:
1. Do not remove screws, covers or cabinet.
2. Do not expose this appliance to rain or moisture.
IMPORTANT FOR LASER PRODUCTS /
CLASS 1 LASER PRODUCT
CAUTION
Invisible laser radiation when open and interlock
1.
failed or defeated. Avoid direct exposure to beam.
CAUTION
Do not open the top cover. There are no user
1.
serviceable parts inside the unit; leave all servicing
to qualified service personnel.
Useofcontrolsadjustmentsorperformance of pro-
2.
cedures other than those specified herein may
result in hazardous radiation exposure.
Caution –– STANDBY/ON button!
Disconnect the main plug to shut the power off completely.
The STANDBY/ON button in any position does not disconnect the main line. The power can be remote controlled.
• When the unit is on standby, the STANDBY/ON indicator
lights red.
• When the unit is turned on, the STANDBY/ON indicator
lights green.
G-1
Page 3
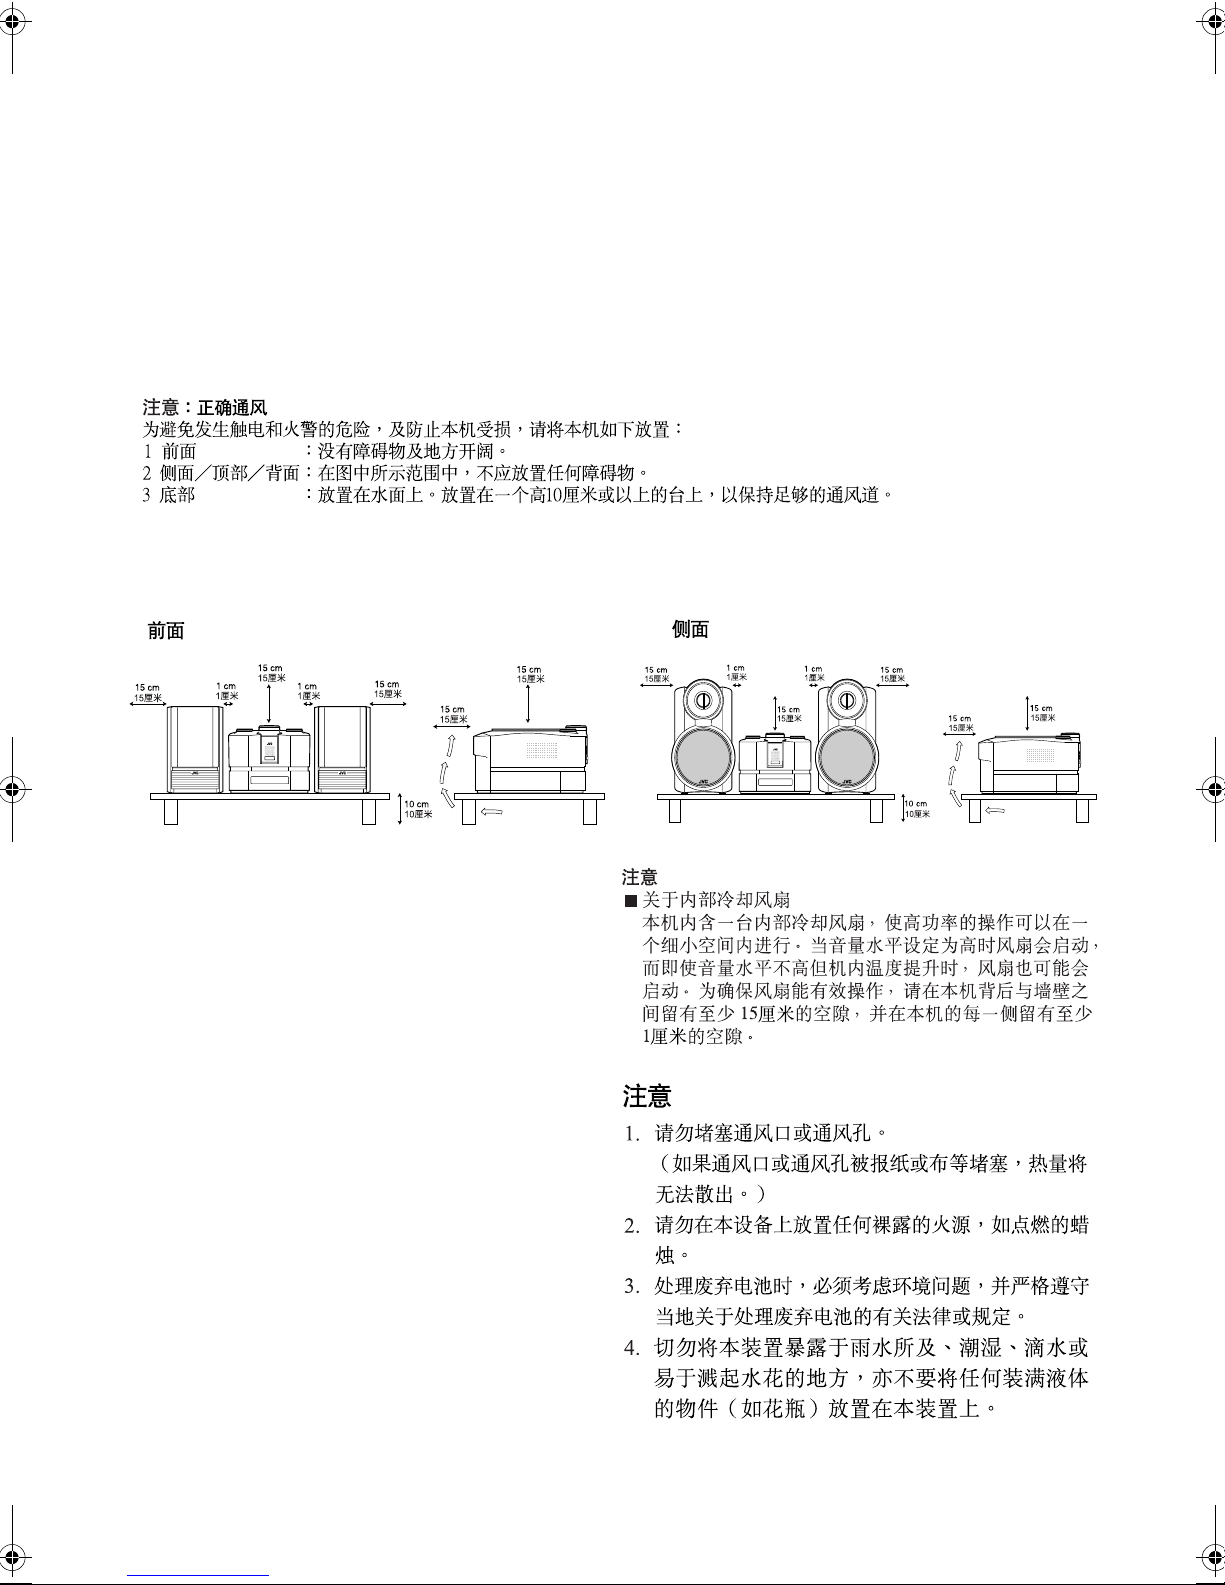
Caution: Proper Ventilation
To avoid risk of electric shock and fire, and to prevent damage, locate the apparatus as follows:
1 Front: No obstructions and open spacing.
2 Sides/ Top/ Back: No obstructions should be placed in the areas shown by the dimensions below.
3 Bottom: Place on the level surface. Maintain an adequate air path for ventilation by placing on a stand with a height
of 10 cm or more.
Front view Side view
FS-X1 CA-FSX1
CAUTION
■ About the Internal Cooling Fan
This unit includes an internal cooling fan, so as to allow for highpower operation within a small space.
This fan comes on when the sound level is set high, and may also
come on even at low sound levels if the internal temperature rises.
To ensure effective fan operation, please leave at least 15cm
clearance between the rear of the unit and the wall, and at least
1cm clearance on each side of the unit.
CAUTION
Do not block the ventilation openings or holes.
1.
(If the ventilation openings or holes are blocked by
a newspaper or cloth, etc., the heat may not be
able to get out.)
Do not place any naked flame sources, such as
2.
lighted candles, on the apparatus.
When discarding batteries, environmental problems
3.
must be considered and local rules or laws governing the disposal of these batteries must be followed
strictly.
Do not expose this apparatus to rain, moisture,
4.
dripping or splashing and that no objects filled with
liquids, such as vases, shall be placed on the apparatus.
FS-X3
CA-FSX3
G-2
Page 4

Introduction
Thank you for purchasing the JVC Compact Component System.
We hope it will be a valued addition to your home, giving you years of enjoyment.
English
Be sure to read this instruction manual carefully before operating your new stereo system.
In it you will find all the information you need to set up and use the system.
If you have a query that is not answered by the manual, please contact your dealer.
Features
Here are some of the things that make your System both powerful and simple to use.
❑ The controls and operations have been redesigned to make them very easy to use, freeing you to
just enjoy the music.
• With JVC’s COMPU PLAY you can turn on the System and automatically start the Radio or
CD Player with a single touch.
❑ The System incorporates AHB (Active Hyper Bass) PRO circuitry to faithfully reproduce low
frequency sound.
❑ A 45-station preset capability (30 FM and 15 AM) in addition to auto-seek and manual tuning.
❑ CD options that include repeat, random and program play.
❑ Timer functions; Daily Timer and Sleep Timer. The Daily Timer can select one of 10 melodies as a source, in addition to
CD, FM, AM and LINE.
❑ You can connect various external units, such as an MD recorder.
❑ The system can play CD-R and CD-RW after they have been finalized.
❑ You can play back your original CD-R or CD-RW recorded in Music CD format. (However they may not be played back
depending on their characteristics or recording conditions.)
How This Manual Is Organized
• Basic information that is the same for many different functions - e.g. setting the volume - is given in the section
‘Basic Operations’, and not repeated under each function.
• The names of buttons/controls and display messages are written in all capital letters: e.g. FM/AM, “CD NO DISC”.
• System functions are written with an initial capital letter only: e.g. Normal Play.
Use the table of contents to look up specific information you require.
We have enjoyed making this manual for you, and hope it serves you in enjoying the many features built into your System.
WARNINGS
• DO NOT PUT ANYTHING ON THE CD DOOR. IF THE SYSTEM IS OPERATED WITH
SOMETHING PUT ON THE CD DOOR, IT WILL BE DAMAGED WHEN YOU TRY TO
OPEN THE CD DOOR.
• NEVER REMOVE THE CD DOOR FROM THE UNIT. SERIOUS INJURY MAY OCCUR IF
THE SYSTEM IS OPERATED WITHOUT THE CD DOOR.
IMPORTANT CAUTIONS
Installation of the System
1
• Select a place which is level, dry and neither too hot nor too cold. (Between 5°C and 35°C)
• Leave sufficient distance between the System and a TV.
• Do not use the System in a place subject to vibrations.
Power cord
2
• Do not handle the power cord with wet hands!
• Some power is always consumed as long as the power cord is connected to the wall outlet.
• When unplugging the System from the wall outlet, always pull the plug, not the power cord.
Malfunctions, etc.
3
• There are no users serviceable parts inside. In case of system failure, unplug the power cord and consult your dealer.
• Do not insert any metallic object into the System.
• Do not insert your hand between the CD door and the main body when the CD door is being closed.
1
Page 5

Table of Contents
Introduction ........................................................................................................1
Features ...................................................................................................................................... 1
How This Manual Is Organized .................................................................................................1
WARNINGS ..............................................................................................................................1
IMPORTANT CAUTIONS ....................................................................................................... 1
Getting Started ...................................................................................................4
Accessories.................................................................................................................................4
How To Put Batteries In the Remote Control ............................................................................4
Using the Remote Control..........................................................................................................4
Connecting the FM Antenna ......................................................................................................5
Connecting the AM Antenna......................................................................................................6
Connecting the Speakers (SP-FSX1/SP-FSX3) .........................................................................7
Removing the Speaker Grills (SP-FSX1)...................................................................................8
Connecting a Powered Subwoofer .............................................................................................8
Connecting an External Equipment............................................................................................8
Connecting an MD Recorder, etc (Optical Digital Output) .......................................................9
COMPU PLAY .......................................................................................................................... 9
Automatic Power On..................................................................................................................9
Basic Operations .............................................................................................10
Turning the Power On and Off.................................................................................................10
Changing the Source ................................................................................................................10
Adjusting the Brightness (DIMMER - at Power On)...............................................................11
Power Saving Mode (DIMMER - at Power Off) .....................................................................11
Adjusting the Volume ..............................................................................................................11
Fade-out Muting (FADE MUTING)........................................................................................11
Reinforcing the Bass Sound (Active Hyper Bass Pro.)............................................................11
Tone Control (BASS/TREBLE)...............................................................................................12
Auto Power Off (A.P.off).........................................................................................................12
Entering the Number with the Remote Control (Numeric Keys).............................................12
Using the Tuner................................................................................................ 13
Tuning In a Station...................................................................................................................13
Presetting Stations .................................................................................................................... 14
To Change the FM Reception Mode ........................................................................................ 14
Beat Cut (AM Reception) ........................................................................................................ 15
Using the CD Player......................................................................................... 16
To Insert a CD .......................................................................................................................... 16
To Unload a CD .......................................................................................................................17
Basics of Using the CD Player – Normal Play.........................................................................17
Programming the Playing Order of the Tracks – Program Play ..............................................17
Random Play ............................................................................................................................18
Repeating Tracks...................................................................................................................... 19
CD DOOR LOCK ....................................................................................................................19
Using External Equipments ............................................................................ 20
Listening to External Equipment.............................................................................................. 20
Changing the Equipment’s Name ............................................................................................ 20
Recording the System’s Source to External Equipment ..........................................................21
Adjusting the Input Level......................................................................................................... 21
Using the Timers.............................................................................................. 22
Setting the Clock ......................................................................................................................22
Showing the Clock (DISPLAY)...............................................................................................23
Correcting the Clock ................................................................................................................23
English
2
Page 6

Table of Contents
English
Setting the Daily Timer............................................................................................................23
Setting the SLEEP Timer .........................................................................................................26
Timer Priority...........................................................................................................................26
Troubleshooting............................................................................................... 27
Care And Maintenance ....................................................................................28
Specifications................................................................................................... 29
3
Page 7
Getting Started
Accessories
Make sure that you have all of the following items, which are supplied with the System.
FM Wire Antenna (1)
AM Loop Antenna (1)
Remote Control (1)
Batteries (2)
Speaker Cords (2)
AC plug adaptor (1)
If any of these items are missing, contact your dealer immediately.
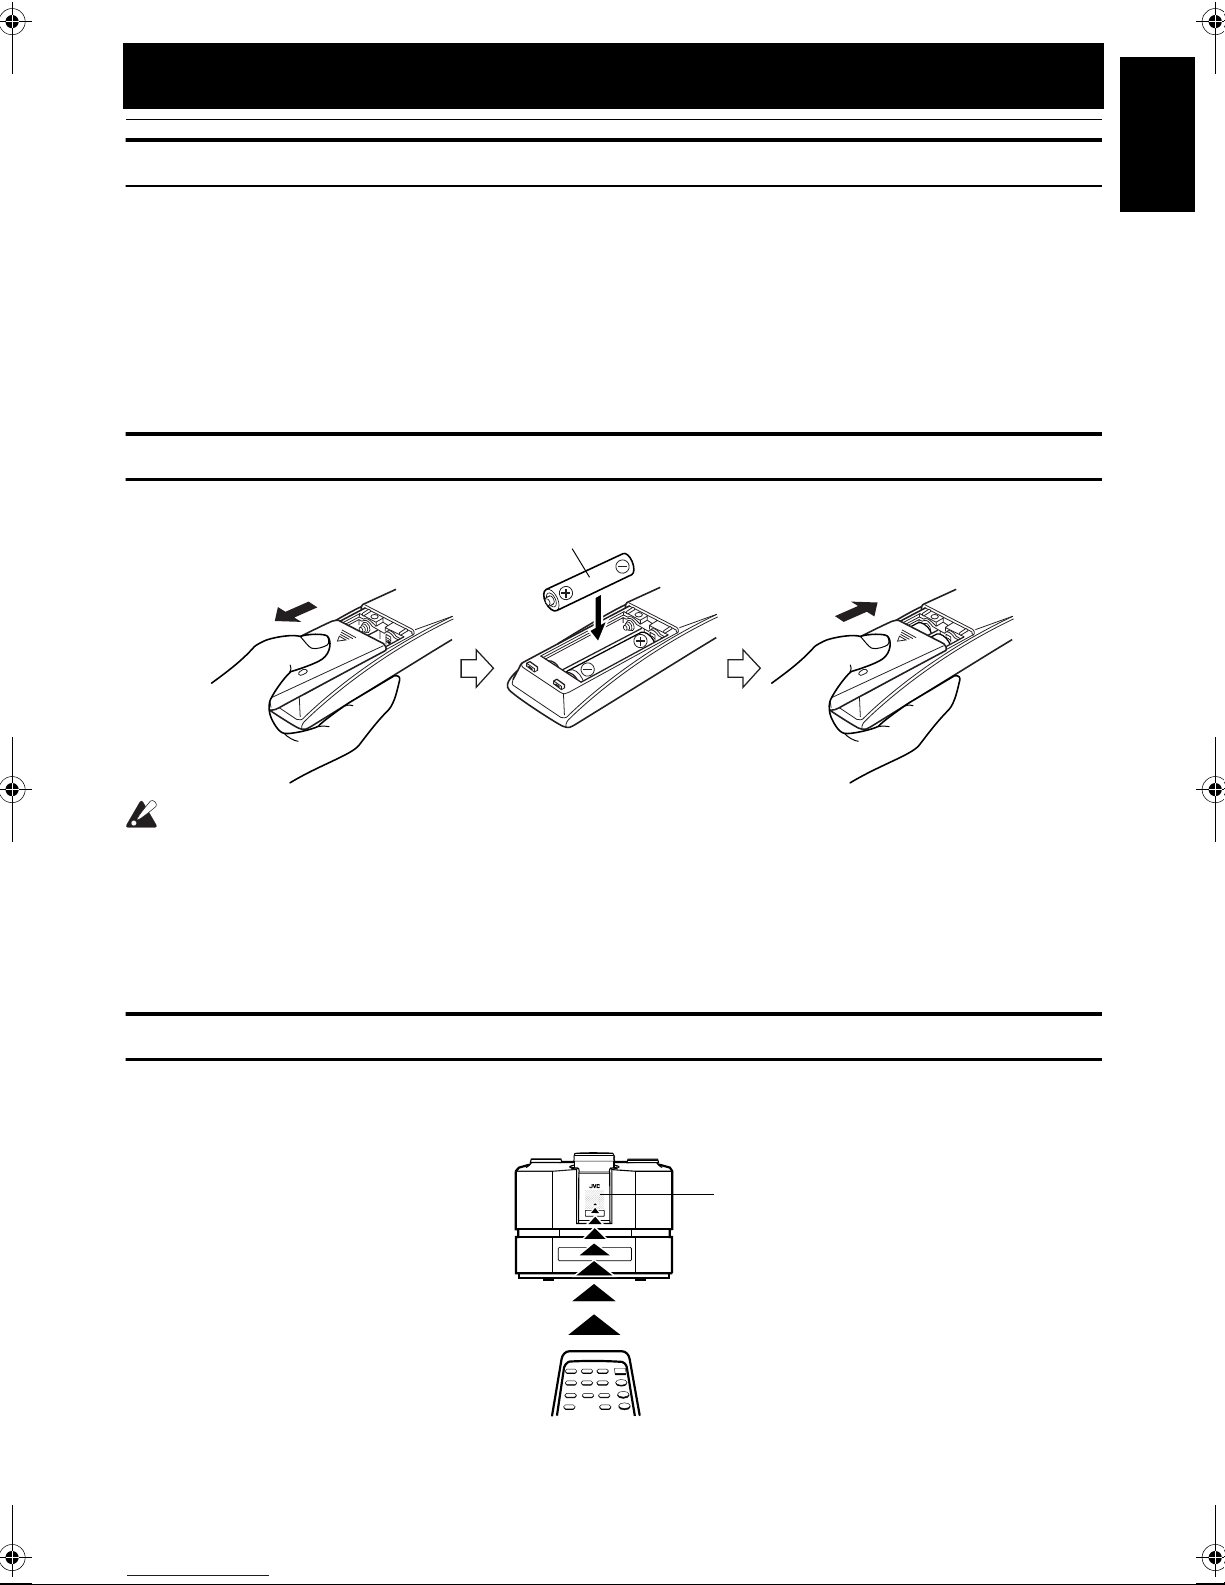
How To Put Batteries In the Remote Control
Match the polarity (+ and –) on the batteries with the + and – markings in the battery compartment.
R6P(SUM-3)/AA(15F)
English
CAUTION:
• Handle batteries properly.
❑ To avoid battery leakage or explosion:
• Remove batteries when the Remote Control will not be used for a long time.
• When you need to replace the batteries, replace both batteries at the same time with new ones.
• Do not use an old battery with a new one.
• Do not use different types of batteries together.
Using the Remote Control
The Remote Control makes it easy to use many of the functions of the System from a distance of up to 7m away.
You need to point the Remote Control at the remote sensor on the System’s front panel.
Remote Sensor
4
Page 8
Getting Started
English
CAUTION:
• Make all connections before plugging the System into an AC power outlet.
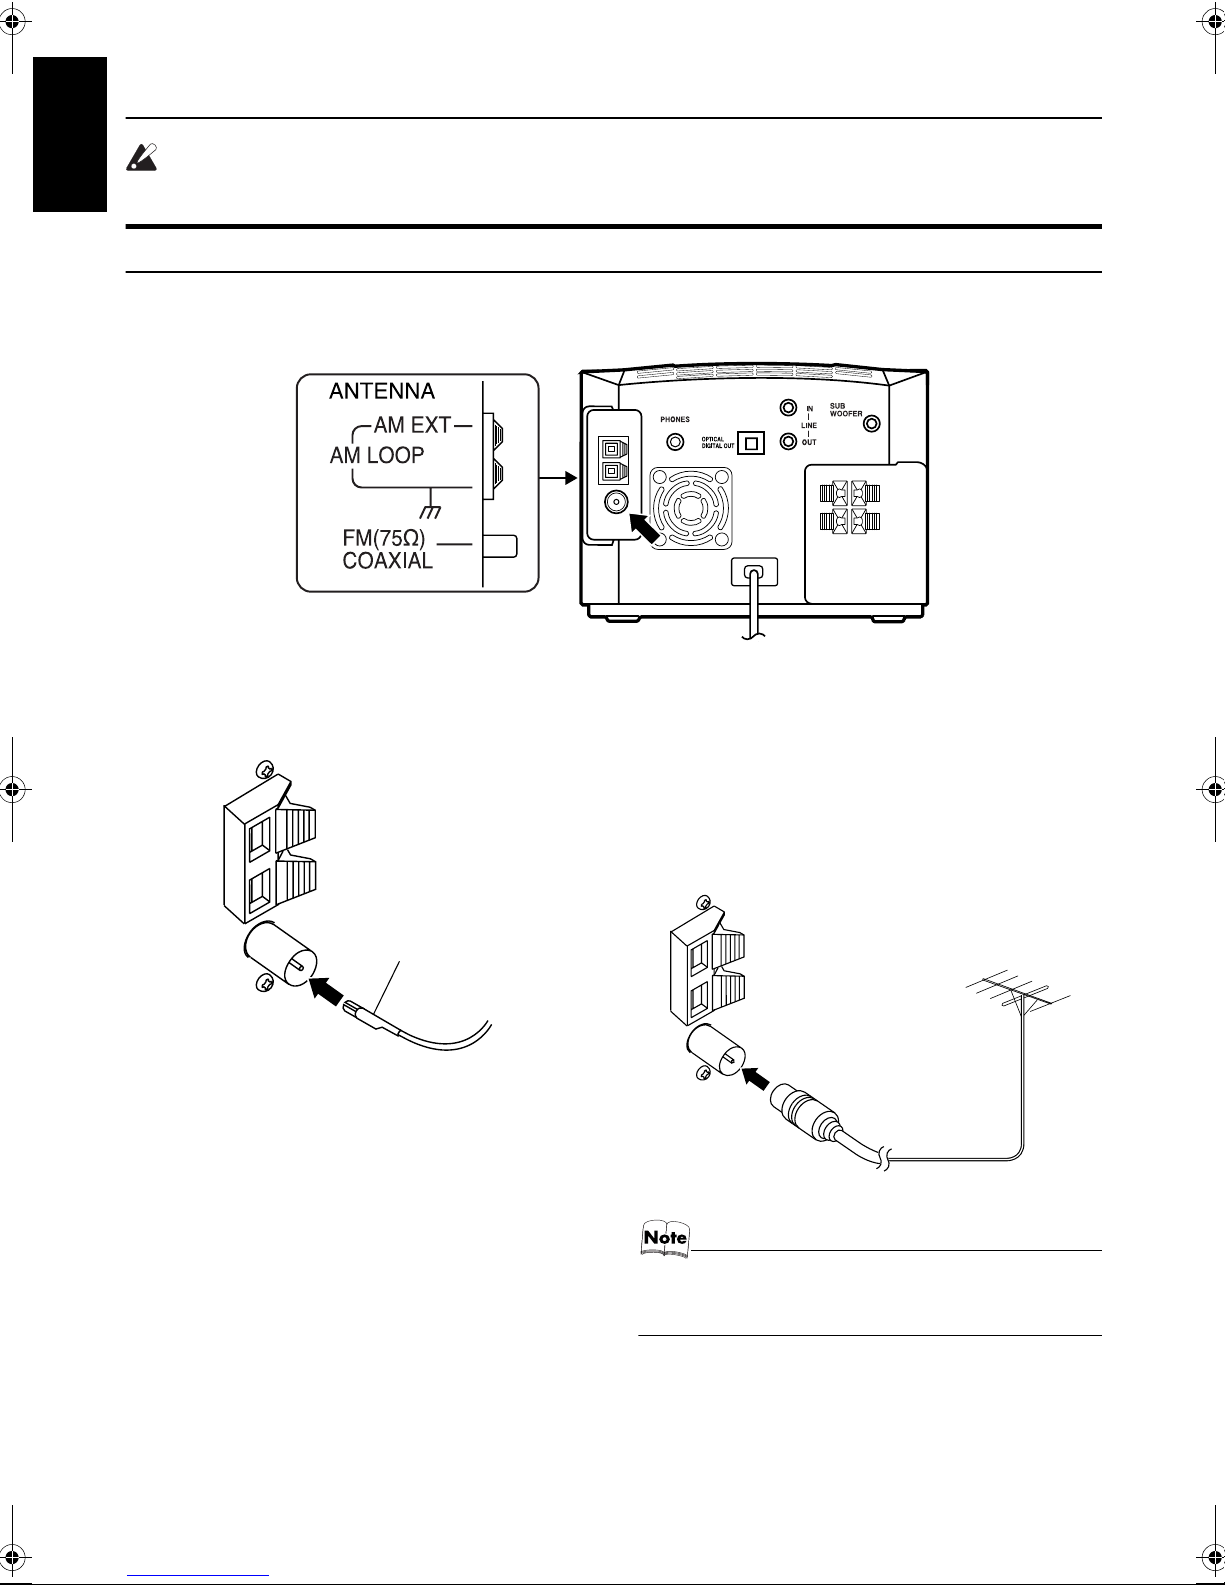
Connecting the FM Antenna
Rear Panel of the Center Unit (CA-FSX1/CA-FSX3)
(on the side panel)
Using the Supplied Wire Antenna
If reception is poor, connect the outdoor antenna.
FM wire antenna (supplied)
• Fasten it up in the position until you have the best
reception.
Using the Coaxial Type Connector
(Not Supplied)
A 75-ohm antenna with coaxial type connector (IEC or
DIN45 325) should be connected to the FM 75-ohm COAXIAL terminal.
FM outdoor
antenna
(Not supplied)
Coaxial cable
• Before attaching a 75 ohm coaxial lead (the kind with a
round wire going to an outdoor antenna), disconnect the
supplied FM Wire Antenna.
5
Page 9

Getting Started
Connecting the AM Antenna
Rear Panel of the Center Unit (CA-
AM loop antenna (Supplied)
English
FSX1/CA-FSX3)
Outdoor single vinyl-covered wire (not supplied)
Attach the AM loop to its base by snapping the tabs on
the loop into the slot in the base.
• If the AM loop antenna wire is covered with vinyl, remove the vinyl by twisting it as shown in the diagram.
• Make sure the antenna conductors do not touch any other terminals, connecting cords and power cord.
This could cause poor reception.
• If reception is poor, connect an outdoor single vinyl-covered wire to the AM EXT terminal. (Keep the AM loop
antenna connected.)
Turn the loop until you have the best reception.
6
Page 10
Getting Started
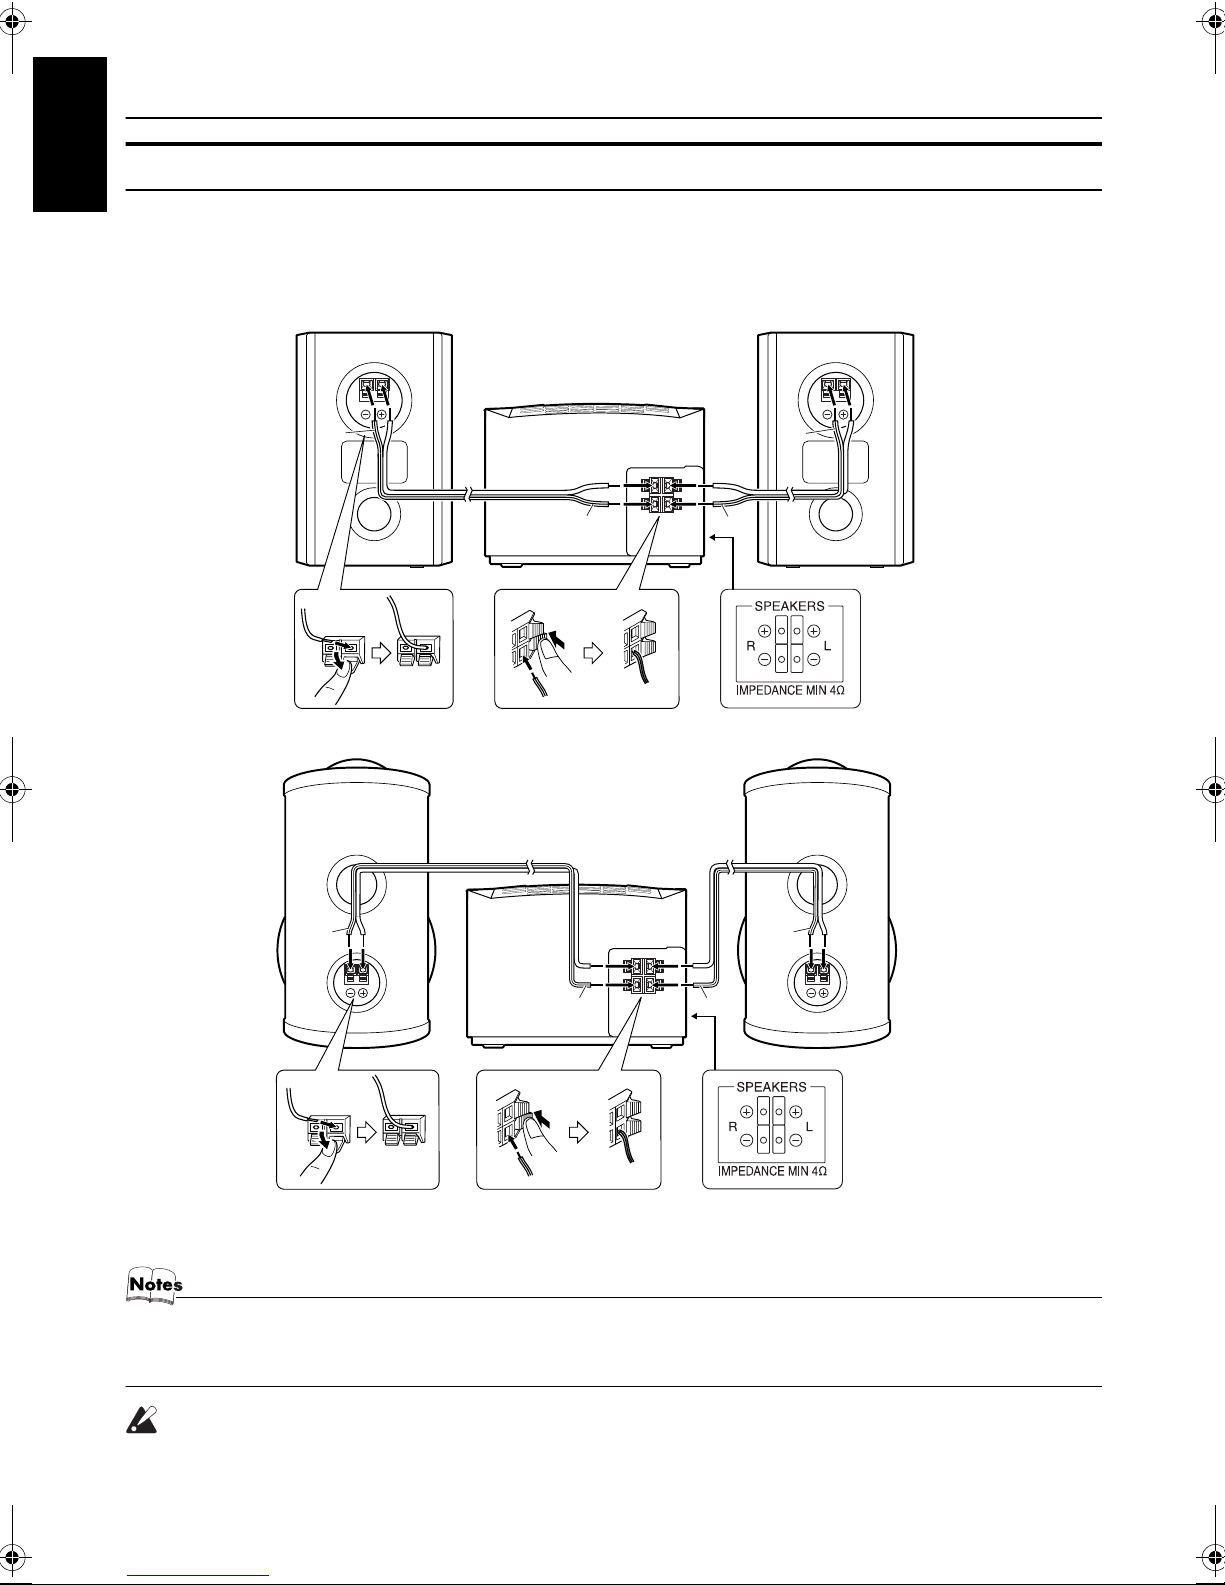
Connecting the Speakers (SP-FSX1/SP-FSX3)
English
These speakers are exclusively for this system. Using with other devices will damage the speakers.
Connect the speaker cords between the speaker terminals of the Unit and those of the Speakers.
• When inserting the speaker wire lead, open the speaker terminal.
• Connect the black cord to the ( - ) terminal and the cord without a black line to the (+) terminal.
Right side (rear view)
Left side (rear view)
SP-FSX1
SP-FSX3
BLACK
BLACK
BLACK
BLACK BLACK
BLACK
BLACK
SPEAKER terminal description
(on the side panel)
BLACK
SP-FSX1
SP-FSX3
• Since both speakers are the same, you can put either one to the right or left side.
• Do not connect other speakers to the Unit. The difference of the load impedance causes failures.
• Do not use the supplied speakers in parallel with other speakers.
CAUTION:
• A TV may display irregular colors if located near the speakers. If this happens, set the speakers away from the TV.
7
SPEAKER terminal description
(on the side panel)
Page 11
Getting Started
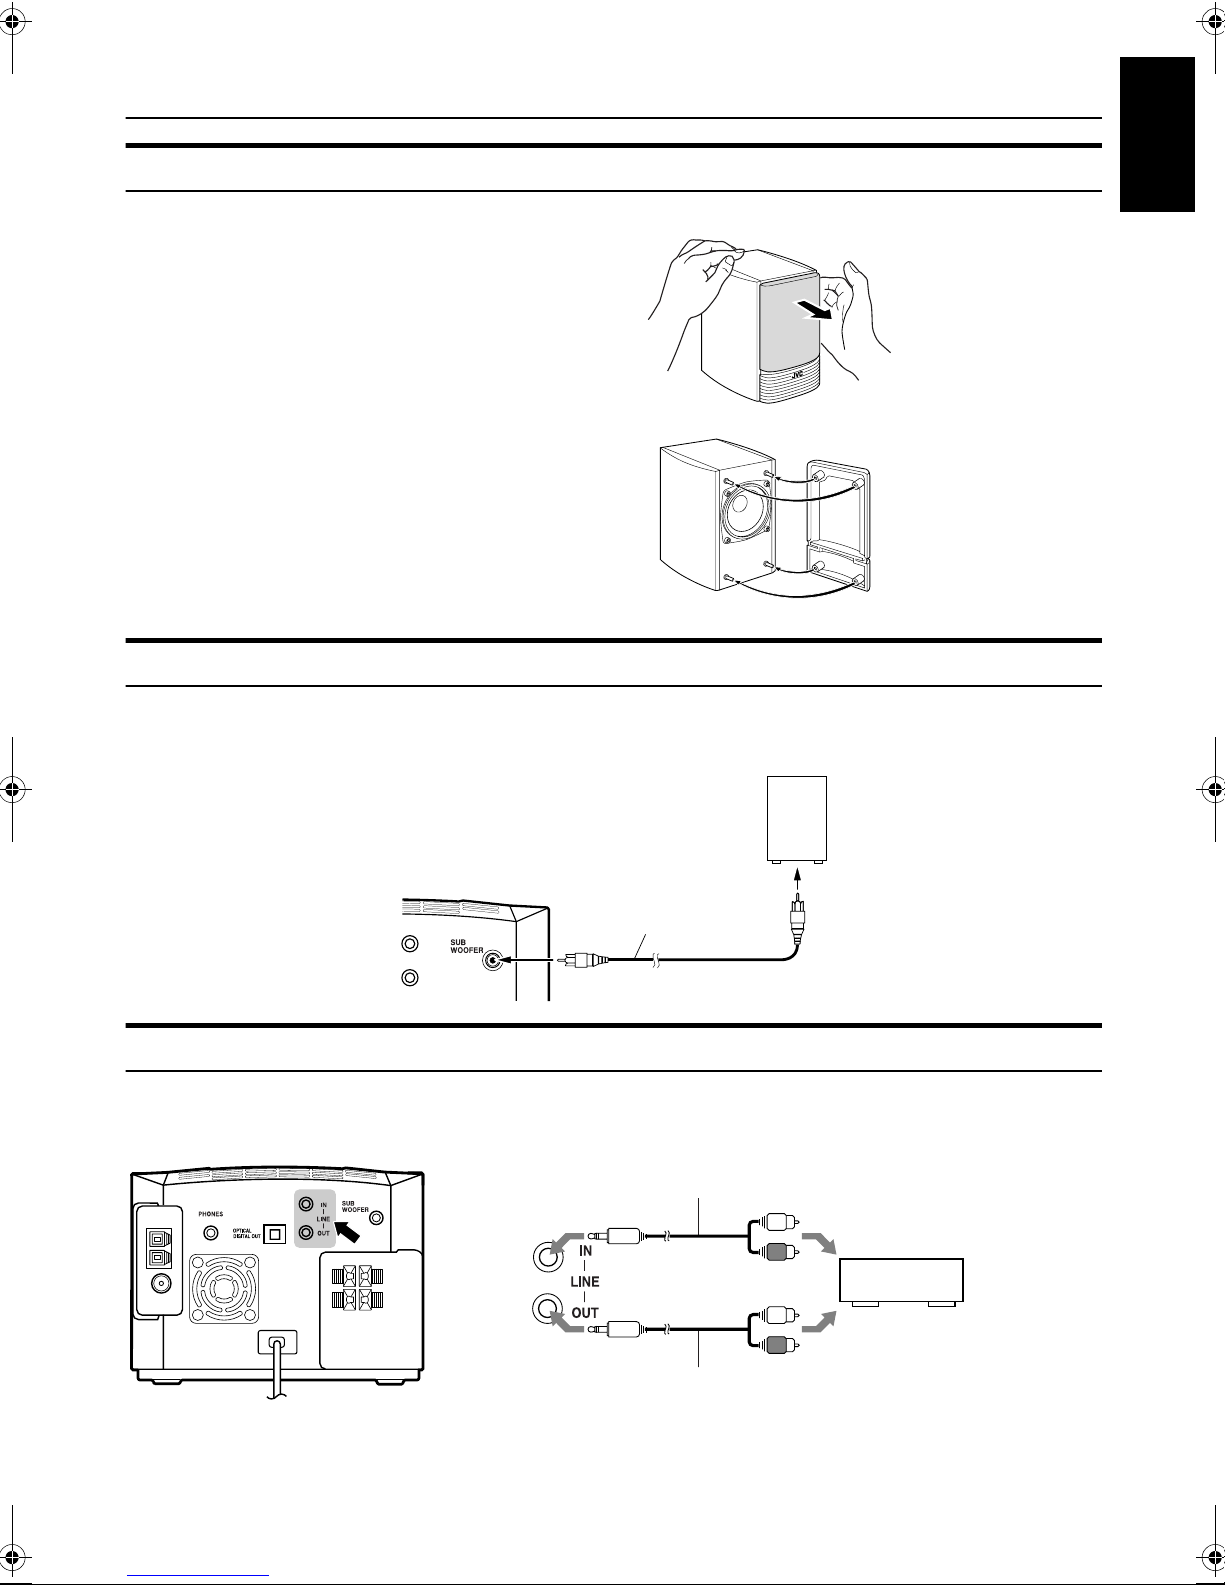
Removing the Speaker Grills (SP-FSX1)
The speaker grills can be removed.
When removing:
1. Pull the bottom towards you with your fingers.
2. Also pull the top towards you.
When attaching the speaker grills:
Attach the speaker grills as shown in the diagram.
Connecting a Powered Subwoofer
Connect a signal cord (not supplied) between the System’s SUBWOOFER terminal and the input terminal of an external subwoofer. (For the details of connection, please refer to the user’s manual of the external equipment.)
Subwoofer (not supplied)
English
Signal cord (not supplied)
Connecting an External Equipment
Connect signal cords (not supplied) between the System’s LINE IN/OUT terminals and the output/input terminals of the external MD recorder, tape deck, etc. (For the details of connection, please refer to the user’s manual of the external equipment.)
You can then listen to the external source through the System or record the System’s CD player or tuner to the external unit.
Signal cord
(not supplied)
STEREO mini plug
STEREO mini plug
Signal cord
(not supplied)
Pin-plug x 2
MD recorder or tape deck
(not supplied)
Pin-plug x 2
8
Page 12
Getting Started
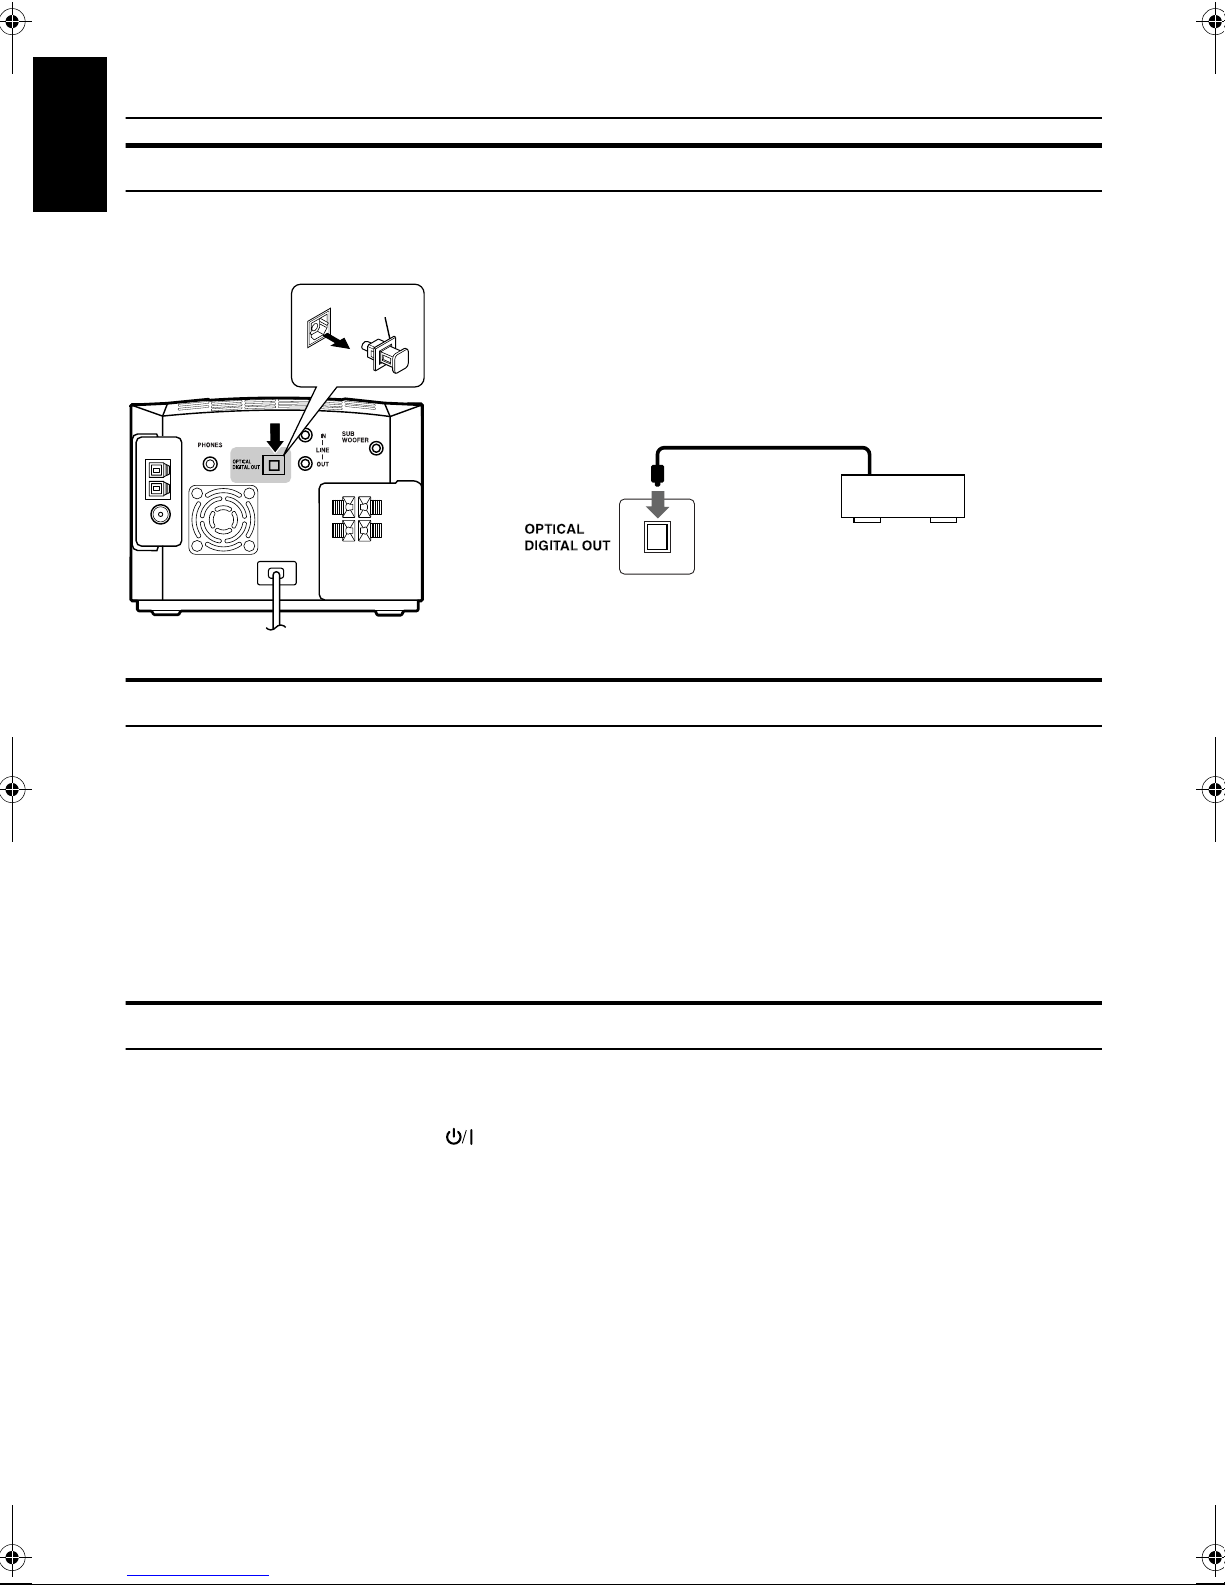
Connecting an MD Recorder, etc (Optical Digital Output)
English
Unplug the cap and connect an optical digital cord (not supplied) between the System’s OPTICAL DIGITAL OUT terminal
and the input terminal of the MD recorder, etc.
You can record the digital output signal from the System’s CD Player to the MD recorder, etc.
Cap
Optical digital cord
(not supplied)
MD recorder, etc.
(not supplied)
COMPU PLAY
JVC’s COMPU PLAY feature lets you control the most frequently used System functions with a single touch.
With One Touch Operation you can play a CD, turn on the radio, or listen to an external equipment with a single press of the
play button for that function. One Touch Operation turns the power on for you, then starts the function you have specified. If
the System is not ready (no CD in place), the System still powers on so you can insert a CD.
How One Touch Operation works in each case is explained in the section dealing with that function.
The COMPU PLAY buttons are:
On the Remote Control
/8 button
CD
3
FM/AM button
LINE button
Automatic Power On
The System automatically turns on with the following operation.
• When you press the 0 CD button on the Unit or the CD DOOR 0 button on the Remote Control, the System automatically
turns on and the CD door opens to allow CD setting. However, this operation does not change the source to CD.
When you press the STANDBY/ON button to turn off the System, the CD door will be automatically closed if it is
opened.
9
Page 13
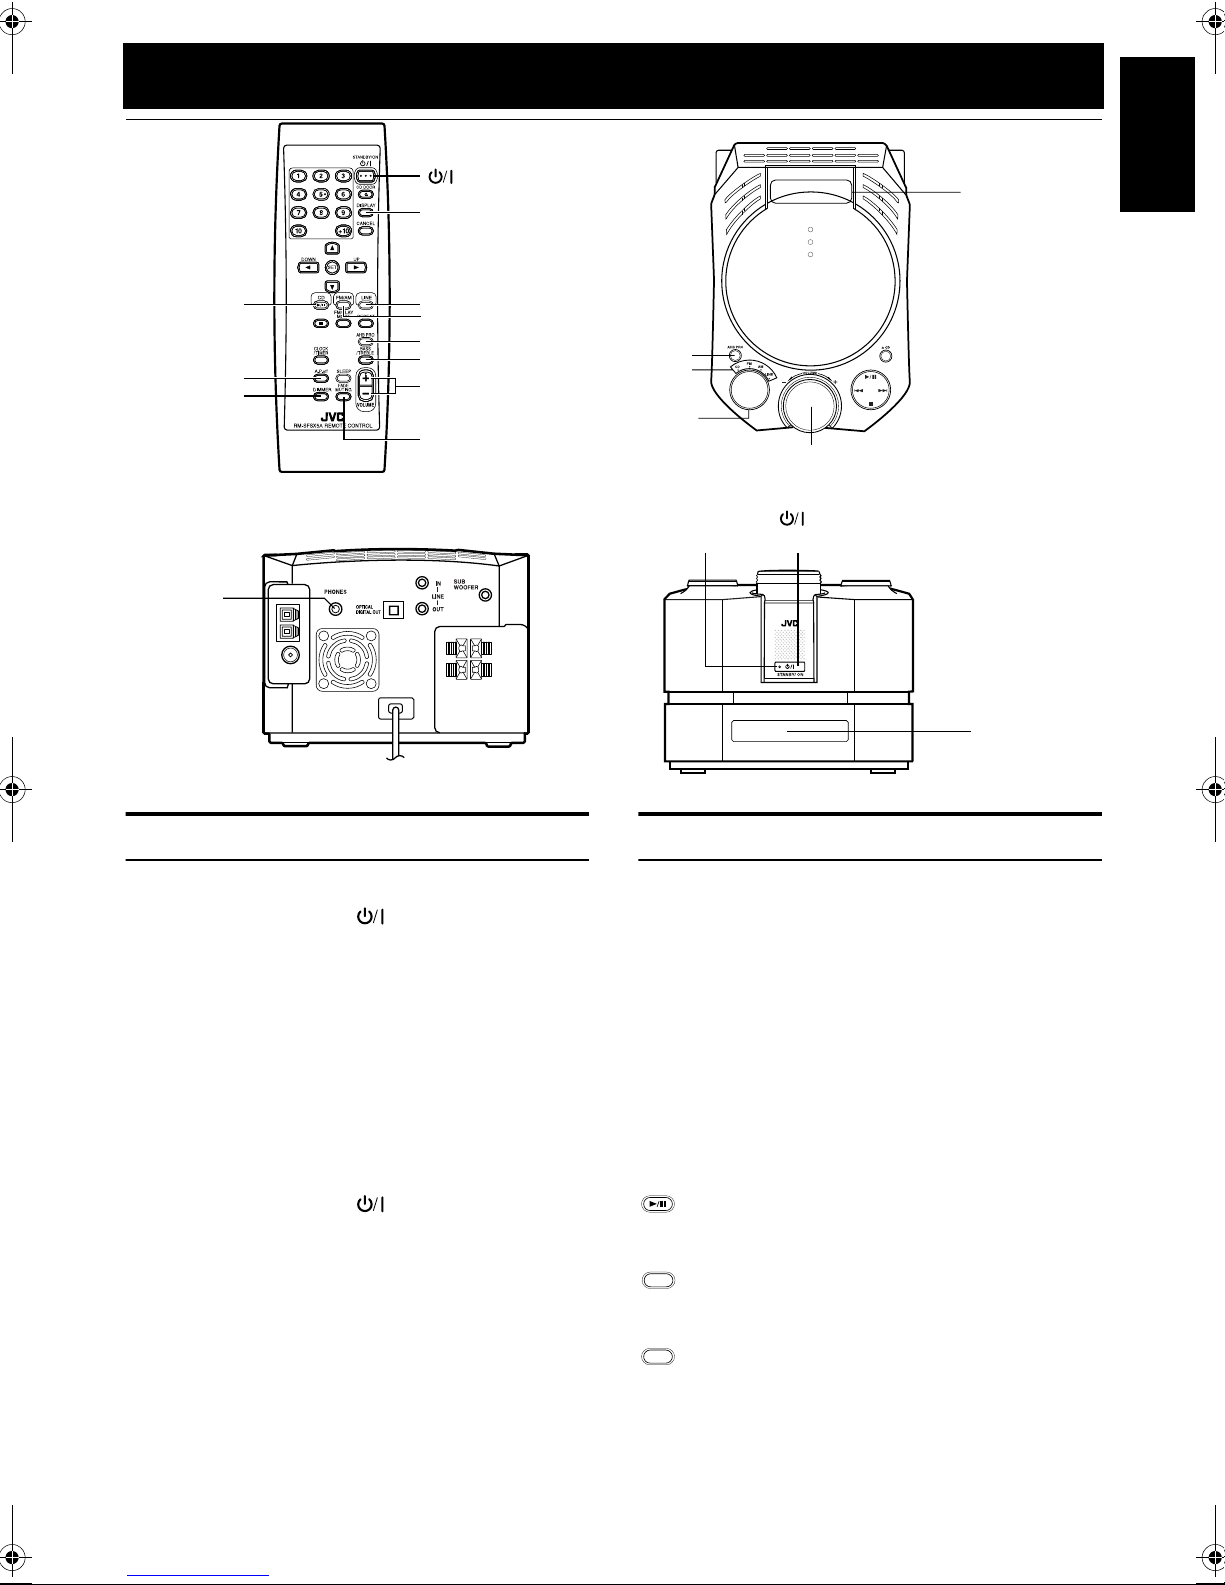
Basic Operations
STANDBY/ON
DISPLAY
CD lamp
(Inside)
English
CD 6
A.P. off
DIMMER
PHONES
LINE
FM/AM
AHB PRO
BASS/TREBLE
VOLUME +,
FADE
MUTING
_
Turning the Power On and Off
AHB PRO
Source indicator
Source
selector
STANDBY/ON
indicator
Changing the Source
VOLUME +,
STANDBY/ON
_
Display
Turning the System On
Press the STANDBY/ON button.
The display comes on and “HELLO” is displayed once. The
STANDBY/ON indicator lights in green.
The System comes on ready to continue in the mode it was
in when the power was last turned off.
❑ For example, if the last thing you were doing was listen-
ing to a CD, you are now ready to listen to a CD again. If
you wish, you can change to another source.
❑ If you were listening to the Tuner last, the Tuner comes
on playing the station it was last set to.
Turning the System Off
Press the STANDBY/ON button again.
“SEE YOU” is displayed and the display goes out, except for
the clock display. The STANDBY/ON indicator lights in red.
❑ Some power is always consumed even though power is
turned off (called Standby Mode).
❑ To switch off the System completely, unplug the AC
power cord from the wall outlet. When you unplug the
AC power cord, the clock will be reset to 0:00.
The System has four sound sources, CD, FM, AM and
LINE. Select one of sources you want to listen.
For example, when you want to listen to the CD, select the
source “CD”.
On the Unit
Turn the Source selector to select the source you want.
Each time you turn it clockwise or counterclockwise, the
source changes as follows.
CD Ô FM Ô AM Ô LINE
The selected source name will appear on the display and the
Source indicator on the Unit will light up.
On the Remote Control
CD
:Press the CD 6 button to select the source “CD”.
You can listen to the CD. If a CD is inserted, the CD
will be played back.
FM / AM
:Press the FM/AM button to select the source “FM” or
“AM”.
You can listen to the FM or AM broadcast.
LINE
:Press the LINE button to select the source “LINE”.
You can listen to the music through external equipment.
10
Page 14
Basic Operations
Adjusting the Brightness
English
(DIMMER - at Power On)
You can adjust the brightness of the display.
When the System is Turned On
At power on, each time you press the DIMMER button on
the Remote Control, the brightness changes as follows:
DIMMER OFF = DIMMER 1 = DIMMER 2 = (back to
the beginning)
DIMMER OFF : Bright
DIMMER 1 : Dark (CD lamp also becomes dark.)
DIMMER 2 : Darker (CD lamp goes out.)
Power Saving Mode
(DIMMER - at Power Off)
In power saving mode, you can save the power while the
System is turned off (Standby Mode).
Each time you press the DIMMER button on the Remote
Control at power off, the display alternates as follows.
DISPLAY ONÔDISPLAY OFF
To enable Power Saving mode, set to “DISPLAY
OFF”.
The display completely turns off to save the power.
To restore normal power mode,
The Clock indicator
()
and the clock appear on the display.
reset to “DISPLAY ON”.
Adjusting the Volume
Turn the VOLUME control on the Unit clockwise to increase the volume or turn it counterclockwise to decrease
the volume.
Press the VOLUME + button on the Remote Control to increase the volume or press the VOLUME _ button on the
Remote Control to decrease the volume.
CAUTION:
• DO NOT turn off the System with the volume set to an extremely high level; otherwise a sudden blast of sound could damage
your hearing, speakers and/or headphones
when you turn on the System or start playing any source next time.
REMEMBER you cannot adjust the volume
level while the System is in standby mode.
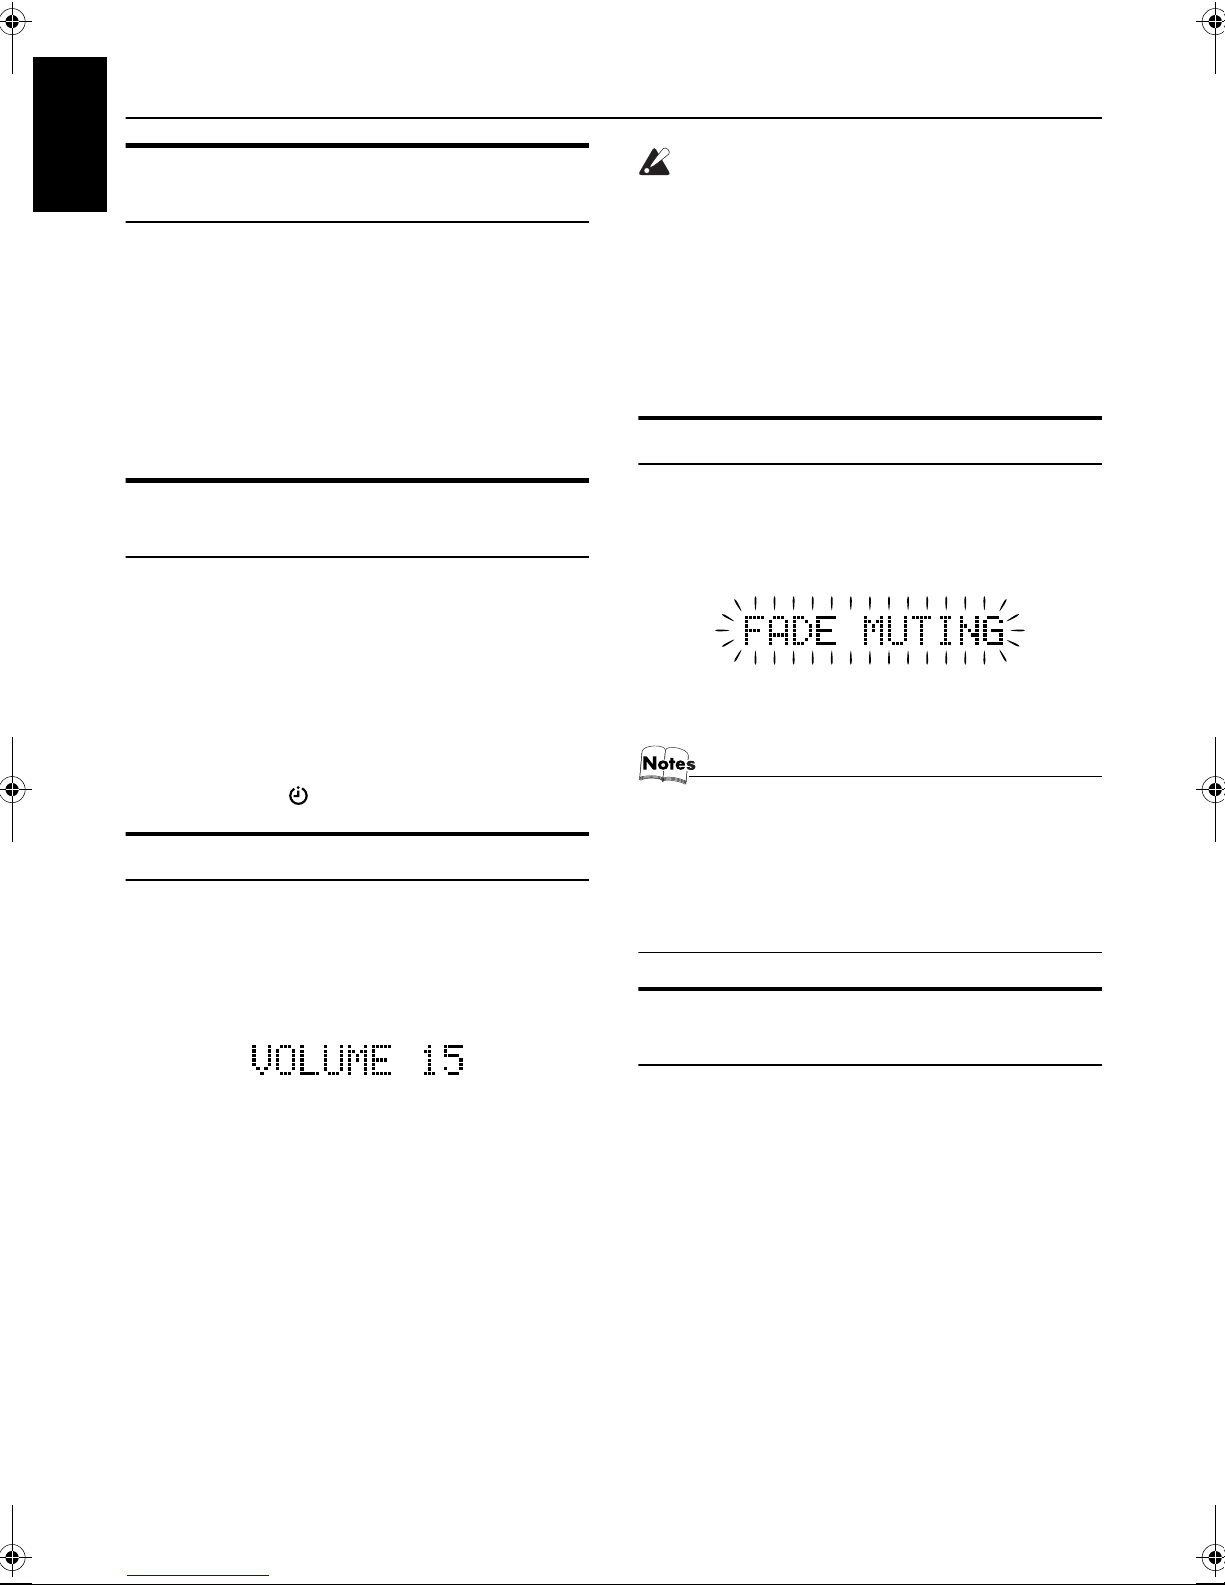
Fade-out Muting (FADE MUTING)
You can mute the output with one touch operation.
To mute the output, press the FADE MUTING button
on the Remote Control. Then, “FADE MUTING” blinks
and the output will be faded out and becomes 0.
To release muting, press the FADE MUTING button once
again. Then, the output will be faded in to the original level.
• Adjusting the volume causes the muting process (fading
out to 0) to release.
• If you use the AHB PRO button or the BASS/TREBLE button during muting, the FADE MUTING button does not
work to release muting. In this case, turn the VOLUME
control on the Unit or the VOLUME+/ _ button on the Remote Control to newly set the volume.
Reinforcing the Bass Sound
(Active Hyper Bass Pro.)
You can adjust the volume level between 0 and 50.
For private listening
Connect a pair of headphones to the PHONES jack. No
sound comes out of the speakers.
Be sure to turn down the volume before connecting or putting on headphones.
11
You can reinforce the bass sound to maintain rich, full bass at
low volume. (This effect does not apply to the headphones.)
To get the effect, press the AHB PRO button on the Unit
or the Remote Control.
“AHB PRO ON” appears and the “BASS” indicator lights up.
To cancel the effect, press the AHB PRO button again.
“AHB PRO OFF” appears and the “BASS” indicator goes out.
Page 15
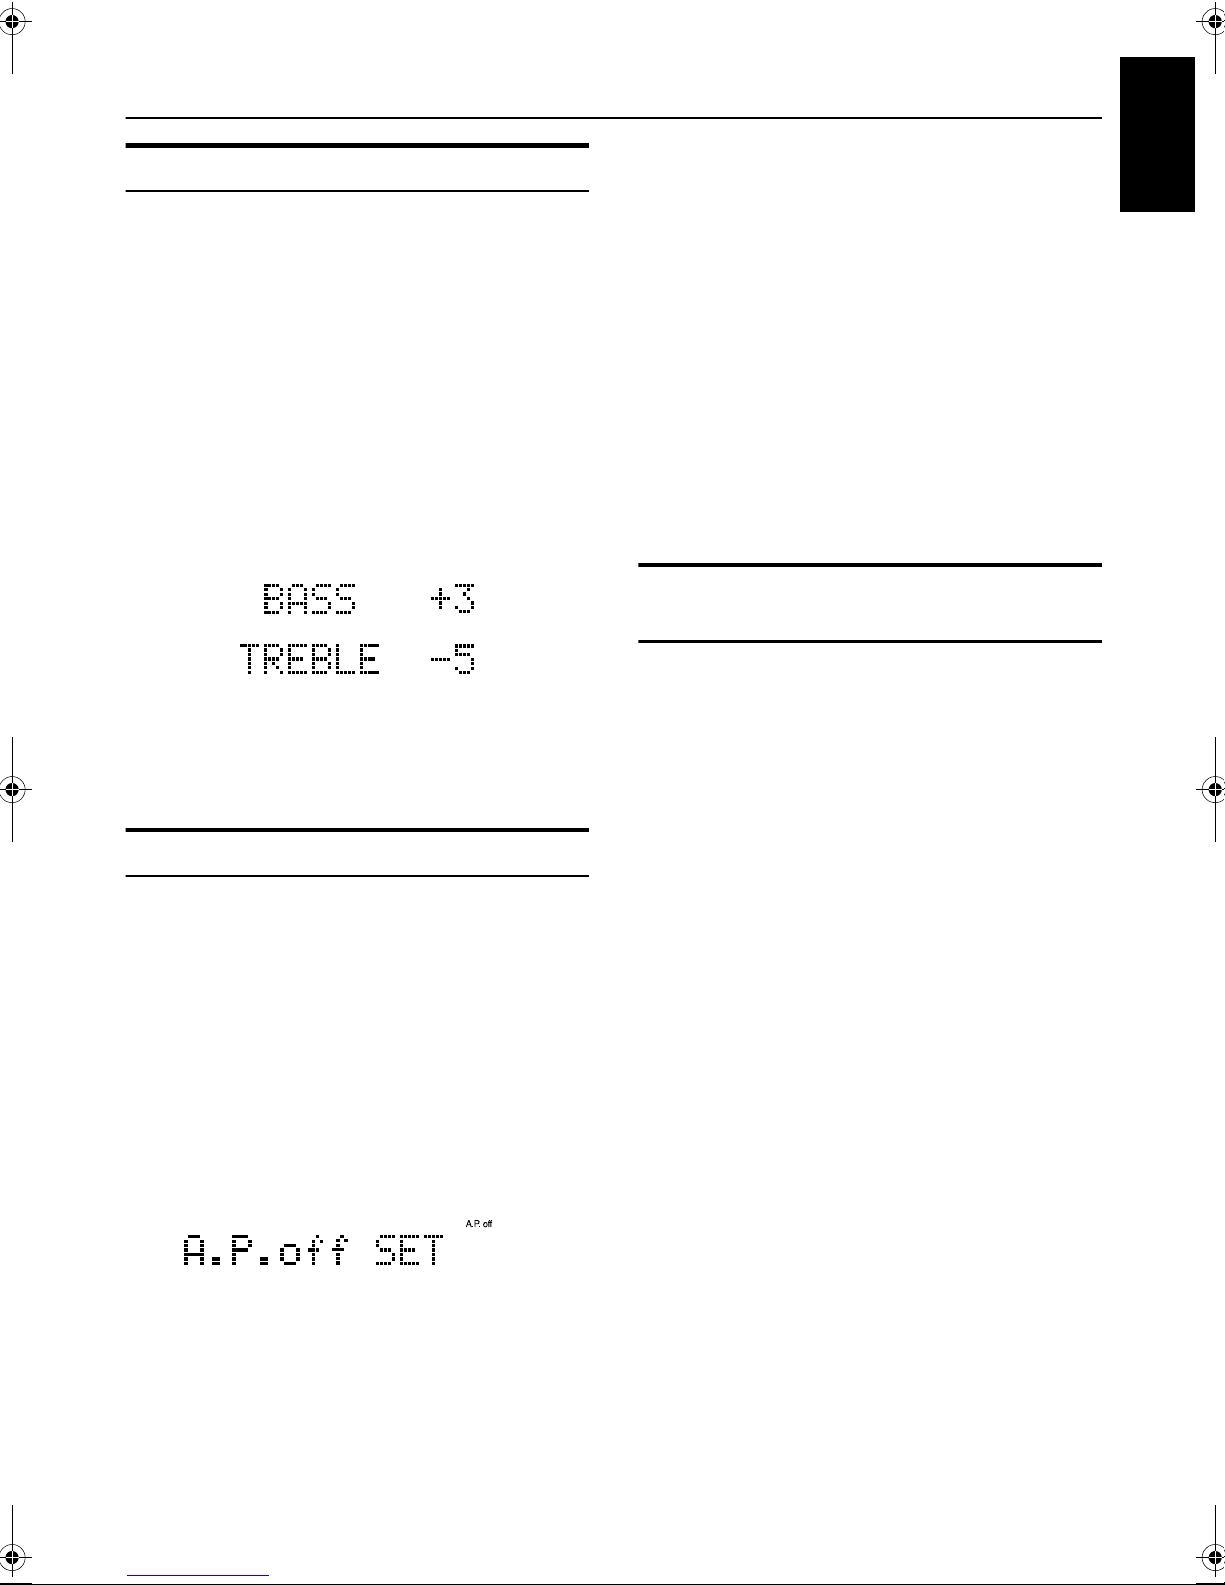
Tone Control (BASS/TREBLE)
Basic Operations
No signal condition:
Source CD: CD is stopped or no CD is inserted.
English
You can control the tone by changing the bass (low frequency) and treble (high frequency).
On the Remote Control
Press the BASS/TREBLE button.
1
Each time you press the button, the Tone Control mode
changes as follows.
BASS = TREBLE = Normal display = (back to the
beginning)
While “BASS” or “TREBLE” appears on
2
the display, press the VOLUME + or
-
button to adjust the bass or treble level.
You can change the level within the range of -5 to +5. (0: flat)
Press the BASS/TREBLE button until
3
normal display appears.
Waiting for five seconds will also return the System to
the normal display.
Auto Power Off (A.P.off)
You can automatically turn off the System when no signal
condition continues for three minutes. This function is effective when the source is set to “CD”, but not to “FM”,
“AM” or “ LINE”.
When no signal condition continues, “A.P.off 20 sec” (20
seconds left before elapsed time reaches three minutes) appears on the display. The displayed time is counted down
and, finally, the System is turned off (Standby mode).
• If a CD is played back, the “A.P.off” indicator stops
blinking and stays lit again.
• If you press a button or turn the VOLUME control,
three-minute counting down is reset and counting down
newly restarts.
To disable the A.P.off function
When the source is “CD”, press the A.P.off button on the
Remote Control until “A.P.off STOP” appears on the display.
Then, the “A.P.off” indicator goes out.
Entering the Number with the
Remote Control (Numeric Keys)
You will use the Numeric Keys on the Remote Control to
enter numbers for presetting stations, recalling the preset
stations, selecting track number, or programming the playing tracks on a CD.
How to enter the number with the Numeric Keys is explained here.
Examples:
• To enter number 5, press 5.
• To enter number 10, press 10.
• To enter number 15, press +10 then 5.
• To enter number 20, press +10 then 10.
• To enter number 25, press +10, +10, then 5.
To Enable the A.P.off function
(When the source is “CD”)
Press the A.P.off button on the Remote
1
Control until “A.P.off SET” appears on
the display.
Then, the “A.P.off” indicator lights up on the display.
• Each time you press the button, the display alternates
as follows.
A.P.off SET Ô A.P.off STOP
When no signal condition is detected, the “A.P.off” indicator will start blinking soon.
12
Page 16
Using the Tuner
English
Numeric
Keys
SET
2
* When the System is in use, the display shows other items as well.
You can listen to FM and AM stations. Stations can be tuned
in manually, automatically, or from preset memory storage.
❑ Before listening to the radio:
• Make sure that both the FM and AM antennas are correctly connected. (See pages 5 and 6).
Setting the AM Tuner Interval Spacing
When shipped, the AM tuner interval is set to 9 kHz or 10 kHz
spacing (Initial setting: 9 kHz except for South and Central
America). You can change it to 10 kHz or 9 kHz spacing.
To select 10 kHz intervals, while holding down the ¢
button on the Unit in Standby mode, press the STANDBY/
ON button on the Unit to turn on the power. “AM
10kHz STEP” will appear on the display.
To select 9 kHz intervals, while holding down the 4
button on the Unit in Standby mode, press the STANDBY/
ON button on the Unit to turn on the power. “AM 9kHz
STEP” will appear on the display.
5
3
∞
FM/AM
FM/PLAY MODE
FM mode indicator
Band display, Preset channel,
Frequency display
For simplicity, we show here only the items described in this section.
Multi-control
Source
selector
button
¢
4
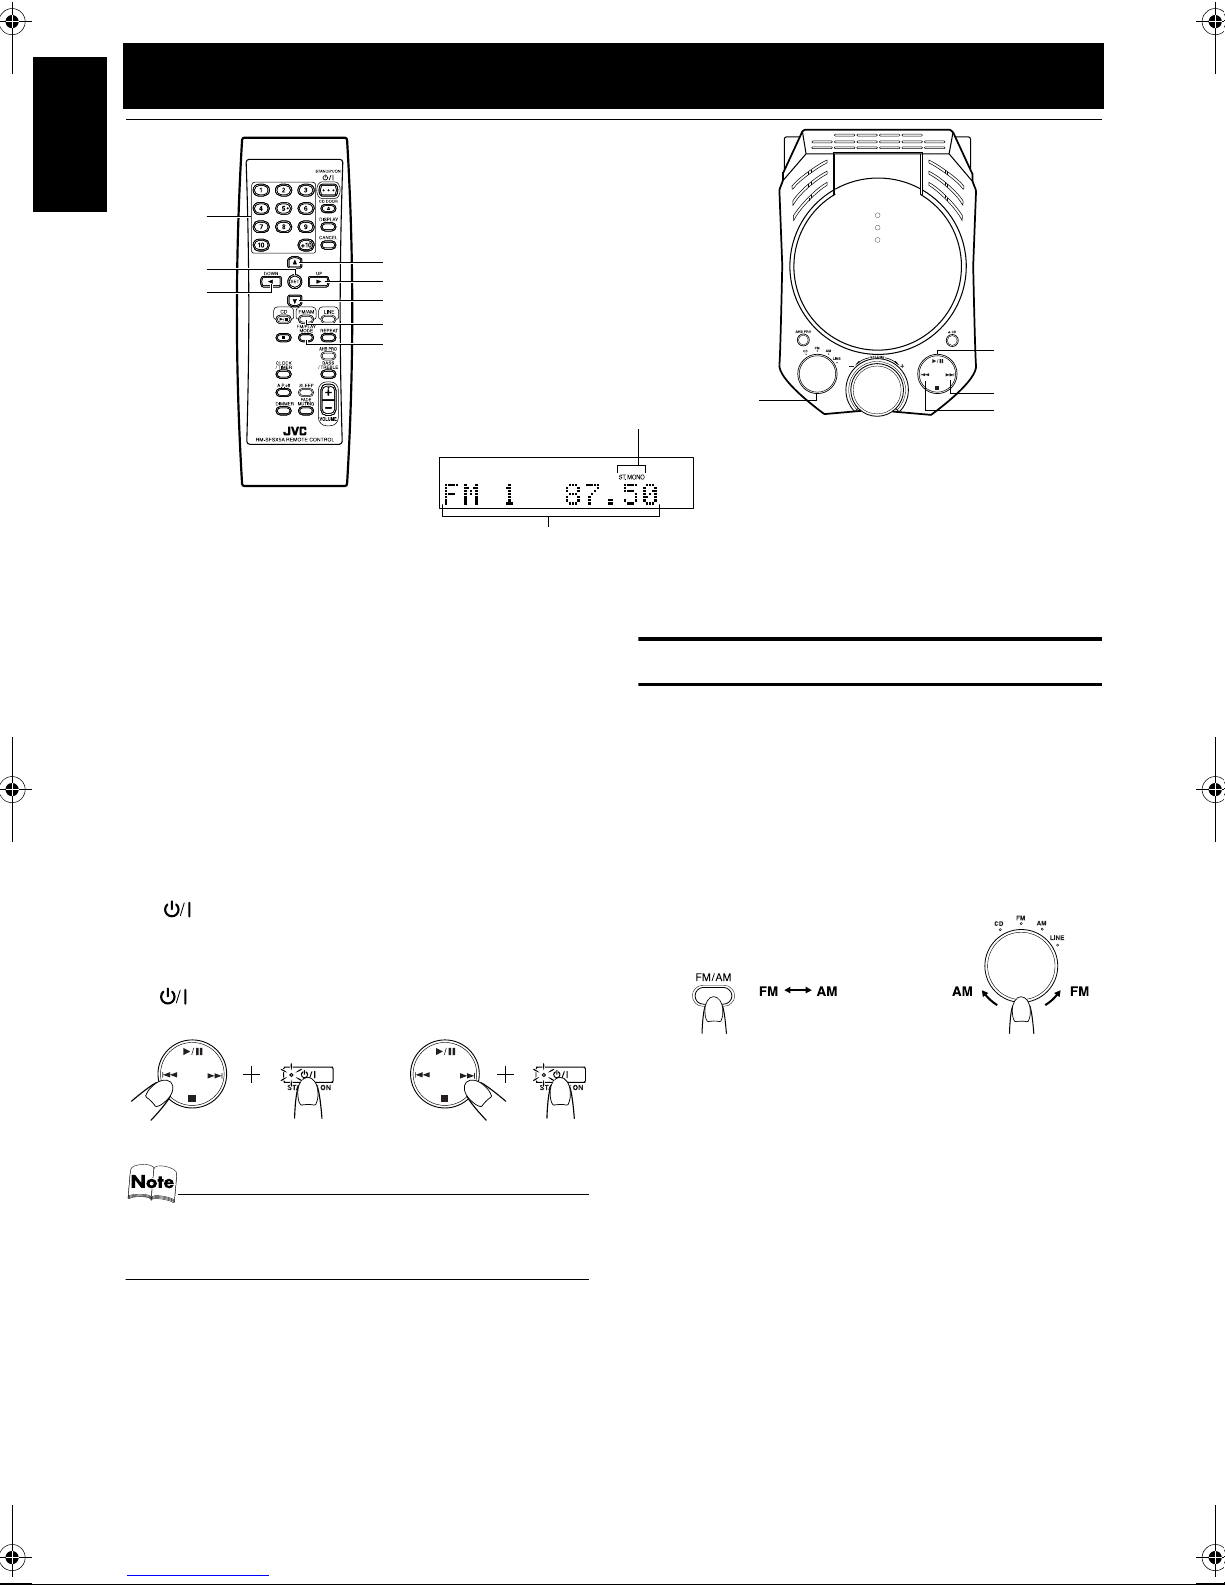
Tuning In a Station
Press the FM/AM button.
1
The Band and Frequency you were last tuned to appear
on the display.
(If the last station was selected using the preset number,
the preset number appears first.)
Each time you press the button, the band alternates between FM and AM.
• You can also select the band by turning the Source
selector on the Unit.
(On the Remote Control) (On the Unit)
(9 kHz interval)
• When you change the setting, the preset AM stations are
erased. You will need to preset the station again. (See
page 14.)
One Touch Radio
Just press the FM/AM button on the Remote Control to turn
on the System and start playing the station you were last
tuned to.
❑ You can switch from any other sound source to the radio
by pressing the FM/AM button.
13
(10 kHz interval)
Select a station using one of the follow-
2
ing methods.
● Manual Tuning
Press the ¢ or 4 button on the Unit or the
button on the Remote Control repeatedly to move
∞
from frequency to frequency until you find the station
you want.
OR
● Auto Tuning
If you press and hold the ¢ or 4 button on the
Unit or the
for one second or more, the frequency changes up, or
down, automatically until a station is found.
5
or
button on the Remote Control
∞
OR
5
or
Page 17
Using the Tuner
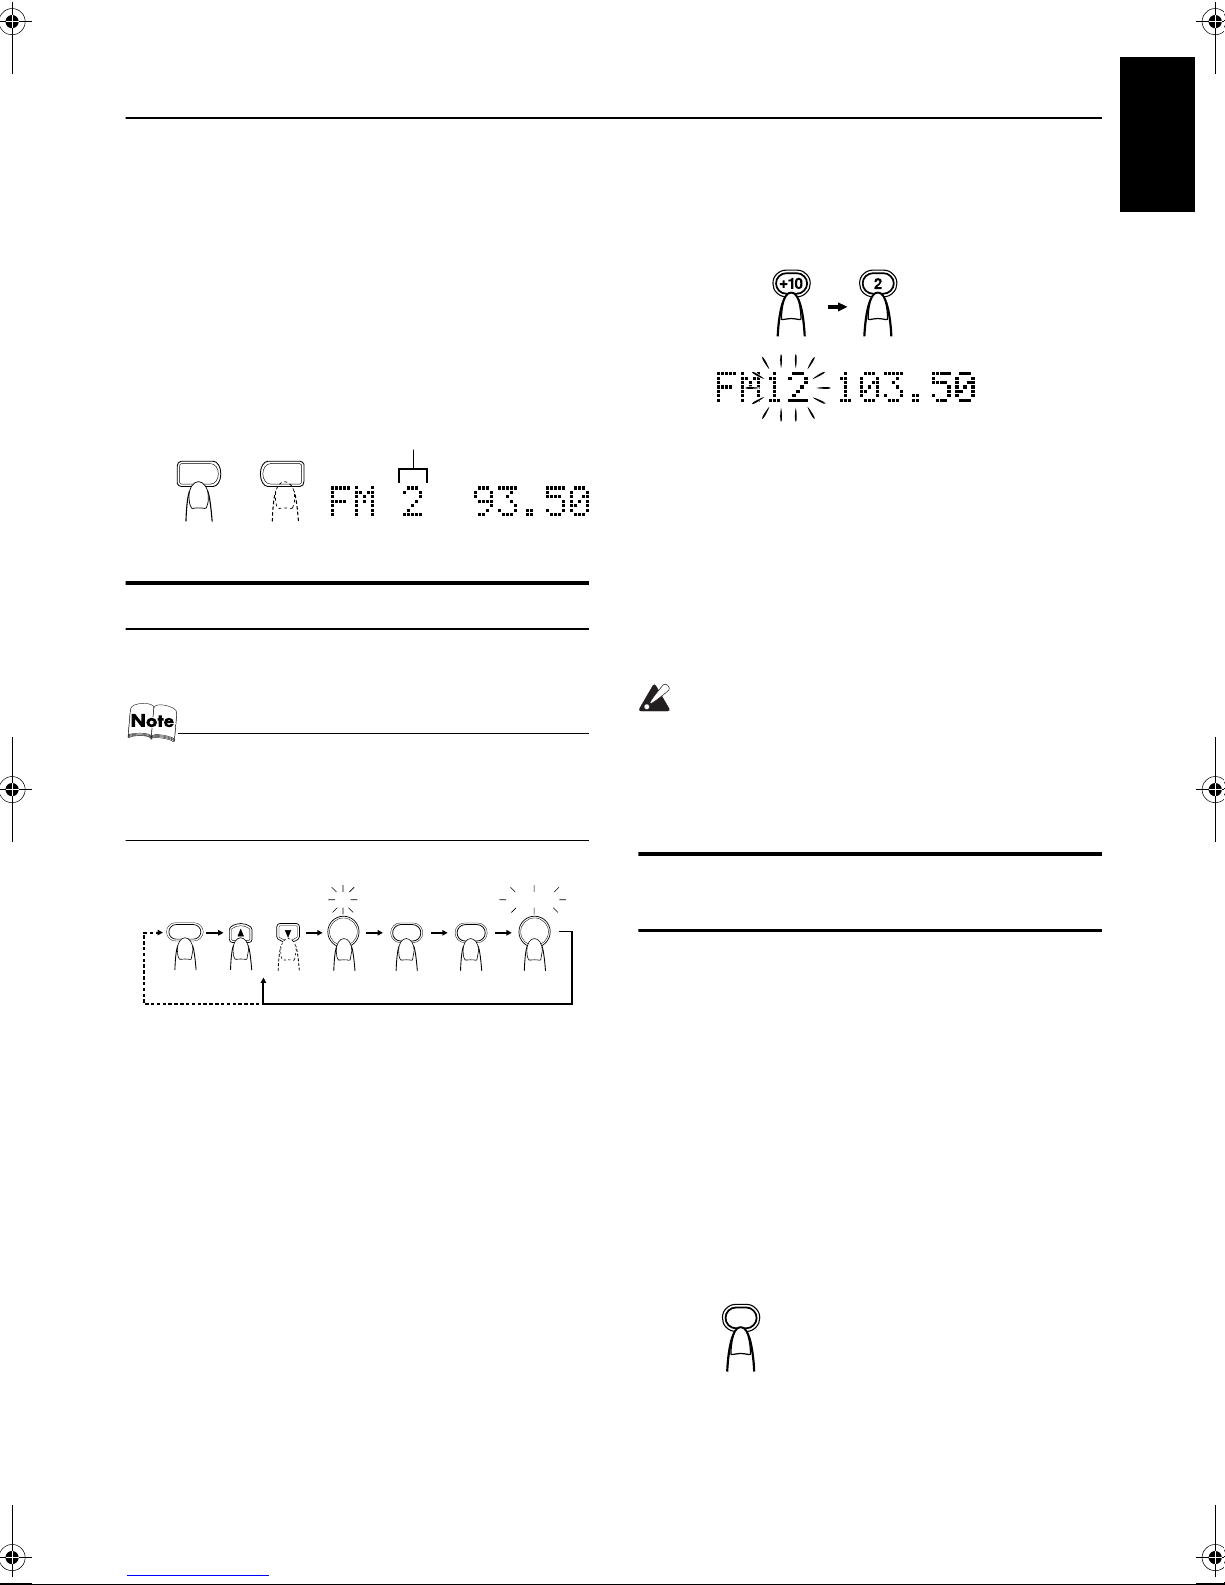
● Preset Tuning using the Remote Control
(Possible only after presetting stations)
Select the desired preset number using the
button on the Remote Control. The display will show
the preset number’s band and frequency.
• You can also select the desired preset number
using the Numeric Keys. See “Entering the
Number with the Remote Control” on page 12.
(e.g. Press +10, and then 2 for number 12.)
3
or
2
Example:
Press the 3 button until the preset number “2” appears.
UP
3
DOWN
3
or
Preset number
Presetting Stations
You can preset up to 30 FM stations and up to 15 AM stations.
• Preset numbers may have been set to factory test frequencies prior to shipment. This is not a malfunction. You
can preset the stations you want into memory by following
one of the presetting methods below.
Press the Numeric Keys, or the 3 or 2
4
button within 5 seconds to select the
preset number.
Example:
Press the SET button within 5 seconds.
5
“STORED” appears and after 2 seconds, the display returns to the broadcast frequency display.
Repeat above steps 1 to 5 for each sta-
6
tion you want to store in memory with a
preset number.
To change the preset stations, repeat the same
steps as above.
CAUTION:
• Even if the system is unplugged or if the
power failure occurs, the preset stations
will be stored for about 24 hours. However,
in case the preset stations are erased, you
will need to preset the stations again.
English
FM / AM
or
When changing the Band
1 STORED
SET
+10
FM = 30, AM = 15
2
On the Remote Control
Select a band by pressing the FM/AM
1
button.
Press the 5 or ∞ button to tune in a sta-
2
tion.
Press the SET button.
3
Preset number “1” will blink for 5 seconds.
Within 5 seconds, proceed to the next step.
When the display returns to the one set in step 2 after 5
seconds, press the SET button again.
SET
To Change the FM Reception
Mode
When you are tuned into an FM stereo broadcast, the “ST.”
indicator lights up and you can hear stereo effects.
If an FM stereo broadcast is hard to receive or noisy, you
can select Monaural mode. Reception improves, but you
lose stereo effect.
FM AUTO mode is also useful to suppress static noise between stations.
To enter Monaural mode while receiving an FM
broadcast, press the FM/PLAY MODE button on the Re-
mote Control until “FM MONO” appears on the display. Then,
the “MONO” indicator lights up.
Each time you press the FM/PLAY MODE button, the display
alternates between “FM AUTO” and “FM MONO”.
FM/ PLAY
MODE
FM AUTO Ô FM MONO
To restore the stereo effect, press the FM/PLAY
MODE button on the Remote Control until “FM AUTO” appears on the display. Then, the “MONO” indicator goes out
and the “ST.” indicator will light up.
14
Page 18
Using the Tuner
Beat Cut (AM Reception)
English
Switching the Beat Cut mode may reduce beat noise.
Each time you press the FM/PLAY MODE button while receiving an AM broadcast, the Beat Cut mode changes as follows.
BEAT CUT 1
BEAT CUT 4
BEAT CUT 2 = BEAT CUT 3 =
=
(back to the beginning)
=
FM/ PLAY
MODE
Set to the position where beat noise is small.
• The best position will differ depending on the AM
broadcast station being received.
• In AM broadcast, reception sensitivity will be changed by
turning the AM loop antenna. Turn the AM loop antenna
for best reception.
15
Page 19
Using the CD Player
Numeric
Keys
SET
2
CD 6
7
CD DOOR 0
CANCEL
5
3
∞
REPEAT
FM/PLAY MODE
English
CD door
0 CD
6
Disc
indicator
Repeat indicator
Play mode
indicator
* When the System is in use, the display shows other items as well.
For simplicity, we show here only the items described in this section.
You can use Normal, Random, Program or Repeat Play. Repeat Play can repeat all the tracks or just one of the tracks
on the CD.
Here are the basic things you need to know to play a CD and
locate the different tracks on it.
This Unit has been designed only to playback the following CDs.
• Digital audio CD
• Recordable digital audio CD (CD-R)
• Rewritable digital audio CD (CD-RW)
When playing a CD-R or CD-RW
You can play back finalized CD-R or CD-RW recorded
music CD format. (If CD-RW have been recorded in a
different format, erase all the data on CD-RW completely before recording on the disc.)
❑ You can play back CD-R or CD-RW like CD.
❑ Some CD-R or CD-RW may not be played back on
this Unit because of their disc characteristics, damage
or stain on them, or if the player lens is dirty.
❑ The reflection factor of CD-RW is lower than that of
other CD, possibly causing CD-RW to take longer to
read.
❑ CD-R and CD-RW of MP3 format are not played
back.
The Quickest Way To Start a CD Is With the One
Touch Operation
❑ Press the CD 6 button on the Remote Control.
• The power is automatically turned on and, if a CD is
already inserted, it will start playing from the first track.
• If no CD is inserted, “CD NO DISC” appears on the display and the CD Player remains in Stop mode.
Source
selector
4
¢
7
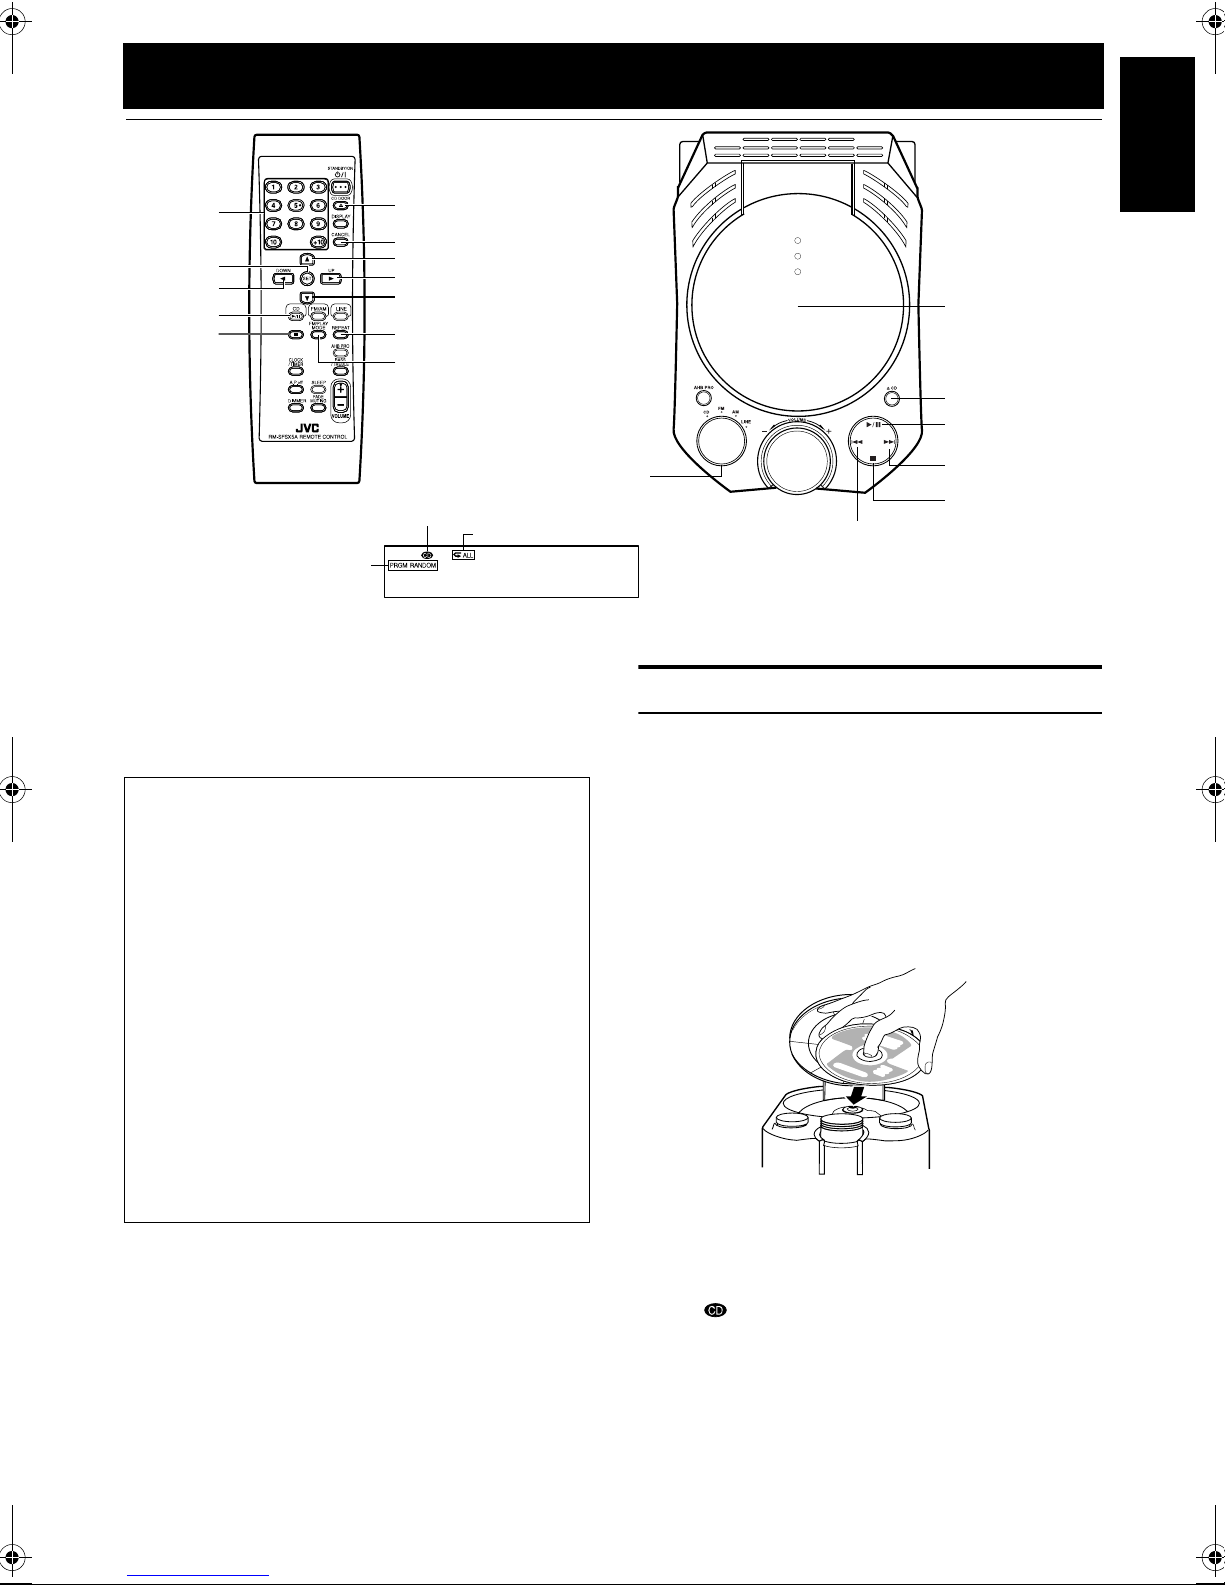
To Insert a CD
Select the source “CD” using the
1
Source selector on the Unit.
Press the 0CD button on the Unit or
2
0
the CD DOOR
Control.
The CD door opens.
Place a CD, with its label side up as
3
shown below. Press down on the CD’s
center until you hear a click.
Press the 0 CD button on the Unit or the
4
CD DOOR
0
trol again to close the CD door.
“CD DOOR CLOSE” appears and then, “CD READING” appears on the display. At that time, Disc indicator ( ) will also be lit on the display.
• To close the CD door and play the CD, you can just
press the
ton on the Remote Control.
❑ You can place an 8 cm CD without an adaptor.
❑ If the CD cannot be read correctly (because it is scratch-
ed, for example), “CD CAN’T PLAY” appears on the
display.
6
button on the Remote
button on the Remote Con-
button on the Unit or the CD 6 but-
16
Page 20
Using the CD Player
❑ You can insert a CD while listening to the other source.
English
• However, while the CD door is operating (opening or
closing), the other source will be muted.
CAUTION:
• DO NOT try to open or close the CD door by
hands as it will be damaged.
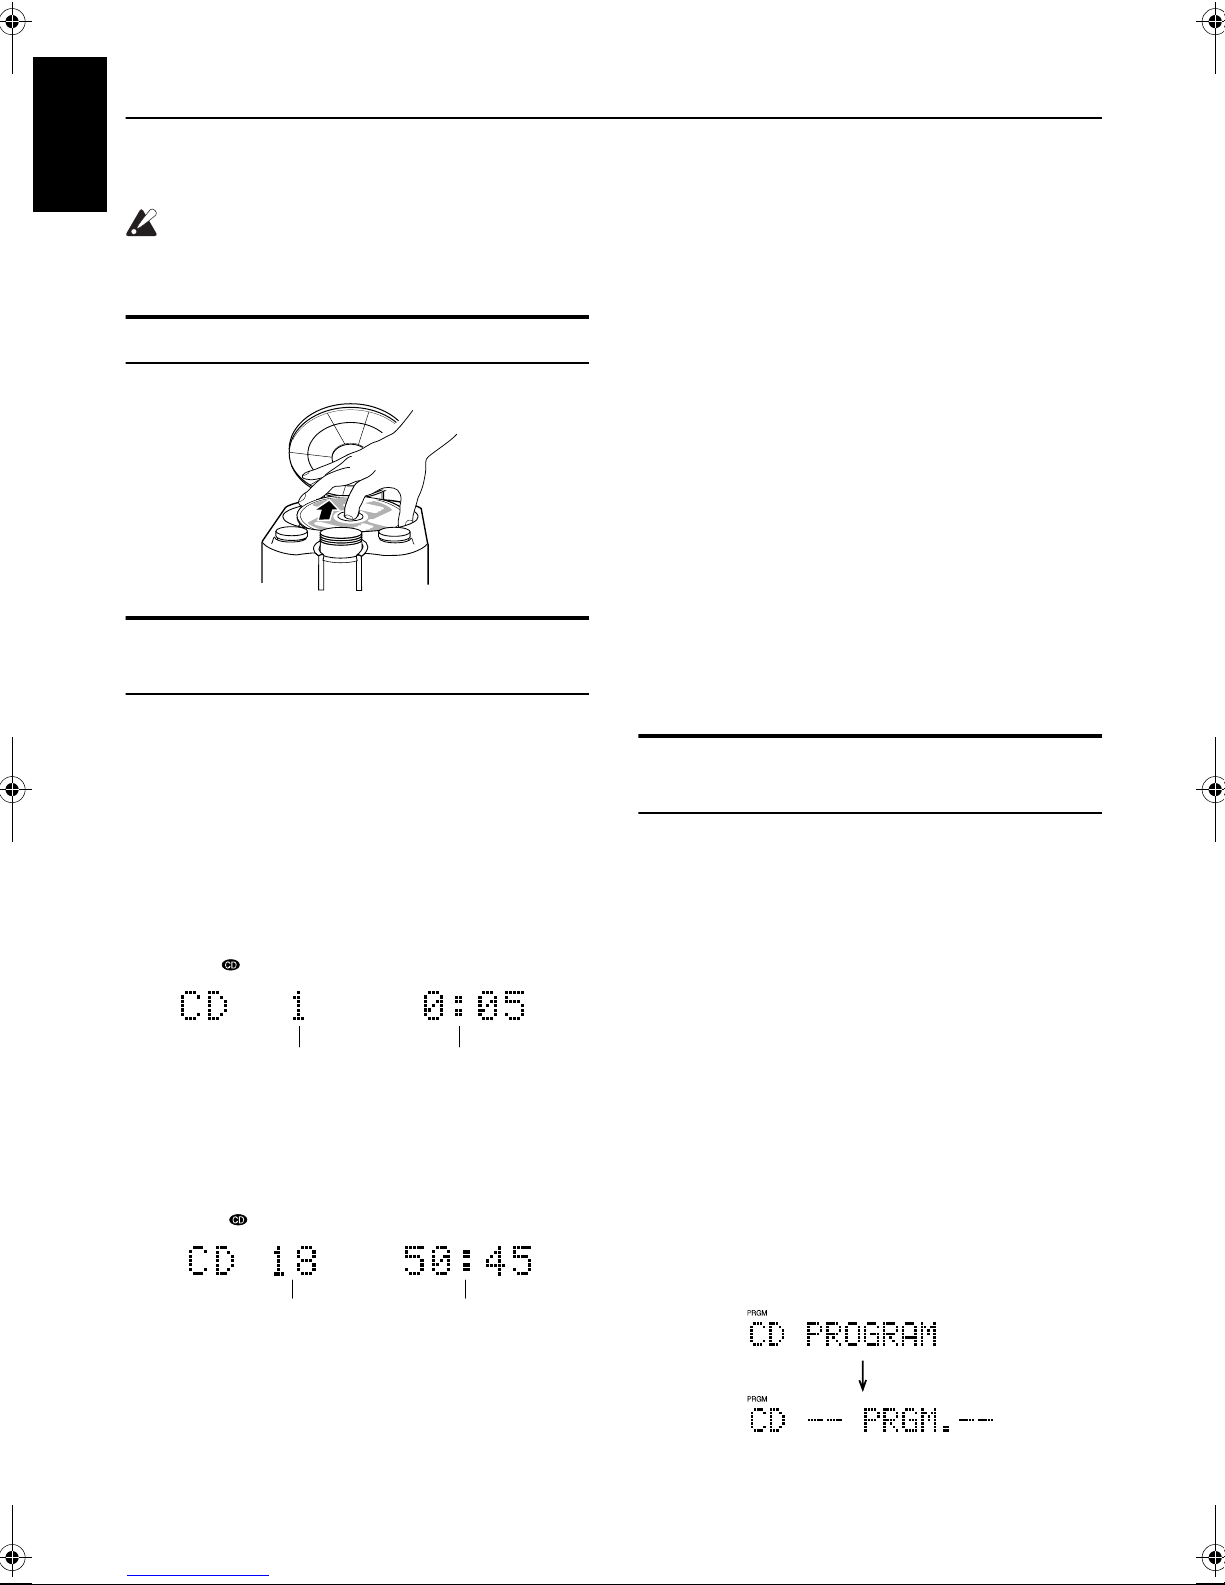
To Unload a CD
Take out the CD as shown below.
Basics of Using the CD Player
– Normal Play
To Play a CD
Select the source “CD”.
1
Insert a CD.
2
Press the 6 button on the Unit or the
3
6
CD
The first track of the CD begins playing.
button on the Remote Control.
To Select a Track or Passage within a Track
During playback
Press the ¢ or 4 button on the Unit or the 3 or 2 button on the Remote Control to select the track you want.
• The selected track starts playing.
• Press the ¢ (or 3) button once to skip to the
beginning of the next track.
• Press the 4 (or 2) button to skip to the beginning
of the track being played. Press twice quickly to skip
to the beginning of the previous track.
• When the 3 or 2 button on the Remote Control is
kept pressing, the track continuously skips.
• Press the Numeric Keys to select truck number (See
page 12).
In Stop mode
• Press the ¢ or 4 (or 3 or 2) button to skip the
track.
• Hold down the ¢ or 4 (or 3 or 2 ) button to
continuously skip the tracks.
Search Play
Holding down the ¢ or 4 button on the Unit or the 5
or ∞ button on the Remote Control, during playback, will
fast forward/backwards the CD so you can quickly find a
particular passage in the track you are listening to.
Programming the Playing Order
of the Tracks – Program Play
You can program up to 32 tracks in any desired order including the same tracks.
❑ You can only make a program when the CD Player is
stopped.
On the Remote Control
Track number Playback time
• The CD Player automatically stops when the last
track of the CD has finished playing.
To stop playing the CD, press the 7 button.
The following information for the CD is displayed.
Total track number Total playback time
To stop playing and remove the CD, press the 0CD
button on the Unit or the CD DOOR 0 button on the Remote Control to open the CD door.
To pause, press the
button on the Remote Control. The playback time blinks on
the display.
To cancel pause, press the same button again. Play continues from the point where it was paused.
button on the Unit or the CD 6
6
17
Insert a CD.
1
Press the CD 6 button.
2
Press the 7 button to stop the CD.
3
Press the FM/PLAY MODE button until
4
“CD PROGRAM” appears.
The System enters the Program Play mode and the
“PRGM” indicator lights up.
Each time you press the button, the play mode changes
as follows.
CD PROGRAM=CD RANDOM=CD NORMAL=
(back to the beginning)
(After a few seconds)
• If already programmed, the track number and preset
number of the last programmed track will appear.
Page 21

Press the Numeric Keys to enter the
5
track number you want to program (See
page 12).
The program order number will be assigned from “1”, if
nothing is programmed yet.
Example:
Track number
Total playback time of the programmed tracks
• To delete the last entry, press the CANCEL button.
Program order number
(After a few seconds)
Using the CD Player
English
• If the total playback time of the programmed tracks exceeds 1 hour and 40 minutes, “--:--” will appear on the display.
• If you try to program the 33rd track, “MEMORY FULL” appears on the display for about 2 seconds.
To Modify the Program
Modify the contents of the program while the CD Player is
stopped.
Each time you press the CANCEL button, the last track in
the program is deleted. To add new tracks to the end of the
program, repeat above step 5.
Random Play
Repeat step 5 to program the other
6
tracks.
You can see the total playback time of programmed
tracks on the display.
Press the CD
7
The System plays the tracks in the order you have programmed them.
The CD will stop when all of the programmed tracks
have been finished playing.
• You can also press the 6 button on the Unit.
❑ You can skip to a particular program track by pressing the
or 2 button on the Remote Control or the ¢ or 4
3
button on the Unit during Program Play.
❑ You can perform search play by holding down the ¢ or
4 button on the Unit or the 5 or ∞ button on the Re-
mote Control during playback.
❑ To stop playing, press the 7 button once.
To confirm the programmed tracks while the CD
player is stopped, each time you press the 3 or 2 but-
ton, the tracks making up the program will successively be
displayed in the programmed order.
To delete all the tracks in the program, in Stop mode,
hold down the CANCEL button until “ALL CLEAR!” appears on the display.
Opening the CD door or turning off the System will clear
the programmed tracks and release the Program Play mode.
To exit the Program Play mode once, while the CD
Player is stopped, Press the FM/PLAY MODE button until
“CD NORMAL” appears on the display. (The “PRGM” indicator goes out.)
To re-enter the Program Play mode, press the FM/
PLAY MODE button until “CD PROGRAM” appears on
the display. (The “PRGM” indicator lights up.)
6
button.
The tracks will play in no special order when you use this
mode.
In Stop mode, press the FM/PLAY MODE
1
button on the Remote Control until “CD
RANDOM” appears.
The “RANDOM” indicator lights up on the display.
Each time you press the button, the play mode changes
as follows.
CD PROGRAM =CD RANDOM =CD NORMAL
=(back to the beginning)
Press the CD 6 button on the Remote
2
Control.
The tracks are played in random order.
The CD will stop when all the tracks have been finished
playing.
• You can also press the 6 button on the Unit.
To skip a track during playback, press the ¢ (or 3)
button to jump to the next track in the random sequence.
Press the 4 (or
track being played.
To perform search play during playback, hold down
the ¢ (or 5) or the 4 (or ∞) button.
To exit the Random Play mode, while the CD Player
is stopped, press the FM/PLAY MODE button until “CD
NORMAL” appears on the display. (The “RANDOM” indicator goes out.)
) button to jump back to the start of a
2
18
Page 22

Using the CD Player
Repeating Tracks
English
You can repeat all tracks or individual track, as many times
as you like.
During playback or in Stop mode, press the REPEAT button on the Remote Control.
Each time you press the button, the Repeat mode and Repeat indicator change as follows.
CD REPEAT ALL ( ALL) =CD REPEAT 1 ( )
=CD REPEAT OFF =(back to the beginning)
ALL: In Normal Play mode, repeats all the tracks.
In Program Play mode, repeats all the tracks
in the program.
In Random Play mode, repeats all the tracks
in random order.
: Repeats one track.
To exit the Repeat mode, press the REPEAT button until “CD REPEAT OFF” appears and the Repeat indicator on
the display goes out.
❑ Repeat mode remains in effect even when you change the
play mode.
CD DOOR LOCK
You can prevent unwanted CD ejection by locking the CD
door. The CD Player works normally except CD ejection
operation.
Locking the CD door
Turn off the system.
1
While pressing down the 7 button on
2
0
the Unit, press the
CD button on the
Unit.
“DOOR LOCKED” appears on the display.
• If you try to open the CD door, “DOOR LOCKED”
appears on the display to let you know that the CD
door has been locked.
Unlocking the CD door
Repeat above steps 1 and 2.
“DOOR UNLOCKED” appears on the display.
Now, you can open the CD door normally.
• Even after the System is unplugged, the CD door lock
condition will be retained for about 24 hours. To unlock the
CD door after powering up, you need to perform the unlocking operation.
19
Page 23

Using External Equipments
SET
2
3
LINE
Source
selector
English
Listening to External
Equipment
You can listen to the external equipment such as MD recorder, tape deck or other auxiliary.
❑ First make sure that the external equipment is properly
connected to the System. (See page 8).
Set the VOLUME control to the mini-
1
mum position.
Press the LINE button on the Remote
2
Control.
“LINE” will appear on the display.
• You can also select “LINE” using the Source selector
on the Unit.
Start playing the external equipment.
3
Adjust the VOLUME control to the
4
desired listening level.
Apply the following sound effects, if you
5
wish.
• AHB PRO (See page 11.)
• Tone (BASS/TREBLE) (See page 12.)
To exit the source “LINE”, select other source (e.g.
CD).
Changing the Equipment’s Name
You can change the equipment’s name according to the
equipment to be used. (At purchase, “LINE” is selected.)
On the Remote Control
Press the LINE button to select the
1
source “LINE”.
Press the LINE button for two seconds
2
or more.
“NAME CHANGE” blinks on the display.
While “NAME CHANGE” is blinking,
3
press the SET button.
Press the 3 or 2 button repeatedly to
4
select the desired name.
Each time you press the button, the equipment name
changes as follows.
LINE Ô TAPE Ô DBS Ô VCR Ô TVÔ
GAME Ô (back to the beginning)
DBS (Direct Broadcasting Satellite): For CS/BS
Press the SET button
5
The current name is replaced with new one.
(When TAPE is selected)
• For operation of the external equipment, refer to its Instructions.
• The selected name will appear on the display when you
select the source “LINE”.
20
Page 24

Using External Equipments
Recording the System’s Source
English
to External Equipment
You can record the System’s source to external equipment
which is connected to the LINE OUT or OPTICAL DIGITAL OUT terminal of the System, such as tape deck or MD
recorder, etc.
❑ First make sure that the external equipment is properly
connected to the System. (See page 8 to 9).
❑ When recording a FM or AM program, use the LINE
OUT terminal (not the OPTICAL DIGITAL OUT terminal).
Play the System’s CD Player or tune in
1
to a station.
❑ The recording level is not affected by the VOLUME level
set by the System. Also it is not affected by the sound effects.
• For operation of the external equipment, refer to its Instructions.
Adjusting the Input Level
If the sound from the component connected to the LINE IN
jacks is too loud or is not loud enough when changing the
source to the external component (without adjusting the
volume level), you can change the input level through the
LINE IN jacks.
On the Remote Control
When the source is “LINE”, press and
1
hold the SET button.
• If you have changed the source name of the external
component, the currently selected source will appear
(see page 20).
Press the 3 or 2 button to select an
2
appropriate input level.
• Each time you press the button, the input level alternate between “INPUT LEVEL1” and “INPUT
LEVEL2”.
INPUT LEVEL1: Select this when the sound is not loud
enough.
INPUT LEVEL2: Select this when the sound is too loud.
Press the SET button to finish the
3
adjustment.
•“LEVEL2 STORED” appears on the display.
• The selected input level will be kept in memory until
you change it.
The input level is too high.
• Select “INPUT LEVEL2” if the current level is “INPUT
LEVEL1”.
• If the current level is “INPUT LEVEL2”, adjust the output
level on the external component.
21
Page 25

Using the Timers
STANDBY/ON
CANCEL
SET
32
CLOCK/TIMER
SLEEP
DAILY indicator
Clock indicator
SLEEP indicator
* When the System is in use, the display shows other items as well.
For simplicity, we show here only the items described in this section.
English
The timers let you control listening functions automatically.
Two types of timers are available:
DAILY Timer
Use this timer to set wake up everyday to music from
any source, including melodies.
SLEEP Timer
Fall asleep and have your System turn off automatically
after a certain length of time.
Setting the Clock
When you plug the AC power cord into the wall outlet, the
time indication “0:00” and the Clock indicator ( ) blink
on the display in standby (System off) mode.
You can set the clock whether the System is on or off (but
not in power saving mode (See page 11)).
• The clock must be correctly set for the timers to work.
• The clock may gain or lose one to two minutes per month.
On the Remote Control
Press the CLOCK/TIMER button.
1
The hour digit of the time indication blinks on the display, also, the Clock indicator ( ) blinks.
• If the clock is already set and the Clock indicator ( ) is
not blinking, press the CLOCK/TIMER button repeatedly
until the clock setting display appears on the display.
Each time you press the CLOCK/TIMER button, the display changes as follows.
DAILY ON?/DAILY OFF?
display*
*: Select this item!
Press the 3 or 2 button to set the hour.
2
Pressing the 3 button moves the time forwards and
pressing the 2 button moves it backwards. Holding
down the button moves the hour.
Cancelled = (back to the beginning)
=
ON (time) = Clock setting
=
22
Page 26

Using the Timers
English
The minute digits of the time indication blink on the display.
• To return to the hour setting, press the CANCEL
button.
Press the 3 or 2 button to set the minute.
4
Press the SET button.
5
“ADJUST OK!” appears on the display. The Clock indicator ( ) remains lit. Then, the selected time is set
and the seconds start counting from 0.
Press the SET button.
3
CAUTION:
• If there is a power failure, the clock loses its
setting. “0:00” and the Clock indicator ()
blinks on the display and the clock must be
reset.
Showing the Clock (DISPLAY)
You can show the current time on the display.
To display the clock, press the DISPLAY button on the
Remote Control.
To return to the normal display, press the same button
again.
Correcting the Clock
Example:
Alternates
(clock)
Display the source
(clock is canceled)
Perform steps 2 to 5 in “Setting the Clo-
2
ck” on page 22-23.
• When the System is in power saving mode, nothing appears on the display. To see the clock, press the DIMMER
button on the Remote Control.
• The clock may gain or lose one to two minutes per month.
• If there is a power failure, the clock loses its setting, “0:00”
blinks on the display and the clock must be reset. To reset
the clock, see “Setting the Clock” on page 22-23.
Use the following method to correct any clock shift.
❑ You can correct the clock whether the System is turned
on or off.
Repeatedly press the CLOCK/TIMER bu-
1
tton to show the clock on the display.
Each time you press the button, the display changes as
follows.
Setting the Daily Timer
Once you have set the Daily Timer, the timer will be activated at the same time every day.
The “DAILY” indicator on the display shows that the Daily
Timer you have set is in effect.
You can set the Daily Timer whether the System is on or off
(but not in power saving mode (See page 11)).
• If you have made a mistake while setting the timer, press
the CANCEL button on the Remote Control. However, this
does not always cancel the current setting. If the CANCEL
button does not work, press the CLOCK/TIMER button on
the Remote Control repeatedly until the display returns to
the original display, and start from the first step.
23
Page 27

Using the Timers
On the Remote Control
Press the CLOCK/TIMER button repeat-
1
edly until “ON (time)” appears on the
display.
At this time, “DAILY” indicator blinks on the display.
Each time you press the button, the display changes as
follows.
DAILY ON?/DAILY OFF? = ON (time)* = Clock
setting display = Cancelled = (back to the beginning)
*: Select this item!
The System enters ON-time setting mode, and the current ON time appears on the display and the hour digits
blink.
Setting the ON time (Example: 10:15)
2
1. Press the 3 or 2 button to set the hour you want the
System to come on, then press the SET button.
The minute digits of the ON time blink on the display.
Pressing the 3 button moves the time forwards and
pressing the 2 button moves it backwards.
Holding down the button moves the time.
2. Press the 3 or 2 button to set the minute, then press
the SET button.
The System enters OFF-time setting mode, and the
hour digits blink.
Setting the OFF time (Example: 13:30).
3
Note that the same time as the ON time cannot be set.
1. Press the 3 or 2 button to set the hour you want the
System to be turned off, then press the SET button.
The minute digits of the OFF time blink on the dis-
play.
2. Press the 3 or 2 button to set the minute, then press
the SET button.
The System enter the Music Source Selecting mode
and “FM?” appears on the display.
Selecting the music source.
4
Press the 3 or 2 button to select the music source you
want to listen to, then press the SET button.
Each time you press the 3 or 2 button, the display
changes as shown below:
FM?
.
Ô
*: If the name has been changed, that name (e.g.
“TAPE”) will appear. (See page 20.)
According to the music source you have selected, the
next operation differs.
FM? : Tunes in to the specified preset FM sta-
AM? : Tunes in to the specified preset AM sta-
CD? : Plays the specified track on the speci-
LINE? : Plays an external source.
MELODY? : Select one of 10 melodies.
Preparation for each music source:
Perform the following operation according to the music
source you have selected. Then, the System enters Volume Setting mode.
● When selecting “FM?” or “AM?”
● When selecting “CD?”
● When selecting “LINE?”
● When selecting “MELODY?”
AM? Ô CD? Ô LINE?*
Ô
(back to the beginning)
tion.
tion.
fied CD.
Press the 3 or 2 button to select the preset station
number, then press the SET button.
• If you select the display “- -”, the current broadcast station is selected.
Press the 3 or 2 button to select the track number
you want to start playback, then press the SET button.
• If you select the display “- -”, playback will start
from the first track.
Prepare the external equipment so that it will turn on
at the ON time set by the System.
To allow this, the equipment should have the timer
function.
Press the 3 or 2 button to select one of melodies
(MELODY 1-10). Then, the selected melody is
played back.
Ô
MELODY?
English
24
Page 28

Using the Timers
English
Press the 3 or 2 button to select the volume level
(VOLUME 1-50), then press the SET button.
Select the FADE function.
6
Press the 3 or 2 button to select either “FADE” (fades
in at power on) or “NoFADE” (does not fade in).
Press the SET button.
7
The timer setting is completed, and the “DAILY” indicator stops blinking and remains lit. Each setting you
have made appears on the display in the order of ON
time, OFF time, music source, volume and fading.
Then, the display returns to the display before you set
the timer.
Press the STANDBY/ON button to
8
Setting the volume level.
5
turn off the System.
The Clock indicator ( ) and “DAILY” indicator are lit
on the display, showing that the Daily Timer is set to on.
To change the timer setting, repeat the setting procedure from the beginning.
When the timer ON-time comes:
The following operation will be automatically repeated everyday.
• When the timer ON-time comes, the System automatically turns on. The “DAILY” indicator blinks, and then
“DAILY TIMER” and “TIMER STANDBY” alternate
for a while. After that, the music source you have set is
played. The “DAILY” indicator blinks during timer
operation. In the case of MELODY, it’s title scrolls on
the display.
• When the timer OFF-time comes, “DAILY TIMER” and
“OFF” alternate for a while. Then, the System automati-
cally turns off and the “DAILY” indicator remains lit.
Selectable Melodies
When you select the melody as the source in step 4, you can
use one of the following melodies.
MELODY 1:Twinkle Twinkle Little Star (by W.A.Mozart)
MELODY 2:Grandfather’s Clock (by H.C.Work)
MELODY 3:Csikos Post (by H.Necke)
MELODY 4:Farewell Song (by La chambre de Chopin)
MELODY 5:Canon (by J.Pachelbel)
MELODY 6:Menuett (by J.S.Bach)
MELODY 7:Humoresk (by A.Dvorak)
MELODY 8:Serenade (by J.Haydn)
MELODY 9:Jesus,Joy Of Man’s Desiring (by J.S.Bach)
MELODY10:Ravel’s Bolero (by Ravel)
• When you select the melody as the source, only the title
of the selected melody will appear on the display.
• When a melody is set for the Daily Timer while playing
back the CD, the CD will stop playing.
• In step 4, the selected melody will be played back for your
reference. However, if the melody is selected with the System turned off, no melody will be heard.
• During setting the melody, the source cannot be selected
with the Source selector on the Unit or the source select
button on the Remote Control.
• If the system is already on when the timer ON-time comes,
the Daily Timer does not work.
Turning the Daily Timer On and Off
Once you have set the Daily Timer, it is stored in memory.
So, the Daily Timer will be activated at the same time every
day until it is canceled.
To cancel the Daily Timer temporarily:
On the Remote Control
Press the CLOCK/TIMER button repeat-
1
edly until the “DAILY ON?/DAILY OFF?”
appears on the display.
The “DAILY” indicator blinks on the display.
Press the CANCEL button.
2
“DAILY OFF” appears and the “DAILY” indicator
goes out.
To activate the canceled Daily Timer:
On the Remote Control
Press the CLOCK/TIMER button repeat-
1
edly until the “DAILY ON?/DAILY OFF?”
appears on the display.
The “DAILY” indicator blinks on the display.
Press the SET button.
2
The “DAILY” indicator remains lit. Each setting already made appears on the display in the order of ON
time, OFF time, music source, volume, and fading.
Then the display returns to the original display.
•“DAILY TIMER/NO SET” appears on the display
before you enter the timer setting.
CAUTION:
• If the System is unplugged, or a power failure occurs, the timer setting will be lost.
You will need to reset the clock first, then
the timer.
25
Page 29

Using the Timers
Setting the SLEEP Timer
Use the Sleep Timer to turn the System off after a certain
number of minutes when it is playing. By setting the Sleep
Timer, you can fall asleep to music and know that your System will turn off by itself rather than play all night.
• You can only set the Sleep Timer when the System is on.
On the Remote Control
During playback a source, press the
1
SLEEP button.
The “SLEEP” indicator lights up on the display.
Set the length of time you want the
2
source to play before shutting off.
Each time you press the SLEEP button, the time length
changes as follows:
10 = 20 = 30 = 60 = 90 = 120 = OFF = (back to
the beginning)
Wait for a few seconds.
3
The display returns to the original one. The display is
dimmed (DIMMER 2 mode) and the CD lamp goes out.
The System is now set to turn off after the number of
minutes you have set.
To Confirm the Sleep Time:
When the SLEEP button is pressed, the remaining sleep
time is displayed. Wait until the display returns to the original display.
To Cancel the SLEEP Timer Setting:
Press the SLEEP button on the Remote Control until
“SLEEP OFF” appears and the “SLEEP” indicator goes out
on the display.
• Pressing the CLOCK/TIMER button or turning off the
System also cancels the SLEEP Timer.
Timer Priority
The timer that will turn off earlier has the priority. You will
see the priority from the following examples.
Example 1
Setting
OFF
SLEEP Timer
ON
DAILY Timer
22:00 22:30
Operation
OFF
SLEEP Timer
ON
DAILY Timer
22:00 22:30
Example 2
Setting
SLEEP Timer
ON
DAILY Timer
22:00 22:30 23:00
Operation
OFF
23:00
OFF
OFF
English
• When the SLEEP button is used without setting the clock,
“CLOCK ADJUST!” appears on the display. You need to
set the clock beforehand.
SLEEP Timer
DAILY Timer
ON
22:00
OFF
22:30
26
Page 30

Troubleshooting
• If you are having a problem with your System, check this list for a possible solution before calling for service.
• If you cannot solve the problem from the hints given here “ERROR!” appears on the display, or the System has been phys-
English
ically damaged, call a qualified person, such as your dealer, for service.
Symptom Possible Cause Action
No sound is heard. • Connections are incorrect, or loose.
• Headphones are connected.
Poor radio reception • The antenna is disconnected.
Stereo effect is lost in FM broadcast. FM reception mode is changed to “FM
The CD skips. • The CD is dirty or scratched.
The CD does not play. • The CD is upside down.
Unable to operate the Remote Control. • The path between the Remote Con-
Operations are disabled. The built-in microprocessor has mal-
“CD NO DISC” appears. There is no disc loaded. Insert a disc.
“CD CAN’T PLAY” appears. • You are trying to playback a CD
“CD DOOR ERROR” appears. The object is blocking the CD door to
When the CD door is operating (opening or closing) while you are listening
to FM, AM or LINE, the source is muted.
Some of the CD functions, such as skip
or search, do not work correctly.
• The AM Loop Antenna is too close
to the System.
• The FM Wire Antenna is not properly extended and positioned.
MONO”.
• Track Skip marks are recorded.
• Track Skip mark is recorded for the
first track of the disc.
trol and the sensor on the Unit is
blocked.
• The batteries have lost their charge.
functioned due to external electrical interference.
which cannot be played, or there is a
problem with the CD.
• The disc has been inserted with its
label side down.
open.
This is one of the characteristics of this
system.
You are playing an unfinalized disc. This is normal. If you need to use these
• Check all connections and make corrections. (See pages 5 to 9.)
• Disconnect the headphones.
• Reconnect the antenna securely.
• Change the position and direction of
the AM Loop Antenna.
• Extend FM Wire Antenna to the best
reception position.
Press the FM/PLAY MODE button to
select “FM AUTO”. (See page 14)
• Clean or replace the CD.
• This is normal.
• Put the CD in with the label side up.
• Wait until the Unit finds a track with-
out a Track Skip mark.
• Remove the obstruction.
• Replace the batteries.
Unplug the System then plug it back in.
• Change the disc.
• Remove the disc and insert it with
the label side up.
Press the 0 CD button to close the CD
door and remove the object.
This is normal.
functions, finalize the disc. (This Unit
cannot finalize CD-R/CD-RW)
27
Page 31

Care And Maintenance
Handle your CDs carefully, and they will last a long time.
Compact Discs
• Only CDs bearing these marks
can be used with this System.
However, continued use of irregular shape CDs (heart-shape,
octagonal, etc.) can damage the
System.
• Remove the CD from its case by
holding it at the edges while pressing the case’s center hole lightly.
• Do not touch the shiny surface of
the CD, or bend the CD.
• Put the CD back in its case after
use to prevent warping.
• Be careful not to scratch the surface of the CD when placing it
back in the case.
• Avoid exposure to direct sunlight,
temperature extremes, and moisture.
- DO NOT wipe it with a hard cloth.
- DO NOT wipe it strong.
- DO NOT wipe it with thinner or benzine.
- DO NOT apply any volatile substance such as insecticides to it.
- DO NOT allow any rubber or plastic to remain in contact with it for a long time.
Cleaning the Lens
If the lens in the CD pickup is dirty, dropout, etc., could degrade sound.
Open the CD door and clean the lens as shown.
• Use a blower (available from a camera store) to blow
dust off the lens.
Blower
Lens
• If there are fingerprints, etc. on the lens, gently wipe
clean with a cotton swab.
English
• A dirty CD may not play correctly. If a CD does become dirty,
wipe it with a soft cloth in a
straight line from center to edge.
CAUTION:
• Do not use any solvent (for example, conventional record cleaner, spray thinner,
benzine, etc.) to clean a CD.
General Notes
In general, you will have the best performance by keeping
your CDs and the mechanism clean.
• Store CDs in their cases, and keep them in cabinets or on
shelves.
• Keep the System’s CD door closed when not in use.
Cleaning the Unit
• Stains on the Unit
Should be wiped off with a soft cloth. If the Unit is heavily
stained, wipe it with a cloth soaked in water-diluted neutral
detergent and wrung well, then wipe clean with a dry cloth.
• Since the Unit may deteriorate in quality, become
damaged or get its paint peeled off, be careful
about the followings.
Moisture Condensation
Moisture may condense on the lens
inside the System in the following
cases:
• After turning on heating in the
room.
• In a damp room.
• If the System is brought directly
from a cold to a warm place.
Should this occur, the System may
malfunction. In this case, leave the
System turned on for a few hours until the moisture evaporates, unplug
the AC power cord, and then plug it
in again.
28
Page 32

Specifications
CA-FSX1/CA-FSX3
Amplifier
English
Output Power
Input Sensitivity/
Impedance (1 kHz)
LINE IN :210 mV/51 kΩ (LEVEL 1)
Output Sensitivity/
Impedance (1 kHz)
LINE OUT :600 mV/5.1 kΩ
OPTICAL DIGITAL
OUT
Speaker terminals :MIN. 4 Ω
Subwoofer out :220 mV/4.9 kΩ
Phones :16 Ω - 1 kΩ
CD Player
Signal-To-Noise Ratio:95 dB
Wow And Flutter :Unmeasurable
Tuner
FM Tuner
Tuning Range :87.50 MHz - 108.00 MHz
AM Tuner
Tuning Range :531 kHz - 1 710 kHz
Power Specifications
Power Requirements :AC 110 - 230 V , 50/60 Hz
Power Consumption
For 110 V :20 W (power on mode)
For 230 V :22 W (power on mode)
:60 W (30 W + 30 W) at 4 Ω (10% THD)
520 mV/51 kΩ (LEVEL 2)
:–23 dBm - –15 dBm
(at 9 kHz interval space)
:530 kHz - 1 710 kHz
(at 10 kHz interval space)
1.2 W (on Standby: with display off)
4.5 W (on Standby: with display on)
2.0 W (on Standby: with display off)
7.0 W (on Standby: with display on)
Speaker Specifications (each unit)
SP-FSX1
Type :1-Way Bass-reflex type
Speaker :8.0 cm cone
Power Handling
Capacity :30 W
:
Impedance
Frequency Range
Sound Pressure Level :81 dB/W·m
Dimensions
Mass :Approx. 1.3 kg each
SP-FSX3
Type :2-Way Bass-reflex type
Speaker
Woofer :10.0 cm cone
Tweeter :2.0 cm dome
Power Handling
Capacity :30 W
Impedance
Frequency Range :55 Hz - 40 000 Hz
Sound Pressure Level :85 dB/W·m
Dimensions
Mass :Approx. 2.4 kg each
Accessories
4 Ω
55 Hz - 20 000 Hz
:
:114 mm ✕ 176 mm ✕ 174 mm (W/H/D)
:
4 Ω
:147 mm ✕ 246 mm ✕ 210 mm (W/H/D)
FM Wire Antenna (1)
AM Loop Antenna (1)
Remote Control (1)
Batteries (2)
Speaker Cords (2)
AC plug adaptor (1)
✕
1
✕
1
✕
1
Center Unit
Dimensions :
Mass :Approx. 2.3 kg
160 mm ✕ 130 mm ✕ 242 mm (W/H/D)
29
Design and specifications are subject to change without
notice.
Page 33

VICTOR COMPANY OF JAPAN, LIMITED
EN, CS 0403MNMCREJEM
© 2003 VICTOR COMPANY OF JAPAN, LIMITED
Page 34

COMPACT COMPONENT SYSTEM
SISTEMAS DE COMPONENTES COMPACTOS
SISTEMA DE COMPONENTES COMPACTOS
FS-X1/FS-X3
Consists of CA-FSX1 and SP-FSX1, Consists of CA-FSX3 and SP-FSX3
Consiste de CA-FSX1 y SP-FSX1, Consiste de CA-FSX3 y SP-FSX3
Consiste em CA-FSX1 e SP-FSX1, Consiste em CA-FSX3 e SP-FSX3
SP-FSX1 CA-FSX1 SP-FSX1
SP-FSX3 CA-FSX3 SP-FSX3
INSTRUCTIONS
For Customer Use:
MANUAL DE INSTRUCCIONES
INSTRUÇÕES
Enter below the Model No. and Serial No.
which are located either on the rear, bottom or side of the cabinet. Retain this
information for future reference.
Mod el No.
Ser ial No.
LVT1040-010A
[UW]
Page 35

Warnings, Cautions and Others
Avisos, precauciones y otras notas
Advertências, Cuidado e outras notas
CAUTION
To reduce the risk of electrical shocks, fire, etc.:
1. Do not remove screws, covers or cabinet.
2. Do not expose this appliance to rain or moisture.
PRECAUCIÓN
Para reducir riesgos de choques eléctricos, incendio, etc.:
1. No extraiga los tornillos, los cubiertas ni la caja.
2. No exponga este aparato a la lluvia o a la humedad.
CUIDADO
Para reduzir riscos de choques elétricos, incêndio, etc.:
1. Não remova parafusos e tampas ou desmonte a
caixa.
2. Não exponha este aparelho à chuva nem à umidade.
Caution —STANDBY/ON button!
Disconnect the main plug to shut the power off completely. The
STANDBY/ON button in any position does not disconnect the
main line. The power can be remote controlled.
• When the unit is on standby, the STANDBY/ON indicator lights
red.
• When the unit is turned on, the STANDBY/ON indicator
green.
Precaución –– Boton STANDBY/ON !
Desconectar el cable de alimentación para desactivar la alimentación totalmente. Cualquier que sea la posición de ajuste el boton
STANDBY/ON , la alimentación no es cortada completamente. La alimentación puede ser controlada remotamente.
• Cuando la unidad esté en espera, la lámpara STANDBY/ON
estará encendida en rojo.
• Cuando conecta la unidad, la lámpara STANDBY/ON estará
encendida en verde.
Cuidado –– Botão STANDBY/ON !
Desconectar o cabo de alimentação para desligar a alimentação
por completo. Qualquer que seja a posição de ajuste do Botão
STANDBY/ON , a alimentação não é completamente cortada.
A alimentação pode ser controlada remotamente.
• Quando o aparelho estiver em espera, a lâmpada STANDBY/ON
irá acender-se em vermelho.
• Quando o aparelho estiver ligado, a lâmpada STANDBY/ON irá
acender-se em verde.
lights
IMPORTANT FOR LASER PRODUCTS / IMPORTANTE PARA PRODUCTOS
LÁSER / IMPOTANTE PARA PRODUTOS LASER
CLASS 1 LASER PRODUCT
CAUTION
1. Invisible laser radiation when open and interlock failed or
defeated. Avoid direct exposure to beam.
CAUTION
1. Do not open the top cover. There are no user serviceable
parts inside the unit; leave all servicing to qualified service
personnel.
2. Useofcontrolsadjustmentsorperformance of procedures
other than those specified herein may result in hazardous
radiation exposure.
PRODUCTO LASER CLASE 1
PRECAUCIÓN:
1. En el interior hay radiación láser invisible. Evite el contacto
directo con el haz.
PRECAUCIÓN:
1. No abra la tapa superior. En el interior de la unidad no exis-
ten piezas reparables por el usuario; deje todo servicio técnico en manos de personal calificado.
2. El uso de controles, ajustes o la realización de procedimien-
tos distintos a los especificados en este documento podrá
resultar en una peligrosa exposición a radiación.
PRODUTO LASER CLASSE 1
CUIDADO:
1. O laser emite uma rediação invisível que é perigosa, caso o
aparelho esteja aberto e a trava inoperante ou danificada.
Evite exposição direta ao feixe dos raios.
CUIDADO:
1. Não abra a caixa do aparelho. Não existem peças reparáveis
pelo usuário na par te interna da unidade. Solicite assistência
técnica somente a pessoal técnico qualificado.
2. A utilização de controlos, ajustes ou efectuar procedimentos
diferentes dos aqui especificados pode resultar numa
exposição a radiação perigosa.
G-1
Page 36

Caution: Proper Ventilation
To avoid risk of electric shock and fire, and to prevent damage, locate the apparatus as follows:
1 Front: No obstructions and open spacing.
2 Sides/ Top/ Back: No obstructions should be placed in the areas shown by the dimensions below.
3 Bottom: Place on the level surface. Maintain an adequate air path for ventilation by placing on a stand with a height of 10 cm or more.
Precaución: el aparato debe estar bien ventilado
Para evitar posibles riesgos de descargas eléctricas e incendios y prevenir cualquier posible daño, coloque el aparato del modo siguiente:
1 Parte delantera: No ponga nada delante, deje el espacio libre.
2 Laterales/ parte superior/ No se debería colocar nada en las áreas y las distancias que se detallan a continuación.
parte trasera:
3 Parte inferior: Coloque el aparato sobre una superficie recta. Debe haber buena circulación de aire; para ello, coloque el
aparato sobre una base a una altura mínima de 10 cm.
Cuidado: Ventilação adequada
Para evitar riscos de choques elétricos e incêndios, e prevenir avarias, instale o aparelho como segue:
1 Parte frontal: Sem obstruções e espaços abertos.
2 Partes laterais/ tampa/ posterior: Nenhuma obstrução deverá ser colocada entre as áreas cujas dimensões são indicadasabaixo.
3 Parte inferior: Instale-o sobre uma superfície plana. Deverá ser mantido espaço suficiente para a ventilação se este
for instalado numa posição que tenha uma altura de 10 cm ou mais.
Front view
Vista frontal
Visão frontal
15 cm
1 cm
15 cm
1 cm
15 cm
15 cm
15 cm
Side view
Vista lateral
Visão lateral
FS-X1 CA-FSX1
10 cm
CAUTION
■
About the Internal Cooling Fan
This unit includes an internal cooling fan, so as to allow for
high-power operation within a small space.
This fan comes on when the sound level is set high, and may
also come on even at low sound levels if the internal temperature rises. To ensure effective fan operation, please leave at
least 15cm clearance between the rear of the unit and the
wall, and at least 1cm clearance on each side of the unit.
PRECAUCIÓN
■
Sobre el ventilador de refrigeración interno
El equipo incorpora un ventilador de refrigeración interno
para cuando se utiliza a toda potencia.
El ventilador se pone en marcha cuando sube considerablemente el volumen o incluso a volúmenes bajos si la temperatura
del interior aumenta. Para que el funcionamiento del ventilador
sea óptimo, debe dejar al menos 15 cm de distancia entre el
equipo y la pared, y como mínimo 1 cm a cada lado del equipo.
CAUTION
1. Do not block the ventilation openings or holes.
(If the ventilation openings or holes are blocked by a newspaper
or cloth, etc., the heat may not be able to get out.)
2. Do not place any naked flame sources, such as lighted candles,
on the apparatus.
3. When discarding batteries, environmental problems must be
considered and local rules or laws governing the disposal of
these batteries must be followed strictly.
4. Do not expose this apparatus to rain, moisture, dripping or
splashing and that no objects filled with liquids, such as vases,
shall be placed on the apparatus.
PRECAUCIÓN
1. No obstruya las rendijas o los orificios de ventilación.
(Si las rendijas o los orificios de ventilación quedan tapados
con un periódico, un trozo de tela, etc., no se podrá disipar
el calor).
2. No ponga sobre el aparato ninguna llama al descubierto,
como velas encendidas.
3. Cuando tenga que descartar las pilas, tenga en cuenta los
problemas ambientales y observe estrictamente los reglamentos o las leyes locales sobre disposición de las pilas.
4. No exponga este aparato a la lluvia, humedad, goteos o salpicaduras. Tampoco ponga recipientes conteniendo làqqui-
dos, como floreros, encima del aparato.
FS-X3
CA-FSX3
CUIDADO
■
Sistema Interno de Refrigeração
Este aparelho possui um ventilador para refrigeração interna,
que permite seu desempenho de alta-potência dentro de um
espaço reduzido.
O ventilador é ligado automaticamente quando o nível do
som ficar muito alto, mas pode também ser acionado com o
som baixo, caso a temperatura interna venha a subir. Para
assegurar um bom funcionamento do ventilador interno,
deixe a parte de trás de seu aparelho afastada pelo menos
uns 15 cm da parede e mantenha um espaço de no mínimo 1
cm de cada lado do aparelho.
CUIDADO
1. Não tape as aberturas ou os orifícios de ventilação.
(Se tapar as aberturas ou orifícios de ventilação com um
jornal, um pano, etc., o calor não sai).
2. Não coloque objectos com chama, como velas acesas, em
cima do aparelho.
3. Quando se desfizer das baterias, deve ter em consideração os
problemas ambientais e respeitar integralmente os regulamentos e leis locais relativos à forma de deitar fora as baterias.
4. N'exposez pas cet appareil àj la pluie, àj l'humiditàm, àj un
àmgouttement ou àj des àmclaboussures et ne placez pas
des objets remplis de liquide, tels qu'un vase, sur l'appareil.
G-2
Page 37

Introduction
Thank you for purchasing the JVC Compact Component System.
We hope it will be a valued addition to your home, giving you years of enjoyment.
Be sure to read this instruction manual carefully before operating your new stereo system.
In it you will find all the information you need to set up and use the system.
English
If you have a query that is not answered by the manual, please contact your dealer.
Features
Here are some of the things that make your System both powerful and simple to use.
❑ The controls and operations have been redesigned to make them very easy to use, freeing you to
just enjoy the music.
• With JVC’s COMPU PLAY you can turn on the System and automatically start the Radio or
CD Player with a single touch.
❑ The System incorporates AHB (Active Hyper Bass) PRO circuitry to faithfully reproduce low
frequency sound.
❑ A 45-station preset capability (30 FM and 15 AM) in addition to auto-seek and manual tuning.
❑ CD options that include repeat, random and program play.
❑ Timer functions; Daily Timer and Sleep Timer. The Daily Timer can select one of 10 melodies as a source, in addition to
CD, FM, AM and LINE.
❑ You can connect various external units, such as an MD recorder.
❑ The system can play CD-R and CD-RW after they have been finalized.
❑ You can play back your original CD-R or CD-RW recorded in Music CD format. (However they may not be played back
depending on their characteristics or recording conditions.)
How This Manual Is Organized
• Basic information that is the same for many different functions - e.g. setting the volume - is given in the section
‘Basic Operations’, and not repeated under each function.
• The names of buttons/controls and display messages are written in all capital letters: e.g. FM/AM, “CD NO DISC”.
• System functions are written with an initial capital letter only: e.g. Normal Play.
Use the table of contents to look up specific information you require.
We have enjoyed making this manual for you, and hope it serves you in enjoying the many features built into your System.
WARNINGS
• DO NOT PUT ANYTHING ON THE CD DOOR. IF THE SYSTEM IS OPERATED WITH
SOMETHING PUT ON THE CD DOOR, IT WILL BE DAMAGED WHEN YOU TRY TO
OPEN THE CD DOOR.
• NEVER REMOVE THE CD DOOR FROM THE UNIT. SERIOUS INJURY MAY OCCUR IF
THE SYSTEM IS OPERATED WITHOUT THE CD DOOR.
IMPORTANT CAUTIONS
Installation of the System
1
• Select a place which is level, dry and neither too hot nor too cold. (Between 5°C and 35°C)
• Leave sufficient distance between the System and a TV.
• Do not use the System in a place subject to vibrations.
Power cord
2
• Do not handle the power cord with wet hands!
• Some power is always consumed as long as the power cord is connected to the wall outlet.
• When unplugging the System from the wall outlet, always pull the plug, not the power cord.
Malfunctions, etc.
3
• There are no users serviceable parts inside. In case of system failure, unplug the power cord and consult your dealer.
• Do not insert any metallic object into the System.
• Do not insert your hand between the CD door and the main body when the CD door is being closed.
1
Page 38

Table of Contents
Introduction ........................................................................................................1
Features ...................................................................................................................................... 1
How This Manual Is Organized .................................................................................................1
WARNINGS ..............................................................................................................................1
IMPORTANT CAUTIONS ....................................................................................................... 1
Getting Started ...................................................................................................4
Accessories.................................................................................................................................4
How To Put Batteries In the Remote Control ............................................................................4
Using the Remote Control..........................................................................................................4
Connecting the FM Antenna ......................................................................................................5
Connecting the AM Antenna......................................................................................................6
Connecting the Speakers (SP-FSX1/SP-FSX3) .........................................................................7
Removing the Speaker Grills (SP-FSX1)...................................................................................8
Connecting a Powered Subwoofer .............................................................................................8
Connecting an External Equipment............................................................................................8
Connecting an MD Recorder, etc (Optical Digital Output) .......................................................9
COMPU PLAY .......................................................................................................................... 9
Automatic Power On..................................................................................................................9
Basic Operations .............................................................................................10
Turning the Power On and Off.................................................................................................10
Changing the Source ................................................................................................................10
Adjusting the Brightness (DIMMER - at Power On)...............................................................11
Power Saving Mode (DIMMER - at Power Off) .....................................................................11
Adjusting the Volume ..............................................................................................................11
Fade-out Muting (FADE MUTING)........................................................................................11
Reinforcing the Bass Sound (Active Hyper Bass Pro.)............................................................11
Tone Control (BASS/TREBLE)...............................................................................................12
Auto Power Off (A.P.off).........................................................................................................12
Entering the Number with the Remote Control (Numeric Keys).............................................12
Using the Tuner................................................................................................13
Tuning In a Station...................................................................................................................13
Presetting Stations .................................................................................................................... 14
To Change the FM Reception Mode ........................................................................................ 14
Beat Cut (AM Reception) ........................................................................................................ 15
Using the CD Player......................................................................................... 16
To Insert a CD .......................................................................................................................... 16
To Unload a CD .......................................................................................................................17
Basics of Using the CD Player – Normal Play.........................................................................17
Programming the Playing Order of the Tracks – Program Play ..............................................17
Random Play ............................................................................................................................18
Repeating Tracks...................................................................................................................... 19
CD DOOR LOCK ....................................................................................................................19
Using External Equipments ............................................................................ 20
Listening to External Equipment.............................................................................................. 20
Changing the Equipment’s Name ............................................................................................ 20
Recording the System’s Source to External Equipment ..........................................................21
Adjusting the Input Level......................................................................................................... 21
Using the Timers..............................................................................................22
Setting the Clock ......................................................................................................................22
Showing the Clock (DISPLAY)...............................................................................................23
Correcting the Clock ................................................................................................................23
English
2
Page 39

Table of Contents
English
Setting the Daily Timer............................................................................................................23
Setting the SLEEP Timer .........................................................................................................26
Timer Priority...........................................................................................................................26
Troubleshooting...............................................................................................27
Care And Maintenance ....................................................................................28
Specifications...................................................................................................29
3
Page 40

Getting Started
Accessories
Make sure that you have all of the following items, which are supplied with the System.
FM Wire Antenna (1)
AM Loop Antenna (1)
Remote Control (1)
Batteries (2)
Speaker Cords (2)
AC plug adaptor (1)
If any of these items are missing, contact your dealer immediately.
How To Put Batteries In the Remote Control
Match the polarity (+ and –) on the batteries with the + and – markings in the battery compartment.
R6P(SUM-3)/AA(15F)
English
CAUTION:
• Handle batteries properly.
❑ To avoid battery leakage or explosion:
• Remove batteries when the Remote Control will not be used for a long time.
• When you need to replace the batteries, replace both batteries at the same time with new ones.
• Do not use an old battery with a new one.
• Do not use different types of batteries together.
Using the Remote Control
The Remote Control makes it easy to use many of the functions of the System from a distance of up to 7m away.
You need to point the Remote Control at the remote sensor on the System’s front panel.
Remote Sensor
4
Page 41

Getting Started
CAUTION:
• Make all connections before plugging the System into an AC power outlet.
English
Connecting the FM Antenna
Rear Panel of the Center Unit (CA-FSX1/CA-FSX3)
(on the side panel)
Using the Supplied Wire Antenna
FM wire antenna (supplied)
• Fasten it up in the position until you have the best
reception.
If reception is poor, connect the outdoor antenna.
Using the Coaxial Type Connector
(Not Supplied)
A 75-ohm antenna with coaxial type connector (IEC or DIN
45 325) should be connected to the FM 75-ohm COAXIAL
terminal.
FM outdoor
antenna
(Not supplied)
Coaxial cable
• Before attaching a 75 ohm coaxial lead (the kind with a
round wire going to an outdoor antenna), disconnect the
supplied FM Wire Antenna.
5
Page 42

Connecting the AM Antenna
Getting Started
Rear Panel of the Center Unit (CA-
AM loop antenna (Supplied)
FSX1/CA-FSX3)
Outdoor single vinyl-covered wire (not supplied)
English
Attach the AM loop to its base by snapping the tabs on
the loop into the slot in the base.
• If the AM loop antenna wire is covered with vinyl, remove the vinyl by twisting it as shown in the diagram.
• Make sure the antenna conductors do not touch any other terminals, connecting cords and power cord.
This could cause poor reception.
• If reception is poor, connect an outdoor single vinyl-covered wire to the AM EXT terminal. (Keep the AM loop
antenna connected.)
Turn the loop until you have the best reception.
6
Page 43

Getting Started
Connecting the Speakers (SP-FSX1/SP-FSX3)
English
These speakers are exclusively for this system. Using with other devices will damage the speakers.
Connect the speaker cords between the speaker terminals of the Unit and those of the Speakers.
• When inserting the speaker wire lead, open the speaker terminal.
• Connect the black cord to the ( - ) terminal and the cord without a black line to the (+) terminal.
Right side (rear view)
Left side (rear view)
SP-FSX1
SP-FSX3
BLACK
BLACK
BLACK
BLACK BLACK
BLACK
BLACK
SPEAKER terminal description
(on the side panel)
BLACK
SP-FSX1
SP-FSX3
• Since both speakers are the same, you can put either one to the right or left side.
• Do not connect other speakers to the Unit. The difference of the load impedance causes failures.
• Do not use the supplied speakers in parallel with other speakers.
CAUTION:
• A TV may display irregular colors if located near the speakers. If this happens, set the speakers away from the TV.
7
SPEAKER terminal description
(on the side panel)
Page 44

Removing the Speaker Grills (SP-FSX1)
Getting Started
The speaker grills can be removed.
When removing:
1. Pull the bottom towards you with your fingers.
2. Also pull the top towards you.
When attaching the speaker grills:
Attach the speaker grills as shown in the diagram.
Connecting a Powered Subwoofer
Connect a signal cord (not supplied) between the System’s SUBWOOFER terminal and the input terminal of an external subwoofer. (For the details of connection, please refer to the user’s manual of the external equipment.)
Subwoofer (not supplied)
English
Signal cord (not supplied)
Connecting an External Equipment
Connect signal cords (not supplied) between the System’s LINE IN/OUT terminals and the output/input terminals of the external MD recorder, tape deck, etc. (For the details of connection, please refer to the user’s manual of the external equipment.)
You can then listen to the external source through the System or record the System’s CD player or tuner to the external unit.
Signal cord
(not supplied)
STEREO mini plug
STEREO mini plug
Signal cord
(not supplied)
Pin-plug x 2
MD recorder or tape deck
(not supplied)
Pin-plug x 2
8
Page 45

Getting Started
Connecting an MD Recorder, etc (Optical Digital Output)
English
Unplug the cap and connect an optical digital cord (not supplied) between the System’s OPTICAL DIGITAL OUT terminal
and the input terminal of the MD recorder, etc.
You can record the digital output signal from the System’s CD Player to the MD recorder, etc.
Cap
Optical digital cord
(not supplied)
MD recorder, etc.
(not supplied)
COMPU PLAY
JVC’s COMPU PLAY feature lets you control the most frequently used System functions with a single touch.
With One Touch Operation you can play a CD, turn on the radio, or listen to an external equipment with a single press of the
play button for that function. One Touch Operation turns the power on for you, then starts the function you have specified. If
the System is not ready (no CD in place), the System still powers on so you can insert a CD.
How One Touch Operation works in each case is explained in the section dealing with that function.
The COMPU PLAY buttons are:
On the Remote Control
/8 button
CD
3
FM/AM button
LINE button
Automatic Power On
The System automatically turns on with the following operation.
• When you press the 0 CD button on the Unit or the CD DOOR 0 button on the Remote Control, the System automatically
turns on and the CD door opens to allow CD setting. However, this operation does not change the source to CD.
When you press the STANDBY/ON button to turn off the System, the CD door will be automatically closed if it is
opened.
9
Page 46

Basic Operations
STANDBY/ON
DISPLAY
CD lamp
(Inside)
English
CD 6
A.P. off
DIMMER
PHONES
LINE
FM/AM
AHB PRO
BASS/TREBLE
VOLUME +,
FADE
MUTING
_
Turning the Power On and Off
AHB PRO
Source indicator
Source
selector
STANDBY/ON
indicator
Changing the Source
VOLUME +,
STANDBY/ON
_
Display
Turning the System On
Press the STANDBY/ON button.
The display comes on and “HELLO” is displayed once. The
STANDBY/ON indicator lights in green.
The System comes on ready to continue in the mode it was
in when the power was last turned off.
❑ For example, if the last thing you were doing was listen-
ing to a CD, you are now ready to listen to a CD again. If
you wish, you can change to another source.
❑ If you were listening to the Tuner last, the Tuner comes
on playing the station it was last set to.
Turning the System Off
Press the STANDBY/ON button again.
“SEE YOU” is displayed and the display goes out, except for
the clock display. The STANDBY/ON indicator lights in red.
❑ Some power is always consumed even though power is
turned off (called Standby Mode).
❑ To switch off the System completely, unplug the AC
power cord from the wall outlet. When you unplug the
AC power cord, the clock will be reset to 0:00.
The System has four sound sources, CD, FM, AM and
LINE. Select one of sources you want to listen.
For example, when you want to listen to the CD, select the
source “CD”.
On the Unit
Turn the Source selector to select the source you want.
Each time you turn it clockwise or counterclockwise, the
source changes as follows.
CD Ô FM Ô AM Ô LINE
The selected source name will appear on the display and the
Source indicator on the Unit will light up.
On the Remote Control
CD
:Press the CD 6 button to select the source “CD”.
You can listen to the CD. If a CD is inserted, the CD
will be played back.
FM / AM
:Press the FM/AM button to select the source “FM” or
“AM”.
You can listen to the FM or AM broadcast.
LINE
:Press the LINE button to select the source “LINE”.
You can listen to the music through external equipment.
10
Page 47

Basic Operations
Adjusting the Brightness
(DIMMER - at Power On)
English
You can adjust the brightness of the display.
When the System is Turned On
At power on, each time you press the DIMMER button on
the Remote Control, the brightness changes as follows:
DIMMER OFF = DIMMER 1 = DIMMER 2 = (back to
the beginning)
DIMMER OFF : Bright
DIMMER 1 : Dark (CD lamp also becomes dark.)
DIMMER 2 : Darker (CD lamp goes out.)
Power Saving Mode
(DIMMER - at Power Off)
In power saving mode, you can save the power while the
System is turned off (Standby Mode).
Each time you press the DIMMER button on the Remote
Control at power off, the display alternates as follows.
DISPLAY ONÔDISPLAY OFF
To enable Power Saving mode, set to “DISPLAY
OFF”.
The display completely turns off to save the power.
To restore normal power mode,
The Clock indicator
()
and the clock appear on the display.
reset to “DISPLAY ON”.
Adjusting the Volume
Turn the VOLUME control on the Unit clockwise to increase the volume or turn it counterclockwise to decrease
the volume.
Press the VOLUME + button on the Remote Control to increase the volume or press the VOLUME _ button on the
Remote Control to decrease the volume.
CAUTION:
• DO NOT turn off the System with the volume set to an extremely high level; otherwise a sudden blast of sound could damage
your hearing, speakers and/or headphones
when you turn on the System or start playing any source next time.
REMEMBER you cannot adjust the volume
level while the System is in standby mode.
Fade-out Muting (FADE MUTING)
You can mute the output with one touch operation.
To mute the output, press the FADE MUTING button
on the Remote Control. Then, “FADE MUTING” blinks
and the output will be faded out and becomes 0.
To release muting, press the FADE MUTING button once
again. Then, the output will be faded in to the original level.
• Adjusting the volume causes the muting process (fading
out to 0) to release.
• If you use the AHB PRO button or the BASS/TREBLE button during muting, the FADE MUTING button does not
work to release muting. In this case, turn the VOLUME
control on the Unit or the VOLUME+/ _ button on the Remote Control to newly set the volume.
Reinforcing the Bass Sound
(Active Hyper Bass Pro.)
You can adjust the volume level between 0 and 50.
For private listening
Connect a pair of headphones to the PHONES jack. No
sound comes out of the speakers.
Be sure to turn down the volume before connecting or putting on headphones.
11
You can reinforce the bass sound to maintain rich, full bass at
low volume. (This effect does not apply to the headphones.)
To get the effect, press the AHB PRO button on the Unit
or the Remote Control.
“AHB PRO ON” appears and the “BASS” indicator lights up.
To cancel the effect, press the AHB PRO button again.
“AHB PRO OFF” appears and the “BASS” indicator goes out.
Page 48

Tone Control (BASS/TREBLE)
You can control the tone by changing the bass (low frequency) and treble (high frequency).
On the Remote Control
Press the BASS/TREBLE button.
1
Each time you press the button, the Tone Control mode
changes as follows.
BASS = TREBLE = Normal display = (back to the
beginning)
While “BASS” or “TREBLE” appears on
2
the display, press the VOLUME + or
-
button to adjust the bass or treble level.
You can change the level within the range of -5 to +5. (0: flat)
Press the BASS/TREBLE button until
3
normal display appears.
Waiting for five seconds will also return the System to
the normal display.
Auto Power Off (A.P.off)
You can automatically turn off the System when no signal
condition continues for three minutes. This function is effective when the source is set to “CD”, but not to “FM”,
“AM” or “ LINE”.
Basic Operations
No signal condition:
Source CD: CD is stopped or no CD is inserted.
When no signal condition continues, “A.P.off 20 sec” (20
seconds left before elapsed time reaches three minutes) appears on the display. The displayed time is counted down
and, finally, the System is turned off (Standby mode).
• If a CD is played back, the “A.P.off” indicator stops
blinking and stays lit again.
• If you press a button or turn the VOLUME control,
three-minute counting down is reset and counting down
newly restarts.
To disable the A.P.off function
When the source is “CD”, press the A.P.off button on the
Remote Control until “A.P.off STOP” appears on the display.
Then, the “A.P.off” indicator goes out.
Entering the Number with the
Remote Control (Numeric Keys)
You will use the Numeric Keys on the Remote Control to
enter numbers for presetting stations, recalling the preset
stations, selecting track number, or programming the playing tracks on a CD.
How to enter the number with the Numeric Keys is explained here.
Examples:
• To enter number 5, press 5.
• To enter number 10, press 10.
• To enter number 15, press +10 then 5.
• To enter number 20, press +10 then 10.
• To enter number 25, press +10, +10, then 5.
English
To Enable the A.P.off function
(When the source is “CD”)
Press the A.P.off button on the Remote
1
Control until “A.P.off SET” appears on
the display.
Then, the “A.P.off” indicator lights up on the display.
• Each time you press the button, the display alternates
as follows.
A.P.off SET Ô A.P.off STOP
When no signal condition is detected, the “A.P.off” indicator will start blinking soon.
12
Page 49

Using the Tuner
Numeric
English
Keys
SET
2
* When the System is in use, the display shows other items as well.
You can listen to FM and AM stations. Stations can be tuned
in manually, automatically, or from preset memory storage.
❑ Before listening to the radio:
• Make sure that both the FM and AM antennas are correctly connected. (See pages 5 and 6).
Setting the AM Tuner Interval Spacing
When shipped, the AM tuner interval is set to 9 kHz or 10 kHz
spacing (Initial setting: 9 kHz except for South and Central
America). You can change it to 10 kHz or 9 kHz spacing.
To select 10 kHz intervals, while holding down the ¢
button on the Unit in Standby mode, press the STANDBY/
ON button on the Unit to turn on the power. “AM
10kHz STEP” will appear on the display.
To select 9 kHz intervals, while holding down the 4
button on the Unit in Standby mode, press the STANDBY/
ON button on the Unit to turn on the power. “AM 9kHz
STEP” will appear on the display.
5
3
∞
FM/AM
FM/PLAY MODE
FM mode indicator
Band display, Preset channel,
Frequency display
For simplicity, we show here only the items described in this section.
Multi-control
Source
selector
button
¢
4
Tuning In a Station
Press the FM/AM button.
1
The Band and Frequency you were last tuned to appear
on the display.
(If the last station was selected using the preset number,
the preset number appears first.)
Each time you press the button, the band alternates between FM and AM.
• You can also select the band by turning the Source
selector on the Unit.
(On the Remote Control) (On the Unit)
(9 kHz interval)
• When you change the setting, the preset AM stations are
erased. You will need to preset the station again. (See
page 14.)
One Touch Radio
Just press the FM/AM button on the Remote Control to turn
on the System and start playing the station you were last
tuned to.
❑ You can switch from any other sound source to the radio
by pressing the FM/AM button.
13
(10 kHz interval)
Select a station using one of the follow-
2
ing methods.
● Manual Tuning
Press the ¢ or 4 button on the Unit or the
button on the Remote Control repeatedly to move
∞
from frequency to frequency until you find the station
you want.
OR
● Auto Tuning
If you press and hold the ¢ or 4 button on the
Unit or the
for one second or more, the frequency changes up, or
down, automatically until a station is found.
5
or
button on the Remote Control
∞
OR
5
or
Page 50

Using the Tuner
● Preset Tuning using the Remote Control
(Possible only after presetting stations)
Select the desired preset number using the
button on the Remote Control. The display will show
the preset number’s band and frequency.
• You can also select the desired preset number
using the Numeric Keys. See “Entering the
Number with the Remote Control” on page 12.
(e.g. Press +10, and then 2 for number 12.)
3
or
2
Example:
Press the 3 button until the preset number “2” appears.
UP
3
DOWN
3
or
Preset number
Presetting Stations
You can preset up to 30 FM stations and up to 15 AM stations.
• Preset numbers may have been set to factory test frequencies prior to shipment. This is not a malfunction. You
can preset the stations you want into memory by following
one of the presetting methods below.
Press the Numeric Keys, or the 3 or 2
4
button within 5 seconds to select the
preset number.
Example:
Press the SET button within 5 seconds.
5
“STORED” appears and after 2 seconds, the display returns to the broadcast frequency display.
Repeat above steps 1 to 5 for each sta-
6
tion you want to store in memory with a
preset number.
To change the preset stations, repeat the same
steps as above.
CAUTION:
• Even if the system is unplugged or if the
power failure occurs, the preset stations
will be stored for about 24 hours. However,
in case the preset stations are erased, you
will need to preset the stations again.
English
FM / AM
or
When changing the Band
1 STORED
SET
+10
FM = 30, AM = 15
2
On the Remote Control
Select a band by pressing the FM/AM
1
button.
Press the 5 or ∞ button to tune in a sta-
2
tion.
Press the SET button.
3
Preset number “1” will blink for 5 seconds.
Within 5 seconds, proceed to the next step.
When the display returns to the one set in step 2 after 5
seconds, press the SET button again.
SET
To Change the FM Reception
Mode
When you are tuned into an FM stereo broadcast, the “ST.”
indicator lights up and you can hear stereo effects.
If an FM stereo broadcast is hard to receive or noisy, you
can select Monaural mode. Reception improves, but you
lose stereo effect.
FM AUTO mode is also useful to suppress static noise between stations.
To enter Monaural mode while receiving an FM
broadcast, press the FM/PLAY MODE button on the Re-
mote Control until “FM MONO” appears on the display. Then,
the “MONO” indicator lights up.
Each time you press the FM/PLAY MODE button, the display
alternates between “FM AUTO” and “FM MONO”.
FM/ PLAY
MODE
FM AUTO Ô FM MONO
To restore the stereo effect, press the FM/PLAY
MODE button on the Remote Control until “FM AUTO” appears on the display. Then, the “MONO” indicator goes out
and the “ST.” indicator will light up.
14
Page 51

Using the Tuner
Beat Cut (AM Reception)
English
Switching the Beat Cut mode may reduce beat noise.
Each time you press the FM/PLAY MODE button while receiving an AM broadcast, the Beat Cut mode changes as follows.
BEAT CUT 1
BEAT CUT 4
BEAT CUT 2 = BEAT CUT 3 =
=
(back to the beginning)
=
FM/ PLAY
MODE
Set to the position where beat noise is small.
• The best position will differ depending on the AM
broadcast station being received.
• In AM broadcast, reception sensitivity will be changed by
turning the AM loop antenna. Turn the AM loop antenna
for best reception.
15
Page 52

Using the CD Player
Numeric
Keys
SET
2
CD 6
7
Play mode
indicator
* When the System is in use, the display shows other items as well.
For simplicity, we show here only the items described in this section.
You can use Normal, Random, Program or Repeat Play. Repeat Play can repeat all the tracks or just one of the tracks
on the CD.
Here are the basic things you need to know to play a CD and
locate the different tracks on it.
This Unit has been designed only to playback the following CDs.
• Digital audio CD
• Recordable digital audio CD (CD-R)
• Rewritable digital audio CD (CD-RW)
When playing a CD-R or CD-RW
You can play back finalized CD-R or CD-RW recorded
music CD format. (If CD-RW have been recorded in a
different format, erase all the data on CD-RW completely before recording on the disc.)
❑ You can play back CD-R or CD-RW like CD.
❑ Some CD-R or CD-RW may not be played back on
this Unit because of their disc characteristics, damage
or stain on them, or if the player lens is dirty.
❑ The reflection factor of CD-RW is lower than that of
other CD, possibly causing CD-RW to take longer to
read.
❑ CD-R and CD-RW of MP3 format are not played
back.
The Quickest Way To Start a CD Is With the One
Touch Operation
❑ Press the CD 6 button on the Remote Control.
• The power is automatically turned on and, if a CD is
already inserted, it will start playing from the first track.
• If no CD is inserted, “CD NO DISC” appears on the display and the CD Player remains in Stop mode.
CD DOOR 0
CANCEL
5
3
∞
REPEAT
FM/PLAY MODE
Disc
indicator
Repeat indicator
CD door
0 CD
6
Source
selector
4
¢
7
To Insert a CD
Select the source “CD” using the
1
Source selector on the Unit.
Press the 0CD button on the Unit or
2
0
the CD DOOR
Control.
The CD door opens.
Place a CD, with its label side up as
3
shown below. Press down on the CD’s
center until you hear a click.
Press the 0 CD button on the Unit or the
4
CD DOOR
0
trol again to close the CD door.
“CD DOOR CLOSE” appears and then, “CD READING” appears on the display. At that time, Disc indicator ( ) will also be lit on the display.
• To close the CD door and play the CD, you can just
press the
ton on the Remote Control.
❑ You can place an 8 cm CD without an adaptor.
❑ If the CD cannot be read correctly (because it is scratch-
ed, for example), “CD CAN’T PLAY” appears on the
display.
6
button on the Remote
button on the Remote Con-
button on the Unit or the CD 6 but-
English
16
Page 53

Using the CD Player
❑ You can insert a CD while listening to the other source.
• However, while the CD door is operating (opening or
closing), the other source will be muted.
English
CAUTION:
• DO NOT try to open or close the CD door by
hands as it will be damaged.
To Unload a CD
Take out the CD as shown below.
Basics of Using the CD Player
– Normal Play
To Play a CD
Select the source “CD”.
1
Insert a CD.
2
Press the 6 button on the Unit or the
3
6
CD
The first track of the CD begins playing.
button on the Remote Control.
To Select a Track or Passage within a Track
During playback
Press the ¢ or 4 button on the Unit or the 3 or 2 button on the Remote Control to select the track you want.
• The selected track starts playing.
• Press the ¢ (or 3) button once to skip to the
beginning of the next track.
• Press the 4 (or 2) button to skip to the beginning
of the track being played. Press twice quickly to skip
to the beginning of the previous track.
• When the 3 or 2 button on the Remote Control is
kept pressing, the track continuously skips.
• Press the Numeric Keys to select truck number (See
page 12).
In Stop mode
• Press the ¢ or 4 (or 3 or 2) button to skip the
track.
• Hold down the ¢ or 4 (or 3 or 2 ) button to
continuously skip the tracks.
Search Play
Holding down the ¢ or 4 button on the Unit or the 5
or ∞ button on the Remote Control, during playback, will
fast forward/backwards the CD so you can quickly find a
particular passage in the track you are listening to.
Programming the Playing Order
of the Tracks – Program Play
You can program up to 32 tracks in any desired order including the same tracks.
❑ You can only make a program when the CD Player is
stopped.
On the Remote Control
Track number Playback time
• The CD Player automatically stops when the last
track of the CD has finished playing.
To stop playing the CD, press the 7 button.
The following information for the CD is displayed.
Total track number Total playback time
To stop playing and remove the CD, press the 0CD
button on the Unit or the CD DOOR 0 button on the Remote Control to open the CD door.
To pause, press the
button on the Remote Control. The playback time blinks on
the display.
To cancel pause, press the same button again. Play continues from the point where it was paused.
button on the Unit or the CD 6
6
17
Insert a CD.
1
Press the CD 6 button.
2
Press the 7 button to stop the CD.
3
Press the FM/PLAY MODE button until
4
“CD PROGRAM” appears.
The System enters the Program Play mode and the
“PRGM” indicator lights up.
Each time you press the button, the play mode changes
as follows.
CD PROGRAM=CD RANDOM=CD NORMAL=
(back to the beginning)
(After a few seconds)
• If already programmed, the track number and preset
number of the last programmed track will appear.
Page 54

Press the Numeric Keys to enter the
5
track number you want to program (See
page 12).
The program order number will be assigned from “1”, if
nothing is programmed yet.
Example:
Track number
Total playback time of the programmed tracks
• To delete the last entry, press the CANCEL button.
Program order number
(After a few seconds)
Using the CD Player
• If the total playback time of the programmed tracks exceeds 1 hour and 40 minutes, “--:--” will appear on the display.
• If you try to program the 33rd track, “MEMORY FULL” appears on the display for about 2 seconds.
To Modify the Program
Modify the contents of the program while the CD Player is
stopped.
Each time you press the CANCEL button, the last track in
the program is deleted. To add new tracks to the end of the
program, repeat above step 5.
Random Play
English
Repeat step 5 to program the other
6
tracks.
You can see the total playback time of programmed
tracks on the display.
Press the CD
7
The System plays the tracks in the order you have programmed them.
The CD will stop when all of the programmed tracks
have been finished playing.
• You can also press the 6 button on the Unit.
❑ You can skip to a particular program track by pressing the
or 2 button on the Remote Control or the ¢ or 4
3
button on the Unit during Program Play.
❑ You can perform search play by holding down the ¢ or
4 button on the Unit or the 5 or ∞ button on the Re-
mote Control during playback.
❑ To stop playing, press the 7 button once.
To confirm the programmed tracks while the CD
player is stopped, each time you press the 3 or 2 but-
ton, the tracks making up the program will successively be
displayed in the programmed order.
To delete all the tracks in the program, in Stop mode,
hold down the CANCEL button until “ALL CLEAR!” appears on the display.
Opening the CD door or turning off the System will clear
the programmed tracks and release the Program Play mode.
To exit the Program Play mode once, while the CD
Player is stopped, Press the FM/PLAY MODE button until
“CD NORMAL” appears on the display. (The “PRGM” indicator goes out.)
To re-enter the Program Play mode, press the FM/
PLAY MODE button until “CD PROGRAM” appears on
the display. (The “PRGM” indicator lights up.)
6
button.
The tracks will play in no special order when you use this
mode.
In Stop mode, press the FM/PLAY MODE
1
button on the Remote Control until “CD
RANDOM” appears.
The “RANDOM” indicator lights up on the display.
Each time you press the button, the play mode changes
as follows.
CD PROGRAM =CD RANDOM =CD NORMAL
=(back to the beginning)
Press the CD 6 button on the Remote
2
Control.
The tracks are played in random order.
The CD will stop when all the tracks have been finished
playing.
• You can also press the 6 button on the Unit.
To skip a track during playback, press the ¢ (or 3)
button to jump to the next track in the random sequence.
Press the 4 (or
track being played.
To perform search play during playback, hold down
the ¢ (or 5) or the 4 (or ∞) button.
To exit the Random Play mode, while the CD Player
is stopped, press the FM/PLAY MODE button until “CD
NORMAL” appears on the display. (The “RANDOM” indicator goes out.)
) button to jump back to the start of a
2
18
Page 55

Using the CD Player
Repeating Tracks
English
You can repeat all tracks or individual track, as many times
as you like.
During playback or in Stop mode, press the REPEAT button on the Remote Control.
Each time you press the button, the Repeat mode and Repeat indicator change as follows.
CD REPEAT ALL ( ALL) =CD REPEAT 1 ( )
=CD REPEAT OFF =(back to the beginning)
ALL: In Normal Play mode, repeats all the tracks.
In Program Play mode, repeats all the tracks
in the program.
In Random Play mode, repeats all the tracks
in random order.
: Repeats one track.
To exit the Repeat mode, press the REPEAT button until “CD REPEAT OFF” appears and the Repeat indicator on
the display goes out.
❑ Repeat mode remains in effect even when you change the
play mode.
CD DOOR LOCK
You can prevent unwanted CD ejection by locking the CD
door. The CD Player works normally except CD ejection
operation.
Locking the CD door
Turn off the system.
1
While pressing down the 7 button on
2
0
the Unit, press the
CD button on the
Unit.
“DOOR LOCKED” appears on the display.
• If you try to open the CD door, “DOOR LOCKED”
appears on the display to let you know that the CD
door has been locked.
Unlocking the CD door
Repeat above steps 1 and 2.
“DOOR UNLOCKED” appears on the display.
Now, you can open the CD door normally.
• Even after the System is unplugged, the CD door lock
condition will be retained for about 24 hours. To unlock the
CD door after powering up, you need to perform the unlocking operation.
19
Page 56

Using External Equipments
SET
2
3
LINE
Source
selector
English
Listening to External
Equipment
You can listen to the external equipment such as MD recorder, tape deck or other auxiliary.
❑ First make sure that the external equipment is properly
connected to the System. (See page 8).
Set the VOLUME control to the mini-
1
mum position.
Press the LINE button on the Remote
2
Control.
“LINE” will appear on the display.
• You can also select “LINE” using the Source selector
on the Unit.
Start playing the external equipment.
3
Adjust the VOLUME control to the
4
desired listening level.
Apply the following sound effects, if you
5
wish.
• AHB PRO (See page 11.)
• Tone (BASS/TREBLE) (See page 12.)
To exit the source “LINE”, select other source (e.g.
CD).
Changing the Equipment’s Name
You can change the equipment’s name according to the
equipment to be used. (At purchase, “LINE” is selected.)
On the Remote Control
Press the LINE button to select the
1
source “LINE”.
Press the LINE button for two seconds
2
or more.
“NAME CHANGE” blinks on the display.
While “NAME CHANGE” is blinking,
3
press the SET button.
Press the 3 or 2 button repeatedly to
4
select the desired name.
Each time you press the button, the equipment name
changes as follows.
LINE Ô TAPE Ô DBS Ô VCR Ô TVÔ
GAME Ô (back to the beginning)
DBS (Direct Broadcasting Satellite): For CS/BS
Press the SET button
5
The current name is replaced with new one.
(When TAPE is selected)
• For operation of the external equipment, refer to its Instructions.
• The selected name will appear on the display when you
select the source “LINE”.
20
Page 57

Using External Equipments
Recording the System’s Source
to External Equipment
English
You can record the System’s source to external equipment
which is connected to the LINE OUT or OPTICAL DIGITAL OUT terminal of the System, such as tape deck or MD
recorder, etc.
❑ First make sure that the external equipment is properly
connected to the System. (See page 8 to 9).
❑ When recording a FM or AM program, use the LINE
OUT terminal (not the OPTICAL DIGITAL OUT terminal).
Play the System’s CD Player or tune in
1
to a station.
❑ The recording level is not affected by the VOLUME level
set by the System. Also it is not affected by the sound effects.
• For operation of the external equipment, refer to its Instructions.
Adjusting the Input Level
If the sound from the component connected to the LINE IN
jacks is too loud or is not loud enough when changing the
source to the external component (without adjusting the
volume level), you can change the input level through the
LINE IN jacks.
On the Remote Control
When the source is “LINE”, press and
1
hold the SET button.
• If you have changed the source name of the external
component, the currently selected source will appear
(see page 20).
Press the 3 or 2 button to select an
2
appropriate input level.
• Each time you press the button, the input level alternate between “INPUT LEVEL1” and “INPUT
LEVEL2”.
INPUT LEVEL1: Select this when the sound is not loud
enough.
INPUT LEVEL2: Select this when the sound is too loud.
Press the SET button to finish the
3
adjustment.
•“LEVEL2 STORED” appears on the display.
• The selected input level will be kept in memory until
you change it.
The input level is too high.
• Select “INPUT LEVEL2” if the current level is “INPUT
LEVEL1”.
• If the current level is “INPUT LEVEL2”, adjust the output
level on the external component.
21
Page 58

Using the Timers
STANDBY/ON
CANCEL
SET
32
CLOCK/TIMER
SLEEP
DAILY indicator
Clock indicator
SLEEP indicator
* When the System is in use, the display shows other items as well.
For simplicity, we show here only the items described in this section.
English
The timers let you control listening functions automatically.
Two types of timers are available:
DAILY Timer
Use this timer to set wake up everyday to music from
any source, including melodies.
SLEEP Timer
Fall asleep and have your System turn off automatically
after a certain length of time.
Setting the Clock
When you plug the AC power cord into the wall outlet, the
time indication “0:00” and the Clock indicator ( ) blink
on the display in standby (System off) mode.
You can set the clock whether the System is on or off (but
not in power saving mode (See page 11)).
• The clock must be correctly set for the timers to work.
• The clock may gain or lose one to two minutes per month.
On the Remote Control
Press the CLOCK/TIMER button.
1
The hour digit of the time indication blinks on the display, also, the Clock indicator ( ) blinks.
• If the clock is already set and the Clock indicator ( ) is
not blinking, press the CLOCK/TIMER button repeatedly
until the clock setting display appears on the display.
Each time you press the CLOCK/TIMER button, the display changes as follows.
DAILY ON?/DAILY OFF?
display*
*: Select this item!
Press the 3 or 2 button to set the hour.
2
Pressing the 3 button moves the time forwards and
pressing the 2 button moves it backwards. Holding
down the button moves the hour.
Cancelled = (back to the beginning)
=
ON (time) = Clock setting
=
22
Page 59

Using the Timers
Press the SET button.
3
The minute digits of the time indication blink on the dis-
English
play.
• To return to the hour setting, press the CANCEL
button.
Press the 3 or 2 button to set the minute.
4
Press the SET button.
5
“ADJUST OK!” appears on the display. The Clock indicator ( ) remains lit. Then, the selected time is set
and the seconds start counting from 0.
CAUTION:
• If there is a power failure, the clock loses its
setting. “0:00” and the Clock indicator ()
blinks on the display and the clock must be
reset.
Showing the Clock (DISPLAY)
You can show the current time on the display.
To display the clock, press the DISPLAY button on the
Remote Control.
To return to the normal display, press the same button
again.
Correcting the Clock
Example:
Alternates
(clock)
Display the source
(clock is canceled)
Perform steps 2 to 5 in “Setting the Clo-
2
ck” on page 22-23.
• When the System is in power saving mode, nothing appears on the display. To see the clock, press the DIMMER
button on the Remote Control.
• The clock may gain or lose one to two minutes per month.
• If there is a power failure, the clock loses its setting, “0:00”
blinks on the display and the clock must be reset. To reset
the clock, see “Setting the Clock” on page 22-23.
Use the following method to correct any clock shift.
❑ You can correct the clock whether the System is turned
on or off.
Repeatedly press the CLOCK/TIMER bu-
1
tton to show the clock on the display.
Each time you press the button, the display changes as
follows.
Setting the Daily Timer
Once you have set the Daily Timer, the timer will be activated at the same time every day.
The “DAILY” indicator on the display shows that the Daily
Timer you have set is in effect.
You can set the Daily Timer whether the System is on or off
(but not in power saving mode (See page 11)).
• If you have made a mistake while setting the timer, press
the CANCEL button on the Remote Control. However, this
does not always cancel the current setting. If the CANCEL
button does not work, press the CLOCK/TIMER button on
the Remote Control repeatedly until the display returns to
the original display, and start from the first step.
23
Page 60

Using the Timers
On the Remote Control
Press the CLOCK/TIMER button repeat-
1
edly until “ON (time)” appears on the
display.
At this time, “DAILY” indicator blinks on the display.
Each time you press the button, the display changes as
follows.
DAILY ON?/DAILY OFF? = ON (time)* = Clock
setting display = Cancelled = (back to the beginning)
*: Select this item!
The System enters ON-time setting mode, and the current ON time appears on the display and the hour digits
blink.
Setting the ON time (Example: 10:15)
2
1. Press the 3 or 2 button to set the hour you want the
System to come on, then press the SET button.
The minute digits of the ON time blink on the display.
Pressing the 3 button moves the time forwards and
pressing the 2 button moves it backwards.
Holding down the button moves the time.
2. Press the 3 or 2 button to set the minute, then press
the SET button.
The System enters OFF-time setting mode, and the
hour digits blink.
Setting the OFF time (Example: 13:30).
3
Note that the same time as the ON time cannot be set.
1. Press the 3 or 2 button to set the hour you want the
System to be turned off, then press the SET button.
The minute digits of the OFF time blink on the dis-
play.
2. Press the 3 or 2 button to set the minute, then press
the SET button.
English
The System enter the Music Source Selecting mode
and “FM?” appears on the display.
Selecting the music source.
4
Press the 3 or 2 button to select the music source you
want to listen to, then press the SET button.
Each time you press the 3 or 2 button, the display
changes as shown below:
FM?
.
Ô
*: If the name has been changed, that name (e.g.
“TAPE”) will appear. (See page 20.)
According to the music source you have selected, the
next operation differs.
FM? : Tunes in to the specified preset FM sta-
AM? : Tunes in to the specified preset AM sta-
CD? : Plays the specified track on the speci-
LINE? : Plays an external source.
MELODY? : Select one of 10 melodies.
Preparation for each music source:
Perform the following operation according to the music
source you have selected. Then, the System enters Volume Setting mode.
● When selecting “FM?” or “AM?”
● When selecting “CD?”
● When selecting “LINE?”
● When selecting “MELODY?”
AM? Ô CD? Ô LINE?*
Ô
(back to the beginning)
tion.
tion.
fied CD.
Press the 3 or 2 button to select the preset station
number, then press the SET button.
• If you select the display “- -”, the current broadcast station is selected.
Press the 3 or 2 button to select the track number
you want to start playback, then press the SET button.
• If you select the display “- -”, playback will start
from the first track.
Prepare the external equipment so that it will turn on
at the ON time set by the System.
To allow this, the equipment should have the timer
function.
Press the 3 or 2 button to select one of melodies
(MELODY 1-10). Then, the selected melody is
played back.
Ô
MELODY?
24
Page 61

Using the Timers
Setting the volume level.
5
Press the 3 or 2 button to select the volume level
English
(VOLUME 1-50), then press the SET button.
Select the FADE function.
6
Press the 3 or 2 button to select either “FADE” (fades
in at power on) or “NoFADE” (does not fade in).
Press the SET button.
7
The timer setting is completed, and the “DAILY” indicator stops blinking and remains lit. Each setting you
have made appears on the display in the order of ON
time, OFF time, music source, volume and fading.
Then, the display returns to the display before you set
the timer.
Press the STANDBY/ON button to
8
turn off the System.
The Clock indicator ( ) and “DAILY” indicator are lit
on the display, showing that the Daily Timer is set to on.
To change the timer setting, repeat the setting procedure from the beginning.
When the timer ON-time comes:
The following operation will be automatically repeated everyday.
• When the timer ON-time comes, the System automatically turns on. The “DAILY” indicator blinks, and then
“DAILY TIMER” and “TIMER STANDBY” alternate
for a while. After that, the music source you have set is
played. The “DAILY” indicator blinks during timer
operation. In the case of MELODY, it’s title scrolls on
the display.
• When the timer OFF-time comes, “DAILY TIMER” and
“OFF” alternate for a while. Then, the System automati-
cally turns off and the “DAILY” indicator remains lit.
Selectable Melodies
When you select the melody as the source in step 4, you can
use one of the following melodies.
MELODY 1:Twinkle Twinkle Little Star (by W.A.Mozart)
MELODY 2:Grandfather’s Clock (by H.C.Work)
MELODY 3:Csikos Post (by H.Necke)
MELODY 4:Farewell Song (by La chambre de Chopin)
MELODY 5:Canon (by J.Pachelbel)
MELODY 6:Menuett (by J.S.Bach)
MELODY 7:Humoresk (by A.Dvorak)
MELODY 8:Serenade (by J.Haydn)
MELODY 9:Jesus,Joy Of Man’s Desiring (by J.S.Bach)
MELODY10:Ravel’s Bolero (by Ravel)
• When you select the melody as the source, only the title
of the selected melody will appear on the display.
• When a melody is set for the Daily Timer while playing
back the CD, the CD will stop playing.
• In step 4, the selected melody will be played back for your
reference. However, if the melody is selected with the System turned off, no melody will be heard.
• During setting the melody, the source cannot be selected
with the Source selector on the Unit or the source select
button on the Remote Control.
• If the system is already on when the timer ON-time comes,
the Daily Timer does not work.
Turning the Daily Timer On and Off
Once you have set the Daily Timer, it is stored in memory.
So, the Daily Timer will be activated at the same time every
day until it is canceled.
To cancel the Daily Timer temporarily:
On the Remote Control
Press the CLOCK/TIMER button repeat-
1
edly until the “DAILY ON?/DAILY OFF?”
appears on the display.
The “DAILY” indicator blinks on the display.
Press the CANCEL button.
2
“DAILY OFF” appears and the “DAILY” indicator
goes out.
To activate the canceled Daily Timer:
On the Remote Control
Press the CLOCK/TIMER button repeat-
1
edly until the “DAILY ON?/DAILY OFF?”
appears on the display.
The “DAILY” indicator blinks on the display.
Press the SET button.
2
The “DAILY” indicator remains lit. Each setting already made appears on the display in the order of ON
time, OFF time, music source, volume, and fading.
Then the display returns to the original display.
•“DAILY TIMER/NO SET” appears on the display
before you enter the timer setting.
CAUTION:
• If the System is unplugged, or a power failure occurs, the timer setting will be lost.
You will need to reset the clock first, then
the timer.
25
Page 62

Using the Timers
Setting the SLEEP Timer
Use the Sleep Timer to turn the System off after a certain
number of minutes when it is playing. By setting the Sleep
Timer, you can fall asleep to music and know that your System will turn off by itself rather than play all night.
• You can only set the Sleep Timer when the System is on.
On the Remote Control
During playback a source, press the
1
SLEEP button.
The “SLEEP” indicator lights up on the display.
Set the length of time you want the
2
source to play before shutting off.
Each time you press the SLEEP button, the time length
changes as follows:
10 = 20 = 30 = 60 = 90 = 120 = OFF = (back to
the beginning)
Wait for a few seconds.
3
The display returns to the original one. The display is
dimmed (DIMMER 2 mode) and the CD lamp goes out.
The System is now set to turn off after the number of
minutes you have set.
To Confirm the Sleep Time:
When the SLEEP button is pressed, the remaining sleep
time is displayed. Wait until the display returns to the original display.
To Cancel the SLEEP Timer Setting:
Press the SLEEP button on the Remote Control until
“SLEEP OFF” appears and the “SLEEP” indicator goes out
on the display.
• Pressing the CLOCK/TIMER button or turning off the
System also cancels the SLEEP Timer.
Timer Priority
The timer that will turn off earlier has the priority. You will
see the priority from the following examples.
Example 1
Setting
OFF
SLEEP Timer
ON
DAILY Timer
22:00 22:30
Operation
OFF
SLEEP Timer
ON
DAILY Timer
22:00 22:30
Example 2
Setting
SLEEP Timer
ON
DAILY Timer
22:00 22:30 23:00
Operation
OFF
23:00
OFF
OFF
English
• When the SLEEP button is used without setting the clock,
“CLOCK ADJUST!” appears on the display. You need to
set the clock beforehand.
SLEEP Timer
DAILY Timer
ON
22:00
OFF
22:30
26
Page 63

Troubleshooting
• If you are having a problem with your System, check this list for a possible solution before calling for service.
• If you cannot solve the problem from the hints given here “ERROR!” appears on the display, or the System has been phys-
ically damaged, call a qualified person, such as your dealer, for service.
English
Symptom Possible Cause Action
No sound is heard. • Connections are incorrect, or loose.
• Headphones are connected.
Poor radio reception • The antenna is disconnected.
Stereo effect is lost in FM broadcast. FM reception mode is changed to “FM
The CD skips. • The CD is dirty or scratched.
The CD does not play. • The CD is upside down.
Unable to operate the Remote Control. • The path between the Remote Con-
Operations are disabled. The built-in microprocessor has mal-
“CD NO DISC” appears. There is no disc loaded. Insert a disc.
“CD CAN’T PLAY” appears. • You are trying to playback a CD
“CD DOOR ERROR” appears. The object is blocking the CD door to
When the CD door is operating (opening or closing) while you are listening
to FM, AM or LINE, the source is muted.
Some of the CD functions, such as skip
or search, do not work correctly.
• The AM Loop Antenna is too close
to the System.
• The FM Wire Antenna is not properly extended and positioned.
MONO”.
• Track Skip marks are recorded.
• Track Skip mark is recorded for the
first track of the disc.
trol and the sensor on the Unit is
blocked.
• The batteries have lost their charge.
functioned due to external electrical interference.
which cannot be played, or there is a
problem with the CD.
• The disc has been inserted with its
label side down.
open.
This is one of the characteristics of this
system.
You are playing an unfinalized disc. This is normal. If you need to use these
• Check all connections and make corrections. (See pages 5 to 9.)
• Disconnect the headphones.
• Reconnect the antenna securely.
• Change the position and direction of
the AM Loop Antenna.
• Extend FM Wire Antenna to the best
reception position.
Press the FM/PLAY MODE button to
select “FM AUTO”. (See page 14)
• Clean or replace the CD.
• This is normal.
• Put the CD in with the label side up.
• Wait until the Unit finds a track with-
out a Track Skip mark.
• Remove the obstruction.
• Replace the batteries.
Unplug the System then plug it back in.
• Change the disc.
• Remove the disc and insert it with
the label side up.
Press the 0 CD button to close the CD
door and remove the object.
This is normal.
functions, finalize the disc. (This Unit
cannot finalize CD-R/CD-RW)
27
Page 64

Care And Maintenance
Handle your CDs carefully, and they will last a long time.
Compact Discs
• Only CDs bearing these marks
can be used with this System.
However, continued use of irregular shape CDs (heart-shape,
octagonal, etc.) can damage the
System.
• Remove the CD from its case by
holding it at the edges while pressing the case’s center hole lightly.
• Do not touch the shiny surface of
the CD, or bend the CD.
• Put the CD back in its case after
use to prevent warping.
• Be careful not to scratch the surface of the CD when placing it
back in the case.
• Avoid exposure to direct sunlight,
temperature extremes, and moisture.
- DO NOT wipe it with a hard cloth.
- DO NOT wipe it strong.
- DO NOT wipe it with thinner or benzine.
- DO NOT apply any volatile substance such as insecticides to it.
- DO NOT allow any rubber or plastic to remain in contact with it for a long time.
Cleaning the Lens
If the lens in the CD pickup is dirty, dropout, etc., could degrade sound.
Open the CD door and clean the lens as shown.
• Use a blower (available from a camera store) to blow
dust off the lens.
Blower
Lens
• If there are fingerprints, etc. on the lens, gently wipe
clean with a cotton swab.
English
• A dirty CD may not play correctly. If a CD does become dirty,
wipe it with a soft cloth in a
straight line from center to edge.
CAUTION:
• Do not use any solvent (for example, conventional record cleaner, spray thinner,
benzine, etc.) to clean a CD.
General Notes
In general, you will have the best performance by keeping
your CDs and the mechanism clean.
• Store CDs in their cases, and keep them in cabinets or on
shelves.
• Keep the System’s CD door closed when not in use.
Cleaning the Unit
• Stains on the Unit
Should be wiped off with a soft cloth. If the Unit is heavily
stained, wipe it with a cloth soaked in water-diluted neutral
detergent and wrung well, then wipe clean with a dry cloth.
• Since the Unit may deteriorate in quality, become
damaged or get its paint peeled off, be careful
about the followings.
Moisture Condensation
Moisture may condense on the lens
inside the System in the following
cases:
• After turning on heating in the
room.
• In a damp room.
• If the System is brought directly
from a cold to a warm place.
Should this occur, the System may
malfunction. In this case, leave the
System turned on for a few hours until the moisture evaporates, unplug
the AC power cord, and then plug it
in again.
28
Page 65

Specifications
CA-FSX1/CA-FSX3
Amplifier
Output Power
English
Input Sensitivity/
Impedance (1 kHz)
LINE IN :210 mV/51 kΩ (LEVEL 1)
Output Sensitivity/
Impedance (1 kHz)
LINE OUT :600 mV/5.1 kΩ
OPTICAL DIGITAL
OUT
Speaker terminals :MIN. 4 Ω
Subwoofer out :220 mV/4.9 kΩ
Phones :16 Ω - 1 kΩ
CD Player
Signal-To-Noise Ratio:95 dB
Wow And Flutter :Unmeasurable
Tuner
FM Tuner
Tuning Range :87.50 MHz - 108.00 MHz
AM Tuner
Tuning Range :531 kHz - 1 710 kHz
Power Specifications
Power Requirements :AC 110 - 230 V , 50/60 Hz
Power Consumption
For 110 V :20 W (power on mode)
For 230 V :22 W (power on mode)
:60 W (30 W + 30 W) at 4 Ω (10% THD)
520 mV/51 kΩ (LEVEL 2)
:–23 dBm - –15 dBm
(at 9 kHz interval space)
:530 kHz - 1 710 kHz
(at 10 kHz interval space)
1.2 W (on Standby: with display off)
4.5 W (on Standby: with display on)
2.0 W (on Standby: with display off)
7.0 W (on Standby: with display on)
Speaker Specifications (each unit)
SP-FSX1
Type :1-Way Bass-reflex type
Speaker :8.0 cm cone
Power Handling
Capacity :30 W
:
Impedance
Frequency Range
Sound Pressure Level :81 dB/W·m
Dimensions
Mass :Approx. 1.3 kg each
SP-FSX3
Type :2-Way Bass-reflex type
Speaker
Woofer :10.0 cm cone
Tweeter :2.0 cm dome
Power Handling
Capacity :30 W
Impedance
Frequency Range :55 Hz - 40 000 Hz
Sound Pressure Level :85 dB/W·m
Dimensions
Mass :Approx. 2.4 kg each
Accessories
4 Ω
55 Hz - 20 000 Hz
:
:114 mm ✕ 176 mm ✕ 174 mm (W/H/D)
:
4 Ω
:147 mm ✕ 246 mm ✕ 210 mm (W/H/D)
FM Wire Antenna (1)
AM Loop Antenna (1)
Remote Control (1)
Batteries (2)
Speaker Cords (2)
AC plug adaptor (1)
✕
1
✕
1
✕
1
Center Unit
Dimensions :
Mass :Approx. 2.3 kg
160 mm ✕ 130 mm ✕ 242 mm (W/H/D)
29
Design and specifications are subject to change without
notice.
Page 66

VICTOR COMPANY OF JAPAN, LIMITED
EN, SP, PR 0503MNMCREJEM
© 2003 VICTOR COMPANY OF JAPAN, LIMITED
 Loading...