

Page 1
COMPACT COMPONENT SYSTEM
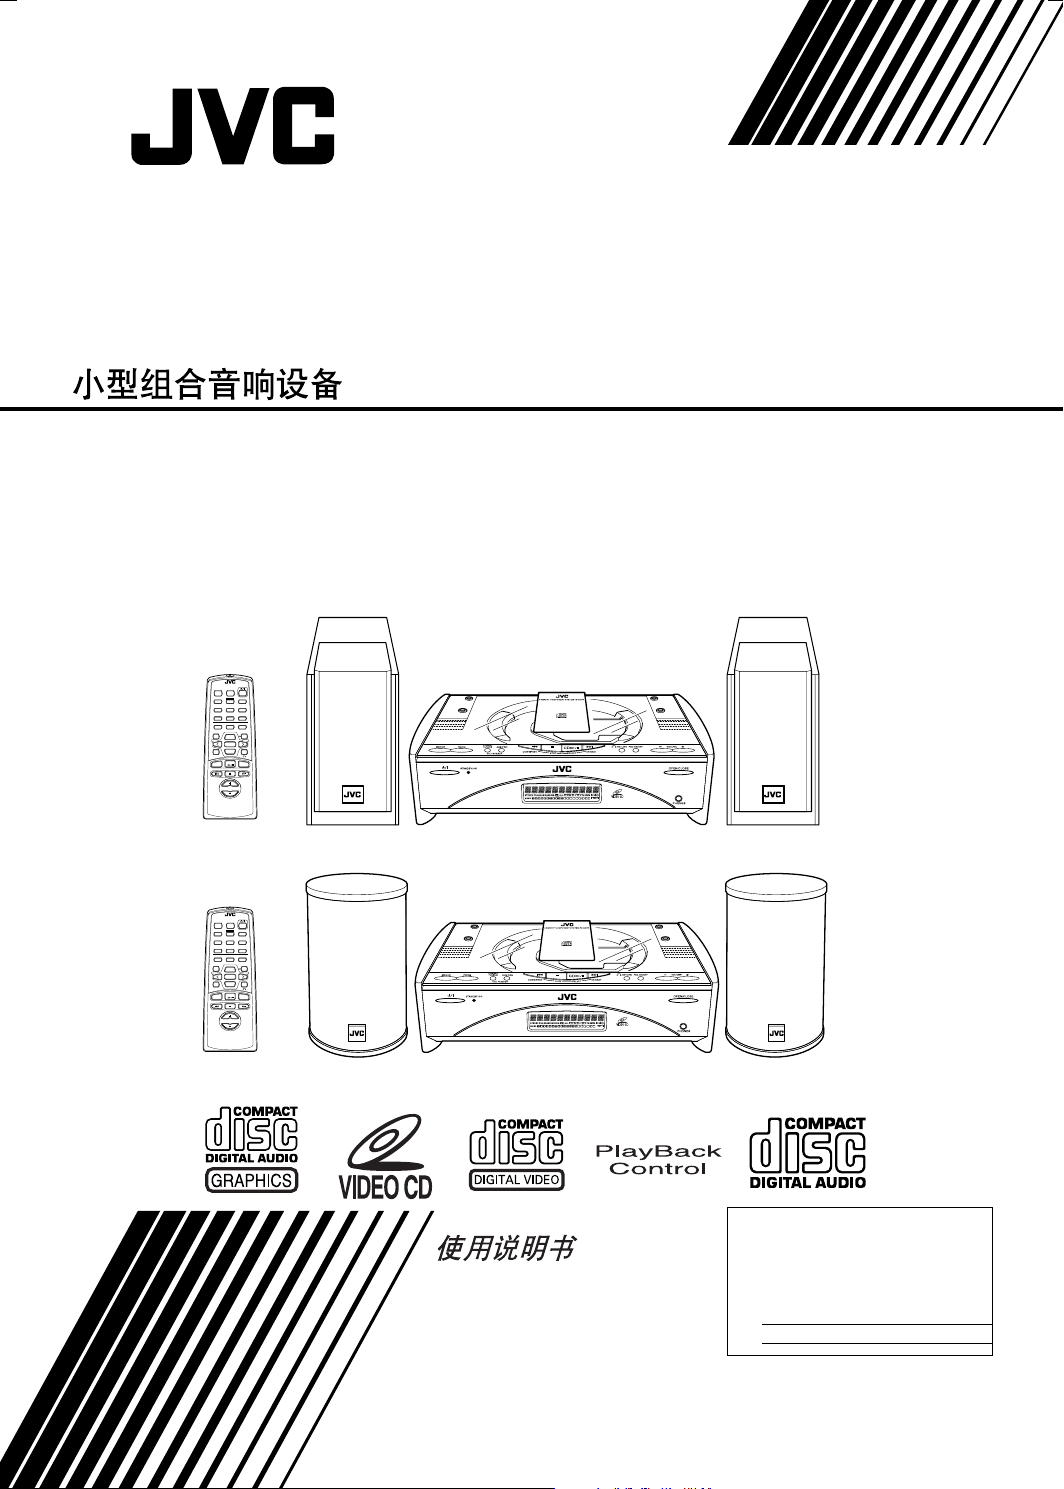
FS-SD58V/FS-SD78V/FS-SD98V
Consists of CA-SD58V and SP-SD58V
Consists of CA-SD78V and SP-SD78V
Consists of CA-SD98V and SP-SD98V
REMOTE CONTROL
DIMMER SLEEP
FM MODE
DISPLAY DOOR SLIDE
MPX
TONE
CLOCK
AHB PRO
CONTROL
/
TIMER
PLAY MODE REPEAT CANCEL
HIGHLIGHT
VIDEO INTRO STILL
PBC ON
/
OFF
ON SCREEN
VCD NUMBER
UP
NEXTPREV
SELECT
SET
DOWN
VCD NUMBER
FADE MUTING
CD
MD / AUX
FM / AM
VOLUME
NTSC / PAL COMPATIBILITY
REMOTE CONTROL
DIMMER SLEEP
DISPLAY DOOR SLIDE
AHB PRO
PLAY MODE REPEAT CANCEL
HIGHLIGHT
VIDEO INTRO STILL
PBC ON
/
OFF
VCD NUMBER
VCD NUMBER
FADE MUTING
MD / AUX
VOLUME
CA-SD58V
FM MODE
MPX
TONE
CLOCK
CONTROL
/
TIMER
ON SCREEN
UP
NEXTPREV
SELECT
SET
DOWN
CD
FM / AM
SP-SD78V, SD98V SP-SD78V, SD98V
CA-SD78V, CA-SD98V
NTSC / PAL COMPATIBILITY
INSTRUCTIONS
SP-SD58VSP-SD58V
For Customer Use:
Enter below the Model No. and Serial No.
which are located either on the rear, bottom or side of the cabinet. Retain this
information for future reference .
Model No.
Serial No.
LVT0548-001A
[US/UB]
Page 2

Warnings, Cautions and Others
CAUTION
To reduce the risk of electrical shocks, fire, etc.:
1. Do not remove screws, covers or cabinet.
2. Do not expose this appliance to rain or moisture.
IMPORTANT FOR LASER PRODUCTS /
REPRODUCTION OF LABELS /
1 CLASSIFICATION LABEL, PLACED ON EXTERIOR SUR-
FACE
1
Caution –– switch!
Disconnect the mains plug to shut the power off completely.
The switch in any position does not disconnect the mains
line. The power can be remote controlled.
2 WARNING LABEL, PLACED INSIDE THE UNIT
2
CLASS 1
LASER PRODUCT
1. CLASS 1 LASER PRODUCT
DANGER:
2.
failed or defeated. Avoid direct exposure to beam.
CAUTION:
3.
serviceable parts inside the Unit; leave all servicing to
qualified service personnel.
Invisible laser radiation when open and interlock
Do not open the top cover. There are no user
G-1
Page 3
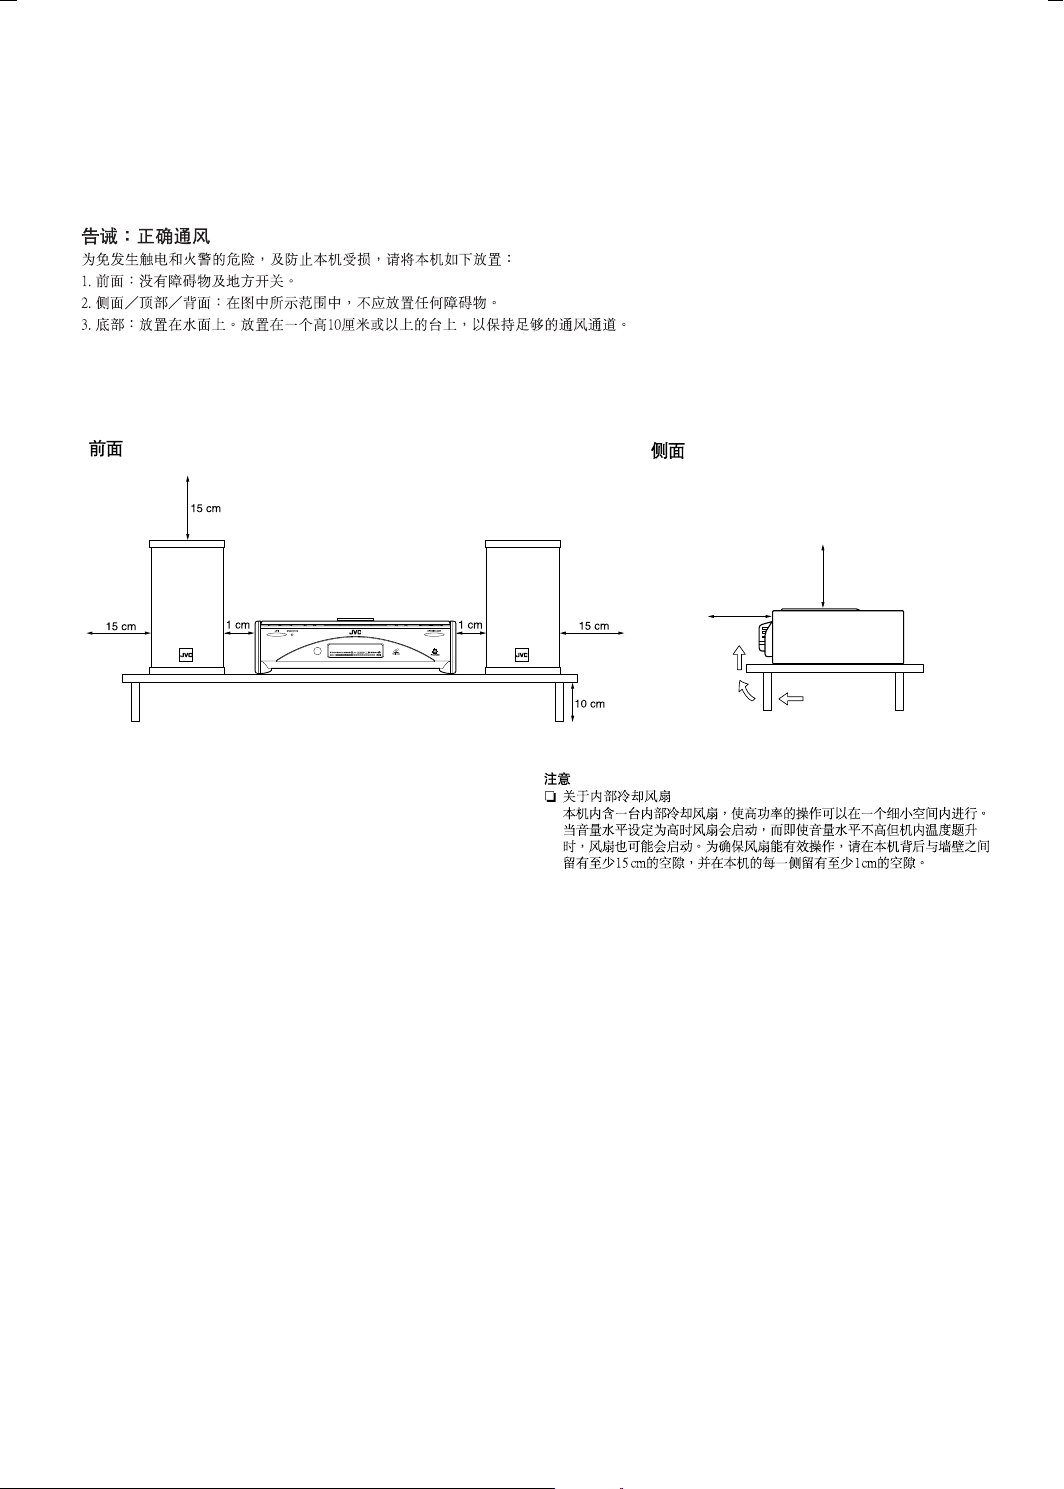
Caution: Proper Ventilation
15 cm
15 cm
To avoid risk of electric shock and fire, and to prevent damage, locate the apparatus as follows:
1 Front: No obstructions and open spacing.
2 Sides/ Top/ Back: No obstructions should be placed in the areas shown by the dimensions below.
3 Bottom: Place on the level surface. Maintain an adequate air path for ventilation by placing on a stand with a height of
10 cm or more.
Front view
NTSC / PAL COMPATIBILITY
CAUTION
About the Internal Cooling Fan
❏❏❏❏
This unit includes an internal cooling fan, so as to allow for highpower operation within a small space.
This fan comes on when the sound level is set high, and may also
come on even at low sound levels if the internal temperature rises. To
ensure effective fan operation, please leave at least 15cm clearance
between the rear of the unit and the wall, and at least 1cm clearance
on each side of the unit.
Side view
G-2
Page 4
Introduction
Thank you for purchasing the JVC Compact Component System.
We hope it will be a valued addition to your home, giving you years of enjoyment.
Be sure to read this instruction manual carefully before operating your new stereo system.
In it you will find all the information you need to set up and use the system.
English
If you have a query that is not answered by the manual, please contact your dealer.
Features
Here are some of the things that make your System both powerful and simple to use.
❏ Types of CD you can play
Many types of compact discs are sold for a variety of uses. The Video CD Player can play the following compact discs.
• Video CD without Playback Control function: for audio and video (moving picture) reproduction.
• Video CD with Playback Control function: featuring menu-type operation and super-fine still pictures for audio
and video (moving picture) reproduction.
• CD Graphics (CD-G): for audio and video (still picture) reproduction.
• Digital Audio CD, including 8-cm(3")CDs: for audio reproduction.
• CDs you cannot play: Do not play SVCDs, DVDs and CD-ROMs on this System. Playing CD-R OMs may generate
a noise which can damage your speakers.
❏ JVC’s COMPU PLAY feature that, with a single touch, automatically starts playing the Radio or CD
Player.
❏ The System incorporates Active Hyper Bass PRO circuitry to faithfully reproduce low frequency
sounds.
❏ A 45-station preset capability (30 FM and 15 AM ) in addition to auto-seek and manual tuning.
❏ CD options that include repeat, random and program play.
❏ Timer functions; Daily Timer and Sleep Timer.
❏ You can connect various external units, such as an MD recorder.
How This Manual Is Organized
• Basic information that is the same for many different functions - e.g. setting the volume - is gi ven in the section
‘Basic Operations’, and not repeated under each function.
• The names of buttons/controls and display messages are written in all capital letters: e.g. FM/AM, “NO DISC”.
• System functions are written with an initial capital letter only: e.g. Normal Play.
Use the table of contents to look up specific information you require.
We have enjoyed making this manual for you, and hope it serves you in enjoying the many features built into your System.
WARNINGS
• DO NOT PUT ANYTHING ON THE TOP COVER. IF THE SYSTEM IS OPERATED WITH SOMETHING
PUT ON THE TOP COVER, IT WILL BE DAMAGED WHEN YOU TRY TO OPEN THE TOP COVER.
• NEVER REMOVE THE TOP COVER FROM THE UNIT. SERIOUS INJURY MAY OCCUR IF THE SYSTEM IS OPERATED WITHOUT THE TOP COVER.
IMPORTANT CAUTIONS
Installation of the System
1
• Select a place which is level, dry and neither too hot nor too cold. (Between 5°C and 35°C or 41°F and 95°F.)
• Leave sufficient distance between the System and a TV.
• Do not use the System in a place subject to vibrations.
Power cord
2
• Do not handle the power cord with wet hands!
• Some power is always consumed as long as the power cord is connected to the wall outlet.
• When unplugging the System from the wall outlet, always pull the plug, not the power cord.
Malfunctions, etc.
3
• There are no user serviceable parts inside. In case of system failure, unplug the power cord and consult your dealer.
• Do not insert any metallic object into the System.
• Do not insert your hand between the Top C over and the main body when the Top Cover is being closed.
1
Page 5

Table of Contents
Introduction.....................................................................................................................................1
Features............................................................................................................................................................................ 1
How This Manual Is Organized....................................................................................................................................... 1
WARNINGS.................................................................................................................................................................... 1
IMPORTANT CAUTIONS............................................................................................................................................. 1
Getting Started................................................................................................................................3
Accessories...................................................................................................................................................................... 3
Set the VOLTAGE SELECTOR Switch ......................................................................................................................... 3
How To Put Batteries In the Remote Control...................................... ... .... ... ... ...................................................... ......... 3
Using the Remote Control ............................................................................................................................................... 3
Connecting the FM Antenna............................................................................................................................................ 4
Connecting the AM Antenna........................................................................................................................................... 5
Connecting the Speakers ................................................................................................................................................. 6
Attaching the Spacers...................................................................................................................................................... 7
Connecting a TV.............................................................................................................................................................. 7
Connecting External Equipment...................................................................................................................................... 7
Connecting an MD Recorder, etc (Digital Output) ......................................................................................................... 7
Connecting the AC Power Cord ...................................................................................................................................... 8
COMPU Play.............................. .... ............................................................................... ..................................... .... ... ...... 8
Automatic Power On ....................................................................................................................................................... 8
Basic Operations.......................................... .. ... .................................. ... .. ............................ ... ... ....9
Turning the Power On and Off................................................................................................................... 9
Adjusting the Brightness (DIMMER)......................................................................................................... 9
Adjusting the Volume................................................................................................................................. 9
Fade-out Muting (FADE MUTING) ........................................................................................................ 10
Reinforcing the Bass Sound (AHB PRO)................................................................................................. 10
Tone Control (TONE CONTROL).............................. ................................................................. ............ 10
Showing the Time (DISPLAY) ................................................................................................................ 10
Sliding the Top Cover (DOOR SLIDE) ................................................................................................... 10
Using the Tuner............................................................................................................................11
Tuning In a Station ....................................... ................................................................ ......................... ... 11
Presetting Stations..................................................................................................................................... 12
Auto Presetting ......................................................................................................................................... 12
To Change the FM Reception Mode........................................................................................................ 12
Using the CD Player.....................................................................................................................13
To Insert a CD........................................................................................................................................... 13
To Unload a CD........................................................................................................................................ 14
Basics of Using the CD Player-Normal Play............................................................................................ 14
Programming the Playing Order of the Tracks......................................................................................... 14
Random Play............................................................................................................................................. 15
Repeating Tracks ...................................................................................................................................... 15
Using the Video CD Player (Video CDs, CD-Gs)........................................................................16
Setting the TV System.............................................................................................................................. 16
Selecting the Audio Channel .................................................................................................................... 16
Playing Video CDs with PBC Function ................................................................................................... 17
Playing Video CDs with PBC Functions without Using the Menu Screen (PBC OFF) .......................... 18
Playing video CDs without the PBC Function.........................................................................................18
Playing CD-Gs................... ................................. ...................................................................................... 18
Various Functions to Enhance Your Enjoyment ...................................................................................... 19
Using External Equipments.........................................................................................................20
Listening to External Equipment............................... ................................. .............................................. 20
Recording the System’s Source to External Equipment........................................................................... 20
Using the Timers ..........................................................................................................................21
Setting the Clock....................................................................................................................................... 21
Setting the Daily Timer............................................................................................................................. 21
Setting the SLEEP Timer.......................................................................................................................... 23
Care And Maintenance.................................................................................................................24
Troubleshooting...........................................................................................................................25
Specifications...............................................................................................................................26
English
2
Page 6
Getting Started
Accessories
Make sure that you have all of the following items, which are supplied with the System.
English
Power Cord (1)
AM Loop Antenna (1)
Remote Control (1)
Batteries (2)
FM Wire Antenna (1)
Speaker Cords (2)
Video Cord (1)
Spacers (6) (only for SP-SD78V / SD98V)
AC Plug Adaptor (except for Hong Kong)
If any of these items are missing, contact your dealer immediately.
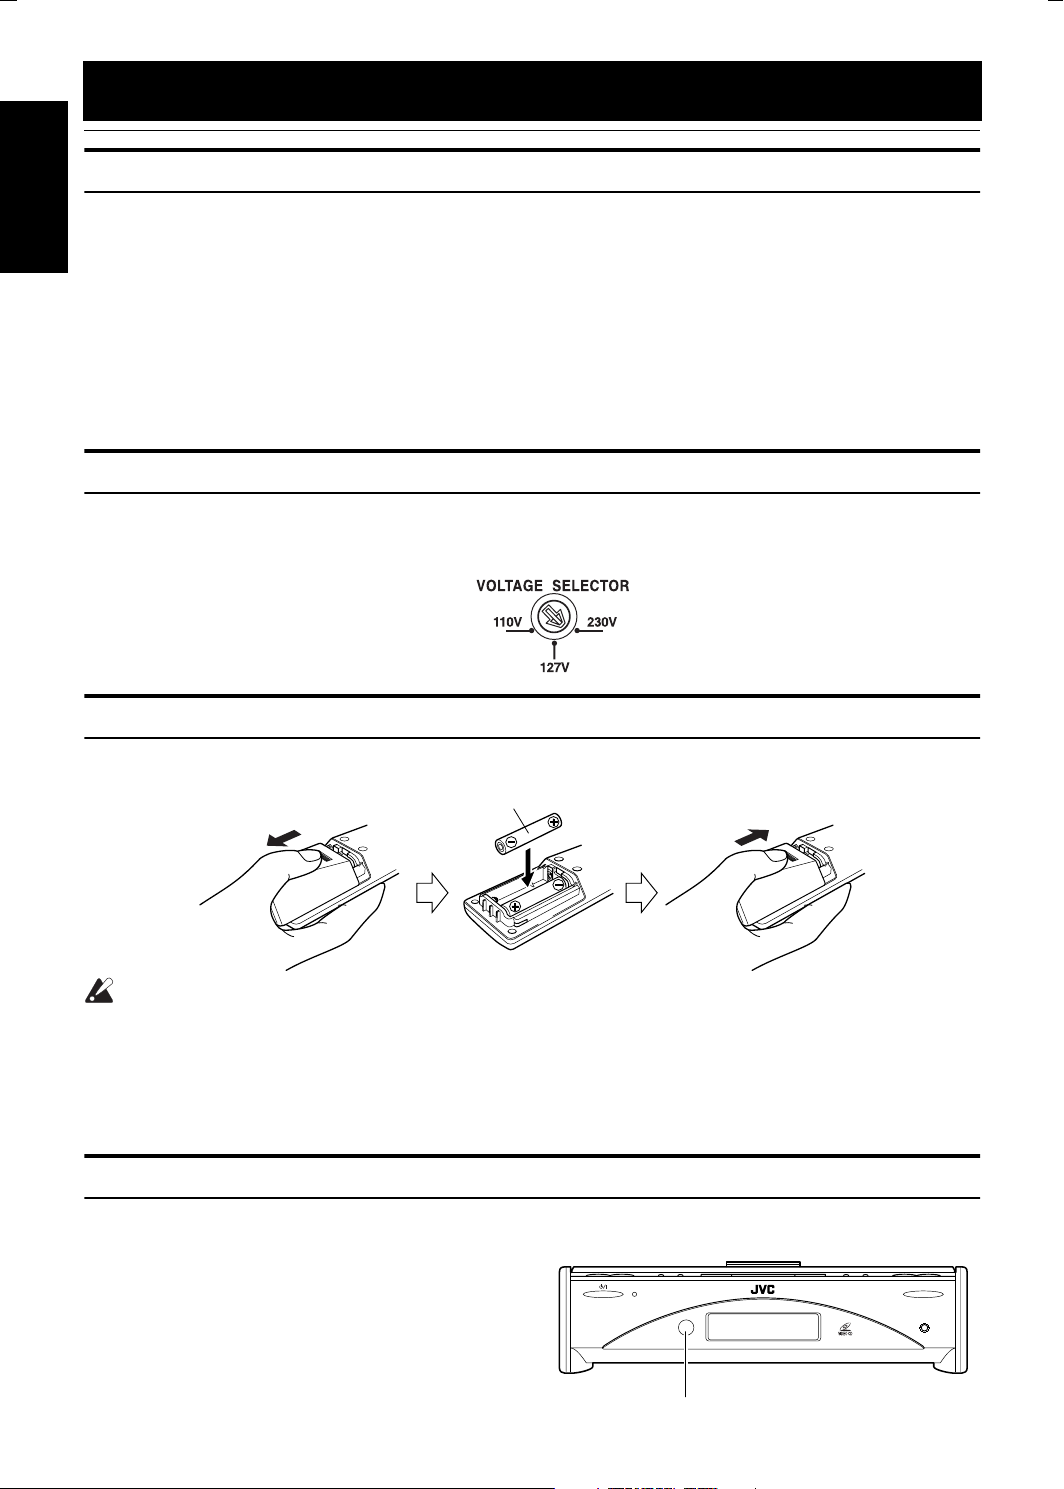
Set the VOLTAGE SELECTOR Switch
To avoid damaging the System, set the voltage before plugging in the System.
Set the correct voltage for your area with the VOLTAGE SELECTOR switch on the back of the Unit. By using a screwdriver,
rotate the VOLTAGE SELECTOR switch so that the arrow mark points the voltage of your area.
How To Put Batteries In the Remote Control
Match the polarity (+ and –) on the batteries with the + and – markings in the battery compartment.
R6P(SUM-3)/AA(15F)
CAUTION:
• Handle batteries properly.
❏ To avoid battery leakage or explosion:
• Remove batteries when the Remote Control will not be used for a long time.
• When you need to replace the batteries, replace both batteries at the same time with new ones.
• Do not use an old battery with a new one.
• Do not use different types of batteries together.
Using the Remote Control
The Remote Control makes it easy to use many of the functions of the System from a distance of up to 7m (23 feet) away.
You need to point the Remote Control at the remote sensor on the System’s front panel.
STANDBY/ON
NTSC / PAL COMPATIBILITY
OPEN/CLOSE
PHONES
3
Remote sensor
Page 7
CAUTION:
• Make all connections before plugging the System into an AC power outlet.
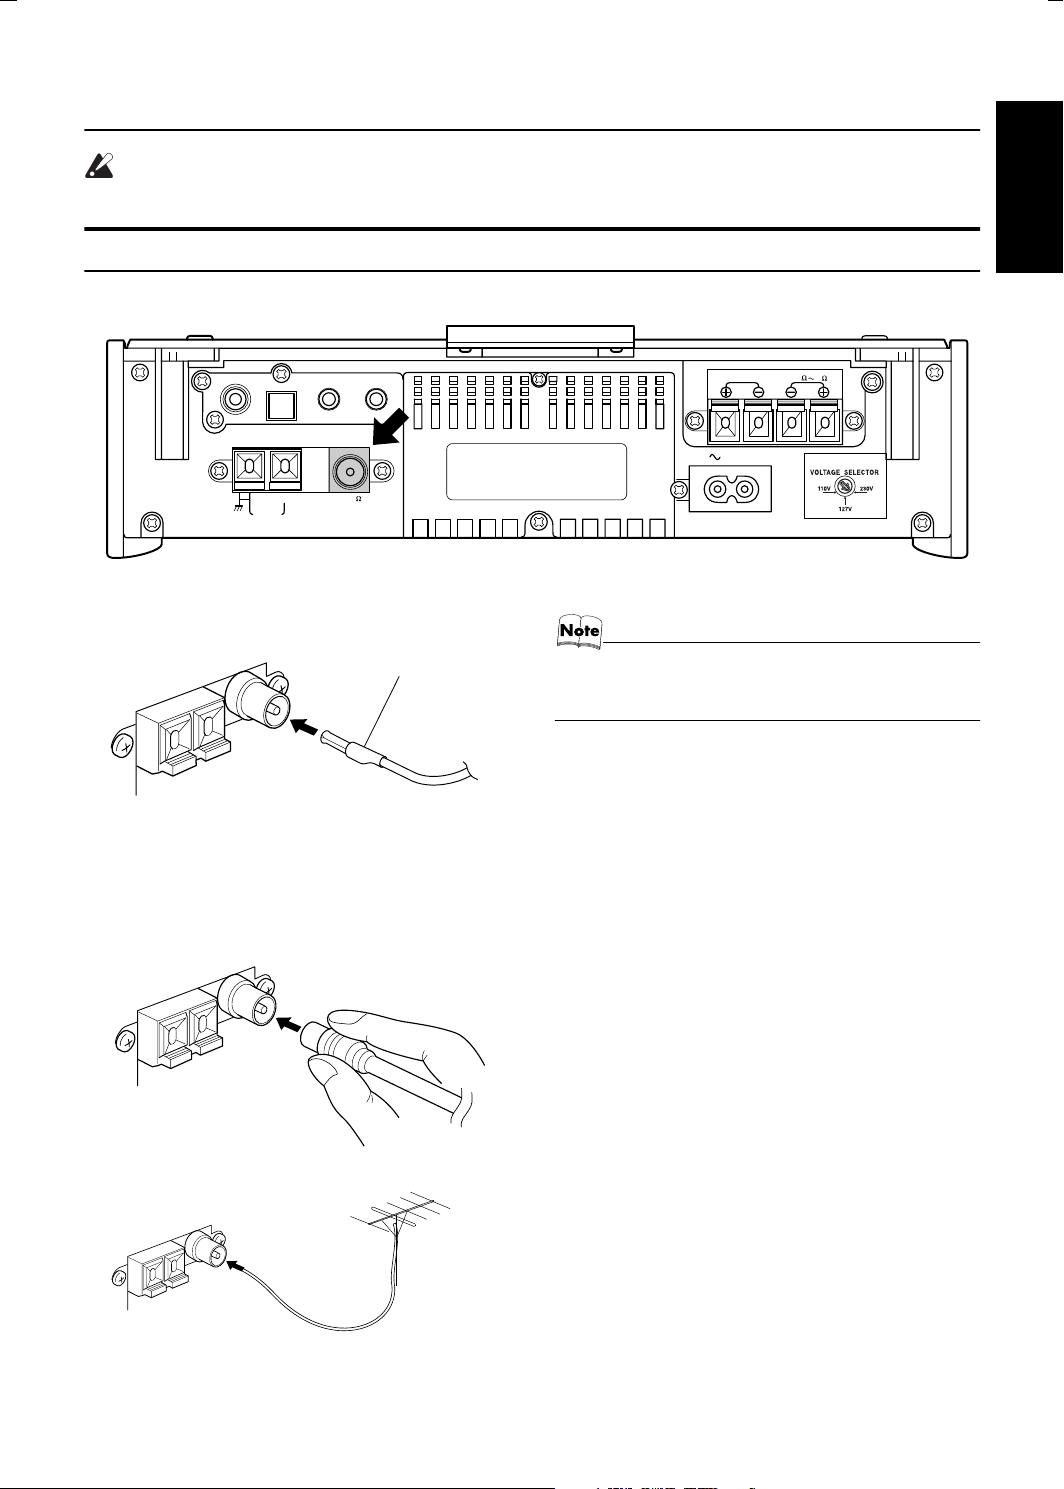
Connecting the FM Antenna
Rear Panel of the Unit
Getting Started
English
VIDEO OUT
CD DIGITAL OUT
AM LOOP
OUT IN
MD
ANTENNA
AM EXT FM(75
COAXIAL
/
AUX
)
Using the Supplied Wire Antenna
FM wire antenna (supplied)
Using the Coaxial Type Connector
(Not Supplied)
A 75-ohm antenna with coaxial type connector (IEC or
DIN45 325) should be connected to the FM 75-ohm COAXIAL terminal.
SPEAKERS IMPEDANCE 4 16
R
AC IN
L
• Before attaching a 75 ohm coaxial lead (the kind with a
round wire going to an outdoor antenna), disconnect the
supplied FM Wire Antenna.
If reception is poor, connect the outdoor antenna.
FM outdoor
antenna
(Not supplied)
Coaxial cable
4
Page 8
Getting Started
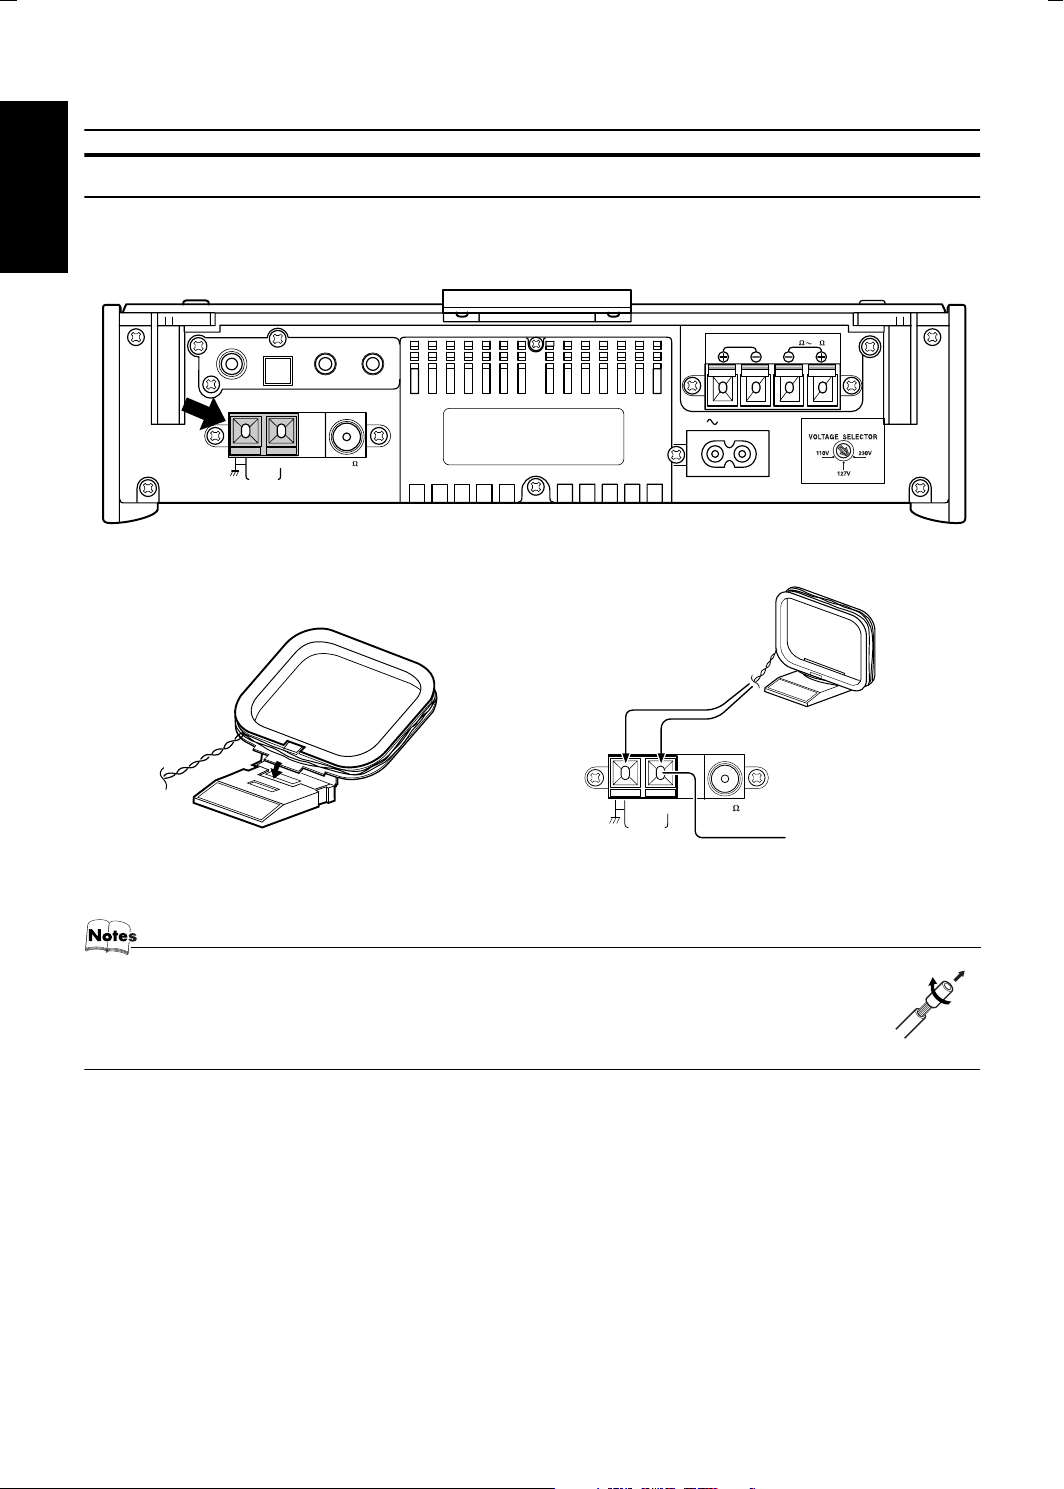
Connecting the AM Antenna
Rear Panel of the Unit
English
VIDEO OUT
CD DIGITAL OUT
AM LOOP
OUT IN
MD
ANTENNA
AM EXT FM(75
COAXIAL
/
AUX
)
AM loop antenna (Supplied)
Attach the AM loop to its base by snapping the tabs on
the loop into the slot in the base.
SPEAKERS IMPEDANCE 4 16
ANTENNA
AM EXT FM(75
AM LOOP
AC IN
COAXIAL
R
)
L
Outdoor single
vinyl-covered wire
Turn the loop until you have the best reception.
• If the AM loop antenna wire is covered with vinyl, remove the vinyl by twisting it as shown in the diagram.
• Make sure the antenna conductors do not touch any other terminals, connecting cords and power cord.
This could cause poor reception.
• If reception is poor, connect an outdoor single vinyl-covered wire to the AM EXT terminal. (Keep the AM loop
antenna connected.)
5
Page 9
CAUTION:
• Make all connections before plugging the System into an AC power outlet.
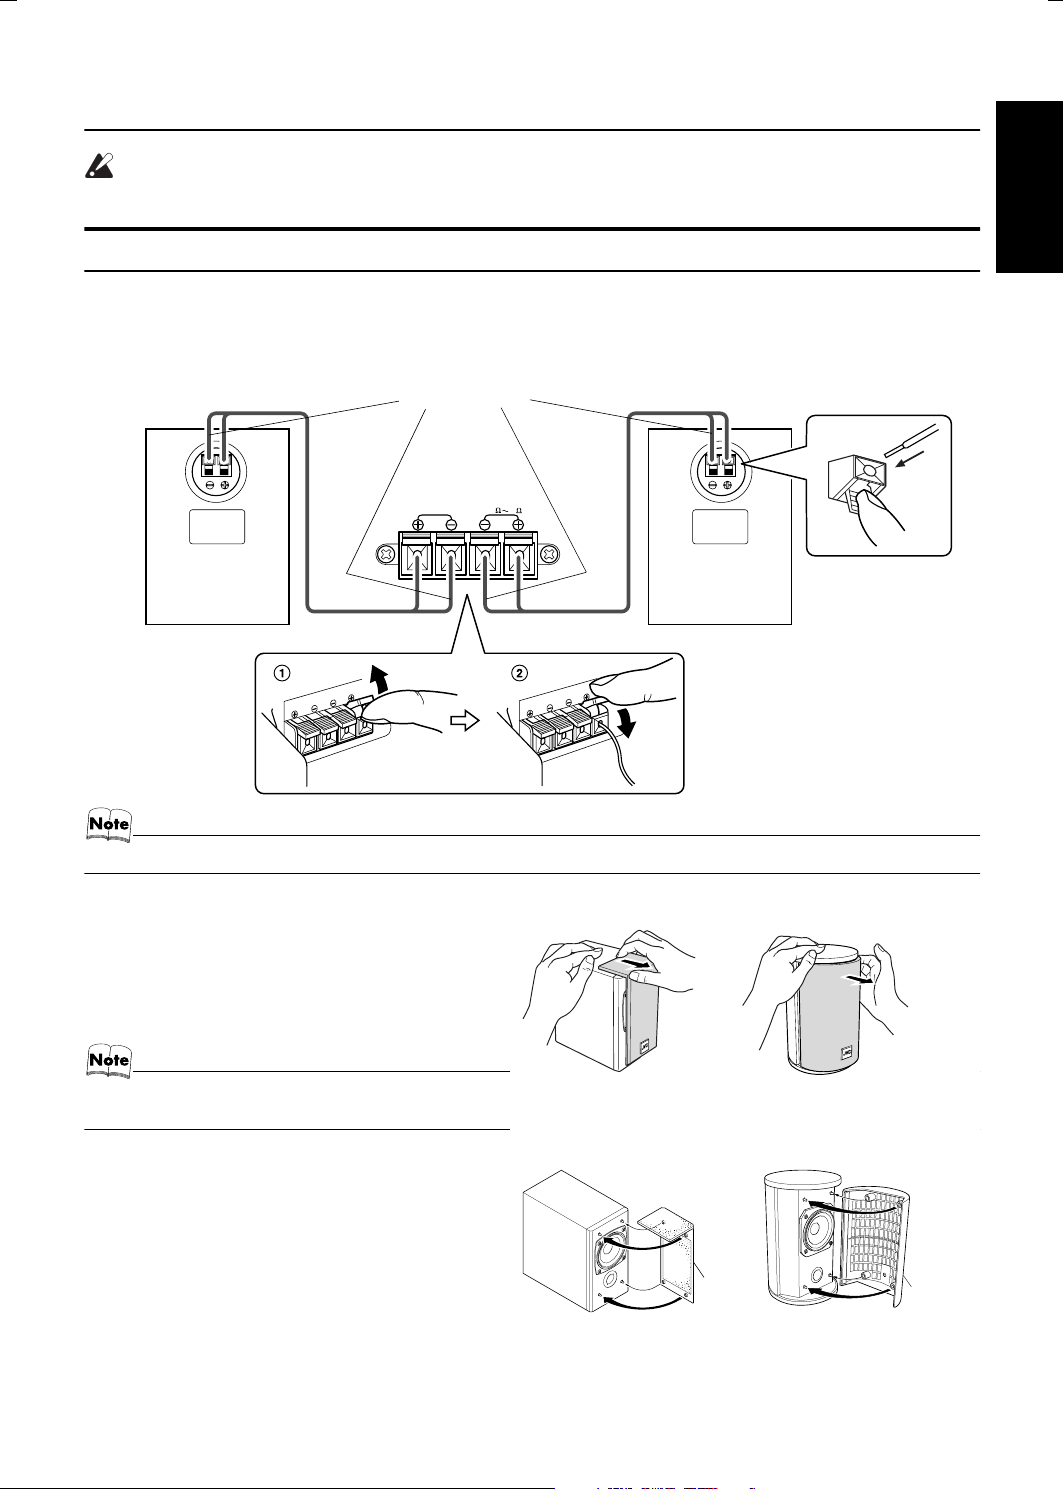
Connecting the Speakers
1. Open each of the terminals to connect the speaker wire leads.
2. Connect the speaker cords between the Speaker terminals of the Unit and the terminals of the Speakers.
Connect the cords with a black line to the (–) terminals and cords without a black line to the (+) terminals.
3. Close each of the terminals to securely connect the cords.
Right side (rear view)
Marked with a black line
SPEAKERS IMPEDANCE 4 16
RL
Left side (rear view)
Getting Started
English
• Since both speakers are the same, you can put either one to the right or left side.
Removing the speaker grilles
(SP-SD58V)
The speaker grilles can be removed.
When removing:
1. Pull the top forwards you with your fingers.
2. Also pull the bottom towards you.
• When removing the speaker grille from the SP-SD98V’s
speaker, be careful not to damage the cabinet.
When attaching the speaker grille:
(SP-SD58V)
Speaker
grille
(SP-SD78V and SP-SD98V)
(SP-SD78V and SP-SD98V)
Speaker
grille
6
Page 10

Getting Started
Attaching the Spacers
English
CAUTION:
NNNNooootttte
e ffffoooor
r iiiinnnnssssttttaaaallllllllaaaattttiiiioooonnnn
e e
• Take special care to select an appropriate installation place where an earthquake or shock does not
cause the speaker to collapse or drop on the floor.
r r
Spacer
(SP-SD78V)
(SP-SD98V)
Spacer
SP-SD78V / SD98V
Attach the supplied spacers to the bottom of the speaker to
protect the cabinet, prevent slipping, and absorb the cabinet
vibration. Peel off the backing from a spacer and attach it.
Connecting a TV
Connect a video cord (supplied) between the System’s VIDEO OUT terminal and the video input jack of your TV.
• Do not connect a cable between the MD/AUX-OUT terminal and the audio input terminal of an external TV. If it is connected,
noise may be generated depending on the TV to be used.
VIDEO OUT
* Use the plug whose diameter is 11mm or less.
CD DIGITAL OUT
ANTENNA
AM EXT FM(75
AM LOOP
OUT IN
/
AUX
MD
COAXIAL
)
Pin-plug
Video cord
11mm Max.
*
TV (not supplied)
Connecting External Equipment
Connect signal cords (not supplied) between the System’s MD/AUX-OUT/IN terminals and the output/input terminals of the
external MD recorder, tape deck, etc.
You can then listen to the external source through the System or record the System’s CD player or tuner to the external unit.
Signal cord (not supplied)
11mm Max.
*
VIDEO OUT
* Use the plug whose diameter is 11mm or less.
CD DIGITAL OUT
ANTENNA
AM EXT FM(75
AM LOOP
OUT IN
MD
/
AUX
COAXIAL
Stereo mini-plug
Signal cord (not supplied)
)
11mm Max.
*
Stereo mini-plug
Pin-plug x 2
Pin-plug x 2
MD recorder or tape deck
(not supplied)
Connecting an MD Recorder, etc (Digital Output)
Unplug the cap and connect an optical digital cord (not supplied) between the System’s CD DIGITAL OUT terminal and the
input terminal of the MD recorder, etc.
You can record the digital output signal from the System’s CD Player to the MD recorder, etc.
Cap
* Use the plug whose diameter is
11mm or less.
CD DIGITAL OUT
11mm Max.
MD recorder, etc. (not supplied)
*
7
Optical digital cord (not supplied)
Page 11

Connecting the AC Power Cord
Getting Started
Firmly insert the supplied AC power cord into the AC inlet on the back of the Unit.
AC IN
Power cord
CAUTIONS:
• ONLY USE THE JVC POWER CORD PROVIDED WITH THIS SYSTEM TO AVOID MALFUNCTION OR DAMAGE TO THE SYSTEM.
• BE SURE TO UNPLUG THE POWER CORD FROM THE OUTLET WHEN GOING OUT OR WHEN
THE SYSTEM IS NOT IN USE FOR AN EXTENDED PERIOD OF TIME.
Now you can plug the AC power cord into the wall outlet, and your System is at your command!
COMPU Play
JVC’s COMPU PLAY feature lets you control the most frequently used System functions with a single touch.
With One Touch Operation you can play a CD, turn on the radio, or listen to an external equipment with a single press of the
play button for that function. One Touch Operation turns the power on for you, then starts the function you have specified. At
the same time, the Top Cover moves backward to allow the Unit’s top button operation. If the System is not ready (no CD in
place), the System still powers on so you can insert a CD.
How One Touch Operation works in each case is explained in the section dealing with that function.
The COMPU PLAY buttons are:
On the Remote Control
CD #/8 button
FM/AM button
MD/AUX button
English
Automatic Power On
The System automatically turns on with the following operation.
• When you press the OPEN/CLOSE button on the Unit, the System automatically turns on and the Top Cover opens to allow
CD setting. However, this operation does not change the function to CD.
When you press the % button to turn off the System, the Top Cover will be automatically closed if it is opened.
• When you press the DOOR SLIDE button on the Remote Control, the System automatically turns on and the Top Cover
moves backwards to allow b utton operation.
When you press the % button to turn off the System, the Top Cover will automatically moves back to the original position,
if it is in the backward posi tion .
8
Page 12

Basic Operations
English
DISPLAY
AHB PRO
VOLUME+,–
DIMMER
FADE
MUTING
REMOTE CONTROL
DIMMER SLEEP
FM MODE
DISPLAY DOOR SLIDE
MPX
TONE
AHB PRO
CONTROL
PLAY MODE REPEA T CANCEL
HIGHLIGHT
VIDEO INTRO STILL
PBC ON / OFF
VCD NUMBER
UP
SELECT
SET
DOWN
VCD NUMBER
FADE MUTING
CD
MD / AUX FM
VOLUME
CLOCK
/ TIMER
ON SCREEN
NEXTPREV
/
AM
%
DOOR SLIDE
TONE CONTROL
CD
STANDBY/ON
STANDBY/ON indicator
%
NTSC / PAL COMPATIBILITY
Top Cover
VOLUME+,–
OPEN/CLOSE
PHONES
PHONES
Turning the Power On and Off
Turning the System On
Press the % button.
The Top Cover moves backward and the Unit’s top buttons
appear. The display comes on and “HELLO” is displayed
once. The STANDBY/ON indicator lights in green.
The System comes on ready to continue in the mode it was
in when the power was last turned off.
❏For example, if the last thing you were doing was listen-
ing to a CD, you are now ready to listen to a CD again. If
you wish, you can change to another source.
❏If you were listening to the Tuner last, the Tuner comes
on playing the station it was last set to.
Turning the System Off
Press the % button again.
The Top Cover moves back to the original position.
“GOOD BYE” is displayed and the display goes out, except
for the clock display. The STANDBY/ON indicator lights in
red.
❏Some power is always consumed even though power is
turned off (called Standby Mode).
❏To switch off the System completely, unplug the AC
power cord from the wall outlet. When you unplug the
AC power cord, the clock will be reset to 0:00 after about
20 minutes.
Adjusting the Brightness
(DIMMER)
You can adjust the brightness of the backlighting for the display.
When the System is Turned On
Each time you press the DIMMER button on the Remote
Control, the brightness of the backlighting changes as follows:
Bright = Dark = (back to the beginning)
When the System is Turned Off
(STANDBY MODE)
Each time you press the DIMMER button on the Remote
Control, the brightness of the backlighting changes as follows:
No backlighting = Dark backlighting
= (back to the beginning)
• When the System is turned off again after power on, the
brightness in Standby mode will be restored to the previous one since the brightness setting in Standby mode is
stored in memory.
Adjusting the Volume
Press the VOLUME + button to increase the volume or
press the VOLUME – button to decrease it.
You can adjust the volume level between 0 and 50.
CAUTION:
• DO NOT turn off the System with the volume set to an extremely high level; otherwise a sudden blast of sound could
damage your hearing, speakers and/or
headphones when you turn on the System
or start playing any source next time.
REMEMBER you cannot adjust the volume
level while the System is in standby mode.
For private listening
Connect a pair of headphones to the PHONES jack. No
sound comes out of the speakers.
Be sure to turn down the volume before connecting or putting on headphones.
9
Page 13

Basic Operations
Fade-out Muting (FADE MUTING)
You can mute the audio output with one touch operation.
To mute the audio output, press the FADE MUTING
button on the Remote Control. Then, the audio output will
be faded out and becomes 0 (VOLUME 0).
To release muting, press the FADE MUTING button
once again. Then, the audio output will be faded in to the
original level.
• The signal output from the MD/AUX-OUT is not muted.
Reinforcing the Bass Sound
(AHB PRO)
You can reinforce the bass sound to maintain rich, full bass
at low volume.
To get the effect, press the AHB (Active Hyper Bass)
PRO button on the Remote Control.
The “AHB PRO” indicator lights up on the display.
To cancel the effect, press the same button again.
The “AHB PRO” indicator goes out.
Showing the Time (DISPLAY)
You can show the current time on the display.
To display the clock, press the DISPLAY button on the
Remote Control.
To return to the previous mode, press the same button
again.
• To let the clock work, you need to set the clock first. (See
“Setting the Clock” on page 21.)
Sliding the Top Cover
(DOOR SLIDE)
Each time you press the DOOR SLIDE button on the Remote Control, the Top Cover slides back and forth.
Slide the Top Cover backward to allow Unit’s top button
operation. Slide it toward you to cover the buttons.
English
Tone Control (TONE CONTROL)
You can control the tone by changing the bass (low frequency range level) and treble (high frequency range level).
Press the TONE CONTROL button on
1
the Remote Control to select "BASS"
or "TREBLE".
Each time you press the button, the display will change
as follows:
BASS --> TREBLE --> (original display) --> (back to
the beginning)
Press the UP or DOWN button on the
2
Remote Control to adjust the bass or
treble level.
You can adjust each level between -5 and +5. (0: Flat)
TONE
DOWN
CONTROL
(
BASS or TREBLE
UP
)
10
Page 14

Using the Tuner
REMOTE CONTROL
DIMMER SLEEP
FM MODE
DISPLAY DOOR SLIDE
MPX
TONE
English
SET
4
PBC ON / OFF
FADE MUTING
CLOCK
AHB PRO
CONTROL
/ TIMER
PLAY MODE REPEAT CANCEL
HIGHLIGHT
VIDEO INTRO STILL
ON SCREEN
VCD NUMBER
UP
SELECT
SET
DOWN
VCD NUMBER
CD
MD / AUX FM
VOLUME
NEXTPREV
/
AM
* When the System is in use, the display shows other items as well.
For simplicity, we show here only the items described in this section.
You can listen to FM and AM stations. Stations can be tuned
in manually, automatically, or from preset memory storage.
❏Before listening to the radio:
• Make sure that both the FM and AM antennas are correctly connected. (See pages 4 and 5).
Setting the AM Tuner Interval Spacing
When shipped, the AM tuner interval is set to 9 kHz spacing.
You can change it to 10 kHz spacing.
●Preparation to setting:
Turn on the power and press the FM/AM button to select
AM mode.
To select 10 kHz intervals, while holding down the 7
button on the Unit, press the VOLUME + button on the
Unit. “AM 10 kHz” will appear on the display (at the same
time, the 100 kHz spacing is selected for FM broadcast).
To select 9 kHz intervals, while holding down the 7 but-
ton on the Unit, press the VOLUME − button on the Unit.
“AM 9kHz” will appear on the display.
[10 kHz Intervals] [9 kHz Intervals]
VOLUME
• When you change the setting, the preset stations are
erased. You will need to preset the stations again. (See
page 12.)
One Touch Radio
Just press the FM/AM button to turn on the System and start
playing the station you were last tuned to.
❏You can switch from any other sound source to the radio
by pressing the FM/AM button.
FM MODE
UP
><
DOWN
FM/AM
¢
VOLUME
FM/AM
PRESET
TUNING +, −
FM mode
indicators
¢
Band display, Frequency display, Preset channel
STEREO
MONO
7
4
Tuning In a Station
Press the FM/AM button.
1
The Band and Frequency you were last tuned to appear
on the display.
(If the last station was selected using the preset number,
the preset number appears first.)
Each time you press the button, the band alternates between FM and AM.
FM / AM
(on the Remote Control)
Select a station using one of the follow-
2
ing methods.
●Manual Tuning
Press the 4 or ¢ (DOWN or UP) button on the
Unit or the Remote Control repeatedly to move from
frequency to frequency until you find the station you
want.
●Auto Tuning
If you press and hold the 4 or ¢ (DOWN or UP)
button on the Unit or the Remote Control for one second or more, the frequency changes down, or up, automatically until a station is found.
●Preset Tuning using the Remote Control
(Possible only after presetting stations)
Select the desired preset number using the > and < button on the Remote Control. After 1 second the display
will show the preset number’s band and frequency.
Example:
Press the > button until the preset number 12 “P12”
appears. (Each time you press the > button, the preset
number will be increased by 1.)
VOLUME +, −
FMAM
OR
OR
FM/AM
FMAM
(on the Unit)
11
or
(After 1 second)
Page 15

●Preset Tuning using the Unit
FM / AM
SET
MONO
FM MODE
MPX
Press the PRESET TUNING + or - button to select
the desired preset number.
Its band and frequency are displayed.
• In AM broadcast, reception sensitivity will be changed by
turning the AM loop antenna. Turn the AM loop antenna
for best reception.
Presetting Stations
You can preset up to 30 FM stations and up to 15 AM stations using the Remote Control.
• Preset numbers may have been set to factory test frequencies prior to shipment. This is not a malfunction. You
can preset the stations you want into memory by following
one of the presetting methods below.
Manual Presetting
SET STORED
FM / AM
When changing the Band
Select a band by pressing the FM/AM
1
SET
or
FM = 30, AM = 15
button.
Press the 4 or ¢ (DOWN or UP) but-
2
ton on the Unit or the Remote Control to
tune in a station.
Press the SET button.
3
“SET” will blink for 5 seconds.
Within 5 seconds, proceed to the next step.
When the display returns to the one set in step 2 after 5
seconds, press the SET button again.
Press the > or < button within 5 seconds
4
to select the preset number.
Pressing the > or < button will increase or decrease the
preset number by 1.
Pressing and holding the button will rapidly increase or
decrease the preset number.
Press the SET button within 5 seconds.
5
“STORED” appears and after 2 seconds, the display returns to the broadcast frequency display.
SET
Using the Tuner
Auto Presetting
In each band, you can automatically preset FM-30, AM-15
stations. Preset numbers will be allocated as stations are
found, starting from the lowest frequency and moving up
the frequency.
(for 2 seconds)
Select a band by pressing the FM/AM
1
button.
Press the SET button on the Remote
2
Control for more than two seconds.
Repeat steps 1-2 for the other band.
3
❏If you want to change the preset stations, carry out the
Manual Presetting for the desired preset numbers.
CAUTION:
• Even if the system is unplugged or if the
power failure occurs, the preset stations
will be stored for about 24 hours. However,
in case the preset stations are erased, you
will need to preset the stations again.
To Change the FM
Reception Mode
When you are tuned into an FM stereo broadcast, the
“STEREO” indicator lights up and you can hear stereo effects.
If an FM stereo broadcast is hard to receive or noisy, you
can select Monaural mode. Reception improves, but you
lose stereo effect.
Press the FM MODE button on the Remote Control
so that the “MONO” indicator lights up on the display.
To restore the stereo effect, press the FM MODE but-
ton on the Remote Control so that the “MONO” indicator
goes off.
English
Repeat above steps 1 to 5 for each sta-
6
tion you want to store in memory with a
preset number.
To change the preset stations, repeat the same
steps as above.
12
Page 16

Using the CD Player
English
PLAY MODE
CD #/8
SET
4
REMOTE CONTROL
DIMMER SLEEP
FM MODE
DISPLAY DOOR SLIDE
MPX
TONE
CLOCK
AHB PRO
CONTROL
/ TIMER
PLAY MODE REPEAT CANCEL
HIGHLIGHT
VIDEO INTRO STILL
VCD NUMBER
UP
SELECT
SET
DOWN
VCD NUMBER
CD
MD / AUX FM
VOLUME
ON SCREEN
NEXTPREV
/
AM
PBC ON / OFF
<
FADE MUTING
CANCEL
UP
>
DOWN
¢
7
4
STANDBY/ON
7
CD #¥8
¢
NTSC / PAL COMPATIBILITY
Top Cover
OPEN/CLOSE
PHONES
OPEN/CLOSE
Track number, Playing time, Preset number
Play mode indicators
* When the System is in use, the display shows other items as well.
For simplicity, we show here only the items described in this section.
You can use Normal, Random, Program or Repeat Play. Repeat Play can repeat all the tracks or just one of the tracks
on the CD.
Here are the basic things you need to know to play a CD and
locate the different tracks on it.
The Quickest Way To Start a CD Is With the One
Touch Operation
❏Press the CD #¥8 button on the Remote Control.
• The power is automatically turned on and the Top Cover
moves backward to allo w the Unit’s top button operation. If a CD is already inserted, it will start playing from
the first track.
• If no CD is inserted, “NO DISC” appears on the display
and the CD Player remains in Stop mode.
To Insert a CD
Press the OPEN/CLOSE button on the
1
Unit.
The Top Cover opens.
RANDOM ALL
PROGRAM
987654321
Music calendar
Place a CD, with its label side up as
2
2019181716151413121110
Track number exceeding 20 is not
displayed.
Repeat indicators
shown below. Press down on the CD’s
center until you hear a click.
NTSC / PAL COMPATIBILITY
Press the OPEN/CLOSE button again to
3
close the Top Cover.
• T o close the Top Co ver and play the CD, you can just
press the CD #¥8 button.
❏You can place an 8 cm (3'') CD without an adaptor.
❏If the CD cannot be read correctly (because it is
scratched, for example), “ 0 0:00” appears on the display.
❏You can insert a CD while listening to the other source.
13
CAUTION:
• DO NOT try to open or close the Top Cover
by hands as it will be damaged.
Page 17

Using the CD Player
To Unload a CD
Take out the CD as shown below.
NTSC / PAL COMPATIBILITY
Basics of Using the
CD Player-Normal Play
To Play a CD
• The display explained here is for digital audio CDs. It
differs a little depending on the disc to be used. For
example, when a video CD is played, “VCD” will be displayed instead of “CD”.
Insert a CD.
1
Press the CD #¥8 button.
2
The first track of the CD begins playing.
To Select a Track or Passage within a Track
During playback, press the 4 or ¢ (DOWN or UP, or
< or >) button on the Unit or the Remote Control to select
the track you want.
• The selected track starts playing.
• Press the ¢ (UP or >) button on the Unit or the
Remote Control once to skip to the beginning of the
next track.
• Press the 4 (DOWN or <) button on the Unit or the
Remote Control to skip to the beginning of the track
being played. Press twice quickly to skip to the beginning of the previous track.
• When the > or < button on the Remote Control is
kept pressing, the track continuously skips.
Search Play
Holding down the 4 or ¢ (DOWN or UP) button on
the Unit or the Remote Control, during playback, will fast
forward/backwards the CD so you can quickly find a particular passage in the track you are listening to.
Programming the
Playing Order of the Tracks
You can program the playing order of the tracks using the
Remote Control.
❏You can program up to 32 tracks in any desired order in-
cluding the same tracks.
❏You can only make a program when the CD Player is
stopped.
English
Track number Playback time
• The track number that has already played disappears
from the music calendar.
• The CD Player automatically stops when the last
track of the CD has finished playing.
To stop playing the CD, press the 7 button.
The following information for the CD is displayed.
Total track number Total playback time
To stop playing and remove the CD, press the
OPEN/CLOSE button on the Unit to open the Top Cover.
To pause, press the CD #¥8 button. The playback time
blinks on the display.
To cancel pause, press the same button again. Play continues from the point where it was paused.
Insert a CD.
1
Press the CD #/8 button.
2
Press the 7 button to stop the CD.
3
Press the PLAY MODE button until the
4
"PROGRAM" indicator lights up on the
display.
Each time you press the PLAY MODE button, the display changes as follows:
CD - - P - - (Program Play) --> CD RANDOM (Random Play) --> Normal Play --> (back to the beginning)
PLAY MODE
PROGRAM
Press the UP, DOWN, >, or < button to
5
select the track to program.
UP or > button: Increases the track number by 1.
DOWN or < button:Decreases the track number by 1.
• When the > or < button is kept pressing, the track
number changes rapidly.
(To be continued on the next page)
14
Page 18

Using the CD Player
Press the SET button.
6
UP
Track number
Program order number
English
PROGRAM
DOWN
PROGRAM
Total playback time of the programmed tracks
Repeat steps 5 and 6 to select the other
7
tracks for the program.
You can see the total playback time of programmed
tracks on the display. Also, you can see the programmed
tracks on the music calendar.
Press the CD
8
The System plays the tracks in the order you have programmed them.
❏You can skip to a particular program track by pressing the
4 or ¢ button during Program Play.
❏To stop playing, press the 7 button once.
To confirm the programmed tracks while the CD
player is stopped, each time press the 4 or ¢ but-
ton; the tracks making up the program will successively be
displayed in the programmed order.
To delete all the tracks in the program, in stop mode,
press the 7 button for more than two seconds. Pressing the
OPEN/CLOSE button on the unit to open the Top Cover
will also clear the programmed tracks.
To exit the program mode, while the CD Player is
stopped, press the PLAY MODE button to light off the
“PRO GRA M” i nd ic at or, or press the OPEN/CLOSE button
on the Unit to open the Top Cover.
• If the total playback time of the programmed tracks exceeds 99 minutes 59 seconds, the total playback time will
go out and “ ” appears on the display.
• If you try to program the 33rd track, “MEMORY FULL” appears on the display for about 2 seconds.
#/8
(After 2 seconds)
button.
To Modify the Program
Modify the contents of the program while the CD Player is
stopped.
Each time you press the CANCEL button, the last track in
the program is deleted. To add new tracks to the end of the
program, repeat above steps 5 to 7.
Insert a CD.
1
Press the CD #/8 button to set the CD
2
mode.
Press the button to stop the CD .
3
Press the PLAY MODE button until the
4
“RANDOM” indicator lights up on the
display.
Each time you press the PLAY MODE button, the display changes as follows:
CD - - P - - (Program Play) --> CD RANDOM (Random Play) --> Normal Play --> (back to the beginning)
Press the CD #/8 button.
5
The tracks are played in random order.
To skip a track during playback, press the ¢ button
to jump to the next track in the random sequence. Press the
4 button to jump back to the start of a track being played.
To exit Random Play mode, while the CD Player is
stopped, press the PLAY MODE button to light off the “RANDOM” indicator, or press the OPEN/CLOSE button on the
Unit to open the Top Cover.
Repeating Tracks
You can repeat all tracks or individual track, as many times
as you like.
Press the REPEAT button on the Remote Control.
The Repeat indicator changes with each press of the button,
as shown below.
= ALL=blank display = (back to the
beginning)
To exit Repeat mode, press the REPEAT button until the
Repeat indicator on the display goes out.
❏In Random Play, cannot be selected.
❏Repeat mode will remain in effect even when you change
the play mode.
: Repeats one track.
ALL: In Normal Play mode, repeats all the tracks.
In Program Play mode, repeats all the tracks
in the program.
In Random Play mode, repeats all the tracks
in random order.
Random Play
The tracks will play in no special order when you use this
mode.
(Using the Remote Control)
15
Page 19

Using the Video CD Player
REMOTE CONTROL
DIMMER SLEEP
FM MODE
DISPLAY DOOR SLIDE
MPX
TONE
CLOCK
AHB PRO
CONTROL
HIGHLIGHT
PBC ON/OFF
< PREV
SELECT
SET
PLAY MODE REPEAT CANCEL
HIGHLIGHT
VIDEO INTRO STILL
PBC ON / OFF
VCD NUMBER
UP
SELECT
SET
DOWN
VCD NUMBER
FADE MUTING
CD
MD / AUX FM
VOLUME
/ TIMER
ON SCREEN
/
VIDEO INTRO
STILL
VCD NUMBER UP
NEXTPREV
AM
ON SCREEN
> NEXT
&
VCD NUMBER DOWN
CD
#/8
Play mode indicator
FM/AMMD/AUX
VCD
NUMBER
+, -
Track number, Playing time, Preset number
PROGRAM
(Video CDs, CD-Gs)
PBC
ON/OFF
&
RETURN
VOLUME
VOLUME +, -
2019181716151413121110
CD
PREV NEXT
7
SELECT
RANDOM ALL
987654321
English
(When playing video CDs)
Repeat indicators
* When the System is in use, the display shows other items as well.
For simplicity, we show here only the items described in this section.
You can play video CDs (with or without the Playback Control (PBC) function) and CD Graphics (CD-Gs) to watch the
picture on your TV while listening to the sound on video
CDs and CD-Gs.
SVCDs and DVDs cannot be used.
❏Before playing video CDs and CD-Gs
• Make sure that the connection between the System and
your TV is correct. (See page 7.)
Setting the TV System
(Using the Unit)
To view a picture of video CDs or CD-Gs, it is required to
set the System’s TV system according to your TV system.
Relationship among the playable CDs, System’s
TV system and your TV system:
Playable CD System’s TV system Your TV system
NTSC/PAL NTSC NTSC
NTSC/PAL PAL PAL
NTSC/PAL PAL AUTO Multisystem
Music calendar
Track number exceeding
20 is not displayed.
The current TV system (“PAL” for example) appears on
the display for five seconds.
Within five seconds, press the VOLUME
4
+ (or –) button to select the TV system.
Each time you press the button, the TV system changes
as follows.
PAL NTSC
P AL A UTO
Within five seconds, press the 7 button
5
PAL: for PAL exclusive TV
NTSC: for NTSC exclusive TV
PAL AUTO: for multisystem TV
on the Unit.
• If you play a CD of NTSC system in PAL AUTO system on
a PAL exclusive TV, the image may be distorted. If this
happen, change to “PAL”.
• When you play a CD of NTSC system in PAL AUTO system
on a multisystem TV, the image may blink for a moment.
This symptom occurs when the System detects the formula of the CD and is not a malfunction.
VOLUME VOLUME
Turn on the TV and select the video
1
input on the TV.
Turn on the System and press the CD
2
#¥8 button.
While pressing and holding the 7 button
3
on the Unit, press the VOLUME + or button on the Unit.
Selecting the Audio Channel
This function may be used for CDs that support multiplex
function. In addition to the normal stereo sound output, you
can select L channel or R channel independently.
Press the button on the Remote Control.
Each time you press the button, the selected channel changes as follows:
NORMAL (Stereo) --> Lch MONO --> Rch MONO --> (back
to the beginning)
• When “Lch MONO” or “Rch MONO” is selected, the
first push of the button will show the current selection.
• The channel selection returns to “NORMAL (Stereo)”
when the CD is ejected, when other source (e.g. FM/AM)
is selected, or when the system is turned off.
16
Page 20

Using the Video CD Player (Video CDs, CD-Gs)
CD
SELECT
VCD NUMBER
VCD NUMBER
UP
SET
DOWN
Playing Video CDs with PBC
Function
English
The System provides a Playback Control (PBC) function
which utilizes a procedure (menu selection) programmed in
a video CD.
What is the Playback Control (PBC) function?
The PBC function allows you to enjoy the following features.
• Menu-driven playback
You can interact with the TV screen using a menu display to select and play an entry.
• High-resolution still image display
You can display high-quality images four times clearer
than video pictures.
❏For operation, refer to the instructions supplied for the
video CD.
❏You can play video CDs with PBC function using the
menu screen (Menu-Driven Play) or without using the
menu screen (Continuous Play).
• The playback operation procedure may differ depending
on the video CD you use.
• Sometimes due to improper manufacturing, video CDs will
function differently.
Playing Video CDs with the PBC Function
Using the Menu Screen (Menu-Driven Play)
❏Before playing, make sure that Repeat indicator “(”or
(ALL” is not lit. If lit, press the REPEAT button on the
“
Remote Control until it disappears.
❏Also, make sure that the “PROGRAM” or RANDOM in-
dicator is not lit. If lit, press the PLAY MODE button on
the Remote Control until it disappears.
Insert a video CD with the PBC function.
1
“PBC” will appear on the display.
To move through the next menu, press
3
the following button.
On the Unit:
Press the NEXT or PREV button.
On the Remote Control:
Press the NEXT or PREV button.
To select the item (track) in the menu
4
and play it, press the following buttons.
On the Unit:
1. Press the VCD NUM BER + or – button to select the item
(“SEL
**”) you want to play.
2. Press the SELECT button to play it back.
(within 5
seconds) SELECT
On the Remote Control:
1. Press the VCD NUMBER UP or DOWN button to select the item (“SEL
2. Press the SELECT button to play it back.
• The next track will be automatically played after the current track is finished.
• While a part of movie is displayed on the TV in step 2,
pressing the
SELECT button causes the track being
played to play from the beginning.
To pause, press the STILL button on the Remote Control.
To resume pause, press the CD
To stop playback press the 7 button until a blue appears
on the TV screen.
To select other item during playback, repeat step 4.
• Program Play, Random Play and Repeating Tracks cannot
be made in this Menu-Driven Play.
• When the video CD is paused for about 10 minutes, the
screen background automatically fades out to prevent
screen burn-in.
”) you want to play.
**
(within 5
seconds)
#/8 button.
#¥8
Press the CD
2
button.
“PBC” appears on the display and the first menu will
appear on the TV screen.
Basic Remote Control and Unit Button Functions for Menu-Driven Play:
5HPRWHý&RQWURO 8QLW )XQFWLRQ
PREV / NEXT PREV / NEXT 0RYHýWKURXJKýPHQXï
VCD NUMBER
VCD NUMBER +/- 6HOHFWýDýVSHFLILFýPHQXýLWHPï
UP/DOWN
SELECT
(SET)
&&ýRETURN 5HWXUQVýWRýWKHýSUHYLRXVýPHQXýGXULQJýSOD\EDFNï
ý
SELECT
(CD #¥8)
(QWHUVýWKHýVHOHFWHGýYLGHRý&'ýQXPEHUýRUýLWHPïý:KHQýDýSDUWýRIýPRYLHýLVýGLVð
SOD\HGýRQýWKHý79ýVFUHHQñýVWDUWVýSOD\LQJýWKDWýWUDFNýIURPýWKHýEHJLQQLQJï
17
Page 21

Using the Video CD Player (Video CDs, CD-Gs)
1
1
2
3
12 123
Moving
picture
Moving
picture
Moving
picture
Moving
picture
A selection menu is displayed when you start playing a video CD with the PBC function. The selection menu shows a
list of numbers for selection. Some video CDs may show
moving pictures or a divided screen.
• When a list of numbers is displayed, selecting a number
shows its contents.
• When a moving picture is displayed, pressing SELECT
at the time when a part of the movie you desire is shown
plays the movie.
• When the selection menu is re-displayed after you have
played your selection, selecting a number again can
replay its contents. (Some video CDs may show the
menu screen several times.)
• When “NEXT” and “PREV” are shown, pressing NEXT
or PREV can change the selection menu.
• After playback, press
& RETURN (&) to go back to
the previous screen. Some video CDs may return you to
the menu screen shown before playback.
1
2
3
2
1
2
Still
picture
Menu screen
To next screen
picture
To previous
screen
Still
Moving
picture
3
Moving
picture
Moving
picture
&
&
&
For Program Play, Random Play, Repeating
Tracks:
Select the mode by pressing respective buttons on the
Remote Control in the same way as for audio CDs. (See
pages 13-15.)
Press the CD #8 button to play the
3
video CD.
Playing video CDs without the
PBC Function
Basic playback procedures for video CDs are the same as
for audio CDs. (See page 13-15.)
• When you start playing a video CD without the PBC
function, “VIDEO CD” appears on the display.
Press
RETURN
(&).
Press
RETURN
(&).
Press
RETURN
(&).
English
• When a menu is displayed for a long time, about 10 minutes, the screen background automatically fades out to
prevent screen burn-in while the setting is suspended.
• When using the REPEAT function, the PBC function is not
available.
Playing Video CDs with PBC
Functions without Using the
Menu Screen (PBC OFF)
You can play the video CDs with the PBC function without
using the menu screen, as if they were without the PBC
function.
Insert a video CD with the PBC function.
1
“PBC” will appear on the display.
In stop mode, press the PBC ON/OFF
2
button until “PBC OFF” appears on the
display.
Each time you press the button, the display alternates as
follows:
PBC OFF Ô PBC ON
• If paused for more than 10 minutes, the screen background automatically fades out to prevent screen burn-in.
Playing CD-Gs
Basic playback procedures for CD-Gs are the same as for
audio CDs. (See page 13-15.)
• When you start playing a CD-G, “GRAPHICS” will
appear on the display for a moment.
• During playback a CD-G, the following operations may
distort the image on the TV screen:
Searching for the beginning of the track, Skipping the
tracks, or pausing the tracks
• If paused for more than 10 minutes, the CD-G will automatically stop.
18
Page 22

Using the Video CD Player (Video CDs, CD-Gs)
1 2 3
4
5
6
7 8 9
Various Functions to Enhance
Your Enjoyment
English
You can use the following features using the Remote
Control.
Frame-by-Frame Playback
Frame-by-Frame Playback is possible only when moving
pictures (of the video CDs with or without the PBC function) are played.
During playback, press the STILL button to pause
the video CD and then press the STILL button.
Each time you press the STILL button, the picture advances
by one frame. During Frame-by-Frame Playback, no sound
comes out.
To resume Normal Play, press the CD #¥8 button.
Display of Operating Status
You can view the current operating status on the TV screen.
Press the ON SCREEN button.
Each time you press the button, the on-screen display turns on
and off, and the following screen is shown for three seconds.
• Once you have turned on the on-screen display, the track
Viewing the Video Intro of Video CDs
You can check the contents of a video CD, watching the
first five seconds of each track on the video CD.
1
2
• If the video CD has more than nine tracks, the tracks
19
Display ON Display OFF
number and playing time are always displayed on the TV
screen. When you play a video CD with the PBC function, “PBC” will be also displayed on the TV screen.
Play the video CD.
Video CD with the PBC function:
Perform PBC OFF Play after selecting "PBC OFF" with
the PBC ON/OFF button. (See page 18.)
Video CD without the PBC function:
Press the CD #¥8 button.
Press the VIDEO INTRO button on the
Remote Control after a picture appears
on the TV screen.
The Video Intro Play starts and the first five seconds of
nine tracks are played in sequence.
1 2 3
4 5 6
7 8 9
whose track number is greater than nine will be displayed after the first nine tracks have been displayed.
Press the VCD NUMBER UP or DOWN
3
button to select the track and then press
the SELECT button. Continuous Play
starts from the selected track.
• When you use the Unit, press the VCD NUMBER + or –
button to select the track . Then , press the SELECT button.
To stop and cancel the Video Intro Play,
• During the Video Intro Play, image shown on the display
may be partially distorted, resulting from noises or incorrect manufacturing of the CD.
• You can use the follo wing features using the Remote Con trol.
press the
7
button.
Viewing the Highlights of Video CDs
You can view nine highlight scenes of the selected track on
a video CD. These highlight scenes are created by dividing
the track equally into nine portions and the beginning (5 seconds each) of those nine scenes are shown on the display.
Play the video CD.
1
Video CD with the PBC function:
Perform PBC OFF Play after selecting "PBC OFF" with
the PBC ON/OFF button. (See page 18.)
Video CD without the PBC function:
Press the CD #¥8 button.
Press the HIGHLIGHT button after a pic-
2
ture appears on the TV screen.
The Highlight Play starts and shows in sequence, the
first five seconds of nine divided highlight scenes on the
TV screen for one minute. If a highlight scene is not selected, it will automatically start and show highlight of
the next track every one minute.
TV screen will show the below:
Press the VCD NUMBER UP or DOWN
3
button to select the highlight number
and press the SELECT button.
Playback starts from the selected scene.
To stop and cancel the Highlight Play, press the 7
button.
• If none of highlight scenes is selected for approx. one
minute, while nine scenes are shown on the TV, nine highlight scenes of the next track will appear on the display.
(After the highlight scenes of the last track are displayed,
the video CD stops.)
• When a highlight scene is selected, playback starts from
the beginning of the highlight scene, but not from the still
image shown on the display (the part shown is the last part
of the highlight scene, not its beginning).
• During the Highlight Play, image shown on the display
may be partially distorted, resulting from noises or incorrect manufacturing of the CD.
Page 23

Using External Equipments
REMOTE CONTROL
DIMMER SLEEP
FM MODE
DISPLAY DOOR SLIDE
MPX
TONE
CLOCK
AHB PRO
CONTROL
/ TIMER
PLAY MODE REPEAT CANCEL
HIGHLIGHT
VIDEO INTRO STILL
PBC ON / OFF
FADE MUTING
MD/AUX
VCD NUMBER
UP
SELECT
SET
DOWN
VCD NUMBER
CD
MD / AUX FM
VOLUME
ON SCREEN
/
NEXTPREV
AM
MD/AUX
English
Listening to External
Equipment
You can listen to external equipment such as MD recorder,
turntable or other auxiliary.
❏First make sure that the external equipment is properly
connected to the System. (See page 7).
Set the VOLUME control to the mini-
1
mum position.
Press the MD/AUX button.
2
“MD/AUX” appears on the display.
Start playing the external equipment.
3
Adjust the VOLUME control to the
4
desired listening level.
Apply sound effects, if you wish.
5
❏Press the AHB PRO button on the Remote Control to re-
inforce the bass sound.
❏Adjust the tone (bass and treble) by using the TONE
CONTROL button on the Remote Control. (See “Tone
Control” on page 10.)
To exit MD/AUX mode, you will automatically switch
out of MD/AUX mode when you select another source.
Recording the System’s Source
to External Equipment
You can record the System’s source to external equipment
which is connected to the MD/AUX-OUT or CD DIGITAL
OUT terminals of the System, such as cassette deck or MD
recorder, etc.
❏First make sure that the external equipment is properly
connected to the System. (See page 7).
Play a CD or tune in to a station.
❏The recording level is not affected by the VOLUME level
set by the System. Also it is not affected by the sound effects.
• For operation of the external equipment, refer to its Instructions.
• During playing a video CD or using tuner, no signal is output from the CD DIGITAL OUT terminals.
• For operation of the external equipment, refer to its Instructions.
20
Page 24

Using the Timers
English
SLEEP
REMOTE CONTROL
DIMMER SLEEP
FM MODE
DISPLAY DOOR SLIDE
MPX
TONE
CLOCK
AHB PRO
CONTROL
/ TIMER
PLAY MODE REPEAT CANCEL
HIGHLIGHT
VIDEO INTRO STILL
PBC ON / OFF
<
FADE MUTING
VCD NUMBER
UP
SELECT
SET
DOWN
VCD NUMBER
CD
MD / AUX FM
VOLUME
ON SCREEN
/
NEXTPREV
AM
CLOCK/TIMER
UP
>
DOWN
SLEEP
ON time, OFF time,
Source, Volume
Timer indicator
SLEEP indicator
* When the System is in use, the display shows other items as well.
For simplicity, we show here only the items described in this section.
The timers let you control listening functions automatically.
Setting the Clock
(Using the Remote Control)
• Y ou can set the clock whether the System is turned on or of f.
• When you plug the AC power cord into the wall outlet,
the time indication “0:00” blinks on the display.
• The clock must be correctly set for the timers to work.
• The procedure must be completed within
Otherwise, the setting is cleared and must be repeated
from the beginning.
CLOCK
/ TIMER
Press the CLOCK/TIMER button on the
1
UP
DOWN
or
Remote Control.
The hour digit of the time indication rapidly blinks on
the display.
Press the UP or DOWN button to set the
2
hour.
Pressing the UP button moves the time forwards and
pressing the DOWN button moves it backwards. Hold
down the button to move the time rapidly.
You can use the > or < button instead of the UP or
DOWN button.
two minutes
SET
.
Press the UP or DOWN button to set the
4
minute.
You can use the > or < button instead of the UP or
DOWN button.
Press the SET button.
5
The selected time is set and the seconds start counting
from 0.
To change the set time, press the CLOCK/TIMER button three times to display the clock, and then repeat
from step 2.
CAUTION:
• If there is a power failure, the clock loses its
setting after about 20 minutes. “0:00”
blinks on the display and the clock must be
reset.
• The clock may gain or lose one to two minutes per month.
Setting the Daily Timer
(Using the Remote Control)
Once you have set the Daily Timer, the timer will be activated at the same time every day.
The Timer indicator on the display shows that the Daily
Timer you have set is in effect.
If the unit is already turned on at the ON time of the timer,
the timer does not work.
Press the SET button.
3
The minute digits of the time indication rapidly blink on
the display.
21
• Perform each setting within
30 seconds
. Otherwise, setting will be cleared and the procedure must be repeated
from the beginning.
Page 25

Using the Timers
Entering the timer setting mode.
1
Press the CLOCK/TIMER button on the Remote Control.
“TIMER” appears and the Timer indicator ( ) lights
up on the display.
Setting the ON time (Example: 10:15).
2
1. Press the CLOCK/TIMER button.
The hour digit of the current ON time blinks on the
display.
Press the UP (>) or DOWN (> or <) button on the Remote control to set the hour you want the Unit to
come on.
Pressing the UP (>) button moves the time forwards
and pressing the DOWN (<) button moves it backwards. Hold down the button to move the time rapidly.
2. Press the SET button.
The minute digits of the ON time blink on the display.
Set the minute you want the Unit to be turned off, using the UP or DOWN (> or <) buttons.
• T o proceed to the next step, the OFF time must dif fer
from the ON time.
Selecting the music source.
4
1. Press the SET button.
The “TUNER” or “CD” blinks on the display.
2. Press the UP or DOWN (> or <) button to select the
music source you want to listen to.
The display changes as shown below.
TUNER
Setting the volume level.
5
1. Press the SET button.
The current volume setting blinks on the display.
2. Press the UP or DOWN (> or <) button to select the volume level.
-- :The volume level immediately before turn-
0 to 50 :When the timer is turned on, the Volume
ÔCDÔ(back to the beginning)
ing off the system is used.
will be automatically set to the selected
level. (It is possible to fade in the sound
from volume level 0 (zero) to the preset
volume.)
English
Set the minute you want the Unit to come on, using
the UP or DOWN button.
Setting the OFF time (Example: 13:30).
3
1. Press the SET button.
The hour digit of the OFF time blink s on the disp lay.
Set the hour you want the Unit to be turned off, using
the UP or DOWN (> or <) button.
2. Press the SET button.
The minute digits of the OFF time blink on the display.
Press the SET button.
6
The timer setting is completed and each setting value
appears on the display for two seconds in the order of
ON time, OFF time, music source and volume. Then,
the display returns to the display before you set the Timer. The Timer indicator ( ) remains lit.
Before turning off the System, prepare
7
the music source selected in step 4.
TUNER:Tune in to the desired station.
CD: Insert a CD. (Playback will start from the first
Press the %%%% button to turn off the Sys-
8
track at Timer on.)
tem.
In standby mode, you can see the Timer indicator ( )
on the display.
• When the timer turns on, the Timer indicator starts
blinking and the prepared source in step 7 will be
played.
❏During setting the timer, pressing the CANCEL button
will return to the previous setting step.
To cancel the timer, press the CLOCK/TIMER button
and then the CANCEL button. "TIMER OFF" appears and
the Timer indicator ( ) goes out on the display.
22
Page 26

Using the Timers
To re-activate the cancelled timer, press the CLOCK/
TIMER button and then the SET button. The Timer indicator ( ) will light up again and you can see the current timer settings (ON time, OFF time, music source and volume).
English
To confirm the timer settings, press the CLOCK/TIM-
ER button and then the SET button. You can see the current
timer settings (ON time, OFF time, music source and volume).
CAUTION:
• If the System is unplugged, or a power failure occurs, the timer setting will be lost.
You will need to reset the clock first, then
the timer.
Setting the SLEEP Timer
(Using the Remote Control)
Use the Sleep Timer to turn the System off after a certain
number of minutes when it is playing. By setting the Sleep
Timer, you can fall asleep to music and know that your System will turn off by itself rather than play all night.
❏You can only set the Sleep Timer when the System is on
and a source is playing.
Play a CD or tune in to the desired sta-
1
tion.
To Confirm the Sleep Time:
When the SLEEP button is pressed, the remaining sleep
time is displayed. Wait until the display returns to the original display.
To Cancel the SLEEP Timer Setting:
Press the SLEEP button until the “SLEEP” indicator goes
out on the display.
Turning off the System also cancels the SLEEP Timer.
❏If you are setting the Daily Timer, the System will be
turned on at the set time to wake you up.
Press the SLEEP button on the Remote
2
Control.
The “SLEEP” indicator lights up.
❏When the clock is not set, “CLOCK” and “ADJUST”
appear alternately on the display. Set the clock at first.
Set the length of time you want the
3
source to play before shutting off.
• Each time you press the SLEEP button, it changes
the number of minutes shown on the display in this
sequence:
10
= 20 = 30 = 60 = 90 = 120 = Cancelled =
(back to the beginning)
The selected number of minutes for the Sleep Timer will
stop blinking five seconds later and the display returns to
the original one before setting the Sleep Timer. (The display
is dimmed.)
The System is now set to turn off after the number of minutes you set.
23
Page 27

Care And Maintenance
Handle your CDs carefully, and they will last a long time.
Compact Discs
• Only CDs bearing this mark can
be used with this System. However, continued use of irregular
shape CDs (heart-shape, octagonal, etc.) can damage the System.
• Remove the CD from its case by
holding it at the edges while
pressing the case’s center hole
lightly.
• Do not touch the shiny surface of
the CD, or bend the CD.
Cleaning the Lens
If the lens in the CD pickup is dirty, dropout, etc., could degrade sound.
Open the Top Cover and clean the lens as shown.
• Use a blower (available from a camera store) to blow
dust off the lens.
Blower
Lens
NTSC / PAL COMPATIBILITY
• If there are fingerprints, etc. on the lens, gently wipe
clean with a cotton swab .
English
• Put the CD back in its case after
use to prevent warping.
• Be careful not to scratch the surface of the CD when placing it
back in the case.
• A void exposur e to direct sunlight,
temperature extremes, and moisture.
• A dirty CD may not play correctly . If a CD does become dirty,
wipe it with a soft cloth in a
straight line from center to edge.
CAUTION:
• Do not use any solvent (for example, conventional record cleaner, spray thinner,
benzine, etc.) to clean a CD.
General Notes
In general, you will have the best performance by keeping
your CDs and the mechanism clean.
• Store CDs in their cases, and keep them in cabinets or on
shelves.
• Keep the System’s Top Cover closed when not in use.
Moisture Condensation
Moisture may condense on the lens
inside the System in the following
cases:
• After turning on heating in the
room.
• In a damp room.
• If the System is brought directly
from a cold to a warm place.
Should this occur, the System may
malfunction. In this case, leave the
System turned on for a few hours until the moisture evaporates, unplug
the AC power cord, and then plug it
in again.
24
Page 28

Troubleshooting
• If you are having a problem with your System, check this list for a possible solution before calling for service.
• If you cannot solve the problem from the hints given here, or the System has been physically damaged, call a qualif ied person, such as your dealer, for service.
English
Symptom Possible Cause Action
No sound is heard. • Connections are incorrect, or loose.
• Headphones are connected.
Poor radio reception • The antenna is disconnected.
The CD skips. The CD is dirty or scratched. Clean or replace the CD.
The CD does not play. The CD is upside down. Put the CD in with the label side up.
Unable to operate the Remote Control. • The path between the Remote Con-
The image on the TV screen is distorted. VIDEO OUT select is not matching. Select the correct TV system. (See page
The picture of the video CD or CD-G is
distorted.
Operations are disabled. The built-in microprocessor has mal-
• The AM Loop Antenna is too close
to the System.
• The FM Wire Antenna is not properly extended and positioned.
trol and the sensor on the Unit is
blocked.
• The batteries have lost their charge.
When you pause or skip the track, the
pictures will be distorted. This is not a
malfunction.
functioned due to external electrical interference.
• Check all connections and make corrections. (See pages 4 to 8.)
• Disconnect the headphones.
• Reconnect the antenna securely.
• Change the position and direction of
the AM Loop Antenna.
• Extend FM Wire Antenna to the best
reception position.
• Remove the obstruction.
• Replace the batteries.
16.)
Unplug the System then plug it back in
after a few minutes.
25
Page 29

Specifications
Amplifier
,QSXWý6HQVLWLYLW\î,PSHGDQFHýõìýN+]ô
2XWSXWý6HQVLWLYLW\î,PSHGDQFHýõìýN+]ô
&'ý',*,7$/ý287ýõ2SWLFDOýRXWô –21 dBm - –15 dBm
9LGHRý2XWýõFRPSRVLWHô 1.0 Vp - p (75 ohms)
2XWSXWý3RZHU 32 W (16 W + 16 W) at 4 ohms (Max.)
0'î$8;ý,1 500 mV/50 kohms
0'î$8;ý287 500 mV/5 kohms
6SHDNHUýWHUPLQDOV 4 - 16 ohms
3KRQHV 16 ohms - 1 kohm
English
0 - 15 mW/ch output into 32 ohms
6LJQDOð7Rð1RLVHý5DWLR 90 dB
CD Player
:RZý$QGý)OXWWHU Unmeasurable
3OD\EDFNý'LVF Video CD (with/without Playback Control function), CD Graph-
Tuner
)0ý7XQHU
7XQLQJý5DQJH 87.50 MHz - 108.00 MHz
$0ý7XQHU
7XQLQJý5DQJH 531 kHz – 1, 710kHz (at 9 kHz channel space)
Center Unit (CA-SD58V/SD78V/SD98V)
'LPHQVLRQV 300mm
0DVV Approx. 3.0kg
Speaker Specifications (each unit)
SP-SD58V
6SHDNHUV 8 cm cone
,PSHGDQFH 4 ohms
'LPHQVLRQV 100mm ✕ 186mm ✕ 193.5mm (W/H/D)
0DVV 1.5kg
SP-SD78V
6SHDNHUV 8 cm cone
,PSHGDQFH 4 ohms
'LPHQVLRQV 137mm ✕ 231mm ✕ 141mm (W/H/D)
0DVV 1.4kg
SP-SD98V
6SHDNHUV 8 cm cone
,PSHGDQFH 4 ohms
'LPHQVLRQV 135mm ✕ 231mm ✕ 141mm (W/H/D)
0DVV 1.4kg
ics, Audio CD
530 kHz – 1, 710kHz (at 10 kHz channel space)
✕ 75mm ✕ 215mm (W/H/D)
Accessories
Power Cord (1)
Remote Control (1)
Batteries R6P (SUM-3)/AA (15F) (2)
AM Loop Antenna (1)
FM Wire Antenna (1)
Speaker Cords (2)
Video Cord (1)
Spacers (6) (only for SP-SD78V/SD98V)
AC Plug Adaptor (except for Hong Kong) (1)
Power Specifications
3RZHUý5HTXLUHPHQWV AC 110/127/230 V ~ adjustable with the voltage selector, 50/60 Hz
3RZHUý&RQVXPSWLRQ 28 watts (power on mode)
2 watts (in Standby mode)
'HVLJQýDQGýVSHFLILFDWLRQVýDUHýVXEMHFWýWRýFKDQJHýZLWKRXWýQRWLFHï
26
Page 30

Mains (AC) Line Instruction (not applicable for Europe, U.S.A., Canada, Australia, and U.K.)
VIDEO OUT
CD DIGITAL OUT
AM LOOP
OUT IN
MD
ANTENNA
AM EXT FM(75
COAXIAL
/
AUX
)
IMPORTANT for mains (AC) line
%()25(ý 3/8**,1*ý ,1ñý GRý FKHFNý WKDWý \RXUý PDLQV
õ$&ôýOLQHý YROWDJHýFRUUHVSRQGVýZLWKýWKHýSRVLWLRQý RIýWKH
YROWDJHýVHOHFWRUýVZLWFKýSURYLGHGýRQýWKHýRXWVLGHýRIý WKLV
HTXLSPHQWý DQGñý LIý GLIIHUHQWñý UHVHWý WKHý YROWDJHý VHOHFWRU
VZLWFKñýWRýSUHYHQWýIURPýDýGDPDJHýRUýULVNýRIýILUHîHOHFWULF
VKRFNï
SPEAKERS IMPEDANCE 4 16
R
AC IN
L
EN, CH
VICTOR COMPANY OF JAPAN, LIMITED
0900MNMCREJSC
 Loading...