

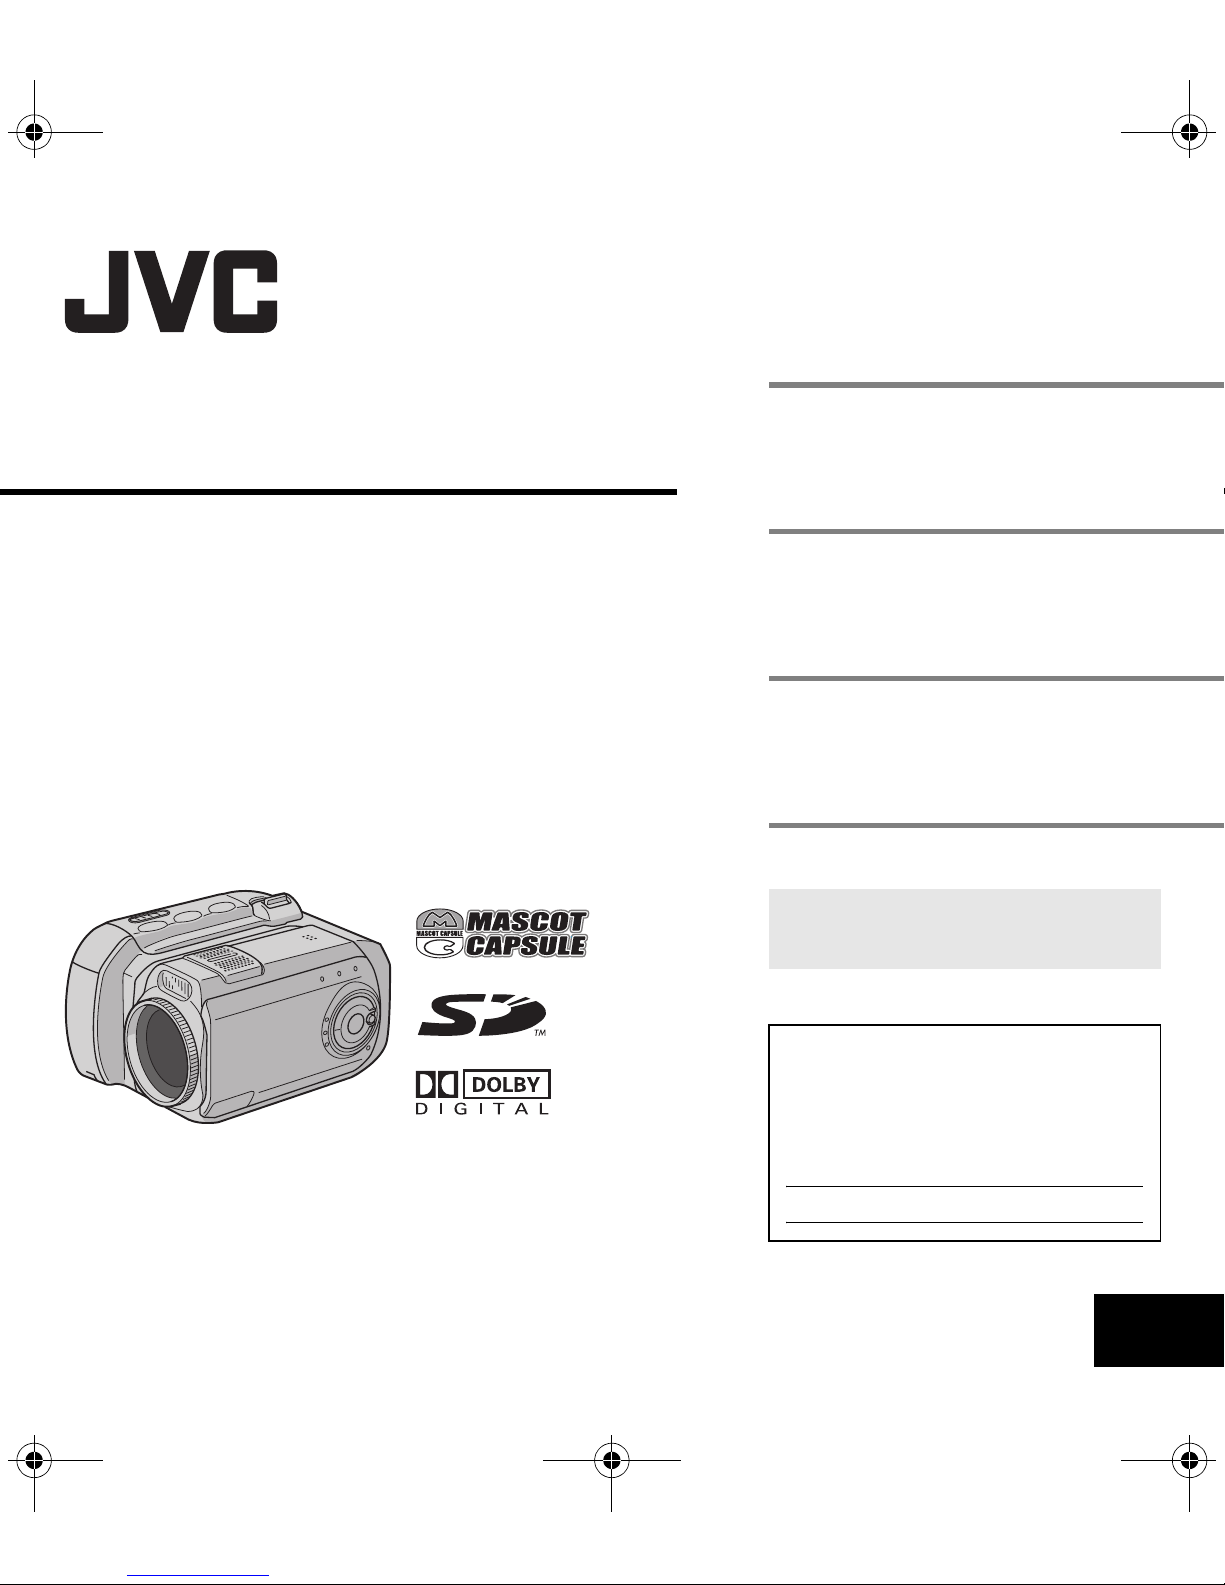
JVC Everio GZ-MC200EK, Everio GZ-MC200US, GZ-MC200EX, GZ-MC200EY, GZ-MC200EZ Instruction Manual
...Page 1
GZ-MC200US.book Page 1 Tuesday, September 7, 2004 9:56 PM
MasterPage: Cover
ENGLISH
DIGITAL MEDIA CAMERA
GZ-MC200
GETTING STARTED
BASIC OPERATIONS
(RECORDING & PLAYBACK)
MENU SETTINGS
REFERENCES
To deactivate the demonstration, set
“DEMO MODE” to “OFF”. (
墌 pg. 26)
6
19
26
32
INSTRUCTIONS
This instruction manual describes the basic operations of the camera.
For more information, read the advanced operation manual provided
as HTML format in the CD-ROM. See page 32 for details.
For Customer Use:
Enter below the Model No. and Serial
No. which is located on the bottom of
the camera. Retain this information for
future reference.
Model No.
Serial No.
LYT1332-001A
EN
Page 2
GZ-MC200US.book Page 2 Tuesday, September 7, 2004 9:56 PM
2 EN
Major Features of this Camera
MasterPage: Safty_Left
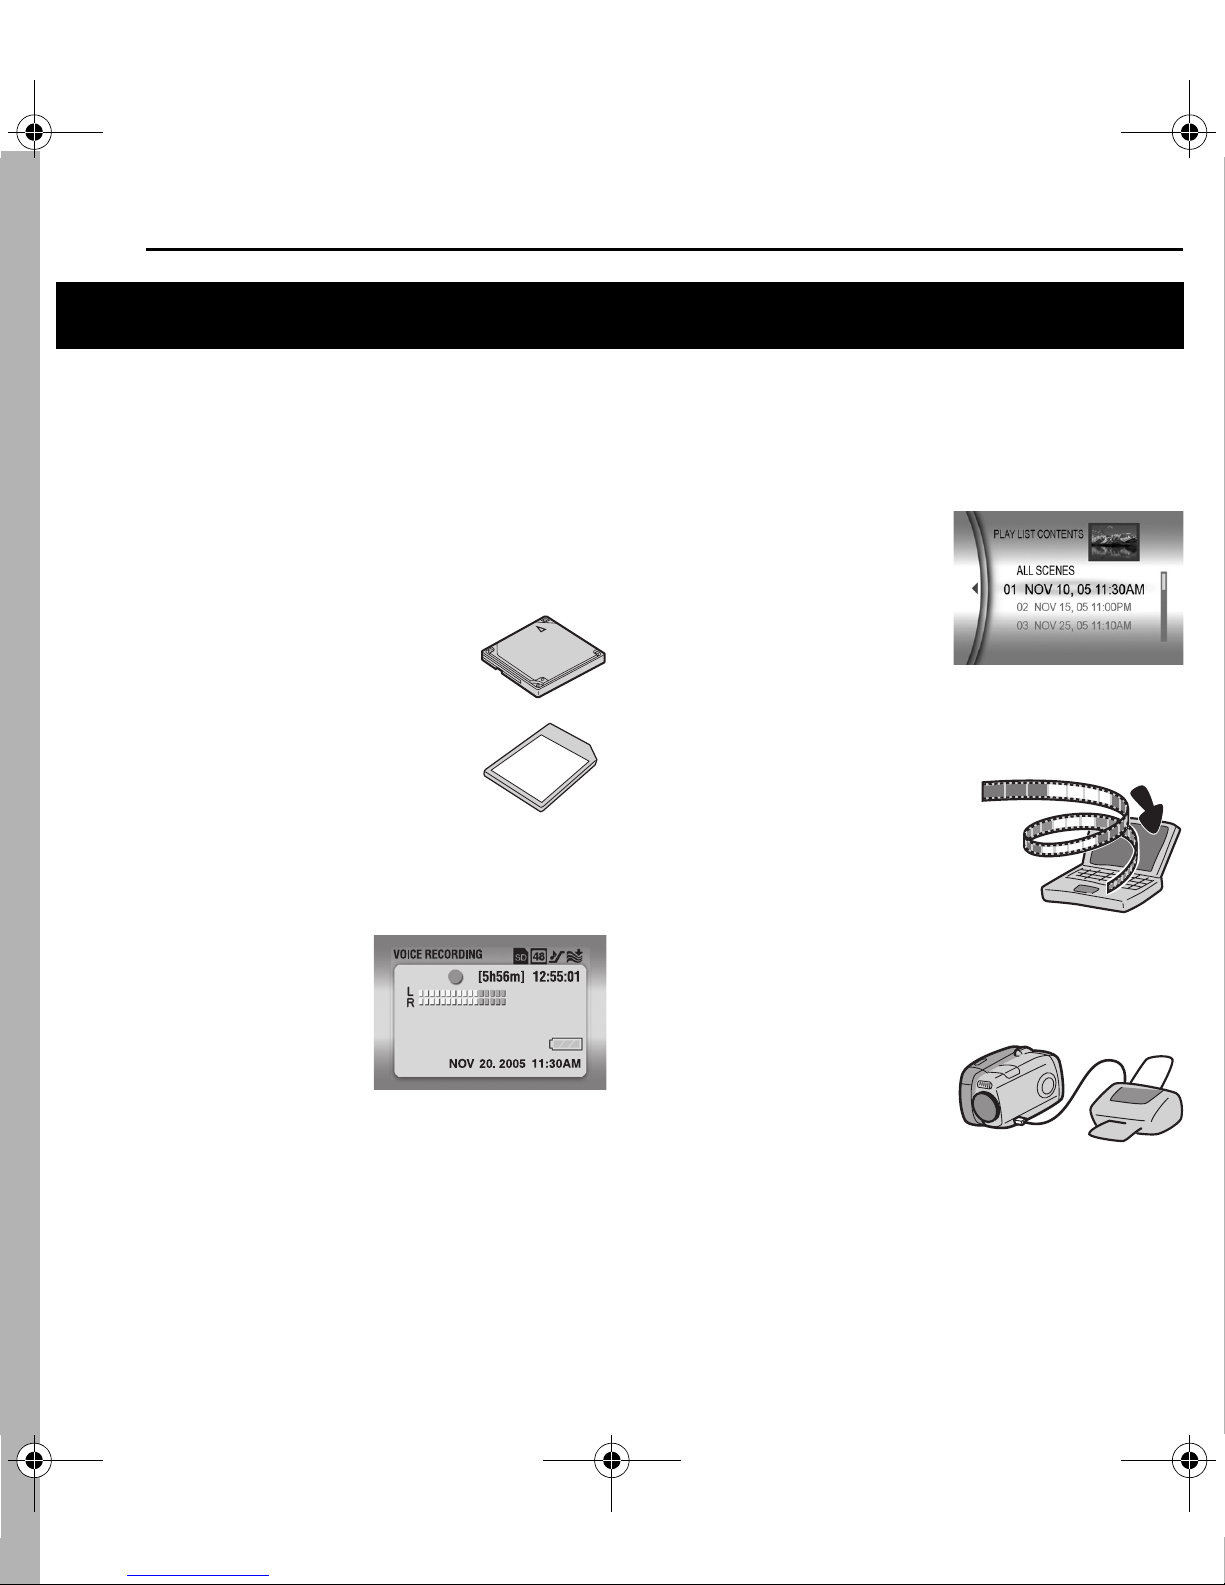
Removable hard disk
In contrast to conventional digital video cameras that
record to DV tapes, the removable hard disk is a new type
of card media that enables extended hours of highresolution, MPEG2 video recording. (墌 pg. 5)
Various Recording Media and Modes
Video and still images can be recorded to
CompactFlash card (CF card) and SD
memory card. The removable hard disk
(provided) or Microdrive is a type of CF
card compliant with CF+ Type II.
You can select the most suitable recording
medium and mode for picture quality,
image size, recording time, and computer
environment. (墌 pg. 42)
Voice Recording Features
The camera can be used as a
voice recorder for audio
recordings. (墌 pg. 24)
Enjoying Various Playback Features
Unlike tape operation, playback is simple and easy in this
camera since no time is needed for rewinding or fast
forward operations.
Playlist, playback effects, and
other functions are also
available for enjoying many
different types of playback.
(Refer to the advanced
operation manual in CD-ROM.
墌 pg. 32)
Editing Files on your PC
USB 2.0 enables the smooth
transfer of video and still images to
a computer. With the bundled
Cyberlink software, you can easily
edit video and create your own
DVDs. (Refer to “SOFTWARE
INSTALLATION AND USB CONNECTION GUIDE”.)
Direct Printing
If your printer is compatible with
PictBridge, still images can be
printed easily by connecting the
camera with USB cable directly
to the printer. (Refer to the advanced operation manual in
CD-ROM. 墌 pg. 32)
Page 3
GZ-MC200US.book Page 3 Tuesday, September 7, 2004 9:56 PM
MasterPage: Safty_Right
EN 3
Dear Customer,
Thank you for purchasing this digital media camera. Before
use, please read the safety information and precautions
contained in the pages 3 – 4 to ensure safe use of this
product.
SAFETY PRECAUTIONS
CAUTION
RISK OF ELECTRIC SHOCK
DO NOT OPEN
CAUTION: TO REDUCE THE RISK OF ELECTRIC SHOCK,
REFER SERVICING TO QUALIFIED SERVICE PERSONNEL.
WARNING: TO PREVENT FIRE OR SHOCK HAZARD,
DO NOT EXPOSE THIS UNIT TO RAIN OR MOISTURE.
CAUTIONS:
● This camera is designed to be used with NTSC-type
color television signals. It cannot be used for playback
with a television of a different standard. However, live
recording and LCD monitor playback are possible
anywhere.
● Use the JVC BN-VM200U battery pack and, to recharge
it or to supply power to the camera from an AC outlet,
use the provided multi-voltage AC adapter. (An
appropriate conversion adapter may be necessary to
accommodate different designs of AC outlets in different
countries.)
DO NOT REMOVE COVER (OR BACK).
NO USER-SERVICEABLE PARTS INSIDE.
The lightning flash with arrowhead symbol, within an
equilateral triangle, is intended to alert the user to the
presence of uninsulated "dangerous voltage" within the
product's enclosure that may be of sufficient magnitude
to constitute a risk of electric shock to persons.
The exclamation point within an equilateral triangle is
intended to alert the user to the presence of import
operating and maintenance (servicing) instructions in
the literature accompanying the appliance.
ant
NOTES:
● The rating plate (serial number plate) and safety caution
are on the bottom and/or the back of the main unit.
● The rating information and safety caution of the AC
adapter are on its upper and lower sides.
This product has a fluorescent lamp that contains a small
amount of mercury. Disposal of these materials may be
regulated in your community due to environmental
considerations.
For disposal or recycling information please contact your
local authorities, or the Electronics Industries Alliance:
<http://www.eiae.org>
When the equipment is installed in a cabinet or on a shelf,
make sure that it has sufficient space on all sides to allow
for ventilation (10 cm (3-15/16") or more on both sides, on
top and at the rear).
Do not block the ventilation holes.
(If the ventilation holes are blocked by a newspaper, or
cloth etc. the heat may not be able to get out.)
No naked flame sources, such as lighted candles, should
be placed on the apparatus.
When discarding batteries, environmental problems must
be considered and the local rules or laws governing the
disposal of these batteries must be followed strictly.
The apparatus shall not be exposed to dripping or
splashing.
Do not use this equipment in a bathroom or places with
water.
Also do not place any containers filled with water or liquids
(such as cosmetics or medicines, flower vases, potted
plants, cups etc.) on top of this unit.
(If water or liquid is allowed to enter this equipment, fire or
electric shock may be caused.)
Page 4
GZ-MC200US.book Page 4 Tuesday, September 7, 2004 9:56 PM
4 EN
Do not point the lens directly into the sun. This can cause
eye injuries, as well as lead to the malfunctioning of internal
circuitry. There is also a risk of fire or electric shock.
CAUTION!
The following notes concern possible physical damage to
the camera and to the user.
Carrying or holding the camera by the LCD monitor can
result in dropping the unit, or in a malfunction.
Do not use a tripod on unsteady or unlevel surfaces. It could
tip over, causing serious damage to the camera.
CAUTION!
Connecting cables (Audio/Video, S-Video, etc.) to the
camera and leaving it on top of the TV is not recommended,
as tripping on the cables will cause the camera to fall,
resulting in damage.
IMPORTANT SAFETY INSTRUCTIONS
1. Read these instructions.
2. Keep these instructions.
3. Heed all warnings.
4. Follow all instructions.
5. Do not use this apparatus near water.
6. Clean only with dry cloth.
7. Do not block any ventilation openings. Install in
accordance with the manufacturer’s instructions.
8. Do not install near any heat sources such as radiators,
heat registers, stoves, or other apparatus (including
amplifiers) that produce heat.
9. Only use attachments/accessories specified by the
manufacturer.
10. Use only with the cart, stand,
tripod, bracket, or table
specified by the manufacturer,
or sold with the apparatus.
When a cart is used, use
caution when moving the cart/
apparatus combination to
avoid injury from tip-over.
11. Unplug this apparatus during
lightning storms or when
unused for long periods of time.
MasterPage: Safty_Left
12. Refer all servicing to qualified service personnel. Servicing
is required when the apparatus has been damaged in any
way, such as power-supply cord or plug is damaged, liquid
has been spilled or objects have fallen into the apparatus,
the apparatus has been exposed to rain or moisture, does
not operate normally, or has been dropped.
Before Using this Camera
This camera is designed exclusively for CompactFlash
Card (CF card) and SD Memory Card.
The removable hard disk (provided) or Microdrive is a
type of CF card compliant with CF+ Type II.
This camera records video in MPEG2 format compliant
with SD-VIDEO format.
Remember that this camera is not compatible with other
digital video formats.
Remember that this camera is intended for private
consumer use only.
Any commercial use without proper permission is prohibited.
(Even if you record an event such as a show, performance or
exhibition for personal enjoyment, it is strongly recommended
that you obtain permission beforehand.)
Before recording important video, be sure to make a trial
recording.
Play back your trial recording to make sure the video and
audio have been recorded properly.
Also read “Cautions” on pages 37 to 39.
Page 5
GZ-MC200US_02Safety.fm Page 5 Tuesday, September 14, 2004 9:57 AM
MasterPage: Safty_Right
EN 5
● Manufactured under licence from Dolby Laboratories.
“Dolby” and double-D symbol are trademarks of Dolby
Laboratories.
● Microdrive
Storage Technologies, Inc. in the United States and/or other
countries.
●
MascotCapsule is registered trademark of HI
CORPORATION in Japan.
Copyright © 2001 HI CORPORATION. All rights reserved.
● Other product and company names included in this
instruction manual are trademarks and/or registered
trademarks of their respective holders.
®
is a registered trademark of Hitachi Global
Removable Hard Disk
The removable hard disk is a precision electronic device.
Be careful when handling it.
Cautions for external jolt or stress
● After removing the disk from the camera, store it by
inserting into the supplied protective case.
● Do not press on the cover.
● Do not subject the disk to
vibrations or sudden jolts. Be
especially careful to avoid
sudden jolts when shooting or
during playback.
● Do not affix stickers or write on the label.
● Do not apply strong pressure to the outside of the disk.
Also, do not put it in your pants pocket or other location
where it can be pressed on.
Cautions for temperature
● The camera’s protection circuit may work for the proper
recording or playback when the camera’s internal
temperature rises or during usage in a cold location.
(墌 pg. 36)
● The camera and removable hard disk can heat up when
used for an extended period. However, this is not a
malfunction.
● The disk can heat up when used for an extended period.
Therefore, do not remove it immediately from the camera.
Other cautions
● Condensation can cause the drive to break down. If water is
splashed on the drive, make sure that it is completely dried
before usage.
● Do not use, replace, or store the disk in locations that are
exposed to strong static electricity or electrical noise.
● Do not turn off the camera power or remove the battery or
AC adapter during shooting, playback, or when otherwise
accessing the recording medium.
● Do not bring the recording medium near objects that have a
strong magnetic field or that emit strong electromagnetic
waves.
● Since data must be read and written by the drive correctly,
the camera may be unable to shoot when the camera heats
up, such as during continuous shooting, or when the
camera is cooled down during usage in a cold location. To
fix this problem, follow the messages displayed on the
screen. (墌 pg. 36)
● To maintain high performance, perform check disks (error
checks) using your computer on a regular basis. Use a USB
cable to connect the camera and PC, and then perform the
check disk on the removable hard disk using the same
procedure as a regular local disk (C drive). Refer to the
instruction manual of your PC for check disks.
● Clean up the disk regularly to maintain high performance.
(墌 pg. 27)
Also read “Recording Medium” on page 38.
Be careful to completely delete data when discarding or
giving away the removable hard disk.
When recording data is formatted or deleted on the camera,
this only modifies the file management information, and the
data is not completely erased. When discarding or giving
away the removable hard disk, to prevent problems caused by
the release of sensitive information, it is extremely important
that the customer take responsibility to erase all recorded
data. Some recommended methods of erasing data include
using a commercial data removal program or using a hammer
or strong magnet to physically or magnetically destroy the
data on the hard disk so that it cannot be read. JVC shall not
be responsible for any personal data that is released.
Page 6
A
GZ-MC200US.book Page 6 Tuesday, September 7, 2004 9:56 PM
MasterPage: Heading0_Left
6 EN
Index
GETTING STARTED
The top, buttom, left or right sides of
the 49rtwe button can be
pressed to operate like a lever. The
explanation “pressing r” in this
instruction manual means moving
the 49rtwe button in the r
direction.
TTENTION:
● Be careful not to cover W, a, b, c
and
d during shooting.
● Be careful not to cover
playback.
X during
Page 7
GZ-MC200US_03Start.fm Page 7 Friday, September 10, 2004 11:45 AM
MasterPage: Start_Right
Controls
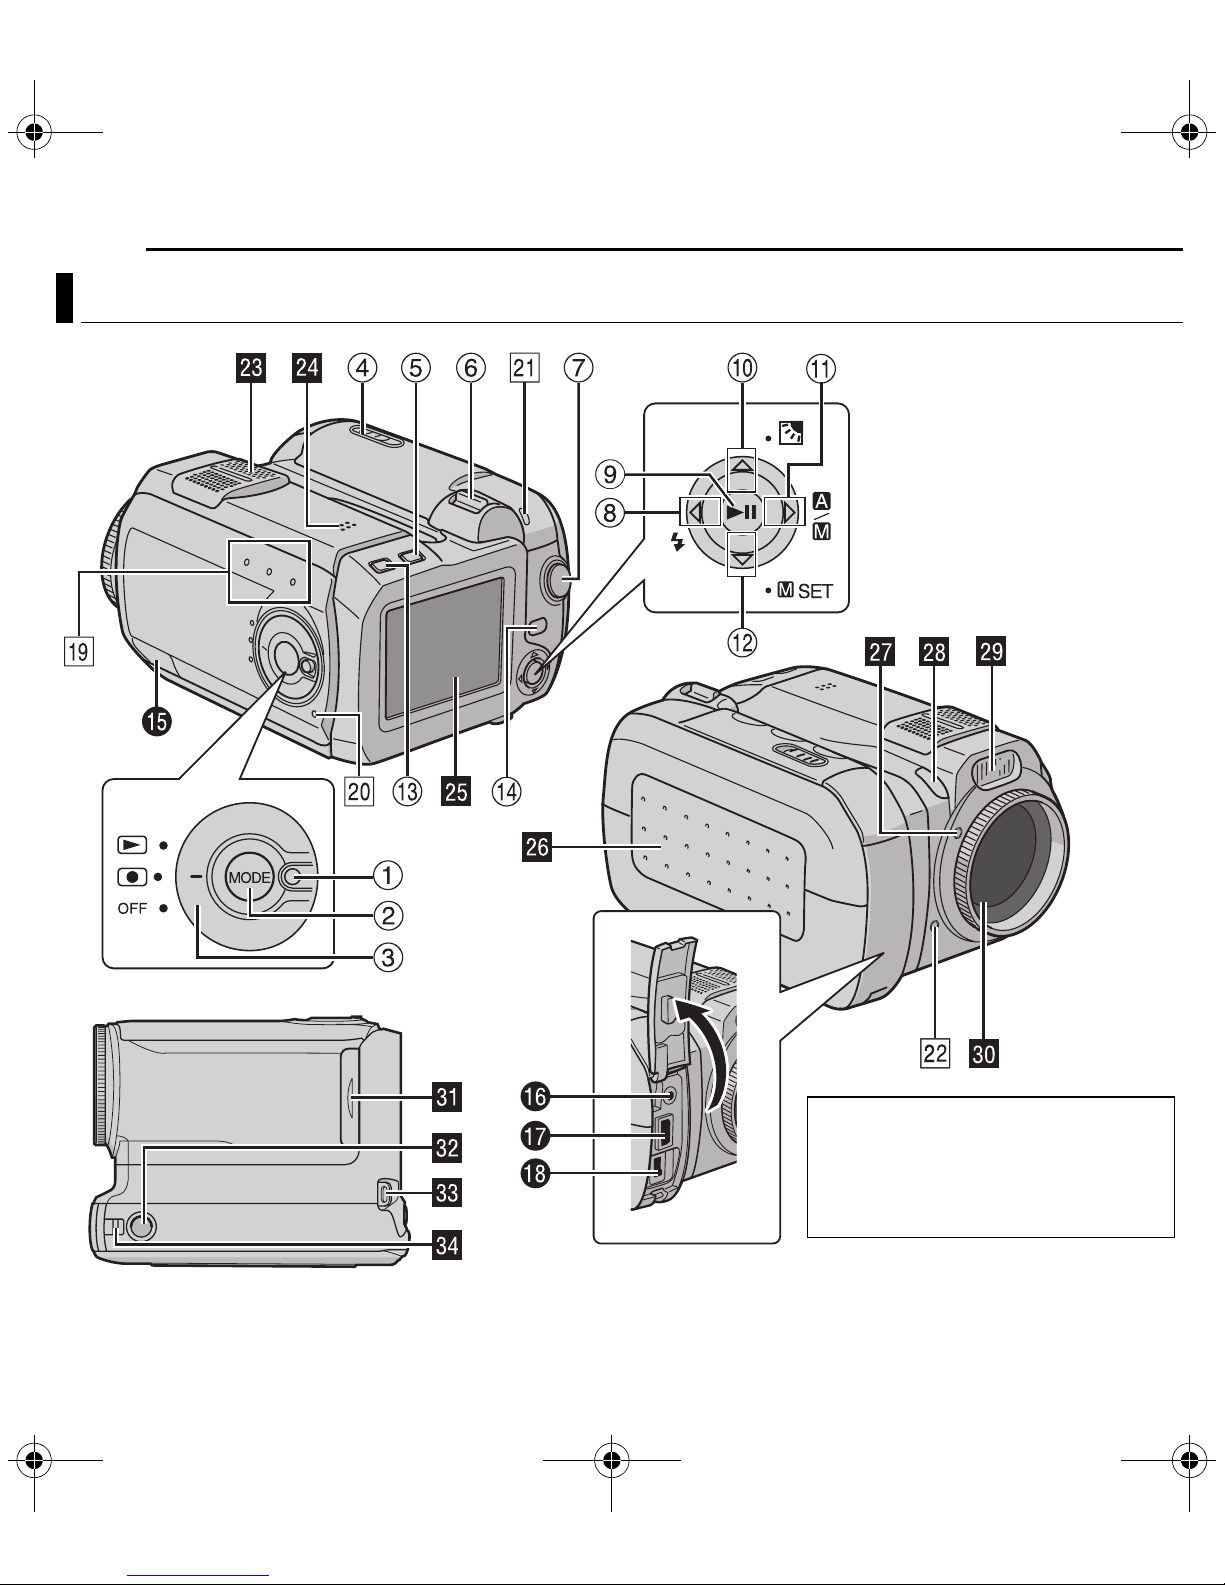
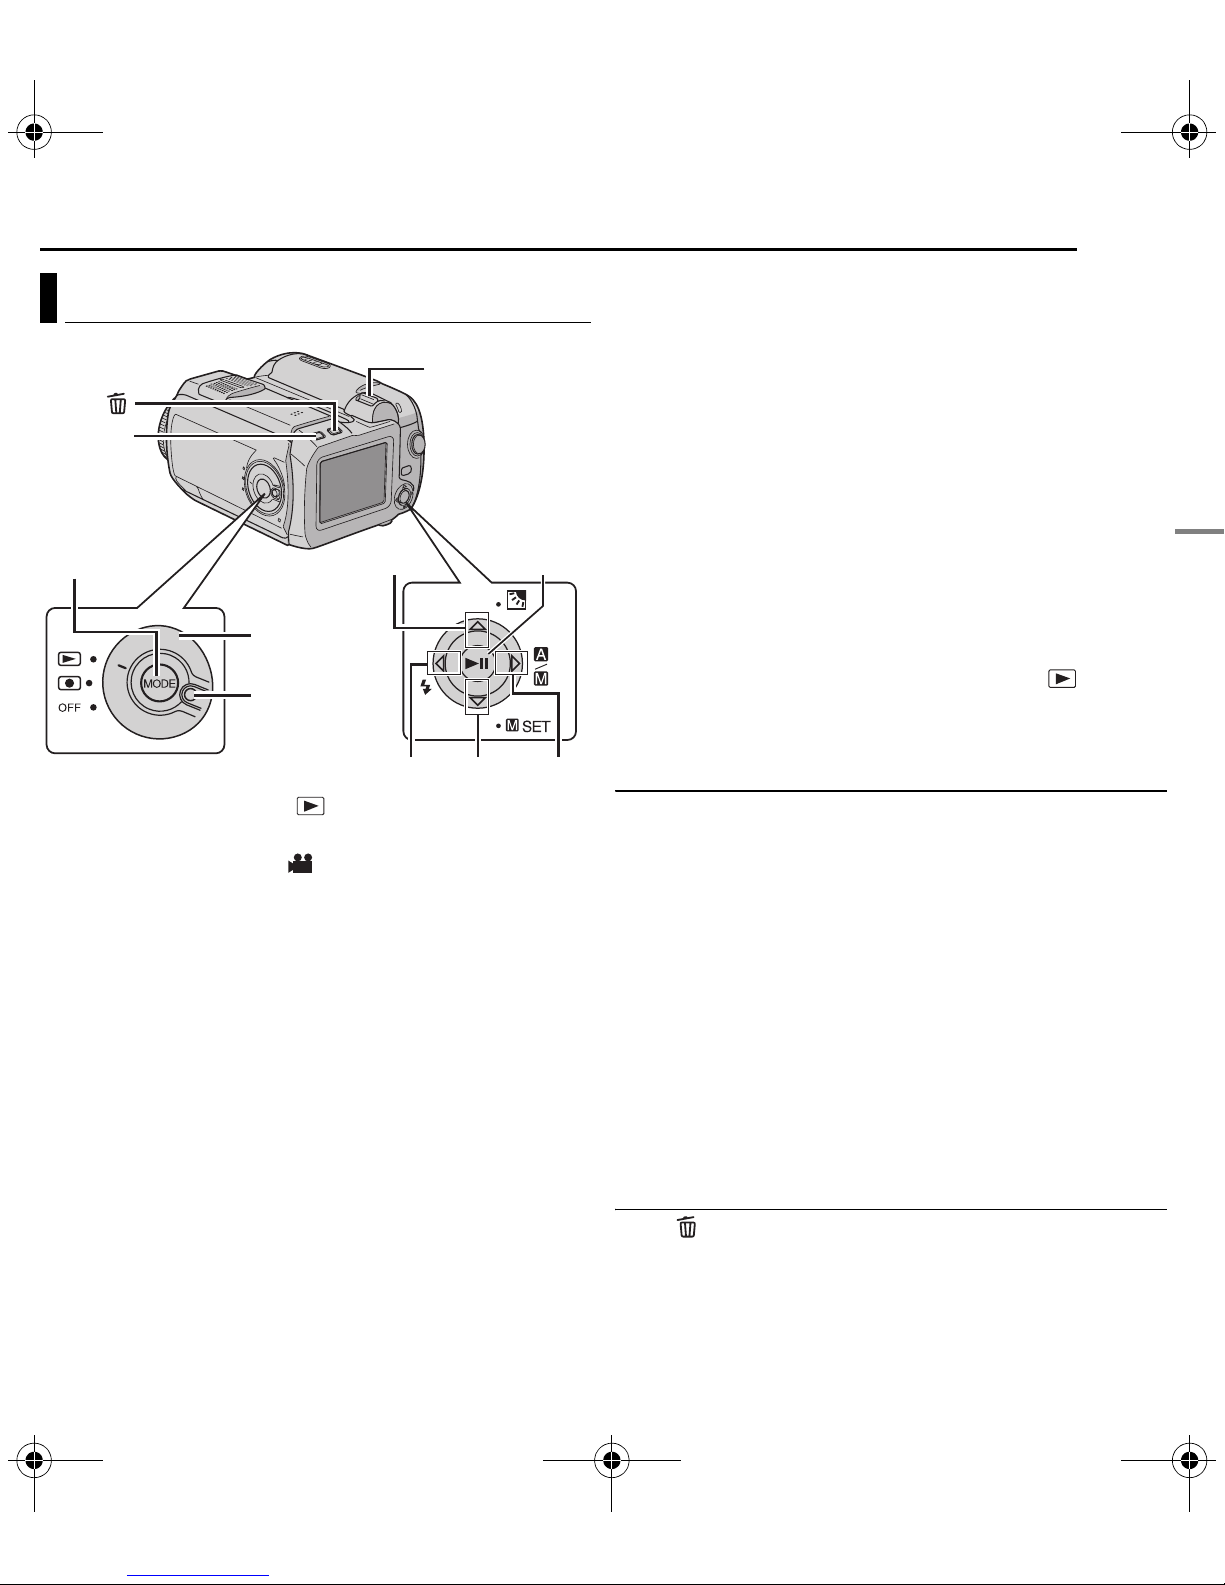
A Lock Button (墌 pg. 19)
B Mode Button [MODE] (墌 pg. 19)
C Power Switch [OFF, , ] (墌 pg. 19)
D Battery/CF Card Cover Open Switch [OPEN]
(墌 pg. 14, 16)
E Delete Button [ ] (墌 pg. 21, 23, 24)
F Zoom Lever [T/W] (墌 pg. 20)
Speaker Volume Control (墌 pg. 21)
G Recording Start/Stop Button (墌 pg. 20)
H Reverse Search Button [w (
Left Button [w] (墌 pg. 26)
Flash Button [ ] (Used to change the flash mode.
Refer to the advanced operation manual. 墌 pg. 32)
I Play/Pause Button [49] (墌 pg. 21)
J Reverse Skip Button [r (
Up Button [r] (墌 pg. 26)
Backlight Compensation Button [ ] (Used to engage
backlight compensation. Refer to the advanced
operation manual. 墌 pg. 32)
K Forward Search Button [e (
Right Button [e] (墌 pg. 26)
Auto/Manual Mode Switch [ ] (墌 pg. 19)
L Forward Skip Button [t (
Down Button [t] (墌 pg. 26)
Manual Set Button [ SET] (墌 pg. 31)
M Information Button [INFO] (Used to display the file
information. Refer to the advanced operation manual.
墌 pg. 32)
N Menu Button [MENU] (墌 pg. 26)
3
)] (墌 pg. 21)
2
)] (墌 pg. 21)
5
)] (墌 pg. 21)
6
)] (墌 pg. 21)
GETTING STARTED
EN 7
Indicators
S Mode Lamp [ (video), (still image), (voice)]
(墌 pg. 19)
T Power/Charge Lamp (墌 pg. 14, 19)
U Access Lamp (Lights up or blinks when you access to
any files. Do not turn off the power or remove the
battery pack/AC adapter while accessing to files during
recording or playback.)
V Tally Lamp (Lights up while recording is in progress.
墌 pg. 20)
Other Parts
W Stereo Microphone
X Speaker (墌 pg. 21)
Y LCD Monitor
Z Battery/CF Card Cover (墌 pg. 14, 16)
a Flash Sensor
b Camera Sensor
c Flash
d Lens
e SD Card Cover [MEMORY CARD] (墌 pg. 16)
f Tripod Mounting Socket
g Hand Strap Eyelet (墌 pg. 12)
h Lens Cap Eyelet (墌 pg. 12)
GETTING STARTED
Connectors
The connectors are located beneath the covers.
O USB (Universal Serial Bus) Connector (Refer to the
software installation and USB connection guide.)
P Headphone connector [ ] (墌 pg. 13)
Q S-Video/Audio/Video Output Connector [AV] (墌 pg. 25)
R DC Input Connector [DC] (墌 pg. 14)
Page 8
GZ-MC200US.book Page 8 Tuesday, September 7, 2004 9:56 PM
MasterPage: Body_Left
8 EN
GETTING STARTED
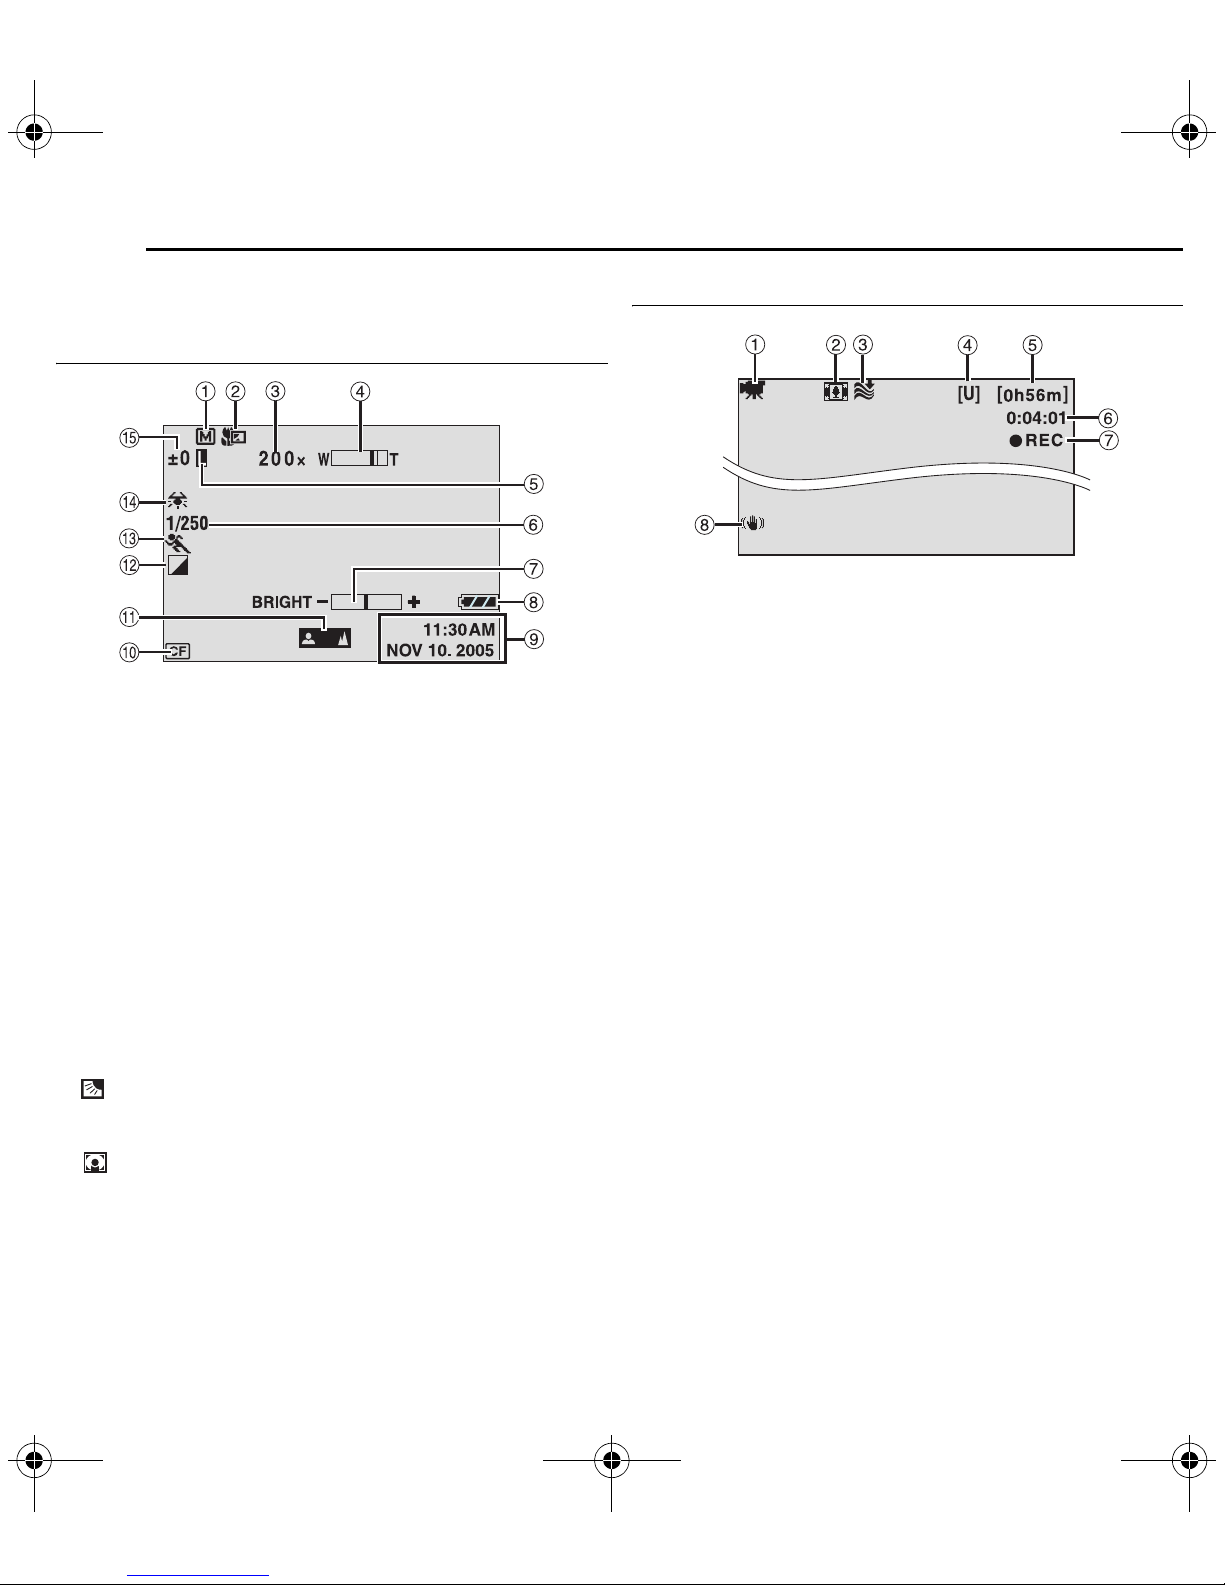
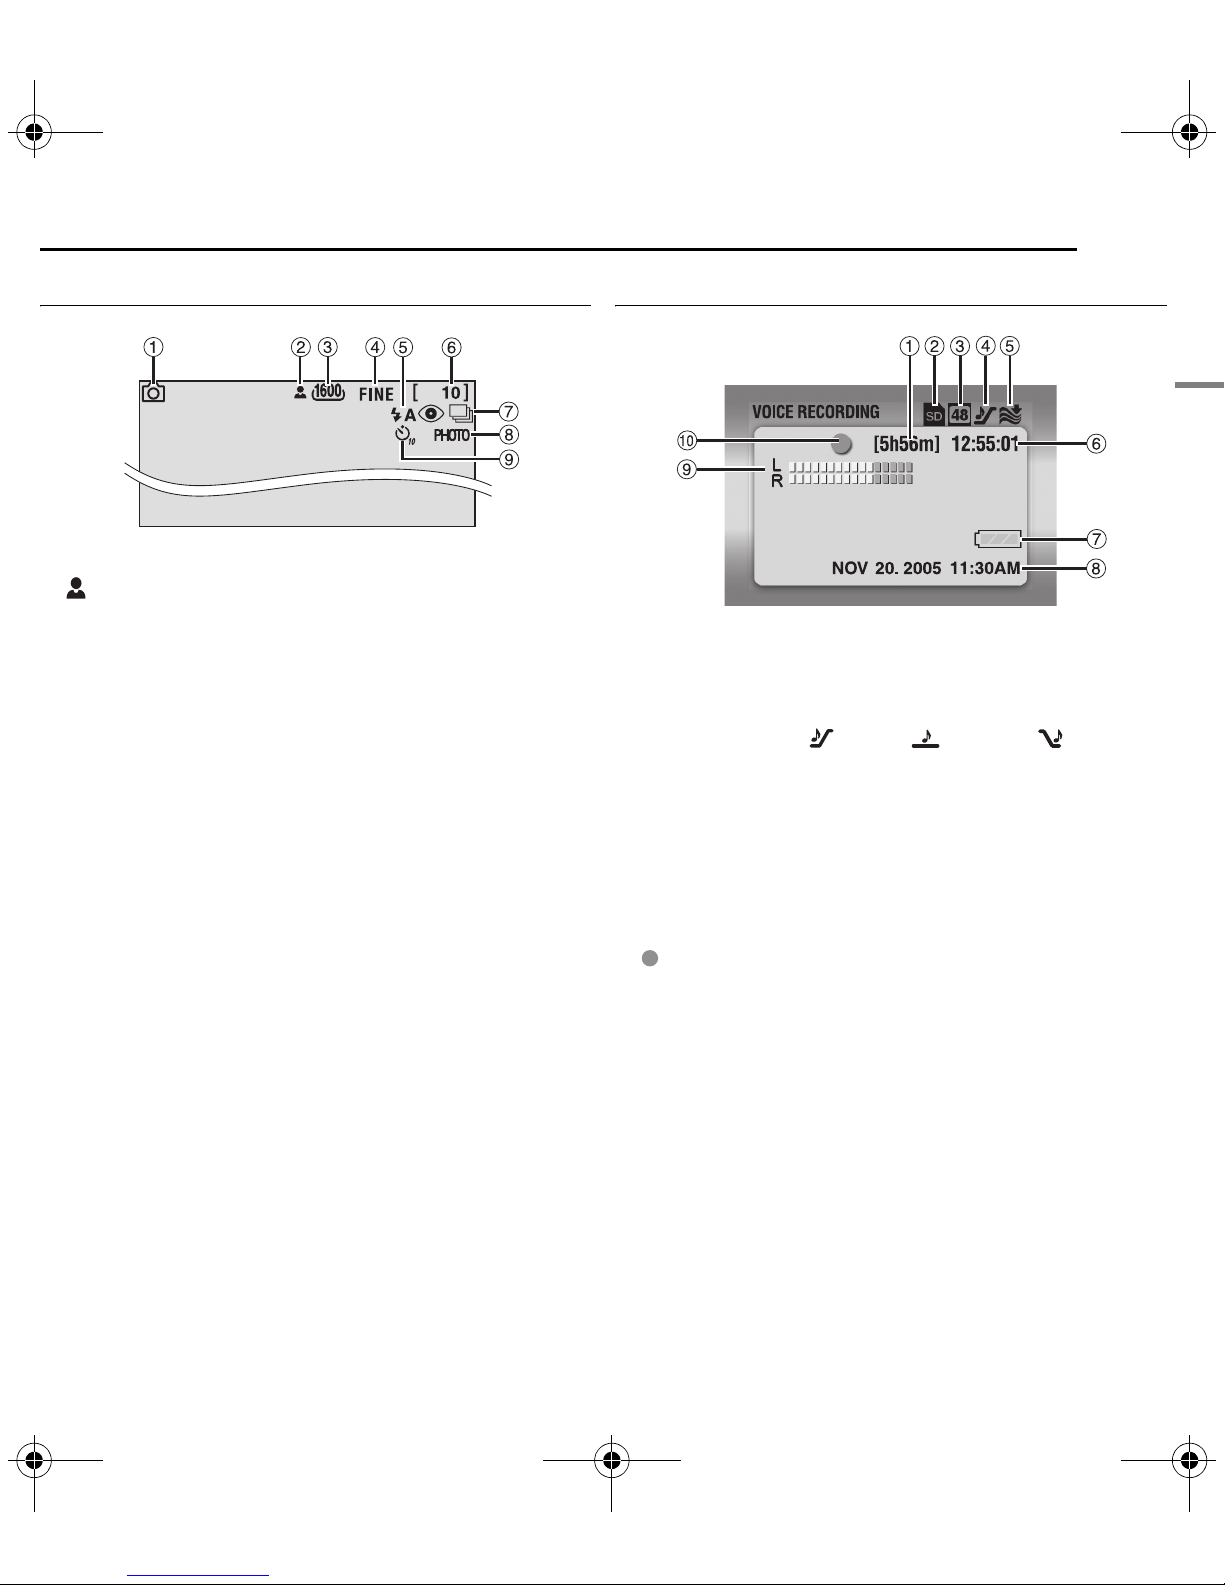
Indications on LCD Monitor
During both Video and Still Image Recording
A Manual Mode Indicator (墌 pg. 19)
B Tele Macro Mode Indicator (墌 pg. 28)
C Approximate Zoom Ratio (墌 pg. 20, 28)
D Zoom Indicator (墌 pg. 20, 28)
E Iris Lock Indicator (Appears when iris is locked. Refer to
the advanced operation manual. 墌 pg. 32)
F Shutter Speed (墌 pg. 31)
G Brightness Control Indicator (墌 pg. 27)
H Battery Indicator
I Date/Time (墌 pg. 27)
J Selected Medium Indicator (墌 pg. 17, 27)
K Manual Focus Adjustment Indicator (墌 pg. 31)
L Effect Mode Indicator (墌 pg. 31)
M Program AE Mode Indicator (墌 pg. 31)
N White Balance Indicator (墌 pg. 31)
O ±: Exposure Adjustment Indicator (墌 pg. 31)
: Backlight Compensation Indicator (Appears when
backlight compensation is engaged. Refer to the
advanced operation manual. 墌 pg. 32)
: Spot Exposure Control Indicator (Appears when
spot exposure control is engaged. Refer to the
advanced operation manual. 墌 pg. 32)
During Video Recording only
A Mode Indicator (墌 pg. 19)
B Wide Mode Indicator (墌 pg. 28)
C Wind Cut Indicator (墌 pg. 28)
D Picture Quality: [U] (ultra fine), [F] (fine), [N] (normal),
[E] (economy) (墌 pg. 28)
E Remaining Time (墌 pg. 20, 42)
F Counter (墌 pg. 27)
G 7REC: (Appears during recording.) (墌 pg. 20)
79: (Appears during record-standby mode.)
(墌 pg. 20)
H Digital Image Stabilizer (DIS) (墌 pg. 28)
Page 9
GZ-MC200US.book Page 9 Tuesday, September 7, 2004 9:56 PM
MasterPage: Start_Right
During Still Image Recording only
A Mode Indicator (墌 pg. 19)
B : Focus Icon (墌 pg. 22)
C Image Size: 1600 (1600 x 1200), 1280 (1280 x 960),
1024 (1024 x 768), 640 (640 x 480) (墌 pg. 29)
D Picture Quality: FINE (fine) and STANDARD (standard)
(墌 pg. 29)
E Flash Indicator (Appears when flash mode is engaged.
Refer to the advanced operation manual. 墌 pg. 32)
F Remaining Number Of Shots (墌 pg. 42)
G Continuous Shooting Mode (墌 pg. 22)
H Shooting Icon (墌 pg. 22)
(Appears during shooting.)
I Self-Timer Recording Indicator (墌 pg. 29)
GETTING STARTED
EN 9
During Voice Recording
A Remaining Time (墌 pg. 43)
B Selected Medium Indicator (墌 pg. 17, 27)
C Sound Quality: 48 (fine), 16 (standard), 8 (economy)
(墌 pg. 30)
D Recording Level: (high), (middle), (low)
(墌 pg. 30)
E Wind Cut Indicator (墌 pg. 28)
F Counter
G Battery Indicator
H Date/Time (墌 pg. 27)
I Microphone Input Level Indicator
J Recording Mode
7: Record
: Record-standby
GETTING STARTED
Page 10
GZ-MC200US_03Start.fm Page 10 Friday, September 10, 2004 11:52 AM
MasterPage: Body_Left
10 EN
GETTING STARTED
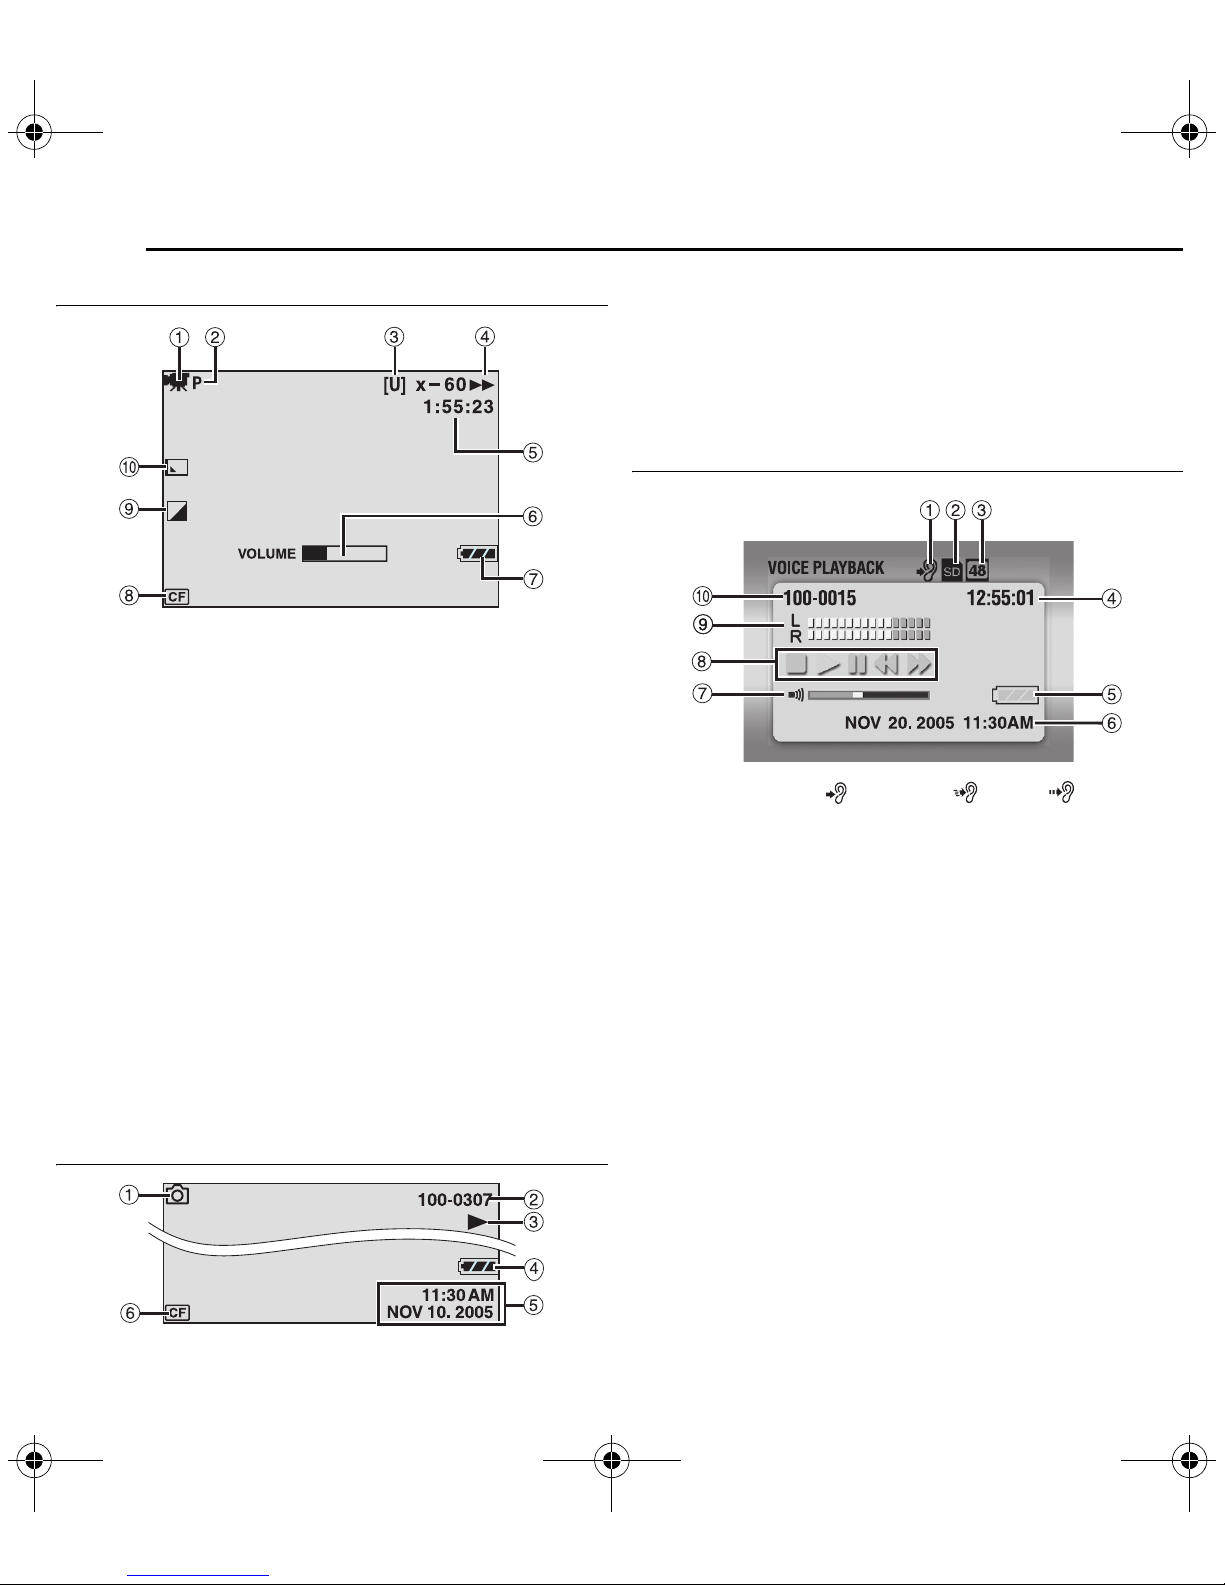
During Video Playback
A Mode Indicator (墌 pg. 19)
B Play List Playback Indicator (Appears when play list is
played back. Refer to the advanced operation manual.
墌 pg. 32)
C Picture Quality: [U] (ultra fine), [F] (fine), [N] (normal),
[E] (economy) (墌 pg. 28)
D Playback Mode (墌 pg. 21)
U : Playback
9 : Pause
5
: Forward High-Speed Search
3
: Reverse High-Speed Search
9U : Forward Slow-Motion
Y9 : Reverse Slow-Motion
(The number on the left shows speed.)
E Counter (墌 pg. 27)
F Volume Level Indicator
G Battery Indicator
H Selected Medium Indicator (墌 pg. 17, 27)
I Effect Mode Indicator (墌 pg. 31)
J Wipe/Fader Effect Indicator (墌 pg. 29)
During Still Image Playback
A Mode Indicator (墌 pg. 19)
B Folder/File Number
C U : Slide Show (墌 pg. 23)
D Battery Indicator
E Date/Time (墌 pg. 27)
F Selected Medium Indicator (墌 pg. 17, 27)
During Voice Playback
A Playback Speed: (normal), (fast), (slow)
(墌 pg. 30)
B Selected Medium Indicator (墌 pg. 17, 27)
C Sound Quality: 48 (fine), 16 (standard), 8 (economy)
(墌 pg. 30)
D Counter
E Battery Indicator
F Date/Time (墌 pg. 27)
G Volume Level Indicator
H Playback Mode (墌 pg. 24)
U : Playback
5
: Forward High-Speed Search
3
: Reverse High-Speed Search
9 : Pause
8 : Stop
I Recording Level Indicator
J Folder/File Number
Page 11

GZ-MC200US.book Page 11 Tuesday, September 7, 2004 9:56 PM
MasterPage: Start_Right
Provided Accessories
GETTING STARTED
EN 11
A AC Adapter AP-V14U
B Battery Pack BN-VM200U
C S-Video/Audio/Video Cable
D USB Cable
E Removable Hard Disk (4 GB)
F Protective Case for Removable Hard Disk
G Hand Strap (See page 12 for attachment)
H Lens Cap (See page 12 for attachment)
I CD-ROM
J Audio Extension Cable (for optional headphone, see
page 13 for attachment)
K Core Filter for cables (See page 13 for attachment)
Large: S-Video/Audio/Video Cable
Medium: USB cable
Small: audio extension cable and AC adapter’s cord
NOTES:
● In order to maintain optimum performance of the camera,
provided cables may be equipped with one or more core
filter. If a cable has only one core filter, the end that is
closest to the filter should be connected to the camera.
● Make sure to use the provided cables for connections. Do
not use any other cables.
GETTING STARTED
Page 12
GZ-MC200US.book Page 12 Tuesday, September 7, 2004 9:56 PM
MasterPage: Body_Left
12 EN
GETTING STARTED
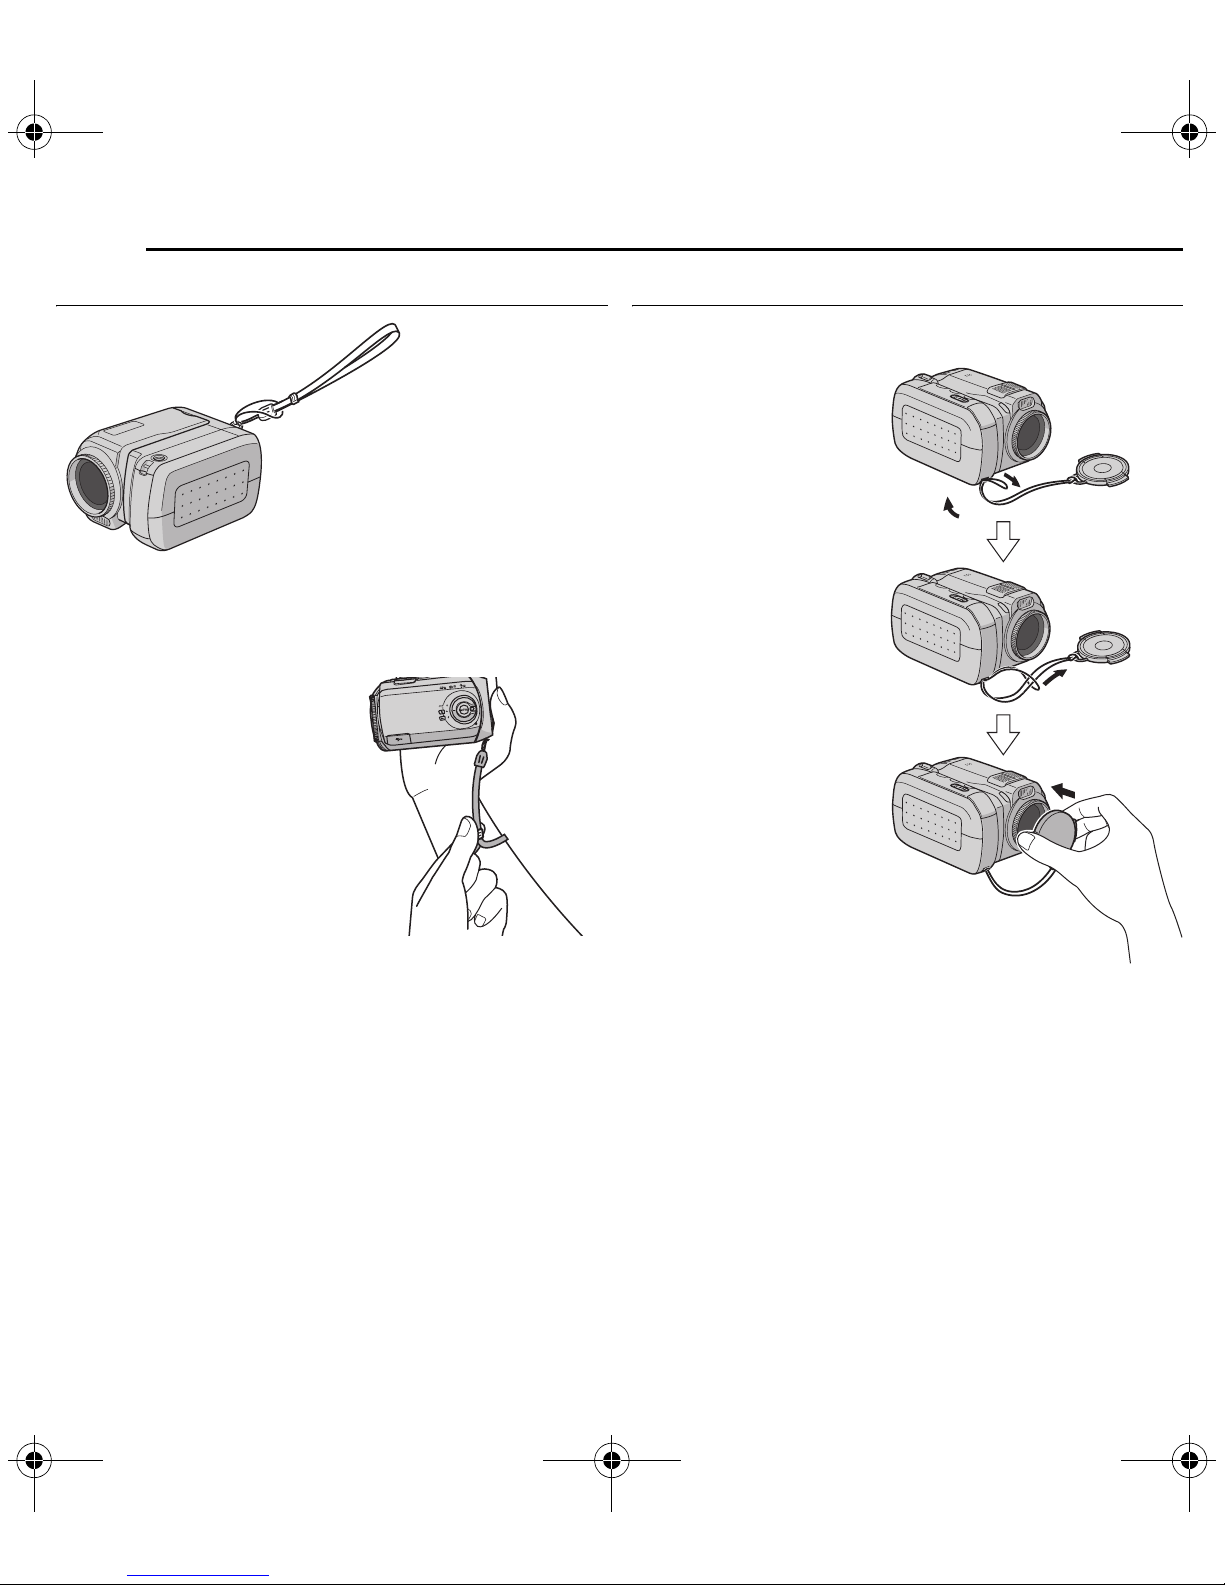
Attaching the Hand Strap
1 Thread the end of the strap through the eyelet.
2 Pass the other end through the loop.
NOTE:
When carrying the
camera, pass your arm
through the strap to
prevent dropping the
camera. Tighten the
strap at your wrist by
sliding the buckle.
Attaching the Lens Cap
To protect the lens, attach the provided lens cap to the
camera as shown in the illustration.
NOTE:
To confirm the lens cap is
on correctly make sure the
cap is flush to the camera.
Page 13
GZ-MC200US.book Page 13 Tuesday, September 7, 2004 9:56 PM
MasterPage: Start_Right
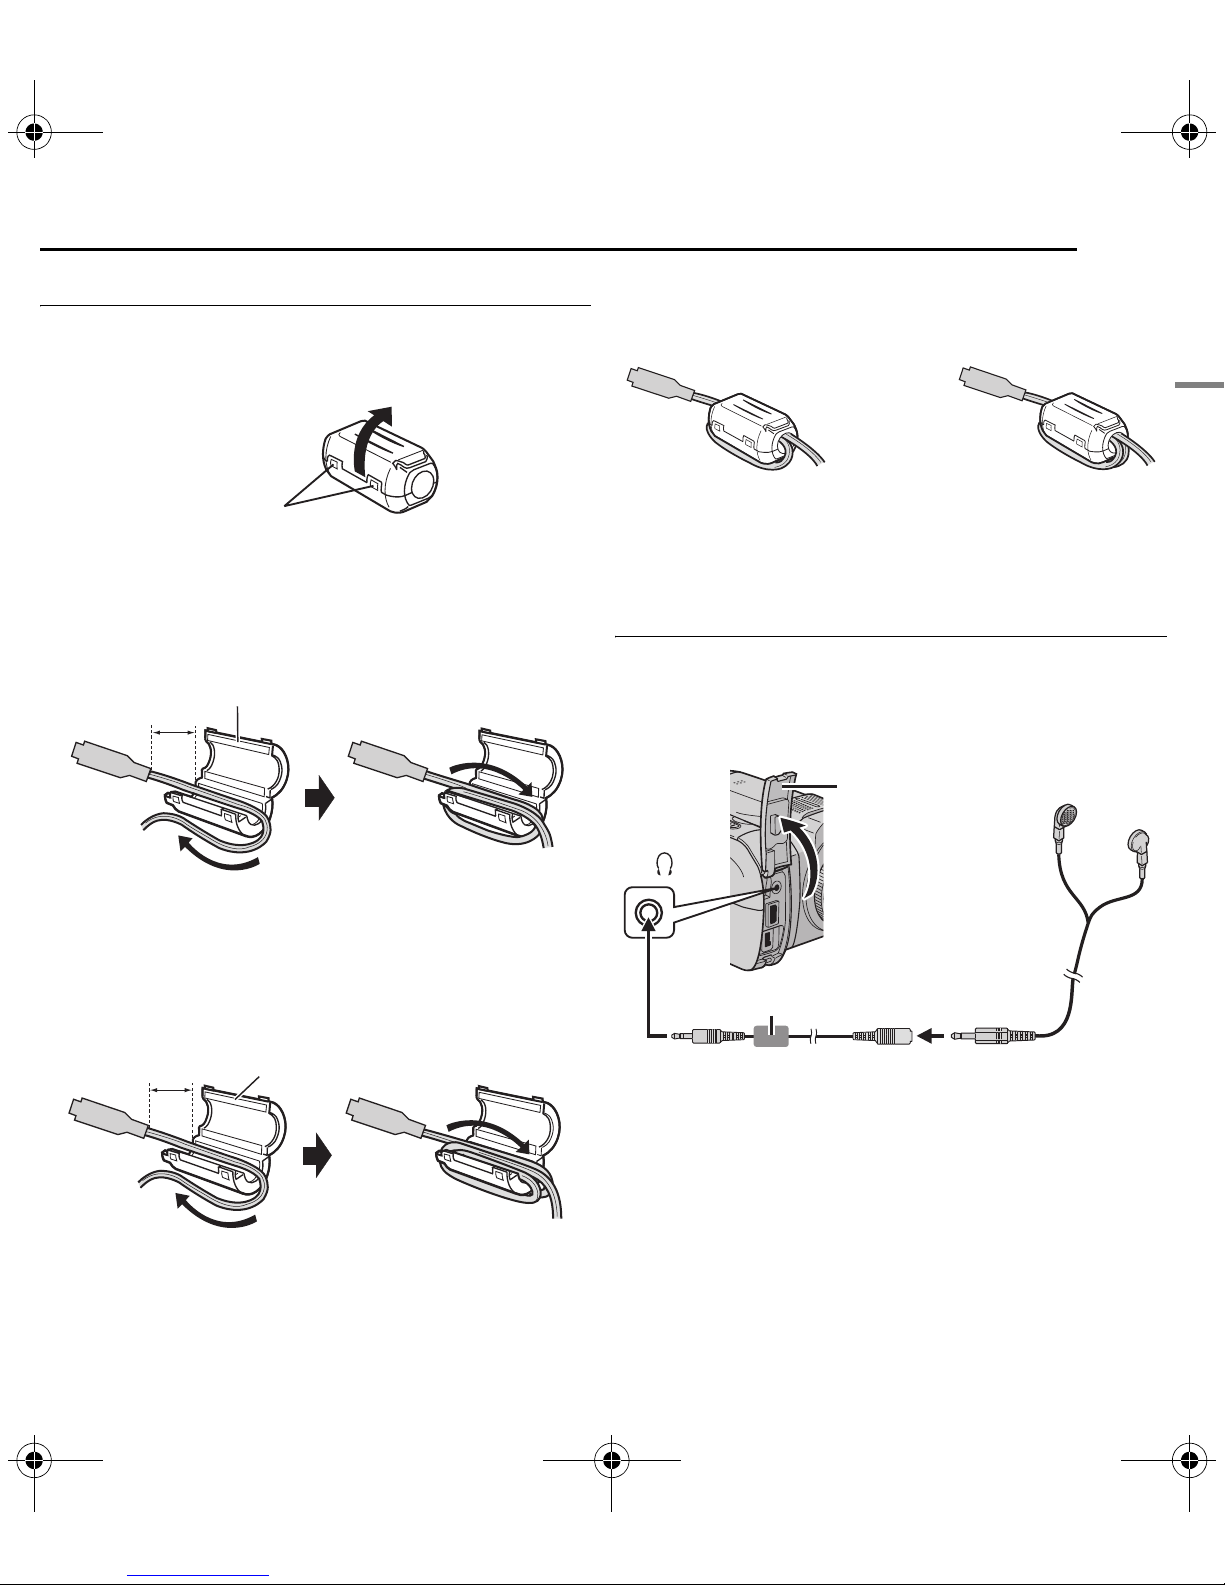
Attaching the Core Filter
Attach the core filters to the cables. The core filter reduces
interference.
1 Release the stoppers on both ends of the core filter.
Stopper
2 Run the cable through the core filter, leaving approx.
3 cm of cable between the cable plug and the core filter.
S-Video/Audio/Video cable
Wind the cable once around the outside of the core filter
as shown in the illustration.
3 cm (1-3/16")
Core filter (large)
GETTING STARTED
EN 13
3 Close the core filter until it clicks shut.
S-Video/Audio/Video
cable
NOTES:
● Take care not to damage the cable.
● When connecting a cable, attach the end with the core filter
to the camera.
How to Use the Audio Extension Cable
When using optional headphones, connect to the
provided audio extension cable (with a core filter
attached), then connect the audio extension cable to the
camera. The core filter reduces interference.
USB cable, audio extension
cable and AC adapter’s cord
Open the cover.
GETTING STARTED
Wind once.
USB cable, audio extension cable and AC adapter’s
cord
Wind the cable twice around the outside of the core filter
as shown in the illustration.
Core filter (medium: USB cable,
small: audio extension cable and
3 cm (1-3/16")
● Wind the cable so that it is not slack.
AC adapter’s cord)
Wind twice.
To
Headphones
Core Filter
Audio Extension Cable (provided)
Page 14
GZ-MC200US_03Start.fm Page 14 Tuesday, September 14, 2004 9:59 AM
MasterPage: Body_Left
14 EN
GETTING STARTED
Power
This camera’s 2-way power supply system lets you
choose the most appropriate source of power. Do not use
provided power supply units with other equipment.
Charging the Battery Pack
OPEN
Battery/CF Card Cover
Open the cover.
Power
Switch
Lock Button
Battery Pack
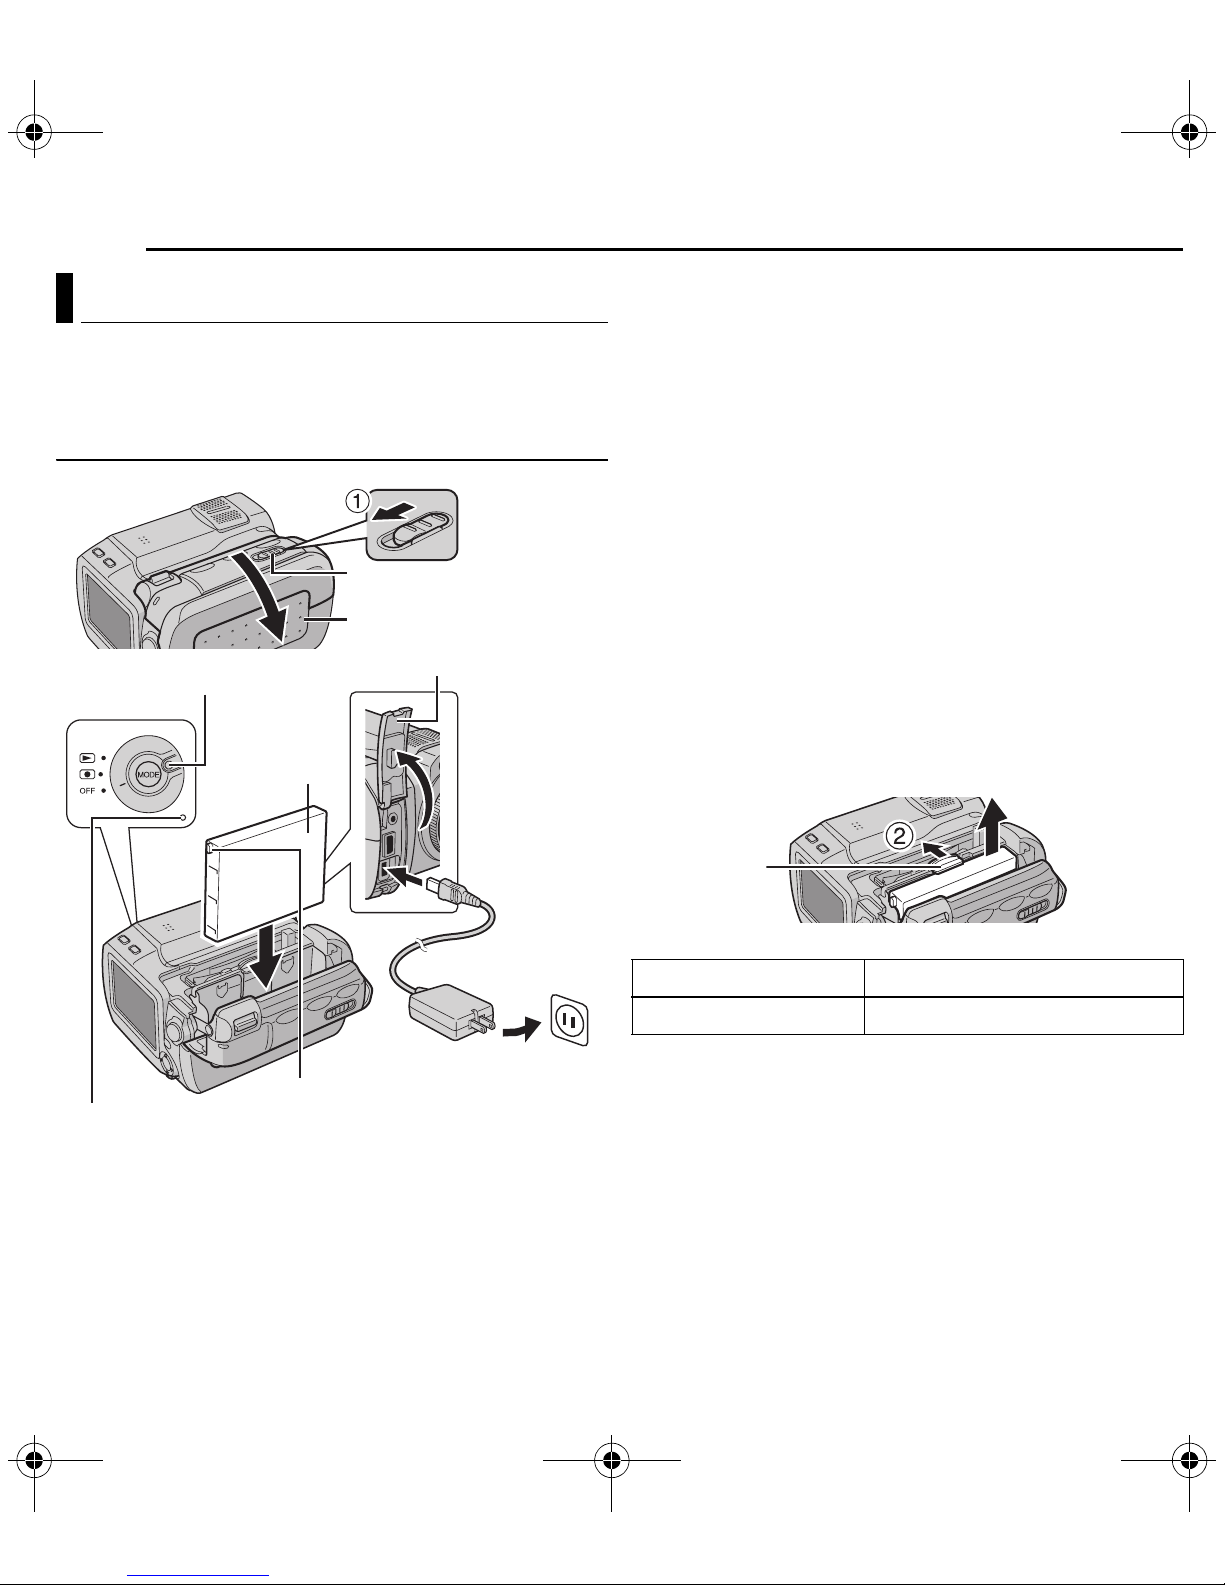
1 Set the power switch to OFF while pressing down the
lock button located on the switch.
2 Slide and hold OPEN in the direction of the arrow A,
then open the battery/CF card cover.
3 Insert the battery pack firmly into the battery pack
mount until it locks into space as shown in the illustration.
4 Close the battery/CF card cover firmly until it locks.
5 Connect the AC adapter to the camera.
6 Plug the AC adapter into an AC outlet. The power/
charge lamp on the camera blinks to indicate charging
has started.
7 When the power/charge lamp goes out, charging is
finished. Unplug the AC adapter from the AC outlet.
Disconnect the AC adapter from the camera.
To detach the battery pack
Open the battery/CF card cover, and remove the battery
pack while sliding BATTERY in the direction of the arrow
B.
Power/Charge Lamp
Protrusion
To DC
connector
AC Adapter
To AC outlet
BATTERY
Battery pack Charging time
BN-VM200U (provided) Approx. 1 hr. 35 min.
Page 15

A
GZ-MC200US.book Page 15 Tuesday, September 7, 2004 9:56 PM
MasterPage: Start_Right
NOTES:
● It is recommended that only genuine JVC batteries are used
in this camera. Using generic non-JVC batteries can cause
damage to the internal charging circuitry.
● If the protective cap is attached to the battery pack, remove
it first.
● When charging the battery pack for the first time or after a
long storage period, the power/charge lamp may not light. In
this case, remove the battery pack from the camera, then try
charging again.
● If the battery operation time remains extremely short even
after having been fully charged, the battery is worn out and
needs to be replaced. Please purchase a new one.
● Since the AC adapter processes electricity internally, it
becomes warm during use. Be sure to use it only in wellventilated areas.
Using the Battery Pack
Perform steps 2 – 4 in “Charging the Battery Pack”.
Maximum continuous recording time
Battery pack Recording time
GETTING STARTED
EN 15
NOTES:
● Recording time is reduced significantly under the following
conditions:
• Zoom or record-standby mode is engaged repeatedly.
• Playback mode is engaged repeatedly.
● Before extended use, it is recommended that you prepare
enough battery packs to cover 3 times the planned
recording time.
Using AC Power
Connect the AC adapter to the camera as shown in the
illustration. (墌 pg. 14)
NOTE:
The provided AC adapter features automatic voltage selection
in the AC range from 110 V to 240 V.
TTENTION:
● Before detaching the power source, make sure that the
camera’s power is turned off. Failure to do so can result in a
camera malfunction.
● If a malfunction occurs by electrostatic discharge, the power
source should be terminated to reset the device.
GETTING STARTED
BN-VM200U (provided) 1 hr. 5 min.
About Batteries
DANGER! Do not attempt to take the batteries apart, or
expose them to flame or excessive heat, as it may cause a
fire or explosion.
WARNING! Do not allow the battery or its terminals to
come in contact with metals, as this can result in a short
circuit and possibly start a fire.
The Benefits Of Lithium-Ion Batteries
Lithium-ion battery packs are small but have a large
power capacity. However, when one is exposed to cold
temperatures (below 10°C/50°F), its usage time becomes
shorter and it may cease to function. If this happens,
place the battery pack in your pocket or other warm,
protected place for a short time, then re-attach it to the
camera.
Page 16
A
GZ-MC200US.book Page 16 Tuesday, September 7, 2004 9:56 PM
MasterPage: Body_Left
16 EN
GETTING STARTED
Inserting/Removing a CF Card
You can use a CF card (CompactFlash card) as a
recording medium in the CF slot.
The removable hard disk (provided) or Microdrive is a type
of CF cards. See page 42 for the recommended media.
Front
CF Slot
Battery/CF Card Cover
Rear
Terminals
OPEN
Eject Button
NOTES:
● Read the cautions on CF card. (墌 pg. 38, “Recording
Medium”)
● Before using a new CF card, it is necessary to format the CF
card. (墌 pg. 27)
TTENTION:
● Do not insert or remove the CF card while the camera is
turned on, as this may cause the CF card to be corrupted or
cause the camera to become unable to recognize whether
or not the CF card is installed.
● Do not squeeze the external covers of the CF card.
Inserting/Removing an SD Card
You can use an SD card as a recording medium in the SD
slot. See page 42 for the recommended media.
1 Make sure the camera’s power is off.
2 Slide and hold OPEN in the direction of the arrow A,
then open the battery/CF card cover.
3 When the eject button is pulled out as shown in the
illustration, push it once.
● The button is pushed in.
4 To insert a CF card, firmly insert it as shown in the
illustration.
To remove a CF card, push the eject button twice.
● The eject button comes out by pushing it once. By pushing
the eject button once again ejects the CF card.
5 Close the battery/CF card cover firmly until it locks.
Clipped edge
SD card
Label
SD Slot
Write/Erase
Protection Tab
Card Cover (MEMORY CARD)
1 Make sure the camera’s power is off.
2 Open the card cover (MEMORY CARD).
Page 17

A
GZ-MC200US.book Page 17 Tuesday, September 7, 2004 9:56 PM
MasterPage: Start_Right
3 To insert a SD card, firmly insert it with its clipped
edge first.
To remove a SD card, push it once. After the SD card
comes out of the camera, pull it out.
● Do not touch the terminal on the reverse side of the label.
4 Close the card cover.
To protect valuable files
Slide the write/erase protection tab on the side of the SD
card in the direction of “LOCK”. This prevents the SD card
from being recorded over. To record on this SD card, slide
the tab back to the position opposite to “LOCK” before
inserting it.
NOTE:
Before using a new SD card, it is necessary to format the
card. (墌 pg. 26, 27)
TTENTION:
Do not insert or remove the SD card while the camera is
turned on, as this may cause the SD card to be corrupted or
cause the camera to become unable to recognize whether or
not the SD card is installed.
GETTING STARTED
EN 17
Selecting Recording Medium
Select the recording medium before starting recording or
playback.
Example: When recording still images to a CF card
1 Set the power switch to or while pressing down
the lock button located on the switch.
2 Press MENU. The menu screen appears.
3 Press rt to select [MEMORY
CARD SETTING], and press 49.
4 Press rt to select [IMAGE
MODE], and press 49.
5 Press rt to select [CF SLOT],
and press 49.
6 Press MENU to return to the
normal screen.
DIS
CAMERA SETTING
BASIC SETTING
MEMORY CARD SETTING
DISPLAY
QUALITY
WIDE MODE
COPY/MOVE
NO. RESET
VIDEO MODE
IMAGE MODE
VOICE MODE
FORMAT
CLEAN UP
GETTING STARTED
Page 18
GZ-MC200US.book Page 18 Tuesday, September 7, 2004 9:56 PM
MasterPage: Body_Left
18 EN
GETTING STARTED
Date/Time Settings
The date/time is recorded on the picture at all times, but
its display can be turned on or off during playback.
(墌 pg. 26, 27)
1 Set the power switch to or while pressing down
the lock button located on the switch.
2 Press MENU. The menu screen appears.
3 Press rt to select
[DISPLAY], and press 49. The
sub menu appears.
4 Press rt to select [CLOCK
ADJUST], and press 49. The
month is highlighted.
5 Press rt to input the month,
and press 49. Repeat to input
the day, year, hour and minute.
6 Press MENU to return to the normal screen.
CAMERA SETTING
BASIC SETTEING
MEMORY CARD SETTING
DISPLAY
QUALITY
WIDE MODE
WIND CUT
SCENE COUNTER
CLOCK ADJUST
BRIGHT
DATE/TIME
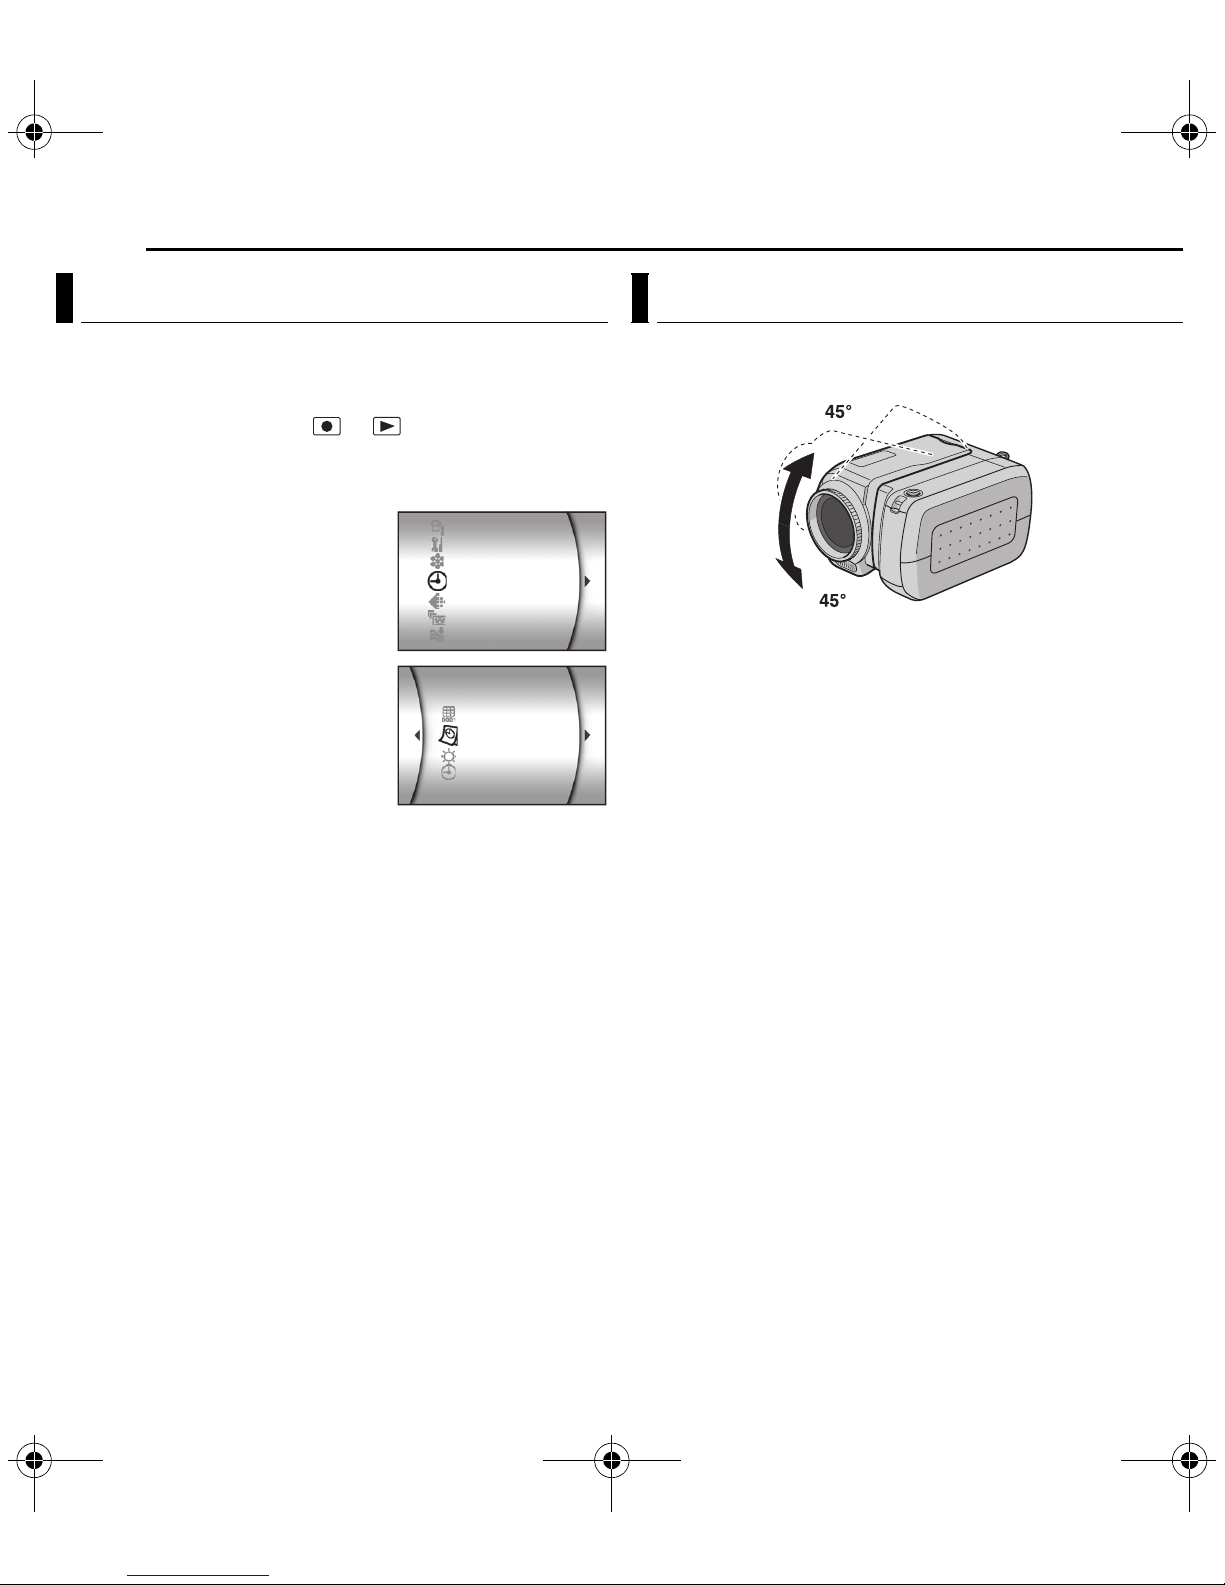
Angle Adjustment
Tilt the lens part at the most convenient angle. The lens
part can rotate 45° upward and downward.
Built-in Clock’s Rechargeable Lithium Battery
If the camera is not used for approx. 3 months, the clock’s
lithium battery will become discharged and the date/time
stored in memory will be lost. When this occurs, first
connect the camera to an AC outlet using the AC adapter
for over 24 hours to charge the clock’s rechargeable
lithium battery. Then perform the date/time setting before
using the camera.
Note that the camera can be used without setting the
date/time.
Page 19

GZ-MC200US.book Page 19 Tuesday, September 7, 2004 9:56 PM
MasterPage: Heading0_Right
Operation Mode
To turn on the camera, set the power switch to or
while pressing down the lock button located on the switch.
● The power/charge lamp turns on.
To turn off the camera, set the power switch to OFF.
1
Power Switch
Mode Lamp
3
e ()
2
MODE
Power/Charge Lamp
Set the appropriate operation mode according to your
preference using the power switch, MODE and e ()
buttons.
Lock Button
BASIC OPERATIONS
EN 19
2 Recording/Playback Mode
Press MODE to select the recording/playback mode.
The selected mode lamp lights up.
: Video mode (墌 pg. 20, 21)
: Still image mode (墌 pg. 22, 23)
: Voice mode (墌 pg. 24)
3 Auto/Manual Mode
Press e ( ) to switch the auto/manual recording
mode. When manual mode is selected, the indicator
appears on the LCD monitor.
Auto mode:
You can record using no special effects or
manual adjustments.
Manual mode:
Manual recording is possible by setting
various functions.
BASIC OPERATIONS
1 Power Switch Position
Set the power switch for recording ( ) or playback ( )
while pressing down the lock button.
Playback
Recording
Power off
Power Switch
Page 20

GZ-MC200US_04Basic.fm Page 20 Tuesday, September 14, 2004 10:00 AM
MasterPage: Body_Left
20 EN
BASIC OPERATIONS
Video Recording
MODE
Power Switch
Zoom Lever
Recording Start/Stop Button
Lock Button
1 Set the power switch to while pressing down the
lock button located on the switch.
2 Press MODE to select .
● The camera is programmed to record videos on the medium
in the CF slot by the factory preset. To switch the recording
medium, see pages 26 and 27.
● To change the picture quality, see pages 26 and 28.
3 Press the recording start/stop button to start recording.
The tally lamp lights while recording is in progress.
● Approximate remaining time for
recording appears on the display.
4 To stop recording, press the
recording start/stop button again.
NOTES:
● If the record-standby mode continues for 5 minutes when
using the battery pack, the camera’s power shuts off
automatically. To turn the camera on again, set the power
switch to OFF, then to . When using AC adapter, the
camera enters the power save mode. To cancel the power
save mode, perform any operation such as zooming.
● When the camera heats up, the [REC] indicator flashes. If
the camera continues to heat up, shooting may be stopped
to protect the recording medium. In this case, turn off the
camera power, and then wait until the camera cools down.
(墌 pg. 36)
● When shooting continuously, shooting is automatically
stopped when a file size of 4 GB is reached.
● If data cannot be recorded or saved properly, the video files
are not saved to the [SD_VIDEO] folder for regular video.
Instead, the files are saved to the [EXTMOV] folder used for
saving files created on the PC. To play back these files, see
“Playing back files created on the PC” (墌 pg. 21).
● To turn the operation sounds off, see page 26.
● For approximate recording time, see page 42.
Zooming
Produces the zoom in/out effect, or an instantaneous
change in image magnification.
Zoom In
Slide the zoom lever towards T.
Zoom Out
Slide the zoom lever towards W.
W: Wide angle T: Telephoto
● The further you slide the zoom lever, the quicker the zoom
action.
● Refer to the advanced operation manual for details.
(墌 pg. 32)
Deleting Files
If you press during recording mode, the file recorded
most recently will be deleted.
● However, if the recording mode (video, still image or voice) is
switched or the power is turned off and on again after
recording, you cannot delete the file.
Page 21
GZ-MC200US.book Page 21 Tuesday, September 7, 2004 9:56 PM
MasterPage: Basic_Right
Video Playback
Zoom Lever
INFO
MODE
Power Switch
Lock Button
2
36 5
1 Set the power switch to while pressing down the
lock button located on the switch.
2 Press MODE to select .
● The index screen for videos appears. The image appears on
the index screen shows the first part of the shooting.
● To switch the medium to be played back, see pages 26 and
27.
3 Press rt w e to select the video file you want to play
back.
4 Press 49 to start playback.
5 To pause playback, press 49 again.
To adjust the speaker volume
During playback slide the zoom lever towards T to turn up
the volume, or towards W to turn down the volume.
How to use INFO button
Press INFO repeatedly. You can display the file
information or remove the on-screen display.
49
BASIC OPERATIONS
Playing back files created on the PC
Video files created on the PC are located in the
[EXTMOV] folder. (Refer to “SOFTWARE INSTALLATION
AND USB CONNECTION GUIDE”.)
To play these video files, press the recording start/stop
button while the index screen is displayed in step 2, and
then proceed to step 3 after [MPG] is displayed.
● The fast forward, rewind, slow, frame-by-frame playback,
and playlist creation functions are not available for files in
the [EXTMOV] folder.
EN 21
NOTES:
● The playback picture can be viewed in the LCD monitor or
on a connected TV. (墌 pg. 25)
● If pause mode continues for 5 minutes during playback
(video, still image or voice) when using the battery pack, the
camera’s power shuts off automatically. To turn the camera
on again, set the power switch to OFF, then to .
● When a cable is connected to the AV connector, the sound
is not heard from the speaker or headphones.
Various Playback Operations
High-speed search
Press
● Each press of the button increases the search speed for
Locating the start point of the file or skip the file
Press
Frame-by-frame playback
Press
● Each press of the button advances/reverses the still picture
Slow motion playback
Press
mode.
3
or
5
during playback.
each direction. (–60x to +60x)
2
or
6
during playback or pause mode.
3
or
5
during pause mode.
frame by frame.
3
or
5
for 2 or more seconds during pause
Deleting Video Files
Press , then press rt to select [EXECUTE] and press
49.
● You can select the desired file to be deleted by pressing w
e.
● To delete multiple files at once, see pages 26 and 29.
BASIC OPERATIONS
Page 22

GZ-MC200US.book Page 22 Tuesday, September 7, 2004 9:56 PM
MasterPage: Body_Left
22 EN
BASIC OPERATIONS
Still Image Recording
MODE
Power Switch
Recording Start/Stop Button
Lock Button
1 Set the power switch to while pressing down the
lock button located on the switch.
2 Press MODE to select .
● The camera is programmed to record still images on the
medium in the SD slot by the factory preset. To switch the
recording medium, see pages 26 and 27.
● To change the image size and picture quality, see pages 26
and 29.
3 Press the recording start/stop button. The still image is
recorded.
● To check how the image looks before recording, press the
recording start/stop button halfway and hold. The
indicator appears and stops blinking when the captured
image is focused. To cancel the recording, release the
recording start/stop button. To record it on the recording
medium, press the recording start/stop button fully.
NOTES:
● If shooting is not performed for approx. 5 minutes when
using the battery pack, the camera’s power shuts off
automatically. To perform shooting again, set the power
switch to OFF, then to . When using AC adapter, the
camera enters the power save mode. To cancel the power
save mode, perform any operation such as zooming.
● To turn the shutter sound off, see page 26.
● For approximate number of storable images, see page 42.
Continuous Shooting
Keeping the recording start/stop button pressed in step 3
provides an effect similar to serial photography. (Interval
between still images: approx. 0.3 seconds)
To use this function, set [CONTINUOUS SHOOTING] to
[ON]. (墌 pg. 26, 29)
● Continuous shooting may not work well depending on
the recording medium.
Deleting Files
If you press during recording mode, the file recorded
most recently will be deleted.
● However, if the recording mode (video, still image or voice)
is switched or the power is turned off and on again after
recording, you cannot delete the file.
Page 23

GZ-MC200US_04Basic.fm Page 23 Thursday, September 16, 2004 6:31 PM
MasterPage: Basic_Right
Still Image Playback
INFO
MODE
Power
Switch
Lock Button
Slide Show
You can playback all the images stored in recording media
Zoom Lever
49
35
automatically.
1 Perform steps 1 – 2 in the left column.
2 Press 49 to start the slide show.
● If you press t during the slide show, files are displayed
in descending order.
● If you press r during the slide show, files are displayed
in ascending order.
● To end the slide show, press 49 again.
To display the next
image
BASIC OPERATIONS
Normal Playback
EN 23
To display the
previous image
BASIC OPERATIONS
1 Set the power switch to while pressing down the
lock button located on the switch.
2 Press MODE to select .
● A still image is displayed.
● To switch the medium to be played back, see pages 26 and
27.
3 Press
display the next file.
How to use INFO button
Press INFO repeatedly. You can display the file
information or remove the on-screen display.
NOTES:
● Images shot and stored on the recording media with another
device may not be played back correctly.
● You can zoom in/out or rotate still images. For details, read
the advanced operation manual. (墌 pg. 32)
3
to display the previous file. Press
5
to
Slide Show
Deleting Still Image Files
Press , then press rt to select [EXECUTE] and press
49.
● You can select the desired file to be deleted by pressing w
e.
● To delete multiple files at once, see pages 26 and 29.
Page 24

GZ-MC200US.book Page 24 Tuesday, September 7, 2004 9:56 PM
MasterPage: Body_Left
24 EN
BASIC OPERATIONS
Voice Recording
Zoom Lever
Recording Start/
Stop Button
MODE
Power Switch
Lock Button
2
36 5
1 Set the power switch to while pressing down the
lock button located on the switch.
2 Press MODE to select .
● The camera is programmed to record voice on the medium
in the SD slot by the factory preset. To switch the recording
medium, see pages 26 and 27.
● To change the sound quality and recording level, see pages
26 and 30.
3 Press the recording start/stop button to start recording.
4 To stop recording, press the recording start/stop button
again. The camera re-enters the record-standby mode.
49
Voice Playback
1 Set the power switch to while pressing down the
lock button located on the switch.
2 Press MODE to select .
● To change the playback speed, see pages 26 and 30.
● To switch the medium to be played back, see pages 26 and
27.
3 Press 49 to start playback.
4 To pause playback, press 49 again.
To adjust the speaker volume
During playback slide the zoom lever towards T to turn up
the volume, or towards W to turn down the volume.
Playback Operations
High-Speed Search
Press
Locating the start point of the file or skip the file
Press
Deleting Voice Files
Press , then press rt to select [EXECUTE] and press
49.
● You can select the desired file to be deleted by pressing w
● To delete multiple files at once, see pages 26 and 29.
e.
3
2
or
or
5
during playback.
6
during playback or pause mode.
NOTE:
For approximate recording time, see page 43.
Deleting Files
If you press during recording mode, the file recorded
most recently will be deleted.
● However, if the recording mode (video, still image or voice)
is switched or the power is turned off and on again after
recording, you cannot delete the file.
Page 25

GZ-MC200US_04Basic.fm Page 25 Friday, September 10, 2004 11:55 AM
MasterPage: Basic_Right
Connecting to a TV or VCR
Open the cover.
To AV connector
S-Video/Audio/Video
Cable
(provided)
TV
VCR
A Black to S-VIDEO IN (Connect when your TV/VCR has
S-VIDEO IN and A/V input connectors. In this case, it is
not necessary to connect the yellow video cable.)
B Yellow to VIDEO IN (Connect when your TV/VCR has
only A/V input connectors.)
C Red to AUDIO R IN*
D White to AUDIO L IN*
* Not required for watching still images only.
BASIC OPERATIONS
EN 25
6 Start playback on the camera. (墌 pg. 21)
To choose whether or not the following displays
appear on the connected TV
● Date/Time
Set [DATE/TIME] to [AUTO], [ON] or [OFF]. (墌 pg. 26, 27)
● Counter
Set [SCENE COUNTER] to [ON] or [OFF]. (墌 pg. 26, 27)
(Pressing INFO button also turns on/off the displays.)
NOTES:
● It is recommended to use the AC Adapter as the power
supply instead of the battery pack. (墌 pg. 14)
● To monitor the picture and sound from the camera without
inserting a recording medium, set the camera’s power switch
to , then set your TV to the appropriate input mode.
● Make sure you adjust the TV sound volume to its minimum
level to avoid a sudden burst of sound when the camera is
turned on.
● To connect the camera to a PC, refer to the software
installation and USB connection guide.
Dubbing to a VCR
1 Perform step 1 to 6 above.
2 At the point you want to start dubbing, start recording
on the VCR. (Refer to the VCR’s instruction manual.)
3 To stop dubbing, stop recording on the VCR, then stop
playback on the camera.
BASIC OPERATIONS
1 Make sure all units are turned off.
2 Connect the camera to a TV or VCR as shown in the
illustration.
If using a VCR, go to step 3.
If not, go to step 4.
3 Connect the VCR output to the TV input, referring to
your VCR’s instruction manual.
4 Turn on the camera, the VCR and the TV.
5 Set the VCR to its AUX input mode, and set the TV to
its VIDEO mode.
Page 26

GZ-MC200US.book Page 26 Tuesday, September 7, 2004 9:56 PM
MasterPage: Heading0_Left
26 EN
MENU SETTINGS
Changing the Menu Settings
You can change the menu settings to customize your
camera. Access the desired menu screen by following the
steps below, then change the various settings.
INFO
MENU
MODE
Power
Switch
Lock Button
r
wt
1 Select the operation mode.
For Recording Menus:
Set the power switch to while pressing down the lock
button located on the switch.
For Playback Menus:
Set the power switch to while pressing down the lock
button located on the switch.
2 Press MODE to select (video), (still image) or
(voice).
3 Press MENU. The menu screen appears.
4 Select the desired sub menu and menu item with rt
and 49.
● To return to the normal screen, press MENU.
● To display the operation guide, press INFO when the menu
screen is displayed.
49
e
NOTE:
Information on the following pages (墌 pg. 26 – 31) are only
excerpts of menu settings.
Refer to the advanced operation manual in the CD-ROM for
the full descriptions. (墌 pg. 32)
Common Menus for All Modes
[ ] = Factory-preset
BASIC SETTING
PRESET
EXECUTE: Resets all settings to the factory-preset.
[CANCEL]: Returns to menu screen without executing
reset.
DEMO MODE
OFF: Disables the function.
[ON]: Activates demonstration mode and shows various
features on the display.
OPERATION
SOUND
OFF: Turns off operation sound.
BEEP: The beep sounds when the power is turned on or
off, and at the beginning and end of recording.
[MELODY]: Instead of a beep, a melody sounds when any
operation is performed.
Page 27
GZ-MC200US.book Page 27 Tuesday, September 7, 2004 9:56 PM
MasterPage: Menu_Right
MEMORY CARD SETTING
VIDEO MODE Media selection can be set for
[CF SLOT] / SD SLOT
IMAGE MODE
CF SLOT / [SD SLOT]
VOICE MODE
CF SLOT / [SD SLOT]
FORMAT
[CF SLOT] / SD SLOT
You can format (initialize) a recording medium in the CF or
SD slot.
CLEAN UP
[CF SLOT] / SD SLOT
Writing speed of recording media tends to become slow
after long period of repeated use. To regain the speed,
execute cleanup periodically.
each recording and playback
mode: video ( ), still image
() or voice ().
CF SLOT: The CF card is
selected as a recording
medium.
SD SLOT: SD card is selected
as a recording medium.
MENU SETTINGS
EN 27
DISPLAY
BRIGHT
When this item is selected, the brightness control
indicator appears. Adjust the brightness of the display
using w e, then press 49.
DATE/TIME
OFF: The date/time does not appear.
[AUTO]: Displays the date/time for approx. 5 seconds
when the power switch is set from OFF to .
ON: The date/time is always displayed.
SCENE COUNTER
[OFF]: Disables the function.
ON: Displays the counter during video mode.
CLOCK ADJUST
墌 “Date/Time Settings” (墌 pg. 18)
MENU SETTINGS
COPY/MOVE
COPY / MOVE
You can copy or move still image files between recording
media in CF and SD slots.
NO. RESET
VIDEO / IMAGE / VOICE
By resetting the file number (name), a new folder will be
made. The new files you are going to make will be stored
in the new folder.
Page 28
GZ-MC200US.book Page 28 Tuesday, September 7, 2004 9:56 PM
MasterPage: Body_Left
28 EN
MENU SETTINGS
Video Recording Menus
[ ] = Factory-preset
QUALITY
Select the desired picture quality.
Mode
(In order of the quality)
[ULTRA FINE] 720 x 480 8.5 Mbps
FINE 720 x 480 5.5 Mbps
NORMAL 720 x 480 4.2 Mbps
ECONOMY 352 x 240 1.5 Mbps
WIDE MODE
[OFF]: Disables the function.
D.WIDE: The zoom range is extended beyond the
maximum optical zoom wide angle range.
WIND CUT
[OFF]: Disables the function.
ON: Helps cut down on noise created by wind.
Size (pixels) Bit rate
CAMERA SETTING
ZOOM
10X: Only optical zoom is available up to 10X.
[40X]: Digital zoom is available up to 40X.
200X: Digital zoom is available up to 200X.
TELE MACRO
[OFF]: Disables the function.
ON: You can shoot a subject as large as possible at a
distance of approx. 60 cm (2 ft).
GAIN UP
OFF: The image in the dark will be recorded with no
picture brightness adjustment.
[ON]: The image in the dark will be brightened. But the
overall appearance may become grainy.
.
DIS
OFF: Disables the function.
[ON]: Compensates for unstable images caused by
camera-shake, particularly at high magnification.
Page 29

GZ-MC200US.book Page 29 Tuesday, September 7, 2004 9:56 PM
MasterPage: Menu_Right
Video Playback Menus
For the actual operations and details, refer to the
advanced operation manual.
[ ] = Factory-preset
PLAY LIST
PLAY LIST CONTENTS / EDIT / RENAME / DELETE
You can create a play list and view your original video
clips.
WIPE/FADER
[OFF] / FADER-WHITE / FADER-BLACK / FADER-B.W /
WIPE-CORNER / WIPE-WINDOW / WIPE-SLIDE /
WIPE-DOOR / WIPE-SCROLL / WIPE-SHUTTER
You can view videos with various effects of scene
transition.
EFFECT
[OFF] / SEPIA / MONOTONE / CLASSIC FILM /
STROBE
You can view videos with special image effects.
PROTECT
[CURRENT] / FILE SELECT / PROTECT ALL / CANCEL
ALL
You can protect files from accidental erasure.
DELETE
[CURRENT] / FILE SELECT / DELETE ALL
You can delete unnecessary files.
MENU SETTINGS
EN 29
Still Image Recording Menus
[ ] = Factory-preset
QUALITY
[FINE] / STANDARD
Select the desired image quality.
IMAGE SIZE
[1600 x 1200] / 1280 x 960 / 1024 x 768 / 640 x 480
Select the desired image size.
SELF-TIMER
[OFF] / 2SEC / 10SEC
By setting the self-timer, a still image is recorded 2 or 10
seconds after pressing recording start/stop button.
CONTINUOUS
SHOOTING
[OFF] / ON
墌 “Continuous Shooting” (墌 pg. 22)
GAIN
[80] / 160
Select the ISO sensitivity to the desired setting.
NOTE:
The menu items of TELE MACRO are the same as in the
description on page 28.
MENU SETTINGS
Page 30

GZ-MC200US_05Menu.fm Page 30 Friday, September 10, 2004 11:56 AM
MasterPage: Body_Left
30 EN
MENU SETTINGS
Still Image Playback Menus
[ ] = Factory-preset
DPOF
墌 Advanced operation manual
DIRECT PRINT
墌 Advanced operation manual
EFFECT
[OFF] / SEPIA / MONOTONE
You can view still images with special image effects.
NOTE:
The menu items of PROTECT and DELETE are the same as
in the description on page 29.
Voice Recording Menus
[ ] = Factory-preset
Voice Playback Menus
[ ] = Factory-preset
PLAYBACK
SPEED
[NORMAL] / FASTPLAY / SLOWPLAY
Select the desired voice playback speed.
NOTE:
The menu items of PROTECT and DELETE are the same as
in the description on page 29.
QUALITY
Select the desired sound quality.
Mode
(In order of the quality)
[FINE] 1,536 kbps
STANDARD 512 kbps
ECONOMY 256 kbps
RECORDING
LEVEL
[HIGH] / MIDDLE / LOW
Select the desired voice recording level.
Bit rate
NOTE:
The menu items of WIND CUT are the same as in the
description on page 28.
Page 31

GZ-MC200US.book Page 31 Tuesday, September 7, 2004 9:56 PM
MasterPage: Menu_Right
Menus for Manual Recording
(MSET Menu)
MODE
Power
Switch
Lock
Button
r
w
t ( SET)
1 Set the power switch to while pressing down the
lock button located on the switch.
2 Press MODE to select or .
3 Press e ( ) so that is displayed.
4 Press t ( SET). The menu screen appears.
5 Press w e to select the desired sub menu.
6 Press 49. The sub menu appears.
7 Press rt (or we) to select the desired menu item.
8 Press 49 again. Selection is complete.
● To return to the normal screen, press t ( SET).
49
e ()
MENU SETTINGS
[ ] = Factory-preset
EXP.
[AUTO*] or [±0**] / ±6* or ±2 (EV)**
Fine exposure adjustment is possible depending on the
shooting condition.
* For video recording
** For still image recording
FOCUS
[AUTO] / (manual)
If correct focus may not be obtained depending on the
shooting condition, use the manual focus mode.
WB
[AUTO] / MWB / FINE / CLOUD / HALOGEN
You can adjust the white balance setting manually or
select an option.
SHUTTER
[AUTO] / 1/2 / 1/4 / 1/8 / 1/15 / 1/30 / 1/60 / 1/100 / 1/250
1/500 / 1/1000* / 1/2000* / 1/4000*
You can select the shutter speed depending on the
subject and shooting condition.
* Not available for still image recording.
P. AE
[OFF] / SPORTS / SNOW / SPOTLIGHT / TWILIGHT
Various programmed effects can be added to the scene.
EFFECT
[OFF] / SEPIA / MONOTONE / CLASSIC FILM /
STROBE
Creative effects can be added to the image.
EN 31
MENU SETTINGS
Page 32

GZ-MC200US.book Page 32 Tuesday, September 7, 2004 9:56 PM
MasterPage: Heading0_Left
32 EN
REFERENCES
For Advanced Operations Cleaning the Camera
Read the advanced operation manual provided as HTML
format in the CD-ROM for more information. To access to
the HTML files, follow the procedure below.
1 Load the provided CD-ROM onto your PC.
2 Right-click on the CD-ROM icon in the [My Computer]
window, then click [Open].
3 Double-click the [Docs] folder, then double-click the
[Manual] folder.
4 Double click “start.html”.
5 Select the language by clicking the language button.
6 Now you can see menus on the left side and
instructions.
Before cleaning, turn off the camera and remove the
battery pack and AC adapter.
To clean the exterior
Wipe gently with a soft cloth. Put the cloth in diluted mild
soap and wring it well to wipe off heavy dirt. Then wipe
again with a dry cloth.
To clean the LCD monitor
Wipe gently with a soft cloth. Be careful not to damage the
monitor.
To clean the lens
Wipe gently with lens cleaning paper.
NOTES:
● Avoid using strong cleaning agents such as benzine or
alcohol.
● Cleaning should be done only after the battery pack has
been removed or other power units have been
disconnected.
● Mould may form if the lens is left dirty.
● When using a cleaner or chemically treated cloth refer to the
cautions of each product.
Page 33

GZ-MC200US_05Menu.fm Page 33 Tuesday, September 14, 2004 10:01 AM
MasterPage: Reference_Right
Troubleshooting
If the problem still exists after following the instructions
below, please consult your nearest JVC dealer.
The camera is a microcomputer-controlled device.
External noise and interference (from a TV, a radio, etc.)
might prevent it from functioning properly. In such cases,
first disconnect its power supply unit (battery pack, AC
adapter, etc.) and wait a few minutes; and then reconnect it and proceed as usual from the beginning.
Power
No power is supplied.
● The power is not connected properly.
H Connect the AC Adapter securely. (墌 pg. 14)
● The battery pack is not attached firmly.
H Detach the battery pack once again and re-attach it firmly.
(墌 pg. 14)
● The battery is dead.
H Replace the dead battery with a fully charged one.
(墌 pg. 14)
Recording
Recording cannot be performed.
● [MEMORY CARD IS FULL] appears.
H Replace with new recording medium or delete unnecessary
files. (墌 pg. 16, 29)
● Recording medium is not selected properly.
H Select the recording medium. (墌 pg. 17)
● The battery/CF card cover is open.
H Close the cover and set the power switch to OFF, then to
.
When shooting a subject illuminated by bright light,
vertical lines appear.
● This is not a malfunction.
REFERENCES
EN 33
When the screen is under direct sunlight during
shooting, the screen becomes red or black for an
instant.
● This is not a malfunction.
During recording, the date/time does not appear.
● [DATE/TIME] is set to [OFF].
H Set [DATE/TIME] to [ON]. (墌 pg. 18)
The LCD monitor indications blink.
● Certain modes of wipe/fader, program AE, effect, DIS and
other functions that cannot be used together are selected at
the same time.
Digital zoom does not work.
● [ZOOM] is set to [10X] (optical zoom).
H Set [ZOOM] to [40X] or [200X]. (墌 pg. 28)
Playback
Playback cannot be performed.
● Recording medium is not selected properly.
H Select the recording medium. (墌 pg. 17)
● The battery/CF card cover is open.
H Close the cover and set the power switch to OFF, then to
.
● Playback starts, but there is no picture on TV.
H Set the TV's input mode or channel appropriate for video
playback.
Advanced features
The focus does not adjust automatically.
● Focus is set to the manual mode.
H Set focus to the automatic mode. (墌 pg. 31)
● The lens is dirty or covered with condensation.
H Clean the lens and check the focus again. (墌 pg. 32)
The color of the image looks strange.
● The light source or the subject does not include white. Or
there are various different light sources behind the subject.
H Try manual white balance adjustment. (Refer to the
advanced operation manual in CD-ROM. 墌 pg. 32)
REFERENCES
Page 34

GZ-MC200US.book Page 34 Tuesday, September 7, 2004 9:56 PM
MasterPage: Body_Left
34 EN
REFERENCES
The recorded image is too dark.
● Shooting was performed under backlit conditions.
H Try backlight compensation. (Refer to the advanced
operation manual in CD-ROM. 墌 pg. 32)
The recorded image is too bright.
● The subject is too bright.
H Set [P. AE] to [SPOTLIGHT]. (墌 pg. 31)
White balance setting cannot be activated.
● The sepia (SEPIA) or monotone (MONOTONE) mode is
activated.
H Turn off the sepia (SEPIA) or monotone (MONOTONE)
mode before setting white balance. (墌 pg. 31)
The black & white fader does not work.
● The sepia (SEPIA) or monotone (MONOTONE) mode is
activated.
H Turn off the sepia (SEPIA) or monotone (MONOTONE)
mode. (墌 pg. 31)
The image looks like the shutter speed is too slow.
● When shooting in the dark, the unit becomes highly
sensitive to light when [GAIN UP] is set to [ON].
H If you want the lighting to look more natural, set [GAIN UP]
to [OFF]. (墌 pg. 28)
Other problems
The power/charge lamp on the camera does not light
during charging.
● Charging is difficult in places subject to extremely high/low
temperatures.
H To protect the battery, it is recommended to charge it in
places with a temperature of 10°C to 35°C (50°F to 95°F).
(墌 pg. 37)
● The battery/CF card cover is open.
H Close the cover. (墌 pg. 14)
[SET DATE/TIME!] appears.
● The built-in clock's rechargeable lithium battery is
discharged.
● The previously set date/time is erased.
H Connect the camera to an AC outlet using the AC Adapter
for over 24 hours to charge the clock's lithium battery. Then
set the date/time. (墌 pg. 18)
Files cannot be deleted.
● Files are protected.
H Remove protection from the files and delete them.
(墌 pg. 29)
When the image is printed from the printer, a black
bar appears at the bottom of the screen.
● This is not a malfunction.
H By recording with DIS activated, this can be avoided.
(墌 pg. 28)
Images on the LCD monitor appear dark or whitish.
● In places subject to low temperature, images become dark
due to the characteristics of the LCD monitor. This is not a
malfunction.
H Adjust the brightness and angle of the LCD monitor.
(墌 pg. 18, 27)
● When the LCD monitor's fluorescent light reaches the end
of its service life, images on the LCD monitor become dark.
H Consult your nearest JVC dealer.
Colored bright spots appear all over the LCD monitor.
● The LCD monitor is made with high precision technology.
However, black spots or bright spots of light (red, green or
blue) may appear constantly on the LCD monitor. These
spots are not recorded on the picture. This is not due to any
defect of the unit. (Effective dots: more than 99.99 %)
The SD card cannot be removed from the camera.
H Push in the SD card a few more times.
Picture does not appear on the LCD monitor.
● The LCD monitor's brightness setting is too dark.
H Adjust the brightness of the LCD monitor. (墌 pg. 27)
Page 35

GZ-MC200US.book Page 35 Tuesday, September 7, 2004 9:56 PM
MasterPage: Reference_Right
Warning Indications
The following indications appear on the screen.
(Battery indicator)
Displays the battery remaining power.
Remaining power level
ExhaustedHigh
● As the battery power comes close to nil, the battery
indicator blinks. When the battery power is exhausted,
power turns off automatically.
SET DATE/TIME!
● Appears when the date/time is not set. (墌 pg. 18)
● Appears when the built-in clock (lithium) battery is
discharged and the previously set date/time is erased.
(墌 pg. 18)
LENS CAP
Appears for 5 seconds after power is turned on if the lens
cap is attached or when it is dark.
PLEASE INSERT MEMORY CARD
Appears when no recording medium is inserted in the
selected slot. (墌 pg. 16)
THIS CARD IS NOT FORMATTED
Appears when an unformatted recording medium is
inserted.
MEMORY CARD IS FULL
Appears when the recording medium is full and recording
is not possible.
CHECK CARD’S WRITE PROTECTION SWITCH
Appears when you attempt recording when the write
protection tab on the SD card is set to the "LOCK"
position.
REFERENCES
EN 35
THIS CARD IS NOT FOR RECORDING VIDEO
Appears when a recording medium which is not capable
of video recording is inserted.
UNSUPPORTED FILE!
Appears when playing back a file that is not compatible
with this camera's file format.
NO VIDEO FILES STORED!
Appears if there are no video files when you attempt video
playback.
NO IMAGE FILES STORED!
Appears if there are no still image files when you attempt
still image playback.
NO VOICE FILES STORED!
Appears if there are no voice files when you attempt voice
playback.
THIS CARD IS NOT FOR CONTINUOUS SHOOTING
Appears when the recording medium is not capable of
continuous shooting.
CLOSE COVER
Appears when the recording medium cover is opened
during file copy/move operation.
NO MEMORY CARD
Appears when recording media are not inserted to both of
slots for file copy/move operation.
NO SUPPORTED FILES
Appears when there is no JPEG (still image) files to be
copied or moved in recording media.
REFERENCES
Page 36

GZ-MC200US_05Menu.fm Page 36 Friday, September 10, 2004 11:57 AM
MasterPage: Body_Left
36 EN
NUMBER OF FOLDERS OVERFLOW
Appears when the number of folders exceeds the limit for
file copy/move operation.
MEMORY CARD ERROR!
REINSERT CARD OR CHANGE CARD
Appears when the camera does not recognize the loaded
recording medium. Remove the medium once and insert it
again or replace with another medium.
FILE SYSTEM MAY HAVE PROBLEM
FORMAT IS RECOMMENDED AFTER COPYING
WANTED DATA
The file system of the recording medium may have a
problem. It is recommended to copy the data for backup,
then format the medium.
VIDEO MANAGEMENT FILE IS BROKEN
TO RECORD/PLAYBACK VIDEO, RECOVERY IS
REQUIRED
The video management file is broken. Recovery is
required to record or play back video files. Follow the
menu guide if you want to execute recovery.
NO VIDEO MANAGEMENT FILE
VIDEO FILES HAVE BEEN MOVED TO MPEG FOLDER
The data cannot be recorded properly, or the video
management file is deleted or not found. The extension of
the corresponding video file is changed from “.MOD” to
“.MPG”. Video files have been moved to MPEG
(EXTMOV) folder.
PLAY LIST’S MANAGEMENT INFORMATION IS
BROKEN
REMAKE PLAY LIST AGAIN
The management information of play list is broken. Create
the play list again.
REFERENCES
NO REGISTERED SCENES IN PLAY LIST
SOME OF SCENES MAY NOT BE PLAYED BACK
The video files registered in the play list do not exist.
Some of the scenes may not be played back.
REGISTERED SCENES IN PLAY LIST IS EMPTY
THIS PLAY LIST WILL BE DELETED
There is no scenes registered in the play list. The play list
will be deleted.
CAMERA TEMPERATURE IS GOING UP
TURN CAMERA OFF, PLEASE WAIT
The temperature of the camera is too high. Turn off the
power, then wait for a while.
CAMERA TEMPERATURE IS TOO LOW
KEEP CAMERA POWER ON, PLEASE WAIT
The temperature of the camera is too low. Keep the power
on, then wait for a while.
RECORDING MAY NOT BE CORRECT ON THE
MEMORY CARD
The data may not be recorded on the recording medium
correctly. Try recording again.
Otherwise, clean up the recording medium.
MEMORY CARD CANNOT BE PLAYED BACK
CORRECTLY
The recording medium cannot be played back correctly.
Try playback again.
CANNOT USE IN VIDEO MODE
The operation is not available in the video mode.
Page 37

GZ-MC200US.book Page 37 Tuesday, September 7, 2004 9:56 PM
MasterPage: Reference_Right
Cautions
AC Adapter
When using the AC adapter in areas other than the USA
The provided AC adapter features automatic voltage
selection in the AC range from 110 V to 240 V.
USING HOUSEHOLD AC PLUG ADAPTER
In case of connecting the unit’s power cord to an AC wall
outlet other than American National Standard C73 series
type use an AC plug adapter, called a “Siemens Plug”, as
shown.
For this AC plug adapter, consult your nearest JVC dealer.
Plug adapter
Battery Packs
The supplied battery pack is a
lithium-ion battery. Before
using the supplied battery
pack or an optional battery
pack, be sure to read the
following cautions:
● To avoid hazards
... do not burn.
... do not short-circuit the
terminals. When transporting, make sure the provided
battery cap is attached to the battery. If the battery cap is
misplaced, carry the battery in a plastic bag.
... do not modify or disassemble.
... do not expose the battery to temperatures exceeding 60°C
(140°F), as this may cause the battery to overheat, explode
or catch fire.
... use only specified chargers.
Terminals
REFERENCES
EN 37
● To prevent damage and prolong service life
... do not subject to unnecessary shock.
... charge in an environment where temperatures are within the
tolerances shown in the chart below. This is a chemical
reaction type battery — cooler temperatures impede
chemical reaction, while warmer temperatures can prevent
complete charging.
... store in a cool, dry place. Extended exposure to high
temperatures will increase natural discharge and shorten
service life.
... fully charge and then fully discharge the battery every 6
months when storing the battery pack over a long period time.
... remove from charger or powered unit when not in use, as
some machines use current even when switched off.
NOTES:
● It is recommended that only genuine JVC batteries are used
in this camera. Using generic non-JVC batteries can cause
damage to the internal charging circuitry.
● It is normal for the battery pack to be warm after charging, or
after use.
Temperature range specifications
Charging: 10°C to 35°C (50°F to 95°F)
Operation: 0°C to 40°C (32°F to 104°F)
Storage: –20°C to 50°C (–4°F to 122°F)
● The lower the temperature, the longer recharging takes.
● Charging times are for a fully discharged battery pack.
REFERENCES
Page 38

GZ-MC200US.book Page 38 Tuesday, September 7, 2004 9:56 PM
MasterPage: Body_Left
38 EN
REFERENCES
Recording Medium
● Be sure to follow the guidelines below to prevent
corruption or damage to your recorded data.
• Do not bend or drop the recording medium, or subject it to
strong pressure, jolts or vibrations.
• Do not splash the disk with water.
• Do not use, replace, or store the disk in locations that are
exposed to strong static electricity or electrical noise.
• Do not turn off the camera power or remove the battery or
AC adapter during shooting, playback, or when otherwise
accessing the recording medium.
• Do not bring the recording medium near objects that have a
strong magnetic field or that emit strong electromagnetic
waves.
• Do not store the recording medium in locations with high
temperature or high humidity.
• Do not touch the metal parts.
● Copy the recorded files to your PC. JVC shall not be
responsible for any lost data. (It is recommended
that you copy the data from your PC to DVD or other
media for storage.)
● A malfunction may cause the recording medium to
fail to operate properly. JVC shall not provide any
compensation for any lost contents.
LCD Monitor
● To prevent damage to the LCD monitor, DO NOT
...push it strongly or apply any shocks.
...place the camera with LCD monitor on the bottom.
● To prolong service life
...avoid rubbing it with coarse cloth.
● Be aware of the following phenomena for LCD
monitor use. These are not malfunctions.
... While using the camera, the surface around the LCD monitor
and/or the back of the LCD monitor may heat up.
... If you leave power on for a long time, the surface around the
LCD monitor becomes hot.
Main Unit
● For safety, DO NOT
... open the camera’s chassis.
... disassemble or modify the unit.
... short-circuit the terminals of the battery pack. Keep it away
from metallic objects when not in use.
... allow inflammables, water or metallic objects to enter the unit.
... remove the battery pack or disconnect the power supply
while the power is on.
... leave the battery pack attached when the camera is not in
use.
● Avoid using the unit
... in places subject to excessive humidity or dust.
... in places subject to soot or steam such as near a cooking
stove.
... in places subject to excessive shock or vibration.
... near a television set.
... near appliances generating strong magnetic or electric fields
(speakers, broadcasting antennas, etc.).
... in places subject to extremely high (over 40°C or 104°F) or
extremely low (under 0°C or 32°F) temperatures.
● DO NOT leave the unit
... in places of over 50°C (122°F).
... in places where humidity is extremely low (below 35%) or
extremely high (above 80%).
... in direct sunlight.
... in a closed car in summer.
... near a heater.
● To protect the unit, DO NOT
...allow it to become wet.
... drop the unit or strike it against hard objects.
... subject it to shock or excessive vibration during
transportation.
... keep the lens directed at extremely bright objects for long
periods.
... expose the lens to direct sunlight.
... carry it by holding the LCD monitor.
... swing it excessively when using the hand strap or the grip.
... swing the soft camera case excessively when the camera is
inside it.
Page 39
GZ-MC200US.book Page 39 Tuesday, September 7, 2004 9:56 PM
MasterPage: Reference_Right
How to Handle a CD-ROM
● Take care not to soil or scratch the mirror surface (opposite
to the printed surface). Do not write anything or put a sticker
on either the front or back surface. If the CD-ROM gets dirty,
gently wipe it with a soft cloth outward from the center hole.
● Do not use conventional disc cleaners or cleaning spray.
● Do not bend the CD-ROM or touch its mirror surface.
● Do not store your CD-ROM in a dusty, hot or humid
environment. Keep it away from direct sunlight.
Serious malfunctioning
If malfunctioning occurs, stop using the unit
immediately and consult your local JVC dealer.
The camera is a microcomputer-controlled device.
External noise and interference (from a TV, a radio,
etc.) might prevent it from functioning properly. In such
cases, first disconnect its power supply unit (battery
pack, AC adapter, etc.) and wait a few minutes and then
re-connect it and proceed as usual from the beginning.
Declaration of Conformity
Model Number : GZ-MC200U
Trade Name : JVC
Responsible party : JVC AMERICAS CORP.
Address : 1700 Valley Road Wayne,
N. J. 07470
Telephone Number : 973-317–5000
This device complies with Part 15 of FCC Rules.
Operation is subject to the following two conditions: (1)
This device may not cause harmful interference, and (2)
this device must accept any interference received,
including interference that may cause undesired
operation.
REFERENCES
EN 39
Changes or modifications not approved by JVC could
void the user’s authority to operate the equipment. This
equipment has been tested and found to comply with
the limits for a Class B digital device, pursuant to Part
15 of the FCC Rules. These limits are designed to
provide reasonable protection against harmful
interference in a residential installation. This equipment
generates, uses, and can radiate radio frequency
energy and, if not installed and used in accordance with
the instructions, may cause harmful interference to
radio communications. However, there is no guarantee
that interference will not occur in a particular
installation. If this equipment does cause harmful
interference to radio or television reception, which can
be determined by turning the equipment off and on, the
user is encouraged to try to correct the interference by
one or more of the following measures:
Reorient or relocate the receiving antenna.
Increase the separation between the equipment and
receiver.
Connect the equipment into an outlet on a circuit
different from that to which the receiver is connected.
Consult the dealer or an experienced radio/ TV
technician for help.
This Class B digital apparatus complies with Canadian
ICES-003.
Cet appareil numérique de la classe B est conforme à
la norme NMB-003 du Canada.
REFERENCES
Page 40

GZ-MC200US_05Menu.fm Page 40 Friday, September 10, 2004 11:57 AM
MasterPage: Body_Left
40 EN
REFERENCES
Specifications
Camera
For general
Power supply
DC 11 V (Using AC adapter)
DC 7.2 V (Using battery pack)
Power consumption
Approx. 4.9 W
Approx. 7.7 W (Maximum; when charging a battery)
Dimensions (W x H x D)
74 mm x 56 mm x 94 mm (2-15/16" x 2-1/4" x 3-3/4")
Weight
Approx. 285 g (0.63 lbs)
(without battery, removable hard disk, lens cap and hand
strap)
Approx. 355 g (0.79 lbs)
(incl. battery, removable hard disk, lens cap and hand
strap)
Operating temperature
0°C to 40°C (32°F to 104°F)
Operating humidity
35% to 80%
Storage temperature
–20°C to 50°C (–4°F to 122°F)
Pickup
1/3.6" CCD
Lens
F 1.8 to 2.2, f = 4.5 mm to 45 mm, 10:1 power zoom lens
Filter diameter
ø30.5 mm
LCD monitor
1.8" diagonally measured, LCD panel/TFT active matrix
system
Speaker
Monaural
Flash
Within 2 m (recommended shooting distance)
For video/audio
Format
SD-VIDEO
Recording/Playback format
Video: MPEG-2-PS
Audio: Dolby Digital AC-3 (2 ch)
Signal format
NTSC standard
Recording mode (video)
ULTRA FINE: 720 x 480 pixels, 8.5 Mbps (CBR)
FINE: 720 x 480 pixels, 5.5 Mbps (CBR)
NORMAL: 720 x 480 pixels, 4.2 Mbps (VBR)
ECONOMY: 352 x 240 pixels, 1.5 Mbps (VBR)
Recording mode (audio)
ULTRA FINE: 48 kHz, 384 kbps
FINE: 48 kHz, 384 kbps
NORMAL: 48 kHz, 256 kbps
ECONOMY: 48 kHz, 128 kbps
For still image
Format
JPEG
Image size
4 modes (1600 x 1200 / 1280 x 960 / 1024 x 768 /
640x480)
Picture quality
2 modes (FINE/STANDARD)
For voice
Format
Linear PCM
Recording mode
FINE: 48 kHz, 1,536 kbps, 16 bit, stereo
STANDARD: 16 kHz, 512 kbps, 16 bit, stereo
ECONOMY: 8 kHz, 256 kbps, 16 bit, stereo
Page 41

GZ-MC200US.book Page 41 Tuesday, September 7, 2004 9:56 PM
MasterPage: Reference_Right
For connectors
AV
S-Video output:
Y: 1.0 V (p-p), 75 Ω, analog
C: 0.29 V (p-p), 75 Ω, analog
Video output: 1.0 V (p-p), 75 Ω, analog
Audio output: 300 mV (rms), 1 kΩ, analog, stereo
Headphone output
ø2.5 mm, stereo
USB
Mini USB-B type, USB 1.1/2.0 compliant
AC Adapter
Power requirement
AC 110 V to 240 Vd, 50 Hz/60 Hz
Output
DC 11 V , 1 A
Design and specifications subject to change without
notice.
REFERENCES
EN 41
REFERENCES
Page 42

GZ-MC200US.book Page 42 Tuesday, September 7, 2004 9:56 PM
MasterPage: Body_Left
42 EN
REFERENCES
Recording Time and Number of Images
The tables below show the approximate recording time
and number of storable images.
● The number increases or decreases depending on the
image size, picture quality and other conditions
(墌 pg. 28, 29, 30). The first column in the table
indicates the conditions.
● The provided 4 GB removable hard disk is indicated with
* mark.
: Approximate recording time (for video)
(The numbers indicate “minutes”.)
● Removable hard disk
Quality 2 GB 4 GB*
ULTRA FINE 30 60
FINE 45 90
NORMAL 60 120
ECONOMY 150 300
• The camera is not compatible with a removable hard disk of
1GB or less.
● SD Card/CompactFlash Card
Quality 128 MB 256 MB 512 MB 1 GB
ULTRA FINE 2 4 8 16
FINE 3 6 12 24
NORMAL 4 7 15 31
ECONOMY 10 21 43 86
: Approximate number of storable images (for still
image)
● Removable hard disk
Image size/quality 2 GB 4 GB*
640 x 480/FINE
640 x 480/STANDARD
1024 x 768/FINE
1024 x 768/STANDARD
1280 x 960/FINE
1280 x 960/STANDARD
1600 x 1200/FINE
1600 x 1200/STANDARD
9999 9999
9999 9999
6826 9999
9999 9999
4376 8752
9999 9999
2797 5595
9142 9999
● SD Card
Image size/quality 32 MB 64 MB 256 MB 1 GB
640 x 480/FINE
640 x 480/STANDARD
1024 x 768/FINE
1024 x 768/STANDARD
1280 x 960/FINE
1280 x 960/STANDARD
1600 x 1200/FINE
1600 x 1200/STANDARD
• Recommended SD cards are products of Panasonic, Toshiba
or SanDisk.
205 425 2210 7756
375 755 5200 9999
95 200 855 3412
185 375 1715 9999
60 125 550 2188
120 250 1100 7110
34 65 285 1398
50 110 480 4570
• The camera is compatible with the high-speed card only.
(SD card: 10 Mbps or faster, CompactFlash card: 40x or
faster)
• Recommended SD cards are products of Panasonic, Toshiba
or SanDisk.
• Recommended CompactFlash cards are products of Lexar,
SanDisk or Hagiwara Sys-Com.
Page 43
GZ-MC200US.book Page 43 Tuesday, September 7, 2004 9:56 PM
MasterPage: Reference_Right
● CompactFlash Card
Image size/quality 64 MB 128 MB 256 MB 1 GB
640 x 480/FINE
640 x 480/STANDARD
1024 x 768/FINE
1024 x 768/STANDARD
1280 x 960/FINE
1280 x 960/STANDARD
1600 x 1200/FINE
1600 x 1200/STANDARD
• Recommended CompactFlash cards are products of Lexar,
SanDisk or Hagiwara Sys-Com.
425 1115 2235 7756
755 2605 5215 9999
200 430 865 3412
375 865 1735 9999
125 280 560 2188
250 560 1120 7110
65 145 290 1398
110 245 490 4570
REFERENCES
: Approximate recording time (for voice)
(The numbers indicate “minutes”.)
● Removable hard disk
Quality 4 GB*
FINE 320
STANDARD 960
ECONOMY 1960
EN 43
REFERENCES
Page 44

GZ-MC200US.book Page 40 Tuesday, September 7, 2004 9:56 PM
MasterPage: Right
EN
© 2004 Victor Company of Japan, Limited
Printed in Japan
US
0904HOH-AL-VP
 Loading...