

JVC Everio GZ-HM690U, Everio GZ-HM670U, Everio GZ-HM650U, Everio GZ-HM450U, Everio GZ-HM440U User Manual
Page 1
LYT2259-OOIB-M
HD MEMORY CAMERA
GZ-H iVi690U/G Z-HiVi670U _--
GZ-H M650UIGZ-H iVi450U __=
GZ-HIVI440U
Basic User Guide
Everio
Dear Customers
Thank you for purchasing this JVC product.
Before use, please read the Safety Precautions and Cautions on p. 2 and p. 28 to ensure safe
use of this product.
A "Basic User Guide" (this manual) and a "Detailed User Guide" are available for this product.
For more details on operating this product, please refer to the "Detailed User Guide" at the
following website.
[] ht_'Jlmanual.jvc.co.jplinde×.html/
[] You can also access the website from the built-in application software of
this unit. (p. 22)
For Future Reference:
Enter the Model No. (located on the bottom of the camera) and Serial No.
(located on the battery pack mount of the camera) below.
ModemNo.
Serial No.
j_'_l_ TM ["lq DOLBY
.................................._ir-if_L
ENGLISH
CASTELLANO
Page 2
Safety Precautions
CAUTION: TO REDUCE THE RiSK OF ELECTRIC SHOCK,
DO NOT REMOVE COVER {OR BACK).
NO USER-SERVICEABLE PARTS iNSIDE.
REFER SERVICING TO QUALIFIED SERVICE PERSONNEL.
_ghtn_ngflashw_tharrowheadsymbol,withinan
presenceofun_nsu_ated"dangerousvoltage"withinthe
product'senclosurethatmaybe of sufficientmagnitude
point within an equ_atera_ tdang_e s
_ntended to a_ert the user to the presence of _mportant
operating and mantenance (servicing) ns_ruct_ons _n
the _terature accompanying the appliance
WARNING: TO PREVENT FIRE OR SHOCK
HAZARD, DO NOT EXPOSE THIS UNIT TO
RAIN OR MOISTURE,
NOTES:
®The rating plate and safety caution are on the
bottom and/or the back of the main unit.
®The serial number plate is on the battery pack
mount.
®The rating information and safety caution of the
AC adapter are on its upper and lower sides.
Caution on Replaceable lithium battery
The battery used in this device may present a fire
or chemical burn hazard if mistreated.
Do not recharge, disassemble, heat above 100°C
(212°F) or incinerate.
Replace battery with Panasonic, Sanyo, Sony or
Maxell CR2025.
Danger of explosion or Risk of fire if the battery is
incorrectly replaced.
®Dispose of used battery promptly.
®Keep away from children.
®Do not disassemble and do not dispose of in fire.
For USA-California Only
This product contains a CR Coin Cell Lithium
Battery which contains Perchlorate Material
- special handling may apply.
See www.dtsc.ca.gov/hazardouswaste/perchlo rate
When the equipment is installed in a cabinet or on
a shelf make sure that it has sufficient space on all
sides to allow for ventilation (10 cm (3-15/16") or
more on both sides on top and at the rear).
Do not block the ventilation holes.
(If the ventilation holes are blocked by a
newspaper, or cloth etc. the heat may not be able
to get out.)
No naked flame sources, such as lighted candles,
should be placed on the apparatus.
When discarding batteries environmental
problems must be considered and the local rules or
laws governing the disposal of these batteries must
be followed strictly.
The apparatus shall not be exposed to dripping or
splashing.
Do not use this equipment in a bathroom or places
with water.
Also do not place any containers filled with water
or liquids (such as cosmetics or medicines, flower
vases, potted plants, cups etc.) on top of this unit.
(If water or liquid is allowed to enter this
equipment, fire or electric shock may be caused.)
Do not point the lens directly into the sun. This
can cause eye injuries, as well as lead to the
malfunctioning of internal circuitry. There is also a
risk of fire or electric shock.
CAUTION!
The following notes concern possible physical
damage to this unit and to the user.
Carrying or holding this unit by the LCD monitor
can result in dropping the unit, or in a malfunction.
Do not use a tripod on unsteady or unlevet surfaces.
It could tip over, causing serious damage to the unit.
CAUTION!
Connecting cables (Audio/Video, etc.) to this unit
and leaving it on top of the TV is not recommended,
as tripping on the cables will cause this unit to fall,
resulting in damage.
CAUTION:
The mains plug shall remain readily operable.
® Remove the mains plug immediately if the
camcorder functions abnormally.
WARNING:
The battery pack, the camcorder with battery
installed, and the remote control with battery
installed should not be exposed to excessive heat
such as direct sunlight, fire or the like.
For more information, refer to the Detailed User Guide
2 http://manual.jvc.co.jp/index.html/
Page 3
iMPORTANT SAFETY iNSTRUCTiONS
1. Read these instructions.
2. Keep these instructions.
3. Heed all warnings.
4. Follow all instructions.
5. Do not use this apparatus near water.
6. Clean only with dry cloth.
7. Do not block any ventilation openings. Install in
accordance with the manufacturer's instructions.
8. Do not install near any heat sources such
as radiators, heat registers, stoves, or other
apparatus (including amplifiers) that produce heat.
9. Protect the power cord from being walked on or
pinched particularly at plugs, convenience
receptacles, and the point where they exit from
the apparatus.
10.Only use attachments/accessories specified by
the manufacturer.
11. Use only with the cart,
stand, tripod, bracket,
or table specified by
the manufacturer, or
sold with the apparatus.
When a cart is used,
use caution when
moving the cart/
apparatus combination
to avoid injury from tip-over.
12. Unplug this apparatus during lightning storms or
when unused for long periods of time.
13. Refer all servicing to qualified service personnel.
Servicing is required when the apparatus has
been damaged in any way. such as power-supply
cord or plug is damaged liquid has been spilled
or objects have fallen into the apparatus, the
apparatus has been exposed to rain or moisture
does not operate normally, or has been dropped.
_ f this symbol is shown, it is only valid
in the European Union.
Remember that this unit is intended for
_rivate consumer use only.
Any commercial use without proper permission
is prohibited. (Even if you record an event such
as a show, performance or exhibition for personal
enjoyment, it is strongly recommended that you
obtain permission beforehand.)
Trademarks
• "AVCHD" "AVCHD" {ogo "AVCHD Mte" and
"AVCHD Lite" Jogo are trademarks of Panasonic
Corporation and Sony Corporation.
" x.v.Color TM is atrademark of x.v.Color
Sony Corporation.
• HDMV M is a trademark of HDMI I_lm| °
Licensing, LLC. ................................
• Manufactured under license from Dolby
Laboratories. Dolby and the double-D symbol
are trademarks of Dolby Laboratories.
• Windows ® is either registered trademark or
trademark of Microsoft Corporation in the
United States and/or other countries.
• Macintosh is a registered trademark of Apple Inc.
• iMovie and iPhoto are trademarks of Apple Inc.,
registered in the U.S. and other countries.
• YouTube TM and the YouTube logo are
trademarks and/or registered trademarks of
YouTube LLC.
• InteL Intet Core, and Pentium are trademarks or
registered trademarks of Intet Corporation or its
subsidiaries in the United States and other countries.
• Eye-Fi is a trademark of Eye-Fi, Inc.
• Other product and company names included in
this instruction manual are trademarks and/or
registered trademarks of their respective holders.
Make a backup of important recorded data
JVC wiJl not be responsiMe for any Jost data. It is
recommended to copy your important recorded
data to a disc or other recording media for storage.
For more information, refer to the Detailed User Guide
http://manual.jvc.co.jp/index.html/ 3
Page 4
Contents
Safety Precautions ............................... 2
Verifying the Accessories .................... 4
Names of Parts and Functions ............. 5
Names of Buttons and Functions on the
LCD Monitor ........................................ 6
Using the Touch Screen ...................... 7
I_Getting Started ........................... 8
Charging the Battery Pack ................... 8
Grip Adjustment ................................... 9
Using as a Hand Strap ......................... 9
Inserting an SD Card ........................... 9
Clock Setting ..................................... 12
Video Quality ..................................... 13
I_Recording ................................. 14
Video Recording ................................ 14
Still Image Recording ......................... 15
I_Playback ................................... 16
Playing Back!Deleting Files on this Unit
........................................................... 16
Playing Back on TV ............................ 17
_Copying .................................... 19
Copying Files ..................................... 19
Dubbing Files by Connecting to a DVD
Recorder or VCR ............................... 20
Copying to Computer ......................... 21
I_Further Information ................... 24
Operating the Menu ........................... 24
Recordable Time/Number of Images
........................................................... 25
Troubleshooting ................................. 26
Cautions ............................................ 28
Specifications .................................... 30
Model Differences ............................. 32
A"BasicUserGuide"(this manual)and a "DetailedUserGuide"areavailableforthis product.
Formoredetailsonoperatingthis product,pleaserefertothe"DetailedUserGuide"atthe
followingwebsite.
m http:flmanual.jvc.co.jplindex.htmll
[] You can also access the website from the built=in application software
of this unit. (p. 22)
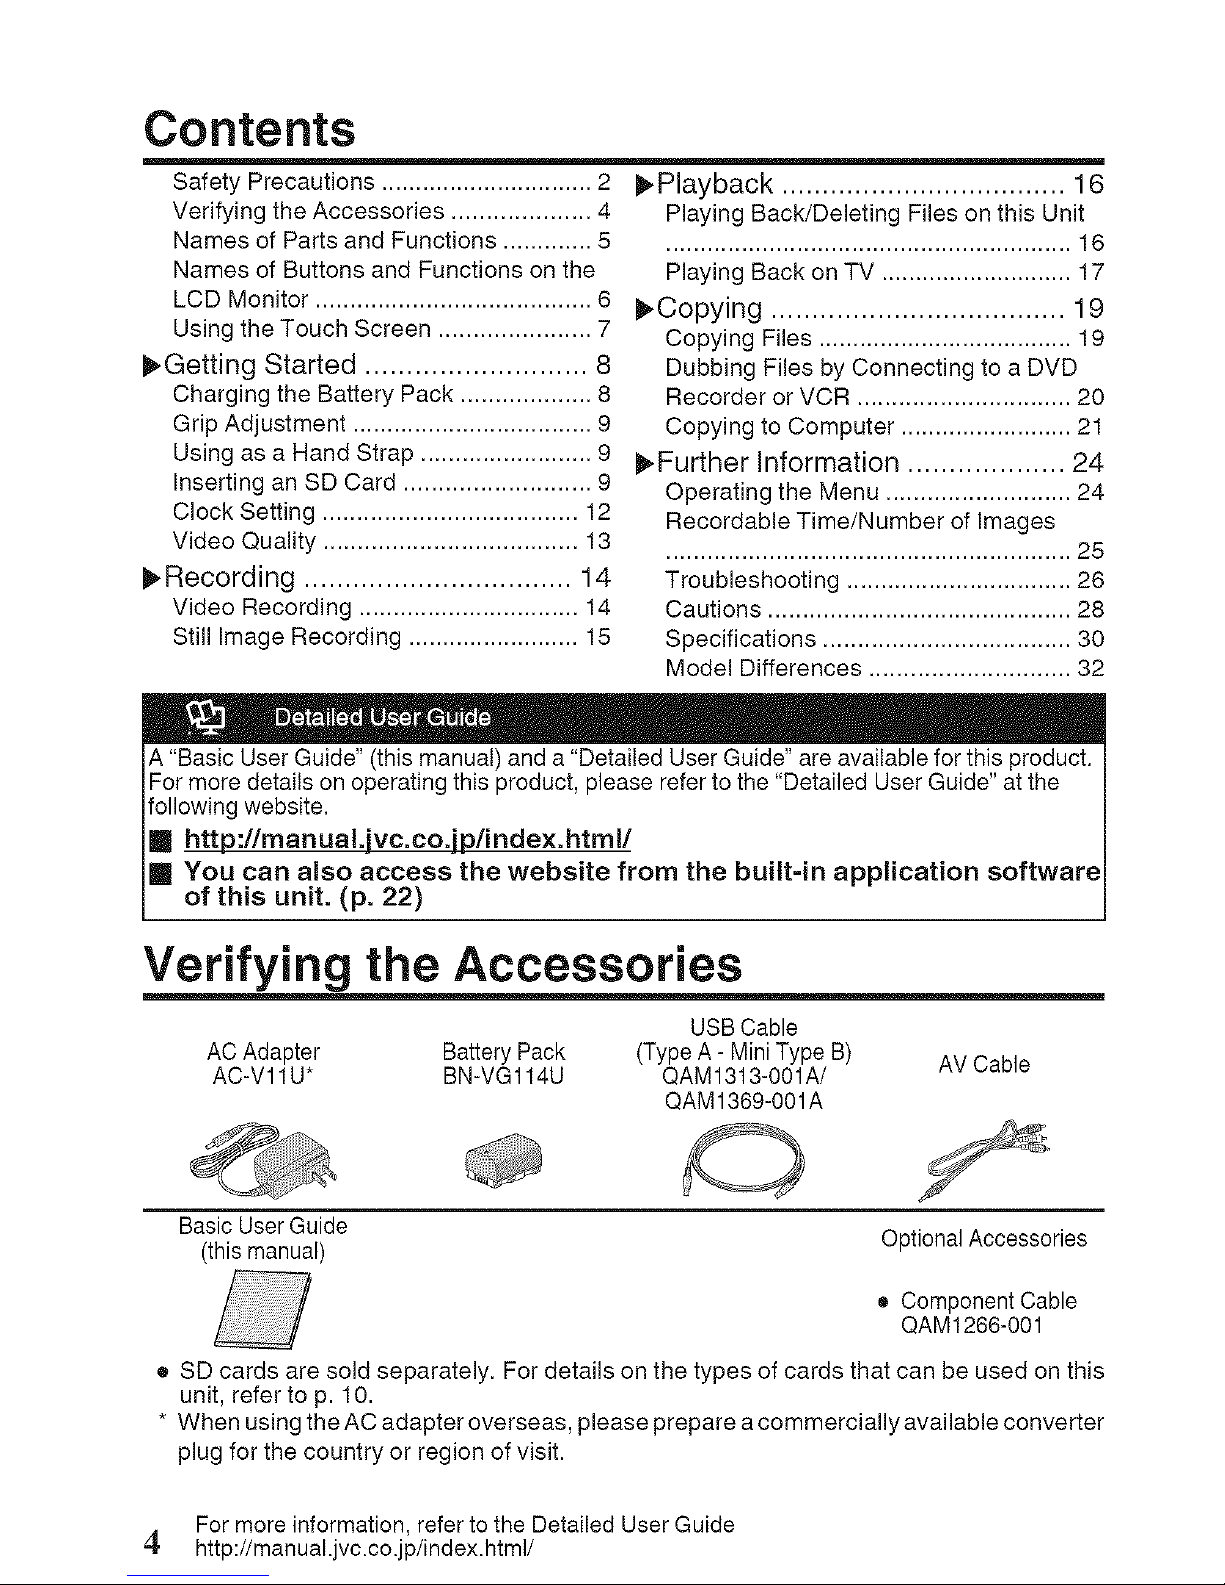
Verifying the Accessories
USB Cable
AC Adapter Battery Pack (Type A- Mini Type B) AV Cable
AC-Vl 1U* BN-VG114U QAM1313-001A/
QAM1369-001A
Basic UserGuide
(this manual)
Optional Accessories
• Component Cable
QAM1266-001
• SD cards are sold separately. For details on the types of cards that can be used on this
unit, refer to p. 10.
• When usingtheACadapteroverseas, pleaseprepareacommerciallyavailableconverter
plug for the country or region of visit.
For more information, refer to the Detailed User Guide
4, http://manual.jvc.co.jp/index.html/
Page 5
Names of Parts and Functions
@
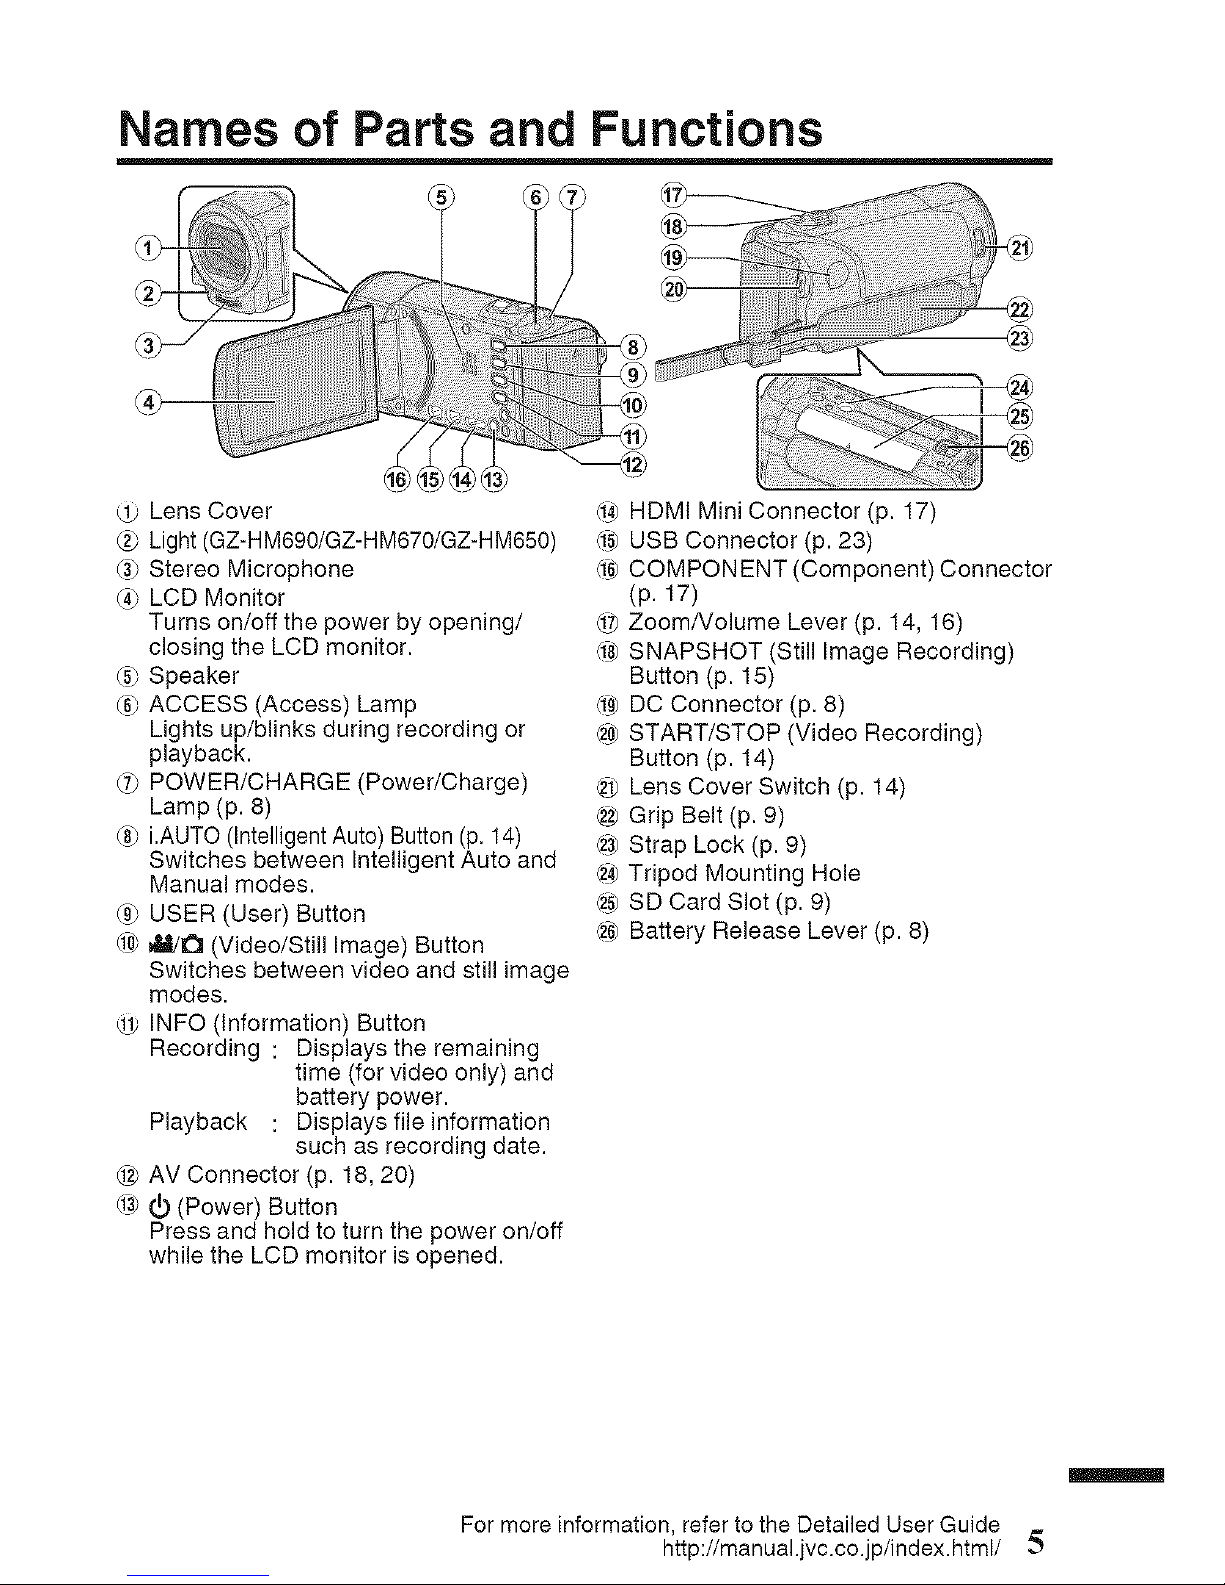
Lens Cover
2_ Light (GZ-HM690/GZ-HM670/GZ-HM650)
(3_Stereo Microphone
(4_LCD Monitor
Turns on/off the power by opening/
closing the LCD monitor.
_5_Speaker
_6_ACCESS (Access) Lamp
Lights up/blinks during recording or
playback.
q_ POWER/CHARGE (Power/Charge)
Lamp (p. 8)
(8_i.AUTO (Intelligent Auto) Button (p, 14)
Switches between Intelligent Auto and
Manual modes.
(9_USER (User) Button
@ 41a/a (Video/Still Image) Button
Switches between video and still image
modes.
@ INFO (Information) Button
Recording : Displays the remaining
time (for video only) and
battery power.
Playback : Displays file information
such as recording date.
@ AV Connector (p. 18, 20)
(i3__ (Power) Button
Press and hold to turn the power on/off
while the LCD monitor is opened.
@ HDMI Mini Connector (p. 17)
(i5)USB Connector (p. 23)
@ COMPONENT (Component) Connector
(p. 17)
@ ZoomNolume Lever (p. 14, 16)
_8)SNAPSHOT (Still Image Recording)
Button (p. 15)
@ DO Connector (p. 8)
@ START/STOP (Video Recording)
Button (p. 14)
@ Lens Cover Switch (p. 14)
@ Grip Belt (p. 9)
@ Strap Lock (p. 9)
¢€ Tripod Mounting Hole
@ SD Card Slot (p. 9)
@ Battery Release Lever (p. 8)
For more information, refer to the Detailed User Guide
http://manual.jvc.co.jp/index.html/
Page 6
Names of Buttons and Functions on the
LCD Monitor
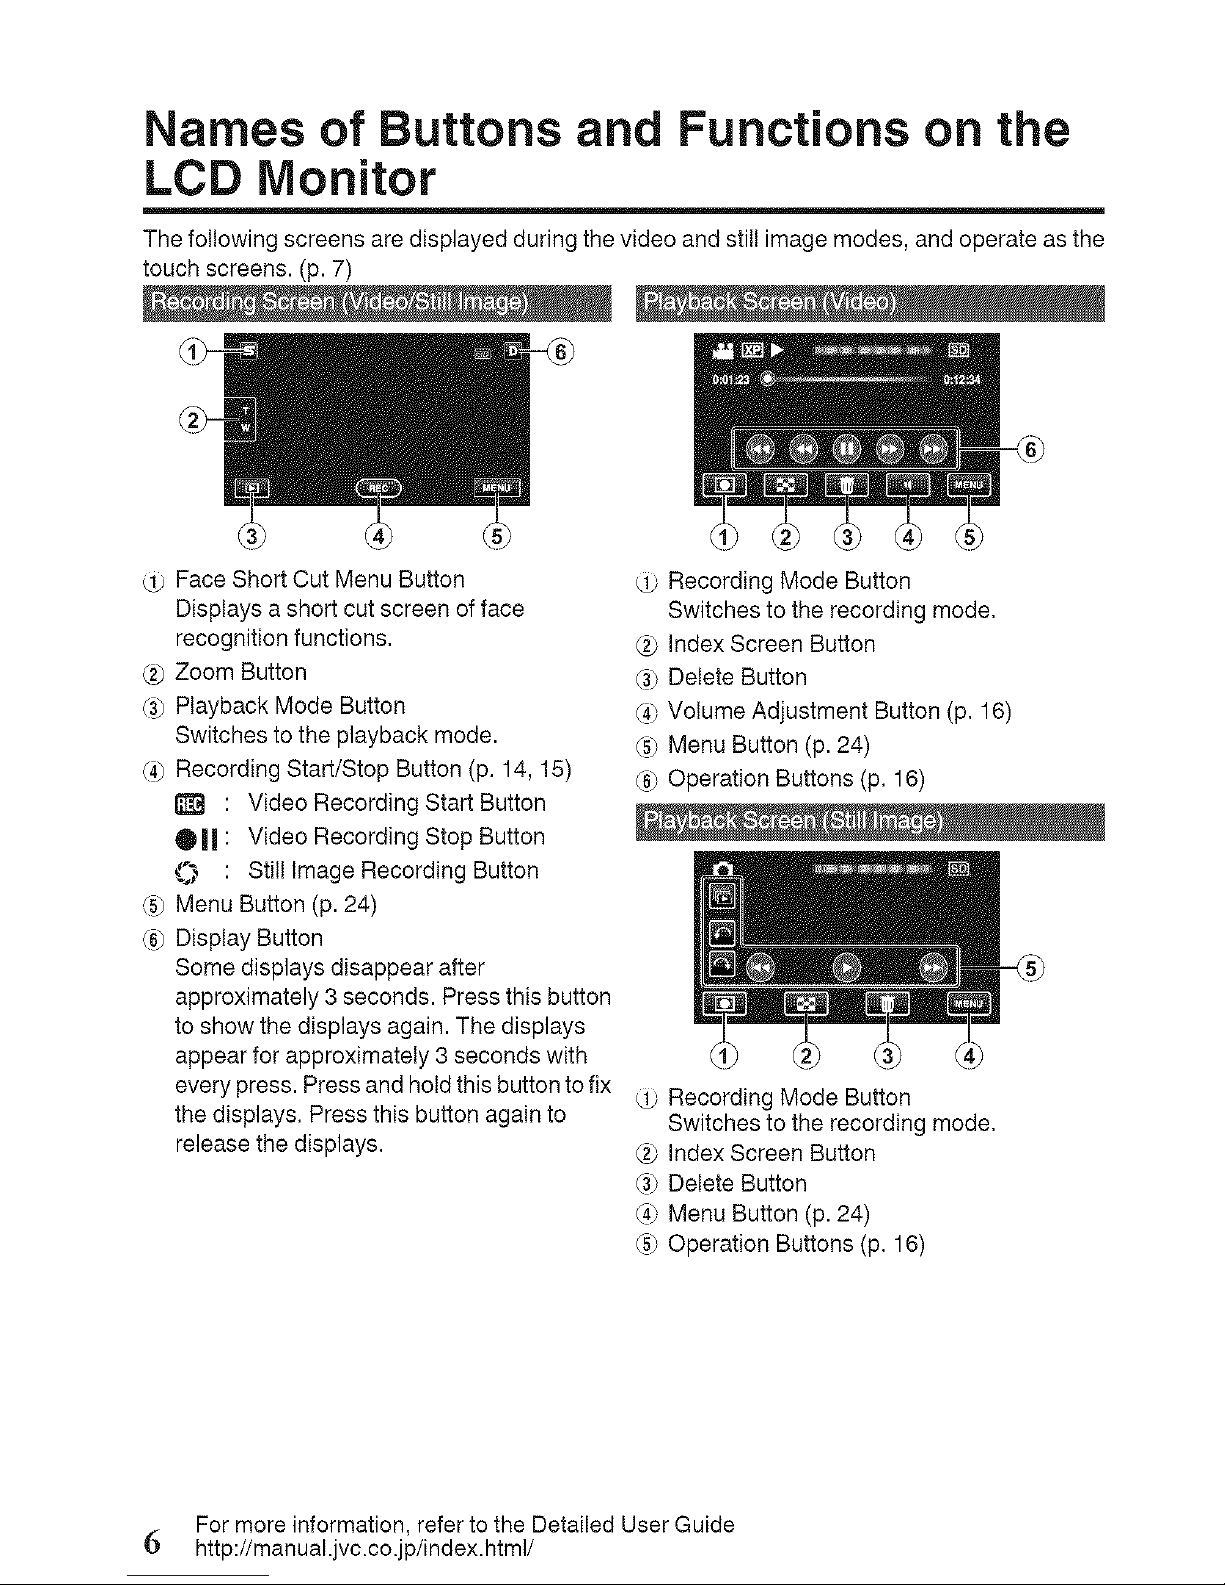
The following screens are displayed during the video and still image modes, and operate as the
touch screens. (p. 7)
Face Short Cut Menu Button
Displays a short cut screen offace
recognition functions.
(_ Zoom Button
(3_Playback Mode Button
Switches to the playback mode.
(4_Recording Start/Stop Button (p. 14, 15)
: Video Recording Start Button
OII : Video Recording Stop Button
O : Stilllmage Recording Button
(5_Menu Button (p. 24)
(6_Display Button
Some displays disappear after
approximately 3 seconds. Press this button
to show the displays again. The displays
appear for approximately 3 seconds with
every press. Press and hold this button to fix
the displays, Press this button again to
release the displays.
Recording Mode Button
Switches to the recording mode.
2_ index Screen Button
(3_Delete Button
(4_Volume Adjustment Button (p. 16)
(5_Menu Button (p. 24)
(6_Operation Buttons (p, 16)
Recording Mode Button
Switches to the recording mode.
2_ index Screen Button
(3_Delete Button
(4_Menu Button (p. 24)
(5_Operation Buttons (p. 16)
For more information, refer to the Detailed User Guide
6 http://manual.jvc.co.jp/index.html/
Page 7

Date Button _ Help Button (p. 24)
Recording Mode Button (_ Menu Items (p. 24)
Switches to the recording mode. (3_Return Button
(3_Delete Button (4_Common/Basic Settings Button
(4_Playback Media Button (5_Close Button
Switches between SD card and built-in
memory or slot A and slot B (GZ-HM440).
_5_Menu Button (p. 24)
_6)Page Forward/Back Button
Using the Touch Screen
There are two ways to operate the touch screen, namely "tap" and "drag". The following
are some examples.
[] Tap the displayed button (icon) or thumbnail (file) on the touch screen to make selection.
[] Drag the thumbnails on the touch screen to search for the desired file.
RecordingScreen PlaybackScreen IndexScreen
[] [] [] [] [] r_
For more information, refer to the Detailed User Guide
http://manual.jvc.co.jp/index.html/ '7
Page 8
Charging the Battery Pack
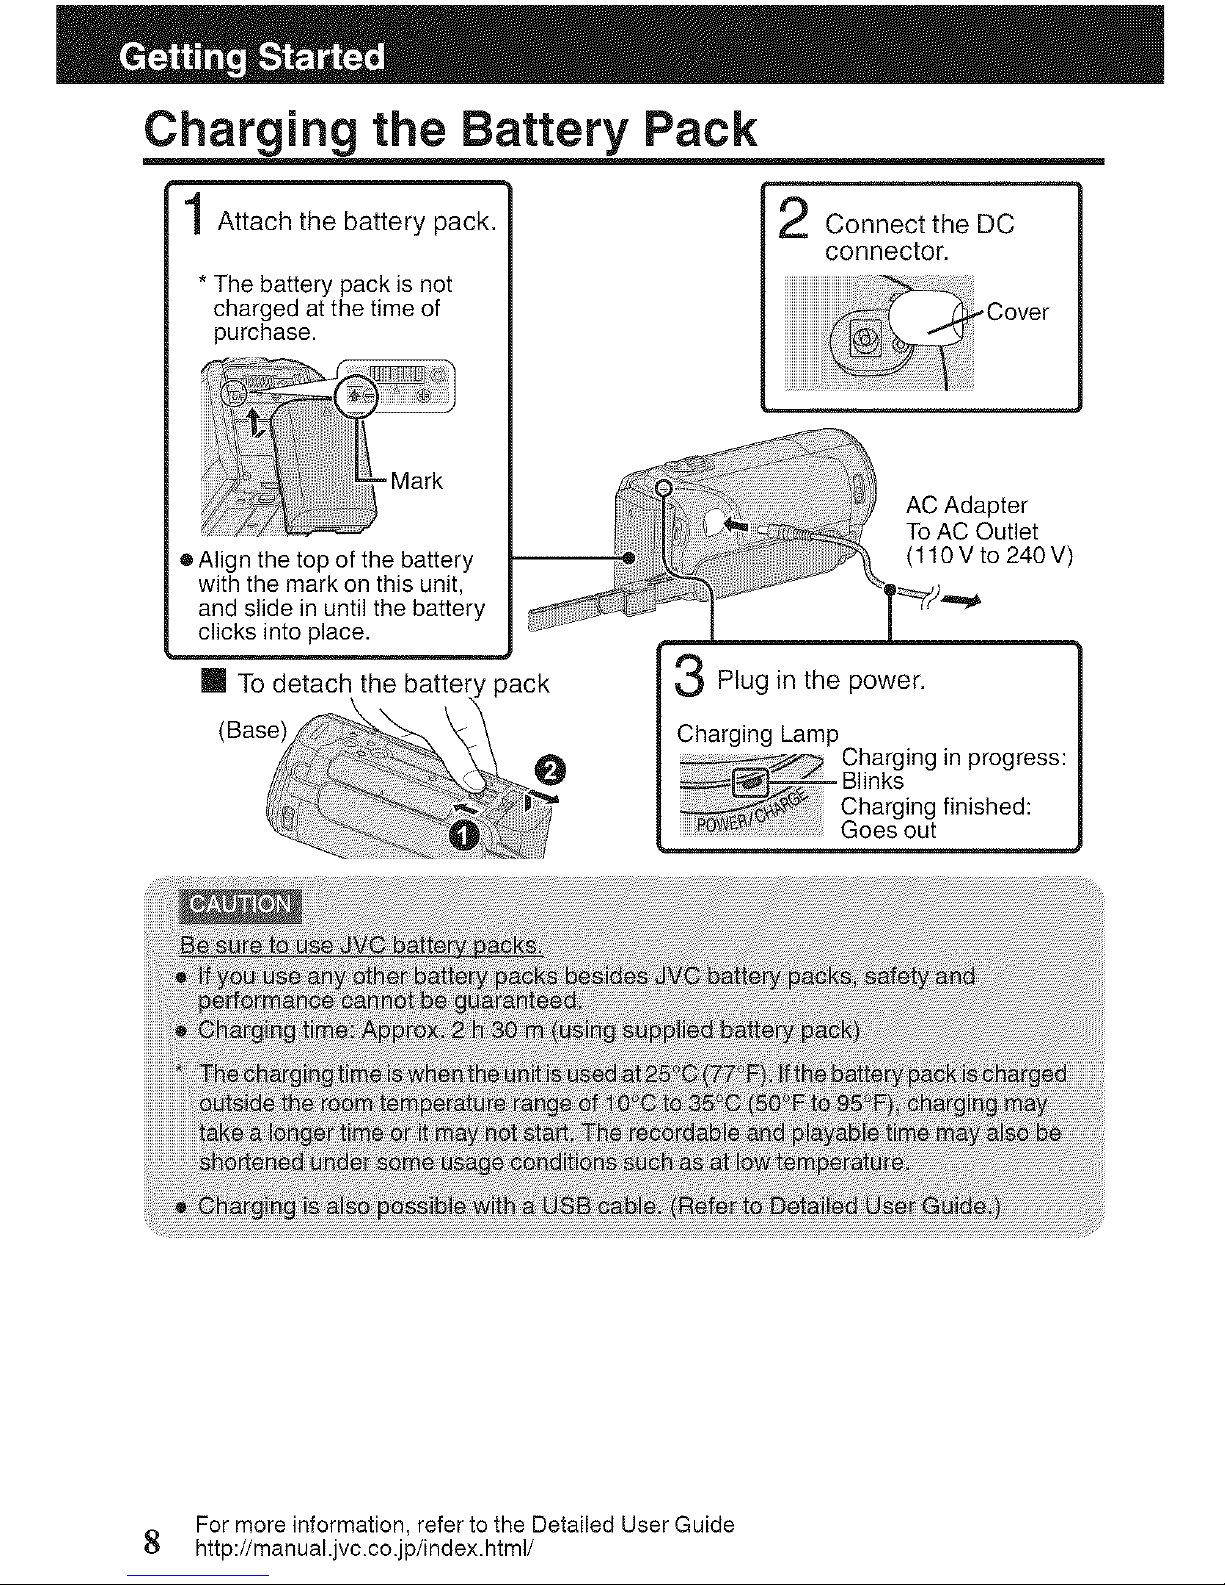
Attach the battery pack.
* The battery pack is not
charged at the time of
purchase.
Connect the DC
connector.
-Cover
- Mark
e Align the top of the battery
with the mark on this unit,
and slide in until the battery
clicks into place.
Im To detach the ! pack
(Base)
AC Adapter
To AC Outlet
(110Vto 240V)
3 Plug in the
power.
harging Lamp
Charging in progress:
Blinks
Charging finished:
Goes out
For more information, refer to the Detailed User Guide
8 http://manual.jvc.co.jp/index.html/
Page 9

Grip Adjustment
_1_Open the lever on _ Adjust the length _ Close the lever
the strap lock of the belt
Using as a Hand Strap
Adjust the length of the belt and loop it around your wrist.
Inserting an SD Card
[] GZ=HM690/GZ-HM670/GZ-HM650/GZ-HM450 (Models with Built-in Memory)
When a commercially available SD card is inserted, recordings can still be made tothe card
without stopping when the remaining recording time on the built-in memory runs out,
*To record to the card, it is necessary to perform media settings. (p. t t)
When no card is available, set media settings to "BUILT-IN MEMORY" for recording.
[ 1 Close the LeD monitor, i 2 Open the cover.
(Base)
Insert an SD card.
* Turn off the power of this unit before
inserting or removing a card.
For more information, refer to the Detailed User Guide
http://manual.jvc.co.jp/index.html/ 9
Page 10

[] GZ=HM440 (Models with Dual Slot)
Insert a commercially available SD card before recording.
This unit comes with two SD card slots. When two SD cards are inserted, recordings
can be continued on the other card even one card is full.
Ilc,osetheLCDmonitor. ] 2 Open the cover.
(Base) T]-- _,,_Insert an SD card into slot A.
* Turn off the power of this unit before
inserting or removing a card.
Slot B Slot A
[] To remove the card
Pushthe card inwardonce, then pull itout straight.
(Base) J
Class 4or highe[ compatible SD card (2 GB',
higher compatib]e SDXC card (48 GB to 64 GB)
SD card (256 Mato 2 GB) / SDHC car d (#GB to 32 GB) /
SDXC card (48 GB to 64 GB)
For more information, refer to the Detailed User Guide
10 http://manual.jvc.co.jp/index.html/
Page 11
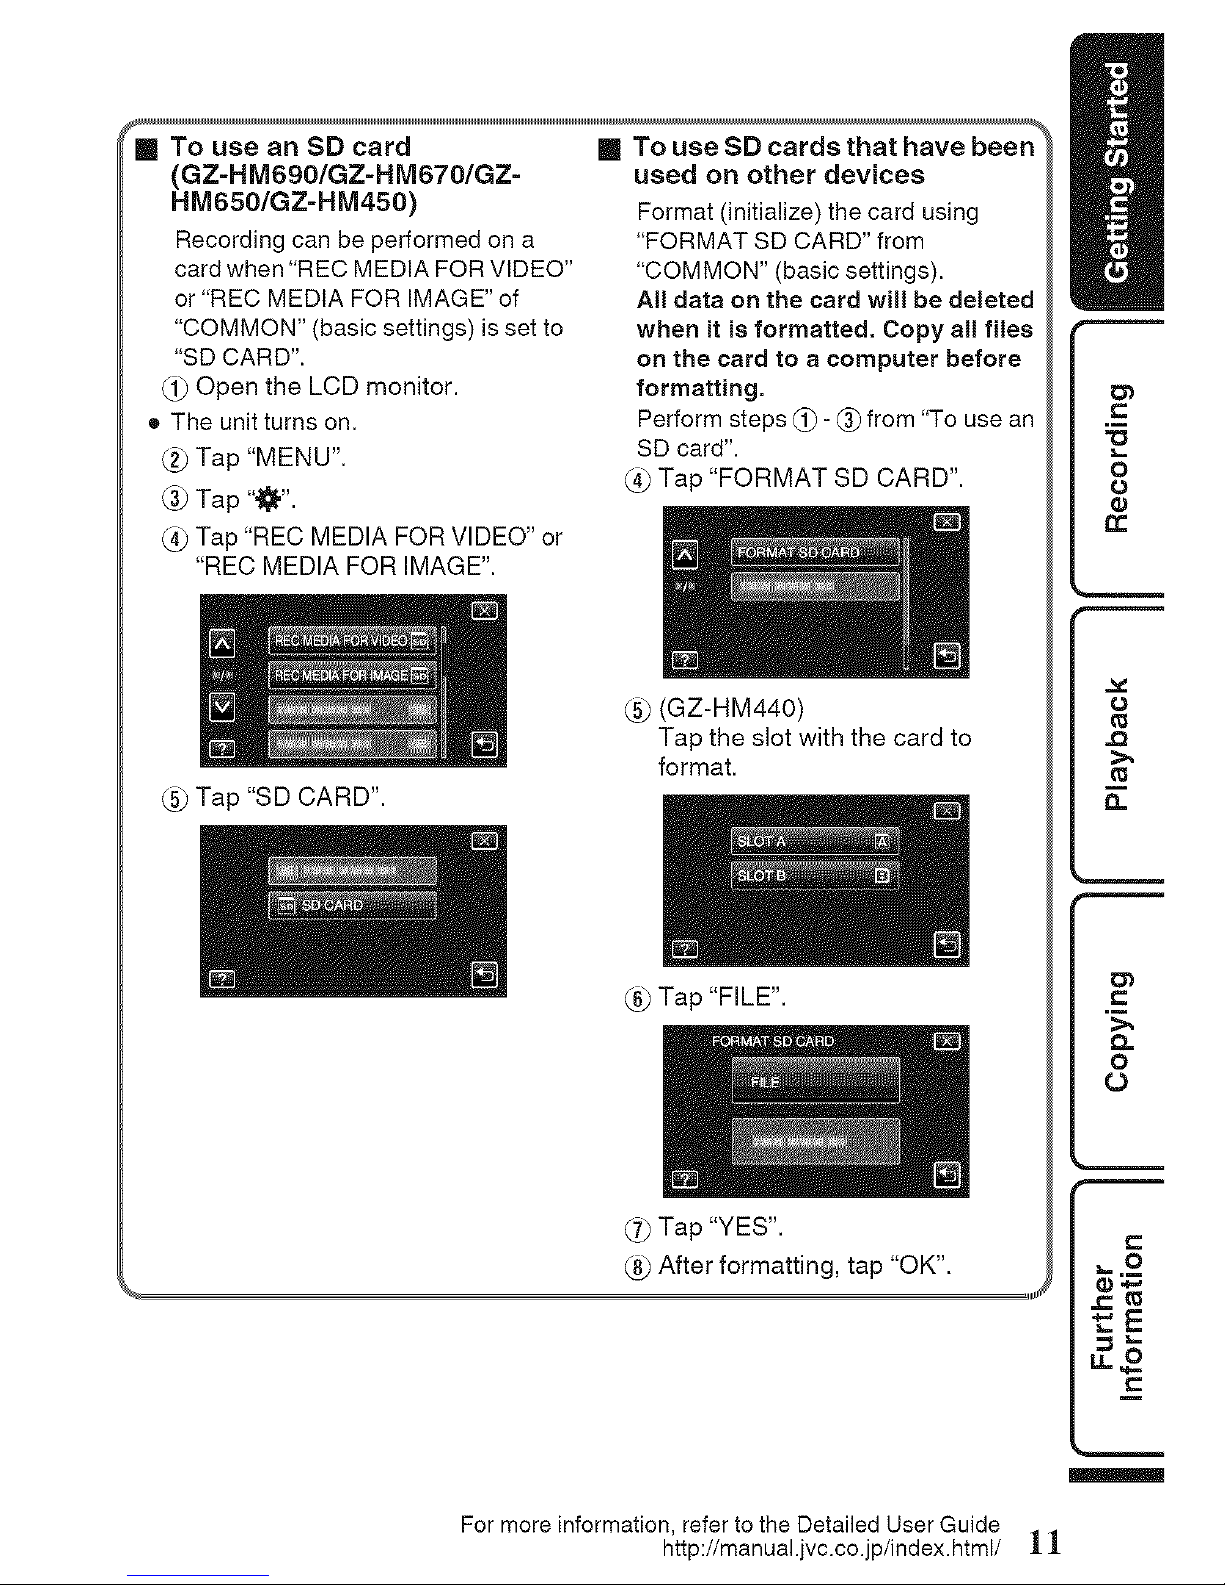
_To use an SD card
(GZ=HM690/GZ=HM670/GZ=
HM650/GZ=HM450)
Recording can be performed on a
card when "REC MEDIA FOR VIDEO"
or "REC MEDIA FOR IMAGE" of
"COMMON" (basic settings) isset to
"SD CARD".
1_ Open the LCD monitor.
• The unit turns on.
Tap "MENU".
@ Tap '"1_".
(_ Tap "REC MEDIA FOR VIDEO" or
"REC MEDIA FOR IMAGE".
[] To use SD cards that have been
used on other devices
Format (init(alize) the card using
"FORMAT SD CARD" from
"COMMON" (basic settings).
All data on the card will be deleted
when it is formatted. Copy all flies
on the card to a computer before
formatting.
Perform steps (:_)- (_) from "To use an
SD card".
(_ Tap "FORMAT SD CARD".
Tap "SD CARD".
(GZ-HM440)
Tap the slot with the card to
format.
(_ Tap "FILE".
(._ Tap "YES".
After formatting, tap "OK".
For more information, refer to the Detailed User Guide
http://manual.jvc.co.jp/index.html/ 1
Page 12
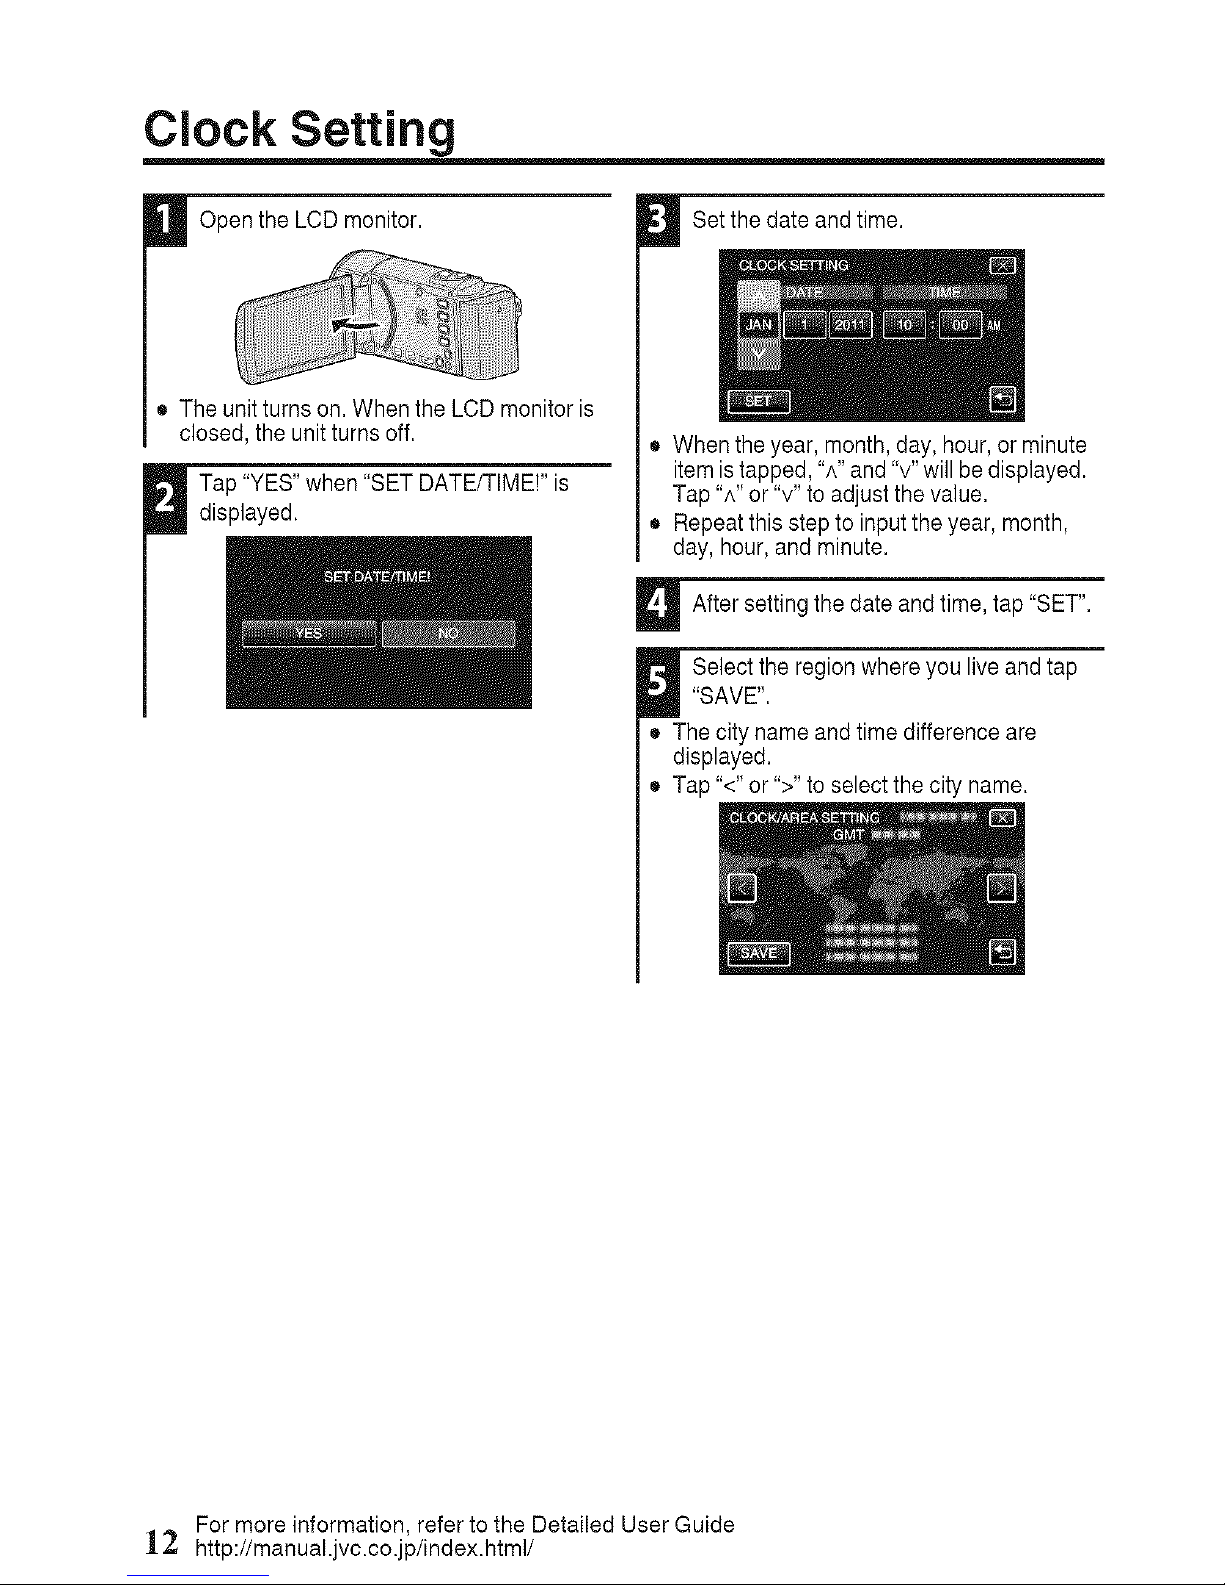
Clock Setting
Open the LCD monitor.
• The unit turns on.When the LCD monitor is
closed, the unit turns off.
Tap "YES"when "SET DATE/TIME!" is
displayed.
Set the date and time.
• When the year, month, day, hour, or minute
item istapped, "^" and "v" will be displayed.
Tap "^" or "v" to adjust the value.
• Repeat this step to input theyear, month,
day, hour, and minute.
After settingthe date and time, tap "SET".
Select the region where you live and tap
"SAVE".
• The city name andtime difference are
displayed.
• Tap "<"or ">" to select the city name.
For more information, refer to the Detailed User Guide
12 http://manual.jvc.co.jp/index.html/
Page 13
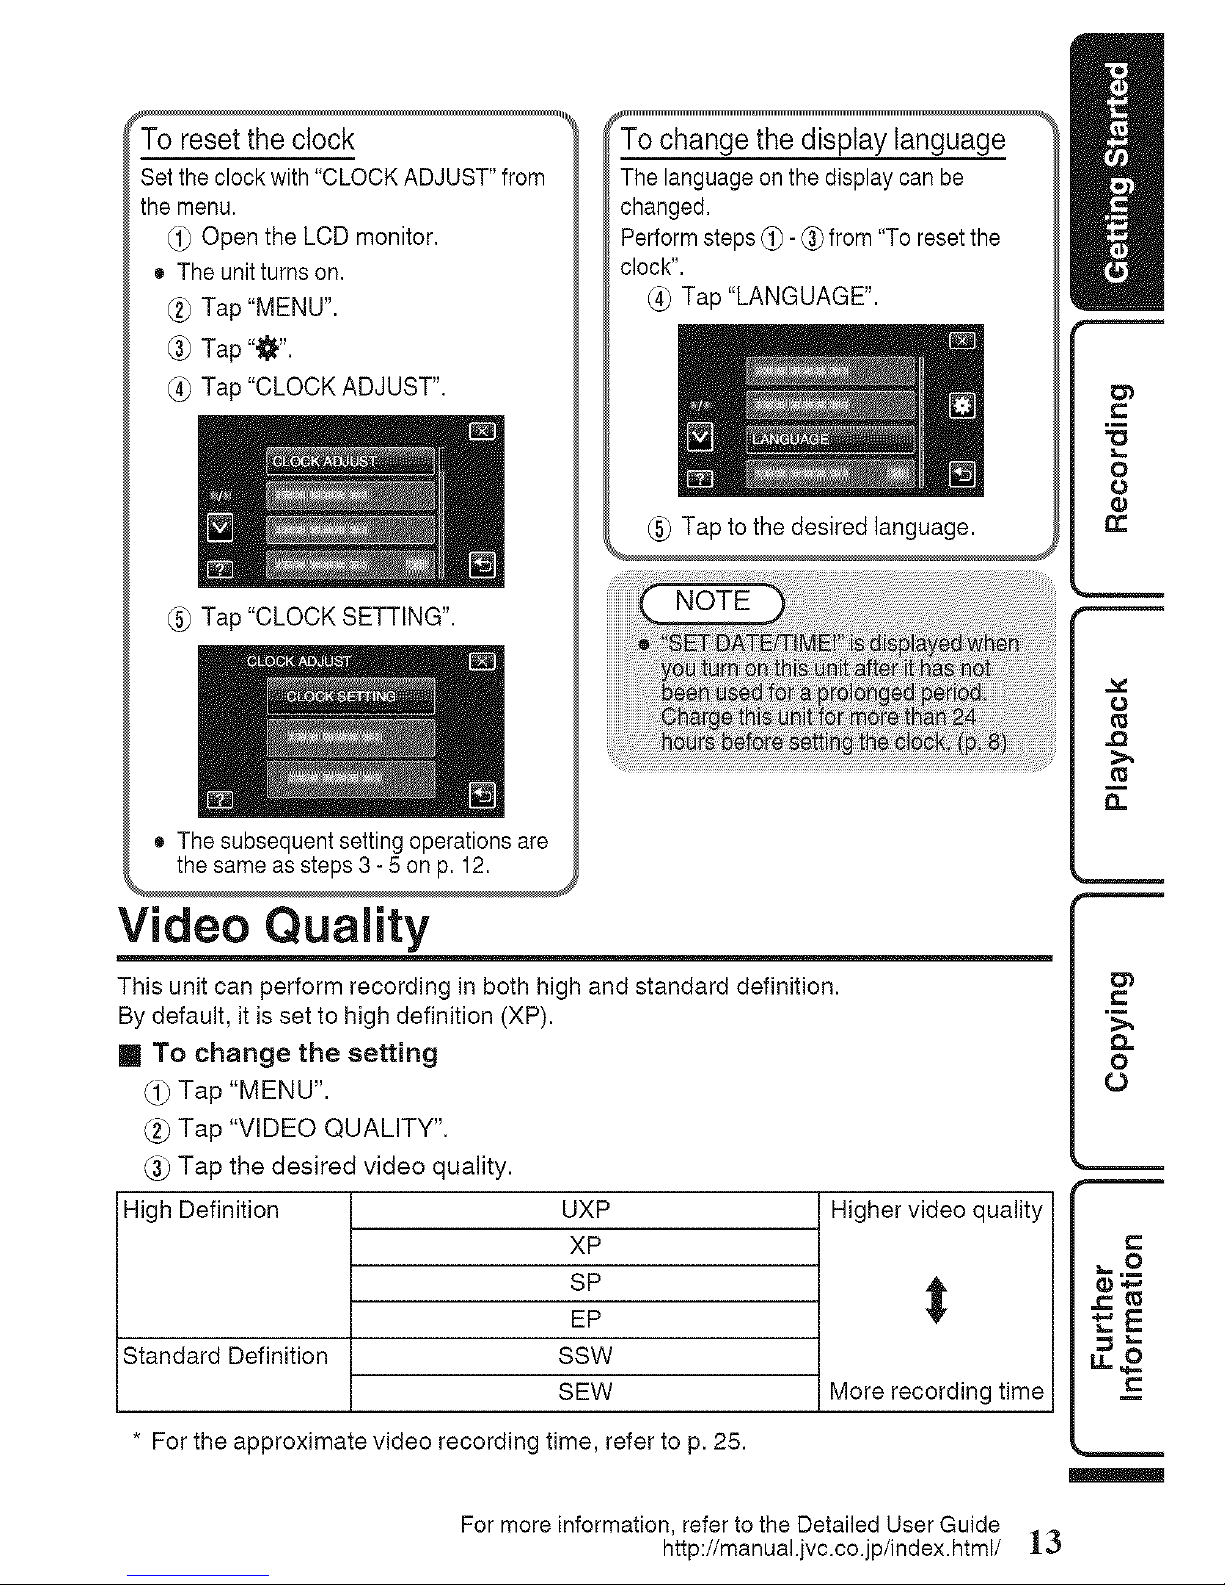
To resetthe clock
Set the clock with "CLOCK ADJUST" from
the menu.
_1_Open the LCD monitor.
• The unitturns on,
(_ Tap "MENU".
(_ Tap "_I".
(_ Tap "CLOCK ADJUST".
Tap "CLOCK SETTING",
To change the display language
The language onthe display can be
changed.
Performsteps _)- _) from "To resetthe
clock".
Tap "LANGUAGE".
Tap to the desired language.
• The subsequent setting operations are
the same as steps 3- 5 on p. 12.
Video Quality
This unit can perform recording in both high and standard definition.
By default, it is set to high definition (XP).
[] To change the setting
Tap "MENU".
Tap "VIDEO QUALITY".
(_ Tap the desired video quality.
High Definition
Standard Definition
UXP
XP
SP
EP
SSW
SEW
* For the approximate video recording time, refer to p. 25.
Higher video quality
t
More recording time
t=-.m
For more information, refer to the Detailed User Guide
http://manual.jvc.co.jp/index.html/ 13
Page 14
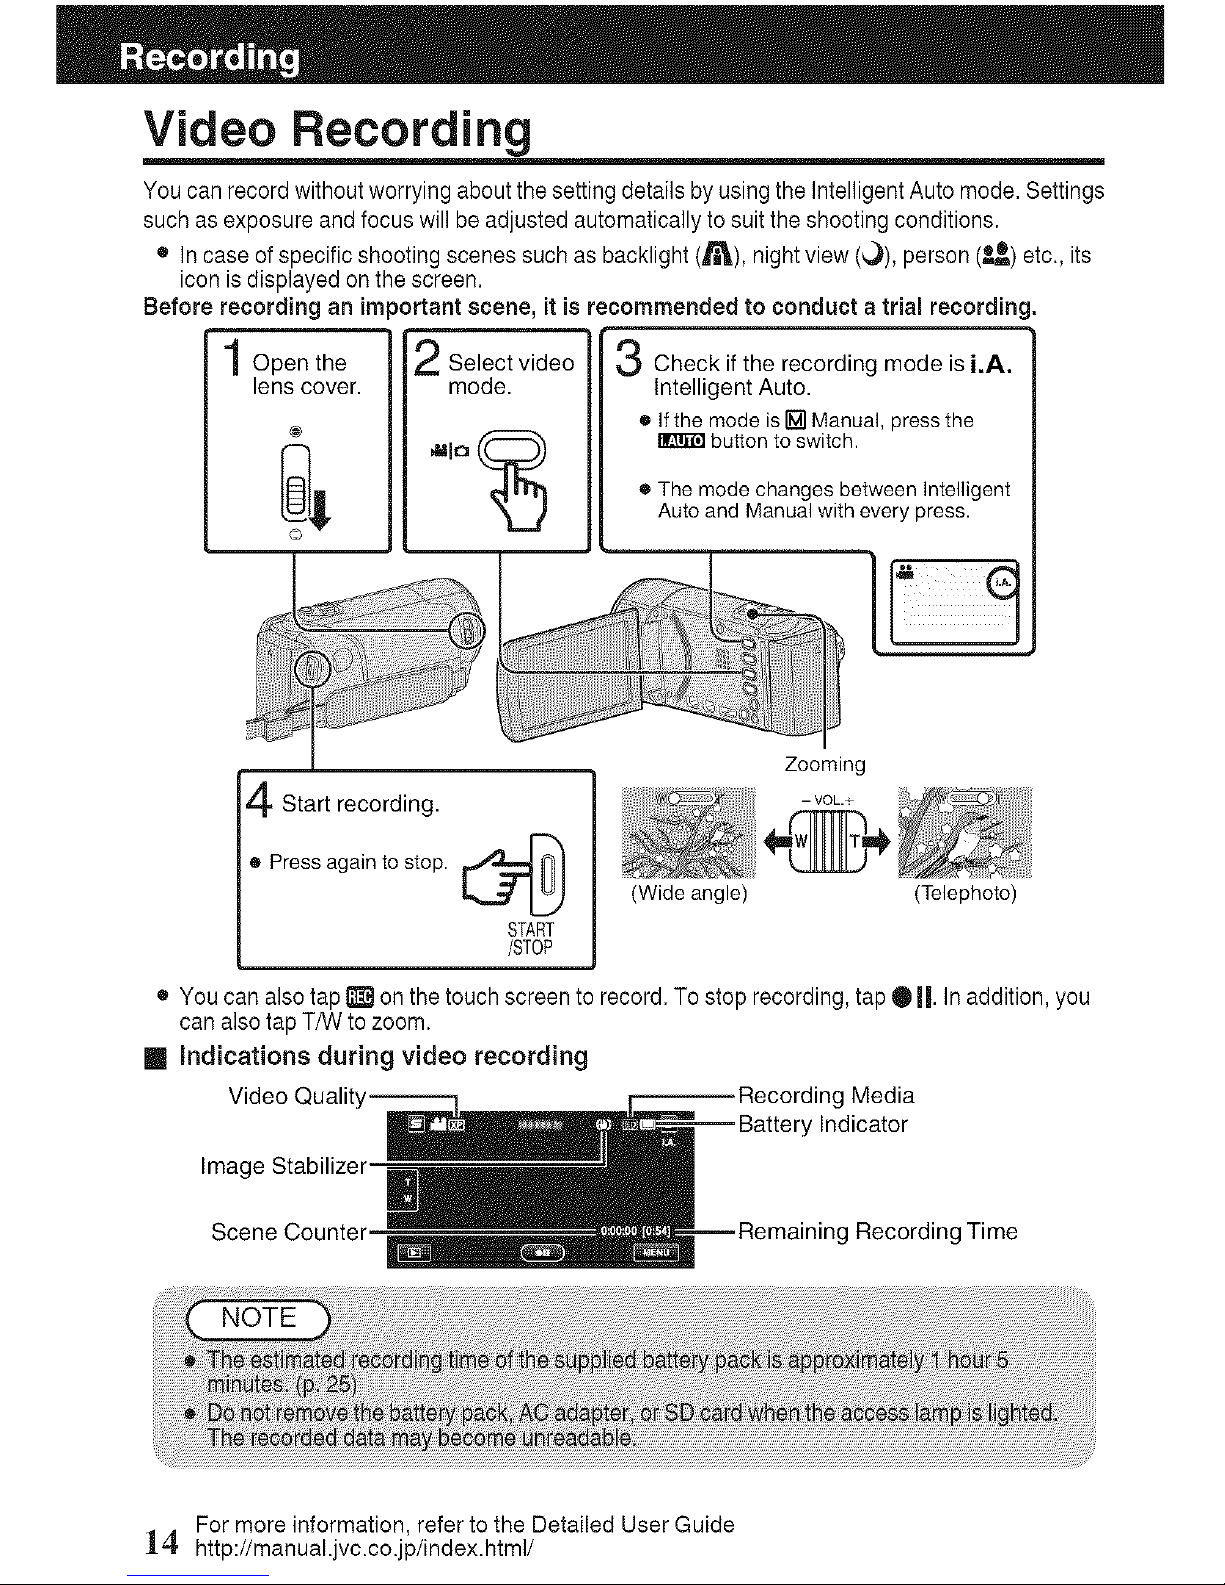
Video Recording
You can record without worryingabout the setting details by using the Intelligent Auto mode. Settings
such as exposure andfocus will be adjusted automatically to suitthe shooting conditions.
• In case ofspecific shooting scenes such as backlight (_i'_), night view (_,)), person (_) etc., its
icon is displayed onthe screen.
Before recording an important scene, it is recommended to conduct a trial recording.
Open the
lens cover.
Select video
mode.
Check if the recording mode is i.A.
Intelligent Auto.
• If the mode is rM-iManual, press the
button to switch.
e The mode changes between Intelligent
Auto and Manual with every press.
Start recording.
e Pressagainto stop.
-'-" LJ
START
/STOP
Zooming
(Wide angle) (Telephoto)
• Youcan also tap_ onthe touch screen to record. To stop recording, tap Oil. In addition, you
can also tap T/W to zoom.
[] Indications during video recording
Video Qualit Media
Indicator
Image Stabilizer
Scene Counter g Recording Time
For more information, refer to the Detailed User Guide
14. http://manual.jvc.co.jp/index.html/
Page 15
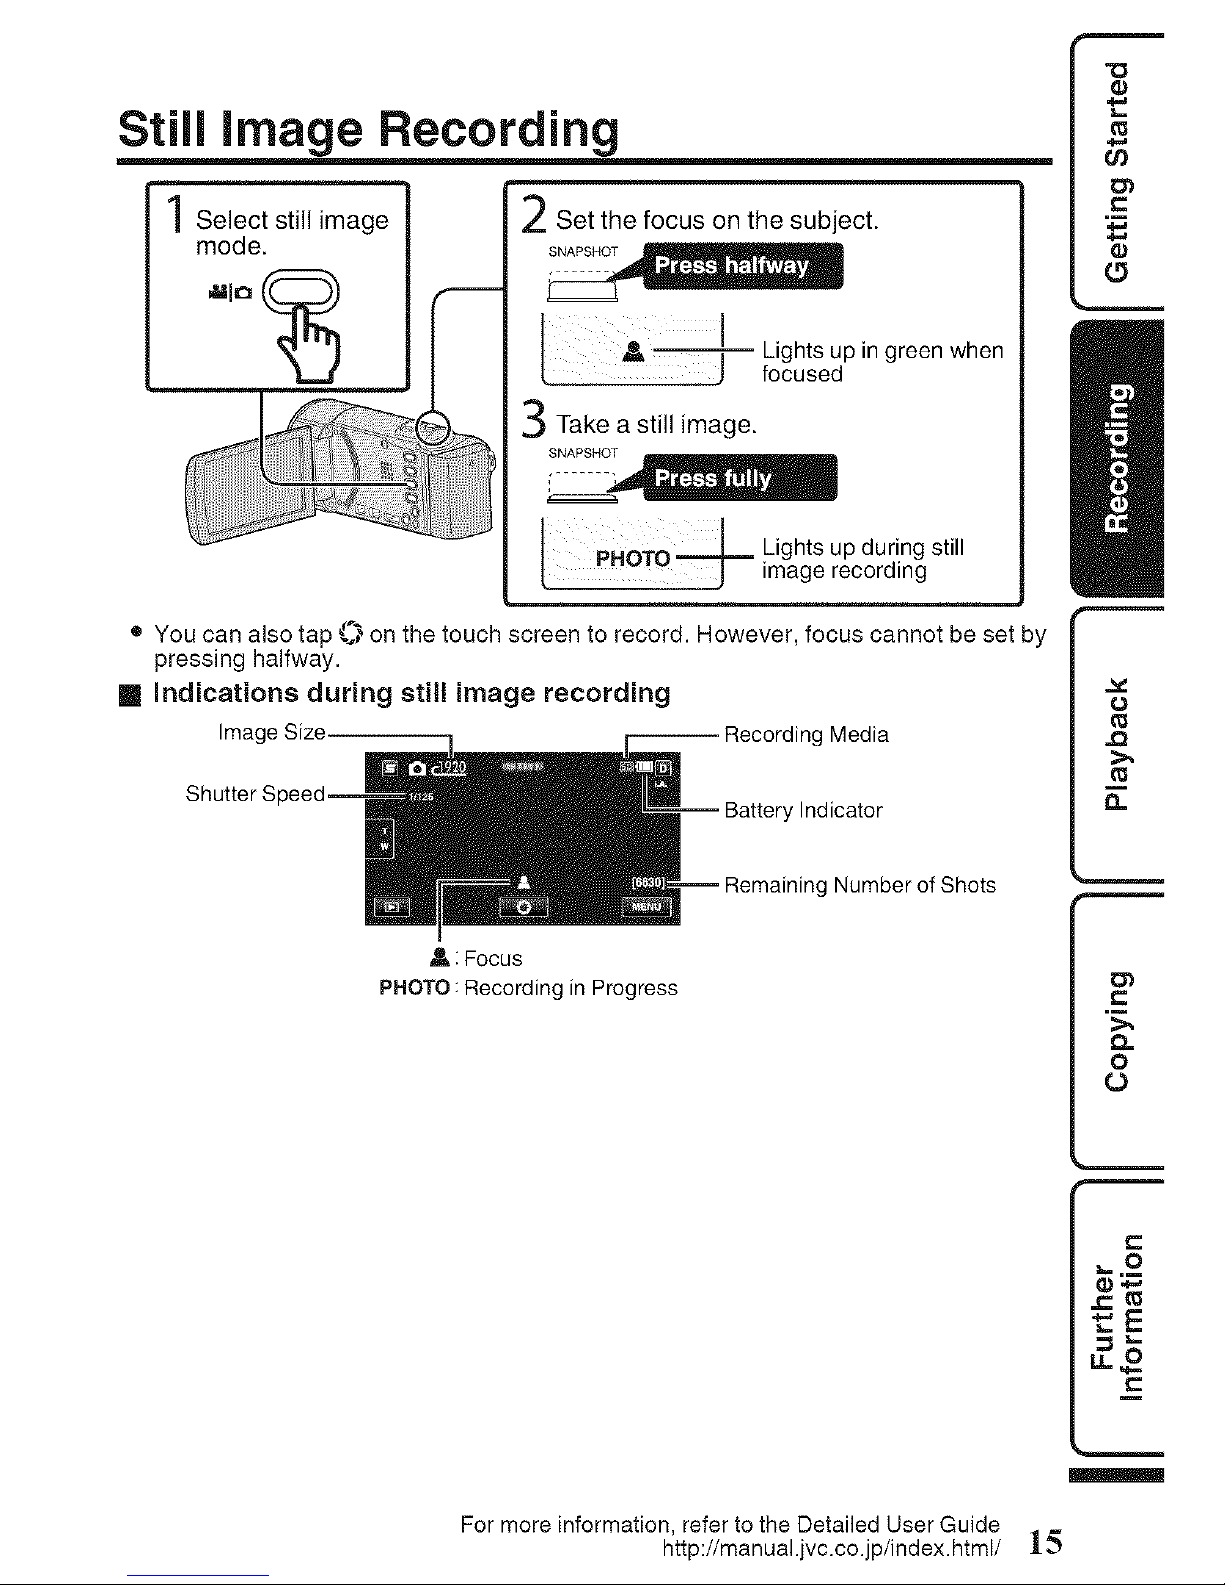
Still image Recording
Select still image
mode.
Set the focus on the subject.
p in green when
Take a still image.
I PHOTO -i,,jL Lights uP during still
image recording
• You can also tap _.*_on the touch screen to record. However, focus cannot be set by
pressing halfway.
[] Indications during still image recording
Image Size -- Recording Media
Battery Indicator
Remaining Number of Shots
A : Focus
PHOTO : Recording in Progress
For more information, refer to the Detailed User Guide
http://manual.jvc.co.jp/index.html/ 1_
Page 16
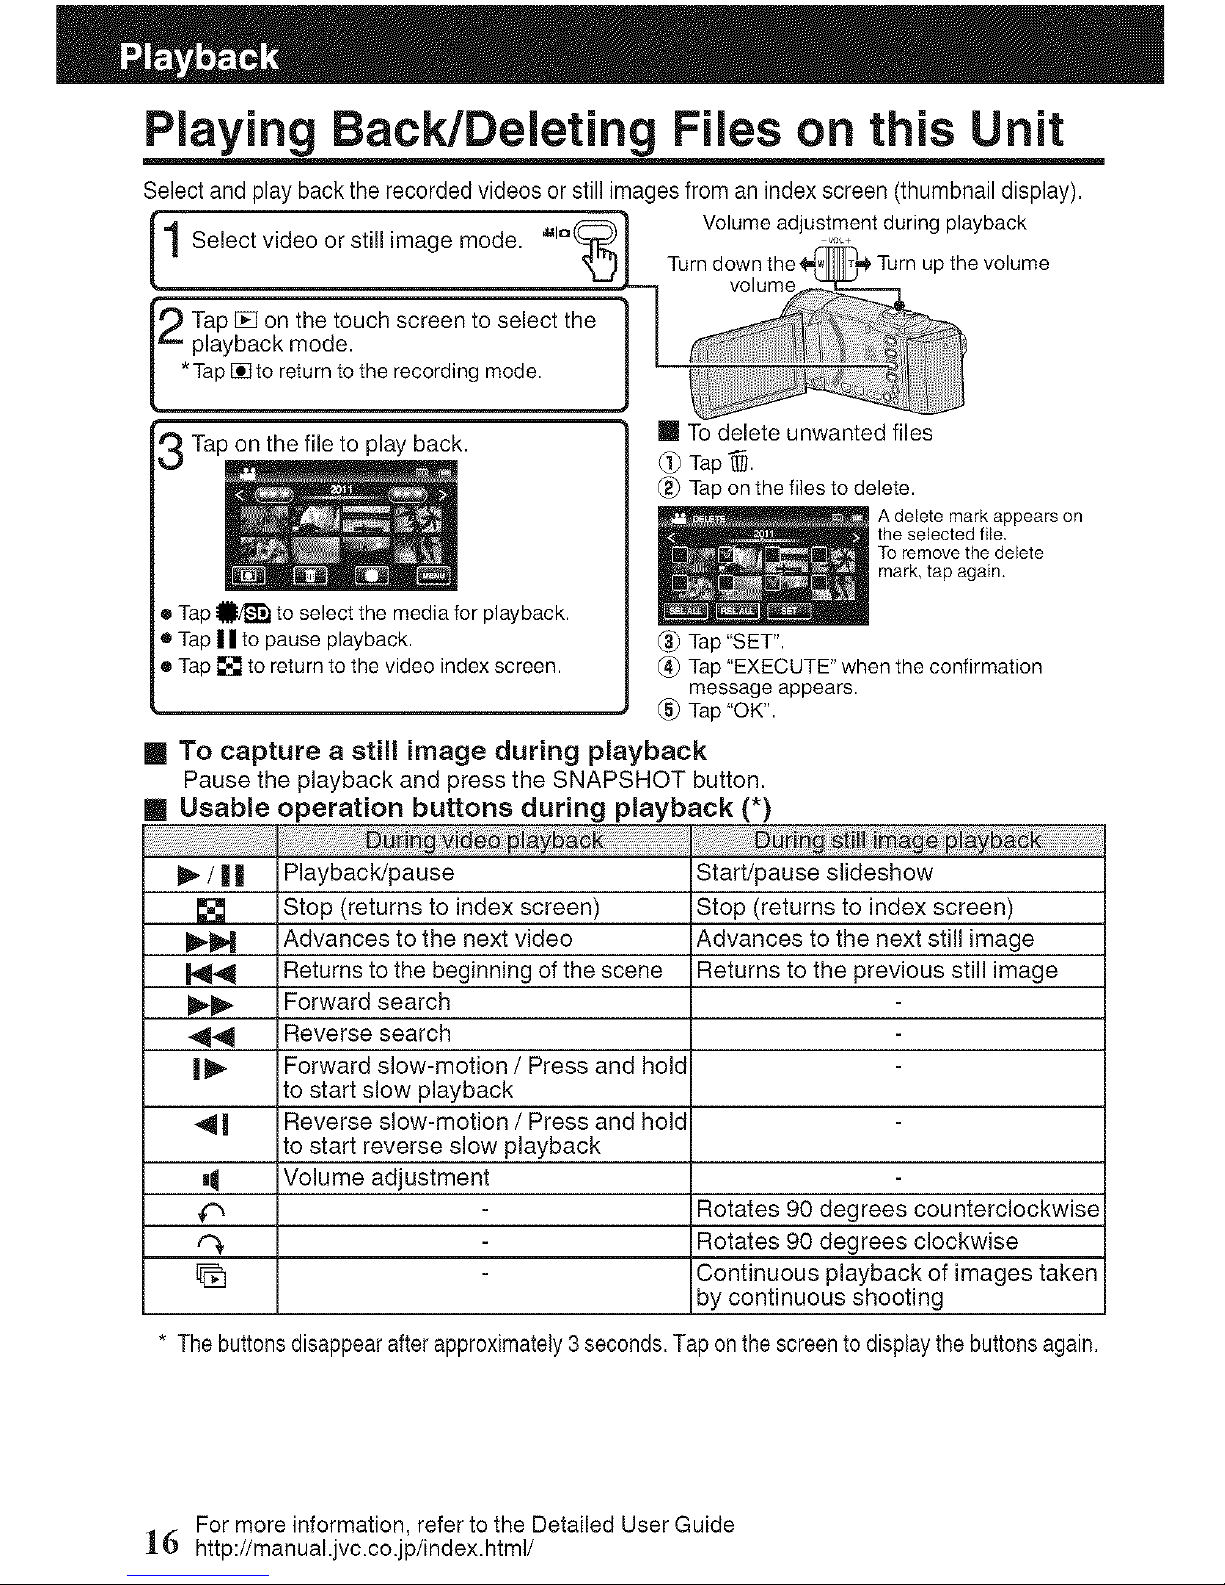
Playing BacidDeleting Files on this Unit
Select and play back the recorded videos or still imagesfrom anindex screen (thumbnail display).
1 Select video or still image mode. ,uto(_
9 ap _ on the touch screen to select the
playback mode.
*Tap [] to return to the recording mode.
Tap on the file to play back.
• Tap _1}/_ to select the media for playback.
• Tap Ill to pause playback.
• Tap [] to return to the video index screen.
Volumeadjustmentduring playback
Turndownthe _ _the volume
volume
m To delete unwanted files
Tap_.
(_ Tap on the files to delete.
A delete mark appears on
the selected file
To remove the debete
mark tap again.
(3_ Tap "SET".
(_) Tap "EXECUTE" when the confirmation
message appears.
(_ Tap "OK".
To capture a still image during playback
Pausethe playback and press the SNAPSHOT button.
m Usable operation buttons during playback (*)
/ | | Playback!pause Start/pause siideshow
[] Stop (returns to index screen) Stop (returns to index screen)
_D,-M Advances to the next video Advances to the next still image
_,q,_ Returns to the beginning of the scene Returns to the previous still image
_ll_ Forward search
44 Reverse search
| _ Forward slow-motion / Press and hold
to start slow playback
4 | Reverse slow-motion / Press and hold
to start reverse slow playback
aI Volume adjustment
Rotates 90 degrees countercaockwise
('_ Rotates 90 degrees clockwise
Continuous playback of images taken
by continuous shooting
* The buttonsdisappearafterapproximately3 seconds.Tap on thescreento displaythe buttonsagain.
For more information, refer to the Detailed User Guide
16 http://manual.jvc.co.jp/index.html/
Page 17
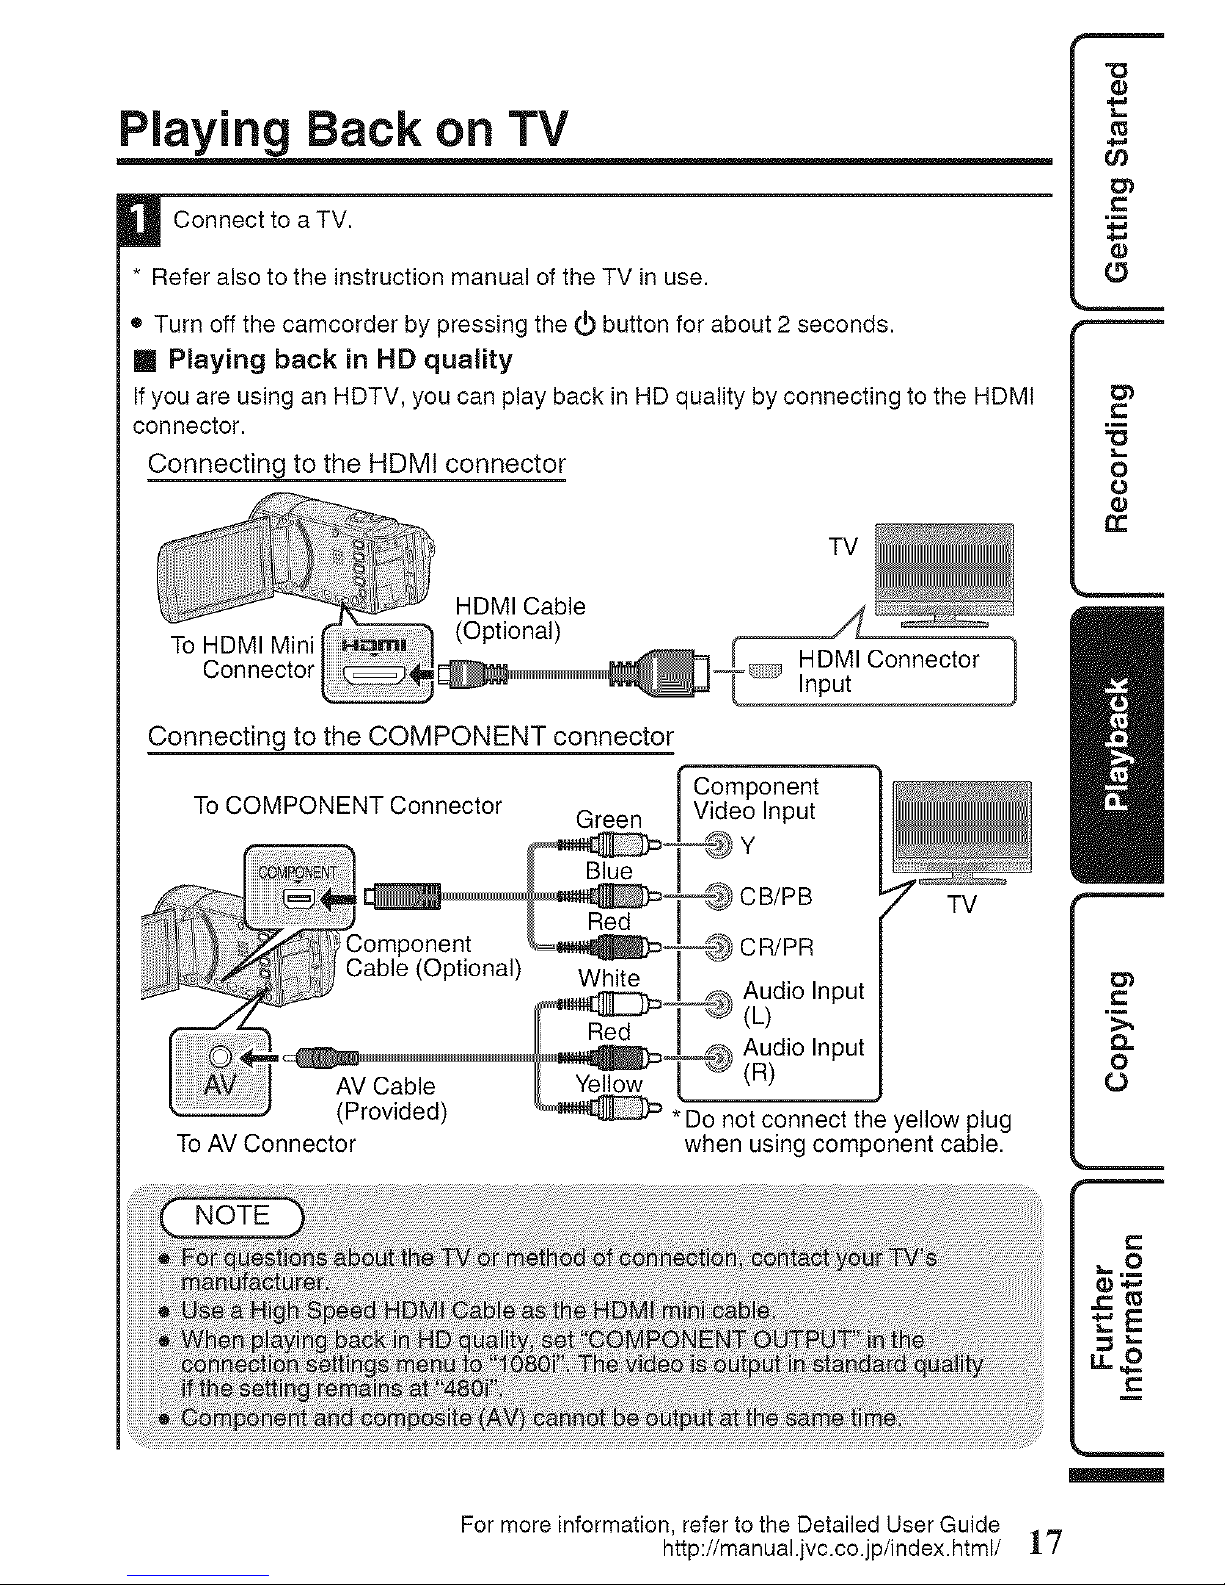
Playing Back on TV
U Connect to TV.
a
* Refer also to the instruction manual of the TV in use.
e Turn off the camcorder by pressing the _ button for about 2 seconds.
!! Playing back in HD quality
If you are using an HDTV, you can play back in HD quality by connecting to the HDMI
connector.
Connecting to the HDMI connector
HDMI Cable _ ..........
To HDMI Mini (Optional) _ _ , Z..:-
Connector _ i-lUIVlluonnector /
Connecting to the COMPONENT connector
_ .,nt-_--_Component
To COMPONENT Connector Green _put I
Y
I
CB/PB _" TV"
Red I I"
omponent _ CR/PR I
omponerlt _ __
able (Optional) White I
Audio Input I
, _) Audio Input I
*Do not connect the y----"ellow plug
To AV Connector when using component cable.
For more information, refer to the Detailed User Guide
http://manual.jvc.co.jp/index.html/ 17
I/
Page 18
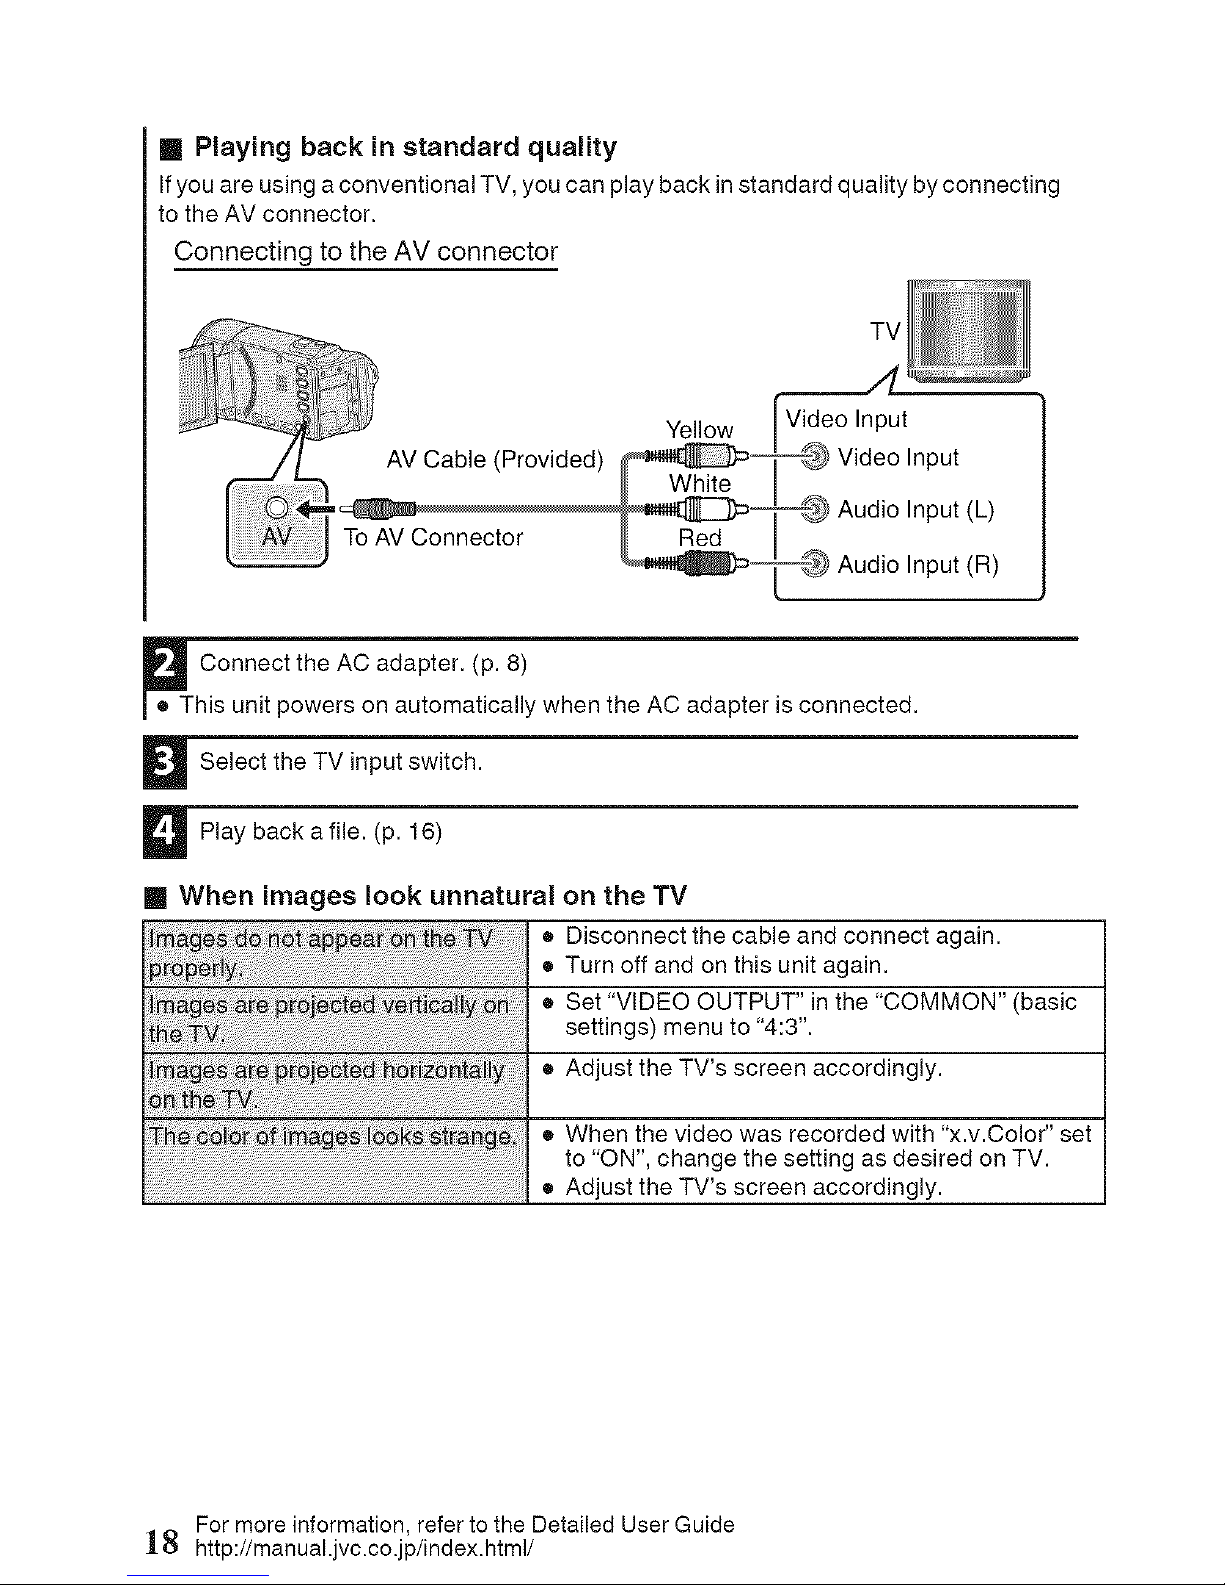
m Playing back in standard quality
Ifyouareusinga conventionalTV,youcan playback instandardquality byconnecting
to the AVconnector.
Connecting to the AV connector
TV
Yellow _t
AV Cable (Provided) __ Video Input
, Audio Input (L)
To AV Connector _ Red I
Audio Input (R)
Connect the AC adapter. (p. 8)
• This unit powers on automatically when the AC adapter is connected.
Select the TV input switch.
Play back a file. (p. 16)
m When images look unnatural on the TV
• Disconnect the cable and connect again.
• Turn off and on this unit again.
• Set "VIDEO OUTPUT" inthe "COMMON" (basic
settings) menu to "4:3".
• Adjust the TV's screen accordingly.
• When the video was recorded with "x.v.Coler" set
to "ON", change the setting as desired on TV.
................................................................................................................................................................................................................................................................• Adjust the TV's screen accordingly.
For more information, refer to the Detailed User Guide
18 http://manual.jvc.co.jp/index.html/
Page 19
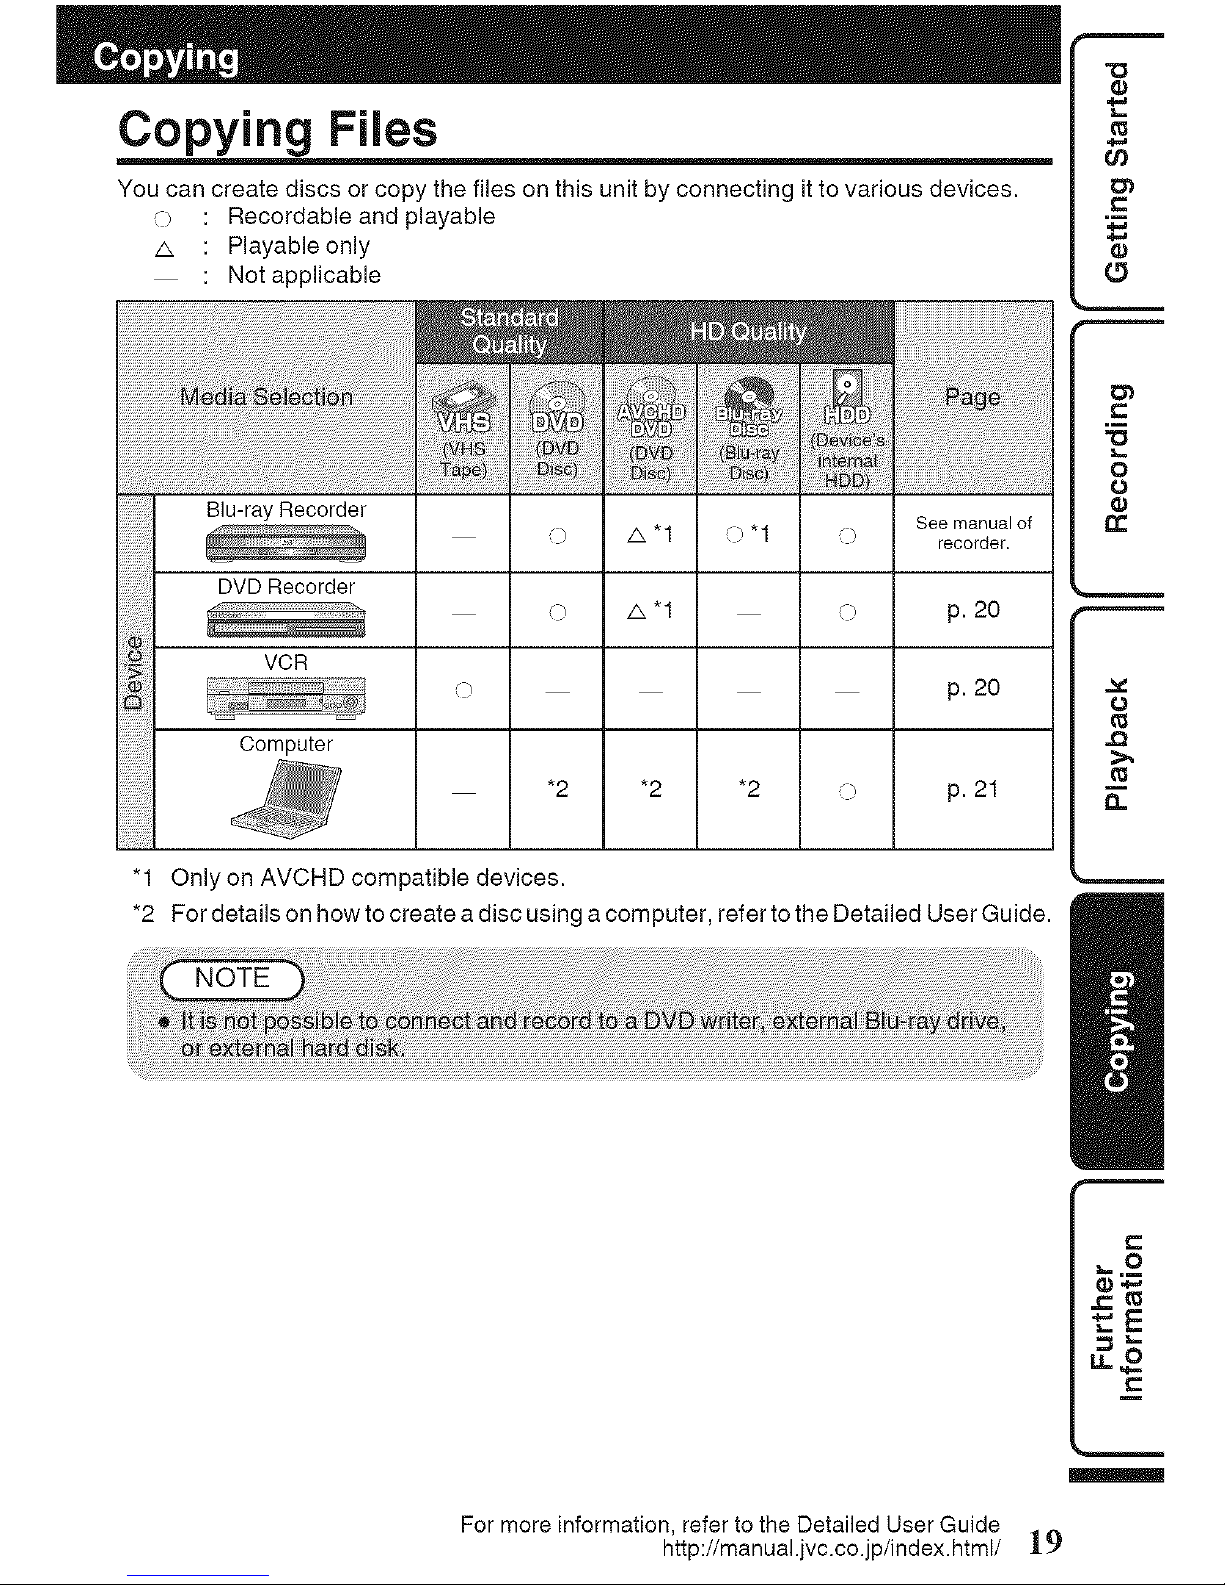
Copying Files
You can create discs or copy the files on this unit by connecting itto various devices.
]) : Recordable and playable
A : Playable only
: Not applicable
Blu-ray Recorder
iiiiiiiiiiii
OVORecorder
VCR
oo= te
¢) A*I ¢)
See manual of
recorder.
p. 20
p. 20
*2 *2 *2 ) p. 21
"1 Only on AVCHD compatible devices.
*2 For details on how to create a disc using acom puter, refer to the Detailed User Guide.
For more information, refer to the Detailed User Guide
http://manual.jvc.co.jp/index.html/ 19
I/
Page 20
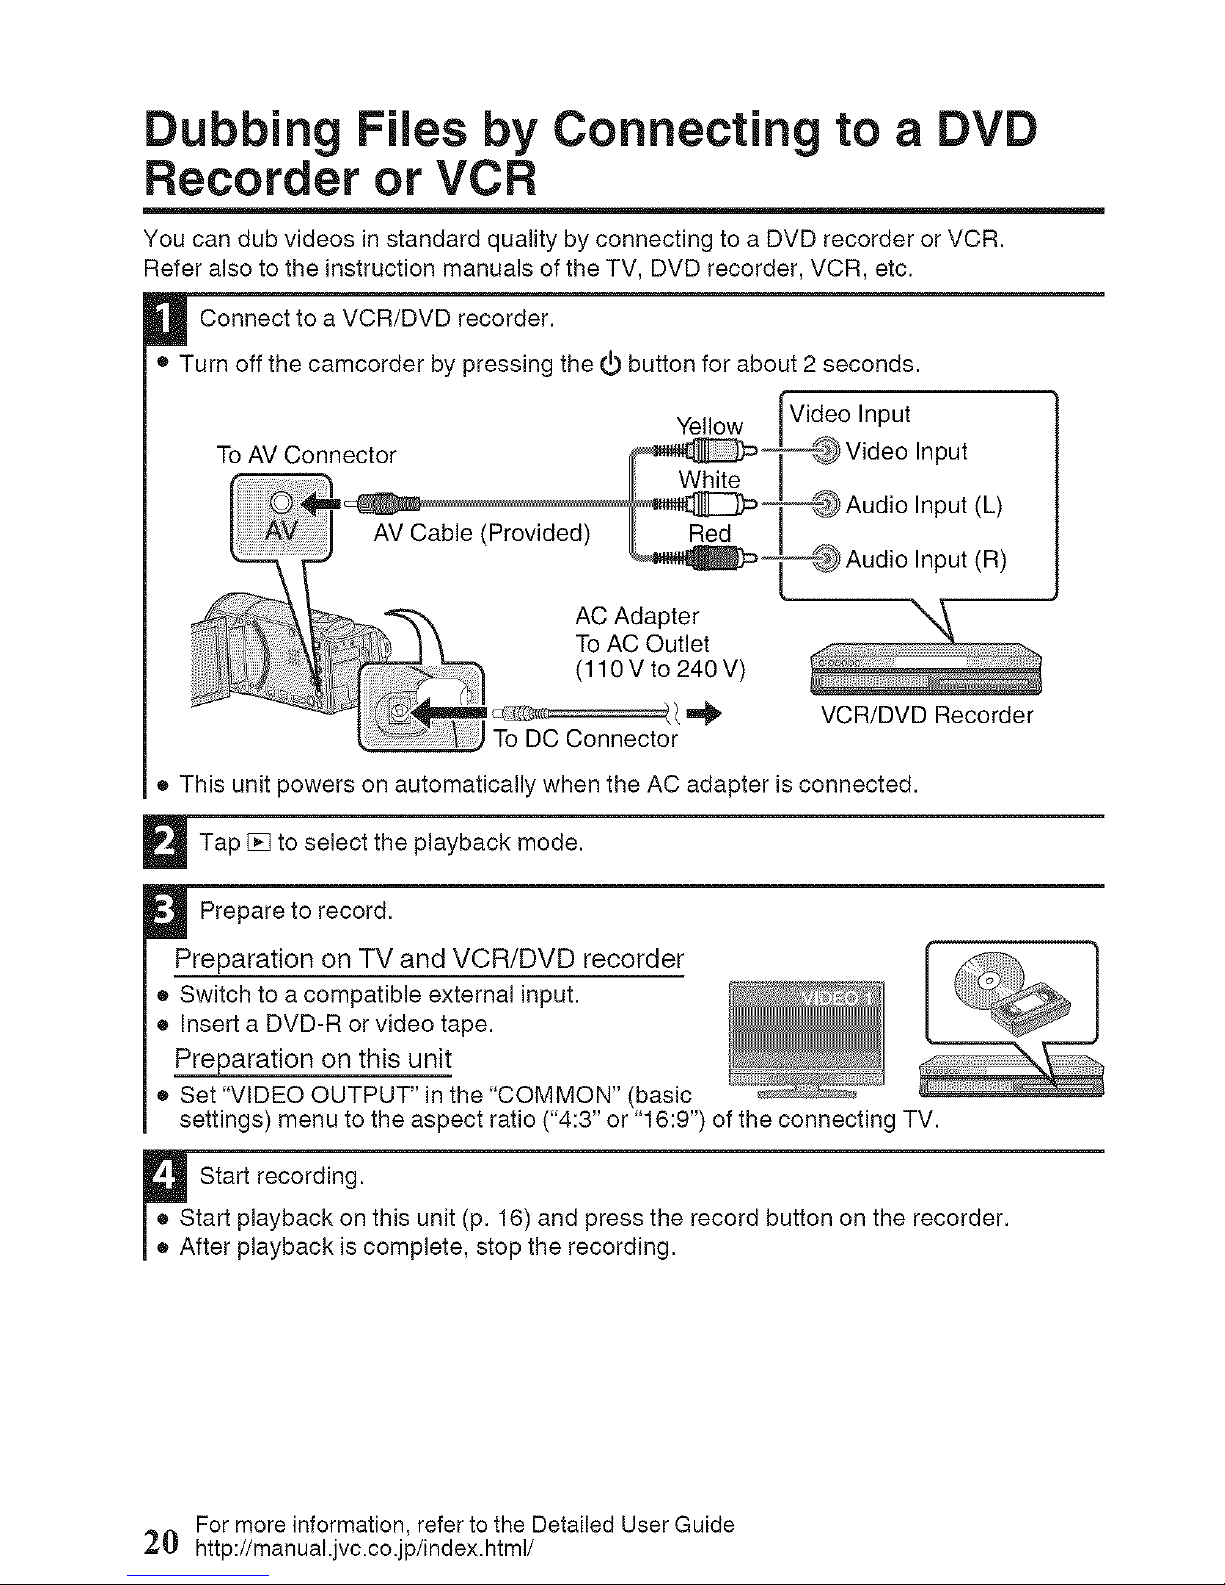
Dubbing Files by Connecting to a DVD
Recorder or VCR
You can dub videos in standard quality by connecting to a DVD recorder or VCR.
Refer also to the instruction manuals of the TV, DVD recorder, VCR, etc.
Connect to a VCR/DVD recorder.
• Turn off the camcorder by pressing the _ button for about 2 seconds.
Yellow Video Input
_ Video Input
_ Audio Input (L)
_ Audio Input (R)
AC Adapter
To AC Outlet
(110 V to 240 V)
To DC Connector
VCR/DVD Recorder
• This unit powers on automatically when the AC adapter is connected.
Tap [] to select the playback mode.
Prepare to record.
Preparation on TV and VCR/DVD recorder
• Switch to a compatible external input.
• Insert a DVD-R or video tape.
Preparation on this unit
• Set "VIDEO OUTPUT" in the "COMMON" (basic
settings) menu to the aspect ratio ("4:3" or "16:9") of the connecting TV.
_ Start recording.
• Start playback on this unit (p. 16) and press the record button on the recorder.
• After playback iscomplete, stop the recording.
For more information, refer to the Detailed User Guide
20 http://manual.jvc.co.jp/index.html/
Page 21

Copying to Computer
Verifying System Requirements (Guideline)
Windows PC
You can copy files to a PC using the provided software.
Right-click on "Computer" (or "My Computer") in the "Start" menu and select "Properties"
to check the following items.
[] Windows 7 / Windows Vista
®Windows 7
Home Premium (Pre-installed versions only)
Windows Vista
ome0asicor ome rem,um, re-insta,,e ve ionson, ,
..... Q Service Pack 2 (Windows Vista only)
, _I'_-_ OProcessor
:;1::::, _1 ................. High definition: Intel Core Duo, CPU 1.66 GHz or higher
- I ....... (Intel Core 2 Duo, CPU 2.13 GHz or higher recommended)
| I Standard definition: Intel Pentium 4, CPU 3.0 GHz or higher
_ '_: r "/_ I (Intel Pentium D, CPU 3.0 GHz or higher recommended)
I I _ I O Memory: At least 2 G B
.................. _ I • System type 32-b t / 64-b t
[] Windows XP
Windows XP
Home Edition or Professional (Preqnstalled versions only)
Service Pack 3
Processor
High definition: Intel Core Duo. CPU 1.66 GHz or higher
(Intel Core 2 Duo, CPU 2.13 GHz or higher recommended)
Standard definition: Intel Pentium 4, CPU 3.0 GHz or higher
(Intel Pentium D, CPU 3.0 GHz or higher recommended)
Memory: At least 1 GB
[] Other requirements
Display: 1024x768 pixels or above (1280xl 024 pixels or above recommended)
Graphic: Intel G965 or higher recommended
[] Video editing
High definition: lntel Core i7, CPU 2.53 GHz or higher recommended
Standard definition: lntel Core 2 Quad, CPU 2.4 GHz or higher recommended
For more information, refer to the Detailed User Guide
http://manual.jvc.co.jp/index.html/ 21
I/
_1==.m
Page 22

Y
Mac Computer
You can importfiles from this unitto acomputer usingApple's iMovie '08, '09, '11 (video) or iPhoto
(still image).
To verify the system requirements, select "About This Mac"from the Apple menu. You can
determine the operating system version, processor and amount of memory.
• For the latest information on iMovie or iPhoto, refer to the Apple website.
• For details on howto use iMovie or iPhoto,refer tothe help file of the respective software.
• There is no guarantee that the operations willwork with all computer environments.
Installing the Provided Software (Builtoin)
You can display the recorded images in calendar
format and perform simple editing using the
)rovided software in the built-in memory.
- Open the LCD monitor.
• Turn offthe camcorder by pressing the
button for about 2 seconds.
Connect the USB cable and the AC
adapter.
ToUSB
Connector
DC Connector
USB Cable @
_L- (Provided)
To USB Connector
AC Adapter
To AC Outlet
10 V to 240 V)
(J_Click "Run INSTALL.EXE" in the auto
play dialog box.
(._ Click "Continue" on the user account
control screen.
• "Software Setup" appears after awhile.
• Ifit doesn't appear, double-click
"JVCCAM APP" in "My Computer", then
double-click "INSTALLEXE".
Click "Everio MediaBrowser 3".
• Follow the on-screen instructions.
Click "Finish".
Click "Quit".
Everio Evedc,
Med)aBro, P._H[aBm,,
• Installation ends and icons are created on
the desktop.
Tap "CONNECT TO PC".
Tap "PLAYBACK ON PC".
Performthe following steps on the
computer.
For more information, refer to the Detailed User Guide
:2:2 http://manual.jvc.co.jp/index.html/
Page 23

Backing Up All Fibs
Before making backup, make sure that
there is enough free space in the PC's HDD.
Open the LCD monitor.
• Turn off the camcorder by pressing the
button for about 2 seconds.
Connect the USB cable and the AC
adapter.
To USB
Connector
DC Connector
J_- (Provided) _ @
To USB Connector
AC Adapter
To AC Outlet
_(110Vto 240V)
_ Select the volume.
4, : i : ! i,_
,r,
_ Start backup.
Saving destination (PC)
U fter backup is complete, click"OK".
if you encounter any problems with
the provided software Everio
MediaBrowser, please consult the
"Pixela User Support Center",
[] To disconnect this unit from the
PC
1_ Click "Safely Remove Hardware".
• The provided software Everio
MediaBrowser starts up on the PC.
The subsequent operations are to be
performed on the PC.
Click "Safely Remove USB Mass
Storage Device".
(._ (For Windows Vista) Click "OK".
(_ Disconnect the USB cable and
close the LCD monitor.
For more information, refer to the Detailed User Guide
http://manual.jvc.co.jp/index.html/ 23
I/
Page 24

Operating the Menu
You can configure various settings using
the menu.
Tap "MENU".
• The menu differs according to the
mode in use.
• Tap "5" to display the face short cut
menu.
Tap the desired menu.
• Tap "._" to display the "COMMON"
(basic settings) menu.
Tap the desired setting.
[] To exit the screen
Tap "X" (quit).
[] To return to the previous screen
Tap ''_" (return).
[] To display the help file
Tap "?" (help) and tap the menu item.
• Help file may not be available for some
items.
• For more information on the
settings, refer to the Detailed User
Guide.
- ,e
Recording Menu
SCENE SELECT
FOCUS
BRIGHTNESS ADJUST
WHITE BALANCE
BACKLIGHT COMR
TELE MACRO
ANIMATION EFFECT
TOUCH PRIORITY AE/AF
SMILE SHOT
SMILE%/NAME DISPLAY
FACE REGiSTRATiON
LIGHT (GZ-H M650/G Z-H M670/GZ-H M690)
DIS
GAIN UP
WIND CUT
TIME-LAPSE RECORDING
AUTO REC
FACE SUB-WINDOW
VIDEO QUALITY
ZOOM
SEAMLESS RECORDING
x.v.Color
USER BUTTON SETTING
Playback Menu
SEARCH DATE
SLIDE SHOW EFFECTS
PROTECT/CANCEL
COPY
MOVE
TRiMMiNG
PLAYBACK OTHER FILE
SEAMLESS REC CTRL
K2 TECHNOLOGY
Common/Basic Settings Menu
CLOCK ADJUST
DATE DISPLAY STYLE
LANGUAGE
MONITOR BRIGHTNESS
REC MEDIA FOR VIDEO
REC MEDIA FOR IMAGE
REC VIDEO TO SLOTS (GZ-HM440)
REC STILLS TO SLOTS (GZ-HM440)
OPERATION SOUND
AUTO POWER OFF
QUICK RESTART
DEMO MODE
TOUCH SCREEN ADJUST
DISPLAY ON TV
VIDEO OUTPUT
COMPONENT OUTPUT
HDMI OUTPUT
HDMI CONTROL
FACTORY PRESET
UPDATE
PC SOFTWARE UPDATE
FORMAT BUILT-IN MEM.
FORMAT SD CARD
ERASE ALL DATA
For more information, refer to the Detailed User Guide
24 http://manual.jvc.co.jp/index.html/
Page 25

Recordable Time/Number of images
You can check the video recording time by pressing the INFO button.
40m
50m
1h20m
3h20m
2h30m
5h20m
i
2h50m 5h50m 20m 40m lh20m 2h50mi4h20m 5h50m
4h 8hl0m 30m lh 2h i4hl0m 6hl0m 8h20m
5h40m 11h40m40m lh20m 2h50mi5h50mi8h40m 11h50m
14h20m 29 h 10m 1 h40m 3h40m 7h 10m i14h50rn121h50m 29h50m
11h10m 22h30m lh20m 2h50m 5h40millh30m 17h 23h
23h 46h40m 2h50m 5h50m 11h40m 23h50m 35h10m47h40m
• The approximate recording time is onlya guide. The actual recording time may shorten
depending on the shooting environment.
640x480 (4:3) 9999 9999 9999 9999 9999
1440x1080 {4:3) 6600 9999 9999 4300 6600
1920x1080 (16:9) 6700 9999 9999 3200 6700
2400xl 344(16:9) * 4300 9999 9999 2100 4300
• GZ-HM650/GZ-HM670/GZ-HM690
• Up to 9999 still images may be recorded on SD cards with at least 32 GB capacity
(regardless of image size).
lh5m lh5m 2h 1h55m
1 h40m 1 h35m 3h5m 2h55m
3h 2h55m 5h30m 5h20m
• The above are values when "LIGHT" is set to "OFF" and "MONITOR BRIGHTNESS"
is set to "3" (standard).
• The actual recording time may be shorter if zooming is used or if recording is stopped
repeatedly. (It is recommended to prepare battery packs ready for three times the
expected recording time.)
For more information, refer to the Detailed User Guide
http://manual.jvc.co.jp/index.html/ 25
Page 26

• When the battery life is reached, the recording time becomes shorter even ifthe battery
pack is fully charged. (Replace the battery pack with a new one.)
Troubleshooting
Ifyou encounter problems with this unit, check the following before requesting service.
1 Refer to "Trouble" below.
2 Refer to the "Troubleshooting" section in the "Detailed User Guide".
Ifyou have difficulties operating the unit, refer to the detailed descriptions in the "Detailed
User Guide".
• http://manual.jvc.co.jp/index.html/
3 Refer to the FAQ of new products on JVC's website.
• http://wwwjvc.com/
4 This unit is a microcomputer-controlled device. Electrostatic discharge, external
noise and interference (from a TV, a radio, etc.) might prevent it from functioning
properly.
Insuch a case, reset the unit.
Turn off the power. (Close the LCD monitor.)
Remove the AC adapter and battery pack from this unit, reattach them, open
the LCD monitor and this unit powers on automatically.
5 If the above do not solve the problem, consult your nearest JVC dealer or JVC
service center.
• The battery pack is being charged. 8
Check the _II / t3 button. 14
Set to the recording mode by tapping the 16
[] button on the screen.
• Turn off this unit, wait for a while, and turn -
it on again. (This unit stops automatically
to protect the circuit when the
temperature rises.)
• Recording stops automatically after 12
hours of continuous recording.
• Sometimes playback is interrupted at the -
connecting section between two scenes.
This is not a malfunction.
For more information, refer to the Detailed User Guide
26 http://manual.jvc.co.jp/index.html/
Page 27

• Check the remaining battery power.
(When the battery pack is fully charged,
the lamp does not flash.)
• When charging in either a hot or cold 8
environment, ensure that battery is being
charged within the permitted temperature
range. (Otherwise, charging may stop to
protect the battery pack.)
_1 • This is not a malfunction. (This unit may -
become warm when used for a long time.)
Warning Indications
• Turn offandonthis unitagain.
• Ifthe abovedoesnotsolvethe problem,backup
yourfiles andexecute"FORMATBUILT-IN
MEM."or "FORMATSD CARD"inthe
"COMMON"(basicsettings) menu.(All datawill
bedeleted.)
14
• When time-lapserecordingisstopped withthe
recordedtime lessthan"0:00:00:17",the video
willnot besaved.
• Turn offandonthis unitagain.
• RemovetheAC adapterandbattery pack,then
removeand re-inserttheSD card.
• Removeany dirtfromthe SDcardterminals.
• Ifthe abovedoesnotsolvethe problem,backup
yourfiles andexecute"FORMATBUILT-IN
MEM."or "FORMATSD CARD"inthe
"COMMON"(basicsettings) menu.(All datawill
bedeleted.)
• Appearsfor 5secondsafter poweristurnedon if
the lenscover isclosed or whenit isdark,
For more information, refer to the Detailed User Guide
http://manual.jvc.co.jp/index.html/ 27
Page 28

Cautions
When using the AC adapter in areas other
than the USA
The provided AC adapter features automatic voltage
selection in the AC range from 110 V to 240 V.
USING HOUSEHOLD AC PLUG ADAPTER
In case of connecting the unit's power cord to
an AC wall outlet other than American National
Standard C73 series type use an AC plug
adapter, called a "Siemens Plug", as shown.
For this AC plug adapter, consult your nearest
JVC dealer. Plug Adapter
® Remove the AC adapter from the AC wall outlet
when not in use.
® Do not leave dust or metal objects adhered to
the AC wall outlet or AC adapter (power/DC plug).
Terminals
The supplied battery pack is a
lithium-ion battery. Before using
the supplied battery pack or an
optional battery pack, be sure
to read the following cautions:
® To avoid hazards
... do not burn.
... do not short-circuit the terminals. Keep it away
from metallic objects when not in use. When
transporting, carry the battery in a plastic bag.
... do not modify or disassemble.
... do not expose the battery to temperatures
exceeding 60°C (140°F), as this may cause the
battery to overheat, explode or catch fire.
... use only specified chargers.
® To prevent damage and prolong service life
... do not subject to unnecessary shock.
... charge within the temperature range of 10°C
to 35°C (50°F to 95°F). Cooler temperatures
require longer charging time, or in some cases
stop charging at all
Warmer temperatures prevent complete
charging, or in some cases stop charging at all.
... store in a cool, dry place. Extended exposure
to high temperatures will increase natural
discharge and shorten service life.
... keep a 30% battery level (C:_)if the battery pack
is not to be used for a long period of time.In addition,
fully charge and then fully discharge the battery pack
every 2 months, then continue to store it at a 30%
battery level (C_).
... remove from charger or powered unit when not
in use, as some machines use current even
when switched off.
... do not drop or subject to strong impact.
ATTENTION:
The product you have purchased
is powered by a rechargeable
battery that is recyclable.
Please call 1-800-8-BATTERY for
information on how to recycle this
battery.
(USA and Canada only)
® Be sure to follow the guidelines below
to prevent corruption or damage to your
recorded data.
® Do not bend or drop the recording medium,
or subject it to strong pressure, jolts or
vibrations.
® Do not splash the recording medium with water.
® Do not use, replace, or store the recording
medium in locations that are exposed to
strong static electricity or electrical noise.
® Do not turn off the camcorder power or
remove the battery or AC adapter during
shooting, playback, or when otherwise
accessing the recording medium.
® Do not bring the recording medium near
objects that have a strong magnetic field or
that emit strong electromagnetic waves.
® Do nat store the recording medium in locations
with high temperature or high humidity.
® Do not touch the metal parts.
® When formatting or erasing data using
the camcorder, only the file administration
information is changed. The data is not
completely erased from the recording medium.
tf you want to completely erase all of the data,
we recommend either using commercially
available software that is specially designed
for that purpose, or by physically destroying
the camcorder with a hammer etc.
® To prevent damage to the LCD monitor,
DO NOT
... push it strongly or apply any shocks,
... place the camcorder with LCD monitor on the
bottom.
® To prolong service life
... avoid rubbing it with coarse cloth.
For more information, refer to the Detailed User Guide
28 http://manual.jvc.co.jp/index.html/
Page 29

®Forsafety,DONOT
...openthecamcorder'schassis.
...disassembleormodifytheunit.
...allowinflammables,waterormetallicobjects
toentertheunit.
...removethebatterypackordisconnectthe
powersupplywhilethepowerison.
...leavethebatterypackattachedwhenthe
camcorderisnotinuse.
...placenakedflamesources,suchaslighted
candles,ontheapparatus.
...exposetheapparatustodrippingorsplashing.
...leavedustormetalobjectsadheredtothe
powerplugoranACwalloutlet.
...insertanyobjectsinthecamcorder.
®Avoidusingtheunit
... in places subject to excessive humidity or dust.
... in places subject to soot or steam such as near
a cooking stove.
...in places subject to excessive shock or vibration.
...near a television set.
... near appliances generating strong magnetic
or electric fields (speakers, broadcasting
antennas, etc.).
... in places subject to extremely high (over 40°C
or 104°F) or extremely low (under 0°C or 32°F)
temperatures.
® DO NOT leave the unit
... in places of over 50°C (122°F).
... in places where humidity is extremely low
(below 35%) or extremely high (above 80%).
... in direct sunlight.
... in a closed car in summer.
... near a heater.
... in high places such as on aTV. Leaving the
unit in high places while a cable is connected
may result in a malfunction ifthe cable is
caught and the unit falls onto the floor.
® To protect the unit, DO NOT
...allow it to become wet.
...drop the unit or strike itagainst hard objects.
...subject it to shock or excessive vibration
during transportation.
... keep the lens directed at extremely bright
objects for long periods.
...expose the lens to direct sunlight.
... swing itexcessively when using the hand strap.
...swing the soft camcorder case excessively
when the camcorder is inside it.
...store the camcorder ina dusty or sandy area.
® To prevent the unit from dropping,
®Fasten the grip belt securely.
®When using the camcorder with a tripod,
attach the camcorder to the tripod securely.
If the camcorder drops, you may be injured
and the camcorder may be damaged.
When a child uses the unit, there must be
parental guidance.
Declaration of Conformity
Model Number : GZ-HM690U/GZ-HM670U/
GZ-HM650U/GZ-HM450U/GZ-HM440U
Trade Name : JVC
Responsible party : JVC AMERICAS CORE
Address : 1700 Valley Road Wayne, N. J. 07470
Telephone Number :973-317-5000
This device complies with Part 15 of FCC
Rules. Operation is subject to the following
two conditions: (1) This device may not cause
harmful interference, and (2) this device must
accept any interference received, including
interference that may cause undesired operation.
Changes or modifications not approved by
JVC could void the user's authority to operate
the equipment. This equipment has been
tested and found to comply with the limits for
a Class B digital device, pursuant to Part 15 of
the FCC Rules. These limits are designed to
provide reasonable protection against harmful
interference in a residential installation. This
equipment generates, uses, and can radiate
radio frequency energy and, if not installed
and used in accordance with the instructions,
may cause harmful interference to radio
communications. However, there is no guarantee
that interference will not occur in a particular
installation, tf this equipment does cause harmful
interference to radio or television reception,
which can be determined by turning the
equipment off and on, the user is encouraged
to try to correct the interference by one or more
of the following measures: Reorient or relocate
the receiving antenna. Increase the separation
between the equipment and receiver.
Connect the equipment into an outlet on a
circuit different from that to which the receiver is
connected.
Consult the dealer or an experienced radio/
TV technician for help.
This Class B digital apparatus complies with
Canadian ICES-003.
Cet appareil numerique de la classe Best
conforme b.la norme NMB-003 du Canada.
For more information, refer to the Detailed User Guide
http://manual.jvc.co.jp/index.html/ 29
Page 30

Specifications
UsingAC adapter:DC5.2V, Usingbatterypack:DC3.5V- 3.8V
2.3W (when"MONITOR 12.4W(when"MONITORBRIGHTNESS"issetto
BRIGHTNESS"issetto "3" 1"3"(standard))
(standard)) 12.6W (when"MONITORBRIGHTNESS"issetto
2.5W (when"MONITOR 1"4"(brighter))
BRIGHTNESS"issetto "4" IRatedCurrentConsumption:1A
(brighter))
RatedCurrentConsumpton:1A
51mmx 55mmx 111mm(2-1/8"x2-1/4"x4-3/8")(excludinggripbelt)
Approx.195g (0.43Ibs)(cameraonly),
Approx.235g (0.52Ibs)(includingsuppliedbatterypack)
Allowableoperatingtemperature:0°Cto40°C (32°Fto 104°F)
Allowablestoragetemperature:-20°Cto50°C(-4°Fto 122°F)
Allowablerelativehumidity:35%to80%
1/5.8"1,500,000pixels
(progressiveCMOS)
(UXP/XP/SP/EP)
630,000to1,050,000pixels(AISON)
630,000to1,250,000pixels(AISOFF)
(SSW/SEW)
340,000to1,050,000pixels(dynamic
zoomON)
630,000to1,050,000pixels(dynamic
zoomOFF)
(4:3)470,000to930,000pixels
(16:9)630,000to 1,250,000pixels
F1.8-&3,f=2.9mmto 116.0mm
(UXP/XP/SP/EP)
35mmconversion:45.6mmto
1,824mm(AISON)
35mmconversion:42.0mmto
1,680mm(AISOFF)
(SSW/SEW)
35mmconversion:45.6mmto
3,182mm(dynamiczoomON)
35mmconversion:45.6mmto
1,824mm(dynamiczoomOFF)
Opticalzoom:Upto 40x
1/4.1"3,320,000pixels(progressiveCMOS)
UXP/XP/SP/EP)
,220,000pixels(AISON)
1,440,000pixels(AISOFF)
(SSW/SEW)
390,000to 1,220,000pixels(dynamiczoomON)
1,220,000pixels(dynamiczoomOFF)
(4:3)1,080,000pixels
(18:9)1,440,000pixels
F1.8- 8.3,f=2.9mmto116.0mm
UXP/XP/SP/EP)
_5mmconversion:45.0mmto1,800mm(AISON)
35mmconversion:41.4mmto 1,856mm(AIS
OFF)
(SSW/SEW)
35mmconversion:45.0mmto3,150mm(dynamic
zoomON)
35mmconversion:45.0mmto1,800mm(dynamic
zoomOFF)
Dynamiczoom:Upto 70x(SSW/SEW)
Digitalzoom:Upto200x
For more information, refer to the Detailed User Guide
30 http://manual.jvc.co.jp/index.html/
Page 31

Opticalzoom:Upto40x
AVCHDstandard,Video:AVC/H.264,Audio:DolbyDigital(2ch)
JPEGstandard
SD/SDHC/SDXCcard(commerciallyavailable)
Dualslot Built-inmemory
8GB 32GB 84GB
Eye-Ficard(commerciallyavailable)
Rechargeablebattery
AC110Vto240V,50Hz/80Hz
DC5.2V,1.0A
O°Cto40°C(32°Fto104°F)
10°Cto35°C(50°Fto95°F)duringcharging)
68mmx28mmx47mm(2-5/8"x1-1/8"x1-7/8")(WxHxD:excludingcordand
ACplug)
Approx.71g(0.15Ibs)
*WhenusingtheACadapteroverseas,pleaseprepareacommerciallyavailable
converterplugforthecountryorregionofvisit.
[. The specifications and appearanee of this produet are subjeet to ehanges for ]
further improvement without prior notice
I Customer Support information I
Use of this software is authorized according to the terms of the software license.
JVC (for inquires regarding this unit)
When contacting the nearest JVC office or agency in your country (refer to the JVC Worldwide Service
Network at http//wwwjvcvictorcojp/english/worldmap/indexehtml) about this software please have the
following information ready
Product Name Model Serial Number Problem Error Message
Computer (Manufacturer Model (Desktop/Laptop) CPU OS Memory (MB/GB) Available Hard Disk Space (GB))
Please note that it may take some time to respond to your questions depending on their subject matter
JVC cannot answer questions regarding basic operation of your computer or questions regarding specifications
or performance of the OS other applications or drivers
Pixela (for inquires regarding the provided software)
USA and Canada
Europe (UK, Germany, France,
and Spain)
Other Countries in Europe
Asia (Philippines)
China
English
English/German/French/Spanish
English/German/French/Spanish
English
Chinese
Homepage: httpg/www pixela,co jp/oem/jvc/mediabrowser/e/
Please check our website for latest information and downloading.
+1-800-458-4029 (toll-free)
+800-1532-4865 (toll-free)
+44-1489-564-764
+63-2-438-0090
10800-163-O014(toll-free)
For more information, refer to the Detailed User Guide
http://manual.jvc.co.jp/index.html/ 31
Page 32

Model Differences
GZ-HM440
GZ-HM450
GZ-HM650
GZ-HM670
GZ-HM690
Index
Dual SD
SDHC/SDXC/Built-in Memory (8 GB)
SDHC/SDXC/Built-in Memory (8 GB)
SDHC/SDXC/Built-in Memory (32 GB)
SDHC/SDXC/Built-in Memory (64 GB)
No 1/5.8" 1.50M CMOS
No 1/5.8" 1.50M CMOS
Yes 1/4.1" 3.32M BSt CMOS
Yes 1/4.1" 3.32M BSt CMOS
Yes 1/4.1" 3.32M BSt CMOS
B
C
F
H
I
AC Adapter ................................. 8, 28
Apple .............................................. 22
AV Connection ......................... 18, 20
Battery Pack ............................... 8, 28
Clock Adjust ................................... 12
Component Connection ................. 17
Copy (Back Up) .............................. 19
Date/Time Setting .......................... 12
Deleting Files ................................. 16
Dubbing (Duplicate) ....................... 20
Format SD Card ............................. 11
HDMI Connection ........................... 17
Installation ...................................... 22
L Language Setting ........................... 13
LCD Monitor ................................... 28
NI Mac ................................................ 22
N Number of Images .......................... 25
R Recordable Time ............................ 25
S SD Card ........................................... 9
Software ......................................... 21
U USB Cable ..................................... 23
V Viewing Files on TV ........................ 17
W Windows ........................................ 21
Z Zoom .............................................. 14
© 2011 Victor Company of Japan, Limited [_ 0311MZR-SW-WM
Page 33

LYT2259-OOIB-MF_F_ _:o
VIDEOC_,MARA --_
GZ-H iVi690U/G Z-HiVi670U
GZ-H M650UIGZ-H iVI450U _-
GZ-HIVI440U :_'
Guia b#sica del usuario
Everio
Estimado cNiente:
Gracias pot haber adquirido este producto JVC.
Antes de su uso, lea las precauciones de seguridad y advertencias en p. 2 y p. 28 para
garantizar un uso seguro de este producto.
Un "Guia basica del usuario" (este manual) y un "Guia detallada del usuario" se encuentran
disponibles para este producto.
Para mb.s detalles sobre el funcionamiento de este producto, consulte el "Guia detallada del
usuario" en el siguiente sitio web.
[] _'Jlmanual.jvc.co.jplindex.html/
[] Tambien puede acceder al sitio web desde el software de aplicaci6n
integrado de esta unidad. (p. 22)
Para futuras consultas:
Introduzca el nomero de modelo (ubicado en la parte inferior de la camara) y el nomero de serie
(ubicado en el compartimineto de la bateria de la camara) a continuacion.
N_mero de modelo
N_mero de serie
j_'_'_ m DOLBY
ENGLISH
CASTELLANO
Page 34

Precauciones de seguridad
ATENC]ON: PARA E VITAR RIESGOS DE ELECTROCUCION
NO EXTRAIGA LA CUBIERTA (O LA PARTE POSTERIOR)
NO HAY PARTES REPARABLES POR USUARIO EN EL INTERIOR
EN CASO DE REPARACIONES, ACUDA AL PERSONAL
DE SERVICIO AUTORIZADO
//_E_ rayo con punta de flecha dentro de un tri&ngulo
equil_tero alerta al usuario sobre la presencia de
"tensi6n peligrosa" sin aislaci6n dentro del gabinete de
la unidad, cuya magnitud constituye un desgo de
electrocuci6n de personas.
El signo de exclamaci6n dentro de un tri_ngulo
que existen importantes
(servicio) y operacion
en el manual que acompaila al aparato
ADVERTENCIA: PARA EVITAR RIESGO
DE INCENDIOS O ELECTROCUCIONES,
NO EXPONGA ESTE APARATO A LA
LLUVIA O HUMEDAD.
NOTAS:
® La placa de valores nominales y la precauci6n de
seguridad se encuentran en la parte inferior y/o
en la parte posterior de la unidad principal.
® La placa del mJmero de serie se encuentra en el
compartimiento de la bateria.
® La informaci6n sobre los valores nominales y las
precauciones de seguridad del adaptador de CA
se encuentran en la parte superior e inferior del
mismo.
Precauci6n relacionada con la bateria de
litio recambiable
La bateria utilizada en este dispositivo presenta
riesgos de incendio y de quemaduras quimicas
si no se usa correctamente.
No la recargue ni la desmonte ni la caliente
por encima de los 100"C (212_'F) ni la incinere.
Reemplazar bateria con Panasonic Sanyo Sony
o Maxell CR2025.
Hay peligro de explosi6n o riesgo de incendio si
la bateria se cambia de manera incorrect&
® Desh&gase de la bateria usada sin demora.
® Mantengala lejos del alcance de los ni_os.
® No la desmonte ni la eche al fuego.
S61o para EE.UU.-California
Este producto contiene una bateria de litio OR
de tipo bot6n que contiene perclorato (puede
requerirse una manipulaci6n especial). Visite
www.dtsc.ca.qov/hazardouswaste/perchlorate
Cuando el equipo se encuentra instalado en un
gabinete o en un estante asegtJrese que tenga
suficiente espacio en todos los lados para permitir
la ventilaci6n (10 cm (3-15/16") o m&s en cada lado.
en la parte superior y en la parte trasera).
No bloquee los orificios de ventilaci6n.
Si los orificios de ventilaci6n est&n bloqueados pol
un peri6dico o paso etc. el calor no podr& salir.)
No deber& ser colocada en el aparato ninguna
fuente de llama sin protecci6n tales como velas
encendidas
Cuando descarte las pilas deber& considerar los
)roblemas ambientales y respetar estrictamente
las normas locales o leyes vigentes para la
eliminaci6n de estas pilas.
La unidad no deber& ser expuesta a goteos ni
salpicaduras.
No use esta unidad en un cuarto de ba_o o en
lugares con agua.
Tampoco coloque ningtJn envase Ileno de agua
o liquidos (tales como cosmeticos o medicinas
floreros, macetas vasos etc.) en la parte
superior de la unidad.
(Si penetra agua o liquidos en la unidad pueden
)roducirse electrocuciones o incendios.)
Esto puede causarle lesiones en los ojos asi como
tambien fallas en los circuitos internes de la c&mara
Esto tambien puede producir riesgo de incendio o
de choque electrico.
PRECAUCl0N_
Las siguientes notas indican posibles da_os a la
c&mara o lesiones al usuario.
El transportar o sostener la c&mara por el monitor
LCD puede resultar en la caida o en fallas de
la unidad.
No utilice el tripode sobre superficies inestables
o desniveladas ya que la c#,mara puede caerse
produciendo graves da_os a la misma.
PRECAUCION!
Evite conectar los cables (audio/video, etc.) a la
c&mara y dejar la unidad sobre el TV. ya que el
tropezar con uno de los cables puede derribar
la c&mara resultando esta daSada.
PRECAUCION:
El enchufe de red siempre debe estar f&cilmente
disponible.
• Retire de iemediato etenchufe de corriente si ta
videocamara funciona anormatmente.
ADVERTENCIA:
Las baterias incluidas las baterias de litio
instaladas en la c&mara yen el mando a distancia,
no deben dejarse expuestas a un calor excesivo
como la luz solar directa el fuego o una condici6n
similar.
Para obtener ma.s informaci6n, consulte la Guia detallada del usuario
2 http://manual.jvc.co.jp/index.html/
Page 35

INSTRUCC!ONES IMPORTANTES DE
SEGURIDAD
1. Lea estas instrucciones.
2. Conserve estas instrucciones.
3. Preste atenci6n alas advertencias.
4. Siga todas las instrucciones.
5. No utilice este aparato cerca del agua.
6. Limpie s61o con patio seco.
7. No bloquee ninguna abertura de ventilaci6n.
Instale de acuerdo con las instrucciones del
fabricante.
8. No Io instale cerca de ninguna fuente de calor
tales como, radiadores, calefactores, cocinas,
u otros aparatos (incluyendo amplificadores)
que produzcan calor.
9. Evite pisar o apretar el cable de alimentaci6n,
especialmente en los enchufes, conectores y
en el punto de salida del aparato.
10. $61o utilice dispositivos/
accesorios especificados
por el fabricante.
11. Utilice s61o con la
carretilla, esiante, tripode,
soporte o mesa especificad(
por el fabricante o vendido
con el aparato. Cuando utilice
una carretilla, sea cauteloso al mover el conjunto
de carretillad aparato para evitar lesiones
provocadas por caidas.
12. Desenchufe este aparato durante estruendos
de rela.mpagos o cuando este fuera de uso por
largo tiempo.
13. Refiera toda reparaci6n a personal de servicio
calificado. Se requiere de reparaci6n cuando el
aparato ha sido datiado de alguna manera, por
ejemplo, si el cable o enchufe de alimentaci6n
est#. datiado, si ocurri6 derrame de liquidos
o caida de objetos dentro del aparato, si el
aparato fue expuesto a la Iluvia o humedad, si
no funciona normalmente, o sufri6 caidas.
Si este simbolo aparece, s61o es
v_tlido en la Uni6n Europea.
I Realice una copia de seguridad de los
datos importantes que haya grabado
JVC no se responsabilizar_t de cualquier
perdida de datos. Le sugerimos que guarde los
datos importantes que haya grabado
copib.ndolos en un DVD o cualquier otro soporte
de grabaci6n.
Recuerde que esta c&mara debe usarse
_nicamente para fines privados.
Ester prohibido cualquier uso comercial sin la
autorizaci6n correspondiente. (Aunque grabe
acontecimientos, tales como espectaculos
o exhibiciones, para su disfrute personal, se
recomienda que obtenga una autorizaci6n previa.)
Marcas comerciales
• "AVCHD" Iogotipo de "AVCHD", "AVCHD Lite" y el
Iogotipo de "AVCHD Lite" son marcas comerciales
de Panasonic Corporation y Sony Corporation.
• x.v.Color TM es una marca
comercial de Sony Corporation. X,M, CO_O[
• HDMr Mes una marca comercial H_[_r_ _
de HDMI Licensing, LLC. ::.o7._,_o_7,_7
• Fabricado bajo licencia de Dolby Laboratories.
Dolby y el simbolo de la doble D son mamas
comerciales de Dolby Laboratories.
• Windows ®es una mama registrada ouna mama
comercial de Microsoft Corporation en los
Estados Unidos y/o en otros paises.
• Macintosh es una mama registrada de Apple Inc.
• iMovie y iPhoto son mamas registradas de Apple
Inc., registradas en EE.UU. y otros paises.
• YouTube TM y el Iogotipo de YouTube son marcas
comerciales y/o marcas comerciales registradas
de YouTube LLC.
• InteJ, Intel Core, y Pentium son marcas registradas
o marcas comerciales de Intel Corporation o de
sus filiales en los Estados Unidos y otros paises.
_ ye-Fi es marca registrada de Eye-R, Inc.
El resto de los nombres de productos y
de compatiias incluidos en este manual
de instrucciones son marcas comerciales
y/o marcas registradas de sus respectivos
propietarios.
Para obtener m&s informacion, consulte la Guia detallada del usuario
http://manual.jvc.co.jp/index.html/ 3
Page 36

Contenido
Precauciones de seguridad ................. 2
Comprobaci6n de los accesorios ........ 4
Nombres de piezas y funciones ........... 5
Nombres de los botones y funciones en el
monitor LCD ........................................ 6
Utilizar la pantalla tactil ........................ 7
_lntroducci6n ................................ 8
Carga de la bateria .............................. 8
Ajuste de la correa de mano ................ 9
Uso de la correa de muSeca ................ 9
Introducci6n de una tarjeta SD ............ 9
Ajuste del reloj ................................... 12
Calidad de video ................................ 13
_,Grabaci6n ................................. 14
Grabaci6n de video ........................... 14
Grabaci6n de imagenes fijas ............. 15
_,Reproducci6n ........................... 16
Reproducci6n y eliminaci6n de archivos
de esta unidad ................................... 16
Reproducci6n en un televisor ............ 17
_,Copia ........................................ 19
Copia de archivos .............................. 19
Copia de archivos mediante la conexi6n a
una grabadora de video o DVD ......... 20
Copia al PC ........................................ 21
_,M&s informaci6n ....................... 24
Funcionamiento del menu ................. 24
Tiempo de grabaci6n/numero de
imb.genes ........................................... 25
Resoluci6n de problemas .................. 26
Advertencias ...................................... 28
Especificaciones ................................ 30
Diferencias del modelo ...................... 32
Un "Gufa basica del usuario" (este manual) y un "Gala detallada del usuario" se encuentran
disponibles para este producto.
Para mas detalles sobre el funcionamiento de este producto, consulte el "Gufa detallada del
usuario" en el siguiente sitio web.
m http://manual.jvc.co.jp/index.html/
[] Tarnbien puede acceder al sitio web desde el software de aplicaci6n
integrado de esta unidad. (p. 22)
Comprobaci6n de los accesorios
Cable USB
Adaptador de CA Bateria (tipo A- minitipo B) Cable AV
AC-Vl 1U* BN-VG114U QAM1313-001A/
QAM1369-001A
Guia bb,sica del usuario
(este manual)
Accesorios opcionales
• Cable componente
QAM1266-001
• Las tarjetas SD se venden pot separado. Para obtener m_.s informaci6n sobre lostipos
de tarjetas que se pueden utilizar en esta unidad, consulte p. 10.
• Si utiliza un adaptador de CA en el extranjero, utilice un enchufe adaptador
comercialmente disponible para el pais o regi6n en la que se encuentre.
Para obtener ma.s informacion, consulte la Guia detallada del usuario
4, http://manual.jvc.co.jp/index.html/
Page 37

Nombres de piezas y funciones
@
Cubierta de la lente
2_ Luz (GZ-HM690/GZ-HM670/GZ-HM650)
(3) Micr6fono estereo
(4) Monitor LCD
Enciende/apaga la alimentaci6n al abdr/
cerrar el monitor LCD.
_5_Altavoz
_6)Luz ACCESS (de acceso)
Se enciende o parpadea durante la
grabaci6n o reproducci6n.
q) Luz POWER/CHARGE (alimentaci6ni
carga) (p. 8)
(8) Bot6n i.AUTO (auto inteligente) (p. 14)
Cambia entre modo Auto Inteligente y
Manual.
(9) Bot6n USER (usuado)
@ Bot6n 4_/It_ (video/imagen fija)
Aaterna entre los modos de video e
imagen fija.
@ Bot6n INFO (informaci6n)
Grabaci6n : Muestra el tiempo (s61o
para video) y carga de
bateria restantes.
Reproduccion: Muestra la informaci6n de
los archivos como pot
ejemplo ia fecha de
grabaci6n.
@ Conector AV (p. 18, 20)
(13) Bot6n _ (alimentaci6n)
Mantenga presionado este bot6n para
encender o apagar la alimentaci6n
mientras que el monitor LCD esta
abierto.
@ Mini conector HDMI (p. 17)
(i5)Conector USB (p. 23)
9_ Conector COMPONENT (componente)
(p. 17)
@ Palanca de zoom/volumen (p. 14, 16)
98)Bot6n SNAPSHOT (grabaci6n de
imb.genes fijas) (p. 15)
@ Conector de CC (p. 8)
@ Bot6n START/STOP (grabaci6n de
video) (p. 14)
@ Interruptor de ia cubierta de ia lente
(p. 14)
@ Correa de mano (p. 9)
@ Traba de correa (p. 9)
@ Abertura para fijaci6n des tripode
@ Ranura para la tarjeta SD (p. 9)
_-6}Palanca de liberaci6n de la bateria
(p. 8)
Para obtener m&s informacion, consulte la Guia detallada del usuario
http://manual.jvc.co.jp/index.html/
Page 38

Nombres de los botones y funciones en el
monitor LCD
Las siguientes pantallas aparecen durante los modos de vfdeo e imagen fija y funcionan como
las pantallas t#.ctiles. (p. 7)
Bot6n de menQde acceso directo a
funciones de rostro
Muestra una pantalla de acceso directo a
funciones de reconocimiento de rostro.
(_ Bot6n de zoom
q3_Bot6n de modo de reproducci6n
Cambia al modo de reproducci6n.
(4_Bot6n de inicio/detenci6n de grabaci6n
(p. 14, 15)
[_ : Bot6ndeiniciode grabaci6ndevideo
• II : Botondedetenci6nde grabaci6ndevideo
_'} : Bot6ndegrabaci6ndeimb.genesfijas
(5_Bot6n de menQ (p. 24)
(6_Bot6n de visualizaci6n
Algunas visualizaciones desaparecen
luego de aproximadamente 3 segundos.
Presione este bot6n para mostrar las
visualizaciones nuevamente. Las
visualizaciones aparecen durante
aproximadamente 3 segundos con cada
pulsaci6n. Pulse y mantenga presionado
Bot6n de modo de grabaci6n
Cambia al modo de grabaci6n.
2_ Bot6n de pantalla de fndice
(3_Bot6n de eliminaci6n
(4_Bot6n de ajuste de volumen (p. 16)
_5_Bot6n de menQ (p. 24)
_6_Botones de funcionamiento (p. 16)
Bot6n de modo de grabaci6n
Cambia al modo de grabaci6n.
2_ Bot6n de pantalla de fndice
(3_Bot6n de eliminaci6n
(4_Bot6n de menO (p. 24)
este bot6n para ajustar las visualizaciones. (5_Botones de funcionamiento (p. 16)
Presione este bot6n nuevamente para que
aparezcan las visualizaciones.
Para obtener mas informacion, consulte la Gufa detallada del usuario
6 http://manual.jvc.co.jp/index.html/
Page 39

Bot6n de fecha _ Bot6n de ayuda (p. 24) '_-I__O
Bot6n de modo de grabaci6n (_ Opciones de menO(p. 24) "o
!'
Cambia al mode de grabaci6n. (3) Bot6n de regreso
(3) Bot6n de eliminaci6n (4_Bot6n de ajustes comunes/basicos
(4) Bot6n de medios de reproducci6n (5) Bot6n de cierre
CambiaentretarjetaSD y memoriaintegradao
ranueraAy ranuraB (GZ-HM440).
_5)Bot6n de ment) (p. 24)
_6)Bot6n de pagina anterior/siguiente I !_-
Utilizar la pantalla t ctil :o
Existen dos maneras de operar ia pantalla tactil: "pulsa¢' y "arrastrar". A continuaci6n
encontrar_, algunos ejemplos.
[] Pulse el bot6n (fcono) o la vista en miniatura (archive) que aparece en la pantalla tactil para _ _
realizar la selecci6n.
bL
[] Arrastre las vistas en miniatura en la pantalla t_.ctil para buscar el archive que desea.
Pantalla de grabacion Pantalla de reproduccion Pantalla de indice
[] [] [] [] Q
L__"-_
Para obtener m&s informacion, consulte la Gu/a detallada del usuario
http://manual.jvc.co.jp/index.html/ '7
Page 40

Carga de la bateria
Sujete la baterfa.
* La c_tmara se suministra con
la bateria descargada.
o Alinee la parte superior de la
bateria con la marca de esta
unidad ydeslicela hasta que
se oiga un clic.
m Para extraer la baterfa
(base)
Conecte el conector
de CC.
Adaptador de CA
II_ _)lida2d_ C_
Encienda la alimentacidn.
kuz indicadora de carga
O Carga en curso:
Carga terminada:
Se apaga
Para obtener ma.s informacion, consulte la Guia detallada del usuario
8 http://manual.jvc.co.jp/index.html/
Page 41

Ajuste de la correa de mano
Abra lapalanca en la _2_Regule la Iongitud de _ Cierre la palanca [
traba de la correa la correa _:
Uso de la correa de mu_eca :o
Regule ia Iongitud de ia correa y aj0steia en su mu_eca.
Introducci6n de una tarjeta SD =_
[] GZ-HM690/GZ-HM670/GZ-HM650/GZ-HM450 (Modelos con mernoria integrada)
Si se introduce una tarjeta SD comercialmente disponible, se pueden realizar
grabaciones en la tarjeta sin que haya que detener el proceso cuando se agota el
tiempo de grabaci6n restante en la memoria integrada.
*Para grabar en la tarjeta, es necesario realizar los ajustes de medios. (p. 11) ._
Cuando no haya una tarjeta disponible, realice los ajustes de los medios en la
"MEMORtA INTEGRADA" para realizar la grabaci6n.
[ 1 Cierre el monitor LeD. } 2 Abra lacubierta.
(b_ 3 Intr°duzca una tarjeta SD" . __ '=.O
Apague la alimentaci6n de esta unidad I '_O
antesde introducir oextraer unatarjeta.
Para obtener ma,s informacion, consulte la Guia detallada del usuario
http://manual.jvc.co.jp/index.html/ 9
Page 42

[] GZ=HM440 (modelos con doble ranura)
Introduzca una tarjeta SD comercialmente disponible antes de iniciar la grabaci6n.
Esta unidad tiene dos ranuras para tarjetas SD. Si se introducen dos tarjetas SD, las
grabaciones continuan en la otra tarjeta si una de elias est& llena.
J1 cierre e, monitor LCD. ] 2 Abralacubierta.
(base) T-|-- _,,_Introduzca una tarjeta SD en ta
ranura A.
* Apague la alimentacion de esta unidad
antes de introducir o extraer unatarjeta, Ranura B Ranura A
[] Para extraer la tarjeta
Presionelatarjeta haciadentro y luegoretirelahacia arriba.
(base) I
Para obtener ma.s informacion, consulte la Guia detallada del usuario
10 http://manual.jvc.co.jp/index.html/
Page 43

_Para utilizar una tarjeta SD
(GZ=HM690/GZ=HM670/GZ=
HM650/GZ=HM450)
Se pueden realizar grabaciones en
una tarjeta si "SOPORTE GRAB.
VIDEO" o "SOPORTE GRAB. FOTO"
de "GENERAL" (ajustes basicos) se
ajustan en "TARJETA SD".
Abra el monitor LCD.
• Se enciende la unidad.
Pulsar "MENU".
(,_ Pulsar "_1_".
(_ Pulsar"SOPORTE GRAB. VfDEO"
o "SOPORTE GRAB. FOTO'.
[] Para usar tarjetas SD que se
han utilizado en otros
dispositivos
Formatee (inicialice) la tarjeta
utilizando "FORMATEAR TARJETA
SD" en "GENERAL" (ajustes
b&sicos).
Si se formatea la tarjeta, todos Io,,
datos inciuidos en ella se
eliminar_n. Reaiice una copia de
todos los archivos a una
computadora antes de realizar el
formateado.
Siga los pasos (_- (_)desde "Para
utilizar una tarjeta SD".
(_ Pulsar "FORMATEAR TARJETA
SD'.
_5_Pulsar "TARJETA SD".
(GZ-HM440)
Pulse la ranura con la tarjeta para
formatear.
(_ Pulsar "ARCHWO".
Pulsar "Sf".
(._ Despues del formateado, pulse
"ACEPTAR".
Para obtener m&s informaci6n, consulte la Guia detallada del usuario
http://manual.jvc.co.jp/index.html/ 1
Page 44

Ajuste del reloj
Abra elmonitor LCD,
• Se enciende la unidad. Si se cierra el
monitor LCD, se apaga la unidad.
Pulse "Sf"cuando se visualice "iAJUSTE
FECHA/HORA!",
Ajuste la fecha y la hora,
• "^" y "v" apareceran cuando se ingrese el
a_o,el mes, el dfa, lahora o el minuto.
Pulse "^" o"v" para ajustar el valor,
• Repita este paso para ingresar ela_o, mes,
dia, hora y minuto.
Despuesdeajustarlafechayhora, pulse
"AJUSTE",
Seleccionelaregi6nenlaqueviveypulse
"GUARDA",
• Se mostrarb,el nombre de la ciudad y la
diferencia horaria,
• Pulse "<" o">" paraseleccionar elhombre
de laciudad.
Para obter_er ma.s informacion, consulte la Guia detallada del usuario
12 http://manual.jvc.co.jp/index.html/
Page 45

Para restabtecer el reloj
Ajuste el reloj con "AJUS.RELOJ" del menU.
_1_Abra el monitor LCD.
• Se enciende la unidad.
(_ Pulsar "MENU".
Pulsar "_".
(_ Pulsar "AJUS.RELOJ".
5@Pulsar"CONF. RELOJ".
• Las siguientes operaciones de ajuste
son las mismas que las de los pasos 3a
Paracambiareiidiomadevisualizaci6n
Elidioma enel quese muestra la informaci6n
de la pantalla puede cambiarse.
Siga los pasos(_- _) en"Para resetear el
reloj".
Pulsar "LANGUAGE".
5@Pulse el idioma deseado.
Calidad de video
Esta unidad puede grabar en definici6n alta y est_.ndar.
La definici6n predeterminada es alta definici6n (XP).
[] Para cambiar la configuraci6n
Pulsar "MENU".
Pulsar "CALIDAD DE VfDEO".
Pulse la calidad de video deseada.
Alta definici6n UXP i Calidadsuperiordevideo
XP
sP $
EP
Definicidn estandar SSW
SEW Mastiempodegrabaci6n
* Para el tiempo aproximado de grabaci6n de video, consuite p. 25.
Para obtener m&s informacion, consulte la Guia detallada del usuario
http://manual.jvc.co.jp/index.html/ 13
Page 46

Grabaci6n de vfdeo
Si se utilizael modo Auto Inteligente, se pueden realizar grabaciones sintener encuenta los ajustes.
Los ajustes tales como exposici6n yfoco se ajustaran en forma automb.ticapara adecuarse alas
condiciones de grabaci6n.
• Encaso deescenas especificas defilmaci6n, tales como iluminaci6nde fondo (_'_), vista nocturna
(_), de personas (e_) etc., su fconoaparecerb, enla pantalla.
Antes de grabar una escena importante, se recomienda realizar una grabaci6n de prueba.
Abra la
cubierta de
la lente.
@
7,
Seleccione
el modo
video.
,_1_(_
Compruebe que el modo de
grabacion sea i.A. Auto tnteligente.
• Siel modo esManualIM-I,presioneel
bot6n_ paracambiarde modo.
e El modo cambia entre Auto Inteligente y
Manual cada vez que se presiona.
Inicie la grabacion.
• Presione [_
nuevamente para
detener la
grabacion. START
/STOP
Zoom
(gran angular) (telefoto)
• Tambien puede pulsar _ en la pantalla t_tctilpara realizar una grabaci6n. Paradetener la
grabaci6n, pulse• II. Ademas, tambien puede pulsar T/W para el zoom.
[] Indicaciones durante la grabaci6n de vfdeo
Calidad de Snde soportes
bateria
Estabilizadorde
imagenes
Contadordeescenas
)o restante de grabacion
Para obter_er mas informacion, consulte la Guia detallada del usuario
14. http://manual.jvc.co.jp/index.html/
Page 47

Grabaci6n de im genes fijas
Seleccioneel modo
de imagenesfijas.
Ajuste el enfoque del sujeto.
Se ilumina an verde
J cuando se ha centrado
3 Tome una imagen fija.
_!!_O _ se enciendedurantela
grabaciondeimdtgenesfijas
• Tambien puede pulsar _} en la pantalla tactil para realizar una grabaci6n. Sin
embargo, el foco no se puede ajustar presionando hasta la mitad del recorrido.
[] Indicaciones durante la grabaci6n de imageries fijas
Tamafiode imag desoportes
Velocidad del
obturador Indicador de baterfa
A : Enfoque
PHOTO :Grabacion en curso
LL
Para obtener mas informacion, consulte la Gufa detallada del usuario
http://manual,jvc,co,jp/index,html/ 1_
Page 48

Reproducci6nyeliminaci6ndearchivosdeestaunidad
Seleccioneyreproduzcalosvideosgrabadosoimagenesfijasdesdelapantalladeindice(pantalladevistasenminiatura),
Seleccione el modo video o =_'_
imagen fija.
Pulse [] en la pantalla tactil para
seleccionar el modo de reproduccion.
*Pulse E_]para regresar al mode de grabaci6n.
Pulse sobre el archivo para reproducir.
o Pulse _1_/_ para seteccionar el medio de reproduccion.
• Pulse || para pausar la reproducci6n.
e Pulse [] para regresar a la pantalla de indice de
video.
Ajuste del volumen durante la reproducci6n
voL
Baj ,Suba el volumen
lira Para eliminar archivos no deseados
_) Pulsar _,
Pulse sobre los archivos para eliminar.
!Aparecer_i una marca de
elLminaci6n sobre et
archLvo seleccionado,
Para etiminar la marca de
etLminaci6n, pulse
nuevamente,
_ Pulsar "AJUSTE".
Pulse "EJECUTAR" cuando aparezca el
mensaje de confirmaci6n.
(_) Pulsar "ACEPTAR'.
ll Para capturar una imagen fija durante una reproduccibn
Pongala reproducci6n en pausa y presioneel bot6n SNAPSHOT.
ll Botones de funcionamiento habilitados durante la reproducci6n (*)
I_"/ | ! Reproducci6n/pausa Inicioy pausadepresentaciondediapositivas
Detenci6n(regresaa lapantalladeindice) Detencion(regresaalapantalladeindice)
iI_M Avanzaal siguientevideo Avanzaalasiguienteimagenfija
i'_4 Regresaal comienzodelaescena Regresaalaimagenfijaanterior
_ll_ B_squedahaciaadelante
B_squedahaciaatras
II1_ Camaralentahaciaadelante/ Mantenga
presionadoestebotonparainiciarla
reproducci6nanc_.maralenta
41 Camaralentahaciaatra.s/Mantengapresionado
estebotonparainiciarlareproduccionen
c_.maralentahaciaatras
Ajustedelvolumen
_, Gira90gradosensentidocontrarioalasagujas
delreloj
,q, Gira90gradosanelsentidodelasagujasdel
reloj
_; Reproducci6ncontinuadeimagenes
capturadasconfilmaci6ncontinua
* Losbotonesdesaparecenluegodeaproximadamente3segundos.Pulseen la pantallaparavisualizar
losbotonesnuevamente.
Para obtener ma.s informacion, consulte la Guia detallada del usuario
16 http://manual.jvc.co.jp/index.html/
Page 49

Reproducci6n en un televisor
U Conecte dispositivo a un
ei televisor.
* Consulte tambien el manual de instrucciones del televisor en use.
e Apague la videocamara presionando el bot6n (_ durante unos 2 segundos.
m Reproducci6n en calidad HD
Si estb. utilizando un HDTV, puede reproducir en calidad HD conect&ndose a un
conector HDMI.
Conexion al conector HDMI
A Mini conector
HDMt
Conexion al conector COMPONENT
A conector COMPONENT
!_!ii!ii!
_pcional)
Verde
Blanco
A conector AV
componente
CB/PB TV
_ CR/PR
Entradadeaudio
_ (k,izquierda)
_G_ Entradadeaudio
(R,derecha)
*No conecteel enchufeamarillo
cuando utilice uncable componente,
EL
Para obtener m&s informacion, consulte la Guia detallada del usuario
http://manual.jvc.co.jp/index.html/ 1'7
Page 50

ll Reproducci6n en calidad estandar
Si utilizaunTV convencional, se puede reproducir encalidad estandar conectando la
unidad al conector AV.
Conexi6n al conector AV
TV
Amarillo _e video
Cable AV Entrada de video
(proporcionado) _ Blanco I
, Entrada de audio
A conector AV _ Rojo I (L, izquierda)
Entrada de audio
[ (R, derecha)
Conecte el adaptador de CA. (p. 8)
• Esta unidad se enciende automaticamente cuando se conecta el adaptador de CA.
Seleccione el interruptor de entrada del televisor.
Reproduzca un archivo. (p. 16)
ll Si las im_igenes no se ven naturales en el televisor
• Desconecte el cable y vuelva a conectado.
• Apague esta unidad y vuelva a encenderla.
• Ajuste "SALIDA DE VfDEO" del menu "GENERAL"
(ajustes basicos) en "4:3".
• Ajuste las pantallas del televisor segun
corresponda.
• Cuando se ha grabado video con "x.v.Color"
_xtra_ ajustado en "ON", cambie el ajuste segun el
formato que se desea ver en el televisor.
• Ajuste las pantallas del televisor segun
................................................................................................................................................................................................................................................................corresponda.
Para obtener ma.s informacion, consulte la Guia detallada del usuario
18 http://manual.jvc.co.jp/index.html/
Page 51

Copia de archivos
Se pueden crear discos o copiar los archivos en esta unidad si se la conecta a diversos
dispositivos.
) : Apto paragrabaci6n y reproducci6n
A : S61oapto para reproducci6n
: No aplicable
Grabadora de Blu-ray
_ A "1 ) "1 _
Grabadora de DVD
!_!!!!
VCR
)
Computadora
*2 *2 *2 )
Consu!tar manua!
del grabador.
p. 20
p. 20
p. 21
"1 Solo para dispositivos compatibles con AVCHD.
*2 Para obtener informaci6n sobre c6mo crear un disco utilizando un ordenador,
consulte la Guia detallada del usuario.
I/
Para obtener mb,s informacion, consulte la Guia detallada del usuario
http://manual,jvc,co,jp/index,html/ 19
Page 52

Copia de archivos mediante la cone×i6n a
una grabadora de video o DVD
Sepuedencopiar videosencalidad est_.ndarsise conectalac_.maraaunagrabadorade videoo DVD.
Consultetambien losmanualesde instruccionesdel televisor,grabadoradevideo, DVD, etc.
Conecte el dispositivo a una grabadora de video o DVD.
• Apague la videocamara presionando el bot6n _ durante unos 2 segundos.
Amarillo IEntradade video
A conector AV Entrada de video
I Blanco I
Entrada de audio
CaMe AV I Rojo I (L, izquierda)
(proporcionado) _ Entrada de audio
[ (R, derecha)
Adaptador de CA
A la salida de CA
(110V a240V)
i_ 4 ),_ Grabadora de video o DVD
A conector de CC
• Esta unidad se enciende automaticamente cuando se conecta el adaptador de CA.
Pulse [] para seieccionar ei modo de reproducci6n.
Preparese para la grabaci6n.
Preparaci6n del televisor y de la grabadora de
vfdeo o DVD
• Cambie a una entrada externa compatible.
• Introduzca un DVD-R o cinta de video.
Preparaci6n en esta unidad
• Ajuste "SALIDA DE VIDEO" del menu "GENERAL" (ajustes basicos) en la proporci6n
de aspecto ("4:3"0 "16:9") del TV conectado.
Inicie ia grabaci6n.
• Inicie la reproducci6n en esta unidad (p. 16) y presione el bot6n de grabaci6n en la
grabadora.
• Una vez que haya finalizado la reproducci6n, detenga la grabaci6n.
Para obtener ma.s informacion, consulte la Guia detallada del usuario
20 http://manual.jvc.co.jp/index.html/
Page 53

Copia al PC
Comprobaci6nde los requisitosdelsistema (instrucciones)
PC Windows
Puede copiar archivos a una PC mediante el software proporcionado.
Haga clic con el bot6n secundario en "Equipo" (o "Mi PC") del menu "lnicio" y seleccione
"Propiedades" para comprobar las siguientes opciones.
[] Windows 7 / Windows Vista
_ ; • Windows 7
: [ - ............ ,, Home Premium (edici6n 32-bit/64-bit, s61oversiones preinstaladas)
: :C::: _ I Windows Vista
::::, .... _ Home Basic o Home Premium
_ I (edici6n 32-bit/64-bit, s61oversiones preinstatadas)
\ i _.... _ | Service Pack 2 (solo Windows Vista)
Procesador
AIta definici6n: Inte] CoreDuo, CPU t ,66 GHz o superior
............. (se recomienda lntel Core 2 Duo, CPU 2,13 GHz o superior)
t ,:_::;: Defieicion estandar: Intel Pentium 4,CPU 3,0 GHz o superior
.... (se recomienda lntel Pentium D,CPU 3,0 GHz o superior)
..... :;; .......... Memoria: 2 GB como minimo
_ 3o de sistema: 32-bit / 64-bit
[] Windows XP
Windows XP
Home Edition o Professional (solo versiones preinstaladas)
Service Pack 3
Procesador
Alta definicion: Intel Core Duo, CPU 1,66 GHz o superior
(se recomienda Intel Core 2 Duo, CPU 2,1 3 GHz o superior)
Definicion estandar: Intel Pentium 4, CPU 3,0 GHz o superior
(se recomienda Intel Pentium D, CPU 3,0 GHz o superior)
Memoria: 1 GB come minimo
[] Otros requisitos
Visualizaci6n: 1024x768 pixeles o superior (se recomienda 1280x1024 pixeles o
superior)
Graficos: se recomienda lntel G965 o superior
[] Edici6n de video
Alta definici6n: Se recomienda lntel Core i7, CPU 2,53 GHz o superior
Definici6n estb.ndar: Se recomienda tntel Core 2 Quad, CPU 2,4 GHz o superior
Para obtener mb,s informacion, consulte la Guia detallada del usuario
http://manual.jvc.co.jp/index.html/ 21
-EL
I/
Page 54

Puede importar archivos desde esta unidad a una computadora utilizando iMovie '08, '09, '11
(video) o iPhoto (imagen fija) de Apple,
Paracomprobar los requisitos del sistema, seleccione "Acerca de este Mac" del menQApple, Se
puede determinar la versi6n del sistema operativo, procesador y memoria,
• Paraobtener informaci6n actualizada sobre iMovie oiPhoto, consulte la p&ginaweb de Apple.
• Paraobtener informaci6n sobre c6mo utilizar iMovie oiPhoto, consulte el archivo deayuda de
los programa de software respectivos,
® No hay garantia de quelas operaciones funcionen en todos los entornos.
Instalar el software proporcionado (integrado)
Se pueden visualizar las imagenes grabadas en
formato calendario y realizar una edici6n sencilla
utilizando el software proporcionado en la
memoria integrada.
- Abra el monitor LCD.
• Apague la videoc_mara presionando el
bot6n _ durante unos 2segundos.
Conecte el cable USB y el adaptador de
CA,
A conector USB
conector de CC
_ble USB _(_
(APrc°oPn°r_i _ _audS°B
Adaptador de CA
A la salida de CA
(110V a 240V)
Pulsar"CONECTAR A PC",
Pulsar"REPRODUCIR EN PC".
(._ Haga clic en "Continuar" de la pantalla
de control de cuenta de usuarlo.
• "Software Setup" aparece despues de
unos momentos,
• Si noapareciera, haga doble clic en
"JVCCAM APP" en "Mi PC",y luego
hagadobleclic en "INSTALL,EXE",
Haga clic en "Everio MediaBrowser 3",
• Sigalasinstruccionesqueaparecenenpantalla,
Haga clic en "Finalizar",
Haga clic en "SALIR",
Ever_o Everio
f,_aBr_ ,. M_diaBro ,
• Finaliza la instalaci6n y se crean los iconos
enel escritorio.
Siga los siguientes pasos enla
computadora.
_1_Haga clic en "Ejecutar INSTALL.EXE"
del cuadro de dl_.logode reproducci6n
autom_.tica.
Para obtener ma.s informacion, consulte la Guia detallada del usuario
22 http://manual.jvc.co.jp/index.html/
Page 55

Copia de seguridad de todos los archivos
Antes de realizar copias de seguridad,
asegurese de que dispone de suficiente
espacio libre en el disco duro del PC.
Abra el monitor LCD.
• Apague la videocamara presionando
el bot6n _ durante unos 2 segundos.
_ onecte el cable USB y el
adaptador de CA.
USB
,conector de CC
C%eOS
(proporcionado) I @
A conector USB
Adaptador de CA
A la salida de CA
10Va240V)
_ Pulsar "CONECTAR A PC".
_ ulsar "HACER COPIA DESEGURIDAD".
_ Seleccione el volumen.
_ Inicie copia seguridad.
la de
Destino de almacenamiento (PC)
I espues de que se haya
completado la copia de seguridad,
haga clic en "Aceptar".
Si tuviera algQn problema con el
software proporcionado Everio
IViediaBrowser, consuite con el
"Pixela eentro de soporte al usuario".
[] Para desconectar a esta unidad del PC
1_ Haga clic en "extracci6n segura de
hardware".
• El software proporcionado Evedo
MediaBrowser se inicia en el PC.
Las demb.s operaciones se deben
realizar en el PC.
Haga clic en "Extracci6n segura de
Dispositivo de almacenamiento
masivo USB".
(Para Windows Vista) Haga clic en
"Aceptar".
(_ Desconecte el cable USB y cierre
el monitor LCD.
-EL
:F,
:F,
ff
:F,
Para obtener m&s informacion, consulte la Guia detallada del usuario
http://manual.jvc.co.jp/index.html/ 23
Page 56

Funcionamiento del men
Se pueden configurar varies ajustes
utilizando ei menu.
Pulsar "MENU".
• El menu es diferente segun ei mode
que este en use.
• Pulse "_" para visualizar el menu de
acceso directo a funciones de rostro.
Pulse el menQ deseado.
• Pulse ",_l_"para visualizar eamenu de
"GENERAL" (ajustes basicos).
Pulse el ajuste deseado.
[] Para salir de la pantalla
Pulse "X" (salir).
[] Para voIver a la pantalla anterior
Pulse "_" (regresar).
[] Para vet el archivo de ayuda
Pulse"?" (ayuda) y pulse lasopciones de
men&
• Es posible que el archive de ayuda no
este disponible para algunas opciones.
• Para m_s informaci6n sobre los
ajustes, eonsulte la Gufa detallada
del usuario.
Men_ de grabaci6n
SELECC. ESCENA
FOCO
AJUSTAR BRILLO
BALANCE BLANCOS
COMP. CONTRALUZ
TELE MACRO
EFECTO ANIMADO
PRIOR. TOQUE AE/AF
CAPTURA DE SONRISA
VER % SONRISA/NOMBRE
REGISTRO DE CARAS
ILUMINACION (G Z-HM650/GZ-H M670/GZ-H M690)
DIS
GANANCiA
CORTAWIENTO
GRAB. POR INTERVALO
GRABACION AUTOM_,TICA
SUBVENTANA DE CARA
CALIDAD DE VIDEO
ZOOM
GRABACION CONTINUA
x.v.Color
CONF. BOTON DE USU.
Menu de reproducci6n
BUSCAR FECHA
EFECTOS PRESENT DIAP
PROTEGER/CANCELAR
COPIAR
MOVER
RECORTAR
REPR. OTRO ARCHIVO
CTRL GRAB. CONTINUA
K2 TECHNOLOGY
Ment_ de ajustes comunes/b_sicos
AJUS.RELOJ
TIPO iNDiC. FECHA
LANGUAGE
BRILLO PANTALLA
SOPORTE GRAB. VIDEO
SOPORTE GRAB. FOTO
GRAB. VIDEO EN RAN. (GZ*HM440)
GRAB. FOTOS EN RAN. (GZ-HM440)
SONIDO FUNCIONAM.
DESCONEXION AUTOM.
REINICIO RAPIDO
MODO DEMO
AJUSTE PANT. T,&,CTiL
VER EN TV
SALIDA DE VIDEO
SALiDA COMPONENTES
SALIDA HDMI
CONTROL HDMI
CONFIG. DE F,A,BRICA
ACTUALiZAR
ACTUAL. SOFTWARE PC
FORMATEAR MEM INT
FORMATEAR TARJETA SD
BORAR MEM iNTEGRADA
Para obtener ma.s informacion, consulte la Guia detallada del usuario
24 http://manual.jvc.co.jp/index.html/
Page 57

Tiempode grabaci6n/n mero de im genes
Es posible comprobar el tiempo de grabaci6n de video presionando el bot6n INFO.
40m
50m
1h20m
3h20m
2h30m
5h20m
2h50m 5h50m 20m 40m lh20m 2h50mi4h20m 5h50m
4h 8hl0m 30m lh 2h i4hl0m 6hl0m 8h20m
5h40m 11h40m40m lh20m 2h50mi5h50mi8h40m 11h50m
14h20m 29h10m lh40m 3h40m 7hl0m 14h50m121h50m29h50m
11h10m 22h30m lh20m 2h50m 5h40millh30m 17h 23h
23h 46h40m 2h50m 5h50m 11h40mi23h50m 35h10m47h40m
• El tiempo estimado de grabaci6n es solo una guia. El tiempo real de grabaci6n puede
set menor, dependiendo del entorno de filmaci6n.
640x480 (4:3) 9999 9999 9999 9999 9999
EL
1440x1080 (4:3) 8800 9999 9999 4300 8800
1920x1080 (16:9) 6700 9999 9999 3200 6700
2400x1344(16:9) * 4300 9999 9999 2100 4300 ._
• GZ-HM65O/GZ-HM67O/GZ-HM690
• Hasta 9999 imb.genes fijas pueden grabarse en tarjetas SD con capacidad minima de
32 GB (sin importar el tama_o de la imagen).
lh5m lh5m 2h 1h55m
1 h4Om 1 h35m 3h5m 2h55m
3h 2h55m 5h3Om 5h2Om
• Estos valores corresponden si "tLUMtNACtON" se ajusta en "OFF" y "BRILLO
PANTALLA" se ajusta en "3" (est_.ndar).
• El tiempo real de grabaci6n puede reducirse si se utiliza el zoom o se detiene la
grabaci6n en reiteradas oportunidades. (se recomienda tenet baterias disponibles
para 3 veces el tiempo estimado de grabaci6n).
Para obtener m&s informacion, consulte la Guia detallada del usuario
http://manual.jvc.co.jp/index.html/ 25
Page 58

• Cuando termina la vida Qtil de la bateria, el tiempo de grabacidn se reduce aunque las
baterias esten completamente cargadas. (reemplace las baterias).
Resolucidn de problemas
Si tiene problemas con esta unidad, corrobore Iosiguiente antes de solicitar servicio tecnico.
1 Consulte"Problema" m_.sabajo.
2 Consulte la secci6n "Resoluci6n de problemas" del "Guia detallada del usuario".
Si tiene dificultades para operar la unidad, consulte lasdescripciones detalladas del "Gufa
detallada del usuario".
• http://manual.jvc.co.jp/index.html/
3 Consulte las preguntas frecuentes de los nuevos productos en la p_.gina web de JVC.
• http://www.jvc.com/
4 Esta unidad es un dispositivo controlado por microordenador. La descarga electrost_.tica, el
ruido exterior y la interferencia (de un televisor, radio, etc.) pueden provocar que la unidad
no funcione correctamente.
En este case, reinicie la unidad.
Apague la unidad. (cierre el monitor LCD).
Retire el adaptador de CA y la bateria de esta unidad, col6quelos nuevamente, abra
el monitor LCD, y la unidad de encencerb, automaticamente.
5 Si Io mencionado anteriomente no resuelve el problema, p6ngase en contacto con su
distribuidor JVC o centre de servicios JVC m_.scercanos.
• Labateriase esta cargando. 8
• Compruebeel botSn_M/I_.
• Ajusteel mode degrabaci6npulsandoel bot6n
[] enla pantalla.
• Apagueestaunidad,espere unosinstantesy
enciendaIanuevamente.(esta unidadprotege
automaticamenteel circuito sila temperatura
aumenta).
• Lagrabaci6n sedetieneautom_.ticamentetras
12betas de grabaci6ncontinua.
• A veces lareproducciSnse interrumpecuando
se cambiade unaescenaaotra. Estonodebe
considerarseunmalfuncionamiento.
14
16
=
=
Para obtener ma.s informacion, consulte la Guia detallada del usuario
26 http://manual.jvc.co.jp/index.html/
Page 59

14
• CompruebeIacarga restantedeIabateria.(si la
bateriaya estatotalmentecargada, laluz no
parpadea).
• Si realizauna cargaen unentornocon 8
condicionesdetemperaturaeIevadaobaja,
asegQresedequela bateriase est_cargando
dentrodel rangodetemperaturaspermitido.(de
noser asi,es posibIequela carga sedetenga
paraproteger labateria).
_,.I • Estonodebe consderarse unma
funcionamiento.(latemperaturadeesta unidad
" [ puedesubirsi seutilizaduranteunlargotiempo).
Indicaciones de advertencia
• Apague estaunidady vuelvaaencenderla.
• Si Iomencionadom_.sarribano soIucionael
problema,realiceunacopiade seguridaddelos
archivosyejecute "FORMATEARMEMINT"o
"FORMATEARTARJETASD"enel ment3
"GENERAL"(ajustesbasicos).(seeliminar_.n
todos losdatos.)
Cuando sedetieneIagrabaci6nsecuencialcon
untiempodegrabaci6nmenora"0:00:00:17",no
se podr_,guardarel video.
Apague estaunidady vuelvaa encenderIa.
Retireel adaptadordeCA y Iabateriay luego
retirey vuelva aintroducirlatarjeta SD.
Limpielasuciedaddelosterminalesde latarjeta
SD.
Si Iomencionadom_.sarribano soIucionael
problema,realiceunacopiade seguridaddelos
archivosyejecute "FORMATEARMEMINT"o
"FORMATEARTARJETASD"enel ment3
"GENERAL"(ajustesbasicos).(seeliminar_.n
todos losdatos.)
Aparecedurante5segundosdespuesdequese
enciendala aiimentaci6nsilacubiertade lalente
esta colocadaocuandoest,. oscuro.
:o
:o
Para obtener mb,s informacion, consulte la Guia detallada del usuario
http://manual.jvc.co.jp/index.html/ 27
Page 60

Advertencias
Si utiliza el adaptador de CA en paises fuera de los EE,UU.
El adaptador de CA suministrado tiene una
funci6n de selecci6n automatica de tensi6n en la
escala de corriente alterna de 110 V a 240 V.
use DEL ENCHUFE ADAPTADOR DE CA
En case de conectar el cable de alimentaci6n
de la unidad a un tomacorriente de CA que no
sea de la serie American National Standard
C73, emplee un enchufe adaptador de CA,
denominado "Siemens Plug", come el mostrado.
Censulte con su distribuidor JVC m_,s cercano
para obtener este enchufe adaptador.
Enchufe adaptador
e Retire el adaptador de CA del enchufe de pared de
CA cuando no Io utilice.
® No deje polvo ni objetos de metal adheridos al
enchufe de pared de CA o al adaptador de CA
(alimentaci6n/enchufe de CC).
La bateria suministrada es Terminales
una bateria de iones de litio.
Antes de utilizar la bateria
suministrada o una baterfa opcional,
lea {asprecauciones siguientes:
® Para evitar riesgos
... no queme la bateria.
... no acorte el circuito de las terminales.
Mantener alejado de objetos meta.licos cuando
no se utilice. Cuando transporte la unidad,
coloque la bateria en una bolsa plb.stica.
... no modifique ni desmonte la bateria.
... no exponga la bateria a temperaturas superiores
a 60°C (140°F), puesto que la bateria podria
calentarse en exceso, explotar o incendiarse.
... utilice solamente los cargadores especificados.
® Para evitar da_os y prolongar la vida _til
... no la someta a sacudidas innecesarias.
... c#,rguela dentro del margen de temperatura
de 10°C a35°C (50°Fto 95°F). A temperaturas
mb,s bajas se requiere mas tiempo de carga,
y en algunos cases puede que incluso se detenga
la carga. A temperaturas mas altas puede resultar
imposible terminar la carga, yen algunos
cases puede que incluso se detenga.
... gub.rdela en lugar fresco y seco. La exposici6n
prolongada a temperaturas elevadas aumentarb, la
descarga natural y reducira el periodo de vida L_til.
... mantenga un 30 % del nivel de bateria ([_) si las baterias
no seran utilizadas per largo tiempo. Asimismo, carguelas
per complete y luego descarguelas per complete cada 2
meses; luego contint3e guardandolas con un nivel de
bateria de 30 % (C_).
... cuando no se utilice, se debe retirar del cargador
o dispositivo electrico, ya que algunas maquinas
utilizan corriente incluso estando apagadas.
... no deje caer ni exponga a fuertes impactos.
ATENC!ON:
La bateria que ha adquirido es
reciclable. Per favor comunicarse
al 1-800-8-BATTERY para
informaci6n sobre come reciclar
dicha bateria.
($61o para EE.UU. y Canadb.)
® Aseg_rese de seguir las siguientes pautas
para evitar corromper o daSar los dates
grabados.
® No doble ni tire el soporte de grabaci6n, ni
Io someta a una fuerte presi6n, sacudidas o
vibraciones.
® No salpique el soporte de grabaci6n con agua.
® No utilice, reemplace o almacene el soporte
de grabacion en lugares expuestos a una
fuerte electricidad estatica o a perturbaciones
electricas.
® No apague la alimentaci6n de la camara ni
retire la bateria o el adaptador de CA durante
la filmaci6n o la reproducci6n, o al acceder de
alg5n otto mode al soporte de grabaci6n.
® No acerque el soporte de grabaci6n
a objetos que tengan un fuerte campo
magnetico o que emitan fuertes ondas
electromagneticas.
® No aimacene el soporte de grabaci6n en
ubicaciones expuestas a altas
temperaturas o a un alto grade de humedad.
® No toque las partes metalicas.
® Cuando formatea o borra Josdates con Jacamara
s6Jo se cambia la informaci6n de administraci6n.
Los dates no se borran del soporte de grabaci6n
per complete. Si desea eliminar per complete
todos los dates, le recomendamos que utilice
algun software disponible comercialmente
diseSado para esta finalidad o que destruya
fisicamente la camara con un martfllo o
procedimiento similar.
® Para prevenir daSos a la pantalla LCD, NO
... presione con demasiada fuerza y evite los golpes.
... coloque la camara con la pantatla LCD hacia abajo.
® Para prolongar la vida util
... evite frotarla con un trapo baste.
Para obtener ma.s informacion, consulte la Guia detallada del usuario
28 http://manual.jvc.co.jp/index.html/
Page 61

® Pot seguridad, NO DEBE
... abrir el chasis de la ca.mara.
... desmontar o modificar el equipo.
... permitir que productos inflamables, agua u
objetos metalicos entren en el equipo.
... extraer la bateria ni desconectar el suministro
de energia con el aparato encendido.
... dejar la bateria colocada cuando la c_tmara no
se utilice.
... colocar sobre el aparato ninguna fuente de llama
sin protecci6n, tales como velas encendidas.
... exponer el equipo a goteos o salpicaduras.
... dejar que polvo u objetos metalicos se
adhieran al enchufe de alimentaci6n o al
tomacorriente de CA.
... insertar ningun objeto en la c_tmara.
® Evite utilizar este aparato
... en lugares sometidos a excesiva humedad o
demasiado polvo.
... en lugares con hollin o vapor, por ejemplo,
cerca de una cocina.
... en lugares sometidos a sacudidas o
vibraciones excesivas.
... cerca de un televisor.
... cerca de aparatos que generen campos
magneticos o electricos fuertes (altavoces,
antenas de emisi6n, etc.).
... en lugares sometidos a temperaturas
extremadamente altas (superiores a 40°C (104_'F)) o
extremadamente bajas 0nferiores a 0°C (32°F).
® NO deje el aparato
... en tugares donde la temperatura supera los 50°C. (122°F).
... en lugares con humedad extremadamente
baja (inferior a135%) o extremadamente alta
(superior a180%).
... bajo luz solar directa.
... en un coche cerrado en verano.
... cerca de una calefacci6n.
... en lugares elevados, como encima de un
televisor. La colocacion del aparato en un lugar
elevado mientras un cable est&. conectado
puede provocar averias si alguien tropieza con
el cable y el aparato cae al suelo.
® Para proteger el aparato, NO DEBE
... permitir que se moje.
... dejar caer el aparato ni golpearlo contra objetos duros.
... someterlo a sacudidas o vibraci6n excesiva
durante su transporte.
... mantener el objetivo dirigido hacia objetos
demasiado brillantes durante largos periodos.
... exponer el objetivo a la luz solar directa.
... balancearlo excesivamente cuando utilice la
correa de mano.
... balancear demasiado la bolsa de la c_tmara
con la c#,mara dentro.
... almacene la videoc_tmara en un lugar con
polvo o arena.
® Para evitar que la unidad se caiga:
® Ajuste bien la correa de mano.
® Si utiliza la c#,mara con un tripode, fije bien la
ca.mara en el tripode.
Si se le cae la c#,mara, puede herirse usted y
daSarse la ca.mara.
Si un niSo utiliza la unidad, un adulto deber_t guiarle.
Declaraci6n de conformidad
Nt_mero de modelo : GZ-HM690U/GZ-HM670U/
GZ-HM650U/GZ-HM45OU/GZ-HM440U
Nombre comercial : JVC
Parte responsable : JVC AMERICAS CORP.
Direcci6n : 1700 Valley Road Wayne, N. J. 07470
Nt_mero de telefono : 973-317-5000
Este dispositivo cumple con el Apartado 15 de la
reglamentaci6n FCC. La operacion ester sujeta alas
dos condiciones siguientes: (1) Este dispositivo no
debe causar interferencias perjudiciales y (2) este
dispositivo debe aceptar cualquier interferencia
recibida, incluyendo la interferencia que pueda
causar errores de funcionamiento.
LOScambios o modificaciones no aprobados por
JVC podrian anular la autoridad del usuario para
utilizar el equipo. Este equipo ha sido examinado
y cumple con los limites de dispositivos
digitales Clase B, segun el Apartado 15 de la
reglamentacion FCC.
Estos limites estan diseSados para suministrar
una protecci6n razonable contra interferencias
perjudiciales en una instalacion residenciaL
Este equipo genera, usa y puede irradiar
radiofrecuencia y si no se instala y emplea de
acuerdo con las instrucciones puede causar
interferencias perjudiciales a las comunicaciones
por radio. Sin embargo, no se garantiza que no
se produzcan interferencias en una instalacion
en particular. Si este equipo causa interferencias
perjudiciales a la recepcion de radio o televisi6n,
que pueden determinarse desconectando y
conectando la alimentacion del equipo, el usuario
puede intentar corregir la interferencia por medio
de una o mas de las siguientes medidas:
Reoriente o recoloque la antena de recepci6n.
Aumente la separacion entre el equipo y el
receptor. Conecte el equipo a un tomacorriente en
un circuito diferente al del receptor conectado.
Consulte con su distribuidor o con un tecnico
experimentado de radio/TV.
-EL
Para obtener m&s informacion, consulte la Guia detallada del usuario
http://manual.jvc.co.jp/index.html/ 29
Page 62

Especificaciones
¸ ad piad i bai i si 315
2,3W(si"BRILLOPANTALLA"se i2,4W (si"BRILLOPANTALLA"seajustaen"3"
ajustaen"3"(estandar)) (esta.ndar))
2,5W(si"BRILLOPANTALLA"se 2,6W (si"BRILLOPANTALLA"seajustaen"4"
ajustaen"4"(conmasbrillo)) (conmasbrillo))
Consumopromedio:1A iConsumopromedio:1A
51mmx 55mmx 111mm(2-1/8"x2-1/4"x4-3/8")(sinincluirlacorreade mano)
Aprox.195g(0,43Ibs)(sololacamara),
aprox.235g (0,52Ibs)(incluyendolabateriasuministrada)
Temperaturade funcionamiento)ermitida:0°Ca40°C(32°Fa104°F)
Temperaturade almacenamientopermitida:-20°Ca50°C(-4 °Fa122°F)
Humedaddefuncionamientorelativa:35%a80%
1/5,8"1.500.000pixeles(CMOS 1/4,1"3.320.000pixeles(CMOSprogresivo)
progresivo)
(UXP/XP/SP/EP) (UXP/XP/SP/EP)
630.000a1.050.000pixeles(AISON)1.220.000pixeles(AISON)
630.000a1.250.000pixeles(AtSOFF)1.440.000pixeles(AISOFF)
(SSW/SEW) (SSW/SEW)
340.000a1.050.000pixeles(zoom 390.000a 1220.000pixeles(zoomdin#.micoON
dinamicoON) il .220.000pixeles(zoomdin_.micoOFF)
630.000a1.050.000pixeles(zoom
dinamicoOFF)
(4:3)470.000a930.000pixeles (4:3)1.080.000pixeles
(16:9)630.000a 1.250.000pixeles(16:9)1.440.000pixeles
F1,8a 6,3,f=2,9mma116,0mm F1,8a6,3,f=2,9mma116,0mm
(UXP/XP/SP/EP) i(UXP/XP/SP/EP)
conversi6nde35mm:45,6mma conversi6nde35mm:45,0mma1.800mm(AISON)
1.824mm(AtSON) conversi6nde35mm:41,4mma1.656mm(AISOFF)
conversi6nde35mm:42,0mma (SSW/SEW)
1.680mm(AISOFF) conversi6nde35 ram:45,0mma3.150mm(zoom
(SSW/SEW) idin_.micoON)
conversi6nde35mm:45,6mma conversi6nde35mm:45,0mma1.800mm(zoom
3.182mm(zoomdin_.micoON) idin_.micoOFF)
conversi6nde35mm:45,6mma
t.824mm(zoomdin_.micoOFF)
Zoom6ptico:hasta40x
Zoomdina.mico:hasta70x(SSW/SEW)
Zoomdigital:hasta200x
Zoom6ptico:hasta40x
AVCHDestandar,Video:AVC/H.264,Audio:DolbyDigital(2ch)
JPEGest#.ndar
Para obtener ma.s informacion, consulte la Guia detallada del usuario
30 http://manual.jvc.co.jp/index.html/
Page 63

TarjetaSD/SDHC/SDXC(disponiblecomercialmente)
Ranuradoble Memoriaintegrada
8GB I 32 GB I 64GB
TarjetaEye-Fi(disponiblecomercialmente)
Bateriarecargable
CA110Va 240V,50 Hz/60Hz
CC5,2V, 1,0A
0°Ca40°C(32°Fa 104°F)
10°Ca35 °C(50°Fa95°F)durantelacarga)
66mmx28mmx 47mm(2-5/8"x 1-1/8"x 1-7/8")(Wx Hx D:sinincluirelcable
nienchufedeCA)
Aprox.71g(0,15Ibs)
* Si utiliza un adaptador de CA en el extranjero, utilice un enchufe adaptador
comercialmente disponible para el pais o regi6n en la que se encuentre.
[" sinLasespecificaci°nesyeiaspectodeestepr°ductoest_nsujetosacamb'°S]previoaviso
I Informacion de asistencia al cliente I
El uso de este software ester autorizado de acuerdo con las condiciones de la licencia de software.
JVC (para informaci6n sobre esta unidad)
Cuando se ponga en contacto con la oficina o agencia JVC mas cercana de su pais (consulte la Red de
servicios internacionales JVC en http://www.jvc-victor.cojp/english/worldmap/index-e.html) para hacer
consultas sobre este software, tenga a mano la siguiente informaci6n.
Nombre del producto, modelo, n£1mero de serie, problema, mensaje de error
Computadora (fabricante, modelo (sobremesa/port_ttil), CPU, sistema operativo, memoria (MB/GB),
espacio disponible en el disco duro (GB))
Tenga en cuenta que puede tardar un poco responder a sus preguntas segOn cual sea el asunto.
JVC no puede responder a preguntas relativas al funcionamiento b_tsico del PC o alas especificaciones
o el rendimiento del sistema operativo, otras aplicaciones o controladores.
Pixela (para informacion sobre el software proporcionado)
+1-800-458-4029
EE.UU. y Canada Ingles (linea gratuita)
Europa (Reino Unido, +800-1532-4865
Atemania, Francia y Espafia) Ingles/aleman/franc6s/espafiol (linea gratuita)
Otros paises de Europa Ingles/aleman/franc6s/espafiol +44-1489-564W64
Asia (Filipinas) Ingles +63-2_438_0090
China Chino t0800-163-00t4
(linea g ratuita)
Pagina principal: http://www.pixela.co.jp/oem/jvc/mediabrowser/e/
Consulte en nuestro sitio Web la informaci6n y las descargas m_ts recientes.
Para obtener m&s informacion, consulte la Guia detallada del usuario
http://manual.jvc.co.jp/index.html/ 31
Page 64

Diferencias del modelo
GZ-HM440
GZ-HM450
GZ-HM650
GZ-HM670
GZ-HM690
indice
SD doble
SDXC/SDHC/Memoria integrada (8 GB)
SDXC/SDHC/Memoria integrada (8 GB)
SDXC/SDHC/Memoria integrada (32 GB)
SDXC/SDHC/Memoria integrada (64 GB)
No 1/5,8" 1,50 M CMOS
No 1/5,8" 1,50 M CMOS
Sf 1/4,1" 3,32 M BSI CMOS
Sf 1/4,1" 3,32 M BSl CMOS
Sf 1/4,1" 3,32 M BSI CMOS
B
C
E
F
Adaptador de CA ........................ 8, 28
Ajuste de la fechaihora ................... 12
Ajuste del idioma ............................ 13
Apple .............................................. 22
Bateria ........................................ 8, 28
Cable USB ..................................... 23
Conexi6n AV ............................ 18, 20
Conexi6n componente ................... 17
Conexi6n HDMI .............................. 17
Configuraci6n del reloj ................... 12
Copia (copia de seguridad) ............ 19
Copia (duplicado) ........................... 20
Eliminaci6n de archivos ................. 16
Formato tarjeta SD ......................... 11
I Instalaci6n ...................................... 22
M Mac ................................................ 22
Monitor LCD ................................... 28
N Numero de imagenes ..................... 25
S Software ......................................... 21
T TarjetaSD ........................................ 9
Tiempo de grabaci6n ..................... 25
V Visualizaci6n de archivos en un
televisor .......................................... 17
W Windows ........................................ 21
Z Zoom .............................................. 14
© 2011 Victor Company of Japan, Limited [_ 0311MZR-SW-WM
 Loading...