

Page 1
CAMCORDER
GZ-HD620 B
GZ-HD500 B
Basic User Guide
Dear Customers
Thank you for purchasing this JVC product.
Before use, please read the Safety Precautions and Cautions on P.2 and P.24 to ensure safe
use of this product.
Some features explained in this manual only apply to the specific camera model identified.
This product comes with a “Basic User Guide” (this manual) and a “Detailed User Guide”.
Detailed User Guide
Explains the ways of shooting in various situations and the
useful features.
Getting StartedRecordingPlaybackCopyingOthers
Access the following website on your PC
.
■
http://manual.jvc.co.jp/index.html/
Page 2

Safety Precautions
When the equipment is installed in a cabinet or on
a shelf, make sure that it has sufficient space on
all sides to allow for ventilation (10 cm or more on
both sides, on top and at the rear).
Do not block the ventilation holes.
(If the ventilation holes are blocked by a
newspaper, or cloth etc. the heat may not be able
to get out.)
No naked flame sources, such as lighted candles,
should be placed on the apparatus.
When discarding batteries, environmental
problems must be considered and the local rules
or laws governing the disposal of these batteries
must be followed strictly.
The apparatus shall not be exposed to dripping
or splashing.
Do not use this equipment in a bathroom or
places with water.
Also do not place any containers filled with water
or liquids (such as cosmetics or medicines, flower
vases, potted plants, cups etc.) on top of this unit.
(If water or liquid is allowed to enter this
equipment, fire or electric shock may be caused.)
NOTES:
•
The rating plate and safety caution are on the
bottom and/or the back of the main unit.
•
The serial number plate is on the battery pack
mount.
•
The rating information and safety caution of the
AC adapter are on its upper and lower sides.
WARNING: TO PREVENT FIRE OR SHOCK
HAZARD, DO NOT EXPOSE THIS UNIT TO
RAIN OR MOISTURE.
CAUTIONS:
•
If you notice smoke or a peculiar smell coming
from this unit or AC Adapter, shut it down and
unplug it immediately. Continue using the unit or
AC Adapter under these conditions could lead to
fire or electric shock. Contact your JVC dealer.
Do not attempt to repair the malfunction yourself.
•
To prevent shock, do not open the cabinet. No
user serviceable parts inside. Refer servicing to
qualified personnel.
•
When you are not using the AC adapter for a
long period of time, it is recommended that you
disconnect the power cord from AC outlet.
•
In certain areas, use the conversion plug
depending on the type of your AC wall outlet.
Caution on Replaceable lithium battery
The battery used in this device may present a fire
or chemical burn hazard if mistreated.
Do not recharge, disassemble, heat above 100°C
or incinerate.
Replace battery with Panasonic, Sanyo, Sony or
Maxell CR2025.
Danger of explosion or Risk of fire if the battery is
incorrectly replaced.
•
Dispose of used battery promptly.
•
Keep away from children.
•
Do not disassemble and do not dispose of in fire.
WARNING:
The battery pack, this unit with battery installed,
and the remote control with battery installed
should not be exposed to excessive heat such as
direct sunlight, fire or the like.
CAUTION:
To avoid electric shock
or damage to the
unit, first firmly insert
the small end of the
power cord into the
AC Adapter until it is
no longer wobbly, and
then plug the larger
end of the power cord into an AC outlet.
CAUTION:
The mains plug shall remain readily operable.
•
Remove the mains plug immediately if this unit
functions abnormally.
.
For more information, refer to the Detailed User Guide
2
http://manual.jvc.co.jp/index.html/
.
Page 3
Do not point the lens directly into the sun. This
can cause eye injuries, as well as lead to the
malfunctioning of internal circuitry. There is also a
risk of fire or electric shock.
CAUTION!
The following notes concern possible physical
damage to this unit and to the user.
Carrying or holding this unit by the LCD monitor
can result in dropping the unit, or in a malfunction.
Do not use a tripod on unsteady or unlevel
surfaces. It could tip over, causing serious damage
to the unit.
CAUTION!
Connecting cables (Audio/Video, S-Video, etc.)
to this unit and leaving it on top of the TV is not
recommended, as tripping on the cables will cause
the unit to fall, resulting in damage.
If this symbol is shown, it is only valid
in the European Union.
Remember that this unit is intended for
private consumer use only.
Any commercial use without proper permission
is prohibited. (Even if you record an event such
as a show, performance or exhibition for personal
enjoyment, it is strongly recommended that you
obtain permission beforehand.)
Trademarks
•
AVCHD and AVCHD logotype are trademarks
of Panasonic Corporation and Sony Corporation.
•
x.v.Colour™ is a trademark of
Sony Corporation.
•
HDMI is a trademark of HDMI
Licensing, LLC.
•
Manufactured under license from Dolby
Laboratories. Dolby and the double-D symbol
are trademarks of Dolby Laboratories.
•
Windows® is either registered trademark or
trademark of Microsoft Corporation in the
United States and/or other countries.
•
Macintosh is a registered trademark of Apple Inc.
•
iTunes, iMovie, iPhoto are trademarks of Apple
Inc., registered in the U.S. and other countries.
•
YouTube™ and the YouTube logo are
trademarks and/or registered trademarks of
YouTube LLC.
•
Other product and company names included in
this instruction manual are trademarks and/or
registered trademarks of their respective holders.
•
Fire or injury may result if batteries NOT
approved by JVC are used.
Only use the batteries specified on page 19.
•
Please do not pull or bend the AC adapter plug
and cable. This may damage the AC adapter.
CAUTION:
JVC will not be responsible for any lost data. It is
recommended to copy your important recorded
data to a disc or other recording media for storage.
Make a backup of important recorded data
.
For more information, refer to the Detailed User Guide
http://manual.jvc.co.jp/index.html/
3
Page 4
Contents
Safety Precautions .............................. 2
Contents .............................................. 4
Verifying the Accessories .................... 4
Names of Parts and Functions ............ 5
▶Getting Started .......................... 6
Charging the Battery Pack .................. 6
Grip Adjustment .................................. 7
Attaching the Lens Cap (GZ-HD500)
............................................................. 7
Clock Setting ....................................... 8
▶Recording ................................ 10
Video Recording ................................ 10
Still Image Recording ........................ 11
Recording on a microSD card ........... 12
▶Learning About Advanced Operations
Use the “Detailed User Guide” on your PC to find out more about the advanced
operations.
Access the following address on your PC
■
http://manual.jvc.co.jp/index.html/
▶Playback .................................. 14
Playing Back/Deleting Files on this Unit
........................................................... 14
Playing Back on TV ........................... 15
▶Copying ................................... 17
Dubbing Files by Connecting to a DVD
Recorder or VCR ............................... 17
▶Others ..................................... 18
Using the Menu ................................. 18
Recordable Time/Number of Images
........................................................... 19
Troubleshooting ................................ 20
Cautions ............................................ 24
Specifications .................................... 26
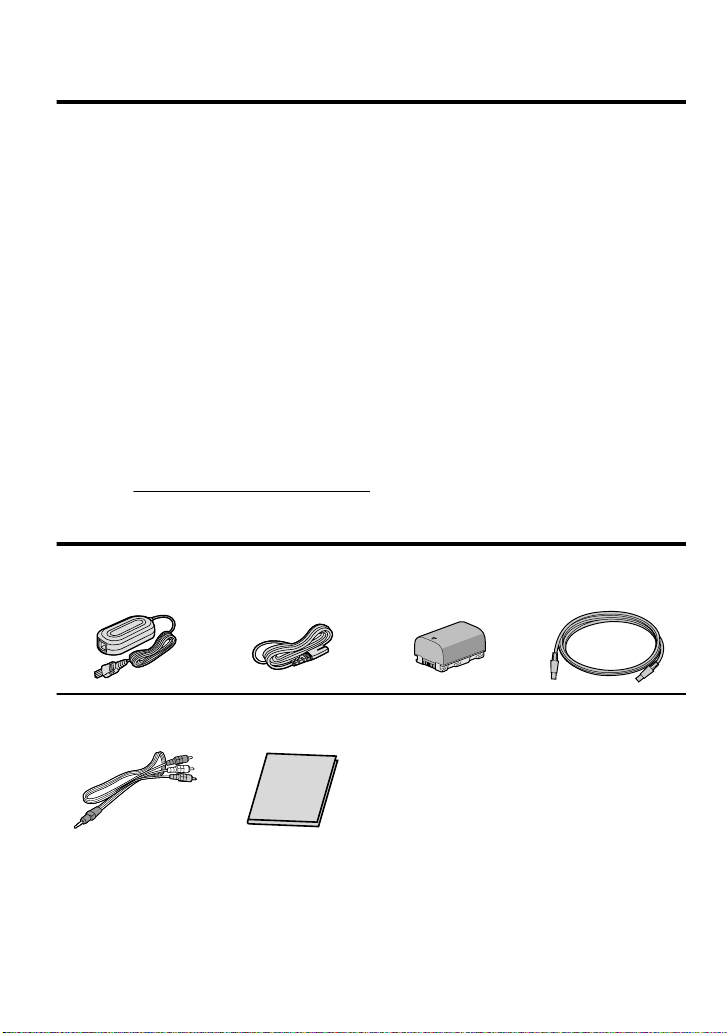
Verifying the Accessories
AC Adapter
AP-V30M *¹
.
AV Cable
.
●
microSD cards are sold separately.
For details on the types of cards that can be used on this unit, refer to P.12.
When using the AC adapter overseas, please prepare a commercially available
*1
converter plug for the country or region of visit.
To use the CD-ROM, refer to the “Installing the Provided Software” section in the
*2
“Detailed User Guide”.
*3 Supplied for GZ-HD620 only.
For more information, refer to the Detailed User Guide
4
http://manual.jvc.co.jp/index.html/
Power Cord *¹
.
Basic User Guide
(this manual)
.
Battery Pack
BN-VG114E
.
●
CD-ROM *²
●
Remote Control *³
RM-V760
●
Lithium Battery *³
(Pre-installed in the remote control)
●
Component Cable *³
●
Lens Cap
(GZ-HD500)
(Type A - Mini Type B)
.
USB Cable
Page 5

Names of Parts and Functions
AV
s
r
t
1
2
3
5
6
7 89
ji
a bc
f
4
e
d
h
g
m
o
n
l
k
q
p
0
.
Playback
M (Power/Information) Button
Q
Recording:Displays the remaining
Playback:Displays file information.
Press and hold to turn the power on/off
while the LCD monitor is opened.
AV Terminal ( P.15, P.17)
R
COMPONENT (Component)
S
Connector ( P.15)
HDMI Mini Connector ( P.15)
T
Zoom/Volume Lever ( P.10, P.14)
U
SNAPSHOT (Still Image Recording)
V
Button ( P.11)
USB Terminal
W
DC Terminal ( P.6)
X
START/STOP (Video Recording)
Y
Button ( P.10)
Grip Belt Release Lever
Z
Grip Belt ( P.7)
a
Tripod Mounting Hole
b
microSD Card Slot ( P.12)
c
Battery Release Lever ( P.6)
d
* For GZ-HD620 only.
http://manual.jvc.co.jp/index.html/
Lens/Lens Cover *
A
Light *
B
Remote Sensor *
C
Stereo Microphone
D
LCD Monitor
E
Turns the power on/off by opening and
closing.
Slider
F
Selects an image or item.
C Button
G
Confirms the selected image or item.
Operation Buttons
H
Functions differently according to the
operation.
D (menu) Button ( P.18)
I
Camera Sensor
J
Speaker
K
ACCESS (Access) Lamp
L
Lights up/blinks during recording or
playback.
POWER/CHARGE (Power/Charge)
M
Lamp ( P.6)
L (Play/Record Mode) Button
N
Switches between recording and
playback modes.
A/B (Video/Still Image) Button
O
Switches between video and still
image modes.
UPLOAD/EXPORT* (Upload/Export to
P
iTunes*) Button
Recording:Takes videos in
YouTubeä or iTunes*
format.
For more information, refer to the Detailed User Guide
Changes the video to
:
YouTubeä or iTunes*
format.
time as well as the
battery power during
continuous recording.
5
Page 6
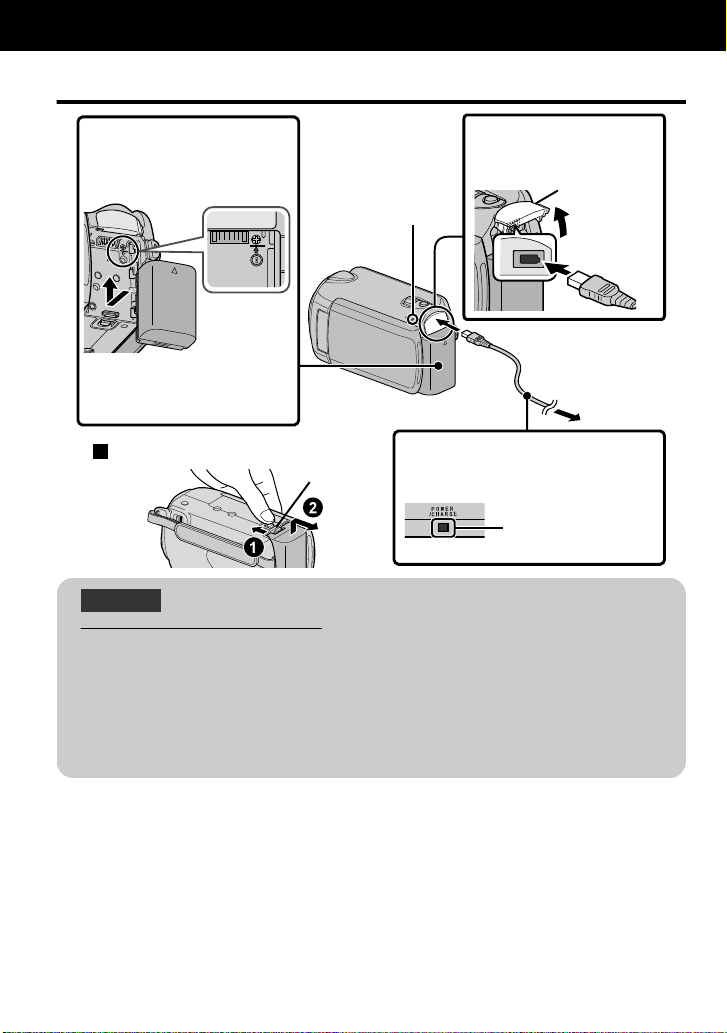
BATT.
2
Connect the DC
terminal.
To detach the battery pack
Charging Lamp
1
Attach the battery pack.
The battery pack is not
charged at the time of
purchase.
*
Align the top of the battery
with the mark on this unit,
and slide in until the battery
clicks into place.
•
(Base)
Cover
3
Plug in the power.
Charging in progress:
Charging finished:
Blinks
Goes out
AC Adapter
To AC Outlet
(110V to 240V)
Charging Lamp
Getting Started
Charging the Battery Pack
.
CAUTION
Be sure to use JVC battery packs.
●
If you use any other battery packs besides JVC battery packs, safety and
performance cannot be guaranteed.
●
Charging time: Approx. 2 h 30 m (using supplied battery pack)
* The charging time is when the unit is used at 25°C. If the battery pack is
charged outside the room temperature range of 10°C - 35°C, charging may
take a longer time or it may not start. The recordable and playable time may
also be shortened under some usage conditions such as at low temperature.
For more information, refer to the Detailed User Guide
6
http://manual.jvc.co.jp/index.html/
Page 7
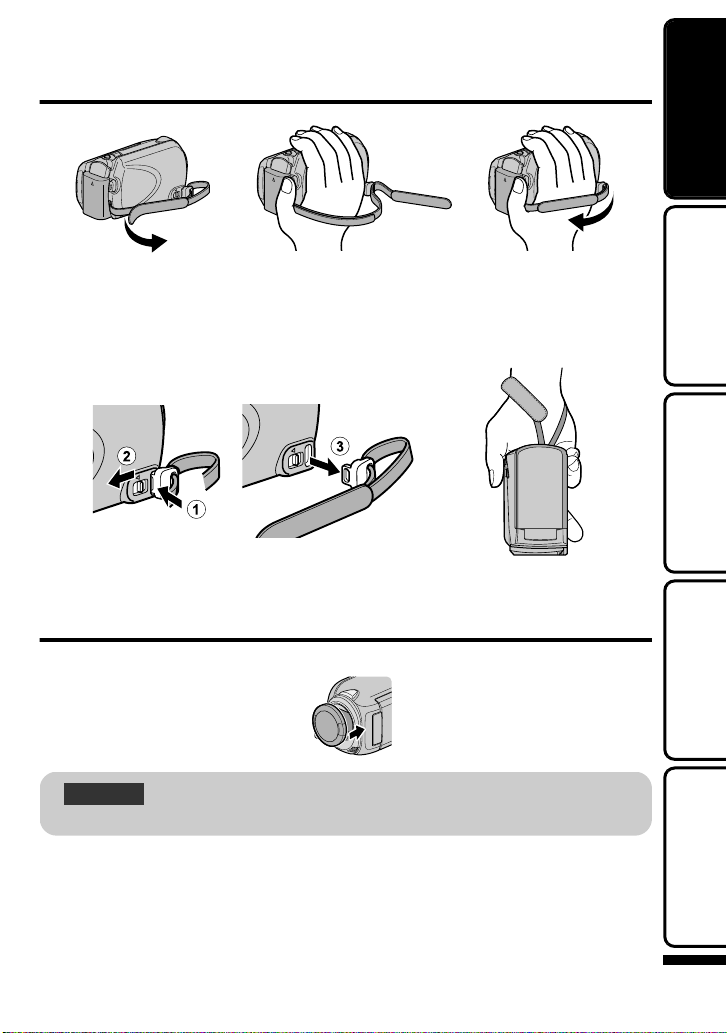
Grip Adjustment
2
Adjust the length
1
Pull back the belt
3
Attach the belt
Press and hold
.
Using as a Hand Strap
Remove the strap and loop it around your wrist.
While pressing A, pull B and remove the strap.
.
●
When attaching the hand strap, insert C until it clicks into place.
Attaching the Lens Cap (GZ-HD500)
Damage may occur to the lens if this unit is stored without the lens cap attached.
Getting StartedRecordingPlaybackCopyingOthers
CAUTION
●
Please be careful not to lose the lens cap.
.
For more information, refer to the Detailed User Guide
http://manual.jvc.co.jp/index.html/
7
Page 8

Clock Setting
AV
SET DATE/TIME!
YES
NO
SET
Select
②
Touch
1
Touch2
Slider
Operation Buttons
10 0020101
1
CLOCK SETTING
DATE TIME
SET QUIT
Cursor
GMT
1. 1. 2010 10:00
CLOCK/AREA SETTING
SAVE QUIT
Open the LCD monitor.
1
.
●
The unit turns on. When the LCD
monitor is closed, the unit turns off.
Select “YES” and touch C when
2
“SET DATE/TIME!” is displayed.
.
●
Slide along the slider to select, then
touch the operation buttons to set.
Set the date and time.
3
After setting the date and time,
4
touch C.
Select the region where you live
5
and touch C.
●
The city name and time difference is
displayed.
.
NOTE
●
Touch the slider and buttons
around the screen with your
fingers.
●
The slider and buttons do not
function if you touch them with
your fingernails or with gloves on.
●
The displays on the screen do not
work even if you touch them.
●
“SET DATE/TIME!” is displayed
when you turn on this unit after it
has not been used for a
prolonged period. Charge this unit
for more than 24 hours before
setting the clock. ( P.6)
.
●
Use the slider to adjust the year,
month, day, hour and minute.
●
Touch the operation buttons “E” / “F”
to move the cursor.
8
For more information, refer to the Detailed User Guide
http://manual.jvc.co.jp/index.html/
Page 9
To reset the clock
To u ch
?
VIDEO
DISPLAY SETTINGS
CLOCK ADJUST
BASIC SETTINGS
CONNECTION SETTINGS
MEDIA SETTINGS
SET
QUIT
?
CLOCK ADJUST
CLOCK SETTING
AREA SETTING
SET FOR DAYLIGHT SAVING TIME
SET QUIT
To u ch
?
VIDEO
DISPLAY SETTINGS
CLOCK ADJUST
BASIC SETTINGS
CONNECTION SETTINGS
SET
QUIT
9+0&%76
?
DISPLAY SETTINGS
LANGUAGE
DATE DISPLAY STYLE
MONITOR BRIGHTNESS
LCD BACKLIGHT
FOCUS ASSIST COLOR
SET QUIT
■
Set the clock with “CLOCK ADJUST”
from the menu.
① Display the menu.
To change the display
■
language
The language on the display can be
changed.
① Display the menu.
Getting StartedRecordingPlaybackCopyingOthers
.
② Select “CLOCK ADJUST” and
touch C.
.
③ Select “CLOCK SETTING” and
touch C.
.
●
The subsequent setting operations
are the same as steps 3 - 5 on the
previous page.
.
② Select “DISPLAY SETTINGS”
and touch C.
.
③ Select “LANGUAGE” and touch
C.
.
④ Select the desired language and
touch C.
⑤
Touch D to exit.
For more information, refer to the Detailed User Guide
http://manual.jvc.co.jp/index.html/
9
Page 10

A
V
Press
Press
Touch
20x
2
Select video
mode.
1
Open the
LCD monitor.
3
Check if the recording mode is
Auto.
If the mode is Manual, touch
the button to switch.
The mode changes between auto
and manual with every touch.
•
•
4
Start recording.
Press again to stop.•
(Wide angle) (Telephoto)
Zooming
For
GZ-HD500,
remove the
lens cap.
•
Remaining Recording Time
Video Quality
: Record-Standby
Scene Counter
Battery Indicator
: Recording in Progress
Recording Media
: SD Card
: Hard-Disk
Recording
Video Recording
You can record without worrying about the setting details by using the auto mode.
Before recording an important scene, it is recommended to conduct a trial
recording.
.
Indications during video recording
■
.
●
The estimated recording time of the supplied battery pack is approximately 45
minutes. ( P.19)
For more information, refer to the Detailed User Guide
10
http://manual.jvc.co.jp/index.html/
NOTE
Page 11

Reducing Camera Shake (Video Recording)
Touch
(White): Image stabilizer
(Green): Image stabilizer
(White): OFF
The setting switches with every touch.
A
V
Press halfway
Press fully
Press
Lights up during still
image recording
1
Select still image
mode.
3
Take a still image.
2
Set the focus on the subject.
Lights up in green
when focused
1920
: SD Card
: Hard-Disk
Remaining Number of Shots
Image Quality
Recording in Progress
Shutter Speed
Focus
Battery Indicator
Image Size
Recording Media
When the image stabilizer is set, camera shake during recording can be effectively
reduced.
.
A
:Reduces camera shake under normal shooting conditions.
B
:More effectively reduces camera shake during wide angle shooting. It is also
more effective for recording while walking.
NOTE
●
It is recommended to set the image stabilizer to off when shooting a subject
of little movement with the unit on a tripod.
●
Complete stabilization may not be possible if camera shake is excessive.
Still Image Recording
Getting StartedRecordingPlaybackCopyingOthers
.
Indications during still image recording
■
.
For more information, refer to the Detailed User Guide
http://manual.jvc.co.jp/index.html/
11
Page 12

Recording on a microSD card
A
V
Press and hold
1
Press the Power button for more than
2 seconds to turn off this unit.
3
Insert a microSD card.
2
Open the cover.
(Base)
Turn off the power of this unit before
inserting or removing a card.
*
AV
(Base)
When a commercially available microSD card is inserted, recordings can be made to the
card.
* To record to the microSD card it is necessary to adjust the media settings. ( P.13)
When no card is available, set media settings to “HDD” for recording.
.
To remove the microSD card
■
Push the card inward once, then pull it out straight.
.
NOTE
Operations are confirmed on the following microSD cards.
Manufacturer Panasonic, TOSHIBA, SanDisk, ATP
Video Class 4 or higher compatible microSDHC card (4 GB to
Still Image microSD card (256 MB to 2 GB),
●
Using microSD or microSDHC cards other than those specified above may
result in recording failure or data loss.
For more information, refer to the Detailed User Guide
12
http://manual.jvc.co.jp/index.html/
8 GB)
microSDHC card (4 GB to 8 GB)
Page 13

To use a microSD card
To u ch
?
VIDEO
DISPLAY SETTINGS
CLOCK ADJUST
BASIC SETTINGS
CONNECTION SETTINGS
MEDIA SETTINGS
SET QUIT
?
MEDIA SETTINGS
REC MEDIA FOR VIDEO
REC MEDIA FOR IMAGE
FORMAT HDD
FORMAT SD CARD
DELETE DATA ON HDD
SET QUIT
MEDIA SETTINGS
SD
SET QUIT
HDD
?
?
MEDIA SETTINGS
REC MEDIA FOR VIDEO
REC MEDIA FOR IMAGE
FORMAT HDD
FORMAT SD CARD
DELETE DATA ON HDD
SET
QUIT
?
FORMAT SD CARD
FILE
FILE + MANAGEMENT NO
SET QUIT
■
Recording and playback can be
performed on a card when “REC
MEDIA FOR VIDEO” or “REC MEDIA
FOR IMAGE” of media settings is set
to “SD”.
① Display the menu.
.
② Select “MEDIA SETTINGS” and
touch C.
To use microSD cards that
■
have been used on other
devices
Format (initialize) the card using
“FORMAT SD CARD” from media
settings.
All data on the card will be deleted
when it is formatted. Copy all files
on the card to a PC before
formatting.
①
Touch D to display the menu.
② Select “MEDIA SETTINGS” with
the slider and touch C.
③ Select “FORMAT SD CARD”
and touch C.
Getting StartedRecordingPlaybackCopyingOthers
.
③ Select “REC MEDIA FOR
VIDEO” or “REC MEDIA FOR
IMAGE”, and touch C.
.
④
Select “SD” and touch C.
.
.
④
Select “FILE” and touch C.
.
⑤
Select “YES” and touch C.
⑥
After formatting, touch C.
For more information, refer to the Detailed User Guide
http://manual.jvc.co.jp/index.html/
13
Page 14

A
V
NOV.01.2009 04:55PM NOV.01.2009 04:55PM01.01.2010 16:55
01.01.2010 16:55
VIDEO PLAYBACK VIDEO PLAYBACK
1
2
1
2
Select
Touch
Select
Touch
Press
Press
3
Play back a file.
1
Select the playback mode.
Volume adjustment
during video playback
Turn up
the volume
Turn down
the volume
2
Select video or still image mode.
To delete unwanted files
■
Touch
to stop.•
Select
“YES” when the confirmation
message appears and touch
.
•
Media being
played back
Playback
Playing Back/Deleting Files on this Unit
Select and play back the recorded videos or still images from an index screen (thumbnail
display). The contents of the media selected in media settings ( P.13) are displayed on
the index screen.
.
To capture a still image during playback
■
Pause the playback and press the SNAPSHOT button.
Usable operation buttons during playback
■
Display
d / e
f
g
h
i
j
k
l
For more information, refer to the Detailed User Guide
14
http://manual.jvc.co.jp/index.html/
During video playback During still image playback
Playback/pause Start/pause slideshow
Stop (returns to thumbnail display) Stop (returns to thumbnail display)
Advances to the next video Advances to the next still image
Returns to the beginning of the scene
Forward search -
Reverse search -
Forward slow-motion -
Reverse slow-motion -
Returns to the previous still image
Page 15

Playing Back on TV
AV
TV
HDMI Terminal Input
To (HDMI mini)
Terminal
HDMI Cable (Optional)
AV
AV
Y
CB/PB
CR/PR
Green
Blue
Red
Component Video Input
Video Input
To COMPONENT
Terminal
TV
Video Input
Audio Input (L)
Audio Input (R)
White
*
Yellow
Red
To AV Terminal
AV Cable
(Provided)
Component Cable **
(Provided for
GZ-HD620 only)
*
Do not connect the
yellow plug when
using component cable.
COMPONENT
Connect to a TV.
1
Refer also to the instruction manual of the TV.
** The component cable recommended is QAM1266-001.
●
Press the Power button (M) for more than 2 seconds to turn off this unit.
To connect using the HDMI mini connector
If you are using an HDTV, you can play back in HD quality by connecting to the
HDMI terminal.
.
To connect using the COMPONENT/AV connector
If you are using an HDTV, you can play back in HD quality by connecting to the
COMPONENT terminal.
Getting StartedRecordingPlaybackCopyingOthers
.
For more information, refer to the Detailed User Guide
http://manual.jvc.co.jp/index.html/
15
Page 16

Connect the AC adapter. ( P.6)
2
●
This unit powers on automatically when the AC adapter is connected.
Select the TV input switch.
3
Play back a file. ( P.14)
4
To play back with date/time display
■
Set “DISPLAY ON TV” in the connection settings menu to “ON”.
Set “ON-SCREEN DISPLAY” in the playback menu to “DISPLAY DATE ONLY”.
When images look unnatural on the TV
■
●
Images do not appear on the TV
properly.
The color of images looks
strange.
Disconnect the cable and connect again.
●
Restart this unit by turning off and on.
●
When the video was recorded with “x.v.Color” set
to “ON”, set the x.v.Colour setting of the TV to on.
●
Adjust the TV's screen accordingly.
NOTE
●
Please contact the TV manufacturer on questions or problems with setting the
TV to the correct mode.
●
We recommend using the Category 2 HDMI cable (High Speed cable) for
viewing in higher picture quality.
For more information, refer to the Detailed User Guide
16
http://manual.jvc.co.jp/index.html/
Page 17

AV
AV
To DC Terminal
VCR/DVD Recorder
Video Input
Audio Input (L)
Audio Input (R)
Video Input
To AV Terminal
AV Cable
(Provided)
Yellow
White
Red
AC Adapter
To AC Outlet
(110V to 240 V)
AV
Press
Copying
Dubbing Files by Connecting to a DVD Recorder or VCR
You can dub videos in standard quality by connecting to a DVD recorder or VCR.
Refer also to the instruction manual of the TV, DVD recorder, VCR, etc.
Connect to a VCR/DVD recorder.
1
●
Press the Power button (M) for more than 2 seconds to turn off this unit.
.
●
This unit powers on automatically when the AC adapter is connected.
Select the playback mode.
2
●
Turn on this unit.
Getting StartedRecordingPlaybackCopyingOthers
.
Prepare to record.
3
Preparation on TV and VCR/DVD recorder
●
Switch to a compatible external input.
●
Insert compatible blank DVD or VHS to dub.
Preparation on this unit
●
Set “VIDEO OUTPUT” in the connection
settings menu to the aspect ratio (“4:3” or “16:9”) of the connecting TV.
●
To include the date during dubbing, set “DISPLAY ON TV” in the “CONNECTION
SETTINGS” menu to “ON”. Set “ON-SCREEN DISPLAY” in the playback menu to
“DISPLAY DATE ONLY”.
Start recording.
4
●
Start playback on this unit ( P.14) and press the record button on the recorder.
●
After playback is complete, stop the recording.
For more information, refer to the Detailed User Guide
http://manual.jvc.co.jp/index.html/
17
Page 18

To u ch
?
VIDEO
REGISTER EVENT
VIDEO QUALITY
ZOOM
GAIN UP
TIME-LAPSE RECORDING
SET QUIT
?
VIDEO
OFF
AGC
AUTO
SET QUIT
Customer Support Information
Use of this software is authorized according to the terms of the software license.
JVC (for inquires regarding this unit)
When contacting the nearest JVC office or agency in your country (refer to the JVC Worldwide Service
Network at http://www.jvc-victor.co.jp/english/worldmap/index-e.html) about this software, please have the
following information ready.
• Product Name, Model, Serial Number, Problem, Error Message
• PC (Manufacturer, Model (Desktop/Laptop), CPU, OS, Memory (MB/GB), Available Hard Disk Space (GB))
Please note that it may take some time to respond to your questions, depending on their subject matter.
JVC cannot answer questions regarding basic operation of your PC, or questions regarding specifications
or performance of the OS, other applications or drivers.
Pixela (for inquires regarding the provided software)
Region Language Phone #
USA and Canada English +1-800-458-4029 (toll-free)
Europe (UK, Germany, France,
and Spain)
English/German/French/Spanish +800-1532-4865 (toll-free)
Other Countries in Europe English/German/French/Spanish +44-1489-564-764
Asia (Philippines) English +63-2-438-0090
China Chinese 10800-163-0014 (toll-free)
Homepage: http://www.pixela.co.jp/oem/jvc/mediabrowser/e/
Please check our website for latest information and downloading.
Others
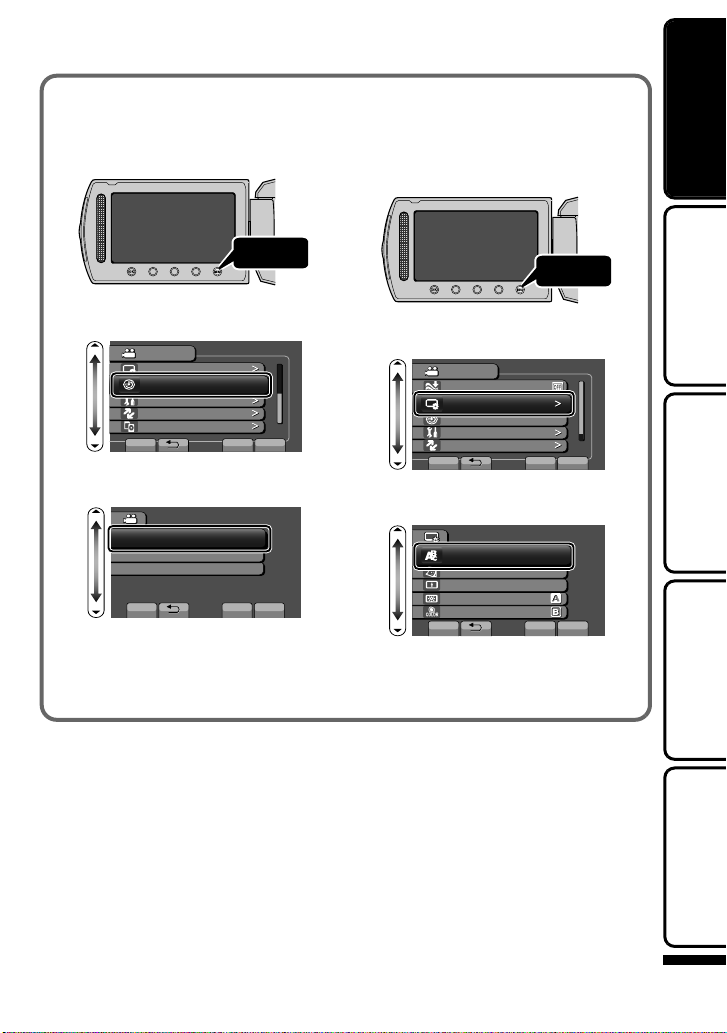
Using the Menu
You can configure various settings using
the menu.
Display the menu.
1
Select the desired setting and
3
touch C.
.
●
The menu differs according to the
mode in use.
Select the desired menu and touch
2
C.
.
To exit the screen
■
Touch D (quit).
To return to the previous screen
■
Touch “J”.
To display the help file
■
Touch “K”.
●
For more information on the
.
settings, refer to the Detailed User
Guide.
.
.
For more information, refer to the Detailed User Guide
18
http://manual.jvc.co.jp/index.html/
Page 19

Recordable Time/Number of Images
You can check the video recording time by pressing the M (Power/Information) button.
Approximate Video Recording Time
Quality
UXP 11 h 7 h 20 m 22 m 44 m
XP 15 h 10 h 31 m 1 h 3 m
SP 21 h 14 h 44 m 1 h 29 m
EP 50 h 33 h 1 h 51 m 3 h 43 m
●
The approximate recording time is only a guide. The actual recording time may
shorten depending on the shooting environment.
Approximate Number of Still Images (Unit: Number of Shots)
Image size / Quality
1920 × 1080 / FINE 260 510 1030 2100 4200 8420
16:9
1920 × 1080 / STANDARD
1440 × 1080 / FINE 350 680 1360 2770 5540 9999
1440 × 1080 / STANDARD
4:3
640 × 480 / FINE 1710 3330 6680 9999 9999 9999
640 × 480 / STANDARD 3090 5990 9999 9999 9999 9999
●
Up to 9999 still images may be recorded on the HDD (regardless of image size
and quality).
Approximate Recording Time (Using Battery)
Battery Pack
BN-VG114E 2 h 30 m 45 m 1 h 20 m
BN-VG121E 3 h 30 m 1 h 10 m 2 h 5 m
●
The above are values when “LIGHT” is set to “OFF” and “LCD BACKLIGHT” is set
to “STANDARD”.
●
The actual recording time may be shorter if zooming is used or if recording is
stopped repeatedly. (It is recommended to prepare battery packs ready for three
times the expected recording time.)
●
When the battery life is reached, the recording time becomes shorter even if the
battery pack is fully charged. (Replace the battery pack with a new one.)
GZ-HD620 GZ-HD500 4 GB 8 GB
HDD microSDHC Card
microSD Card
256 MB 512 MB
410 810 1620 3210 6410 9999
550 1070 2150 4360 8700 9999
Approximate
Charging Time
1 GB 2 GB 4 GB 8 GB
Actual Recording
Time
microSDHC
Card
Continuous
Recording Time
Getting StartedRecordingPlaybackCopyingOthers
For more information, refer to the Detailed User Guide
http://manual.jvc.co.jp/index.html/
19
Page 20

Troubleshooting
Before requesting service, consult the following chart or the “Troubleshooting” section in
the Detailed User Guide.
If the solutions indicated in the chart do not solve the problem, consult your nearest JVC
dealer or JVC service center for instructions. Refer also to the FAQ of new products on
JVC’s website.
Refer also to the Q&A information of new products on JVC’s website (http://
www.jvc.com).
This unit is a microcomputer-controlled device. Electrostatic discharge, external noise
and interference (from a TV, a radio, etc.) might prevent it from functioning properly. In
such a case, reset this unit.
Reset this unit when it does not function properly or when “...
■
Error” appears on the screen.
① Turn off the power. (Close the LCD monitor.)
② Remove the AC adapter and battery pack from this unit, reattach them, and
turn on the power again.
Troubleshooting
Trouble Action Page
Power
POWER/CHARGE lamp
starts blinking when the
monitor is closed.
Recording/snapshot
cannot be performed.
●
The battery pack is being charged.
●
Check the A / B mode.
●
Set to the recording mode with the L
button.
6
5
14
●
Turn off this unit, wait for a while, and
Recording
Recording stops by itself.
For more information, refer to the Detailed User Guide
20
http://manual.jvc.co.jp/index.html/
turn it on again. (This unit stops
automatically to protect the HDD when
the temperature rises.)
●
Move this unit away from loud or shaky
places.
●
Insert a commercially available
microSD card, and set “REC MEDIA
FOR VIDEO” and “REC MEDIA FOR
IMAGE” in the media settings menu to
“SD”. (There may be a malfunction
with the HDD.)
●
Recording stops automatically after 12
hours of non-stop recording.
-
-
13
-
Page 21

No date/time display.
Sound or video is
interrupted.
Playback
Cannot find a recorded
video.
The color of images
looks strange.
The lamp does not flash
during battery pack
charging.
Other problems
The slider and operation
buttons do not work.
●
Set “ON-SCREEN DISPLAY” in the
playback menu accordingly.
●
Sometimes playback is interrupted at
the connecting section between two
scenes. This is not a malfunction.
●
Select “PLAYBACK OTHER FILE”
then search the video on the index
screen. (Video files that have damaged
management information can be
played back.)
●
Cancel group display and date search
functions.
●
Change the setting in “REC MEDIA FOR
VIDEO” or “REC MEDIA FOR IMAGE”.
(Files on other media are not displayed.)
●
When recording the white balance was
not correctly adjusted.
●
When the video was recorded with
“x.v.Color” set to “ON”, change the
setting as desired on TV.
●
Set “EFFECT” to “OFF”.
●
Check the remaining battery power.
(When the battery pack is fully
charged, the lamp does not flash.)
●
When charging in either a hot or cold
environment, ensure that battery is
being charged within the permitted
temperature range. (Otherwise,
charging may stop to protect the
battery pack.)
●
Remove any gloves.
●
Touch the slider and buttons with your
fingers to operate. (They do not
function if you touch them with your
fingernails or pen tips.)
-
-
Getting StartedRecordingPlaybackCopyingOthers
-
-
-
-
-
-
10
6
-
-
This unit heats up.
Some functions cannot
be used when playing a
backup BD/DVD through
a BD/DVD burner
connected to this unit.
●
This is not a malfunction. (This unit may
become warm when used for a long time.)
●
The following functions cannot be used
for a backup BD/DVD.
When playing back video:
- Search index by date
- Playback effects
When playing back still image:
- Playback effects
For more information, refer to the Detailed User Guide
http://manual.jvc.co.jp/index.html/
-
-
21
Page 22

When connecting to the
HDMI cable, the image
or sound does not
appear on the TV
properly.
HDMI-CEC functions do
not work properly and the
TV does not work in
conjunction with this unit.
●
The image or sound may not appear
on the TV properly depending on the
TV connected. In such cases, perform
the following operations.
A Disconnect and reconnect the HDMI
cable.
B Turn off and on this unit again.
●
Some TVs may operate differently
depending on the specifications even if
they are HDMI-CEC compliant.
Therefore, the HDMI-CEC function of
this unit cannot be guaranteed to
operate in combination with all TVs. In
such cases, set “HDMI CONTROL” to
“OFF”.
-
-
For more information, refer to the Detailed User Guide
22
http://manual.jvc.co.jp/index.html/
Page 23

Warning Indications
Warning Indications Action Page
●
Turn off and on this unit again.
●
RECORDING CANCELLED/
RECORDING FAILURE
THIS CARD CANNOT BE
USED FOR RECORDING
OR EDITING ON THIS
CAMERA /
UNSUPPORTED FILE!
Set “REC MEDIA FOR VIDEO” in the
media settings menu to “SD”. (Records
on the microSD card.)
●
Do not subject this unit to any strong
impact or vibration.
●
Make use of a file recorded with this
unit. (Files recorded with other devices
may not be playable. If the file was
recorded with this unit, then it is
corrupted.)
13
-
Getting StartedRecordingPlaybackCopyingOthers
-
-
Warning Indications
DATA RECORDED IS TOO
LITTLE UNABLE TO SAVE
HDD ERROR!
MEMORY CARD ERROR!
CHECK LENS COVER
●
If a video recording is stopped with the
actual recording time displayed at
“0:00:00:17” and below, the video
cannot be saved.
●
Turn off and on this unit again.
●
Format the HDD by executing
“FORMAT HDD” in the media settings
menu. (All data is deleted.)
●
Turn off and on this unit again.
●
Remove the AC adapter and battery
pack, then remove and re-insert the
microSD card.
●
Remove any dirt from the microSD
card terminals.
●
Format the microSD card by executing
“FORMAT SD CARD” in the media
settings menu. (All data is deleted.)
●
Appears for 5 seconds after power is
turned on if the lens cap is attached or
when it is dark.
-
-
-
-
-
-
-
-
For more information, refer to the Detailed User Guide
http://manual.jvc.co.jp/index.html/
23
Page 24

Cautions
Battery Pack
The supplied battery pack is a
lithium-ion battery. Before using
the supplied battery pack or an
optional battery pack, be sure
to read the following cautions:
•
To avoid hazards
...
do not burn.
...
do not short-circuit the terminals. Keep it away
from metallic objects when not in use. When
transporting, carry the battery in a plastic bag.
...
do not modify or disassemble.
...
do not expose the battery to temperatures
exceeding 60°C, as this may cause the battery
to overheat, explode or catch fire.
... use only specified chargers.
•
To prevent damage and prolong service life
... do not subject to unnecessary shock.
... charge within the temperature range of 10°C
to 35°C. Cooler temperatures require longer
charging time, or in some cases stop charging
at all.
Warmer temperatures prevent complete
charging, or in some cases stop charging at all.
... store in a cool, dry place. Extended exposure
to high temperatures will increase natural
discharge and shorten service life.
... fully charge and then fully discharge the battery
every 6 months when storing the battery pack
over a long period of time.
... remove from charger or powered unit when not
in use, as some machines use current even
when switched off.
Recording Medium
•
Be sure to follow the guidelines below
to prevent corruption or damage to your
recorded data.
•
Do not bend or drop the recording medium,
or subject it to strong pressure, jolts or
vibrations.
•
Do not splash the recording medium with
water.
•
Do not use, replace, or store the recording
medium in locations that are exposed to
strong static electricity or electrical noise.
•
Do not turn off this unit’s power or remove
the battery or AC adapter during shooting,
playback, or when otherwise accessing
the recording medium.
•
Do not bring the recording medium near
objects that have a strong magnetic field or
that emit strong electromagnetic waves.
•
Do not store the recording medium in
locations with high temperature or high
humidity.
•
Do not touch the metal parts.
LCD Monitor
•
To prevent damage to the LCD monitor,
DO NOT
... push it strongly or apply any shocks.
... place this unit with LCD monitor on the
bottom.
•
To prolong service life
... avoid rubbing it with coarse cloth.
Terminals
•
When formatting or erasing data using
this unit, only the file administration
information is changed. The data is not
completely erased from the hard disk. If
you want to completely erase all of the
data, we recommend either using
commercially available software that is
specially designed for that purpose, or by
physically destroying the unit with a
hammer etc.
Hard Disk
•
Do not use the unit where it is subject to
vibrations or loud sounds.
•
If you move the unit suddenly, the drop
detection function may operate and the
power may be turned off.
.
For more information, refer to the Detailed User Guide
24
http://manual.jvc.co.jp/index.html/
Page 25

Main Unit
•
For safety, DO NOT
... open the unit’s chassis.
... disassemble or modify the unit.
... allow inflammables, water or metallic objects
to enter the unit.
... remove the battery pack or disconnect the
power supply while the power is on.
... leave the battery pack attached when the
unit is not in use.
... place naked fl ame sources, such as lighted
candles, on the apparatus.
... expose the apparatus to dripping or splashing.
... leave dust or metal objects adhered to the
power plug or an AC wall outlet.
... insert any objects in the unit.
•
Avoid using the unit
... in places subject to excessive humidity or dust.
•
DO NOT leave the unit
... in places of over 50°C.
... in places where humidity is extremely low
(below 35%) or extremely high (above 80%).
... in direct sunlight.
... in a closed car in summer.
... near a heater.
... in high places such as on a TV. Leaving the
unit in high places while a cable is connected
may result in a malfunction if the cable is
caught and the unit falls onto the floor.
•
To protect the unit, DO NOT
... allow it to become wet.
... drop the unit or strike it against hard objects.
... subject it to shock or excessive vibration
during transportation.
... keep the lens directed at extremely bright
objects for long periods.
... expose the lens to direct sunlight.
... swing it excessively when using the hand strap.
... swing the soft camcorder case excessively
when the unit is inside it.
... place the unit in dusty or sandy areas, such
as on a beach.
•
To prevent the unit from dropping,
•
Fasten the grip belt securely.
•
When using the unit with a tripod, attach
the unit to the tripod securely.
If the unit drops, you may be injured and the
unit may be damaged.
When a child uses the unit, there must be
parental guidance.
... in places subject to soot or steam such as near
a cooking stove.
... near appliances generating strong magnetic
or electric fields (speakers, broadcasting
antennas, etc.).
... in places subject to extremely high (over 40°C)
or extremely low (under 0°C) temperatures.
...
in places subject to excessive shock or vibration.
... near a television set.
... in places where air pressure is low (more than
3000 m above the sea level).
.
For more information, refer to the Detailed User Guide
http://manual.jvc.co.jp/index.html/
Getting StartedRecordingPlaybackCopyingOthers
25
Page 26

Specifications
Camera
Model name GZ-HD620 GZ-HD500
Power supply Using AC adapter: DC 5.2 V,
Power consumption 3.3 W (when “LIGHT” is set
Dimensions (W x H x D) 53 mm x 63 mm x 110 mm (excluding grip belt)
Mass Approx. 270 g (camera only),
Operating environment Allowable operating temperature: 0°C to 40°C
Image pickup device 1/4" 3,320,000 pixels
Recording area (Video) (16:9) 1,160,000 to
Recording area (Still image) (4:3) 870,000 to 1,040,000
Lens F1.8 - 4.7, f= 3.0 mm to
Zoom (Video) Optical zoom: Up to 30x
Zoom (Still image) Optical zoom: Up to 30x Optical zoom: Up to 20x
Video recording format AVCHD standard, Video: AVC/H.264, Audio: Dolby Digital
Still image recording format JPEG standard
Recording media Internal HDD (120 GB) Internal HDD (80 GB)
Clock battery Rechargeable battery
HDMI HDMIä Mini Connector (V.1.3 with x.v.Colourä)
Component output Y, Pb, Pr component output
AV output Video output: 1.0 V (p-p), 75 W
Connectors
USB Mini USB type AB, USB 2.0
Using battery pack: DC 3.6 V
to “OFF” and “LCD
BACKLIGHT” is set to
“STANDARD”)
Approx. 310 g (including
supplied battery pack)
Allowable storage temperature: -20°C to 50°C
Allowable operating humidity: 35 % to 80 %
(progressive CMOS)
1,380,000 pixels (optical
zoom)
pixels
(16:9) 1,160,000 to
1,380,000 pixels
90.0 mm
(35 mm conversion: 43.7 mm
to 1311 mm)
Digital zoom: Up to 200x
(2ch)
microSD/microSDHC card (commercially available)
Y: 1.0 V (p-p), 75 W Pb/Pr: 0.7 V (p-p), 75 W
Audio output: 300 mV (rms), 1 kW
compliant
3.2 W (when “LCD
BACKLIGHT” is set to
“STANDARD”)
Approx. 265 g (camera only),
Approx. 305 g (including
supplied battery pack)
1/5.8" 1,370,000 pixels
(progressive CMOS)
(16:9) 750,000 to 1,090,000
pixels (optical zoom)
(4:3) 560,000 to 820,000
pixels
(16:9) 750,000 to 1,090,000
pixels
F1.8 - 3.5, f= 3.0 mm to
60.0 mm
(35 mm conversion: 46.4 mm
to 928 mm)
Optical zoom: Up to 20x
Digital zoom: Up to 200x
Mini USB type B, USB 2.0
compliant
For more information, refer to the Detailed User Guide
26
http://manual.jvc.co.jp/index.html/
Page 27

AC Adapter (AP-V30M)*
Power supply AC 110 V to 240 V, 50 Hz/60 Hz
Output DC 5.2 V, 1.8 A
Allowable operating
temperature
Dimensions (W x H x D) 50 mm x 29 mm x 100 mm
Mass Approx. 112 g
* When using the AC adapter overseas, please prepare a commercially available
converter plug for the country or region of visit.
●
The specifications and appearance of this product are subject to changes for
further improvement without prior notice.
0°C to 40°C (10°C to 35°C during charging)
(excluding cord and AC plug)
Getting StartedRecordingPlaybackCopyingOthers
For more information, refer to the Detailed User Guide
http://manual.jvc.co.jp/index.html/
27
Page 28

Index
0110MZR-SW-MD
AA
© 2010 Victor Company of Japan, Limited
A
AC Adapter ...................................... 6
AV Connection ......................... 15, 17
B
Battery Pack .............................. 6, 24
C
Clock Adjust ..................................... 9
Copy (Back Up) ............................. 17
D
Date/Time Setting ............................ 8
Deleting Files ................................. 14
F
Format SD Card ............................ 13
L
Language Setting ............................ 9
LCD Monitor .................................. 24
M
Menu Settings ................................ 18
N
Number of Images ......................... 19
R
Recordable Time ........................... 19
Recording Media for Image ........... 13
S
SD Card ................................... 12, 19
V
Viewing Files on TV ....................... 15
Z
Zoom ............................................. 10
.
 Loading...