

Page 1
U
Dear Customers
Thank you for purchasing this hard
disk camera. Before use, please read
the safety information and precautions
contained on pages 6 and 7 to ensure
safe use of this product.
For Future Reference:
Enter the Model No. (located on the
bottom of the camera) and Serial No.
(located on the battery pack mount of the
camera) below.
Model No.
Serial No.
Apreciado cliente
Muchas gracias por haber adquirido
esta cámara con disco duro integrado.
Antes de usarla, lea la información de
seguridad y las precauciones contenidas
en las páginas 6 y 7 para garantizar un
uso seguro de este producto.
Para futuras consultas:
Escriba a continuación el número
de modelo (situado en la base de la
cámara) y el número de serie (situado
en el compartimiento de la batería de la
cámara).
Número de modelo
Número de serie
ENGLISH
ESPAÑOL
GZ-HD10
INSTRUCTIONS
MANUAL DE INSTRUCCIONES
HD HARD DISK CAMCORDER
VIDEOCÁMARA EQUIPADA CON DISCO DURO
SPEN
Page 2

2
EN
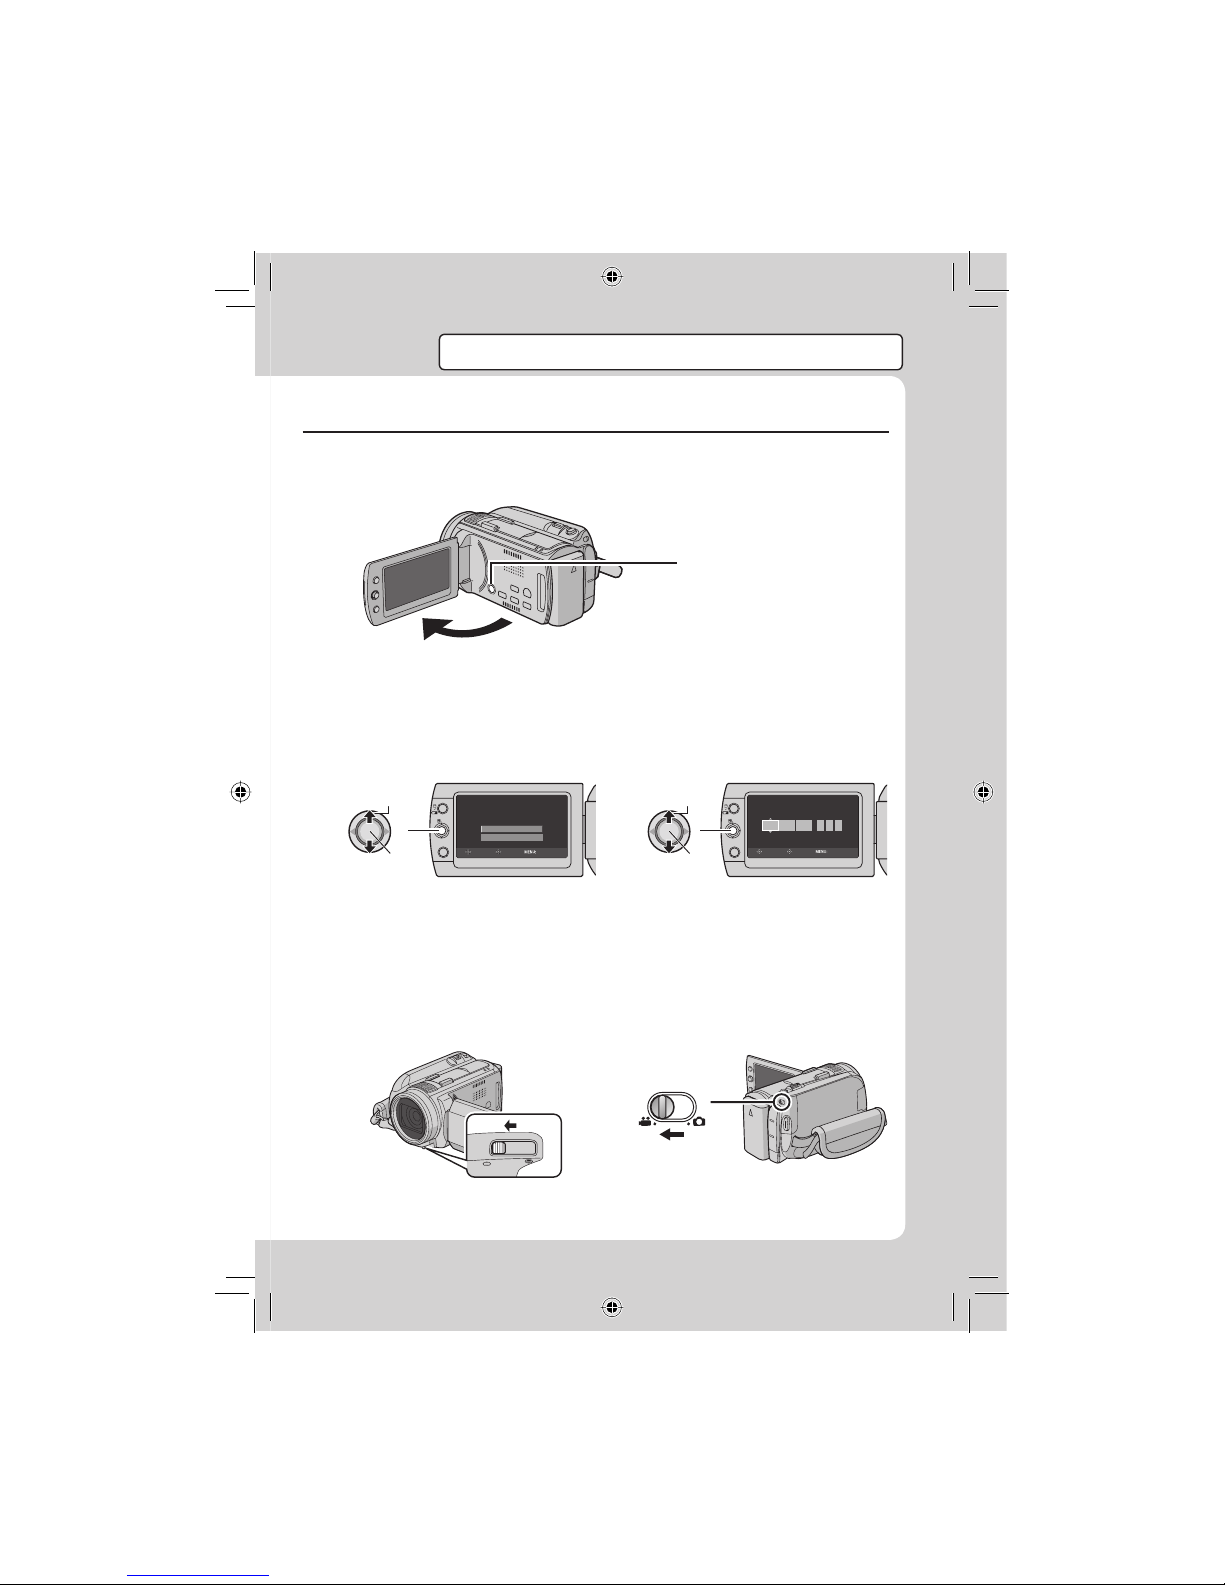
Easy Start Guide
CAUTION
•
Charge the battery pack before use. (墌 p. 16)
•
Be sure to use JVC battery packs. If you use any other battery packs besides
JVC battery packs, safety and performance can not be guaranteed.
ACCESS
POWER
/CHARGE
The power turns on if you open the LCD
monitor
Close the LCD monitor after you fi nish recording.
Charge the battery before recording
Turn off the camera and attach the battery pack.
Power/charge lamp
blinks: Charging
goes out: Charging fi nished
Battery Pack
To AC Outlet
(110V to 240V)
AC Adapter
Open the cover
Page 3
3
EN
Before recording, charge the battery and set the date/time.
See the next page for recording videos.
Preparation
Q
Open the LCD monitor to turn on the camera
R
Select [YES] within
10 seconds
T
Power Button
SET DATE/TIME!
YES
NO
SELECT
SET QUIT
SELECT
SET QUIT
DATE TIME
JAN 31
11AM07
2008
CLOCK ADJUST
S
Set the date and time
Select
Set
Select
Set
When the message disappears, press the
power button for at least 2 seconds to turn
off the power, and then press it again for at
least 2 seconds.
To change the date and time (墌 p. 17)
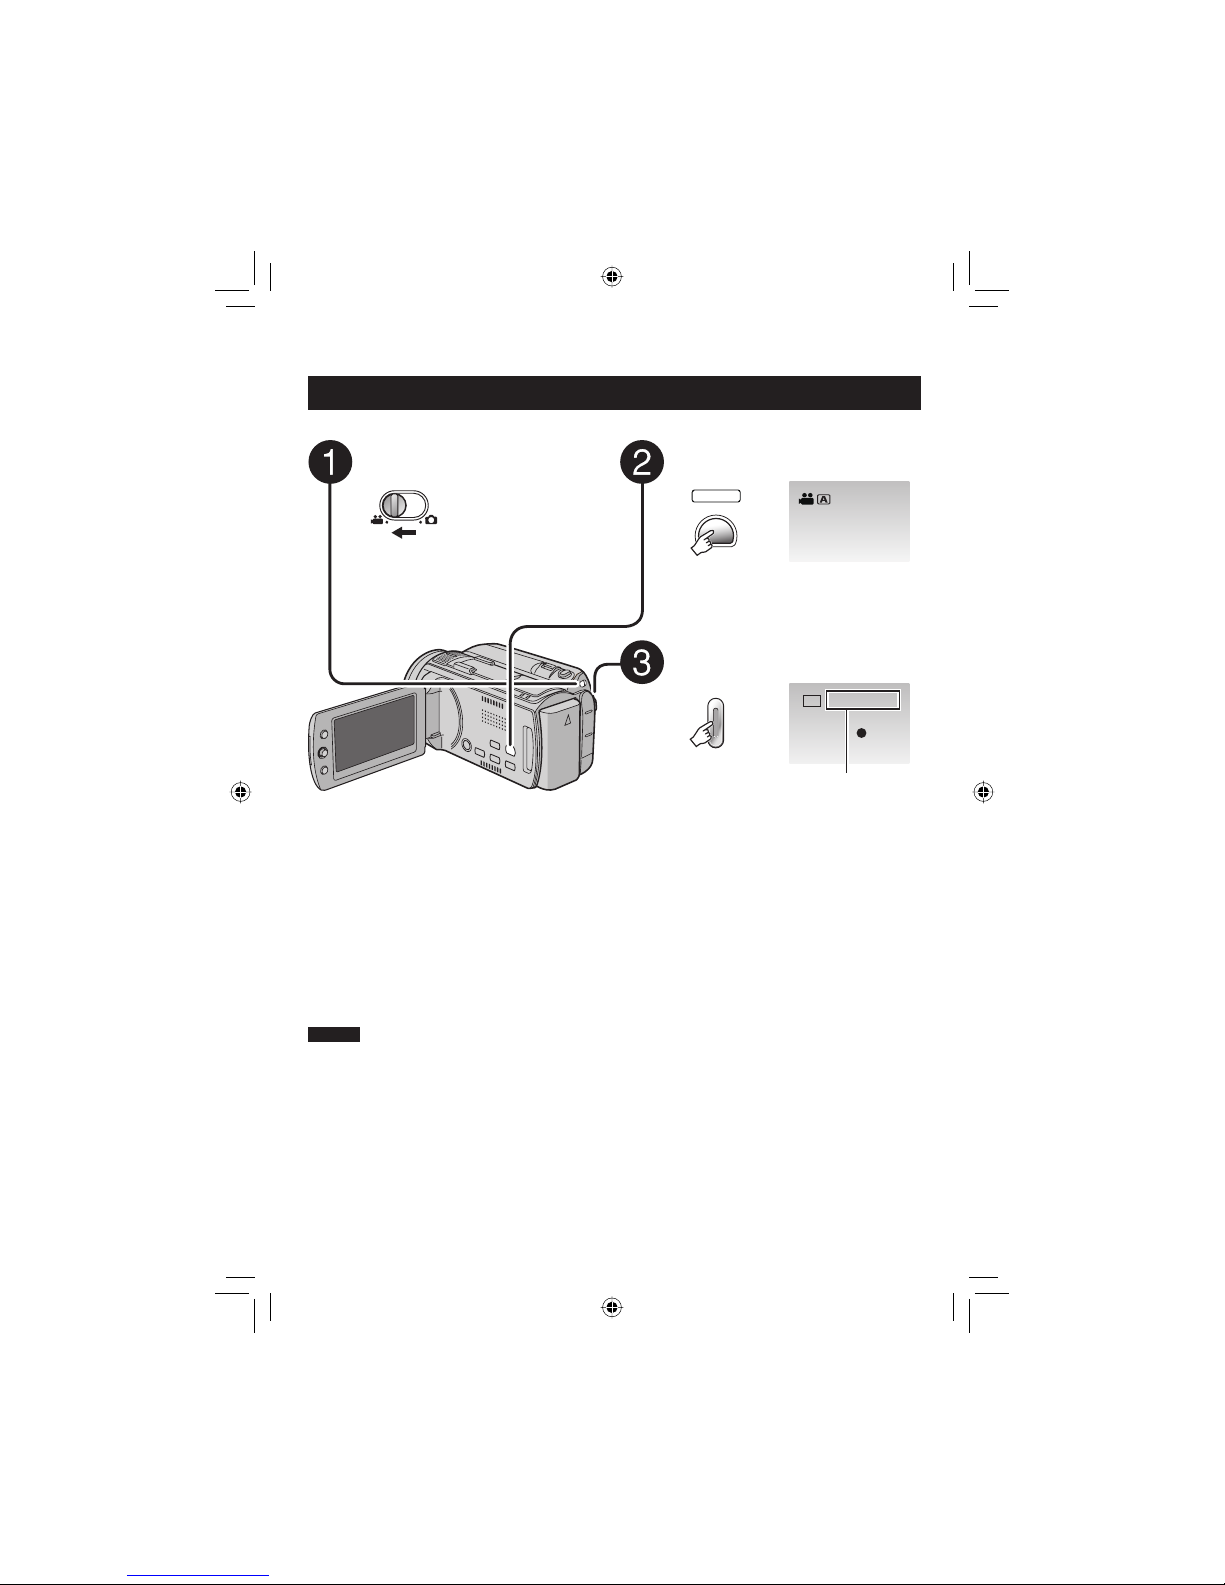
Open the lens cover
U
Select video mode
Page 4
4
EN
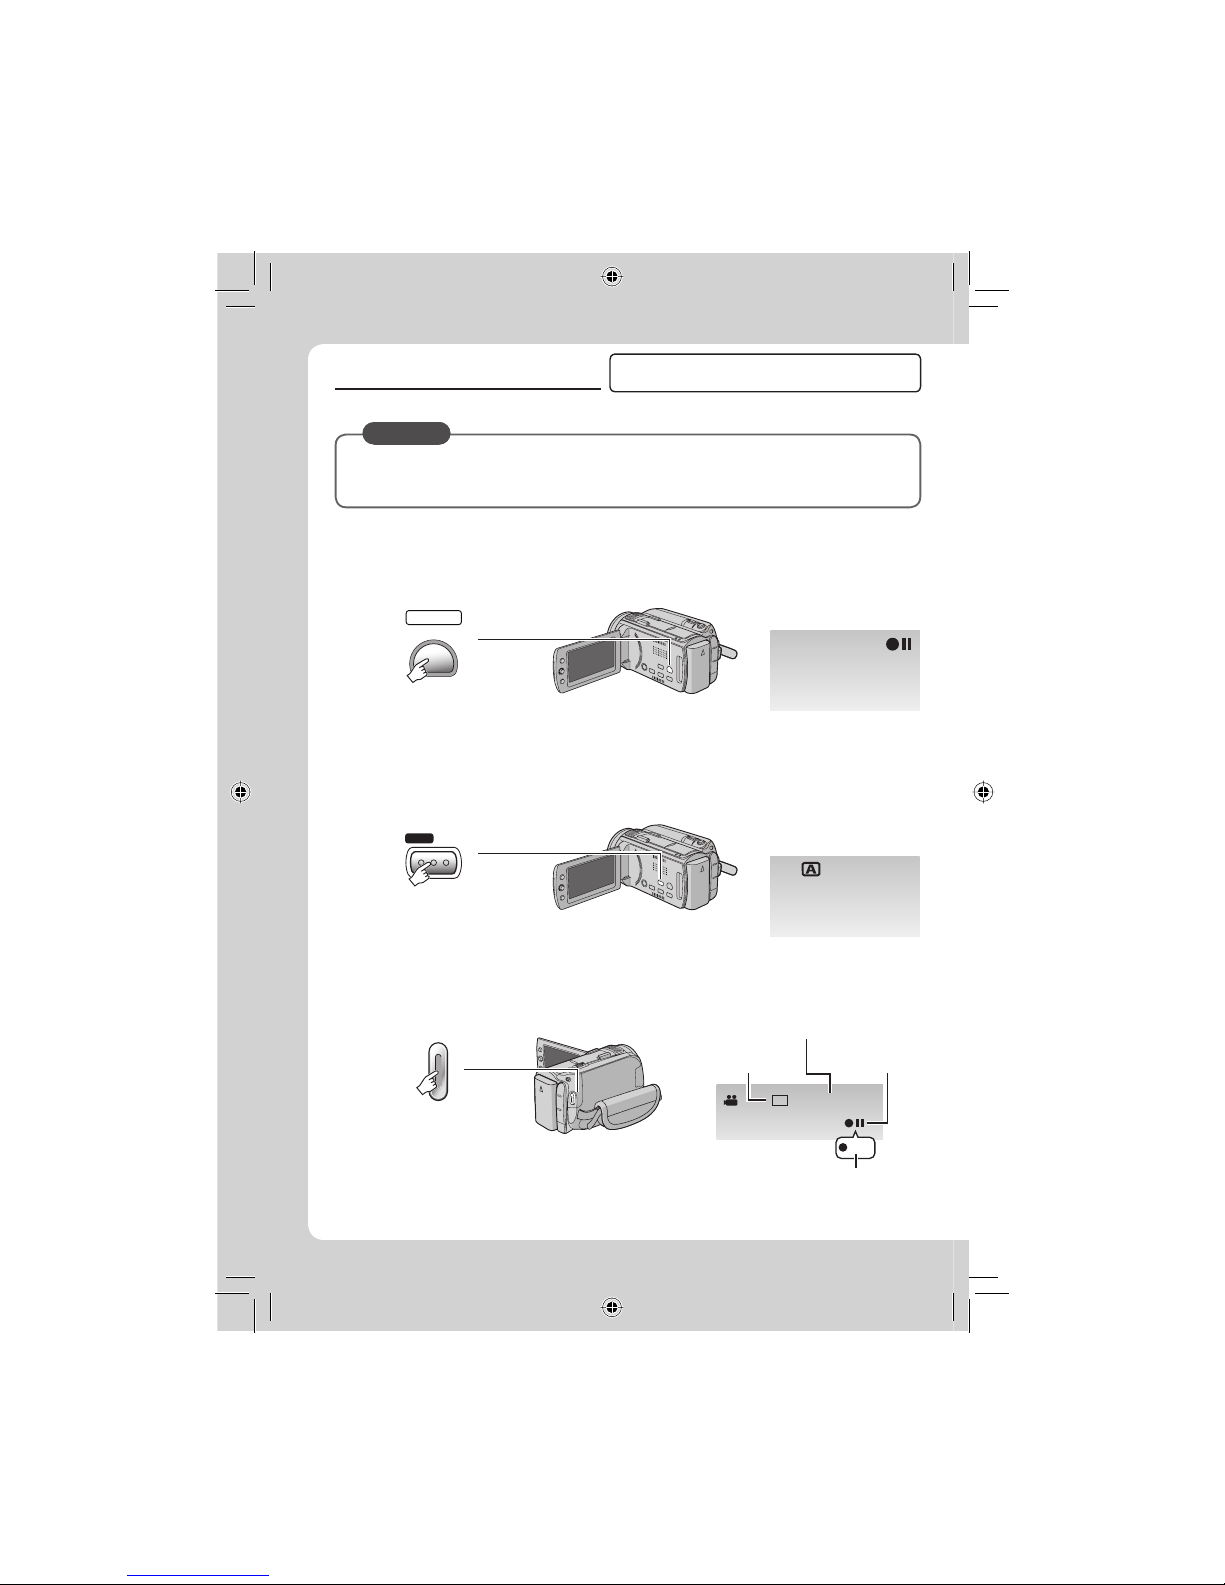
Video recording
Before recording an important scene, it is
recommended to conduct a trial recording.
Q
Select recording mode
PLAY/REC
SELECT
When recording
The mode changes when
you press the button
R
Select auto mode
/
INFO
AUTO
The mode changes when
you press the button
(recording mode only)
The auto recording
indicator appears.
S
Start recording
START
/STOP
Press the START/STOP
button to start recording,
and press it again to stop
[4h59m]
XP
0:01:30
REC
Remaining space on
the hard disk
Picture Quality Record-standby
Recording
CAUTION
•
This camera records video in accordance with the AVCHD format.
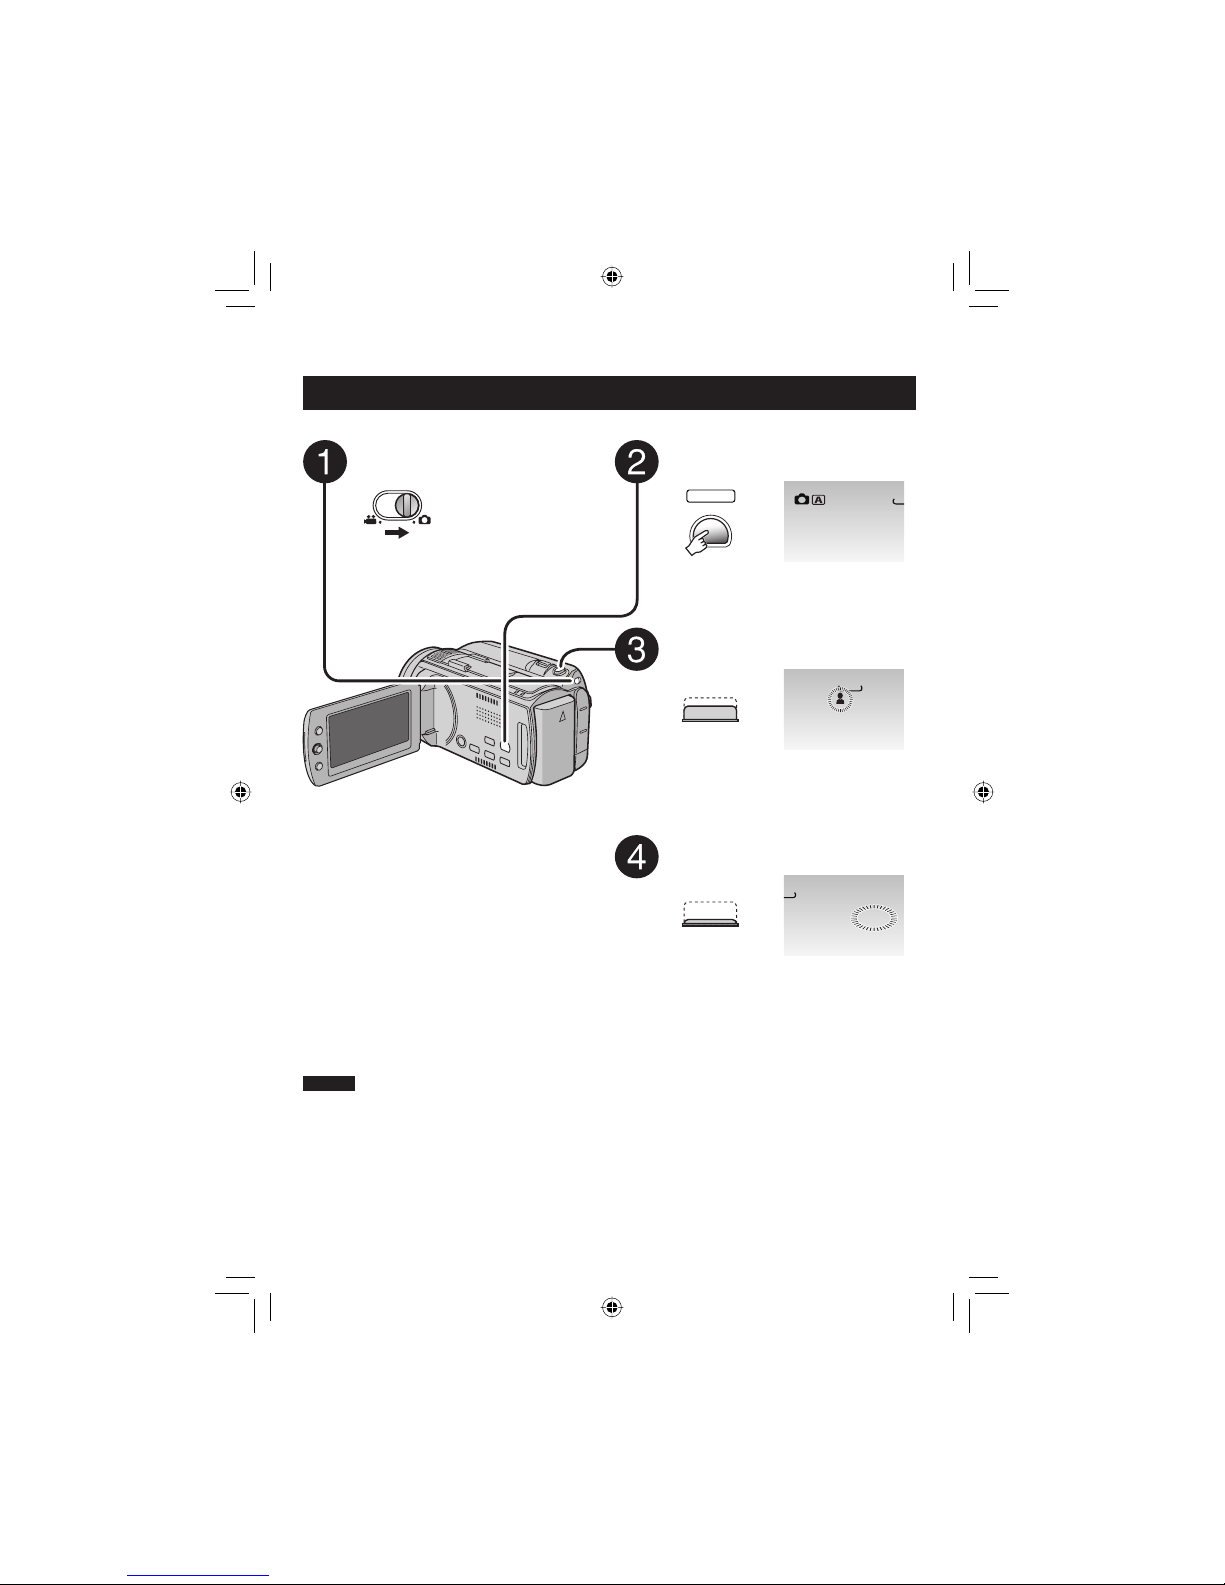
•
Try recording with easy [AUTO] mode fi rst.
Page 5
5
EN
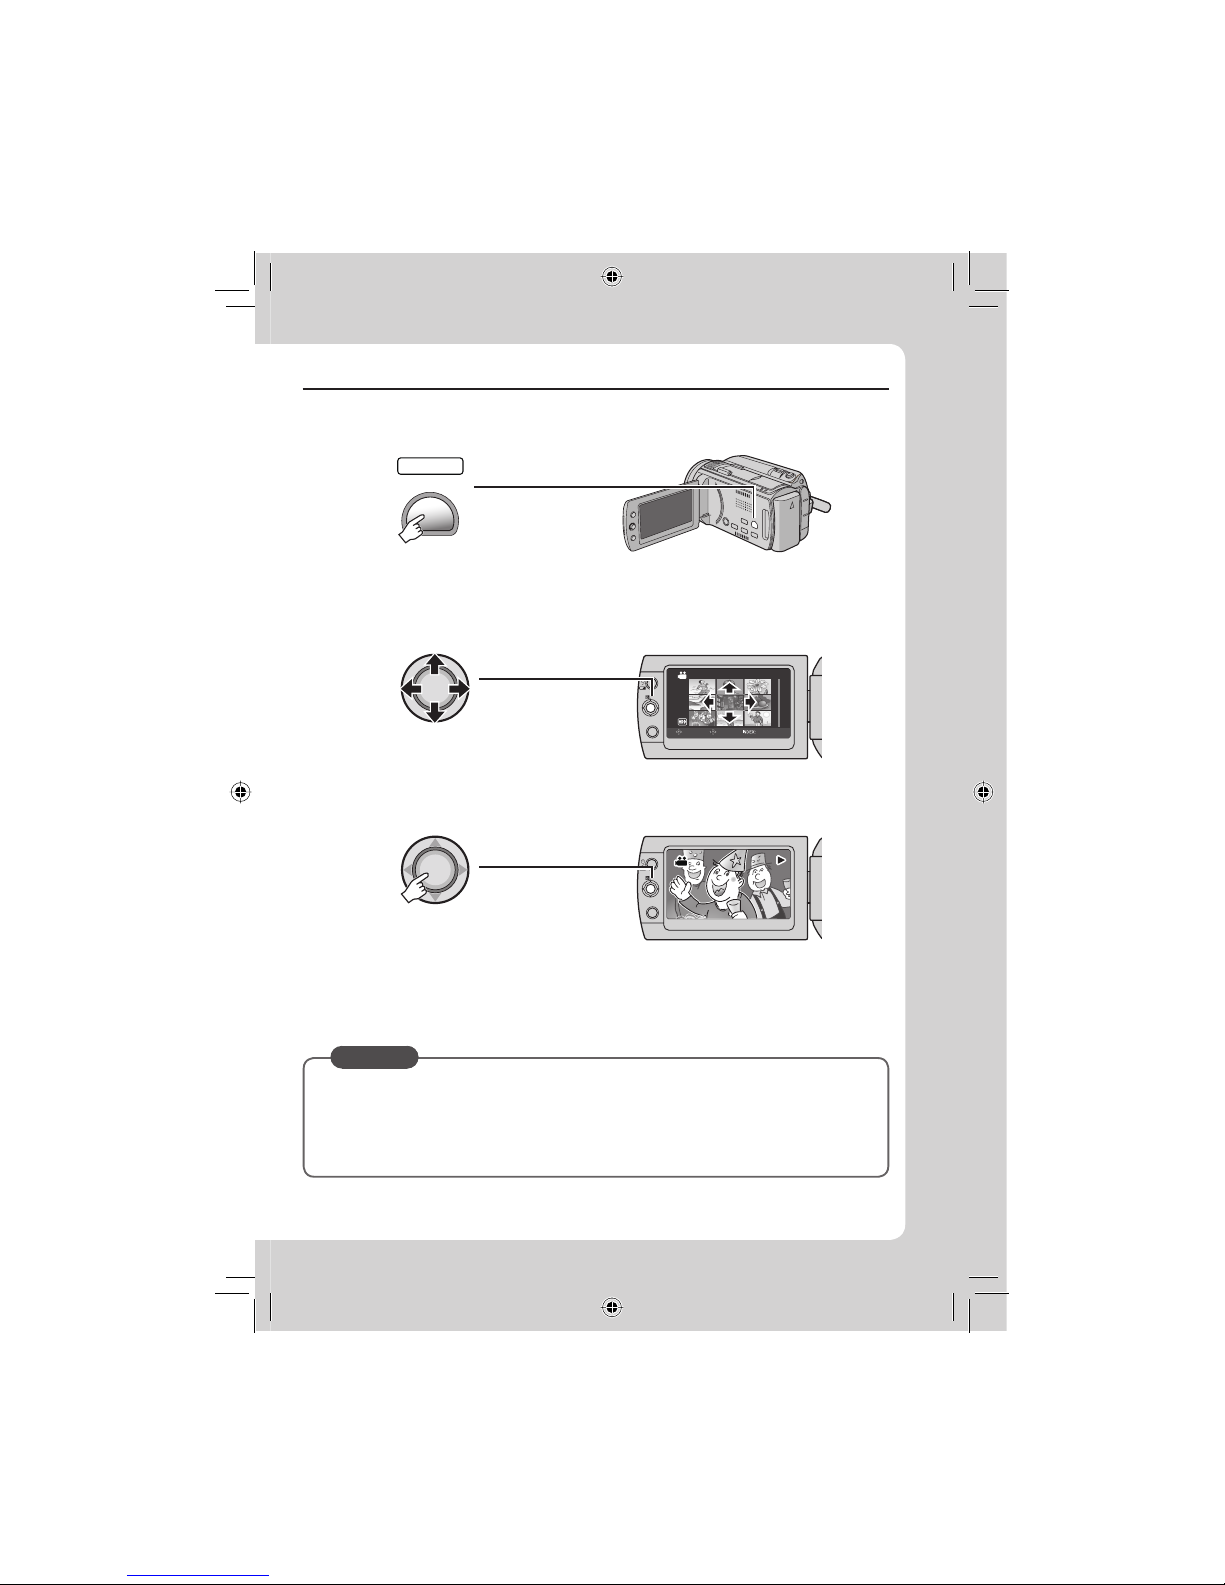
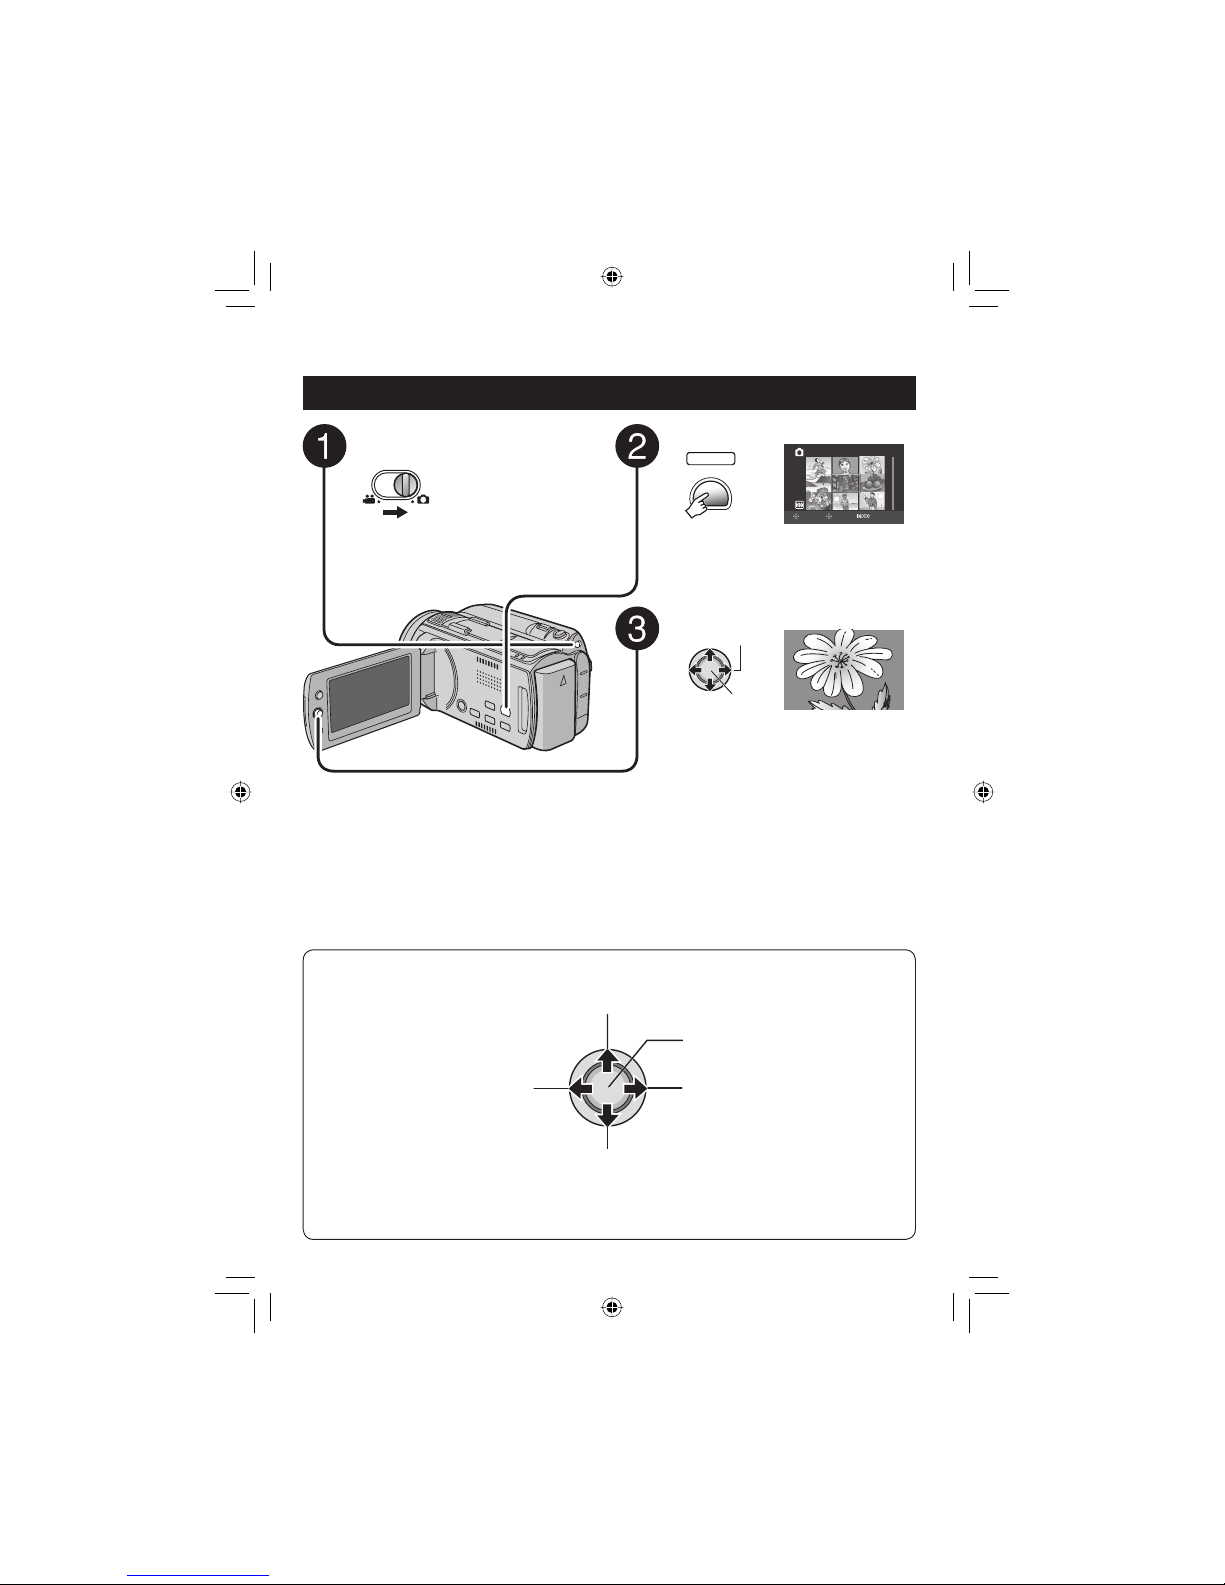
Playing back
Q
Select playback mode
PLAY/REC
SELECT
The mode changes when
you press the button
R
Select the desired fi le
VIDEO
1/1
SELECT
SET SORT
Index screen
S
Press down the set lever
Playback screen
Press down the set lever to
start playback, and press it
again to stop
To perform operations such as fast forwarding or fast rewinding (墌 p. 24)
To view video/still image on TV (墌 p. 26)
䡵
䡵
CAUTION
Don’t forget to make copies after recording!
•
To copy fi les onto DVD discs (墌 p. 31)
•
To dub fi les using a VCR/DVD recorder (墌 p. 33)
•
To play back a created DVD disc (墌 p. 32)
•
To edit fi les on your computer (墌 p. 9)
Page 6
6
EN
Safety Precautions
CAUTION
RISK OF ELECTRIC SHOCK
DO NOT OPEN
CAUTION: TO REDUCE THE RISK OF ELECTRIC SHOCK,
DO NOT REMOVE COVER (OR BACK).
NO USER-SERVICEABLE PARTS INSIDE.
REFER SERVICING TO QUALIFIED SERVICE PERSONNEL.
The lightning flash with arrowhead symbol, within an
equilateral triangle, is intended to alert the user to the
presence of uninsulated "dangerous voltage" within the
product's enclosure that may be of sufficient magnitude
to constitute a risk of electric shock to persons.
The exclamation point within an equilateral triangle is
intended to alert the user to the presence of important
operating and maintenance (servicing) instructions in
the literature accompanying the appliance.
WARNING: TO PREVENT FIRE OR SHOCK
HAZARD, DO NOT EXPOSE THIS UNIT TO
RAIN OR MOISTURE.
NOTES:
•
The rating plate and safety caution are on the
bottom and/or the back of the main unit.
•
The serial number plate is on the battery pack
mount.
•
The rating information and safety caution of the
AC adapter are on its upper and lower sides.
Caution on Replaceable lithium battery
The battery used in this device may present a fi re
or chemical burn hazard if mistreated.
Do not recharge, disassemble, heat above 100°C
or incinerate.
Replace battery with Panasonic (Matsushita
Electric), Sanyo, Sony or Maxell CR2025.
Danger of explosion or Risk of fi re if the battery is
incorrectly replaced.
•
Dispose of used battery promptly.
•
Keep away from children.
•
Do not disassemble and do not dispose of in fi re.
For USA-California Only
This product contains a CR Coin Cell Lithium
Battery which contains Perchlorate Material
– special handling may apply.
See www.dtsc.ca.gov/hazardouswaste/perchlorate
When the equipment is installed in a cabinet or on
a shelf, make sure that it has suffi cient space on all
sides to allow for ventilation (10 cm (3-15/16") or
more on both sides, on top and at the rear).
Do not block the ventilation holes.
(If the ventilation holes are blocked by a
newspaper, or cloth etc. the heat may not be able
to get out.)
No naked fl ame sources, such as lighted candles,
should be placed on the apparatus.
When discarding batteries, environmental
problems must be considered and the local rules or
laws governing the disposal of these batteries must
be followed strictly.
The apparatus shall not be exposed to dripping or
splashing.
Do not use this equipment in a bathroom or places
with water.
Also do not place any containers fi lled with water
or liquids (such as cosmetics or medicines, fl ower
vases, potted plants, cups etc.) on top of this unit.
(If water or liquid is allowed to enter this
equipment, fi re or electric shock may be caused.)
Do not point the lens directly into the sun. This
can cause eye injuries, as well as lead to the
malfunctioning of internal circuitry. There is also a
risk of fi re or electric shock.
CAUTION!
The following notes concern possible physical
damage to the camera and to the user.
Carrying or holding the camera by the LCD monitor
can result in dropping the unit, or in a malfunction.
Do not use a tripod on unsteady or unlevel surfaces. It
could tip over, causing serious damage to the camera.
CAUTION!
Connecting cables (Audio/Video, S-Video, etc.)
to
the camera and leaving it on top of the TV is not
recommended, as tripping on the cables will cause
the camera to fall, resulting in damage.
CAUTION:
The mains plug shall remain readily operable.
WARNING:
Batteries, including lithium batteries installed in
the camera and the remote control, should not be
exposed to excessive heat such as direct sunshine,
fi re or the like.
Page 7
7
EN
IMPORTANT SAFETY INSTRUCTIONS
1. Read these instructions.
2. Keep these instructions.
3. Heed all warnings.
4. Follow all instructions.
5. Do not use this apparatus near water.
6. Clean only with dry cloth.
7. Do not block any ventilation openings. Install in
accordance with the manufacturer’s instructions.
8. Do not install near any heat sources such
as radiators, heat registers, stoves, or other
apparatus (including amplifi ers) that produce
heat.
9. Only use attachments/accessories specifi ed by
the manufacturer.
10. Use only with the cart,
stand, tripod, bracket,
or table specifi ed by
the manufacturer,
or sold with the
apparatus. When a cart
is used, use caution
when moving the cart/
apparatus combination
to avoid injury from tip-over.
11. Unplug this apparatus during lightning storms
or when unused for long periods of time.
12. Refer all servicing to qualifi ed service
personnel. Servicing is required when the
apparatus has been damaged in any way, such
as power-supply cord or plug is damaged, liquid
has been spilled or objects have fallen into the
apparatus, the apparatus has been exposed to
rain or moisture, does not operate normally, or
has been dropped.
Remember that this camera is intended for
private consumer use only.
Any commercial use without proper permission
is prohibited. (Even if you record an event such
as a show, performance or exhibition for personal
enjoyment, it is strongly recommended that you
obtain permission beforehand.)
Trademarks
•
AVCHD and AVCHD logotype are trademarks of
Matsushita Electric Industrial Co., Ltd. and Sony
Corporation.
•
Manufactured under license from Dolby
Laboratories. Dolby and the double-D symbol are
trademarks of Dolby Laboratories.
•
x.v.Color™ is a trademark of Sony Corporation.
•
HDMI is a trademark of HDMI Licensing, LLC.
•
Windows® is either registered
trademark or trademark of
Microsoft Corporation in the
United States and/or other
countries.
•
Macintosh is a registered trademark of Apple Inc.
•
Other product and company names included in
this instruction manual are trademarks and/or
registered trademarks of their respective holders.
If this symbol is shown, it is only valid
in the European Union.
Page 8

8
EN
Contents
GETTING STARTED
Accessories ............................................10
Preparing the Remote Control ...................... 11
Index ........................................................12
Indications on LCD Monitor ...................14
Necessary Settings before Use .............16
Charging the Battery Pack ............................ 16
Checking the Remaining Battery Power ....... 16
Date/Time Setting ......................................... 17
Language Setting ......................................... 17
Other Settings .........................................18
Grip Adjustment ............................................ 18
Attaching the Shoulder Strap ........................ 18
Lens Cover ................................................... 18
Tripod Mounting ............................................ 18
When Using a microSD Card ....................... 19
Changing the Menu Settings ........................ 19
RECORDING
Recording Files .......................................20
Video Recording ........................................... 20
Still Image Recording ................................... 21
Zooming ........................................................ 22
LED Light ...................................................... 22
Registering Files to Events ........................... 22
Manual Recording ..................................23
To Change to Manual Recording Mode ........ 23
Program AE .................................................. 23
Manual Setting in Menu ................................ 23
PLAYBACK
Playing Back Files ..................................24
Video Playback ............................................ 24
Still Image Playback ..................................... 25
Watching Images on TV..........................26
Connection with TV....................................... 26
Playback Operation ...................................... 27
EDITING/PRINTING
Managing Files ........................................28
To Capture a Still Image from a Video .......... 28
Deleting/Protecting Files ............................... 28
Changing the Event Registration .................. 29
Dividing Files ................................................ 29
Playlists ...................................................30
Creating Playlists .......................................... 30
COPYING
Copying Files ..........................................31
Copying/Moving Files ................................... 31
Using a DVD Burner to Copy Files from the
Camera ....................................................... 31
Standard-defi nition Dubbing ......................... 33
FURTHER INFORMATION
Troubleshooting ......................................34
Warning Indications ...............................36
Specifi cations .........................................37
Cautions ..................................................39
Terms .......................................................44
Page 9
9
EN
Read This First!
Make a backup of important recorded data
It is recommended to copy your important
recorded data to a DVD or other recording
media for storage. (墌 p. 31) JVC will not be
responsible for any lost data.
Make a trial recording
Before the actual recording of important data,
make a trial recording and play back the
recorded data to check that the video and
sound have been recorded correctly.
Reset the camera if it does not operate
correctly
This camera uses a microcomputer. Factors
such as background noise and interference
can prevent it from operating correctly. If the
camera does not operate correctly, reset the
camera.
Precautions on handling batteries
•
Be sure to use the JVC BN-VF808U/VF823U
battery packs.
•
If the camera is subjected to electrostatic
discharge, turn off the power before using it
again.
If a malfunction occurs, stop using the
camera immediately and consult your local
JVC dealer
•
If a problem occurs when using the microSD
card, take the card together with the camera
for repair. If one of them is not included,
the cause of the malfunction cannot be
diagnosed, and the camera cannot be
repaired.
•
Recorded data may be erased while the
camera is being repaired or inspected. Back
up all data before requesting repairs or
inspections.
Because cameras may be used
for demonstration in a shop, the
demonstration mode is set to on by default
To deactivate the demonstration mode, set
[DEMO MODE] to [OFF].
Do not cover the fan (墌 p. 12 (, /)
If the camera becomes too hot inside it may
cause a malfunction.
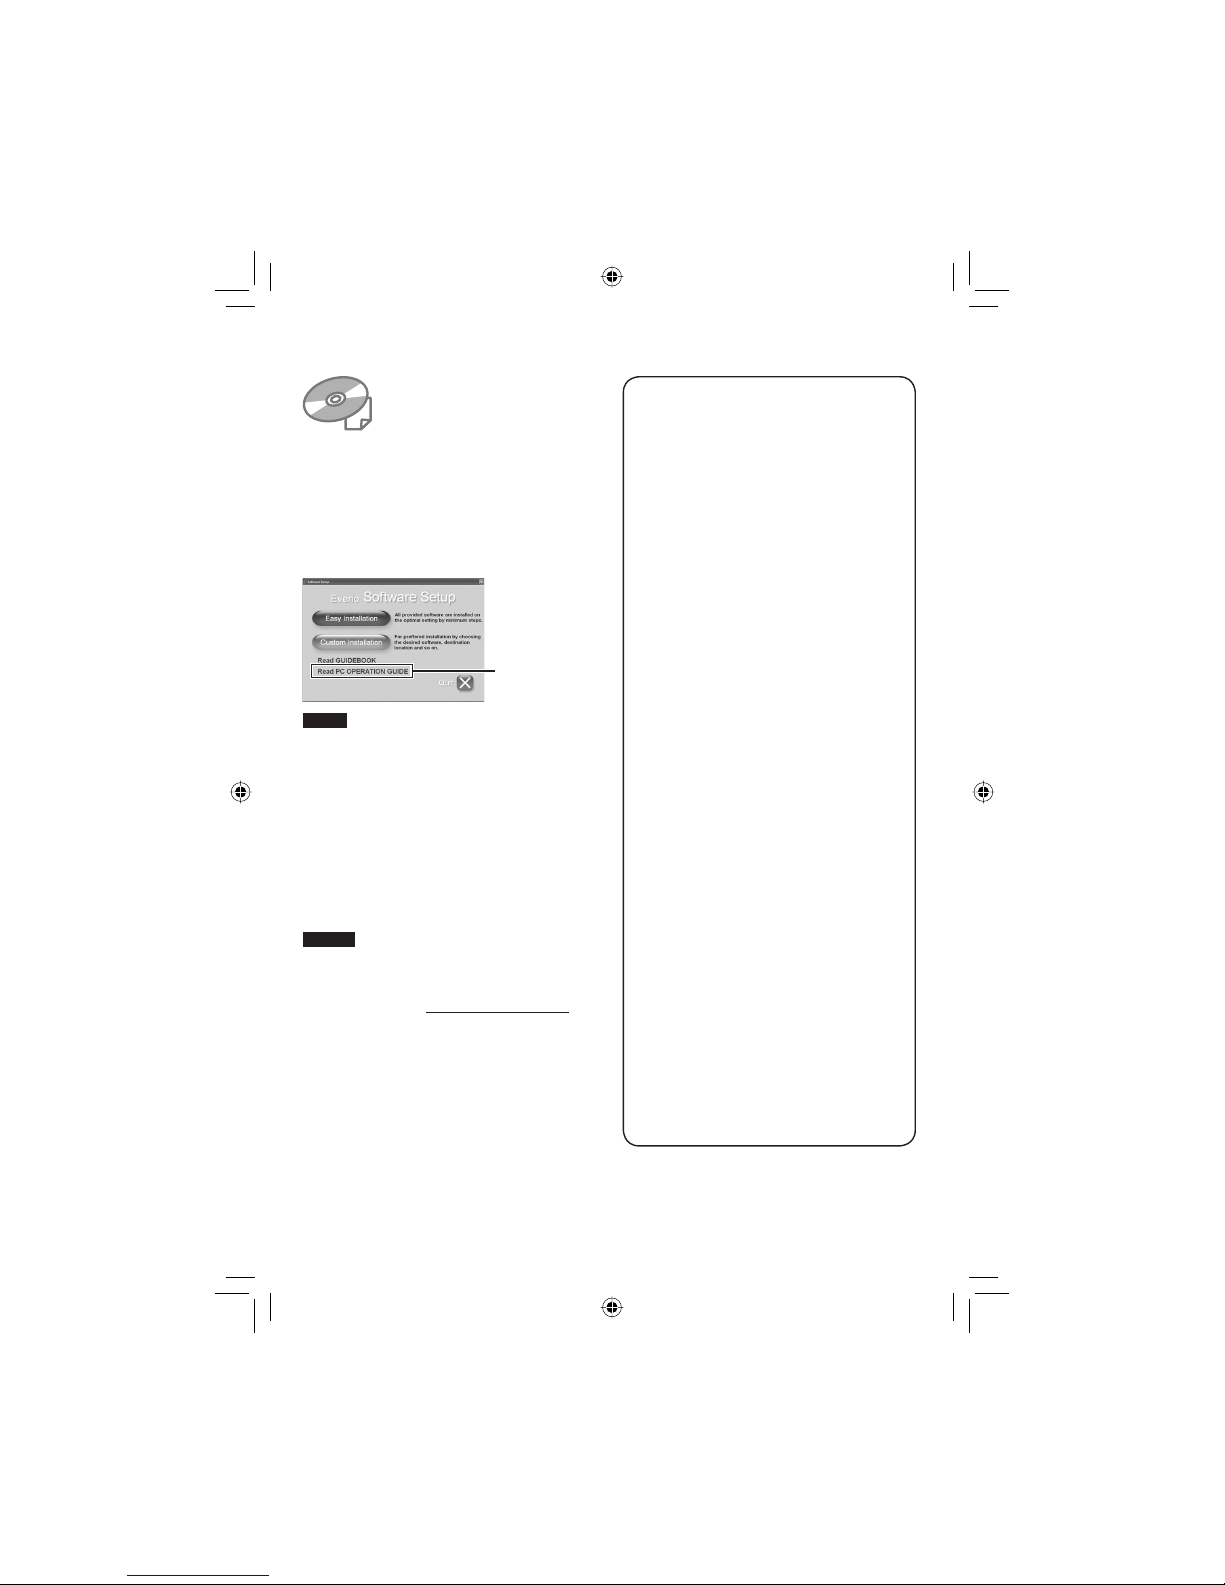
For Windows
Refer to the PC OPERATION GUIDE in the
supplied CD-ROM.
! Load the provided CD-ROM into the PC.
After a moment, the [Software Setup] screen
appears. If the [Software Setup] screen does
not appear, double-click the CD-ROM icon
in [My Computer].
NOTE
Refer to the PC OPERATION GUIDE for the
system requirements of the provided software.
For details, refer to the User’s guide or Help of
the software.
For Macintosh
! Load the provided CD-ROM into the
Computer.
# Double-click the CD-ROM icon.
$ Double-click “Start.pdf” in the “PC guide”
folder.
% Click the desired language.
NOTES
• Adobe® Acrobat® Reader™ or Adobe®
Reader
®
must be installed to read PDF
fi les. Adobe
®
Reader® can be located from
Adobe’s web site: http://www.adobe.com/
• For more details on the operations, refer to
the GUIDEBOOK and the PC OPERATION
GUIDE in the supplied CD-ROM.
䡵
䡵
# Click
PC OPERATION
Page 10
10
EN
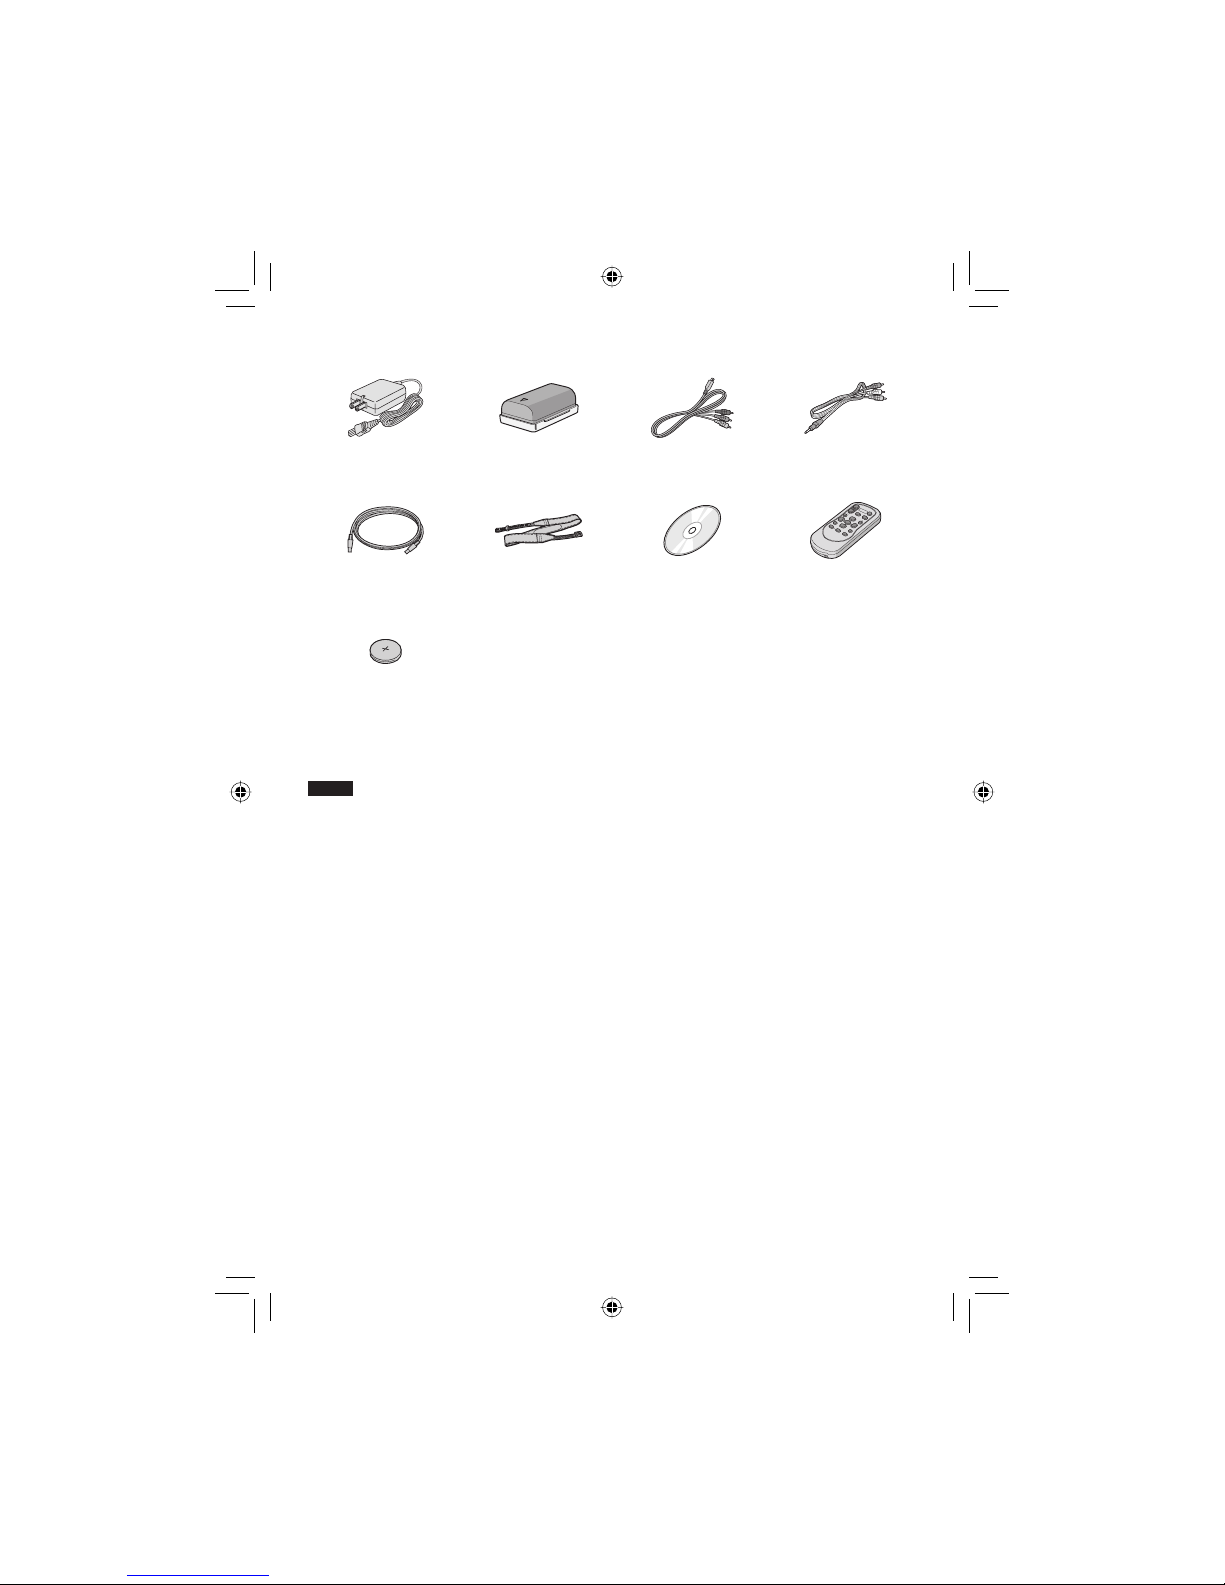
Accessories
GETTING STARTED
AC Adapter
AP-V14U
Battery Pack
BN-VF808U
Component Cable
(墌 p. 26)
Audio/Video Cable
(墌 p. 27, 33)
USB Cable Shoulder Strap
(墌 p. 18)
CD-ROM
(墌 p. 9)
Remote Control
RM-V750U
(墌 p. 11)
Lithium Battery
CR2025
Pre-installed in the
remote control unit.
NOTE
Make sure to use the provided cables for connections. Do not use any other cables.
Page 11
11
EN
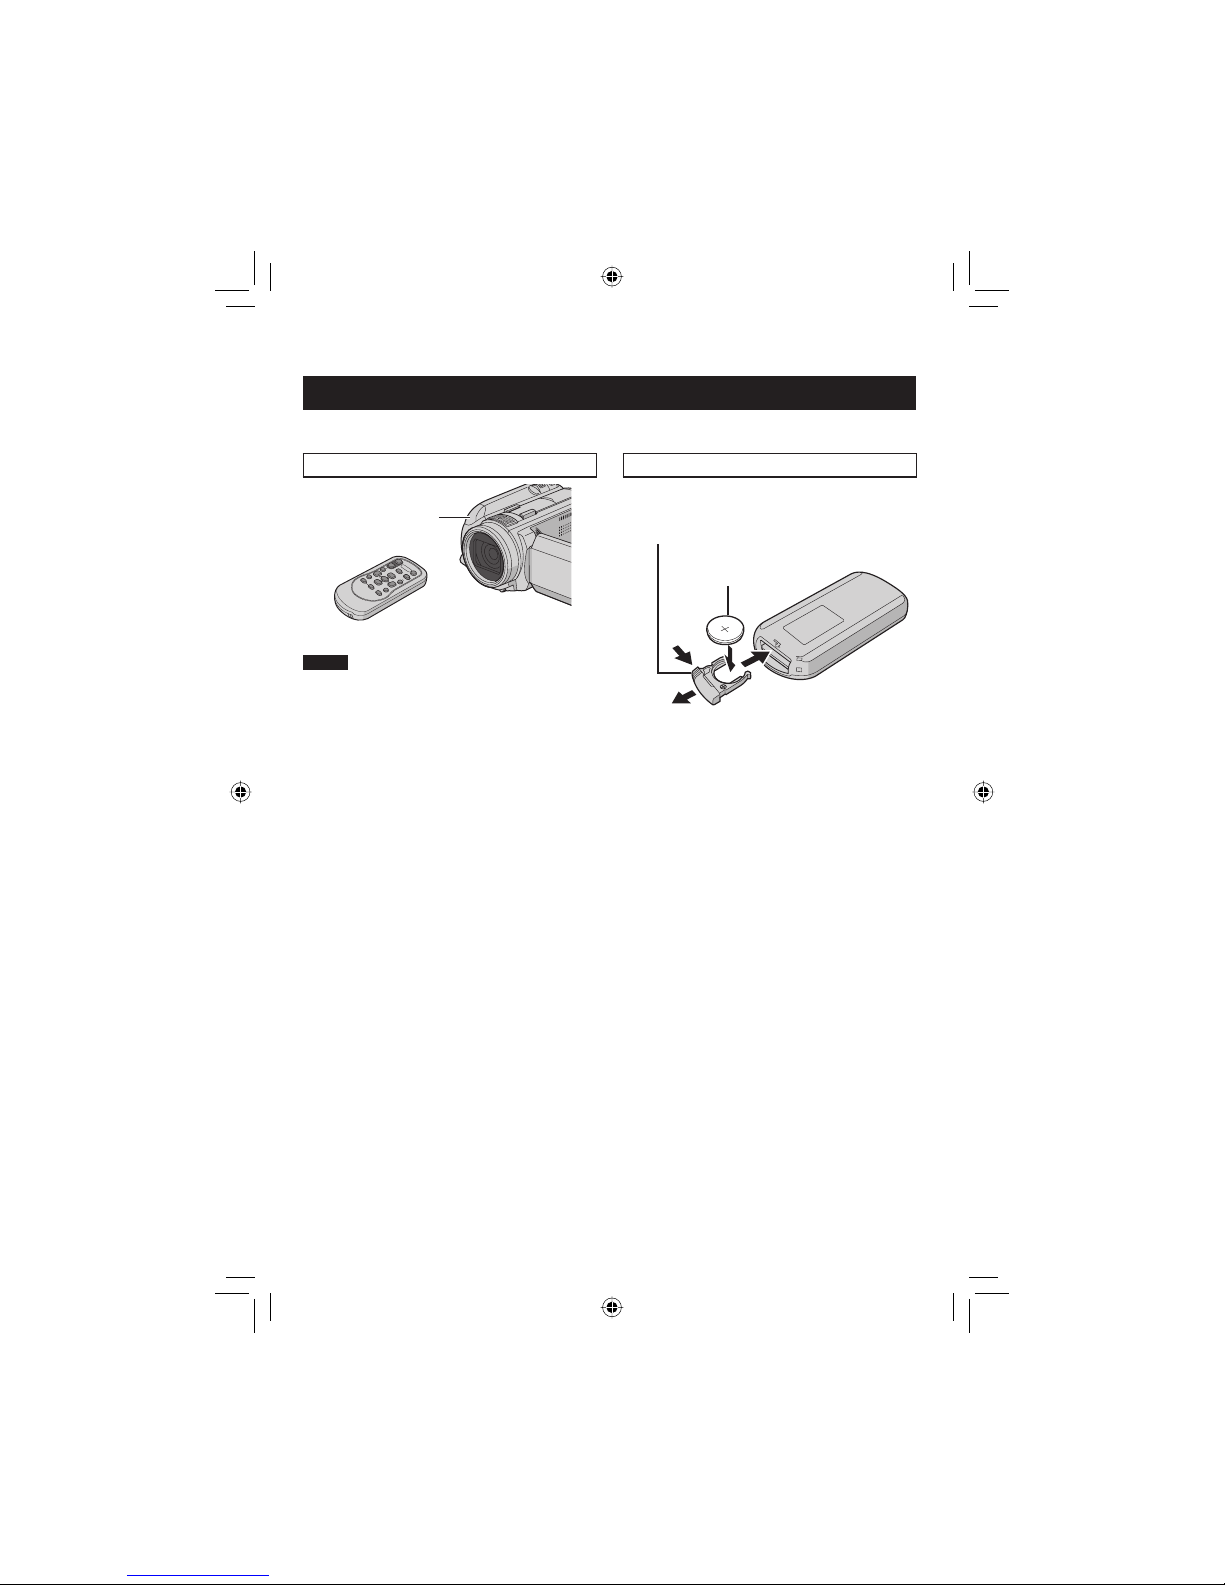
Preparing the Remote Control
A battery is included inside the remote control at the time of purchase.
Remove the insulation sheet before use.
Beam Effective Area To Reinsert the Battery
NOTE
The transmitted beam may not be effective
or may cause incorrect operation when the
remote sensor is directly exposed to sunlight
or powerful lighting.
Pull out the battery holder by pressing the lock
tab.
Effective distance:
Max. 5 m (16 ft)
Remote Sensor
Lock Tab
Lithium Battery
(CR2025)
Page 12
12
EN
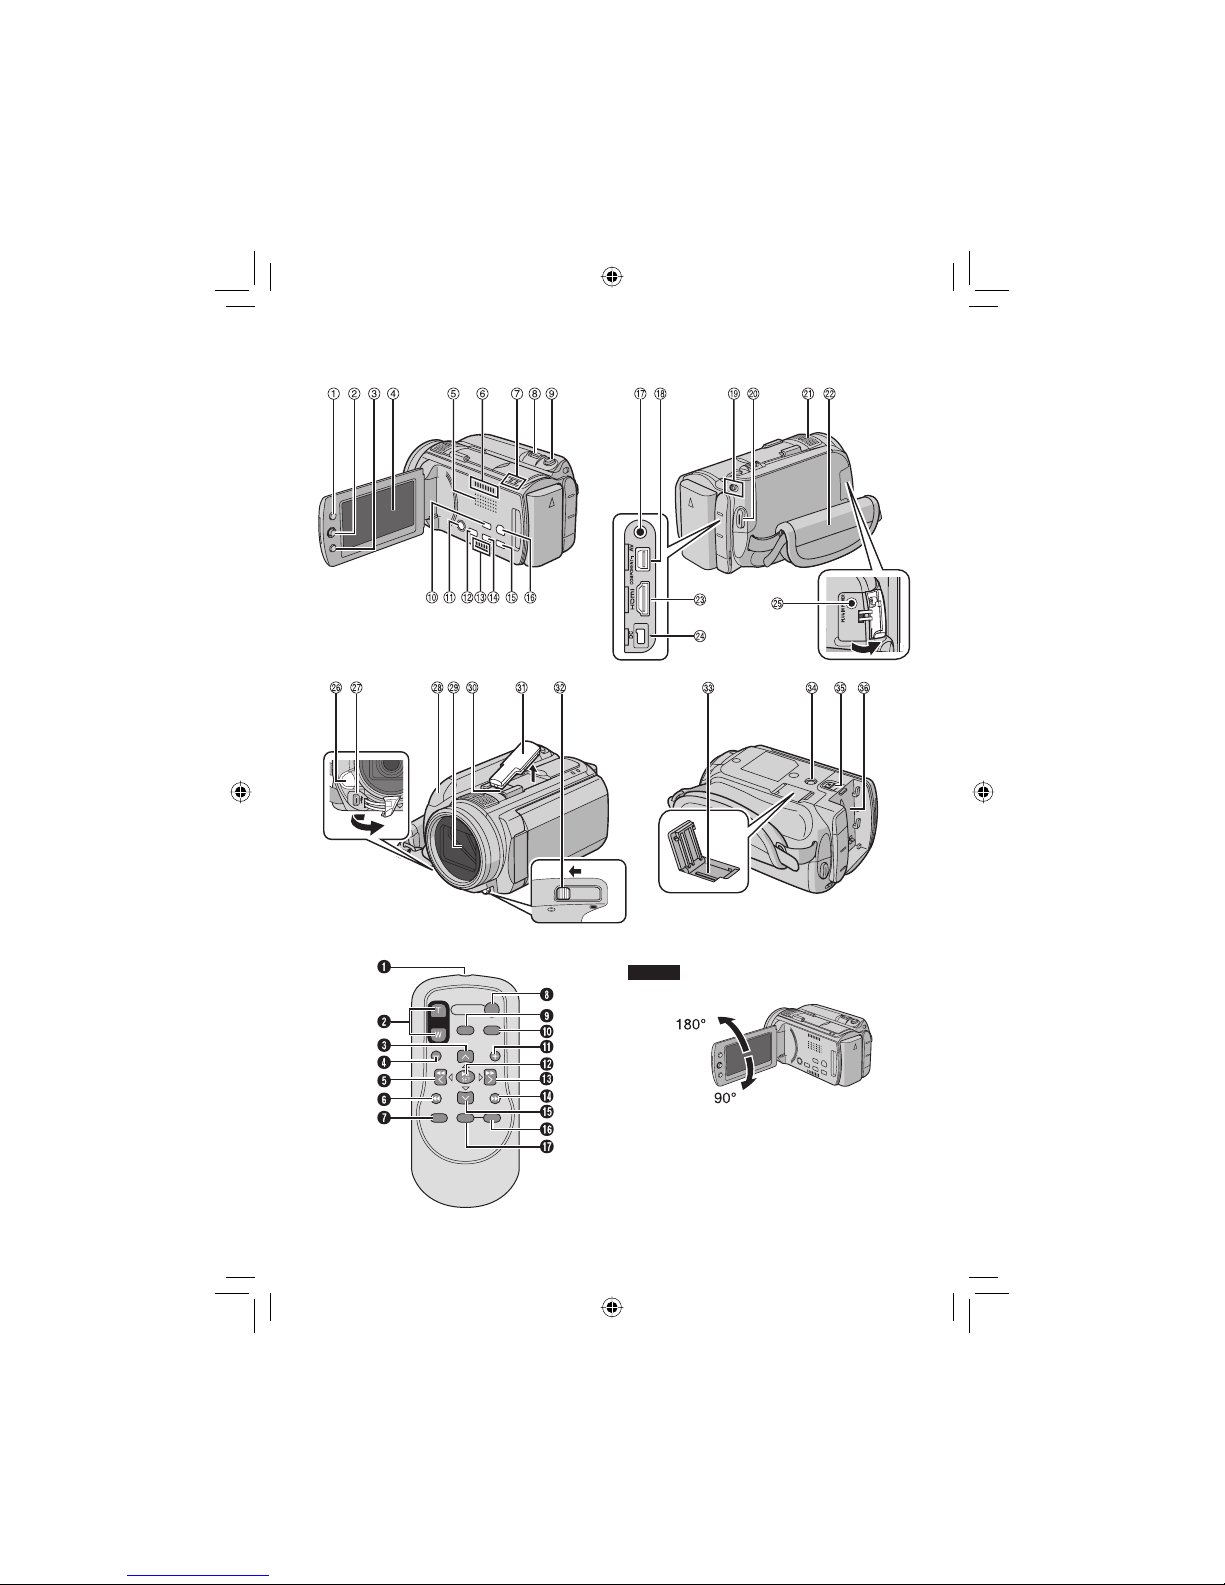
Index
NOTES
•
The LCD monitor can rotate 270°.
•
Power-linked operation
You can also turn on/off the camera by
opening/closing the LCD monitor.
•
Be careful not to cover sensors 7, > and ?
during shooting.
Page 13

13
EN
7 Stereo Microphone
8 Grip Strap (墌 p. 18)
9 HDMI Connector [HDMI] (墌 p. 26)
: DC Connector [DC] (墌 p. 16)
; Microphone Input Connector [MIC]
< LED Light
= USB Connector [
2
]
> Remote Sensor (墌 p. 11)
? Lens Cover/Lens
@ Shoe (for external microphone, etc)
A Shoe Cover
B Lens Cover Switch [=, >] (墌 p. 18)
C microSD Card Slot (墌 p. 19)
D Tripod Mounting Socket (墌 p. 18)
E Battery Release Button [BATT.] (墌 p. 16)
F Battery Pack Mount
Remote Control
Q Infrared Beam Transmitting Window
R ZOOM (T/W) Buttons
(Zoom in/out during playback.)
S Up Button
Rotate Button (counterclockwise)
T Skip Backward Button
U Left Button
V Back Button
W PLAYLIST Button
X START/STOP Button
Y SNAPSHOT Button
Z INFO Button
a Skip Forward Button
b PLAY/PAUSE Button
c Right Button
d Next Button
e Down Button
Rotate Button (clockwise)
f INDEX Button
g DATE Button
NOTE
You can move the zooming area with the up/
down/left/right button during zoom in playback
mode.
Camera
!
Index Button [INDEX]/Remaining Space
Button/Data Battery Button
[ 0 / 1 ] (墌 p. 16)
# Set Lever
Move to ¡ :
Reverse Skip (墌 p. 24)/Up/Backlight
Compensation Button [ - ]
Move to ¢ :
Forward Skip (墌 p. 24)/Down/Manual
Focus Button [FOCUS]
Move to £ :
Reverse Search (墌 p. 24)/Left/Light
Button [LIGHT] (墌 p. 22)
Move to ¤ :
Forward Search (墌 p. 24)/Right/Program
AE Button [PROGRAM AE] (墌 p. 23)
Press down:
Play/Pause (墌 p. 24)
$ Menu Button [MENU]
% LCD Monitor
& Speaker
( Fan outlet
) Access Lamp [ACCESS] (Blinks when you
access fi les. Do not turn off the power or
remove the battery pack/AC adapter while
accessing fi les.)
Power/Charge Lamp [POWER/CHARGE]
(Blinks when you charge the battery.)
* Zoom Lever [W 7 , T
,
] (墌 p. 22)
Speaker Volume Control [–VOL+] (墌 p. 24)
+ Still Image Shooting Button [SNAPSHOT]
(墌 p. 21)
, Auto/Manual Mode Button [AUTO] (墌 p. 23)/
Information Button [INFO]
- Power Button (You can turn off the camera
by pressing and holding this button.)
. Direct Disc Button [DIRECT DISC]/
Focus Assist Button [FOCUS ASSIST]
/ Fan inlet
0 Direct Backup Button [DIRECT BACK UP]/
Quick Review Button [QUICK REVIEW]
(墌 p. 20, 21)
1 Delete Button [
*
]
2 Playback/Recording Mode Switching Button
[PLAY/REC] (墌 p. 20, 21)
3 Audio/Video Connector [AV] (墌 p. 27, 33)
4 Component Connector [COMPONENT]
(墌 p. 26)
5 Mode Switch [!, #]
6 Video Recording Start/Stop Button [START/
STOP] (墌 p. 20)
Page 14
14
EN
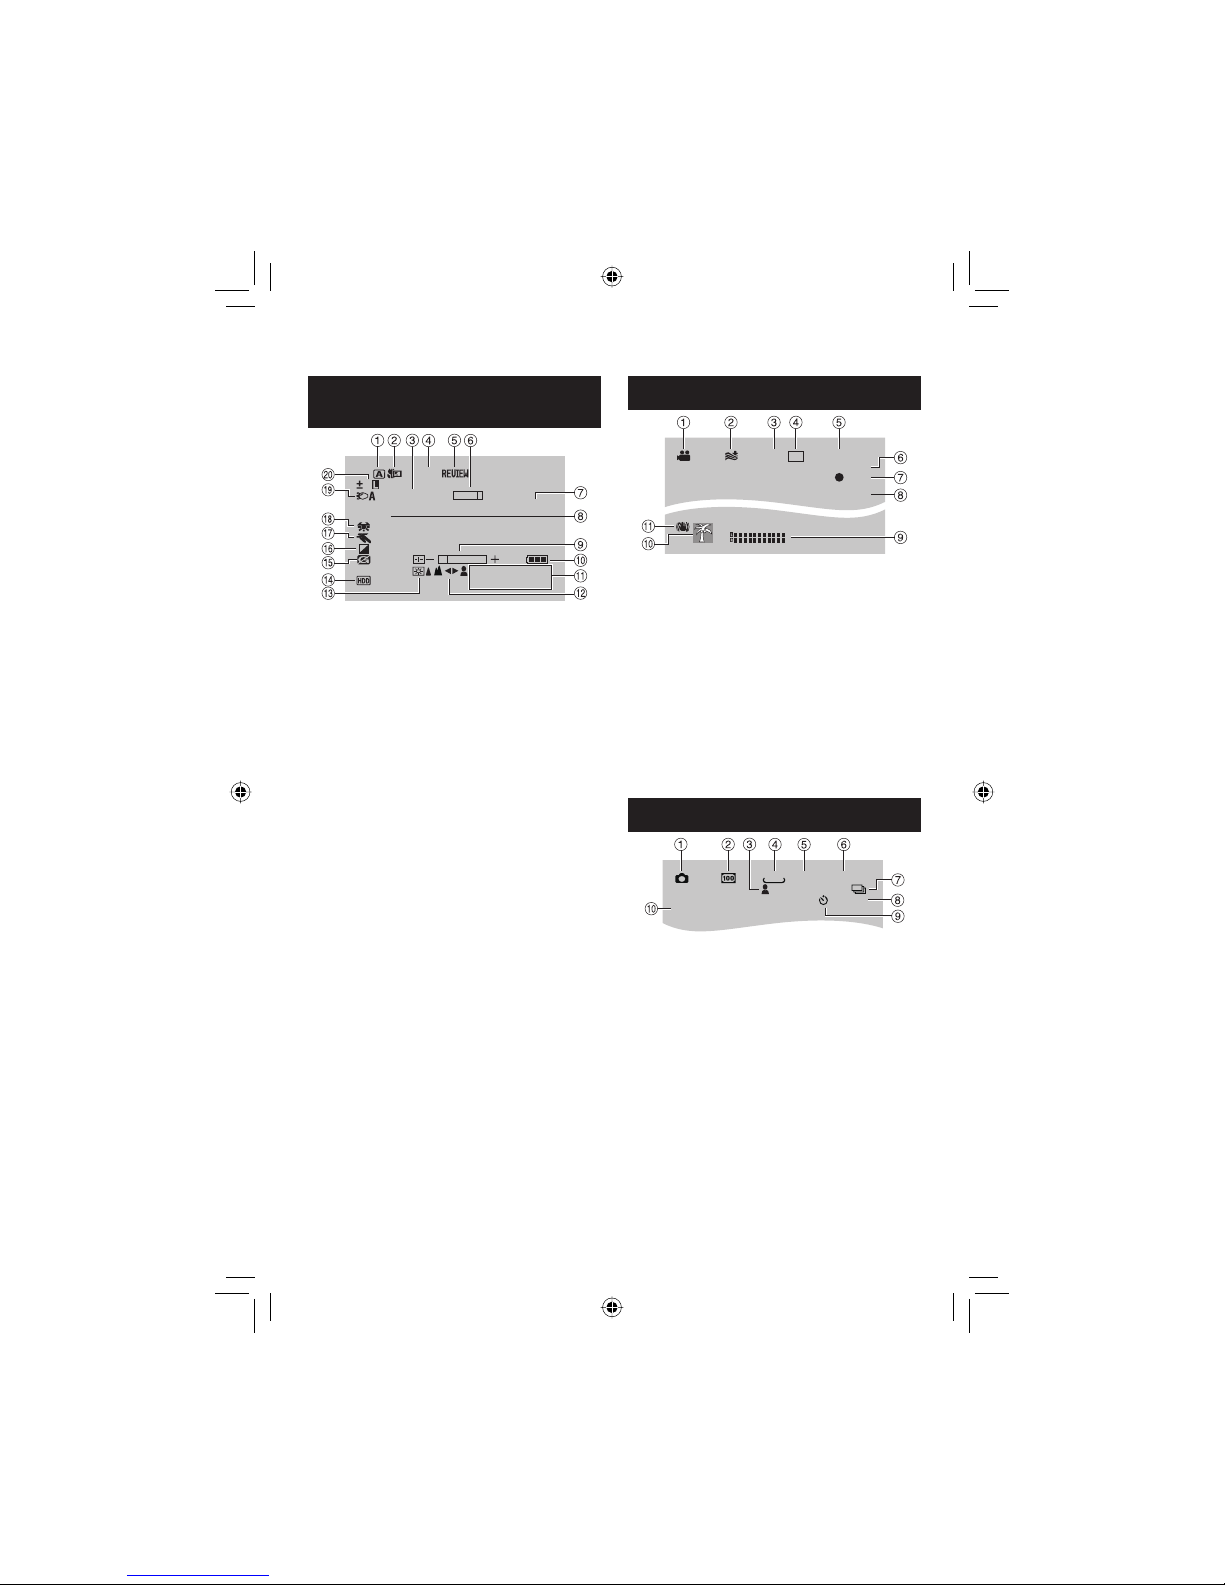
Indications on LCD Monitor
During both Video and Still Image
Recording
WT
0
FOCUS
200X
1/4000
LCD
1080p
4:55PM
JAN.20.2008
! Selected Recording Mode Indicator
(墌 p. 23)
# Tele Macro Mode Indicator
$ Approximate Zoom Ratio
% Output with 1080p
& Quick Review Indicator
( Zoom Indicator
) Focus Assist Indicator
* Shutter Speed
+ Brightness/Sharpness Control Indicator
, Battery Indicator
- Date/Time
. Manual Focus Adjustment Indicator
/ Monitor Backlight
0 Selected Recording Medium Indicator
1 Drop Detection Indicator (Appears when
[DROP DETECTION] is set to [OFF].)
2 Effect Mode Indicator
3 Program AE Mode Indicator
4 White Balance Indicator
5 LED Light Indicator (墌 p. 22)
6 ±0 : Exposure Adjustment Indicator
- : Backlight Compensation Indicator
. : Spot Exposure Control Indicator
C
: Iris Lock Indicator
During Video Recording Only
REC
0:04:01
[4h59m]
XP
xvC
PHOTO
! Mode Indicator (墌 p. 20)
# Wind Cut Indicator
$ x.v.Color™
% Picture Quality
& Remaining Time (墌 p. 20, 38)
( Counter
)
M
REC : (Appears during recording.)
(墌 p. 20)
MQ
: (Appears during record-standby
mode.)
* Shooting Indicator (墌 p. 20)
+ Microphone Input Level Indicator
, Event Indicator (墌 p. 22)
- Digital Image Stabilizer (DIS) Indicator
(Appears when [DIS] is set to [OFF].)
During Still Image Recording Only
[9999]
FINE
10
1920
PHOTO
F4.0
! Mode Indicator (墌 p. 21)
# ISO Sensitivity
(GAIN): When set to [AUTO], there is no
indication.
$ Focus Indicator (墌 p. 21)
% Image Size
& Picture Quality
( Remaining Number of Shots (墌 p. 38)
) { : Continuous Shooting Mode Indicator
J : Bracket Shooting Mode Indicator
* Shooting Indicator (墌 p. 21)
+ Self-Timer Indicator
, Aperture Value (F-number)
Page 15
15
EN
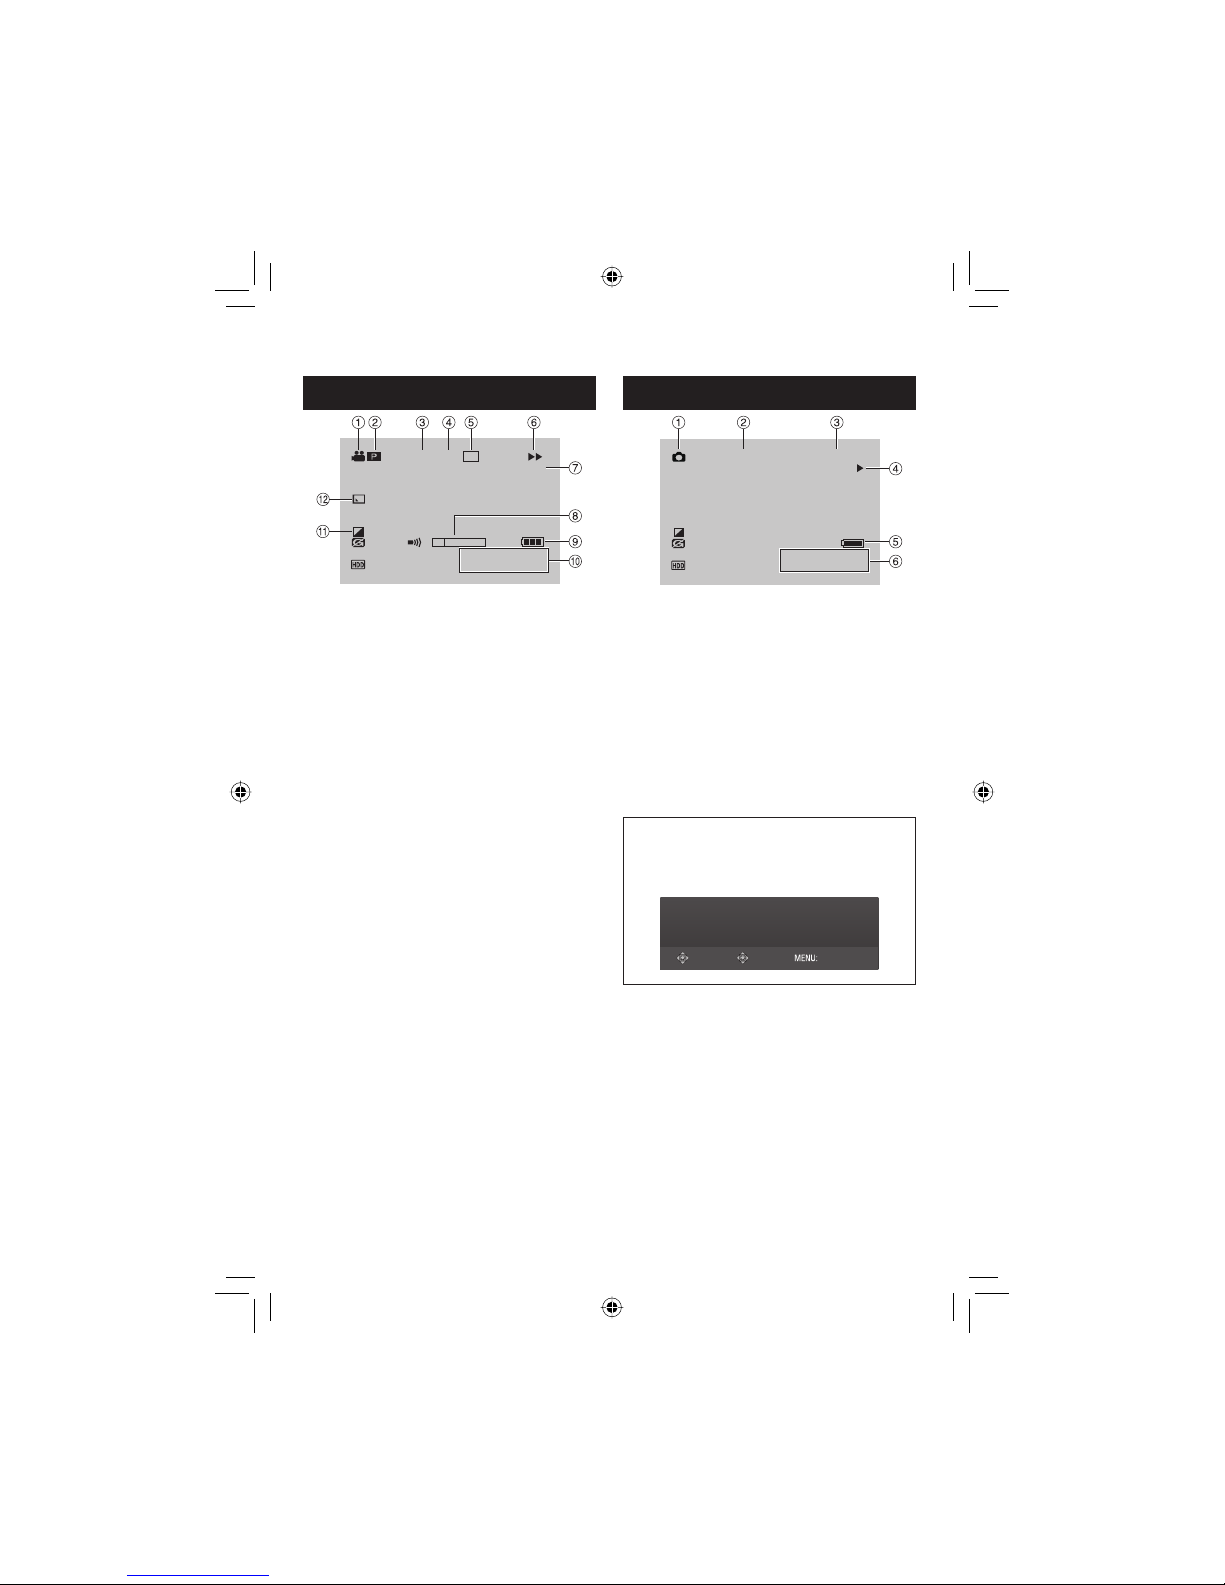
During Video Playback
1:55:01
X-60
XP
xvC1080p
4:55PM
JAN.20.2008
! Mode Indicator (墌 p. 24)
#
6
: Playlist Playback Indicator (Appears
when playing back a playlist.)
$ Output with 1080p
% x.v.Color™
& Picture Quality
( Playback Mode (墌 p. 24)
F
:
Playback
Q
:
Pause
K
:
Forward Search
J
:
Reverse Search
QF
:
Forward Slow-Motion
PQ
:
Reverse Slow-Motion
(The number on the left shows speed.)
) Counter
* Volume Level Indicator
+ Battery Indicator
, Date/Time
- Effect Mode Indicator
. Wipe/Fader Effect Indicator
During Still Image Playback
101-0098
PM
4:55
JAN.20.2008
1080p
! Mode Indicator (墌 p. 25)
# Output with 1080p
$ Folder/File Number
% Slide Show Playback Indicator (墌 p. 25)
& Battery Indicator
( Date/Time
Operation guide display
The operation guide is displayed at the
bottom of the screen during menu display
etc.
SELECT
SET QUIT
Page 16
16
EN
Necessary Settings before Use
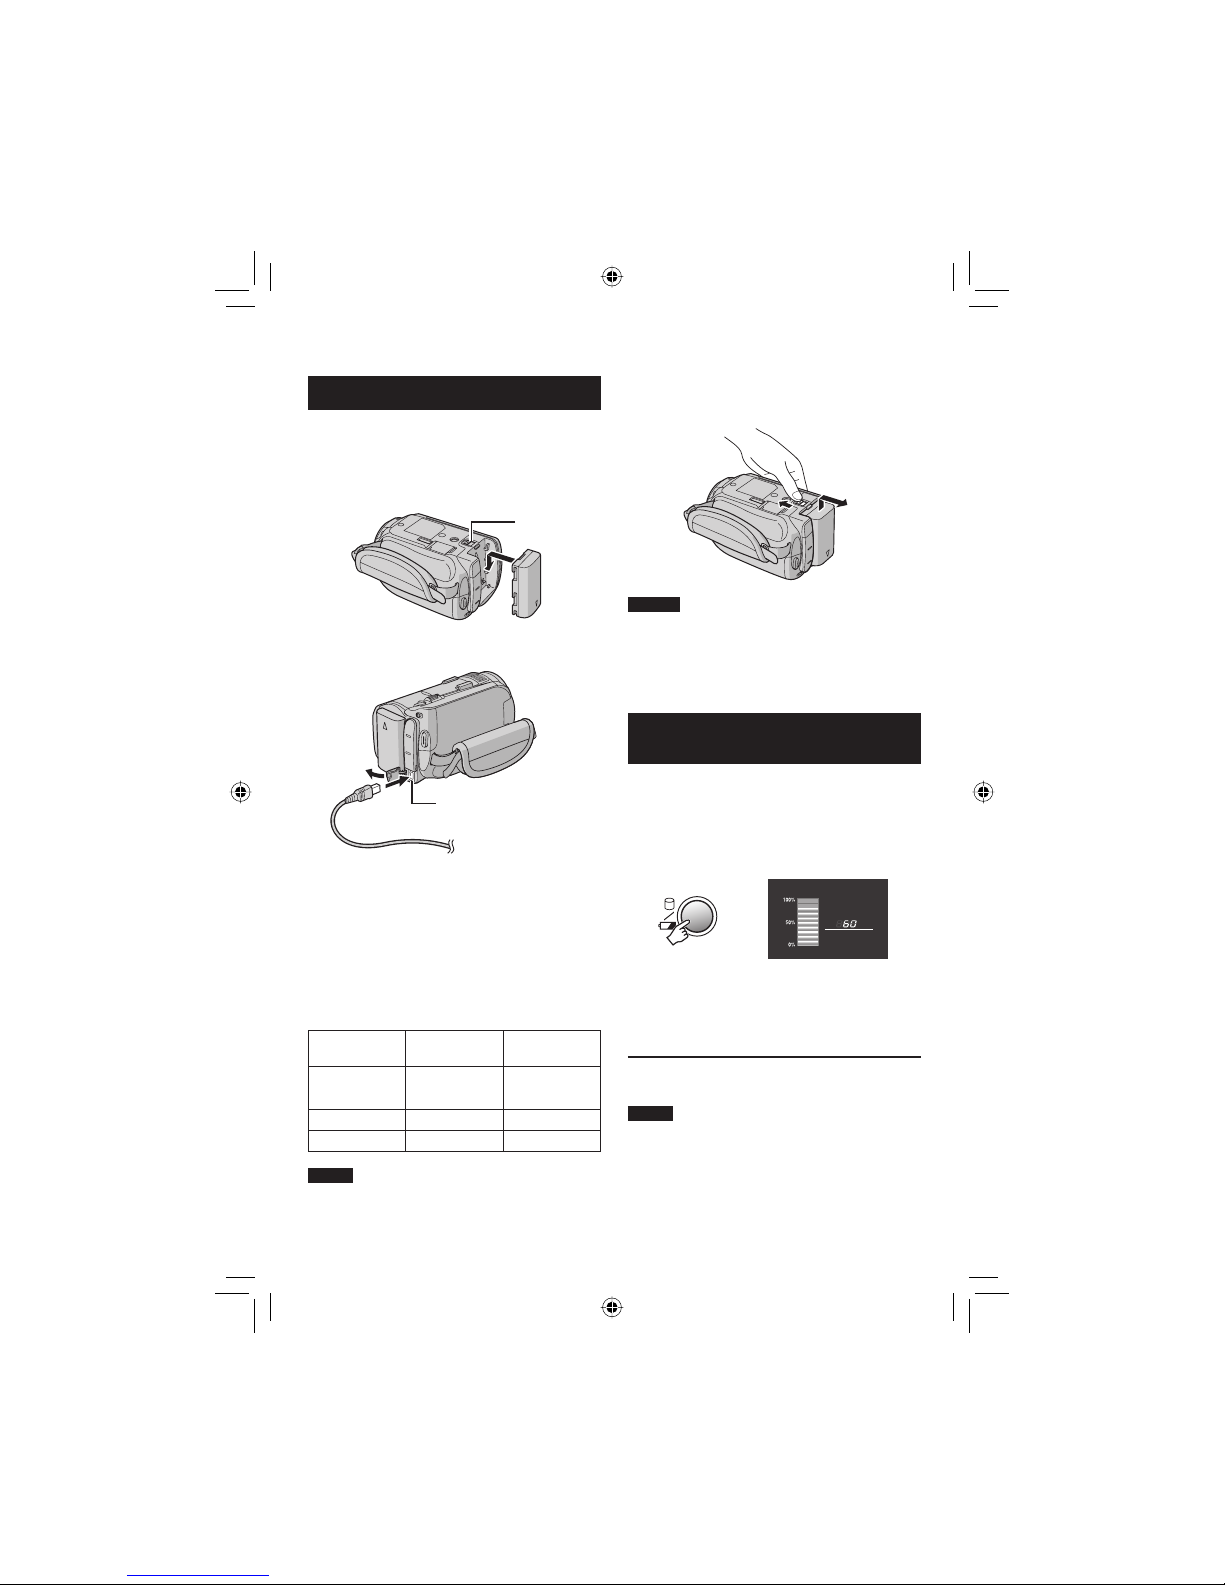
Charging the Battery Pack
1 Close the LCD monitor to turn off the
camera.
2 Attach the battery pack.
BATT.
3 Connect the AC adapter.
•
The power/charge lamp blinks to indicate
charging has started.
•
When the lamp goes out, charging is
fi nished.
Required charging/recording time
(approx.)
* When the LED light is off and the monitor
backlight is set to [STANDARD] mode.
Battery pack Charging time
Recording
time
BN-VF808U
(Provided)
1 hr. 30 min. 1 hr. 00 min.*
BN-VF815U 2 hr. 40 min. 2 hr. 00 min.*
BN-VF823U 3 hr. 50 min. 3 hr. 05 min.*
NOTE
The actual recording time may shorten
depending on the recording environment, such
as when recording scenes with fast moving.
䡵
To detach the battery pack
Slide and hold BATT. (step 2), then remove
the battery pack.
NOTES
•
You can also use the camera with just the AC
adapter.
•
Please do not pull or bend the AC adapter
plug and cable. This may damage the AC
adapter.
Checking the Remaining Battery
Power
Preparation:
•
Close the LCD monitor to turn off the
camera.
•
Attach the battery pack.
! mode: press INDEX twice.
# mode: press INDEX.
INDEX
BATTERY CONDITION
MAX TIME
min
Battery information is displayed for approx.
3 seconds if the button is pressed and
released quickly, and for approx. 15 seconds
if the button is pressed and held for several
seconds.
To return to the normal screen
Press INDEX.
NOTE
The recordable time display should only be
used as a guide. It is displayed in 10 minute
units.
䡵
䡵
DC Connector
AC Adapter
To AC Outlet
(110V to 240V)
Page 17
17
EN
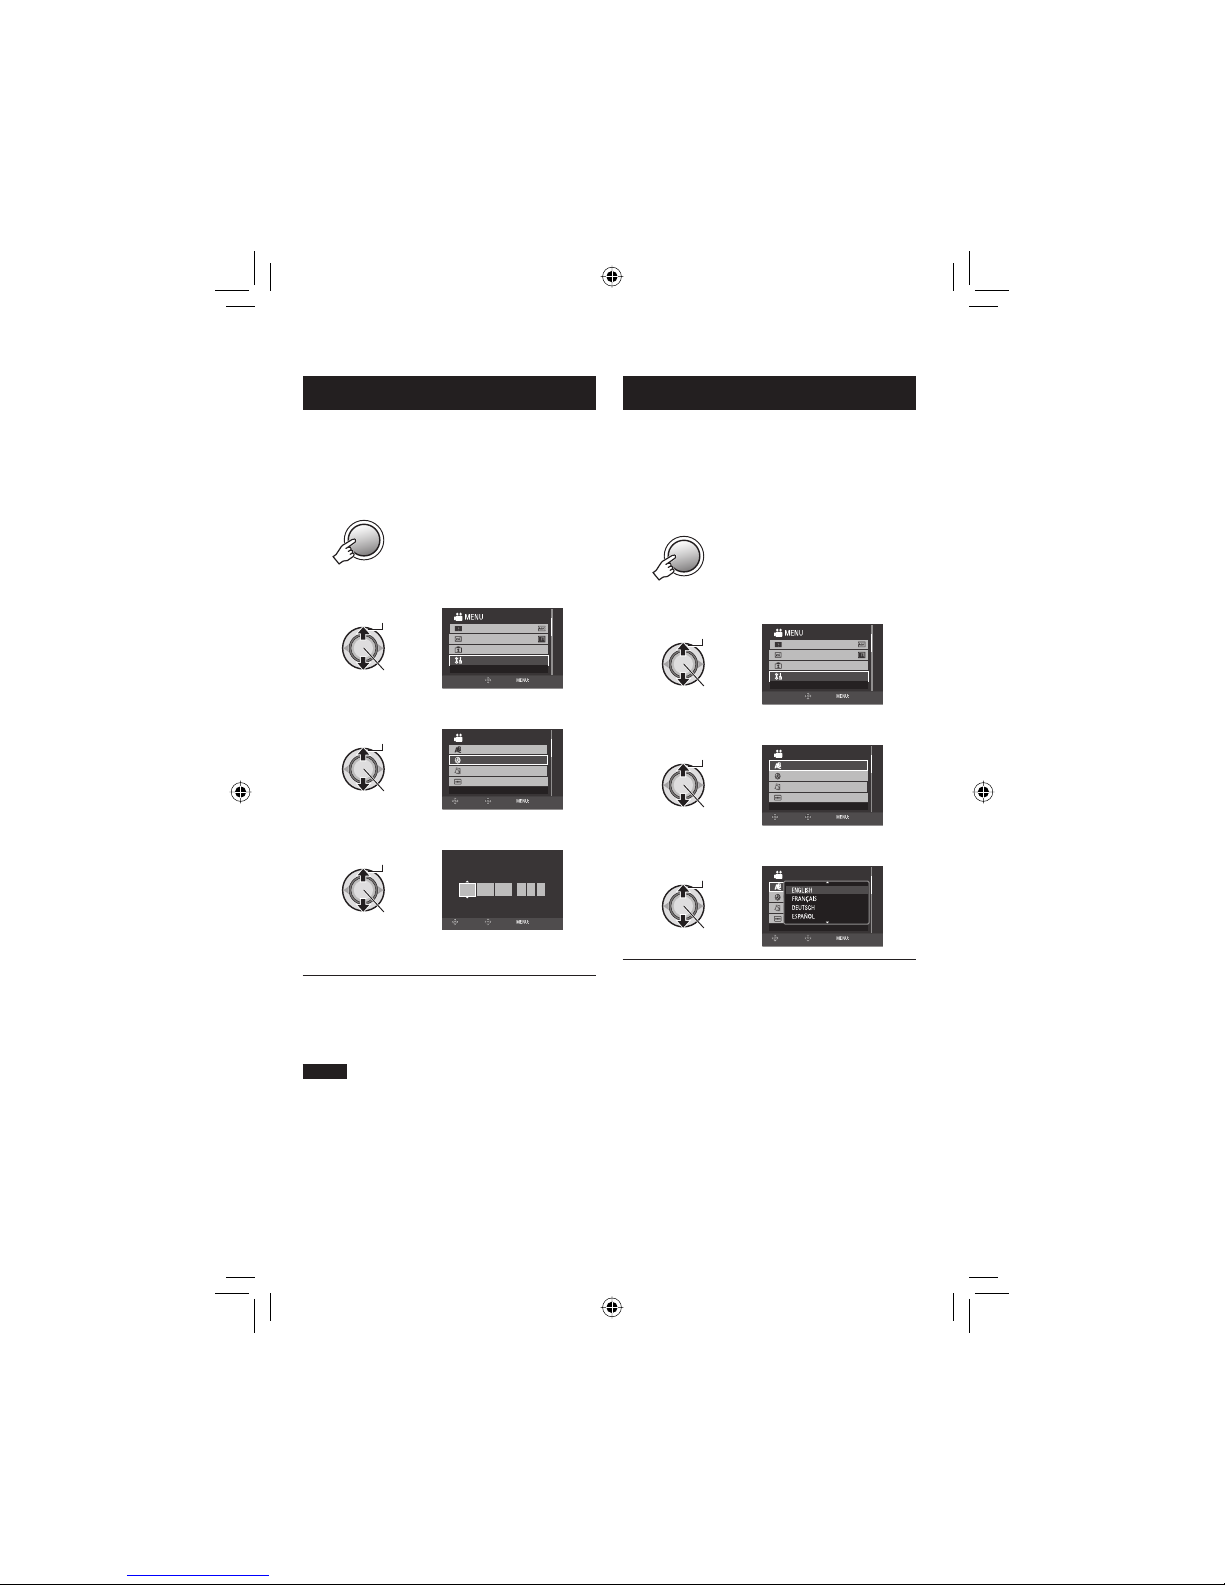
Date/Time Setting
1 Open the LCD monitor to turn on the
camera.
2 Press MENU.
MENU
3 Select [BASIC SETTINGS].
Select
Set
x.v.Color
REGISTER EVENT
BASIC SETTINGS
GAIN UP
SET QUIT
4 Select [CLOCK ADJUST].
Select
Set
SET DATE/TIME
BASIC SETTINGS
LANGUAGE
DATE DISPLAY STYLE
CLOCK ADJUST
MONITOR BRIGHT
RETURN
SET QUIT
5 Set the date and time.
Select
Set
CLOCK ADJUST
SELECT
SET QUIT
DATE TIME
JAN 31
11AM07
2008
Repeat this step to input the month, day,
year, hour and minute.
To return to the previous screen
Move the set lever to £.
To quit the screen
Press MENU.
NOTE
If you do not set the date and time, the [SET
DATE/TIME!] screen appears every time you
turn on the camera.
䡵
䡵
Language Setting
The language on the display can be changed.
1 Open the LCD monitor to turn on the
camera.
2 Press MENU.
MENU
3 Select [BASIC SETTINGS].
Select
Set
x.v.Color
REGISTER EVENT
BASIC SETTINGS
GAIN UP
SET QUIT
4 Select [LANGUAGE].
Select
Set
BASIC SETTINGS
LANGUAGE
DATE DISPLAY STYLE
CLOCK ADJUST
MONITOR BRIGHT
SELECT LANGUAGE
RETURN
SET QUIT
5 Select the desired language.
Select
Set
BASIC SETTINGS
LANGUAGE
DATE DISPLAY STYLE
CLOCK ADJUST
MONITOR BRIGHT
RETURN
SET QUIT
To return to the previous screen
Move the set lever to £.
To quit the screen
Press MENU.
䡵
䡵
Page 18
18
EN
Other Settings
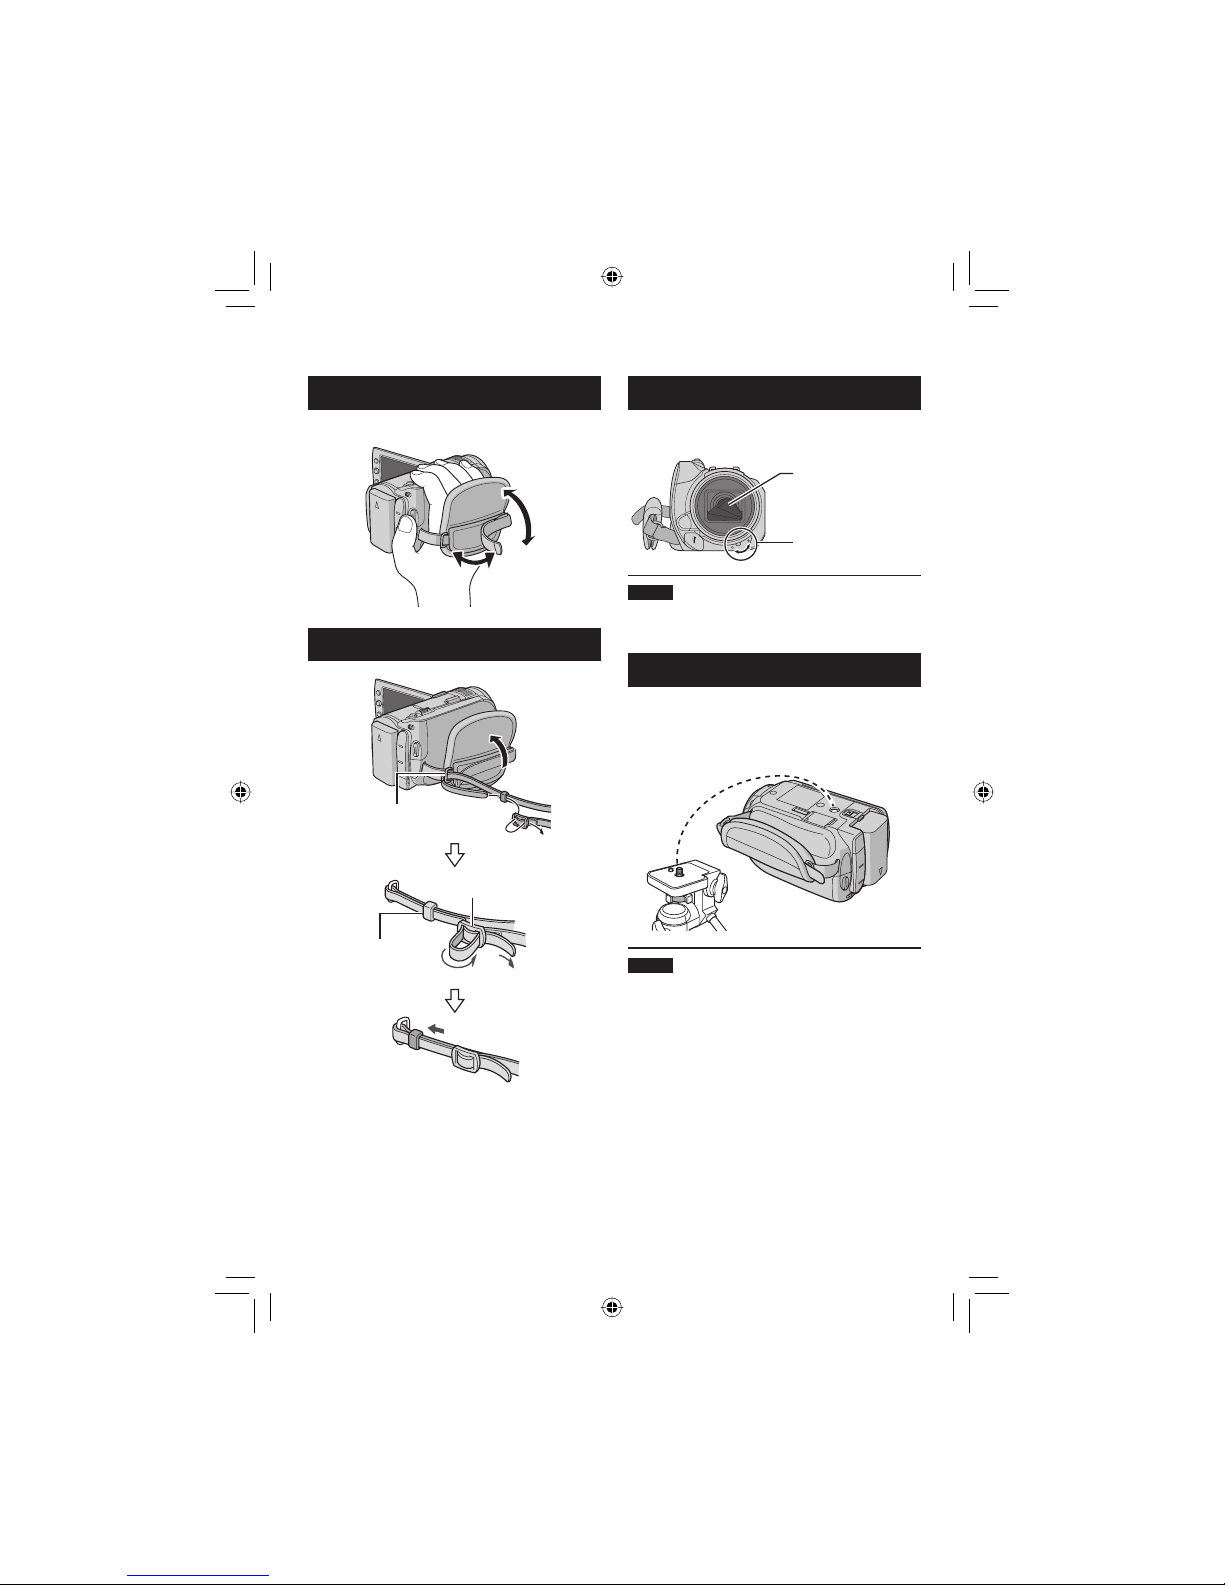
Grip Adjustment
Open the pad and make grip adjustments.
Attaching the Shoulder Strap
Lens Cover
When not using the camera, close the lens
cover to protect the lens.
NOTE
Do not push the lens cover strongly. Doing so
may cause damage to the lens.
Tripod Mounting
Align the camera stud hole with the tripod stud,
and the mounting socket with the screw, and
then rotate the camera clockwise to mount it to
the tripod.
NOTE
Do not use a tripod on unsteady or unlevel
surfaces. It could tip over, causing serious
damage to the camera.
Eyelet
Strap Guide
Buckle
Lens Cover
Switch
Lens Cover
Page 19
19
EN
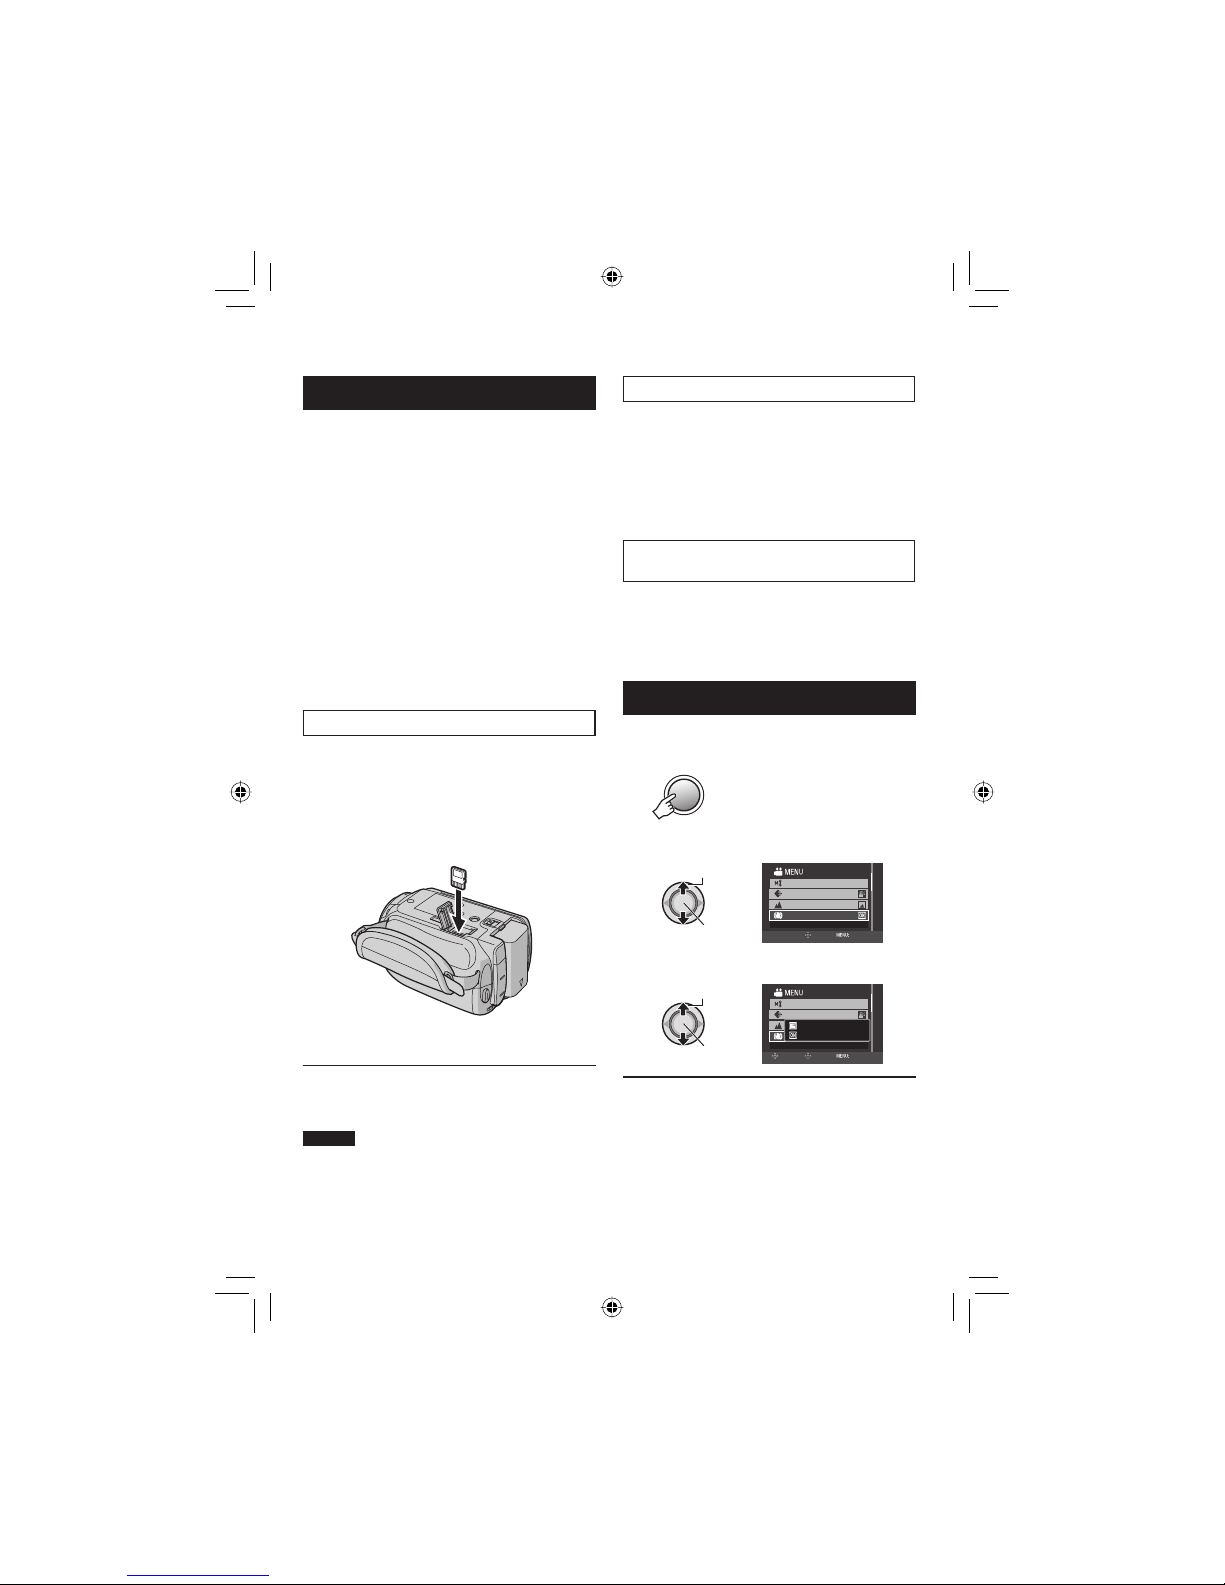
When Using a microSD Card
If you want to record to a microSD card, the
following 3 operations need to be performed.
•
Operations are confi rmed on the following
microSD cards.
- Panasonic
- TOSHIBA
- SanDisk
- ATP
Video recording:
Class 4 or 6 compatible microSDHC card
(4 GB, 8 GB)
Still image recording:
microSD card (256 MB to 2 GB) or
microSDHC card (4 GB, 8 GB)
•
If other media are used, they may fail to
record data correctly, or they may lose data
that had already been recorded.
•
MultiMediaCards are not supported.
Q Insert a microSD card
Preparation:
Close the LCD monitor to turn off the camera.
1 Open the microSD card cover.
2 Firmly insert the card with its clipped
edge fi rst.
3 Close the microSD card cover.
To remove a microSD card
Push the microSD card once.
After the card comes out a little, pull it out.
NOTES
•
Insert and remove the microSD card only
while the power is turned off. Otherwise, data
on the card may be corrupted.
•
Do not touch the terminal on the reverse side
of the label.
䡵
R Change the recording medium
The camera is programmed to record on the
built-in hard disk when it is shipped from the
factory. You can change the recording medium
to microSD card.
Set [REC MEDIA FOR VIDEO] and [REC
MEDIA FOR IMAGE] to [SD].
S Format a microSD card when using it
for the fi rst time
This will also ensure stable speeds and
operation when accessing the microSD card.
Select [FORMAT SD CARD] to format the
card.
Changing the Menu Settings
1 Press MENU.
MENU
2 Select the desired menu.
Select
Set
ZOOM
DIS
MANUAL SETTING
COMPENSATE FOR HAND SHAKE
VIDEO QUALITY
SET QUIT
3 Select the desired setting.
Select
Set
ZOOM
DIS
MANUAL SETTING
COMPENSATE FOR HAND SHAKE
VIDEO QUALITY
OFF
ON
RETURN
SET QUIT
To return to the previous screen
Move the set lever to £.
To quit the screen
Press MENU.
䡵
䡵
Page 20
20
EN
Video Recording
Preparation: Open the LCD monitor to turn on the camera.
Recording Files
RECORDING
Press PLAY/REC to select the
recording mode.
PLAY/REC
SELECT
Press START/STOP to start
recording.
START
/STOP
REC
[4h59m]
XP
0:01:30
To stop recording
Press START/STOP again.
To view the last recorded scene
Press QUICK REVIEW while recording is
paused. Pressing DELETE during playback
deletes that scene.
To change the picture quality
Change the settings in [VIDEO QUALITY].
䡵
䡵
䡵
Slide the mode switch to select !
(video) mode.
NOTES
•
If the camera is not operated for 5 minutes while the power is on, it turns itself off automatically
to conserve power. To turn on the camera again when using the battery pack, close the LCD
monitor and open it again. When using the AC adapter, perform any operation such as zooming.
•
A new fi le will be created for every 4 GB.
•
Do not move or shake the camera suddenly during recording. If you do so, the driving sound
(hum) of the hard disk may be recorded.
To record a still image during video
recording
Press SNAPSHOT.
䡵
Approximate remaining
time for recording
Page 21
21
EN
Slide the mode switch to select #
(still image) mode.
Press PLAY/REC to select the
recording mode.
PLAY/REC
SELECT
19
Press and hold SNAPSHOT
halfway.
[
FINE
1920
The ? indicator becomes green when
the captured image is focused.
Press SNAPSHOT fully to take the
picture.
PHOTO
[9999]
FINE
20
NOTES
•
DIS (Digital Image Stabilizer) does not function during still image recording.
•
If the camera is not operated for 5 minutes while the power is on, it turns itself off automatically
to conserve power. To turn on the camera again when using the battery pack, close the LCD
monitor and open it again. When using the AC adapter, perform any operation such as zooming.
•
The sides of still images recorded in 16:9 size may be cut off when printed. Check whether 16:9
size prints can be printed at your local print store.
•
When you turn off the camera after the recording is paused and turn it on again, the QUICK
REVIEW and DELETE button cannot work.
Still Image Recording
Preparation: Open the LCD monitor to turn on the camera.
To view the last recorded scene
Press QUICK REVIEW while recording is
paused. Pressing DELETE during playback
deletes that scene.
To change the picture quality
Change the settings in [IMAGE QUALITY].
To change the image size
Change the settings in [IMAGE SIZE].
To record still images continuously
Set [SHUTTER MODE] to [CONTINUOUS
SHOOTING].
䡵
䡵
䡵
䡵
Page 22

22
EN
Recording Files (Continued)
Zooming
Preparation:
•
Select ! or # mode.
•
Select the recording mode.
Zoom out Zoom in
W: Wide angle T: Telephoto
Maximum zoom ratio (factory-preset)
! mode # mode
10x 8x
To change the maximum zoom ratio
(! mode only)
Change the settings in [ZOOM].
NOTE
Macro shooting is possible as close as approx.
5 cm (2
") to the subject when the zoom lever
is set all the way to W.
LED Light
Preparation:
•
Select ! or # mode.
•
Select the recording mode.
LIGHT
Each time you press the setting changes.
D
The LED light remains on
regardless of the surrounding
conditions.
D
A
The LED light turns on
automatically when shooting in
insuffi cient light conditions.
No display
Deactivates this function.
䡵
Registering Files to Events
!
If you select an event to register the fi le to
before starting recording, the fi le will be
registered to the selected event, thus making
the fi le easy to fi nd at playback.
Preparation:
•
Select ! mode.
•
Select the recording mode.
1 Press MENU.
MENU
2 Select [REGISTER EVENT].
Select
Set
x.v.Color
REGISTER EVENT
BASIC SETTINGS
GAIN UP
REGISTER EVENT AT RECORDING
SELECT
SET QUIT
3 Select the event that you want to
register the fi le to.
To cancel the event registration, select
[DON’T REGISTER].
Select
Set
VACATION
DON'T REGISTER NEXT PAGE
1/ 3
SELECT
REGISTER
QUIT
The selected event is displayed on the
screen.
To quit the screen
Press MENU.
NOTE
Once you select a certain event to register a
fi le, the setting will remain even if you turn off
the camera.
䡵
Page 23
23
EN
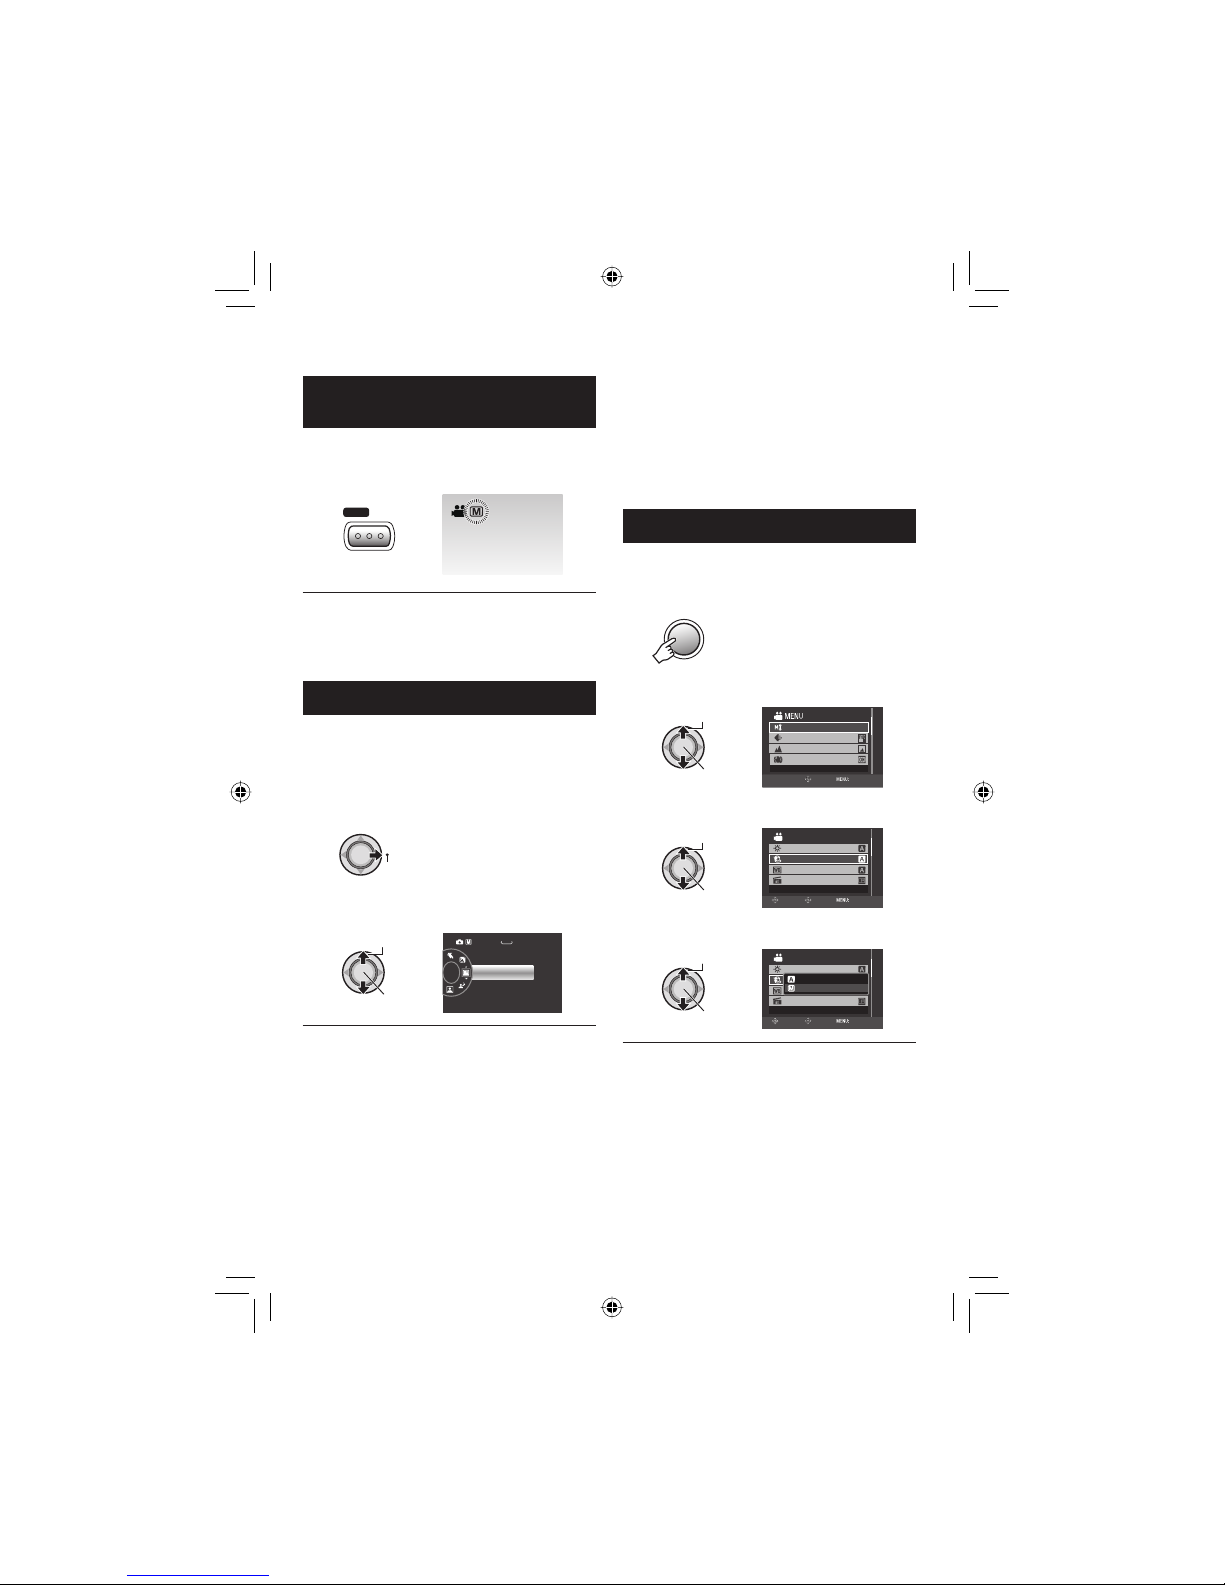
To Change to Manual Recording
Mode
Preparation:
•
Select ! or # mode.
•
Select the recording mode.
/
INFO
AUTO
To return to the auto recording mode
Press AUTO/INFO so that the 4 indicator
appears.
Program AE
You can record videos or still images with
optimum brightness by adjusting the exposure
and shutter speed to suit your surroundings or
the subject.
In the manual recording mode;
1
PROGRAM AE
2 Select the desired setting.
Select
Set
OFF
[9999]
FINE
1920
To cancel the program AE
Select [OFF] in step 2.
Items for program AE setting
•
6 PORTRAIT*:
The subject in the foreground is
accentuated by blurring the background.
•
H SPORTS:
Records fast moving subjects clearly.
•
G SNOW:
Compensates for subjects that may appear
too dark when shooting in extremely bright
surroundings, such as in snow.
䡵
䡵
䡵
•
/ SPOTLIGHT:
Select this when a spotlight makes a
subject appear too bright.
•
V TWILIGHT:
Makes evening scenes look more natural.
* # mode only
Manual Setting in Menu
In the manual recording mode;
1 Press MENU.
MENU
2 Select [MANUAL SETTING].
Select
Set
VIDEO QUALITY
ZOOM
DIS
MANUAL SETTING
SET MANUAL RECORDING
SET QUIT
3 Select the desired menu.
Select
Set
SHUTTER SPEED
WB
ADJUST BRIGHTNESS
ADJUST SHUTTER SPEED
MANUAL SETTING
EFFECT
RETURN
SET QUIT
4 Select the desired setting.
Select
Set
SHUTTER SPEED
WB
ADJUST BRIGHTNESS
MANUAL SETTING
EFFECT
RETURN
SET QUIT
AUTO
MANUAL
To return to the previous screen
Move the set lever to £.
To quit the screen
Press MENU.
䡵
䡵
Manual Recording
Page 24
24
EN
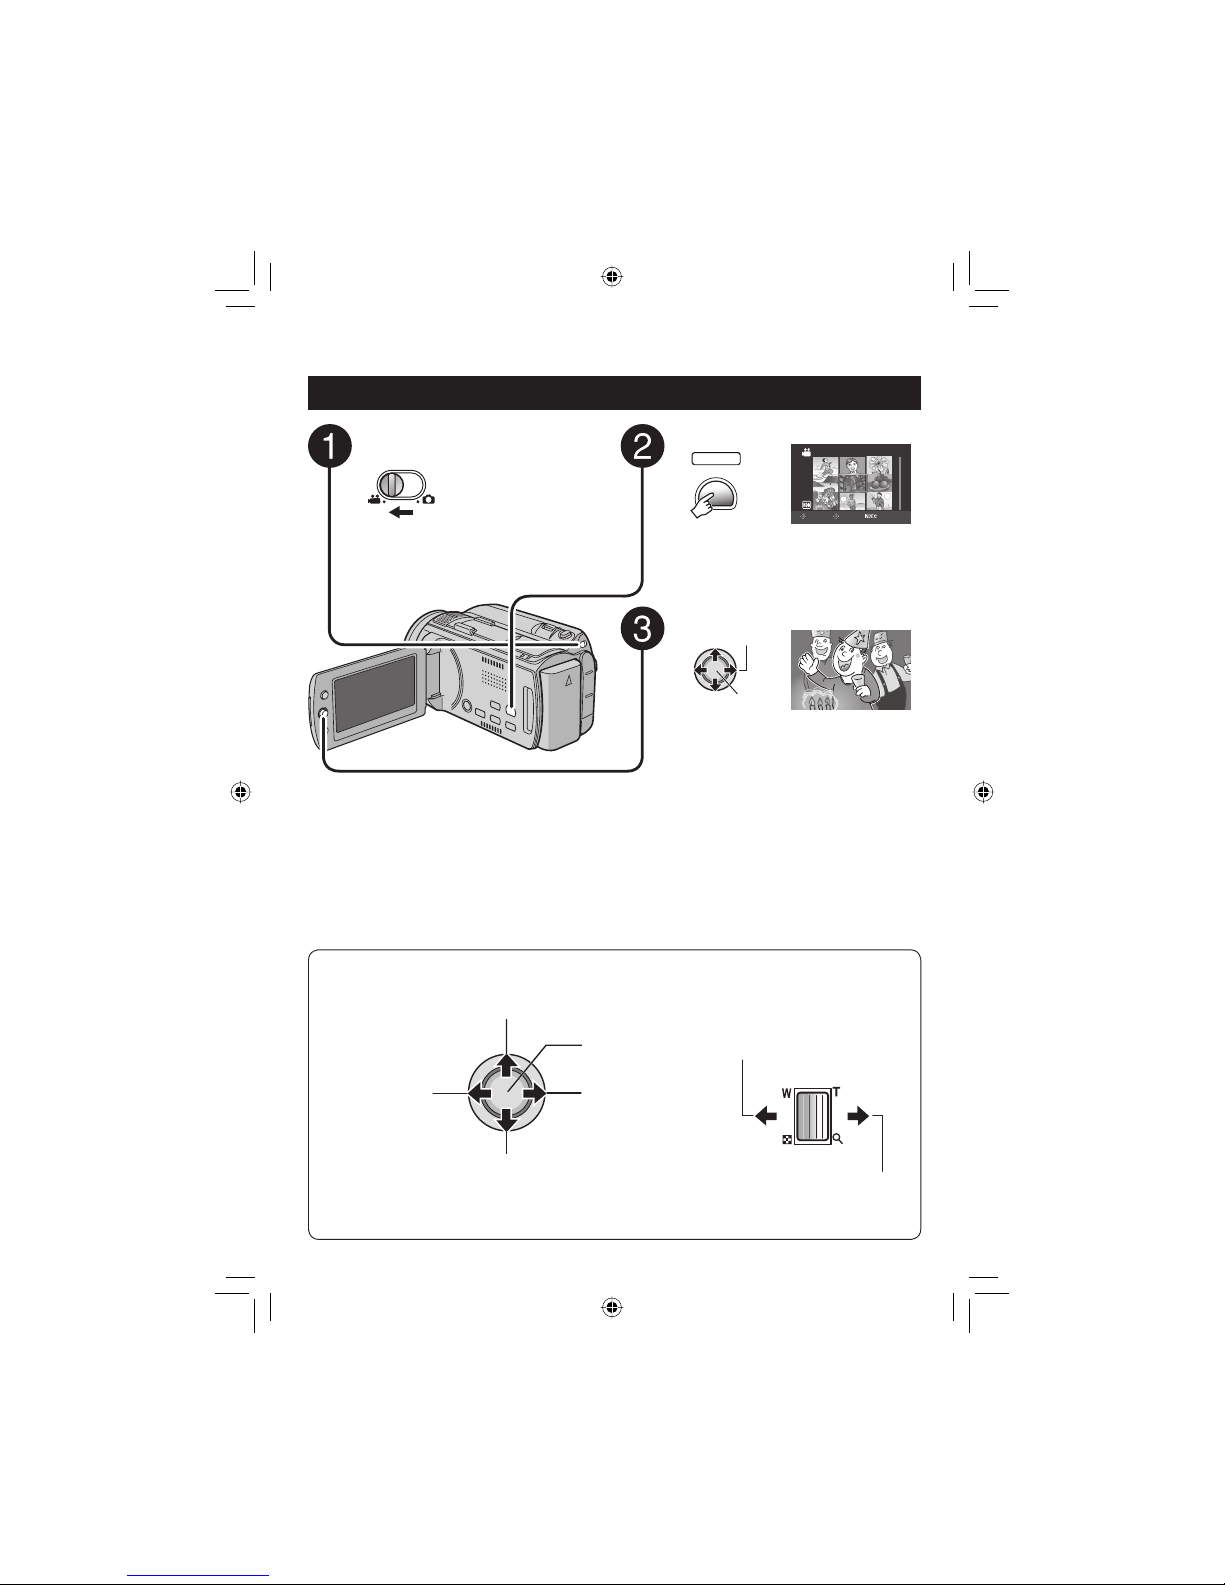
Operations during Playback
Return to the fi rst
scene of the fi le
Reverse search/
Frame-by-frame
playback (during
pause)
Play/Pause
Forward search/
Frame-by-frame
playback (during
pause)
Go to the fi rst scene
of the next fi le
During forward/reverse search, moving the set lever to £ / ¤
alters the search speed (maximum 60x).
— : Turn down the
volume
+ : Turn up the
volume
Speaker volume
PLAYBACK
Playing Back Files
Video Playback
Slide the mode switch to select !
(video) mode.
Select the playback mode.
PLAY/REC
SELECT
VIDEO
1/1
SELECT
SET SORT
The index screen appears.
Select the desired fi le.
Select
Set
To return to the index screen
Press INDEX.
To check the fi le information
Press AUTO/INFO when playback is
stopped.
To delete a video
Press DELETE when playback is stopped.
䡵
䡵
䡵
Page 25
25
EN
To return to the index screen
Press INDEX.
To check the fi le information
Press AUTO/INFO.
To delete a still image
Press DELETE.
䡵
䡵
䡵
Select the playback mode.
PLAY/REC
SELECT
IMAGE
1/1
SELECT
SET SORT
The index screen appears.
Select the desired fi le.
Select
Set
Slide the mode switch to select #
(still image) mode.
Rotate 90 degrees
(counterclockwise)
Display the previous fi le
Start/end the slide show
Display the next fi le
Rotate 90 degrees
(clockwise)
During the slide show, moving the set lever to ¡ /
¢ changes the playback order.
Operations during Playback
Still Image Playback
Page 26
26
EN
This camera is designed to be used with
high-defi nition or NTSC-type color television
signals. It cannot be used with a television of a
different standard.
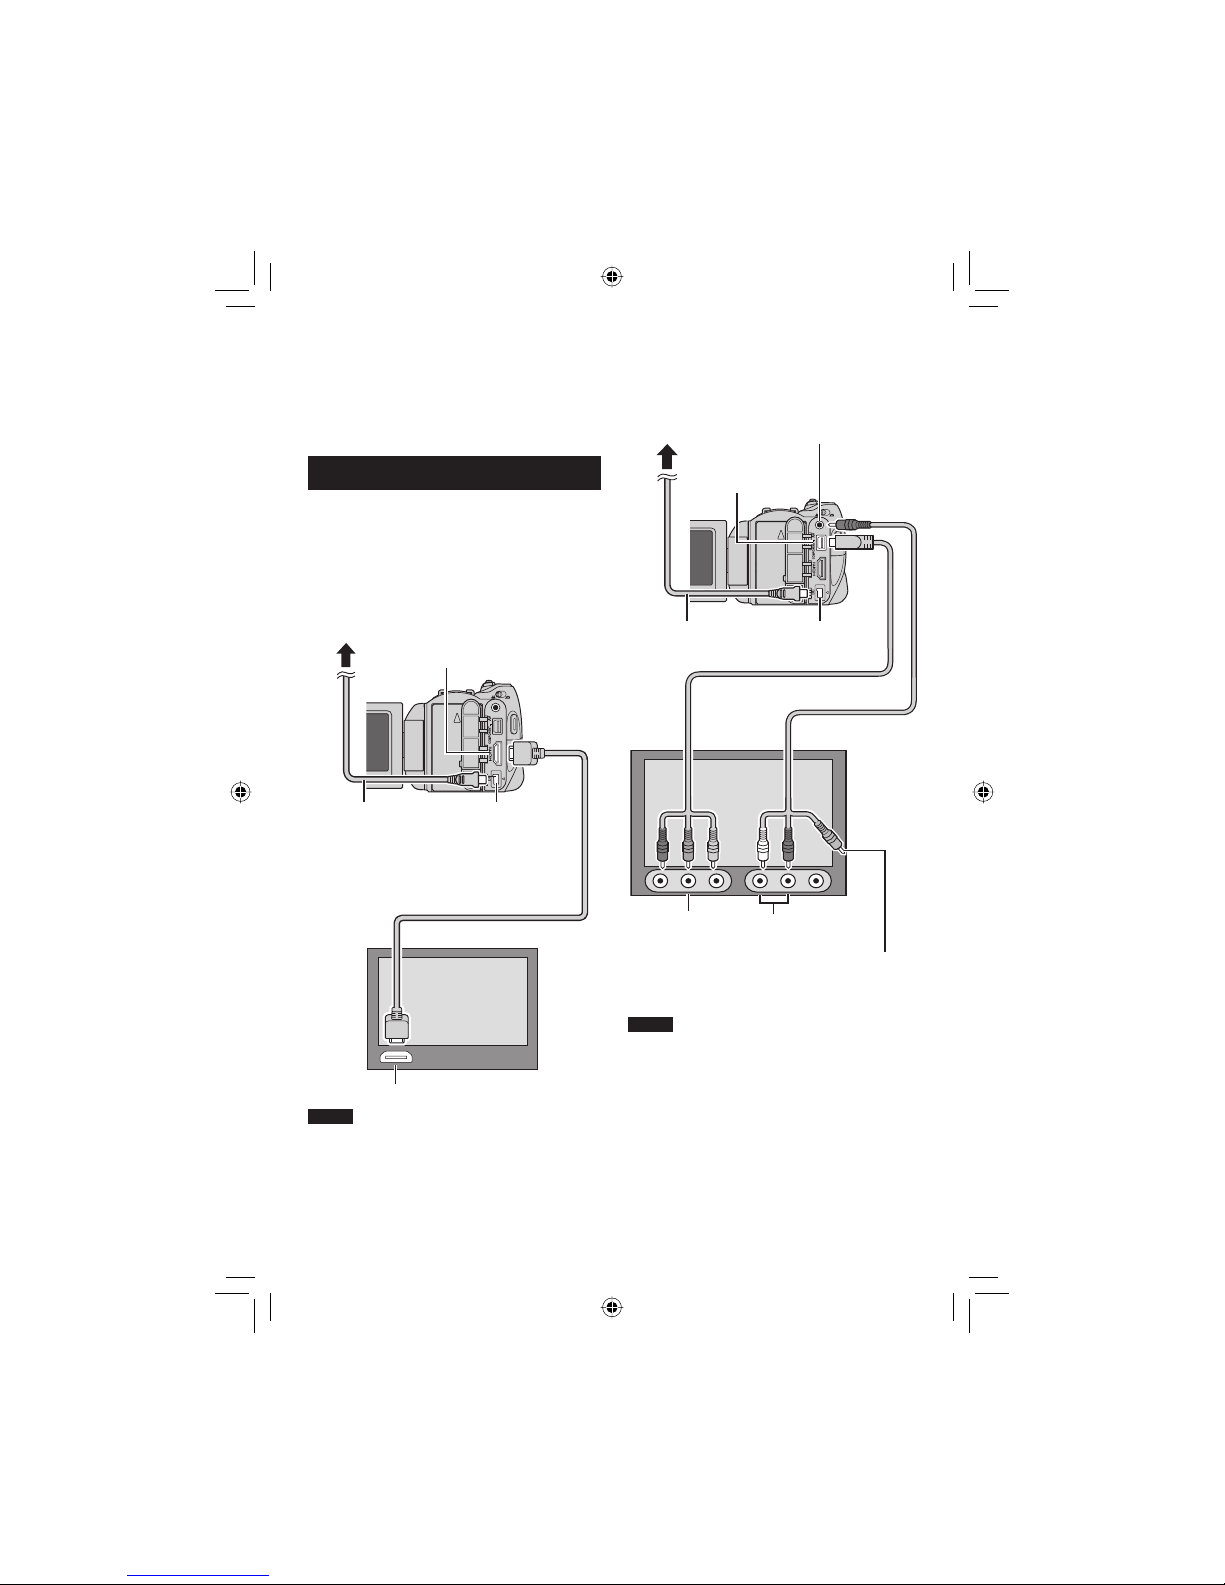
Connection with TV
You can output videos from the HDMI
connector, COMPONENT connector, or AV
connector. Select the connector that best suits
your television.
Preparation: Turn off all units.
To connect using the HDMI connector
NOTE
When connecting to a 1080p compatible TV,
set [HDMI OUTPUT] to [AUTO1]. When this is
set, 1080p appears at the top of the display.
䡵
To connect using the COMPONENT
connector
NOTE
Change the settings in [COMPONENT
OUTPUT] according to the connection.
䡵
Watching Images on TV
HDMI Connector
AC Adapter
DC Connector
HDMI Connector
HDMI Cable (optional)
To AC Outlet
AV Cable
AC Adapter
To AC Outlet
Video Connector
is not in use.
AV Connector
Component Cable
DC Connector
COMPONENT
Connector
Audio L/R Input
Connector
COMPONENT
Input Connector
Page 27
27
EN
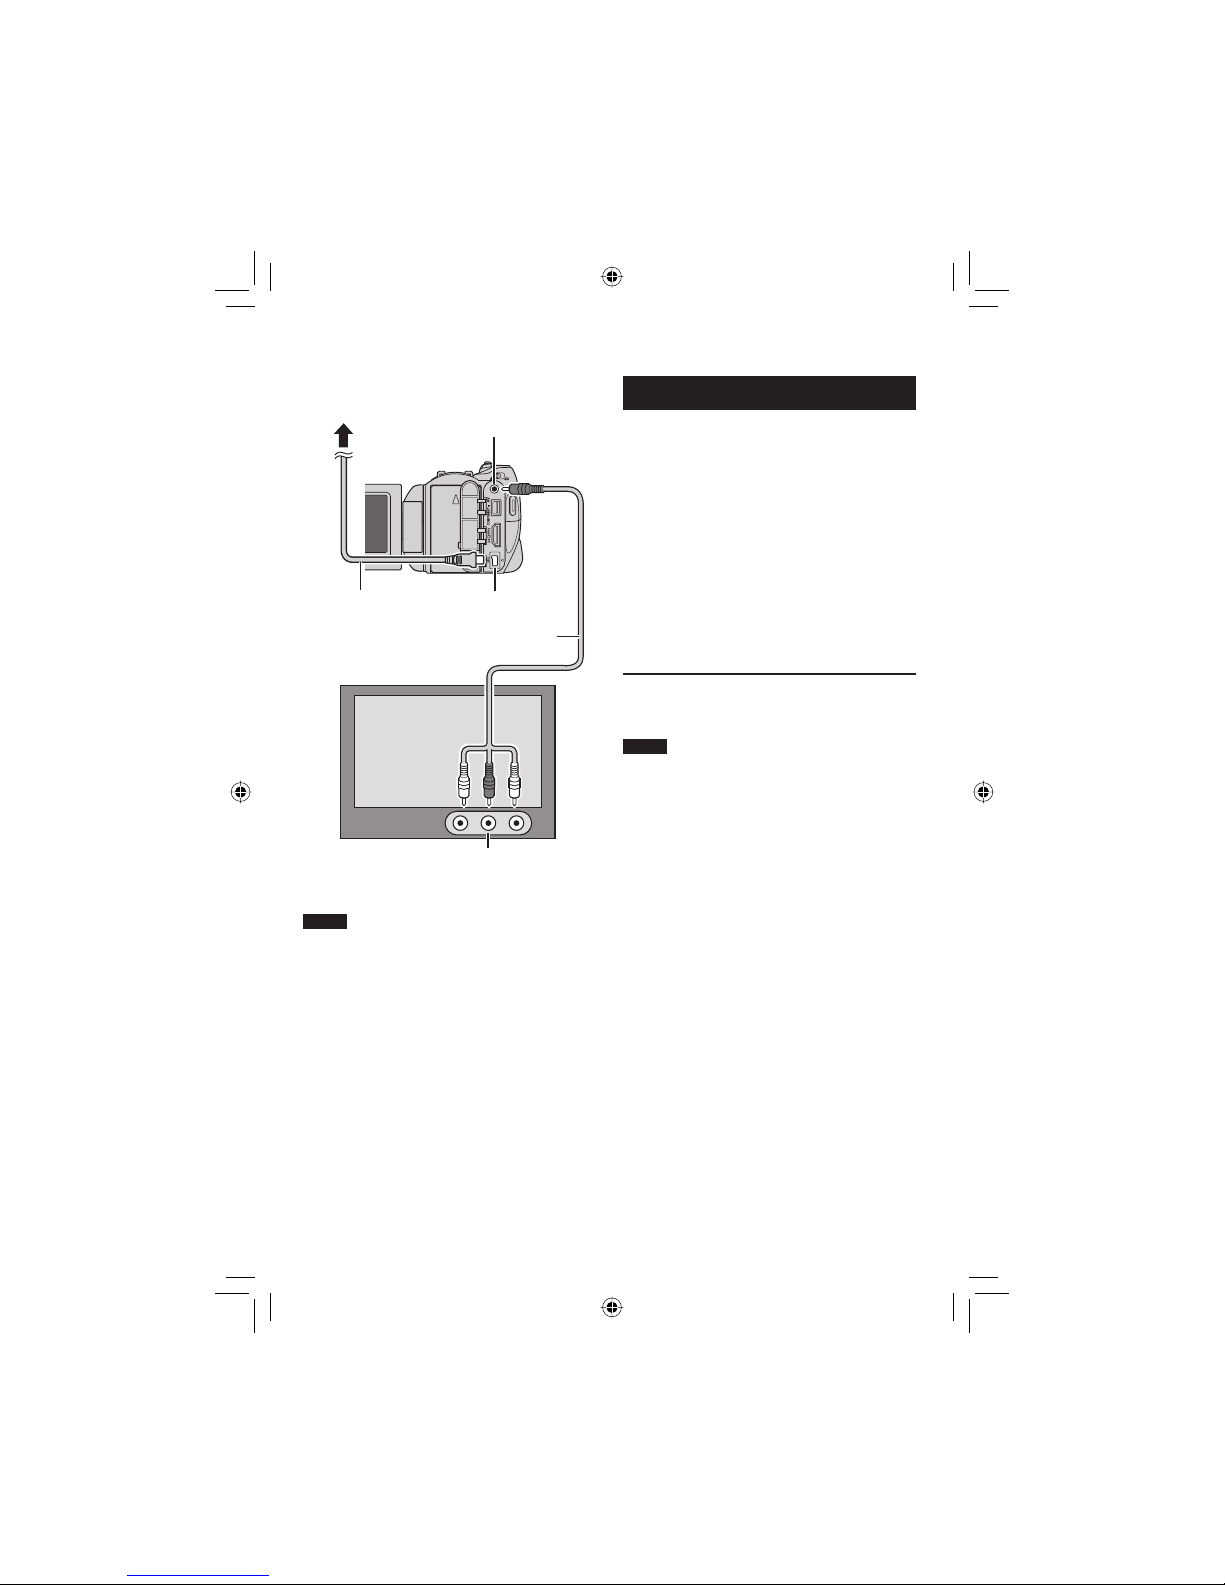
To connect using the AV connector
NOTE
Change the settings in [VIDEO OUTPUT] to
suit the screen size of your television.
䡵
Playback Operation
After the connection with TV is completed
1 Turn on the camera and the TV.
2 Set the TV to its VIDEO mode.
3 (Only when connecting the camera to
the VCR/DVD recorder)
Turn on the VCR/DVD recorder, and
set the VCR/DVD recorder to its AUX
input mode.
4 Start playback on the camera.
(墌 p. 24, 25)
To display camera’s on-screen display
on TV
Set [DISPLAY ON TV] to [ON].
NOTE
When the video was recorded with x.v.Color™
set to [ON], change the x.v.Color™ setting on
TV. For details, refer to the TV’s instruction
manual.
䡵
AV Cable
DC Connector
AC Adapter
To AC Outlet
AV Connector
AV Input Connector
Page 28

28
EN
Managing Files
EDITING/PRINTING
CAUTION
Do not remove the recording medium or
perform any other operation (such as turning
off the power) while accessing fi les. Also,
be sure to use the provided AC adapter, as
the data on the recording medium may be
corrupted if the battery becomes exhausted
during operation. If the data on the recording
medium becomes corrupted, format the
recording medium to use the medium again.
To Capture a Still Image from a
Video
!
You can capture the desired scene from a
recorded video, and store it as a still image.
Preparation:
•
Select ! mode.
•
Select the playback mode.
Press SNAPSHOT when playback is
paused.
SNAPSHOT
NOTES
•
Captured still images are stored at a
resolution of 1920 x 1080. The image can
be elongated in the horizontal or vertical
directions depending on the picture quality of
the source video fi le.
•
Images cannot be captured when the video
is in search or slow-motion playback.
•
The continuous shooting function cannot be
used to capture images.
Deleting/ Protecting Files
•
Protected fi les cannot be deleted. To delete
them, release the protection fi rst.
•
Once fi les are deleted, they cannot be
restored. Check fi les before deleting.
Preparation:
•
Select ! or # mode.
•
Select the playback mode.
Deleting/Protecting the Currently
Displayed File
1 Press MENU.
MENU
2 Select [DELETE] or [PROTECT/
CANCEL].
Select
Set
DELETE VIDEO
PROTECT/CANCEL
DELETE
COPY
MOVE
SET QUIT
3 Select [CURRENT].
Select
Set
DELETE
FILE SELECT
DELETE ALL
SELECT SCENES ONE BY ONE
CURRENT
SELECT
SET QUIT
You can select the previous or next fi le by
moving the set lever to £ / ¤.
4 Select [YES].
Select
Set
NO
YES
DELETE?
(Remaining scenes: 0001)
ANY PLAYLISTS THAT INCLUDE
THIS SCENE WILL BE ALTERED
SELECT
SET
To quit the screen
Press MENU.
䡵
Page 29

29
EN
Changing the Event Registration
!
Preparation:
•
Select ! mode.
•
Select the playback mode.
Changing the Event of the Currently
Displayed File
1 Press MENU.
MENU
2 Select [CHANGE EVENT REG.].
Select
Set
CHANGE EVENT REG.
SEARCH EVENT
MONITOR OFF
PLAYBACK PLAYLIST
CHANGE REGISTERED EVENT
SET QUIT
3 Select [CURRENT].
Select
Set
CHANGE EVENT REG.
SET RANGE AND CHANGE
SELECT SCENES ONE BY ONE
CURRENT
SELECT
SET QUIT
4 Select the fi le you want to register.
Select
Set
CHANGE EVENT?
NO
YES
SELECT
SET QUIT
You can select the previous or next fi le by
moving the set lever to £ / ¤.
Dividing Files
!
You can divide the selected video into two.
Preparation:
•
Select ! mode.
•
Select the playback mode.
1 Press MENU.
MENU
2 Select [DIVIDE].
Select
Set
EFFECT
WIPE/FADER
DIVIDE VIDEO
BASIC SETTINGS
DIVIDE
SET QUIT
3 Select the desired fi le.
Select
Set
DIVIDE
SELECT
SET QUIT
Playback starts.
4 Set the point at which you want to
divide the fi le.
DIVIDE
00:00:04
SET
QUIT
RETURN
The actual division point may differ slightly
from the point that is set.
5 Select [DIVIDE HERE].
Select
Set
DIVIDE
DIVIDE HERE
CANCEL
00:00:04
SELECT
SET QUIT
To set the division point again, select
[CANCEL].
To quit the screen
Press MENU.
NOTE
When playing back the divided fi le, the
recording date of the division point is displayed.
䡵
Page 30

30
EN
Playlists
!
It is a list that enables you to organize
recorded videos in order of preference.
Preparation:
•
Select ! mode.
•
Select the playback mode.
Creating Playlists
1 Press MENU.
MENU
2 Select [EDIT PLAYLIST].
Select
Set
CHANGE EVENT REG.
PLAYBACK PLAYLIST
CREATE/EDIT PLAYLIST
EDIT PLAYLIST
SEARCH EVENT
SET QUIT
3 Select [NEW LIST].
Select
Set
EDIT PLAYLIST
EDIT
RENAME PLAYLIST
DELETE
CREATE PLAYLIST
NEW LIST
SELECT
SET QUIT
4 Select an item and display fi les.
Select
Set
NEW LIST
SELECT SCENE BY DATE
CREATE BY GROUP
CREATE BY EVENT
CREATE BY DATE
SELECT FROM SCENES
SELECT
SET QUIT
•
[SELECT FROM SCENES]:
Display all fi les individually.
•
[CREATE BY GROUP]:
Display all fi les listed by group.
•
[CREATE BY DATE]:
Display all the fi les listed by recording
date.
•
[CREATE BY EVENT]:
Search for an event and display the
corresponding fi les listed by recording
date.
5 Select the fi le to add to playlist.
Select
Set
TOTAL
SEP.01.2008
0/999
SELECT
REGISTER
To preview scenes, press INDEX. When the
index screen of individual scenes appears,
select the fi le.
To return to the previous screen, press
INDEX.
6 Select the insertion point.
Select
Set
TOTAL
DVD1
SEP.01.2008
1/999
00h02m
REGISTER
QUIT
•
To add other fi les, repeat steps 5 and 6.
•
To delete a registered scene, select the
registered fi le.
7
MENU
TOTAL
SEP.01.2008
DVD1
00h02m
1/999
REGISTER
QUIT
8 Select [SAVE AND QUIT].
Select
Set
SAVE AND QUIT
DELETE AND QUIT
RETURN
QUIT PLAYLIST.
SAVE EDITED CONTENTS?
SELECT
SET
To quit the screen
Press MENU.
NOTES
•
A maximum of 99 playlists can be created.
•
If you delete the original fi les, the
corresponding fi les are also deleted from the
playlist.
䡵
Page 31

31
EN
Copying Files
COPYING
Types of Copying and Connectable Device
The Camera
You can copy fi les between
the HDD and microSD card
with this camera alone.
(墌 see below)
DVD Burner
(CU-VD50/CU-VD3)*
You can copy fi les recorded
on this camera onto DVD
discs. (墌 right column)
* AVCHD discs can be
played back only on
CU-VD50. CU-VD3 is not
capable of playing back
videos. In such case, use
the camera to play back.
VCR/DVD Recorder
You can dub video recorded
on this camera onto VCR/
DVD recorder. (墌 p. 33)
It is recommended to use the JVC DVD burner
(CU-VD50/CU-VD3). When using
CU-VD20 or CU-VD40, the recording time may
take approx. 2 times longer than the time that
is described in the instruction manual of DVD
burner.
Copying/Moving Files
You can copy or move fi les between the HDD
and microSD card.
# mode
! mode
Using a DVD Burner to Copy Files
from the Camera
The fi les in the camera can be backed up to a
DVD disc using a DVD burner.
•
This disc cannot be played in a normal DVD player.
Use one of the following methods to view the disc.
- Playback the disc using the camera.
(“To play back the created disc using the
camera” 墌 p. 32)
- Playback the disc using a DVD burner.*
- Playback on a PC.*
* The disc must fi rst be fi nalized on the camera.
•
Other than the created DVD using a DVD
burner cannot be played.
•
When connecting a DVD burner (CU-VD50)
to a TV, you can play back the created disc
without using the camera. When playing back
disconnect the USB cable.
Connection with a DVD Burner
Preparation:
Turn on the camera fi rst, then turn on the DVD
burner
NOTES
•
Refer to also the optional DVD burner’s
instruction manual.
•
Use the USB cable that came with the DVD
burner.
DC Connector
USB Connector
AC Adapter
To AC Outlet
USB Cable
DVD Burner
USB Connector
Page 32

32
EN
Backup All Files
Preparation:
•
Connect the camera to the DVD burner.
•
Select ! or # mode.
•
Select HDD or microSD card. (# mode only)
The following illustrations of display
screens are examples of when backing up
video.
1 Select [CREATE FROM ALL].
Select
Set
VIDEO
PLAYBACK
SELECT AND CREATE
CREATE FROM ALL
FINALIZE
CREATE FROM ALL SCENES
SET
SELECT
2 Select the desired menu.
•
! mode: [UNSAVED SCENES]
# mode: [UNSAVED IMAGES]
Files that have never been copied to a
DVD disc are automatically selected and
copied.
•
! mode: [ALL SCENES]
# mode: [ALL IMAGES]
All fi les in the recording medium are
copied.
Select
Set
CREATE FROM ALL
SELECT ALL VIDEOS
ALL SCENES
UNSAVED SCENES
SELECT
SET TOP
3 Select [OK].
Select
Set
ALL SCENES
RETURN
OK
QUANTITY REQUIRED
PREPARE AN EMPTY DISC
DVD10 / DVD(DL)5
SELECT
SET TOP
To cancel the backup, select [RETURN].
4 Select [YES] or [NO].
•
[YES]: Displays the thumbnails by group
•
[NO]: Displays the thumbnails by date
Select
Set
ALL SCENES
NO
YES
DO YOU WANT TO MAKE
AN AUTOMATIC HEADLINE ON
THE DISC TOP MENU?
SET TOP
SELECT
5 Select [EXECUTE].
Select
Set
ALL SCENES
CANCEL
EXECUTE
0%
100%
DVD(DL)
DVD35
SELECT
SET TOP
•
The fi les are copied on the disc. When
[COMPLETED] appears, press down the
set lever to complete the operation.
•
When [INSERT NEXT DISC. PRESS
[STOP] TO EXIT CREATE] appears,
change the disc. Remaining fi les are
copied on the second disc.
•
To cancel the copying, select [STOP].
To return to the top screen
Press MENU, then select [YES].
To fi nalize the disc after copy is fi nished
1) Connect the camera to the DVD burner.
2) Turn on the camera.
3) Select [FINALIZE].
4) Select [EXECUTE].
5) When [COMPLETED] appears, select
[OK].
To play back the created disc using the
camera
1) Connect the camera to the DVD burner.
2) Turn on the camera fi rst, then turn on the
DVD burner.
3) Select [PLAYBACK].
4) Select the desired folder.
5) Select the desired fi le.
To return to the previous screen, press
INDEX.
To view video/still image on TV
See page 26.
䡵
䡵
䡵
䡵
Copying Files (Continued)
Page 33

33
EN
Standard-defi nition Dubbing
You can dub videos in standard-defi nition to a
DVD recorder.
Preparation: Turn off all units.
To connect using the AV connectors
(analog dubbing)
Preparation: Create a playlist.
1 Set the VCR/DVD recorder to its AUX
input mode.
Check that the images from the camera are
input correctly to the VCR/DVD recorder.
䡵
2 Play back playlists on the camera.
1) Press MENU.
2) Select [DUBBING PLAYBACK].
3) Select the desired playlist.
4) Select [YES]. (A black screen is
displayed for 5 seconds at the fi rst and
the last scene.)
3 At the point you want to start
dubbing, start recording on the VCR/
DVD recorder.
Refer to the VCR/DVD recorder’s
instruction manual.
To stop dubbing
Stop recording on the VCR/DVD recorder,
then press START/STOP again.
To hide the date or icons on the screen
Change the settings in [DISPLAY ON TV]. or
[ON-SCREEN DISPLAY].
䡵
䡵
AV Cable
DC Connector
AC Adapter
To AC Outlet
AV Connector
VCR/DVD Recorder
AV Connector
Page 34

34
EN
Troubleshooting
Trouble Action
Card
Cannot insert the
microSD card.
•
Check that the microSD card is facing the right direction.
Power
No power is supplied.
•
Connect the AC adapter correctly.
•
Recharge the battery.
After the low
temperature message
is displayed, the power
turns off when the
camera warms up.
•
When the camera has warmed up after being cold, the camera
may switch itself off to check it is operating correctly.
Recording
Recording cannot be
performed.
•
Open the LCD monitor to turn on the camera.
•
Press PLAY/REC to select the recording mode.
Recording stops by
itself.
•
If the camera temperature increases, REC fl ashes in the LCD
monitor. If the temperature continues to increase, operation stops
automatically to protect the HDD.
•
Move to a place where the camera is not affected by excessive
sound or vibration.
•
Insert a commercially available microSD card, and set each of
the [REC MEDIA FOR VIDEO] and [REC MEDIA FOR IMAGE] to
[SD].
•
Recording stops automatically after 12 hours of continuous
recording.
The focus is not
adjusted automatically.
•
Clean any dirt or water droplets from the lens.
•
Set focus to the automatic mode.
•
If you are recording in a dark place or a subject that has no
contrast between dark and light, adjust the focus manually.
A function cannot be
activated.
•
Check the indication that represents that function.
•
If the indication is fl ashing or off, you have selected two functions
that cannot be used together. Choose which of the functions to
use.
The camera is a microcomputer-controlled
device. External noise and interference (from
a TV, a radio, etc.) might prevent it from
functioning properly.
The following phenomena are not
malfunctions.
•
The camera heats up when it is used for a
long time.
•
The battery heats up during charging.
•
When playing back a video, the image stops
momentarily or the sound is interrupted at
junctions between scenes.
•
To solve the problem, fi rst follow the
instructions below.
•
If the problem is not solved, reset the
camera.
•
If the problem persists, please consult your
nearest JVC dealer.
FURTHER INFORMATION
Page 35

35
EN
Trouble Action
Displays
The LCD monitor
appears blank.
•
Operate the camera.
If the camera is not operated for a certain length of time when
using the AC adapter, it will enter sleep mode, and the LCD
monitor will turn off.
Playback
The same scene
appears stopped for a
long time.
•
Replace the microSD card.
(If there are scratches etc. on the microSD card, the camera will
have diffi culty reading the data, and this phenomenon may occur.
The camera will try to play back as much as possible, but if this
condition continues, the camera will not be able to play back the
video and it will automatically stop.)
•
Perform cleanup or formatting.
Video movement
appears jerky.
The color of images
looks strange.
•
When recording the white balance was not correctly adjusted
•
When the video was recorded with x.v.Color™ set to [ON], change
the setting as desired on TV.
•
Set [EFFECT] to [OFF].
Images look unnatural
on the TV (long and thin
etc.)
•
Change [VIDEO OUTPUT] in the [BASIC SETTINGS] to match
your TV.
Dubbing
When dubbing, the
connected video device
does not start recording
automatically.
•
Operate the video device manually to start and stop recording.
Other problems
The camera operates
slowly when switching
between video mode
and still image mode,
or when switching the
power on or off.
•
Copy all fi les from the media onto your computer, and erase the
fi les from the media.
(If there are many still images (more than 1,000 fi les) on the
media, it takes time for the camera to process the fi les.)
The lamp does not fl ash
during battery charging.
•
Check the remaining battery charge.
(When the battery is fully charged, the lamp does not fl ash.)
•
When recharging in either a hot or cold environment, ensure that
battery is being charged within the permitted temperature range.
(If the battery is being recharged outside the permitted
temperature range, recharging may stop to protect the battery.)
The remote control
doesn’t work.
•
Replace the battery.
•
Set [REMOTE] in the [BASIC SETTINGS] to [ON].
•
The remote control may not operate outdoors or in places
exposed to strong light.
Page 36

36
EN
Warning Indications
Indication Action
SET DATE/TIME!
•
Set the date and time. (Connect the camera to an AC outlet
using the AC adapter for over 24 hours to charge the clock’s
built-in lithium battery. Then set the date/time.)
CANNOT USE IN
VIDEO MODE
•
Set [REC MEDIA FOR VIDEO] in the [BASIC SETTINGS] to
[HDD].
•
Replace the microSD card.
HDD ERROR!
MEMORY CARD ERROR!
•
Perform cleanup or formatting.
•
Remove and re-insert the microSD card. (MultiMediaCard
cannot be used.)
•
Remove any dirt from the microSD card terminals.
•
Insert the microSD card before switching the power on.
•
Turn off the camera, and turn it on again.
RECORDING FAILURE
microSD card:
•
Check whether the microSD card has been checked for operability.
HDD:
•
Perform cleanup.
•
Do not allow the camera to be subject to impact/vibrations.
CANCELLED BECAUSE
PLAYLIST NUMBER
LIMIT EXCEEDED
•
When creating a DVD, reduce the number of playlists to be
saved.
•
Reduce the number of videos to add to the playlist to 999 fi les or
less.
PROCESSING CANCELLED
DUE TO
LACK OF SPACE FOR
OPERATION
NO REGISTERED SCENES
IN PLAYLIST
SOME OF SCENES MAY
NOT BE PLAYED BACK
•
Delete the playlist, and then create a new one.
INCOMPATIBLE FORMAT
•
Perform the following operations in order.
! Disconnect the external HDD from the camera, and connect it
to a PC to make sure it contains no important fi les.
# Connect the external HDD to the camera, and then select the
[FORMAT] from the menu. (All fi les on the external HDD will
be deleted.)
Page 37

37
EN
Specifi cations
Camera
For general
Power supply
DC 11 V (Using AC adapter)
DC 7.2 V (Using battery pack)
Power consumption
Approx. 4.8 W*
* When the LED light is off and the monitor
backlight is set to [STANDARD] mode.
Dimensions (W x H x D)
71 mm x 68 mm x 123 mm
(2-13/16" x 2-11/16" x 4-7/8")
Weight
Approx. 430 g (0.95 lbs)
Approx. 475 g (1.05 lbs) (incl. battery)
Operating temperature
0°C to 40°C (32°F to 104°F)
Operating humidity
35% to 80%
Storage temperature
–20°C to 50°C (–4°F to 122°F)
Pickup
1/4.5" (1,840,000 pixels) progressive CMOS
Lens
Video: F1.8 to 2.5, f = 3.2 mm to 32.0 mm,
10:1 power zoom lens
Still image: F 1.9 to 2.5, f = 4.0 mm to 32.0 mm,
8:1 power zoom lens
Filter diameter
ø43.0 mm
LCD monitor
2.7" diagonally measured,
LCD panel/TFT active matrix system
Speaker
Monaural
LED Light
Within 1.5 m (4.9 ft)
(recommended shooting distance)
For video/audio
Recording/Playback format
Video: MPEG-4 AVC/H.264
Audio: Dolby Digital (2ch)
Signal format
1080/60i
䡵
䡵
Recording mode (video)
XP: VBR, average of 17 Mbps
SP: VBR, average of 12 Mbps
EP: VBR, average of 5 Mbps
Recording mode (audio)
48 kHz, 256 kbps
For still image
Format
JPEG
Image size
3 modes: 1920 x 1080
1440 x 1080
640 x 480
Picture quality
2 modes: FINE / STANDARD
For connectors
HDMI
HDMI™ (V.1.3 with x.v.Color™)
Component output
Y, Pb, Pr component output
Y: 1.0 V (p-p), 75 W
Pb/Pr: 0.7 V (p-p), 75 W
AV output
Video output: 1.0 V (p-p), 75 W
Audio output: 300 mV (rms), 1 kW
USB
Mini USB type A and type B,
USB 2.0 compliant
Microphone
ø3.5 mm stereo mini jack
AC Adapter
Power requirement
AC 110 V to 240 V
$, 50 Hz/60 Hz
Output
DC 11 V
§
, 1 A
䡵
䡵
Page 38

38
EN
Remote Control
Power supply
DC 3 V
Battery life
Approx. 1 year
(depending on the frequency of use)
Operating distance
Within 5 m (16.4 ft)
Operating temperature
0°C to 40°C (32°F to 104°F)
Dimensions (W x H x D)
42 mm x 14.5 mm x 91 mm
(1-11/16" x 5/8" x 3-5/8")
Weight
Approx. 30 g (0.07 lbs) (incl. battery)
Design and specifi cations subject to change
without notice.
Approximate recording time (minutes) (for video)
Recording medium
Quality
HDD microSD Card
40 GB 4 GB 8 GB
XP 300 30 60
SP 420 44 88
EP 1020 100 200
Approximate number of storable images (for still image)
Recording medium
Image size/Quality
HDD microSD Card
40 GB 512 MB 1 GB 2 GB 4 GB 8 GB
16:9
1920 x 1080 / FINE 9999
510 1040 2100 4200 8420
1920 x 1080 / STANDARD 9999
800 1630 3210 6410 9999
4:3
1440 x 1080 / FINE 9999
680 1370 2770 5540 9999
1440 x 1080 / STANDARD 9999
1060 2160 4360 8700 9999
640 x 480 / FINE 9999
3320 6720 9999 9999 9999
640 x 480 / STANDARD 9999
5980 9999 9999 9999 9999
Specifi cations (Continued)
Page 39

39
EN
Cautions
AC Adapter
When using the AC adapter in areas other than
the USA
The provided AC adapter features automatic voltage
selection in the AC range from 110 V to 240 V.
USING HOUSEHOLD AC PLUG ADAPTER
In case of connecting the unit’s power cord to an AC wall
outlet other than American National Standard C73 series
type use an AC plug adapter, called a “Siemens Plug”, as
shown.
For this AC plug adapter, consult your nearest JVC dealer.
Battery Packs
The supplied battery pack is
a lithium-ion battery. Before
using the supplied battery pack
or an optional battery pack,
be sure to read the following
cautions:
Terminals
•
To avoid hazards
... do not burn.
... do not short-circuit the terminals. Keep it away
from metallic objects when not in use. When
transporting, make sure the provided battery
cap is attached to the battery. If the battery cap
is misplaced, carry the battery in a plastic bag.
... do not modify or disassemble.
... do not expose the battery to temperatures
exceeding 60°C (140°F), as this may cause the
battery to overheat, explode or catch fi re.
... use only specifi ed chargers.
•
To prevent damage and prolong service life
... do not subject to unnecessary shock.
... charge within the temperature range of 10°C to
35°C (50°F to 95°F). This is a chemical reaction
type battery — cooler temperatures impede
chemical reaction, while warmer temperatures
can prevent complete charging.
... store in a cool, dry place. Extended exposure
to high temperatures will increase natural
discharge and shorten service life.
... fully charge and then fully discharge the battery
every 6 months when storing the battery pack
over a long period of time.
... remove from charger or powered unit when not
in use, as some machines use current even
when switched off.
ATTENTION:
The product you have purchased is
powered by a rechargeable battery
that is recyclable.
Please call 1-800-8-BATTERY for
information on how to recycle this
battery.
Recording Medium
•
Be sure to follow the guidelines below
to prevent corruption or damage to your
recorded data.
•
Do not bend or drop the recording medium, or
subject it to strong pressure, jolts or vibrations.
•
Do not splash the recording medium with water.
•
Do not use, replace, or store the recording
medium in locations that are exposed to strong
static electricity or electrical noise.
•
Do not turn off the camera power or remove the
battery or AC adapter during shooting, playback,
or when otherwise accessing the recording
medium.
•
Do not bring the recording medium near objects
that have a strong magnetic fi eld or that emit
strong electromagnetic waves.
•
Do not store the recording medium in locations
with high temperature or high humidity.
•
Do not touch the metal parts.
•
When formatting or erasing data using the
camera, only the fi le administration information
is changed. The data is not completely erased
from the hard disk. If you want to completely
erase all of the data, we recommend either
using commercially available software that
is specially designed for that purpose, or by
physically destroying the camera with a hammer
etc.
Hard disk
•
Do not use the unit where it is subject to
vibrations or loud sounds.
•
If you move the unit suddenly, the drop detection
function may operate and the power may be
turned off.
LCD Monitor
•
To prevent damage to the LCD monitor, DO
NOT
... push it strongly or apply any shocks.
... place the camera with LCD monitor on the
bottom.
•
To prolong service life
... avoid rubbing it with coarse cloth.
Plug Adapter
Page 40

40
EN
Cautions (Continued)
Main Unit
•
For safety, DO NOT
... open the camera’s chassis.
... disassemble or modify the unit.
... allow infl ammables, water or metallic objects to
enter the unit.
... remove the battery pack or disconnect the
power supply while the power is on.
... leave the battery pack attached when the
camera is not in use.
... place naked fl ame sources, such as lighted
candles, on the apparatus.
... expose the apparatus to dripping or splashing.
... leave dust or metal objects adhered to the
power plug or an AC wall outlet.
... insert any objects in the camera.
•
Avoid using the unit
... in places subject to excessive humidity or dust.
... in places subject to soot or steam such as near
a cooking stove.
...
in places subject to excessive shock or vibration.
... near a television set.
... near appliances generating strong magnetic
or electric fi elds (speakers, broadcasting
antennas, etc.).
... in places subject to extremely high (over 40°C
or 104°F) or extremely low (under 0°C or 32°F)
temperatures.
... in places where air pressure is low (more than
3000 m (9870 ft) above the sea level).
•
DO NOT leave the unit
... in places of over 50°C (122°F).
... in places where humidity is extremely low
(below 35%) or extremely high (above 80%).
... in direct sunlight.
... in a closed car in summer.
... near a heater.
... in high places such as on a TV. Leaving the unit
in high places while a cable is connected may
result in a malfunction if the cable is caught and
the unit falls onto the fl oor.
•
To protect the unit, DO NOT
... allow it to become wet.
... drop the unit or strike it against hard objects.
... subject it to shock or excessive vibration during
transportation.
... keep the lens directed at extremely bright
objects for long periods.
... expose the lens to direct sunlight.
... swing it excessively when using the hand strap.
... swing the soft camera case excessively when
the camera is inside it.
... place the camera in dusty or sandy areas, such
as on a beach.
•
To prevent the unit from dropping,
•
Attach the shoulder strap securely and fasten the
grip belt securely.
•
When using the camera with a tripod, attach the
camera to the tripod securely.
If the camera drops, you may be injured and
the camera may be damaged.
When a child uses the unit, there must be
parental guidance.
Declaration of Conformity
Model Number : GZ-HD10U
Trade Name : JVC
Responsible party : JVC AMERICAS CORP.
Address : 1700 Valley Road Wayne, N. J. 07470
Telephone Number : 973-317–5000
This device complies with Part 15 of FCC
Rules. Operation is subject to the following
two conditions: (1) This device may not cause
harmful interference, and (2) this device must
accept any interference received, including
interference that may cause undesired
operation.
Changes or modifi cations not approved
by JVC could void the user’s authority to
operate the equipment. This equipment has
been tested and found to comply with the
limits for a Class B digital device, pursuant
to Part 15 of the FCC Rules. These limits are
designed to provide reasonable protection
against harmful interference in a residential
installation. This equipment generates, uses,
and can radiate radio frequency energy and, if
not installed and used in accordance with the
instructions, may cause harmful interference
to radio communications. However, there is
no guarantee that interference will not occur
in a particular installation. If this equipment
does cause harmful interference to radio or
television reception, which can be determined
by turning the equipment off and on, the user is
encouraged to try to correct the interference by
one or more of the following measures: Reorient
or relocate the receiving antenna. Increase the
separation between the equipment and receiver.
Connect the equipment into an outlet on a
circuit different from that to which the receiver is
connected.
Consult the dealer or an experienced radio/
TV technician for help.
This Class B digital apparatus complies with
Canadian ICES-003.
Cet appareil numérique de la classe B est
conforme à la norme NMB-003 du Canada.
Page 41

41
EN
MEMO
Page 42

42
EN
MEMO
Page 43

43
EN
Page 44

44
EN
A
AC Adapter ..................................................16, 39
AV Connection .............................................27, 33
B
Battery Pack ................................................ 16, 39
C
Clock Adjust ......................................................17
Component Connection ....................................26
Copying (Moving) Files ......................................31
D
Deleting Files ....................................................28
Dividing Files ..................................................... 29
DVD Backup ......................................................31
E
Event Registration ....................................... 22, 29
H
Hard Disk ..........................................................39
HDMI Connection .............................................. 26
I
Image Rotation .................................................. 25
L
Language Setting ..............................................17
LCD Monitor ................................................14, 39
LED Light ..........................................................22
Lens Cover ........................................................ 18
M
Manual Recording .............................................23
Menu Settings ...................................................19
Microphone .......................................................13
microSD Card ....................................................19
P
Playlist ............................................................... 30
Program AE .......................................................23
Protecting Files .................................................28
R
Recordable Time/Number of Images ................. 38
Recording Medium ............................................39
Remote Control ...........................................11, 13
S
Speaker Volume ................................................24
T
TV ......................................................................26
Z
Zooming ............................................................22
Terms
Page 45

MEMO
Page 46

2
SP
Guía de inicio rápido
PRECAUCIÓN
•
Cargue la batería antes del uso. ( p. 16)
•
Asegúrese de utilizar baterías JVC. Si utiliza alguna otra batería que no sea
de JVC, no se puede garantizar la seguridad ni el rendimiento.
ACCESS
POWER
/CHARGE
La cámara se enciende al abrir la pantalla LCD
Cierre la pantalla LCD tras terminar de grabar.
Cargue la batería antes de grabar
Apague la cámara e inserte la batería.
Luz de alimentación/carga
Parpadea: carga en curso
Se apaga: carga terminada
Batería
A la toma de CA
(de 110 V a 240 V)
Adaptador de CA
Abrir la cubierta
Page 47

3
SP
Antes de grabar, cargue la batería y ajuste la fecha/hora.
Consulte la página siguiente para saber cómo grabar vídeos.
Preparativos
Q
Abra la pantalla LCD para encender la cámara
R
Seleccione [SÍ] en
10 segundos
T
Botón de
alimentación
¡AJUSTE FECHA/HORA!
SÍ
NO
SELECC
AJUSTE SALIR
SELECC
AJUSTE SALIR
FECHA HORA
JAN 31
11AM07
2008
AJUS.RELOJ
S
Ajuste la fecha y la hora
Seleccionar
Ajustar
Seleccionar
Ajustar
Cuando desaparezca el mensaje, pulse el
botón de alimentación durante al menos
2 segundos para apagar la cámara y vuelva
a pulsarlo durante al menos 2 segundos.
Para cambiar la fecha y la hora ( p. 17)
Abra la cubierta del
objetivo
U
Seleccione el modo de
vídeo
Page 48

4
SP
Grabación de vídeo
PRECAUCIÓN
•
Esta cámara graba vídeo de acuerdo con el formato AVCHD.
•
Primero pruebe a grabar con el modo [AUTO], que es más sencillo.
Q
Seleccione el modo de grabación
PLAY/REC
SELECT
A la hora de grabar
El modo cambia al pulsar
el botón
R
Seleccione el modo automático
/
INFO
AUTO
El modo cambia al pulsar
el botón (sólo modo de
grabación)
Aparece el indicador de
grabación automática.
S
Inicie la grabación
START
/STOP
Pulse el botón START/
STOP para iniciar la
grabación y vuelva a
pulsarlo para detenerla
[4h59m]
XP
0:01:30
REC
Espacio restante en
el disco duro
Calidad de imagen
Espera de
grabación
Grabación
Antes de grabar una escena importante se
recomienda realizar una grabación de prueba.
Page 49

5
SP
Reproducción
Q
Seleccione el modo de reproducción
PLAY/REC
SELECT
El modo cambia al pulsar
el botón
R
Seleccione el archivo que desee
VÍDEO
1/1
SELECC
AJUSTE CLASIF
Pantalla de índice
S
Pulse el botón selector
Pantalla de reproducción
Pulse el botón selector
para iniciar la reproducción
y vuelva a pulsarlo para
detenerla
Para realizar operaciones, como avance rápido o retroceso rápido ( p. 24)
Para visualizar vídeos/imágenes fi jas en un televisor ( p. 26)
PRECAUCIÓN
¡No olvide realizar copas tras la grabación!
•
Para copiar archivos en discos DVD ( p. 31)
•
Para copiar archivos mediante una grabadora de vídeo/DVD ( p. 33)
•
Para reproducir un disco DVD creado ( p. 32)
•
Para editar archivos en el equipo ( p. 9)
Page 50

6
SP
Precauciones de seguridad
ADVERTENCIA: PARA EVITAR RIESGO
DE INCENDIOS O ELECTROCUCIONES,
NO EXPONGA ESTE APARATO A LA
LLUVIA O HUMEDAD.
NOTAS:
•
La placa de valores nominales y la precaución de
seguridad se encuentran en la parte inferior y/o
en la parte posterior de la unidad principal.
•
La placa del número de serie se encuentra en el
compartimiento de la batería.
•
La información sobre los valores nominales y las
precauciones de seguridad del adaptador de CA
se encuentran en la parte superior e inferior del
mismo.
Precaución relacionada con la batería de
litio recambiable
La batería utilizada en este dispositivo presenta
riesgos de incendio y de quemaduras químicas
si no se usa correctamente.
No la recargue, ni la desmonte, ni la caliente
por encima de los 100°C, ni la incinere.
Cambie la batería por una Panasonic
(Matsushita Electric), Sanyo, Sony o Maxell
CR2025.
Hay peligro de explosión o riesgo de incendio si
la batería se cambia de manera incorrecta.
•
Deshágase de la batería usada sin demora.
•
Manténgala lejos del alcance de los niños.
•
No la desmonte ni la eche al fuego.
Sólo para EE.UU.-California
Este producto contiene una batería de litio CR
de tipo botón que contiene perclorato (puede
requerirse una manipulación especial). Visite
www.dtsc.ca.gov/hazardouswaste/perchlorate
Cuando el equipo se encuentra instalado en
un gabinete o en un estante, asegúrese que
tenga sufi ciente espacio en todos los lados para
permitir la ventilación (10 cm o más en cada lado,
en la parte superior y en la parte trasera).
No bloquee los orifi cios de ventilación.
(Si los orifi cios de ventilación están bloqueados
por un periódico, o paño, etc., el calor no podrá
salir.)
No deberá ser colocada en el aparato ninguna
fuente de llama sin protección, tales como velas
encendidas.
Cuando descarte las pilas, deberá considerar los
problemas ambientales y respetar estrictamente
las normas locales o leyes vigentes para la
eliminación de estas pilas.
La unidad no deberá ser expuesta a goteos ni
salpicaduras.
No use esta unidad en un cuarto de baño o en
lugares con agua.
Tampoco coloque ningún envase lleno de agua
o líquidos (tales como cosméticos o medicinas,
fl oreros, macetas, vasos, etc.) en la parte
superior de la unidad.
(Si penetra agua o líquidos en la unidad, pueden
producirse electrocuciones o incendios.)
No apunte el objetivo directamente hacia el sol.
Esto puede causarle lesiones en los ojos así
como también fallas en los circuitos internos de
la cámara. Esto también puede producir riesgo
de incendio o de choque eléctrico.
¡PRECAUCIÓN!
Las siguientes notas indican posibles daños a la
cámara o lesiones al usuario.
El transportar o sostener la cámara por el
monitor LCD puede resultar en la caída o en
fallas de la unidad.
No utilice el trípode sobre superfi cies inestables
o desniveladas ya que la cámara puede caerse,
produciendo graves daños a la misma.
¡PRECAUCIÓN!
Evite conectar los cables (audio/video, S-video,
etc.) a la cámara y dejar la unidad sobre el TV,
ya que el tropezar con uno de los cables puede
derribar la cámara resultando ésta dañada.
PRECAUCIÓN:
El enchufe de red siempre debe estar
fácilmente disponible.
ADVERTENCIA:
Las baterías, incluidas las baterías de litio
instaladas en la cámara y en el mando a
distancia, no deben dejarse expuestas a un
calor excesivo, como la luz solar directa, el
fuego o una condición similar.
Page 51

7
SP
Recuerde que esta cámara debe usarse
únicamente para fi nes privados.
Está prohibido cualquier uso comercial sin la
autorización correspondiente. (Aunque grabe
acontecimientos, tales como espectáculos
o exhibiciones, para su disfrute personal, se
recomienda que obtenga una autorización previa.)
Marcas comerciales
•
Los logotipos AVCHD y AVCHD son marcas
comerciales de Matsushita Electric Industrial
Co., Ltd. y Sony Corporation.
•
Fabricado bajo licencia de Dolby Laboratories.
Dolby y el símbolo de la doble D son marcas
comerciales de Dolby Laboratories.
•
x.v.ColorTM es una marca
comercial de Sony Corporation.
•
HDMI es una marca comercial
de HDMI Licensing, LLC.
•
Windows® es una marca
registrada o una marca comercial de Microsoft
Corporation en los Estados Unidos y/o en otros
países.
•
Macintosh es una marca registrada de Apple Inc.
•
El resto de los nombres de productos y
de compañías incluidos en este manual
de instrucciones son marcas comerciales
y/o marcas registradas de sus respectivos
propietarios.
INSTRUCCIONES IMPORTANTES DE
SEGURIDAD
1. Lea estas instrucciones.
2. Conserve estas instrucciones.
3. Preste atención a las advertencias.
4. Siga todas las instrucciones.
5. No utilice este aparato cerca del agua.
6. Limpie sólo con paño seco.
7. No bloquee ninguna abertura de ventilación.
Instale de acuerdo con las instrucciones del
fabricante.
8. No lo instale cerca de ninguna fuente de calor
tales como, radiadores, calefactores, cocinas,
u otros aparatos (incluyendo amplifi cadores)
que produzcan calor.
9. Sólo utilice dispositivos/accesorios
especifi cados por el
fabricante.
10. Utilice sólo con la
carretilla, estante,
trípode, soporte o
mesa especifi cado
por el fabricante
o vendido con el
aparato. Cuando
utilice una carretilla, sea cauteloso al mover
el conjunto de carretilla/aparato para evitar
lesiones provocadas por caídas.
11. Desenchufe este aparato durante estruendos
de relámpagos o cuando esté fuera de uso por
largo tiempo.
12. Refi era toda reparación a personal de servicio
califi cado. Se requiere de reparación cuando el
aparato ha sido dañado de alguna manera, por
ejemplo, si el cable o enchufe de alimentación
está dañado, si ocurrió derrame de líquidos
o caída de objetos dentro del aparato, si el
aparato fue expuesto a la lluvia o humedad, si
no funciona normalmente, o sufrió caídas.
Si este símbolo aparece, sólo es
válido en la Unión Europea.
Page 52

8
SP
Contenido
PREPARATIVOS
Accesorios ..............................................10
Preparación del mando a distancia .............. 11
Índice .......................................................12
Indicaciones en la pantalla LCD ............14
Ajustes preliminares necesarios ..........16
Carga de la batería ....................................... 16
Comprobación de la carga restante de la
batería ......................................................... 16
Ajuste de la fecha/hora ................................. 17
Ajuste del idioma .......................................... 17
Otros ajustes ...........................................18
Ajuste de la correa de mano ......................... 18
Colocación de la correa para hombro .......... 18
Cubierta del objetivo ..................................... 18
Instalación en trípode ................................... 18
Cuando se utiliza una tarjeta microSD ......... 19
Cambio de las confi guraciones de menús .... 19
GRABACIÓN
Grabación de archivos ...........................20
Grabación de vídeo ...................................... 20
Grabación de imágenes fi jas ........................ 21
Uso del zoom ................................................ 22
Luz LED ........................................................ 22
Registro de archivos en eventos .................. 22
Grabación manual ..................................23
Para cambiar al modo de grabación
manual ........................................................ 23
Programa AE ................................................ 23
Ajuste manual en el menú ............................ 23
REPRODUCCIÓN
Reproducción de archivos .....................24
Reproducción de vídeo ................................ 24
Reproducción de imágenes fi jas ..................25
Visionado de imágenes en el televisor
...26
Conexión con el televisor .............................. 26
Operación de reproducción .......................... 27
EDICIÓN/IMPRESIÓN
Gestión de archivos ...............................28
Para capturar una imagen fi ja de un vídeo ... 28
Eliminación/protección de archivos .............. 28
Cambio del registro de eventos .................... 29
División de archivos ...................................... 29
Listas de reproducción ..........................30
Creación de listas de reproducción .............. 30
COPIA
Copia de archivos ...................................31
Copia/traslado de archivos ........................... 31
Uso de una grabadora de DVD para copiar
archivos de la cámara ................................. 31
Copia de defi nición estándar ........................ 33
INFORMACIÓN ADICIONAL
Solución de problemas ..........................34
Indicaciones de advertencia ..................36
Especifi caciones ....................................37
Precauciones ..........................................39
Términos .................................................44
Page 53

9
SP
No olvide leer esta
información.
Realice una copia de seguridad de los
datos importantes que ha grabado
Se recomienda que guarde los datos importantes
que haya grabado copiándolos en un DVD o
cualquier otro soporte de grabación. ( p. 31)
JVC no se responsabilizará de cualquier pérdida
de datos.
Realice una grabación de prueba
Antes de grabar los datos importantes, realice
una grabación de prueba y reproduzca los datos
grabados para comprobar si el vídeo y el sonido
se han grabado correctamente.
Reinicie la cámara si no funciona
correctamente
Esta cámara utiliza una microcomputadora.
Determinados factores, como el ruido de
fondo y las interferencias, pueden afectar a su
funcionamiento. Reinicie la cámara si no funciona
correctamente.
Precauciones sobre el uso de baterías
•
Asegúrese de utilizar baterías JVC BN-VF808U/
VF823U.
•
Si la cámara sufre una descarga electrostática,
apague la cámara antes de utilizarla de nuevo.
Si se produce un fallo de funcionamiento,
deje de usar inmediatamente la cámara y
consulte con su distribuidor local de JVC.
•
Si se produce un problema al utilizar la tarjeta
microSD, lleve la tarjeta junto con la cámara
al servicio técnico. Si falta alguno de los dos,
no se podrá diagnosticar la causa del fallo y la
cámara no se podrá reparar.
•
Durante la reparación o la revisión de la
cámara, es posible que se borren datos
grabados. Antes de realizar una reparación o
revisión, haga una copia de seguridad de todos
los datos.
Como las cámaras se pueden utilizar
en un punto de venta para realizar
demostraciones, el modo de demostración
está activado de forma predeterminada
Para desactivar el modo de demostración, ajuste
[MODO DEMO] en [OFF].
No cubra el ventilador ( p. 12 (, /)
Si la cámara se calienta demasiado, se puede
producir un fallo de funcionamiento.
Para Windows
Consulte PC OPERATION GUIDE en el
CD-ROM suministrado.
! Inserte el CD-ROM suministrado en el PC.
Al cabo de unos momentos, aparece la
pantalla [Software Setup]. Si no aparece la
pantalla [Software Setup], haga doble clic
en el icono de CD-ROM de [Mi PC].
NOTA
Consulte en PC OPERATION GUIDE los
requisitos del sistema correspondientes al
software suministrado. Para obtener más
información, consulte la guía del usuario o la
ayuda del software.
Para Macintosh
!
Inserte el CD-ROM suministrado en el equipo.
# Haga doble clic en el icono de CD-ROM.
$ Haga doble clic en “Start.pdf”, en la carpeta
“PC guide”.
% Haga clic en el idioma deseado.
NOTAS
•
Adobe® Acrobat® Reader™ o Adobe®
Reader
®
deben estar instalados para
leer archivos PDF. Adobe
®
Reader® se
puede encontrar en el sitio web de Adobe:
http://www.adobe.com/
•
Para obtener más información sobre las
operaciones, consulte GUIDEBOOK y
PC OPERATION GUIDE en el CD-ROM
suministrado
# Clic
FUNCIONAMIENTO
DE PC
Page 54

10
SP
Accesorios
PREPARATIVOS
Adaptador de CA
AP-V14U
Batería
BN-VF808U
Cable componente
( p. 26)
Cable de audio/vídeo
( p. 27, 33)
Cable USB Correa para hombro
( p. 18)
CD-ROM
( p. 9)
Mando a distancia
RM-V750U ( p. 11)
Pila de litio
CR2025
Preinstalada en el
mando a distancia.
NOTA
Asegúrese de utilizar los cables suministrados para las conexiones. No utilice ningún otro cable.
Page 55

11
SP
Preparación del mando a distancia
El mando a distancia se suministra con una pila instalada.
Antes de su uso, retire el plástico de aislamiento.
Área efectiva del haz de infrarrojos Para volver a insertar la pila
NOTA
El haz transmitido no será efectivo o puede
provocar un funcionamiento incorrecto si el
sensor remoto está expuesto a la luz directa
del sol o a un foco de luz muy potente.
Presione la pestaña de cierre para extraer el
soporte de la pila.
Distancia efectiva:
Máx. 5 m
Sensor remoto
Pestaña de cierre
Pila de litio
(CR2025)
Page 56

12
SP
Índice
NOTAS
•
La pantalla LCD puede girar 270°.
•
Funcionamiento siempre listo para grabar
La cámara también se puede encender y
apagar abriendo y cerrando la pantalla LCD.
•
Procure no tapar los sensores 7, > y ?
durante la fi lmación.
Page 57

13
SP
7 Micrófono estéreo
8 Correa de mano ( p. 18)
9 Conector HDMI [HDMI] ( p. 26)
: Conector de CC [DC] ( p. 16)
; Conector de entrada del micrófono [MIC]
< Luz LED
= Conector USB [
2
]
> Sensor remoto ( p. 11)
? Cubierta del objetivo/objetivo
@ Zapata (para micrófono externo, etc.)
A Cubierta de la zapata
B Interruptor de la cubierta del objetivo [=, >]
( p. 18)
C Ranura para la tarjeta microSD ( p. 19)
D Zócalo de fi jación del trípode ( p. 18)
E Botón de liberación de la batería [BATT.]
( p. 16)
F Compartimento de la batería
Mando a distancia
Q Ventana de transmisión del haz de
infrarrojos
R Botones de ZOOM (T/W)
(Ampliar/reducir durante la reproducción.)
S Botón arriba
Botón de giro (hacia la izquierda)
T Botón de salto hacia atrás
U Botón izquierda
V Botón atrás
W Botón PLAYLIST
X Botón START/STOP
Y Botón SNAPSHOT
Z Botón INFO
a Botón de salto hacia adelante
b Botón PLAY/PAUSE
c Botón derecha
d Botón siguiente
e Botón abajo
Botón de giro (hacia la derecha)
f Botón INDEX
g Botón DATE
NOTA
Puede mover el área de zoom con el botón
arriba/abajo/izquierda/derecha al utilizar el
zoom en el modo de reproducción.
Cámara
! Botón de índice [INDEX]/
botón de espacio restante/
botón de batería de datos [ 0 / 1 ] ( p. 16)
# Botón selector
Mover hacia ¡ :
Botón de salto hacia atrás ( p. 24)/arriba/
compensación de contraluz [ - ]
Mover hacia ¢ :
Botón de salto hacia adelante ( p. 24)/
abajo/enfoque manual [FOCUS]
Mover hacia £ :
Botón de búsqueda hacia atrás
( p. 24)/izquierda/luz [LIGHT] ( p. 22)
Mover hacia ¤ :
Botón de búsqueda hacia adelante
( p. 24)/derecha/programa AE
[PROGRAM AE] ( p. 23)
Presionar:
Reproducción/pausa ( p. 24)
$ Botón de menú [MENU]
% Pantalla LCD
& Altavoz
( Salida del ventilador
) Luz de acceso [ACCESS] (Parpadea
al acceder a los archivos. No apague
la alimentación ni extraiga la batería o
el adaptador de CA mientras se está
accediendo a los archivos.)
Luz de alimentación/carga [POWER/
CHARGE] (Parpadea al cargar la batería.)
* Palanca del zoom [W 7 , T
,
] ( p. 22)
Control de volumen del altavoz [–VOL+]
( p. 24)
+ Botón de disparo de imagen fi ja
[SNAPSHOT] ( p. 21)
, Botón de modo automático/manual [AUTO]
( p. 23)/botón de información [INFO]
- Botón de alimentación (Puede apagar la
cámara manteniendo pulsado este botón.)
. Botón de disco directo [DIRECT DISC]/
botón de asistencia de enfoque [FOCUS
ASSIST]
/ Entrada del ventilador
0 Botón de copia de seguridad directa
[DIRECT BACK UP]/botón de revisión
rápida [QUICK REVIEW] ( p. 20, 21)
1 Botón de eliminación [
*
]
2 Botón de cambio de modo de reproducción/
grabación [PLAY/REC] ( p. 20, 21)
3 Conector de audio/vídeo [AV] ( p. 27, 33)
4 Conector componente [COMPONENT]
( p. 26)
5 Interruptor de modo [!, #]
6 Botón de inicio/parada de grabación de
vídeo [START/STOP] ( p. 20)
Page 58

14
SP
Indicaciones en la pantalla LCD
Durante la grabación de vídeo e
imágenes fi jas
WT
0
FOCUS
200X
1/4000
LCD
1080p
4:55PM
JAN.20.2008
! Indicador de modo de grabación
seleccionado ( p. 23)
# Indicador de modo telemacro
$ Porcentaje aproximado de zoom
% Salida con 1080p
& Indicador de revisión rápida
( Indicador de zoom
) Indicador de asistencia de enfoque
* Velocidad de obturación
+ Indicador de control de brillo/nitidez
, Indicador de batería
- Fecha/hora
. Indicador de ajuste de enfoque manual
/ Retroiluminación de la pantalla
0 Indicador de soporte de grabación
seleccionado
1 Indicador de detección de caída (Aparece
si [SENSOR DE GRAVEDAD] está ajustado
en [OFF].)
2 Indicador de modo de efectos especiales
3 Indicador de modo de programa AE
4 Indicador de balance de blancos
5 Indicador de luz LED ( p. 22)
6 ±0 : Indicador de ajuste de exposición
- : Indicador de compensación de
contraluz
. : Indicador de control de exposición
puntual
C
: Indicador de bloqueo del diafragma
Sólo durante la grabación de vídeo
REC
0:04:01
[4h59m]
XP
xvC
PHOTO
! Indicador de modo ( p. 20)
# Indicador de reducción de viento
$ x.v.Color™
% Calidad de imagen
& Tiempo restante ( p. 20, 38)
( Contador
)
M
REC : (Aparece durante la grabación.)
( p. 20)
MQ
: (Aparece durante el modo de espera
de grabación.)
* Indicador de disparo ( p. 20)
+ Indicador de nivel de entrada del micrófono
, Indicador de evento ( p. 22)
- Indicador de Estabilizador de imagen digital
(DIS) (Aparece si [DIS] está ajustado en
[OFF].)
Sólo durante la grabación de imágenes
fi jas
[9999]
FINE
10
1920
PHOTO
F4.0
! Indicador de modo ( p. 21)
# Sensibilidad ISO
(GANANCIA): Si se ajusta en [AUTO], no
aparece ninguna indicación.
$ Indicador de enfoque ( p. 21)
% Tamaño de imagen
& Calidad de imagen
( Número restante de tomas ( p. 38)
) { : Indicador de modo de toma continua
J : Indicador de modo de fotografía con
horquillado
* Indicador de disparo ( p. 21)
+ Indicador de temporizador
, Valor de apertura (número F)
Page 59

15
SP
Durante la reproducción de vídeo
1:55:01
X-60
XP
xvC1080p
4:55PM
JAN.20.2008
! Indicador de modo ( p. 24)
#
6
: Indicador de reproducción de lista de
reproducción (Aparece al reproducir una
lista de reproducción.)
$ Salida con 1080p
% x.v.Color™
& Calidad de imagen
( Modo de reproducción ( p. 24)
F
:
Reproducción
Q
:
Pausa
K
:
Búsqueda hacia adelante
J
:
Búsqueda hacia atrás
QF
:
Cámara lenta hacia adelante
PQ
:
Cámara lenta hacia atrás
(El número de la izquierda indica la
velocidad.)
) Contador
* Indicador de nivel de volumen
+ Indicador de batería
, Fecha/hora
- Indicador de modo de efectos especiales
. Indicador de efectos de cortinilla/fundido
Durante la reproducción de imágenes
fi jas
101-0098
PM
4:55
JAN.20.2008
1080p
! Indicador de modo ( p. 25)
# Salida con 1080p
$ Número de carpeta o archivo
% Indicador de reproducción automática de
las imágenes ( p. 25)
& Indicador de batería
( Fecha/hora
Visualización de la guía de
funcionamiento
La guía de funcionamiento aparece en la
parte inferior de la pantalla mientras se
muestra el menú, etc.
SELECC
AJUSTE SALIR
Page 60

16
SP
Ajustes preliminares necesarios
Carga de la batería
1 Cierre la pantalla LCD para apagar la
cámara.
2 Instale la batería.
BATT.
3 Conecte el adaptador de CA.
•
La luz de alimentación/carga parpadea
para indicar que la carga se ha iniciado.
•
La carga fi naliza cuando la luz se apaga.
Tiempo de carga/grabación necesario
(aprox.)
* Cuando la luz LED está apagada y la luz
de fondo de la pantalla está ajustada en
modo de [ESTÁNDAR].
Batería
Tiempo de
carga
Tiempo de
grabación
BN-VF808U
(suministrada)
1 h 30 min. 1 h 00 min.*
BN-VF815U 2 h 40 min. 2 h 00 min.*
BN-VF823U 3 h 50 min. 3 h 05 min.*
NOTA
El tiempo de grabación real puede reducirse en
función del entorno de grabación, como cuando
se graban escenas de movimiento rápido.
䡵
Para extraer la batería
Deslice y mantenga presionado BATT.
(paso 2) y extraiga la batería.
NOTAS
•
La cámara también se puede usar con sólo
el adaptador de CA.
•
No estire ni doble el enchufe o el cable
del adaptador de CA. Se podría dañar el
adaptador de CA.
Comprobación de la carga restante
de la batería
Preparativos:
•
Cierre la pantalla LCD para apagar la
cámara.
•
Instale la batería.
Modo
!: pulse INDEX dos veces.
Modo
#: pulse INDEX.
INDEX
ESTADO DE LA BATERÍA
TIEMPO MÁX
MIN
La información de la batería se muestra
durante unos 3 segundos si el botón se pulsa
y suelta rápidamente, y durante unos
15 segundos si el botón se mantiene pulsado
durante unos segundos.
Para volver a la pantalla normal
Pulse INDEX.
NOTA
El tiempo de grabación restante sólo debe
utilizarse a modo orientativo. Se muestra en
unidades de 10 minutos.
䡵
䡵
Conector de CC
Adaptador de CA
A la toma de CA
(de 110 V a 240 V)
Page 61

17
SP
Ajuste de la fecha/hora
1 Abra la pantalla LCD para encender la
cámara.
2 Pulse MENU.
MENU
3 Seleccione [AJUSTES BÁSICOS].
Seleccionar
Ajustar
x.v.Color
REGISTRAR EVENTO
AJUSTES BÁSICOS
GANANCIA
AJUSTE SALIR
4 Seleccione [AJUS.RELOJ].
Seleccionar
Ajustar
AJUSTAR FECHA/HORA
AJUSTES BÁSICOS
LANGUAGE
ESTILO INDIC. FECHA
AJUS.RELOJ
BRILLO DEL MONITOR
VOLVER
AJUSTE SALIR
5 Ajuste la fecha y la hora.
Seleccionar
Ajustar
SELECC
AJUSTE SALIR
FECHA HORA
JAN 31
11AM07
2008
AJUS.RELOJ
Repita este paso para introducir el mes, el
día, el año, la hora y los minutos.
Para volver a la pantalla anterior
Mueva el botón selector hacia £.
Para salir de la pantalla
Pulse MENU.
NOTA
Si no ajusta la fecha y la hora, la pantalla
[¡AJUSTE FECHA/HORA!] aparecerá cada
vez que encienda la cámara.
Ajuste del idioma
El idioma en el que se muestra la información
de la pantalla puede cambiarse.
1 Abra la pantalla LCD para encender la
cámara.
2 Pulse MENU.
MENU
3 Seleccione [AJUSTES BÁSICOS].
Seleccionar
Ajustar
x.v.Color
REGISTRAR EVENTO
AJUSTES BÁSICOS
GANANCIA
AJUSTE SALIR
4 Seleccione [LANGUAGE].
Seleccionar
Ajustar
AJUSTES BÁSICOS
LANGUAGE
ESTILO INDIC. FECHA
AJUS.RELOJ
BRILLO DEL MONITOR
SELECCIONAR IDIOMA
VOLVER
AJUSTE SALIR
5 Seleccione un idioma.
Seleccionar
Ajustar
AJUSTES BÁSICOS
LANGUAGE
DATE DISPLAY STYLE
CLOCK ADJUST
MONITOR BRIGHT
VOLVER
AJUSTE SALIR
Para volver a la pantalla anterior
Mueva el botón selector hacia £.
Para salir de la pantalla
Pulse MENU.
Page 62

18
SP
Otros ajustes
Ajuste de la correa de mano
Abra la almohadilla y ajuste la correa a sus
necesidades.
Colocación de la correa para hombro
Cubierta del objetivo
Cuando no utilice la cámara, cierre la cubierta
del objetivo para proteger el objetivo.
NOTA
No presione con fuerza la cubierta del objetivo.
De lo contrario, puede dañarse el objetivo.
Instalación en trípode
Encaje el orifi cio para perno de la cámara con
el perno del trípode y el zócalo de fi jación con
el tornillo; a continuación, gire la cámara a la
derecha para montarla en el trípode.
NOTA
No utilice el trípode en superfi cies inestables
o desniveladas. La cámara podría caer y sufrir
una avería grave.
Orifi cio
Guía corredera
de la correa
Hebilla
Interruptor de
la cubierta del
objetivo
Cubierta del
objetivo
Page 63

19
SP
Cuando se utiliza una tarjeta microSD
Para grabar en una tarjeta microSD, realice las
3 operaciones siguientes.
•
Se ha confi rmado el funcionamiento con las
siguientes tarjetas microSD.
- Panasonic
- TOSHIBA
- SanDisk
- ATP
Grabación de vídeo:
Tarjeta microSDHC compatible de clase 4 ó
6 (4 GB, 8 GB)
Grabación de imágenes fi jas:
Tarjeta microSD (de 256 MB a 2 GB) o
tarjeta microSDHC (4 GB, 8 GB)
•
Si se utilizan otros soportes, pueden
producirse errores en la grabación de datos
o pueden perderse datos ya grabados.
•
Las MultiMediaCards no son compatibles.
Q Inserte una tarjeta microSD
Preparativos:
Cierre la pantalla LCD para apagar la cámara.
1 Abra la tapa de la tarjeta microSD.
2 Inserte fi rmemente la tarjeta por su
lado recortado.
3 Cierre la tapa de la tarjeta microSD.
Para extraer la tarjeta microSD
Presione la tarjeta microSD una vez.
Cuando la tarjeta se expulse parcialmente,
extráigala.
NOTAS
•
La tarjeta microSD sólo se puede insertar
y extraer con la cámara apagada. De lo
contrario, los datos de la tarjeta podrían
dañarse.
•
No toque el terminal de la parte posterior de
la etiqueta.
R Cambio del soporte de grabación
La cámara está preajustada de fábrica para
grabar en el disco duro integrado. El soporte
de grabación se puede cambiar por una tarjeta
microSD.
Ajuste [SOPORTE GRAB. VÍDEO] y
[SOPORTE GRAB. IMAGEN] en [SD].
S Formateo de una tarjeta microSD
cuando se utiliza por primera vez
De este modo, se garantiza también que la
velocidad y el funcionamiento serán estables
al acceder a la tarjeta microSD.
Seleccione [FORMATEAR TARJETA SD]
para formatear la tarjeta.
Cambio de las confi guraciones de menús
1 Pulse MENU.
MENU
2 Seleccione el menú que desee.
Seleccionar
Ajustar
ZOOM
DIS
AJUSTE MANUAL
COMPENSAR VIBRACIÓN
CALIDAD DE VÍDEO
AJUSTE SALIR
3 Seleccione el ajuste que desee.
Seleccionar
Ajustar
ZOOM
DIS
AJUSTE MANUAL
COMPENSAR VIBRACIÓN
CALIDAD DE VÍDEO
OFF
ON
VOLVER
AJUSTE SALIR
Para volver a la pantalla anterior
Mueva el botón selector hacia £.
Para salir de la pantalla
Pulse MENU.
Page 64

20
SP
Grabación de vídeo
Preparativos: Abra la pantalla LCD para encender la cámara.
Grabación de archivos
GRABACIÓN
Pulse PLAY/REC para seleccionar
el modo de grabación.
PLAY/REC
SELECT
Pulse START/STOP para empezar
la grabación.
START
/STOP
REC
[4h59m]
XP
0:01:30
Para detener la grabación
Pulse START/STOP de nuevo.
Para ver la última escena grabada
Pulse QUICK REVIEW mientras la
grabación está en pausa. Si se pulsa
DELETE durante la reproducción, se
elimina la escena.
Para cambiar la calidad de la imagen
Cambie los ajustes de [CALIDAD DE VÍDEO].
Deslice el interruptor de modo
para seleccionar el modo !
(vídeo).
NOTAS
•
Si no se realiza ninguna operación durante 5 minutos cuando la cámara está encendida, ésta
se apaga automáticamente para ahorrar energía. Para volver a encender la cámara cuando ésta
se utiliza con la batería, cierre la pantalla LCD y vuélvala a abrir. Cuando utilice la cámara con el
adaptador de CA, realice cualquier operación, como utilizar el zoom.
•
Cada 4 GB se creará un nuevo archivo.
•
No mueva ni sacuda la cámara bruscamente durante la grabación. De lo contrario, puede que
se grabe el sonido (zumbido) de la unidad de disco duro.
Para grabar una imagen fi ja durante la
grabación de vídeo
Pulse SNAPSHOT.
Tiempo restante
aproximado para la
grabación
Page 65

21
SP
Deslice el interruptor de modo
para seleccionar el modo #
(imagen fi ja).
Pulse PLAY/REC para seleccionar
el modo de grabación.
PLAY/REC
SELECT
19
Mantenga pulsado SNAPSHOT
hasta la mitad de su recorrido.
[
FINE
1920
El indicador ? se vuelve verde cuando
la imagen capturada queda enfocada.
Pulse SNAPSHOT hasta el fondo
para tomar la fotografía.
PHOTO
[9999]
FINE
20
NOTAS
•
El Estabilizador de imagen digital (DIS) no funciona durante la grabación de imágenes fi jas.
•
Si no se realiza ninguna operación durante 5 minutos cuando la cámara está encendida, ésta
se apaga automáticamente para ahorrar energía. Para volver a encender la cámara cuando ésta
se utiliza con la batería, cierre la pantalla LCD y vuélvala a abrir. Cuando utilice la cámara con el
adaptador de CA, realice cualquier operación, como utilizar el zoom.
•
Las imágenes fi jas grabadas en tamaño 16:9 pueden imprimirse con los lados recortados.
Compruebe si en su establecimiento habitual pueden imprimir imágenes de tamaño 16:9.
•
Cuando apaga la cámara después de detener la grabación y la vuelve a encender, los botones
QUICK REVIEW y DELETE no funcionan.
Grabación de imágenes fi jas
Preparativos: Abra la pantalla LCD para encender la cámara.
Para ver la última escena grabada
Pulse QUICK REVIEW mientras la
grabación está en pausa. Si se pulsa
DELETE durante la reproducción, se
elimina la escena.
Para cambiar la calidad de la imagen
Cambie los ajustes de [CALIDAD DE
IMAGEN].
Para cambiar el tamaño de la imagen
Cambie los ajustes de [TAM.IMAGEN].
Para grabar imágenes fi jas continuamente
Ajuste [MODO DE CAPTURA] en [TOMA
CONTINUA].
Page 66

22
SP
Grabación de archivos (continuación)
Uso del zoom
Preparativos:
•
Seleccione el modo ! o #.
•
Seleccione el modo de grabación.
Reducción Ampliación
W: Gran angular T: Telefoto
Porcentaje de zoom máximo (preajuste de fábrica).
Modo ! Modo #
10X 8X
Para cambiar el porcentaje de zoom
máximo (sólo modo !)
Cambie los ajustes en [ZOOM].
NOTA
La fi lmación en macro (acercándose hasta
unos 5 cm del sujeto) es posible cuando la
palanca del zoom está totalmente ajustada
en W.
Luz LED
Preparativos:
•
Seleccione el modo ! o #.
•
Seleccione el modo de grabación.
LIGHT
El ajuste cambia con cada pulsación del botón.
D
La luz LED permanece
encendida independientemente
de las condiciones del entorno.
D
A
La luz LED se enciende
automáticamente cuando la
luminosidad es insufi ciente.
Sin
indicación
Desactiva esta función.
Registro de archivos en eventos
!
Si antes de empezar la grabación selecciona
un evento en el que desea registrar el
archivo, el archivo se registrará en el evento
seleccionado, lo que facilita la localización del
archivo para reproducirlo.
Preparativos:
•
Seleccione el modo !.
•
Seleccione el modo de grabación.
1 Pulse MENU.
MENU
2 Seleccione [REGISTRAR EVENTO].
Seleccionar
Ajustar
x.v.Color
REGISTRAR EVENTO
AJUSTES BÁSICOS
GANANCIA
REGISTRAR EVENTO AL GRABAR
SELECC
AJUSTE SALIR
3 Seleccione el evento en el que desea
registrar el archivo.
Para cancelar el registro de un evento,
seleccione [NO REGISTRAR].
Seleccionar
Ajustar
VIAJE
NO REGISTRAR PÁG. SIGUIENTE
1/ 3
SELECC
REGIST. SALIR
El evento seleccionado aparece en la
pantalla.
Para salir de la pantalla
Pulse MENU.
NOTA
Una vez haya elegido un evento determinado
en el que registrar un archivo, el ajuste se
conservará aunque apague la cámara.
Page 67

23
SP
El modo de grabación manual permite ajustar
manualmente el enfoque, el brillo de la pantalla, etc.
Para cambiar al modo de grabación
manual
Preparativos:
•
Seleccione el modo ! o #.
•
Seleccione el modo de grabación.
/
INFO
AUTO
Para regresar al modo de grabación automático
Pulse el botón AUTO/INFO para que
aparezca el indicador 4.
Programa AE
Se pueden grabar vídeos o imágenes fi jas con una
claridad óptima ajustando la exposición y la velocidad
de obturación que se adecuen al entorno o al sujeto.
En el modo de grabación manual;
1
PROGRAM AE
2 Seleccione el ajuste que desee.
Para obtener más información sobre cada
ajuste, vea la columna derecha.
Seleccionar
Ajustar
OFF
[9999]
FINE
1920
Para cancelar el programa AE
Seleccione [OFF] en el paso 2.
Opciones de ajuste del programa AE
•
6 RETRATO*:
El sujeto en primer plano se acentúa
dejando borroso el fondo.
•
H DEPORTE:
Graba con claridad sujetos que se
mueven con rapidez.
•
G NIEVE:
Realiza una compensación de los sujetos que
aparecerían demasiado oscuros al fi lmar en
ambientes extremadamente claros, como en la nieve.
•
/ FOCO:
Cuando un sujeto aparece demasiado
claro iluminado por la luz de un foco.
•
V ATARDECER:
Hace que las escenas de atardecer
parezcan más naturales.
*
Sólo modo #
Ajuste manual en el menú
En el modo de grabación manual;
1 Pulse MENU.
MENU
2 Seleccione [AJUSTE MANUAL].
Seleccionar
Ajustar
CALIDAD DE VÍDEO
ZOOM
DIS
AJUSTE MANUAL
AJUSTAR GRABACIÓN MANUAL
AJUSTE SALIR
3 Seleccione el menú que desee.
Seleccionar
Ajustar
VELOCIDAD OBTURACIÓN
WB
AJUSTAR BRILLO
AJUSTAR VELOCIDAD OBTURACIÓN
AJUSTE MANUAL
EFECTO
VOLVER
AJUSTE SALIR
4 Seleccione el ajuste que desee.
Seleccionar
Ajustar
VELOCIDAD OBTURACIÓN
WB
AJUSTAR BRILLO
AJUSTE MANUAL
EFECTO
VOLVER
AJUSTE SALIR
AUTO
MANUAL
Para volver a la pantalla anterior
Mueva el botón selector hacia £.
Para salir de la pantalla
Pulse MENU.
Grabación manual
Page 68

24
SP
Operaciones durante la reproducción
Reproducción/
Pausa
Si durante la búsqueda hacia adelante/atrás se mueve el botón selector
hacia £ / ¤, se modifi ca la velocidad de búsqueda (máximo 60x).
Volver a la primera
escena del archivo
Búsqueda
hacia atrás/
Reproducción
fotograma a fotograma
(durante la pausa)
Búsqueda
hacia adelante/
Reproducción
fotograma a fotograma
(durante la pausa)
Ir a la primera escena
del siguiente archivo
— : Bajar el volumen
+ : Subir el
volumen
Volumen del altavoz
REPRODUCCIÓN
Reproducción de archivos
Reproducción de vídeo
Deslice el interruptor de modo
para seleccionar el modo !
(vídeo).
Seleccione el modo de
reproducción.
PLAY/REC
SELECT
VÍDEO
1/1
SELECC
AJUSTE CLASIF
Aparece la pantalla de índice.
Seleccione el archivo que desee.
Seleccionar
Ajustar
Para volver a la pantalla de índice
Pulse INDEX.
Para consultar la información del archivo
Pulse AUTO/INFO cuando la reproducción
esté detenida.
Para eliminar un vídeo
Pulse DELETE cuando la reproducción esté
detenida.
Page 69

25
SP
Para volver a la pantalla de índice
Pulse INDEX.
Para consultar la información del archivo
Pulse AUTO/INFO.
Para eliminar una imagen fi ja
Pulse DELETE.
Seleccione el modo de
reproducción.
PLAY/REC
SELECT
IMAG.
1/1
SELECC
AJUSTE CLASIF
Aparece la pantalla de índice.
Seleccione el archivo que desee.
Seleccionar
Ajustar
Deslice el interruptor de modo
para seleccionar el modo #
(imagen fi ja).
Girar 90 grados
(a la izquierda)
Ver el archivo anterior
Iniciar/fi nalizar la reproducción
automática
Ver el archivo siguiente
Girar 90 grados
(a la derecha)
Si durante la reproducción automática se mueve el botón selector hacia ¡ /
¢, se
modifi ca el orden de reproducción.
Operaciones durante la reproducción
Reproducción de imágenes fi jas
Page 70

26
SP
Esta cámara está diseñada para ser utilizada
con señales de televisión en color de tipo
NTSC o de alta defi nición. No se puede usar
con un televisor de otra norma.
Conexión con el televisor
Los vídeos se pueden emitir por el conector
HDMI, el conector COMPONENT o el conector
AV. Seleccione el conector que se adecue
mejor a su televisor.
Preparación: Apague todas las unidades.
Para realizar la conexión con el conector
HDMI
NOTA
Si se conecta a un televisor compatible con
1080p, ajuste [SALIDA HDMI] en [AUTO1].
Una vez ajustado, aparece 1080p en la parte
superior de la pantalla.
Para realizar la conexión con el conector
COMPONENT
NOTA
Cambie los ajustes de [SALIDA
COMPONENTES] de acuerdo con la conexión.
Visionado de imágenes en el televisor
Conector HDMI
Adaptador de CA Conector de CC
Conector HDMI
Cable HDMI (opcional)
A la toma de CA
Cable AV
Adaptador de CA
A la toma de CA
El conector de
vídeo no está en
uso.
Conector AV
Cable componente
Conector de CC
Conector
COMPONENT
Conector de entrada
de audio L/R
Conector
de entrada
COMPONENT
Page 71

27
SP
Para realizar la conexión con el conector
AV
NOTA
Cambie los ajustes de [SALIDA DE VÍDEO]
de acuerdo con el tamaño de la pantalla de su
televisor.
Operación de reproducción
Una vez realizada la conexión con el
televisor
1 Encienda la cámara y el televisor.
2 Ajuste el televisor en el modo de
vídeo.
3 (Sólo cuando se conecta la cámara a la
grabadora de vídeo/DVD)
Encienda la grabadora de vídeo/DVD
y ajuste la grabadora de vídeo/DVD
en el modo de entrada AUX.
4 Inicie la reproducción en la cámara.
( p. 24, 25)
Para ver en el televisor la visualización
en pantalla de la cámara
Ajuste [VER EN TV] en [ON].
NOTA
Si se ha grabado el vídeo con x.v.Color™
ajustado en [ON], cambie el ajuste x.v.Color™
en el televisor. Para obtener más información,
consulte el manual de instrucciones del
televisor.
Cable AV
Conector de CC
Adaptador de CA
A la toma de CA
Conector AV
Conector de entrada AV
Page 72

28
SP
Gestión de archivos
EDICIÓN/IMPRESIÓN
PRECAUCIÓN
No extraiga el soporte de grabación ni realice
ninguna otra operación (por ejemplo, apagar la
alimentación) mientras se accede a los archivos.
Asimismo, asegúrese de utilizar el adaptador de
CA suministrado, ya que los datos del soporte de
grabación se pueden dañar si la batería se agota
durante la operación. Si los datos del soporte de
grabación se dañan, deberá formatear el soporte
de grabación para volver a usarlo.
Para capturar una imagen fi ja de
un vídeo
!
Puede capturar la escena deseada de un
vídeo grabado y guardarla como imagen fi ja.
Preparativos:
•
Seleccione el modo !.
•
Seleccione el modo de reproducción.
Pulse SNAPSHOT cuando la
reproducción esté en pausa.
SNAPSHOT
NOTAS
•
Las imágenes fi jas capturadas se guardan con
una resolución de 1920 x 1080. La imagen se
puede alargar en sentido horizontal o vertical
dependiendo de la calidad de imagen del
archivo de vídeo de origen.
•
No se pueden capturar imágenes cuando el
vídeo se reproduce en modo de búsqueda o
en cámara lenta. Las imágenes se pueden
capturar cuando el vídeo se reproduce
normalmente o cuando está en pausa.
•
La función de toma continua no se puede
utilizar para capturar imágenes.
Eliminación/ protección de archivos
•
Los archivos protegidos no se pueden
eliminar. Para eliminarlos, primero debe
anular la protección.
•
Una vez eliminados, los archivos no se
pueden restaurar. Compruebe los archivos
antes de eliminarlos.
Preparativos:
•
Seleccione el modo ! o #.
•
Seleccione el modo de reproducción.
Eliminación/protección del archivo
visualizado
1 Pulse MENU.
MENU
2 Seleccione [ELIMINAR] o
[PROTEGER/CANCELAR].
Seleccionar
Ajustar
ELIMINAR VÍDEO
PROTEGER/CANCELAR
ELIMINAR
COPIAR
MOVER
AJUSTE SALIR
3 Seleccione [ACTUAL].
Seleccionar
Ajustar
ELIMINAR
SELECCIÓN ARCHIVOS
ELIMINAR TODO
SELECC. ESCENAS UNA A UNA
ACTUAL
SELECC
AJUSTE SALIR
Se puede seleccionar el archivo anterior o
siguiente moviendo el botón selector hacia
£ / ¤.
4 Seleccione [SÍ].
Seleccionar
Ajustar
NO
SÍ
¿ELIMINAR?
(Nº actual escenas: 0001)
LAS LISTAS DE REPR. CON
ESTA ESCENA SE MODIFICARÁN
SELECC
AJUSTE
Para salir de la pantalla
Pulse MENU.
Page 73

29
SP
Cambio del registro de eventos
!
Preparativos:
•
Seleccione el modo !.
•
Seleccione el modo de reproducción.
Cambio del evento del archivo visualizado
1 Pulse MENU.
MENU
2 Seleccione [CAMBIAR REG.
EVENTO].
Seleccionar
Ajustar
CAMBIAR REG. EVENTO
BUSCAR EVENTO
MONITOR APAGADO
REPR. LISTA REPROD.
CAMBIAR EVENTO REGISTRADO
AJUSTE SALIR
3 Seleccione [ACTUAL].
Seleccionar
Ajustar
CAMBIAR REG. EVENTO
AJ.INTERV. Y CAMBIAR
SELECC. ESCENAS UNA A UNA
ACTUAL
SELECC
AJUSTE SALIR
4 Seleccione el archivo que desee
registrar.
Seleccionar
Ajustar
¿CAMBIAR EVENTO?
NO
SÍ
SELECC
AJUSTE SALIR
Se puede seleccionar el archivo anterior o
siguiente moviendo el botón selector hacia
£ / ¤.
División de archivos
!
Es posible dividir el vídeo seleccionado en dos.
Preparativos:
•
Seleccione el modo !.
•
Seleccione el modo de reproducción.
1 Pulse MENU.
MENU
2 Seleccione [DIVIDIR].
Seleccionar
Ajustar
EFECTO
CORTINILLA/FUNDIDO
DIVIDIR VÍDEO
AJUSTES BÁSICOS
DIVIDIR
AJUSTE SALIR
3 Seleccione el archivo que desee.
Seleccionar
Ajustar
DIVIDIR
SELECC
AJUSTE SALIR
Se inicia la reproducción.
4 Ajuste el punto en el que desee
dividir el archivo.
DIVIDIR
00:00:04
AJUSTE SALIRVOLVER
El punto real de división puede diferir
ligeramente del punto ajustado.
5 Seleccione [DIVIDIR AQUÍ].
Seleccionar
Ajustar
DIVIDIR
DIVIDIR AQUÍ
CANCELAR
00:00:04
SELECC
AJUSTE SALIR
Para volver a ajustar el punto de división,
seleccione [CANCELAR].
Para salir de la pantalla
Pulse MENU.
NOTA
Al reproducir el archivo dividido, se muestra la
fecha de grabación del punto de división.
Page 74

30
SP
Listas de reproducción
!
Una lista de reproducción es una lista que
permite organizar los vídeos grabados por
preferencias.
Preparativos:
•
Seleccione el modo !.
•
Seleccione el modo de reproducción.
Creación de listas de reproducción
1 Pulse MENU.
MENU
2 Seleccione [EDITAR LISTA REPR.].
Seleccionar
Ajustar
CAMBIAR REG. EVENTO
REPR. LISTA REPROD.
CREAR/EDITAR LISTAS REPR.
EDITAR LISTA REPR.
BUSCAR EVENTO
AJUSTE SALIR
3 Seleccione [NUEVA LISTA].
Seleccionar
Ajustar
EDITAR LISTA REPR.
EDITAR
RENOMBRAR LISTA REP.
ELIMINAR
CREAR LISTA REPROD.
NUEVA LISTA
SELECC
AJUSTE SALIR
4 Seleccione una opción y visualice los
archivos.
Seleccionar
Ajustar
NUEVA LISTA
SELECCIONAR ESCENA POR FECHA
CREAR POR GRUPO
CREAR POR EVENTO
CREAR POR FECHA
SELECC. DE ESCENAS
SELECC
AJUSTE SALIR
•
[SELECC. DE ESCENAS]:
Muestra todos los archivos
individualmente.
•
[CREAR POR GRUPO]:
Muestra todos los archivos por grupo.
•
[CREAR POR FECHA]:
Muestra una lista de todos los archivos
ordenados por fecha de grabación.
•
[CREAR POR EVENTO]:
Busca un evento y muestra una lista de
los archivos correspondientes ordenados
por fecha de grabación.
5 Seleccione el archivo que desee
agregar a la lista de reproducción.
Seleccionar
Ajustar
TOTAL
SEP.01.2008
0/999
SELECC
REGIST.
•
Para obtener una vista preliminar de las
escenas, pulse INDEX. Cuando aparezca
la pantalla de índice de escenas
individuales, seleccione el archivo.
Para volver a la pantalla anterior, pulse INDEX.
6 Seleccione el punto de inserción.
Seleccionar
Ajustar
TOTAL
SEP.01.2008
1/999
00h02m
REGIST.
SALIR
DVD1
•
Para agregar más archivos, repita los
pasos 5 y 6.
•
Para eliminar una escena registrada,
seleccione el archivo registrado.
7
MENU
TOTAL
SEP.01.2008
1/999
00h02m
REGIST.
SALIR
DVD1
8 Seleccione [GUARDAR Y SALIR].
Seleccionar
Ajustar
GUARDAR Y SALIR
ELIMINAR Y SALIR
VOLVER
SALIR DE LISTA DE REPR.
¿GUARDAR CONTENIDO EDITADO?
SELECC
AJUSTE
Para salir de la pantalla
Pulse MENU.
NOTAS
•
Se pueden crear como máximo 99 listas de
reproducción.
•
Si elimina los archivos originales, éstos
también se eliminan de la lista de reproducción.
Page 75

31
SP
Copia de archivos
COPIA
Tipos de copia y dispositivos conectables
La cámara
Se pueden copiar archivos
entre la unidad de disco
duro y la tarjeta microSD en
la propia cámara.
( abajo)
Grabadora de DVD
(CU-VD50/CU-VD3)*
Se pueden copiar en discos
DVD archivos grabados en
esta cámara.
( columna derecha)
* Los discos AVCHD sólo se
pueden reproducir en
CU-VD50. CU-VD3 no es
capaz de reproducir vídeos.
En tal caso, utilice la cámara
para reproducir.
Grabadora de vídeo/DVD
Se pueden copiar en una
grabadora de vídeo/DVD
vídeos grabados en esta
cámara. ( p. 33)
Se recomienda utilizar la grabadora de DVD
JVC (CU-VD50/CU-VD3). Si se utiliza
CU-VD20 o CU-VD40, el tiempo de grabación
puede tardar aprox. 2 veces más que el tiempo
indicado en el manual de instrucciones de la
grabadora de DVD.
Copia/traslado de archivos
Puede copiar o mover archivos entre el disco
duro y la tarjeta microSD.
Modo #
Modo !
Uso de una grabadora de DVD para
copiar archivos de la cámara
Se puede hacer una copia de seguridad de los
archivos de la cámara en un disco DVD con
una grabadora de DVD.
•
Este disco no se puede reproducir en un
reproductor de DVD normal. Utilice uno de
los siguientes métodos para ver el disco.
- Reproducción del disco mediante la cámara.
(“Para reproducir el disco creado con la
cámara” p. 32)
- Reproducción del disco con una grabadora de
DVD. *
- Reproducción en un PC*
* El disco debe fi nalizarse primero en la cámara.
•
No se pueden reproducir los discos DVD que
no se hayan creado con una grabadora de DVD.
•
Si se conecta una grabadora de DVD (CU-VD50)
a un televisor, se puede reproducir el disco
creado sin utilizar la cámara. Desconecte el
cable USB a la hora de reproducir.
Conexión con una grabadora de DVD
Preparación:
Primero encienda la cámara y luego encienda
la grabadora de DVD.
NOTAS
•
Consulte también el manual de instrucciones
de la grabadora de DVD opcional.
•
Utilice el cable USB suministrado con la
grabadora de DVD.
Cable USB
Conector de CC
Conector USB
Adaptador de CA
A la toma de CA
Grabadora de DVD
Conector USB
Page 76

32
SP
Copia de archivos (continuación)
4 Seleccione [SÍ] o [NO].
•
[SÍ]: Muestra las miniaturas por grupo.
•
[NO]: Muestra las miniaturas por fecha.
Seleccionar
Ajustar
TODAS LAS ESCENAS
NO
SÍ
¿DESEA CREAR UN TÍTULO
AUTOMÁTICO EN EL MENÚ
SUPERIOR DEL DISCO?
AJUSTE ARRIBA
SELECC
5 Seleccione [EJECUTAR].
Seleccionar
Ajustar
TODAS LAS ESCENAS
CANCEL
EJECUTAR
0%
100%
DVD(DL)
DVD35
SELECC
AJUSTE ARRIBA
•
Los archivos se copian en el disco.
Cuando aparezca [HECHO], pulse el botón
selector para completar la operación.
•
Si aparece [INSERTAR SIGUIENTE
DISCO PULSAR [CANCELAR] PARA
ABANDONAR LA CREACIÓN], cambie
de disco. Los archivos restantes se
copiarán en el segundo disco.
•
Para cancelar la copia, seleccione
[CANCELAR].
Para volver a la pantalla principal
Pulse MENU y seleccione [SÍ].
Para fi nalizar el disco una vez terminada
la copia
1)
Conecte la cámara a la grabadora de DVD.
2) Encienda la cámara.
3) Seleccione [FINALIZAR].
4) Seleccione [EJECUTAR].
5) Cuando aparezca [HECHO], seleccione
[ACEPTAR].
Para reproducir el disco creado con la
cámara
1)
Conecte la cámara a la grabadora de DVD.
2) Primero encienda la cámara y luego
encienda la grabadora de DVD.
3) Seleccione [REPRODUCCIÓN].
4) Seleccione la carpeta que desee.
5) Seleccione el archivo que desee.
Para volver a la pantalla anterior, pulse
INDEX.
Para ver vídeos/imágenes fi jas en el
televisor
Vea la página 26.
Copia de seguridad de todos los
archivos
Preparativos:
•
Conecte la cámara a la grabadora de DVD.
•
Seleccione el modo ! o #.
•
Seleccione unidad de disco duro o tarjeta
microSD. (Sólo modo #)
Las siguientes ilustraciones de las
visualizaciones en pantalla son ejemplos
de cuando se realiza una copia de
seguridad de vídeos.
1 Seleccione [SELECC. ENTRE TODO].
Seleccionar
Ajustar
VIDEO
REPRODUCCIÓN
SELECCIONAR Y CREAR
SELECC. ENTRE TODO
FINALIZAR
CREAR DESDE TODAS ESCENAS
AJUSTE
SELECC
2 Seleccione el menú que desee.
•
Modo !: [ESCENAS SIN GUARDAR]
Modo #: [IMÁG. NO GUARDADAS]
Los archivos que nunca se han copiado
en un disco DVD se seleccionan y copian
automáticamente.
•
Modo !: [TODAS LAS ESCENAS]
Modo #: [TODAS LAS IMÁGENES]
Se copian todos los archivos del soporte
de grabación.
Seleccionar
Ajustar
SELECC. ENTRE TODO
SELECCIONAR TODOS VÍDEOS
TODAS LAS ESCENAS
ESCENAS SIN GUARDAR
SELECC
AJUSTE ARRIBA
3 Seleccione [ACEPTAR].
Seleccionar
Ajustar
TODAS LAS ESCENAS
VOLVER
ACEPTAR
CANTIDAD REQUERIDA
PREPARAR DISCO VACÍO
DVD10 / DVD(DL)5
SELECC
AJUSTE ARRIBA
Para cancelar la copia de seguridad,
seleccione [VOLVER].
Page 77

33
SP
Copia de defi nición estándar
Se pueden copiar en defi nición estándar en
una grabadora de DVD.
Preparación: Apague todas las unidades.
Para realizar la conexión con los
conectores AV (copia analógica)
Preparación: Cree una lista de reproducción.
1 Ajuste la grabadora de vídeo o de
DVD en el modo de entrada AUX.
Asegúrese de que las imágenes
de la cámara se hayan introducido
correctamente en la grabadora de vídeo/
DVD.
2 Reproduzca las listas de
reproducción en la cámara.
1) Pulse MENU.
2) Seleccione [REPROD. COPIA].
3) Seleccione la lista de reproducción que
desee.
4) Seleccione [SÍ]. (Aparece una pantalla
negra durante 5 segundos en la primera
y en la última escena.)
3 En el punto donde desee iniciar
la copia, inicie la grabación en la
grabadora de vídeo o de DVD.
Consulte el manual de instrucciones de la
grabadora de vídeo o de DVD.
Para detener la copia
Detenga la grabación en la grabadora de
vídeo o de DVD y pulse otra vez START/
STOP.
Para ocultar la fecha o los iconos de la
pantalla
Cambie los ajustes en [VER EN TV] o
[DATOS EN PANTALLA].
Cable AV
Conector de CC
Adaptador de
CA
A la toma de CA
Conector AV
Grabadora de
vídeo/DVD
Conector AV
Page 78

34
SP
Solución de problemas
Problema Acción
Tarjeta
No se puede insertar la
tarjeta microSD.
•
Compruebe que la tarjeta microSD se esté insertando en la
dirección correcta.
Alimentación
No hay alimentación.
•
Conecte bien el adaptador de CA.
•
Recargue la batería.
Cuando aparece
el mensaje de baja
temperatura, la cámara
se apaga cuando
aumenta su temperatura.
•
Cuando aumenta la temperatura de la cámara si era baja, ésta
puede apagarse para comprobar si su funcionamiento es correcto.
Grabación
La grabación no puede
realizarse.
•
Abra la pantalla LCD para encender la cámara.
•
Pulse PLAY/REC para seleccionar el modo de grabación.
La grabación se detiene.
•
Si aumenta la temperatura de la cámara, REC parpadea en la
pantalla LCD. Si la temperatura continúa aumentando, la cámara
se detiene automáticamente para proteger el disco duro.
•
Trasládese a un lugar donde la cámara no se vea afectada por
vibraciones ni sonido en exceso.
•
Inserte una tarjeta microSD de venta en comercios, y ajuste
[SOPORTE GRAB. VÍDEO] y [SOPORTE GRAB. IMAGEN] en
[SD].
•
La grabación se detiene automáticamente tras 12 horas de
grabación continua.
El enfoque no se ajusta
automáticamente.
•
Limpie la suciedad o las gotas de agua que pueda haber en el
objetivo.
•
Ajuste el enfoque en el modo automático.
•
Si está grabando en un lugar oscuro o un sujeto que no ofrece
ningún contraste entre las partes oscuras y las claras, ajuste el
enfoque de forma manual.
No se puede activar una
función.
•
Compruebe la indicación que representa la función.
•
Si la indicación parpadea o está desactivada, signifi ca que ha
seleccionado dos funciones que no se pueden utilizar a la vez.
Elija cuál de las dos funciones quiere utilizar.
La cámara es un dispositivo controlado por
una microcomputadora. El ruido externo y las
interferencias (de un televisor, una radio, etc.)
podrían impedir su correcto funcionamiento.
Los siguientes fenómenos no son fallos
de funcionamiento.
•
La cámara se calienta cuando se utiliza de
forma prolongada.
•
La batería se calienta durante la carga.
•
Cuando se reproduce un vídeo, la imagen se
detiene momentáneamente o el sonido se
interrumpe en las uniones entre escenas.
•
Para resolver el problema, siga primero las
instrucciones indicadas abajo.
•
Si no se resuelve el problema, reinicie la
cámara.
•
Si el problema persiste, consulte con su
distribuidor JVC más próximo.
INFORMACIÓN ADICIONAL
Page 79

35
SP
Problema Acción
Visualizaciones
La pantalla LCD aparece
en blanco.
•
Haga funcionar la cámara.
Si la cámara no se hace funcionar durante un determinado
periodo de tiempo cuando se utiliza el adaptador de CA, entra en
modo de suspensión y se apaga la pantalla LCD.
Reproducción
La misma escena
se muestra detenida
durante un largo
periodo de tiempo.
•
Reemplace la tarjeta microSD.
(Si la tarjeta microSD presenta arañazos, etc., la cámara
tendrá difi cultades para leer los datos y se puede producir este
fenómeno. La cámara intentará reproducir la mayor cantidad
posible de vídeo, pero si este problema continúa, la cámara no
podrá reproducir el vídeo y se detendrá automáticamente.)
•
Realice una limpieza o un formateo.
El movimiento del vídeo
aparece entrecortado.
El color de las imágenes
parece extraño.
•
Al grabar, el balance de blancos no estaba ajustado
correctamente.
•
Si se ha grabado el vídeo con x.v.Color™ ajustado en [ON],
cambie el ajuste en el televisor según sea necesario.
•
Ajuste [EFECTO] en [OFF].
Las imágenes tienen un
aspecto anormal en el
televisor (alargadas y
delgadas, etc.)
•
Cambie [SALIDA DE VÍDEO] en [AJUSTES BÁSICOS] para que
coincida con el ajuste del televisor.
Copia
Al realizar la copia,
el dispositivo de
vídeo conectado no
empieza a grabar
automáticamente.
•
Inicie o detenga la grabación en el dispositivo de vídeo
manualmente.
Otros problemas
La cámara funciona
con lentitud al pasar
del modo de vídeo
al modo de imagen
fi ja y viceversa, o al
encenderla o apagarla.
•
Copie todos los archivos de los soportes de grabación al equipo,
o elimine los archivos de los soportes.
(Si los soportes contienen muchas imágenes fi jas (más de 1.000
archivos), puede que la cámara tarde en procesarlos.)
La luz no parpadea
durante la carga de la
batería.
•
Compruebe la carga restante de la batería.
(Si la batería ya está totalmente cargada, la luz no parpadea.)
•
Si realiza una carga en un entorno con unas condiciones de
temperatura elevada o baja, asegúrese de que la batería se esté
cargando dentro del intervalo de temperaturas permitido.
(Si la batería se está cargando fuera del intervalo de temperaturas
permitido, puede que la carga se detenga para protegerla.)
El mando a distancia no
funciona.
•
Cambie la batería.
•
En [AJUSTES BÁSICOS], ajuste [MANDO A DISTANCIA] en
[ON].
•
Es posible que el mando a distancia no funcione en exteriores ni
en lugares expuestos a fuentes de luz intensas.
Page 80

36
SP
Indicaciones de advertencia
Indicación Acción
¡AJUSTE FECHA/HORA!
•
Ajuste la fecha y la hora. (Conecte la cámara a una toma de CA
mediante el adaptador de CA durante más de 24 horas para
cargar la pila de litio integrada en el reloj. A continuación, ajuste
la fecha/hora.)
NO SE PUEDE UTILIZAR EN
MODO DE VÍDEO
•
En [AJUSTES BÁSICOS], ajuste [SOPORTE GRAB. VÍDEO] en
[HDD].
•
Reemplace la tarjeta microSD.
¡ERROR EN HDD! ¡ERROR
EN TARJETA DE MEMORIA!
•
Realice una limpieza o un formateo.
•
Extraiga la tarjeta microSD y vuelva a insertarla. (No se pueden
utilizar tarjetas MultiMediaCard.)
•
Elimine la suciedad de los terminales de la tarjeta microSD.
•
Inserte la tarjeta microSD antes de encender la cámara.
•
Apague la cámara y vuélvala a encender.
ERROR DE GRABACIÓN
Tarjeta microSD:
•
Ver i fi que que se haya comprobado el funcionamiento de la
tarjeta microSD.
Unidad de disco duro:
•
Realice una limpieza.
•
Evite someter la cámara a vibraciones o golpes.
CANCELADO POR SUPERAR
LÍMITE DE NÚMEROS EN
LISTA DE REPRODUCCIÓN
•
A la hora de crear un DVD, reduzca el número de listas de
reproducción que vaya a guardar.
•
Reduzca el número de vídeos que vaya a añadir a la lista de
reproducción a 999 archivos o menos.
PROCESAMIENTO
CANCELADO DEBIDO A
FALTA DE ESPACIO PARA LA
OPERACIÓN
NO HAY ESCENAS
REGISTRADAS EN LISTA DE
REPRODUCCIÓN
PUEDE QUE NO SE
REPRODUZCAN ALGUNAS
ESCENAS
•
Elimine la lista de reproducción y cree una nueva.
FORMATO INCOMPATIBLE
•
Realice las operaciones siguientes en este orden:
! Desconecte la unidad de disco duro externa de la cámara
y conéctela a un PC para asegurarse de que no contenga
archivos importantes.
# Conecte la unidad de disco duro externa a la cámara y
seleccione [FORMATEAR] en el menú. (Se eliminarán todos
los archivos de la unidad de disco duro externa.)
Page 81

37
SP
Especifi caciones
Cámara
Aspectos generales
Fuente de alimentación eléctrica
CC 11 V (con adaptador de CA)
CC 7,2 V (con batería)
Consumo eléctrico
Aprox. 4,8 W*
* Cuando la luz LED está apagada y la luz de
fondo de la pantalla está ajustada en modo
de [ESTÁNDAR].
Dimensiones (anchura x altura x fondo)
71 mm x 68 mm x 123 mm
Peso
Aprox. 430 g
Aprox. 475 g (con batería)
Temperatura de funcionamiento
0°C a 40°C
Humedad de funcionamiento
35% a 80%
Temperatura de almacenamiento
–20°C a 50°C
Fotocaptor
CMOS progresivo de 1/4,5" (1.840.000 píxeles)
Objetivo
Vídeo: F 1,8 a 2,5, f = 3,2 mm a 32,0 mm,
objetivo con capacidad de zoom 10:1
Imagen: F 1,9 a 2,5, f = 4,0 mm a 32,0 mm,
objetivo con capacidad de zoom 8:1
Diámetro del fi ltro
ø 43,0 mm
Pantalla LCD
con medida diagonal de 2,7",
panel LCD/sistema de matriz activa TFT
Altavoz
Monoaural
Luz LED
Dentro de 1,5 m
(distancia de fi lmación recomendada)
Para vídeo/audio
Formato de grabación/reproducción
Vídeo: MPEG-4 AVC/H.264
Audio: Dolby Digital (2 canales)
Formato de señal
1080/60i
Modo de grabación (vídeo)
XP: VBR, promedio de 17 Mbps
SP: VBR, promedio de 12 Mbps
EP: VBR, promedio de 5 Mbps
Modo de grabación (audio)
48 kHz, 256 kbps
Para imágenes fi jas
Formato
JPEG
Tamaño de imagen
3 modos: 1920 x 1080
1440 x 1080
640 x 480
Calidad de imagen
2 modos : FINA / ESTÁNDAR
Para conectores
HDMI
HDMI™ (V.1.3 con x.v.Color™)
Salida componente
Salida componente Y, Pb, Pr
Y: 1,0 V (p-p), 75 W
Pb/Pr: 0,7 V (p-p), 75 W
Salida AV
Salida de vídeo: 1,0 V (p-p), 75 W
Salida de audio: 300 mV (rms), 1 kW
USB
Mini USB tipo A y B,
compatible con USB 2.0
Micrófono
Miniconector estéreo de ø3,5 mm
Adaptador de CA
Requisito de alimentación eléctrica
CA 110 V a 240 V
$
, 50 Hz/60 Hz
Salida
CC 11 V
§
, 1 A
Page 82

38
SP
Mando a distancia
Fuente de alimentación eléctrica
CC 3 V
Duración de la batería
1 año aproximadamente
(dependiendo de la frecuencia de uso)
Distancia de funcionamiento
Dentro de 5 m
Temperatura de funcionamiento
0°C a 40°C
Dimensiones (anchura x altura x fondo)
42 mm x 14,5 mm x 91 mm
Peso
Aprox. 30 g
(con batería)
El diseño y las especifi caciones están sujetas a
modifi caciones sin previo aviso.
Tiempo de grabación aproximado (minutos) (para vídeo)
Soporte de grabación
Calidad
Unidad de disco
duro
Tarjeta microSD
40 GB 4 GB 8 GB
XP 300 30 60
SP 420 44 88
EP 1020 100 200
Número aproximado de imágenes almacenables (para imágenes fi jas)
Soporte de grabación
Tamaño de imagen/Calidad
Unidad de
disco duro
Tarjeta microSD
40 GB 512 MB 1 GB 2 GB 4 GB 8 GB
16:9
1920 x 1080 / FINA 9999 510 1040 2100 4200 8420
1920 x 1080 / ESTÁNDAR 9999 800 1630 3210 6410 9999
4:3
1440 x 1080 / FINA 9999 680 1370 2770 5540 9999
1440 x 1080 / ESTÁNDAR 9999 1060 2160 4360 8700 9999
640 x 480 / FINA 9999 3320 6720 9999 9999 9999
640 x 480 / ESTÁNDAR 9999 5980 9999 9999 9999 9999
Especifi caciones (continuación)
Page 83

39
SP
Precauciones
Adaptador de CA
Si utiliza el adaptador de CA en países fuera
de los EE.UU.
El adaptador de CA suministrado tiene una
función de selección automática de tensión en la
escala de corriente alterna de 110 V a 240 V.
USO DEL ENCHUFE ADAPTADOR DE CA
En caso de conectar el cable de alimentación
de la unidad a un tomacorriente de CA que no
sea de la serie American National Standard
C73, emplee un enchufe adaptador de CA,
denominado “Siemens Plug”, como el mostrado.
Consulte con su distribuidor JVC más cercano
para obtener este enchufe adaptador.
Baterías
La batería suministrada
es una batería de iones
de litio. Antes de utilizar la
batería suministrada o una
batería opcional, lea las
precauciones siguientes:
Terminales
•
Para evitar riesgos
... no queme la batería.
... no provoque cortocircuitos en los terminales.
Manténgala alejada de objetos metálicos cuando
no se utilice. Durante el transporte, asegúrese de
que la tapa de la batería está colocada. Si la tapa
de la batería está mal colocada, guarde la batería
en una bolsa de plástico.
... no modifi que ni desmonte la batería.
... no exponga la batería a temperaturas
superiores a 60°C, puesto que la batería podría
calentarse en exceso, explotar o incendiarse.
... utilice solamente los cargadores especifi cados.
•
Para evitar daños y prolongar la vida útil
... no la someta a sacudidas innecesarias.
... cárguela dentro del margen de temperatura
de 10°C a 35°C. Esta es una batería de
reacción química — las temperaturas más frías
difi cultan la reacción química, mientras que las
temperaturas más cálidas pueden impedir la
carga completa.
... guárdela en lugar fresco y seco. La exposición
prolongada a temperaturas elevadas
aumentará la descarga natural y reducirá el
periodo de vida útil.
... se debe cargar totalmente y luego descargar
totalmente la batería cada seis meses cuando
se guarde durante un periodo de tiempo
prolongado.
Enchufe adaptador
... cuando no se utilice, se debe retirar del
cargador o dispositivo eléctrico, ya que algunas
máquinas utilizan corriente incluso estando
apagadas.
ATENCIÓN:
La batería que ha adquirido es
reciclable. Por favor comunicarse
al 1-800-8-BATTERY para
información sobre como reciclar
dicha batería.
Soporte de grabación
•
Asegúrese de seguir las siguientes pautas
para evitar corromper o dañar los datos
grabados.
•
No doble ni tire el soporte de grabación, ni lo someta
a una fuerte presión, sacudidas o vibraciones.
•
No salpique el soporte de grabación con agua.
•
No utilice, reemplace o almacene el soporte de
grabación en lugares expuestos a una fuerte
electricidad estática o a perturbaciones eléctricas.
•
No apague la alimentación de la cámara ni
retire la batería o el adaptador de CA durante
la fi lmación o la reproducción, o al acceder de
algún otro modo al soporte de grabación.
•
No acerque el soporte de grabación a objetos
que tengan un fuerte campo magnético o que
emitan fuertes ondas electromagnéticas.
•
No almacene el soporte de grabación en
ubicaciones expuestas a altas temperaturas o a
un alto grado de humedad.
•
No toque las partes metálicas.
•
Cuando formatea o borra los datos con la cámara, sólo
se cambia la información de administración. Los datos
no se borran completamente del disco duro. Si desea
eliminar por completo todos los datos, le recomendamos
que utilice algún software disponible comercialmente
diseñado para esta fi nalidad o que destruya físicamente
la cámara con un martillo o procedimiento similar.
Disco duro
•
No utilice la unidad cuando esté sujeta a
vibraciones o sonidos fuertes.
•
Si mueve la unidad bruscamente, la función
de detección de caídas puede activarse y la
alimentación se puede desconectar.
Pantalla LCD
•
Para prevenir daños a la pantalla LCD, NO
...
presione con demasiada fuerza y evite los golpes.
... coloque la cámara con la pantalla LCD hacia
abajo.
•
Para prolongar la vida útil
... evite frotarla con un trapo basto.
Page 84

40
SP
Equipo principal
•
Por seguridad, NO DEBE
... abrir el chasis de la cámara.
... desmontar o modifi car el equipo.
... permitir que productos infl amables, agua u
objetos metálicos entren en el equipo.
... extraer la batería ni desconectar el suministro
de energía con el aparato encendido.
... dejar la batería colocada cuando la cámara no
se utilice.
... colocar sobre el aparato ninguna fuente
de llama sin protección, tales como velas
encendidas.
... exponer el equipo a goteos o salpicaduras.
... dejar que polvo u objetos metálicos se
adhieran al enchufe de alimentación o al
tomacorriente de CA.
... insertar ningún objeto en la cámara.
•
Evite utilizar este aparato
... en lugares sometidos a excesiva humedad o
demasiado polvo.
... en lugares con hollín o vapor, por ejemplo,
cerca de una cocina.
... en lugares sometidos a sacudidas o
vibraciones excesivas.
... cerca de un televisor.
... cerca de aparatos que generen campos
magnéticos o eléctricos fuertes (altavoces,
antenas de emisión, etc.).
... en lugares sometidos a temperaturas
extremadamente altas (superiores a 40°C) o
extremadamente bajas (inferiores a 0°C).
... en lugares donde la presión atmosférica sea
baja (más de 3000 m por encima del nivel del
mar).
•
NO deje el aparato
... en lugares donde la temperatura supera los 50°C.
... en lugares con humedad extremadamente
baja (inferior al 35%) o extremadamente alta
(superior al 80%).
... bajo luz solar directa.
... en un coche cerrado en verano.
... cerca de una calefacción.
... en lugares elevados, como encima de un
televisor. La colocación del aparato en un lugar
elevado mientras un cable está conectado
puede provocar averías si alguien tropieza con
el cable y el aparato cae al suelo.
•
Para proteger el aparato, NO DEBE
... permitir que se moje.
... dejar caer el aparato ni golpearlo contra
objetos duros.
... someterlo a sacudidas o vibración excesiva
durante su transporte.
... mantener el objetivo dirigido hacia objetos
demasiado brillantes durante largos periodos.
... exponer el objetivo a la luz solar directa.
... balancearlo excesivamente cuando utilice la
correa de mano.
... balancear demasiado la bolsa de la cámara
con la cámara dentro.
... deje la cámara en áreas donde haya polvo o
arena, como en la playa.
•
Para evitar que la unidad se caiga:
•
Fije bien la correa para hombro y ajuste bien la
correa de mano.
•
Si utiliza la cámara con un trípode, fi je bien la
cámara en el trípode.
Si se le cae la cámara, puede herirse usted y
dañarse la cámara.
Si un niño utiliza la unidad, un adulto deberá
guiarle.
Declaración de conformidad
Número de modelo :
GZ-HD10U
Nombre comercial : JVC
Parte responsable : JVC AMERICAS CORP.
Dirección : 1700 Valley Road Wayne, N. J. 07470
Número de teléfono : 973-317-5000
Este dispositivo cumple con el Apartado 15
de la reglamentación FCC. La operación está
sujeta a las dos condiciones siguientes: (1)
Este dispositivo no debe causar interferencias
perjudiciales y (2) este dispositivo debe aceptar
cualquier interferencia recibida, incluyendo
la interferencia que pueda causar errores de
funcionamiento.
Los cambios o modifi caciones no aprobados
por JVC podrian anular la autoridad del
usuario para utilizar el equipo. Este equipo
ha sido examinado y cumple con los límites
de dispositivos digitales Clase B, segun el
Apartado 15 de la reglamentacion FCC.
Estos limites estan diseñados para suministrar
una protección razonable contra interferencias
perjudiciales en una instalacion residencial.
Este equipo genera, usa y puede irradiar
radiofrecuencia y si no se instala y emplea
de acuerdo con las instrucciones puede
causar interferencias perjudiciales a las
comunicaciones por radio.
Sin embargo, no se garantiza que no se
produzcan interferencias en una instalacion
en particular. Si este equipo causa
interferencias perjudiciales a la recepcion de
radio o televisión, que pueden determinarse
desconectando y conectando la alimentacion
del equipo, el usuario puede intentar corregir
la interferencia por medio de una o mas de las
siguientes medidas:
Reoriente o recoloque la antena de recepción.
Aumente la separación entre el equipo y el
receptor.
Conecte el equipo a un tomacorriente en un
circuito diferente al del receptor conectado.
Consulte con su distribuidor o con un tecnico
experimentado de radio/TV.
Precauciones (continuación)
Page 85

41
SP
MEMO
Page 86

42
SP
MEMO
Page 87

43
SP
Page 88

0608MNH-AL-VP1
US
© 2008 Victor Company of Japan, Limited
A
Adaptador de CA .........................................16, 39
Ajuste del idioma ............................................... 17
Ajuste del reloj ...................................................17
B
Batería .........................................................16, 39
C
Conexión AV ................................................27, 33
Conexión componente ......................................26
Conexión HDMI ................................................. 26
Confi guraciones de menús ................................19
Copia (traslado) de archivos .............................31
Copia de seguridad en DVD ..............................31
Cubierta del objetivo .........................................18
D
Disco duro .........................................................39
División de archivos ..........................................29
E
Eliminación de archivos .....................................28
G
Giro de las imágenes ........................................25
Grabación manual ............................................. 23
L
Lista de reproducción ........................................ 30
Luz LED ............................................................22
M
Mando a distancia .......................................11, 13
Micrófono ...........................................................13
P
Pantalla LCD ...............................................14, 39
Programa AE .....................................................23
Protección de archivos ...................................... 28
R
Registro de eventos ....................................22, 29
S
Soporte de grabación ........................................ 39
T
Tarjeta microSD .................................................19
Televisor ............................................................26
Tiempo de grabación/Número de imágenes .....38
V
Volumen del altavoz ..........................................24
Z
Zoom .................................................................22
Términos
 Loading...