

Page 1
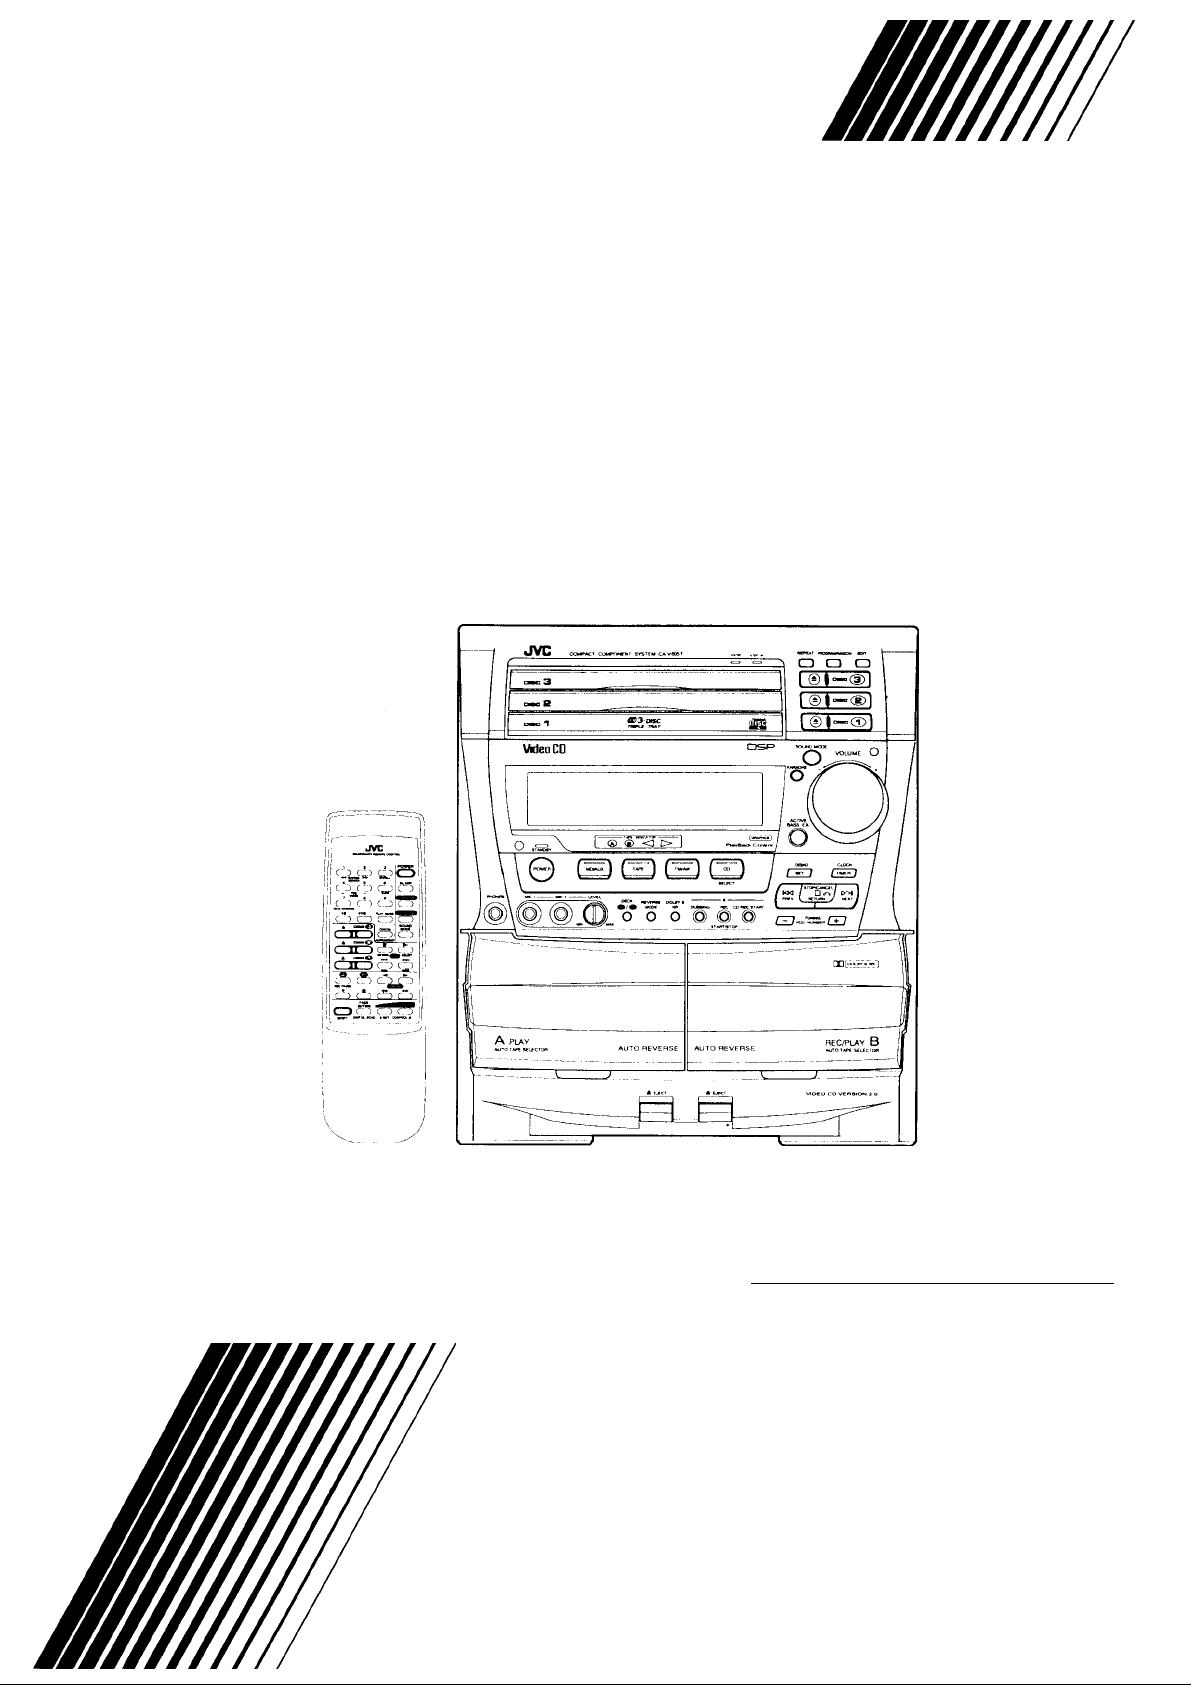
JVC
COMPACT COMPONENT SYSTEM
CA-V605T
PlayBack
Control
Video CD [pi^ALVlDEol (graphics]
INSTRUCTIONS
n COMPACT
rriirff^ra HDSE
InirsiTAi v/incr»l ICDADNICQI
For Customer Use:
Enter below the Model No. and Serial No.
which are located either on the rear, bottom or
side of the cabinet. Retain this information for
the future reference.
Model No.
Serial No.
E30580-2537A*
------
lUCJV
-----------
DIGITAL AUDIO
[U, UT, US, UB]
)
Page 2

Warnings, Cautions and Others
IMPORTANT for the U K.
DO NOT cut off the mains plug from this equipment. If the
plug fitted is not suitable for the power points in your home
or the cable is too short to reach a power point, then obtain
an appropriate safety approved extension lead or consult
your dealer.
BE SURE to replace the fuse only with an identical approved
type, as originally fitted.
If nontheless the mains plug is cut off ensure to remove the
fuse and dispose of the plug immediately, to avoid a possible
shock hazard by inadvertent connection to the mains supply.
If this product is not supplied fitted with a mains plug then
follow the instructions given below:
IMPORTANT.
DO NOT make any connection to the terminal which is
marked with the letter E or by the safety earth symbol or
coloured green or green-and-yellow.
The wires in the mains lead on this product are coloured in
accordance with the following code:
Blue: Neutral
Brown: Live
As these colours may not correspond with the coloured
markings identifying the terminals in your plug proceed as
follows:
The wire which is coloured blue must be connected to the
terminal which is marked with the letter N or coloured black.
The wire which is coloured brown must be connected to the
terminal which is marked with the letter L or coloured red.
IFINDOUBT-CONSULTACOMPETENTELECTRICIAN.
Caution — POWER switchl
Disconnect the mains plug to shut the power off completely. The
POWER switch in any position does not disconnect the mains
line. The power can be remote controlled.
}it —ta^iS!!
CAUTION
To reduce the risk of electrical shocks, fire, etc.:
1. Do not remove screws, covers or cabinet.
2. Do not expose this appliance to rain or moisture.
himimn - ‘Xmim ■■
IMPORTANT FOR LASER PRODUCTS
REPRODUCTION OF LABELS
® CLASSIFICATION LABEL, PLACED ON REAR ENCLO
SURE
1. CLASS 1 LASER PRODUCT
2. DANGER: Invisible laser radiation when open and interlock
failed or defeated. Avoid direct exposure to beam.
3. CAUTION: Do not open the top cover. There are no user
serviceable parts Inside the Unit; leave all servicing to quali
fied service personnel.
(2) WARNING LABEL, PLACED INSIDE THE UNIT
DANGER:
radiation when open and
interlock failed or defeated
AVOID DIRECT EXPOSURE
TO BEAM, (e)
1.
Invisible laser
VARNING:
sträining när denna del är
öppnad och Sparren är
urkopplad. Betrakta ej
strälen. (sl
3. î'È* :
Osynlig laser-
ADVARSEL:
strâling ved äbning, när
sikkerhedsafbrydere er ude
af funktion, Undgä udsaet-
VARO:
Usynilg laser-
jalukitus ohltettaessa ölet
alttllna näkyrilättömälle
lasersätellylle. Älä katso
säleeseen. (I)
ft ; »
Avattaessa ja suo-
G-1
Page 3

INTRODUCTIONS
We would like to thank you for purchasing one of our JVC products.
Before operating this System,
read this manual carefully and
thoroughly to obtain the best possible performance from your System,
and retain this manual for future reference.
About this manual
This manual is organized as follows:
• The manual mainly explains operations using the buttons
and controls on the System. You can also use the buttons
on the remote control if they have the same or similar
names (or marks) as those on the System.
If operation using the remote control is different from that of
using the System, it is then explained.
• Basic and common information that is the same for many
functions is grouped in one place, and is not repeated in
each procedure. For instance, we do not repeat the infor
mation about turning on/off the System, setting the volume,
changing the sound effects, and others, which are ex
plained in the section “Common Operations” on page 10.
• The following marks are used in this manual:
CAUTION:
Gives you warnings and cautions to prevent from a damage
or risk of fire or electric shock.
Also gives you information which is not good for obtaining
the best possible performance from the System.
Notes:
Gives you information and hints you had better know.
Power sources
• When unplugging from the wall outlet, always pull the plug,
not the AC power cord.
|— CAUTION------------------------------------------------------
DO NOT handle the AC power cord with wet hands.
Moisture condensation
Moisture may condense on the lens inside the System in the
following cases:
• After starting the heating in the room
• In a damp room
• If the System is brought directly from a cold to a warm place
should this occur, the System may malfunction. In this case,
leave the System turned on for a few hours until the moisture
evaporates, unplug the AC power cord, and then plug it in
again.
Others
• Should any metallic object or liquid fall into the System,
unplug the System and consult your dealer before operat
ing any further.
• If you are not going to operate the System for an extended
period of time, unplug the AC power cord from the wall
outlet.
Precautions
Installation
• Install in a place which is level, dry and neither too hot or too
cold — between 5°C (41 °F) and 35°C (95°F).
• Install the System in a location with adequate ventilation to
prevent internal heat built-up in the System.
• Leave sufficient distance between the System and the TV.
• Keep the speakers away from the TV to avoid interference
with TV.
- CAUTION
DO NOT install the System in a location near heat sources,
or in a place subject to direct sunlight, excessive dust or
vibration.
---------------------------------------------------------------
____________________
r- CAUTION----------------------------------------------------------------
DO NOT disassemble the System since there are no user
serviceable parts inside.
If anything goes wrong, unplug the AC power cord and consult
your dealer.
Page 4

Table of contents
GENERAL INFORMATION
Checking supplied accessories.....................................1
Types of CDs you can play
Adjusting the voltage selector switch
Laying out the System...................................................1
BEFORE USING FOR THE FIRST TIME...........................2
Connecting the antennas...............................................2
Connecting the speakers
Connecting other equipment
Connecting the power cord............................................4
Putting the batteries into the remote control unit............5
Using the remote control unit.........................................5
UNIQUE FEATURES
About the DEMO mode..............................................,...6
About the ONE-TOUCH easy-on feature.......................6
How to use ONE-TOUCH buttons
Digital Signal Processor (DSP)......................................6
OVERVIEW OF CONTROLS
Front panel
Display...........................................................................8
Remote control unit
COMMON OPERATIONS
Amplifier/Tuner
Turning the power ON and selecting sources
Adjusting the volume....................................................10
Using stereo headphones............................................10
Reinforcing the bass sound
Fade/Muting................................................................11
Selecting the sound modes.........................................11
BASIC OPERATIONS......................................................12
Now you can play a variety of CDs!!.................................12
Triple disc tray usage...................................................12
Preparation for playing ...............................................
Inserting/removing the disc(s)
Starting to play disc(s)
Using number keys......................................................12
Using VCD INDEX.......................................................13
Stopping play...............................................................13
Pausing play................................................................13
Auto search .................................................................13
Manual search.............................................................13
To use slow motion playback.......................................13
To use frame-by-frame playback
RESUME.....................................................................13
VARIOUS UNIQUE FUNCTIONS.....................................14
Programming track sequence......................................14
Programming track sequence (front panel)
Canceling a programmed track....................................14
Repeating tracks..........................................................14
Randomly playing tracks
Tray Lock Function
OPERATION OF PLAYBACK CONTROL FUNCTION .. 16
....................................................................
.................................................................
...............................................
...........................................
............................
...............................................
.........................................
.........................................................
.................................
.............................................
.......................................................
................................................
..............
........................................
.....................................
.................................................
.................................
.................
.............................................
......................................................
11
10
10
10
12
12
12
13
14
15
15
1
1
1
2
3
6
6
7
7
9
Playing Video CDs with Playback Control function
Video CD with Playback Control function
GRAPHIC/DIGITAL AUDIO CDs
Playing CD Graphics/digital audio CDs
Playing CD Graphics
Playing digital audio CDs.............................................18
AM-FM TUNER.................................................................19
Setting the AM tuner interval spacing
Tuning in a station........................................................19
Presetting stations.......................................................20
Tuning in a preset station.............................................20
CASSETTE DECK...........................................................21
Listening to tapes.............................................................21
Listening to tapes in deck A or B..................................21
Locating the beginning of a song — Music Scan
Fast fonward/Reversing tapes.....................................22
Continuous play...........................................................22
RECORDING....................................................................23
Recording tapes
Dubbing tapes
Recording on the connected equipment......................24
CD edit recording..............................................................25
CD direct recording......................................................25
Auto edit recording.......................................................26
KARAOKE........................................................................27
Singing along — Karaoke.................................................27
Singing along with conventional audio CDs or
tapes — Vocal Masking...............................................27
Singing along with Multiplex Karaoke Video CDs
without the PBC function or Multiplex Karaoke
CD-Gs..........................................................................28
Singing along with Multiplex Karaoke Video CDs
with the PBC function
Adjusting music key
USING THE MICROPHONE
Microphone mixing
Recording only through the microphone......................30
USING THE TIMER
Setting the clock..........................................................31
Using recording timer..................................................31
Setting the daily timer
Setting the sleep timer.................................................32
Timer priority................................................................33
MAINTENANCE
Handling compact discs
Handling cassette tapes
Cassette decks............................................................34
TROUBLESHOOTING
Troubleshooting...........................................................35
SPECIFICATIONS............................................................36
...................................................
..........................................................
.............................................................
..................................................
.....................................................
......................................................
.........................................................
..................................................
...............................................................
.....................................................
.....................................
............................
..........................
............................................
..............................................
..............................................
...........
....................
..........
16
17
18
18
18
19
22
23
23
29
29
30
30
31
32
34
34
34
35
Page 5

GENERAL INFORMATION
Checking supplied accessories
After unpacking, check to be sure that you have all the
following items;
AM loop antenna
and stand (1)
FM antenna (1)
type A or type B
AC Plug Adaptor (1)
(except Hong Kong)
If any items are missing, consult your dealer immediately.
Remote control unit (1)
Batteries (2)
When the power plug is a flat
blade type, the type A adaptor
is supplied.
When the power plug is a round
prong type, the type B adaptor
is supplied.
Adjusting the voltage selector switch
Before plugging in the unit, set the correct voltage for your area
with the voltage selector switch on the rear of the System.
Use a screwdriver to rotate the voltage selector switch so the
voltage number the arrow is pointing at is the same as the
voltage where you are plugging in the System.
- CAUTION —
To avoid damaging CA-V605T set the voltage selector
switch before plugging in the System.
-----------------------------------------------------------
Types of CDs you can piay
Many types of compact discs are sold for a variety of uses. The
Video CD Player can play the following compact discs:
• Video CD in COMPACT
for audio and video (moving picture) repro- []^[§
duction, including multiplex sound.
• Video CD with Piayback Controi function
featuring menu-type operation and super
fine still pictures for audio and video (moving
picture) reproduction, including multiplex
sound. nCOMPACT
CD Graphics (CD-G)
for audio and video (still picture) reproduc
tion, including multiplex sound.
Digital Audio CD, including single discs
for audio reproduction.
CDs you can't play back
Do not play back CD-ROMs on this equipment. Doing so may
generate a noise which can damage your speakers.
________
(DIGITAL VIDEOl
PlayBack
Control
)(§
DIGITAL AUDIO
[graphics]
COMPACT
DIGITAL AUDIO
Laying out the System
Leave a space of at least 1 cm on both sides of the System and
at least 10 cm at the back, for ventilation.
Page 1
Page 6
BEFORE USING FOR THE FIRST TIME
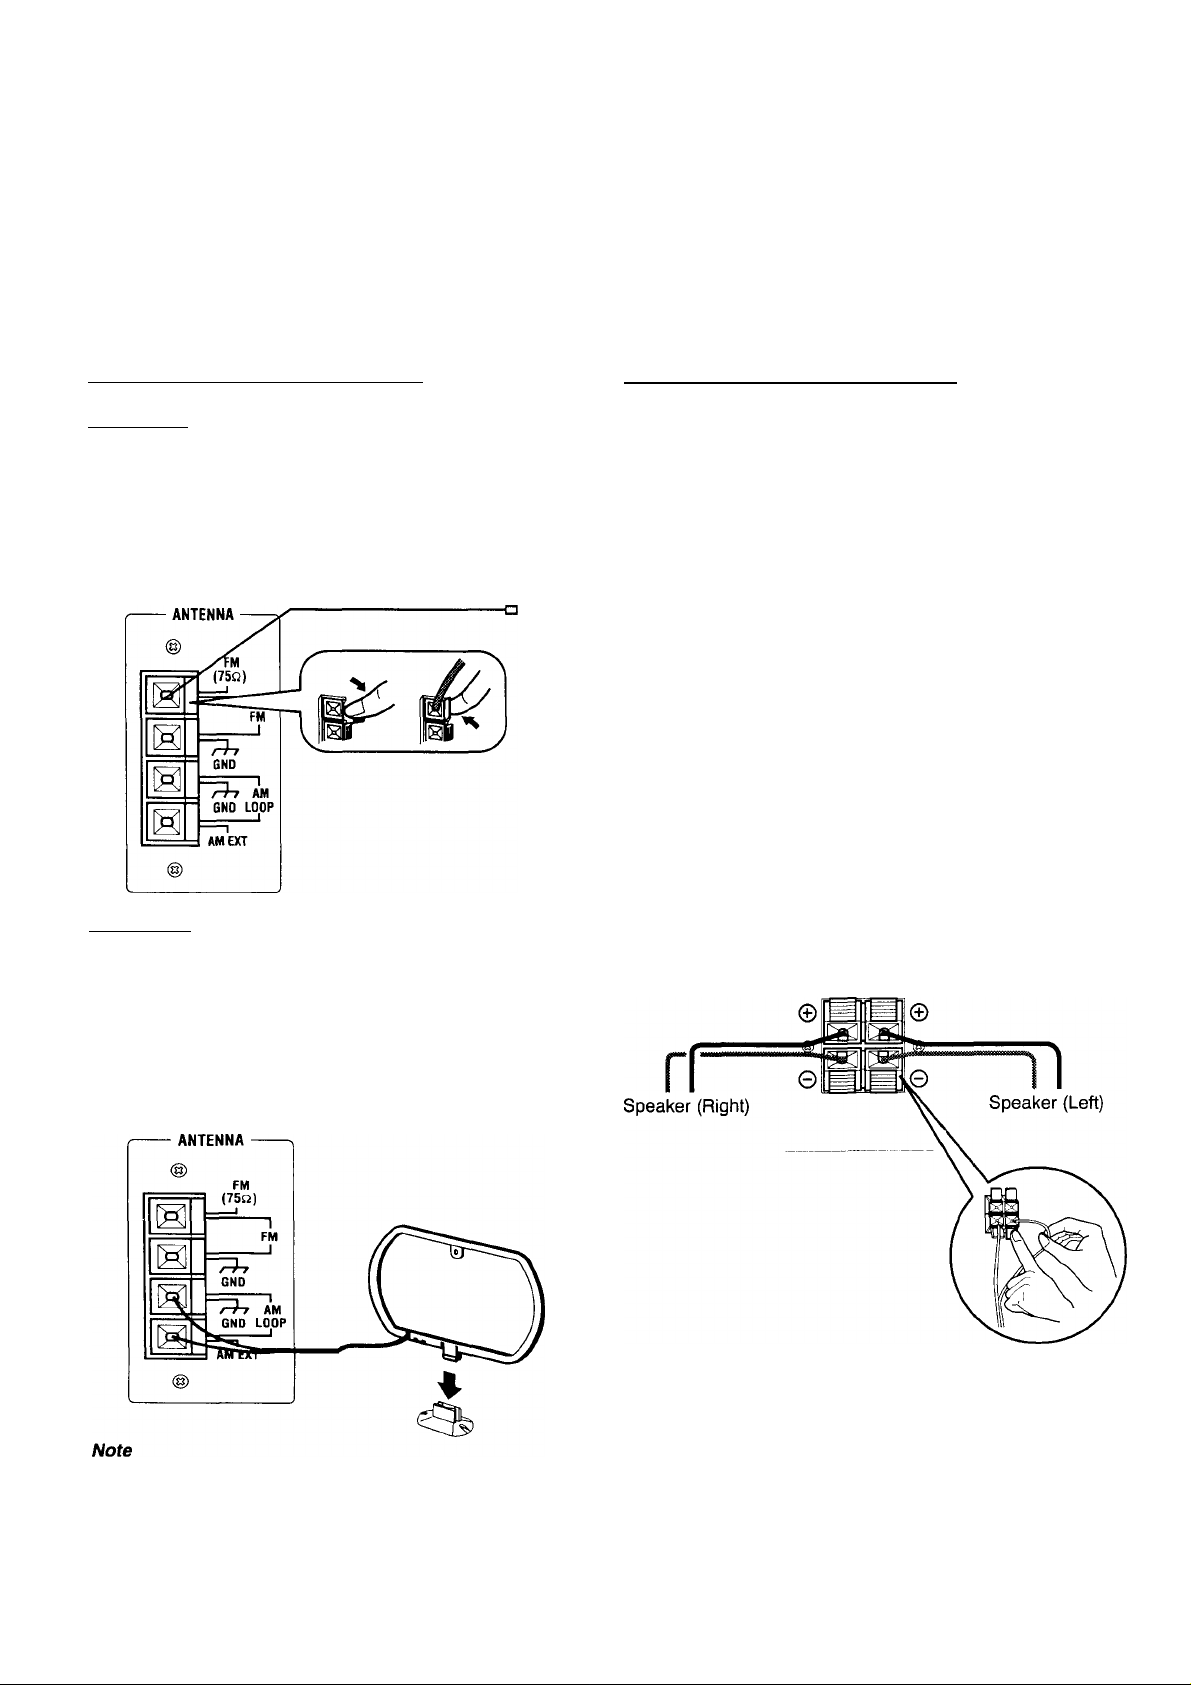
Connecting the antennas
FM antenna Antenna preparations
You need to connect the FM antenna to the back ot the
System.
• Open the FM antenna wire connectors by pushing them to
the side, insert the FM antenna wires, and close them by
pushing them back into their original position.
* Hang the FM antenna on the wall behind the System.
AM antenna
1. Connect the AM loop antenna to the AM LOOP termi
nals as illustrated.
2. Turn the AM loop antenna until you have the best reception.
_________
Connecting the speakers
The speaker cords are included with the speaker system.
Speaker connections
(Both speakers should be connected)
1. Remove the insulation at the end of each cord and twist
the core of the cord.
2. Open the speaker terminal.
3. Insert the end of the speaker cord to the terminal.
For each speaker, connect one end of the speaker cord to
the speaker terminals on the rear of the System. Match the
polarity of the speaker terminals: Red (-i-) to red (-h) and
black (-) to black (-).
4. Close the speaker terminal on the rear of the System or
just re-lease your finger from the terminal on the
speaker.
Rear panel
-------
SPEAKERS
---------------
RIGHT LEFT
_________
Pull
Twist
To connect an outside AM antenna
When reception is poor, connect a single vinyl-covered wire to
the AM EXT terminal. (The AM loop antenna must remain
connected.)
For better reception of both FM and AM
Make sure the antenna conductors do not touch any other
terminals or connecting cords.
Keep the antennas away from metallic parts of the System,
connecting cords, and the AC power cord.
Page 2
Page 7
BEFORE USING FOR THE FIRST TIME
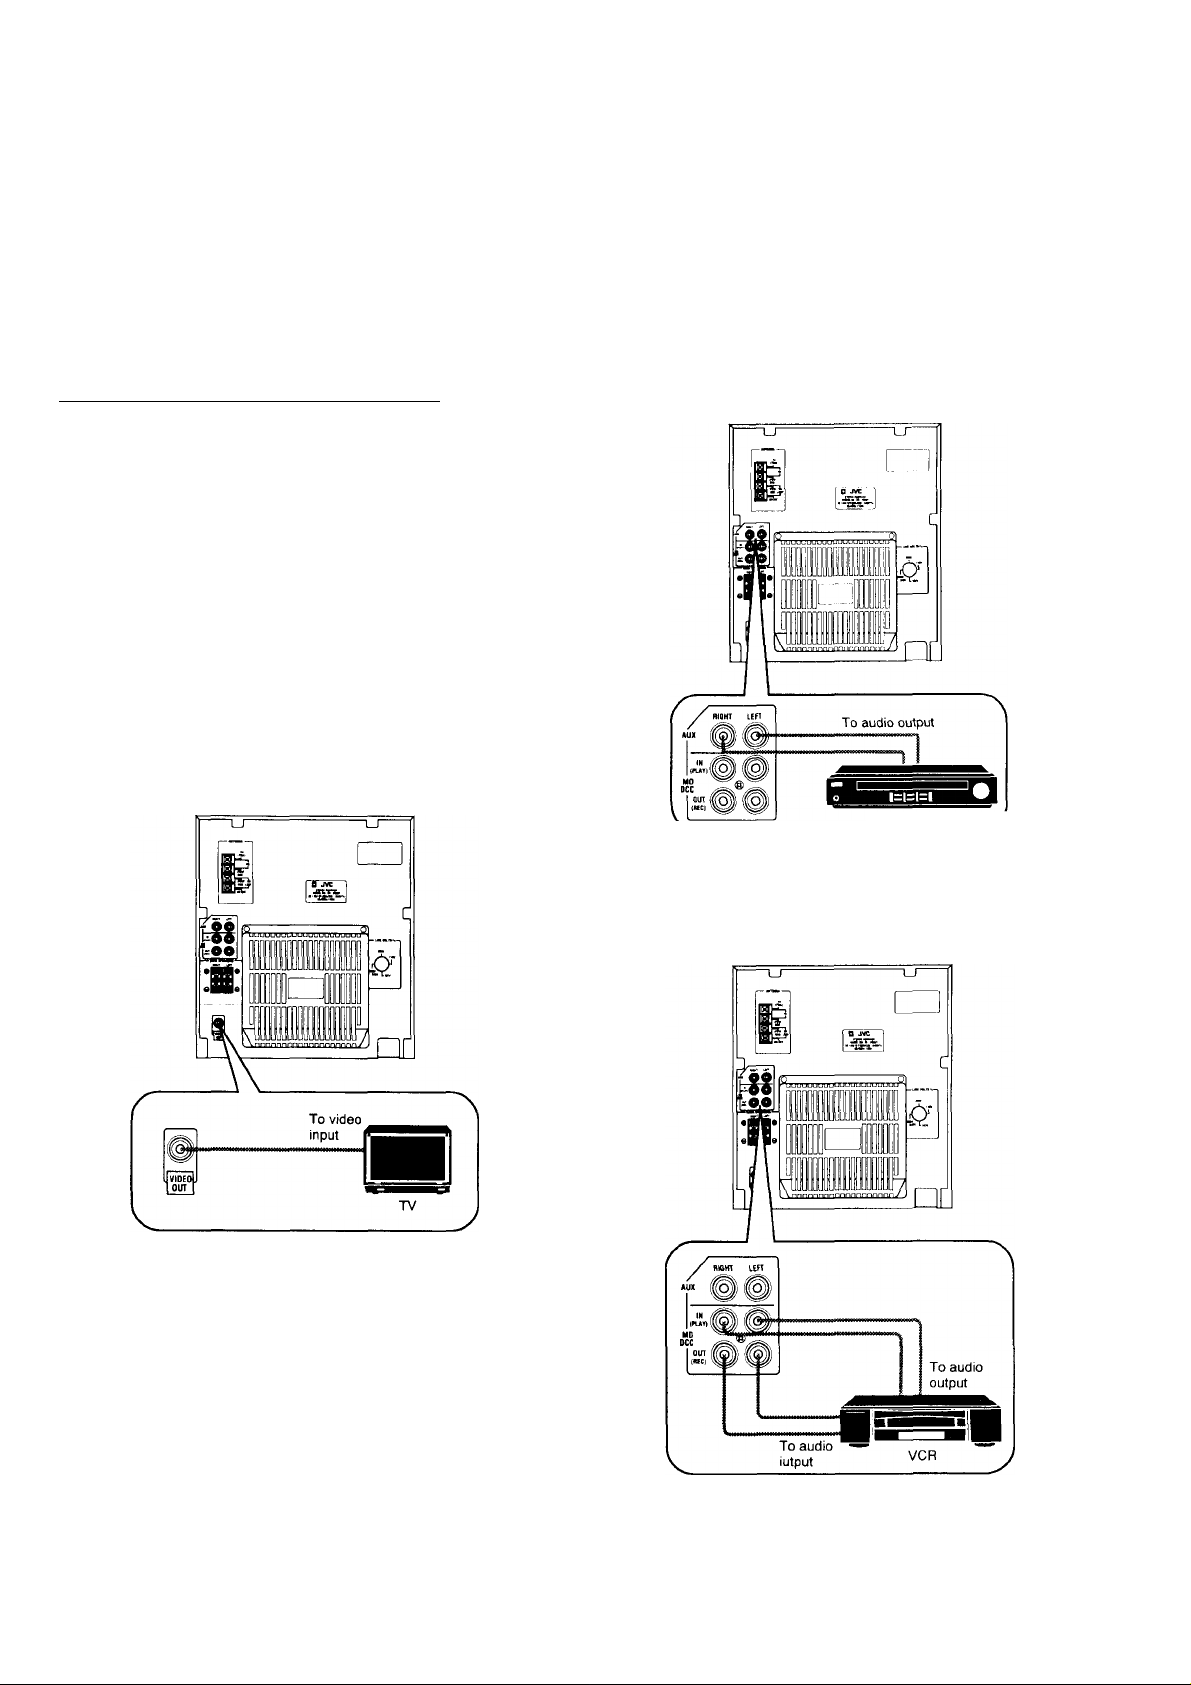
Connecting other equipment
You can connect the following equipment to this System:
• TV with a video input jack — used as a monitor of VCR
playback or video CD playback.
• VCR — used as a sound playback and sound recording
device.
• Audio/video equipment such as a video disc player—used
only as a playback device.
• Audio equipment with an optical digital input terminal —
used only as a digital recording device like MD/DCC player.
— Caution---------------------------------------------------------------
DO NOT connect other equipment while power is on.
DO NOT plug in the AC power cord/until all connections are
complete.
To connect a TV
______
To connect audio/video equipment such as a video disc
player
Video disc player
Connect the audio output jacks on the other equipment and the
AUX jacks, using an audio cord (not supplied).
To connect a VCR
Connect the video input jack on the TV and the VIDEO OUT
jack, using the supplied video cord.
To view a video CD, you need to connect an NTSC-compatible
TV.
By using audio cords (not supplied), connect:
• Between the audio input jacks on the VCR and the MD/
DCC OUT (REC) jacks,
• Between the audio output jacks on the VCR and the MD/
DCC IN (PLAY) jacks.
Page 3
Page 8
BEFORE USING FOR THE FIRST TIME
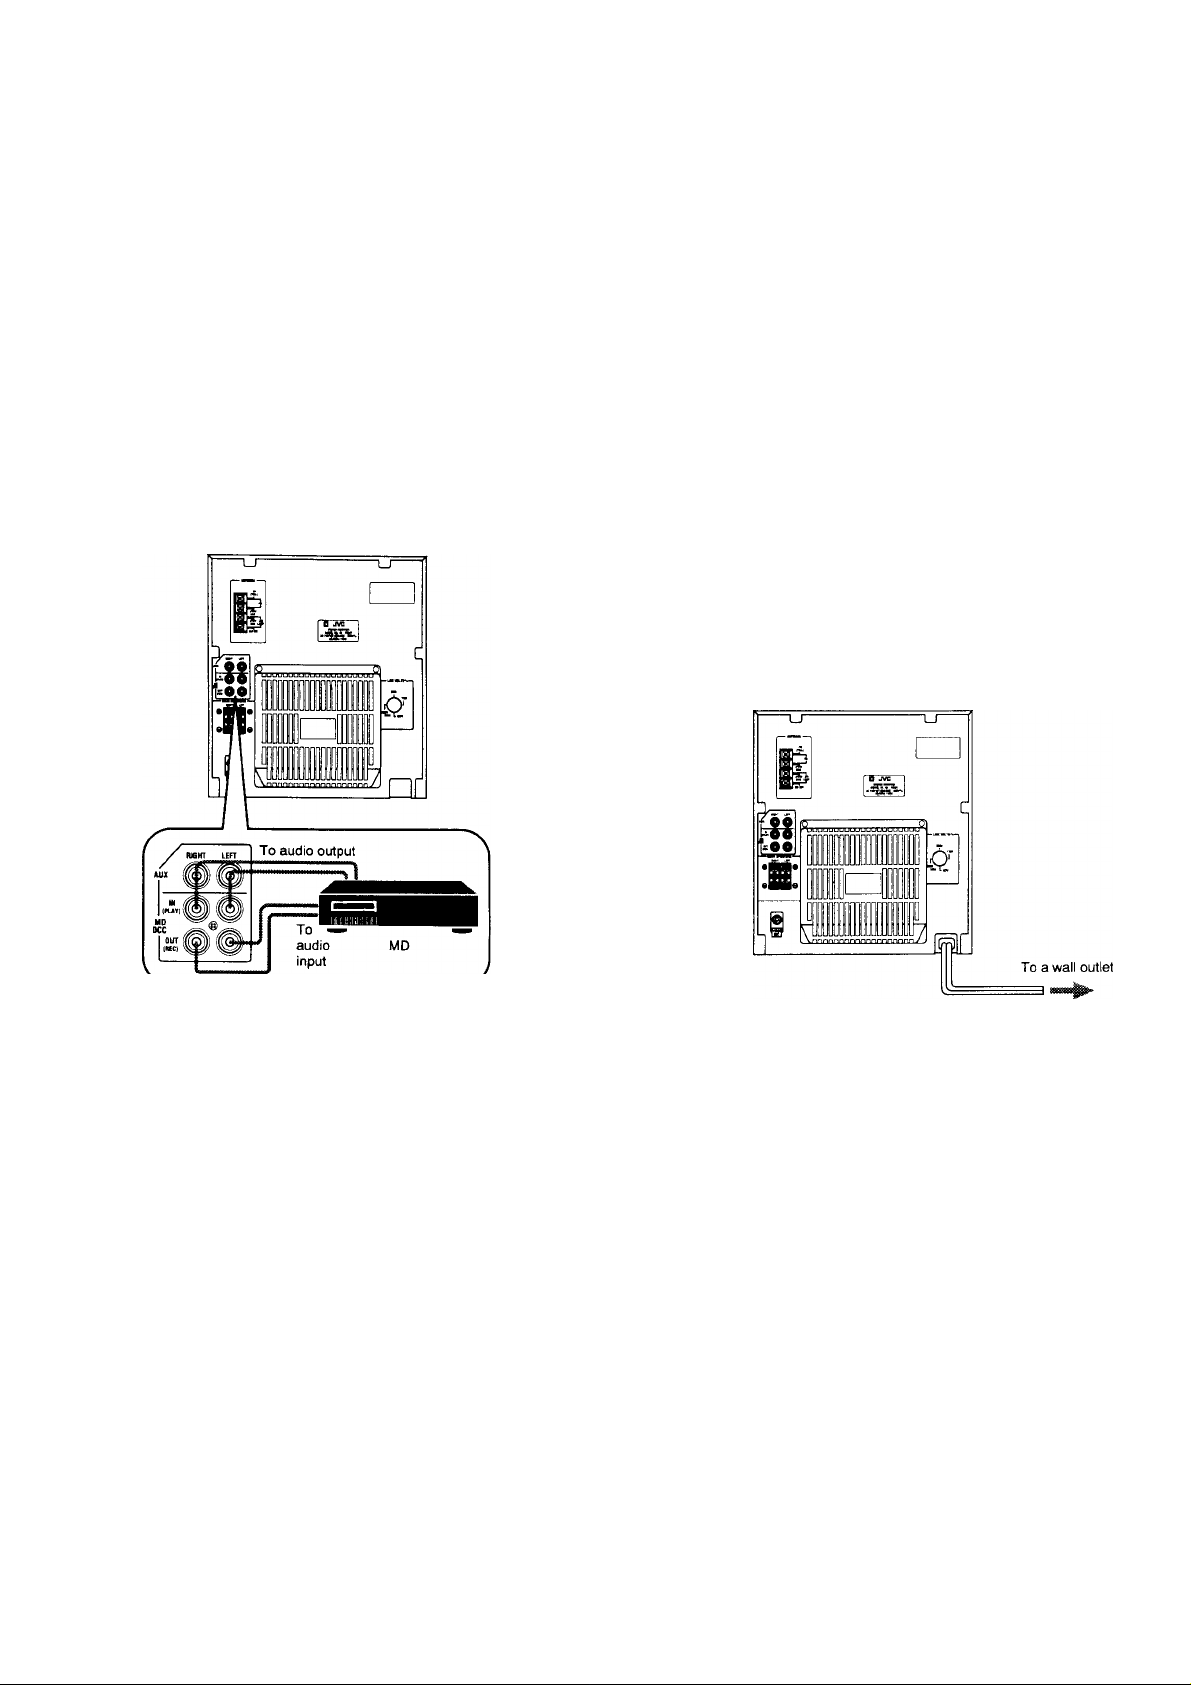
To connect MD, DCC and DAT
You can connect the audio output terminals to the MD DCC IN
(PLAY) jacks, and the audio input terminals to MD DCC OUT
(REC) jacks.
Make sure to connect the wires correctly: Red to red and white
to white.
Notes
When recording onto the MD through this terminai
• You can record only audio signals of conventional CDs and
CD-Gs through this terminal.
• It is not recommended to use the automatic marking
function of the MD player since the marking signal cannot
be recorded correctly between recorded tracks. It is prefer
able to use manual marking while recording.
Connecting the power cord
NOW, you can plug the power cord.
If the wall outlet does not match the AC plug, use the supplied
AC plug adaptor.
When the power cord is connected, the STANDBY light on the
left-hand side of the System’s front panel comes on. [See
“Overview of controls” for a description of the controls on the
System.]
Page 4
Page 9
BEFORE USING FOR THE FIRST TIME
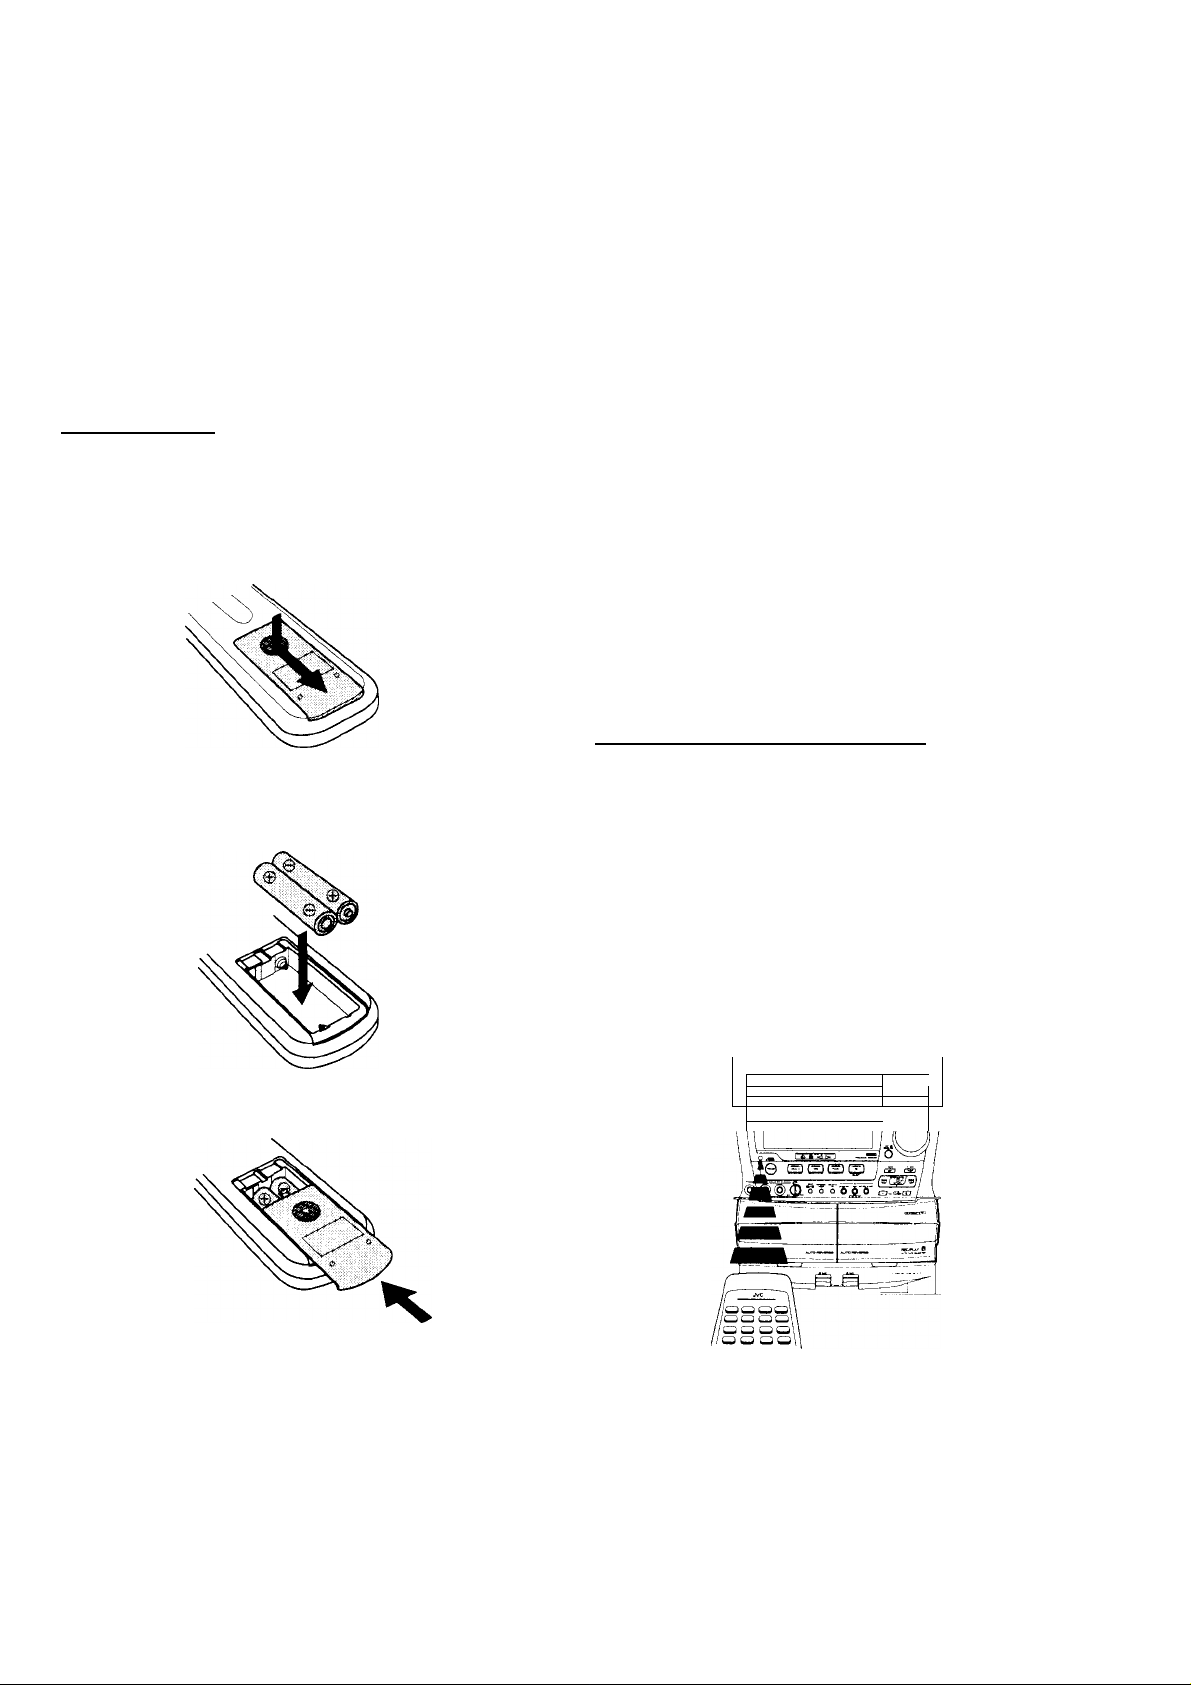
Putting the batteries into the remote
controi unit_____________________
The battery compartment is located on the back of the remote
control.
1. Press down on the triangular mark of the compartment
cover, and slide the cover off to open the compartment.
2. Place the two accessory R6P (SUM-3)AA (15F) batter
ies in the remote control according to the polarity
markings (“+” and inside the compartment and on
the batteries.
Precautions for the safe use of batteries
Observe the following precautions for the safe use of batteries.
Their life will be shortened, they may burst or their contents
may leak if they are used improperly:
• Remove batteries from the remote control if it is not going
to be used for a long period of time.
• Remove dead batteries and dispose of them properly.
• Never leave dead batteries lying around, take them apart,
mix them with other refuse, or throw them into an incinera
tor.
• Never touch liquid that has leaked out of a battery.
• Do not mix new and old batteries, or batteries of different
types, when replacing them.
Using the remote control
_________
The remote control is ready to use when its batteries are
installed properly.
To use it, point its infrared light-emitting window toward the
display window of the System and press a button. The oper
ating range of the remote control is up to about seven meters
in front of the System and within about 30 degrees to each side
— with nothing between the remote control and the System
interrupting the beam path.
If pressing a button on the remote control does not produce
any response, check to make sure it is pointed correctly and
try again. If it still does not function, check the batteries.
3. Place the cover over the compartment, press down
lightly, and push it upward until it snaps on.
The batteries last about one year with normal use. If function
of the remote control become erratic, replace the batteries.
See “Precautions for the safe use of batteries” below for more
information.
ii
..............................
J _. -iJs“ ...a
.....
'* ^'
—
1 —*1
\o ^ \
Page 5
Page 10

UNIQUE FEATURES
About the DEMO mode
The Compact Component system CA-V605T is equipped with
a DEMO mode which is designed to introduce different fea
tures of the system to you. This DEMO mode wili display these
differentfeaturesto you on the display screen. Thisfeaturewill
be turned on automatically when you plug in your system.
To turn the DEMO mode off push the DEMO button once while
the System is off. The words “DEMO OFF” wiii appear in the
display. (The System must be turned off to turn the demo
feature off.)
About the ONE-TOUCH easy-on
feature_________________________
This feature lets you start your system with ONE-TOUCH
ease. When you approach the system the one touch easy-on
buttons will start to blink and display the functions that are
available to you. All you need to do is push any of the blinking
buttons and the System will automatically turn on and start to
play the chosen feature. When you push a blinking CD tray
button that has no CD in it the tray will open.
To turn off the blinking buttons, and retain the easy-one
feature, turn the System off and while holding down the STOP/
CANCELbutton, press the POWER button. The word "GUIDE
OFF” will appear on the screen.
Digital Signal Processor (DSP)
The DSP built into this System is a processor which performs
sophisticated digital signal processing to produce live sound
space, based on sound field measurement data.
The sound field measurement data was obtained by measur
ing the sound fields of world famous concert halls using a
“symmetrical 6-point sound analysis method”, a unique three
dimensional sound field measuring method created by JVC.
____
How to use ONE-TOUCH buttons
Changing the source
When you turn the power on, the indicator lights on the source
buttons will turn to green and when you choose a certain
source, that button will turn to red.
The disc buttons
• When the power cord is connected, only the disc tray
buttons with CDs loaded in them will light. The light will
change from green to red when they start to play.
• After you plug in the power cord after it has been discon
nected, or power has been restored after a power outage,
the ONE-TOUCH buttons will not illuminate.
I © |°”=(3)1
1 ©
t © 11 °‘»‘= (S) I
Page 6
Page 11
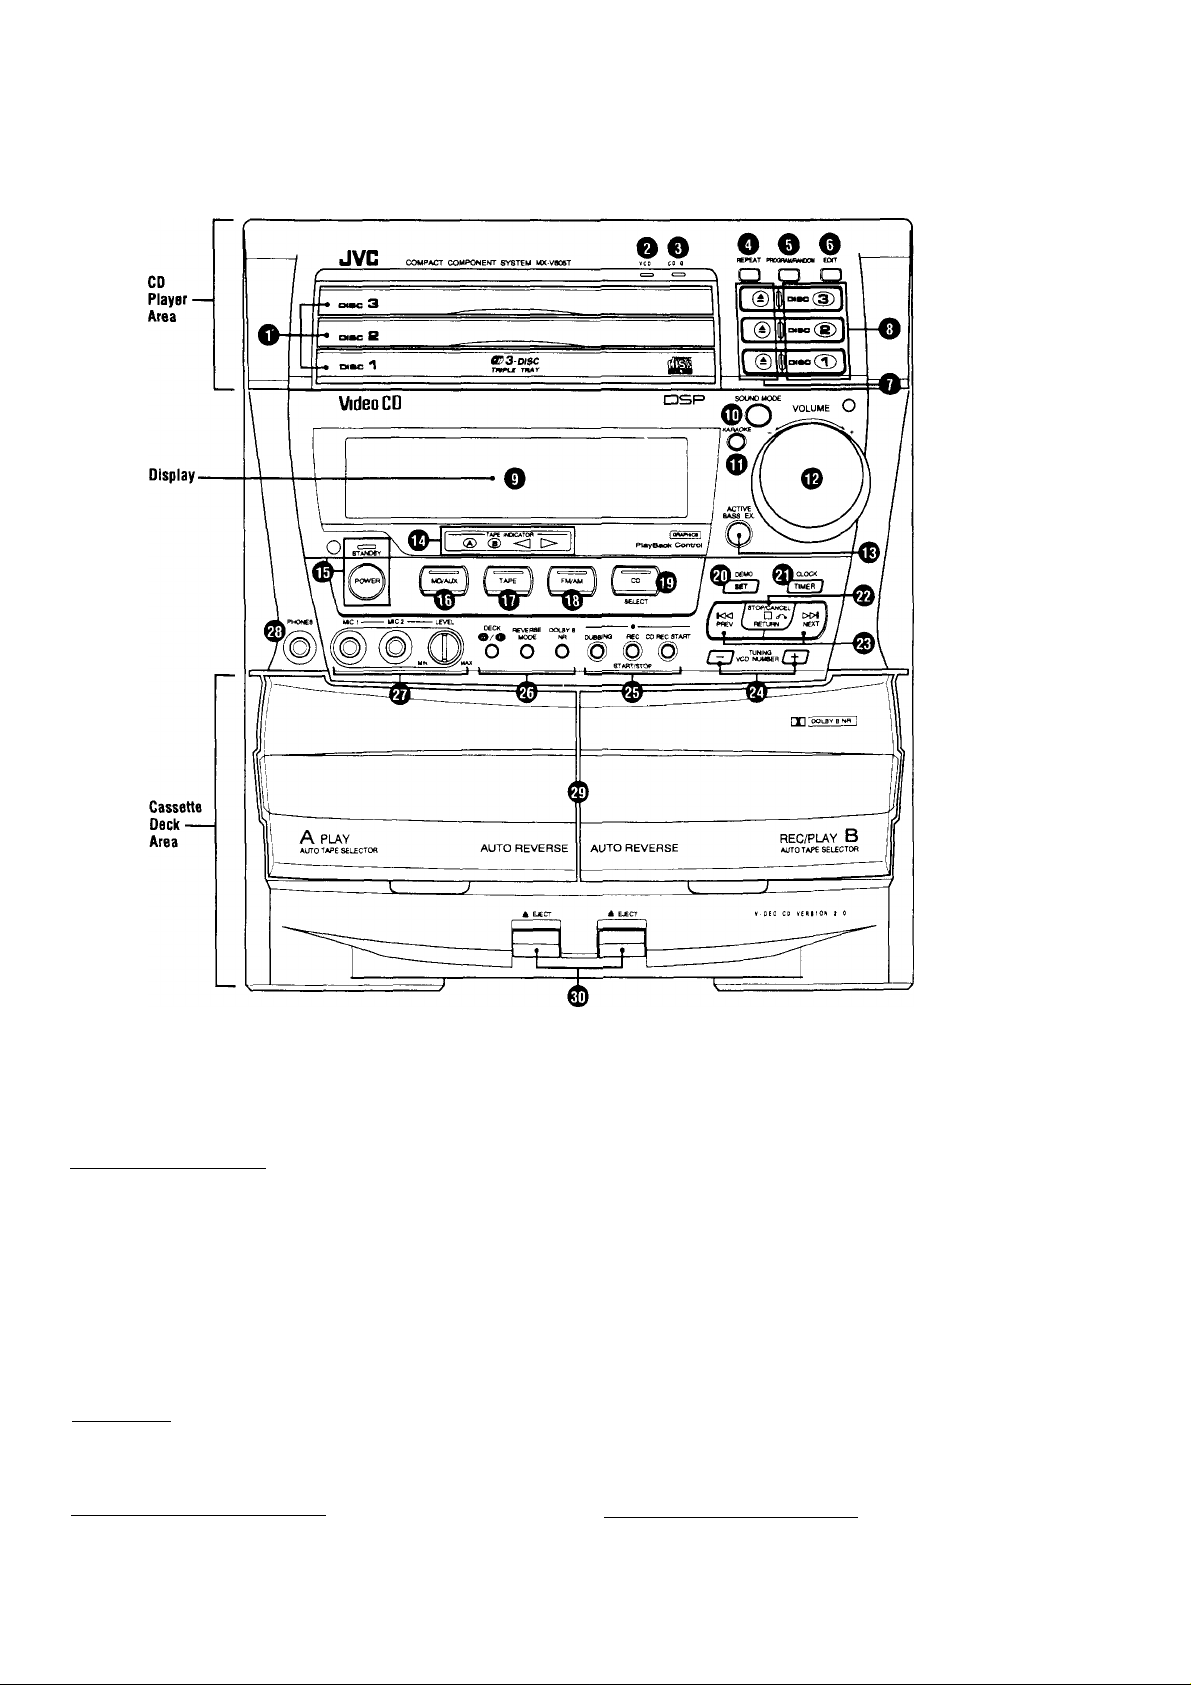
OVERWEI// OF CONTROLS
See pages in the parentheses for details.
Source
- Button
Area
Front Panel
CD player area
O Disc trays................................................................ P.12
O VCD indicator...........................................................P.12
O CD-G indicator.........................................................P.18
O REPEAT button........................................................ P.14
O PROGRAM/RANDOM button
O EDIT button..............................................................P.26
O — (open/close) buttons
O Disc buttons............................................................ P.12
Display
________________________
O Display (See page 8 for description)
Source button area
® SOUND MODE button
O KARAOKE button..................................................... P.27
______
...........................................
Main Ref. Page
.............................
______________
.............................................
P.14, 15
P.12
P.11
O VOLUME knob...........................................................P.10
O ACTIVE BASS EX. (Extension) button
® TAPE INDICATOR..................................................... P.21
® STANDBY indicator/POWER button
0 MD/AUX selector button
0 TAPE selector button.................................................. P.21
0 FM/AM selector button
0 CD selector button/SELECT button............................P.12
0 DEMO mode/SET button ........................................P.6, 20
0 TIMER/CLOCK button
© B/cTi STOP/CANCEL/RETURN button
0 PREV/NEXT buttons
© TUNINGA/CD NUMBER buttons
0 Record control buttons
0 Tape control buttons................................................... P.21
© MIC jack/MIC LEVEL knob
© PHONE jack
..............................................................
Cassette deck area
© Tape deck A/B...........................................................P-21
0 ± EJECT buttons........................................................P.21
.............................................
...............................................
................................................
...............................................
........................................
______________
.......................
..........................
.............
.....................
..........................
P.11
P.10
P.10
P.19
P.31
P.13,16
P.13, 16, 22
P.13,19
P.23
P.30
P-10
Page 7
Page 12
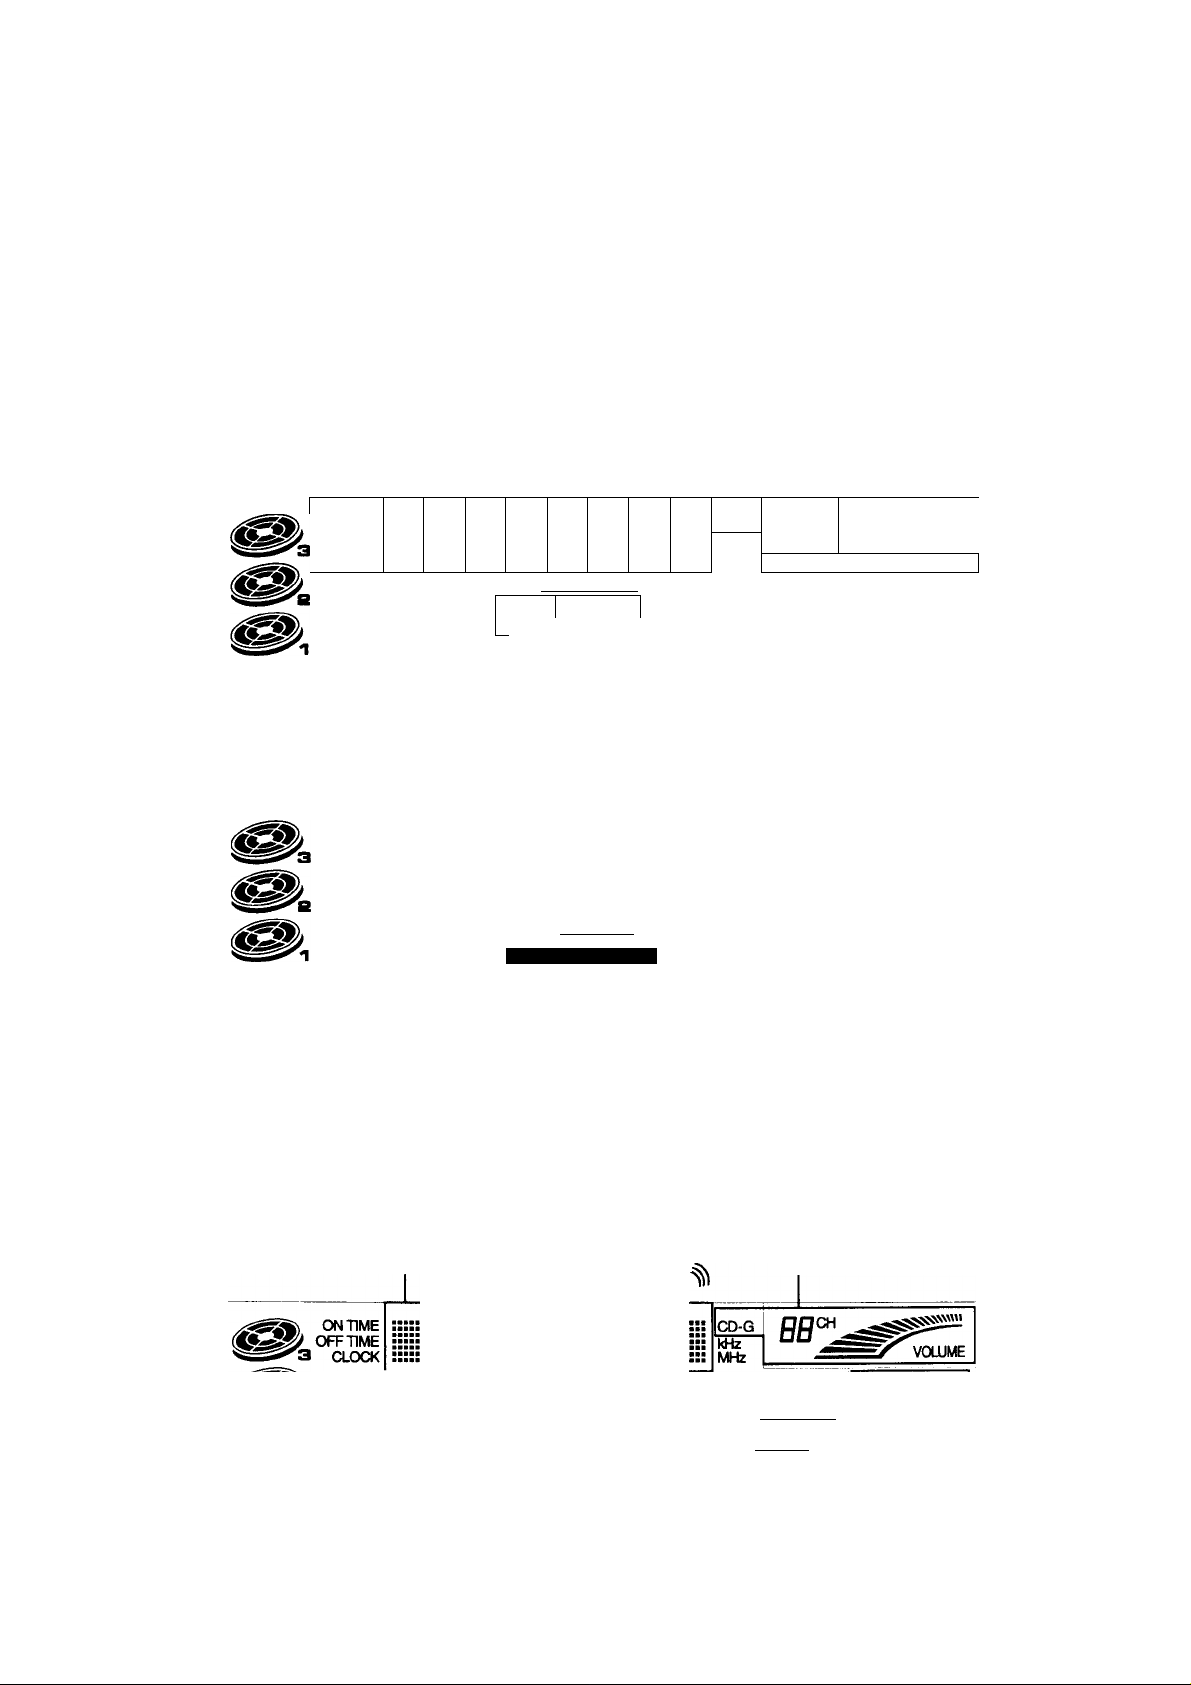
OVERVIEW OF CONTROLS
Display
• Tuning display • Time display • Timer display • Record Timer and Recording Source indicator
• Sleep Timer and Source indicator • FM/AM band indicator • Preset channel indicator • All message display
currently playing song indicator
Disc
indicator ■
ON TIME ■■■■■
Ul"h lIMt
(Deg)®®
Number of songs and
CINTIME
TIME
CFF
CLOCK
Ф®®®
6)®®®
(D®®®
®®®®
—
■■■■■■■■■■ввава
■■■■■
■■■■■
■■■■■■■■■aвваваaaaaa■■■■a■■■■aaaaaa
PROGRAM lAirrmiiNm gii
RANDOM
REPEAT
ALL1CD
SIDEAB
Currently playing song and time display
Program play order
PROGRAM
RANDOM
REPEAT
ALU^
SIDEAB
CD edit indicator
■■■■■
■aaaa
■■■■■
■ BBBB
■авва
ввава
ввава
aaaaa
ававв
SOUND
MODE SURROUND
ALTTO TUNED i
SXJND
kODE
ACTIVE BASS EX.
PROGRAM:
RANDOM:
REPEAT ALL:
REPEAT 1:
UVE
LIVE
iSURROUND
aaaaa
■■■■a
■aaaa
■■■■a
■■■■a
■aaaa
■■■■a
■aaaa
■■■■a
■■■■a
Program performance mode
Random performance mode
Repeat all mode
Repeat 1 mode
co-g[
aaaaa
kHz
■ aaaa
Mi
MEMORY
ISLEEP
MEMORY,
9’" В NR
r—TIMER—'
DAILY ONCE
BNR
1Ш1Сщ
CtDl
Daily Timer and Source indicator
CD-G
kHz
MHz
^TIMER-^
DAILY ONCE
REC REC
DOLBY
jEsaoB
VOLUIUE
This displays the six different
musical intervals.
This displays the 3 different
echo levels.
Page 8
KEV
KEV
D.EC
#b
bb
:H0 1
D„EC:H0
D.EC
®@®®
®®®®
®®®®
:H0
When ACTIVE BASS EX. is on,
this display will light.
4<EV #b
4<EV bb
•~i
jI-
—r
PROGRAM
RANDOM
REPEAT
ALLI CD
SIDEAB
SOUND
MODE
■ ■■■■
■ ■■■■
■•taa
■ AUrQ .TÜNEP '
iruVE 1 m
JIsurMjndIJ ^
When KARAOKE is on,
this display will light.
When ECHO is on,
this display will light.
ECHO
■■■■■
MEMORY
DOLBY
*’"bnr
The DOLBY B NR display
Reverse mode display
timer—'
DAILY ONCE
REC REC
■мая ИДИ
Lit when playing a CD with CD Graphics
Radio channel display
Volume level display
Music effect
display
Page 13

Remote Control Unit
Function and number buttons
O POWER button
O SLEEP button
O FM/AM button
O MD/AUX button
O SOUND MODE button
0 1.2 buttons — MANUAL SEARCH (S)
O 3 button — II STILL (S)
O 4, 5 buttons
O 6 button — SLOW (S)
0 7 button — CD-G CHANNEL (S)
0 8, 9, 10 button
0+10 button (enables 11 thru 99 number selection)
0
PLjfliY MODE button
0
CANCEL button — AUTO/MONO (S)
--------
-/ — VCD INDEX (S)
OVERVIEW OF CONTROLS
CD buttons
0
± Open/close buttons
0
Disc buttons
■ RETURN/STOP button
0
► SELECT/PLAY button
0
i/^w PREV/NEXT buttons
Cassette deck buttons
0
A/B Deck select buttons
0 ◄/► PLAY buttons
0
• REC/PAUSE button
0
■ STOP button
0
Fast forward/Reverse buttons
System Control buttons
© SHIFT button (enables buttons to have various different
functions)
© FADE MUTING button — DIGITAL ECHO (S)
0
VOLUME buttons — KEY CONTROL button (S)
(S): The buttons with the (S) mark after them have different
functions when used in unison with the SHIFT button.
__________
Page 9
Page 14

COMMON OPERATIONS
Amplifier/Tuner
Turning the power ON and selecting sources
When you press the play button for a particular source, the
System automatically turns on and starts playing the source.
To select the auxiliary equipment as the source, press
press MD/AUX the System will turn on, but the AUX equipment
will not start to play).
When using the remote control, press MD/AUX. Each timeyou
press the button, the source alternates between MD and AUX.
To turn on the System without playing, press POWER
button so that the STANDBY indicator turns off.
To turn off the System, press POWER button again so that
the STANDBY indicator lights red.
Some energy (20 watts) is always consumed even while the
System is in standby mode.
To switch off the power supply completely, unplug the AC
power cord from the AC outlet.
Note
When you unplug the AC power cord or power failure
occurs
The clock is reset to 0:00 right away, while the tuner preset
stations will be erased in a few days.
________________________
so that the System automatically turns on (when you
Adjusting the volume
Turn the VOLUME knob clockwise to increase the volume or
counterclockwise to decrease it.
When using the remote control, press VOLUME + to increase
the volume or press VOLUME - to decrease it.
( )
Using stereo headphones_________
Connecting stereo headphones
Connect stereo headphones to the PHONES jack at the
middle-left of the front panel.
Page 10
Note
For private listening
Connect a pair of headphones to the PHONES jack. No sound
comes out of the speakers. Be sure to turn down the volume
before connecting or putting headphones on.
- Caution-------------------------------------------------------------------
DO NOT turn on the unit and/or start playing any source
without setting VOLUME to MIN; otherwise, the sudden
blast of sound can damage your hearing, speakers and/or
headphones.
Page 15

COMMON OPERATIONS
Reinforcing the bass sound
When using the ACTIVE BASS EX., the richness and fullness
of the bass sound is maintained regardless of how low you set
the volume.
You can use this effect only for playback.
To get the effect, press the ACTIVE BASS EX. (Active Bass
Extension) button so that the ACTIVE BASS EX. indicator
lights up in the display.
To cancel the effect, press the button again so that the
indicator goes off.
Fade/Muting
When you press the FADE MUTING button (on the remote
control) the volume will automatically fade out. If you press the
button again it will return to its previous level.
____________________
_______
Seiecting the sound modes
You can use only one mode at a time. Sound modes can be
used for playback and for recording.
To select the sound modes, push the SOUND MODE button
until the sound mode you want appears in the display.
SOUND MODE
The SOUND MODE indicator lights up. (When selecting one
of the Live Surround modes, the LIVE SURROUND indicator
also lights up.)
Sound modes
* D.CLUB;
* HALL:
* STADIUM:
KARAOKE:
ROCK:
POP:
CLASSIC:
Increases resonance and bass.
Enhances the mid-frequency range which
human voice is mostly made up of, like in a
concert hall.
Adds clarity and spreads the sound, like in an
outdoor stadium.
Puts your voice in instead of the vocals.
Gives a feeling of a live atmosphere. Good for
rock music.
Enhances the vocals of the music.
Adds depth and brilliance to the sound.
_______
* indicates a sound mode that incorporates live surround
sound.
To cancel the effect, press the sound mode until the word
“OFF" appears on the display.
When using the remote control
Press SOUND MODE button repeatedly until the sound mode
you want appears in the display.
Each time you press the button, the modes change as follows:
—> D.CLUB^ HALL-> STADIUM-^ KARAOKE-
OFF^ CLASSIC^ POP^ ROCK-
□
Page 11
Page 16

BASIC OPERATIONS
Now you can play a
variety of CDs!!
Triple disc tray usage
Up to three (3) discs can be loaded in the System, You may
insert a disc into any of the disc trays 1 through 3 whichever
you prefer.
If you want to play only a specified disc, press the correspond
ing disc 1,2 or, 3 button located to the right of the ± (OPEN/
CLOSE) button.
When three discs are inserted, basic order of playing is as
following.
• Pressing DISC 1; DISC 1 — DISC 2 — DISC 3 — STOP
• Pressing DISC 2: DISC 2 - DISC 3 - DISC 1 -» STOP
• Pressing DISC 3: DISC 3 -* DISC 1 — DISC 2 -* STOP
I 0 |^»^°(^
I 0 I
Preparation for playing
The CA-V605T is equipped with an ONE TOUCH easy-on
feature that lets you turn the System on with one easy touch.
Just press the button of the source you want to play and it will
start to play.
Note
When loading a disc in the disc tray, be sure to position the
disc inside the recess. Otherwise, the disc will be damaged
when the disc tray is closed, and the disc cannot be
removed from the System.
CD
Tray
CORRECT
INCORRECT
Starting to play disc(s)
Press the (^1 SELECT (PLAY) button. The player starts
to play from the disc indicated in the display window.
Press one of the DISC 1 through 3 buttons and the player
plays the disc you pressed, from the 1st track. For
individual track selection, use the number keys (1 to 10
and -hIO button) on the remote control.
©
= (D
or I 0 I o,.c (a) )
©
When you start play, the display window shows disc number
and the track number being played.
If the disc is a Video CD, the VCD indicator on the front panel
will light up.
Inserting/removing the disc(s)
Press the ± (OPEN/CLOSE) button (1 through 3) to open
the disc tray. Then place the disc in the round recess of the
tray with the label side up. To close the tray, press the A
(OPEN/CLOSE) button again.
If you press the A (OPEN/CLOSE) button of the playing disc,
the player stops and then opens the tray.
If you press the A (OPEN/CLOSE) button of a disc that is not
being played, you can change discs without stopping play.
_____
[ © II °'*°(3))
[ 0 I I ama (g) ]
[
Page 12
Using number keys
Press the number keys to select numbers.
On the remote control
Example: For number 5, press 5. For number 15, press +10,
then5. For number 20, press+10, then 10. For track 32, press
+10 three times, then 2.
.....
1 2 3
(
-----
- SEARCH - «
CT3„„CID CD
CD CD
CCM) CHANNEL
10 -fio
______________
1 to 10 and +10 key
) ( ) ( )
UANUAL P*- II STILL
9
CD CD
Page 17

BASIC OPERATIONS
Using VCD INDEX
An index is a pre-recorded mark to locate a particular point in
a disc. If a disc has indexes recorded, it is mentioned on the
printed surface of the disc or on the disc's package.
Thisfunction is handled by the remote control. Holddown
the SHIFT button and select the index number by pressing
the VCD INDEX button.
CZD CZ3
VCD
INDEX
(Remote control)
Stopping play
To stop a disc, push the ■ STOP/CANCEL button once.
Pausing play
Press the CD button to temporarily suspend play.
To restart play press the CD button once again. On
the remote control, while pressing the SHIFT key press
the II STILL button.
To restart play, press the ► SELECT play button on the
remote control.
Auto search
On the System, during play, pressing the PREV
button once causes the player to replay the current track
from the beginning. Pressing the PREV button twice
causes the player to play the previous track. Pressing the
►►i NEXT button once causes the player to skip to the
next track. —
On the remote control, pressing the (◄◄/►►i PREV/NEXT
buttons cause the disc to skip to the next or previous
track. fcw.
/ O <r* J >CHI
RETURN y
( )
J
Manual search
This function is handled by the remote control. To
reverse/fast forward, hold down the SHIFT button and
press either MM or of the MANUAL SEARCH (No. 1,2)
buttons.
Continuing to hold down the buttons causes it to search
much faster.
To use slow motion playback
During playbackof a video the CD, hold down the SHIFT
button, and then press thp SLOW button.
Each time you press the button, the slow motion speed
decreases 1 level until the slowest speed is reached. During
slow motion playback, no sound comes out.
To resume normal playback, press ► on the remote control.
______
To use frame-by-frame playback
During playback of a video CD, hold down the SHIFT button and then press the STILL il button.
Play pauses and you see a still picture on the TV screen. Then
each time you press the button, still pictures advance by one
frame. During frame-by-frame playback, no sound comes out.
To resume normal playback, press ► on the remote control.
Notes
• If you do not advance the still picture for about 5 minutes,
the CD player automatically stops, the still picture disap
pears and the blue screen appears on the TV screen.
• If you cannot restore normal playback after using the slow
motion or frame-by-frame playback.
• Press the PREV button and then restart play.
• Press the ■ RETURN button to go back to the menu and
then restart play.
RESUME
When the ■ STOP/CANCEL button (or the ■ button on the
Remote Control) is pressed during playback, and the source is
changed, the track number is memorized even when the
power is turned off. The next time the CD button (or the ►
button on the Remote Control) is pressed, play resumes from
the track where it was interrupted.
□ To start playback from the first track, press the DISC button.
_______________________
(Remote control)
Page 13
Page 18

VARIOUS UNIQUE FUNCTIONS
Programming track sequence
Preparation
It is not possible to enter programming mode during play. Verify
whether the Player is playing. If playing, stop the player.
Operation
1. Press the PLAY MODE button untii PROGRAM Is dis
played.
2. Specify the disc by the DISC (1 through 3) button and
then the track by the number keys successively. You
can program up to thirty two (32) tracks by repeating
this procedure.
3. To play the programmed track press the ► SELECT
button on the remote control.
A DISC &
CHHD
A OIBC o
Diac^^
PUY MODE
(Remote control)
1 2 3
O CD CZD
■«4 MANUAL P*- II mu.
4 S 6
7 8 9
CD a qp
OK)CHANNEL ] LC
10 K-10 [ 1
CD) CD) ^
_____
Programming track sequence (front
panei)
Operation
1. Press the PROGRAM/RANDOM button until PROGRAM
2. Press the disc button to designate the disc you want to
3. Press the PREV/NEXT button to designate the
4. Press the SET button to enter your selection into
5. Continue with this procedure until all desired program
Canceiing a programmed track
Operation
The Player must be stopped to cancel a track. Once you
have stopped the Player. Press the STOP/CANCEL button
and the last programmed track is canceled. The next track
to be played and the number of programmed tracks left
are displayed on the display screen.
_________________________
appears In the display window.
program.
track number you want to program.
programming.
ming Is completed, and press the (*s~) CD SELECT
button.
____
(Remote control)
(D(g)(ii)(ii) Disc Track
d|)(S)(g)(g) Number: Number:
15
Program
Number:
25
Repeating tracks
It is possible to repeat all discs, repeat (1) CD or repeat 1 song.
Preparation
This function is controlled by the REPEAT button on the front
panel of the Player.
Operation
By pressing the REPEAT button, REPEAT modes are
cycled as shown below.
■ REPEAT ALL -
(All discs)
Notes
• When playing a programmed sequence of tracks, REPEAT
ALL, and REPEAT 1 are available.
• When playing a disc with the Playback Control function, the
repreat function is not available.
•REPEAT 1 co
il CD)
(Display window)
-REPEAT 1-
(1 track)
Page 14
Page 19

VARIOUS UNIQUE FUNCTIONS
Randomly playing tracks
Preparations
• This function is controlled on the front panel and on the
remote control.
• This function plays tracks randomly from all trays in which
CDs are loaded.
Operation
1. Stop the piayer.
2. Press the PLAY MODE or PROGRAM/RANDOM button untii “RANDOM" appears in the dispiay window.
PROG RAW.'RAN DOM
3. Press ► PLAY button.
4. To cancei random playing, after stopping the player [■
STOP/CANCEL button], press the PLAY MODE button
on the remote control or PROGRAM/RANDOM button
on the front panel.
_________
(Remote control)
or
Tray Lock Function
In order to safely keep the discs in the CD Player, the three
trays can be electronically locked in a single operation.
When the electronic lock is on, the trays cannot be opened
even if the A button is pressed.
This function can only be accessed by using the buttons on
the Unit itself.
Locking the Electronic Lock
1. Put the CA-V605T’s power into STANDBY mode.
If the power is on, press the POWER button to light the
Standby indicator.
2. While pressing the ■ STOP/CANCEL button, press
the ± button for DISC 1’s tray on the Unit.
“LOCKED" appears on the display to let you know that
the trays have been locked.
When the CD Player trays are locked, pressing the ^
buttons displays the message “LOCKED" on the display
and the trays do not open.
PflOGRAWRANDOM
(Front panel)
Notes
• Random is not available in program mode.
• In RANDOM mode, only REPEAT ALL and REPEAT 1
functions are available.
Unlocking the Electronic Lock
1. Put the CA-V605T’s power into STANDBY mode.
If the power is on, press the POWER button to light the
Standby indicator.
2. While pressing the ■ STOP/CANCEL button, press
the ^ button for DISC 1’s tray on the Unit.
When the unlock operation is done, “UNLOCKED" ap
pears in the display to show that the lock has been taken
off.
The trays can now be opened by pressing the ^ buttons.
The A button can also be used to automatically turn on the
power.
Page 15
Page 20

OPERATION OF PLAYBACK CONTROL FUNCTION
Playing Video CDs
with Playback Control
function
This System provides a Playback Control function which
utilizes a procedure (menu selection) programmed in a video
CD. The playback operation procedure may differ depending
on the disc you use.
The Playback Control function is described below and in the
figure.
• High-resolution still image display - Super-fine reproduc
tion of still images with more than 4 times the resolution of
video tape.
• Menu-driven playback - interactive menus for easy selec
tion of tracks
Preparations
• A video CD with the Playback Control function is required
for this operation.
• The buttons available for use are on the remote control, are
the [^/►►l PREV/NEXT buttons, CD SELECT
button, DISC (1 through 3) buttons, ¡Ti RETURN button
and the number keys.
Button functions
!◄◄/►►) PREV/NEXT buttons .. Move through menu.
(~) CD SELECT button
DISC (1 through 3) buttons
<5^ RETURN button
Number keys and +10 button ...Select a specific menu item
MANUAL SEARCH
Note
Sometimes due to improper manufacturing video CDs will
function differently.
............
.......
................
.....
Starts up a video CD with the
PBC function in DISC tray 1
to 3.
Start up a video CD with the
PBC function in the specified
DISC tray.
Returns to the menu.
from the
television screen or monitor.
To use manual search while
playing a video CD, hold
down the SHIFT button, and
press the MANUAL
SEARCH button on the re
mote control.
Operation
Press the DISC (1 through 3) or CD SELECT button, and
1.
then the Player starts up the PBC function. “PBC” is
shown In the Display window.
I © II
I © I (g) I or
[ 0 ili I
UIDEO CD —PBC
2. To move through the menus, press the PREV/ NEXT buttons.
/STOP/CANCEL/ I
KW / □ cr% / >CH I
i
PHEV ^RETURN / N0a jj
(Front panel)
3. When the menu you want appears, select an item in the
menu by using the number keys. The numbers on the
number keys correspond to the menu item numbers.
On the front panel
Press the VCD NUMBER button CEJICU and then ^
CD SELECT button.
On the remote control
Press the number key and your selection will start to play.
4. To return to a menu and stop the track being played, press the (Ti RETURN button.
(Front panel)
Notes
• Page numbers in the menu show that preceding pages
exist. To move from the current menu, press the !◄◄/►►)
PREV/NEXT buttons.
• When you press number keys, the track will start playing
without pressing the ► SELECT button.
• When there is only one menu, pressing the NEXT button
will cause the System to start playing.
or
or
( ) CZ3
(Remote control)
(Remote control)
Page 16
Page 21

OPERATION OF PLAYBACK CONTROL FUNCTION
Video CD with Playback Control
function________________________
What is the Playback Control function?
The Playback Control function, ushering in a new video CD
age, allows you to enjoy menu-driven operation and highresolution still images having a resolution four times greater
than video pictures.
Example of playback by the Playback Control function
Menu-driven playback
You can interact with the screen using a menu display to
select and play an entry.
High-resolution still Image display
You can display high-quality images fourtimes clearer than
video pictures.
Press
RETURN.
A selection menu is displayed when you start playing a video
CD disc with the Playback Control function. The selection
menu shows a list of numbers for selection. Some discs may
show moving pictures or a divided screen.
1. When a list of numbers is displayed, selecting a number
shows its contents.
2. When a moving picture is displayed, pressing SELECT at
the time when a part of the movie you desire is shown
plays the movie.
3. When the selection menu is redisplayed after you have
played your selection, selecting a number again can
replay its contents. (Some discs may show the menu
screen several times.)
When “Next” and “PreY’ are shown, pressing “NEXT’ or
“PREV” can change the selection menu.
4. After playback, press RETURN to go back to the previous
screen.
After playback, pressing RETURN for 2 seconds or more
causes it to go back to the previous menu selection.
Some discs may return you to the menu screen shown
before playback.
Notes
• When a menu is displayed for a long time, about 10
minutes, the screen background automatically fades out
to prevent screen burn-in while the setting is suspended.
• When using the REPEAT function the PBC function is not
available.
Page 17
Page 22

GRAPHIC/DIGITAL AUDIO CDs
Playing CD Graphics/ digital audio CDs
Playing CD Graphics
Basic video CD-playing procedures apply although the pic
tures are still. A graphic picture CD is identified by “GRAPH
ICS” shown on the display and the CD-G indicator will lit on the
front panel.
To select the CD graphic channel
If the CD-G has patterns (up to 15) of graphics (they are called
“graphic channels”), you can select the one you want. You can
find out whether or not the CD-G has graphic channels by
looking at its package or the printed surface of the disc.
To change the graphic channel, press CD-G CHANNEL
repeatedly until the graphic channel you want appears on the
TV screen.
Notes
• The following operations may distort the image on the
screen.
Searching for starting point of music
Fast forwarding/reversing
Stop/pause
• If paused, the screen changes to blue in a few minutes.
This is to prevent burn-in of the TV screen.
• When you use as Karaoke, see page 28.
Playing digital audio CDs
Basic video CD-playing procedures apply to the reproduction
of sound.
To record a CD onto a cassette tape, see page 23.
_________
Page 18
Page 23

AM-FM TUNER
Before listening to FM and AM broadcasts, check the follow
ing:
• Both the FM and AM antennas are firmly connected.
• Check the AM tuner interval spacing (9 kHz or 10 kHz) for
your area.
Setting the AM tuner interval spacing
Some countries space AM stations 9 kHz apart, and some
countries use 10 kHz spacing.
When shipped, the built-in AM tuner is set to 9 kHz spacing.
To set the AM tuner to the 10 kHz spacing, be sure that the
unit is turned off, but is plugged into a wall outlet. Hold down
►w NEXT and then press POWER.
To set it back to the 9 kHz spacing, be sure that the unit is
turned off, but is plugged into a wall outlet.
Hold down PREV and then press POWER.
Tuning in a station
Operation
1. Press (^1 FM/AM.
When using the remote controi unit
Pressing FM/AM button, FM or AM automatically turns on the
remote control and starts tuning in the most recent FM or AM
station respectively.
Note
When you press TUNING - or + briefly and repeatedly, the
frequency changes step by step.
To change the FM reception mode
When an FM stereo broadcast is hard to receive or noisy,
press AUTO/MONO on the remote control, so that the AUTO
indicator goes off in the display. Reception improves, but there
are no stereo effects. In this monaural mode, static is produced
(since muting is also canceled).
To restore the stereo effect, press AUTO/MONO so that the
AUTO indicator lights up. In this stereo mode, static is not
produced, and you can hear stereo sounds when a program is
broadcast in stereo.
The unit automaticaily turns on and tunes in the most recent
station (either FM or AM).
Each time you press the button, the band alternates be
tween FM and AM.
Press and hold TUNING - or +.
The unit starts searching stations and stops when a station
of sufficient signal strength is tuned in.
The TUNED indicator lights up in the display. If a FM
program is broadcast in stereo, the STEREO indicator also
lights up.
To stop during searching, press TUNING - or +.
Page 19
Page 24

AM-FM TUNER
Presetting stations
You can preset 10 stations each for FM and AM.
Operation
1. Press (^) FM/AM button and then TUNING - or + to
tune in the station you want to preset.
See ‘Tuning in a Station” on the previous page.
2. Press SET.
The MEMORY indicator blinks for about 5 seconds.
3. Press PREV/NEXT to select a channel number while the MEMORY indicator is blinking in the display.
4. Press SET again .
The MEMORY indicator goes off in the display.
To erase the preset stations
Storing a new station on a used number erases the previously
stored one.
Note
When you unplug the AC power cord or power failure occurs,
the preset stations will be erased in afewdays. If this happens,
preset the stations again.
Tuning in a preset station
Operation
1. Press FM/AM.
The unit automatically turns on and tunes in the most recent
station (either FM or AM).
Each time you press the button, the band alternates be
tween FM and AM.
2. Press and hold PREV/NEXT until the channel number you want appears in the display.
When using the remote control
You can select a preset station directly by specifying its
channel number.
Operation
1. Press US FM/AM.
The System automatically turns on, and then by pressing
the FM/AM button, the System will switch from the most
recently selected FM or AM station.
2. Press the number button (1 —10) to select your preset channels.
Note
If you want to use the number buttons on the remote control to
select the preset radio stations, you must select FM or AM from
the remote control’s FM/AM button.
_________
Page 20
Page 25

CASSETTE DECK
Listening to tapes
You can play back type I, type II, and type IV tapes without
changing any settings.
Type I
..............
Type II
Type IV
However, before you start play, you need to check the type of
the Dolby NR* system used for the tape you play. Only the
Dolby B NR is incorporated into this unit.
............
...........
Normal
High Position
Metal (For listening only, not recordable)
Listening to tapes in deck A or B
By pressing the TAPE button, you can turn on the unit,
and start playing a tape if a tape is in the deck.
Operation
1. Press EJECT for the deck you want to use.
2. Put the cassette in, with the exposed part of the tape
down.
3. Close the cassette holder gently.
4. Press C^) TAPE and the Player will start the side the
tape indicator shows.
To play a tape recorded with the Dolby NR system
Press DOLBY B NR to activate the Dolby B NR system.
The DOLBY B NR indicator lights up. The system works for
both decks at the same time.
To cancel the Dolby NR system, press the button again so
that the indicator turns off.
To play both sides repeatedly — Reverse Mode
Press REVERSE MODE button so that the REVERSE MODE
indicator in the display window is lit. Reverse Mode works
for both decks at the same time.
The tape automatically reverses at the end of a side and start
playing the other side, and repeats the same process.
To cancel Reverse Mode, press the REVERSE MODE
button again so that the indicator turns to ■
To play the opposite side ofthe tape, press the i^l TAPE
button again. When the tape plays to the end, the deck
automatically stops if the Reverse Mode is noton. (See “To
play both sides repeatedly — Reverse Mode.”)
On the Player to stop during play, press ■ STOP/CANCEL.
To reverse or forward, press PREV/NEXT and the
TAPE button to start the tape playing again.
To remove the cassette, press EJECT.
Note
When cassette tapes are loaded into both deck A and B, you
can choose the deck to play by pressing the DECK
0/0 button on the front panel, or the O or ©buttons on
the remote control. Tape indicator shows you which deck will
be activated.
Dolby noise reduction manufactured under license from
Dolby Laboratories Licensing Corporation.
“DOLBY" and the double-D symbol are trademarks of
Dolby Laboratories Licensing Corporation.
Page 21
Page 26

CASSETTE DECK
Locating the beginning of a song
— Music Scan___________________
You can use Music Scan to locate the beginning of a song.
Music Scan searches for blank portions that usually separate
recorded songs, then plays the next song.
To find the beginning of the current song
During play, press PREV/NEXT in the opposite
direction to the tape play.
Searching stops automatically at the beginning of the current
song, and the current song starts again automatically.
To find the beginning of the next song
During play, press PREV/NEXT in the same direc
tion as the tape play.
Searching stops automatically at the beginning of the next
song, and the next song starts automatically.
On the remote control, to locate the beginning of the current
or next song, press buttons.
Notes
• You may stop music scan and start play again by pressing
the TAPE button.
* Music Scan works by detecting a 4-second long blank
between each song, so it won’t work well in the follow
ing cases.
• No blank at the beginning of a song.
• Noise (often caused by much use or poor quality dub
bing) which fills the blank with noise.
• Long, very soft passages or pauses in a song.
Continuous play
Playing tapes in deck A and B
You can play tapes in deck A and B continuously.
Operation
1. Press EJECT for both decks.
2. Put cassettes into both decks, with the exposed part of
the tape down.
3. Close the cassette holders gently.
4. Press TAPE and the Player will start the side the
tape indicator shows.
The direction indicator starts blinking and tape play starts.
When a tape finishes playing, the unit checks to see if a
tape is in the other deck. If one is there, it automatically
starts playing it.
To stop play, press the ■ STOP/CANCEL button.
Notes
— How Continuous Play actually works —
When Reverse Mode is on;
• After the reverse side of the tape finishes playing, the tape
in the other deck starts playing. The tapes continue to play
in the sequence below.
_____
Fast forward/Reversing tapes
To fast forward/reverse tapes, first press the ■ STOP/
CANCEL button and the one of the M^/^M PREV/NEXT
buttons.
□ <#% / »il
RETURN y NEXT //
—r^
_____
/
(Front panel)
On the remote control, press the ■ STOP and then one of
the buttons.
( )
(Remote control)
_____
Page 22
When Reverse Mode is off:
• After one side of the tape finishes playing, the tape stops.
Page 27

RECORDING
You can record using deck B, connected VCR and connected
digital recording equipment.
Recording tapes
You can use type I and II tapes for recording.
You can only record on deck B.
Operation
1. Press EJECT for the deck B.
2. Put in the cassette to record onto, with the exposed
part of the tape down.
3. Cióse the cassette holder gently.
4. Press REC START/STOP so that the REC indicator
lights up.
5. Start playing the source — FM, AM, CD player, deck A,
or auxiliary equipment connected to VCR and AUX
jacks by pressing the desired button.
When the source is deck A, you can also use the dubbing
method. (See “Dubbing Tapes.”)
To stop recording, press REC START/STOP button.
To stop recording temporarily, press REC PAUSE on the
remote control.
To resume recording, press REC START/STOP button or ◄/
► button on the remote control.
To record a tape with the Dolby NR system (except when
the source is deck A)
Press DOLBY B NR to activate the Dolby B NR system.
The DOLBY B NR indicator lights up.
To cancel the Dolby NR system, press the button again so
that the indicator turns off.
To record on both sides — Reverse Mode
Press REVERSE MODE so that the REVERSE MODE indica
tor lights up.
When the source is deck A, see “Dubbing Tapes.”
To cancel Reverse Mode, press the REVERSE MODE
button again so that the indicator ¡2 turns off.
To record a tape with the sound modes (except when the
source is deck A)
Before you start recording, select the sound mode you want by
pressing the SOUND MODE button. You can record in anyone
of the modes.
________________
Dubbing tapes
You cannot dub tapes with the sound modes.
It is preferable that the tape type (type I or II) you record from
be the same as the tape type you record onto when dubbing
tapes.
Operation
1. Put the source cassette in deck A, and the cassette to
be recorded onto in deck B.
2. Press DUBBING button on the front panel.
Dubbing starts. (The System will automatically find the
begining of both tape and start to record).
To stop during dubbing, press REC START/STOP button.
To dub both sides — Reverse Mode
Press REVERSE MODE so that the Reverse Mode indicator
is lit, and start from the front sides for both deck A and B.
To cancel Reverse Mode, press the REVERSE MODE
button again so that the indicator turns to ^ ■
Note
The Dolby NR system is inactive during dubbing
The dubbed tape automatically contains the same processing
as the source tape. The DOLBY B NR indicator automatically
turns off.
To protect your recording
Cassettes have two small tabs on the back to protect unex
pected erasure or re-recording.
To protect your recording, remove these tabs.
To re-record on a protected tape, cover the holes with adhe
sive tape.
When using type 11 tape, be careful not to cover the holes used
to detect the tape type.
- CAUTION
The use of the 120 minutes long or thinner tape is not
recommended, since characteristic deterioration may occur
and this tape easily jams in the pinch-rollers and the
capstans.
---------------------------------------------------------------
Page 23
Page 28

RECORDING
Recording on the connected equip
ment
You can record sounds on the VCR connected to the MD DCC
OUT (REC) jacks on the rear panel.
Before you start recording, refer also to the manuals supplied
for the connected equipment.
Operation
Start playing the source and recording.
__________________________
For recording on VCR:
You can select the sources; FM, AM, deck A and B, CD
player, and the equipment connected to the AUX jacks.
When you start recording from the equipment connected to
the AUX jacks, select [mo/aux] .
Refer to page 3 and the manual for the connected equip
ment.
For recording on the digital equipment; — MD, DCC,
DAT
You can play only the conventional audio CD and the CD-
G as the source.
Notes
• You cannot adjust the recording level manually
Recording level is fixed.
• You can not record on the connected digital equipment
from video CDs.
CAUTION------------------------------------------------------------It may be unlawful to record or playback copyrighted
material without the consent of the copyrighted
owner.
If recording you make have excessive noise or static, the
unit may be too close to a TV. Increase the distance
between the TV and the unit.
Page 24
Page 29

CD edit recording
RECORDINa
You have 2 ways, except the standard method described on
page 23, to record from disc (conventional audio CD, CD-G,
and video CD without the PBC function) to tape.
CD Direct Recording — Everything on the disc onto the tape
in the order it is on the disc.
Auto Edit Recording —The unit arrange which tracks to be
recorded on which side of the tape, so a track isn’t cut off at the
end of the tape.
CD Direct Recording
This is the easiest way of recording a disc.
Operation
1. Put the cassette to record onto in deck B.
2. Place a disc correctly on the circle of the disc tray, with
its label side up.
3. Press CD REC START.
CD REC START
(Front panel)
“CD REC" appears in the display.
Deck B starts recording and the CD player starts playing.
_____________
To record a tape with the Dolby NR system
Press DOLBY B NR to activate the Dolby B NR system.
The DOLBY B NR indicator is shown on the display.
To cancel the Dolby NR system, press the button again so
that the indicator turns off.
To record on both sides — Reverse Mode
Press REVERSE MODE so that the REVERSE MODE indica
tor is lit on the display.
To cancel Reverse Mode, press the button again so that the
indicator turns off.
To record a tape with the sound modes
Before you start recording, select the sound mode you want.
You can record with any one of the preset the sound modes.
Notes
• You can record a set of programmed tracks using CD
Direct Recording.
Before you press CD REC START, make a program as you
want.
To make a program, see page 14.
‘ You can use Repeat Play during CD Direct Recording.
To repeat a disc or a track, see page 14.
To stop during CD Direct Recording, press ■ STOP/
CANCEL button.
When you press ■ STOP/CANCEL button, you can make a 4-
second blank at the end of recording.
Note
— How CD Direct Recording Actually works —
Deck B records tracks in the order on the disc. If the tape ends
while recording a track, deck B rewinds the tape to the
beginning of the track and re-records it so that it fades out
naturally at the end of the tape.
If recording is continued to the reverse side, a 10 second blank
is created at the beginning of the reverse side. Then the
reverse side starts from last track recorded on the front side
and will fade out at the end of the tape again.
Page 25
Page 30

RECORDING
Auto Edit Recording
The unit automatically arranges the tracks on a disc to fit the
tape. The selection of which tracks go on which side of the tape
is based on the lengths of the tracks and the length of the tape.
Operation
1. Put the cassette to be recorded onto in deck B.
2. Piace a disc correctiy in the circle of the disc tray, with
its label side up.
3. Press REVERSE MODE so that the REVERSE MODE
indicator lights up.
If you want to record on only one side of a tape, turn off the
REVERSE MODE indicator.
4. Press EDIT. “DISC ?” appears in the display, and then
the tape length best to use appears.
(Front panel)
5. Press the disc button of the disc you want to record
from.
If the tape you want to record on is a different length,
press [◄◄/►►) PREV/NEXT. The tape length shown in the
display cycles as follows so you can select a different tape
length.
Press CD REC START.
“TAPE SIDE-A STAND-BY” appears in the display.
CO REC START
Deck B rewinds the tape and starts recording. The CD
player starts playing about 10 seconds later.
8.
When recording is complete, the player will stop.
To cancel the Auto Edit setting, press the PROGRAM/
RANDOM button.
To stop during Auto Edit Recording, press ■ STOP/CANCEL on the front panel.
When you press ■ STOP/CANCEL, you make a 4-second
blank at the end of recording.
To record a tape with the Dolby NR system
Press DOLBY B NR to activate the Dolby B NR system.
The DOLBY B NR indicator lights up.
To cancel the Dolby NR system, press the button again so
that the indicator turns off.
To record a tape with the sound modes
Before you start recording, select the sound mode you want.
You can record with any one of the sound modes.
Notes
• You can program up to 16 tracks for each side of the
tape
However, you cannot program a track the number of which
on the disc is greater than 31.
• If you use a tape shorter than the total playing time of
selected tracks
The last recorded tracks will be fading out at the ends of
both sides.
6. Press SET when the length tape you want to use
appears in the display.
The display shows which tracks go on the front side (A) and
which on the reverse side (B).
(Front panel)
Each time you press the button, the display alternates to
show the tracks for the front side (A) and those for the
reverse side (B).
Page 26
— How Auto Edit Recording actually works —
The unit selects which tracks go on which side of the tape so
that the total playing time of the selected tracks is within the
tape length and that no track is cut off while recording.
Before recording starts, the deck B automatically rewinds the
tape to the beginning of the front side and creates a 10 second
blank.
If recording is continued to the reverse side, a 10 second blank
is also created at the beginning of the reverse side.
Page 31

KARAOKE
Singing aiong Karaoke
You can enjoy singing along using conventional audio CDs (or
tapes), CD-Gs and video CDs.
Singing along with conventional
audio CDs or tapes — Vocal Masking
When playing a stereo recorded source such as conventional
audio CDs or tapes, you can reduce the lead vocal and replace
it with your voice by singing into the microphone. Usually
stereo recorded CDs are the best source for Vocal Masking.
What Vocal Masking actually does
Vocal Masking reduces the lead vocal (but never erases it).
The following sources are not good for Vocal Masking.
• Monaural sources
• Multiplex karaoke tapes and discs
• Poorly dubbed tapes
• Stereo recorded source, butwithonlyfew Instruments, with
duets, or with strong echo
Operation
1. Turn down MIC LEVEL fully.
2. Connect the microphone (not supplied) into the MIC
jack on the front panel.
3. Play the source — a CD, a tape, or other.
To apply echo to your voice
While holding down the SHIFT button, press DIGITAL ECHO
on the remote control.
Each time you press the button, the amount of echo applied
changes and the display shows as follows;
•ECHO 1ECHO 2^ ECHO 3^ OFF-
ECHO 1
ECHO 2
ECHOS
OFF:
To record yourself singing along
See “Microphone Mixing" on page 30.
Notes
• For preventing howling and squealing when using the
* When you are not going to use the microphone
A little echo is applied.
More amount of echo than ECHO 1.
Strong echo is applied.
No echo is applied.
microphone
Adjust MIC LEVEL and VOLUME, and try not to point the
microphone at the speakers.
Keep MIC LEVEL set to MIN, and disconnect the micro
phone.
4. Press the KARAOKE button until “V. MASK” appears on the display.
5. Turn MIC LEVEL and VOLUME to adjust the micro
phone level and the sound output level.
6. Sing into the microphone.
Note
You can adjust both MIC 1 and MIC 2 with the MIC LEVEL
knob.
Page 27
Page 32

KARAOKE
Singing aiong with Muitipiex
Karaoke Video CDs without the PBC
function or Muitipiex Karaoke CD-Gs
If the disc you are going to play is a multiplex karaoke disc, the
instrumental parts are recorded on the left channel and the
vocal parts are recorded on the right channel. So, you can
select the output sounds — whether the instrumental parts
only or both of the instrumental parts and vocal parts.
Before playing a disc, turn on the TV and select the video input
so that you can view the pictures from the CD player.
Operation
1. Turn down MIC LEVEL fully.
2. Connect the microphone (not supplied) into the MIC
jack on the front panel.
3.
Press ^ on any of the disc trays.
The unit automatically turns on and the disc tray comes out.
Place a disc correctly In the circle of the disc tray, with
its label side up.
Press f~) or ►/SELECT button on the remote control.
The disc tray closes.
• When you play a video CD, “VIDEO CD” appears in the
display and play starts from the first track.
• When you play a CD-G, “GRAPHICS” appears in the
display and play starts from the first track.
Press KARAOKE to select the output sound—whether
the instrumental parts only or both of the instrumental
parts and the vocal parts.
^ (Display window)
Playing a multiplex sound CD
• This function is used for multiplex sound discs.
* By pressing the KARAOKE button, channel multiplex
ing modes are cycled as shown below.
To stop during play, press ■ STOP/CANCEL.
The blue screen appears on the TV screen.
To stop play and remove the disc, press A.
After singing, restore the stereo effect by pressing KARAOKE.
So, you will not lose the stereo effect when you play a stereo
disc next time.
To select the CD graphic channel
If the CD-G has several patterns (up to 15) of graphics (they
are called “graphic channels"), you can select the one you
want. You can find out whether or not the CD-G has graphic
channels by looking at its package or the printed surface of the
disc.
To change the graphic channel, press CD-G CHANNEL
repeatedly until the graphic channel you want appears on the
TV screen.
To apply echo to your voice
Operation
1. Press DIGITAL ECHO on the remote control while
holding down the SHIFT button.
SHIFT DIGITAL ECHO
Each time you press the button, the amount of echo
2.
applied changes and the display shows as follows:
----
»D.ECHO 1->D.ECH0 2^D.ECH0 3^0FF
ECHO 1: A little echo is applied.
ECHO 2: More amount of echo than ECHO 1.
ECHO 3: Strong echo is applied.
OFF: No echo is applied.
To select a particular track or to use other basic opera
tions
See “Basic Operations” on page 12.
To record yourself singing along
See “Microphone Mixing” on page 30.
( )
ECHO
(Display window)
---------------
1
REPLACE-^Lch MONO^Rch MONO ^V.MASK-
c
(Display window)
7. Turn MIC LEVEL and VOLUME to adjust the micro
phone level and the sound output level.
8. Sing into the microphone.
Page 28
Notes
* You can use Vocal Masking only on a multiplex Karaoke
disc.
* To prevent howling and squealing when using the
microphone
Adjust MIC LEVEL and VOLUME, and try not to point the
microphone at the speakers.
* When you are not going to use the microphone
Keep MIC LEVEL set to MIN, and disconnect the micro
phone.
Page 33

KARAOKE
Singing aiong with Muitipiex
Karaoke Video CDs with the PBC
function________________________
Before playing a disc, turn on the TV and select the video input
so that you can view the pictures from the CD player.
Operation
1.
Turn down MIC LEVEL fully.
2.
Connect the microphone (not supplied) into the MIC
jack on the front panel.
3.
Press
The System automatically turns on and disc tray comes
out.
4.
Place a disc correctly in the circle of the disc tray, with
its label side up and press A again. The disc tray will
close.
Press the disc button next to the disc you want to play.
When the menu appears on the TV screen, select the
song you want by using the number buttons on the
remote control unit.
Press the KARAOKE button to select the output sound
— whether the instrumental parts only or both the
instrumental parts and the vocal parts.
Each time you press the button, the sound changes and the
display window shows as follows:
V.MASK->REPLACE-^Lch MONO^Rch MONO-
Lch MONO:
Rch MONO:
VOCAL MASK:
REPLACE:
only the instrumental parts
only the vocal parts
vocal is to be muted
your voice replace the vocal
To apply echo to your voice
Hold down the SHIFT button and press DIGITAL ECHO on the
remote control.
Each time you press the button, the amount of echo applied
changes and the display shows as follows:
-------
>ECHO 1ECHO 2-^ECHO 3-^OFF
ECHO 1: A little echo is applied.
ECHO 2: More amount of echo than ECHO 1.
ECHO 3: Strong echo is applied.
OFF: No echo is applied.
To use other operations
See ‘Various Unique Functions" on page 14.
T0 use slow motion or frame-by-frame playback for video CDs
Press the ii STILL button while holding down to SHIFT button
on the remote control.
To record yourself singing along
See “Microphone Mixing” on page 30.
Notes
* You cannot use Vocal Masking on a multiplex karaoke
disc.
* To prevent howling and squealing when using the
microphone
Adjust MIC LEVEL and VOLUME, and try not to point the
microphone at the speakers.
« When you are not going to use the microphone
Keep MIC LEVEL set to MIN, and disconnect the micro
phone.
----------------
8. Turn MIC LEVEL and VOLUME to adjust the micro
phone level and the sound output level.
9. Singing into the microphone.
To stop Menu Play, select the item in the menu (such as "End”
or "Quit”) which can quit playback. If there is not such a
selection, press and hold RETURN for more than 2 seconds.
To stop play and remove the disc,
press A.
Adjusting music key
Hold down the SHIFT button and press the KEY CONTROL
buttons on the remote control ( b 1 - 6 or # 1 - 6) to change
the key in which the music plays.
( ) a
SHIFT
Note
Once the music key is adjusted, the key level will not return to
the previous level after playing a song.
b KEY CONTROL B
Page 29
Page 34

USING THE MICROPHONE
You can use the microphone (not supplied) for two kinds of
recording.
Microphone mixing
You can record sound through the microphone by mixing
sound from other sources.
When recording on deck B, you cannot use deck A as the
playing source. (But you can use deck A as the playing source
when recording on the connected VCR.)
Operation
1. Turn down MIC LEVEL fully.
2. Connect the microphone (not supplied) into the MIC
jack on the front panel.
3. Play the source — a CD, a tape, and others.
4. Turn MIC LEVEL and VOLUME to adjust the micro
phone level and the sound output level.
______________
Recording oniy though the micro
phone
You can record sound picked up by the microphone only.
See page 23 to prepare for recording.
Operation
1. Turn down MIC LEVEL fully.
2.
jack on the front panel.
Turn MIC LEVEL and VOLUME to adjust the micro
3.
5.
Notes
• You can record using both deck B and the connected MD.
• To prevent howling and squealing when using the
• When you are not going to use the microphone
________________________
Connect the microphone (not supplied) into the MIC
phone level and the sound output level.
Press the REC START/STOP button, the indicator turns
red and recording will start.
(Front panel)
Sing into the microphone or pick up sound using the
microphone.
microphone
Adjust MIC LEVEL and VOLUME, and try not to point the
microphone at the speakers.
Keep MIC LEVEL set to MIN, and disconnect the micro
phone.
5. Sing into the microphone.
6. Start recording.
You can record using both deck B and the connected VCR.
When recording on deck B, see “Recording Tapes” on
page 23.
When recording on the VCR, refer to the manual supplied
for it.
Page 30
Page 35

USING THE TIMER
There are three timers available — Recording Timer, Daily
Timer and Sleep Timer.
Before using the timers, you need to set the clock built into the
System.
Setting the clock
________________
Setting the clock for the first time
After you plug the system in you need to set the clock before
you can set any of the timers.
Operation
1. Press the CLOCK button once.
2. The indicators below will start to blink.
\
\ \ I / 7^
-CLOCK/'... .
^ / I \ '< I ^
I „
/^f^^STOP^CANCE^r
fH«-/ 0<r\h
Ify PRPV \ t RETURN y /
i /
3.
Press the ►» NEXT button to advance the hour. When
OWl
N^
you reach the right hour press the SET button.
4.
Press the NEXT button to advance the minutes.
When you reach the right minute press the SET button.
5.
“CLOCK OK” will appear on the display.
Note
Holding down the !◄◄/►►) PREV/NEXT buttons will advance/
decrease the time by 10 minute intervals.
Using Recording Timer
With Recording Timer, you can make a tape of a radio
broadcast automatically.
You can set Recording Timer whether the System is turned on
or off.
Operation
1. Place a tape in deck B and select the recording direc
tion. See page 23.
2. Choose the radio station you wish to record. (The
Player will remember the station.)
3. Press the TIMER button consecutively until “ON TIME”
and “ONCE REC” blink.
s V I / /
- ONTIME -
/ / I \ N
4. Use the PREV/NEXT buttons to set the hour
and press SET. Then do the same for the minutes and
press SET.
5. Use the PREV/NEXT buttons to set the off time
In the same way.
6. TIMER OK will appear on the screen and the Recording
Timer is set.
To reset the timer after the System has automatically
turned off.
Turn the System on and press the timer button until ONCE
REC appears in the display, and press SET. The once record
timer is set again for the same time, and source.
Notes
• To turn off the Recording Timer, press the Timer button
until ONCE REC blinks, and press STOP/CANCEL button.
The ONCE RECORD feature is turned off.
— How Recording Timer actually works —
The System automatically turns on, tunes into the most
recent station, and starts recording on deck B when the
timer-on time comes. Then, when the timer-off time comes,
the System automatically turns off.
The timer-on time and timer-off time remain stored in
memory until you reset them or disconnect the AC power
cord.
\ \ \ I / / /
/ / I I I V \
-TlMEn^
ONCE
- REC
Page 31
Page 36

USING THE TIMER
Setting the Daily Timer
With Daily Timer, you can wake up to music or your favorite
radio program. You can set Daily Timer whether the System
is turned on or off.
Operation
1. Press the TIMER button once. DAILY will start to blink on the display.
2. Press TIMER once more to set the Dally Timer. The ON
TIME and hour spaces will start to blink. Use the \«/
►w PREV/NEXT buttons to forward or reverse the
hours, and press SET.
3. Use the PREV/NEXT buttons again to set the minutes, and press the SET button again.
4. The OFF TIME and hour spaces will start to blink. Set the OFF TIME the same way you set the ON TIME.
5. After you set the minutes of the OFF TIME, “SOURCE” will appear on the screen. Press the PREV/ NEXT button to select the source you wish to use. To select a source, press the PREV/NEXT
buttons and different sources wil blink In the display.
When the source you want to use is blinking press the
SET button.
CD: When you choose CD as a source “DISC will
appear in the display. To choose other discs use
the ^<◄/►►^ PREV/NEXT buttons. When the cor
rect disc is displayed press the SET button.
Next “TRACK —’’ will appear in the display. Use
the [◄◄/►►! PREV/NEXT buttons to choose the
track you want to start from.
Next, “VOLUME” will appear In the screen. Use the
!◄◄/►►) PREV/NEXT buttons to choose the vol
ume you want. Now “TIMER OK” will appear in the
display and the timer is set.
TAPE: When you choose tape as a source, “VOLUME” will
appear in the display. Adjust the volume with the
PREV/NEXT buttons. Now “TIMER OK”
will appear in the display. (If tapes are in both decks
when the timer comes on the System will play deck
B first.)
FM or AM: When you choose FM or AM as a source,
“VOLUME” will appear in the display. Adjust the
volume with the ^◄◄/►►^ PREV/NEXT buttons and
press SET. Now “TIMER OK” will appear in the
display.
To change the source or time for Daily Timer, press the
TIMER button and then press it again and “ON TIME” and
the time will start to blink. Now you can reset the timer and
source.
To cancel the Daily Timer, press the TIMER button and
then press the STOP/CANCEL button while “DAILY" is
blinking on the display.
To turn the Daily Timer back on, press the TIMER button
and then press the SET button while “DAILY” is blinking on
the display.
Note
* If there is a power failure
The clock loses the setting and the display shows “0:00.”
You need to reset the clock.
Setting the Sleep Timer___________
With Sleep Timer, you can fall asleep to music.
You can set Sleep Timer when the unit is turned on.
Operation
1. Press SLEEP on the remote control.
The SLEEP indicator starts blinking in the display. Each
time you preset the button, the time length changes as
follows:
------------- -- -- -- ------
2. Wait for about 6 seconds after specifying the time
length.
The SLEEP indicator stops blinking and remains lit.
To check the remaining time until the timer-off time, press
SLEEP once so that the remaining time until the shut-off time
appears for about 5 seconds.
To change the timer-off time, press SLEEP repeatedly until
the desired time length appears in the display.
To cancel the Sleep Timer, press SLEEP repeatedly so that
the SLEEP indicator goes off in the display or turn off the
System.
Note
The System automatically turns off after the specified time
length passes.
»10->20^30^60^90 ^120-- -- -- ------------------------------------- -- -- -- -- -- -- -- -- -- -
Canceled ■
Page 32
Page 37

Timer priority
Since each timer can be set separateiy, you may wonder what
happens if the setting for these timers overlap.
Here are the priorities for each timer.
Recording Timer has priority over Daiiy Timer and Sieep Timer.
If the Daily Timer is set to come on while the Recording Timer
is operating, the Daily Timer will not come on at all.
6:00 6:30 7:00 7:30
I
Recording Timer [
Daily Timer
II I I
does not work.
USING THE TIMER
If Recording Timer is set to come on while the Sleep Timer is
operating, the Sleep Timer will be canceled several seconds
before Recording Timer comes on.
6:00
6:30 7:00 7:30
I
Recording Timer
Sleep Timer
Sleep Timer has priority over Daiiy Timer.
If Daily Timer is set to come on while the Sleep Timer is
operating, the Daily Timer will not come on at all.
Sleep Timer
Daily Timer
I C
6:00
canceled.
7:30
II I I
does not work.
Therefore, the priority is like this —
Recording Timer > Sleep Timer > Daily Timer
Page 33
Page 38

MAINTENANCE
Handling compact discs
When handling a compact disc, do not touch the surface of the
disc (reflective silver side — the side without the label).
Since compact discs are made of plastic, they are easily
damaged. If a disc gets dirty, dusty, scratched or warped, the
sound will not be picked up correctly and, in addition, such a
disc may cause the CD player to malfunction.
Even on label side
Do not damage the label side, stick paper to or use any
adhesive on its surface.
Storage
Make sure that discs are kept in their cases. If discs are piled
one on top of another without their protective cases, they can
be damaged. Do not put discs in a location where they may be
exposed to direct sunlight, or in a place where the humidity or
temperature is high. Avoid leaving discs in your car!
Maintenance of discs
If there are fingerprints or other dirt adhering to a disc, wipe it
with a soft dry cloth, moving from the center outwards.
If a disc is difficult to clean, wipe it with a cloth moistened with
water. Never use record cleaners, petrol, alcohol or any anti
static agents.
Handiing cassette tapes
If the tape is loose in its cassette, take up
the slack by inserting a pencil in one of the
reels and rotating.
if the tape is loose, it may get stretched,
cut, or caught in the cassette.
Be careful not to touch the tape surface.
Avoid the following places to store the
tape:
— In dusty places
— In direct sunlight or heat
— In moist areas
— Near a magnet
Cassette decks
If the heads, capstans, and pinch-rollers of the cassette decks
become dirty, the following will occur;
• Impaired sound quality
• Discontinuous sound
• Fading
• Incomplete erasure
• Difficulty in recording
To clean the heads, capstans, and pinch-rollers
Use a cotton swab moistened with alcohol.
- CAUTION
Sometimes during play noise or images may be garbled.
This is sometimes due to the disc. (It may not be up to
industry standards.)
These symptom are caused by the discs, not by the
malfunction of the System.
DO NOT use any solvent — such as conventional record
cleaner, spray, thinner, or benzine — to clean the disc.
---------------------------------------------------------------
Page 34
To demagnetize the heads
Turn off the unit, and use a head demagnetizer (available at
electronics and record shops).
Page 39

TROUBLESHOOTING
Troubleshooting
If you are having a problem with your System, check this list for
a possible solution before calling for service.
If you cannot solve the problem from the hints given here, or
the System has been physically damaged, call a qualified
person, such as your dealer, for service.
Symptom
No sound is heard.
Hard to listen to broadcasts
because of noise.
The disc sound is discontinuous.
The disc sound loses stereo
effect.
The pictures from the CD player is
distorted.
The disc tray does not open or
close.
The disc does not play.
The cassette holders cannot be
opened.
Cause
Connections are incorrect or loose.
• Antennas are disconnected.
• The AM loop antenna is too close to the
System.
• The FM antenna is not properly extended
and positioned.
The disc is scratched or dirty.
The Lch MONO mode is activated.
When you pause or advance the pictures
manually, the pictures are distorted. This is
not a malfunction.
The AC power cord is not plugged in. Plug the AC power cord.
The disc is placed upside down. Place the disc with the label side up.
Power supply from the AC power cord has
been cut off while the tape was running.
Check all connections and make
corrections. (See pages 2 to 4.)
• Reconnect the antennas correctly and
securely.
• Change the position and direction of the
AM loop antenna.
• Extend the FM antenna at the best
position.
Clean or replace the disc. (See page 1.)
Press KARAOKE on the front panel to
restore the stereo effect.
Turn on the System.
Action
Impossible to record.
Operations are disabled. The built-in microprocessor may malfunction
Unable to operate the System
from the remote control.
Small taps on the back of the cassette are
removed.
due to external electrical interference.
• The path between the remote control and
the remote sensor on the unit is blocked.
• The batteries are exhausted.
Cover the holes with adhesive tape.
Unplug the AC power cord and then plug
it back in.
• Remove the obstruction.
• Replace the batteries.
Page 35
Page 40

SPECIFICATIONS
CA-V605T
Amplifier
Output power
(IEC268-3/DIN)
Audio input
sensitivity and
impedance
(at 1 kHz)
Audio output
level/Impedance
(at 1 kHz)
Video output level
(at 1 Vp-p input)
Speakers/
Impedance
Tuner
FM tuning range
AM tuning range
Cassette deck
Frequency
response
Wow and flutter
CD player
Wow and flutter
Available disc type
General
Power
requirements
Power
consumption
Max. power
consumption
Dimensions
(approx.)
Mass (approx.)
47 watts per channel, min. RMS, both
channels driven into 6Q at 1 kHz with no
more than 0.9% total harmonic distor
tion.
MD/DCC 900mV/47kQ
AUX 300mV/47kQ
MIC 1, MIC 2 2.0mV/10kQ
MD/DCC 200mV/2.0kQ
VIDEO OUT 1.0Vp-p/75Q
SPEAKERS 6-16Q
87.50- 108.00MHz
531 - 1602kHz
(at 9kHz channel spacing)
530- 1600kHz
(at 10kHz channel spacing)
Normal (type 1) 30 - 15000Hz
Cr02(type2) 30-16000Hz
H-0.3% W.PEAK (EIAJ)
0.15% WRMS
Unmeasurable
Audio CD, CD-G, video CD
AC110/127/220/230 - 240V ^ , adjust
able with the voltage selector, 50/60Hz
110 watts (during operation)
20 watts (during standby)
380 watts
(Taiwan only)
245 X 270 X 302.5 mm (W/H/D)
9 11/16 X 10 11/16 X 11 15/16 in.
6.3 kg (13.9 lbs.)
Page 36
 Loading...