

Page 1
COMPACT COMPONENT SYSTEM
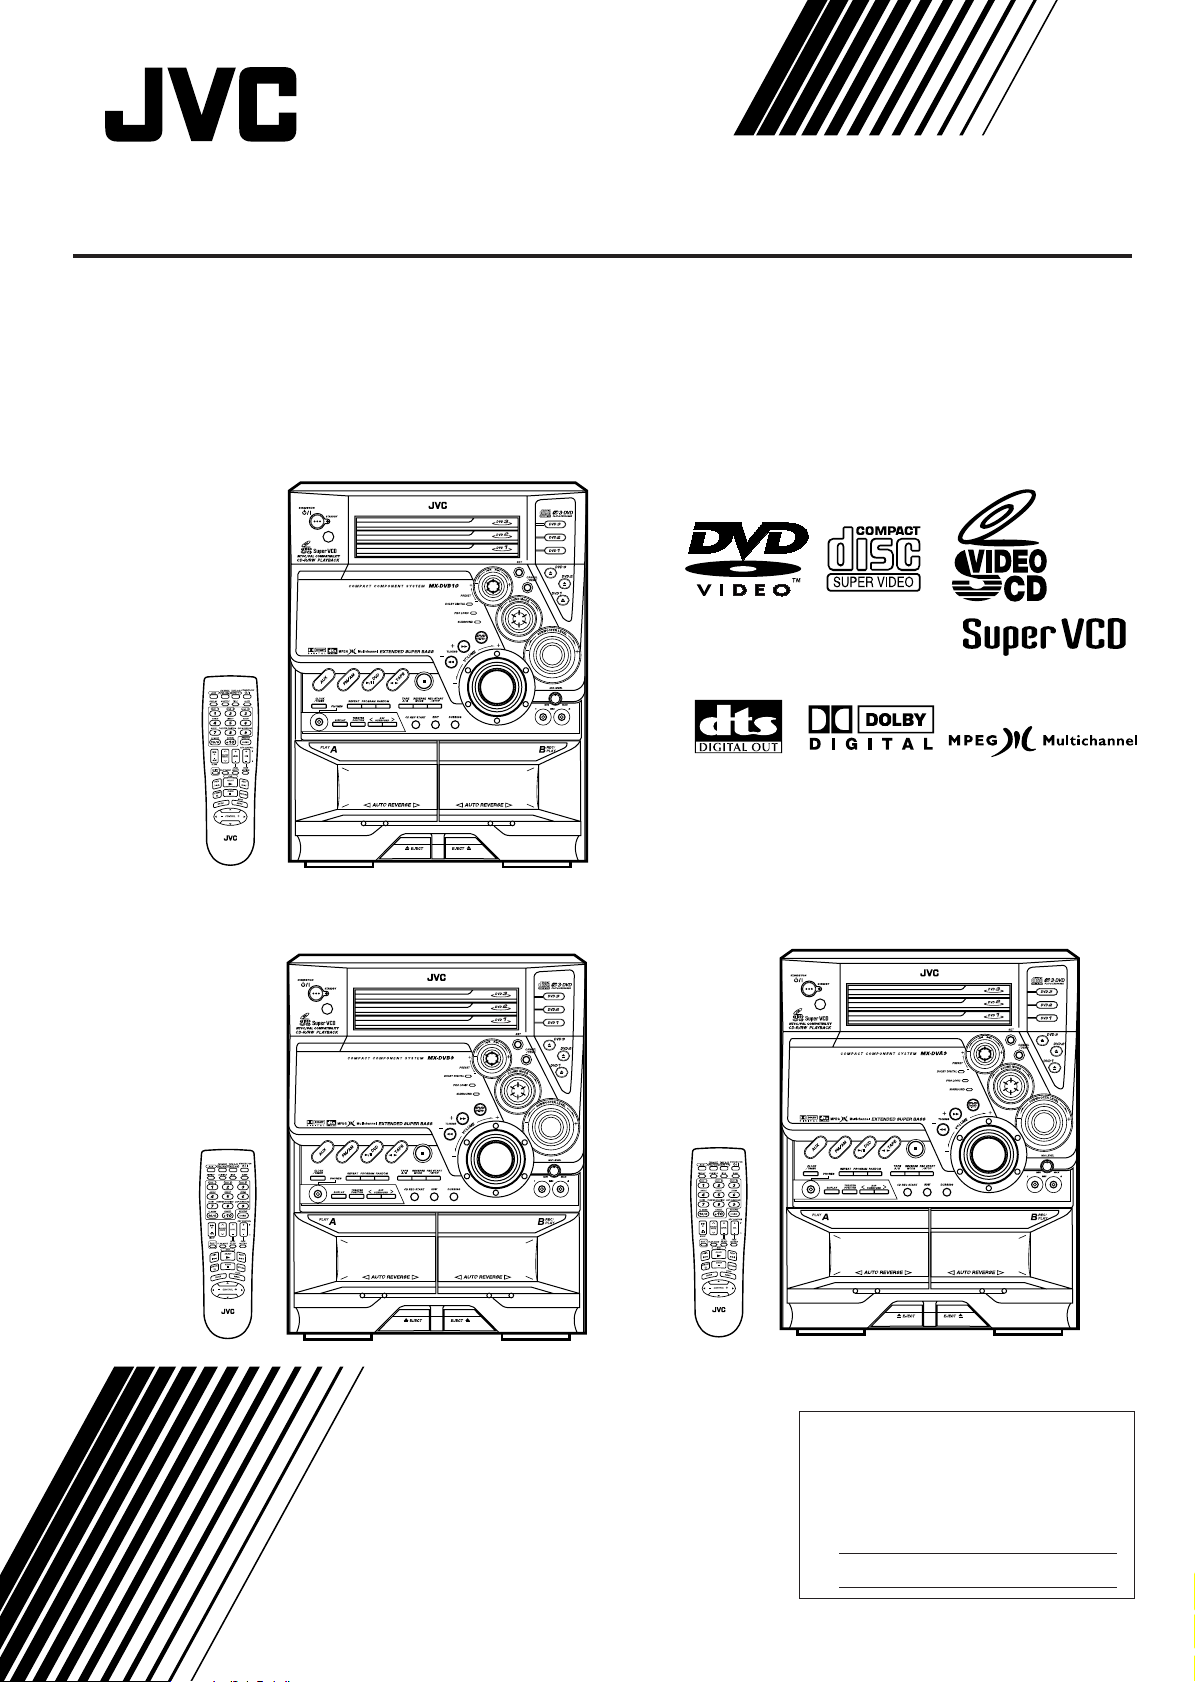
CA-MXDVB10 / CA-MXDVB9
CA-MXDVA9
CA-MXDVB10
CA-MXDVB9
INSTRUCTIONS
CA-MXDVA9
For Customer Use:
Enter below the Model No. and Serial
No. which are located either on the rear,
bottom or side of the cabinet. Retain this
information for future reference.
Model No.
Serial No.
GVT0057-016B
[U, UG, US, UW, UX]
Page 2

Warnings, Cautions and Others
Caution — STANDBY/ON button!
Disconnect the mains plug to shut the power off completely.
The STANDBY/ON
disconnect the mains line. The power can be remote
controlled.
CAUTION
To reduce the risk of electrical shocks, fire, etc.:
1. Do not remove screws, covers or cabinet.
2. Do not expose this appliance to rain or moisture.
button in any position does not
CAUTION
• Do not block the ventilation openings or holes.
(If the ventilation openings or holes are blocked by a
newspaper or cloth, etc., the heat may not be able to
get out.)
• Do not place any naked flame sources, such as lighted
candles, on the apparatus.
• When discarding batteries, environmental problems
must be considered and local rules or laws governing
the disposal of these batteries must be followed strictly.
• Do not expose this apparatus to rain, moisture, dripping
or splashing and that no objects filled with liquids such
as vases, shall be placed on the apparatus.
– G-1 –
Page 3
IMPORTANT FOR LASER PRODUCTS
REPRODUCTION OF LABELS
1 CLASSIFICATION LABEL, PLACED ON REAR ENCLOSURE 2 WARNING LABEL, PLACED INSIDE THE UNIT
CLASS 1
LASER PRODUCT
1. CLASS 1 LASER PRODUCT
2. DANGER: Invisible laser radiation when open and interlock
failed or defeated. Avoid direct exposure to beam.
3. CAUTION: Do not open the top cover. There are no user
serviceable parts inside the Unit; leave all servicing to qualified
service personnel.
DANGER: Invisible laser
radiation when open and
interlock failed or defeated.
AVOID DIRECT EXPOSURE
TO BEAM. (e)
ADVARSEL: Usynlig laserstråling ved åbning, når
sikkerhedsafbrydere er ude
af funktion. Undgå udsættelse for stråling (d)
VARNING: Osynlig laserstrålning när denna del är
öppnad och spärren är
urkopplad. Betrakta ej
strålen. (s)
VARO: Avattaessa ja suojalukitus ohitettaessa olet
alttiina näkymättömälle
lasersäteilylle. Älä katso
säteeseen. (f)
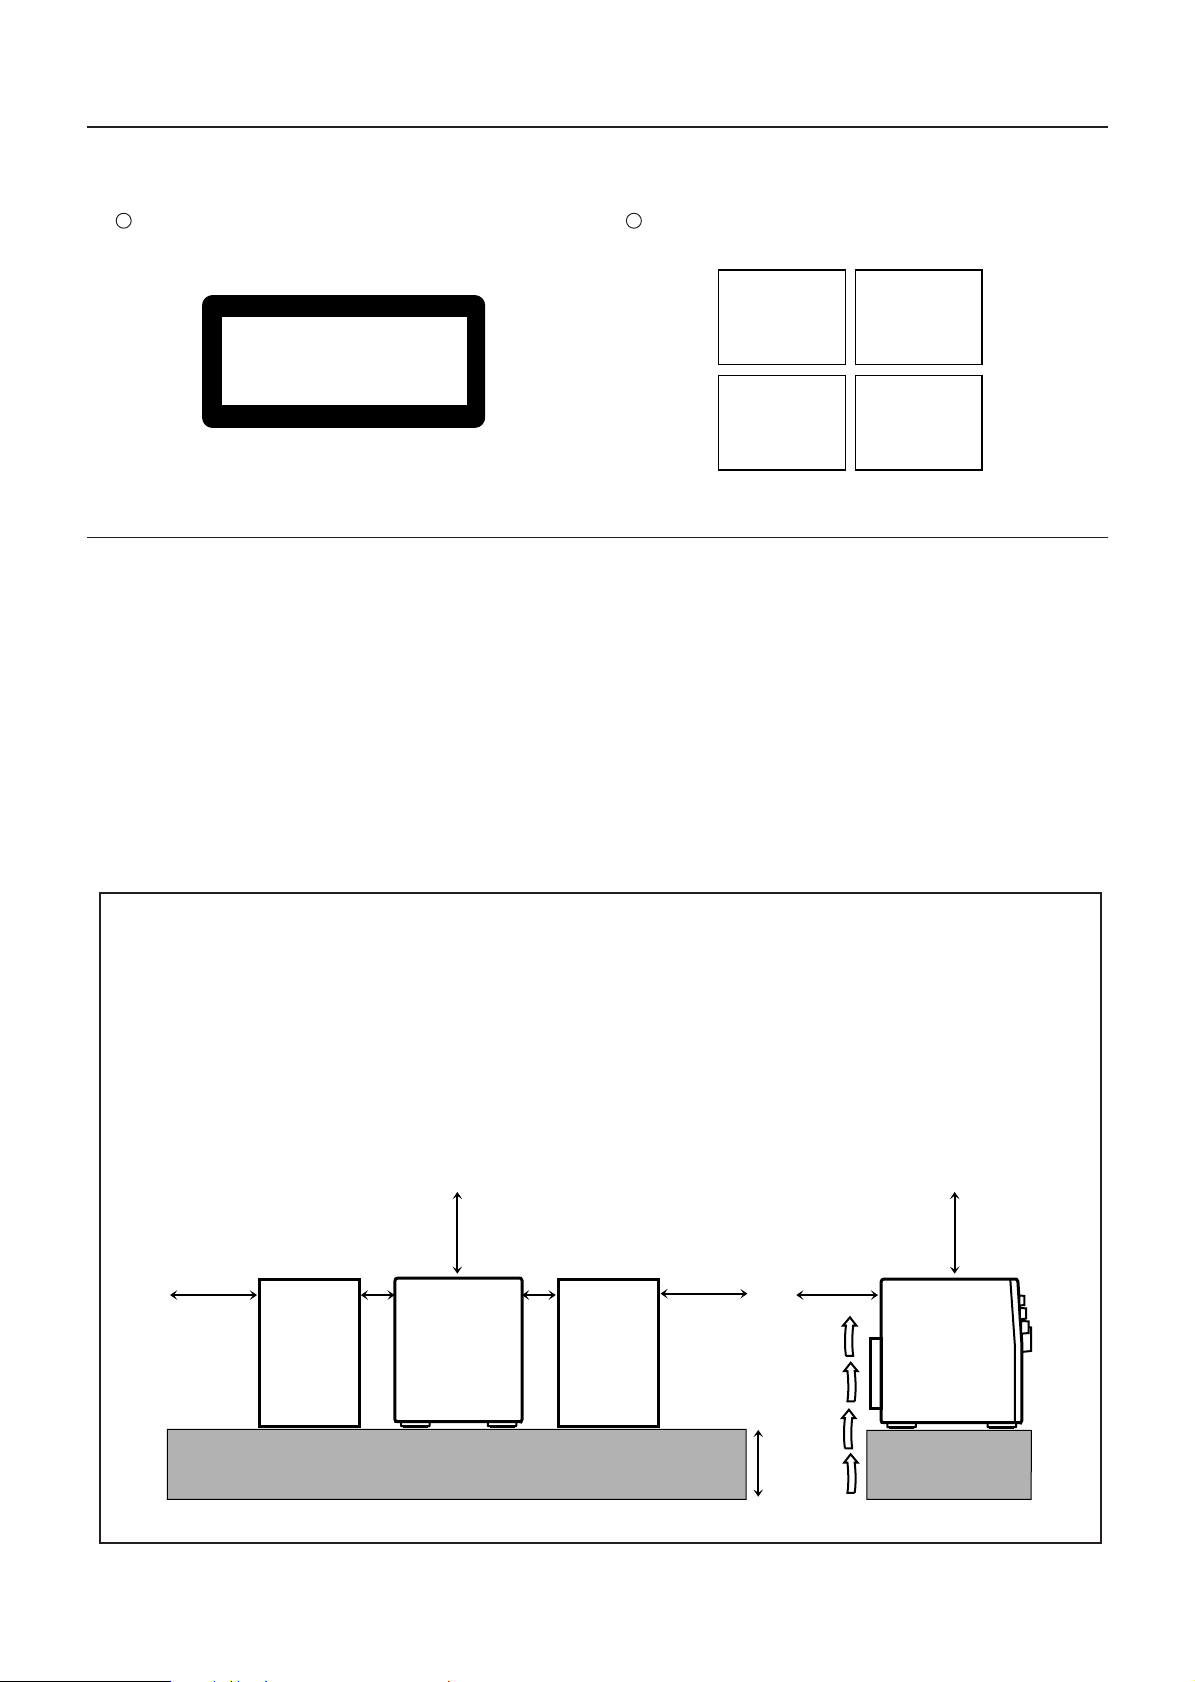
Caution: Proper Ventilation
To avoid risk of electric shock and fire, and to prevent damage, locate the apparatus as follows:
1 Front: No obstructions and open spacing.
2 Sides/ Top/ Back: No obstructions should be placed in the areas shown by the dimensions below.
3 Bottom: Place on the level surface. Maintain an adequate air path for ventilation by placing on a stand
with a height of 10 cm or more.
Front view
15 cm
15 cm 15 cm
1 cm
1 cm
CA-MXDVB10
CA-MXDVB9
CA-MXDVA9
Side view
15 cm
15 cm
CA-MXDVB10
CA-MXDVB9
CA-MXDVA9
10 cm
– G-2 –
Page 4
Introduction
We would like to thank you for purchasing one of our JVC products.
Before operating this unit, read this manual carefully and thoroughly to
obtain the best possible performance from your unit, and retain this manual
for future reference.
About This Manual
This manual is organized as follows:
• The manual mainly explains operations using the
buttons and controls on the unit. You can also use the
buttons on the remote control if they have the same or
similar names (or marks) as those on the unit.
If operation using the remote control is different from
that using the unit, it is then explained.
• Basic and common information that is the same for many
functions is grouped in one place, and is not repeated in
each procedure. For instance, we do not repeat the
information about turning on/off the unit, setting the
volume, changing the sound effects, and others, which are
explained in the section “Common Operations” on pages
11 to 14.
• The following marks are used in this manual:
Gives you warnings and cautions to prevent
from damage or risk of fire/electric shock.
Also gives you information which is not good
for obtaining the best possible performance
from the unit.
Gives you information and hints you had better
know.
Power sources
• When unplugging from the wall outlet, always pull the
plug, not the AC power cord.
DO NOT handle the AC power cord with wet
hands.
Moisture condensation
Moisture may condense on the lens inside the unit in the
following cases:
• After starting heating in the room
• In a damp room
• If the unit is brought directly from a cold to a warm place
should this occur, the unit may malfunction. In this case,
leave the unit turned on for a few hours until the moisture
evaporates, unplug the AC power cord, and then plug it in
again.
Others
• Should any metallic object or liquid fall into the unit,
unplug the AC power cord and consult your dealer before
operating any further.
• If you are not going to operate the unit for an extended
period of time, unplug the AC power cord from the wall
outlet.
Precautions
Installation
• Install in a place which is level, dry and neither too hot nor
too cold—between 5˚C and 35˚C.
• Install the unit in a location with adequate ventilation to
prevent internal heat buildup in the unit.
• Leave sufficient distance between the unit and the TV.
• Keep the speakers away from the TV to avoid interference
with TV.
DO NOT install the unit in a location near heat
sources, or in a place subject to direct sunlight,
excessive dust or vibration.
DO NOT disassemble the unit since there are no
user serviceable parts inside.
If anything goes wrong, unplug the AC power cord and
consult your dealer.
– 1 –
Page 5

Contents
Location of the Buttons and Controls ....................... 3
Front Panel ................................................................. 3
Remote Control .......................................................... 5
Getting Started ............................................................ 6
Supplied Accessories .................................................. 6
Putting the Batteries into the Remote Control ........... 6
Connecting Antennas ................................................. 6
Connecting Speakers .................................................. 7
Connecting Other Equipment ..................................... 8
Adjusting the Voltage Selector ................................. 10
Canceling the Display Demonstration ..................... 10
Common Operations ................................................ 11
Turning On or Off the Power ..................................... 11
Setting the Clock ...................................................... 11
Setting the AM Tuner Interval Spacing .................... 11
Selecting the Sources ................................................. 12
Adjusting the Volume ............................................... 12
Adjusting the Front Speaker Output Balance........... 12
Reinforcing the Bass Sound ..................................... 13
Selecting the Sound Modes ...................................... 13
Creating Your Own Sound Modes
—Manual Mode .................................................. 14
Listening to FM and AM Broadcasts ...................... 15
Tuning into a Station ................................................ 15
Presetting Stations .................................................... 15
Tuning into a Preset Station ..................................... 15
Playing Back Discs—Introduction .......................... 16
Disc Structure ........................................................... 17
DVD Features........................................................... 17
Selecting the Multi-Angle View ............................... 17
Selecting the Audio Language or Sound .................. 18
Selecting the Subtitle ................................................ 18
Basic Disc Playback .................................................. 19
Loading Discs........................................................... 19
Common Basic Disc Operations .............................. 19
DVD Playback.......................................................... 19
SVCD/VCD/CD Playback ....................................... 21
Searching for a Particular Point ............................... 22
Prohibiting Disc Ejection—Tray Lock .................... 22
Menu Driven Playback ............................................. 23
Menu Operations ...................................................... 23
Selecting Playback Modes ........................................ 24
Programming the Playing Order of the Titles and
Tracks—Program Play ....................................... 24
Playing at Random—Random Play ......................... 26
Repeating Playback .................................................. 26
• Repeat Play ........................................................ 26
• A-B Repeat......................................................... 27
DVD/SVCD/VCD Special Effect Playback............. 28
Still Picture/Frame-by-Frame Playback ................... 28
Viewing Continuous Still Pictures—Strobe ............. 28
Slow Motion Playback—Slow ................................. 28
Zoom in the Picture—Zoom .................................... 28
Viewing the Desired Chapters/Tracks—Digest........ 29
Selecting the Picture Brightness
—Theater Position .............................................. 29
Playing Back Tapes ................................................... 30
Playing Back a Tape ................................................. 30
Locating the Beginning of a Song—Music Scan ..... 30
Using DSP Surround Mode ..................................... 31
Activating and Adjusting
the DSP Surround Mode ..................................... 31
Recording .................................................................. 32
Recording a Tape on Deck B.................................... 32
Dubbing Tapes .......................................................... 33
SVCD/VCD/CD Direct Recording ............................ 33
Auto Edit Recording .................................................. 34
Using the Microphones ............................................. 35
Singing along (Karaoke) .......................................... 35
Reserving Karaoke Songs
—Karaoke Program Play .................................... 37
Operating the On-Screen Menu .............................. 38
Basic Procedure ........................................................ 38
Changing the Initial Language Settings ................... 39
Changing the Various Audio Settings....................... 39
Changing the Display Settings ................................. 41
Changing the System Settings .................................. 42
Using the Parental Lock ........................................... 43
Setting the Parental Lock Level ............................... 43
Unlocking the Parental Lock Temporarily ............... 43
Using the Timers ....................................................... 44
Using Daily Timer .................................................... 44
Using Recording Timer ............................................ 46
Using Sleep Timer .................................................... 47
Timer Priority ........................................................... 47
Using AV COMPU LINK Control System .............. 48
Appendix A—Maintenance...................................... 49
Appendix B—Troubleshooting ................................ 50
Appendix C—Output Signals Through the
OPTICAL DIGITAL OUTPUT Terminal ......... 51
Appendix D—Channel Display ............................... 51
Appendix E—Language Code
for On-Screen Menu ............................................ 52
Appendix F—Country Code for Parental Lock..... 53
Appendix G—Glossary ............................................ 55
Specifications............................................................. 56
– 2 –
Page 6
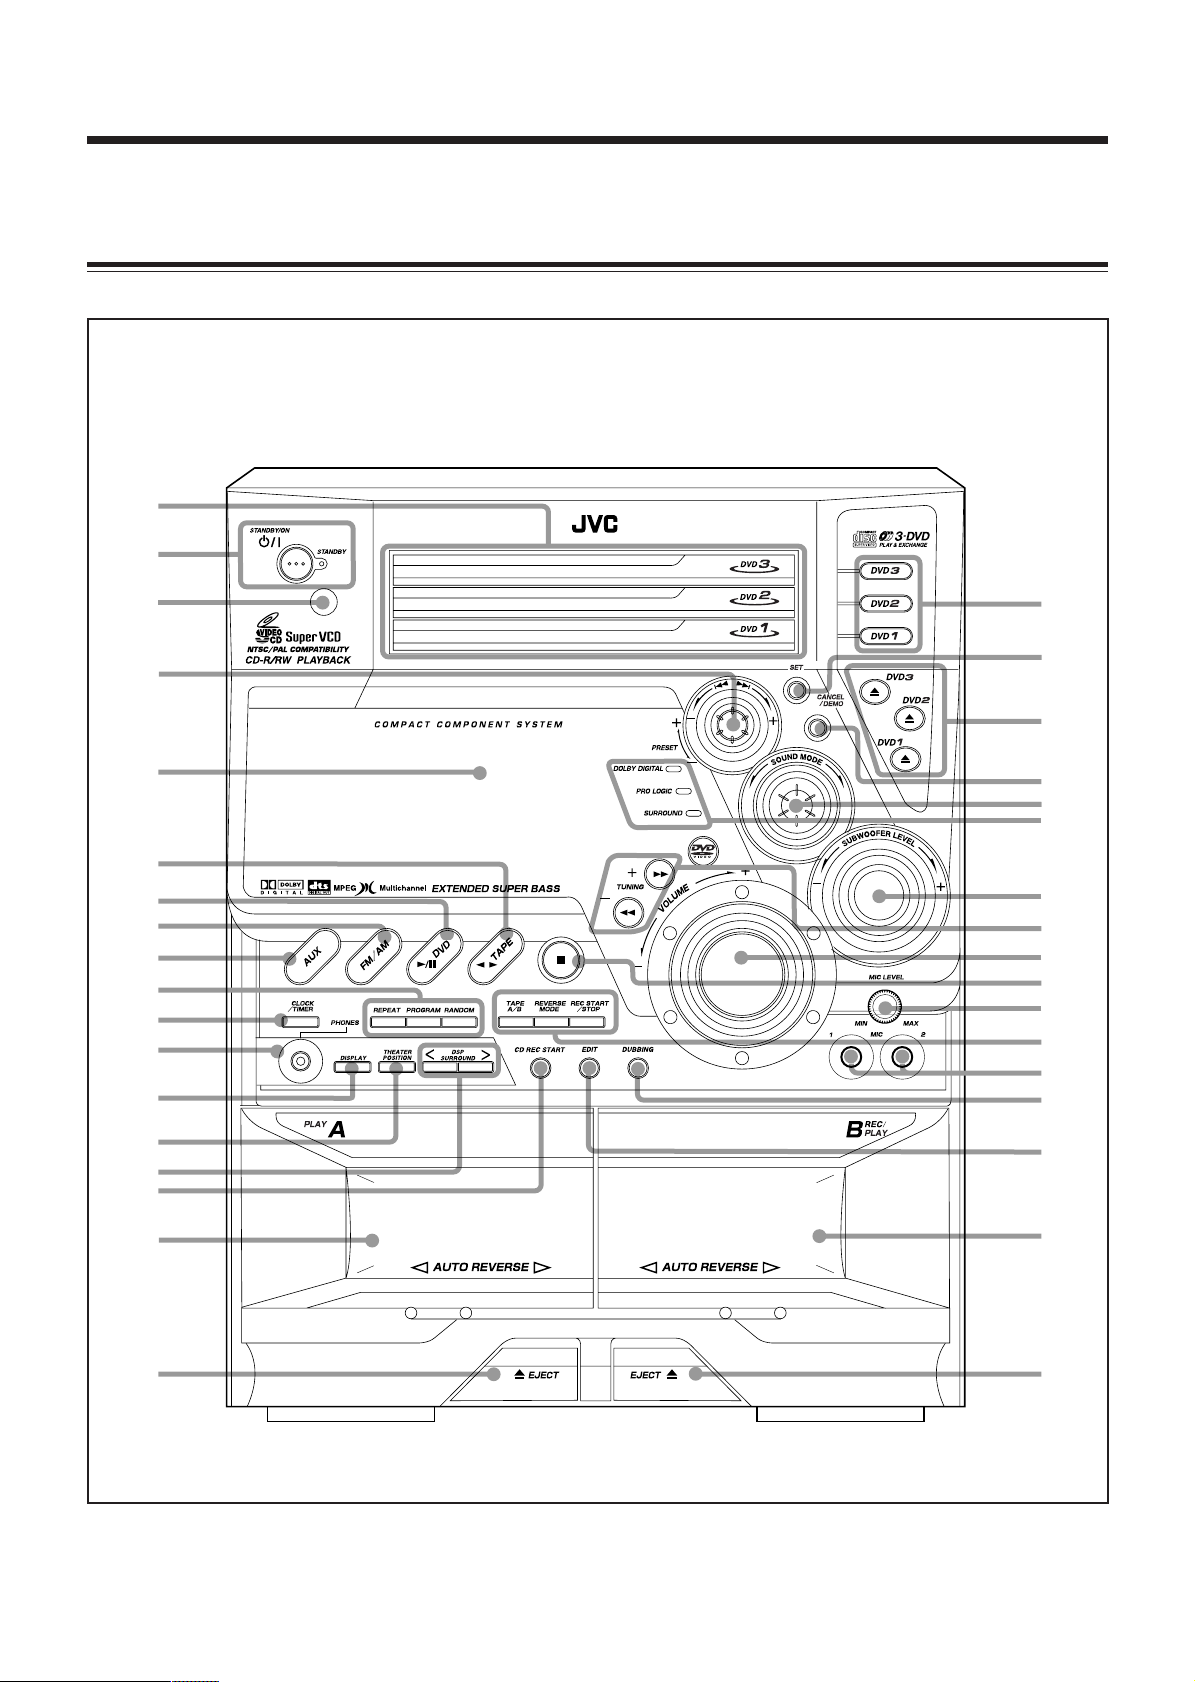
Location of the Buttons and Controls
Become familiar with the buttons and controls on your unit.
Front Panel
Front Panel
1
2
3
4
5
6
7
8
9
p
q
w
e
r
t
y
o
;
a
s
d
f
g
h
j
k
l
/
z
x
c
u
i
v
b
– 3 –
Page 7
Continued
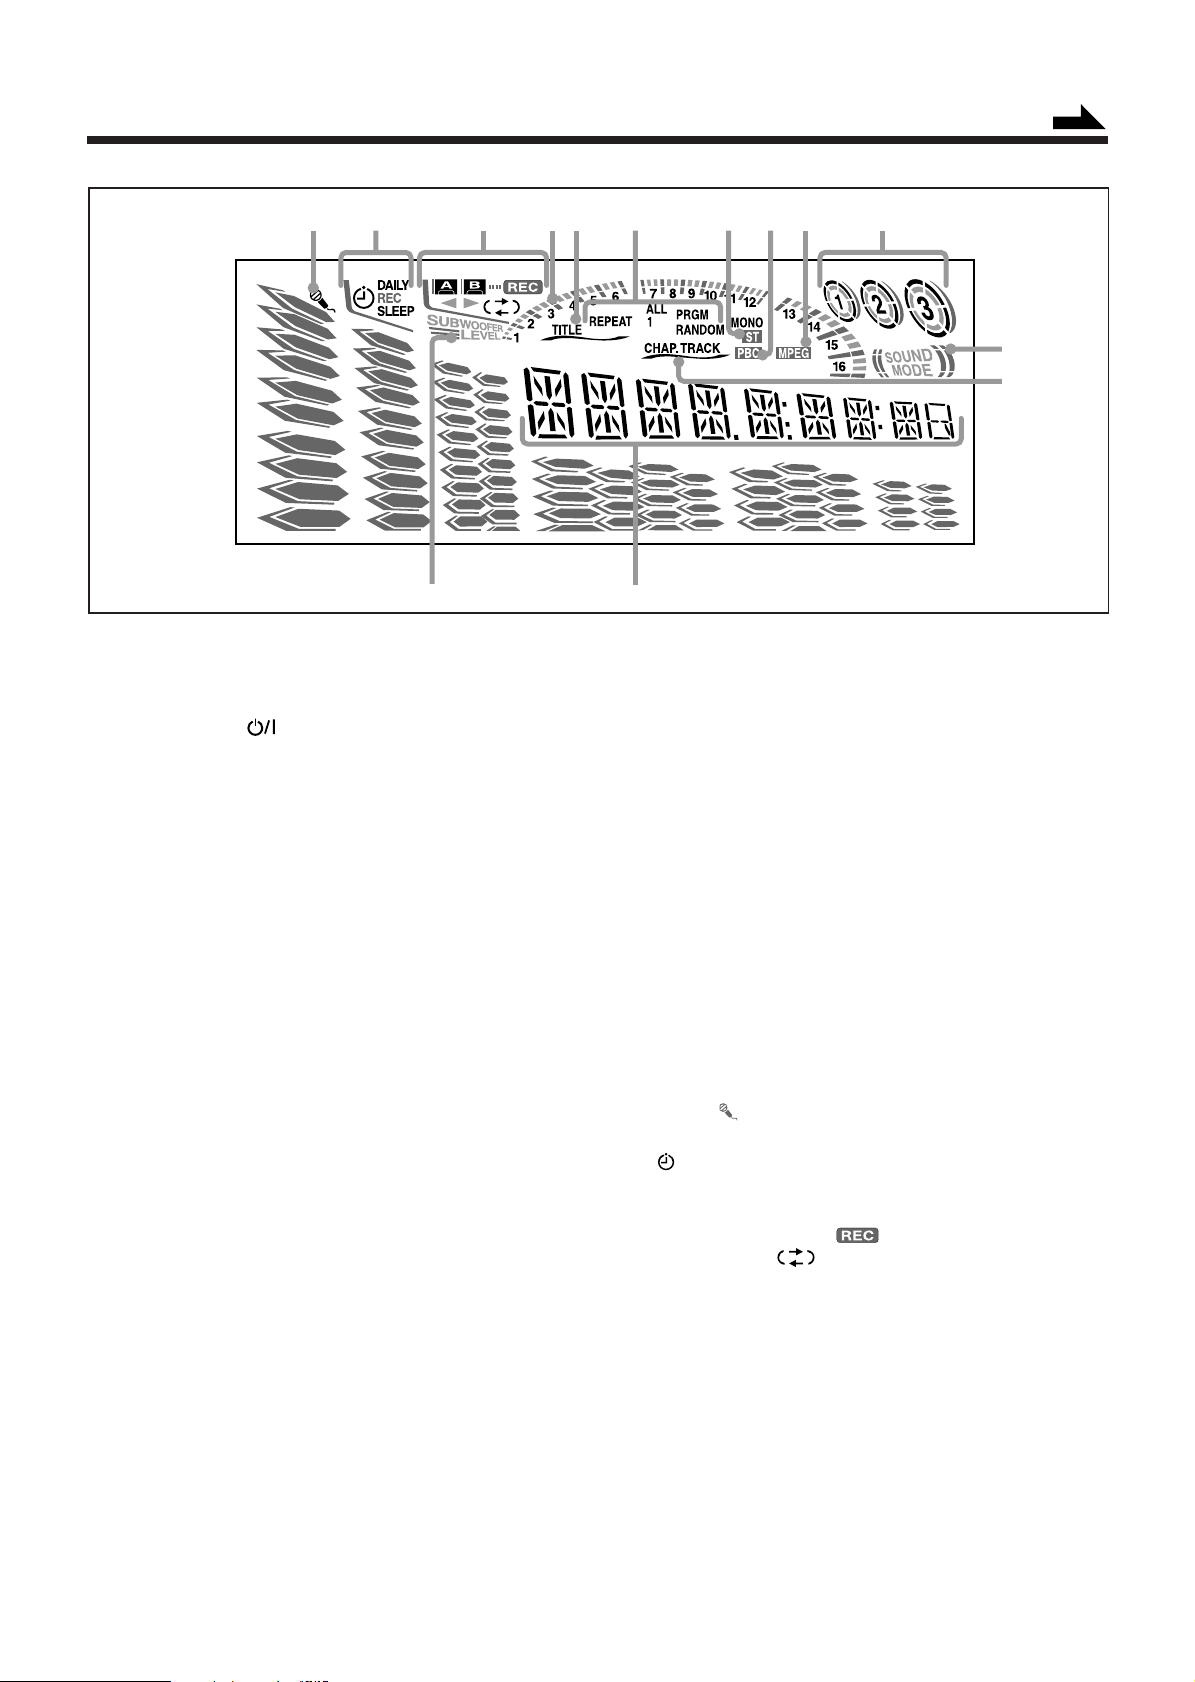
Display Window
1
2
3
e r
See pages in the parentheses for details.
Front Panel
1 Disc trays
2 STANDBY/ON button and STANDBY lamp
(11, 45, 46)
3 Remote sensor
4 PRESET + / – control (15)
4 / ¢ (reverse search/forward search) control
(11, 14, 20, 21, 24, 26, 34, 44 – 46)
5 Display window
6 TAPE 2 3 button and lamp (12, 30, 32, 33)
Pressing this button also turns on the unit.
7 DVD 3¥8 (play/pause) button and lamp
(12, 19 – 24, 26, 36)
Pressing this button also turns on the unit.
8 FM/AM button and lamp (12, 15)
Pressing this button also turns on the unit.
9 AUX button and lamp (12)
Pressing this button also turns on the unit.
p Disc play mode buttons
• REPEAT button (23, 27)
• PROGRAM button (24, 25, 37)
• RANDOM button (26)
q CLOCK/TIMER button (11, 44 – 47)
w PHONES jack (12, 20, 39)
e DISPLAY button (17, 20, 22, 51)
r THEATER POSITION button (29)
t DSP SURROUND < / > buttons (31)
y CD REC START button (33, 34)
u Deck A cassette holder (30, 34)
i 0 EJECT button for deck A (30)
o Disc number buttons and lamps (DVD1, DVD2, and
DVD3) (19, 21, 24, 26, 33, 34)
Pressing one of these buttons also turns on the unit.
; SET button (10, 11, 14, 15, 24, 34, 44 – 47)
a 0 (Disc tray open/close) buttons (DVD1, DVD2, and
DVD3) (19, 20 – 22)
Pressing one of these buttons also turns on the unit.
s CANCEL/DEMO button (10, 11, 24, 34, 44 – 47)
d SOUND MODE control (13)
4
8
6
5
f DOLBY DIGITAL lamp (17, 20)
PRO LOGIC lamp (39)
SURROUND lamp (31)
g SUBWOOFER LEVEL + / – control (13)
h TUNING + / – buttons (15)
1 / ¡ (fast reverse/fast forward) buttons (14, 22, 30)
j VOLUME + / – control (12, 35, 36)
k 7 (stop) button (11, 20 – 26, 30, 32 – 34, 36, 46)
l MIC LEVEL control (35, 36)
/ Tape operation buttons
• TAPE A/B button (30)
• REVERSE MODE button (30, 32 – 34)
• REC START/STOP button (32 – 36, 46)
z MIC 1 and MIC 2 jacks (35, 36)
x DUBBING button (33)
c EDIT button (34)
v Deck B cassette holder (30, 32 – 34)
b EJECT 0 button for deck B (30, 32)
7
9
p
Display Window
1 Karaoke ( ) indicator
2 Timer indicators
• (Timer), DAILY (Daily Timer), REC (Recording
Timer), and SLEEP (Sleep Timer) indicators
3 Tape operation indicators
• A/B (operating deck), (recording), 2 3 (tape
direction), and (reverse mode) indicators
4 Title and track number (1 – 16) indicators
5 TITLE indicator
6 Disc play mode indicators
• REPEAT (ALL/1), PRGM (program), and RANDOM
indicators
7 Tuner operation indicators
• MONO and ST (stereo) indicators
8 PBC indicator
9 MPEG indicator
p Disc indicators
q SOUND MODE indicator
w CHAP. (chapter) and TRACK indicators
e SUBWOOFER LEVEL indicator
r Main display
• Shows the source name, frequency, etc.
– 4 –
q
w
Page 8
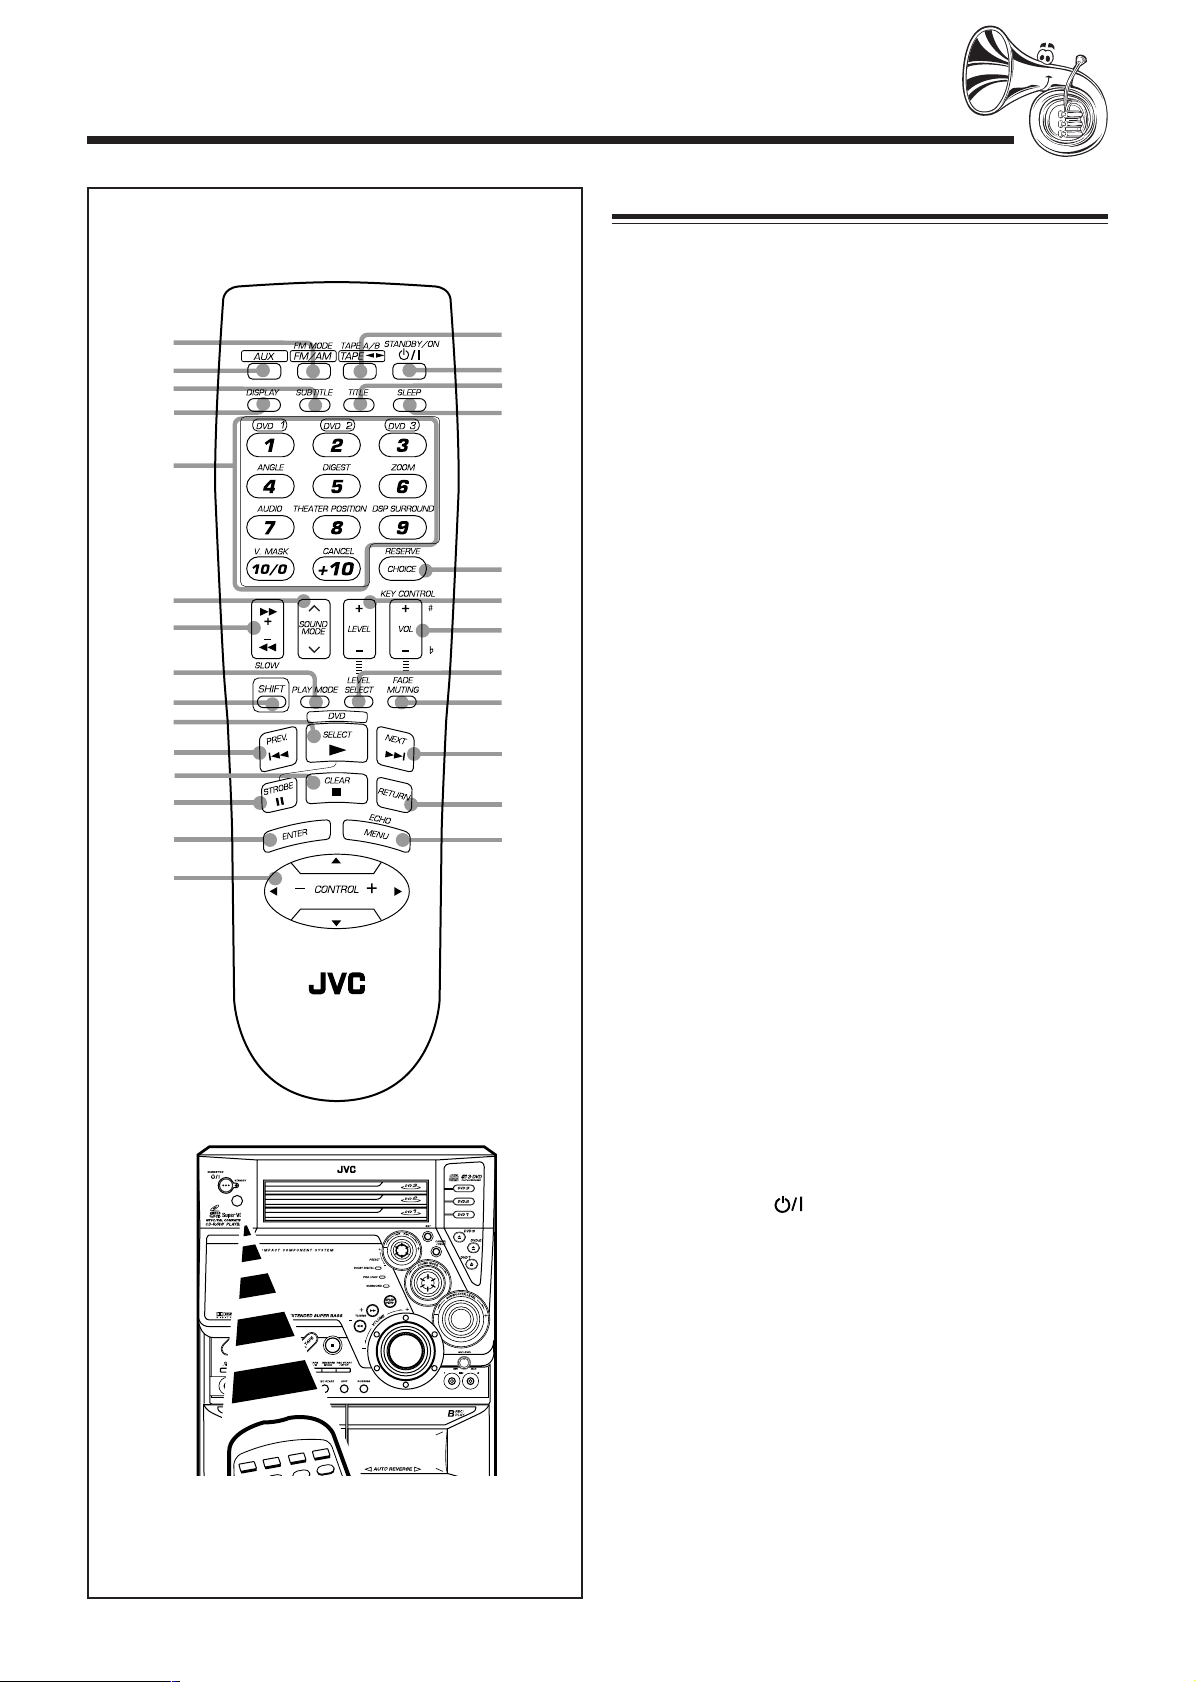
Remote Control
Remote Control
1
2
3
4
5
6
7
8
9
p
q
w
e
r
t
When using the remote control, point it at
the remote sensor on the front panel.
y
u
i
o
;
a
s
d
f
g
h
j
1 FM/AM button (12, 15)
Pressing this button also turns on the unit.
FM MODE button* (15)
2 AUX button (12)
Pressing this button also turns on the unit.
3 SUBTITLE button (18)
4 DISPLAY button (17, 20, 22, 51)
5 Number buttons (15, 20 – 22, 25, 37, 43)
Disc number buttons* (DVD 1, DVD 2, and DVD 3)
(19, 21, 25, 26, 37)
ANGLE button* (17)
DIGEST button* (29)
ZOOM button* (28)
AUDIO button* (18, 36)
THEATER POSITION button* (29)
DSP SURROUND button* (31)
V. MASK button* (35, 37)
CANCEL button* (25, 37)
6 SOUND MODE ∧ / ∨ button (13)
7 1 / ¡ (fast reverse/fast forward) button (22, 30)
+ / − button (15)
SLOW + / − button (28)
8 PLAY MODE button (20 – 22, 24 – 27)
9 SHIFT button
p DVD 3 (play) button (12, 19 – 22, 25, 28, 36, 37)
Pressing this button also turns on the unit.
SELECT button (23, 29)
q 4 (reverse search) button (20, 21)
PREV. (preview) button (29)
w 7 (stop) button (20, 21, 23 – 26, 30, 36, 37, 43)
CLEAR button (25, 37)
e 8 (pause) button (19, 28)
STROBE button (28)
r ENTER button (20 – 22, 25 – 27, 29, 38 – 41, 43)
t Cursor (5 / ∞ / 3 / 2) button
(23, 28, 29, 37, 38, 40, 41, 43)
CONTROL + / – button (18, 20 – 22, 25 – 27)
y TAPE 2 3 button (12, 30)
Pressing this button also turns on the unit.
TAPE A/B button* (30)
u STANDBY/ON
i TITLE button (23)
o SLEEP button (47)
; CHOICE button (38)
RESERVE button* (37)
a LEVEL + / – button (12, 13, 31)
s VOL (volume) + / – button (12, 35, 36)
KEY CONTROL # / I button* (35)
d LEVEL SELECT button (12, 13, 31)
f FADE MUTING button (12)
g ¢ (forward search) button (20, 21, 25, 26)
NEXT button (29)
h RETURN button (23)
j MENU button (23)
ECHO button* (35)
button (11)
* These buttons function while pressing with SHIFT.
– 5 –
Page 9
Getting Started
Continued
Supplied Accessories
Make sure that you have all the following items.
The number in the parentheses indicates the quantity of the
pieces supplied.
• AM loop antenna (1)
• FM antenna (1)
• Remote control (1)
• Batteries (2)
• AC plug adaptor (1)
• Composite video cord (1)
If anything is missing, consult your dealer immediately.
Putting the Batteries into the Remote Control
Insert the batteries—R6(SUM-3)/AA(15F)—into the
remote control, by matching the polarity (+ and –) on the
batteries with the + and – markings on the battery
compartment.
When the remote control can no longer operate the unit,
replace both batteries at the same time.
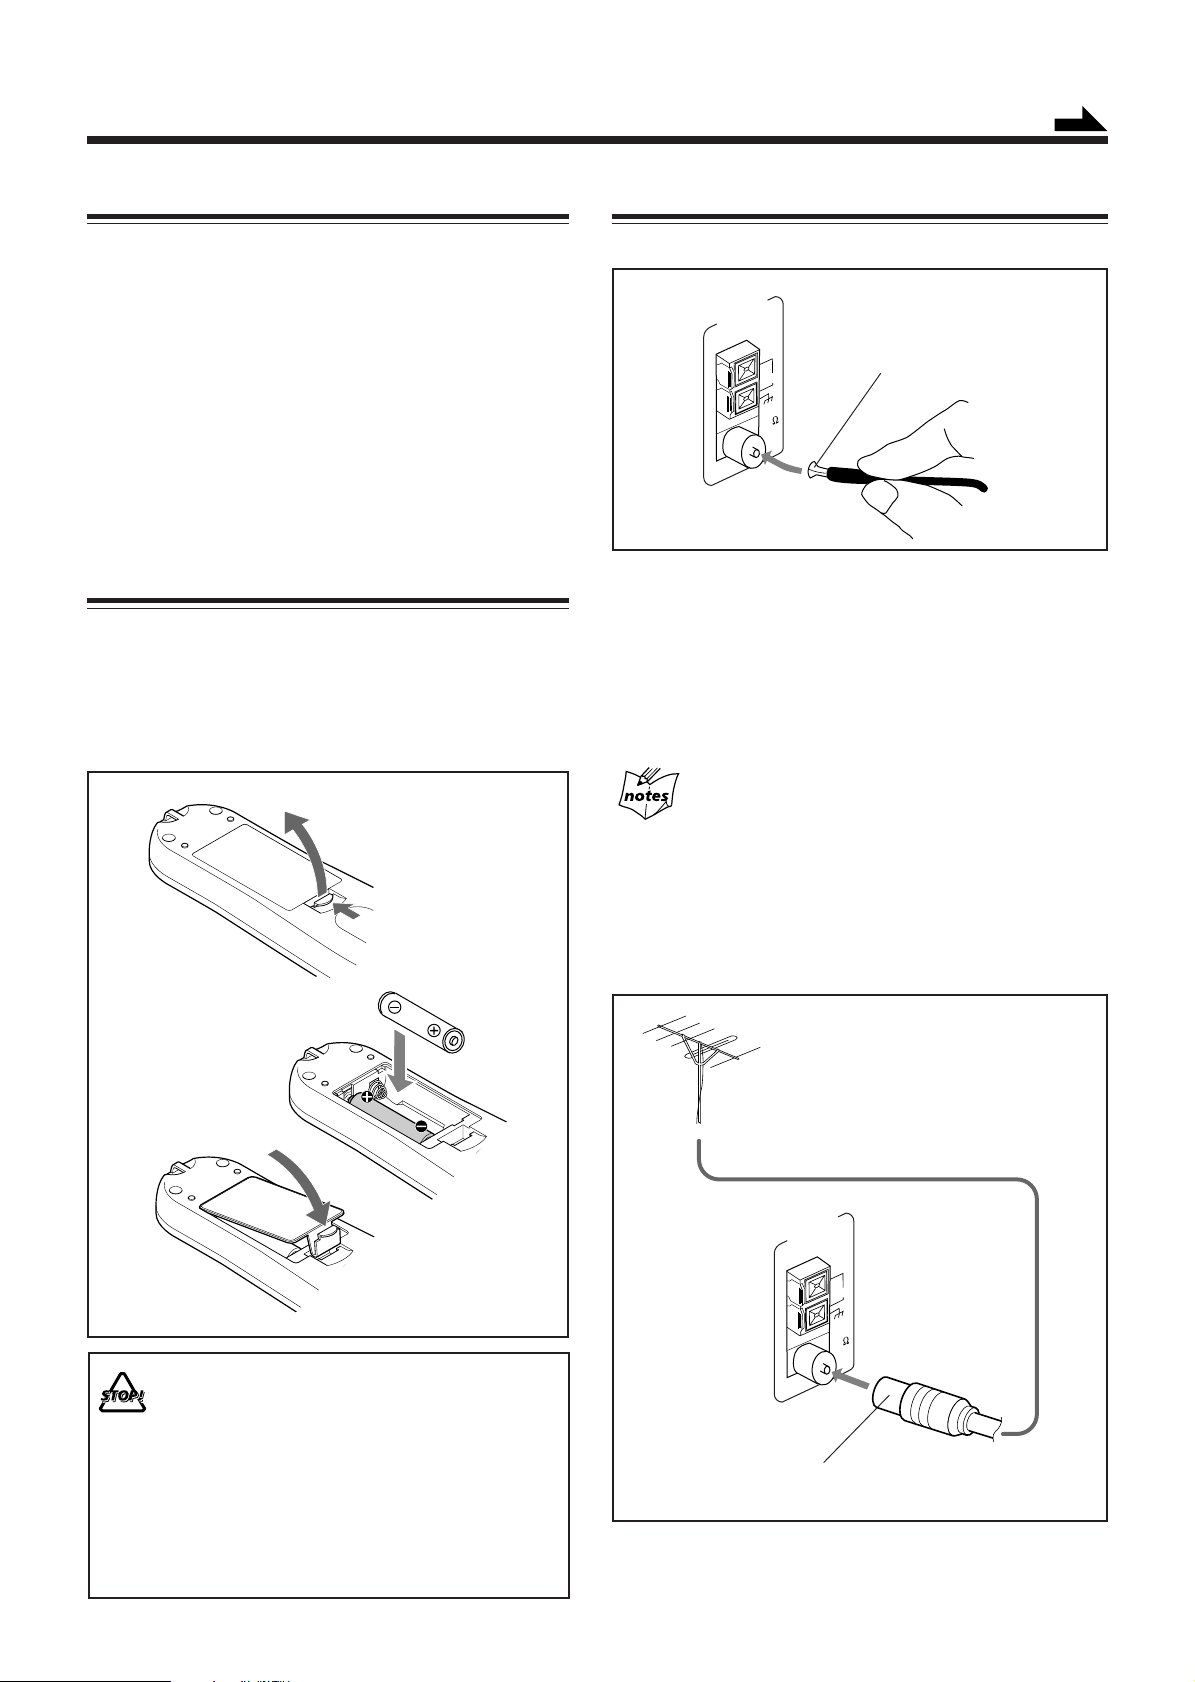
Connecting Antennas
FM antenna
ANTENNA
AM EXT
LOOP
FM 75
COAXIAL
FM antenna (supplied)
1 Attach the FM antenna to the FM 75 Ω
COAXIAL terminal.
2 Extend the FM antenna.
3 Fasten it up in the position which gives you
the best reception, then fix it on the wall, etc.
1
R6(SUM-3)/AA(15F)
2
3
• DO NOT use an old battery together with a
new one.
• DO NOT use different types of batteries
together.
• DO NOT expose batteries to heat or flame.
• DO NOT leave the batteries in the battery
compartment when you are not going to use
the remote control for an extended period of
time. Otherwise, it will be damaged from
battery leakage.
About the supplied FM antenna
The FM antenna supplied with this unit can be used as temporary
measure. If reception is poor, you can connect an outdoor FM
antenna.
To connect an outdoor FM antenna
Before connecting it, disconnect the supplied FM antenna.
Outdoor FM antenna
(not supplied)
ANTENNA
AM EXT
LOOP
FM 75
COAXIAL
A 75 Ω antenna with coaxial type connector should be
used.
– 6 –
Page 10
AM antenna
Connecting Speakers
IMPORTANT: Use only speakers with the same speaker
impedance as indicated by the speaker terminals on the
rear of the unit.
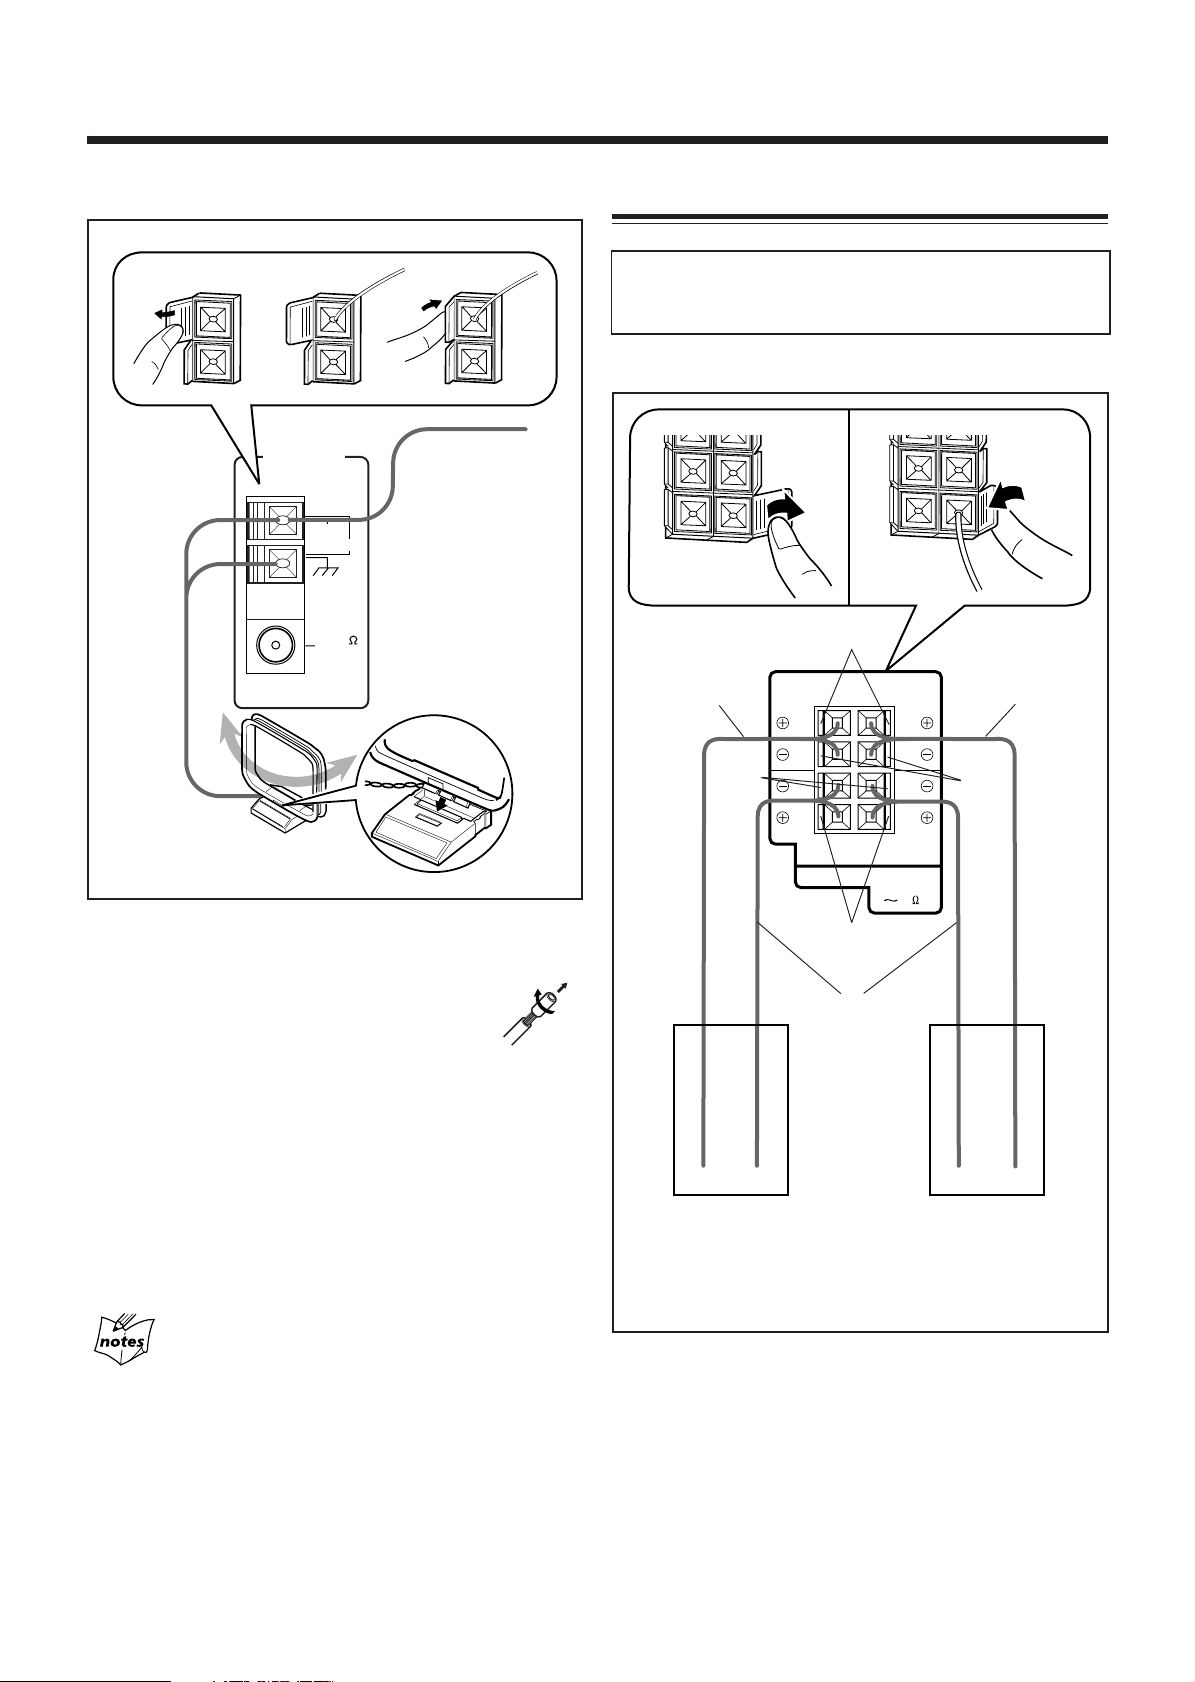
To connect main speakers and front subwoofers
ANTENNA
1
AM EXT
AM LOOP
FM 75
COAXIAL
Vinyl-covered wire
(not supplied)
2
AM loop antenna
(supplied)
1
Connect the AM loop antenna to the AM
LOOP terminals as illustrated.
• If the AM loop antenna wire is covered with
vinyl, remove the vinyl by twisting it as
shown in the diagram.
Speaker cords
(red/black)
Black
1
Red
RIGHT
RIGHT
CAUTION: SPEAKER
Blue
Speaker cords
(blue/black)
FRONT
SUBWOOFERS
LEFT
LEFT
MAIN
SPEAKERS
IMPEDANCE
616
3
2
Speaker cords
(red/black)
Black
2 Turn the AM loop antenna until you have the
best reception.
To connect an outdoor AM antenna
When reception is poor, connect a single vinyl-covered wire
to the AM EXT terminal and extend it horizontally. The AM
loop antenna must remain connected.
For better reception of both FM and AM
• Make sure the antenna conductors do not touch any other
terminals and connecting cords.
• Keep the antennas away from metallic parts of the unit,
connecting cords, and the AC power cord.
Right front speaker
• When using front multi speaker system, refer to
“Recommended Main Speakers and Subwoofers Layout”
separately attached.
Open the speaker terminal.
1
Left front speaker
2 Insert the end of the speaker cord into the
terminal.
Match the polarity (colors) of the speaker terminals: Red
(+) to red (+) and black (–) to black (–); Blue (+) to blue
(+) and black (–) to black (–).
3 Close the speaker terminal.
– 7 –
Page 11
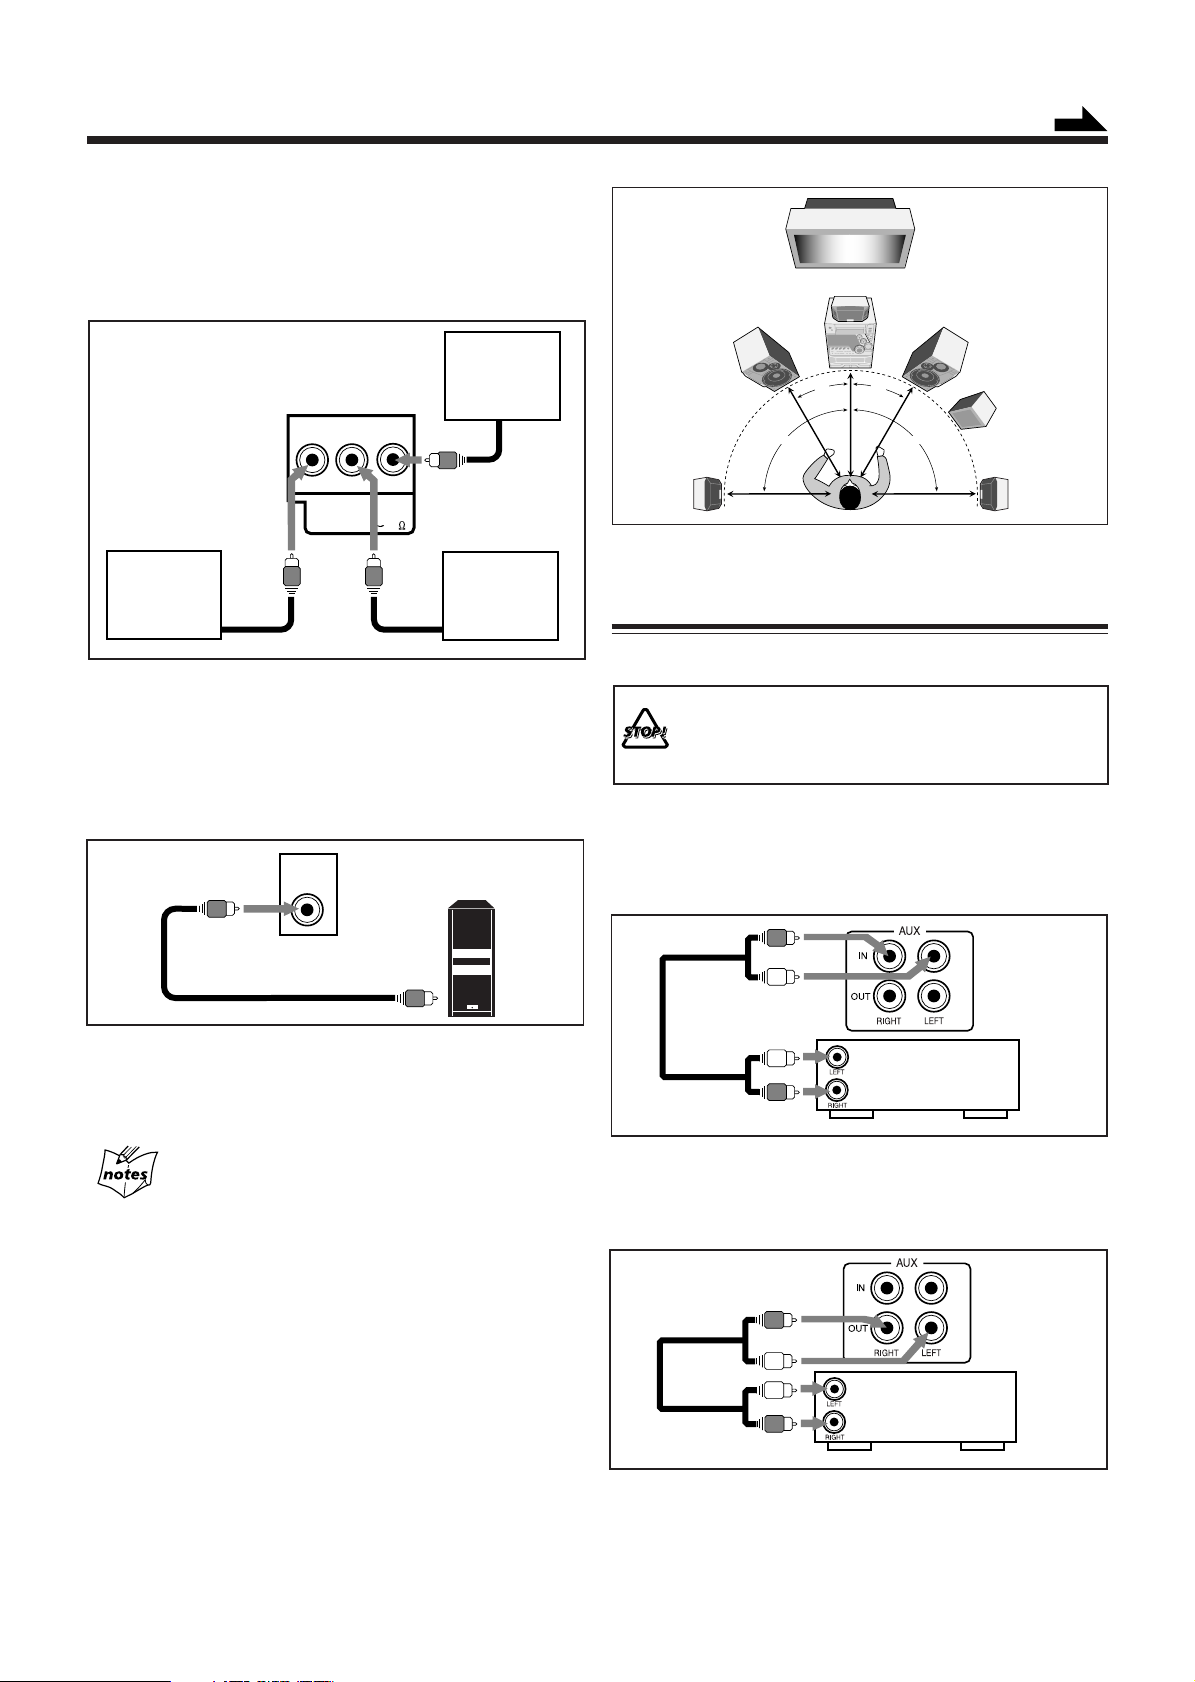
To connect a center speaker and rear speakers
Left
front speaker
Right
front speaker
Center speaker
Right rear
speaker
Left rear
speaker
30˚
90˚ 90˚
30˚
Subwoofer
(5.1ch OUT)
By connecting a center speaker and rear speakers to the
SURROUND SPEAKERS jacks, you can enjoy Dolby
Digital and MPEG Multichannel sound, and the DSP
Surround modes. (See page 31.)
Center
speaker
Continued
SURROUND SPEAKERS
RIGHT LEFT
CAUTION: SPEAKER
Right rear
speaker
REAR
CENTER
IMPEDANCE
16 32
Left rear
speaker
• Connect the right rear speaker to the REAR RIGHT jack.
• Connect the left rear speaker to the REAR LEFT jack.
• Connect the center speaker to the CENTER jack.
To connect a subwoofer
By connecting a subwoofer, you can reproduce the LFE signals
recorded in multichannel software.
SUBWOOFER
5.1ch OUT
Powered
subwoofer
(not supplied)
To input
When using front multi speaker system, refer to “Recommended
Main Speakers and Subwoofers Layout” separately attached.
Connecting Other Equipment
You can connect both analog and digital equipment.
• DO NOT connect any equipment while the unit is
on.
• DO NOT plug in any equipment until all
connections are complete.
To connect an analog component
Be sure that the plugs of the audio cords are colored: White
plugs and jacks are for left audio signals, and red ones for
right audio signals.
Connect the input jack of a powered subwoofer to the SUBWOOFER 5.1ch OUT jack, using a monaural audio cord (not
supplied).
To prevent powered subwoofer from damaging
Set the powered subwoofer (not supplied) volume level to the
minimum before selecting disc as a playing source. When playing a
disc that has software with the LFE signals, then adjust the powered
subwoofer volume to the desired level.
Ideal speaker layout
To enjoy multichannel sound, locate speakers as follows. If you
cannot locate them like this, adjust the speaker setting by using
the on-screen menu. (See page 40.)
• Do not place a speaker on another speaker, which may the
piled speaker to fall down.
Audio
equipment
To audio output
For playing the other equipment through this unit,
connect between the audio output jacks on the other
equipment and the AUX IN jacks by using audio cords (not
supplied).
Audio
equipment
To audio input
For recording sounds through this unit on the other
equipment, connect between the audio input jacks on the
other equipment and the AUX OUT jacks by using an audio
cord (not supplied).
• See “About sounds output through the rear terminals” on
the next page.
– 8 –
Page 12
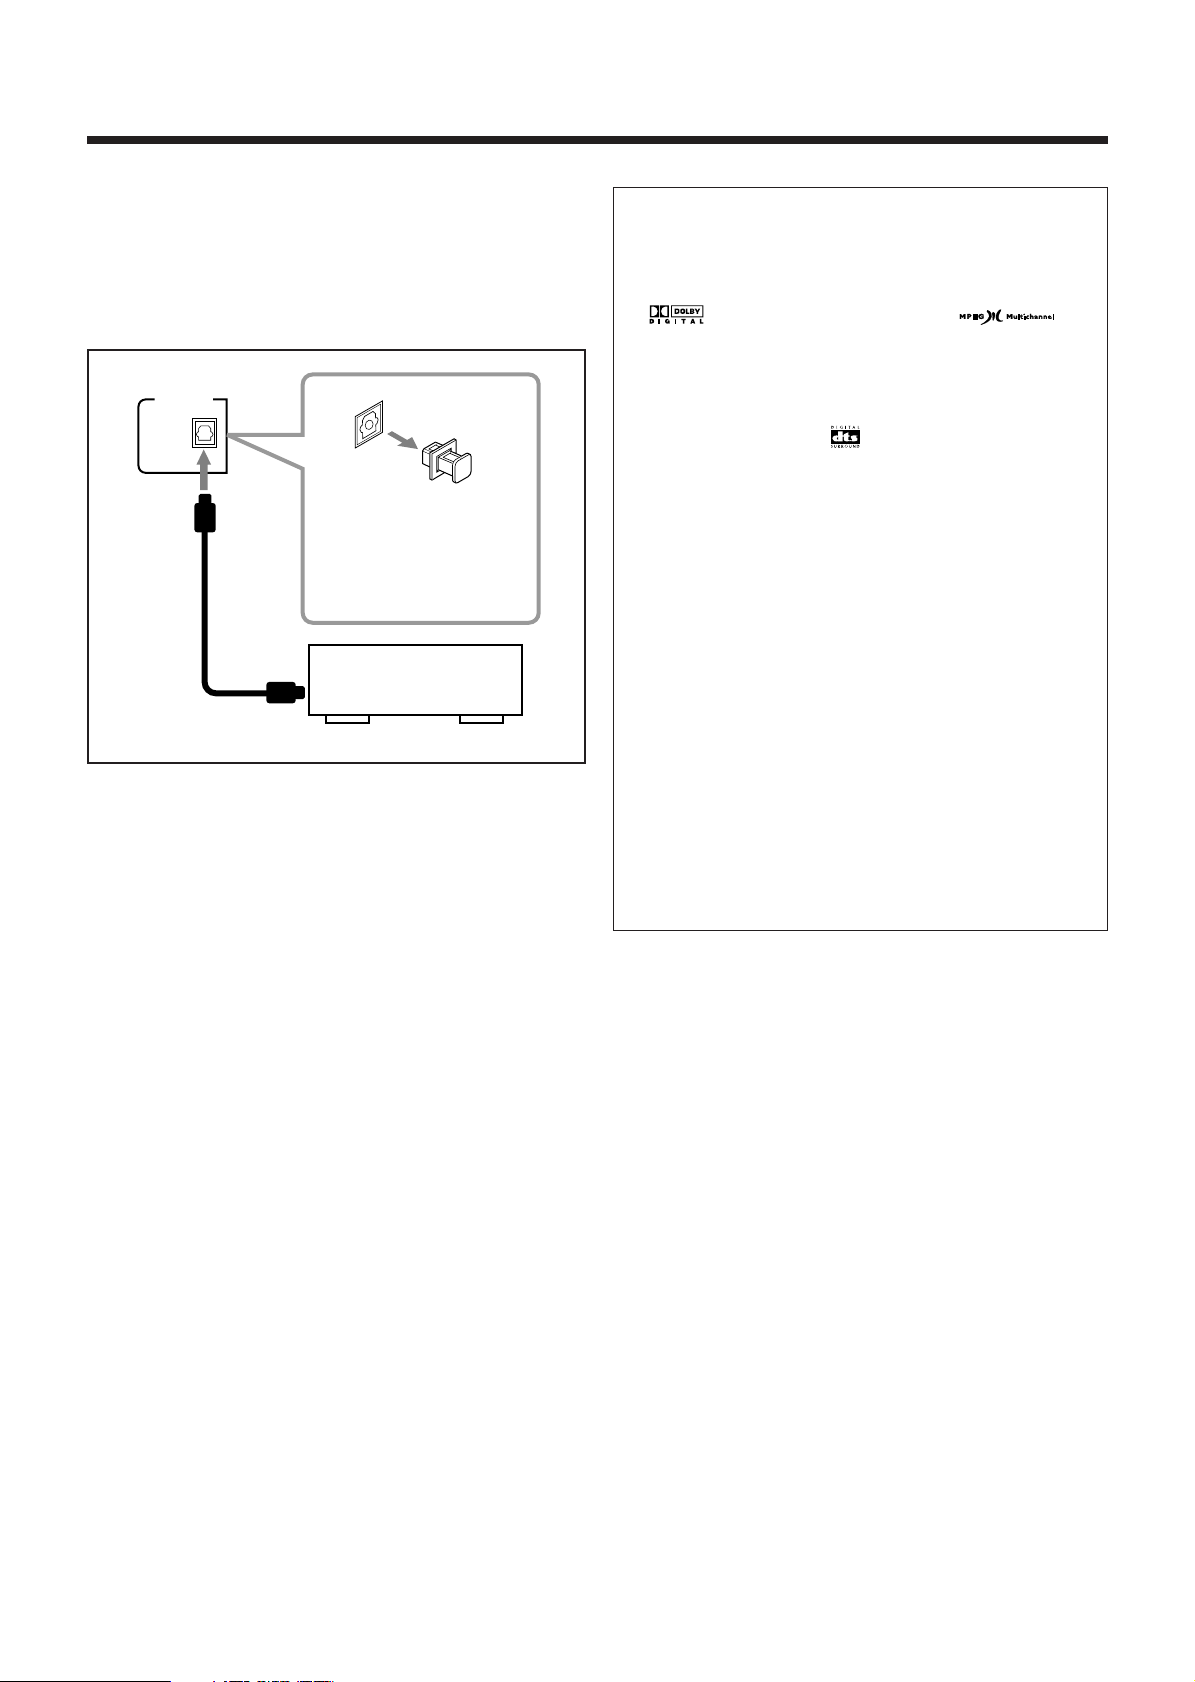
To connect audio equipment with an optical digital
input terminal—such as digital decoder
You can connect a digital decoder such as an MD recorder or
a CD recorder by using an optical digital cord (not supplied).
• See “About sounds output through the rear terminals” on
the right.
OPTICAL
DIGITAL OUTPUT
PCM /
STREAM
Before connecting the
other equipment, remove
the protective plug from
the terminal.
Audio equipment with an
optical digital input
To optical digital input
Connect an optical digital cord (not supplied) between the
optical digital input terminal on the other equipment and the
OPTICAL DIGITAL OUTPUT terminal.
Protective
plug
About sounds output through the rear terminals
• Through the AUX OUT (RIGHT/LEFT) jacks:
Analog stereo signals are output.
When playing a source encoded with Dolby Digital*
( ) or with MPEG Multichannel ( ),
multichannel signals are mixed to the right front and left
front channels, then output. You also need to set “PRO
LOGIC” setting correctly. (See page 39.)
– You cannot reproduce the sound encoded with DTS
Digital Surround** ( ).
• Through the OPTICAL DIGITAL OUTPUT
terminal:
Digital signals (Linear PCM, Dolby Digital*, DTS
Digital Surround**, MPEG Multichannel) are output.
To reproduce the multichannel sounds such as Dolby
Digital, DTS Digital Surround and MPEG
Multichannel, connect an amplifier or a decoder
compatible with these multichannel sources to this
terminal, and set “DIGITAL AUDIO OUTPUT” setting
correctly. (See page 39.)
* Manufactured under license from Dolby Laboratories.
“Dolby,” “Pro Logic,” and the double-D symbol are
trademarks of Dolby Laboratories. Confidential unpublished
works. Copyright 1992–1997 Dolby Laboratories. All rights
reserved.
** Manufactured under license from Digital Theater Systems,
Inc. US Pat. No. 5,451,942 and other world-wide patents
issued and pending. “DTS,” and “DTS Digital Surround” are
trademarks of Digital Theater Systems, Inc. Copyright 1996,
2000 Digital Theater Systems, Inc. All Rights Reserved.
– 9 –
Page 13
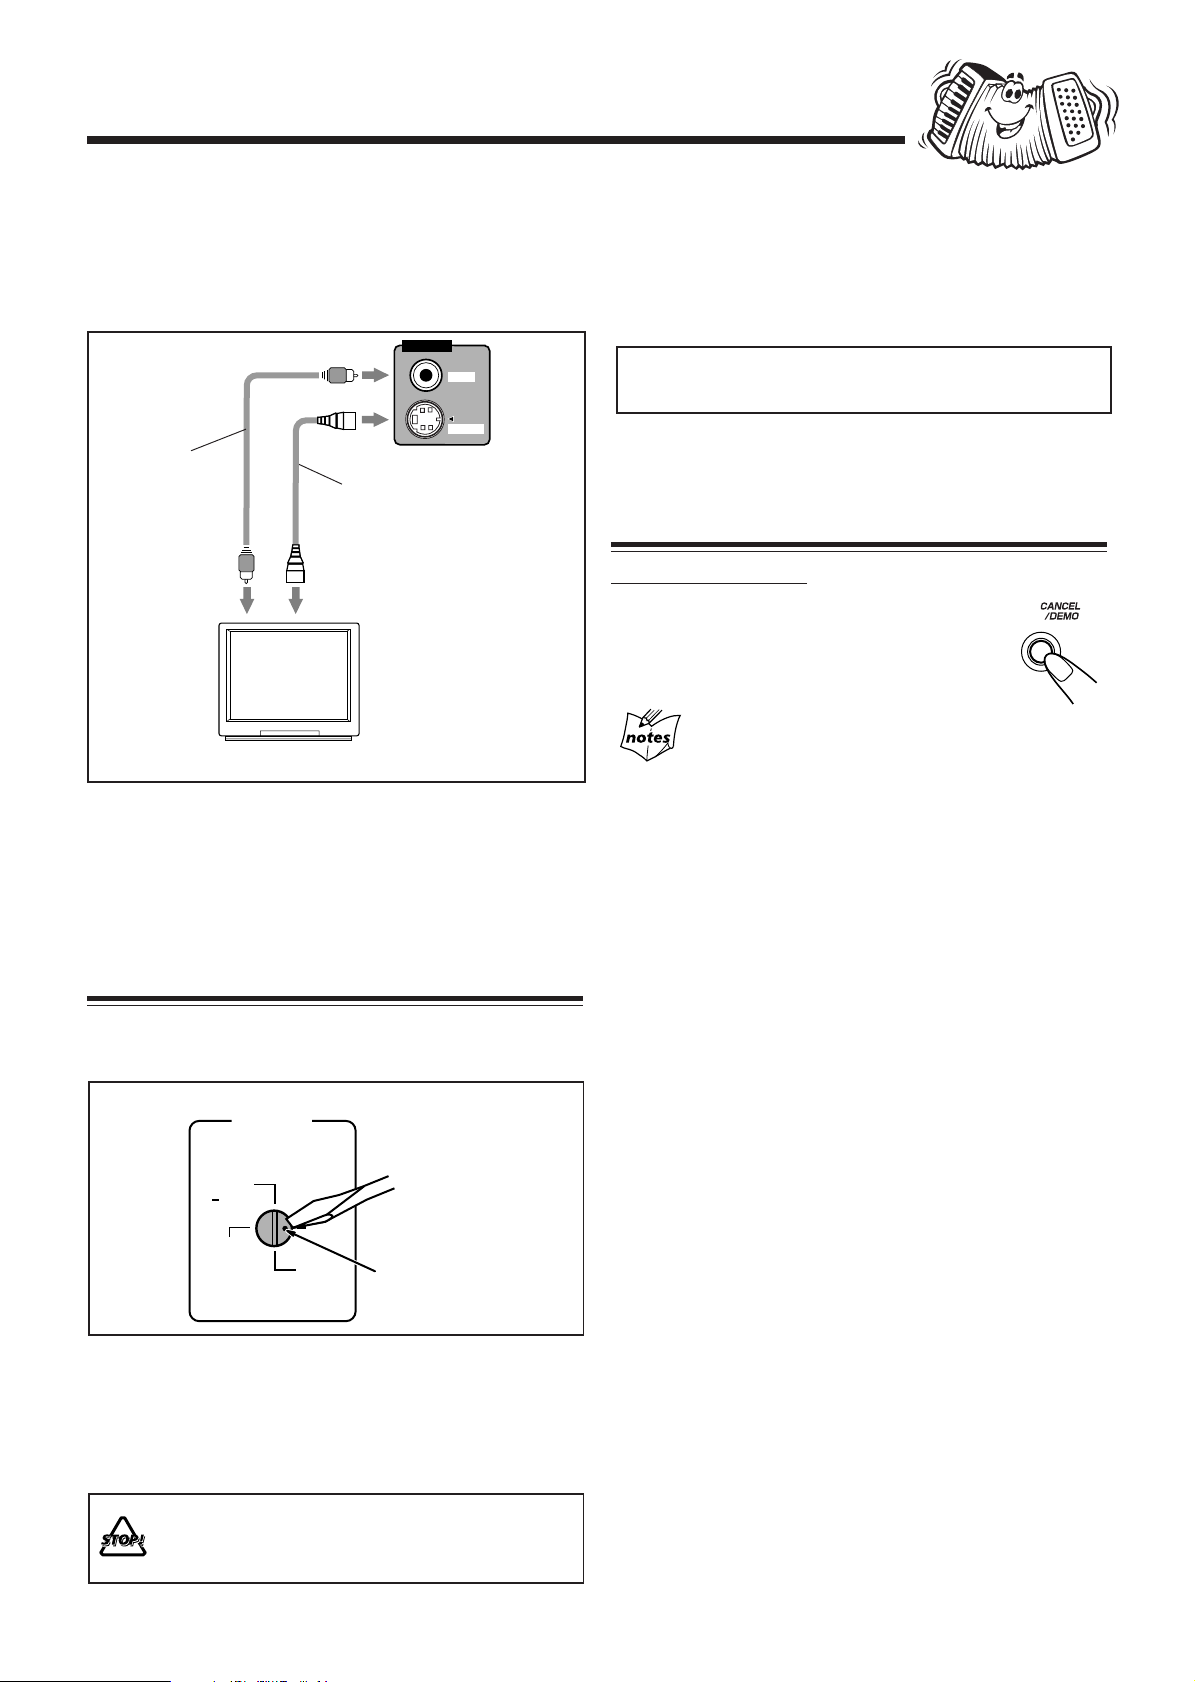
To connect a TV
Connect your TV and this unit using the composite video
cord (supplied) or an S-video cord (not supplied).
• You can also use JVC’s AV COMPU LINK control system.
(See page 48.)
VIDEO OUT
VIDEO
S-VIDEO
Composite
video cord
(supplied)
To composite
video input
TV
This unit is compatible with the color systems of PAL and
NTSC. Check your TV’s color system and select the correct
one by pressing and holding SET while the unit is turned off
(on standby). Each time you press and hold the button, “PAL”
and “NTSC” appears alternately.
S-video cord*
(not supplied)
To S-video
input
* Using an S-video cord
gives you a better
quality pictures.
Now, you can plug the AC power cord.
When connecting the AC power cord into a wall outlet, the
unit automatically starts display demonstration.
• If the wall outlet does not match the AC plug, use the
supplied AC plug adaptor.
IMPORTANT: Be sure to check all connections to be done
before plugging the AC power cord into a wall outlet.
Canceling the Display Demonstration
On the unit ONLY:
To cancel the display demonstration, press
CANCEL/DEMO until “DEMO OFF” appears
on the display.
When you press other buttons
The display demonstration stops temporarily. It will start
automatically again (if no operation is done for 2 minutes) unless
you cancel it by pressing CANCEL/DEMO.
To start the display demonstration manually
Press and hold CANCEL/DEMO for more than 1 second.
Adjusting the Voltage Selector
Before plugging in the unit, set the correct voltage for your
area with the voltage selector on the rear of the unit.
VOLTAGE
SELECTOR
230V
240V
127V
Use a screwdriver to rotate the voltage selector so the voltage
number the voltage mark is pointing at is the same as the
voltage where you are plugging in the unit. (See the back
cover page.)
DO NOT plug in before setting the voltage selector
on the rear of the unit and all connection
procedures are complete.
220V
110V
Voltage mark
– 10 –
Page 14
Common Operations
DAILY
Canceled
ON TIME
(Daily timer setting)
ON TIME
(Recording
timer setting)
Clock
setting
(The hour digits
start flashing.)
REC
Y
Y
Y
Turning On or Off the Power
To turn on the unit, press
STANDBY/ON so that the
STANDBY lamp goes off.
To turn off the unit (on standby), press
STANDBY/ON again so that the
STANDBY lamp lights up.
• A little power is always consumed even while the unit is on
standby.
To switch off the power supply completely, unplug the AC
power cord from the AC outlet.
When you unplug the AC power cord or if a power
failure occurs
The clock is reset to “0:00” right away, while the tuner preset
stations (see page 15) will be erased in a few days.
STANDBY/ON
STANDB
STANDBY/ON
STANDB
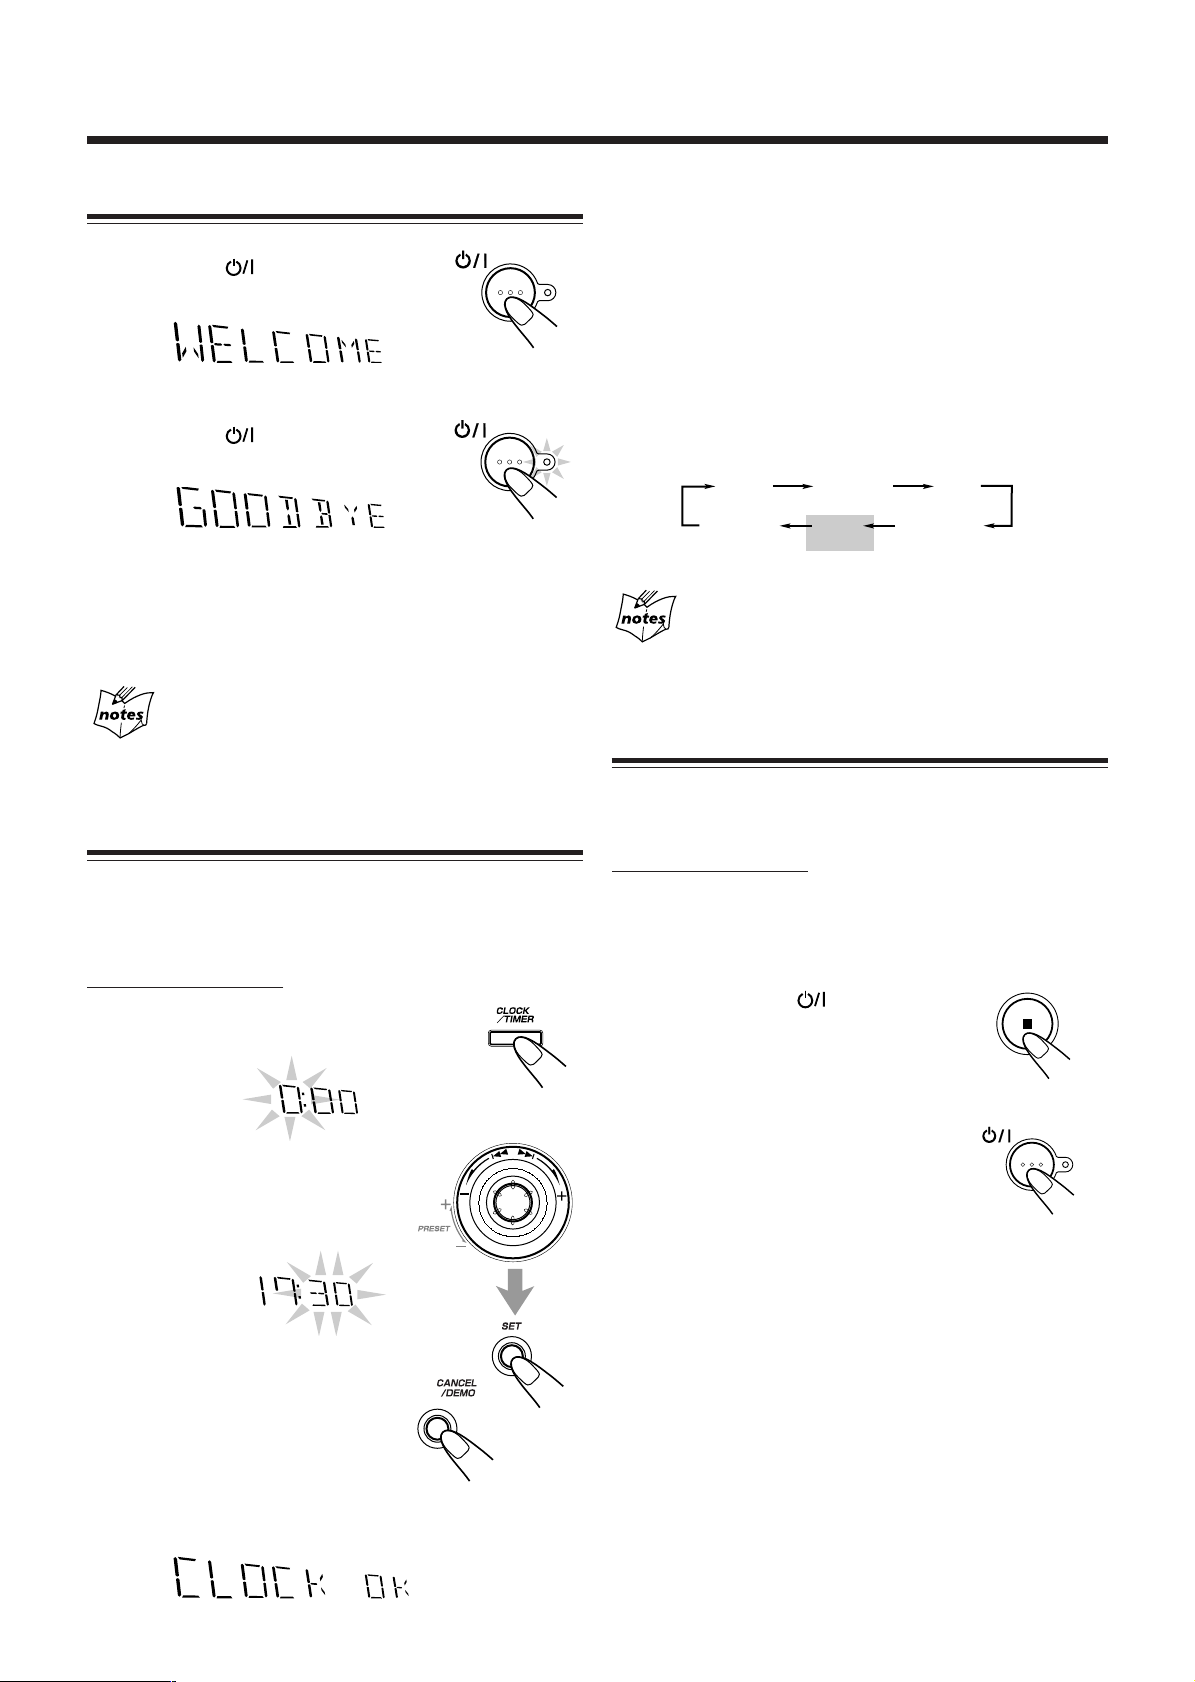
Setting the Clock
Before operating the unit any further, first set the clock built
in this unit. You can set the clock whether the unit is on or
off.
On the unit ONLY:
1
Press CLOCK/TIMER.
The hour digits start flashing on the display.
2
Tur n 4 / ¢ to adjust the
hour, then press SET.
The minute digits start flashing on
the display.
To check the clock time
Press and hold SET while playing any source.
• Pressing SET, the source indication appears again.
To adjust the clock again
If you have adjusted the clock before, you need to press
CLOCK/TIMER repeatedly until the clock setting mode is
selected.
• Each time you press the button, the clock/timer setting
modes change as follows:
When you unplug the AC power cord or if a power
failure occurs
The clock is reset to “0:00” right away. If this happens, set the clock
again.
Setting the AM Tuner Interval Spacing
Some countries space AM stations 9 kHz apart, and some
countries use 10 kHz spacing.
On the unit ONLY:
When shipped, the unit is set to 9 kHz spacing.
You can only change the AM tuner interval spacing while
tuning into an AM station. (See page 15.)
Press STANDBY/ON while holding
down 7.
• Each time you press these buttons, the
AM tuner interval spacing alternates
between 9 kHz and 10 kHz.
+
STANDBY/ON
STANDB
• If you want to correct the hour after
pressing SET, press
CANCEL/DEMO.
The hour digits start flashing again.
3
Tur n 4 / ¢ to adjust the minute, then
press SET.
– 11 –
Page 15
Continued
Selecting the Sources
To listen to the FM/AM broadcasts, press FM/AM.
(See page 15.)
To playback discs, press DVD 3¥8 (or DVD 3 on the
remote control). (See pages 16 – 29.)
To playback tapes, press TAPE 2 3. (See page 30.)
To select the external equipment as the source, press AUX.
When you press the play button for a particular source
(FM/AM, DVD 3/8 (or DVD 3 on the remote control),
TAPE 2 3, and AUX), the unit turns on (and starts playing
the source if it is ready).
Adjusting the Volume
You can adjust the volume level only while the unit is turned
on. The volume level can be adjusted in 32 steps (VOL MIN,
VOL 01—VOL 30, and VOL MAX).
Turn VOLUME + / – clockwise (+) to
increase the volume or
counterclockwise (–) to decrease it.
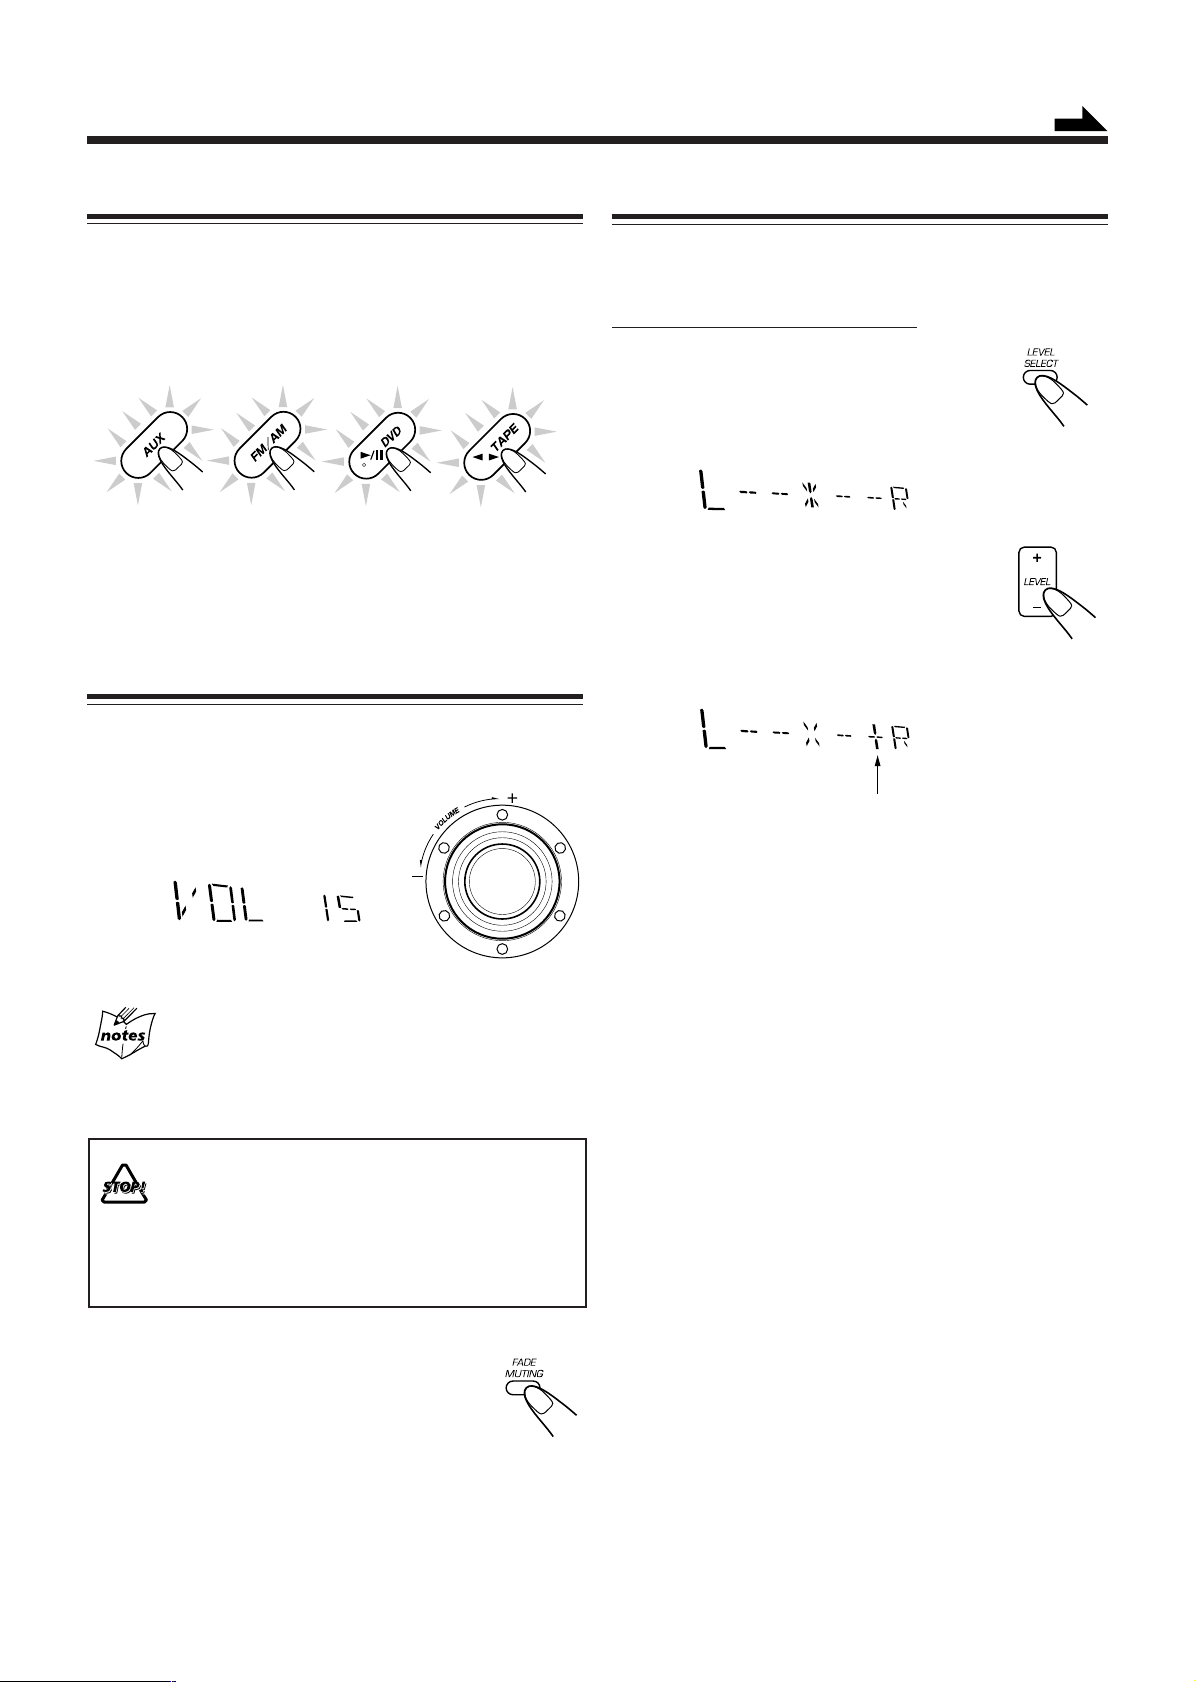
Adjusting the Front Speaker Output Balance
If the sounds you hear from the front right and left speakers
are unequal, you can adjust the speaker output balance.
On the remote control ONLY:
1
Press LEVEL SELECT until “L”
and “R” appear on the display.
Initially the front speakers output balance is set
to the center.
2
Press LEVEL + or – to adjust the
front speaker output balance.
• Press LEVEL + to increase the right channel
output.
• Press LEVEL – to increase the left channel
output.
The line moves as you adjust.
When using the remote control, press
VOL + to increase the volume or press VOL – to decrease it.
For private listening
Connect a pair of headphones to the PHONES jack. No sound
comes out of the speakers. Be sure to turn down the volume before
connecting or putting on headphones.
DO NOT turn off (on standby) the unit with the
volume set to an extremely high level; otherwise, a
sudden blast of sound can damage your hearing,
speakers and/or headphones when you turn on the
unit or start playing any source next time.
REMEMBER you cannot adjust the volume level
while the unit is off (on standby).
To turn down the volume level temporarily
Press FADE MUTING on the remote control.
The volume level gradually decreases to
“VOL MIN.”
To restore the sound, press the button again.
• Turning VOLUME + / – clockwise (to +) on the unit or
pressing VOL + on the remote control also restores the
sound.
– 12 –
Page 16
Reinforcing the Bass Sound
You can select one of the 4 subwoofer levels. This function
only affects the playback sound, but does not affect your
recording. The subwoofer level can be adjusted in 4 steps—
LEVEL 1, LEVEL 2, LEVEL 3, and LEVEL 4 (MAX
LEVEL).
Turn SUBWOOFER LEVEL + / –
clockwise (+) to increase the subwoofer
level or counterclockwise (–) to decrease
it.
When using the remote control, press
LEVEL SELECT until “LEVEL” appears.
• Press LEVEL + to increase the subwoofer level.
• Press LEVEL – to decrease the subwoofer level.
SUBWOOFER indicator flashes
when adjusting subwoofer level.
Selecting the Sound Modes
D.CLUB*: Increases resonance and bass.
HALL*: Adds depth and brilliance to the sound.
STADIUM*: Adds clarity and spreads the sound, like in an
outdoor stadium.
SEA (Sound Effect Amplifier) modes:
ROCK: Boosts low and high frequency. Good for
acoustic music.
POP: Good for vocal music.
CLASSIC: Good for classical music.
Manual modes:
MANUAL 1/2/3:
Your individual mode stored in memory. See
“Creating Your Own Sound Modes—Manual
Mode” on page 14.
OFF: The sound mode is canceled. The SOUND
MODE indicator goes off.
* Surround elements are added to the SEA element to create a
being-there feeling in your room.
When one of these modes is selected, the SOUND MODE
indicator lights up as —
While one of the SEA modes (including manual modes) without
surround elements is selected, the SOUND MODE indicator
lights up as —
You can select one of the 6 preset sound modes. This function
only affects the playback sound, but does not affect your
recording.
To select the sound modes, turn
SOUND MODE until the sound mode
you want appears on the display.
When using the remote control, press
SOUND MODE ∧ or ∨.
The SOUND MODE indicator
also lights up on the display.
• The sound modes change as follows:
D.CLUB
(Dance CLUB)
OFF
(Canceled)
HALL STADIUM ROCK
POP
CLASSIC
MANUAL 1MANUAL 2MANUAL 3
– 13 –
Page 17
Creating Your Own Sound Modes
—Manual Mode
You can create SEA patterns to suit your preference. These
changed settings can be stored in the MANUAL 1,
MANUAL 2, and MANUAL 3 modes.
• There is a time limit in doing the following steps. If the
setting is canceled before you finish, start from step 1
again.
On the unit ONLY:
1
Select one of the preset sound modes.
• If you want to add the surround elements in your
SEA pattern, select one of the sound modes (D.CLUB,
HALL, or STADIUM) before starting the procedure
below. (See “Selecting the Sound Modes” on page 13.)
2
Press and hold SET until “SEA
CONT” appears on the display.
4
Press SET again.
5
Turn 4 / ¢ to select one of
the MANUAL 1, MANUAL 2,
and MANUAL 3 modes into
which you want to store the
SEA pattern.
6
Press SET.
Ex.: When “D.CLUB” is selected as the sound mode.
Current level appears.
3
Adjust the SEA pattern.
1) Turn 4 / ¢ to select
the frequency range to
adjust (LOW, MID or
HIGH).
2) Press ¡ or 1 to
adjust the level (–3 to +3) of
the selected frequency range.
The SEA pattern you have created is stored into the
MANUAL mode selected in step 5.
To use your own sound mode
Select MANUAL 1, MANUAL 2, or MANUAL 3 mode. See
“Selecting the Sound Modes” on page 13.
When you unplug the AC power cord or if a power
failure occurs
The setting will be erased in a few days. If this happens, set the
manual sound modes again.
3) Repeat steps 1) and 2) to
adjust the level of the other
frequency ranges.
– 14 –
Page 18
Listening to FM and AM Broadcasts
Tuning into a Station
1
Press FM/AM.
The unit automatically turns on and
tunes into the previously received
station (either FM or AM).
• Each time you press the button, the
band alternates between FM and AM.
2
Start searching for stations.
On the unit:
Press and hold TUNING + or –
for more than 1 second.
On the remote control:
Press and hold + (¡) or – (1)
for more than 1 second.
The unit starts searching for stations and
stops when a station of sufficient signal
strength is tuned in.
• If a program is broadcast in stereo, the ST (stereo)
indicator lights up.
To stop searching, press TUNING + or – (+ (¡) or
– (1) on the remote control).
When you press TUNING + or – (+ (¡) or – (1) on
the remote control) briefly and repeatedly
The frequency changes step by step.
To change the FM reception mode
When an FM stereo broadcast is hard to receive or
noisy, press FM MODE while holding down
SHIFT on the remote control so that the MONO
indicator lights up on the display. Reception
improves.
To restore the stereo effect, press FM MODE
again while holding down SHIFT so that the
MONO indicator goes off from the display. In
stereo mode, you can hear stereo sounds when a
program is broadcasted.
+
On the unit ONLY:
1
Tune into the station you want to preset.
• See “Tuning into a Station.”
2
Press SET.
3
Turn PRESET + / – to select a
preset number.
4
Press SET.
The tuned station in step 1 is stored in the preset number
selected in step 3.
• Storing a new station on a used number erases the
previously stored one.
When you unplug the AC power cord or if a power
failure occurs
The preset stations will be erased in a few days. If this happens,
preset the stations again.
Tuning into a Preset Station
1
Press FM/AM.
The unit automatically turns on and
tunes into the previously received
station (either FM or AM).
• Each time you press the button, the
band alternates between FM and AM.
Presetting Stations
You can preset 30 FM and 15 AM stations.
In some cases, test frequencies have been already memorized
for the tuner since the factory examined the tuner preset
function before shipment. This is not a malfunction. You can
preset the stations you want into memory by following the
presetting method.
• There is a time limit in doing the following steps. If the
setting is canceled before you finish, start from step 2
again.
2
– 15 –
Select a preset number.
On the unit:
Turn PRESET + / –.
On the remote control:
Press the number buttons.
Ex.: For preset number 5, press 5.
For preset number 15, press
+10, then 5.
For preset number 20, press
+10, then 10.
For preset number 25, press
+10, +10, then 5.
For preset number 30, press
+10, +10, then 10.
Page 19
Playing Back Discs—Introduction
Continued
Discs you can play
This unit has been designed to play back discs having the
marks listed below.
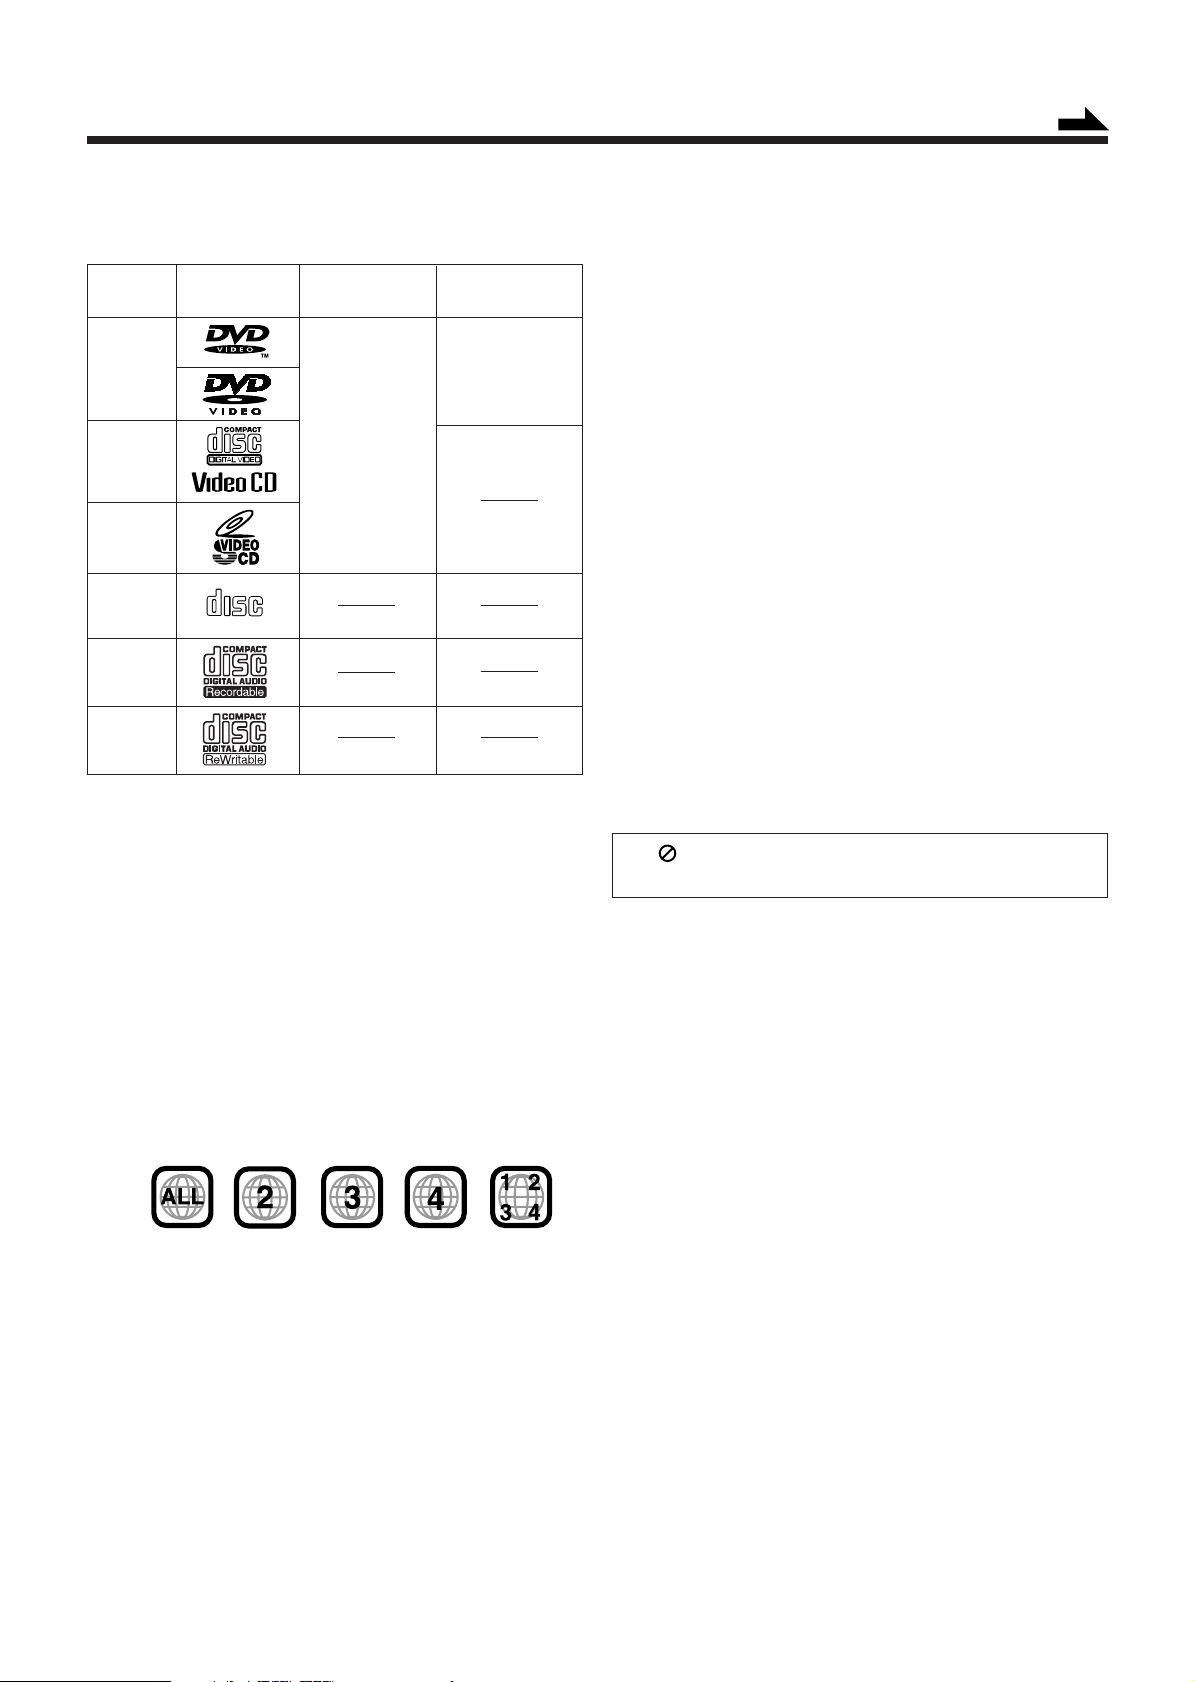
Disc Mark Video Region Code
Type (Logo) Format Number*
DVD
VIDEO
Video
CD
S-Video
CD
Audio
CD
CD-R**
CD-RW**
NTSC
PAL
COMPACT
DIGITAL AUDIO
2, 3, 4
or
ALL
** Note on CD-R and CD-RW
User-edited CD-Rs (CD-Recordable) and CD-RWs (CDRewritable) can be played back only if they are already
“finalized.”
• You can play back your original CD-Rs or CD-RWs
recorded in music CD format. (However, they may not be
played back depending on their characteristics or
recording conditions.)
• Before playing back CD-Rs or CD-RWs, read their
instructions or cautions carefully.
• Some CD-Rs or CD-RWs may not be played back on this
unit because of their disc characteristics, damage or stain
on them, or if the player’s lens is dirty.
• CD-RWs may require a longer readout time. This is
caused by the fact that the reflectance of CD-RWs is
lower than for regular CDs.
IMPORTANT:
Before performing any operations for DVD, SVCD and
VCD, make sure of the following.
• Check the connection with the TV.
• Turn on the TV and select the correct input on the TV to
view the pictures or on-screen menus/indications on the TV
screen.
• Select the correct color system.
• On some discs, their actual operations may be different
from what is explained in this manual.
• The following discs cannot be played back;
DVD-AUDIO, DVD-ROM, DVD-RAM, DVD-R,
DVD-RW, CD-ROM, CD-I (CD-I Ready), Photo CD, etc.
Playing back these discs will generate noise and damage
the speakers.
• Continued use of irregular shape discs (heart-shape,
octagonal, etc.) can damage the unit.
* Note on Region Code
DVD players and DVD Video discs have their own Region
Code numbers. Confirm the Region Code shown on the rear
of the unit.
Ex.:
If “ ” appears on the screen when pressing a button,
the disc cannot accept an operation you have tried to do.
– 16 –
Page 20
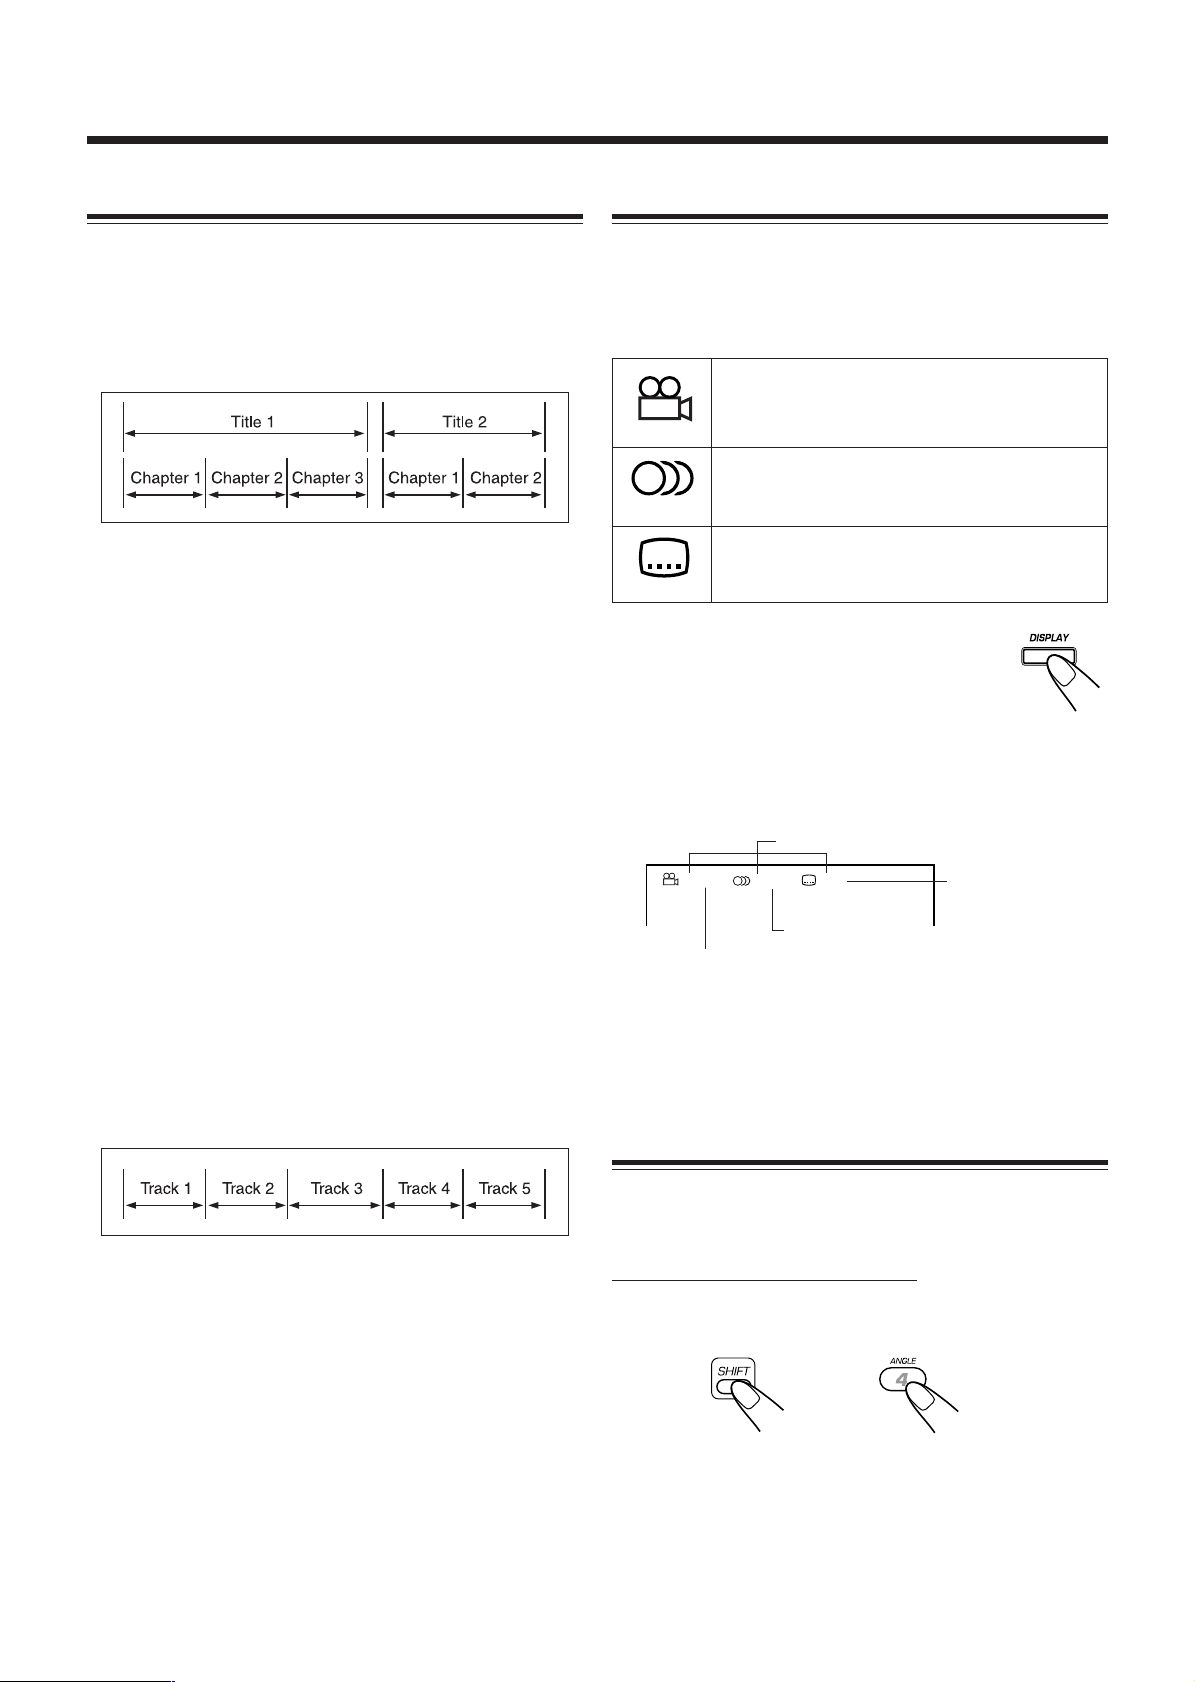
Disc Structure
3
DVD Features
DVD
A DVD disc consists of Titles, and each title may be divided
into some Chapters.
For example, if a DVD disc contains some movies, each
movie may have its own title number, and it may be further
divided into some chapters.
How sounds are recorded on DVD
The digital audio format used for DVD differs among discs
and it is written on the package or disc itself.
This unit can only reproduce the sound recorded in the
following audio formats:
• Linear PCM—This is the same format used for Audio
CDs and Video CDs.
• Dolby Digital—This is an encoding method for audio
signals. By compressing audio signals, it can record up to
5.1 multichannel signals—the right front channel, left front
channel, center channel, and right rear channel, left rear
channel and LFE signals.
– While playing back a disc encoded with Dolby Digital on
this unit, the DOLBY DIGITAL lamp on the front panel
lights up. If it has multichannel signals—5.1ch, Surround
mode is automatically activated.
• MPEG Multichannel—This is a compression format for
PAL/SECAM DVD software. MPEG Multichannel is 5.1ch
multi surround using MPEG Audio coding format.
Some DVDs contain several multi-angle views, audio
languages and subtitles.
When you find the following marks on the DVD or its
package, you can select these elements recorded on the DVD.
Multi-angle views are recorded on the disc. The
number inside the mark indicates the total
number of the recorded multi-angle views.
3
3
To check the current settings, press DISPLAY
once while playing back a disc. Current disc
information appears on the TV screen as follows.
And also the current channel information appears
on the display by pressing DISPLAY on the unit. (See page
51.)
• If you press the button twice, the disc playing information
appears. (See page 20.)
1 / 2 1 / 2 1 / 5
ENGLISH ENGLISH
Several audio languages are recorded on the
disc. The number inside the mark indicates the
total number of the recorded audio languages.
Subtitles are recorded on the disc. The
number inside the mark indicates the total
number of the recorded subtitles.
Current disc information
Total number of
subtitles
Total number of audio languages
Total number of multi-angle views
SVCD, VCD and CD
A SVCD, VCD or CD disc consists of Tracks.
In general, each song has its own track number. (On some
discs, each track may also be divided by Indexes.)
When playing back a SVCD or VCD with the Playback
Control (PBC*) function, you can select what to view using
the menu shown on the TV screen. While operating a SVCD
or VCD using the menu, some of the functions such as Time
Search may not work.
* A SVCD and VCD recorded with the PBC function has its
own menus, such as a list of the songs of the disc.
To erase the on-screen indication, press DISPLAY repeatedly
until the indications disappear from the TV screen.
Selecting the Multi-Angle View
For DVD only
While playing a disc containing multi-angle views, you can
view the same scene at different angles.
On the remote control ONLY:
1
Press ANGLE while holding down SHIFT.
The on-screen indication appears on the TV.
+
– 17 –
Page 21
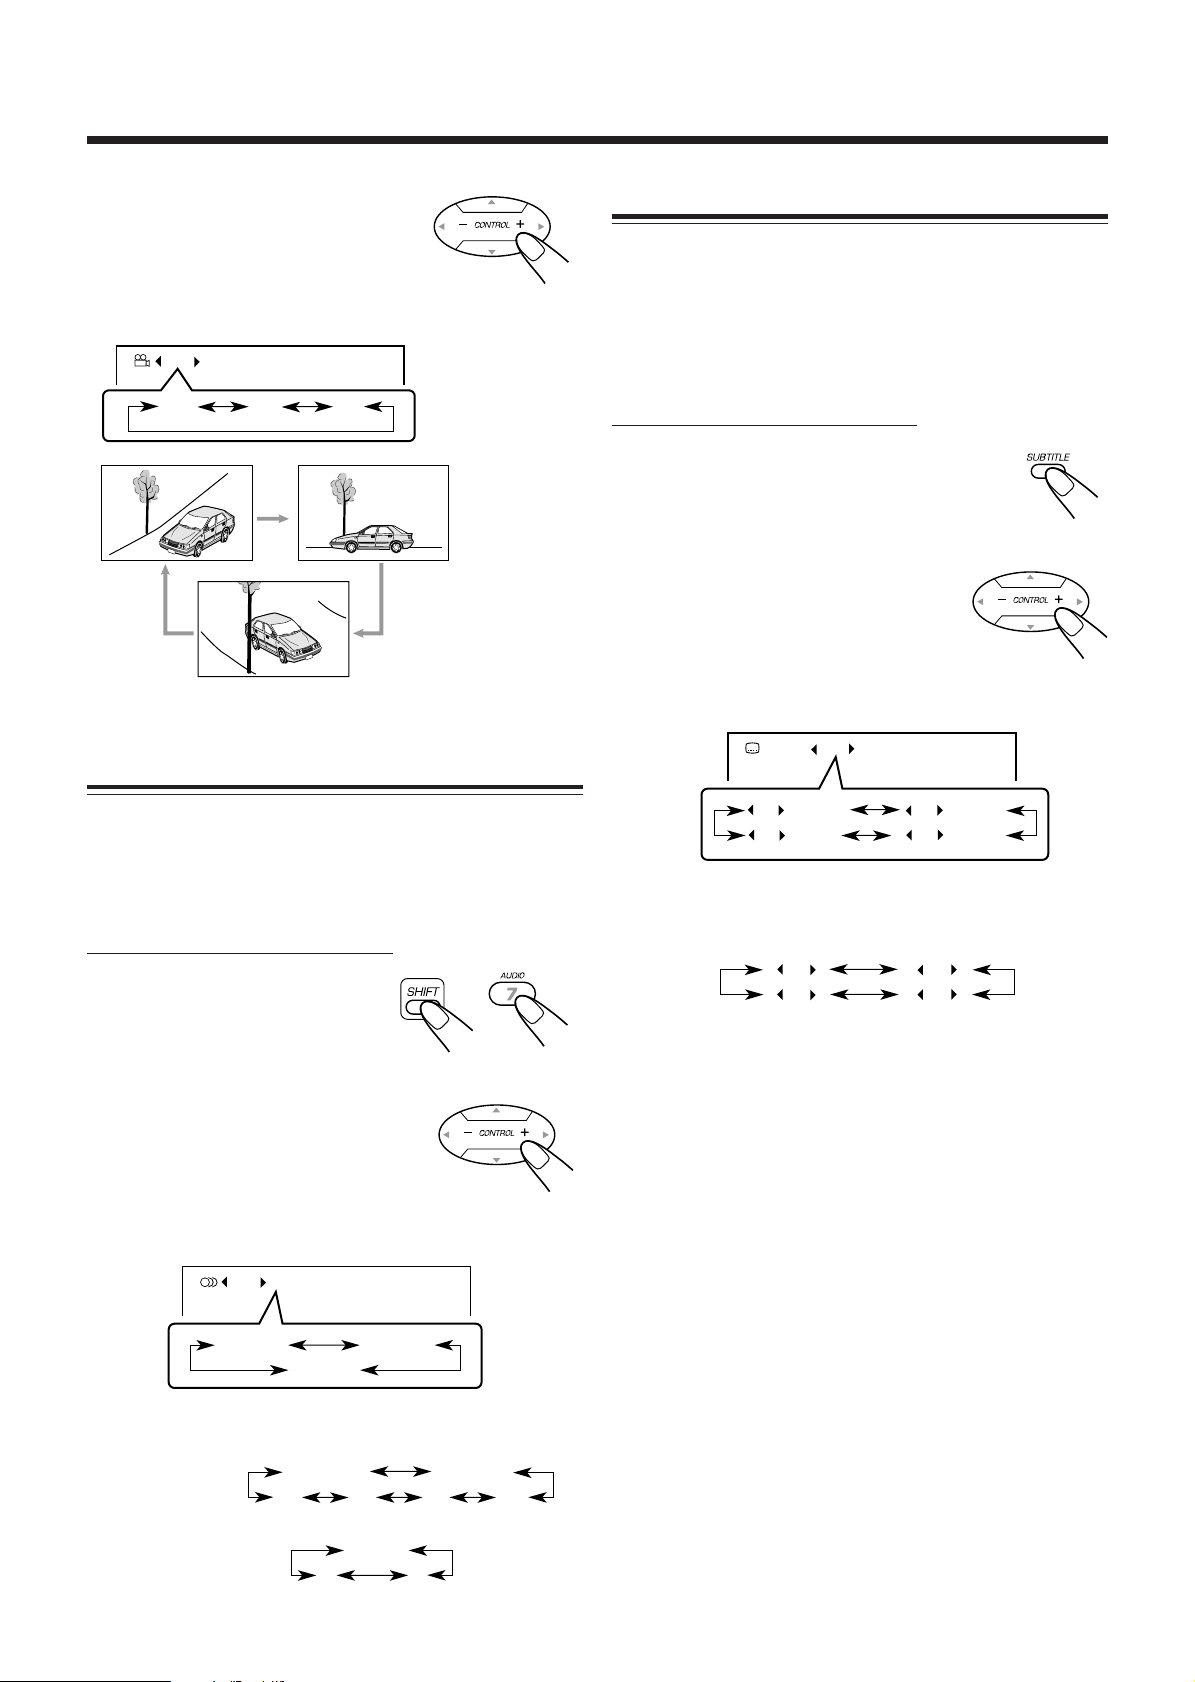
ON 1 / 3 ENGLISH
1 / 3
ENGLISH
3 / 3
SPANISH
2 / 3
FRENCH
– / 3
(OFF)
2
Press CONTROL + or − to
select a desired multi-angle
view.
• Each time you press the button, the
view angle changes.
1 / 3
Selecting the Subtitle
For DVD and SVCD
While playing a disc containing subtitles in different
languages, you can select the subtitle to be displayed on the
TV screen.
• You can set your favorite subtitle language as the initial
language shown on the screen. (See page 39.)
1 / 3
2 / 3
3 / 3
Ex.: When the disc has 3
multi-angle views.
Selecting the Audio Language or Sound
For DVD, SVCD and VCD
While playing a disc containing audio languages (sound
tracks), you can also select the language (sound) to listen to.
• You can set your favorite audio language for DVD as the
initial audio language. (See page 39.)
On the remote control ONLY:
1
Press AUDIO while
holding down SHIFT.
The on-screen indication appears
on the TV.
+
On the remote control ONLY:
1
Press SUBTITLE.
The on-screen indication appears on the TV.
• Each time you press the button, the subtitle
setting turns on and off.
2
Press CONTROL + or − to
select a desired subtitle
language.
• Each time you press the button, the
subtitle language changes.
For DVD
Ex.: When the disc has 3 selections—English,
French, Spanish and no subtitle (OFF).
For SVCD
1 / 4
– / 4
(OFF)
4 subtitle channels are shown even though the
subtitle is recorded or not.
2 / 4
3 / 4
2
Press CONTROL + or − to
select a desired audio
language.
• Each time you press the button, the
audio language changes.
For DVD
1 / 3 ENGLISH
Ex.: When the disc has 3 selections—English,
French, and Spanish.
For SVCD
For VCD
ENGLISH
SPANISH
STEREO-1
R-2
L-2 R-1
STEREO
R
To show no subtitle, select “–.”
FRENCH
STEREO-2
L-1
L
– 18 –
Page 22
Basic Disc Playback
This unit cannot accept any disc operations while reading
disc contents.
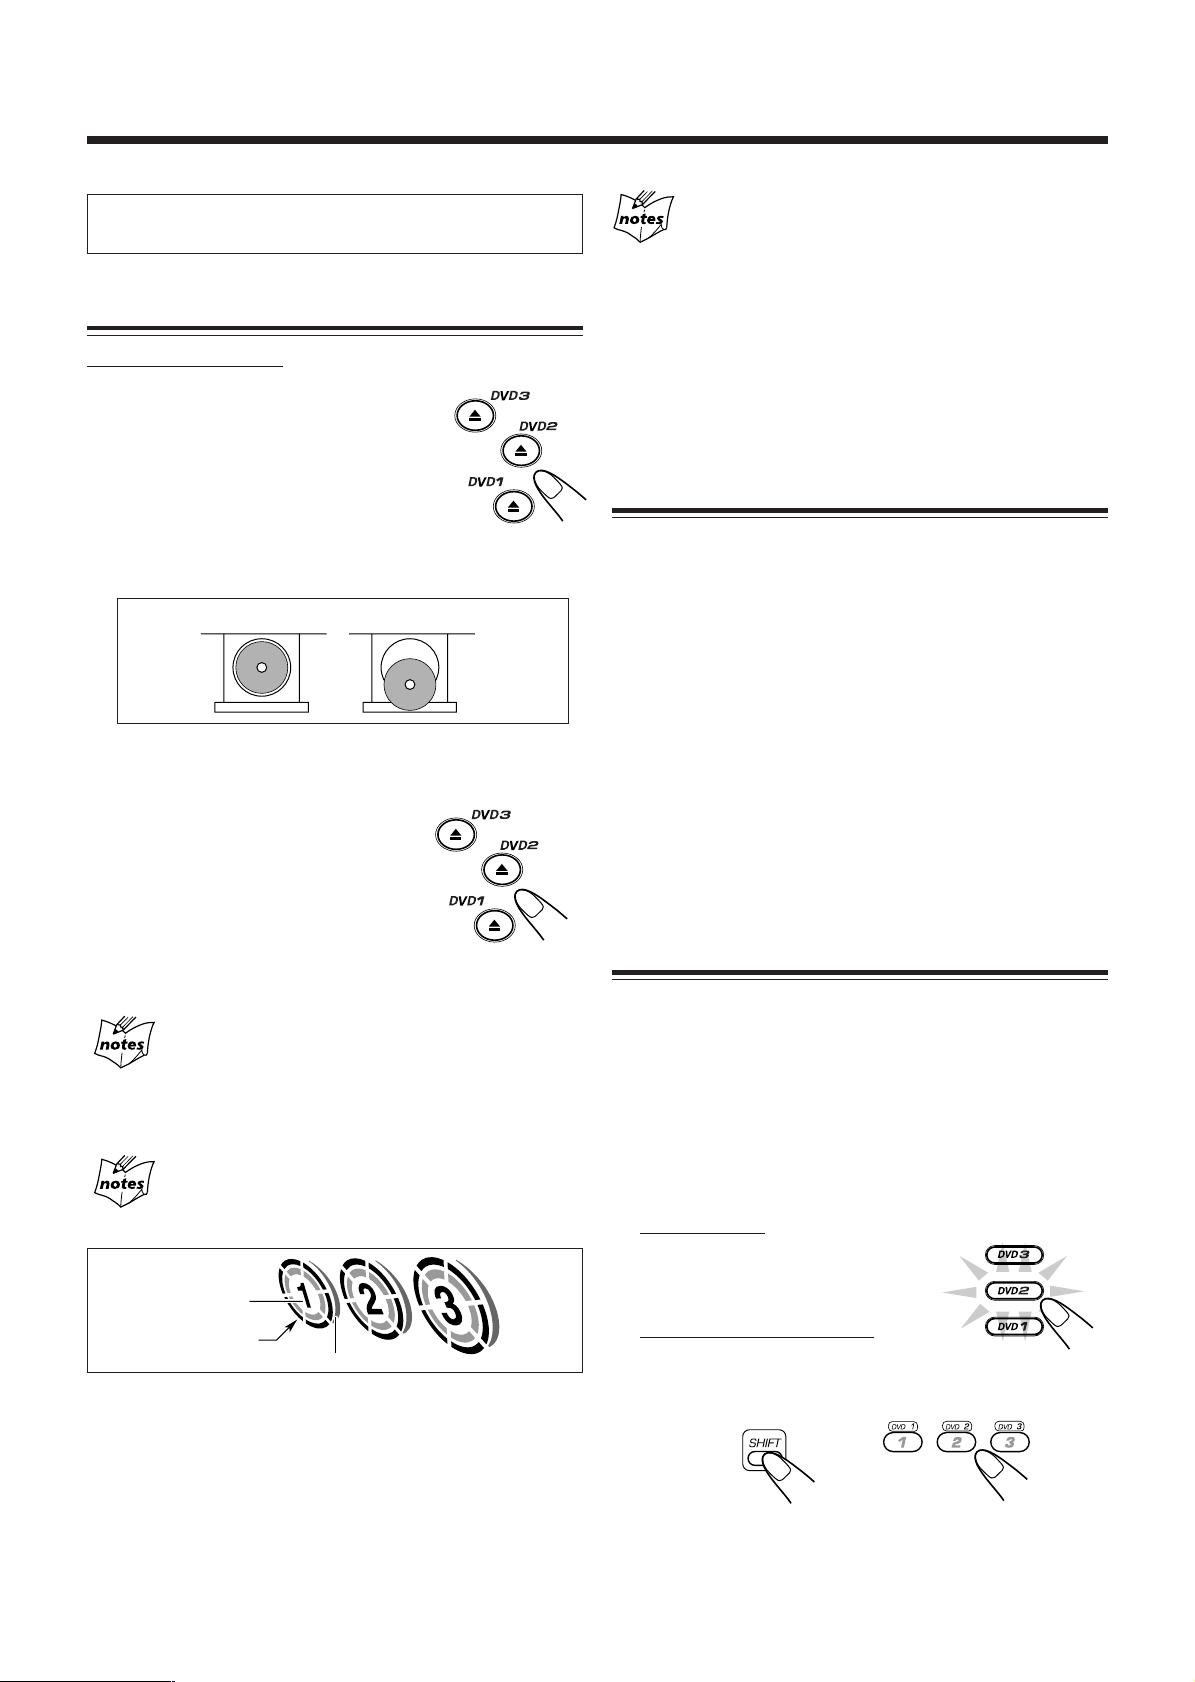
Loading Discs
On the unit ONLY:
1
Press 0 for the disc tray (DVD1,
DVD2, or DVD3) you want to
load a disc onto.
The unit automatically turns on and the
disc tray comes out.
2
Place a disc correctly on the circle of the disc
tray, with its label side up.
CORRECT
• When using a single disc (8 cm), place it on the inner
circle of the disc tray.
3
Press the same 0 you have
pressed in step 1.
The disc tray closes, and the
corresponding disc number lamp and
disc indicator light up on the display.
INCORRECT
SVCD/VCD/CD playback sequence during Continuous
play
When 3 SVCDs, VCDs or CDs are loaded on the disc trays, they are
played in one of the following sequences.
• When DVD1 is pressed : DVD1 ] DVD2 ] DVD3 (then stops)
• When DVD2 is pressed : DVD2 ] DVD3 ] DVD1 (then stops)
• When DVD3 is pressed : DVD3 ] DVD1 ] DVD2 (then stops)
* When only 2 SVCDs, VCDs or CDs are loaded, they are played in
the same order, but the disc tray without a disc is skipped.
* This function cannot be used for SVCD or VCD with the PBC
function and DVD.
Common Basic Disc Operations
While playing a disc, you can do the following operations.
To exchange discs during playback of another
Press 0 corresponding to a disc, not playing or selected
currently, to eject and exchange the disc.
If you exchange discs during play, the current play will not
stop.
To stop play for a moment
Press DVD 3¥8 (or 8 on the remote control).
While pausing, the elapsed playing time flashes on the
display.
To resume playing, press DVD 3¥8 again (or press DVD 3
on the remote control).
4
Repeat steps 1 to 3 to place other discs.
When loading more than one disc continuously
When you press 0 for the next tray you want to place another disc
onto, the first disc tray automatically closes and then the next tray
comes out.
About the disc indicators
Each disc indicator corresponds to the disc tray of the same number.
Disc number
Disc indicator
Disc marker
• The disc marker lights up for the disc number you have selected.
• The disc indicator rotates while the corresponding disc is being
played.
• The disc indicator goes off when the unit has detected that there is
no disc on the corresponding disc tray.
DVD Playback
• To play back a SVCD, VCD or CD see page 21.
• Playback will stop when a disc menu appears on the TV
screen. If a menu appears while playing, see “Menu-
Driven Playback” on page 23.
1
Load discs.
2
Select the disc number button you want to
play.
On the unit:
Press one of the disc number
buttons (DVD1, DVD2, or
DVD3).
On the remote control:
Press one of the disc number
buttons (DVD 1, DVD 2, or DVD 3) while
holding down SHIFT.
+
The unit starts reading the disc contents and “DVD” is
shown on the display. Then the total title number appears.
• Playback starts from the first chapter of the first title and
the disc number lamp starts flashing.
– 19 –
Page 23

Current disc information
(See page 17.)
Disc playing
information
Off
(No indication)
Continued
While playing back a disc encoded with Dolby Digital, the
DOLBY DIGITAL lamp on the front panel lights up. If it has
multichannel signals—5.1ch, the Surround mode is
automatically activated.
While playing back an MPEG Multichannel disc, the
Surround mode is automatically activated.
• Using the on-screen menus, you can adjust the speaker
settings for 5.1ch Surround mode depending on your room
situation. (See page 40.)
• While playing back a multichannel disc, the front left and
the front right signals are output when—
—hearing a disc through headphones.
—hearing a disc through AUX OUT jacks.
—recording onto tapes.
• You can also confirm the current channel setting by pressing
DISPLAY on the unit. (See page 51.)
Title numbers of the currently playing disc.
(Numbers exceeding 16 are not displayed.)
Current title
number
Current Chapter
number
Elapsed title
playing time
To stop playing, press 7.
• This unit can memorize the stop point of DVD, and when
you start playback again by pressing DVD 3¥8 (or
DVD 3 on the remote control), playback starts from the
beginning of a chapter previously stopped—Resume play.
To use Resume play, you need to turn on the Resume
function. (See page 42.)
• To stop completely, press 7 twice.
To remove the disc, press 0 for the corresponding disc tray.
To use Time Search and Chapter Search on the TV
screen
• You cannot use this function while using Random play.
On the remote control ONLY:
1
Press PLAY MODE during play.
The play mode screen appears.
2
Press CONTROL + or − to move
to “TIME SEARCH” or “CHAP.
SEARCH,” then press ENTER.
“GO TO _: _ _:_ _ ” for Time Search
or “GO TO CHAPTER = ” for
Chapter Search appears on the TV
screen.
DVD CONTROL
REPEAT A-B REPEAT TIME SEARCH CHAP. SEARCH
REPEAT CHAPTER
GO TO CHAPTER =
Ex.: When “CHAP. SEARCH” is selected.
3
Enter desired playing time or
chapter number by pressing the
number buttons.
• You can only use Time Search
within a currently playing title.
Ex.: To enter the time of “0:23:45,”
press 0, 2, 3, 4 and 5. (Always
enter all 5 digits.)
To enter chapter number 23, press 2 and 3.
To enter chapter number 3, press 3.
To cancel misentry for Time Search, press CONTROL −.
Each time you press the button the last number you
entered is erased. (You cannot erase a chapter number.)
To go to another chapter
Turn 4 / ¢ during playback (or
press 4 or ¢ on the remote
control).
• 4: Goes back to the beginning of
the current or previous chapters.
• ¢: Skips to the beginning of the
next or succeeding chapters.
To go to a particular title or chapter directly using the
number buttons on the remote control
• Pressing the number buttons before playback allows you to
start playing from the title number you want.
• Pressing the number buttons during playback allows you to
start playing from the chapter number of the currently
playing title you want.
Ex.: To select number 5, press 5.
To select number 10, press 10.
To select number 20, press +10 then 10.
To select number 23, press +10, +10 then 3.
4
Press ENTER.
The unit starts playback of the selected
point.
To erase the on-screen indication, press PLAY MODE
again.
To show the on-screen indication
You can show the following information on the TV screen
while playing back a disc.
To show the on-screen indication, press
DISPLAY while playing a disc.
• Each time you press the button, the indication
on the TV screen changes as follows:
– 20 –
Page 24

DISC 3 TITLE
1 : Current disc number
2 : Current title number
3 : Current chapter number
4 : Elapsed playing time of the current title
5 : Transmission rate
1
3
2
CHAP.
2
3
TIME
1:33:33
4
BITRATE
3.3
5
Mbps
SVCD/VCD/CD Playback
• To play back a DVD see page 19.
• While playing a SVCD or VCD with the PBC function
loaded on the disc trays, the playback will stop when a disc
menu appears. If a menu appears while playing a SVCD
or VCD with PBC function, see “Menu-Driven
Playback” on page 23.
1
Load discs.
2
Select the disc number button you want to
play.
On the unit:
Press one of the disc number
buttons (DVD1, DVD2, or
DVD3).
On the remote control:
Press one of the disc number
buttons (DVD 1, DVD 2, or DVD 3) while
holding down SHIFT.
+
The unit starts reading the disc contents and “SVCD,”
“VCD” or “CD” is shown on the display. Then the total
playing time appears. (When SVCD or VCD with the
PBC function is loaded, only “PBC” appears.)
Playback starts from the first track of the selected disc and
the disc number lamp starts flashing.
Track numbers of the currently playing disc.
(Numbers exceeding 16 are not displayed.)
To stop playing, press 7.
• This unit can memorize the stop point of SVCD and VCD,
and when you start SVCD or VCD playback again by
pressing DVD 3¥8 (or DVD 3 on the remote control),
playback starts from where it has been stopped—Resume
play. When using Resume play on SVCD or VCD with the
PBC function, the playback starts from the earlier point
you stop.
To use Resume play, you need to turn on the Resume
function. (See page 42.)
• To stop completely, press 7 twice.
To remove the disc, press 0 for the corresponding disc tray.
To go to another track
Turn 4 / ¢ during playback (or
press 4 or ¢ on the remote
control).
• 4: Goes back to the beginning of the
current or previous tracks.
• ¢: Skips to the beginning of the next
or succeeding tracks.
To go to a particular track directly using the number
buttons on the remote control
Pressing the number buttons before or
during play allows you to start playing
from the track number you want.
Ex.: To select number 5, press 5.
To select number 10, press 10.
To select number 20, press +10
then 10.
To select number 23, press +10, +10 then 3.
To use Time Search on the TV screen
• You cannot use this function while a SVCD or VCD with
the PBC function is played back.
• You cannot use this function while using Random play.
On the remote control ONLY:
1
Press PLAY MODE during play.
The play mode screen appears.
2
Press CONTROL + or − to move to
“TIME SEARCH,” then press
ENTER.
“GO TO _ _:_ _ ” appears on the TV
screen.
Current track number
Elapsed track playing time
– 21 –
CD CONTROL
REPEAT A-B REPEAT TIME SEARCH
GO TO :
Ex.: When CD is a playing source.
Page 25

3
Enter desired playing time by
pressing the number buttons.
• You can only use Time Search
within a currently playing track.
Ex.: To enter the time of “03:45,”
press 0, 3, 4 and 5. (Always
enter all 4 digits.)
Reverse Search
To fast-reverse the chapter or track, press 1
while playing a disc.
• Each time you press the button, the search
speed changes as follows:
X 2
X 5
X10
To cancel misentry for Time Search, press
CONTROL −. Each time you press the button the last
number you entered is erased.
4
Press ENTER.
The unit starts playback from the selected
point.
To erase the on-screen indication, press PLAY MODE
again.
To show the on-screen indication
You can show the following information on the TV screen
while playing back a disc.
To show the on-screen indication, press
DISPLAY while playing a disc.
DISC 3 TRACK
Ex.: When SVCD or VCD with the PBC
3
TIME
3:33 PBC
1
2
function is a playing source.
3
4
X60
To go back to normal play, press DVD 3¥8 (or DVD 3 on
the remote control).
No sound comes out during Forward/Reverse Search.
X20
Prohibiting Disc Ejection—Tray Lock
You can prohibit disc ejection from the unit and can lock
discs.
• This operation is possible only when the source is the
DVD/SVCD/VCD/CD player.
On the unit ONLY:
To prohibit disc ejection, press 0 for any disc tray while
holding down 7. (If there is any disc tray opened, close it
first.)
+
1 : Current disc number
2 : Current track number
3 : Elapsed playing time of the current track
4 : • “PBC” is shown when a SVCD or VCD with the
PBC function is played.
• “EACH” is shown when a SVCD or VCD without
the PBC function or a CD is played.
To erase the on-screen indication, press DISPLAY again.
Searching for a Particular Point
You can search for a particular portion while playing a disc
— Forward/Reverse Search.
Forward Search
To fast-forward the chapter or track, press
¡ while playing a disc.
• Each time you press the button, the search
speed changes as follows:
X 2 X 5 X10
X60
X20
“LOCKED” appears for a while, and the loaded discs are
locked.
To cancel the prohibition and unlock the discs, press 0 for
any disc tray while holding down 7.
“UNLOCKED” appears for a while, and the loaded discs are
unlocked.
If you try to eject discs
“LOCKED” appears to inform you that the Tray Lock is in use.
– 22 –
Page 26

Menu-Driven Playback
Menu Operations
Menu-driven playback is possible while playing back a DVD
with menu-driven features or a SVCD or VCD with the
Playback Control (PBC) function.
7 When playing a DVD
DVD discs generally have their own menus or title lists. A
menu usually contains various information about the disc and
playback selections. On the other hand, a title list usually
contains titles of movies and of songs recorded.
On the remote control ONLY:
1
Press MENU or TITLE.
A menu or title list appears on the TV screen.
• On some discs, a menu or title list automatically appears
without pressing MENU or TITLE.
or
2
Press Cursor (5 / ∞ / 3 / 2) to
select a desired item on the
menu or on the title list, then
press SELECT.
The unit starts playback of the selected item.
• On some discs, you can also select items
by pressing the number buttons
corresponding to the item numbers listed.
To cancel the PBC function
Press 7 to stop playback, then press MENU.
• Each time you press MENU, the PBC function turns on and
off alternately.
To restore the PBC function, press REPEAT on the unit
repeatedly until the REPEAT indicator goes off from the
display. Then press DVD 1, DVD 2 or DVD 3 to play a
SVCD or VCD with the PBC function.
• If you press DVD 3¥8 on the unit or SELECT on the
remote control when the PBC indicator on the display is
turned off and a SVCD or VCD disc stops playing, the
SVCD or VCD will be played back with the PBC function
off.
While playing back a SVCD or VCD with the PBC
function
A-B Repeat is only usable as the playing back mode.
Even though you turn on the PBC function while a
SVCD or VCD is played back.
The PBC function remains off.
PBC operation concept
To erase the menu or title list
Press MENU or TITLE.
• If “ ” appears on the screen when pressing TITLE
in step 1, the disc does not have a menu listing titles.
• If “ ” appears on the screen when pressing MENU
in step 1, the disc does not have a menu.
You can use MENU only while playing a disc.
7 When playing a SVCD or VCD
When a SVCD or VCD with the Playback Control function
(PBC) is detected, the PBC indicator lights up on the display.
The PBC function allows you to operate the SVCD or VCD
using menus.
When you start playback, a menu automatically appears on
the TV screen.
• A menu may be a list of items, divided screens, or some
moving pictures. (See “PBC operation concept” on the
right.)
To return to the previous menu
Press RETURN.
– 23 –
Page 27

Selecting Playback Modes
This unit cannot accept any disc operations while reading
disc contents.
Programming the Playing Order of the Titles
and Tracks—Program Play
You can arrange the order in which the titles (for DVD) and
tracks (for SVCD, VCD and CD) play before you start
playing. You can program up to 18 steps.
• When you use Program play for a SVCD or VCD with the
PBC function activated, the PBC function is turned off.
• Program play cannot be used on some DVD discs.
On the unit:
• There is a time limit in doing the following steps. If the
setting is canceled before you finish, start from step 2
again.
1
Load discs.
• If the current playing source is not the DVD/SVCD/
VCD/CD player press DVD 3¥8, then 7 before going
to the next step.
Continued
4
Turn 4 / ¢ to select a title
or track number, then press SET.
Ex.: When SVCD, VCD or CD is a
source disc.
5
To program another title or track from the
same disc, repeat step 4.
To program another title or track from a
different disc, repeat steps 3 and 4.
• Each time you select a title or track, the program item is
added up to 18 steps.
6
Press DVD 3¥8.
The titles and tracks are played in the
order you have programed.
To stop playing, press 7.
To go to the next title or track, turn 4 / ¢ to the right.
2
Press PROGRAM so that
“PROGRAM” appears on the
display.
The PRGM (program) indicator also lights up on the
display.
• If a program has been stored in memory, the program is
called up.
3
Press one of the disc number
buttons (DVD1, DVD2 or
DVD3) you want to program.
Selected title or track number
Selected disc number
Ex.: When SVCD, VCD or CD is a source disc.
Program step number
Even if you turn 4 / ¢ to the left
It just goes back to the beginning of the current title or track, but
cannot go back to the previous titles or tracks.
To modify the program
You can modify the program before or after playing.
To erase the last step, press
CANCEL/DEMO.
• Each time you press the button, the last
programed step is erased from the program.
To add steps in the program before playing,
simply select the disc number and title/track numbers you
want to add by following steps 3 to 5 of the programming
procedure.
To erase program completely, press 7 before or after
playing.
The program you have made will be also erased,
• when you remove all the discs, and then press DVD 3¥8.
• when you unplug the AC power cord.
• when a power failure occurs.
To exit from Program play mode, press PROGRAM after
playing. The PRGM (program) indicator goes off. The
program you have made is memorized.
To check the programed contents
Press PLAY MODE on the remote control. The programed
contents appear on the TV screen.
To erase the play mode screen, press PLAY MODE again.
– 24 –
Page 28

On the remote control:
REPEAT PROGRAM RANDOM
1 2 3 4 5 6
1-18 2-17 3-16 1-15 2-14 3-13
7 8 9 10 11 12
1-12 2-11 3-10 1-9 2-8 3-7
13 14 15 16 17 18
1-6 2-5 3-4 1-3 2-2 1-1
1
Load discs.
• If the current playing source is not the DVD/SVCD/
VCD/CD player press DVD 3, then 7 before going to
the next step.
2
Press PLAY MODE.
The play mode screen appears on the TV.
3
Press CONTROL + or − to
move
to “PROGRAM,”
then press ENTER.
The program screen appears.
• If a program has been stored in
memory, the program is called up.
• You cannot select “PROGRAM”
during Random play.
REPEAT PROGRAM RANDOM
1 2 3 4 5 6
7 8 9 10 11 12
13 14 15 16 17 18
4
Press one of the disc number buttons (DVD 1,
DVD 2 or DVD 3) you want to program while
holding down SHIFT .
The selected disc number is shown on the TV screen.
+
6
To program another title or track from the
same disc, repeat step 5.
To program another title or track from a
different disc, repeat steps 4 and 5.
• Each time you select a title or track, the program item is
added up to 18 steps.
7
Press DVD 3.
The titles and tracks are played in the order
you have programed.
To stop playing, press 7.
To go to the next title or track, press ¢.
Even if you press 4
It just goes back to the beginning of the current title or track, but
cannot go back to the previous titles or tracks.
To modify the program
You can modify the program before or after playing.
To erase the last step, press CANCEL while holding down
SHIFT.
• Each time you press the button, the last programmed step is
erased from the program.
5
Press the number buttons to
enter a title or track
number you want to
program.
The selected title or track number is
shown on the TV screen.
Ex.: To select number 5, press 5.
To select number 10, press 10.
To select number 20, press +10 then 10.
To select number 23, press +10, +10 then 3.
Selected title or track number
Selected disc number
To add steps in the program before play, simply select the
disc and title/track numbers you want to add by following
steps 4 to 6 of the programming procedure.
To erase program completely, press CLEAR before or after
playing.
The program you have made will be also erased,
• when you remove all the discs, and then press DVD 3.
• when you unplug the AC power cord.
• when a power failure occurs.
To exit from Program play mode, press PROGRAM on the
unit after playing. The PRGM (program) indicator goes off.
The program you have made is memorized.
To check the programed contents
Press PLAY MODE. The programed contents appear on the
TV screen.
To erase the play mode screen, press PLAY MODE. The
program you have made is memorized.
– 25 –
Page 29

REPEAT PROGRAM RANDOM
Continued
Playing at Random—Random Play
The titles and tracks of all loaded discs are played at random.
• When you use Random play for a SVCD or VCD with the
PBC function activated, the PBC function is turned off.
• Random Play cannot be used on some DVD discs.
On the unit:
1
Load discs.
• If the current playing source is not the DVD/SVCD/
VCD/CD player, press DVD 3¥8, then 7 before going
to the next step.
2
Press RANDOM so that “RANDOM”
appears on the display.
The RANDOM indicator also lights up on the
display.
3
Press one of the disc number
buttons (DVD1, DVD2 or
DVD3) you want to play first.
The titles and tracks are played from
the selected disc at random.
Random play ends when all the titles and tracks on the all
loaded discs are played once.
To stop playing, press 7.
• Random play also stops when the disc tray currently played
is opened.
To exit from Random play mode when finished, press
RANDOM on the unit. Or perform steps 3 and 4 on the
remote control. Each time you press ENTER, the Random
play turns on and off.
To skip the currently playing title or track, turn 4 / ¢
to the right (or press ¢ on the remote control).
Even if you turn 4 / ¢ to the left or press 4 on
the remote control
It just goes back to the beginning of the current title or track, but
cannot go back to the previous titles or tracks.
To erase the play mode screen, press PLAY MODE.
Repeating Playback
Repeat Play
You can repeat a title, chapter or track.
• For DVD, to use Repeat play with Program play or
Random play, select Repeat play after starting Program
play or Random play .
• Repeat play cannot be used on some DVD discs.
• You can only use Repeat play on SVCD or VCD with the
PBC function deactivated. When you turn on the PBC
function after Repeat play, press REPEAT repeatedly until
the REPEAT indicators go off from the display.
On the remote control:
1
Load discs.
2
Press one of the disc number buttons (DVD 1,
DVD 2 or DVD 3) while holding down SHIFT
to select the disc you want to play, then 7.
+
3
Press PLAY MODE.
The play mode screen appears on the TV.
REPEAT PROGRAM RANDOM
4
Press CONTROL + or − to
move to “RANDOM,” then
press ENTER.
The titles and tracks are played from
the selected disc at random.
Random play ends when all the titles
and tracks on the all loaded discs are
played once.
• You cannot select “RANDOM” during Program play.
On the remote control:
1
Press PLAY MODE before or
during play.
The play mode screen appears on the TV.
2
Press CONTROL + or − to
move to “REPEAT.”
• When DVD is a playing source,
“REPEAT” cannot be selected while
playing.
Ex.: When the playback is stopped.
3
Press ENTER repeatedly to
select Repeat play mode you
want.
• Each time you press the button, the Repeat play mode
indication on the TV screen changes as follows:
– 26 –
Page 30

A 1:12:34
B 1:12:37
When a DVD is a playing source.
A-B Repeat
REPEAT A-B REPEAT TIME SEARCH CHAP. SEARCH
REPEAT CHAPTER
TITLE
CHAPTER
Canceled
• TITLE: Current title will be repeated.
• CHAPTER: Current chapter will be repeated.
When a SVCD, VCD or CD is a playing source.
REPEAT A-B REPEAT TIME SEARCH
REPEAT ALL
ALL
1
Canceled
• ALL: All tracks on all discs will be repeated.
• 1: Current track will be repeated.
While playing, you can also select a portion you want to
repeat.
• During Program play, Random play or Repeat play
A-B Repeat play cannot be selected.
• A-B Repeat is not performed between different chapters or
different titles on a DVD.
On the remote control ONLY:
1
Press PLAY MODE during play.
The play mode screen appears on the TV.
2
Press CONTROL + or − to
move to “A-B REPEAT.”
DVD CONTROL
REPEAT A-B REPEAT TIME SEARCH CHAP. SEARCH
Ex.: When DVD is a playing source.
3
Press ENTER at the starting
point you want to repeat (point
A).
The A-B Repeat indication appears on the TV screen.
To cancel Repeat play, perform steps 1 and 2, then press
ENTER repeatedly until the REPEAT indications disappear
from the TV screen.
To erase the play mode screen, press PLAY MODE.
On the unit:
Press REPEAT before or during play.
The REPEAT indicators also light up on the
display.
• Each time you press the button, Repeat play
mode changes as follows:
For DVD
REPEAT
Canceled
REPEAT: Current chapter will be repeated.
REPEAT 1: Current title will be repeated.
For SVCD, VCD and CD
REPEAT ALL
Canceled
REPEAT 1
REPEAT 1
A 1:12 : 34 B : :
4
Press ENTER again at the end point you
want to repeat (point B).
A-B Repeat begins.
The unit automatically locates point A and starts repeated
playback of the portion between points A and B.
To cancel A-B Repeat play, press ENTER. A-B Repeat play
is canceled and normal playback starts.
To erase the play mode screen, press PLAY MODE.
REPEAT ALL: All tracks on all discs will be
repeated.
REPEAT 1: Current track will be repeated.
To cancel Repeat play, press REPEAT repeatedly until the
REPEAT indicators go off from the display.
– 27 –
Page 31

DVD/SVCD/VCD Special Effect Playback
1/32
1/16
1/41/3
1/2
1/8
1/16
1/41/3
1/8
1/12
ZOOM
Continued
Still Picture/Frame-by-Frame Playback
You can still a picture and advance the still picture frame by
frame.
Still picture
On the remote control ONLY:
Press 8 once during play.
A still picture appears on the TV screen.
Frame-by-frame playback
On the remote control ONLY:
Press 8 repeatedly during play to
advance the picture frame by frame.
• Each time you press the button, the picture
advances frame by frame.
Slow Motion Playback—Slow
You can enjoy slow motion playback.
• Reverse slow motion playback cannot be used on some
SVCDs or VCDs.
On the remote control ONLY:
1
Press 8 once during play.
A still picture appears on the TV screen.
2
Press SLOW + or − to start slow
motion playback.
• Each time you press SLOW +, forward slow
motion speed changes as follows:
• Each time you press SLOW −, reverse slow motion
speed changes as follows:
To go back to normal play, press DVD 3.
Viewing Continuous Still Pictures—Strobe
You can view 9 continuous still pictures.
On the remote control ONLY:
1
Press 8 during play at the point
you want to view continuous still
pictures.
A still picture appears on the TV screen.
2
Press and hold STROBE for more
than 1 second.
9 continuous still pictures appear on the TV
screen.
• Pressing STROBE again, next 9 still pictures appear.
To cancel strobe play, press and hold STROBE. A still
picture appears. Then press DVD 3 to go back to normal
play.
If you press and hold STROBE for more than 1 second
during normal playback or press 3 after pressing and
holding STROBE in step 2
9 same pictures appear but advance at normal speed.
No sound is heard during slow motion playback.
To go back to normal play, press DVD 3.
Zoom in the Picture—Zoom
You can zoom a picture by 2 times.
On the remote control ONLY:
1
Press ZOOM while holding down
SHIFT during play.
“ZOOM” appears on the TV screen.
• Each time you press ZOOM while holding
down SHIFT, the picture is zoomed in and
out alternately.
Normal
2
Press Cursor (5 / ∞ / 3 / 2) to
Zoom
select the position you want to
zoom in.
To go back to normal play, press ZOOM while holding
down SHIFT.
+
– 28 –
Page 32

Viewing the Desired Chapters/Tracks—Digest
You can view 9 opening scenes of chapters or tracks at a time
and select desired scene from those displayed on the TV
screen directly.
• You cannot use this function on SVCD or VCD with the
PBC function.
On the remote control ONLY:
1
Press DIGEST while holding down
SHIFT when the disc is stopped
playing or during play back.
The opening scene appears in sequence (up
to 9 pictures at a time) on the TV screen.
• When DVD is a source disc and stopped,
the opening scene of each title appears.
• When DVD is a source disc and played
back, the opening scene of each chapter in
the current title appears.
• When SVCD or VCD without the PBC
function is loaded, the opening scene of
each track appears.
+
Selecting the Picture Brightness
—Theater Position
You can select picture brightness from among three options
according to the source program, lighting condition of the
room and/or personal preference.
On the unit:
Press THEATER POSITION
during play.
On the remote control:
Press THEATER
POSITION while holding
down SHIFT during play.
The theater position indication
appears on the TV screen.
• Each time you press THEATER POSITION, the theater
position changes as follows. The picture brightness
becomes darker as the number increases.
THEATER 1
THEATER OFF
THEATER 2
THEATER 3
+
2
Press Cursor (5 / ∞ / 3 / 2) to
move to a scene you want to
start play back.
• If there are more than 9 scenes, you
can see next 9 scenes. To go to the
next screen press NEXT, and to go
back to the previous screen press
PREV.
3
Press SELECT or ENTER.
Playback starts from the selected scene.
To cancel the function, select “THEATER OFF.”
or
– 29 –
Page 33

Playing Back Tapes
You can play back type I, type II, and type IV tapes without
changing any settings.
Playing Back a Tape
1
Press EJECT (0) for the deck you want to
use.
For Deck B
For Deck A
2
Put a cassette in with the exposed part of the
tape down.
To play both sides repeatedly—Reverse Mode
Reverse Mode works for both decks at the same time.
When it is in use, the tape automatically reverses at the end of
a side and the unit starts playing for the other side of the tape,
and repeats the same process.
To use Reverse Mode, press
REVERSE MODE so that the Reverse Mode
indicator on the display lights up like— .
To cancel Reverse Mode, press the button
again so that the Reverse Mode indicator on the
display lights up like—
When Reverse Mode is on with cassettes in both decks
A and B
After the reverse (2) side of the tape finishes playing, the tape in the
other deck starts playing.
.
Locating the Beginning of a Song
—Music Scan
You can use Music Scan to locate the beginning of a song.
Music Scan searches for blank portions that usually separate
recorded songs, then plays the next song.
3
Close the cassette holder gently.
If you put cassettes in both decks A and B, the last deck
you have closed is selected.
To operate the other deck, press TAPE A/B
(or press TAPE A/B while holding SHIFT on
the remote control).
4
Press TAPE 2 3.
The tape play starts and the tape
direction indicator (3 or 2) on the
display starts flashing slowly to
indicate the tape running direction.
• Each time you press the button, the
tape direction changes.
33
3 : plays the front side.
33
22
2 : plays the reverse side.
22
• If no cassette is inserted, “NO TAPE” appears on the
display.
When the tape plays to the end, the deck automatically
stops if the Reverse Mode is off. (See “To play both sides
repeatedly—Reverse Mode.”)
To stop playing, press 7.
To fast-wind to the right or to the left, press ¡ or 1
while the tape is not running.
The tape direction indicator (3 or 2) starts flashing quickly
on the display.
To remove the cassette, press 0 EJECT for deck A or
EJECT 0 for deck B.
To find the beginning of the current song
During play, press ¡ or 1 in the
opposite direction to the tape play.
The tape direction indicator of the opposite
direction to the tape play starts flashing
slowly.
Searching stops automatically at the beginning of the current
song, and the current song starts automatically.
To find the beginning of the next song
During play, press ¡ or 1 in the same
direction as the tape play.
The tape direction indicator of the same
direction as the tape play starts flashing
slowly and quickly alternately.
Searching stops automatically at the beginning of the next
song, and the next song starts automatically.
Music Scan works by detecting a 4-second long blank
between each song, so it will not work well in the
following cases
• No blank at the beginning of a song.
• Noise (often caused by much use or poor quality dubbing) which
fills the blank.
• Long, very soft passages or pauses in a song.
The use of the C-120 or thinner tape is not
recommended, since characteristic deterioration
may occur and this tape easily jams in the pinchrollers and the capstans.
– 30 –
Page 34

Using DSP Surround Mode
S THEATER
L THEATER
LIVECLUB
PAVILION
CHURCH
OFF
(DSP off)
DELAY 1
DELAY 2
DELAY 3
DELAY 4
DELAY 5
DELAY 6
In order to reproduce a more acoustic sound field in your
listening room while playing any source, you can use
following DSP Surround modes.
• DSP Surround mode can be also used for a disc encoded
with Dolby Digital 5.1ch or with MPEG Multichannel.
You can select one of the following DSP Surround modes
according to your preference.
S (Small) THEATER: Reproduces the sound field of a small
theater (where the seating capacity
about 300).
L (Large) THEATER: Reproduces the sound field of a large
theater (where the seating capacity
about 1,000).
LIVECLUB: Gives the feeling of a live music club
with a low ceiling.
PAVILION: Gives the spacious feeling of a
pavilion with a high ceiling.
CHURCH: Gives the spacious feeling of a
majestic church with a high ceiling.
Activating and Adjusting the DSP Surround
Mode
3
Press LEVEL + / – to adjust the
delay time.
• Each time you press the button, the delay
time changes as follows:
As the number increases, the delay time increases so that
you can obtain much larger sound field.
• This setting does not affect the delay time setting of the
“SPEAKER SETTING.” (See page 40.)
To cancel the DSP Surround mode, select “OFF” in step 1
so that the SURROUND lamp goes off.
On the unit:
When using the buttons on the unit, you can activate the DSP
Surround modes, but cannot make delay time adjustment.
Press DSP SURROUND > or < to
select a desired DSP Surround
mode.
• Each time you press the button, the DSP
Surround mode changes as follows:
You can use the DSP Surround mode for any source you like.
On the remote control:
Only when using the remote control, you can adjust the delay
time of the surround speakers.
1
Press DSP SURROUND, while holding down
SHIFT, to select a desired DSP Surround
mode.
+
• Each time you press the button, the DSP Surround mode
changes as follows:
S THEATER
OFF
(DSP off)
• When one of the DSP Surround modes is activated, the
SURROUND lamp on the unit lights up.
2
Press LEVEL SELECT repeatedly
until “DELAY” appears on the
display.
L THEATER
CHURCH
LIVECLUB
PAVILION
• When one of the DSP Surround modes is activated, the
SURROUND lamp on the unit lights up.
To cancel the DSP Surround mode, select “OFF” so that the
SURROUND lamp goes off.
When you use one of sound modes with surround
elements—D.CLUB, HALL, STADIUM (see page 13)
You can set these sound modes together with the DSP Surround
modes, but the surround elements of these sound modes are changed
to the DSP Surround mode.
– 31 –
Page 35

Recording
Continued
IMPORTANT:
• It may be unlawful to record or playback copyrighted
material without the consent of the copyright owner.
• The recording level is automatically set correctly, so it is
not affected by the VOLUME, the SUBWOOFER LEVEL,
the SOUND MODE, and the DSP Surround controls. Thus,
during recording you can adjust the sound you are actually
listening to without affecting the recording level.
• If recordings you have made have excessive noise or static,
the unit may be too close to a TV. Increase the distance
between the TV and the unit.
• You can use type I tape for recording.
To protect your recording
Cassettes have two small
tabs on the top to protect
from unexpected erasure or
re-recording.
To protect your recording,
remove these tabs.
To re-record on a protected tape, cover the holes with
adhesive tape.
To keep the best recording and playback sound quality
If the heads, capstans, and pinch rollers of the cassette decks
become dirty, the following will occur:
• Impaired sound quality
• Discontinuous sound
• Fading
• Incomplete erasure
• Difficulty in recording
To clean the heads, capstans, and pinch rollers
Use a cotton swab moistened with alcohol.
Pinch rollers
Recording a Tape on Deck B
On the unit ONLY:
1
Press EJECT 0 for the deck B.
2
Put a recordable cassette into deck B.
3
Close the cassette holder gently.
4
Start playing the source—FM, AM,
DVD/SVCD/VCD/CD player, deck A, or
auxiliary equipment connected to AUX jacks.
• When the source is SVCD, VCD or CD, you can also
use SVCD/VCD/CD Direct Recording (see page 33)
and Auto Edit Recording (see page 34).
• When the source is deck A, you can also use the
dubbing method. (See “Dubbing Tapes” on page 33.)
5
Check the tape direction of deck B.
• If the tape direction is not correct, press TAPE 2 3
twice then 7 to change the tape direction.
6
Press REC START/STOP.
The (recording) indicator lights up on
the display and recording starts.
• If no cassette is inserted, “NO TAPE”
appears on the display. If a protected tape is inserted,
“NO REC” appears on the display.
Capstans
Heads
To demagnetize the heads
Turn off the unit, and use a head demagnetizer (available at
electronics and audio shops).
To stop recording immediately, press 7.
To remove the cassette, press EJECT 0 for deck B.
To record on both sides—Reverse Mode
Press REVERSE MODE so that the Reverse
Mode indicator lights up like— .
• When using the Reverse Mode for recording,
start recording in the forward (3) direction
first. Otherwise, recording will stop when
recording is done only on one side (reverse) of the tape.
To cancel Reverse Mode, press the button again so that the
Reverse Mode indicator lights up like— .
– 32 –
Page 36

Dubbing Tapes
SVCD/VCD/CD Direct Recording
You can record from one tape to another.
On the unit ONLY:
1
Press TAPE 2 3, then 7.
2
Put the source cassette in deck A, and a
recordable cassette in deck B.
• Put the cassettes in both decks so that the tapes will run
in the forward (3) direction.
3
Press DUBBING.
The (recording) indicator lights up on
the display and dubbing starts.
To stop dubbing, press 7 so that both decks (A and B) stop.
To record on both sides—Reverse Mode
Press REVERSE MODE so that the Reverse
Mode indicator lights up like— .
To cancel Reverse Mode, press the button
again so that the Reverse Mode indicator
lights up like— .
You can easily record sound of a SVCD or VCD without the
PBC function or CD onto a tape.
• You can also record the tracks in order you have made the
program.
• This function cannot be used for recording DVDs.
On the unit ONLY:
1
Put a recordable cassette into deck B.
2
Load discs with the label side up.
3
Press one of the disc
number buttons (DVD1,
DVD2, or DVD3) to select
the disc, then 7.
4
Press CD REC START.
“CD REC” appears, and the
(recording) indicator lights up on the
display.
Deck B starts recording and the DVD/SVCD/VCD/CD
player starts playing.
When the recording is done, “CD REC FINISHED”
appears on the display, and the DVD/SVCD/VCD/CD
player and deck B stop.
To stop recording, press REC START/STOP
or 7 so that a 4-second blank portion is
created on the recording tape. (Remember a
4-second blank is important when using
Music Scan—see page 30.)
To record on both sides—Reverse Mode
Press REVERSE MODE so that the Reverse
Mode indicator lights up like— .
• When using the Reverse Mode for SVCD/
VCD/CD Direct Recording, start recording in
the forward (3) direction first. When the tape reaches its
end while recording a song in the forward direction (3),
the last song will be re-recorded at the beginning of the
reverse side (2).
If you start recording on the reverse side (2), recording
will stop when recording is done only on one side (reverse)
of the tape.
To cancel Reverse Mode, press the button again so that the
Reverse Mode indicator lights up like— .
– 33 –
Page 37

Auto Edit Recording
By using Auto Edit Recording, you can record disc tracks to
fit the tape. Auto Edit Recording makes a program by
selecting disc tracks in numerical order. However, to prevent
the end of the last track on the front side from being cut off,
the last track is selected so as to fit on the remaining tape
length.
• This function cannot be used for recording DVD, SVCD
and VCD.
On the unit ONLY:
1
Load discs with the label side up.
2
Press EDIT.
3
Press the disc number
button (DVD1, DVD2, or
DVD3) for the disc you
want to record from.
4
Press SET.
• Each time you press the button, the tracks to
be recorded on the front side (“SIDE-A”)
and on the reverse side (“SIDE-B”) alternate.
Tracks to be recorded on the
reverse side (SIDE-B) appear.
5
Put a recordable cassette of appropriate
length into deck B.
6
Press REVERSE MODE so that the
Reverse Mode indicator lights up
like
• Without turning on the Reverse Mode
( ), recording will stop when the front
side of the tape is recorded.
7
Press CD REC START.
“TAPE SIDE-A STAND-BY” appears, and
the (recording) indicator lights up
on the display.
Deck B starts recording then, and about 10 seconds later,
the DVD/SVCD/VCD/CD player starts playing.
When the recording is done, “CD REC FINISHED”
appears on the display, and the DVD/SVCD/VCD/CD
player and deck B stop.
• If a tape has not been rewound, deck B will rewind the
tape before it starts recording.
• A 10-second blank portion is automatically created at
the beginning of each side of the tape.
.
The optimum tape length for the disc appears.
To change the tape length manually
If the tape length selected is not satisfactory, you can
change the tape length by turning 4 / ¢.
You can select the tape length among the following
— 40, 46, 50, 54, 60, 64, 70, 74, 80, 84, and 90.
To stop recording, press REC START/STOP or 7 so that a 4-
second blank portion is created on the recording tape.
(Remember a 4-second blank is important when using Music
Scan—see page 30.)
To cancel Auto Edit Recording
Press CANCEL/DEMO or 7 before or after recording.
– 34 –
Page 38

Using the Microphones
You can enjoy singing along (Karaoke) and microphone
mixing by using two microphones.
• MIC LEVEL adjustment is valid for both microphones
connected to the MIC 1 and MIC 2 jacks.
IMPORTANT:
• Always set MIC LEVEL to MIN when connecting or
disconnecting the microphone.
• When you do not use the microphone, keep it microphones
unconnected.
DO NOT forget to cancel the Karaoke mode by pressing
V. MASK while holding SHIFT after you finish enjoying
Karaoke. Otherwise normal playback cannot be started.
Singing along (Karaoke)
Vocal Masking
Vocal Masking reduces the lead vocal of any playing source,
and allows you to replace it by singing into the microphones
as the music plays.
• Vocal Masking continues to function even though you change
the source.
1
Turn MIC LEVEL to MIN.
2
Connect the microphone(s) (not
supplied) by plugging it into the
MIC 1 and/or MIC 2 jack.
3
Press V. MASK while
holding down SHIFT on
the remote control.
The karaoke ( ) indicator lights
up on the display.
4
Start playing the source—DVD/SVCD/VCD/
CD player, tape, FM/AM tuner or other
connected component.
5
Turn MIC LEVEL and
VOLUME as you sing into the
microphone(s).
• By pressing REC START/STOP, you
can record your singing along if you
want. (See page 32.)
+
To apply an echo to your voice
You can apply echo effect to your voice.
On the remote control ONLY:
Press ECHO while holding
down SHIFT.
• Each time you press the buttons,
the echo level changes as follows.
As the number increases, a
stronger echo effect applies to
your voice.
ECHO 1
To adjust the Key
You can adjust the key of the disc to fit to your voice.
• This function is available while playing back discs loaded
on the DVD/SVCD/VCD/CD player.
ECHO 2
ECHO OFF
(Canceled)
ECHO 3
+
On the remote control ONLY:
Press KEY CONTROL # or
I while holding down SHIFT
+
to adjust the key.
The following display appears.
Adjustable key range is “–6” to “6.”
• To raise the key, press KEY CONTROL #.
• To lower the key, press KEY CONTROL I.
You can also check your key adjustment on the TV screen.
To cancel the key control, set the key to “KEYCON 0” by
pressing KEY CONTROL # or I.
When the current playing title or track finishes
the key returns to “KEYCON 0.”
– 35 –
Page 39

Continued
If howling or squealing (feedback) occurs while using
the microphone(s)
Take the following actions to prevent these noises.
• Adjust MIC LEVEL and VOLUME.
• Avoid pointing the microphone(s) towards the speakers.
• When two microphones are connected, turn off the unused
microphone.
If you use the following sources as the playing source
for Karaoke (Vocal Masking), you cannot get the
satisfactory results
• Radio programs—a radio signal is not as reliable as the signals
coming from a tape or disc.
• Monaural sources.
• Poorly dubbed tapes.
• Sources recorded with duets, strong echo, a chorus, or only a few
instruments.
Microphone mixing
1
Connect the microphone(s).
2
Start playing the source—DVD/SVCD/VCD/
CD player, tape, FM/AM tuner or other
connected component.
To use microphone only
Without any background sound, you can use your
microphone(s), and record it if you want.
1
Connect the microphone(s).
2
Press DVD 3/8 (or DVD 3 on the remote
control), then 7.
No background sound will be heard.
3
Turn MIC LEVEL and
VOLUME as you sing into the
microphone(s).
• By pressing REC START/STOP, you
can record your singing along if you
want. (See page 32.)
3
Turn MIC LEVEL and
VOLUME as you sing into the
microphone(s).
• By pressing REC START/STOP, you
can record your singing along if you
want. (See page 32.)
If the playing disc is a multiplex Karaoke disc
You can enjoy multiplex sound by pressing AUDIO on the remote
control while holding down SHIFT. (See page 18.) You can also
replace the vocal part with your voice by selecting instrument sound
on DVD, SVCD or VCD.
– 36 –
Page 40

Reserving Karaoke Songs
—Karaoke Program Play
You can determine the playback order of the titles or tracks
on the DVD/SVCD/VCD/CD player. You can program up
to 12 steps.
• You cannot use reserve function when a SVCD or VCD
with the PBC function is played back. Press 7 before
performing below procedure.
• When playing back a DVD, you can only reserve titles on
the disc.
On the remote control ONLY:
1
Press RESERVE while holding
down SHIFT.
The karaoke reserve screen appears on the
TV.
1 2 3 4 5 6
2
Press one of the disc number buttons (DVD 1,
+
DVD 2 or DVD 3) you want to program while
holding down SHIFT .
The selected disc number is shown on the TV screen.
+
5
Press V. MASK while
holding down SHIFT.
The karaoke ( ) indicator lights
up on the display.
6
Press DVD 3.
The titles and tracks are played in the order
you have programed.
• A title or track which has finished played
back is deleted from the reserved program.
The play is stops after playing back all reserved
program and the PRGM indicator goes from the display.
To modify the program
You can modify the program before or after playing.
To erase a reserved steps, press CANCEL while holding
down SHIFT.
• Each time you press the buttons, the last programmed step
is erased from the program.
To add steps in the reserve program before playing, press
Cursor 3 or 2 to move
select the disc and title/track numbers by following steps 2
and 3 before or after playing.
To erase program completely before playing, press
CLEAR when the playback is stopped.
The program you have made will be also erased,
• when you remove all the discs, and then press DVD 3.
• when you unplug the AC power cord.
• when a power failure occurs.
to a number you like to add, then
+
3
Press the number buttons
to enter a title or track
number you want to
program.
The selected title or track number
is shown on the TV screen.
Ex.: To select number 5, press 5.
To select number 10, press 10.
To select number 20, press +10 then 10.
To select number 23, press +10, +10 then 3.
7 8 9 10 11 12
1 - 5 2-10 3 - 1 1 - 7 2-14 3-13
Selected title or track number
Selected disc number
• PRGM indicator also flashes on the display.
4
To program another title or track from the
same disc, repeat step 3.
To program another title or track from a
different disc, repeat steps 2 and 3.
Each time you select a title or track, the program item is
added up to 12 steps.
To check the programed contents
Press RESERVE while holding down SHIFT. The programed
contents appear on the TV screen.
To erase the karaoke reserve screen, press RESERVE while
holding down SHIFT again. The program you have made is
memorized.
To exit from Karaoke Program play mode, press 7 and
then PROGRAM on the unit twice.
If you do not press DVD 3 in step 6,
The normal play continues.
– 37 –
Page 41

Operating the On-Screen Menu
Continued
Using the on-screen menus, you can store the initial selection
for subtitle languages and audio languages (sound) for DVD
playback as well as other settings.
• The on-screen menu disappears if no operation is done for
five minutes.
Buttons you use to operate on-screen menus (on the
remote control)
• Press to show or erase the
on-screen menu.
• Press to select the item.
• Press to enter into sub-menu.
• Press to enter your selection.
On-screen menus
• LANGUAGE menu (see page 39)
MENU LANGUAGE
AUDIO LANGUAGE
SUBTITLE
ON SCREEN LANGUAGE
ENGLISH
ENGLISH
ENGLISH
ENGLISH
EXIT
Basic Procedure
The on-screen menu appears only when the selected source
is DVD, SVCD or VCD on the DVD/SVCD/VCD/CD
player and the disc is not played back.
On the remote control ONLY:
1
Press CHOICE.
LANGUAGE menu appears.
2
Press Cursor 3 or 2 to move to the
menu you want—LANGUAGE, AUDIO,
DISPLAY, or SYSTEM.
Selected item changes its color to green.
MENU LANGUAGE
AUDIO LANGUAGE
SUBTITLE
ON SCREEN LANGUAGE
PRESS KEY
Ex.: When selecting LANGUAGE menu.
3
Press Cursor ∞ or 5 to move to an item
you want to set.
Selected item changes its color to green.
ENGLISH
ENGLISH
ENGLISH
ENGLISH
EXIT
PRESS KEY
• AUDIO menu (see page 39)
DIGITAL AUDIO OUTPUT
PRO LOGIC
COMPRESSION
SPEAKER SETTING
PRESS KEY
STREAM/PCM
AUTO
EXPERT
• DISPLAY menu (see page 41)
MONITOR TYPE
SCREEN SAVER
ON SCREEN GUIDE
PRESS KEY
4:3 LB
MODE 2
• SYSTEM menu (see page 42)
AUTO STANDBY
RESUME
AV COMPULINK MODE
PRESS KEY
DVD 1
OFF
EXIT
ON
EXIT
OFF
OFF
EXIT
Usable buttons
MENU LANGUAGE
AUDIO LANGUAGE
SUBTITLE
ON SCREEN LANGUAGE
PRESS KEY
Ex.: When selecting “MENU LANGUAGE.”
4
Press Cursor 3 or 2 to select a proper
ENGLISH
ENGLISH
ENGLISH
ENGLISH
EXIT
setting you want.
• When selecting “EXPERT” for “SPEAKER
SETTING” on AUDIO menu, press ENTER. (See
page 39.)
5
To set the other items on the same menu,
repeat steps 3 and 4.
To set the other items on the different
menus, repeat steps 2 to 4.
6
When finished, press Cursor ∞ to move
to “EXIT,” then press ENTER.
The on-screen menu disappears.
To exit from the on-screen menu any time during the
above procedure, press CHOICE. The settings you have
done by that time will be stored.
– 38 –
Page 42

Changing the Initial Language Settings
On LANGUAGE menu, you can select the following initial
languages.
MENU LANGUAGE
AUDIO LANGUAGE
SUBTITLE
ON SCREEN LANGUAGE
PRESS KEY
ENGLISH
ENGLISH
ENGLISH
ENGLISH
EXIT
• DIGITAL AUDIO OUTPUT :
Set the output signal type through the OPTICAL
DIGITAL OUTPUT terminal. (For the output signal
types, see page 51.)
– Select “STREAM/PCM” when connecting an
amplifier or a decoder compatible with DTS, Dolby
Digital and MPEG Multichannel.
– Select “PCM ONLY” when connecting a digital
recording device such an MD recorder, DAT deck, etc.
– Select “DOLBY DIGITAL/PCM” when connecting
an amplifier or a decoder compatible only with Dolby
Digital.
• MENU LANGUAGE :Select the DVD menu language.
Selectable languages—ENGLISH, SPANISH, FRENCH,
CHINESE, GERMAN, ITALIAN, JAPANESE, AA – ZU
(Language code: see page 52.)
• AUDIO LANGUAGE :Select the initial language for
audio sound language.
Selectable languages—ENGLISH, SPANISH, FRENCH,
CHINESE, GERMAN, ITALIAN, JAPANESE, AA – ZU
(Language code: see page 52.)
• SUBTITLE :Select the initial language for
subtitles.
Selectable languages—ENGLISH, SPANISH, FRENCH,
CHINESE, GERMAN, ITALIAN, JAPANESE, AA – ZU
(Language code: see page 52.)
• ON SCREEN LANGUAGE :
Select the language for the onscreen menus and indications.
Selectable languages—ENGLISH, (Chinese),
ESPAÑOL (Spanish)
NOTICE: The original language will be selected as the initial
language regardless of your setting in the following cases.
– If the language you have selected is not recorded on the
disc.
– If the disc is programed to be played back in the original
language.
Changing the Various Audio Settings
On AUDIO menu, you can change the following sound
settings.
DIGITAL AUDIO OUTPUT
PRO LOGIC
COMPRESSION
SPEAKER SETTING
PRESS KEY
STREAM/PCM
AUTO
OFF
EXPERT
EXIT
• PRO LOGIC :
Set the output signal type.
– Select “AUTO ” to output original signals recorded in
discs.
– Select “ON” to automatically decode into Pro Logic
format. You cannot use this setting for a DVD with
Linear PCM.
– Select “OFF” to down mix multichannel source to the
front left and the front right.
By selecting “OFF,” you can enjoy full range stereo
sound when using headphones, hearing through AUX
OUT jacks, and recording.
• The PRO LOGIC lamp on the front panel lights up
when—
—setting “PRO LOGIC” to “ON” when playing back
any disc except Dolby Digital 5.1ch and MPEG
Multichannel discs.
—setting “PRO LOGIC” to “AUTO” when playing back
a Dolby Surround Pro Logic disc.
When playing back a CD, set this item to “AUTO” or
“OFF.” You cannot show the on-screen menu when CD is
the playing source. Show the on-screen menu by selecting
a DVD, SVCD or VCD as a playing source or remaining
the disc tray opened, and change the setting.
• COMPRESSION :
Compress the dynamic range (difference between the
maximum and minimum sound levels) while playing a
source encoded with Dolby Digital. This is useful when
listening at a low volume level.
– Select “ON” to apply dynamic compression.
– Select “OFF” not to apply dynamic compression (full
dynamic range recorded on the original disc.)
• SPEAKER SETTING :
Set the speaker’s output level and delay time according to
your speaker setting in your listening room. (See page 40.)
– Select “EXPERT” if you cannot locate all the
speakers at the same distance from the listening
position. Select “EXPERT” to enter EXPERT
SPEAKER SETTING menu, then press ENTER.
– Select “5.1CHANNEL” if all the speakers are located
at the same distance from the listening position.
– 39 –
Page 43

Continued
HAPTER
More about “SPEAKER SETTING”
The following example shows the ideal speaker locations for
surround reproduction in your listening room.
Center speaker
Left
front speaker
30˚
90˚ 90˚
Left rear
speaker
30˚
When using front multi speaker system, refer to
“Recommended Main Speakers and Subwoofers Layout”
separately attached.
Right
front speaker
Subwoofer
(5.1ch OUT)
Right rear
speaker
“EXPERT” adjustment procedure
7 Adjusting the delay time for the center and rear
speakers
You can adjust the delay time of the sounds from the center
speaker and from the rear speakers, comparing to that of the
sound from the front speakers.
If the distance to the center speaker and/or rear speakers from
your listening position is almost the same as that to the front
speakers, select “0 ms” (the default setting for
“5.1CHANNEL” settings).
• 1 msec increase (or decrease) in delay time corresponds to
1 foot (30 cm) increase (or decrease) in distance.
Left front
speaker
Left rear
speaker
Center speaker
Ex.: In this case, set “C.SPK–DELAY” to “–1 ms” and
“R.SPK–DELAY” to “–5 ms.”
1.5 m
Right front
speaker
2.7 m
2.4 m
Right rear
speaker
3.0 m
If you can locate the speakers as the above example, you can
select “5.1CHANNEL” for your speaker setting.
If you can NOT do as above, select “EXPERT,” then press
ENTER. EXPERT SPEAKER SETTING menu appears and
you can adjust the output level and delay time for the center
and rear speakers.
EXPERT SPEAKER SETTING
SIZE LEVEL DELAYHAPTER
F.SPK Large
C.SPK Small 0 dB 0 ms
R.SPK Small 0 dB 0 ms
SUB WOOFER 0 dB
BASS L / R TEST TONE
EXIT
L
The output channel
signals appears when
checking signal by
using TEST TONE.
• You cannot adjust the speaker size
(SIZE) settings.
On EXPERT SPEAKER SETTING menu, you can set the
following:
• C.SPK–LEVEL: Adjust the output level for the center
speaker. (See page 41.)
• R.SPK–LEVEL: Adjust the output level for the rear
speakers. (See page 41.)
• SUB WOOFER–LEVEL:
Adjust the output level for the
subwoofer. (See page 41.)
• C.SPK–DELAY: Adjust the delay time for the center
speaker. (See the right.)
• R.SPK–DELAY: Adjust the delay time for the rear
speakers. (See the right.)
• BASS: Select the speaker for bass output. (See
page 41.)
1 Display EXPERT SPEAKER SETTING menu.
• See page 38.
2 Press Cursor (5 / ∞ / 3 / 2) to move to “C.SPK–
DELAY,” then press ENTER.
3 Press Cursor 3 or 2 to select “–1 ms,” then press
ENTER.
• Adjustable range for the center speaker delay time is
from “–5 ms” to “0 ms.”
4 Press Cursor ∞ or 5 to move to “R.SPK–DELAY,”
then press ENTER.
5 Press Cursor 3 or 2 to select “–5 ms,” then press
ENTER.
• Adjustable delay time for rear speakers is “–5 ms,”
“–10 ms” and “–15 ms.”
Now you can also adjust the speaker output level and
select the speaker for the bass output (see next page).
6 When finished, press Cursor (5 / ∞ / 3 / 2) to move
to “EXIT,” then press ENTER.
EXPERT SPEAKER SETTING menu disappears.
– 40 –
Page 44

7 Adjusting the center and rear speaker output levels
MONITOR TYPE
SCREEN SAVER
ON SCREEN GUIDE
4:3 LB
MODE 2
ON
EXIT
PRESS KEY
You can adjust the speaker output level for the center speaker
and rear speakers.
You can adjust the output level while listening to the test
tone.
• Make adjustments so that the sound level of the selected
speaker is set at the same level as that of the front speakers.
• To output test tone properly, turn off the sound mode and
the DSP Surround mode before entering on-screen menu.
1 Display EXPERT SPEAKER SETTING menu.
• See page 38.
2 Press Cursor (5 / ∞ / 3 / 2) to move
to “TEST
TONE,” then press ENTER.
“TEST TONE” changes its color to green and test tone
comes out of in the following sequence—left front speaker,
center speaker, right front speaker, right rear speaker, and
left rear speaker.
• Test tone is output only when the tray loaded with a
DVD is selected.
7 Adjusting the subwoofer output levels
You can adjust the output level according to your preference.
1 Display EXPERT SPEAKER SETTING menu.
• See page 38.
2 Press Cursor (5 / ∞ / 3 / 2) to move
to “SUB
WOOFER,” then press ENTER.
• You can adjust the output level from “–6 dB” to “+6 dB.”
3 Press Cursor 3 or 2 to adjust the output level, then
ENTER.
4 When finished, press Cursor (5 / ∞ / 3 / 2) to move
to “EXIT,” then press ENTER.
EXPERT SPEAKER SETTING menu disappears.
Changing the Display Settings
On DISPLAY menu, you can change the following display
settings.
3 Press Cursor (5 / ∞ / 3 / 2) to move
LEVEL” or “R.SPK–LEVEL,” then press ENTER.
4 Press Cursor 3 or 2 to adjust the output level, then
press ENTER.
• You can adjust the output level from “–6 dB” to “+6 dB.”
5 Repeat steps 3 and 4 to adjust the other speaker output
level.
6 Press Cursor (5 / ∞ / 3 / 2) to select “TEST TONE,”
then press ENTER.
Test tone stops.
7 When finished, press Cursor (5 / ∞ / 3 / 2) to move
EXPERT SPEAKER SETTING menu disappears.
7 Selecting the speaker for bass output
You can select the speaker for bass output according to your
preference.
1 Display EXPERT SPEAKER SETTING menu.
• See page 38.
2 Press Cursor (5 / ∞ / 3 / 2) to move to “BASS,”
then press ENTER.
3 Press Cursor 3 or 2 to select your desired setting.
• L/R : to output the bass signals through the
• S.woofer : to output the bass signals through the
4 When finished, press Cursor (5 / ∞ / 3 / 2) to move
EXPERT SPEAKER SETTING menu disappears.
to “EXIT,” then press ENTER.
FRONT SUBWOOFERS terminals.
subwoofer connected to the SUB-WOOFER
5.1ch OUT jack.
to “EXIT,” then press ENTER.
to “C.SPK–
• MONITOR TYPE :
Set the monitor type to use while playing back a DVD
recorded with 16:9 wide screen video signal.
Selectable types—4:3 LB , 16:9 WIDE, 4:3 PS .
(See page 42.)
• SCREEN SAVER :
Select the screen saver to prevent a TV monitor from
burning out.
– Select “MODE 1” to activate the screen saver by
making the TV screen dark.
– Select “MODE 2” to activate the screen saver by
showing the original screen-saver.
– Select “OFF” to deactivate this function.
When “MODE 1” or “MODE 2” is selected, screen saver
functions if still (static) picture is shown for more than 5
minutes.
• ON SCREEN GUIDE :
By watching the on-screen indications shown on the TV
screen, you can confirm what you are doing while
operating the DVD player.
– Select “ON” to show the on-screen indications.
– Select “OFF” to deactivate this function.
– 41 –
Page 45

7 Monitor types
AUTO STANDBY
RESUME
AV COMPULINK MODE
OFF
OFF
DVD 1
EXIT
PRESS KEY
• 4:3 LB (Letter Box)
this when viewing on TV whose
aspect ratio is 4:3.
While viewing a wide screen
picture, the black bars appear on
the top and the bottom of the
screen.
• 16:9 WIDE: Select this when
viewing on TV whose aspect
ratio is 16:9.
• 4:3 PS (Pan Scan) : Select
this when viewing on TV whose
aspect ratio is 4:3.
While viewing a wide screen
picture, the black bars do not
appear, however, the left and
right edge sides of the pictures
will not be shown on the screen.
• Even if “4:3 PS
” is selected, the screen size may
become “4:3 LB ” while playing some DVDs. This
depends on how the DVD is programed and recorded.
• If a disc (or some portions of the disc) is recorded
with the video signals of 4:3 aspect ratio, this setting
does not take effect. The pictures are displayed with full
4:3 aspect ratio or with 4:3 Letter Box.
Changing the System Settings
: Select
On SYSTEM menu, you can change the following settings.
• AUTO STANDBY :
You can turn off (into standby) the unit automatically.
– Select “30” to turn off the unit automatically if no
operation is done for 30 minutes.
– Select “60” to turn off the unit automatically if no
operation is done for 60 minutes.
– Select “OFF” to deactivate this function.
• RESUME :
This unit can memorize the stop-point where DVD,
SVCD or VCD playback stops. When the playback is
selected again, it starts from where it has been stopped—
Resume play.
– Select “ON” to activate Resume play.
– Select “OFF” to deactivate Resume play. Playback
always starts from the beginning.
• AV COMPULINK MODE :
When connecting this unit to a JVC’s TV with the AV
COMPULINK remote control system, select the proper
setting.
– Select “DVD 1” when connecting this unit to the
COMPONENT VIDEO or INPUT-2 terminals on a
TV.
– Select “DVD 2” when connecting this unit to the
INPUT-1 terminals on a TV.
– Select “DVD 3” when connecting this unit to the
INPUT-2 terminals on a TV.
* For AV COMPU LINK control system, see page 48.
– 42 –
Page 46

Using the Parental Lock
Temporary
Level Change ?
PASSWORD
YES
NO
– – – –
PRESS ENTER EXECUTIVE
This DISC can't play now!
Setting the Parental Lock Level
Using this function, you can restrict playback of DVD
containing violent scenes (and those not suitable for your
family members).
• This function is only possible for the DVDs containing
such rating level information—Level 1 (most restrictive) to
Level 8 (least restrictive).
On the remote control ONLY:
Before setting the parental lock, make sure that no disc is
loaded on the currently selected tray.
1
Press ENTER while holding
down 7.
PARENTAL LOCK screen appears.
• When you set the parental lock for the
first time, points “Country Code.”
(Go to step 3.)
• When you change the parental lock settings,
points “PASSWORD.”
Country Code
Set Level
PASSWORD
A D
–
– – – –
EXIT
+
5
Press the number buttons (0 – 9) to enter new
password (4 digits), then press ENTER.
moves to “EXIT.”
6
Press ENTER.
The parental lock level is set and
PARENTAL LOCK screen disappears
from the TV.
To exit from PARENTAL LOCK screen any time during
the above procedure, press ENTER while holding down 7.
If you do not enter new password
The setting you have done is not stored.
Unlocking the Parental Lock Temporarily
Some discs cannot be played back at all when the parental
lock is set. If you insert such a disc and try to play, the
following PARENTAL LOCK screen appears on the TV. You
can unlock the parental lock setting temporarily on this
screen.
PRESS KEY ENTER
Initial PARENTAL LOCK screen
2
Press the number buttons (0
– 9) to enter the current
password (4 digits), then
press ENTER.
moves to “Country Code.”
• If you enter a wrong password,
“WRONG! RETRY···” appears.
Enter correct password again.
3
Press Cursor 3 or 2 to
select a proper country code,
then press ENTER.
moves to “Set Level.”
• For each country code, see pages 53
and 54.
4
Press Cursor 3 or 2 to select a parental lock
level, then press ENTER.
moves to “PASSWORD.”
• Each time you press the button, the parental lock level
changes as follows. The playback of the software rated
the level you select or more restrictive is prohibited to
be played back.
1
• If you do not want to make any restriction, select “–.”
–
On the remote control ONLY:
1
Press Cursor 5 or ∞ to select “YES,” then
press ENTER.
moves to “PASSWORD.”
• If you do not unlock the parental lock (do not see the
loaded DVD), move to “NO” for “Level Change ?”
by pressing Cursor 5 or ∞. PARENTAL LOCK screen
disappears.
2
Press the number buttons (0 – 9) to enter the
current password (4 digits).
• If you enter a wrong password, “WRONG! RETRY···”
appears. Enter correct password again.
3
Press ENTER.
The parental lock is temporarily unlocked and
PARENTAL LOCK screen disappears.
If you enter wrong password 3 times,
“WRONG! CAN’T CHANGE!” appears on the screen.
2
8
3
7
6
4
5
to “EXIT” and Cursor 5 and ∞ do not work.
When you forget your password, enter “8888.”
moves
– 43 –
Page 47

Using the Timers
Continued
There are three timers available—Daily Timer, Recording
Timer, and Sleep Timer.
Before using the timers, you need to set the clock built in the
unit. (See page 11.)
Using Daily Timer
With Daily Timer, you can wake to your favorite music or
radio program. You can set the timer whether the unit is on or
off (on standby).
How Daily Timer actually works
The unit automatically turns on, set the volume level to the
preset level, and starts playing the specified source when the
on-time comes (the indicator continues flashing while the
timer is operating). Then, when the off-time comes (“OFF”
flashes just before the off-time), the unit automatically turns
off (on standby).
The Daily timer works everyday automatically. If you do not
want to use the Daily timer, turn off the Daily timer. (See “To
turn off or on Daily Timer after its setting is done” on the
next page.) The timer setting remains in memory until you
change it.
• There is a time limit in doing the following steps. If the
setting is canceled before you finish, start from step 1
again.
• To correct a misentry while setting the timer, press
CANCEL/DEMO.
On the unit ONLY:
1
Press CLOCK/TIMER repeatedly
until “DAILY” appears on the
display.
indicator lights up and DAILY (Daily
Timer) indicator also starts flashing on the
display.
• Each time you press the button, the timer setting modes
change as follows:
DAILY
Canceled
2
Press CLOCK/TIMER again.
“ON TIME” appears for 2 seconds on the
display, then the unit enters on-time setting
mode.
ON TIME
(Daily timer setting)
Clock
setting
(The hour digits
start flashing.)
REC
ON TIME
(Recording
timer setting)
Before you start...
• When using a DVD, SVCD or VCD as the source to
play—
–Make sure that a TV is set to turn on at the setting time
and the correct input mode is selected.
–Make sure there is a disc on the selected disc number
tray.
• When using a CD as the source to play—
–Make sure there is a disc on the selected disc number
tray.
• When using a tape as the source to play—
–Make sure that a tape is in the deck whose deck
indicator (A or B) is lit on the display.
–Make sure that the tape direction is correct.
• When using tuner as the source to play—
–Set the preset stations.
• When using the external component as the source to
play—
–Set the timer equipped on the external component at
the same time.
3
Set the on-time you want the
unit to turn on at.
1) Turn 4 / ¢ to set the hour, then
press SET.
2) Turn 4 / ¢ to set the minute,
then press SET.
“OFF TIME” appears for 2 seconds
on the display, then the unit enters
off-time setting mode.
4
Set the off-time you want the unit to turn off
(on standby) at.
1) Turn 4 / ¢ to set the hour, then press SET.
2) Turn 4 / ¢ to set the minute, then press SET.
The unit enters source selecting mode.
– 44 –
Page 48

5
STANDBY/ON
STANDBY
Turn 4 / ¢ to select the source to play,
then press SET.
• The source changes as follows:
TUNER FM TUNER AM
DISC– – –TAPEAUX
9
Press STANDBY/ON to
turn off the unit (on standby)
if you have set the Daily Timer
with the unit turned on.
TUNER FM: tunes into a specified preset FM station.
= Go to step 6.
TUNER AM: tunes into a specified preset AM station.
= Go to step 6.
DISC– – –: plays a disc from a specified title or track
of a specified disc. = Go to step 6.
TAPE: plays a tape in deck A or B.
= Go to step 7.
AUX: plays an external source. = Go to step 7.
6
When selecting “TUNER FM” or “TUNER
AM”
Turn 4 / ¢ to select the preset station number, then
press SET.
The unit enters volume setting mode.
When selecting “DISC– – –”
1) Turn 4 / ¢ to select the disc number, then press
SET.
2) Turn 4 / ¢ to set the title or track number, then
press SET.
The unit enters volume setting mode.
7
Turn 4 / ¢ to set the
volume level.
• The volume level changes as
follows:
VOL – – VOL 05
If the unit is turned on when the on-time comes
Daily Timer does not work.
Even if you unplug the AC power cord or if a power
failure occurs
Once you set the timer, the timer setting may remain stored in
memory for a few days. In this case, check whether the timer setting
still remains or not.
To turn off or on Daily Timer after its setting is done
1 Press CLOCK/TIMER repeatedly until
“DAILY” appears on the display.
2 To turn off the Daily Timer, press
CANCEL/DEMO.
indicator and the DAILY (Daily
Timer) indicator go off from the display
(“OFF” appears for a while).
The Daily Timer is canceled, but the
setting for the Daily Timer remains in
memory.
To turn on the Daily Timer, press SET.
indicator and the DAILY (Daily Timer)
indicator light up on the display. The settings
you have done are shown on the display in
sequence for your confirmation.
VOL 10VOL 15
• If you select “ VOL – –,” the volume is set to the last
level when the unit has been turned off.
8
Press SET to complete the Daily
Timer setting.
The DAILY (Daily Timer) indicator stops
flashing and remains lit. The settings you
have done are shown on the display in
sequence.
– 45 –
Page 49

Y
g.)
Continued
Using Recording Timer
With Recording Timer, you can make a tape of a radio
broadcast automatically. You can set the timer whether the
system is on or off.
How Recording Timer actually works
The unit automatically turns on, tunes into the specified
station, sets the volume level to “VOL MIN,” and starts
recording when the on-time comes (the indicator
continues flashing while the timer is operating). Then, when
the off-time comes (“OFF” flashes just before the off-time),
the unit automatically turns off (on standby).
The timer setting remains in memory until you change it.
• There is a time limit in doing the following steps. If the
setting is canceled before you finish, start from step 2
again.
• To correct a misentry while setting the timer, press
CANCEL/DEMO.
On the unit ONLY:
1
Put a recordable cassette into deck B.
2
Press CLOCK/TIMER repeatedly
until “REC” appears on the display.
indicator lights up and the REC (Recording
Timer) indicator also starts flashing on the
display.
4
Set the on-time you want the
unit to turn on at.
1) Turn 4 / ¢ to set the hour, then
press SET.
2) Turn 4 / ¢ to set the minute,
then press SET.
“OFF TIME” appears for 2 seconds
on the display, then the unit enters
off-time setting mode.
5
Set the off-time you want the unit to turn off
(on standby) at.
1) Turn 4 / ¢ to set the hour, then press SET.
2) Turn 4 / ¢ to set the minute, then press SET.
The unit enters preset station selecting mode.
6
Select the preset station.
1) Turn 4 / ¢ to select the band (“TUNER FM” or
“TUNER AM”), then press SET.
2) Turn 4 / ¢ to select a preset channel number,
then press SET.
The REC (Recording Timer) indicator stops flashing
and remains lit. The settings you have done are shown
on the display in sequence.
7
Press STANDBY/ON to
STANDBY/ON
turn off the unit (on standby)
if necessary.
STANDB
• Each time you press the button, the timer setting modes
change as follows:
DAILY
Canceled
3
Press CLOCK/TIMER again.
“ON TIME” appears for 2 seconds on the
display, then the unit enters on-time setting
mode.
ON TIME
(Daily timer setting)
Clock
setting
(The hour digits
start flashin
REC
ON TIME
(Recording
timer setting)
If you want to listen to another source while recording
Press REC START/STOP or 7 to stop recording. Without stopping
it, you cannot change the source.
Even if you unplug the AC power cord or if a power
failure occurs
Once you set the timer, the timer setting may remain stored in
memory in a few days. In this case, check whether the timer setting
still remains or not.
– 46 –
Page 50

To turn off or on Recording Timer after its setting is
21:00 21:30 22:00 22:30
does not work.
done
1 Press CLOCK/TIMER repeatedly until
“REC” appears on the display.
2 To turn off the Recording Timer, press
CANCEL/DEMO.
indicator and the REC (Recording
Timer) indicator go off from the display
(“OFF” appears for a while).
The Recording Timer is canceled, but the
setting for the Recording Timer remains in memory.
To turn on the Recording Timer, press
SET.
indicator and the REC (Recording Timer)
indicator light up on the display. The settings
you have done are shown on the display in
sequence for your confirmation.
Timer Priority
Since each timer can be set separately, you may wonder what
happens if the setting for these timers overlaps.
Here are examples.
Recording Timer has priority over Daily Timer and Sleep
Timer.
• If Daily Timer is set to come on while Recording Timer is
operating, Daily Timer will not come on at all.
6:00 6:30 7:00 7:30
Recording Timer
Daily Timer
does not work.
• If Recording Timer is set to come on while Sleep Timer is
operating, Sleep Timer will not work (the SLEEP indicator
does not go off).
Using Sleep Timer
With Sleep Timer, you can fall asleep to sound. You can set
Sleep Timer only while the unit is turned on.
How Sleep Timer actually works
The unit automatically turns off after the specified time
length passes.
On the remote control ONLY:
1
Press SLEEP.
The time length until the shut-off time appears
and the SLEEP indicator starts flashing on the
display.
• Each time you press the button, the time length changes
as follows:
SLEEP 10 SLEEP 60SLEEP 30SLEEP 20
Canceled
2
Wait for about 5 seconds after specifying the
time length.
The SLEEP indicator stops flashing and remains lit.
SLEEP120 SLEEP 90
Recording Timer
Sleep Timer
To check the remaining time until the shut-off time, press
SLEEP once so that the remaining time until the shut-off time
appears for about 5 seconds.
To change the shut-off time, press SLEEP repeatedly until
the desired time length appears on the display.
To cancel the setting, press SLEEP repeatedly so that the
SLEEP indicator goes off.
• Sleep Timer is also canceled when you turn off the unit.
– 47 –
Page 51

Using AV COMPU LINK Control System
The AV COMPU LINK control system allows you to use
JVC’s TV with simple operations.
To use AV COMPU LINK control system, you need to
connect this unit and a TV through the AV COMPU LINK
terminals.
• You can connect a TV that has AV COMPU LINK II or AV
COMPU LINK EX terminals.
AV COMPU LINK Connection
Connect a TV by using a video cord (see page 10) then also
connect it by using a cord with monaural mini-plugs (not
supplied).
• You need to set “AV COMPULINK MODE” correctly to
use AV COMPU LINK control system. (See page 42.)
AV COMPU LINK
AV
COMPU LINK II
Available operations
You can use following functions by using AV COMPU LINK
control system.
Automatic power on/off
The connected TV turns on and off along with this unit.
When you turn on the unit the connected TV automatically
turns on and changes the input mode to the appropriate
position. Also when you turn off the unit, the connected TV
automatically turns off.
One-touch disc play
Simply by inserting or playing back a disc, you can enjoy the
playback view on the TV without setting other switches
manually.
AV
Cord with monaural
mini-plugs (not supplied)
Set the “AV COMPULINK MODE” to
•“DVD 1” when connecting this unit to the COMPONENT
VIDEO or INPUT-2 terminals on a TV.
•“DVD 2” when connecting this unit to the INPUT-1
terminals on a TV.
•“DVD 3” when connecting this unit to the INPUT-2
terminals on a TV.
COMPU LINK EX
– 48 –
Page 52

Appendix A—Maintenance
To get the best performance of the unit, keep your discs, tapes, and mechanism clean.
Handling discs
DO NOT use any solvent—such as conventional
record cleaner, spray, thinner, or benzine—to clean
the disc.
• Remove the disc from its case by
holding it at the edge while pressing the
center hole lightly.
• Do not touch the shiny surface of the
disc, or bend the disc.
• Put the disc back in its case after use to
prevent warping.
• Be careful not to scratch the surface of
the disc when placing it back in its case.
• Avoid exposure to direct sunlight,
temperature extremes, and moisture.
To clean the disc
Wipe the disc with a soft cloth in a straight
line from center to edge.
Handling cassette tapes
• If the tape is loose in its cassette, take
up the slack by inserting a pencil in
one of the reels and rotating.
• If the tape is loose, it may get
stretched, cut, or caught in the
cassette.
• Be careful not to touch the tape
surface.
• Avoid the following places to store the
tape:
— In dusty places
— In direct sunlight or heat
— In moist areas
— Near a magnet
Cleaning the unit
• Stains on the unit
Should be wiped off with a soft cloth. If the unit is
heavily stained, wipe it with a cloth soaked in water
diluted neutral detergent and wrung well, then wipe clean
with a dry cloth.
• Since the unit may deteriorate in quality, become
damaged or get its paint peeled off, be careful about
the followings.
— DO NOT wipe it with a hard cloth.
— DO NOT wipe it strong.
— DO NOT wipe it with thinner or benzine.
— DO NOT apply any volatile substance such as
insecticides to it.
— DO NOT allow any rubber or plastic to remain in
contact with it for a long time.
– 49 –
Page 53

Appendix B—Troubleshooting
If you are having a problem with your unit, check this list for a possible solution before calling for service.
If you cannot solve the problem from the hints given here, or the unit has been physically damaged, call a qualified person,
such as your dealer, for service.
Symptom
Unable to cancel the display demonstration.
No sound is heard.
Hard to listen to broadcasts because of
noise.
The disc sound is discontinuous.
The disc tray does not open or close.
The disc does not play.
The disc reading time is too long or the disc
cannot be ejected by pressing 0.
Impossible to turn off Pro Logic while
playing back a CD.
No picture appears on the screen.
DVD does not play back.
The left and right edges of the picture are
missing on the screen.
No subtitle appears on the display though
you have selected the initial subtitle
language.
Audio language is different from the one
you have selected as the initial audio
language.
Impossible to record.
Stereo effect is lost.
Operations are disabled.
Unable to operate the unit from the remote
control.
Cause
Other buttons are pressed to cancel the
display demonstration.
• Connections are incorrect or loose.
• You are playing a disc encoded with DTS
Digital Surround.
• Antennas are disconnected.
• The AM loop antenna is too close to the
unit.
• The FM antenna is not properly extended
and positioned.
The disc is scratched or dirty.
• The AC power cord is not plugged in.
• Trays are locked.
The disc is placed upside down.
The disc is placed upside down.
“ON” is selected as Pro Logic setting.
• The video cord is not connected correctly.
• Incorrect color system is selected.
• An incorrect input has been selected on
the TV or monitor.
Parental lock is in use.
“4:3 PS ” is selected when viewing on a
conventional TV (aspect ratio 4:3).
Small tabs on the top of the cassette are
removed.
Vocal Masking is activated.
The built-in microprocessor may
malfunction due to external electrical
interference.
• The path between the remote control and
the remote sensor on the unit is blocked.
• The batteries are exhausted.
Action
Press CANCEL/DEMO on the unit. (See
page 10.)
• Check all connections and make
corrections. (See pages 6 to 10.)
• This unit cannot output DTS sound
without connecting a decoder compatible
with DTS Digital Surround (with
“DIGITAL AUDIO OUTPUT” to
“STREAM/PCM”—See page 39).
• Reconnect the antennas correctly and
securely.
• Change the position and direction of the
AM loop antenna.
• Extend the FM antenna at the best
position.
Clean or replace the disc. (See page 49.)
• Plug the AC power cord.
• Unlock the trays. (See page 22.)
Place the disc with the label side up.
Change source to another one (ex. FM/AM),
eject the disc, and place it with the label
side up.
Show the on-screen menu by selecting a
DVD, SVCD or VCD as a playing source or
leaving the disc tray opened, then change
the Pro Logic setting to “AUTO” or “OFF.”
(See page 39.)
• Connect the video cord correctly.
• Select correct color system (See page 10.)
• Select the correct input on the TV or
monitor.
Unlock the parental lock. (See page 43.)
Select “4:3 LB
Some DVDs are programed to always
display no subtitle initially. If this happens,
press SUBTITLE on the remote control
after starting play. (See page 39.)
Some DVDs are programed to always use
the original language initially. If this
happens, press AUDIO while holding down
SHIFT on the remote control after starting
play. (See page 39.)
Cover the holes with adhesive tape.
Cancel the Vocal Masking. (See page 35.)
Unplug the AC power cord and then plug it
back in.
• Remove the obstruction.
• Replace the batteries.
.” (See page 41.)
– 50 –
Page 54

Appendix C—Output Signals Through the OPTICAL DIGITAL
OUTPUT Terminal
They differ according to the “DIGITAL AUDIO OUTPUT” setting. (See page 39.)
DIGITAL AUDIO
Playback disc
DVD with 48 kHz, Linear PCM
with 96 kHz, Linear PCM
with Dolby Digital
with DTS Digital Surround
with MPEG Audio
Video CD, Audio CD
Audio CD with DTS Digital
Surround
OUT
STREAM/PCM DOLBY DIGITAL/PCM PCM ONLY
48 kHz, Linear PCM 48 kHz, Linear PCM 48 kHz, Linear PCM
48 kHz, Linear PCM 48 kHz, Linear PCM 48 kHz, Linear PCM
Dolby Digital bitstream Dolby Digital bitstream 48 kHz, Linear PCM
DTS bitstream
MPEG bitstream 48 kHz, Linear PCM 48 kHz, Linear PCM
44.1 kHz, 16 bit Linear PCM 44.1 kHz, 16 bit Linear PCM 44.1 kHz, 16 bit Linear PCM
DTS bitstream 44.1 kHz, 16 bit Linear PCM 44.1 kHz, 16 bit Linear PCM
Output Signals
Appendix D—Channel Display
Current outputting channel appears on the display when you press DISPLAY. (See page 17.)
DOLBY DIGITAL
Linear PCM and DTS
Display LFE Channel
1/0 CH C ONLY
1/0.1 CH ON C ONLY
2/0 CH L/R
2/0.1 CH ON L/R
2/0 CH L/R (L0/R0)
2/0.1 CH ON L/R (L0/R0)
2/0 CH L/R/S (Lt/Rt)
2/0.1 CH ON L/R/S (Lt/Rt)
3/0 CH L/C/R
3/0.1 CH ON L/C/R
2/1 CH L/R/S
2/1.1 CH ON L/R/S
3/1 CH L/C/R/S
3/1.1 CH ON L/C/R/S
2/2 CH L/R/LS/RS
2/2.1 CH ON L/R/LS/RS
3/2 CH L/C/R/LS/RS
3/2.1 CH ON L/C/R/LS/RS
Display Channel
1 CH Monaural
2 CH 2 ch stereo
3 CH 3 ch
4 CH 4 ch
5 CH 5 ch
6 CH 6 ch
7 CH 7 ch
8 CH 8 ch
MPEG
Display Channel
2/0 CH Monaural
2/0.1 CH 2 ch stereo
2/2 CH 3 ch
3/0 CH 4 ch
2/2.1 CH 5 ch
3/0.1 CH 6 ch
3/2 CH 7 ch
3/2.1 CH 8 ch
2/0 CH (down mix)
– 51 –
Page 55

Appendix E—Language Code for On-Screen Menu
This code list is used when you select a language of on-screen menus. (See page 39.)
Code Language
AA Afar
AB Abkhazian
AF Afrikaans
AM Ameharic
AR Arabic
AS Assamese
AY Aymara
AZ Azerbaijani
BA Bashkir
BE Byelorussian
BG Bulgarian
BH Bihari
BI Bislama
BN Bengali, Bangla
BO Tibetan
BR Breton
CA Catalan
CO Corsican
CS Czech
CY Welsh
DA Danish
DZ Bhutani
EL Greek
EO Esperanto
ET Estonian
EU Basque
FA Persian
FI Finnish
FJ Fiji
FO Faroese
FY Frisian
GA Irish
GD Scots Gaelic
GL Galician
GN Guarani
GU Gujarati
HA Hausa
HI Hindi
HR Croatian
HU Hungarian
HY Armenian
IA Interlingua
IE Interlingue
Code Language
IK Inupiak
IN Indonesian
IS Icelandic
IW Hebrew
JI Yiddish
JW Javanese
KA Georgian
KK Kazakh
KL Greenlandic
KM Cambodian
KN Kannada
KO Korean (KOR)
KS Kashmiri
KU Kurdish
KY Kirghiz
LA Latin
LN Lingala
LO Laothian
LT Lithuanian
LV Latvian, Lettish
MG Malagasy
MI Maori
MK Macedonian
ML Malayalam
MN Mongolian
MO Moldavian
MR Marathi
MS Malay (MAY)
MT Maltese
MY Burmese
NA Nauru
NE Nepali
NL Dutch
NO Norwegian
OC Occitan
OM (Afan) Oromo
OR Oriya
PA Panjabi
PL Polish
PS Pashto, Pushto
PT Portuguese
QU Quechua
RM Rhaeto-Romance
Code Language
RN Kirundi
RO Rumanian
RU Russian
RW Kinyarwanda
SA Sanskrit
SD Sindhi
SG Sangho
SH Serbo-Croatian
SI Singhalese
SK Slovak
SL Slovenian
SM Samoan
SN Shona
SO Somali
SQ Albanian
SR Serbian
SS Siswati
ST Sesotho
SU Sundanese
SV Swedish
SW Swahili
TA Tamil
TE Telugu
TG Tajik
TH Thai
TI Tigrinya
TK Turkmen
TL Tagalog
TN Setswana
TO Tonga
TR Turkish
TS Tsonga
TT Tatar
TW Twi
UK Ukrainian
UR Urdu
UZ Uzbek
VI Vietnamese
VO Volapuk
WO Wolof
XH Xhosa
YO Yoruba
ZU Zulu
– 52 –
Page 56

Appendix F—Country Code for Parental Lock
This code list is used when you set a country code for parental lock. (See page 43.)
Code Country
AD Andorra
AE United Arab Emirates
AF Afghanistan
AG Antigua and Barbuda
AI Anguilla
AL Albania
AM Armenia
AN Netherlands Antilles
AO Angola
AQ Antarctica
AR Argentina
AS American Samoa
AT Austria
AU Australia
AW Aruba
AZ Azerbaijan
BA Bosnia and Herzegovina
BB Barbados
BD Bangladesh
BE Belgium
BF Burkina Faso
BG Bulgaria
BH Bahrain
BI Burundi
BJ Benin
BM Bermuda
BN Brunei Darussalam
BO Bolivia
BR Brazil
BS Bahamas
BT Bhutan
BV Bouvet Island
BW Botswana
BY Belarus
BZ Belize
CA Canada
CC Cocos (Keeling) Islands
CF Central African Republic
CG Congo
CH Switzerland
CI Côte d’Ivoire
CK Cook Islands
CL Chile
Code Country
CM Cameroon
CN China
CO Colombia
CR Costa Rica
CU Cuba
CV Cape Verde
CX Christmas Island
CY Cyprus
CZ Czech Republic
DE Germany
DJ Djibouti
DK Denmark
DM Dominica
DO Dominican Republic
DZ Algeria
EC Ecuador
EE Estonia
EG Egypt
EH Western Sahara
ER Eritrea
ES Spain
ET Ethiopia
FI Finland
FJ Fiji
FK Falkland Islands
(Malvinas)
FM Micronesia
(Fedelated States of)
FO Faroe Islands
FR France
FX France, Metropolitan
GA Gabon
GB United Kingdom
GD Grenada
GE Georgia
GF French Guiana
GH Ghana
GI Gibraltar
GL Greenland
GM Gambia
GN Guinea
GP Guadeloupe
GQ Equatorial Guinea
Code Country
GR Greece
GS South Georgia and the
South Sandwich Islands
GT Guatemala
GU Guam
GW Guinea-Bissau
GY Guyana
HK Hong Kong
HM Heard Island and
McDonald Islands
HN Honduras
HR Croatia
HT Haiti
HU Hungary
ID Indonesia
IE Ireland
IL Israel
IN India
IO British Indian Ocean
Territory
IQ Iraq
IR Iran (Islamic Republic of)
IS Iceland
IT Italy
JM Jamaica
JO Jordan
JP Japan
KE Kenya
KG Kyrgyzstan
KH Cambodia
KI Kiribati
KM Comoros
KN Saint Kitts and Nevis
KP Korea, Democratic
People’s Republic of
KR Korea, Republic of
KW Kuwait
KY Cayman Islands
KZ Kazakhstan
LA Lao People’s Democratic
Republic
LB Lebanon
LC Saint Lucia
– 53 –
Page 57

Code Country
LI Liechtenstein
LK Sri Lanka
LR Liberia
LS Lesotho
LT Lithuania
LU Luxembourg
LV Latvia
LY Libyan Arab Jamahiriya
MA Morocco
MC Monaco
MD Moldova, Republic of
MG Madagascar
MH Marshall Islands
ML Mali
MM Myanmar
MN Mongolia
MO Macau
MP Northern Mariana
Islands
MQ Martinique
MR Mauritania
MS Montserrat
MT Malta
MU Mauritius
MV Maldives
MW Malawi
MX Mexico
MY Malaysia
MZ Mozambique
NA Namibia
NC New Caledonia
NE Niger
NF Norfolk Island
NG Nigeria
NI Nicaragua
NL Netherlands
NO Norway
NP Nepal
NR Nauru
NU Niue
NZ New Zealand
OM Oman
PA Panama
Code Country
PE Peru
PF French Polynesia
PG Papua New Guinea
PH Philippines
PK Pakistan
PL Poland
PM Saint Pierre and
Miquelon
PN Pitcairn
PR Puerto Rico
PT Portugal
PW Palau
PY Paraguay
QA Qatar
RE Réunion
RO Romania
RU Russian Federation
RW Rwanda
SA Saudi Arabia
SB Solomon Islands
SC Seychelles
SD Sudan
SE Sweden
SG Singapore
SH Saint Helena
SI Slovenia
SJ Svalbard and Jan Mayen
SK Slovakia
SL Sierra Leone
SM San Marino
SN Senegal
SO Somalia
SR Suriname
ST Sao Tome and Principe
SV El Salvador
SY Syrian Arab Republic
SZ Swaziland
TC Turks and Caicos Islands
TD Chad
TF French Southern
Territories
TG Togo
TH Thailand
Code Country
TJ Tajikistan
TK Tokelau
TM Turkmenistan
TN Tunisia
TO Tonga
TP East Timor
TR Turkey
TT Trinidad and Tobago
TV Tuvalu
TW Taiwan
TZ Tanzania, United
Republic of
UA Ukraine
UG Uganda
UM United States Minor
Outlying Islands
US United States
UY Uruguay
UZ Uzbekistan
VA Vatican City State
(Holy See)
VC Saint Vincent and the
Grenadines
VE Venezuela
VG Virgin Islands (British)
VI Virgin Islands (U.S.)
VN Viet Nam
VU Vanuatu
WF Wallis and Futuna
Islands
WS Samoa
YE Yemen
YT Mayotte
YU Yugoslavia
ZA South Africa
ZM Zambia
ZR Zaire
ZW Zimbabwe
– 54 –
Page 58

Appendix G—Glossary
4:3 Letter Box screen
This is one method for displaying a wide screen picture on a
conventional sized (4:3) TV. While viewing a wide screen picture,
the black bars appear on the top and the bottom of the screen.
4:3 Pan-Scan screen
This is one method for displaying a wide screen picture on a
conventional sized (4:3) TV. While viewing a wide screen picture,
the left and right edges of the pictures will not be shown on the
screen.
Dolby Digital
This is a digital audio compression technology that was developed
by Dolby Laboratories. Dolby Digital encoding method (so-called
discrete 5.1 channel digital audio format) records and compresses
the left front channel, right front channel, center channel, left rear
channel, right rear channel, and LFE channel (total 6 channels, but
LFE channel is counted as 0.1 channel, therefore called 5.1
channels) signals digitally. Each channel is completely independent
from other channel signals to avoid interference, therefore, you can
obtain much better sound quality with stereo and surround effects.
To reproduce these original surround signals, you need to connect an
amplifier or a decoder compatible with Dolby Digital.
DTS Digital Surround
Another discrete 5.1 channel digital audio format, available on CD,
LD, and DVD software, developed by Digital Theater Systems, Inc.
Compared to Dolby Digital, audio compression rate is relatively low.
This fact allows DTS Digital Surround format to add breadth and
depth to the reproduced sounds. As a result, DTS Digital Surround
features natural, solid and clear sound.
To reproduce these surround signals, you need to connect an
amplifier or a decoder compatible with DTS Digital Surround.
Linear PCM
This is a digital recording format that is used for audio CDs.
MPEG Multichannel
Digital audio compression format used for PAL/SECAM DVD
software. (MPEG stands for “Moving Picture Experts Group” and
has been originally developed for compressing video signals.)
MPEG Multichannel is 5.1 channel surround using MPEG Audio
coding format.
Playback Control (SVCD, VCD)
When a VCD has the PBC (Playback Control) function, you can
enjoy menu-driven operations and high-resolution still pictures.
Sampling Frequency, Quantization Bits
When analog signals are converted into digital signals, they are
divided into many points and digitized. This dividing method is
called “sampling.” The sampling frequency indicates how many
points one second is divided into – for example, for CD sound, one
second is divided into 44100 points since its sampling frequency is
44.1 kHz. On the other hand, the number of quantization bits
indicates the volume size used to memorize each divided point.
The larger this number is, the clearer the sound can be reproduced.
Titles and Chapters (DVD)
A DVD is divided into several titles (large divisions), and each title
is divided into chapters (smaller divisions).
These divisions are assigned their particular numbers, so that they
are easily accessed.
Tracks (SVCD, VCD, CD)
SVCD, VCDs and CDs are divided into tracks. Each track has its
own number so that it is easily accessed.
– 55 –
Page 59

Specifications
Design and specifications are subject to change without notice.
CA-MXDVB10 / CA-MXDVB9
Output Power
FRONT SUBWOOFERS:
90 W per channel, min. RMS, driven into 6 Ω at 63 Hz with
no more than 10% total harmonic distortion.
FRONT MAIN SPEAKERS:
45 W per channel, min. RMS, driven into 6 Ω at 1 kHz with
no more than 10% total harmonic distortion.
SURROUND (REAR and CENTER) SPEAKERS:
25 W per channel, min. RMS, driven into 16 Ω at 1 kHz with
no more than 10% total harmonic distortion.
Audio input sensitivity/Impedance
(Measured at 1 kHz, with tape recording signal 300 mV)
AUX: 410 mV/50 kΩ
Audio output level
AUX: 290 mV
MIC 1/2: 3.0 mV/5 kΩ
Dolby Digital 5.1ch subwoofer (LFE) output level
(measured when playing Dolby Digital 5.1ch track with LFE of
30 Hz at 0 dBFS)
SUB-WOOFER 5.1ch OUT: 340 mV
Digital output: OPTICAL DIGITAL OUTPUT
Signal wave length: 660 nm
Output level: –15 dBm to –12 dBm
AV OUT
COMP.: 1 V(p-p)/75 Ω
S-video:
Y (luminance) 1 V(p-p)/75 Ω
C (chrominance, burst) 0.286 V(p-p)/75 Ω
Speakers/Impedance
FRONT SUBWOOFERS: 6 Ω – 16 Ω
FRONT MAIN SPEAKERS: 6 Ω – 16 Ω
SURROUND SPEAKERS: 16 Ω – 32 Ω
Tuner
FM tuning range: 87.50 MHz – 108.00 MHz
AM tuning range:
For Saudi Arabia At 9 kHz intervals: 531 kHz – 1 602 kHz
At 10 kHz intervals: 530 kHz – 1 600 kHz
For other countries At 9 kHz intervals: 531 kHz – 1 710 kHz
At 10 kHz intervals: 530 kHz – 1 710 kHz
DVD player
Disc capacity: 3 discs
Readable disc: DVD Video, S-Video CD, Video CD,
Audio CD, CD-R, CD-RW
Video format: NTSC/PAL compatibility
Frequency response
DVD, fs=48 kHz: 16 Hz to 22 000 Hz
DVD, fs=96 kHz: 16 Hz to 44 000 Hz
SVCD, VCD, CD: 16 Hz to 20 000 Hz
Dynamic range: 85 dB
Signal-to-noise ratio: 90 dB
Wow and flutter: Immeasurable
Cassette deck
Frequency response
Normal (type I): 50 Hz – 14 000 Hz
Wow and flutter: 0.15% (WRMS)
General
Power requirement: AC 110 V / AC 127 V / AC 220 V /
AC 230 V – AC 240 V (adjustable with the
voltage selector), 50 Hz / 60 Hz
Power consumption: 175 W (at operation)
29 W (on standby)
Dimensions (approx.): 265 mm x 335 mm x 401 mm (W/H/D)
Mass (approx.): 10.3 kg
Supplied accessories
See page 6.
CA-MXDVA9
Output Power
FRONT SUBWOOFERS:
90 W per channel, min. RMS, driven into 6 Ω at 63 Hz with
no more than 10% total harmonic distortion.
FRONT MAIN SPEAKERS:
45 W per channel, min. RMS, driven into 6 Ω at 1 kHz with
no more than 10% total harmonic distortion.
SURROUND (REAR and CENTER) SPEAKERS:
25 W per channel, min. RMS, driven into 16 Ω at 1 kHz with
no more than 10% total harmonic distortion.
Audio input sensitivity/Impedance
(Measured at 1 kHz, with tape recording signal 300 mV)
AUX: 410 mV/50 kΩ
Audio output level
AUX: 290 mV
MIC 1/2: 3.0 mV/5 kΩ
Dolby Digital 5.1ch subwoofer (LFE) output level
(measured when playing Dolby Digital 5.1ch track with LFE of
30 Hz at 0 dBFS)
SUB-WOOFER 5.1ch OUT: 170 mV
Digital output: OPTICAL DIGITAL OUTPUT
Signal wave length: 660 nm
Output level: –15 dBm to –12 dBm
AV OUT
COMP.: 1 V(p-p)/75 Ω
S-video:
Y (luminance) 1 V(p-p)/75 Ω
C (chrominance, burst) 0.286 V(p-p)/75 Ω
Speakers/Impedance
FRONT SUBWOOFERS: 6 Ω – 16 Ω
FRONT MAIN SPEAKERS: 6 Ω – 16 Ω
SURROUND SPEAKERS: 16 Ω – 32 Ω
Tuner
FM tuning range: 87.50 MHz – 108.00 MHz
AM tuning range:
For Saudi Arabia At 9 kHz intervals: 531 kHz – 1 602 kHz
At 10 kHz intervals: 530 kHz – 1 600 kHz
For other countries At 9 kHz intervals: 531 kHz – 1 710 kHz
At 10 kHz intervals: 530 kHz – 1 710 kHz
DVD player
Disc capacity: 3 discs
Readable disc: DVD Video, S-Video CD, Video CD,
Audio CD, CD-R, CD-RW
Video format: NTSC/PAL compatibility
Frequency response
DVD, fs=48 kHz: 16 Hz to 22 000 Hz
DVD, fs=96 kHz: 16 Hz to 44 000 Hz
SVCD, VCD, CD: 16 Hz to 20 000 Hz
Dynamic range: 85 dB
Signal-to-noise ratio: 90 dB
Wow and flutter: Immeasurable
Cassette deck
Frequency response
Normal (type I): 50 Hz – 14 000 Hz
Wow and flutter: 0.15% (WRMS)
General
Power requirement: AC 110 V / AC 127 V / AC 220 V /
AC 230 V – AC 240 V (adjustable with the
voltage selector), 50 Hz / 60 Hz
Power consumption: 175 W (at operation)
29 W (on standby)
Dimensions (approx.): 265 mm x 335 mm x 401 mm (W/H/D)
Mass (approx.): 10.3 kg
Supplied accessories
See page 6.
– 56 –
Page 60

Mains (AC) Line Instruction (not applicable for Europe, U.S.A., Canada,
Australia, and U.K.)
ANTENNA
VOLTAGE
SELECTOR
AM EXT
AM LOOP
230V
240V
VIDEO OUT
VIDEO
FM 75
COAXIAL
220V
127V
S-VIDEO
110V
AV COMPU LINK
IMPORTANT for mains (AC) line
BEFORE PLUGGING IN, do check that your mains
(AC) line voltage corresponds with the position of
the voltage selector switch provided on the outside
of this equipment and, if different, reset the voltage
selector switch, to prevent from damage or risk of
fire/electric shock.
AUX
IN
OUT
RIGHT LEFT
FRONT
RIGHT LEFT
SUBWOOFERS
OPTICAL
DIGITAL OUTPUT
PCM /
STREAM
SURROUND SPEAKERS
REAR CENTER
RIGHT
LEFT
CAUTION : SPEAKER
IMPEDANCE
16
~
32
VOLTAGE
SELECTOR
230V
240V
127V
220V
110V
SUBWOOFER
5.1ch OUT
EN
RIGHT LEFT
MAIN
SPEAKERS
CAUTION : SPEAKER
IMPEDANCE
6
~
16
VICTOR COMPANY OF JAPAN, LIMITED
JVC
0402NSMMDWJEM
Page 61

INSTRUCTIONS
ﺔﻴﻣﺎﻣﻷا تﺎﻋﺎﻤﺴﻟا مﺎﻈﻧSP-XDVB10
ﺔﻃﺎﺣﻹا تﻮﺻ تﺎﻋﺎﻤﺳ مﺎﻈﻧSP-XSDVB10
ﻲﻋﺮﻔﻟا ﺔﻀﻴﻔﳋا تاددﺮﺘﻟا رﺎﻬﺠﻣSP-WDVB10
ﻰﻄﺳﻮﻟا تﺎﻋﺎﻤﺴﻟا مﺎﻈﻧSP-XCDVB10
UUL« ÂUE ∫ULOKF« qOœ
:ﺔﻴﻟﺎﺘﻟا ﺔﻤﻈﻧﻷا ﻦﻣ مﺎﻈﻨﻟا اﺬﻫ نﻮﻜﺘﻳ
SPEAKER SYSTEM
SP-MXDVB10
Consists of SP-XDVB10, SP-WDVB10, SP-XSDVB10 and SP-XCDVB10
MANUAL DE INSTRUCCIONES: SISTEMA DE
ALTAVOCES
INSTRUÇÕES: SISTEMA DE ALTIFALANTES
This system consists of the following systems:
Este sistema se compone de los cuatro siguientes:
Este equipamento compõe-se dos seguintes sistemas:
MAIN SPEAKER SYSTEM : SP-XDVB10
SUBWOOFER : SP-WDVB10
SURROUND SPEAKER SYSTEM : SP-XSDVB10
CENTER SPEAKER SYSTEM : SP-XCDVB10
SISTEMA DE ALTAVOZ PRINCIPAL : SP-XDVB10
SUBWOOFER : SP-WDVB10
SISTEMA DE ALTAVOCES PERIMÉTRICOS : SP-XSDVB10
SISTEMA DE ALTAVOZ CENTRAL : SP-XCDVB10
SISTEMA DE ALTO-FALANTE PRINCIPAL : SP-XDVB10
SUBWOOFER : SP-WDVB10
SISTEMA DE COLUNAS SURROUND : SP-XSDVB10
SISTEMA DE COLUNA DE CENTRO : SP-XCDVB10
!"#$%&
!"#$ !%&'
!"#=W=pmJuas_NM
!"#=W=pmJtas_NM
!"#$=W=pmJupas_NM
!"#$=W=pmJu`as_NM
“SOME DOS AND DON’TS ON THE SAFE USE OF EQUIPMENT”
This equipment has been designed and manufactured to meet
international safety standards but, like any electrical equipment, care
must be taken if you are to obtain the best results and safety is to be
assured.
Do read the operating instructions before you attempt to use the
equipment.
Do ensure that all electrical connections (including the mains plug,
extension leads and interconnections between pieces of equipment)
are properly made and in accordance with the manufacturer’s
instructions. Switch off and withdraw the mains plug when making or
changing connections.
Do consult your dealer if you are ever in doubt about the installation,
operation or safety of your equipment.
Do be careful with glass panels or doors on equipment.
DON’T continue to operate the equipment if you are in any doubt
about it working normally, or if it is damaged in any way — switch off,
withdraw the mains plug and consult your dealer.
DON’T remove any fixed cover as this may expose dangerous
voltages.
DON’T leave equipment switched on when it is unattended unless it
is specifically stated that it is designed for unattended operation or
has a standby mode.
— SAFETY INSTRUCTIONS —
Switch off using the switch on the equipment and make sure that
your family know how to do this.
Special arrangements may need to be made for infirm of handicapped people.
DON’T use equipment such as personal stereos or radios so that
you are distracted from the requirements of traffic safety. It is illegal
to watch television whilst driving.
DON’T listen to headphones at high volume as such use can
permanently damage your hearing.
DON’T obstruct the ventilation of the equipment, for example with
curtains or soft furnishing.
Overheating will cause damage and shorten the life of the
equipment.
DON’T use makeshift stands and NEVER fix legs with wood screws
— to ensure complete safety always fit the manufacturer’s approved
stand or legs with the fixings provided according to the instructions.
DON’T allow electrical equipment to be exposed to rain or moisture.
ABOVE ALL
– NEVER let anyone, especially children, push anything into holes,
slots or any other opening in the case.
– this could result in a fatal electrical shock;
– NEVER guess or take chances with electrical equipment of any
kind
– it is better to be safe than sorry!
GVT0091-001A
[UN/US]
Page 62

Thank you for purchasing JVC speakers.
ﻲﺳ ﻲﻓ ﻲﺟ تﺎﻋﺎﻤﺳ ءاﺮﺷ ﻰﻠﻋ كﺮﻜﺸﻧ
JVC
.
ﻰﻠﻋ ﻚﻟﻮﺼﺣ ﻦﻣ ﺪﻛﺄﺘﺗ ﻰﺘﺣ ﺔﻳﺎﻨﻌﺑ تﺎﻤﻴﻠﻌﺘﻟا هﺬﻫ ةءاﺮﻗ ﻰﺟﺮﻳ ،ﺎﻬﻟﺎﻤﻌﺘﺳا أﺪﺒﺗ نأ ﻞﺒﻗ
عزﻮﻣ ﻊﺟار ﺎﻫﺪﻨﻋ ،ﺔﻠﺌﺳأ ﺔﻳأ كﺪﻨﻋ نﺎﻛ اذإ .ﻦﻜﳑ ءادأ ﻞﻀﻓأ
JVC
.ﻚﻳﺪﻟ
Before you begin using them, please read the instructions carefully
to be sure you get the best possible performance. If you have any
questions, consult your JVC dealer.
Le estamos muy agradecidos por haber adquirido estos altavoces
de JVC.
Antes de utilizarlos, sirvase leer las instrucciones detenidamente a
fin de obtener el mejor rendimiento posible. Si tienenaluna pregunta,
acuda a su agente de JVC.
Gratos pela aquisição dos altifalantes JVC.
Antes de desfrutar este sistema, leia atentamente as instruções
que o acompanham, de modo a assegurar-se da obtenção do
melhor desempenho possível. Caso surjam dúvidas concernentes
a este sistema, consulte o seu agente JVC.
!"=gs`=
!"#$ !"#$%&'() !"#$%
!"# !=gs`= !"#$
2
Page 63

MAIN SPEAKER SYSTEM : SP-XDVB10
ﺔﻴﻣﺎﻣﻷا تﺎﻋﺎﻤﺴﻟا مﺎﻈﻧSP-XDVB10
ﻲﻋﺮﻔﻟا ﺔﻀﻴﻔﳋا تاددﺮﺘﻟا رﺎﻬﺠﻣSP-WDVB10
uB« WuL q√ s WULA/V
ةﺪﺣﻮﻟا يﻮﺘﲢ
SP-XDVB10
و
SP-WDVB10
ﻲﺴﻴﻃﺎﻨﻐﻣ ﻞﺋﺎﺣ وذ ﻢﻴﻤﺼﺗ ﻰﻠﻋ و
فاﺮﺤﻧا ﻲﻓ ﺐﺒﺴﺘﻟا نوﺪﺑ ﺔﺒﻗاﺮﳌا ةﺰﻬﺟأو نﻮﻳﺰﻔﻴﻠﺘﻟا ةﺰﻬﺟأ راﻮﺠﺑ ﻊﺿﻮﻟا ﻞﺟأ ﻦﻣ
ﻰﻠﻋ صﺮﺣإ ،ﻚﻟﺬﻟ .ﺔﻋﺎﻤﺴﻟا مﺎﻈﻧ ﺐﻴﻛﺮﺗ ﺔﻘﻳﺮﻃ ﺔﺠﻴﺘﻧ ناﻮﻟﻻا ﺮﺛﺄﺘﺗ ﺪﻗ ﻦﻜﻟ .ناﻮﻟﻻا
:ﻲﻟﺎﺘﻟا
.١زﺎﻬﺠﺑ ﻲﺴﻴﺋﺮﻟا ةرﺪﻘﻟا حﺎﺘﻔﻣ ﻞﺼﻓإ ،نﻮﻳﺰﻔﻴﻠﺗ زﺎﻬﺟ راﻮﺠﺑ تﺎﻋﺎﻤﺴﻟا ﻚﻠﺗ ﻊﺿو ﺪﻨﻋ
.تﺎﻋﺎﻤﺴﻟا ﺐﻴﻛﺮﺗ ﻞﺒﻗ ﻪﺴﺑﺎﻗ ﻞﺼﻓإ وأ نﻮﻳﺰﻔﻠﺘﻟا
.نﻮﻳﺰﻔﻴﻠﺘﻟا زﺎﻬﺟ ةرﺪﻗ ﻞﺻو ﻞﺒﻗو مﺎﻈﻨﻟا ﺐﻴﻛﺮﺗ ﺪﻌﺑ ﻞﻗﻷا ﻰﻠﻋ ﺔﻘﻴﻗد ٣٠ ﺮﻈﺘﻧإ
.٢ﻚﻟذ ﺐﺒﺴﺘﻳ ﺪﻘﻓ ،نﻮﻳﺰﻔﻴﻠﺘﻟا زﺎﻬﺟ راﻮﺠﺑ عﻮﺿﻮﻣ ﺮﺧآ ﺔﻋﺎﻤﺳ مﺎﻈﻧ كﺎﻨﻫ نﺎﻛ اذإ
.نﻮﻳﺰﻔﻴﻠﺘﻟا زﺎﻬﺟ ةرﻮﺻ ﻲﻓ ناﻮﻟﻻا مﺎﻈﺘﻧا مﺪﻋ ﻲﻓ مﺎﻈﻨﻟا
.٣ةﺰﻬﺟأ عاﻮﻧأ ﺾﻌﺑ ﺮﺛﺄﺘﺗ ﺪﻘﻓ ،تﺎﻋﺎﻤﺴﻟا ﻚﻠﺘﻟ ﻞﺋﺎﳊا وذ ﻢﻴﻤﺼﺘﻟا ﻦﻣ ﻢﻏﺮﻟا ﻰﻠﻋ
زﺎﻬﺟ ﻦﻋ ةﺮﻴﺼﻗ ﺔﻓﺎﺴﻣ تﺎﻋﺎﻤﺴﻟا ﻚﻳﺮﺤﺘﺑ ﻢﻗ ،ﻚﻟذ ثﺪﺣ اذإ .ﻢﻬﺘﻄﺳاﻮﺑ نﻮﻳﺰﻔﻴﻠﺘﻟا
.نﻮﻳﺰﻔﻴﻠﺘﻟا
SUBWOOFER : SP-WDVB10
MAIN SPEAKER SYSTEM : SP-XDVB10 SUBWOOFER : SP-WDVB10
SISTEMA DE ALTAVOZ PRINCIPAL : SP-XDVB10
SUBWOOFER : SP-WDVB10
SISTEMA DE ALTO-FALANTE PRINCIPAL : SP-XDVB10
SUBWOOFER : SP-WDVB10
SPEAKER FOR A/V COMBINATION
SP-XDVB10 and SP-WDVB10 have a magnetically-shielded design for
placement adjacent to TV’s and monitors without causing color
aberrations. However, color may be affected as a result of how the
speaker system is installed. Therefore, be careful of the following:
1. When placing these speakers near a TV set, turn off the TV’s main
power switch or unplug it before installing the speakers.
Wait at least 30 minutes after the system is installed before turning
on the TV’s power.
2. If another speaker system has been set up near the TV set, that
system may cause color unevenness in the TV’s picture.
3. In spite of the shielded design of these speakers, some types of
TV’s may be affected by them. If this happens, move the speakers a
short distance from the TV set.
!"#$pmJuas_NM
!"#$pmJtas_NM
^Ls= !"
pmJuas_NM==pmJtas_NM= !"# !"#$%&
!"#$%&'()*+,-. !"#$%
!"#$%&' !"#$%&'
NK !"#$%&'()*+ !"#$%&'()*
!"#$%& !"#$%&' !=PM
!"#$%&'(%)
OK !"#$%&'()*+,-./ !"#$%&
!"#$%&'()
PK !"#$%&'()*+, !"#$%&'(
!"#$ !"#$%&'()*+,-.
ALTAVOZ PARA COMBINACIÓN A/V
Los modelos SP-XDVB10 y SP-WDVB10 tienen una construcción
protegida magneticamente para una colocación contigua de los
televisores y monitores sin causar aberraciones de color.
Sin embargo, el color puede ser afectado como resultado del modo de
instalar el sistema de altavoces.
1. Al colocar los altavoces cerca de un televisor, desactivar el interruptor
de alimentación principal del televisor o desconectarlo antes de
instalar los altavoces.
Esperar a lo menos 30 minutos después de instalar el sistema y
antes de activar la alimentación del televisor.
2. Si otro sistema del altavoz ha sido ajustado cerca del televisor, este
sistema puede causar una desigualdad de color en la imagen del
televisor.
3. A pesar de la protección de estos altavoces, algúnos tipos del
televisores pueden estar afectados por ellos. En este caso, mover
los altavoces a una distancia corta de la unidad del televisor.
ALTIFALANTES PARA COMBINAÇÃO A/V
O SP-XDVB10 e SP-WDVB10 tê m uma estrutura blindada
magneticamente para sua colocação perto de televisores e monitores
sem causar anormalidades nas cores.
No entanto, as cores podem ser afectadas, dependendo de como o
sistema de altifalantes for instalado. Tenha portanto cuidado com os
seguintes pontos:
1. Ao colocar estes altifalantes perto de um televisor, desligue o
interruptor de alimentação principal do televisor ou desligue-o da
rede eléctrica antes de instalar os altifalantes.
Espere pelo menos 30 minutos após a instalação do sistema antes
de voltar a ligar o televisor.
2. Se houver um outro sistema de altifalantes instalado perto do televisor, tal sistema poderá causar irregularidade nas cores da imagem
do televisor.
3. Apesar da estrutura blindada destes altifalantes, alguns tipos de
televisores podem ser afectados por eles. Se isso acontecer, afaste
os altifalantes um pouco do televisor.
3
Page 64

Connection
qOu«
ﺔﻴﺴﻴﺋﺮﻟا ﺔﻋﺎﻤﺴﻟا
(ﻦﳝﻷا ﺐﻧﺎﳉا)
ﻲﻋﺮﻔﻟا ﺔﻀﻴﻔﳋا تاددﺮﺘﻟا رﺎﻬﺠﻣ
(ﻦﳝﻷا ﺐﻧﺎﳉا)
ﻲﻋﺮﻔﻟا ﺔﻀﻴﻔﳋا تاددﺮﺘﻟا رﺎﻬﺠﻣ
(ﺮﺴﻳﻷا ﺐﻧﺎﳉا)
ﺔﻴﺴﻴﺋﺮﻟا ﺔﻋﺎﻤﺴﻟا
(ﺮﺴﻳﻷا ﺐﻧﺎﳉا)
ﺮﻤﺣأ
دﻮﺳأ
دﻮﺳأ
دﻮﺳأ
دﻮﺳأ
قرزأ
قرزأ
ﻢﺨﻀﳌا جﺮﺧ تﺎﻳﺎﻬﻧ
Conexión
Ligaçao
Main Speaker
(Right Side)
Altavoz principal
(Lado derecho)
Alto-falante principal
(Lado direito)
!
!
Black
Negra
Preto
Blue
Azul
Azul
Subwoofer
(Right Side)
Subwoofer
(Lado derecho)
Subwoofer
(Lado direito)
!"#
!
Black
Negra
Preto
Main Speaker
(Left Side)
Altavoz principal
(Lado izquierdo)
Alto-falante principal
(Lado esquerdo)
!
!
Black
Negra
Preto
Blue
Azul
Azul
Red
Rojo
Vermelho
Subwoofer
(Left Side)
Subwoofer
(Lado izquierdo)
Subwoofer
(Lado esquerdo)
!"#
!
Black
Negra
Preto
Amplifier output terminals
Terminales de salida de amplificador
Terminais de saida do amplificador
!"#$
CONNECTION
• DON’T use other amplifier to operate this speaker system except
for CA-MXDVB10.
• Turn off power to the whole system before connecting the speakers to the amplifier.
• The maximum power handling capacity of the SP-XDVB10 main
speaker is 40 W/Subwoofer is 100 W. Excessive input will result
in abnormal noise and possible damage. In cases where the signals described below are applied to the speakers, even if the
signals are below the maximum allowable input, they may cause
an overload and burn the wiring of the speakers. Be sure to lower
the amplifier volume beforehand.
1) Noise during FM tuning.
2) High level signals containing high frequency components pro-
duced by a tape deck in the fast forward mode.
3) Click noise produced when turning power of other components
on and off.
4) Click noise produced when connecting or disconnecting cords
with the power on.
5) Click noise produced when the cartridge is replaced with the
power on.
6) Click noise produced when operating amplifier switches.
7) Continuous high frequency oscillation or high pitch electroni-
cally produced musical instrument sound.
8) Howling when using a microphones.
CAUTION
Do not drag or push the speakers on the floor or table.
Otherwise, the four feet at the bottom side of each speaker may
peel off or drop from the speaker.
SPECIFICATIONS
Type : 3-Way 3-Speaker Bass-Reflex
Type Main Speaker
With 2-Separate Subwoofers
(Magnetically-shielded Type)
Speakers
Subwoofer : 16.0 cm (6-5/16 in.) cone × 1
Main woofer : 16.0 cm (6-5/16 in.) cone × 1
Mid Range : 5.0 cm (2 in.) cone × 1
Tweeter : 2.0 cm (13/16 in.) dome × 1
Power Handling Capacity
Subwoofer : 100 W
Main Speaker : 40 W
Impedance
Subwoofer : 6 Ω
Main Speaker : 6 Ω
Frequency Range
Subwoofer : 30 Hz – 1 800 Hz
Main Speaker : 42 Hz – 25 000 Hz
Sound Pressure Level
Subwoofer : 79 dB/W·m
Main Speaker : 86 dB/W·m
Dimensions (W × H × D)
Subwoofer : 215 mm × 335 mm × 315 mm
(8-1/2 in. × 13-1/4 in. × 12-3/8 in.)
Main Speaker : 215 mm × 335 mm × 249 mm
(8-1/2 in. × 13-1/4 in. × 9-13/16 in.)
Mass
Subwoofer : 5.6 kg each
(12.4 lbs)
Main Speaker : 3.4 kg each
(7.5 lbs)
Design and specifications subject to change without notice.
4
Page 65

CONEXIÓN
• NO utilice ningún otro amplificador para operar este sistema de
altavoces excepto CA-MXDVB10.
• Desactive la alimentación de todo el sistema antes de conectar los
altavoces al amplificador.
• La capacidad máxima de potencia del altavoz principal SP-XDVB10
es de 40 W, y del Subwoofer es de 100 W.
En casos donde las señales descritas más abajo se apliquen a los
altavoces, aunque las mismas resulten menores que la entrada
máxima permisible, pueden causar una sobrecarga y quemar el
cableado de los altavoces. Asegúrese de disminuir el volumen del
amplificador con anterioridad.
1) Ruido durante la sintonía en FM.
2) Señales de alto nivel que contengan componentes de alta
frecuencia producidos por un magnetófono en el modo de avance
rápido.
3) Ruidos de conmutación provocados al encender y apagar otros
componentes.
4) Ruido de conmutación al conectar o desconectar cables con los
componentes encendidos.
5) Ruido de conmutación cuando se reemplaza la cápsula con los
componentes encendidos.
6) Ruido de conmutación provocados por la operación de los
selectores del amplificador.
7) Continua oscllación de alta fracuencia o de sonidos de tonos al-
tos provocados por instrumentos electrónicos.
8) Aullidos al utilizar micrófonos.
Precaución
No arrastre ni empuje los altavoces sobre el piso o la mesa. De lo
contrario, las cuatro patas del lado inferior de cada altavoz se podrían
desprender o salir del altavoz.
LIGAÇÃO
• NÃO use outro amplificador para operar este sistema de altifalantes
à excepção do CA-MXDVB10.
• Desligue a alimentação de todo o sistema antes de iniciar as ligações
dos altifalantes ao amplificador.
• A máxima potência utilizável do altifalante principal do SP-XDVB10
é de 40 W; a do subwoofer é de 100 W.
Uma entrada excessiva resultará em ruídos anormais e possíveis
avarias.
Nos casos em que os sinais descritos abaixo apresentem-se nos
altifalantes, mesmo que os sinais estejam abaixo do nível de entrada
permissível, poderão causar uma sobrecarga e o curto-circuito dos
fios dos altifalantes. Certifique-se de reduzir o volume do amplificador
de antemão.
1) Interferências durante a sintonia de FM.
2) Sinais com níveis elevados e com componentes de alta frequência
produzidos pelo deck de cassetes durante o modo do avanço
rápido.
3) Estalidos produzidos quando do ligar/desligar da alimentação de
outros componentes.
4) Estalidos produzidos ao se ligar/desligar cabos de ligação com a
alimentação ligada.
5) Estalidos produzidos quando da troca da célula fonocaptadora
com a alimentação ligada.
6) Estalidos produzidos quando do activar/desactivar dos
interruptores do amplificador.
7) Oscilação contínua das altas frequências ou altas tonalidades
electronicamente produzidas por sons de músicas instrumentais.
8) Efeito de realimentação acústica (microfonia) quando da utilização
de microfone.
ESPECIFICACIONES
Tipo : Reflex bajo con 3-altavoces y 3
vias
altavoces Bass-Reflex con 2
subwoofers separados
(Tipo blindado magnéticamente)
Altavoces
Subwoofer : Cono de 16,0 cm × 1
Principal : Cono de 16,0 cm × 1
Frecuencias medias : Cono de 5,0 cm × 1
De agudos : Domo de 2,0 cm × 1
Capacidad de potencia
Subwoofer : 100 W
Principal : 40 W
Impedancia
Subwoofer : 6 Ω
Principal : 6 Ω
Gama de frecuencias
Subwoofer : 30 Hz – 1 800 Hz
Principal : 42 Hz – 25 000 Hz
Nivel de presión acústica
Subwoofer : 79 dB/W·m
Principal : 86 dB/W·m
Dimensiones (An × Al × Prf)
Subwoofer : 215 mm × 335 mm × 315 mm
Principal : 215 mm × 335 mm × 249 mm
Peso
Subwoofer : 5,6 kg cada uno
Principal : 3,4 kg cada uno
Precaução
Não arraste nem empurre as caixas acústicas no chão ou na
mesa, do contrário os quatro pés da parte inferior de cada uma
delas podem se desprender ou cair.
ESPECIFICAÇÕES
Tipo : Reflector de graves de 3 vías e 3
altifalantes
Altifalante principal com 2 subwoofers
separados
(Tipo protegido magneticamente)
Altifalantes
Subwoofer : Cone 16,0 cm × 1
Woofer principal : Cone 16,0 cm × 1
Alcance médio : Cone 5,0 cm × 1
Tweeter : Cúpula 2,0 cm × 1
Potência efectiva
Subwoofer : 100 W
Altifalante principal : 40 W
Impedância
Subwoofer : 6 Ω
Altifalante principal : 6 Ω
Amplitude de frequência
Subwoofer : 30 Hz – 1 800 Hz
Altifalante principal : 42 Hz – 25 000 Hz
Nível da pressão sonora
Subwoofer : 79 dB/W·m
Altifalante principal : 86 dB/W·m
Dimensões (larg. × alt. × prof.)
Subwoofer : 215 mm × 335 mm × 315 mm
Altifalante principal : 215 mm × 335 mm × 249 mm
Peso
Subwoofer : 5,6 kg cada
Altifalante principal : 3,4 kg cada
El diseño y las especificaciones están sujetos a cambio sin previo aviso.
Desenho e especificações sob reserva de alterações sem aviso prévio.
5
Page 66

qOu«
•ﻮﺻ ﻢﺨﻀﻣ ﻞﻤﻌﺘﺴﺗ ﻻﻮﻤﻠﻟ ءﺎﻨﺜﺘﺳﺎﺑ اﺬﻫ تﺎﻋﺎﻤﺴﻟا مﺎﻈﻧ ﻞﻴﻐﺸﺘﻟ ﺮﺧآ تﻞﻳد
CA-MXDVB10
.
•.ﻢﺨﻀﳌﺎﺑ تﺎﻋﺎﻤﺴﻟا ﻞﻴﺻﻮﺗ ﻞﺒﻗ مﺎﻈﻨﻟا ﻞﻜﻟ ﺔﻗﺎﻄﻟا ﻞﺼﻓا
•ﻤﺤﺘﻟا ﺔﻌﺳ
ّ
ﻮﺼﻘﻟا ﻞﻮﻤﻠﻟ ﺔﻋﺎﻤﺴﻠﻟ ﺔﻗﺎﻄﻠﻟ ى ﻞﻳد
SP-XDVB10
و ٤٠ ﻮﻫ ،تا
ﺮﺘﻟا رﺎﻬﺠﻣو ١٠٠ ﻮﻫ ﻲﻣﺎﻣﻻا ﺔﻀﻴﻔﳋا تاددﺰﻟا ﻞﺧﺪﻟا .تاﺆﻴﺳ ﺪﺋاﻰﻟا يد
ﻮﺸﺗو ذﺎﺷ ﺶﻳوﺪﺣ ﺔﻴﻧﺎﻜﻣا.ﻒﻠﺗ ث
رﺎﺷﻻا ﺎﻬﻴﻓ ﻖﺒﻄﻨﺗ ﻲﺘﻟا تﻻﺎﳊا ﻲﻓﻮﺻﻮﳌا تاﻮﻟ ﻰﺘﺣ ،تﺎﻋﺎﻤﺴﻟا ﻰﻠﻋ هﺎﻧدأ ﺔﻓ
رﺎﺷﻻا ﺖﻧﺎﻛﻼﻤﺣ ﺐﺒﺴﺗ ﺪﻗ ﺎﻬﻧﺎﻓ ،ﻪﺑ حﻮﻤﺴﻣ ﻞﺧد ﻰﺼﻗأ نود تاًز اﺪﺋاًو قﺮﺣ
رﺎﻬﺟ ﺾﻴﻔﺨﺗ ﻦﻣ ﺪﻛﺄﺗ اﺬﻬﻟ .تﺎﻋﺎﻤﺴﻟا كﻼﺳاﻮﺻ ةﺎﻣﺪﻘﻣ ﻢﺨﻀﳌا تً.
(١ﻮﺸﺗﻮﻣ ءﺎﻨﺛأ ﺶﻳ ﺚﺒﻟا ﺔﻔﻟا
FM
.
(٢رﺎﺷاﻮﺘﺴﻣ تاذ تاﺮﻣ ىﻮﲢ ﻊﻔﺗﺮﻣ يﺮﺗ تﺎﺒﻛﺖﻴﺳﺎﻛ زﺎﻬﺟ ﻦﻋ ﺔﲡﺎﻧ لﺎﻋ دد
و ﻲﻓﺮﺴﻟا ﱘﺪﻘﺘﻟا ﻊﺿ.ﻊﻳ
(٣ﻮﺻو ﻞﻴﻐﺸﺗ ﺪﻨﻋ ﺞﺘﻨﻳ ﺔﻘﻄﻘﻃ تﺰﻬﺟﻻا ﻰﻠﻋ ﺔﻗﺎﻄﻟا فﺎﻘﻳاﺮﺧﻻا ة.ى
(٤ﻮﺻ.ﺔﻠﺻﻮﻣ ﺔﻗﺎﻄﻟا نﻮﻜﺗ ﺎﻤﻨﻴﺑ كﻼﺳﻻا ﻞﺼﻓ وأ ﻞﺻو ﺪﻨﻋ ﺞﺘﻨﻳ ﺔﻘﻄﻘﻃ ت
(٥ﻮﺻرﺎﻜﻟا لﺎﺒﻘﺘﺳا ﺪﻨﻋ ﺞﺘﻨﻳ ﺔﻘﻄﻘﻃ تﺮﺗ.ﺔﻠﺻﻮﻣ ﺔﻗﺎﻄﻟا نﻮﻜﺗ ﺎﻤﻨﻴﺑ جﺪﻳ
(٦ﻮﺻ.ﻢﺨﻀﳌا ﺢﻴﺗﺎﻔﻣ ﻞﻴﻐﺸﺗ ﺪﻨﻋ ﺞﺘﻨﻳ ﺔﻘﻄﻘﻃ ت
(٧ﺮﻤﺘﺴﻣ ﺔﺑﺬﺑذﺮﺗ تاذ ةﺮﻣ ددوﺮﺘﻜﻟا ﺔﲡﺎﻧ ﺔﻴﻟﺎﻋ ﺔﻤﻐﻧ وأ ﻊﻔﺗﺎﻴﻧًﻮﺻ ﻦﻋ ﺔﻟآ ت
ﻮﻣ.ﺔﻴﻘﻴﺳ
(٨زوﺮﻜﻴﻣ ماﺪﺨﺘﺳا ﺪﻨﻋ ﻖﻴﻋ.نﻮﻓ
ﻪﻴﺒﻨﺗ
رﻷا ﻰﻠﻋ تﺎﻋﺎﻤﺴﻟا ﻊﻓد وأ ﺮﺟ ﻰﻟا ﺪﻤﻌﺗ ﻻوﺎﻃ ﻰﻠﻋ وأ ﺔﻴﺿ.ﺔﻟ
رﻷا ماﺪﻗﻷا ﺖﻠﻔﻨﺗ ﺪﻘﻓ ﻚﻟذ ﺖﻠﻌﻓ اذإﻮﳌا ﺔﻌﺑﻮﺟﻞﻛ عﺎﻘﻟ ﺔﻴﺒﻧﺎﳉا ﺔﻬﳉا ﻰﻠﻋ ةد
ﻮﻣ ﻦﻣ ﻂﻘﺴﺗ وأ ﺔﻋﺎﻤﺳ.ﺔﻋﺎﻤﺴﻟا ﻰﻠﻋ ﺎﻬﻌﺿ
UH«u*«
عﻮﻨﻟا:ﺲﻛﺎﻋ تﺎﻋﺎﻤﺴﻟا ﻲﺛﻼﺛ ﺮﺻﺎﻨﻌﻟا ﻲﺛﻼﺛ
ﺮﻴﻬﺠﻠﻟ
ر ﺔﻋﺎﻤﺳو ﺔﻴﺴﻴﺋرﺎﻬﺠﻣﺮﻓ نانﻼﺼﻔﻨﻣ نﺎﻴﻋ
ﺮﺘﻠﻟﺔﻀﻴﻔﳋا تادد
ﺮﻃ)ﺼﺤﻣ زا
ّ
ﺎﻴﺴﻴﻃﺎﻨﻐﻣ ﻦً(
:ﺔﻋﺎﻤﺴﻟا
ﺮﺘﻟا رﺎﻬﺠﻣﻲﻣﺎﻣﻻا ﺔﻀﻴﻔﳋا تادد
:وﺮﺨﻣ عﻮﻧ١ × ﻢﺳ ١٦٫٠ ﻲﻃ
ﺮﻟا رﺎﻬاﺮﺘﻠﻟ ﻲﺴﻴﺋﺔﻀﻔﺨﻨﳌا تادد
:وﺮﺨﻣ عﻮﻧ١ × ﻢﺳ ١٦٫٠ ﻲﻃ
ﻮﺘﳌا قﺎﻄﻨﻟاﻂﺳ:وﺮﺨﻣ عﻮﻧ١ × ﻢﺳ ٥٫٠ ﻲﻃ
ﺮﺘﻟا رﺎﻬﺠﻣﺔﻴﻟﺎﻌﻟا تادد:ﺒﻘﻟا عﻮﻧ
ّ
١ × ﻢﺳ ٢٫٠ ﺔ
رﺪﻘﻟا ﻞﻴﻐﺸﺗ ﺔﻌﺳ:ة
ﺮﺘﻟا رﺎﻬﺠﻣﻲﻣﺎﻣﻻا ﺔﻀﻴﻔﳋا تادد
:و ١٠٠طا
ﺮﻟا ﺔﻋﺎﻤﺴﻟاﺔﻴﺴﻴﺋ:و ٤٠طا
وﺎﻘﳌا:ﺔﻣ
ﺮﺘﻟا رﺎﻬﺠﻣﻲﻣﺎﻣﻻا ﺔﻀﻴﻔﳋا تادد
:وأ ٦م
ﺮﻟا ﺔﻋﺎﻤﺴﻟاﺔﻴﺴﻴﺋ:وأ ٦م
ﺮﺘﻟا لﺎﺠﻣ:تادد
ﺮﺘﻟا رﺎﻬﺠﻣﻲﻣﺎﻣﻻا ﺔﻀﻴﻔﳋا تادد
:ﺮﻫ ٣٠ﺮﻫ ١٨٠٠ - ﺰﺗﺰﺗ
ﺮﻟا ﺔﻋﺎﻤﺴﻟاﺔﻴﺴﻴﺋ: ٤٢ﺮﻫﺰﺗﺮﻫ ٢٥٠٠٠ - ﺰﺗ
ﻮﺘﺴﻣﻮﺼﻟا ﻂﻐﺿ ى:ت
ﺮﺘﻟا رﺎﻬﺠﻣﻲﻣﺎﻣﻻا ﺔﻀﻴﻔﳋا تادد
:و/ﻞﻴﺒﻴﺴﻳد ٧٩ﺮﺘﻣ-طا
ﺮﻟا ﺔﻋﺎﻤﺴﻟاﺔﻴﺴﻴﺋ:و/ﻞﻴﺒﻴﺴﻳد ٨٦ﺮﺘﻣ-طا
دﺎﻌﺑﻻا
ﺮﺘﻟا رﺎﻬﺠﻣﺮﻔﻟا ﺔﻀﻴﻔﳋا تاددﻲﻋ
ﱈ ٣١٥ × ﱈ ٣٣٥ × ﱈ ٢١٥ :
ﺮﻟا ﺔﻋﺎﻤﺴﻟاﺔﻴﺴﻴﺋﱈ ٢٤٩ × ﱈ ٣٣٥ × ﱈ ٢١٥ :
نزﻮﻟا
ﺮﺘﻟا رﺎﻬﺠﻣﺮﻔﻟا ﺔﻀﻴﻔﳋا تاددﻲﻋ
و ﻞﻜﻟ ﻢﺠﻛ ٥٫٦ :ﺪﺣا
ﺮﻟا ﺔﻋﺎﻤﺴﻟاﺔﻴﺴﻴﺋو ﻞﻜﻟ ﻢﺠﻛ ٣٫٤ :ةﺪﺣا
.رﺎﻌﺷإ نود ﺮﻴﻴﻐﺘﻠﻟ ﺔﺿﺮﻋ تﺎﻔﺻاﻮﳌاو ﻢﻴﻤﺼﺘﻟا
• !"#$%&'(=`^Jjuas_NM= !"#$%
• !"#$%&'"( !"#$%&'(
• pmJuas_NM= !"#$%&'()*+=QM=t
!=NMM=t !" !"#$ !"
!"#$%&'( !"#$%&'()*
!"#$%&'()*+, !"#$%&'()*
!
N=cj= !"#$%
O !"#$%&'()*+$,-./01$.2345
P !"#$%&'()*+,-./0
Q !"#$%&'(&)*+,-./0
R !"#$%&'()*+,-./
S !"#$%&'()*+,-
T !"#$%&'"()*+,-./!012
U !"#$%&'()
!"#$%&'()*+,-
!"#$%&'()*+,-./0
P==P= !"#
!"
=O= !"#$%&
!"
!" =NSKM Åã × N
=NSKM Åã × N
==RKM Åã × N
!
!" NMM t
! ==QM t
!" S !"
! S !"
!
!" PM eò==N=UMM eò
! QO eò= =OR MMM eò
!" TV Ç_Ltã
! US Ç_Ltã
! × ×
!" ONR ãã × PPR ãã × PNR ãã
! ONR ãã × PPR ãã × OQV ãã
!" =RKV âÖ
! =PKQ âÖ
!"#$%&'()*+,-.
==OKM Åã × N
6
Page 67

CENTER & SURROUND SPEAKER SYSTEM
ﻰﻄﺳﻮﻟا تﺎﻋﺎﻤﺴﻟا مﺎﻈﻧ
SP-XCDVB10
ﺔﻃﺎﺣﻹا تﻮﺻ تﺎﻋﺎﻤﺳ مﺎﻈﻧ
SP-XSDVB10
…—uB« Ë uB« WuL q√ s WUL
A/V
ةﺪﺣﻮﻟا يﻮﺘﲢ
SP-XCDVB10
داﻮﺠﺑ ﻊﺿﻮﻟا ﻞﺟأ ﻦﻣ ﻲﺴﻴﻃﺎﻨﻐﻣ ﻞﺋﺎﺣ وذ ﻢﻴﻤﺼﺗ ﻰﻠﻋ
ﺮﺛﺄﺘﺗ ﺪﻗ ،ﻦﻜﻟ .ناﻮﻟﻷا فاﺮﺤﻧا ﻲﻓ ﺐﺒﺴﺘﻟا نوﺪﺑ ﺔﺒﻗاﺮﳌا ةﺰﻬﺟأ و نﻮﻳﺰﻔﻠﺘﻟا ةﺰﻬﺟأ
:ﻲﻟﺎﺘﻟا ﻰﻠﻋ صﺮﺣإ ،ﻚﻟﺬﻟ .ﺔﻋﺎﻤﺴﻟا مﺎﻈﻧ ﺐﻴﻛﺮﺗ ﺔﻘﻳﺮﻃ ﺔﺠﻴﺘﻧ ناﻮﻟﻷا
.١و ﺪﻨﻋﻮﺠﺑ تﺎﻋﺎﻤﺴﻟا ﻚﻠﺗ ﻊﺿﺰﻔﻴﻠﺗ زﺎﻬﺟ رارﺪﻘﻟا حﺎﺘﻔﻣ ﻞﺼﻓإ ،نﻮﻳﺰﻟا ةزﺎﻬﺠﺑ ﻲﺴﻴﺋ
ﺰﻔﻠﺘﻟاﺮﺗ ﻞﺒﻗ ﻪﺴﺑﺎﻗ ﻞﺼﻓأ وأ نﻮﻳ.تﺎﻋﺎﻤﺴﻟا ﺐﻴﻛ
ﺮﺗ ﺪﻌﺑ ﻞﻗﻷا ﻰﻠﻋ ﺔﻘﻴﻗد ٣٠ ﺮﻈﺘﻧارﺪﻗ ﻞﺻو ﻞﺒﻗ و مﺎﻈﻨﻟا ﺐﻴﻛﺰﻔﻴﻠﺘﻟا زﺎﻬﺟ ة.نﻮﻳ
.٢ﻮﻣ ﺮﺧآ ﺔﻋﺎﻤﺳ مﺎﻈﻧ كﺎﻨﻫ نﺎﻛ اذإﻮﺠﺑ عﻮﺿﺰﻔﻴﻠﺘﻟا زﺎﻬﺟ راﻚﻟاذ ﺐﺒﺴﺘﻳ ﺪﻘﻓ ،نﻮﻳ
ﻮﻟﻷا مﺎﻈﺘﻧا مﺪﻋ ﻲﻓ مﺎﻈﻨﻟارﻮﺻ ﻲﻓ ناﺰﻔﻴﻠﺘﻟا زﺎﻬﺟ ة.نﻮﻳ
.٣ﺮﻟا ﻰﻠﻋﻮﻧأ ﺾﻌﺑ ﺮﺛﺄﺘﺗ ﺪﻘﻓ ،تﺎﻋﺎﻤﺴﻟا ﻚﻠﺘﻟ ﻞﺋﺎﳊا وذ ﻢﻴﻤﺼﺘﻟا ﻦﻣ ﻢﻏﺰﻬﺟأ عاة
ﺰﻔﻴﻠﺘﻟاﻮﺑ نﻮﻳﺮﺣ ،ﻚﻟذ ثﺪﺣ اذإ .ﻢﻬﺘﻄﺳاﺮﻴﺼﻗ ﺔﻓﺎﺴﻣ تﺎﻋﺎﻤﺴﻟا كزﺎﻬﺟ ﻦﻋ ة
ﺰﻔﻴﻠﺘﻟا.نﻮﻳ
WDO;« UUL« VOd WOHO
•ﻮﻟا هﺬﻫو ﰎ اذإ.ﺔﻴﺴﻃﺎﻨﻐﳌا ﺪﺿ ﺔﻨﺼﺤﻣ ﺖﺴﻴﻟ ةﺪﺣﺮﻗ ﺎﻬﻌﺿﺰﻔﻴﻠﺗ زﺎﻬﺟ بﻦﻜﳝ نﻮﻳ
ﻮﻟﻷرﻮﺼﻟا ناﺰﻔﻠﺘﻟا ﺔﺷﺎﺷ ﻰﻠﻋ ةﺮﺘﺑ ﻢﻗ اﺬﻟ .ﺔﻤﻈﺘﻨﻣ ﺮﻴﻏ ﺢﺒﺼﺗ نا نﻮﻳﺪﻌﺑ ﻰﻠﻋ ﺎﻬﺒﻴﻛ
ﺰﻔﻴﻠﺘﻟا زﺎﻬﺟ ﻦﻣ فﺎﻛ.نﻮﻳ
•ﻮﻠﻟ ﺔﻤﻤﺼﻣ تﺎﻋﺎﻤﺴﻟا هﺬﻫﻮﻗر ﺐﺴﺣ ،ﺎﻬﻋﺎﻗ ﻰﻠﻋ وأ ﺎﻬﺒﻧﺎﺟ ﻰﻠﻋ ف.ﻚﺘﺒﻏ
•ﻮﻠﻟ ﺔﻤﻤﺼﻣ تﺎﻋﺎﻤﺴﻟا هﺬﻫﻮﻗر ﻞﺜﻣ ﺊﻴﺷ ﻰﻠﻋ فﺮﻣ فﺮﻟا ﻲﻓ ﺎﻬﺘﻴﺒﺜﺗ ﻦﻣ ﺪﻛﺄﺗ ،ﻊﻔﺗف
وز ﻞﺜﻣ ﺖﻴﺒﺜﺗ ةادأ لﺎﻤﻌﺘﺳﺎﺑو .ﺔﻴﻧﺪﻌﳌا ﺖﻴﺒﺜﺘﻟا ﺎﻳاﻮﻘﺳ لﺎﻤﺘﺣﻻ ﺎﺒﺴﲢ ﻚﻟذط
ﺮﻟا ﺰﺘﻫا اذا تﺎﻋﺎﻤﺴﻟا.ف
tOMﺮﺗ :راﺪﳉا ﻰﻠﻋ تﺎﻋﺎﻤﺴﻟا ﺐﻴﻛ
ﺮﺘﻠﻟ تﺎﻋﺎﻤﺴﻟا ﻢﻴﻤﺼﺗ ﰎﺮﺗ ﺪﻨﻋ .راﺪﳉا ﻰﻠﻋ ﺐﻴﻛﺮﺗأ ،راﺪﳉا ﻰﻠﻋ ﺎﻬﺒﻴﻛﻞﻤﻌﻟا اﺬﻫ ك
ﺆﳌا ﺺﺨﺸﻠﻟ.ﻪﺑ ﻞﻫ
ﺮﻴﻏ ﺮﻄﳋا يدﺎﻔﺘﻟ ﻚﺴﻔﻨﺑ تﺎﻋﺎﻤﺴﻟا ﻖﻴﻠﻌﺗ ﺔﻴﻠﻤﻌﺑ ﻢﻘﺗﻻﻮﺘﳌاﺮﺟ ﻦﻣ ﻊﻗﻮﻘﺳ ءاﻦﻋ ﺎﻬﻃ
و ،راﺪﳉاﺮﺘﻟا ﻦﻋ ﰋﺎﻧ ﻮﻫ.راﺪﳉا ﻒﻌﺿ ﻦﻋ وأ ﺢﻴﺤﺼﻟا ﺮﻴﻏ ﺐﻴﻛ
CENTER SPEAKER SYSTEM : SP-XCDVB10
SURROUND SPEAKER SYSTEM : SP-XSDVB10
SISTEMA DE ALTAVOZ CENTRAL : SP-XCDVB10
SISTEMA DE ALTAVOCES PERIMÉTRICOS : SP-
XSDVB10
SISTEMA DE COLUNA DE CENTRO : SP-XCDVB10
SISTEMA DE COLUNAS SURROUND : SP-XSDVB10
SPEAKER FOR A/V COMBINATION
SP-XCDVB10 have a magnetically-shielded design for placement adjacent to TVs and monitors without causing color aberrations. However, color may be affected as a result of how the
speaker system is installed. Therefore, be careful of the following:
1. When placing these speakers near a TV set, turn off the TV’s main power switch or unplug
it before installing the speakers.
Wait at least 30 minutes after the system is installed before turning on the TV’s power.
2. If another speaker system has been set up near the TV set, that system may cause color
unevenness in the TV’s picture.
3. In spite of the shielded design of these speakers, some types of TV’s may be affected by
them. If this happens, move the speakers a short distance from the TV set.
HOW TO INSTALL SURROUND SPEAKERS
• This equipment is not magnet-proof. If it is placed near a TV set, color on a TV screen may
become uneven. If the case of installation, therefore, locate it at sufficient distance from
the TV set.
• The speakers of this system are designed to stand on the side or on the bottom, whichever you prefer.
• When setting the speaker on such as a high shelf, be sure to fix them to the shelf by using
such as metal braces: this a precaution against the speakers falling off due to shelf trembling.
CAUTION: Attaching the speakers on the wall
The speakers are designed to be attached on the wall. When attaching them on the wall,
have them attached to the wall by a qualified person.
DO NOT hang the speakers by yourself to avoid an unexpected danger of their falling from
the wall, caused by incorrect attachment or weakness in the wall.
!"#$%pmJu`as_NM
!"#$%pmJupas_NM
^Ls= !"
pmJu`as_NM= !"#$%&'()*+,-./,0123456789:;<=
!"#$%&'()*+,-./012345678
NK !"#$%&'()*+,-$./0123!"#45!67289:!6;<
!"#$%&'()*+=PM= !"#$%&'$(
OK !"#$%&'()*+,-./0123&'45678,-.9:";<=>
PK !"#$%&'()*+,&!-./012345J !"#$%&'()*
!"#$%&'()*
!"#$%&'&(
• !"#$%&' !"#$%&'$("#$)*+,-./01234
!"#$%&'!( )*+',-./012
• !"#$%&'()*+,-./01!23456789
• !"#$%&'()*+,-./*+0123"456 !-789:'(
!"#$%&'()*+
!"#$%&'()
!"#$%&'()*+J !"#$%&'()*+,-. !
!"#$%&'()*+,-./0123456/789:;<=>
ALTAVOZ PARA COMBINACION A/V
El modelo SP-XCDVB10 tiene una construcción protegida magneticamente para una
colocación contigua de los televisores y monitores sin causar aberraciones de color.
Sin embargo, el color puede ser afectado como resultado del modo de instalar el sistema de
altavoces.
1. Al colocar los altavoces cerca de un televisor, desactivar el interruptor de alimentación
principal del televisor o desconectado antes de instalar los altavoces.
Esperar a lo menos 30 minutos después de instalar el sistema y antes de activar la
alimentación del televisor.
2. Si otro sistema del altavoz ha sido ajustado cerca del televisor, este sistema puede causar
una desigualdad de color en la imagen del televisor.
3. A pesar de la protección de estos altavoces, algúnos tipos del televisores pueden estar
afectados por ellos. En este caso, mover los altavoces a una distancia corta de la unidad
del televisor.
COMO INSTALAR LOS ALTAVOCES DE ENTORNO
• Este equipo no tiene protección antimagnética. Si se lo coloca junto a un televisor, los
colores en la pantalla pueden verse afectados. Si se da este caso, ubicar el equipo a más
distancia del televisor.
• Los altoparlantes de este sistema han sido diseñados de manera que puedan ser utilizados
en posición vertical o bien en posición horizontal, según se prefiera.
• Al ubicar los altoparlantes en lugares altos tales como repisas es importante asegurarlos
correctamente con trabas para evitar el riesgo que cafgen al moverse la repisa.
PRECAUCION: Instalación de los altavoces en la pared Los altavoces se han diseñado para
fijarse a la pared. Cuando los instale en la pared, solicite a una persona cualificada que lo
haga por usted.
No cuelgue usted mismo los altavoces para evitar que puedan desprenderse debido a
una instalasión incorrecta o a la debilidad de la pared.
ALTIFALANTES PARA COMBINAÇÃO A/V
O SP-XCDVB10 tem um desenho blindado magneticamente para sua colocaç|o perto de
televisores e monitores sem causar anormalidades nas cores.
No entanto, a color pode ser afectada dependendo de como o sistema de altifalantes for
instalado.
Portanto, tome cuidado dos seguintes pontos:
1. Ao colocar estes altifalantes perto de um televisor, desligue o interruptor de alimentaç|o
principal do televisor ou desligue-o da rede leéctrica antes de instalar os altifalantes.
Espere pelo menos 30 minutos após a instalação do sistema antes de voltar a ligar o
televisor.
2. Se houver um outro sistema de altifalantes instalado perto do televisor, tal sistema pode
causar irregularidade nas cores na imagem do televisor.
3. Apesar do desenho blindado destes altifalantes, alguns tipos de televisores podem ser
afectados por eles. Se isso acontecer, mova os altifalantes um pouco do televisor.
MANEIRA DE INSTALAR OS ALTIFALANTES DE SOM
ENVOLVENTE
• O alto-falante n|o possui proteç|o anti-magnética, se este for colocado perto de um
televisor, a cor da imagem poderá perder a nitidez. Por isso, quando da instalaç|o, façaa em um local relativamente distante do televisor.
• Os alto-falantes deste sistema s|o projetados para serem utilizados tanto na posiç|o vertical como na horizontal, como você preferir.
• Ao instalar os alto-falantes em locais altos, como por exemplo, em cima de estantes,
certifique-se de fixá-los bem à estante através de presihas metálicas. Isso deve ser feito
para prevenir que os alto-falantes n|o caiam, caso se mova a estante.
CUIDADO: Fixaç|o dos altifalantes na parede
Os altifalantes foram concebidos para serem fixados na parede. Para a sua colocaç|o,
recorra a um técnico qualificado.
7
Page 68

Amplifier Connection
rC*U UUL« qOu«
ﻰﻄﺳﻮﻟا ﺔﻋﺎﻤﺴﻟا
ﺔﻄﻴﶈا ﺔﻋﺎﻤﺴﻟا
ﻢﺨﻀﳌا جﺮﺧ تﺎﻳﺎﻬﻧ
ﻢﺨﻀﳌا جﺮﺧ تﺎﻳﺎﻬﻧ
نارﺪﳉا ﻲﻓ ﺐﻴﻛﺮﺘﻟا ﺐﻘﺛ
Conexión del amplificador
Ligação do amplificador
!"
Center speaker
Altavoz central
Coluna de centro
!"
Surround speakers
Altavoces peromètricos
Colunas surround
!"
Amplifier output terminals
Terminales de salida de amplificador
Terminais de saida do amplificador
!"#$
Amplifier output terminals
Terminales de salida de amplificador
Terminais de saida do amplificador
!"#$
CONNECTION
A pin plug is attached to the tip of the speaker cord. If the speaker
connection terminal on the amplifier to which the speaker is to be
connected is a pin jack, connect the left-hand speaker’s lead to the
left terminal, and the right-hand speaker’s lead to the right terminal.
• Turn off power of all equipment before connecting the speakers
to the amplifier.
• The nominal impedance of the SP-XCDVB10 is 16 ohms. Connect them to an amplifier with the load impedance of 16 ohms
speaker.
• The nominal impedance of the SP-XSDVB10 is 16 ohms. Connect them to an amplifier with the load impedance of 16 ohms
speaker.
• The maximum power handling capacity is shown in the SPECIFICATIONS.
Excessive input to the speaker will result in abnormal noise and
possible damage. The following cases described below may
cause an overload of the speakers.
Be sure to lower the amplifier volume beforehand.
1) Noise during FM tuning.
2) High level signals containing high frequency components
prouduced by a tape deck in the fast forward mode.
3) Click noise produced when turning power of other compo-
nents on and off.
4) Click noise produced when connecting or disconnecting cords
with the power on.
5) Click noise when the cartridge is replaced with the power on.
6) Click noise produced when operating amplifier switches.
7) Continuous high frequency oscillation or high pitch musical
instrument sound.
8) Howling or feed back when using a microphones.
SPECIFICATIONS
SP-XCDVB10
Type : Full range bass-reflex type
(Magnetically-shielded type)
Speaker
Full range : 8 cm (3-3/16 in.) cone × 1
Power Handling Capacity : 30 W
Impedance : 16 Ω
Frequency Range : 70 Hz – 25 000 Hz
Sound Pressure Level : 84 dB/W·m
Dimensions (W × H × D) : 245 mm × 110 mm × 145 mm
(9-11/16 in. × 4-3/8 in. × 5-3/4 in.)
Mass : 0.8 kg (1.8 lbs)
SP-XSDVB10
Wall mounting hole
Orificio para montaje en la pared
Furo de montagem da parede
!"
Type : Full range bass-reflex type
Speaker
Full range : 8 cm (3-3/16 in.) cone × 1
Power Handling Capacity : 30 W
Impedance : 16 Ω
Frequency Range : 85 Hz – 20 000 Hz
Sound Pressure Level : 83 dB/W·m
▼
Dimensions (W × H × D) : 160 mm × 110 mm × 136 mm
(6-5/16 in. × 4-3/8 in. × 5-3/8 in.)
Mass : 0.55 kg (1.3 lbs)
Design and specifications subject to change without notice.
8
Page 69

CONEXIÓN
Una clavija monopolar está fijada al extremo del cordón del altavoz.
Si el terminal de conexión para altavoz en el amplificador al cual se
conectará el altavoz es un jack monopolar, conecte el cable del
altavoz izquierdo al terminal izquierdo, y el cable de altavoz derecho
al terminal derecho.
• Desactivar la alimentación de todo el equipo antes de conectar
el altoparlante al amplificador.
• La impedancia nominal des SP-XCDVB10 es de 16 ohmios.
Conecte los altavoces a un amplificador con una impedancia de
carga de 16 ohmios.
• La impedancia nominal des SP-XSDVB10 es de 16 ohmios.
Conecte los altavoces a un amplificador con una impedancia de
carga de 16 ohmios.
• La capacidad de uso de la alimentación máxima se indica en la
sección de las ESPECIFICACIONS.
Una entrada excesiva del altavoz causará ruido anormal y
posibilidad de daño. Los casos describidos a continuación
pueden ocasionar una sobrecarga de los altavoces. Asegúrese
de que el volumen del amplificador sea reducido de antemano.
1) Ruido durante la sintonia en FM.
2) Señales de alto nivel que contengan componentes de alta
frecuencia producidos por un magnetófono en el modo de
avance rápido.
3) Ruidos de conmutación provocados al encender y apagar
otros componentes.
4) Ruido de conmutación al conectar o desconectar cables con
los componentes encendidos.
5) Ruido de conmutación cuando se reemplaza la cápsula con
los componentes encendidos.
6) Ruido de conmutación provocados por la operación de los
selectores del amplificador.
7) Oscilación de frecuencia elevada continua o sonido de
instrumento musical de tono elevado.
8) Zumbido o feed back cuando se utiliza un micrófono.
LIGAÇÃO
O plugue do pino é colocado na ponta do fio do alto-falante. Se o
terminal de conex|o do alto-falante ao amplificador, onde esse altofalante será conectado, é do tipo de “jack” de pinos, conecte o cabo
do alto-falante esquerdo ao terminal esquerdo, e o cabo do altofalante direito ao terminal direito.
• Desligue a alimentaç|o de todo o equipamento antes de ligar os
altifalantes ao amplificador.
• A impedãncia nominal dos SP-XCDVB10 é de 16 ohm. Ligue-os
a um amplificador com uma impedãncia de carga de 16 ohm
por altifalante.
• A impedãncia nominal dos SP-XSDVB10 é de 16 ohm. Ligue-os
a um amplificador com uma impedãncia de carga de 16 ohm
por altifalante.
• A capacidade máxima de potência é mostrada nas
ESPECIFICAÇÃES.
Uma entrada excessiva para os altifalantes resultará em ruído
anormal e possíveis danos aos mesmos. Os seguintes casos
descritos abaixo podem causar uma sobrecarga dos altifalantes.
Certifique-se de abaixar o volume do amplificador de antem|o.
1) Interferências durante a sintonia FM.
2) Sinais com níveis elevados e com componentes de alta
frequência produzidos pelo deck de cassetes durante o modo
do avanço rápido.
3) Estalidos produzidos quando do ligar/desligar da alimentaç|o
de outros componentes.
4) Estalidos produzidos ao se ligar/desligar cabos de ligaç|o com
a alimentaç|o ligada.
5) Estalidos produzidos quando da troca da célula fonocaptadora
com a alimentaç|o ligada.
6) Estalidos produzidos quando do activar/desactivar dos
interruptores no amplificador.
7) Oscilaç|o de alta frequência contínua ou som de instrumento
musical de alto tom.
8) Uivo de áudio ou realimentaç|o ao usar microfones.
ESPECIFICACIONES
SP-XCDVB10
Tipe : Tipo bajo reflex de gamma completa
(Tipo de protección magnética)
Altavoz
Gamma completa : Tipo cónico de 8 cm × 1
Potencia máxima : 30 W
Impedancia : 16 Ω
Gamma de frecuencia : 70 Hz – 25.000 Hz
Nivel de presión sonora : 84 dB/W·m
Dimensiones (An × Al × Prf) : 245 mm × 110 mm × 145 mm
Peso : 0,8 kg
SP-XSDVB10
Tipe : Tipo bajo reflex de gamma completa
Altavoz
Gamma completa : Tipo cónico de 8 cm × 1
Potencia máxima : 30 W
Impedancia : 16 Ω
Gamma de frecuencia : 85 Hz – 20.000 Hz
Nivel de presión sonora : 83 dB/W·m
Dimensiones (An × Al × Prf) : 160 mm × 110 mm × 136 mm
Peso : 0,55 kg
El diseño y las especificaciones están sujetos a combios sin aviso.
ESPECIFICAÇÃES
SP-XCDVB10
Tipo : Tipo de reflex|o de graves em gama
completa
(Tipo blindado magneticamente)
Altifalante
Gama completa : 8 cm cónico × 1
Potência efectiva : 30 W
Imped|ncia : 16 Ω
Gama de frequência : 70 Hz – 25.000 Hz
Nível de Ptess|o Sonora : 84 dB/W·m
Dimensões (L × A × P) : 245 mm × 110 mm × 145 mm
Peso : 0,8 kg
SP-XSDVB10
Tipo : Tipo de reflex|o de graves em gama
completa
Altifalante
Gama completa : 8 cm cónico × 1
Potência efectiva : 30 W
Imped|ncia : 16 Ω
Gama de frequência : 85 Hz – 20.000 Hz
Nível de Ptess|o Sonora : 83 dB/W·m
Dimensões (L × A × P) : 160 mm × 110 mm × 136 mm
Peso : 0,55 kg
Design e especificaç[es sujeitos a alteraç[es sem aviso prévio.
9
Page 70

qOu«
فﺮﻃ نﺎﻛ اذإ .ﺮﻴﺒﻜﺘﻟا ﺔﻋﺎﻤﺳ ﻚﻠﺳ فﺮﻃ ﻲﻓ ﻲﺳﻮﺑد ﺲﺑﺎﻗ ﺖﻴﺒﺜﺗ ﰎ
زاﺮﻃ ﻦﻣ ﻪﺑ ﺔﻋﺎﻤﺴﻟا ﻞﻴﺻﻮﺗ ﺪﻳﺮﺗ يﺬﻟا ﻢﺨﻀﳌا ﻲﻓ ﺔﻋﺎﻤﺴﻟا ﻞﻴﺻﻮﺗ
ﺮﺴﻳﻷا فﺮﻄﻟﺎﺑ ﺮﺴﻳﻷا ﺔﻋﺎﻤﺴﻟا ﻚﻠﺳ ﻞﻴﺻﻮﺘﺑ ﻢﻗ ،ﻲﺳﻮﺑﺪﻟا ﺲﺒﻘﳌا
.ﻦﳝﻷا فﺮﻄﻟﺎﺑ ﻦﳝﻷا ﻚﻠﺴﻟاو
•ﻰﻟإ تﺎﻋﺎﻤﺴﻟا ﻞﻴﺻﻮﺗ ﻞﺒﻗ فﺎﻘﻳﻹا ﻰﻟإ ةﺰﻬﺟﻷا ﻊﻴﻤﳉ ةرﺪﻘﻟا لﻮﺣ
.ﻢﺨﻀﳌا
• ةﺪﺣﻮﻠﻟ ﺔﻴﻤﺳﻷا ﺔﻗوﺎﻌﳌا
SP-XCDVB10
ﻰﻟإ ﺎﻬﻠﺻوإ .موأ ٨ نﻮﻜﺗ
.موأ ٨ ﻢﺨﻀﳌا ﺔﻋﺎﻤﺳ تﻼﻴﺻﻮﺗ
• ةﺪﺣﻮﻠﻟ ﺔﻴﻤﺳﻷا ﺔﻗوﺎﻌﳌا
SP-XSDVB10
ﻰﻟإ ﺎﻬﻠﺻوإ .موأ ٨ نﻮﻜﺗ
.موأ ٨ ﻢﺨﻀﳌا ﺔﻋﺎﻤﺳ تﻼﻴﺻﻮﺗ
•.تﺎﻔﺻاﻮﳌا ﻲﻓ ﺔﺤﺿﻮﻣ ىﻮﺼﻘﻟا ةرﺪﻘﻟا لواﺪﺗ ﺔﻌﺳ
ﻒﻠﺗ و ﻲﻌﻴﺒﻃ ﺮﻴﻏ ﺶﻳﻮﺸﺗ ﺔﻋﺎﻤﺴﻠﻟ طﺮﻔﳌا لﺎﺧدﻻا ﺐﺒﺴﻳ فﻮﺳ
ﺪﺋاز ﻞﻴﻤﲢ ﻲﻓ ﺐﺒﺴﺘﺗ ﺪﻗ ﻪﻠﻔﺳﺄﺑ ﺔﻓﻮﺻﻮﳌا ﺔﻴﻟﺎﺘﻟا تﻻﺎﳊا .ﻞﻤﺘﺤﻣ
.ﺎﻘﺒﺴﻣ ﻢﺨﻀﳌا تﻮﺻ ةرﺎﻬﺟ ﺾﻔﺧ ﻦﻣ ﺪﻛﺄﺗ .تﺎﻋﺎﻤﺴﻠﻟ
(١ﻮﺸﺗﻮﻣ ءﺎﻨﺛأ ﺶﻳ ﺚﺒﻟا ﺔﻔﻟا
FM
.
(٢رﺎﺷاﻮﺘﺴﻣ تاذ تاﺮﻣ ىﻮﲢ ﻊﻔﺗﺮﻣ يﺮﺗ تﺎﺒﻛﻦﻋ ﺔﲡﺎﻧ لﺎﻋ دد
و ﻲﻓ ﺖﻴﺳﺎﻛ زﺎﻬﺟﺮﺴﻟا ﱘﺪﻘﺘﻟا ﻊﺿ.ﻊﻳ
(٣ﻮﺻو ﻞﻴﻐﺸﺗ ﺪﻨﻋ ﺞﺘﻨﻳ ﺔﻘﻄﻘﻃ تﺰﻬﺟﻻا ﻰﻠﻋ ﺔﻗﺎﻄﻟا فﺎﻘﻳاة
ﺮﺧﻻا.ى
(٤ﻮﺻرﺪﻘﻟا ﺎﻤﻨﻴﺑ كﻼﺳﻻا ﻞﺼﻓ وأ ﻞﺻو ﺪﻨﻋ ﺞﺘﻨﻳ ﺔﻘﻄﻘﻃ تة
.ﺔﻠﺻﻮﻣ
(٥ﻮﺻرﺎﻜﻟا لاﺪﺒﺘﺳا ﺪﻨﻋ ﺞﺘﻨﻳ ﺔﻘﻄﻘﻃ تﺮﺗرﺪﻘﻟا ﺎﻤﻨﻴﺑ جﺪﻳ.ﺔﻠﺻﻮﻣ ة
(٦ﻮﺻ.ﻢﺨﻀﳌا ﺢﻴﺗﺎﻔﻣ ﻞﻴﻐﺸﺗ ﺪﻨﻋ ﺞﺘﻨﻳ ﺔﻘﻄﻘﻃ ت
(٧ﺮﻤﺘﺳاﺮﺗ وذ بﺬﺑﺬﺗ راﻮﺻ وأ لﺎﻋ ددﺰﻬﺟا تﻮﻣ ةﺔﻘﺒﻃ تاذ ﺔﻴﻘﻴﺳ
ﻮﺻ.ﺔﻴﻟﺎﻋ ت
(٨ﺮﳌا ﺔﻳﺬﻐﺘﻟا وأ حﺎﻴﺼﻟاوﺮﻜﻴﻣ ماﺪﺨﺘﺳا ﺪﻨﻋ ةﺪﺗﻮﻓ.تﺎﻧ
UH«u*«
SP-XCDVB10
عﻮﻨﻟاتﺎﻤﻐﻨﻟ ﺲﻛﺎﻋ عﻮﻧ ﻦﻣ ﻞﻣﺎﻛ لﺎﺠﻣ :
ﺮﺘﻟاﺾﻔﺨﻨﳌا دد
(ﻲﺴﻴﻃﺎﻨﻐﻣ ﻞﺋﺎﺣ وذ عﻮﻧ)
:ﺔﻋﺎﻤﺴﻟا
ﻞﻣﺎﻛ لﺎاوﺮﺨﻣ : ﻢﺳ ٨ ط
×
١
رﺪﻘﻟا لواﺪﺗ ﺔﻌﺳةو ٣٠ :طا
وﺎﻌﳌاﺔﻗوأ ٨ :م
ﺮﺘﻟا لﺎﺠﻣددﺮﻫ ٧٠ :ﺮﻫ ٢٥٠٠٠- ﺰﺗﺰﺗ
ﻮﺘﺴﻣﻮﺼﻟا ﻂﻐﺿ ىتو/ ﻞﺒﻴﺴﻳد ٨٤ :ﺮﺘﻣ.طا
ﺮﻋ) دﺎﻌﺑﻷا ض
×
رإ عﺎﻔﺗ
×
(ﻖﻤﻋ ٢٤٥ :
×
١١٠
×
ﱈ ١٤٥
نزﻮﻟاﻎﻛ ٠٫٨ :
SP-XSDVB10
عﻮﻨﻟاتﺎﻤﻐﻨﻟ ﺲﻛﺎﻋ عﻮﻧ ﻦﻣ ﻞﻣﺎﻛ لﺎﺠﻣ :
ﺮﺘﻟاﺾﻔﺨﻨﳌا دد
:ﺔﻋﺎﻤﺴﻟا
ﻞﻣﺎﻜﻟا لﺎاوﺮﺨﻣ : ﻢﺳ ٨ ط
×
١
رﺪﻘﻟا لواﺪﺗ ﺔﻌﺳةو ٣٠ :طا
وﺎﻌﳌاﺔﻗوأ ١٦ :م
ﺮﺘﻟا لﺎﺠﻣددﺮﻫ ٨٥ :ﺮﻫ٢٠٠٠٠-ﺰﺗﺰﺗ
ﻮﺘﺴﻣﻮﺼﻟا ﻂﻐﺿ ىتو /ﻞﻴﺒﺴﻳد ٨٣ :ﺮﺘﻣ.طا
ﺮﻋ) دﺎﻌﺑﻷا ض
×
رإ عﺎﻔﺗ
×
(ﻖﻤﻋ ١٦٠ :
×
١١٠
×
ﱈ ١٣٦
نزﻮﻟاﻎﻛ ٠٫٥٥ :
.رﺎﻌﺷإ نوﺪﺑ ﺮﻴﻴﻐﺘﻠﻟ ﺔﺿﺮﻋ تﺎﻔﺻاﻮﳌاو ﻢﻴﻤﺼﺘﻟا
!"#$%&'()'$ !"#$%&'()*"
!"#$%&'()'*+,-. !/0"#1-$
!"#$%&'()*!+
• !"#$%&'"()*+,-./012345
• pmJu`as_NM= !"#=NS !" !"#$%&
NS !"#$%&"'(!J
• pmJupas_NM= !"#=NS !" !"#$%&
NS !"#$%&'()*&+,%
• !"#$%&'()J
!"#$%&'()*+,-.&/012345%&'
!"#$%&'()*+ !"#$%&'()*
NF =cj= !"#$%
OF !"#$%&'()*+#,-./01#.234
PF !"#$%&'()*+,-.
QF !"#$ %&'()%&*+, -./0
RF !"#$%&'()*#
SF !"#$%&'()*+,
TF !"#$%&!%'()*+, -%
UF !"#$%&'()*+(,
pmJu`as_NM
!"#
!"#
=UÅãPJPLNS= × N
! PMt
NS !"
! TMeò – ORIMMMeò
UQÇ_Lt·ã
!"# × × OQRãã × NNMãã × NQRãã
EVJNNLNS × QJPLU × RJPLQ=
MKUâÖNKU=
pmJupas_NM
!"#
=UÅãPJPLNS= × N
! PMt
NS !"
! UReò – OMIMMMeò
UPÇ_Lt·ã
!"# × × NSMãã × NNMãã × NPSãã
MKRRâÖNKP=
ESJRLNS × QJPLU × RJPLU=
!"#$%&'()*+,-.
10
Page 71

11
Page 72

EN. SP. PR. CH. AR. 0302NSMMMPJEM
VICTOR COMPANY OF JAPAN, LIMITED
 Loading...