

Page 1
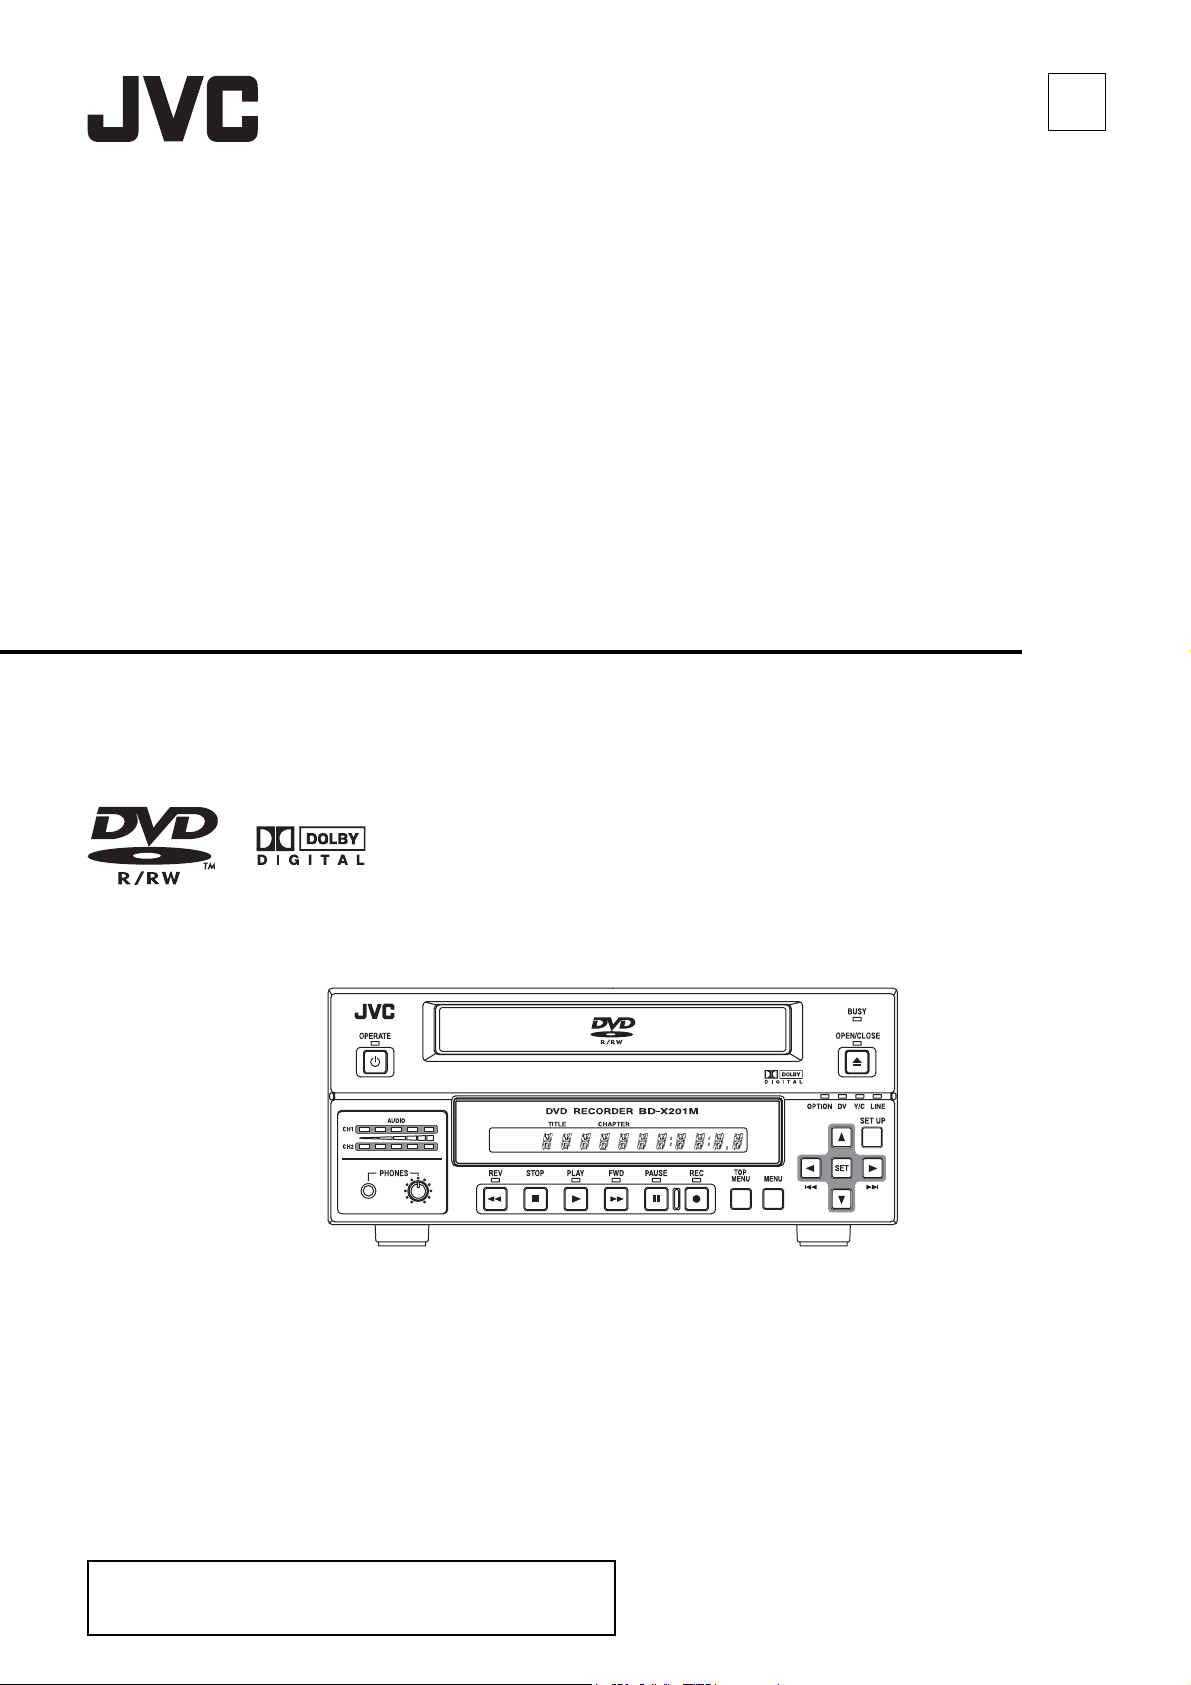
DVD RECORDER
E
BD-X201MS
INSTRUCTIONS
Thank you for purchasing this JVC product. Before operating this
unit, please read the instructions carefully to ensure the best
possible performance.
LST0373-001A
Page 2

Thank you for purchasing
this DVD Recorder.
Main Features
• Recording of DVD-R/DVD-RW (video mode only) and
DVD+R/DVD+RW (compliance with video mode).
• Composite video, YC separate, and DV signals are supported as video inputs; furthermore, analog or DV signals
are supported as audio inputs.
• The title and chapter menus can be created either automatically or manually.
•NTSC / PAL selectable
• Dual mode foot switch terminal available.
Recording can be turned ON/OFF and insertion of chapter/
index are possible using the external switch terminal.
• Equipped with an index search feature.
Allows automatic playback upon locating a specific index
position.
• Equipped with a JPEG capture feature.
Allows DVD playback images to be captured and recorded
to a DVD disc as JPEG files. Input images can also be captured and recorded to a CD-R/RW disc as JPEG files.
Trademarks & Copyrights
• , Dolby and the Double “D” symbols are trademarks of Dolby Laboratories.
• The copying, broadcasting, screening, or rental of copyrighted material without the authorization of the copyright holder is prohibited by law.
Copyright Protection Technology
This DVD recorder utilizes copyright protection technology
and is protected by US patents and intellectual property as
owned by Macrovision and other copyright holders. The
permission of Macrovision is required in order to use this
copyright protection technology, and except in situations
where special permission has been granted by that company, said technology is restricted to domestic usage and
for certain other viewing purposes. The disassembly and/or
modification of this DVD recorder is also prohibited.
Copyrights
• The recording, dubbing, or playing of software containing a copyright protection signal is not possible on this
DVD recorder.
• The usage of audio or video discs created using this
DVD recorder either for financial gain or in broadcasting
for widespread viewing may result in the legally-enforceable rights of the copyright holder being infringed.
• Unless the permission of the copyright holder has been
obtained, audio or video discs created using this DVD
recorder are to be used for personal enjoyment only.
Contents
Introduction
Overview of Functions . . . . . . . . . . . . . . . . . . . . . . . . . . . . . . . . . . . . . . . . . . . . . . . . . . . . . . . . . . . . . . . . . . . . . . . . . . . . . . . . . . .4
Precautions for DVD Recorder Use . . . . . . . . . . . . . . . . . . . . . . . . . . . . . . . . . . . . . . . . . . . . . . . . . . . . . . . . . . . . . . . . . . . . . . . . .5
Precautions for Disc Usage . . . . . . . . . . . . . . . . . . . . . . . . . . . . . . . . . . . . . . . . . . . . . . . . . . . . . . . . . . . . . . . . . . . . . . . . . . . . . . .6
Details Regarding Discs . . . . . . . . . . . . . . . . . . . . . . . . . . . . . . . . . . . . . . . . . . . . . . . . . . . . . . . . . . . . . . . . . . . . . . . . . . . . . . . . .7
Component Names & Functions
Front Panel . . . . . . . . . . . . . . . . . . . . . . . . . . . . . . . . . . . . . . . . . . . . . . . . . . . . . . . . . . . . . . . . . . . . . . . . . . . . . . . . . . . . . . . . . . .9
Rear Panel . . . . . . . . . . . . . . . . . . . . . . . . . . . . . . . . . . . . . . . . . . . . . . . . . . . . . . . . . . . . . . . . . . . . . . . . . . . . . . . . . . . . . . . . . .13
LCD Display and On-Screen Content
LCD Display . . . . . . . . . . . . . . . . . . . . . . . . . . . . . . . . . . . . . . . . . . . . . . . . . . . . . . . . . . . . . . . . . . . . . . . . . . . . . . . . . . . . . . . . .15
On-Screen Content . . . . . . . . . . . . . . . . . . . . . . . . . . . . . . . . . . . . . . . . . . . . . . . . . . . . . . . . . . . . . . . . . . . . . . . . . . . . . . . . . . . .17
Status Messages . . . . . . . . . . . . . . . . . . . . . . . . . . . . . . . . . . . . . . . . . . . . . . . . . . . . . . . . . . . . . . . . . . . . . . . . . . . . . . . . . . .17
Event Messages . . . . . . . . . . . . . . . . . . . . . . . . . . . . . . . . . . . . . . . . . . . . . . . . . . . . . . . . . . . . . . . . . . . . . . . . . . . . . . . . . . .19
Alarm Messages . . . . . . . . . . . . . . . . . . . . . . . . . . . . . . . . . . . . . . . . . . . . . . . . . . . . . . . . . . . . . . . . . . . . . . . . . . . . . . . . . . .20
Preparation
Connections . . . . . . . . . . . . . . . . . . . . . . . . . . . . . . . . . . . . . . . . . . . . . . . . . . . . . . . . . . . . . . . . . . . . . . . . . . . . . . . . . . . . . . . . .21
Power Connections . . . . . . . . . . . . . . . . . . . . . . . . . . . . . . . . . . . . . . . . . . . . . . . . . . . . . . . . . . . . . . . . . . . . . . . . . . . . . . . . . . . .22
Inserting & Removing Discs . . . . . . . . . . . . . . . . . . . . . . . . . . . . . . . . . . . . . . . . . . . . . . . . . . . . . . . . . . . . . . . . . . . . . . . . . . . . .23
Using a Keyboard . . . . . . . . . . . . . . . . . . . . . . . . . . . . . . . . . . . . . . . . . . . . . . . . . . . . . . . . . . . . . . . . . . . . . . . . . . . . . . . . . . . . .24
Attach the provided ferrite core . . . . . . . . . . . . . . . . . . . . . . . . . . . . . . . . . . . . . . . . . . . . . . . . . . . . . . . . . . . . . . . . . . . . . . . .24
Setting & Displaying the Date & Time . . . . . . . . . . . . . . . . . . . . . . . . . . . . . . . . . . . . . . . . . . . . . . . . . . . . . . . . . . . . . . . . . . . . . .25
E-2
Page 3

Contents
Settings & Controls for Recording
DVD Recording . . . . . . . . . . . . . . . . . . . . . . . . . . . . . . . . . . . . . . . . . . . . . . . . . . . . . . . . . . . . . . . . . . . . . . . . . . . . . . . . . . . . . . .27
Preparing a Disc for Recording . . . . . . . . . . . . . . . . . . . . . . . . . . . . . . . . . . . . . . . . . . . . . . . . . . . . . . . . . . . . . . . . . . . . . . . . . . .28
Pre-Recording Settings . . . . . . . . . . . . . . . . . . . . . . . . . . . . . . . . . . . . . . . . . . . . . . . . . . . . . . . . . . . . . . . . . . . . . . . . . . . . . . . . .30
Specifying the Disc Status Created when the Disc was Finalized . . . . . . . . . . . . . . . . . . . . . . . . . . . . . . . . . . . . . . . . . . . . . . . . .31
Setting the Encoding Format for Audio & Video . . . . . . . . . . . . . . . . . . . . . . . . . . . . . . . . . . . . . . . . . . . . . . . . . . . . . . . . . . . . . .32
Adjusting of Audio Recording Levels . . . . . . . . . . . . . . . . . . . . . . . . . . . . . . . . . . . . . . . . . . . . . . . . . . . . . . . . . . . . . . . . . . . . . . .33
Checking the Video Input . . . . . . . . . . . . . . . . . . . . . . . . . . . . . . . . . . . . . . . . . . . . . . . . . . . . . . . . . . . . . . . . . . . . . . . . . . . . . . .34
Title & Chapter Menus . . . . . . . . . . . . . . . . . . . . . . . . . . . . . . . . . . . . . . . . . . . . . . . . . . . . . . . . . . . . . . . . . . . . . . . . . . . . . . . . . .35
Selecting Styles for Title & Chapter Menu . . . . . . . . . . . . . . . . . . . . . . . . . . . . . . . . . . . . . . . . . . . . . . . . . . . . . . . . . . . . . . . . . . .36
Changing Styles for Title & Chapter Menus . . . . . . . . . . . . . . . . . . . . . . . . . . . . . . . . . . . . . . . . . . . . . . . . . . . . . . . . . . . . . . . . .37
Recording
Recording Sequence . . . . . . . . . . . . . . . . . . . . . . . . . . . . . . . . . . . . . . . . . . . . . . . . . . . . . . . . . . . . . . . . . . . . . . . . . . . . . . . . . . .38
Recording with the Front Panel . . . . . . . . . . . . . . . . . . . . . . . . . . . . . . . . . . . . . . . . . . . . . . . . . . . . . . . . . . . . . . . . . . . . . . . . . . .39
Inserting Chapter Marks Manually or Automatically . . . . . . . . . . . . . . . . . . . . . . . . . . . . . . . . . . . . . . . . . . . . . . . . . . . . . . . .40
Erasing the Last Title . . . . . . . . . . . . . . . . . . . . . . . . . . . . . . . . . . . . . . . . . . . . . . . . . . . . . . . . . . . . . . . . . . . . . . . . . . . . . . . . . . .41
Disc Repair Feature . . . . . . . . . . . . . . . . . . . . . . . . . . . . . . . . . . . . . . . . . . . . . . . . . . . . . . . . . . . . . . . . . . . . . . . . . . . . . . . . . . .41
Finalizing (for Playback on Other DVD Players) . . . . . . . . . . . . . . . . . . . . . . . . . . . . . . . . . . . . . . . . . . . . . . . . . . . . . . . . . . . . . .42
Recording & Viewing Still Images (JPEG)
Recording Playback Still Images to DVD . . . . . . . . . . . . . . . . . . . . . . . . . . . . . . . . . . . . . . . . . . . . . . . . . . . . . . . . . . . . . . . . . . .43
Recording Still Images of Input Video to CD-R/RW . . . . . . . . . . . . . . . . . . . . . . . . . . . . . . . . . . . . . . . . . . . . . . . . . . . . . . . . . . .44
Viewing Still Images (JPEG) with FILE VIEWER . . . . . . . . . . . . . . . . . . . . . . . . . . . . . . . . . . . . . . . . . . . . . . . . . . . . . . . . . . . . .45
Precautions for Recording and Viewing Still Images (JPEG) . . . . . . . . . . . . . . . . . . . . . . . . . . . . . . . . . . . . . . . . . . . . . . . . . . . .46
Title & Chapter Menu Settings
Changing Chapter Menus (THUMBNAIL EDIT Screen) . . . . . . . . . . . . . . . . . . . . . . . . . . . . . . . . . . . . . . . . . . . . . . . . . . . . . . . .47
Changing & Naming Thumbnails for Chapter Menus . . . . . . . . . . . . . . . . . . . . . . . . . . . . . . . . . . . . . . . . . . . . . . . . . . . . . . . . . .48
Changing & Checking Chapter Menu Styles . . . . . . . . . . . . . . . . . . . . . . . . . . . . . . . . . . . . . . . . . . . . . . . . . . . . . . . . . . . . . . . . .50
Ending the Editing of Chapter Menus . . . . . . . . . . . . . . . . . . . . . . . . . . . . . . . . . . . . . . . . . . . . . . . . . . . . . . . . . . . . . . . . . . . . . .52
Changing & Checking Title Menu Styles & Names . . . . . . . . . . . . . . . . . . . . . . . . . . . . . . . . . . . . . . . . . . . . . . . . . . . . . . . . . . . .53
Playback
Playing Back a Disc . . . . . . . . . . . . . . . . . . . . . . . . . . . . . . . . . . . . . . . . . . . . . . . . . . . . . . . . . . . . . . . . . . . . . . . . . . . . . . . . . . . .57
Selecting Playback Images from the Title List . . . . . . . . . . . . . . . . . . . . . . . . . . . . . . . . . . . . . . . . . . . . . . . . . . . . . . . . . . . . . . . .59
Fast & Slow Playback . . . . . . . . . . . . . . . . . . . . . . . . . . . . . . . . . . . . . . . . . . . . . . . . . . . . . . . . . . . . . . . . . . . . . . . . . . . . . . . . . .60
Playing the Previous or Next Chapter . . . . . . . . . . . . . . . . . . . . . . . . . . . . . . . . . . . . . . . . . . . . . . . . . . . . . . . . . . . . . . . . . . . . . .60
Playing the Previous or Next Titles . . . . . . . . . . . . . . . . . . . . . . . . . . . . . . . . . . . . . . . . . . . . . . . . . . . . . . . . . . . . . . . . . . . . . . . .60
Index Writing and Index Search . . . . . . . . . . . . . . . . . . . . . . . . . . . . . . . . . . . . . . . . . . . . . . . . . . . . . . . . . . . . . . . . . . . . . . . . . .61
Setup Menu
Setting the Setup Menu . . . . . . . . . . . . . . . . . . . . . . . . . . . . . . . . . . . . . . . . . . . . . . . . . . . . . . . . . . . . . . . . . . . . . . . . . . . . . . . . .63
Setup Menu Configuration . . . . . . . . . . . . . . . . . . . . . . . . . . . . . . . . . . . . . . . . . . . . . . . . . . . . . . . . . . . . . . . . . . . . . . . . . . . . . . .64
Setup Menus . . . . . . . . . . . . . . . . . . . . . . . . . . . . . . . . . . . . . . . . . . . . . . . . . . . . . . . . . . . . . . . . . . . . . . . . . . . . . . . . . . . . . . . . .65
DISC MENU Screen . . . . . . . . . . . . . . . . . . . . . . . . . . . . . . . . . . . . . . . . . . . . . . . . . . . . . . . . . . . . . . . . . . . . . . . . . . . . . . . . . . .66
INPUT SELECT MENU Screen . . . . . . . . . . . . . . . . . . . . . . . . . . . . . . . . . . . . . . . . . . . . . . . . . . . . . . . . . . . . . . . . . . . . . . . . . . .67
SYSTEM MENU Screen . . . . . . . . . . . . . . . . . . . . . . . . . . . . . . . . . . . . . . . . . . . . . . . . . . . . . . . . . . . . . . . . . . . . . . . . . . . . . . . .67
DVD MENU Screen . . . . . . . . . . . . . . . . . . . . . . . . . . . . . . . . . . . . . . . . . . . . . . . . . . . . . . . . . . . . . . . . . . . . . . . . . . . . . . . . . . . .71
RECORDER MENU Screen . . . . . . . . . . . . . . . . . . . . . . . . . . . . . . . . . . . . . . . . . . . . . . . . . . . . . . . . . . . . . . . . . . . . . . . . . . . . .73
REMOTE MENU Screen . . . . . . . . . . . . . . . . . . . . . . . . . . . . . . . . . . . . . . . . . . . . . . . . . . . . . . . . . . . . . . . . . . . . . . . . . . . . . . . .75
DISPLAY MENU Screen . . . . . . . . . . . . . . . . . . . . . . . . . . . . . . . . . . . . . . . . . . . . . . . . . . . . . . . . . . . . . . . . . . . . . . . . . . . . . . . .77
CLOCK ADJUST MENU Screen . . . . . . . . . . . . . . . . . . . . . . . . . . . . . . . . . . . . . . . . . . . . . . . . . . . . . . . . . . . . . . . . . . . . . . . . . .78
NETWORK MENU Screen . . . . . . . . . . . . . . . . . . . . . . . . . . . . . . . . . . . . . . . . . . . . . . . . . . . . . . . . . . . . . . . . . . . . . . . . . . . . . .78
Others
Easymenu: Freeware for Editing Menu Templates . . . . . . . . . . . . . . . . . . . . . . . . . . . . . . . . . . . . . . . . . . . . . . . . . . . . . . . . . . . .79
Changing the Signal System (NTSC / PAL) . . . . . . . . . . . . . . . . . . . . . . . . . . . . . . . . . . . . . . . . . . . . . . . . . . . . . . . . . . . . . . . . .80
Information for Users on Disposal of Old Equipment . . . . . . . . . . . . . . . . . . . . . . . . . . . . . . . . . . . . . . . . . . . . . . . . . . . . . . . . . .81
Specifications . . . . . . . . . . . . . . . . . . . . . . . . . . . . . . . . . . . . . . . . . . . . . . . . . . . . . . . . . . . . . . . . . . . . . . . . . . . . . . . . . . . . . . . .82
E-3
Page 4

Introduction
Overview of Functions
Video and audio signals from this DVD recorder’s input terminals can be recorded to DVD-R/DVD-RW (video mode
only) or DVD+R/DVD+RW (compliance with video mode). (X Page 28)
The types of signals that can be used are as follows.
Video: Composite video, YC separate, or DV signals (including audio)
Audio: Analog audio or DV signals (including video)
Playback images that were recorded to an unfinalized DVD by the DVD recorder can be captured and recorded to an
identical DVD as JPEG files. (X Page 43)
Video from the DVD recorder’s input terminals can be captured and recorded to a CD-R/RW as JPEG files.
(X Page 44)
A wide range of recording methods are supported. The appropriate method is to be selected in accordance with the
intended mode of use.
• The REC, PAUSE, and STOP buttons on the front panel can be used for standard operations. (X Page 39)
• Recording can be operated via the external switch that is connected to the foot switch terminal. (X Page 40)
The title and chapter menus can be created either automatically or manually. (X Page 47)
Five different patterns have been provided as display styles for the title and chapter menus. Each of these patterns is characterized by different thumbnail characteristics (i.e., number, position, and size) and background images displayed on the title and
chapter menu screens.
When a display style is selected during the recording of content to a DVD, this DVD recorder will automatically create the title
and chapter menus in accordance with this style.
The DVD MENU screen can be used to modify the thumbnail and background display characteristics of each of the display
styles.
In addition, the THUMBNAIL EDIT screen and the CHAPTER MENU EDIT screen can be used to modify the display style and
thumbnail images for chapter menus, and also to input chapter names and comments. The input of names or comments is carried out using a keyboard connected to one of the recorder’s USB terminals.
The TITLE MENU EDIT screen can be used to modify the display style for the title menu and to enter title names.
This DVD recorder can be used to play discs that it has created. (X Page 57)
• Once a disc has been finalized, it can also be played on other DVD players.
E-4
Page 5

Precautions for DVD Recorder Use
Introduction
Storage & Usage Locations
The storage and usage of this DVD recorder in the following types of location should be avoided.
• Areas at temperatures which deviate by a significant
degree above or below the permitted service temperature range (i.e., 5°C to 35°C).
• Areas at humidities which deviate by a significant degree
above or below the permitted service humidity range
(i.e., 20% to 80% RH).
• Areas where a large amount of dust or sand is present.
• Areas where the DVD recorder may come into contact
with oily smoke or steam, such as in kitchens or in their
immediate vicinity.
• Areas that are unstable or where significant vibration
occurs.
• Areas where condensation occurs readily.
• Areas where strong magnetic fields are generated by
transformers, motors, or the like.
• Areas where transceivers, mobile phones, and other
wireless-communication devices are present.
• Areas that are subjected to X-ray irradiation or where
corrosive gases are present. (This precaution must be
strictly observed.)
Handling
• Ensure that this DVD recorder is placed on a flat, hori-
zontal surface for use.
• Do not place heavy objects such as a monitor on top of
the DVD recorder.
• Do not insert foreign objects into the disc tray opening.
• Be careful not to get your fingers clamped when loading
the disc to prevent injury.
• Do not block the fan’s ventilation holes.
• Avoid knocking or dropping this DVD recorder.
• When the DVD recorder is to be moved, ensure that any
DVD it contains is removed in advance.
• If the DVD recorder is not to be used for an extended
period of time, please set the POWER switch to OFF to
avoid wasting electricity.
Cleaning the Exterior (with the power off)
Use a soft cloth when cleaning the outside of this DVD
recorder.
Do not use paint thinners or organic solvents as cleaning
agents.
Failure to observe these precautions can result in discoloration or melting of exterior surfaces.
When stubborn dirt is present, wipe away using a cloth
soaked in a dilute neutral solvent.
Always use the power cord provided with this DVD
recorder.
The usage of a different type of cord or a damaged cord
can result in the outbreak of fire or electric shocks.
The power cord supplied with this DVD recorder
should not be used with any other device.
Before connecting this DVD recorder to other devices,
turn those devices off and then carry out setup procedures as described in the corresponding user’s manuals.
The DVD drive unit is an expendable part. Although the
service life of the DVD drive unit differs depending on
the usage environment of the customer, replacement
every 1000 hours as a guide is recommended.
(X Page 68 “TOTAL RECORDING TIME”)
Precautions Regarding Condensation
Condensation
When cold water is poured into a glass and droplets of
water form on its outer surface, this moisture is referred to
as “condensation”.
When condensation occurs
Condensation can cause water droplets to adhere to the
DVD recorder’s internal lens, thus making normal operation impossible.
Condensation occurs easily in the following situations,
and the appropriate care should be taken.
• When the DVD recorder is moved from a cold location
into a warm room.
• When the room containing the DVD is rapidly heated.
• When an air conditioner’s air duct is pointing straight at
the DVD recorder.
In situations where it is likely that condensation will occur,
remove any DVD that may be present in this DVD
recorder and then turn the power on. As the interior heats
up, condensation will be less likely to occur.
Condensation is a principal cause of the inability to play
discs and other similar problems. In this type of situation,
allow the DVD recorder to remain inactive with its power
on for several hours. If the problem persists after this
period of time has elapsed, contact either the store where
this DVD recorder was purchased or your JVC Authorized
dealer.
Extended Periods of Inactivity
Performance may deteriorate over extended periods of
inactivity; for this reason, the power should be turned on
and the DVD recorder should be operated at regular intervals.
Compensation for Damaged Content
JVC accepts no responsibility whatsoever for damages
incurred as a result of an inability to play or record audio
and video content in the rare event that this DVD
recorder, a disc fails to operate correctly.
It is recommended that discs containing important content
be backed up at regular intervals (i.e., on a yearly basis).
Although digital signals do not deteriorate, storage environments can have an effect on a disc’s aging characteristics, and this may result in an inability to play or record.
If a disc should break, there will be no way to recover
data from it.
Proper playback of discs recorded using this DVD
recorder on all devices is not guaranteed.
E-5
Page 6

Introduction
Precautions for Disc Usage
Care of Discs to Ensure High-Quality Playback
Fingerprints, dust, or any other similar contamination of the surface of a disc can lead to distortion in the playback of recorded
video and audio. For this reason, it is good practice to wipe each disc with a soft cloth before use.
Looking After Discs
• Using a soft cloth, wipe the disc gently from the inside to
the outside.
• If stubborn dirt is present on the surface of a disc, wipe
first using a slightly wet cloth and then using a dry cloth.
• Paint thinners, organic solvents, analog record cleaning
agents, anti-static sprays, and the like must never be
used. Failure to observe this precaution can lead to
discs being permanently damaged.
Handling Discs
• Removing a disc • Placing a disc in its case
• Correct method for holding a disc
Your hands or fingers should not
come into contact with the recording
surface when holding a disc.
Additional Notes on Disc Handling
Never wipe a disc using paint thinners, organic solvents,
alcohol, or record-cleaning fluid.
Do not use disc protectors or scratch guards.
Stickers and other types of paper label should not be
applied.
Do not use discs from which stickers or labels have been
removed.
Do not use discs on which illustrations or text has been
printed using a commercially-available label printer. First
create a disc using the unit before printing.
The use of non-circular discs (i.e., heart or rectangular
shaped), warped discs, and cracked discs can lead to
breakage of the DVD recorder.
Storing Discs
Avoid storing discs in any of the following locations.
• Areas with high levels of humidity or dust, or areas
where mold is present.
• Areas exposed to direct sunlight or close to heating
equipment.
• Vehicle interiors during summer months.
Take care to avoid dropping or knocking discs.
Place discs in cases and stack these cases for storage.
Discs can be deformed or cracked as a result of stacking,
leaning, or dropping when not inside a case.
E-6
Page 7
Details Regarding Discs
Introduction
Discs for Recording & Playback
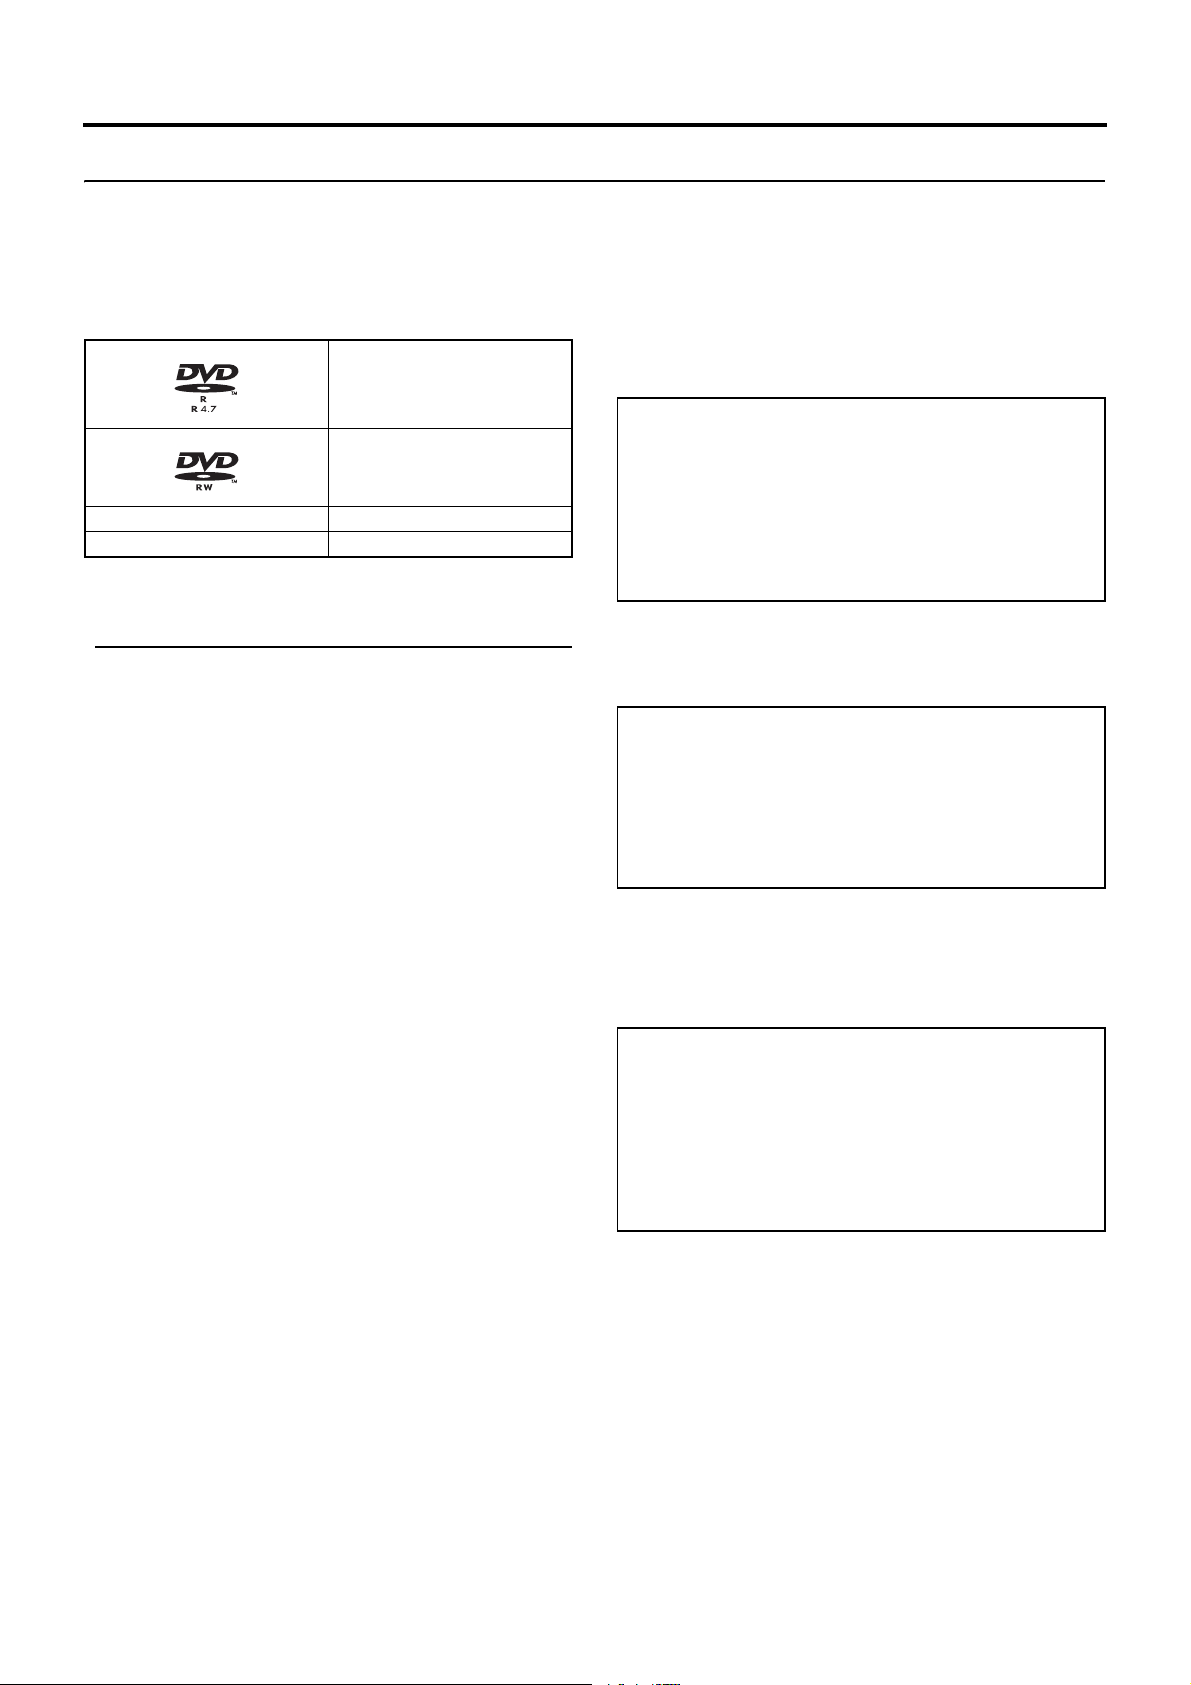
The following shows the discs that can be recorded to and
played using this DVD recorder, in addition to the corresponding display marks or logos.
DVD-R 12 cm: 4.7 GB
General Version 2.0
(video mode)
DVD-RW 12 cm: 4.7 GB
Version 1.1 or later
(video mode)
DVD+R 12 cm: 4.7 GB
DVD+RW 12 cm: 4.7 GB
* Certain characteristics and properties of a disc can render
them unsuitable for recording or playback.
Recommended manufacturers
DVD-R : JVC, Maxell 2×, 4×, 8×
DVD-RW : JVC 2×, 4×
DVD+R : JVC 2.4×, 4×, 8×
DVD+RW : JVC 2.4×, 4×
CD-R : JVC ~ 40×
CD-RW : JVC ~ 32×
DVD-R/-RW and DVD+R/+RW Details
DVD-R : Only discs that conform with DVD-R Standard 2.0
(video mode) can be used.
DVD-RW : Discs of Version 1.1 or later can be used.
Although Version 1.1 of the DVD-RW Standards
allows the selection of either video mode or VR
mode for recording, this DVD recorder performs
recording in video mode only.
* Version 1.0 of the DVD-RW Standards does not
support video-mode recording, and for this rea-
son, the corresponding discs cannot be used.
In terms of recording characteristics, DVD-R/DVD-RW (video
mode) and DVD+R/DVD+RW (compliance with video mode)
differ as follows.
DVD-R/DVD+R
• Each disc can be recorded only one. Accordingly, these
discs are recommended for use in archiving or long-term
storage.
• Once a disc has been finalized, it can also be played on
other DVD players.
DVD-RW (video mode)/DVD+RW (compliance with
video mode)
• After viewing a disc, all data can be erased and it can be
used to record new content.
• Once a disc has been finalized, it can also be played on
other DVD players.
• It is possible to cancel the finalization and add a recording.
Finalizing
When DVD-R, DVD-RW, DVD+R and DVD+RW have been
finalized, they can be played in the same way as any other
DVD using a standard DVD player. (X Page 42)
Recording to unused sections of a disc and the modifi-
cation of titles or display styles can be carried out as
required before a disc is finalized.
• In the case of both DVD-Rs/DVD-RWs and DVD+Rs/
DVD+RWs, it is impossible to overwrite previously
recorded content with new data, even if the disc in question has not yet been finalized. The deletion of specific
sections of data is also impossible.
• Regardless of whether or not finalization has been carried
out, it will not be possible to use this DVD recorder to
record new content to DVD-R/DVD-RW and DVD+R/
DVD+RW that have been recorded using other devices.
Once a disc has been finalized, it can be used as a
standard DVD and its recorded audio and video can be
played on this and other DVD players.
• After finalizing, a disc’s titles can be selected from the top
menu.
• Additional recording will not be possible after finalizing.
• In the case of a DVD-RW or DVD+RW, it is possible to
cancel the finalization and add a recording.
• Although a finalized disc may in principle be played on
other DVD players, certain characteristics of the disc and
its recording conditions may make this impossible.
Playing Discs on this DVD Recorder
This DVD recorder is capable of playing any discs that it has
created and finalized.
• The following conditions may occur when attempting to
play discs recorded using other devices on this DVD
recorder.
• Inability to play
• Block-type noise (i.e., mosaic)
• Interruptions in audio and/or video
• Unintentional stopping during playback
• Commercially-available DVD-Videos and DVD-ROMs
cannot be used.
E-7
Page 8

Introduction
Details Regarding Discs (continued)
DVD Data Configuration
Generally speaking, the content recorded on a DVD is separated into large units referred to as “titles”. A unique number
called a “title number” is assigned to each of these titles, and
as a result, any title can be immediately accessed using its
title number. In addition, each title can be divided into smaller
units referred to as “chapters”. Similarly, a unique number
called a “chapter number” is assigned to each of these chapters, and this allows any chapter to be immediately accessed
using its chapter number.
Each recording made to a disc is stored as a single title. In
this, each pressing of the STOP button to leave Recording
mode constitutes a different recording. (This action is also
referred to as “title closing”.) It is also possible to insert chapter marks to partition titles at the desired points by pressing
the REC button while recording.
It is possible to automatically add a chapter mark when
recording is temporarily stopped by pressing the PAUSE button. (Set from the menu.) In addition, this DVD recorder can
also be used to automatically insert chapter marks at regular
intervals. (CHAPTER CREATION menu settings will be
required for this function.)
Disc
Title 1 Title 2
Chapter 1 Chapter 2 Chapter 3 Chapter 1 Chapter 2
Region Codes
One of six numbers referred to as “region codes” is assigned
to DVD content to control the global regions in which this content may be viewed. If a DVD’s region code does not correspond to the region code of the DVD player being used, it will
not be possible to play the disc.
• This DVD recorder assigns the region code “ALL” to the
discs that it records.
• It will not be possible to play discs to which region codes
have been assigned.
Screen Sizes
This DVD recorder is capable of recording video content for
wide-screen TVs (i.e., with a 16:9 aspect ratio).
In addition, signals for normal content with a 4:3 aspect ratio,
for squeezed content (i.e., where the left and right are compressed), and for letterbox content (i.e., where the top and
bottom of the screen are black) can be recorded as is.
• Thumbnail creation method for use in the title/chapter
menu during wide-signal input can be selected in THUMBNAIL FORM of the DVD MENU screen. (X Page 71)
• Before a title is closed, it will be possible to modify the style
used for chapter menu display, to change the thumbnails
used, and to input thumbnail names.
• Before a disc is finalized, it will be possible to modify the
style used for the title menu and to input title names.
E-8
Page 9

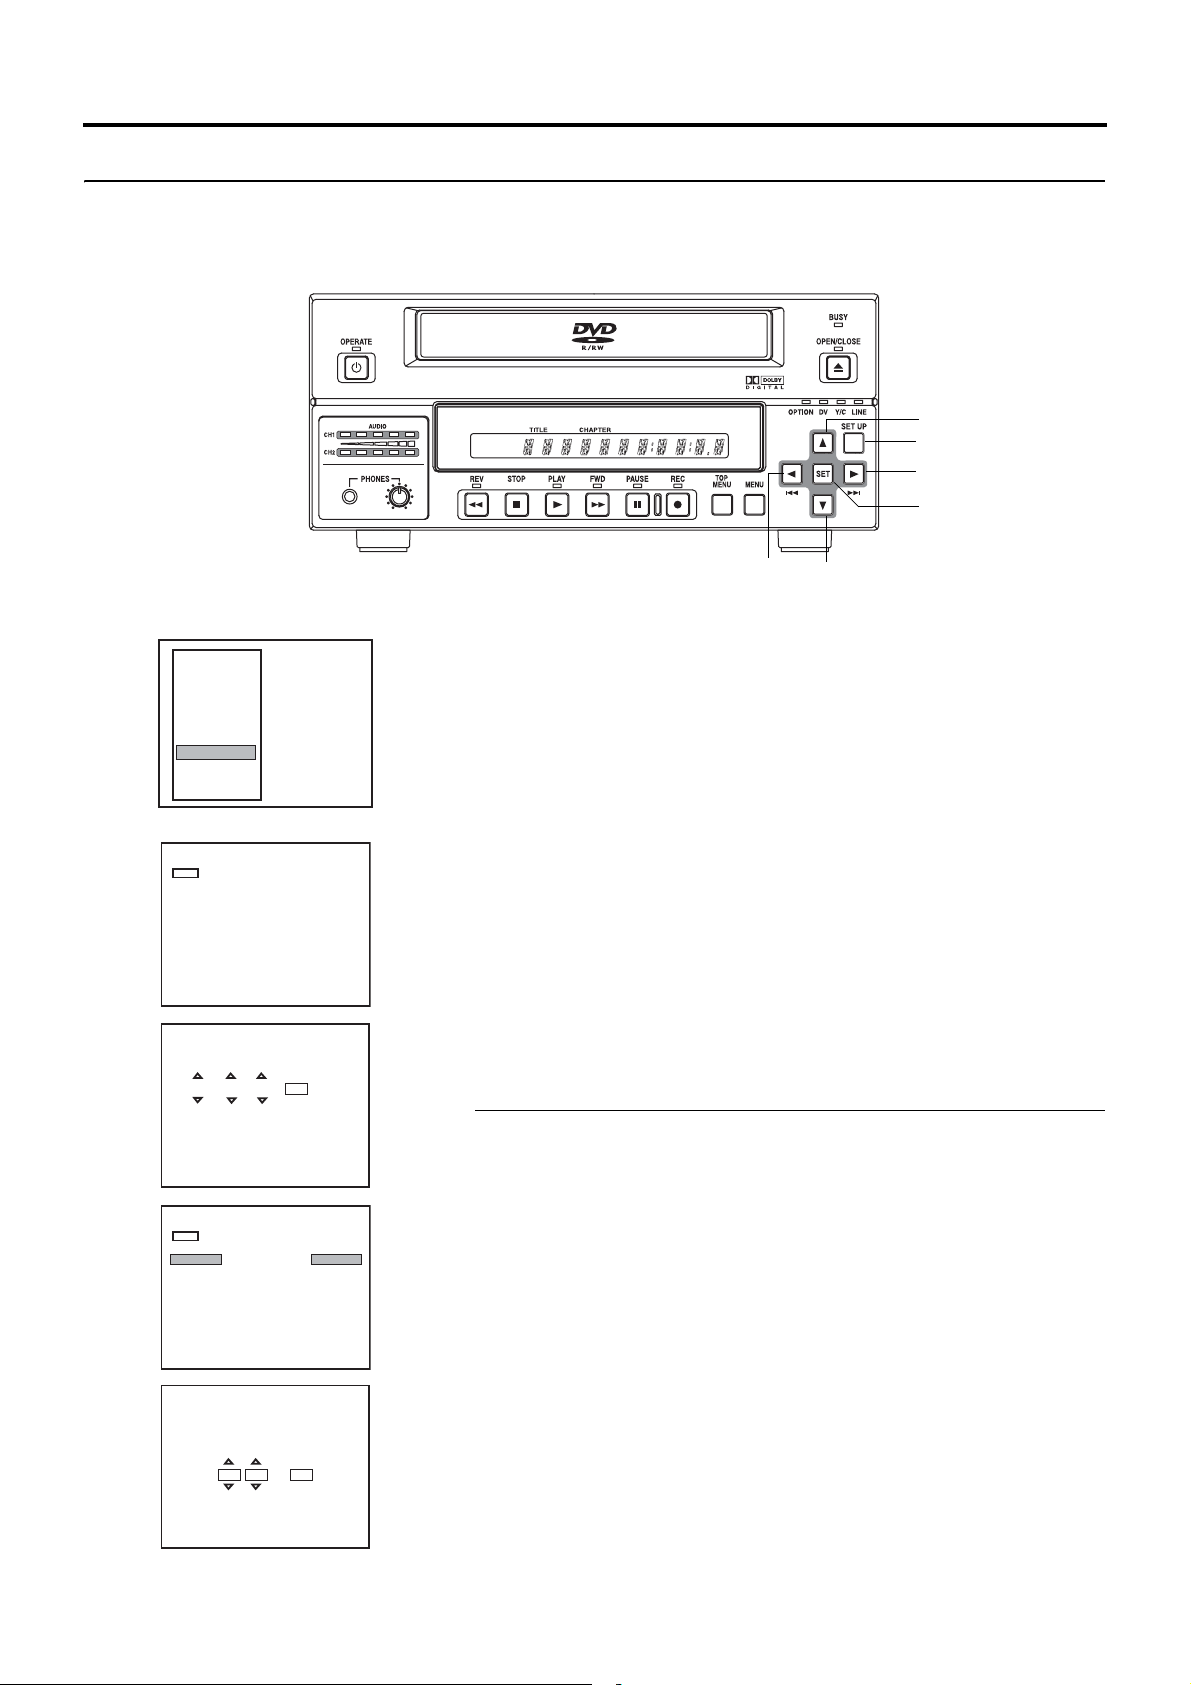
Component Names & Functions
Front Panel
26
1
5
3
4
1OPERATE button and indicator
• This button is used to make it ready for use. Press again
to disable operation (Operate OFF mode).
• The indicator’s lighting condition depends on the condi-
tion of the DVD recorder and can be one of the following.
Lit in green : Operate ON.
Lit in orange : Operate OFF.
Notes
• The OPERATE button will have no effect if pressed while
the DVD recorder is in either Recording or Recording
Pause mode. This is also the case when performing finalizing or erasing.
• The DVD recorder continues to use a small amount of
power even after it has been turned off using the OPERATE button. If it will not be used for an extended period of
time, please set the POWER switch to OFF to avoid wasting electricity.
• Do not turn the power off when in Operate On mode as
this can result in the DVD recorder being damaged.
• Malfunction may occur when switching to OPERATE ON
while pressing a key on a connected USB keyboard.
2Disc tray
The purpose of the disc tray is to hold DVDs.
This tray opens automatically when the OPEN/CLOSE button is pressed. In addition, the OPEN/CLOSE button can
be pressed again to close the tray.
Notes
• Do not push the disc tray as it is opening or closing.
• Do not place objects other than discs on the disc tray.
• Do not press down on the disc tray.
3BUSY indicator
This indicator flashes when the DVD recorder is in Recording Pause mode or when it is performing time-consuming
operations such as title closing, finalizing, and erasing.
None of the DVD recorder’s buttons will have any effect if
pressed while the BUSY indicator is flashing.
4OPEN/CLOSE button and indicator
This button is used to open and close the disc tray.
In addition, the OPEN/CLOSE indicator is lit up while the
disc tray is opening, and also when it is open.
• If this button is pressed and held for at least 7 seconds,
the disc is ejected after it is finalized.
• The following operation is performed when ejecting a
CD-R/RW.
Any JPEG files captured to the memory of this DVD
recorder are automatically recorded to the CD-R/RW
and then the disc tray opens.
Note
The OPEN/CLOSE button will have no effect if pressed
while the DVD recorder is in either Recording or Recording
Pause mode. This is also the case when performing finalizing or erasing.
5Audio level indicator
These meters are used to indicate the current level of
audio on Channel 1 and Channel 2.
Specifically, the audio level meters indicate the audio
recording levels when the DVD recorder is in Recording
mode, and the audio playback levels when it is in Playback
mode. (Adjustment of the audio recording levels:
X Page 33.)
6LCD display
The LCD display is used to present important information.
During recording or playback, for example, the title, chapter
number, and elapsed time are indicated on the LCD display. (X Page 15 for more details.)
E-9
Page 10

Component Names & Functions
Front Panel (continued)
8
90abc
7
7Video input indicators
OPTION indicator
This indicator is lit up or flashes when INPUT SELECT
from the INPUT SELECT MENU screen has been set to
OPTION. (This setting cannot be carried out using the DVD
recorder alone.)
DV indicator
This indicator is lit up or flashes when INPUT SELECT
from the INPUT SELECT MENU screen has been set to
DV. Specifically, the indicator is lit up when an input signal
is present, and it flashes when no signal is present.
Y/C indicator
This indicator is lit up or flashes when INPUT SELECT
from the INPUT SELECT MENU screen has been set to Y/
C. Specifically, the indicator is lit up when an input signal is
present, and it flashes when no signal is present.
LINE indicator
This indicator is lit up or flashes when INPUT SELECT
from the INPUT SELECT MENU screen has been set to
LINE. Specifically, the indicator is lit up when an input signal is present, and it flashes when no signal is present.
8Phones jack and volume adjuster
The phones jack allows headphones to be connected to
the DVD recorder for monitoring of audio levels; in addition,
the headphone volume can be adjusted using the volume
adjuster. Note that this adjuster has no effect on the actual
recording levels.
9REV button and indicator
• Press this button during playback or fast-forward mode
to start fast-reverse play. If pressed during fast-reverse
play, this button toggles the speed of fast-reverse play
between low speed and high speed.
• Press this button in still mode or during slow-forward
play to start slow-reverse play. If pressed during slowreverse play, this button toggles the speed of slowreverse play between low speed and high speed.
• The REV indicator is lit up during fast-reverse and slowreverse play.
0STOP button
• This button has the following effect when pressed in
Recording or Recording Pause mode.
If EDIT MENU from the DVD MENU screen is set to DISABLE, the DVD recorder stops recording (i.e., it performs title closing).
If EDIT MENU from the DVD MENU screen is set to
ENABLE, the DVD recorder stops recording and the
THUMBNAIL EDIT screen is displayed. It will then be
possible to modify the chapter menu.
• When the STOP button is pressed in Playback mode,
the DVD recorder stops playback.
aPLAY button and indicator
• If this button is pressed together with the REC button
while a recordable disc is inserted into the DVD
recorder, recording will be started.
• When the PLAY button is pressed in Recording Pause
mode, the DVD recorder restarts recording.
• When an unfinalized disc is inserted and this button is
pressed, playback of the most recent title starts.
• The PLAY indicator is lit up in Recording and Playback
modes.
bFWD button and indicator
• Press this button during playback or fast-reverse mode
to start fast-forward play. If pressed during fast-forward
play, this button toggles the speed of fast-forward play
between low speed and high speed.
• Press this button in still mode or during slow-reverse
play to start slow-forward play. If pressed during slowforward play, this button toggles the speed of slow-forward play between low speed and high speed.
• The FWD indicator is lit up during fast-forward and slowforward play.
cPAUSE button and indicator
• When this button is pressed while recording, the
recorder enters the recording pause mode.
• If this button is pressed during playback, the DVD
recorder switches to Still mode and freezes playback. If
the PAUSE button is then pressed again in Still mode,
the DVD recorder will advance playback by a single
field.
• The PAUSE indicator is lit up in Recording Pause and
Still modes.
E-10
Page 11

Component Names & Functions
j
h
g
k
l
ef i
d
dREC button and indicator
• If this button is pressed together with the PLAY button in
Stop mode, recording will be started.
• If the current disc is blank or title closing has been
carried out, a new title will be created and recording
will start at Chapter 1.
• When this button is pressed during recording, a new
chapter and index will be setup within the continuous
video data.
• If this button is pressed while an unfinalized DVD with
available space is being played back, the playback
image (still image) is captured to the internal memory of
this DVD recorder.
Recording to the disc is performed when playback is
stopped. If recording is not performed and the DVD
recorder is switched to OPERATE OFF mode, the image
data stored in the internal memory of the DVD recorder
is cleared. (The simultaneous recording of multiple captured images is possible.)
• If this button is pressed in Stop mode when a CD-R/RW
with available space is inserted, a still image of the input
video (E-E image) is captured to the internal memory of
the DVD recorder.
Recording to the disc is performed when the disc is
ejected or FILE VIEWER (X Page 45) is started. If
recording is not performed and the DVD recorder is
switched to OPERATE OFF mode, the image data
stored in the internal memory of the DVD recorder is
cleared. (The simultaneous recording of multiple captured images is possible.)
• If this button is pressed and held for more than 2 seconds while the DVD recorder is stopped or inserted with
no disc, input signal encoded/decoded in MPEG will be
output via the VIDEO OUT terminal on the rear panel.
This will continue for as long as the button is held, and it
allows the DVD recording quality to be confirmed. Audio
will be muted at this time.
• The REC indicator is lit up in Recording and Recording
Pause modes.
eTOP MENU button
If this button is pressed while the DVD recorder is in a playback condition, the current DVD’s top menu or title list will
be displayed on the monitor screen.
• The title list is displayed when the disc is unfinalized or
PLAYBACK NAVIGATION of the SYSTEM MENU (2/2)
screen is set to OFF.
• The TOP MENU is displayed when you are using a finalized disc and PLAYBACK NAVIGATION of the SYSTEM
MENU (2/2) screen is set to ON.
fMENU button
If this button is pressed while the DVD recorder is in a playback condition, the chapter menu for the currently selected
title will be displayed on the monitor screen.
If the DVD title does not contain a chapter menu, nothing
will be displayed when the MENU button is pressed.
gSET UP button
• This button can be pressed to display the Setup Menu
on the monitor. A wide range of different menu settings
can then be made via the Setup Menu. (X Page 63)
In addition, the SET UP button can be pressed again to
hide the Setup Menu.
• If the SET UP button is pressed in Recording or Recording Pause mode, setting data relevant to recording (i.e.,
video bit rate and audio encoding format) will be displayed on-screen. In addition, the SET UP button can be
pressed again to hide this information.
• Press this button when in the Playback mode to display
the INDEX MANAGER screen.
When the INDEX MANAGER screen is displayed, press
this button to return to the original screen. (X Page 61)
• FILE VIEWER starts when an unfinalized disc is inserted
and this button is pressed and held for at least 2 seconds while the DVD recorder is stopped. (X Page 45)
• If this button and the STOP button are simultaneously
pressed and held for at least 2 seconds while the DVD
recorder is stopped, the NTSC/PAL signal system is
changed. (NTSC is the setting for the US.) (X Page 80)
E-11
Page 12

Component Names & Functions
Front Panel (continued)
h[g] button
• This button is used to select menu items or setting val-
ues when the Setup Menu is displayed.
• Press this button during playback to playback the next
title.
• If a title menu or chapter menu is displayed, this button
can be used to select a menu number for playback. Specifically, pressing of this button moves the selection position upward.
• The g button can be used to adjust the audio recording
levels when the DVD recorder is stopped or in Recording Pause mode.
• If AUDIO REC VOLUME MODE from the
RECORDER MENU (2/2) screen is set to BOTH and
this button is pressed while either the i or j button
is being held, the audio recording levels for both
Channel 1 and Channel 2 will increase.
• If AUDIO REC VOLUME MODE from the
RECORDER MENU (2/2) screen is set to INDEPENDENCE and this button is pressed while the i button
is being held, the audio recording level for Channel 1
will increase. Similarly, if the g button is pressed
while the j button is being held, the audio recording
level for Channel 2 will increase.
i[h] button
• This button is used to select menu items or setting val-
ues when the Setup Menu is displayed.
• Press this button during playback to playback the previous title.
• If a title menu or chapter menu is displayed, this button
can be used to select a menu number for playback. Specifically, pressing of this button moves the selection position downward.
• The h button can be used to adjust the audio recording
levels when the DVD recorder is stopped or in Recording Pause mode.
• If AUDIO REC VOLUME MODE from the
RECORDER MENU (2/2) screen is set to BOTH and
this button is pressed while either the i or j button
is being held, the audio recording levels for both
Channel 1 and Channel 2 will decrease.
• If AUDIO REC VOLUME MODE from the
RECORDER MENU (2/2) screen is set to INDEPENDENCE and this button is pressed while the i button
is being held, the audio recording level for Channel 1
will decrease. Similarly, if the h button is pressed
while the j button is being held, the audio recording
level for Channel 2 will decrease.
j[i] button
• If a title menu or chapter menu is displayed, this button
can be used to select a menu number for playback. Specifically, pressing of this button moves the selection position to the left.
• This button can be pressed while the DVD recorder is
playing to move playback to the start of the current chapter.
• The i button can be used to adjust the audio recording
levels when the DVD recorder is stopped or in Recording Pause mode.
• If AUDIO REC VOLUME MODE from the
RECORDER MENU (2/2) screen is set to INDEPEN-
DENCE and either the g or h button is pressed
while this button is being held, the audio recording
level for Channel 1 will be adjusted accordingly.
• If AUDIO REC VOLUME MODE from the
RECORDER MENU (2/2) screen is set to BOTH and
either the g or h button is pressed while this button
is being held, the audio recording levels for both
Channel 1 and Channel 2 will be adjusted accordingly.
• If this button is pressed together with the j button,
the audio recording levels will be returned to their
default settings (i.e., unity gain).
k[j] button
• If a title menu or chapter menu is displayed, this button
can be used to select a menu number for playback. Specifically, pressing of this button moves the selection position to the right.
• This button can be pressed while the DVD recorder is
playing to move playback to the start of the next chapter.
• The j button can be used to adjust the audio recording
levels when the DVD recorder is stopped or in Recording Pause mode.
• If AUDIO REC VOLUME MODE from the
RECORDER MENU (2/2) screen is set to INDEPENDENCE and either the g or h button is pressed
while this button is being held, the audio recording
level for Channel 2 will be adjusted accordingly.
• If AUDIO REC VOLUME MODE from the
RECORDER MENU (2/2) screen is set to BOTH and
either the g or h button is pressed while this button
is being held, the audio recording levels for both
Channel 1 and Channel 2 will be adjusted accordingly.
• If this button is pressed together with the i button,
the audio recording levels will be returned to their
default settings (i.e., unity gain).
lSET button
• This button is used to confirm the selection of menu
items or setting values when the Setup Menu is displayed.
• When this button is pressed during normal screen display, the counter from the DVD recorder’s LCD display
will switch to display of either the elapsed recording/
playback time or the remaining disc/title time.
E-12
Page 13

Rear Panel
f
e
134567
2
Component Names & Functions
8
90abcd
1VIDEO LINE IN terminal (BNC)
This terminal allows composite video signals to be input to
the DVD recorder.
In order to select these signals for input, set INPUT
SELECT from the INPUT SELECT MENU screen to LINE.
• SETUP from the SYSTEM MENU (1/2) screen should be
set in accordance with whether or not this input signal is
a setup signal. (NTSC only)
2VIDEO Y/C IN terminal (4-pin)
This terminal allows YC separate video signals to be input
to the DVD recorder.
In order to select these signals for input, set INPUT
SELECT from the INPUT SELECT MENU screen to Y/C.
• SETUP from the SYSTEM MENU (1/2) screen should be
set in accordance with whether or not this input signal is
a setup signal. (NTSC only)
• This terminal’s specification (i.e., S1 or S2) can be
selected using Y/C TERMINAL MODE from the SYSTEM MENU (2/2) screen.
3VIDEO LINE OUT terminal (BNC)
This terminal is used to connect the DVD recorder to a
monitor.
• When the DVD recorder is in Stop or Recording mode,
the video input signal is output on the E-E screen as a
composite video signal.
• If the REC button is pressed and held for at least 2 seconds while the DVD recorder is stopped, the input signal
will be subjected to MPEG encode/decode processing
and output via the VIDEO LINE OUT terminal. This will
continue for as long as the REC button is held, and it
allows the DVD recording quality to be confirmed.
• Playback from the DVD is output as a composite signal
when in Playback mode.
• The Setup Menu, title menu, chapter menus, and other
setting and control screens are displayed on the monitor
connected to this terminal.
• Status and alarm information is also displayed onscreen. (The DISPLAY MENU screen can be used to
indicate which items are to be displayed.)
4VIDEO Y/C OUT terminal (4-pin)
For output of YC separate video signals.
• Information that is the same as that of the VIDEO LINE
OUT terminal is being output.
• This terminal’s specification (i.e., S1 or S2) can be
selected using Y/C TERMINAL MODE from the SYSTEM MENU (2/2) screen.
5AUDIO INPUT LEVEL switch
This switch is used to set the standard level for audio input.
+4 dB : The standard level is set to +4 dB.
–8 dB : The standard level is set to –8 dB.
6AUDIO IN terminals (RCA × 2)
These terminals allow analog audio signals to be input to
the DVD recorder.
• In order to select these signals for input, set INPUT
SELECT from the INPUT SELECT MENU screen to
LINE or Y/C.
7AUDIO OUT terminals (RCA × 2)
These terminals allow analog audio signals to be output
from the DVD recorder.
• When the DVD recorder is in Stop or Recording mode,
the audio input signals (i.e., E-E signals) are output via
these terminals.
• Audio from the DVD is output when in Playback mode.
8RS-232C REMOTE terminal (D-sub 9-pin female)
Operation of this unit can be controlled externally by connecting to an RS-232C control device.
9USB terminals (× 2)
For connecting to a USB-supported keyboard.
The input of text in setting screens is carried out using a
keyboard.
• It is not be possible to operate devices other than a keyboard by connecting them to the USB terminal.
• Set KEYBOARD STYLE from the SYSTEM MENU (1/2)
screen in accordance with the keyboard’s input language.
Recommended manufacturers: Logitech
E-13
Page 14

Component Names & Functions
Rear Panel (continued)
0DV IN/OUT terminal
This I/O terminal for digital signals conforms with
IEEE1394 specifications.
• In order to select this terminal’s audio and video signals
for input, set INPUT SELECT from the INPUT SELECT
MENU screen to DV.
• REMOTE SELECT from the REMOTE MENU screen is
used to select a control method for this terminal as follows.
DV (SLAVE) : The DVD recorder operates as a slave
device and is controlled by commands
from a master device.
DV (TRIGGER): The DVD recorder performs recording
in response to operation of the trigger
button on a camera capable of DV triggering (i.e., a GY-DV5000 from JVC).
aFOOT SW 1/2 terminal
FOOT SW 1 : For controlling the Record/Record Pause
functions of this unit by connecting to an
external switch (foot switch, etc.).
FOOT SW 2 : If an external switch (foot switch, etc.) is con-
nected, the following operations are performed in response to switch signals from
the switch.
• Insert chapter marks and indexes while
recording to a DVD.
• Capture still images (JPEG) during playback of an unfinalized DVD with available
space.
• Capture still images (JPEG) of the input
video when a CD-R/RW with available
space is inserted.
For selecting the method of control by this terminal using
the FOOT SW1/2 items on the REMOTE (1/2) menu
screen. (X Page 75)
bFOR SERVICE terminal (RJ-45)
• Connect this terminal to a PC that has been installed
with utilities for this unit, such as application software for
creating title/chapter menus.
• NETWORK settings must be carried out using the NETWORK MENU screen.
cOptional-board slot cover
This cover is removed to allow commercially-available
optional boards to be installed.
dEquipotential Terminal
Ensure proper connection of the equipotential terminal for
each device when connecting this unit to other devices.
eAC IN terminal (3P)
For connecting to the power outlet using the power cord
supplied.
fMAIN POWER switch
Switch for turning ON/OFF the power.
• When the power is turned ON, operating mode can be
selected using the AC IN MODE item on the SYSTEM
MENU (2/2) screen. (X Page 69)
E-14
Page 15
LCD Display and On-Screen Content
LCD Display
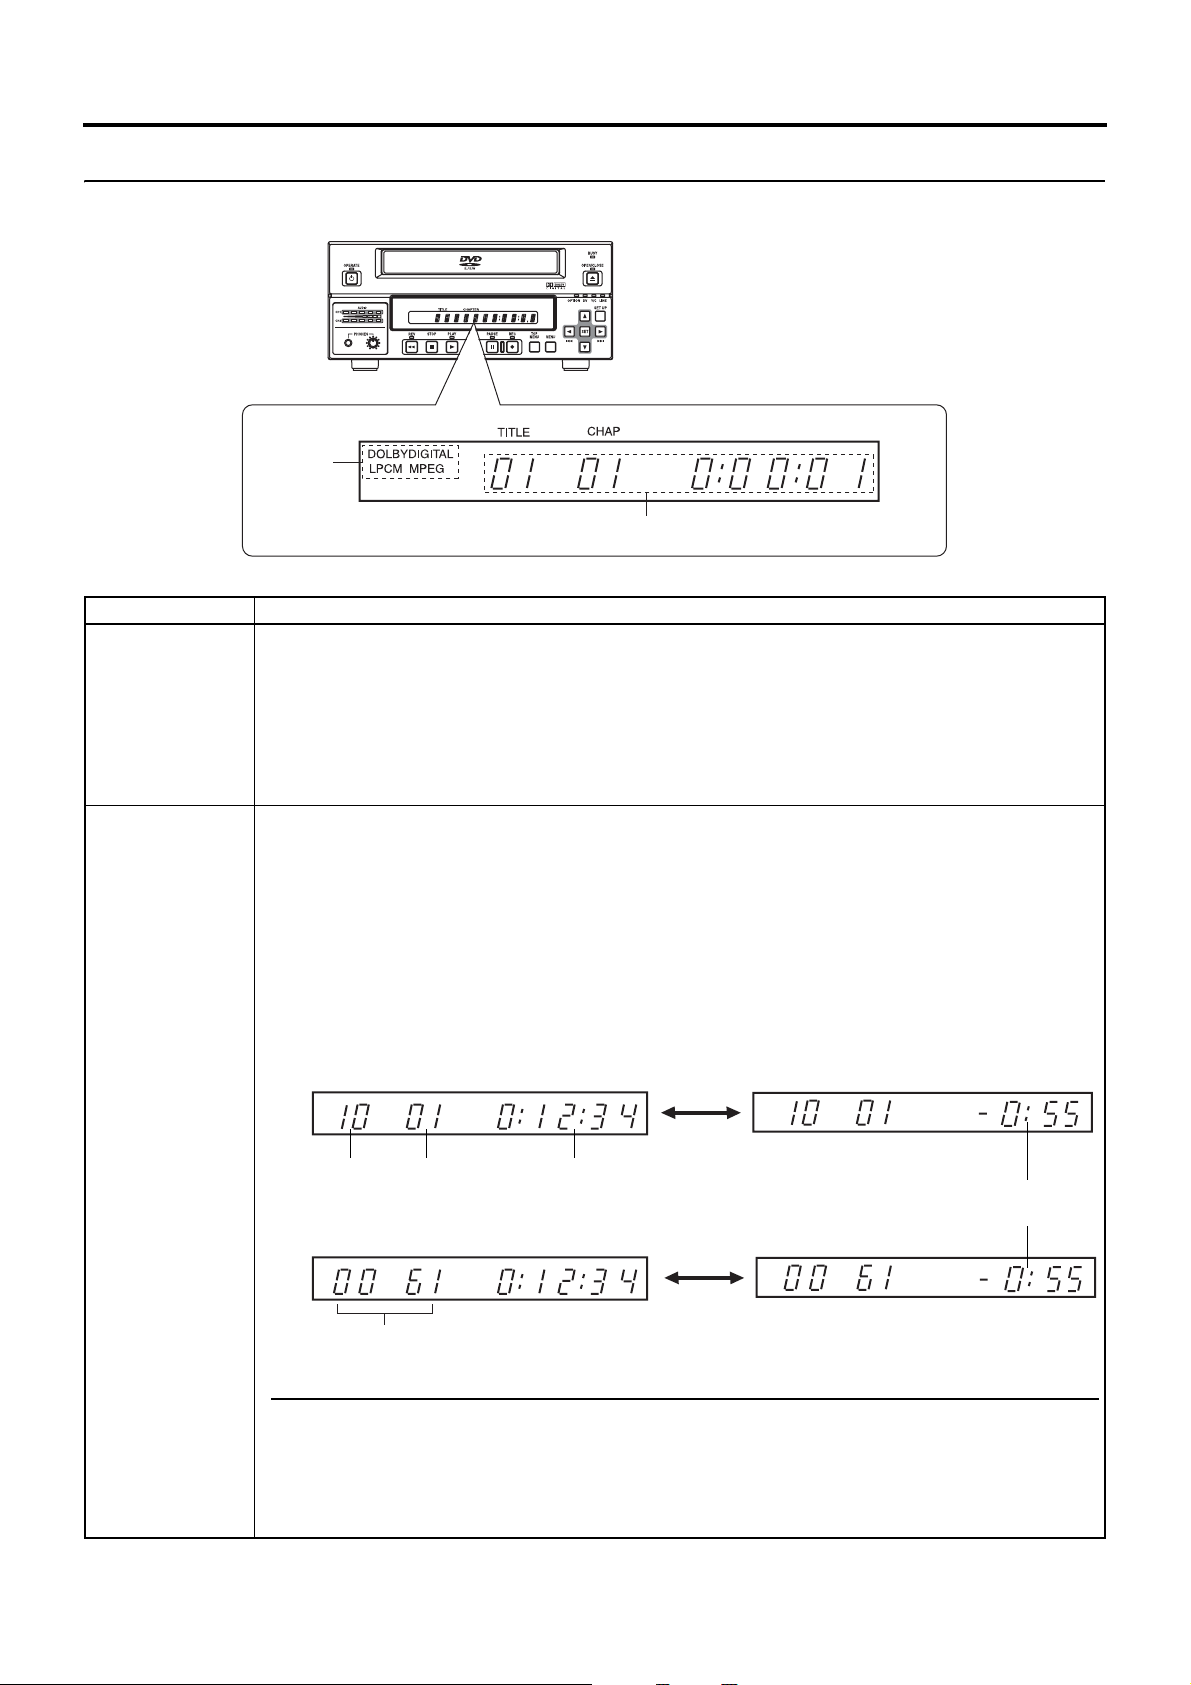
The following information and data is presented on the DVD recorder’s LCD display.
1
2
No. Description
1 Encoding format for audio recordings (LPCM / DOLBY DIGITAL / MPEG) …… MPEG can only be
selected when in the PAL mode.
Recording mode : The encoding format set using AUDIO ENCODE from the RECORDER MENU (1/2)
screen is displayed. This will not be displayed when the AUDIO ENCODE item is set
to NO AUDIO.
Playback mode : The encoding format used for audio on the current disc is displayed. This will not be
displayed during playback of a recorded disc with the AUDIO ENCODE item set to
NO AUDIO.
2 Information relevant to the current mode.
Title number / Chapter number / Index number / Counter
Display details can be selected using the LCD item on the DISPLAY menu screen.
• Displays the title No., chapter No. and elapsed time of a title when the LCD item is set to
TITLE+CHAPTER.
• Displays the index No. and elapsed time of a title when the LCD item is set to INDEX.
Press the SET button to alternate counter display between elapsed time and remaining time.
Remaining Time: Displays the remaining time of the disc (hr: min) during recording and remaining
time of the title during playback.
When the LCD item is set to TITLE+CHAPTER
SET button
Title No. Chapter No. Title Recording Elapsed Time (hr: min: sec)
Disc Remaining Time
When the LCD item is set to INDEX
SET button
Index No. (4 digits)
Notes
• The remaining disc and title time depend on the amount of data comprising video, and for this reason,
they should be taken as being a general indication and not an exact figure.
• When the PLAYBACK & 232C TYPE item on the SYSTEM MENU (1/2) screen is set to VTR, the
elapsed time and index No. will represent the total time and total number respectively as accumulated
from Title 1. (X Page 68)
(hr: min)
E-15
Page 16
LCD Display and On-Screen Content
LCD Display (continued)
No. Description
2 Indication of the current operating mode
PLEASE WAIT : The DVD recorder is starting up.
OPERATE OFF : The DVD recorder is preparing to shut down.
NO DISC : The DVD recorder currently contains no disc.
LOADING : A disc is being loaded into the DVD recorder.
DVD-R : The current disc is a non-finalized DVD-R. (Approximately 3 seconds)
DVD-RW : The current disc is a non-finalized DVD-RW. (Approximately 3 seconds)
DVD+R : The current disc is a non-finalized DVD+R. (Approximately 3 seconds)
DVD+RW : The current disc is a non-finalized DVD+RW. (Approximately 3 seconds)
DVD : The current disc is a finalized DVD-R/DVD-RW/DVD+R/DVD+RW. (Approximately 3
seconds)
CD-R : The current disc is a non-finalized CD-R. (Approximately 3 seconds)
CD-RW : The current disc is a non-finalized CD-RW. (Approximately 3 seconds)
CD : The current disc is a finalized CD-R or CD-RW. (Approximately 3 seconds)
REC PAUSE : The DVD recorder is switching from Recording mode to Recording Pause mode.
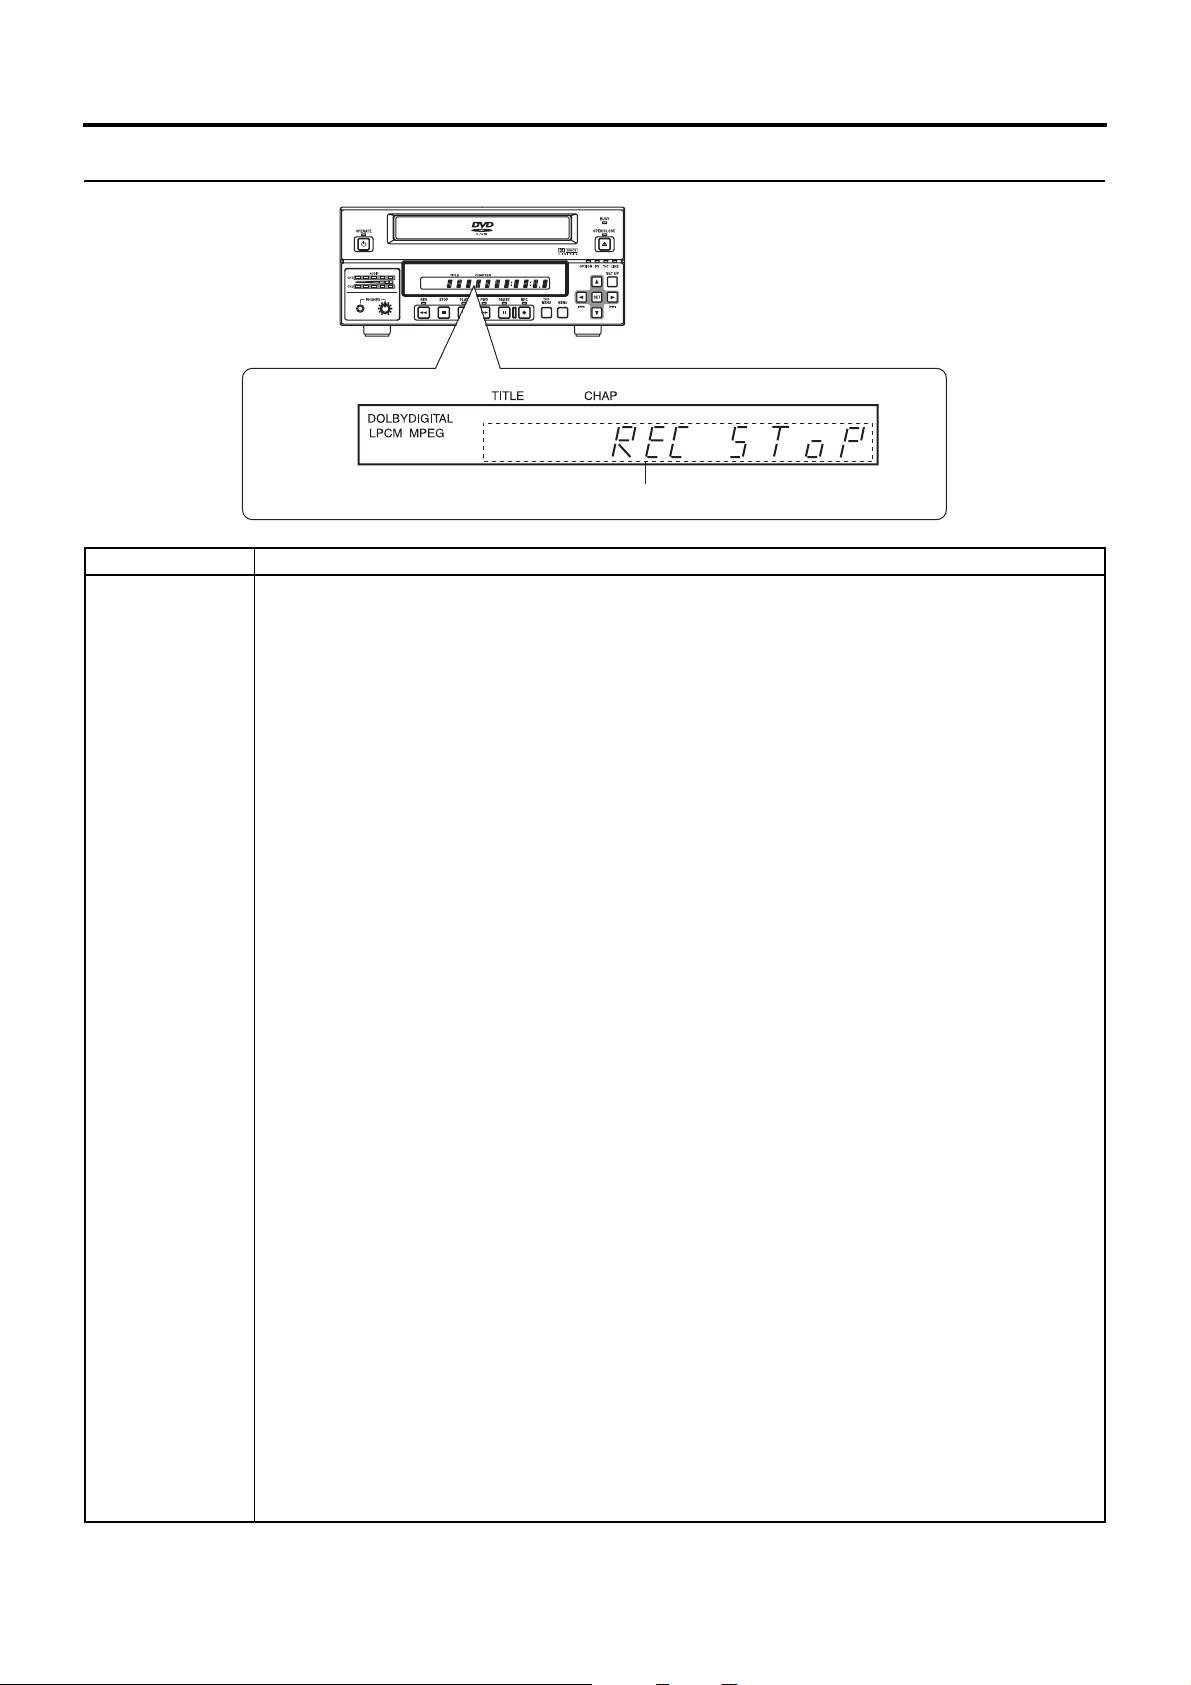
REC STOP : The DVD recorder is switching from Recording mode to Stop mode.
MENU EDIT : A title menu or chapter menu is currently being edited.
EJECT : The current disc is being ejected.
TITLE CLOSE : The DVD recorder is performing title-close processing.
FINALIZE : The DVD recorder is finalizing the disc.
QUICK ERASE : The DVD recorder is erasing data from a DVD-RW disc.
FULL ERASE : The DVD recorder is erasing data from a DVD-RW disc.
INDEX WRITE : Displayed when index is written. (Approximately 3 seconds)
INDEX ERASE : Displayed when index is erased. (Approximately 3 seconds)
CAPTURE : Displayed when a still image (JPEG) is captured.
WRITE IMAGE FILES:
Displayed when a still image (JPEG) is being written to disc.
TOP MENU : The disc’s top menu is being played.
MENU : A menu is being played.
ENCODE XX : Encoded video is being output. (XX: Encode quality (UXP, XP, SP, LP, EP, DLP, DEP))
RESTORE XX : Displayed when executing disc recovery. XX: Progress (%)
2
E-16
Display of the Setup Menu
Menu items and setting values from the Setup Menu are displayed. (X Page 64)
Event messages
Messages relating to incorrect operation and the like are displayed for approximately 3 seconds.
(X Page 19)
Alarm messages
Alarms are displayed when the DVD recorder cannot obey a command. (X Page 20)
Page 17

LCD Display and On-Screen Content
On-Screen Content
In addition to E-E and playback screens, the monitor connected to the DVD recorder’s VIDEO LINE OUT terminal can display the
following.
• Status messages
• Event messages
• Alarm messages
• The Setup Menu (X Page 63)
Status Messages
The DVD recorder’s setting condition and operation status are indicated by status messages, and these messages are displayed
on E-E or playback screens.
The DISPLAY MENU screen can be used to indicate whether or not status messages are to be displayed.
DISPLAY MENU screen
DISPLAY MENU
MENU
DISPLAY
TITLE/CHAPTER/INDEX
RECORDER MODE
TIME/DATE
REMAIN
DATE STYLE
LCD
ON
TITLE+CHAPTER
ON
TIME+DATE
ON
MM/DD/YY
TITLE+CHAPTER
To display status messages:
Set DISPLAY from the DISPLAY MENU screen to ON.
The various items of status information for display can be selected.
If DISPLAY is set to OFF, no status information will be displayed.
Data relevant to record-
Status Messages
4
000 min
ing:
If the SET UP button is
pressed while in Recording mode, the video
DVD -RW
encode quality and the
audio encoding format will
be displayed. If the SET
UP button is then pressed
once again, this information is removed from the
screen.
1
2
3
04/05/06
11:20:00
TITLE 01 0:11:22
CHAPTER
01 0:11:22
REC
5
No. Item Description
1 Operation Mode This area indicates the DVD recorder’s current mode of operation.
Use RECORDER MODE from the DISPLAY MENU screen to indicate whether or not
this is to be displayed.
NO DISC : The DVD recorder currently contains no disc.
EJECT : The current disc is being ejected.
STOP : Stop mode
REC : Recording mode
REC PAUSE : Recording Pause mode
PLAY : Playback mode
STL : Still mode
FWD >> : Fast-forward playback (low speed)
FWD >>> : Fast-forward playback (high speed)
REV << : Fast-reverse playback (low speed)
REV <<< : Fast-reverse playback (high speed)
SLOW FWD >>> : Slow-forward playback (high speed)
SLOW FWD >> : Slow-forward playback (low speed)
SLOW REV <<< : Slow-reverse playback (high speed)
SLOW REV << : Slow-reverse playback (low speed)
LOADING : A disc is being loaded.
RESTORE : Disc recovery in progress. (X Page 41)
E-17
Page 18

LCD Display and On-Screen Content
On-Screen Content (continued)
No. Item Description
2 Title number /
Chapter number /
Index number /
Counter
3 Date / Time Use TIME/DATE from the DISPLAY MENU screen to select the way in which the
4 Remaining time Use REMAIN from the DISPLAY MENU screen to indicate whether or not this is to
5 DISC STATUS /
Index display
Use TITLE/CHAPTER/INDEX from the DISPLAY MENU screen to indicate whether
or not this is to be displayed.
OFF : No information is displayed
TITLE+CHAPTER: Title No., chapter No. and elapsed time of a title (hr: min: sec)
INDEX+TITLE : Index No. and elapsed time of a title (hr: min: sec) are dis-
* When the PLAYBACK & 232C TYPE item on the SYSTEM MENU (1/2) screen is
set to VTR, the elapsed time and index No. will represent the total time and total
number respectively as accumulated from Title 1. (X Page 68)
date and time are displayed.
OFF : No information is displayed.
DATE : Only the date is displayed.
TIME : Only the time is displayed.
TIME+DATE : Both date and time are displayed.
• The date display style can be changed using DATE STYLE from the DISPLAY
MENU screen.
Recording mode : The date and time from the internal clock are displayed.
Playback mode : The date and time of disc recording are displayed.
be displayed.
Recording mode : The amount of video that can still be recorded on the current
Playback mode : Not displayed
* Remaining time is to be used as a general guide, not as an exact figure.
When a disc is inserted into the DVD recorder, one of the following disc status is displayed on the monitor screen. (Approximately 3 seconds)
DVD-R : The current disc is a non-finalized DVD-R.
DVD-RW : The current disc is a non-finalized DVD-RW.
DVD+R : The current disc is a non-finalized DVD+R.
DVD+RW : The current disc is a non-finalized DVD+RW.
DVD : The current disc is a finalized DVD-R/DVD-RW/DVD+R/DVD+RW.
CD-R : The current disc is a non-finalized CD-R.
CD-RW : The current disc is a non-finalized CD-RW.
CD : The current disc is a finalized CD-R or CD-RW.
INVALID DISC : A disc other than specified was inserted.
• The following will be displayed when index is recorded or erased. (3 seconds)
INDEX WRITE : Displayed when writing index. (This is not displayed if TITLE/
INDEX ERASE: Displayed when erasing index.
This is not displayed if DISPLAY item from the DISPLAY MENU screen is set to OFF.
are displayed.
played.
disc is displayed (in minutes).
(Displayed while being inserted.)
CHAPTER/INDEX item from the DISPLAY MENU screen is set
to INDEX+TITLE or LCD item is set to INDEX.)
E-18
Page 19

LCD Display and On-Screen Content
Event Messages
Event messages are displayed on the DVD recorder’s LCD display and on the monitor when incorrect operations are attempted.
These messages will remain on-screen for approximately 3 seconds.
Monitor screen
04/05/06
11:20:00
TITLE FULL
000 min
TITLE 01 0:11:22
CHAPTER
01 0:11:22
Event messages:
Displayed when
DISPLAY from the
DISPLAY MENU
screen is set to
ON.
REC
LCD display
Event message
Monitor message
LCD display
message
Description
INVALID TV INVALId TV A signal of an invalid format has been input.
Alternatively, an attempt has been made to play a disc containing signals of an
invalid format.
TITLE FULL TITLE FULL Recording was attempted on a disc already containing 99 titles.
INDEX FULL INdEX FULL An attempt was made to add a index to a title already containing 99 indexes.
CHAPTER FULL CHAP FULL An attempt was made to add a chapter to a title already containing 99 chapters.
NOT FINALIZE NoT FINAL An attempt was made to eject a disc before it was finalized.
A L-xxxx-R Set value is displayed when changing the recording level of analog audio.
d L-xxxx-R Set value is displayed when changing the recording level of digital audio.
OPE LOCK oPE LoCK This is displayed when buttons on this unit are operated while the Operation Lock is
activated. Operation Lock can be canceled by setting the OPERATION LOCK item
on the SYSTEM MENU (2/2) screen to OFF.
IMAGE FULL IMAgE FULL This is displayed when a still image is captured if more than 1000 still images have
already been captured.
NOT WRITABLE NoT WRITE • This is displayed when the capture operation is performed if 1000 still images
have already been written to disc.
• This is displayed when the capture operation is performed for a finalized disc.
E-19
Page 20

LCD Display and On-Screen Content
On-Screen Content (continued)
Alarm Messages
Alarm messages are displayed on the DVD recorder’s LCD display and on the monitor when the recorder cannot obey a command. These messages will remain on-screen until the next operation is carried out.
Monitor screen
04/05/06
11:20:00
REC INHIBIT
CHAPTER
000 min
TITLE 01 0:11:22
REC
01 0:11:22
Alarm messages:
Displayed when
DISPLAY from the
DISPLAY MENU
screen is set to
ON.
LCD display
Alarm message
Monitor message
LCD display
message
Description
INVALID DISC INVALId dISC A disc other than specified was inserted.
NOT SUPPORT
NoT SUPPoRT A disc recorded using a different DVD recorder was inserted or played.
DISC
REC INHIBIT REC INH • Recording was attempted using a disc on which no more data can be recorded.
• The current disc is a non-finalized disc to which no more data can be recorded.
COPY INHIBIT CoPY INH Recording of a copy-protected signal was attempted.
DISC FULL dISC FULL All remaining space on the disc is used up during recording.
CELL OVER CELL oVER The number of cells for a single title exceeded 255.
This will be displayed when the recording time for a single title is exceeded as a
result of setting ENCODE QUALITY to a low quality, recording content with little
movement, or other similar factors.
OVERHEATING! oVERHEATING Displayed when the internal temperature of the set rises due to fan malfunction, etc.
In this case, immediately turn off the power and discontinue use. The power will
automatically shut down in about 20 minutes after the OVERHEATING display.
INVALID SYNC INVALId SYNC This is displayed if recording is discontinued when signals are interrupted and out of
sync during recording.
ERRoR This is displayed when playback or recording is stopped due to dirt or damage on the
disc. In this case, either clean the disc or replace it.
FAN STOP FAN SToP This is displayed when the fan stops.
CAUTION
If alarm messages such as “INVALID DISC” are displayed several times when a disc recorded using this DVD recorder or a
blank disk is inserted, there is a possibility that the disc itself has been damaged. In such a case, the damaged disc should be
replaced with a new one.
If the alarm messages continue to appear after replacing the disc, the problem may lie within the DVD recorder, and in such a
case, you are recommended to contact either the store where this DVD recorder was purchased or your JVC authorized dealer.
E-20
Page 21

Preparation
Connections
Audio and video signals
Video output
Input
Note 1
RS-232C
REMOTE
Audio output
Input
Analog audio
Note 2
DV
DV
DV IN/OUT Y/C IN
Note 6
DV IN/OUT
REMOTE cable
YC separate
Note 4
Composite
LINE IN
Note 3
LINE OUT
Note 4
Y/C OUT
AUDIO IN
Note 5
Monitor TV
Composite
YC separate
Analog audio
AUDIO OUT
Headphones
PHONES
(on front panel)
Stereo
REMOTE
USB
Keyboard
Note 1: The video signal for input is selected using INPUT SELECT from the INPUT SELECT MENU screen.
Note 2: The audio signals for input are selected using INPUT SELECT from the INPUT SELECT MENU screen.
When either LINE or Y/C is set for INPUT SELECT, the analog audio signals from the AUDIO IN terminals will be
selected for input.
When DV is set for INPUT SELECT, the DV audio signals from the DV IN/OUT terminal will be selected for input.
Note 3: When the DVD recorder is in Stop or Recording mode, the video input signal is output on the E-E screen as a composite
video signal.
In addition, the Setup Menu and other setting screens are also displayed on the monitor connected to this terminal. The
DVD recorder’s operation status and other relevant information are displayed on-screen when DISPLAY from the DISPLAY MENU screen has been set to ON.
Note 4: The Y/C IN/OUT terminal’s specification (i.e., S1 or S2) can be selected using Y/C TERMINAL MODE from the SYS-
TEM MENU (2/2) screen. The same information as with the VIDEO LINE OUT terminal is output from the Y/C OUT terminal.
Note 5: The standard input level for audio signals input via the AUDIO IN terminals (i.e., +4 dB or –8 dB) can be selected using
the AUDIO INPUT LEVEL switch on the rear panel.
Note 6: Use the following cable as the DV cable.
VC-VDV204 (2m, 4P-4P) from JVC
VC-VDV206 (2m, 4P-6P) from JVC
E-21
Page 22
Preparation
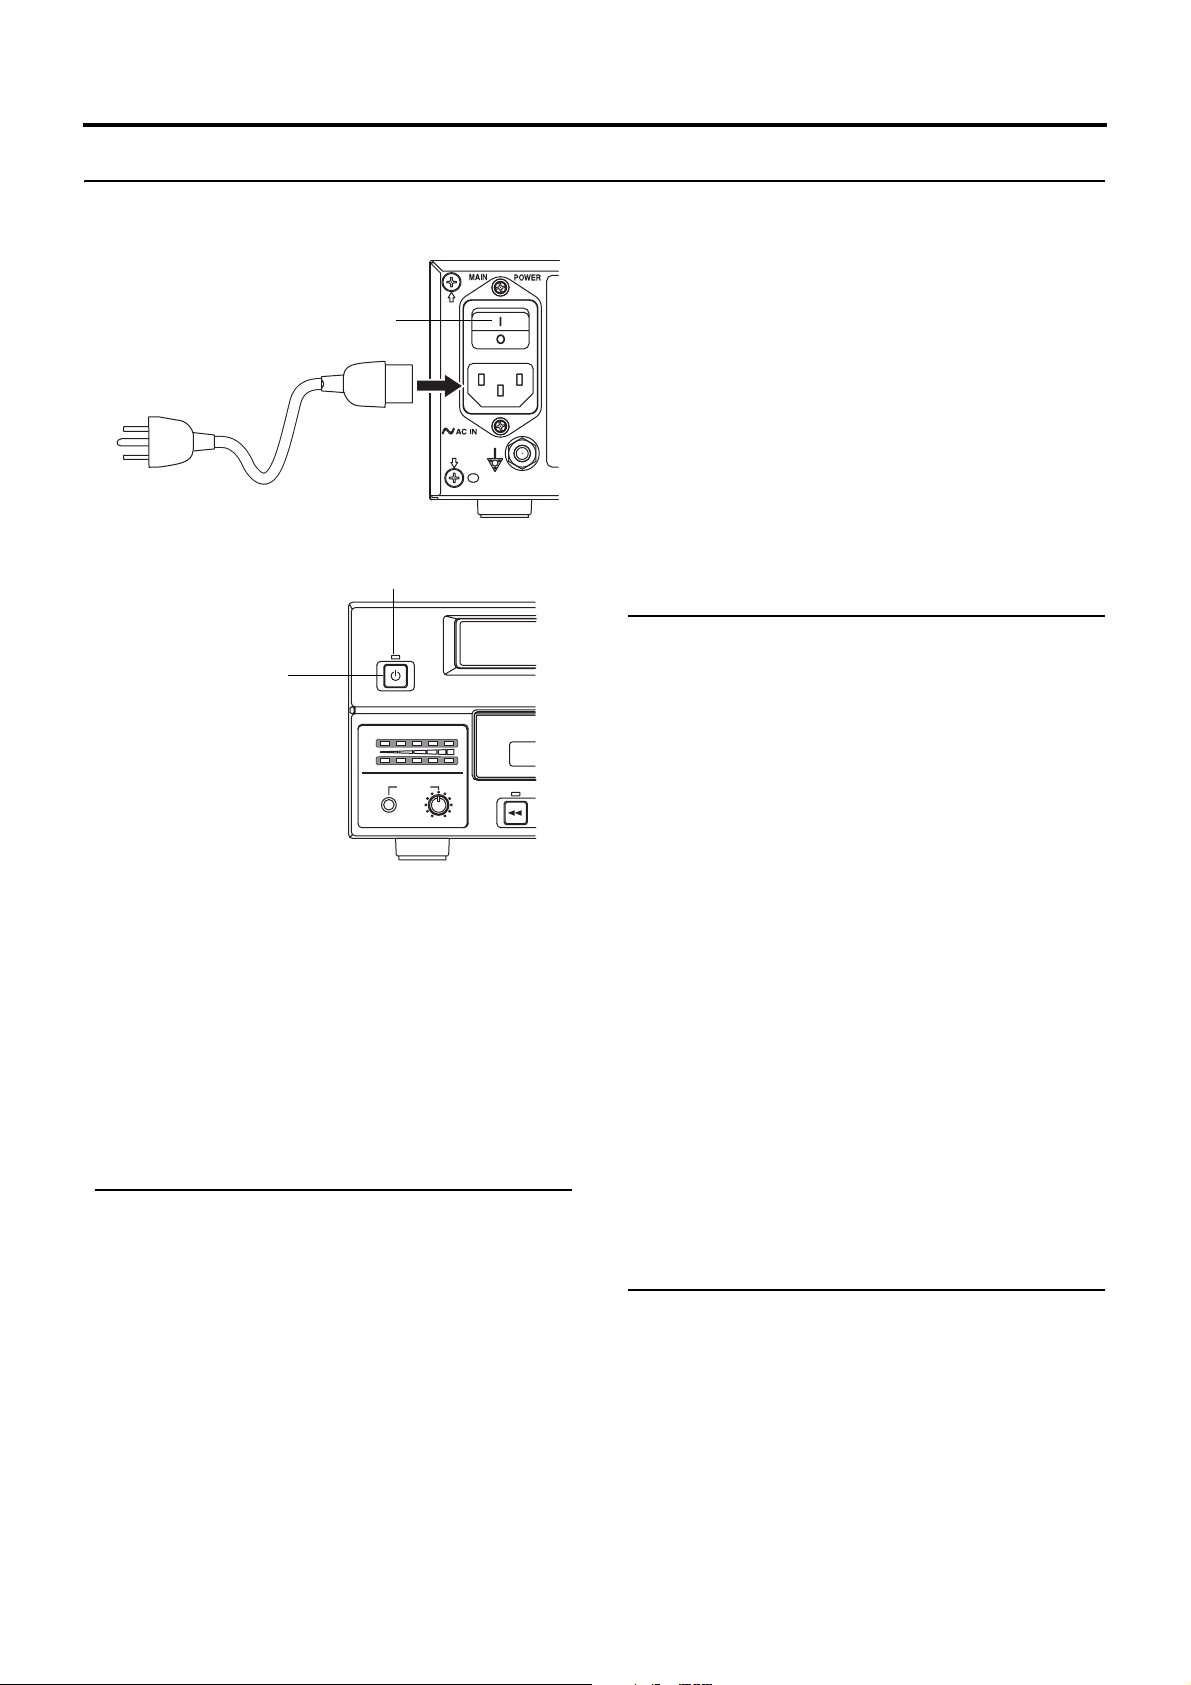
Power Connections
Connect the Power cord (included) to the DVD recorder.
MAIN POWER switch
Power cord
(included)
AC
OPERATE indicator
OPERATE
OPERATE button
AUDIO
CH1
CH2
PHONES REV
1. Connect the Power cord (included) to the DVD
recorder’s AC IN terminal.
2. Connect the power cord (included) into an electrical
outlet.
3. Set the MAIN POWER switch to ON.
• Power will be supplied to the DVD recorder and the
OPERATE indicator will be lit up in green. (Operate On
mode)
• The AC IN MODE item on the SYSTEM MENU (2/2)
screen can be used to specify whether to start up in the
Operate ON or OFF mode when the power switch is
turned ON. (X Page 69)
CAUTIONS
• Always use the AC cord provided with the DVD recorder.
The use of other power cord should be avoided.
• Do not turn the power off during recording or playback.
In the case of DVD-R discs, failure to observe this precaution will result in the discs becoming unusable.
In the case of DVD-RW discs, it will be necessary to
erase all data from the disc and to start recording again
from the beginning.
Turning the Power On
While in Operate Off mode (i.e., the OPERATE indicator
is lit up in orange), press the OPERATE button.
• The power will turn on, the color of the OPERATE indica-
tor will change to green, and the DVD recorder will
become ready for use. (Operate On mode)
Notes
• A period of 45 seconds may pass before the DVD
recorder adopts Operate On mode as it prepares for
operation.
• A small amount of current will be required by the DVD
recorder when in Operate Off mode.
Turning the Power Off
Stop the DVD recorder.
(It is recommended that you eject the disc at this time.)
1. Press the OPERATE button.
• The DVD recorder will adopt Operate Off mode and the
color of the OPERATE indicator will change to orange.
2. If the DVD recorder will not be used for an extended
period of time, set the MAIN POWER switch to OFF.
• When disconnecting the power cord, remove the power
cord from the electrical outlet first.
Notes
• Pressing the OPERATE button will have no effect in
Recording mode or Recording Pause mode.
• Pressing this button also has no effect during finalizing
and erasing.
E-22
Page 23

Inserting & Removing Discs
Disc tray
Preparation
OPEN/CLOSE indicator
OPEN/CLOSE button
Inserting a Disc
Press the OPERATE button to activate Operate On
mode.
1. Press the OPEN/CLOSE button.
• The disc tray will open automatically.
While the disc tray is open, the OPEN/CLOSE indicator
will be lit up.
2. Place the disc on the disc tray.
Ensure that the disc is inserted correctly into the tray’s
recess with the printed side facing upward.
• Carefully place the disc in the tray so as not to hit the
front panel.
3. Press the OPEN/CLOSE button.
• The disc tray will close automatically.
Notes
• When a disc is inserted, information about that disc is dis-
played on-screen. (X Page 18)
• When either a new DVD-RW or one that has been erased
on another machine is inserted, quick erase starts up.
(X Page 29)
• When the AUTO CANCEL DISC FINALIZ. item on the
DISC menu screen is set to ON, finalization will be automatically canceled when a DVD-RW that is finalized using
this unit has been inserted. (X Page 66)
Removing a Disc
Stop the DVD recorder.
1. Press the OPEN/CLOSE button.
• The disc tray will open automatically.
While the disc tray is open, the OPEN/CLOSE indicator
will be lit up.
• If the current disc has not been finalized, the message
“NOT FINALIZE” will appear on both the monitor and
LCD display.
2. Remove the disc from the disc tray.
Be sure to wait until the disc tray has opened fully before
removing the disc.
3. Press the OPEN/CLOSE button.
• The disc tray will close automatically.
Notes
• If the DVD recorder is in either Recording mode or
Recording Pause mode, the disc tray will not open when
the OPEN/CLOSE button is pressed.
• Pressing this button also has no effect during finalizing
and erasing.
• When the AUTO FINALIZE item on the DISC menu
screen is set to ON, finalization will be executed when
ejecting an unfinalized disc. (When the EDIT MENU item
on the DVD MENU screen is set to DISABLE.)
Precautions regarding the disc tray
• Do not push the disc tray as it is opening or closing.
• Do not place objects other than discs on the disc tray.
• Do not press down on the disc tray.
E-23
Page 24
Preparation
Using a Keyboard
Menu settings, the title and chapter settings, and other DVD recorder settings are carried out from setting screens displayed on
the TV or monitor.
Although the DVD recorder’s buttons are used in setting and operation screens, a keyboard can be used as an alternative.
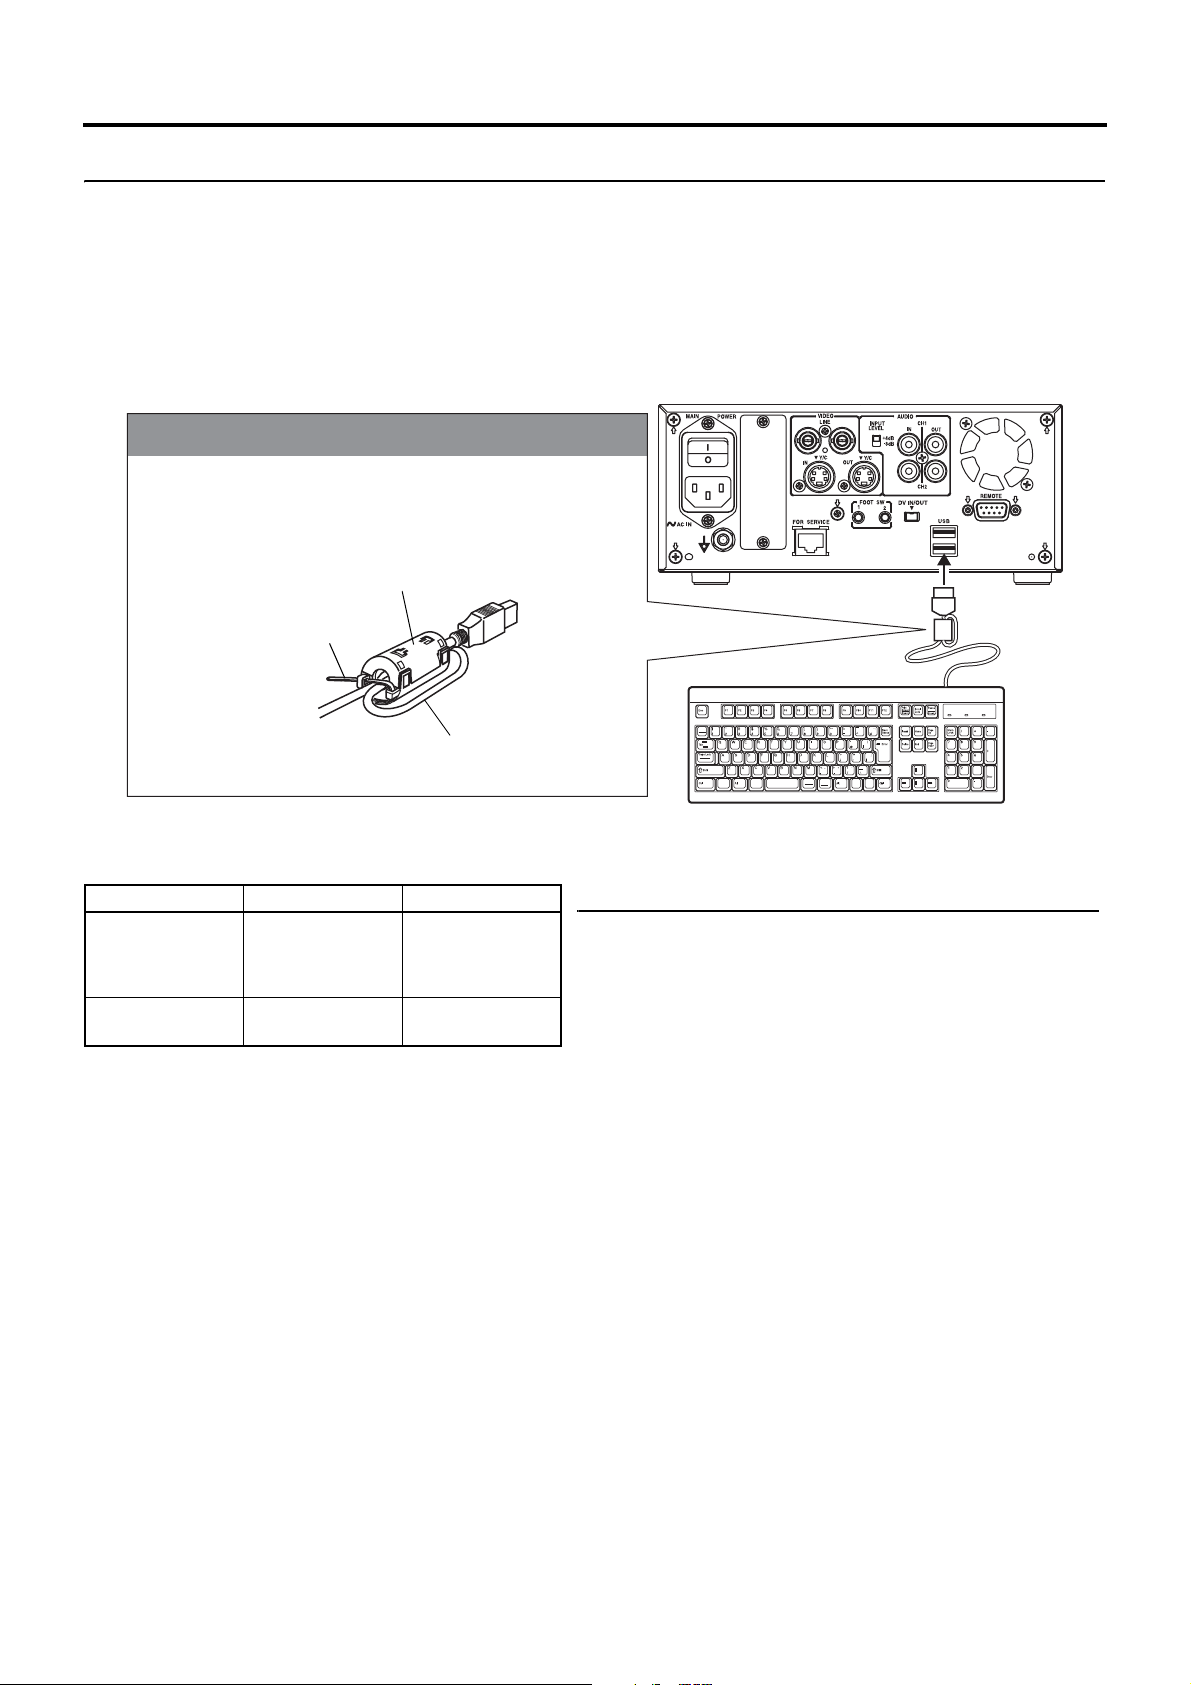
Connections
Connect a USB keyboard to the USB terminal on the back of the DVD recorder.
This DVD recorder has the two USB terminals.
Recommended manufacturers: Logitech
Attach the provided ferrite core
• Attach the ferrite core as shown in the diagram to reduce
unwanted electromagnetic emissin.
• Attach the ferrite core as shown in the diagram to this DVD
recorder as near as possible.
The provided ferrite core
The wire clamp
Wind the cable once around the
ferrite core.
Procedure
The following functions can be controlled using the keyboard.
Function Front panel Keyboard
Selection of
menu items or
setting values
Confirmation of
settings
The entry of names and comments for the title and chapter menus is carried out using the keyboard. (Set KEYBOARD STYLE
from the SYSTEM MENU (1/2) screen in accordance with the keyboard’s input language.)
K button
L button
M button
N button
SET button Enter key
r key
q key
x key
y key
Note
Unless otherwise specified, this user’s manual describes procedures carried out from the DVD recorder itself.
USB terminal
E-24
Page 25
Preparation
Setting & Displaying the Date & Time
Use the following procedure to set the internal clock’s date and time. Even when the DVD recorder’s power is turned off, the
clock’s date and time settings are stored using the internal battery.
Note that these settings are used to write the current date and time to a disc being recorded.
The DISPLAY screen can be used to indicate whether or not the date and time are to be displayed on-screen.
M button
SET UP button
K button
SET button
N buttonL button
Setup Menu
DISC
INPUT SELECT
SYSTEM
DVD MENU
RECORDER
REMOTE
DISPLAY
CLOCK ADJUST
NETWORK
EXIT
CLOCK ADJUST MENU screen
CLOCK ADJUST MENU
MENU
DATE
TIME
DATE SETTING
04 / 05 / 06
5
4
CLOCK ADJUST MENU
MENU
DATE
TIME
06
YEARMONTH DAY
04/05/06
10:00
SET
04/05/06
12:00
Setting the Date and Time
Setting of the date and time is carried out using the CLOCK ADJUST MENU
screen. During this procedure, the monitor connected to the VIDEO LINE OUT
terminal is used to monitor the setting of data.
Turn on the power and ensure that the DVD recorder is stopped.
1. Press the SET UP button to display the Setup Menu.
2. Open the CLOCK ADJUST MENU screen.
1Use the M and N buttons to select CLOCK ADJUST. (The currently
selected menu item is displayed as highlighted.)
2Press the SET button to open the CLOCK ADJUST MENU screen.
3. Set the date and time as required.
1Use the M and N buttons to select either DATE or TIME. Then press the
SET button.
2Use the K and L buttons to select the digit to be changed. (The currently
selected digit is displayed as highlighted text.)
3Use the M and N buttons to change the value of the selected digit.
4Repeat steps 2 through 3 to make all of the required settings, and then
press the SET button.
Note
It is not possible to set the time in units of seconds. After setting the minutes,
press the SET button in sync with a time signal.
4. After completing all of the required settings, return to the Setup Menu.
To do this, use the M or N buttons to select MENU and then press the SET
button.
5. Return to the normal screen display.
• To do this, press the SET UP button
or
• Select EXIT from the Setup Menu and press the SET button.
CLOCK SETTING
44
07 :
07 44
SET
E-25
Page 26
Preparation
Setting & Displaying the Date & Time (continued)
Displaying the Date and Time
DISPLAY MENU screen
DISPLAY MENU
MENU
DISPLAY
TITLE/CHAPTER/INDEX
RECORDER MODE
TIME/DATE
REMAIN
DATE STYLE
LCD
ON
TITLE+CHAPTER
ON
TIME+DATE
ON
MM/DD/YY
TITLE+CHAPTER
Use the DISPLAY MENU screen to indicate whether or not the date and time are
to be displayed on-screen and to set a display style. (X Page 77 for details
regarding setting methods.)
DISPLAY MENU Screen Makeup
DISPLAY: This parameter is used to indicate whether or not data is to
be displayed on-screen.
ON : Data will be displayed on-screen. The following parameters
can be used to indicate which data is to be displayed.
OFF : No data is displayed on-screen.
TIME/DATE: This parameter is used to set the way in which the date
and time are displayed.
OFF : Neither date or time are displayed.
TIME : Only the time is displayed.
DATE : Only the date is displayed.
TIME + DATE: Both date or time are displayed.
DATE STYLE: This parameter is used to select the way in which the date
is to be displayed.
YY/MM/DD : Year, month, day
MM/DD/YY : Month, day, year
DD/MM/YY : Day, month, year
04/05/06
11:20:00
TIME/DATE
On-screen display
TITLE 01 0:11:22
CHAPTER
000 min
REC
01 0:11:22
To display date and time information on-screen;
• Set DISPLAY to ON.
• Set TIME/DATE to anything other than OFF.
Date and time information is displayed as follows.
Mode Displayed information
Recording or Stop The value of the internal clock
Playback The date and time at which the current disc was recorded.
E-26
Page 27

Settings & Controls for Recording
DVD Recording
DVD recording is carried out using the following procedure.
Pre-Recording Settings
Preparation of the DVD-R/
DVD+R or DVD-RW/
DVD+RW (video mode only)
On-screen settings Use the setting screens to select the appropriate recording signal, setup the recording condi-
Adjustment of audio recording levels
Selection of styles for the title and chapter menus
Start of
recording
Title 1
End of
recording
Start of
recording
End of
recording
Start of
recording
End of
recording
(Title closing)
Title 2
(Title closing)
Title 3
(Title closing)
• Insert a new DVD-R/DVD+R or DVD-RW/DVD+RW (video mode) or alternatively, a similar
disc that has been recorded on using the DVD recorder.
• If the recording on a DVD-RW/DVD+RW is to be performed once again from the beginning,
erase the disc’s data using ERASE from the DISC MENU screen. (X Page 29)
tions, and make other necessary settings. (X Page 30)
Audio recording levels can be adjusted in one of two different ways. (X Page 33)
The title and chapter menus are used during playback of a disc to select the section of the disc
to be viewed. A total of five different display styles have been made available for these menus,
and these can be selected using the DVD MENU screen. In addition, the DVD recorder also
allows you to freely modify these display styles. (X Page 36)
Recording Operations (X Page 38)
• The section between the start of recording using the REC and PLAY but-
tons and the end of recording using the STOP button constitutes a single
Chapter 1
(chapter mark)
Chapter 2
Chapter 3
Chapter 4
Chapter 1
Chapter 2
recording title, and each title is assigned a unique number.
A single disc can contain up to 99 different titles.
• Each title can be separated into a number of different chapters by inserting
chapter marks at the appropriate points. Unique numbers are also
assigned to chapters, and a single title can contain up to 99 different chapters.
• Adding chapters
If the REC button is pressed while recording, chapter mark and index will
be inserted.
In addition, CHAPTER CREATION from the RECORDER MENU (1/2)
screen can also be used to setup the automatic or manual insertion of
chapter marks and indexes.
When the INDEX CREATION item on the RECORDER MENU (2/2) screen
is set to AUTO, indexes will be inserted automatically together with chapters at the record start point and recording pause point.
• Thumbnails (i.e., the frame at the start of recording) and backgrounds are
automatically created for the title and chapter menus using the style
selected using STYLE from the DVD MENU screen.
If EDIT MENU from the DVD MENU screen is set to ENABLE before the
start of recording, it will be possible to modify the chapter menu’s style and
thumbnails and to insert chapter names and comments whenever recording is stopped (i.e., whenever title closing is performed).
• Once title closing has been carried out, it will not be possible to modify the
chapter menu.
• If EDIT MENU from the DVD MENU screen is set to ENABLE, it will be
possible to modify the title menu’s style and to input title names when the
disc is being finalized.
If additional recording is to be
performed:
Press the OPEN/CLOSE button
and remove the disc.
Processing After Recording (X Page 42)
If the disc is to be played on this DVD recorder or on a different DVD player:
Finalize the disc.
To do this, select FINALIZE from the DISC MENU screen. Alternatively, press and hold the
OPEN/CLOSE button for at least 7 seconds.
* When a disc has been finalized, it will not be possible to record more content to it or to
modify its menu styles.
E-27
Page 28

Settings & Controls for Recording
Preparing a Disc for Recording
This DVD recorder is capable of recording to DVD-R/DVD-RW (in video mode) and DVD+R/DVD+RW.
DVD-R : Only discs that conform with DVD-R Standard 2.0 (video mode) can be used.
DVD-RW : Discs of Version 1.1 or later can be used.
Although Version 1.1 of DVD-RW standards allows the selection of video mode and VR mode for recording, this
DVD recorder performs recording in video mode only.
* Version 1.0 of the DVD-RW standards does not support video-mode recording, and for this reason, the corre-
sponding discs cannot be used.
In terms of recording characteristics, DVD-R/DVD+R and DVD-RW (video mode)/DVD+RW differ as follows.
DVD-R/DVD+R : Each disc can be recorded only once. Erasing of data and re-recording are not possible.
DVD-RW (video mode)/DVD+RW (compliance with video mode) :
After viewing a disc, all data can be erased and it can be used to record new content.
The condition of the disc being used will dictate the available recording options as follows.
Disc condition Recording operations
DVD-R
DVD+R
DVD-RW
DVD+RW
Blank disc New content can be recorded. A new title is created and
recording starts from that title’s first chapter.
A disc recorded on using this DVD recorder but
not yet finalized.
Blank disc New content can be recorded. A new title is created and
A disc recorded on using this DVD recorder but
not yet finalized.
A recorded disc from which data is to be erased. Erase the recorded data (as described below), and then
A new title is created in the unused section of the disc, and
recording starts from that title’s first chapter.
recording starts from that title’s first chapter.
A new title is created in the unused section of the disc, and
recording starts from that title’s first chapter.
record new content.
Notes
• If data has been erased from a disc using a different DVD recorder, it may not be possible to record new content to it using
this recorder. To avoid this type of situation, ensure that this DVD recorder is used to erase recorded data.
• New content cannot be recorded to discs that have been finalized.
• It is possible to cancel the finalization and add a recording to a DVD-RW/DVD+RW finalized on this machine.
• Regardless of whether or not finalization has been carried out, it will not be possible to use this DVD recorder to record new
content to a disc that has been recorded on using other devices.
E-28
Page 29

Settings & Controls for Recording
Erasing All Data From a DVD-RW/DVD+RW Disc
DISC menu screen
DISC MENU
MENU
FINALIZE
CANCEL DISC FINALIZATION
AUTO FINALIZE
AUTO CANCEL DISC FINALIZ.
(
DISC ERASE
DISC ERASE
LAST TITLE ERASE
QUICK
(
FULL
)
)
CANCEL
CANCEL
OFF
OFF
EXECUTE
CANCEL
CANCEL
DISC ERASE (QUICK)
Note
When either a new DVD-RW/DVD+RW
or one that has been erased on another
machine is inserted, quick erase starts
up.
1. Insert the DVD-RW/DVD+RW from which data is to be erased.
2. Press the SET UP button to display the Setup Menu.
3. Use the N and M buttons to select DISC item and then press the SET
button.
• The DISC menu screen will appear.
4. Press the N or M button, select either the DISC ERASE (QUICK) item or
the DISC ERASE (FULL) item, then press the SET button.
• The setting value list box is displayed.
DISC ERASE (QUICK): Only the disc control area is erased. (Quick Erase)
Compared with Full Erase the time to erase is
shorter.
DISC ERASE (FULL) : All areas of the disc are erased. (Full Erase) This
setting is recommended for repeated use of a disc.
5. Use the N and M buttons to select EXECUTE from the list and then
press the SET button.
• The erasing of data will begin.
The message “DISC ERASE” appears and the state of progress is displayed using a progress bar.
• When all data has been erased, the progress bar will disappear.
CAUTIONS
• All of the data recorded to the disc will be erased in this process. Before starting, therefore, confirm that no important data is stored on this disc.
• Under no circumstances should the power be turned off or the power cord
disconnected while data is being erased.
Canceling the Finalization of a DVD-RW/DVD+RW
When adding an extra recording to a finalized DVD-RW/DVD+RW, cancel the finalization.
DISC menu screen
DISC MENU
MENU
FINALIZE
CANCEL DISC FINALIZATION
AUTO FINALIZE
AUTO CANCEL DISC FINALIZ.
DISC ERASE
DISC ERASE
LAST TITLE ERASE
(
QUICK
(
FULL
)
)
CANCEL
EXECUTE
OFF
OFF
CANCEL
CANCEL
CANCEL
CANCELING DISC FINALIZATION
1. Insert the DVD-RW/DVD+RW whose finalization you want to cancel.
2. Press the SET UP button and the set up top menu screen will be dis-
played.
3. Press the N or M button to select the DISC item, then press the SET
button.
• The DISC menu screen is displayed.
4. Press the N or M button, and select the CANCEL DISC FINALIZATION
item, then press the SET button.
• The setting value list box is displayed.
5. Press the N or M button, select EXECUTE from the list box, then press
the SET button.
• Cancellation of finalization starts.
Execution status will be displayed on a progress bar.
• When completed, the progress bar disappears.
Notes
• When canceling finalization, the TOP MENU created when finalizing is
deleted.
• Discs finalized on another machine cannot be cancelled.
E-29
Page 30

Settings & Controls for Recording
Pre-Recording Settings
Recorder switch settings
Use the AUDIO INPUT LEVEL switch on the DVD recorder’s
rear panel to select the reference input level for analog audio
(i.e., +4 dB or −8 dB).
The following screens are used to make settings relevant
to recording. (Screen setting methods: X Page 63)
• INPUT SELECT MENU screen
This screen is used to select the audio and video signals to
be used. For more details, refer to page 67.
• SYSTEM MENU screen
The SYSTEM MENU screen contains two different pages
of parametes.
SYSTEM MENU (1/2) screen
• SET UP (NTSC only)
This parameter is set when an analog video signal (i.e.,
composite or YC separate) is being input to the DVD
recorder. Specifically, a setting is made to reflect
whether or not the input signal is a setup signal. SETUP
should be set to ON if it is a setup signal, or to OFF if it is
not.
• TEST SIGNAL
Set this parameter to ON when the color bar output by
the DVD recorder’s internal signal generator is to be
recorded.
SYSTEM MENU (2/2) screen
• SYNC SYSTEM Item
For selecting the synchronization method for this unit.
• TV TYPE Item
For selecting the NTSC(U), NTSC(I) or PAL mode.
This unit will be rebooted when settings are changed.
• Y/C TERMINAL MODE
This parameter indicates whether the Y/C IN terminal’s
specification is S1 or S2. (Specifically, it selects the
recording method for the wide-screen discrimination signal.)
• DVD MENU screen
• EDIT MENU
This parameter indicates whether or not a screen for
menu editing is to be displayed during title closing and
finalizing.
• STYLE
This screen is used to select the arrangement and background style for thumbnails displayed on the tops menu.
This DVD recorder can store eight individual style type
(i.e., TYPE1 through TYPE8), and the most suitable type
should be selected here.
• THUMBNAIL FORM
This parameter selects the method to be used for thumbnail conversion when recording a wide-screen signal.
• DISC IN ACTION Item / TITLE END Item / DVD MENU
TYPE Item
This is used to set the status of a disc created when
finalizing. Set this before recording to a blank disc. (X
Refer to pages 71 and 72.)
• RECORDER MENU screen
The RECORDER MENU screen contains two different
pages of parameters.
RECORDER MENU (1/2) screen
• CHAPTER CREATION
This parameter indicates whether chapters are to be created automatically or manually.
• SET INTERVAL
This parameter is set the time interval for automatic
chapter creation and is set in units of minutes.
• AUTO CHAPTER (REC PAUSE) Item
Set whether to automatically insert a chapter when
recording is paused.
• ENCODE QUALITY
This parameter is used to set the quality for encording
(or compressing) video data.
• AUDIO ENCODE
This parameter is used to set the format for encoding (or
compressing) audio data.
For more details regarding the encoding of audio and
video, refer to page 32.
RECORDER MENU (2/2) screen
• AUDIO CHANNEL (DV)
This parameter is to be set when recording an audio signal from the DV IN/OUT terminal.
Specifically, it indicates whether the signals from channels 1 and 2 or from channels 3 and 4 are to be
recorded. (Only with sampling frequency of 32 kHz)
• AUDIO REC VOLUME MODE
This parameter is used to select the method for adjustment of audio recording levels. Specifically, both channels can be adjusted while maintaining the same level
(BOTH), or each channel can be adjusted independently
(INDEPENDENCE).
For more details regarding methods for the adjustment
of audio recording levels, refer to page 33.
• ASPECT
This parameter is used to set the aspect for recorded
video. (AUTO, 4:3, LETTER, or SQUEEZE)
• INDEX CREATION
Set whether to insert indexes automatically at record
start points and recording pause point.
• REMOTE MENU (1/2) screen
• REMOTE SELECT
This parameter should be set to OFF when not controlling the DVD recorder via the DV IN/OUT terminal.
• FOOT SW1 Item
Set this to any mode other than OFF when turning ON/
OFF recording using an external switch that is connected to the FOOT SW1 terminal at the rear of this unit.
• FOOT SW2 Item
Set this to any mode other than OFF when writing chapters/indexes or capturing a still picture (JPEG) using an
external switch that is connected to the FOOT SW2 terminal at the rear of this unit.
Please see page 75 for details
E-30
Page 31
Settings & Controls for Recording
Specifying the Disc Status Created when the Disc was Finalized
It is possible to specify the action when a finalized disc is inserted into a DVD player, or the operation when playback of a title is
finished. Also, it is possible to select whether to create a title menu (TOP MENU) or chapter menu (MENU) when finalizing or
closing a title. It is necessary to carry out the setting before recording to a blank disc. The setting is carried out with the DISC IN
ACTION Item, TITLE END Item or DVD MENU TYPE Item of the DVD MENU screen.
Operation
Set up top menu screen
DISC
INPUT SELECT
SYSTEM
DVD MENU
RECORDER
REMOTE
DISPLAY
CLOCK ADJUST
NETWORK
EXIT
DVD MENU screen
DVD MENU
MENU
EDIT MENU
STYLE
TITLE PATERN
CAPTER PATERN
THUMNAIL FORM
DVD MENU TYPE
DISC IN ACTION
TITLE END
DISABLE
TYPE1
1
1
NORMAL
TOP
TITLE
NEXT TITLE
The disc should be not inserted, or a blank disc should be inserted.
1. Display the DVD MENU screen.
1Press the SET UP button and the set up top menu screen will be dis-
played.
2Press either the M or N button to select the DVD MENU item, then press
the SET button.
2. Set the DVD MENU menu screen.
1With the M or N buttons, select Item, press the SET button and the setting
value list box will be displayed.
2With the M or N buttons, select the setting value, press the SET button to
confirm the setting value.
3. Finish the Setting.
Carry out either of the following operations.
• Select the MENU item, press the SET button to return to the set up top
menu screen.
• Press the SET UP button to return to the normal screen.
DVD MENU TYPE Item
This is for selecting whether to create a title menu (TOP MENU) or a chapter menu (MENU) when finalizing or closing a title.
DISC IN ACTION Item
This is to set the operation when a finalized disc is inserted into a DVD player.
TITLE END Item
This is to set the operation when playback of a title is finished.
* Settings cannot be changed after the title is recorded. Setting is possible only when there is no disc inserted or when a blank
disc is inserted. Please see page 72 for details.
E-31
Page 32

Settings & Controls for Recording
Setting the Encoding Format for Audio & Video
The setting of encoding formats for audio and video is carried out from the RECORDER MENU (1/2) screen as described below.
Setting Encoding Formats
Stop the DVD recorder.
1. Open the RECORDER MENU (1/2) screen.
1Press the SET UP button to display the Setup Menu.
SET UP button
2Select RECORDER using the M and N buttons and then press the SET
button.
SET button
RECORDER MENU (1/2) screen
2. Make the required settings on the RECORDER MENU (1/2) screen.
1Select the parameter to be set using the M and N buttons, and then press
the SET button to display a list of possible settings.
RECORDER MENU (1/2)
MENU
CHAPTER CREATION
SET INTERVAL
AUTO CHAPTER (RECPAUSE)
ENCODE QUALITY
AUDIO ENCODE
MANUAL
Every05Min
ON
SP
DOLBY DIGITAL
2Select the required setting using the M and N buttons, and then press the
SET button to adopt it.
3. Complete the setting process.
To do so, carry out one of the following procedures.
• Select MENU and press the SET button to return to the Setup Menu.
• Press the SET UP button to return to the normal screen display.
Video Encoding
Item Description
ENCODE QUALITY For setting the recording quality. Recording quality and time vary with the set values as follows:
(For a 4.7 GB disc)
Set Value Recording Time Picture Quality Upload Size
UXP (NOT DVD VIDEO) 40 mins High D1: NTSC = 720 × 480 dots
XP 60 mins x
SP 120 mins
LP 180 mins
Normal
y
EP 240 mins
DLP (Double LP) 360 mins Low
DEP (Double EP) 480 mins
y
PAL = 720 × 576 dots
HalfD1: NTSC = 352 × 480 dots
PAL = 352 × 576 dots
* Only UXP, XP or SP can be selected when the AUDIO ENCODE item is set to LPCM.
Audio Encoding
AUDIO ENCODE
This parameter is used to set the encoding format for audio data.
NO AUDIO : Do not record audio sound.
LPCM : Linear PCM encoding
DOLBY DIGITAL : Dolby AC3 encoding.
MPEG : MPEG encoding (Effective only when the TV TYPE item from SYSTEM MENU (2/2) screen is set to PAL.)
Note
If the SET UP button is pressed while in Recording mode, the video encode quality and audio encoding format will be displayed
on-screen. Press the SET UP button once again to hide this information.
E-32
Page 33

Settings & Controls for Recording
Adjusting of Audio Recording Levels
This DVD recorder’s audio recording levels can be adjusted using two different methods, and AUDIO REC VOLUME MODE from
the RECORDER MENU (2/2) screen indicates the method to be used. In addition, it is also possible to return the audio recording
levels to their default settings (i.e., unity gain).
Note: The AUDIO INPUT LEVEL switch on the DVD recorder’s rear panel can be used to select the reference input level for
analog audio (i.e., +4 dB or −8 dB).
Selecting the Adjustment Method
RECORDER MENU (2/2) screen
RECORDER MENU (2/2)
BACK
AUDIO CHANNEL (DV)
AUDIO REC VOLUME MODE
ASPECT
INDEX CREATION
1,2ch
→
BOTH
AUTO
MANUAL
1,2ch
Adjusting the Audio Recording Levels
1. Open the RECORDER MENU (2/2) screen.
To do this, select r button from the RECORDER MENU (1/2) screen and
press the SET button.
2. Make the required setting using AUDIO REC VOLUME MODE from the
RECORDER MENU (2/2) screen.
BOTH : Audio levels are adjusted while both the CH1/CH2 are
maintained at the same volume.
INDEPENDENCE : The CH1/CH2 are adjusted separately.
BUSY
OPEN/CLOSE
OPTION DV Y/C LINE
SET UP
SET
Buttons used
Audio level indicator
OPERATE
AUDIO
CH1
CH2
PHONES REV
TITLE
DOLBY DIGITAL
LPCMMPEG
CHAPTER
STOP PLAY FWD PAUSE REC
TOP
MENU MENU
Return from setting screens to the normal display.
Recording levels can be adjusted in either Stop or Recording mode. Be sure to monitor the front panel’s audio level indicator as
the levels are being adjusted. Adjust the level so that the LED on the far right does not light.
Adjusting both channels together (BOTH) Adjusting both channels separately (INDEPENDENCE)
To raise the recording level
Press the M button while holding the L or K
button to raise the audio recording levels for
SET
Channel 1 and Channel 2 simultaneously.
To adjust the Channel 1 level
Press either the M or N button while holding the L button.
SET
Pressing the M button raises the recording
level.
Pressing the N button lowers the recording
level.
To lower the recording level
Press the N button while holding the L or K
button to lower the audio recording levels for
SET SET
Channel 1 and Channel 2 simultaneously.
To adjust the Channel 2 level
Press either the M or N button while holding the K button.
Pressing the M button raises the recording
level.
Pressing the N button lowers the recording
level.
Returning Audio Recording Levels to Default Settings (UNITY MODE)
Press and hold the L and K buttons simultaneously to return the audio recording levels to their default settings (i.e., unity
gain).
• Both of the audio recording levels will be fixed at the default setting.
E-33
Page 34

Settings & Controls for Recording
Checking the Video Input
Use the monitor connected to the VIDEO LINE OUT or Y/C OUT terminal to confirm that the input video signal is as required.
The following procedure will allow you to monitor the quality at which the video will be recorded to a DVD.
VIDEO LINE OUT terminal
Monitor screen
Signal Connections
Connect the VIDEO LINE OUT or Y/C OUT terminal to the monitor.
Procedure
Press and hold the REC button for at least 2 seconds while the DVD
recorder is stopped or inserted with no disc. While this button is being
held, input signal encoded/decoded in MPEG will be output via the
VIDEO OUT or Y/C OUT terminal on the rear panel.
• This function allows the quality of the video to be confirmed before recording
REC button
The setting value of the
ENCODE QUALITY is indicated on the LCD display.
to a DVD.
Note
Audio will be muted at this time.
ENCODE XX
UXP, XP, SP, LP,
EP, DLP, DEP
E-34
Page 35

Settings & Controls for Recording
Title & Chapter Menus
This DVD recorder can automatically create title and chapter menus in response to recording operations and can save these to
the disc being recorded.
When the disc is subsequently played, these title and chapter menus can be used to access specific sections of stored video and
audio.
• When recording is stopped using the STOP button or a similar action (i.e., disc closing), a title number and a thumbnail (corresponding to the frame at the start of recording) will be created to form part of the disc’s title menu. A single disc can contain up
to 99 different titles.
• Similarly, if a chapter mark is inserted during recording, a chapter number and a thumbnail (corresponding to the frame at the
chapter mark) will be created to form part of the title’s chapter menu. Chapter marks are used as targets for skipping during
playback. Each title can contain up to 99 chapters. In addition, indexes will be inserted together with chapters. (Please see
page 61 for details on indexes.)
Start of recording End of recording End of recordingStart of recording
Title menu
Chapter menus
Display Styles
A total of eight different display styles can be used with title and chapter menus. The DVD MENU screen can be used to select
the type of style to be used in the creation of title and chapter menus.
In addition, each of the display styles can be modified as required. (X Page 37)
Depending on the style used and the number of menu items, title and chapter menus may extend over more than one page.
Thumbnail Thumbnail
Thumbnail Thumbnail ThumbnailThumbnail
Title 1 Title 2
Chapter mark Chapter mark Chapter mark
Recording Recording
Thumbnail
Chapter 2Chapter 1Chapter 3Chapter 2Chapter 1
Note
This DVD recorder can store a total of six different display patterns for title and chapter menus.
At the time of purchase, this DVD recorder will contain five different template files. Any of the stored display patterns can be
selected to change the styles applied to each of the title and chapter menus.
Modifying Chapter Menus
A chapter menu’s display style and thumbnails can be edited at the end of recording (i.e., during title closing); furthermore,
titles and comments for the chapter menu can also be input at this time. (EDIT MENU from the DVD MENU screen must be set
to ENABLE for this to be possible.) (X Page 47)
Modifying the Title Menu
The style used for the title menu and the text input for the title name may both be modified before finalizing is carried out. (EDIT
MENU from the DVD MENU screen must be set to ENABLE for this to be possible.) (X Page 53)
Notes
• Thumbnail of the title menu will be the top thumbnail of the chapter menu.
• Once a title is closed, it will no longer be possible to modify the chapter menu.
• No modifications what so ever will be possible when the disc has been finalized.
• When a disc is finalized, its title menu will be used to create the top menu.
• Thumbnail creation method during wide-signal recording can be selected in THUMBNAIL FORM of the DVD MENU screen.
E-35
Page 36

Settings & Controls for Recording
Selecting Styles for Title & Chapter Menu
Each recorded DVD contains title and chapter menus that provide information relating to its titles and chapters.
Whenever recording is carried out, title numbers, chapter numbers, and thumbnails are automatically generated in order to create
the title and chapter menus.
Specifically, the frames from the start of individual recordings are used as thumbnails for the title menu.
In a similar way, the frames at which chapter marks have been inserted are used as thumbnails for chapter menus. (These
thumbnails may be modified later on.) The title menu will become the top thumbnail of the chapter menu.
The term “style” is used to refer to a combination of thumbnail characteristics for the title and chapter menus. This DVD recorder
can store eight different style types, and the DVD MENU screen is used to indicate which of these types is to be used.
Making Settings in the DVD MENU screen
Setup Menu
DISC
INPUT SELECT
SYSTEM
DVD MENU
RECORDER
REMOTE
DISPLAY
CLOCK ADJUST
NETWORK
EXIT
DVD MENU screen
DVD MENU
MENU
EDIT MENU
STYLE
TITLE PATERN
CAPTER PATERN
THUMNAIL FORM
DVD MENU TYPE
DISC IN ACTION
TITLE END
STYLE screen
STYLE
BACK
TITLE PATTERN
1
TYPE1
TYPE5 TYPE6
TYPE2
TYPE3 TYPE4
TYPE7 TYPE8
Style t ypes
DISABLE
TYPE1
1
1
NORMAL
TOP
TITLE
NEXT TITLE
CHAPTER PATTERN
1
1
1. Press the SET UP button to display the Setup Menu.
2. Select DVD MENU from the Setup Menu and then press the SET button.
• The DVD MENU screen will appear. Within this screen, the STYLE parameter indicates the style type currently selected for the title and chapter
menus.
3. Confirm the settings for the currently selected style.
Select STYLE and then press the SET button to display the corresponding
STYLE screen.
TITLE PATTERN : The display pattern currently selected for the title
menu. Each display pattern uses different numbers,
positions, and sizes for thumbnails, in addition to different backgrounds.
CHAPTER PATTERN: The display pattern currently selected for chapter
menus. Each display pattern uses different numbers,
positions, and sizes for thumbnails, in addition to different backgrounds.
4. Use the cursor buttons (M, N, K, and L) to select one of the eight style
types and display the corresponding STYLE screen.
5. To use a specific style, select the corresponding type number and then
press the SET button.
This type number will then be stored by the DVD recorder.
Following this, the screen’s BACK button will be highlighted. The SET button
can now be pressed to return to the DVD MENU screen.
If BACK is used to exit the STYLE screen without the SET button being
pressed for the newly selected type, the style setting will not be updated.
Notes
• The STYLE settings for chapter menus can be freely modified until title clos-
ing is carried out. (X Page 47)
• The STYLE settings for the title menu can be freely modified until the DVD is
finalized. (X Page 53)
• Each style can be freely modified and stored in the DVD recorder’s memory.
In addition, it is also possible to freely select and modify display patterns (i.e.,
the number, position, and size of thumbnails in addition to the background).
For more details regarding modification of STYLE, refer to page 37.
• In certain cases, the frames used for chapter menu thumbnails may differ
slightly from the exact frames at which the corresponding chapter marks
were inserted.
E-36
Page 37

Settings & Controls for Recording
Changing Styles for Title & Chapter Menus
The DVD MENU screen can be used to change the styles used for displaying title and chapter menus. One of eight different types
of style can be selected for each of the title and chapter menus.
This DVD recorder can also store a total of six different display patterns for title and chapter menus. At the time of purchase, this
DVD recorder will contain five different template files. Any of the stored display patterns can be selected to change the styles
applied to each of the title and chapter menus.
1. Open the DVD MENU screen.
DVD MENU screen
DVD MENU
MENU
EDIT MENU
STYLE
TITLE PATERN
CAPTER PATERN
THUMNAIL FORM
DVD MENU TYPE
DISC IN ACTION
TITLE END
TITLE PATTERN screen
DISABLE
TYPE1
1
1
NORMAL
TOP
TITLE
NEXT TITLE
This screen allows patterns to be modified for the style indicated by the
STYLE parameter.
TITLE PATTERN : Shows the pattern number for the current title-menu
display style as indicated by the STYLE parameter.
CHAPTER PATTERN : Shows the pattern number for the current chapter-
menu display style as indicated by the STYLE
parameter.
When the STYLE parameter’s number setting is changed, the patterns used
for title and chapter menus in the new style will be displayed by TITLE PATTERN and CHAPTER PATTERN respectively.
2. Change the display patterns for the title and chapter menus as required.
For example, let’s change the title menu’s display pattern from 1 to 4.
Select TITLE PATTERN from the DVD MENU screen and press the SET
button.
• The TITLE PATTERN screen will appear.
3. Use the cursor buttons (K, L, M and N) to select the fourth pattern on
the TITLE PATTERN screen, and then press the SET button.
• The title menu’s display pattern changes to No. 4, and the BACK button
becomes highlighted.
4. With the BACK button highlighted, press the SET button and return to
the DVD MENU screen.
If BACK is used to exit the TITLE PATTERN screen without the SET button
being pressed for the newly selected pattern, the pattern setting will not be
updated.
To change the display pattern for chapter menus, select CHAPTER PATTERN from the DVD MENU screen and then proceed in the same way as
described above.
Note
The TITLE PATTERN screen and CHAPTER PATTERN screen show the patterns that are currently stored in this DVD recorder.
Display pattern : A combination of thumbnail characteristics (i.e., position,
quantity, and size) and the type of menu background used.
E-37
Page 38

Recording
Recording Sequence
Use the following sequence as a reference when performing recording.
• Input settings: X Page 67.
• Video and audio quality settings: X Page 32.
• Navigation settings (i.e., DISC IN ACTION , TITLE END and DVD MENU TYPE): X Page 72.
REC button + PLAY button
Start of recording
REC button
REC button
PAUSE button *1
Recording Pause
PLAY button or PAUSE button
Resumption of recording
PAUSE button *1
Recording Pause
Index 1 *4
Chapter 1
Index 2
Chapter 2
Index 3
Chapter 3
Title 1
Index 4 *4
Chapter 4
STOP button
End of recording
Chapter menu modification possible *2 (XPage 47)
Title closing
Recording of a new title
Title menu modification possible *2 ( X Page 53)
Finalizing
Playback possible (Other DVD player) *3
*1 It is possible to select whether to automatically insert a chapter mark when there is a pause in the recording using the AUTO
CHAPTER (REC PAUSE) item of the RECORDER MENU (1/2) screen.
*2 Title and chapter menu modification will be possible when EDIT MENU from the DVD MENU screen has been set to ENABLE.
*3 It is possible to playback a disc that has been recorded on this machine even before finalizing it.
*4 When the INDEX CREATION item on the RECORDER MENU (2/2) screen is set to AUTO, indexes will be inserted automati-
cally together with chapters at the record start point and recording pause point.
Processing time:
30 seconds maximum
Processing time:
several seconds ~ several minutes
Processing time:
20 minutes maximum
E-38
Page 39
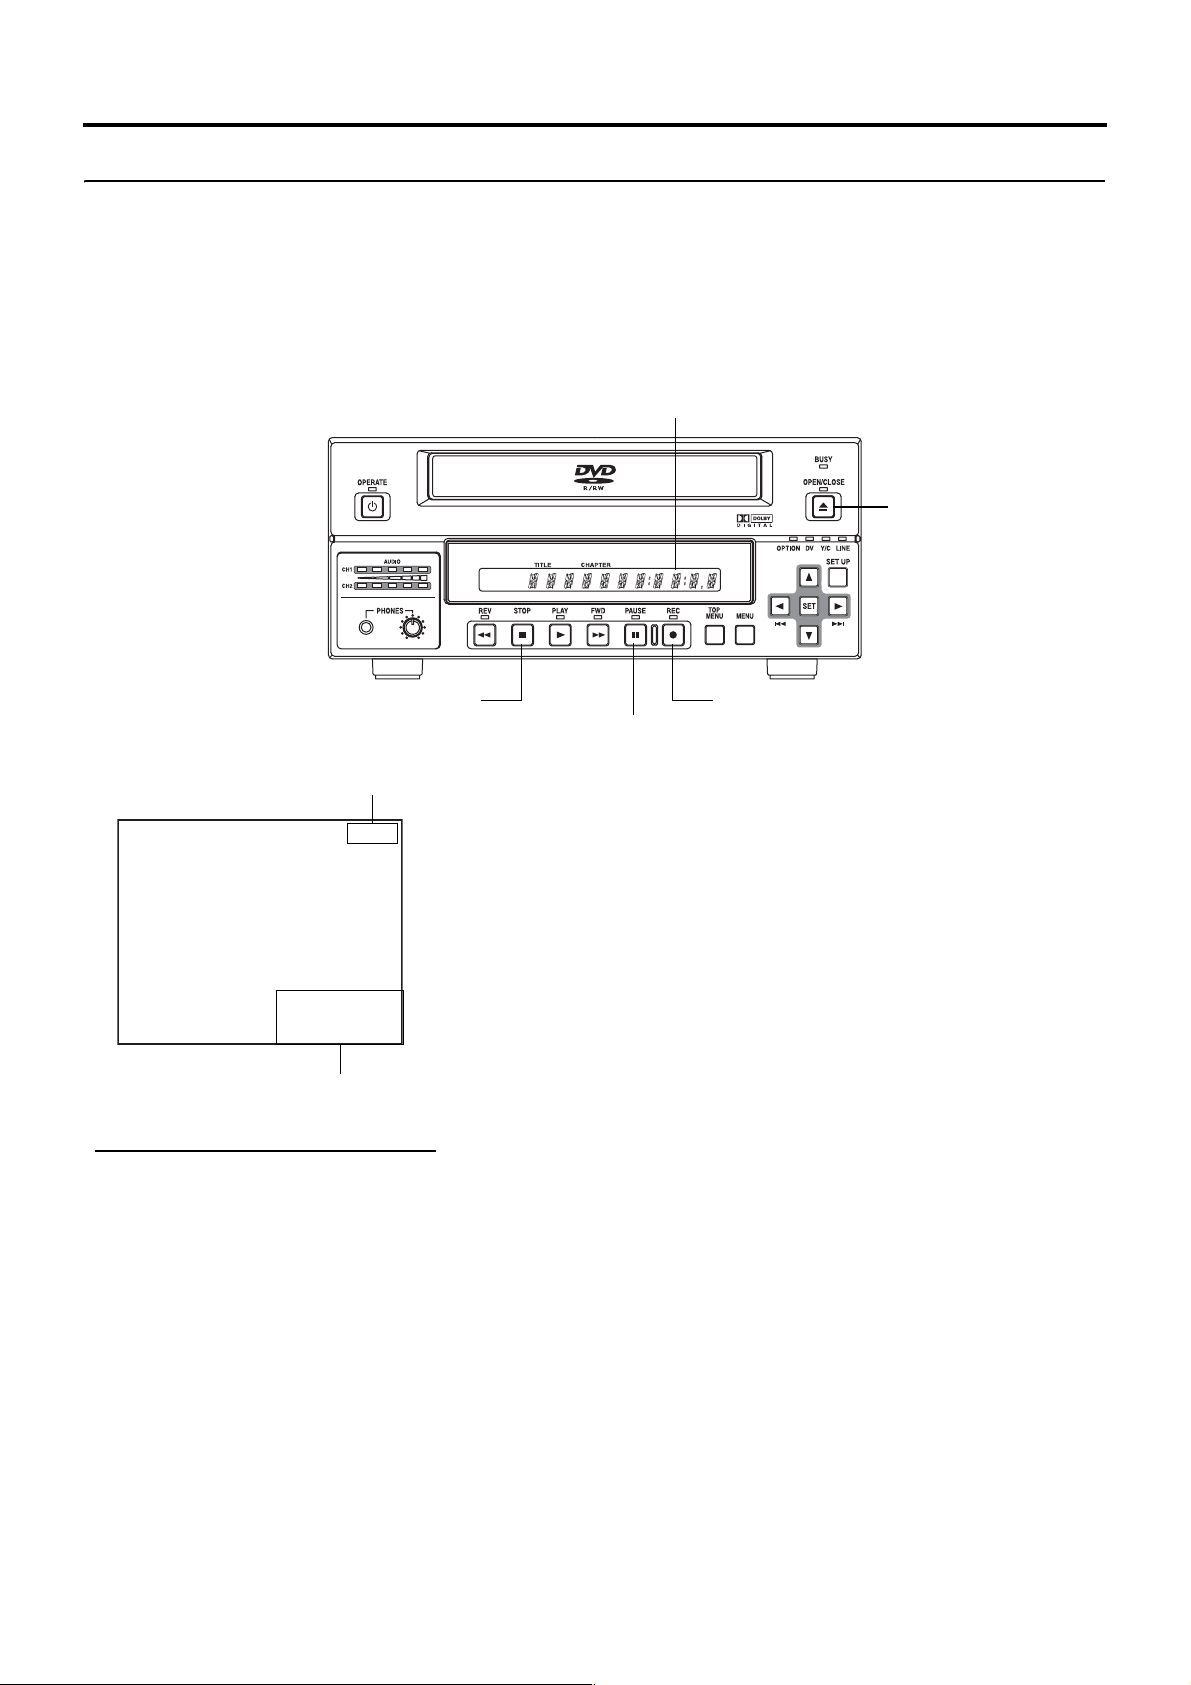
Recording
r
Recording with the Front Panel
On a DVD, the section of video recorded between the start of recording and pressing of the STOP button to end recording is
stored as a single title, and a unique title number is assigned to each of these sections. A single disc can contain up to 99 different
titles.
In addition, each title can be separated into a number of different chapters by inserting chapter marks at the appropriate points,
and each title can contain up to 99 chapters.
Information relating to titles and chapters is stored on a disc in the form of title and chapter menus. When the disc is being played,
therefore, the title and chapter menus can be used to access specific sections of stored video and audio.
LCD display
OPEN/CLOSE button
STOP button
Remaining time
Monitor display
000 min
04/05/06
11:20:00
Title and chapter numbers
Notes
• A maximum of 10 minutes will be
required to complete title closing.
• The remaining time available for recording on a disc will be displayed on the
monitor. Note that this is to be used as a
general guide, not as an exact figure.
(DISPLAY and REMAIN from the DISPLAY MENU screen must both be ON
for this figure to be displayed.)
• During the recording process, the current title number and chapter numbe
are displayed on the monitor.
(ONSCREEN will be displayed when the
DISPLAY item is ON and the TITLE/
CHAPTER/INDEX item is set to
TITLE+CHAPTER.)
TITLE 01 0:11:22
CHAPTER
REC
01 0:11:22
REC button
PAUSE button
Insert a disc that can be recorded on.
1. With the DVD recorder stopped, make all of the required settings and
adjust the audio recording levels.
2. Start recording.
This is done by pressing the REC and PLAY buttons simultaneously.
3. Pause recording.
This is done by pressing the PAUSE button.
• The recording pause mode is entered.
When the AUTO CHAPTER (REC PAUSE) item of the RECORDER [1/2]
screen is set to ON, a chapter mark is automatically inserted when the
recording pause mode is entered.
A number of different methods can also be used for the manual or automatic insertion of chapter marks. (X Page 40)
4. Restart recording.
Press the PLAY or PAUSE button.
• Recording will begin once again and a new chapter will be created in the
current title.
5. End recording (i.e., close the title)
Press the STOP button when either recording or paused.
• The action of the DVD recorder following the end of recording depends on
the setting of EDIT MENU from the DVD MENU screen.
DISABLE : Recording is ended and the chapter menu is created using pre-
set settings (i.e., the title is closed).
ENABLE : The THUMBNAIL EDIT screen will appear. This screen can be
used to modify the chapter menu’s display style, to change the
thumbnails used, to input chapter names, and to perform other
similar functions. For more details, refer to Page 48.
If additional recording is to be carried out, repeat steps 1 through 5
above.
• In such a case, the subsequent recording is stored as a new title.
E-39
Page 40

Recording
Not
Recording with the Front Panel (continued)
e
When recording is stopped or a title is
closed, the “PLEASE WAIT” message will
be displayed on the monitor.
6. End recording and remove the disc.
Depending on how the disc will be used, one of two different procedures is
implemented at this time.
• If more content will be recorded to the disc using this DVD recorder:
Simply press the OPEN/CLOSE button and remove the disc. (Do not finalize the disc before it is removed.)
* The AUTO FINALIZE item on the DISC menu screen will have to be set to
OFF.
• If the disc is to be played on a different DVD player:
Finalize the disc, press the OPEN/CLOSE button, and then remove the
disc.
For more details regarding finalizing, refer to page 42.
Inserting Chapter Marks Manually or Automatically
RECORDER MENU (1/2) screen
RECORDER MENU (1/2)
MENU
CHAPTER CREATION
SET INTERVAL
AUTO CHAPTER (RECPAUSE)
ENCODE QUALITY
AUDIO ENCODE
MANUAL
Every05Min
ON
SP
DOLBY DIGITAL
It is possible to insert a chapter mark either manually or automatically.
Indexes are written together with chapter marks.
The actual method to be used is determined by CHAPTER CREATION and
SET INTERVAL from the RECORDER MENU (1/2) screen.
• If chapter marks are to be inserted manually at any point, set CHAPTER
CREATION to MANUAL.
Chapter marks and indexes can then be inserted by pressing the REC button while recording.
• If chapter marks are to be inserted automatically, first of all set CHAPTER
CREATION to AUTO. Then use SET INTERVAL to set a time (in minutes)
for chapter mark insertion.
The DVD recorder will insert chapter marks and indexes at the corresponding intervals during recording.
Whether a chapter mark is automatically inserted or not during a recording
pause is set with the AUTO CHAPTER (REC PAUSE) item.
ON: Insert a chapter mark.
OFF: Do not insert a chapter mark.
Notes
• When the INDEX CREATION item on the RECORDER MENU (2/2) screen is
set to AUTO, indexes will be inserted together with chapters at the record
start point and recording pause point.
• The frame at which a chapter mark is inserted will be used for the corresponding thumbnail in the chapter menu. When EDIT MENU from the DVD
MENU screen is set to ENABLE, the frames used for thumbnails can be
modified on the THUMBNAIL EDIT screen that appears automatically at the
end of recording.
• Each title can contain up to 99 chapters.
• In certain cases, the frames used for chapter menu thumbnails may differ
slightly from the exact frames at which the corresponding chapter marks
were inserted.
Using the Foot Switch to Perform Recording
Operations such as recording and writing chapter marks (indexes) can be performed using the external switch that is connected
to the foot switch terminal at the rear of this unit.
• Use the FOOT SW1 terminal to turn ON/OFF recording. The FOOT SW1 item on the REMOTE (1/2) menu screen can be used
to specify whether to use the FOOT SW1 terminal as well as to specify conditions for using the terminal. (X Page 75)
• Use the FOOT SW2 terminal to write chapter marks (indexes) or to capture a still picture (JPEG). The FOOT SW2 item on the
REMOTE (1/2) menu screen can be used to specify whether to use the FOOT SW2 terminal as well as to specify conditions for
using the terminal. (X Page 75)
E-40
Page 41

Erasing the Last Title
Only the last title of an unfinalized disc that is recorded using this unit will be erased.
Recording
DISC MENU screen
DISC MENU
MENU
FINALIZE
CANCEL DISC FINALIZATION
AUTO FINALIZE
AUTO CANCEL DISC FINALIZ.
(
DISC ERASE
DISC ERASE
LAST TITLE ERASE
QUICK
(
FULL
)
)
CANCEL
CANCEL
OFF
OFF
CANCEL
CANCEL
EXECUTE
1. Insert the DVD-R/DVD-RW/DVD+R/DVD+RW.
2. Press the SET UP button to display the Setup Menu.
3. Use the h and g buttons to select DISC item and then press the SET
button.
• The DISC menu screen will appear.
4. Press the h and g button, select either the LAST TITLE ERASE item,
then press the SET button.
• The setting value list box is displayed.
5. Use the h and g buttons to select EXECUTE from the list and then
press the SET button.
• The last title will be erased.
Note
In the case of DVD-R/DVD+R, erasing a title will not create more disc space.
CAUTION
Under no circumstances should the power be turned off or the power cord disconnected while data is being erased.
Disc Repair Feature
When the power supply is cut off during recording or other operations on this unit, there is a feature to repair the disc.
After the power supply is cut off during recording or other operations, the disc repair (RESTORE) will automatically start when the
power is supplied again.
CAUTIONS
• Do not switch off or plug out the power cord during disc repair.
• The repair might not be possible depending on the disc.
E-41
Page 42

Recording
Finalizing (for Playback on Other DVD Players)
Finalize a disc recorded using this DVD recorder as described below in order to ensure that it can be played on other DVD players. In the case of DVD-RWs/DVD+RWs, playback will be possible on DVD players that support video mode.
After finalizing a disc;
• No additional recording will be possible.
• The title menu cannot be changed.
• The titles created before finalizing will be displayed as the top menu.
Finalizing
The process of finalizing can be carried out in two different ways.
• Select DISC MENU and then FINALIZE from the Setup Menu.
• Press and hold the OPEN/CLOSE button for at least 7 seconds.
Setup Procedure: Insert the disc to be finalized.
1. If using the Setup Menu: 1. Press and hold the OPEN/CLOSE button for at least 7
DISC
MENU
MENU
FINALIZE
CANCEL DISC FINALIZATION
AUTO FINALIZE
AUTO CANCEL DISC FINALIZ.
DISC ERASE (QUICK)
DISC ERASE (FULL)
LAST TITLE ERASE
EXECUTE
CANCEL
OFF
OFF
CANCEL
CANCEL
CANCEL
1Press the SET UP button to
display the Setup Menu,
and then select DISC.
2Set FINALIZE from the
DISC MENU screen to
EXECUTE and then press
the SET button.
seconds.
• Finalizing is carried out regardless of the setting of
EDIT MENU of the DVD MENU screen described
below.
The screen that will now be displayed depends on the setting of EDIT MENU
from the DVD MENU screen.
When DISABLE is set, finalization starts. If this is set to ENABLE, a screen for editing ti-
Progress screen
tle menus will appear. Use this screen to confirm that the title menu is as required, to modify
the display style, and to input title names.
(X Page 53)
• A bar showing the state of progress will be displayed during finalizing.
• The progress bar will disappear when finalization has been completed and
the normal screen display will then be restored.
• The disc is ejected when finalizing ends.
Select NO from the confirmation screen to cancel finalizing and return to the
previous screen.
FINALIZE
Notes
• A maximum of 20 minutes will be required to complete finalizing.
• When finalizing is carried out, all of the disc’s recorded video and audio are
stored in accordance with the DVD Video Standard; accordingly, this content
can also be replayed as DVD video.
• Although a disc finalized using this DVD recorder may in principle be played
on other DVD players, there is no guarantee that all of its content will be playable.
• When the AUTO FINALIZE item on the DISC menu screen is set to ON, finalization will be automatically performed when ejecting the disc. (When the
EDIT MENU item on the DVD MENU screen is set to DISABLE.)
• In the case of a DVD-RW/DVD+RW, it is possible to cancel the finalization
and make an additional recording. (X Page 29)
E-42
Page 43

Recording & Viewing Still Images (JPEG)
Recording Playback Still Images to DVD
When an unfinalized DVD recorded by the DVD recorder is being played back, you can record any still image to the disc. The disc
needs to have sufficient available space. You can record up to 1000 still image (JPEG) files to one disc.
Refer to the following flowchart for the operating procedure.
Recorded and unfinalized DVD
with available space
REC button
Or FOOT SW 2 terminal
REC button
REC button
Records the data to the Image folder on the disc
PLAY button
Play back starts
STOP button
Finalize
Still image
Still image
Still image
Saved to the DVD
recorder’s memory
Capture 1
Capture 2
Capture N
If the OPERATE button is
pressed, the still image files
are cleared from memory and
this DVD recorder enters
OPERATE OFF mode.
The still images (JPEG) can be viewed on a PC, etc.
Capture still images.
If the REC button is pressed or a signal is input to the FOOT SW 2 terminal on the rear panel during DVD playback, the still
image is captured to the internal memory of the DVD recorder.
If you want to use the FOOT SW 2 terminal, set FOOT SW 2 of the REMOTE MENU (1/2) screen to other than OFF.
(X Page 75)
Record still images (JPEG) saved to memory to the disc.
At the following time, the still image (JPEG) files saved to memory are automatically written to the Image folder on the disc.
• When playback stops and the DVD recorder enters Stop mode.
A file name such as the following is assigned to each still image.
File Number_Recording Year/Month/Day/Hour/Minute/Second.jpg (Example: 0001_20060313105310.jpg)
Recording Year/Month/Day/Hour/Minute/Second: The date and time the still image was captured
I picture is captured for still pictures. As a result, there may be a 0 to 0.5 second lag between the displayed image and the cap-
tured image.
E-43
Page 44

Recording & Viewing Still Images (JPEG)
Recording Still Images of Input Video to CD-R/RW
When an unfinalized CD-R/RW is inserted, any still image of the input video (E-E image) can be recorded to the disc. The disc
needs to have sufficient available space. You can record up to 1000 still image (JPEG) files to one disc.
Refer to the following flowchart for the operating procedure.
• For a CD-RW, use the DVD recorder to do a full erase beforehand. (X Page 29)
• Input a video signal and set the DVD recorder to Stop mode.
Unfinalized CD-R/RW with available space
Stop mode
Input video (E-E image)
REC button
Or FOOT SW 2
terminal
REC button
REC button
Press and hold the SET UP button for at least 2 seconds
(to start FILE VIEWER) or press the CLOSE/OPEN button
(to perform the disc eject operation)
Records the data to the Image folder on the disc
Finalize
Still image
Still image
Still image
Saved to this DVD
recorder’s memory
Capture 1
Capture 2
Capture N
If the OPERATE button is
pressed, the still image files
are cleared from memory and
this DVD recorder enters
OPERATE OFF mode.
The still images (JPEG) can be viewed on a PC, etc.
Capture still images.
If the REC button is pressed or a signal is input to the FOOT SW 2 terminal on the rear panel in Stop mode, the still image displayed at that point in time is captured to the internal memory of the DVD recorder.
If you want to use the FOOT SW 2 terminal, set FOOT SW 2 of the REMOTE MENU (1/2) screen to other than OFF.
(X Page 75)
Record still images (JPEG) saved to memory to the disc.
At the following times, the still image (JPEG) files saved to memory are automatically written to the Image folder on the disc.
• When FILE VIEWER is started by pressing and holding the SET UP button for at least 2 seconds.
FILE VIEWER: A program for viewing still images (JPEG) recorded to discs. (X Page 45)
• When the disc is ejected.
A file name such as the following is assigned to each still image.
File Number_Recording Year/Month/Day/Hour/Minute/Second.jpg (Example: 0001_20060315102030.jpg)
Recording Year/Month/Day/Hour/Minute/Second: The date and time the still image was captured
Switching the DVD recorder to OPERATE OFF mode clears the still image data stored in the internal memory of the DVD
recorder. If you do not want to record the data to the disc, press the OPERATE button in Stop mode. (State when a disc is
inserted)
E-44
Page 45

Recording & Viewing Still Images (JPEG)
Viewing Still Images (JPEG) with FILE VIEWER
Use FILE VIEWER of the DVD recorder to view still images (JPEG) recorded to discs.
1. Start FILE VIEWER.
1Insert a DVD or CD-R/RW containing recorded JPEG still images and set the DVD recorder to the stop state.
2Press and hold the SET UP button for at least 2 seconds.
• FILE VIEWER starts. If the disc is a CD-R/RW and there are still images in the internal memory of the DVD recorder that
have not been written to the disc, the still images are written to the disc.
• The file selection screen of FILE VIEWER appears on the monitor.
File Selection Screen of FILE VIEWER
Closes FILE VIEWER
screen.
FILE VIEWER
BACK
0001_20060313105310.jpg
0002_20060313105323.jpg
0003_20060314123403.jpg
0004_20060314143050.jpg
0005_20060314144030.jpg
0006_20060314150035.jpg
File List: Displays up to 10 files on 1
screen.
Use the M/N buttons of the DVD
recorder to scroll the list.
File Name: Recording Date & Time.jpg
(X Pages 43 and 44)
File Number: Number of the selected file/total
number of files on the disc
Select a file and press the SET button of the DVD
recorder to display the still image of the selected
file in the preview display area.
----
/0006
Returns to the file selection screen.
BACK
0001_20060313105310.jpg
0002_20060313105323.jpg
0003_20060314123403.jpg
0004_20060314143050.jpg
0005_20060314144030.jpg
0006_20060314150035.jpg
Preview Display Area
FILE VIEWER
0002/0006
BACK
Preview
FULL SCREEN
Jump Buttons: Jumps backward or forward in
increments of 10 or 100 files. Use the L/K
buttons of the DVD recorder to select a jump
button on the screen.
Displays a full screen view of
the still image.
2. Select a file and display the still image.
1Use the M or N button of the DVD recorder to select the desired file from the file list. (The selected file is highlighted.)
To jump files in increments of 10 or 100
Use the L or K button of the DVD recorder to select a jump button on the screen and press the SET button.
l : Jumps 100 files back. m : Jumps 10 files back.
o : Jumps 100 files forward. n : Jumps 10 files forward.
2There are two ways to display still images.
Press the PLAY button for full screen display. (If this operation is performed, proceed to Step 4.)
Press the SET button for preview display.
• The still image of the selected file appears in the preview display area.
* To return to the file selection screen, use the M or N button of the DVD recorder to select the BACK button above the
preview display area and press the SET button.
3. Switch the display of the still image from preview to full screen.
While a preview of a still image is displayed, use the M or N button of the DVD recorder to select the FULL SCREEN button
on the screen and press the SET button.
4. Return from full screen display to the file selection screen of FILE VIEWER.
Press the SET button of the DVD recorder.
5. Close FILE VIEWER.
While the file selection screen of FILE VIEWER is displayed, use the M or N button of the DVD recorder to select the BACK
button on the screen and press the SET button.
Alternatively, press the SET UP button of the DVD recorder.
• The E-E screen is redisplayed.
E-45
Page 46

Recording & Viewing Still Images (JPEG)
Precautions for Recording and Viewing Still Images (JPEG)
• Still images cannot be captured when a disc recorded by another device is inserted.
• Even when a disc recorded by the DVD recorder is inserted, still images cannot be captured if the disc has been finalized.
“NOT WRITABLE” appears on the LCD display of the DVD recorder.
• Still images cannot be captured if there is insufficient available space on the disc.
• Up to 1000 still images can be captured to the internal memory of the DVD recorder. If the capture operation is performed when
1000 still images have been captured, “IMAGE FULL” appears on the LCD display of the DVD recorder.
• Up to 1000 still images can be written to a disc.
After 1000 still images are written to the disc, no more still images can be captured. “NOT WRITABLE” appears on the LCD display of the DVD recorder.
• If a still image is captured, the LAST TITLE ERASE function does not work even if the disc is unfinalized. (X Page 41)
• Still image files on a finalized disc can be viewed on a PC, etc. If the still image files are difficult to find, use Explorer.
E-46
Page 47

Title & Chapter Menu Settings
Changing Chapter Menus (THUMBNAIL EDIT Screen)
This DVD recorder can automatically create title and chapter menus as recording operations are started and stopped.
Title and chapter menus are created using the following.
• Chapter thumbnails : The frames at which chapter marks have been inserted are used as thumbnails.
• Title thumbnails : The frames at the start of individual recordings are used as thumbnails. As a result, a title’s thumbnail
is the same as that of its first chapter.
• Display style : Menus are created using the style set using the DVD MENU screen. (Styles determine factors such as
thumbnail positioning and background)
After chapter menus have been created in this way, it will be possible to modify thumbnails and styles, or to insert new names and
comments.
In specific terms, the editing of chapter menus is carried out using the THUMBNAIL EDIT screen that appears when recording of
a title is ended.
Opening the THUMBNAIL EDIT Screen
DVD MENU Screen
Set EDIT MENU from the DVD MENU screen to ENABLE.
• The THUMBNAIL EDIT screen will appear automatically whenever moving to
DVD MENU
MENU
EDIT MENU
STYLE
TITLE PATERN
CAPTER PATERN
THUMNAIL FORM
DVD MENU TYPE
DISC IN ACTION
TITLE END
ENABLE
TYPE1
1
1
NORMAL
TOP
TITLE
NEXT TITLE
Stop mode from Recording mode or Recording Pause mode.
Note
If EDIT MENU from the DVD MENU screen is set to DISABLE, the THUMBNAIL EDIT screen will not be displayed. In such a case, title and chapter menus
are created using preset settings.
THUMBNAIL EDIT screen
When initially displayed, the THUMBNAIL EDIT screen contains thumbnails for up to six recorded chapters in the order that they
were recorded. The seventh and subsequent thumbnails are displayed on the following pages.
• This initial screen can be used to change a chapter’s thumbnail or to input names and comments.
• Operations on this screen can be carried out using the front panel buttons or a keyboard.
Front panel : Select using the j, i, g, and h buttons, and confirm the selection using the SET button.
Keyboard : Select using the arrow keys and confirm the selection using the Enter key. The input of names and comments is
also carried out using the keyboard.
Displays the previous page
This button is used to close a
disc’s titles when editing has been
completed. As such, it should not
be used until all other operations
have been completed.
THUMBNAIL EDIT
TITLE CLOSE
Displays the next page
Thumbnail
1 - 6
When title close processing has
ended, the display will return to the
E-E screen, and subsequent editing
of chapter menus will not be possible.
AAA
BBB
CCC
Chapter number:
This number is used during
1
2
3
description of operation.
It will not appear on the
actual screen.
Highlighted item:
The currently selected item is
displayed in highlight.
DDD
EEE
4
5
FFF
6
This is used for import-
CHAPTER MENU TEXT LOAD TEMP LOAD
ing a template using the
“EasyMenu” menu template editing software.
Displays the CHAPTER MENU EDIT screen.
Specifically, this screen is used to check and
change display styles.
Reads title text that has been created using
an external application.
E-47
Page 48

Title & Chapter Menu Settings
Changing & Naming Thumbnails for Chapter Menus
The modification of chapter menu thumbnails and the entry of names and comments are carried out as described below using the
THUMBNAIL EDIT screen.
Changing Thumbnails
THUMBNAIL EDIT screen
THUMBNAIL EDIT
TITLE CLOSE
AAA2BBB3CCC
1.
1
DDD5EEE
4
CHAPTER MENU TEXT LOAD TEMP LOAD
THUMBNAIL EDIT
BACK
2.
PREVIEW
THUMBNAIL EDIT
3.
BACK
PREVIEW
BBB
2
TEXT INPUT
BBBB
2
TEXT INPUT
CHAPTER
LENGTH:
5000 sec
POSITION:
40/100
CHAPTER
LENGTH:
5000 sec
POSITION:
50/100
1 - 6
For example, let’s change the thumbnail for the second chapter.
1. Select the second chapter and press the SET button.
• The thumbnail screen for this chapter will be displayed.
The CHAPTER LENGTH item displays the chapter length (sec.).
The denominator of the POSITION item is the range in which the thumbnail
can be changed. The numerator shows the current display position.
2. Select the thumbnail to be used for the second chapter.
Thumbnails can be selected using the r and q buttons found on this
screen.
• If you select r and press the SET button, the image* recorded after the
selected thumbnail will be displayed. Each time the SET button is pressed,
a subsequent image will be displayed. (*Image after 15 frames)
By selecting the B item and pressing the SET button, the display moves
forward by 10 frames.
• If you select q and press the SET button, the image recorded before the
selected thumbnail will be displayed. Each time the SET button is pressed,
a previous image will be displayed.
By selecting the A item and pressing the SET button, the display moves
backward by 10 frames.
3. Select BACK and press the SET button to change that chapter’s thumb-
nail.
THUMBNAIL EDIT
TITLE CLOSE
AAA2BBBB3CCC
1
DDD5EEE
4
CHAPTER MENU TEXT LOAD TEMP LOAD
FFF
6
• The initial THUMBNAIL EDIT screen is dis-
1 - 6
played once again.
The thumbnail for the second chapter will
have changed to that just selected.
Checking Thumbnails
THUMBNAIL EDIT
1.
2.
3.
TITLE CLOSE
AAA2BBBB3CCC
1
DDD5EEE
4
CHAPTER MENU TEXT LOAD TEMP LOAD
THUMBNAIL EDIT
BACK
BBB
2
PREVIEW
TEXT INPUT
BACK
FFF
6
CHAPTER
LENGTH:
5000 sec
POSITION:
40/100
1 - 6
BBBB
* Thumbnail of the title menu will be the top thumbnail of the chapter menu.
Use the following procedure to confirm that thumbnails are as desired by displaying them in full-screen mode.
For example, let’s look at the thumbnail for the second chapter.
1. Select the second chapter and press the SET button.
• The thumbnail screen for this chapter will be displayed.
2. Select PREVIEW and then press the SET button.
• The thumbnail image for this chapter will be displayed in full-screen mode.
3. Select BACK and press the SET button to return to the THUMBNAIL
EDIT screen.
E-48
Page 49

Title & Chapter Menu Settings
Entering Names and Comments for Chapter Menus
1.
2.
3.
5.
THUMBNAIL EDIT
TITLE CLOSE
AAA2BBB3CCC
1
DDD5EEE
4
CHAPTER MENU TEXT LOAD TEMP LOAD
THUMBNAIL EDIT
BACK
AAA
PREVIEW
TEXT INPUT
THUMBNAIL EDIT
BACK
AAA
TITLE INPUT
april
CANCEL
THUMBNAIL EDIT
BACK
AAA
april
PREVIEW
TEXT INPUT
FFF
6
CHAPTER
LENGTH:
5000 sec
POSITION:
40/100
CHAPTER
LENGTH:
5000 sec
POSITION:
CHAPTER
LENGTH:
5000 sec
POSITION:
40/100
1 - 6
Use the following procedure to apply names to the thumbnails used in chapter
menus, and also to add comments to be displayed on a chapter menu screen.
Names and comments are entered using a keyboard.
Set KEYBOARD STYLE from the SYSTEM MENU (1/2) screen in accordance
with the keyboard’s input language.
The following description assumes that all operations are carried out by key-
board.
For example, let’s now apply a name to the first chapter.
1. Use the arrow keys to select the first chapter from the THUMBNAIL EDIT
screen, and then press the Enter key.
• The thumbnail screen for this chapter will be displayed.
2. Select TEXT INPUT using the arrow keys and then press the Enter key.
• A box for inputting text will appear.
3. Enter a name or comment into the text box.
Enter a comment to be displayed on
the chapter menu screen.
TITLE INPUT
april
CANCEL
Select CANCEL and press the Enter key to
close the text box without applying the name
or comment that has been entered.
Notes
• The ¥ mark will become a backslash.
• If text cannot be entered, press the CTRL key (right side) on the keyboard.
Enter a name for the chapter
menu thumbnail. (Names can be
up to 20 characters in length.)
THUMBNAIL EDIT
TITLE CLOSE
BBB CCC
AAA
april
DDD5EEE
CHAPTER MENU TEXT LOAD TEMP LOAD
23
4
1 - 6
FFF
6
Display Characters
The characters displayed in title and
chapter menus depend on the title or
chapter pattern that has been selected.
A preview allows actual display characters to be confirmed.
Note that at the time of purchase, display characters will be as follows.
PATTERN No. Display characters
1 17 × 2 (34)
2 17 × 2 (34)
3 32 × 4 (128)
4 50 (Included Title No.)
5 25 (Included Title No.)
6-
4. After the required text has been entered, press the Enter key.
• The text box will close.
The name just entered will be applied to the selected chapter.
* The text that has been input will be displayed on the chapter menu screen.
5. Select BACK and then press the Enter key.
• The initial THUMBNAIL EDIT screen will again be displayed, and the name
or comment will be shown for the first chapter.
Note
THUMBNAIL EDIT
TITLE CLOSE
AAA2BBB3CCC
1
DDD5EEE
4
CHAPTER MENU TEXT LOAD TEMP LOAD
FFF
6
If you select TEXT LOAD from the THUMBNAIL
1 - 6
EDIT screen and then press the SET button, title
text created using an external application will be
read into the DVD recorder for use as a thumbnail
name.
TEXT LOAD
E-49
Page 50

Title & Chapter Menu Settings
Changing & Checking Chapter Menu Styles
Although display styles for chapter menus are created using settings from the STYLE item of the DVD MENU screen as
described above, the following procedure can be used to modify these styles at the end of title recording. In addition, it will also be
possible at this time to confirm that chapter menus are as required.
These actions are carried out by selecting and confirming CHAPTER MENU from the THUMBNAIL EDIT screen.
Changing the Display Style
THUMBNAIL EDIT
TITLE CLOSE
AAA
BBB CCC
1.
2.
april
DDD5EEE
CHAPTER MENU TEXT LOAD TEMP LOAD
BACK
PRESET STYLE
CHAPTER MENU PREVIEW
23
4
CHAPTER MENU
PRESET STYLE MENU screen
PRESET STYLE
3.
BACK
TITLE PATTERN
CHAPTER PATTERN
TYPE 1
1
1
FFF
1. Select CHAPTER MENU from the THUMBNAIL EDIT screen and press
1 - 6
the SET button.
• The CHAPTER MENU EDIT screen will appear.
2. Select PRESET STYLE from the CHAPTER MENU EDIT screen and then
press the SET button.
6
• The PRESET STYLE MENU screen will appear.
The style number set using the PRESET STYLE parameter will be displayed in this screen.
3. To change the display PATTERN;
Select PATTERN and then press the SET button.
Turn to page 37 for details regarding the editing procedure.
* TITLE PATTERN and CHAPTER PATTERN changed here are also reflected in
DVD MENU of the SETUP MENU.
E-50
Page 51

Title & Chapter Menu Settings
Checking the Chapter Menu Screen
Use the following procedure to see how the chapter menu looks when the selected display style is used.
THUMBNAIL EDIT START screen
THUMBNAIL EDIT
1.
TITLE CLOSE
BBB CCC
AAA
april
DDD5EEE
CHAPTER MENU TEXT LOAD TEMP LOAD
23
4
1 - 6
FFF
6
CHAPTER MENU EDIT screen
CHAPTER MENU
BACK
PRESET STYLE
2.
CHAPTER MENU PREVIEW
CHAPTER MENU PREVIEW screen
4.
BACK
1
01
02
03
03/08
1. Select CHAPTER MENU from the THUMBNAIL EDIT START screen and
press the SET button.
• The CHAPTER MENU EDIT screen will appear.
2. Select CHAPTER MENU PREVIEW from the CHAPTER MENU EDIT
screen and press the SET button.
• The CHAPTER MENU PREVIEW screen will appear. Here, it will be possi-
ble to preview the first page of the chapter menu.
3. Confirm that the other pages are as required.
Select r from the CHAPTER MENU PREVIEW screen and press the SET
button to move to the next page.
Select q and press the SET button to move to the previous page.
s and p can be used in combination with the SET button to skip forward
or back in units of ten pages.
4. Complete the preview process.
To do this, select BACK from the CHAPTER MENU PREVIEW screen and
press the SET button.
• The CHAPTER MENU EDIT screen will reappear.
5. Select BACK from the CHAPTER MENU EDIT screen and press the SET
button to return to the THUMBNAIL EDIT screen.
Notes
• Up to 20 seconds per page will be required to create preview displays.
More time may be required depending on the number of thumbnails per
page.
• During creation of preview displays, jump by selecting the s button can
only be made to the page being created.
• A maximum of 33 pages can be created for the Chapter Menu.
The denominator shows the total
number of thumbnails, and the
numerator shows the number of
thumbnails currently created.
E-51
Page 52

Title & Chapter Menu Settings
Ending the Editing of Chapter Menus
Once all of the necessary changes and checks have been made using the THUMBNAIL EDIT screen, title closing must be carried
out.
Please ensure that title closing is performed as the last stage of chapter menu editing.
Even if the chapter menu is to be left unchanged, title closing must be carried out to leave the THUMBNAIL EDIT screen. Note
that when title closing has been completed, chapter menu details will be permanently set.
THUMBNAIL EDIT
1.
2.
TITLE CLOSE
AAA BBBB CCC
april
DDD EEE FFF
CHAPTER MENU TEXT LOAD TEMP LOAD
THUMBNAIL EDIT
TITLE CLOSE
AAA BBBB CCC
april
TITLE CLOSE
YES NO
CHAPTER MENU
TEXT LOAD TEMP LOAD
Select NO and then press the SET
button to close the confirmation
window.
The title will not be closed in this
case.
1. Select TITLE CLOSE from the THUMBNAIL EDIT screen and press the
SET button.
• A confirmation window will appear.
2. If you wish to proceed with title closing, select YES and then press the
SET button.
• Title closing will begin. The “PLEASE WAIT” message will be displayed on
the monitor.
When title closing has been completed, the message bar will disappear.
Notes
• A maximum of 10 minutes will be required to complete title closing.
• If EDIT MENU from the DVD MENU screen is set to DISABLE, title closing
will be carried out automatically whenever recording is ended by, for example, pressing the STOP button. In such a case, title and chapter menus are
created using preset settings.
E-52
Page 53

Title & Chapter Menu Settings
Changing & Checking Title Menu Styles & Names
If EDIT MENU from the DVD MENU screen is set to ENABLE, the TITLE MENU EDIT screen will be displayed upon disc finalizing. Using this screen, it will be possible to change the title menu’s display style, to enter title names, and to confirm that the title
and chapter menus are as required.
• Thumbnail of the title menu will be the top thumbnail of the chapter menu.
Opening the TITLE MENU EDIT Screen
TITLE MENU EDIT screen
FINALIZE
PRESET STYLE
TITLE TEXT INPUT
TITLE MENU PREVIEW
EXIT
TITLE MENU
Changing the Display Style
TITLE MENU EDIT screen
TITLE MENU
1.
FINALIZE
PRESET STYLE
TITLE TEXT INPUT
TITLE MENU PREVIEW
EXIT
PRESET STYLE screen
Settings
Set EDIT MENU from the DVD MENU screen to ENABLE.
Procedure
The TITLE MENU EDIT screen will be displayed when finalizing of the disc is
started.
1. Select PRESET STYLE from the TITLE MENU EDIT screen and press the
SET button.
• The PRESET STYLE screen will appear.
2. To change the display PATTERN;
Select TITLE PATTERN and then press the SET button.
For more details regarding the editing procedure, refer to page 37.
* The TITLE PATTERN changed here is also reflected in DVD MENU of the
SETUP MENU.
2.
PRESET STYLE
BACK
TITLE PATTERN 1
TYPE 1
E-53
Page 54

Title & Chapter Menu Settings
Changing & Checking Title Menu Styles & Names (continued)
Checking the Title Menu Screen
TITLE MENU EDIT screen
TITLE MENU
1.
FINALIZE
PRESET STYLE
TITLE TEXT INPUT
TITLE MENU PREVIEW
EXIT
TITLE MENU PREVIEW screen
3.
BACK 1
01 02 03
TITLE MENU EDIT screen
4.
FINALIZE
PRESET STYLE
TITLE TEXT INPUT
TITLE MENU PREVIEW
EXIT
TITLE MENU
03/08
1. Select TITLE MENU PREVIEW from the TITLE MENU EDIT screen and
press the SET button.
• The TITLE MENU EDIT screen will appear.
2. Confirm that the other pages are as required.
• Select r from the TITLE MENU PREVIEW screen and press the SET but-
ton to move to the next page. Starting with the first page of the title menu,
the display will move forward through the pages each time r is selected
and the SET button is pressed.
• Select q and press the SET button to move to the previous page.
• s and p can be used in combination with the SET button to skip for-
ward or back in units of ten pages.
Displays the previous page Displays the next page
Thumbnail
BACK 1
01 02 03
Displays the page
number
The denominator shows
Background
03/08
the total number of
thumbnails, and the
numerator shows the
number of thumbnails
currently created.
3. Complete the preview process.
To do this, select BACK from the TITLE MENU PREVIEW screen and press
the SET button.
• The TITLE MENU EDIT screen will reappear.
4. If you wish to finalize the disc, select FINALIZE from the TITLE MENU
EDIT screen and then press the SET button.
(X Page 56)
E-54
Notes
• Up to 20 seconds may be required per page to display the PREVIEW screen.
More time may be required depending on the number of thumbnails per
page.
• During creation of preview displays, jump by selecting the s button can
only be made to the page being created.
• A maximum of 33 pages can be created for the Title Menu.
Page 55
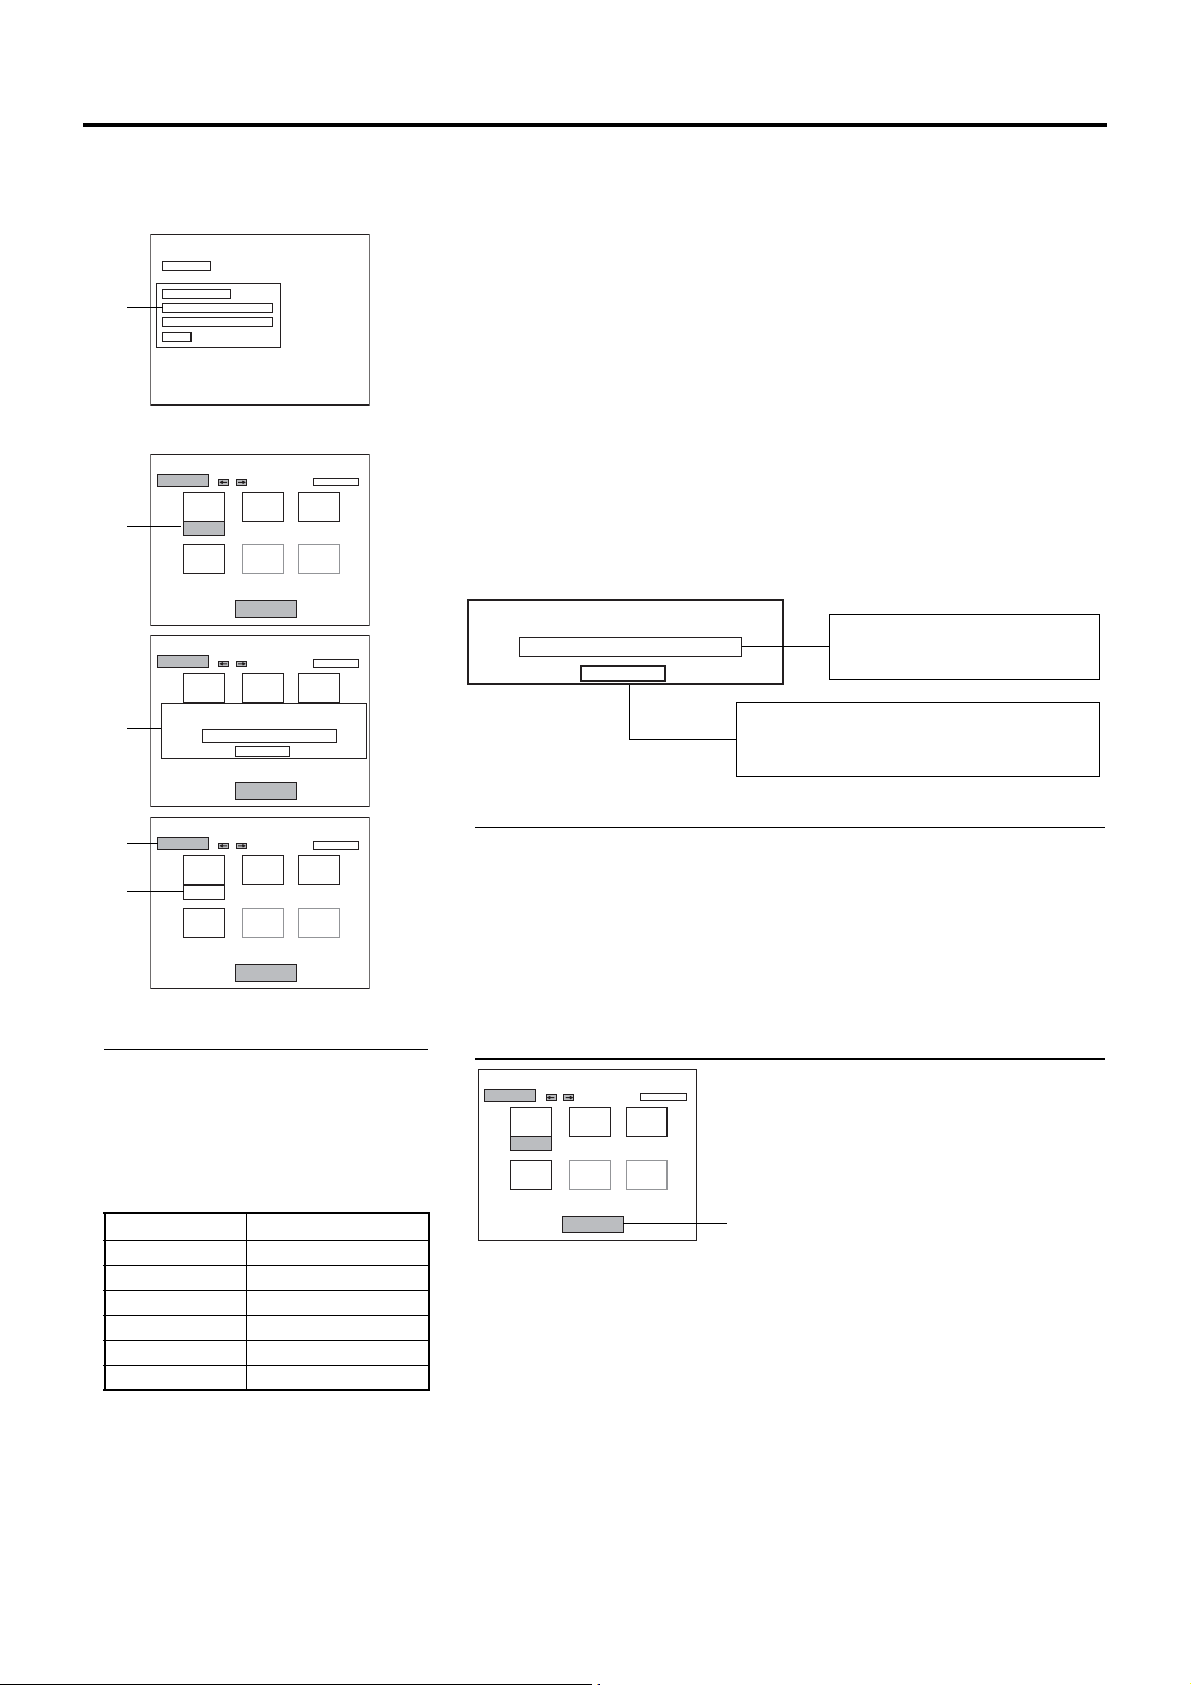
Changing Names for the Title Menu
Title & Chapter Menu Settings
TITLE MENU EDIT screen
TITLE MENU
FINALIZE
PRESET STYLE
1.
TITLE TEXT INPUT
TITLE MENU PREVIEW
EXIT
TITLE TEXT INPUT screen
TITLE TEXT INPUT
BACK
AAA BBB CCC
2.
DDD
TITLE TEXT INPUT
BACK
AAA BBB CCC
4.
DDD
TITLE INPUT
august
TEXT LOAD
CANCEL
Each title will be automatically assigned with a recording date/time and ENCODE
QUALITY.
Use the following procedure to enter manually names for titles in the title menu.
Names and comments are entered using a keyboard.
Set KEYBOARD STYLE from the SYSTEM MENU (1/2) screen in accordance
with the keyboard’s input language.
The following description assumes that all operations are carried out by key-
board.
1. Select TITLE TEXT INPUT from the TITLE MENU EDIT screen and press
the Enter key.
• The TITLE TEXT INPUT screen is displayed.
1 - 6
2. Use the arrow keys to select the title for which text is to be input.
• The currently selected title is highlighted.
3. Press the Enter key.
• A box for inputting text will appear.
4. Change the default name in the text box.
TITLE INPUT
1 - 6
august
CANCEL
Select CANCEL and press the Enter key to
close the text box without applying the name
or comment that has been entered.
Enter a name for the title.
(Names can be up to 20 characters in length.)
TEXT LOAD
TITLE TEXT INPUT
6.
5.
BACK
AAA BBB CCC
august
DDD
TEXT LOAD
1 - 6
Display Characters
The characters displayed in title and
chapter menus depend on the title or
chapter pattern that has been selected.
A preview allows actual display characters to be confirmed.
Note that at the time of purchase, display characters will be as follows.
PATTERN No. Display characters
1 17 × 2 (34)
2 17 × 2 (34)
3 32 × 4 (128)
4 50 (Included Title No.)
5 25 (Included Title No.)
6-
Notes
• The ¥ mark will become a backslash.
• If text cannot be entered, press the CTRL key (right side) on the keyboard.
5. After the required text has been entered, press the Enter key.
• The text box will close.
The name just entered will be applied to the selected title.
6. Select BACK and then press the Enter key.
• The TITLE MENU EDIT screen will reappear.
Note
TITLE TEXT INPUT
BACK
AAA BBB CCC
DDD
TEXT LOAD
If you select TEXT LOAD from the TITLE MENU
1 - 6
screen and then press the SET button, title text
created using an external application will be read
into the DVD recorder for use as a title name.
TEXT LOAD
E-55
Page 56

Title & Chapter Menu Settings
Changing & Checking Title Menu Styles & Names (continued)
Finalizing Discs
TITLE MENU EDIT screen
1.
FINALIZE
PRESET STYLE
TITLE TEXT INPUT
TITLE MENU PREVIEW
EXIT
TITLE MENU
Confirmation screen
FINALIZE
2.
YES NO
Progress screen
1. Select FINALIZE from the TITLE MENU EDIT screen and press the SET
button.
• A confirmation window will appear.
2. Select YES and then press the SET button.
• The disc finalizing process will begin.
The state of progress during finalizing is displayed using a progress bar.
When the disc has been finalized, the progress bar will disappear and the E-E
screen will return.
Notes
• A maximum of 20 minutes will be required to complete finalizing.
• When finalizing is carried out, all of the disc’s recorded video and audio are
stored in accordance with the DVD Video Standard; accordingly, this content
can then also be replayed as DVD video.
• Although a disc finalized using this DVD recorder may in principle be played
on other DVD players, there is no guarantee that all of its content will be playable.
• Select EXIT from the TITLE MENU EDIT screen and then press the SET button to return to the E-E screen without finalizing the disc.
FINALIZE
E-56
Page 57

Playback
Playing Back a Disc
It is possible to playback a disc recorded on this DVD recorder.
Playback operation may vary according to whether finalization has been performed.
Playing Back a Disc before Finalizing
Operation
1. Insert the disc.
2. Play the disc.
Press the PLAY button.
• The final title is played.
3. Select still mode.
STOP button
Clearing Resume Data
• When the PLAYBACK&232C TYPE item
on the SYSTEM MENU (1/2) screen is set
to DVD, resume data will be cleared and
the stop position will return to the beginning of the last title if the STOP button is
pressed when in the Stop mode.
• When the PLAYBACK&232C TYPE item
is set to VTR, resume data will not be
cleared even if the STOP button is
pressed when in the Stop mode.
• Resume data will be cleared upon ejecting
the disc.
PAUSE button
PLAY button
Press the PAUSE button.
• The machine enters still mode.
• If the PAUSE button is then pressed again in Still mode, the DVD recorder
will advance playback by a single frame.
4. Restart the play.
Press the PLAY button.
Upon reaching a title end, it will automatically jump to the next title and
play back all titles.
When disc end is reached it will automatically enter stop mode.
Stop position may vary according to settings of the PLAYBACK & 232C TYPE
item on the SYSTEM MENU (1/2) screen. (X Page 68)
When set to DVD : Beginning of last title
When set to VTR : Position set for AUTO REW (Beginning of first title or 3
seconds before end position)
5. To manually stop playback press the STOP button.
When the STOP button is pressed, the stop position will be registered and the
next playback will start from the same position. (Resume feature)
Note
In addition to the above procedure, the title list can be used to play back a disc.
For details, refer to page 59.
Playing Back a Finalized Disc
When a disc is finalized, its title menu will be used to create the top menu.
Set PLAYBACK NAVIGATION of the SYSTEM MENU (2/2) screen to ON.
The action taken by this DVD recorder when playback of a title has ended will depend on the settings of TITLE END as set on the
DVD MENU screen during recording.
* The operation of a finalized disc is identical to that of an unfinalized disc when PLAYBACK NAVIGATION of the SYSTEM
MENU (2/2) screen is set to OFF.
* Playback may not proceed smoothly with discs recorded using different devices, regardless of whether or not they have been
finalized.
Cursor buttons
STOP
PAU S E
PLAY button
TOP MENU button
SET button
E-57
Page 58

Playback
Playing Back a Disc (continued)
1. Insert a disc.
The DVD recorder enters Stop mode.
2. Play back.
There are two playback modes.
Press the TOP MENU button. Press the PLAY button.
• The title menu (TOP MENU) will appear.
1 Select the number of the title to be played.
Use the j, i, h, and g buttons to select the title number
for playback.
2 Press the SET button to begin playback.
3. Set to Still mode.
This is done by pressing the PAUSE button.
• The DVD recorder enters Still mode.
• If the PAUSE button is then pressed again in Still mode, the DVD recorder will advance playback by a single frame.
4. Restart playback.
Press the PLAY button.
The DVD recorder will behave as follows when title playback has ended.
These actions will depend on the setting made for TITLE END from the DVD MENU screen during recording.
The first title is played back.
TITLE END item setting during recording
Set to MENU Set to REPEAT Set to STOP Set to NEXT TITLE
Enters stop mode and the title
menu (TOP MENU) is displayed.
Repeats playback within the
title.
Enters the stop mode. The title
menu (TOP MENU) is not displayed.
Stops at the beginning of the
first title.
Next title is played. When
playback of the final title finished, the first title is played.
(Disc repeat playback)
5. Stop playback.
This is done by pressing the STOP button.
• The DVD recorder enters Stop mode.
• When the STOP button is pressed, the stop position will be registered and the next playback will start from the same posi-
tion. (Resume feature)
Clearing Resume Data
• When the STOP button is pressed while in the Stop mode, resume data will be cleared and the stop position will return to the
beginning of the first title.
• Resume data will be cleared upon ejecting the disc.
A Disc Set with No Menu
The title list can be used to play back a disc for which DVD MENU TYPE of the DVD MENU screen has been set to NONE.
(X Page 59)
Precaution regarding the playback
• During playback of a disc, if the input setting is DV then the sound can be delayed. In this case, change the input setting to
LINE or Y/C.
• If the disc is dirty or damaged good playback may not be possible. In this case either clean the disc or change it.
• When playing back an unfinalized disc containing mixed data such as screen aspect ratio of 4:3, squeezed, and letterbox for-
mat or a menuless disc, the wide information is not always correctly output.
E-58
Page 59
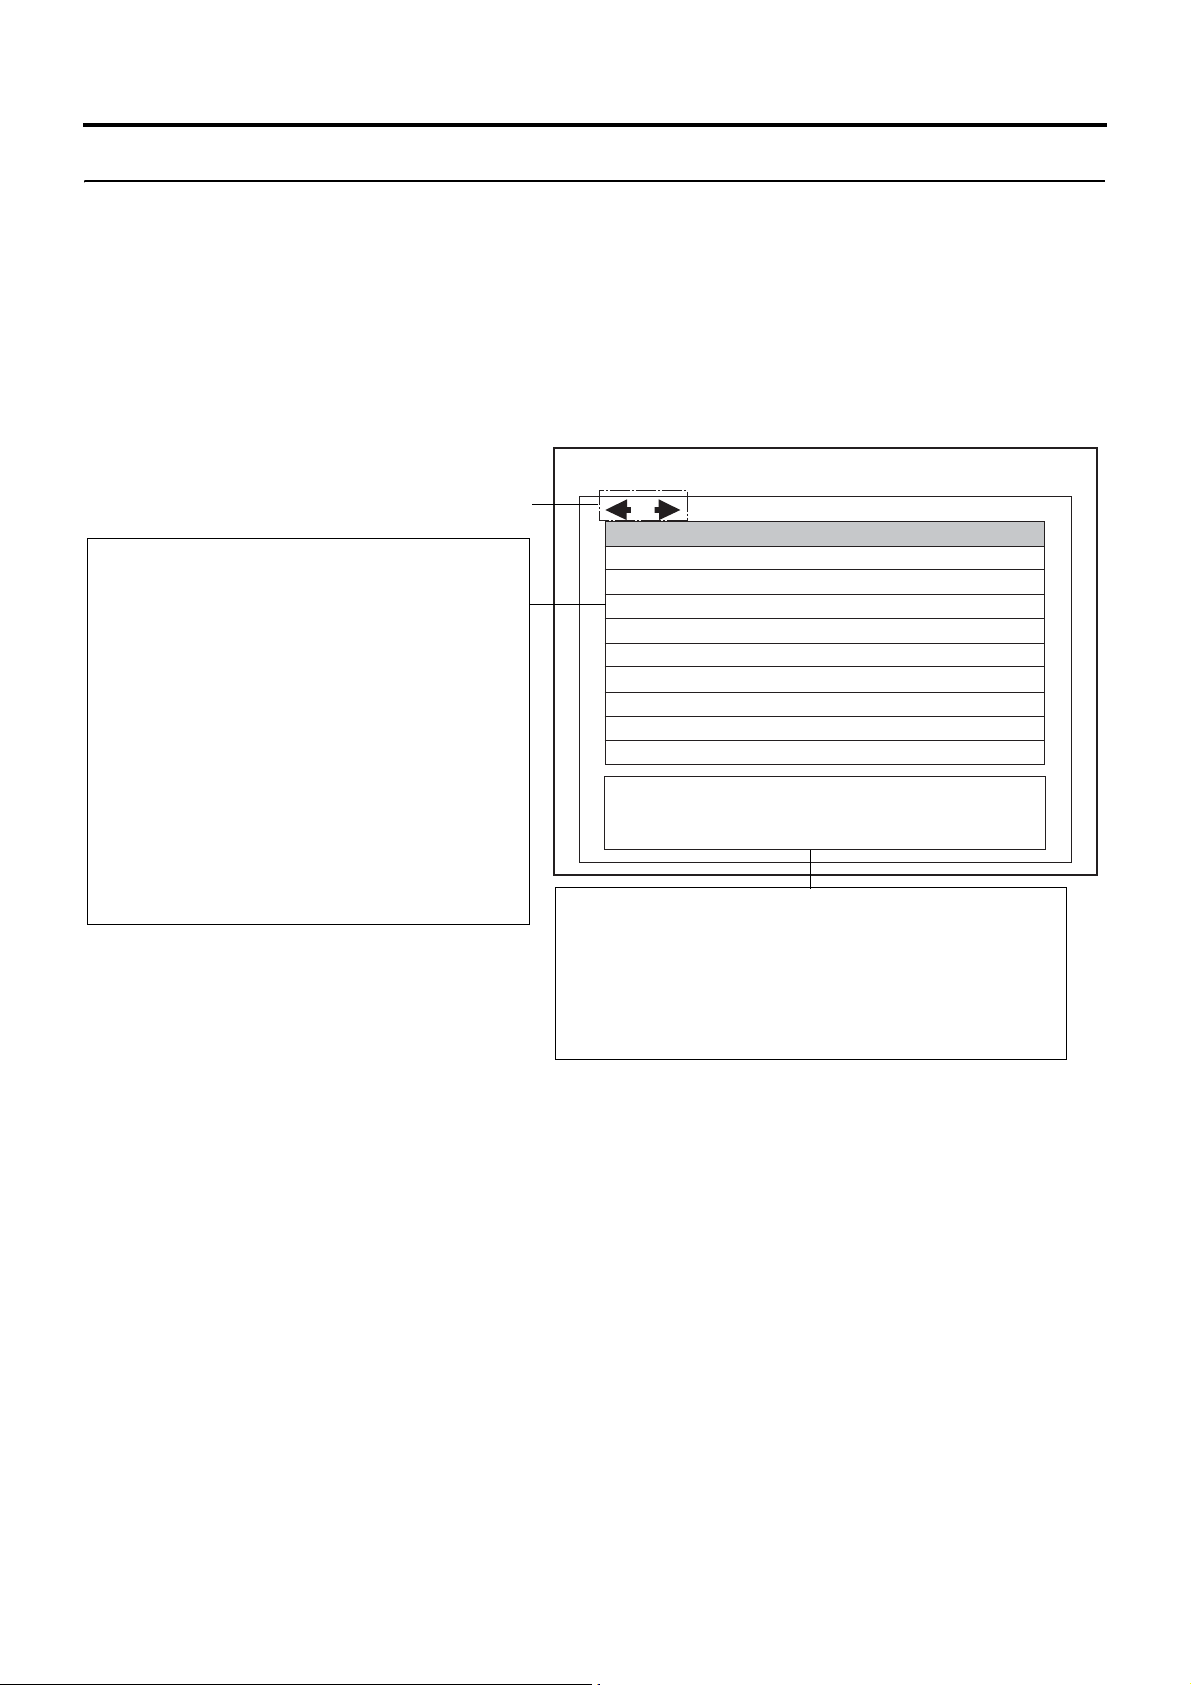
Playback
Selecting Playback Images from the Title List
The DVD recorder can display the title list of a DVD on the monitor so that you can select and play back a desired title.
The title list is displayed for the following DVD recorded by the DVD recorder.
• Unfinalized disc
• A finalized disc recorded when no menu is set to appear (DVD MENU TYPE of the DVD MENU screen is set to NONE)
• Any disc when PLAYBACK NAVIGATION of the SYSTEM MENU (2/2) screen is set to OFF (operation of a finalized disc is the
same as that of an unfinalized disc)
Operation
1. Insert a DVD.
2. Press the TOP MENU button in Stop or Playback mode.
• The title list of the DVD appears on the monitor.
TITLE LIST
Jump Buttons
Title List
Up to 10 titles are displayed on 1 screen.
A title name indicates the following information.
When an ID was entered
Title Number: Recording Year/Month/Day + Recording End Time + ID (up to 25 characters)
When no ID was entered
Title Number: Recording Year/Month/Day + Recording End Time + Recording Mode (Example: Title 06
in the list on the right)
* The display style of the recording year, month, and
day depends on the setting of DATE STYLE of the
DISPLAY MENU screen when the title was
recorded.
* Since the title display information is recorded as a
character string when the title is closed, modifying
the setting after recording has no effect on the title.
01 : 2006/05/14 10:00 0123456789
02 : 2006/05/14 10:10 2222222222222
03 : 2006/05/14 10:18 33333333333333333333
04 : 2006/05/14 11:02 4444444444444444444444444444
05 : 2006/05/14 13:22 555555555555555555555555
06 : 2006/05/17 09:08 SP
07 : 2006/05/17 10:00 AAAAAAAAAAAAAAAAAAAAAAA
08 : 2006/05/17 12:36 JVC-Victor
09 : 2006/05/17 13:50 BBB
10 : 2006/05/18 10:00 abcdefghijklmn
ID : 0123456789
NAME : JVC-VICTOR PROFESSIONAL DVD
2006/05/14 10:00 SP
Information Display Area
Displays information on the selected title.
ID : Up to 40 characters
NAME : Up to 40 characters
Additional Information: The recording end date and time and
the recording mode
* If no ID was recorded, the additional information is regis-
tered as the ID.
3. Select a title.
Use the g or h button of the DVD recorder to select the desired title from the title list.
• The selected title is highlighted.
• The information for the selected title appears in the information display area.
To move to another title list display page
Use the i or j button of the DVD recorder to select a jump button on the screen and press the SET button.
u: Moves to a title page with lower title numbers. w: Moves to a title page with higher title numbers.
4. Start playback.
Press the SET button or PLAY button of the DVD recorder.
In the case of an unfinalized disc, the DVD recorder automatically switches to Stop mode when the title ends.
In the case of a finalized disc, the operation when the title ends is in accordance with the setting of TITLE END of the DVD
MENU screen.
5. Stop playback.
Press the STOP button of the DVD recorder.
• The DVD recorder switches to Stop mode.
E-59
Page 60

Playback
Fast & Slow Playback
REV button FWD button
Fast-Forward & Fast-Reverse Play
Fast-forwarding
• Press the FWD button during playback or fast-reverse
play to start fast-forward play.
If the FWD button is pressed during fast-forward playback, the machine toggles between fast- and slow-forward playback.
Fast-reversing
• Press the REV button during playback or fast-forward
play to start fast-reverse play.
If the REV button is pressed during fast-reverse playback, the machine toggles between fast- and slowreverse playback.
Note
The DVD recorder can be returned to Playback mode during fast-forward, fast-reverse, slow-forward, or slow-reverse play by
pressing the PLAY button. Still mode can be activated by pressing the PAUSE button. Stop mode is activated by pressing the
STOP button.
Slow-Forward & Slow-Reverse Play
Slow-forwarding
• Press the FWD button in Still mode or during slow-
reverse play to start slow-forward play.
If the FWD button is pressed during slow-forward playback, each time it is pressed the slow-forward playback
speed changes from HIGH (>>>) r LOW (>>) r HIGH
(>>>).
Slow-reversing
• Press the REV button in Still mode or during slow-for-
ward play to start slow-reverse play.
If the REV button is pressed during slow-reverse playback, each time it is pressed the slow-reverse playback
speed changes from HIGH (<<<) r LOW (<<) r HIGH
(<<<).
Playing the Previous or Next Chapter
Press the j button while the DVD recorder is playing to move playback to the
start of the next chapter.
Press the i button while the DVD recorder is playing to move playback to the
start of the current chapter.
When the i button is pressed within 1 second of a chapter mark, playback
from the beginning of the previous chapter starts.
*The j button is deactivated during playback of the final chapter.
i button j button
Playing the Previous or Next Titles
During playback, press the g button and the next title will be played.
During playback, press the h button and previous title will be played.
g button
h button
E-60
* During playback of the first title the h button is ineffective.
During playback of the final title the g button is ineffective.
Page 61

Playback
Index Writing and Index Search
Indexes are used to locate the beginning of specific positions when in the Playback mode. (Index search)
Viewing of index information (index No. and counter data) and index search can be performed on the INDEX MANAGER screen.
Writing Index
Chapter points registered during the Recording mode are used as index values.
When recording is executed with the INDEX CREATION item on the RECORDER MENU (2/2) screen set to AUTO, record start
points and recording pause points will be used as indexes.
Performing Index Search and Erasing Indexes
Index search and erasing of indexes can be performed upon starting up the INDEX MANAGER screen.
1. Starting up the INDEX MANAGER screen.
Press the SET UP button on the front panel when in the Playback mode (PLAY or STILL mode).
• The INDEX MANAGER screen will be displayed on the monitor.
* The INDEX MANAGER screen will not be displayed if the Top Menu or Menu of a finalized disc is currently displayed.
Title No. Display Area
Title Selection Buttons
q: Move to the previous title
A: Move 10 titles backwards
Displays the selected
title No..
Title Selection Buttons
r: Move to the next title
B: Move 10 titles forward
INDEX LIST Scroll Buttons
g: For scrolling the index
No. at the topmost part
of the INDEX LIST in the
descending direction.
h: For scrolling the index
No. at the bottommost
part of the INDEX LIST
in the ascending direction.
INDEX MANAGER
Title No
01
Index No Counter Data
0001:
0002:
0003:
0004:
0005:
0006:
0007:
0008:
0009:
0010:
INDEX LIST
Displays indexes of a selected title.
• When the PLAYBACK & 232C TYPE item
on the SYSTEM MENU (1/2) screen is set
to VTR, an index value as accumulated
from Title 1 will be displayed. (X Page 68)
00:05:00:00
00:05:00:01
00:05:00:02
00:05:00:03
00:05:00:04
00:05:00:05
00:05:00:06
00:05:00:07
00:05:00:08
00:05:00:09
0001
PLAY
ERASE
ALL ERS
Index No. Display Area
Displays the selected
index No..
For searching and playing
back a selected index.
For erasing a selected
index.
For erasing all indexes
in a selected title.
E-61
Page 62

Playback
Index Writing and Index Search (continued)
2. Selecting an index to search or erase.
Upon starting up the INDEX MANAGER screen, the title and index of the point for which its screen is called up will be
selected.
When selecting a title No.
1Press the cursor buttons (r/q/x/y) on the main unit to highlight the title selection buttons (r/q/B/A) on the INDEX
MANAGER screen.
2Press the SET button on the main unit to select the title No.. The title No. changes each time the SET button is pressed.
The selected title No. will be displayed on the Title No. Display Area.
When selecting an index No.
1Press the cursor buttons (r/q/x/y) on the main unit to move within the INDEX LIST and highlight a specific index No..
2Press the SET button on the main unit and the highlighted index No. will be selected.
• The selected index No. will be displayed on the Index No. Display Area.
* To scroll the INDEX LIST automatically, highlight the g /h buttons on the INDEX MANAGER screen, followed by
pressing the SET button on the main unit.
3. Performing index search.
1Press the cursor buttons (r/q/x/y) on the main unit to highlight the PLAY button on the INDEX MANAGER screen.
2Press the SET button on the main unit to execute index search.
• The unit will automatically search for the index position and play back accordingly.
• The INDEX MANAGER screen disappears.
4. Erasing indexes.
Select an index according to the procedure in 2. above.
1Press the cursor buttons (r/q/x/y) on the main unit to highlight the ERASE button on the INDEX MANAGER screen.
2Press the SET button on the main unit to display the confirmation dialog box.
3Once erase is executed via the confirmation dialog box, the selected index will be deleted.
• When doing so, an “INDEX ERASE” message will be displayed on the panel of the main unit as well as onscreen for
approximately 3 seconds.
• INDEX LIST on the INDEX MANAGER screen will be sorted.
When erasing all indexes in a title,
there is no need to select the indexes.
1Select the ALL ERS button on the INDEX MANAGER screen, followed by pressing the SET button on the main unit.
• A confirmation dialog box will be displayed.
2Once erase is executed via the confirmation dialog box, all indexes of the selected titles will be deleted.
5. Quitting the INDEX MANAGER screen.
Press the SET UP button on the main unit.
Note
Arrow keys (r/q/x/y) and the Enter key on the keyboard can also be used as a substitute to the cursor and SET buttons on
the main unit respectively.
E-62
Page 63

Setup Menu
Setting the Setup Menu
Settings made in the setup menus are stored in this DVD recorder ’s internal memory and will be retained even when the power is
turned off.
In addition to the buttons on the front panel, a keyboard can also be used to perform operations on these menus. The following
section, however, will describe operations performed using the front panel buttons.
Keyboard:Select using the arrow keys (x and y), and confirm the selection using the Enter key.
Settings
Cursor buttons
(M, N, L and K)
SET UP button
SET button
Setup Menu
DISC
INPUT SELECT
SYSTEM
DVD MENU
RECORDER
REMOTE
DISPLAY
CLOCK ADJUST
NETWORK
EXIT
RECORDER MENU (1/2) screen
RECORDER MENU (1/2)
MENU
CHAPTER CREATION
SET INTERVAL
AUTO CHAPTER (RECPAUSE)
ENCODE QUALITY
AUDIO ENCODE
RECORDER MENU (1/2)
MENU
CHAPTER CREATION
SET INTERVAL
AUTO CHAPTER (RECPAUSE)
ENCODE QUALITY
AUDIO ENCODE
MANUAL
Every05Min
ON
SP
DOLBY DIGITAL
MANUAL
AUTO
SP
DOLBY DIGITAL
Setup menu operations are carried out while monitoring the display on the monitor connected to the VIDEO LINE OUT or Y/C OUT terminal. In addition, setup
menu content also appears on the LCD display.
Stop the DVD recorder.
1. Open the Setup Menu screen.
To do this, press the SET UP button.
2. Open the setup menu in which settings are to be modified.
1Use the M and N buttons to select the required screen.
2Press the SET button.
* The EXIT option can be selected to return to the normal screen display.
3. Make the required settings in the setup menu.
1Use the M and N buttons to select the parameter to be set.
2Press the SET button.
• A list of setting values will appear.
3Use the M and N buttons to select the required value from the list and
then press the SET button.
• The setting value will be modified accordingly.
4Repeat steps 1 through 3 until all of the required settings have been
made.
To return to the Setup Menu, select MENU and press the SET button.
To move to the next menu screen, select the r button at the top of the current
screen and press the SET button.
To return to the original menu screen, select either MENU or BACK and press
the SET button.
4. Use either of the following methods to return to the normal screen dis-
play.
Press the SET UP button.
or
Select EXIT from the Setup Menu and press the SET button.
Note
When a CD-R/RW disc is inserted, only DISC MENU is displayed.
Setting list
E-63
Page 64

Setup Menu
Setup Menu Configuration
The Setup Menu screen is displayed on both the monitor and LCD display. As shown below, this screen is used to access this
DVD.
Setup Menu (X Page 65)
DISC
INPUT SELECT
SYSTEM
DVD MENU
RECORDER
REMOTE
DISPLAY
CLOCK ADJUST
NETWORK
EXIT
DISC MENU screen (XPage 66)
DISC MENU
MENU
FINALIZE
CANCEL DISC FINALIZATION
AUTO FINALIZE
AUTO CANCEL DISC FINALIZ.
(
QUICK
(
FULL
)
)
DISC ERASE
DISC ERASE
LAST TITLE ERASE
CANCEL
CANCEL
OFF
OFF
CANCEL
CANCEL
CANCEL
SYSTEM MENU (1/2) screen
(X Page 67)
SYSTEM MENU (1/2)
MENU
AUTO REW
SETUP
TEST SIGNAL
KEYBOARD STYLE
PLAYBACK & 232C TYPE
MODEL SELECT
TOTAL RECORDING TIME
ON
ON
OFF
ENGLISH
VTR
DEFAULT
5 Hour 30 Min
DVD MENU screen (XPage 71)
DVD MENU
MENU
EDIT MENU
STYLE
TITLE PATTERN
CHAPTER PATTERN
THUMBNAIL FORM
DVD MENU TYPE
DISC IN ACTION
TITLE END
DISABLE
TYPE1
1
1
NORMAL
TOP
TITLE
NEXT TITLE
RECORDER MENU (1/2)
screen (X Page 73)
RECORDER MENU (1/2)
MENU
CHAPTER CREATION
SET INTERVAL
AUTO CHAPTER (REC PAUSE)
ENCODE QUALITY
AUDIO ENCODE
MANUAL
Every05Min
ON
SP
DOLBY DIGITAL
INPUT SELECT MENU screen
(X Page 67)
INPUT SELECT MENU
MENU
INPUT SELECT
Y/C
SYSTEM MENU (2/2) screen
(X Page 69)
SYSTEM MENU (2/2)
BACK
AC IN MODE
SYNC SYSTEM
TV TYPE
VBID OUT(WIDE)
Y/C TERMINAL MODE
OPERATION LOCK
EE OUTPUT
DIGITAL STILL
PLAYBACK NAVIGATION
ON
AUTO
NTSC (U)
OFF
S1
OFF
THROUGH
FRAME
ON
RECORDER MENU (2/2) screen
(X Page 74)
RECORDER MENU (2/2)
BACK
AUDIO CHANNEL (DV)
AUDIO REC VOLUME MODE
ASPECT
INDEX CREATION
1,2ch 1,2ch
BOTH
AUTO
AUTO
REMOTE MENU (2/2) screen
(X Page 76)
REMOTE MENU (2/2)
BACK
232C FF/REW TYPE
232C SETUP MENU STATUS
232C MODE STATUS
232C BUSY STATUS
FF/REW
STOP
TARGET
NATIVE
E-64
REMOTE MENU (1/2)
screen (X Page 75)
REMOTE MENU (1/2)
MENU
REMOTE SELECT
FOOT SW1
FOOT SW2
232C BAUDRATE
232C PROTCOL TYPE
OFF
OFF
OFF
9600
TYPE1
CLOCK ADJUST MENU screen
X
Page 78)
(
CLOCK ADJUST MENU
MENU
DATE
TIME
04/12/04
10:00
DISPLAY MENU screen (XPage 77)
DISPLAY MENU
MENU
DISPLAY
TITLE/CHAPTER/INDEX
RECORDER MODE
TIME/DATE
REMAIN
DATE STYLE
LCD
ON
OFF
OFF
OFF
OFF
MM/DD/YY
TITLE+CHAPTER
NETWORK MENU screen (X Page 78)
NETWORK MENU
MENU
HOST NAME
IP ADDRESS SETTING
IP ADDRESS
SUBNET MASK
DEFAULT GATEWAY
MAC ADDRESS
bdx201m
STATIC
192.168.0.2
255..255.255.0
192.168.0.254
Page 65

Setup Menus
The following table identifies and describes the parameters that may be set using the Setup Menus.
Top half : Appearance on monitor screen
Bottom half : Appearance on LCD display
Option Description
DISC
dISC
INPUT SELECT
INPUT SEL
SYSTEM
SYSTEM
DVD MENU
dVd MENU
RECORDER
RECoRdER
REMOTE
REMoTE
DISPLAY
dISPLAY
CLOCK ADJUST
CLoCK
NETWORK
NETWoRK
EXIT
EXIT
This button opens a menu that allows settings to be made for finalizing and other similar disc processes.
This button opens a menu that allows input audio and video signals to be selected.
This button opens a SYSTEM MENU screen containing two different pages of parameters.
This button opens a menu that allows settings to be made for the DVD recorder itself.
This button opens a menu that allows settings to be made for title-menu and chapter-menu display styles.
This buttons opens a RECORDER MENU screen containing two different pages of parameters.
The RECORDER MENU (1/2) screen allows settings to be made for the chapter creation method and the encoding of
audio and video.
The RECORDER MENU (2/2) screen allows the settings required for recording to be made.
This button opens a REMOTE MENU screen containing two different pages of parameters.
This button opens a menu that allows settings to be made for remote operations via the DVD recorder’s FOOT SW, RS232C or DV terminal.
This button opens a menu that allows settings to be made for the display of status and alarm information on the TV or
monitor screen.
This button opens a menu that allows setting of the internal clock’s date and time.
This button opens a menu that allows network settings to be made for FOR SERVICE terminal usage.
This button is selected to return to the normal screen display.
Setup Menu
E-65
Page 66

Setup Menu
DISC MENU Screen
The following table identifies and describes the parameters that may be set using the DISC MENU screen.
Top half : Appearance on monitor screen
Bottom half : Appearance on LCD display
[ ] : Default setting
Parameter Possible settings Description
FINALIZE [CANCEL]
EXECUTE
FINAL [CAN]
EXE
CANCEL DISC
FINALIZATION
[CANCEL]
EXECUTE
CAN FIN [CAN]
EXE
AUTO FINALIZE [OFF]
ON
AFINAL [oFF]
oN
AUTO CANCEL
DISC FINALIZ.
[OFF]
ON
ACAN FI [oFF]
oN
DISC ERASE
(QUICK)
[CANCEL]
EXECUTE
q ERASE [CAN]
EXE
This parameter indicates whether or not the recorded disc is to be finalized. If a disc recorded
using this DVD recorder is to be played on a DVD player, it must first be finalized. Once finalizing
has been carried out, no addition recordings can be made on the disc.
CANCEL : Finalizing is not to be carried out.
EXECUTE : Finalizing is to be carried out.
* A maximum of 20 minutes will be required to complete finalizing.
Select whether to cancel the finalization of a finalized DVD-RW/DVD+RW. To add a recording
to a finalized DVD-RW/DVD+RW set to EXECUTE. A DVD-RW/DVD+RW finalized on another
machine cannot be canceled.
CANCEL : Do not cancel the finalization.
EXECUTE : Cancel the finalization. The TOP MENU created during finalization is deleted.
For selecting whether to finalize automatically when ejecting the recorded disc using the OPEN/
CLOSE button.
OFF : Do not finalize
ON : Finalize
* Finalization processes may take up to 20 minutes to complete.
* The disc will be ejected without being finalized if the EXIT item on the Title Menu
Edit screen is selected.
For selecting whether to cancel finalization automatically when a finalized DVD-RW/DVD+RW
disc is inserted. Set this to ON when recording additional data to a finalized DVD-RW/DVD+RW
disc.
Cancellation is not possible for DVD-RW/DVD+RW discs that are finalized using other devices.
OFF : Do not cancel finalization
ON : Cancel finalization
The Top Menu that has been created during the finalization process will also be
erased.
Select whether to do a quick erase on a DVD-RW/DVD+RW/CD-RW. A quick erase only deletes
the DVD-RW/DVD+RW/CD-RW disc control area. The time required is shorter than a full erase,
and the disc data is deleted.
CANCEL : Do not do a quick erase.
EXECUTE : Do a quick erase. The disc can be newly recorded from the beginning.
DISC ERASE
(FULL)
[CANCEL]
EXECUTE
F ERASE [CAN]
EXE
LAST TITLE
ERASE
[CANCEL]
EXECUTE
TERASE [CAN]
EXE
MENU
MENU
Note
FULL ERASE is required for new CD-RW.
Select whether to carry out a full erase on a DVD-RW/DVD+RW/CD-RW. All areas of a DVDRW/DVD+RW/CD-RW disc are deleted. If a disc is to be used repeatedly delete using this item.
CANCEL : Do not do a full erase.
EXECUTE : Do a full erase. The disc can be newly recorded from the beginning.
For selecting whether to erase the last title.
This can only be selected when an unfinalized DVD-R/DVD-RW/DVD+R/DVD+RW disc recorded using this unit is inserted.
CANCEL : Do not erase.
EXECUTE : The last title will be erased.
In the case of DVD-R/DVD+R, erasing a title will not create more disc space.
This button is used to return to the Setup Menu screen.
E-66
Page 67

Setup Menu
INPUT SELECT MENU Screen
The following table identifies and describes the parameters that may be set using the INPUT SELECT MENU screen.
Top half : Appearance on monitor screen
Bottom half : Appearance on LCD display
[ ] : Default setting
Parameter Possible settings Description
INPUT SELECT LINE
[Y/C]
DV
INPUT LINE
[Y/C]
dV
MENU
This parameter is used to select the audio and video input signals.
LINE : The composite video signal from the VIDEO LINE IN terminal and the analog au-
dio signals from the AUDIO IN terminals are to be used.
Y/C : The YC separate signal from the Y/C IN terminal and the analog audio signals from
the AUDIO IN terminals are to be used.
DV : The digital video and audio signals from the DV IN/OUT terminal are to be used.
* The front-panel indicator corresponding to the type of input signal selected on this screen will
light up or start to flash.
Setting of this parameter will not be possible when REMOTE SELECT from the REMOTE MENU
screen has been set to DV(SLAVE), or DV(TRIGGER). DV signals will be used for input at these
times.
This button is used to return to the Setup Menu screen.
MENU
SYSTEM MENU Screen
The following table identifies and describes the parameters that may be set using the SYSTEM MENU screen.
Top half : Appearance on monitor screen
Bottom half : Appearance on LCD display
[ ] : Default setting
SYSTEM MENU (1/2) screen
Parameter Possible settings Description
AUTO REW OFF
[ON]
ON-QUICK
A REW oFF
[oN]
oN-q
SETUP [OFF]
ON
SETUP [oFF]
oN
TEST SIGNAL [OFF]
ON
TEST S [oFF]
oN
KEYBOARD
STYLE
[ENGLISH]
FRENCH
ITALIAN
GERMAN
SPANISH
JAPANESE
KboARd [ENG]
FRN
ITL
GER
ESP
JPN
This parameter is used to select whether to use the AUTO REW function.
AUTO REW function: When playback reaches the end position of the last title, the stop position
is the beginning of the first title.
* This item is only enabled if PLAYBACK & 232C of the SYSTEM MENU (1/2) screen is set to VTR.
* This item is only enabled when using a disc that has not been finalized or when PLAYBACK NAV-
IGATION of the SYSTEM MENU (2/2) screen is set to OFF.
OFF : The AUTO REW function is disabled. When playback reaches the end position of
the last title, the stop position is three seconds prior to the end position.
ON : The AUTO REW function is enabled. When this setting is set, the counter is re-
turned to the initial indication in the same manner as if the rewind operation was
performed for a VTR.
ON-QUICK : The AUTO REW function is enabled.
This parameter is used to indicate whether or not a setup signal is to be added to analog video
(i.e., composite or YC separate) during the recording process. The actual setting depends on
whether the input analog signal contains a setup signal. (NTSC only)
OFF : This setting should be made when the input analog signal does not contain a setup
signal.
ON : This setting should be made when the input analog signal contains a setup signal.
This parameter is used to indicate whether or not the color bar output by the DVD recorder’s
internal signal generator is to be displayed.
OFF : The color bar is not displayed and video from the VIDEO LINE IN terminal is output
to the monitor.
ON : The color bar is displayed. Use this setting when the color bar is to be recorded.
This parameter is set when using a USB keyboard, and its purpose is to indicate the keyboard’s
layout (or language) as one of the following.
ENGLISH
FRENCH
ITALIAN
GERMAN
SPANISH
JAPANESE
Note
The system must be restarted after this parameter is changed.
E-67
Page 68

Setup Menu
SYSTEM MENU Screen (continued)
Parameter Possible settings Description
PLAYBACK
&232C TYPE
DVD
[VTR]
232C dVd
[VTR]
Playback
Playback till end point of the last title.
Index Search Accepts index of points that exist in the
STOP Operation in Stop Mode
(Unfinalized Discs)
LCD / Onscreen
Elapsed Time Display of a Title Displays total time as accumulated
Index Value Display Displays total number as accumulated
For selecting whether to set DVD playback actions and display of a title’s elapsed time /index
number to the VTR or DVD mode. Actions via RS-232C control will vary accordingly with this
setting. Please see the following table for details.
Action When Set to VTR When Set to DVD
Performs the operation set for AUTO
REW. (X Page 67)
disc.
Resume data will not be cleared. Resume data will be cleared.
from the first title.
from the first title. [Range: 0 - 9801]
Searches and stops at the beginning of
the last title.
Accepts index of points that exist in the
current title.
Searches and stops at the beginning of
the last title.
Displays elapsed time of the current title.
Displays index value of the current title.
[Range: 0 - 99]
MODEL SELECT [G60 ADVANCED]
IRIS
G40+
CV70
CYPRESS
G40
ANTARES
SEQUOIA
DEFAULT
ModEL [G60A]
IRIS
G40+
CV70
CYPR
G40
ANTA
SEqU
dEF
TOTAL RECORDING
—
TIME
——
r
SYS2
MENU
MENU
Enables you to switch to the optimal menu settings, picture quality, and operation specifications
for the SIEMENS model.
Set this setting in accordance with the model connected.
This button displays the total time for recording and erasing operations. (xHour xxMin)
This button is used to display the SYSTEM MENU (2/2) screen.
This button is used to return to the Setup Menu screen.
E-68
Page 69

SYSTEM MENU (2/2) screen
Parameter Possible settings Description
AC IN MODE [POWER ON]
POWER OFF
AC [oN]
oFF
SYNC SYSTEM [AUTO]
INTERNAL
SYNC [AUTo]
For selecting whether to start up in the Operate ON or OFF mode when the MAIN POWER
switch at the rear of this unit is turned ON.
POWER ON : Start up in Operate ON mode
POWER OFF: Start up in Operate OFF mode
For selecting the synchronization method for this unit.
AUTO : Switches automatically between internal and external synchronization
INTERNAL : Set to internal synchronization
INTE
TV TYPE
[NTSC (U)]
NTSC (I)
PAL
For selecting the signal system during recording and playback.
NTSC (U) : When recording/playing back in the NTSC mode (for USA)
NTSC (I) : When recording/playing back in the NTSC mode (for Japan)
PAL : When recording/playing back in the PAL mode
Setup Menu
TV [NTU]
NTI
PAL
VBID OUT (WIDE) [OFF]
ON
Vbid [oFF]
oN
Y/C TERMINAL
MODE
[S1]
S2
Y C TM [S1]
S2
OPERATION
LOCK
[OFF]
ON
oPLoCK [oFF]
oN
This unit will automatically be rebooted when this setting is changed.
Upon reboot, all menu items except the date/time data and hour meter will be restored to their
default values.
For selecting whether to add the JCPX-1204 standard-compliant VBID (Video Blanking ID) signals to the analog video signals output from this unit. (NTSC only)
OFF : Do not add VBID signals (Copyguard signals will be added.)
ON : Add VBID signals
This parameter is used to set the specification for the DVD recorder’s VIDEO Y/C INPUT and
OUTPUT terminal in order to enable the recording of wide-screen discrimination signals.
S1 : S1 terminal mode is to be adopted. A discrimination signal for normal video with a
4:3 aspect ratio and squeezed video is to be recorded.
S2 : S2 terminal mode is to be adopted. A discrimination signal for normal video with a
4:3 aspect ratio, squeezed video, and letterbox video is to be recorded.
Squeezed video: 16:9 wide-screen content with the left and right sides compressed for nor-
mal aspect screens.
Letterbox video : Content with the top and bottom of the screen blackened out.
For selecting whether to enable operation lock.
OFF : Operation lock turns OFF and all operation buttons on the main unit are enabled
ON : Operation lock turns ON and operation buttons on the main unit are disabled
However, the CLOSE/OPEN, SET UP, SET and cursor buttons will not be disabled.
E-69
Page 70

Setup Menu
SYSTEM MENU Screen (continued)
SYSTEM MENU (2/2) Screen (continued)
Parameter Possible settings Description
EE OUTPUT [THROUGH]
MUTING
EE oUT [THR]
MUT
DIGITAL STILL OFF
[FRAME]
1st
2nd
STILL oFF
[FRM]
1ST
2Nd
PLAYBACK
NAVIGATION
OFF
[ON]
NAVI oFF
[oN]
BACK
bACK
This parameter is used to select whether to output E-E images from the VIDEO OUT terminal
when in Stop or Recording mode.
THROUGH : Outputs E-E images.
MUTING : Outputs black images. Set this setting when you want to prevent a loop connection
being used when connected to ultrasound diagnostic equipment.
* The on-screen display is output for any of these settings.
This parameter is used to select whether to use the frame memory of the DVD recorder to set
digital still mode when the DVD recorder enters Still mode.
OFF : The frame memory of the DVD recorder is not used.
FRAME : The frame memory of the DVD recorder is used for outputting the frame still image.
1st : The frame memory of the DVD recorder is used for outputting the 1st field still im-
age.
2nd : The frame memory of the DVD recorder is used for outputting the 2nd field still im-
age.
This parameter is used to select whether to use the navigator function when playing back a disc
that has been finalized by the DVD recorder.
OFF : The navigator function is not used. Operation is performed in the same manner as
during playback of an unfinalized disc.
ON : The navigator function is used. Operation is performed in accordance with the set-
ting of TITLE END of the DVD MENU screen.
Returns to the SYSTEM MENU (1/2) Screen.
E-70
Page 71

DVD MENU Screen
The following table identifies and describes the parameters that may be set using the DVD MENU screen.
Top half : Appearance on monitor screen
Bottom half : Appearance on LCD display
[ ] : Default setting
Parameter Possible settings Description
EDIT MENU ENABLE
[DISABLE]
EdIT oN
[oFF]
STYLE [TYPE1]
TYPE2
TYPE3
TYPE4
TYPE5
TYPE6
TYPE7
TYPE8
BACK
STYLE [T1]
T2
T3
T4
T5
T6
T7
T8
bACK
TITLE PATTERN
[1] to 6
BACK
TITL P [1] to 6
bACK
CHAPTER
PATTERN
[1] to 6
BACK
CHAP P [1] to 6
bACK
THUMBNAIL
FORM
[NORMAL]
V-CUT
H-CUT
V+H CUT
THUMb [NoR]
VCUT
HCUT
V+H
This parameter is used to indicate whether or not a screen for editing the title and chapter menus
is to be displayed when title closing or finalizing is performed.
ENABLE : The menu editing screen is to be displayed. Upon title closing, the THUMBNAIL
EDIT screen will be displayed for the corresponding chapter menu. (X Page 47)
Upon finalizing, the TITLE MENU EDIT screen will be displayed for the title menu.
(X Page 53)
DISABLE : The menu editing screen is not to be displayed.
This parameter is used to select one of the eight different display styles that have been provided
for title and chapter menus. (X Page 36)
BACK : Returns to the DVD MENU screen.
Default settings
TYPE TITLE PATTERN CHAPTER PATTERN
1 1 1
2 2 2
3 3 3
4 4 4
5 5 5
6 1 1
7 2 2
8 3 3
This parameter is used to open the TITLE PATTERN screen.
That screen can then be used to select a display pattern for the title menu.
BACK : Returns to the DVD MENU screen.
* 6 cannot be selected when setting for factory shipment.
This parameter is used to open the CHAPTER PATTERN screen.
That screen can then be used to select a display pattern for the chapter menus.
BACK : Returns to the DVD MENU screen.
* 6 cannot be selected when setting for factory shipment.
Thumbnail creation method for chapter and title menus during wide-signal recording is selected.
NORMAL : The input signal is to be converted into thumbnails without modification. If the input
video has an aspect ratio of 4:3, the corresponding thumbnails are also to have
this aspect ratio.
V-CUT : In this case, the top and bottom of the video content is to be removed to form
thumbnails.
H-CUT : In this case, the left and right of the video content is to be removed to form thumb-
nails. (SQUEEZE)
V+H CUT : In this case, the top, bottom, left, and right of the video content is to be removed
to form thumbnails. (LETTER BOX)
Setup Menu
E-71
Page 72

Setup Menu
DVD MENU Screen (continued)
Parameter Possible settings Description
DVD MENU TYPE TOP+MENU
[TOP]
NONE
MENU T T+M
[ToP]
NoNE
DISC IN ACTION MENU
[TITLE]
dISC IN MENU
[TITL]
TITLE END
MENU
REPEAT
STOP
[NEXT TITLE]
TI ENd MENU
REPT
SToP
[NEXT]
MENU
MENU
Select whether to create a TOP MENU or MENU in a completed disc (finalized disc).
This is set before inserting a disc or when a blank disc is inserted.
TOP+MENU : When finalizing a TOP MENU is created.
When closing a title a MENU is created.
TOP : When finalizing a TOP MENU is created.
When closing a title a MENU is not created.
NONE : Neither a TOP MENU nor a MENU is created. The disc will be without a menu.
Select the action when a completed disc (finalized disc) is inserted into a DVD player.
This is set before inserting a disc or when a blank disc is inserted.
MENU : Displays the TOP MENU (title menu)
TITLE : Starts to playback TITLE1
Select the action to be taken when playback within a title of a completed disc (finalized disc) is
finished. This is set before inserting a disc or when a blank disc is inserted.
MENU : Display the TOP MENU (title menu)
REPEAT : Repeat playback within a title.
STOP : Enter stop mode. The TOP MENU is not displayed.
NEXT TITLE : Start to playback the next title. In the case of playback of the final title, start to
playback the first title.
This button is used to return to the Setup Menu screen.
Notes
• Settings on this page will change accordingly with the disc information when a recorded disc is loaded.
• The items on this page are applied when a finalized disc is used in a DVD player.
Additionally, if the PLAYBACK NAVIGATION of the SYSTEM MENU (2/2) screen is set to ON, the TITLE END item is enabled
when a finalized disc is played back with this machine.
E-72
Page 73

RECORDER MENU Screen
The following table identifies and describes the parameters that may be set using the RECORDER screen.
Top half : Appearance on monitor screen
Bottom half : Appearance on LCD display
[ ] : Default setting
RECORDER MENU (1/2) screen
Parameter Possible settings Description
CHAPTER
CREATION
[MANUAL]
AUTO
CHAPTR [MANU]
AUTo
SET INTERVAL Every01min
z
[Every05min]
z
Every59min
INTERV 1
z
[5]
z
59
AUTO CHAPTER
(REC PAUSE)
OFF
[ON]
ATCHAP oFF
[oN]
ENCODE
QUALITY
UXP (NOT DVD
VIDEO)
XP
[SP]
LP
EP
DLP
DEP
qUALTY UXP
XP
[SP]
LP
EP
dLP
dEP
AUDIO ENCODE NO AUDIO
LPCM
[DOLBY DIGITAL]
MPEG
A ENC oFF
LPCM
[dd]
MPEG
r
REC2
MENU
MENU
This parameter is used to indicate whether or not chapters are to be created automatically at set
intervals while recording.
MANUAL : Chapters are not to be created automatically.
AUTO : Chapters are to be created at set intervals during recording.
This parameter becomes active whenever CHAPTER CREATION has been set to AUTO.
It is used to set the time interval for automatic chapter creation and is set in units of minutes.
Select whether to automatically insert a chapter mark during a recording pause.
OFF : Do not insert a chapter mark.
ON : Insert a chapter mark.
For setting the recording quality. Recording quality and time vary with the set values as follows:
(When using a 4.7 GB disc)
UXP
(NOT DVD VIDEO)
XP 60 mins
SP 120 mins
LP 180 mins
EP 240 mins
DLP 360 mins Low
DEP 480 mins
* Only UXP, XP or SP can be selected when the AUDIO ENCODE item is set to LPCM.
This parameter is used to set the encoding format for audio data.
NO AUDIO : Do not record audio sound. The recording time will be longer as sound re-
LPCM : Linear PCM encoding (Non-compressed)
DOLBY DIGITAL : Dolby AC3 encoding (Compressed)
MPEG : MPEG encoding (Compressed)
Use this setting when chapters are to be set manually.
The SET INTERVAL parameter below is used to specify this interval.
Set Value Recording Time Picture Quality Upload Size
40 mins High
x
Normal
y
y
cording is not performed.
D1 : NTSC = 720 × 480 dots
HalfD1: NTSC = 352 × 480 dots
Notes
• Only UXP, XP or SP on the ENCODE QUALITY item can be selected when the
AUDIO QUALITY item is set to LPCM.
• The MPEG set values can be displayed and selected when the TV TYPE item on
the SYSTEM MENU (2/2) screen is set to PAL.
This button is used to display the RECORDER MENU (2/2) screen.
This button is used to return to the Setup Menu screen.
Setup Menu
PAL = 720 × 576 dots
PAL = 352 × 576 dots
E-73
Page 74

Setup Menu
RECORDER MENU Screen (continued)
RECORDER MENU (2/2) screen
Parameter Possible settings Description
AUDIO CHANNEL
(DV)
[1,2ch r 1,2ch]
3,4ch r 1,2ch
dV CH [1 2]
3 4
AUDIO REC
VOLUME MODE
[BOTH]
INDEPENDENCE
VRModE [boTH]
INdE
ASPECT [AUTO]
4:3
LETTER
SQUEEZE
ASPECT [AUTo]
4 3
LETT
SqUE
INDEX CREATION MANUAL
[AUTO]
INdEX MANU
[AUTo]
BACK
bACK
This parameter is to be set when recording an audio signal from the DV IN/OUT terminal.
Specifically, it indicates whether the signals from channels 1 and 2 or from channels 3 and 4 are
to be recorded. (Only available for 32 kHz)
1,2ch r 1,2ch : Channels 1 and 2 are to be recorded.
3,4ch r 1,2ch : Channels 3 and 4 are to be recorded.
This parameter is used to select the method for adjustment of audio recording levels. Specifically, both channels can be adjusted while maintaining the same level, or each channel can be adjusted independently.
BOTH : Both channels are to be adjusted while maintaining the same level.
INDEPENDENCE : Both channels are to be adjusted independently.
The screen aspect distinction signal of recorded video is selected.
AUTO : Aspect distinction signal is recorded according to the screen aspect ratio of
the input video.
4:3 : Constantly records aspect distinction signal of 4:3 aspect ratio.
LETTER : Constantly records aspect distinction signal of letterbox video. (Content at
the top and bottom of the screen is blackened out.)
SQUEEZE : Constantly records aspect distinction signal of squeezed video. (Content at
the left and right of the screen is compressed.)
Note
Setting this item to LETTER or SQUEEZE will not change the output image during
recording and is reflected only in the recording to the disc.
For selecting whether to insert indexes automatically at record start points and recording pause
point.
MANUAL : Index will not be automatically inserted.
AUTO : Index automatically inserted.
Note
The writing of index at the recording pause point is valid when the AUTO CHAPTER (REC PAUSE) item is set to ON.
This button is used to return to the RECORDER MENU (1/2) screen.
E-74
Page 75

Setup Menu
REMOTE MENU Screen
The following table identifies and describes the parameters that may be set using the REMOTE MENU screen.
Top half : Appearance on monitor screen
Bottom half : Appearance on LCD display
[ ] : Default setting
REMOTE MENU (1/2) screen
Parameter Possible settings Description
REMOTE SELECT [OFF]
DV(SLAVE)
DV(TRIGGER)
REMoTE [oFF]
dVS
dVT
FOOT SW1 [OFF]
LOW EDGE
HIGH EDGE
LOW LEVEL
FSW1 [oFF]
LE
HE
LL
FOOT SW2 [OFF]
LOW EDGE
HIGH EDGE
BOTH EDGE
FSW2 [oFF]
LE
HE
bE
232C BAUDRATE [9600]
19200
bPS [96]
192
232C
PROTCOL TYPE
[TYPE1]
to
TYPE8
232C [T1]
to
T8
r
REM2
MENU
MENU
This parameter is used to select a method for controlling external devices connected via the DV
IN/OUT terminal.
OFF : Control is not to be carried out via the DV IN/OUT terminal. This is the stan-
dard setting for normal operation.
DV (SLAVE) : This DVD recorder will become the slave device and will be controlled by
the master device.
DV(TRIGGER) : This setting is made when this DVD recorder is connected to a DV camera
featuring a DV record triggering function, and it allows this DVD recorder to
record video from the camera in response to operation of its trigger button.
Set this item when connecting an external switch (foot switch, etc.) to the FOOT SW1 terminal.
OFF : Set to this when an external switch is not used
LOW EDGE : Switch between recording and record pause actions using the low edge of
external switch signals.
HIGH EDGE : Switch between recording and record pause actions using the high edge of
external switch signals.
LOW LEVEL : Use the low level and high level of external switch signals for recording and
record pause respectively.
Set this item when connecting an external switch (foot switch, etc.) to the FOOT SW2 terminal.
OFF : Set to this when an external switch is not used
LOW EDGE : Add chapter marks and indexes using the low edge of external switch sig-
nals. Also, capture still images (JPEG) to the internal memory of the DVD
recorder.
HIGH EDGE : Add chapter marks and indexes using the high edge of external switch sig-
nals. Also, capture still images (JPEG) to the internal memory of the DVD
recorder.
BOTH EDGE : Add chapter marks and indexes using the low and high edges of external
switch signals. Also, capture still images (JPEG) to the internal memory of
the DVD recorder.
For setting the communication speed of the RS-232C terminal.
9600 : Communicate at a rate of 9600 bps
19200 : Communicate at a rate of 19200 bps
This item does not work for the DVD recorder.
This button is used to display the REMOTE MENU (2/2) screen.
This button is used to return to the Setup Menu screen.
E-75
Page 76

Setup Menu
REMOTE MENU Screen (continued)
REMOTE MENU (2/2) screen
Parameter Possible settings Description
232C FF/REW
TYPE
[SEARCH]
FF/REW
TITLE SKIP
CHAPTER SKIP
FF [SRCH]
FF
TT
CHAP
232C SETUP
MENU STATUS
[STOP]
PLAY
MN STS [StoP]
PLAy
232C MODE
STATUS
REAL
[TARGET]
ModE REAL
[TRGT]
232C BUSY
STATUS
[NATIVE]
STOP
PLAY
CASSETTE OUT
bUSy [NATI]
SToP
PLAy
Cout
BACK
bACK
This parameter is used to select the operation to perform when an RS-232C FF/REW command
is received.
SEARCH : A search operation is performed.
FF/REW : Fast-forwards or rewinds only the counter indication.
TITLE SKIP : Jumps to the previous or next title.
CHAPTER SKIP : Jumps to the previous or next chapter.
This parameter is used to select the RS-232C status to return to the connected device when the
Setup Menu screen is displayed.
STOP : Stop status
PLAY : Play status
This parameter is used to select whether to return the RS-232C status in the current mode or
the target mode.
REAL : Current mode
TARGET : Target mode
This parameter is used to select the RS-232C status to return to the connected device when the
DVD recorder is busy.
NATIVE : Previous mode
STOP : Stop status
PLAY : Play status
CASSETTE OUT : No disc status
Returns to the REMOTE MENU (1/2) Screen.
E-76
Page 77

DISPLAY MENU Screen
The following table identifies and describes the parameters that may be set using the DISPLAY screen.
Top half : Appearance on monitor screen
Bottom half : Appearance on LCD display
[ ] : Default setting
Parameter Possible settings Description
DISPLAY OFF
[ON]
dISPLY oFF
[oN]
TITLE/CHAPTER/
INDEX
[OFF]
TITLE+CHAPTER
INDEX+TITLE
TITLE [oFF]
T+C
I+T
RECORDER
MODE
[OFF]
ON
ModE [oFF]
oN
TIME/DATE [OFF]
DATE
TIME
TIME+DATE
dATE [oFF]
dATE
TIME
T+d
REMAIN [OFF]
ON
REMAIN [oFF]
oN
DATE STYLE YY/MM/DD
[MM/DD/YY]
DD/MM/YY
dSTYLE YMd
[MdY]
dMY
LCD
[TITLE+CHAPTER]
INDEX
LCd [T+C]
INd
MENU
MENU
This parameter is used to indicate whether or not status and alarm information is to be displayed
on the monitor screen.
OFF : No such data is to be displayed on-screen.
ON : Data is to be displayed on-screen.
When this parameter has been set to ON, the following parameters can be
used to indicate which types of status information will be displayed
For selecting whether to display the title/chapter/index information of a DVD disc onscreen during recording or playback.
OFF : Do not display onscreen
TITLE+CHAPTER: Display title and chapter onscreen
INDEX+TITLE : Display index and title onscreen
These will not be displayed onscreen when the DISPLAY menu item is set to OFF.
This parameter is used to indicate whether or not the DVD recorder’s current status is to be displayed on-screen.
OFF : The status is not to be displayed on-screen.
ON : The status is to be displayed on-screen. Note, however, that nothing will be
displayed when OFF has been set for the DISPLAY parameter.
This parameter is used to indicate whether or not the current date and/or time are to be displayed
on-screen.
OFF : No such information is to be displayed on-screen.
DATE : Only the date is to be displayed.
TIME : Only the time is to be displayed.
TIME+DATE : Both date and time are to be displayed.
• When the DVD recorder is stopped or recording, data from the internal clock is displayed.
When playing a disc, the date and time of disc recording are displayed.
• Even if DATE, TIME, or DATE+TIME have been selected, nothing will be displayed when OFF
has been set for the DISPLAY parameter.
This parameter is used to indicate whether or not the disc’s remaining time (in minutes) is to be
displayed on-screen.
OFF : No such data is to be displayed on-screen.
ON : This data is to be displayed on-screen.
• During recording, the remaining space available for recording is displayed (in minutes).
During playback, the time remaining in the current title is displayed.
• Nothing will be displayed when OFF has been set for the DISPLAY parameter.
Note
The remaining space available for recording will depend on factors such as the
number of titles recorded and the data encoding method; accordingly, this value
should be treated as an estimate and not as an exact value.
This parameter is used to select the display style for dates.
YY/MM/DD : Dates are to be displayed in year, month, and day sequence.
MM/DD/YY : Dates are to be displayed in month, day, and year sequence.
DD/MM/YY : Dates are to be displayed in day, month, and year sequence.
Default Setting : MM/DD/YY (NTSC)
DD/MM/YY (PAL)
For selecting the DVD disc information to display (title/chapter/index) on the LCD during recording or playback.
TITLE+CHAPTER: Display title and chapter on LCD
INDEX : Display index on LCD
This button is used to return to the Setup Menu screen.
Setup Menu
E-77
Page 78
Setup Menu
CLOCK ADJUST MENU Screen
The following table identifies and describes the parameters that may be set using the CLOCK ADJUST MENU screen.
Top half : Appearance on monitor screen
Bottom half : Appearance on LCD display
[ ] : Default setting
Parameter Possible settings Description
DATE
dATE
TIME
This parameter is used to set the date.
This parameter is used to set the time.
For more details regarding date and time settings, refer to page 25.
TIME
MENU
This button is used to return to the Setup Menu screen.
MENU
NETWORK MENU Screen
The following table identifies and describes the parameters that may be set using the NETWORK MENU screen.
Top half : Appearance on monitor screen
Bottom half : Appearance on LCD display
[ ] : Default setting
Parameter Possible settings Description
HOST NAME
[bdx201m]
CANCEL
HoST
IP ADDRESS
IP Add
SUBNET MASK
SUbNET
DEFAULT
[192.168.0.2]
[192]
[255.255.255.0]
[255]
[192.168.0.254]
GATEWAY
GATE
[192]
MENU
MENU
* The IP ADDRESS SETTING item cannot be selected.
This parameter is used to enter this DVD recorder’s network name using a keyboard.
The name cannot be input from this DVD recorder.
(Names may be up to 20 characters in length. Alphanumerical characters and hyphen (-))
CANCEL : Cancel setting the host name.
This parameter is used to set the IP address. It is important to ensure that no two devices on a
single network share the same IP address.
This parameter is used to set the subnet mask. Connected DVD recorders should have the
same network setting.
This parameter is used to set the gateway address. Connected DVD recorders should have the
same address.
This button is used to return to the Setup Menu screen.
E-78
Page 79

Others
Easymenu: Freeware for Editing Menu Templates
The freeware application Easymenu can be used to create original DVD menus on your PC.
Menu templates created with this application can then be transferred to this DVD recorder using a network cable, thus allowing
you to make imaginative and creative DVDs with the minimum of effort.
Easymenu can be downloaded from the following web page. Please refer to the software manual for details regarding usage and
precautions.
http://www.jvc-victor.co.jp/english/pro/prodv/
Create menu patterns on your PC Transfer the patterns via a network
Main Specifications (Please refer to the above-mentioned home page for the most up-to-date information.)
OS : Windows XP
Properties set : Thumbnail number, size, and position; background image (per page), and chapter comments.
Thumbnail highlighting format and color; navigation button design and layout.
Readable image files : BMP and JPEG
Layout size : 720 × 480 (NTSC)
720 × 576 (PAL)
Importing a Template Using “EasyMenu”
THUMBNAIL EDIT START screen
THUMBNAIL EDIT
TITLE CLOSE
AAA2BBB3CCC
1
DDD5EEE6FFF
4
CHAPTER MENU TEXT LOAD TEMP LOAD
1.
THUMBNAIL EDIT
TITLE CLOSE
AAA2BBB3CCC
1
DDD5EEE6FFF
4
CHAPTER MENU TEXT LOAD
TEMP LOAD
FTP STOP
2.
1 - 6
TEMP LOAD
FTP STOP
1 - 6
In stop mode, the template can always be imported from the EasyMenu software.
In addition, by using the thumbnail edit start screen, the import is also possible
with the following procedures.
1. Select the TEMP LOAD item on the thumbnail edit start screen, and
press the SET button.
• Below the TEMP LOAD item “FTP STOP” is displayed.
In this state it is possible to import a template using the “EasyMenu” menu
template edit software.
2. When importing the template is finished, press the SET button and the
“FTP STOP” display will disappear.
E-79
Page 80

Others
Changing the Signal System (NTSC / PAL)
This DVD recorder supports both the NTSC and PAL signal systems.
The signal system can be altered at the TV TYPE item on the SYSTEM(2/2) menu screen, or via the following procedure.
The signal system can be changed even when the monitor is not connected.
Operation Procedure
1. Set this unit to the Stop mode.
2. Press and hold the SETUP and STOP buttons simultaneously for approximately 3 seconds.
• This changes the signal system. When this is done, the unit will turn off automatically and rebooted.
E-80
This product uses partial third-party software.
For information concerning the software used, login via FTP by inputting the following into
the unit and view the readme.txt file:
User: anonymous
Password: None
(If the IP address of the unit is set to 192.168.0.2, FTP connection can be established by
entering ftp://196.168.0.2 in the address bar of Internet Explorer.)
Page 81

Information for Users on Disposal of Old Equipment
(Business users)
If you wish to dispose of this product, please visit our web
to obtain information about the
Attention:
This symbol is only valid in the European
Union.
[European Union]
This symbol indicates that the electrical and electronic equipment should not be disposed as general household waste at
its end-of-life. Instead, the product should be handed over to
the applicable collection point for the recycling of electrical
and electronic equipment for proper treatment, recovery and
recycling in accordance with your national legislation.
By disposing of this product correctly, you will help to conserve natural resources and will help prevent potential negative effects on the environment and human health which could
otherwise be caused by inappropriate waste handling of this
product. For more information about collection point and recycling of this product, please contact your local municipal
office, your household waste disposal service or the shop
where you purchased the product.
Penalties may be applicable for incorrect disposal of this
waste, in accordance with national legislation.
page www.jvc-europe.com
take-back of the product.
[Other Countries outside the European Union]
If you wish to dispose of this product, please do so in accordance with applicable national legislation or other rules in
your country for the treatment of old electrical and electronic
equipment.
Others
E-81
Page 82

Others
SDSP3
SDSP3
Specifications
Recording format : DVD Video Version 1.1
Disc format : ISO9660-compatible UDF
Recordable media : DVD-R For General Version 2.0
DVD-RW Version 1.1
DVD+R/DVD+RW
CD-R/CD-RW (JPEG only)
Recording signals : Must conform to DVD Video Format
Video Signals
Line input : 1.0 V(p-p), 75 Ω unbalanced
Y/C input :
Y signal = 1.0 V(p-p), 75 Ω unbalanced
C signal = 0.286 V(p-p), 75 Ω unbalanced (NTSC)
C signal =0.3 V (p-p), 75 Ω unbalanced (PAL)
Line output : 1.0 V(p-p), 75 Ω unbalanced
Y/C output :
Y signal = 1.0 V(p-p), 75 Ω unbalanced
C signal = 0.286 V(p-p), 75 Ω unbalanced (NTSC)
C signal = 0.3 V(p-p), 75 Ω unbalanced (PAL)
Encoding format : ISO/IEC13818-2 (MPEG-2 video)
Quantization : 8 bit
Sampling rate : 13.5 MHz
Audio Signals
Line input : –8 dBs, 10 kΩ minimum, unbalanced
+4 dBs, high impedance, unbalanced
Line output : –8 dBs, 1 kΩ minimum, unbalanced
Standard level : –20 dBFS
Dynamic range : 85 dB
Recording format :
LPCM / DOLBY DIGITAL / MPEG (PAL only)
Quantization : 16 bit
Sampling rate : 48 kHz
Number of channels : 2
DV Interface
I/O : IEEE1394
General
FOOT SWITCH terminal
: 3.5 mm Monaural mini jack
(OPEN/SHORT control Operation follows menu settings.)
Network terminal : RJ-45 (Category 5),
100 BASE-Tx
USB terminal : USB 1.1 × 2
Power supply : AC 120V to 240 V C, 50 Hz / 60 Hz
Power consumption : 1.0 A to 0.45 A
Weight : 4.8 d (device only)
Dimensions :
212 mm (w) × 352 mm (d) × 88 mm (h)
(not including feet and other protrusions)
Permissible operating temperature : 5 °C to 35 °C
Permissible operating humidity : 20% to 80% RH
Permissible storage temperature : –20 °C to 60 °C
Permissible storage humidity : 5% to 80% RH
Accessories
CD-ROM (Instruction manual) .............................................×1
Quick reference guide..........................................................×1
Safety precaution.................................................................×1
Power cord (For Continental Europe, etc.: 2.5 m) ...............×1
Power cord (For USA: 2.4 m) ..............................................×1
Ferrite core (for USB cable).................................................×1
(X Page 24)
External Dimensions (Unit: mm)
OPERATE
AUDIO
CH1
CH2
PHONES REV
352
20
212
BUSY
OPEN/CLOSE
TOP
MENU MENU
OPTION DV Y/C LINE
SET
SET UP
DVD R ECORDE R
BD-X201M
TITLE
CHAPTER
DOLBY DIGITAL
LPCMMPEG
STOP PLAY
FWD PAUSE REC
88
6.5
E-82
* Design and specifications are subject to change without notice.
Page 83

© 2006 Victor Company of Japan, Limited
LST0373-001A
Page 84

DVD-RECORDER
G
BD-X201MS
BEDIENUNGS-
ANLEITUNG
Vielen Dank, dass Sie dieses JVC-Produkt erworben haben.
Bevor Sie dieses Gerät in Betrieb nehmen, lesen Sie diese
Bedienungsanleitung sorgfältig durch, um eine optimale
Leistung zu gewährleisten.
LST0373-001A
Page 85

Vielen Dank, dass Sie diesen
DVD-Recorder erworben haben.
Wichtigste Funktionen
• Aufnahme von DVD-Rs/DVD-RWs (nur Videomodus) und
DVD+Rs/DVD+RWs (Konformität mit Videomodus).
• Als Video-Eingangssignale werden Composite-Video-, sepa-
rate Y/C- und DV-Signale unterstützt; daneben werden Analog- und DV-Signale als Audio-Eingangssignale unterstützt.
• Die Titel- und Kapitelmenüs können entweder automatisch
oder manuell erstellt werden.
• NTSC/PAL wählbar
• Dualmodus-Fußschalteranschluss verfügbar.
Über den externen Schalter kann die Aufnahme ein- und ausgeschaltet werden. Außerdem können Kapitel-/Indexmarken
eingefügt werden.
• Ausgestattet mit einer Indexsuchfunktion.
Dient zur automatischen Wiedergabe beim Auffinden einer
bestimmten Indexposition.
• Ausgestattet mit einer JPEG-Erfassungsfunktion.
Dient zum Erfassen von DVD-Wiedergabebildern und deren
Aufnahme als JPEG-Dateien auf eine DVD-Disc. Eingegebene Bilder können ebenfalls erfasst und als JPEG-Dateien
auf eine CD-R/RW aufgenommen werden.
Marken und Urheberrechte
• , Dolby und das doppelte D-Symbol sind Marken
von Dolby Laboratories.
• Das Kopieren, Senden, Aufführen oder der Verleih von
urheberrechtlich geschütztem Material ohne Zustimmung
seitens des Urheberrechtsinhabers ist gesetzlich verboten.
Kopierschutztechnologie
Dieser DVD-Recorder verwendet eine Kopierschutztechnologie, die durch US-Patente und andere Rechte an geistigem
Eigentum von Macrovision und anderen Rechteinhabern
geschützt ist. Um diese Kopierschutztechnologie verwenden
zu können, ist eine Zustimmung seitens Macrovision erforderlich. Außer in den Fällen, für die eine spezielle Erlaubnis von
diesem Unternehmen gewährt wurde, ist die Nutzung besagter Technologie auf den Heimbereich sowie für bestimmte
andere Betrachtungszwecke beschränkt. Demontage und/
oder Modifikation dieses DVD-Recorders sind ebenfalls verboten.
Urheberrechte
• Aufnahme, Überspielung und Wiedergabe von Software mit
Kopierschutzsignal sind auf diesem DVD-Recorder nicht
möglich.
• Die Verwendung von mit diesem DVD-Recorder erstellten
Audio- oder Video-Discs zur Erzielung finanzieller Gewinne
oder zur Rundfunkübertragung für eine ausgedehnte
Betrachtung kann einen Verstoß gegen die gesetzlich einklagbaren Rechte des Rechteinhabers darstellen.
• Wenn keine Zustimmung seitens des Rechteinhabers ein-
geholt wurde, dürfen mit diesem DVD-Recorder erstellte
Audio- und Video-Discs lediglich für den persönlichen
Gebrauch verwendet werden.
Inhalt
Einführung
Übersicht der Funktionen . . . . . . . . . . . . . . . . . . . . . . . . . . . . . . . . . . . . . . . . . . . . . . . . . . . . . . . . . . . . . . . . . . . . . . . . . . . . . . . . . . . . . . 4
Sicherheitshinweise für die Verwendung des DVD-Recorders . . . . . . . . . . . . . . . . . . . . . . . . . . . . . . . . . . . . . . . . . . . . . . . . . . . . . . . . . 5
Sicherheitshinweise zum Umgang mit Discs . . . . . . . . . . . . . . . . . . . . . . . . . . . . . . . . . . . . . . . . . . . . . . . . . . . . . . . . . . . . . . . . . . . . . . . 6
Weitere Informationen zu Discs . . . . . . . . . . . . . . . . . . . . . . . . . . . . . . . . . . . . . . . . . . . . . . . . . . . . . . . . . . . . . . . . . . . . . . . . . . . . . . . . . 7
Bedienelemente und Funktionen
Vorderseite des Geräts . . . . . . . . . . . . . . . . . . . . . . . . . . . . . . . . . . . . . . . . . . . . . . . . . . . . . . . . . . . . . . . . . . . . . . . . . . . . . . . . . . . . . . . . 9
Rückseite des Geräts . . . . . . . . . . . . . . . . . . . . . . . . . . . . . . . . . . . . . . . . . . . . . . . . . . . . . . . . . . . . . . . . . . . . . . . . . . . . . . . . . . . . . . . . 13
LCD-Anzeigen und Bildschirmanzeigen
LCD-Anzeige . . . . . . . . . . . . . . . . . . . . . . . . . . . . . . . . . . . . . . . . . . . . . . . . . . . . . . . . . . . . . . . . . . . . . . . . . . . . . . . . . . . . . . . . . . . . . . 15
Bildschirmanzeigen . . . . . . . . . . . . . . . . . . . . . . . . . . . . . . . . . . . . . . . . . . . . . . . . . . . . . . . . . . . . . . . . . . . . . . . . . . . . . . . . . . . . . . . . . 17
Statusmeldungen . . . . . . . . . . . . . . . . . . . . . . . . . . . . . . . . . . . . . . . . . . . . . . . . . . . . . . . . . . . . . . . . . . . . . . . . . . . . . . . . . . . . . . . . 17
Ereignismeldungen . . . . . . . . . . . . . . . . . . . . . . . . . . . . . . . . . . . . . . . . . . . . . . . . . . . . . . . . . . . . . . . . . . . . . . . . . . . . . . . . . . . . . . . 19
Alarmmeldungen . . . . . . . . . . . . . . . . . . . . . . . . . . . . . . . . . . . . . . . . . . . . . . . . . . . . . . . . . . . . . . . . . . . . . . . . . . . . . . . . . . . . . . . . 20
Vorbereitung
Anschlüsse . . . . . . . . . . . . . . . . . . . . . . . . . . . . . . . . . . . . . . . . . . . . . . . . . . . . . . . . . . . . . . . . . . . . . . . . . . . . . . . . . . . . . . . . . . . . . . . . 21
Stromanschlüsse . . . . . . . . . . . . . . . . . . . . . . . . . . . . . . . . . . . . . . . . . . . . . . . . . . . . . . . . . . . . . . . . . . . . . . . . . . . . . . . . . . . . . . . . . . . 22
Einlegen und Entnehmen von Discs . . . . . . . . . . . . . . . . . . . . . . . . . . . . . . . . . . . . . . . . . . . . . . . . . . . . . . . . . . . . . . . . . . . . . . . . . . . . . 23
Benutzen einer Tastatur . . . . . . . . . . . . . . . . . . . . . . . . . . . . . . . . . . . . . . . . . . . . . . . . . . . . . . . . . . . . . . . . . . . . . . . . . . . . . . . . . . . . . . 24
Anbringen des mitgelieferten Ferritkerns . . . . . . . . . . . . . . . . . . . . . . . . . . . . . . . . . . . . . . . . . . . . . . . . . . . . . . . . . . . . . . . . . . . . . . 24
Einstellen und Anzeigen des Datums und der Uhrzeit . . . . . . . . . . . . . . . . . . . . . . . . . . . . . . . . . . . . . . . . . . . . . . . . . . . . . . . . . . . . . . . 25
G-2
Page 86

Inhalt
Einstellungen und Steuerungen für die Aufnahme
DVD-Aufnahme . . . . . . . . . . . . . . . . . . . . . . . . . . . . . . . . . . . . . . . . . . . . . . . . . . . . . . . . . . . . . . . . . . . . . . . . . . . . . . . . . . . . . . . . . . . . 27
Vorbereiten einer Disc für die Aufnahme . . . . . . . . . . . . . . . . . . . . . . . . . . . . . . . . . . . . . . . . . . . . . . . . . . . . . . . . . . . . . . . . . . . . . . . . . 28
Einstellungen vor der Aufnahme . . . . . . . . . . . . . . . . . . . . . . . . . . . . . . . . . . . . . . . . . . . . . . . . . . . . . . . . . . . . . . . . . . . . . . . . . . . . . . . 30
Angeben des erstellten Disc-Status beim Finalisieren der Disc . . . . . . . . . . . . . . . . . . . . . . . . . . . . . . . . . . . . . . . . . . . . . . . . . . . . . . . . 31
Einstellen des Kodierungsformats für Audio und Video . . . . . . . . . . . . . . . . . . . . . . . . . . . . . . . . . . . . . . . . . . . . . . . . . . . . . . . . . . . . . . 32
Einstellen der Tonaufnahmepegel . . . . . . . . . . . . . . . . . . . . . . . . . . . . . . . . . . . . . . . . . . . . . . . . . . . . . . . . . . . . . . . . . . . . . . . . . . . . . . 33
Überprüfen des Video-Eingangs . . . . . . . . . . . . . . . . . . . . . . . . . . . . . . . . . . . . . . . . . . . . . . . . . . . . . . . . . . . . . . . . . . . . . . . . . . . . . . . 34
Titel- und Kapitelmenüs . . . . . . . . . . . . . . . . . . . . . . . . . . . . . . . . . . . . . . . . . . . . . . . . . . . . . . . . . . . . . . . . . . . . . . . . . . . . . . . . . . . . . . 35
Auswählen der Darstellungsweise der Titel- und Kapitelmenüs . . . . . . . . . . . . . . . . . . . . . . . . . . . . . . . . . . . . . . . . . . . . . . . . . . . . . . . . 36
Ändern der Darstellungsweise der Titel- und Kapitelmenüs . . . . . . . . . . . . . . . . . . . . . . . . . . . . . . . . . . . . . . . . . . . . . . . . . . . . . . . . . . . 37
Aufnahme
Aufnahmereihenfolge . . . . . . . . . . . . . . . . . . . . . . . . . . . . . . . . . . . . . . . . . . . . . . . . . . . . . . . . . . . . . . . . . . . . . . . . . . . . . . . . . . . . . . . . 38
Aufnahme über die Vorderseite des Geräts . . . . . . . . . . . . . . . . . . . . . . . . . . . . . . . . . . . . . . . . . . . . . . . . . . . . . . . . . . . . . . . . . . . . . . . 39
Kapitelmarkierungen automatisch oder manuell einfügen . . . . . . . . . . . . . . . . . . . . . . . . . . . . . . . . . . . . . . . . . . . . . . . . . . . . . . . . . 40
Löschen des letzten Titels . . . . . . . . . . . . . . . . . . . . . . . . . . . . . . . . . . . . . . . . . . . . . . . . . . . . . . . . . . . . . . . . . . . . . . . . . . . . . . . . . . . . 41
Disc-Reparaturfunktion . . . . . . . . . . . . . . . . . . . . . . . . . . . . . . . . . . . . . . . . . . . . . . . . . . . . . . . . . . . . . . . . . . . . . . . . . . . . . . . . . . . . . . . 41
Finalisieren (für die Wiedergabe auf anderen DVD-Playern) . . . . . . . . . . . . . . . . . . . . . . . . . . . . . . . . . . . . . . . . . . . . . . . . . . . . . . . . . . 42
Aufnehmen und Anzeigen von Standbildern (JPEG)
Aufnehmen von wiedergegebenen Standbildern auf DVD . . . . . . . . . . . . . . . . . . . . . . . . . . . . . . . . . . . . . . . . . . . . . . . . . . . . . . . . . . . . 43
Aufnehmen von Standbildern eingegebener Videosignale auf CD-R/RW . . . . . . . . . . . . . . . . . . . . . . . . . . . . . . . . . . . . . . . . . . . . . . . . 44
Anzeigen von Standbildern (JPEG) mit FILE VIEWER . . . . . . . . . . . . . . . . . . . . . . . . . . . . . . . . . . . . . . . . . . . . . . . . . . . . . . . . . . . . . . 45
Sicherheitshinweise für das Aufnehmen und Anzeigen von Standbildern (JPEG) . . . . . . . . . . . . . . . . . . . . . . . . . . . . . . . . . . . . . . . . . . 46
Einstellungen für die Titel- und Kapitelmenüs
Ändern der Kapitelmenüs (Bildschirmmenü THUMBNAIL EDIT) . . . . . . . . . . . . . . . . . . . . . . . . . . . . . . . . . . . . . . . . . . . . . . . . . . . . . . . 47
Ändern und Benennen der Vorschaubilder für die Kapitelmenüs . . . . . . . . . . . . . . . . . . . . . . . . . . . . . . . . . . . . . . . . . . . . . . . . . . . . . . . 48
Ändern und Überprüfen der Darstellungsweise für die Kapitelmenüs . . . . . . . . . . . . . . . . . . . . . . . . . . . . . . . . . . . . . . . . . . . . . . . . . . . 50
Beenden der Kapitelmenü-Bearbeitung . . . . . . . . . . . . . . . . . . . . . . . . . . . . . . . . . . . . . . . . . . . . . . . . . . . . . . . . . . . . . . . . . . . . . . . . . . 52
Ändern und Überprüfen der Darstellung und Namen für die Titelmenüs . . . . . . . . . . . . . . . . . . . . . . . . . . . . . . . . . . . . . . . . . . . . . . . . . 53
Wiedergabe
Wiedergeben einer Disc . . . . . . . . . . . . . . . . . . . . . . . . . . . . . . . . . . . . . . . . . . . . . . . . . . . . . . . . . . . . . . . . . . . . . . . . . . . . . . . . . . . . . . 57
Auswählen von Wiedergabebildern aus der Titelliste . . . . . . . . . . . . . . . . . . . . . . . . . . . . . . . . . . . . . . . . . . . . . . . . . . . . . . . . . . . . . . . . 59
Schnelle und langsame Wiedergabe . . . . . . . . . . . . . . . . . . . . . . . . . . . . . . . . . . . . . . . . . . . . . . . . . . . . . . . . . . . . . . . . . . . . . . . . . . . . 60
Wiedergeben des vorherigen oder nächsten Kapitels . . . . . . . . . . . . . . . . . . . . . . . . . . . . . . . . . . . . . . . . . . . . . . . . . . . . . . . . . . . . . . . 60
Wiedergeben der vorherigen oder nächsten Titel . . . . . . . . . . . . . . . . . . . . . . . . . . . . . . . . . . . . . . . . . . . . . . . . . . . . . . . . . . . . . . . . . . 60
Index-Schreiben und Indexsuche . . . . . . . . . . . . . . . . . . . . . . . . . . . . . . . . . . . . . . . . . . . . . . . . . . . . . . . . . . . . . . . . . . . . . . . . . . . . . . . 61
Setup-Menü
Einstellen des Setup-Menüs . . . . . . . . . . . . . . . . . . . . . . . . . . . . . . . . . . . . . . . . . . . . . . . . . . . . . . . . . . . . . . . . . . . . . . . . . . . . . . . . . . . 63
Konfiguration des Setup-Menüs . . . . . . . . . . . . . . . . . . . . . . . . . . . . . . . . . . . . . . . . . . . . . . . . . . . . . . . . . . . . . . . . . . . . . . . . . . . . . . . . 64
Setup-Menüs . . . . . . . . . . . . . . . . . . . . . . . . . . . . . . . . . . . . . . . . . . . . . . . . . . . . . . . . . . . . . . . . . . . . . . . . . . . . . . . . . . . . . . . . . . . . . . 65
Bildschirmmenü DISC MENU . . . . . . . . . . . . . . . . . . . . . . . . . . . . . . . . . . . . . . . . . . . . . . . . . . . . . . . . . . . . . . . . . . . . . . . . . . . . . . . . . . 66
Bildschirmmenü INPUT SELECT MENU . . . . . . . . . . . . . . . . . . . . . . . . . . . . . . . . . . . . . . . . . . . . . . . . . . . . . . . . . . . . . . . . . . . . . . . . . 67
Bildschirmmenü SYSTEM MENU . . . . . . . . . . . . . . . . . . . . . . . . . . . . . . . . . . . . . . . . . . . . . . . . . . . . . . . . . . . . . . . . . . . . . . . . . . . . . . . 67
Bildschirmmenü DVD MENU . . . . . . . . . . . . . . . . . . . . . . . . . . . . . . . . . . . . . . . . . . . . . . . . . . . . . . . . . . . . . . . . . . . . . . . . . . . . . . . . . . 71
Bildschirmmenü RECORDER MENU . . . . . . . . . . . . . . . . . . . . . . . . . . . . . . . . . . . . . . . . . . . . . . . . . . . . . . . . . . . . . . . . . . . . . . . . . . . . 73
Bildschirmmenü REMOTE MENU . . . . . . . . . . . . . . . . . . . . . . . . . . . . . . . . . . . . . . . . . . . . . . . . . . . . . . . . . . . . . . . . . . . . . . . . . . . . . . 75
Bildschirmmenü DISPLAY MENU . . . . . . . . . . . . . . . . . . . . . . . . . . . . . . . . . . . . . . . . . . . . . . . . . . . . . . . . . . . . . . . . . . . . . . . . . . . . . . 77
Bildschirmmenü CLOCK ADJUST MENU . . . . . . . . . . . . . . . . . . . . . . . . . . . . . . . . . . . . . . . . . . . . . . . . . . . . . . . . . . . . . . . . . . . . . . . . 78
Bildschirmmenü NETWORK MENU . . . . . . . . . . . . . . . . . . . . . . . . . . . . . . . . . . . . . . . . . . . . . . . . . . . . . . . . . . . . . . . . . . . . . . . . . . . . . 78
Zusatzinformationen
Easymenu: Freeware zum Bearbeiten von Menüvorlagen . . . . . . . . . . . . . . . . . . . . . . . . . . . . . . . . . . . . . . . . . . . . . . . . . . . . . . . . . . . . 79
Ändern des Signalsystems (NTSC/PAL) . . . . . . . . . . . . . . . . . . . . . . . . . . . . . . . . . . . . . . . . . . . . . . . . . . . . . . . . . . . . . . . . . . . . . . . . . 80
Informationen für Benutzer zur Entsorgung von Altgeräten . . . . . . . . . . . . . . . . . . . . . . . . . . . . . . . . . . . . . . . . . . . . . . . . . . . . . . . . . . . 81
Technische Daten . . . . . . . . . . . . . . . . . . . . . . . . . . . . . . . . . . . . . . . . . . . . . . . . . . . . . . . . . . . . . . . . . . . . . . . . . . . . . . . . . . . . . . . . . . . 82
G-3
Page 87

Einführung
Übersicht der Funktionen
Video- und Audiosignale der Eingangsanschlüsse dieses DVD-Recorders können auf DVD-R/DVD-RW (nur im Video-
Modus) oder DVD+R/DVD+RW (Konformität mit Videomodus) aufgenommen werden. (X Seite 28)
Die folgenden Signale werden unterstützt:
Video: Composite-Video-, separate Y/C- oder DV-Signale (auch Audio)
Audio: Analog-Audio- oder DV-Signale (auch Video)
Wiedergabebilder, die mit dem DVD-Recorder auf eine nicht-finalisierte DVD aufgenommen wurden, können erfasst und als
JPEG-Dateien auf eine identische DVD aufgenommen werden. (X Seite 43)
Videobilder der Eingangsanschlüsse des DVD-Recorders können erfasst und als JPEG-Dateien auf einer CD-R/RW aufge-
nommen werden. (X Seite 44)
Eine Vielzahl von Aufnahmeverfahren wird unterstützt. Das jeweils geeignete Verfahren hängt von der gewünschten späte-
ren Verwendung ab.
• Mit den Tasten REC, PAUSE und STOP an der Vorderseite des DVD-Recorders können Sie die Standard-Funktionen ausführen.
(X Seite 39)
• Die Aufnahme kann über den mit dem Fußschalteranschluss verbundenen externen Schalter gesteuert werden. (X Seite 40)
Die Titel- und Kapitelmenüs können entweder automatisch oder manuell erstellt werden. (X Seite 47)
Es stehen fünf verschiedene Vorlagen für die Darstellung der Titel- und Kapitelmenüs zur Verfügung. Jede dieser Vorlagen unterscheidet sich durch die verschiedenen Eigenschaften der Vorschaubilder (d. h. Anzahl, Position und Größe) und der Hintergrundbilder, die in
der Bildschirmanzeige der Titel- und Kapitelmenüs angezeigt werden.
Wenn Sie bei der Aufnahme von Daten auf eine DVD eine Darstellungsweise gewählt haben, erstellt dieser DVD-Recorder automatisch die Titel- und Kapitelmenüs entsprechend der gewählten Darstellung.
Mithilfe des Bildschirmmenüs DVD MENU können Sie die Eigenschaften für das Vorschaubild und den Hintergrund für jede Darstellungsweise ändern.
In der Bildschirmanzeige THUMBNAIL EDIT und CHAPTER MENU EDIT können Sie zudem die Darstellungsweise und die Vorschaubilder für die Kapitelmenüs ändern sowie Kapitelnamen und Kommentare eingeben. Die Eingabe von Namen oder Kommentaren
erfolgt über eine Tastatur, die an einen der USB-Anschlüsse des Recorders angeschlossen wird.
Im Bildschirmmenü TITLE MENU EDIT können Sie die Darstellungsweise für das Titelmenü ändern sowie Titelnamen eingeben.
Mit diesem DVD-Recorder können Sie Discs abspielen, die auf ihm erstellt wurden. (X Seite 57)
• Sobald eine Disc finalisiert wurde, kann sie auch auf anderen DVD-Playern wiedergegeben werden.
G-4
Page 88

Einführung
Sicherheitshinweise für die Verwendung des DVD-Recorders
Aufbewahren und Aufstellen des Recorders
Der DVD-Recorder sollte nicht an den folgenden Orten aufgestellt und betrieben werden:
• In einer Umgebung mit Temperaturen, die erheblich über
oder unter der zulässigen Betriebstemperatur liegen (d.h.
5°C bis 35°C).
• In einer Umgebung mit Luftfeuchtigkeit, die erheblich über
oder unter der zulässigen Luftfeuchtigkeit liegt (d.h. 20% bis
80% relative Luftfeuchtigkeit (RH)).
• In einer sehr staubigen oder sandigen Umgebung.
• An Orten, an denen der DVD-Recorder öligem Rauch oder
Dampf (z.B. in Küchen und deren Umgebung) ausgesetzt
ist.
• An Orten ohne stabile Unterlage oder an Orten, an denen
Erschütterungen auftreten.
• In einer Umgebung, in der es leicht zu Kondensation kom-
men kann.
• In einer Umgebung mit starken magnetischen Felder, die
durch Transformatoren, Motoren u. ä. erzeugt werden.
• In einer Umgebung, in der Empfänger, Mobiltelefone und
andere schnurlose Geräte vorhanden sind.
• An Orten, an denen der Recorder Röntgenstrahlung oder
ätzenden Gasen ausgesetzt ist. (Diese Sicherheitshinweise
müssen genau befolgt werden.)
Handhabung
• Stellen Sie sicher, dass der DVD-Recorder während des
Betriebs auf einer glatten, waagerechten Oberfläche steht.
• Stellen Sie keine schweren Gegenstände wie z.B. einen
Monitor oder ein Fernsehgerät auf den DVD-Recorder.
• Stecken Sie keine fremden Gegenstände in das Disc-Fach.
• Passen Sie auf, dass Sie sich beim Einlegen der Disc nicht
die Finger einklemmen.
• Blockieren Sie nicht die Belüftungsöffnungen des Gerätes.
• Setzen Sie den DVD-Recorder keinen Stößen aus und las-
sen Sie ihn nicht fallen.
• Wenn Sie den DVD-Recorder transportieren müssen, stel-
len Sie vorher sicher, dass sich keine DVD mehr im Recorder befindet.
• Wenn Sie den DVD-Recorder für längere Zeit nicht benut-
zen wollen, stellen Sie den Netzschalter auf OFF, damit
kein unnötiger Strom verbraucht wird.
Reinigen der Außenteile des Geräts (im ausgeschaltenen
Zustand)
Reinigen Sie das Äußere des DVD-Recorders mit einem weichen Tuch.
Verwenden Sie keine Farbverdünner oder organischen
Lösungsmittel als Reinigungsmittel.
Bei Nichtbeachtung dieser Sicherheitshinweise kann es zu Farbveränderungen oder dem Auflösen der Geräteoberfläche kommen.
Verwenden Sie zum Entfernen von hartnäckigem Schmutz ein
Tuch, das mit einer verdünnten, neutralen Flüssigkeit getränkt ist.
Verwenden Sie immer das im Lieferumfang des DVD-
Recorders enthaltene Stromkabel.
Wenn Sie ein anderes Kabel oder ein beschädigtes Kabel verwenden, kann dies zum Ausbruch von Feuer oder zu elektrischen Stromschlägen führen.
Das im Lieferumfang des DVD-Recorders enthaltene
Stromkabel darf nicht mit anderen Geräten verwendet
werden.
Bevor Sie diesen DVD-Recorder an andere Geräte anschlie-
ßen, schalten Sie diese Geräte aus und befolgen Sie die
Installationsanweisungen in den jeweiligen Benutzerhandbüchern.
Die DVD-Antriebseinheit ist ein Verschleißteil. Da die
Lebensdauer der DVD-Antriebseinheit von der jeweiligen
Benutzung durch den Kunden abhängt, empfehlen wir als
Richtlinie, die Einheit alle 1000 Stunden auszutauschen.
(X Seite 68 „TOTAL RECORDING TIME“)
Sicherheitshinweise zur Kondensation
Kondensation
Wenn kaltes Wasser in ein Glas gefüllt wird und sich an der
Glasaußenseite Wassertropfen bilden, wird dies als „Kondensation“ bezeichnet.
Auftreten von Kondensation
Kondensation kann dazu führen, dass sich Wassertropfen an
der inneren Linse des DVD-Recorders absetzen und somit
der ordnungsgemäße Betrieb nicht mehr gewährleistet werden kann.
Kondensation tritt leicht in den folgenden Situationen auf,
deshalb sollten Sie mit der entsprechenden Sorgfalt vorgehen.
• Wenn der DVD-Recorder von einem kalten Ort an einen
warmen Ort transportiert wird.
• Wenn der Raum, in dem sich der DVD-Recorder befindet,
sehr schnell erwärmt wird.
• Wenn der Luftschacht einer Klimaanlage direkt auf den
DVD-Recorder zeigt.
In Situationen, in denen Kondensationsniederschlag auftre-
ten kann, sollten Sie die DVD, falls vorhanden, aus dem
Gerät nehmen und das Gerät einschalten. Da sich dadurch
das Innere des Recorders erwärmt, kann eine Kondensation
nicht mehr so leicht entstehen.
Kondensation ist eine der Hauptursachen, warum Discs
nicht mehr abgespielt werden können oder andere Probleme
auftreten. In einer solchen Situation sollte das Gerät einige
Stunden in eingeschaltetem Zustand ruhen. Sollte das Problem danach immer noch bestehen, wenden Sie sich bitte an
den Händler, bei dem Sie diesen DVD-Recorder gekauft
haben oder an einen autorisierten JVC-Fachhändler.
Nichtbenutzung über einen längeren Zeitraum
Die Geräteleistung kann sich verschlechtern, wenn das Gerät
längere Zeit nicht benutzt wird, deshalb sollten Sie den DVDRecorder einschalten und in regelmäßigen Abständen in
Betrieb nehmen.
Schadensersatz für beschädigte Inhalte
Wenn es im seltenen Falle einer Fehlfunktion des DVD-
Recorders oder einer Disc zu Störungen bei der Aufnahme
oder Wiedergabe kommt, übernimmt JVC keine Haftung für
die nicht erfolgte oder beschädigte Aufnahme.
Wir empfehlen Ihnen in regelmäßigen Abständen (d.h. ein-
mal pro Jahr), Sicherheitskopien von Discs mit wichtigen
Daten zu erstellen. Obwohl digitale Signale sich nicht verschlechtern, kann die Aufbewahrungsumgebung Einfluss auf
den Alterungsprozess einer Disc haben, wodurch die Disc
nicht mehr abgespielt oder beschrieben werden kann.
Sollte die Disc zerbrechen, können die Daten nicht wieder-
hergestellt werden.
Die einwandfreie Wiedergabe von Discs, die mit diesem
DVD-Recorder aufgenommen wurden, kann nicht auf allen
Geräten garantiert werden.
G-5
Page 89

Einführung
Sicherheitshinweise zum Umgang mit Discs
Pflege von Discs zur Erhaltung der Wiedergabequalität
Fingerabdrücke, Staub oder ähnliche Verschmutzungen auf der Oberfläche einer Disc können zu Fehlern bei der Wiedergabe von
aufgenommenen Video- oder Audiodaten führen. Deshalb ist es sinnvoll, jede Disc vor Gebrauch mit einem weichen Tuch abzuwischen.
Reinigen von Discs
• Wischen Sie die Disc mit einem weichen Tuch von innen
nach außen ab.
• Bei hartnäckigem Schmutz auf der Oberfläche der Disc rei-
nigen Sie die Disc zuerst mit einem leicht feuchten Tuch
und wischen Sie sie danach mit einem trockenen Tuch ab.
• Verwenden Sie niemals Farbverdünner, organische
Lösungsmittel, Reinigungsmittel für analoge Aufnahmegeräte, anti-statische Sprays und ähnliche Reinigungsmittel.
Die Nichtbeachtung dieses Hinweises kann zu einer dauerhaften Beschädigung der Disc führen.
Handhabung von Discs
• Disc entnehmen • Disc in die Hülle legen
• Richtiges Halten einer Disc
Berühren Sie beim Halten der Discs nie
die Aufnahmeseite mit Ihren Fingern
oder Händen.
Weitere Hinweise zur Handhabung
von Discs
Wischen Sie die Disc niemals mit Farbverdünner, organischen
Lösungsmitteln, Alkohol oder Schallplattenreiniger ab.
Benutzen Sie kein Disc-Zubehör wie Reinigungs- und Schutz-
flüssigkeiten.
Kleben Sie weder Etiketten noch anderen Klebefilm auf die
Disc.
Verwenden Sie keine Discs, von denen Etiketten oder anderer
Klebefilm entfernt wurde.
Verwenden Sie keine Discs, auf die Bilder oder Text mit einem
handelsüblichen Etikettendrucker gedruckt wurden. Erstellen
Sie zuerst die Disc mit dem DVD-Recorder, bevor Sie diese
beschriften.
Verwenden Sie keine Discs, die nicht rund sind (z.B. herzför-
mige oder quadratische Discs), Verformungen oder Risse
haben, da sie den DVD-Recorder beschädigen können.
Aufbewahren von Discs
Bewahren Sie Discs nicht an den folgenden Orten auf.
• Meiden Sie Orte mit hoher Luftfeuchtigkeit und viel Staub
sowie Orte, an denen Schimmelbildung auftritt.
• Legen Sie die Discs nicht in das direkte Sonnenlicht oder in
die Nähe einer Heizung.
• Legen Sie die Discs während der Sommermonate nicht ins
Auto.
Achten Sie darauf, dass Sie die Discs nicht fallen lassen oder
Stößen aussetzen.
Bewahren Sie die Discs in der Schutzhülle auf und stapeln Sie
diese.
Wenn die Discs nicht in einer Hülle aufbewahrt werden, kann
es zu Verformungen oder Rissen kommen, die durch Lagern,
Stapeln oder Herunterfallen entstehen.
G-6
Page 90
Weitere Informationen zu Discs
Einführung
Discs für die Aufnahme und Wiedergabe
Die folgende Aufstellung zeigt Ihnen, welche Discs Sie in diesem
DVD-Recorder aufnehmen und abspielen können sowie die
dazugehörigen Aufschriften und Logos.
DVD-R 12 cm: 4,7 GB
DVD-RW 12 cm: 4,7 GB
DVD+R 12 cm: 4,7 GB
DVD+RW 12 cm: 4,7 GB
* Bestimmte Merkmale und Eigenschaften von Discs können
dazu führen, dass sie eventuell für die Aufnahme oder Wiedergabe nicht geeignet sind.
Empfohlene Hersteller
DVD-R : JVC, Maxell 2×, 4×, 8×
DVD-RW : JVC 2×, 4×
DVD+R : JVC 2,4×, 4×, 8×
DVD+RW : JVC 2,4×, 4×
CD-R : JVC
CD-RW : JVC
~ 40×
~ 32×
General Version 2.0
(Videomodus)
Version 1.1 oder höher
(Videomodus)
Informationen zu DVD-R/-RWs und
DVD+R/+RWs
DVD-R : Nur Discs mit dem DVD-R-Standard 2.0 (Video-
Modus) können verwendet werden.
DVD-RW : Discs der Versionen 1.1 und höher können verwen-
det werden. Die Version 1.1 des DVD-RW-Standards
ermöglicht die Auswahl zwischen Video-Modus oder
VR-Modus für die Aufnahme. Mit diesem DVDRecorder können Sie jedoch nur Daten im VideoModus aufnehmen.
* Version 1.0 des DVD-RW-Standards unterstützt
nicht die Aufnahme im Video-Modus, deshalb kön-
nen diese Discs auch nicht verwendet werden.
Die Aufnahmemerkmale unterscheiden sich bei DVD-R/DVD-RW
(Videomodus) und DVD+R/DVD+RW (Konformität mit Videomodus) wie folgt:
DVD-R/DVD+R
• Jede Disc kann nur einmal beschrieben werden. Deshalb
werden diese Discs für die Archivierung bzw. für eine längere Aufbewahrung empfohlen.
• Sobald eine Disc finalisiert wurde, kann sie auch auf ande-
ren DVD-Playern wiedergegeben werden.
DVD-RW (Videomodus)/DVD+RW (Konformität mit Video-
modus)
• Nachdem Sie den Inhalt der Disc angesehen haben, kön-
nen Sie die Daten wieder löschen oder die Disc neu bespielen.
• Sobald eine Disc finalisiert wurde, kann sie auch auf ande-
ren DVD-Playern wiedergegeben werden.
• Es ist möglich, die Finalisierung rückgängig zu machen und
noch eine Aufnahme hinzuzufügen.
Finalisieren
Nachdem eine DVD-R, DVD-RW, DVD+R oder DVD+RW finalisiert wurde, kann sie wie jede andere DVD auch in einem herkömmlichen DVD-Player abgespielt werden. (X Seite 42)
Das Bespielen von noch leeren Sektionen einer Disc und
die Änderung der Titel oder Darstellungsweise kann vor
dem Finalisieren einer Disc vorgenommen werden.
• Bei DVD-Rs/DVD-RWs sowie DVD+Rs/DVD+RWs ist es
nicht möglich, vorher aufgenommene Daten mit neuen
Daten zu überschreiben, auch wenn die entsprechende Disc
noch nicht finalisiert wurde. Auch einzelne Datensektionen
können nicht gelöscht werden.
• Unabhängig davon, ob die Disc schon finalisiert wurde oder
nicht, ist es mit diesem DVD-Recorder nicht möglich, neue
Daten auf eine DVD-R/DVD-RW oder DVD+R/DVD+RW zu
schreiben, wenn bereits Daten mit einem anderen Gerät aufgenommen wurden.
Sobald die Disc finalisiert wurde, kann sie als herkömmli-
che DVD verwendet werden und die darauf aufgenommenen Video- und Audiodaten können auf diesem Recorder
oder einem anderen DVD-Player abgespielt werden.
• Nach dem Finalisieren können Sie die Titel der Disc aus dem
Hauptmenü auswählen.
• Nach dem Finalisieren können Sie keine weiteren Daten auf-
nehmen.
• Bei Verwendung einer DVD-RW oder DVD+RW ist es mög-
lich, die Finalisierung rückgängig zu machen und noch eine
Aufnahme hinzuzufügen.
• Normalerweise können Sie eine finalisierte Disc auf jedem
anderen DVD-Player abspielen. Manche Eigenschaften von
Discs und deren Aufnahmebedingungen führen jedoch dazu,
dass eine Wiedergabe nicht möglich ist.
Wiedergeben von Discs auf diesem
DVD-Recorder
Auf diesem DVD-Recorder können Sie alle Discs abspielen, die
mit ihm erstellt und finalisiert wurden.
• Die folgenden Störungen können auftreten, wenn Sie versu-
chen Discs, die mit anderen Geräten aufgenommen wurden,
auf diesem Recorder abzuspielen.
• Die Discs können nicht wiedergegeben werden
• Blockrauschen (z.B. Mosaikmuster)
• Unterbrechungen bei der Wiedergabe von Audio- und
Videodaten
• Unbeabsichtigtes Anhalten während der Wiedergabe
• Handelsübliche DVD-Videos und DVD-ROMs können nicht
benutzt werden.
G-7
Page 91

Einführung
Weitere Informationen zu Discs (Fortsetzung)
DVD-Datenkonfiguration
Im Allgemeinen sind die aufgenommenen Daten auf einer DVD
in große Einheiten eingeteilt, die man als „Titel“ bezeichnet.
Jeder Titel erhält eine eindeutige Nummer, die man als „Titelnummer“ bezeichnet, so dass jeder Titel sofort über diese Titelnummer angesteuert werden kann. Des Weiteren kann jeder Titel
in noch kleinere Einheiten unterteilt werden, die man „Kapitel“
nennt. Genau wie bei den Titeln erhält jedes Kapitel eine eindeutige Nummer, die man als „Kapitelnummer“ bezeichnet, so dass
jedes Kapitel sofort über diese Kapitelnummer angesteuert werden kann.
Jede Aufnahme auf der Disc wird als Einzeltitel gespeichert. Mit
jedem Drücken der Taste STOP verlassen Sie den Aufnahmemodus und erstellen danach wieder eine neue Aufnahme. (Eine
andere Bezeichnung hierfür ist „den Titel abschließen“.) Sie habe
auch die Möglichkeit, Kapitelmarkierungen zur Unterteilung von
Titeln an von Ihnen gewählte Positionen zu setzen, indem Sie
während der Aufnahme die Taste REC drücken.
Es ist möglich, durch vorübergehendes Anhalten der Aufnahme
automatisch eine Kapitelmarkierung einzufügen, indem Sie die
Taste PAUSE drücken. (Die Einstellung erfolgt über das Menü.)
Außerdem können Sie mit diesem DVD-Recorder automatisch
Kapitelmarkierungen in regelmäßigen Abständen einfügen. (Sie
müssen dafür Einstellungen im Menü CHAPTER CREATION vornehmen.)
Disc
Regionalcodes
Dem DVD-Inhalt wird eine von sechs Nummern, der „Regionalcode“, zugewiesen, um die Wiedergabe auf bestimmte geografische Regionen zu beschränken. Wenn die Region der DVD nicht
mit dem Regionalcode des DVD-Players übereinstimmt, kann die
Disc nicht abgespielt werden.
• Dieser DVD-Recorder weist allen Discs, die mit ihm aufge-
nommen wurden, den Regionalcode „ALL“ zu.
• Das Abspielen von Discs mit Regionalcode ist nicht möglich.
Bildschirmgrößen
Mit diesem DVD-Recorder können Sie Videos für Breitbildfernseher (d.h. mit einem 16:9-Bildseitenverhältnis) aufnehmen.
Zusätzlich können Signale für ein normales Fernsehbild mit
einem 4:3-Bildseitenverhältnis, für ein gestauchtes Bild (d.h. bei
dem die linke und die rechte Seite komprimiert sind) und für Letterbox-Formate (d.h. mit schwarzen Balken am unteren und oberen Bildrand) aufgenommen werden.
• Das Verfahren für die Erstellung der Vorschaubilder für die
Titel- und Kapitelmenüs bei Einspeisung eines Breitbildsignals
können Sie im Bildschirmmenü DVD MENU im Menüpunkt
THUMBNAIL FORM auswählen. (X Seite 71)
Titel 1 Titel 2
Kapitel 1 Kapitel 2 Kapitel 3 Kapitel 1 Kapitel 2
• Bevor Sie einen Titel abschließen, können Sie noch die Dar-
stellungsweise für das Kapitelmenü und die Vorschaubilder
ändern sowie Namen für die Vorschaubilder eingeben.
• Bevor Sie die Disc finalisieren, können Sie noch die Darstel-
lungsweise für die Titelmenüs ändern sowie Titelnamen eingeben.
G-8
Page 92

Bedienelemente und Funktionen
Vorderseite des Geräts
26
1
5
3
4
1Taste OPERATE und Leuchtanzeige
• Mit dieser Taste können Sie das Gerät auf betriebsbereit
schalten. Durch erneuten Tastendruck können Sie die
Betriebsbereitschaft wieder deaktivieren (Operate-OFFModus).
• Die Leuchtanzeige gibt Ihnen Informationen zum Betriebs-
zustand des DVD-Recorders. Es gibt die folgenden Anzeigen:
Die Anzeige leuchtet grün : Operate-ON-Modus.
Die Anzeige leuchtet orange: Operate-OFF-Modus.
Hinweise
• Das Drücken der Taste OPERATE ist nicht wirksam, wenn
sich der DVD-Recorder im Aufnahme- oder AufnahmepauseModus befindet. Dies gilt ebenfalls, wenn gerade ein Finalisier- oder Löschvorgang durchgeführt wird.
• Der DVD-Recorder verbraucht fortwährend eine geringe
Strommenge, selbst wenn er mit der Taste OPERATE ausgeschaltet wurde. Wenn Sie ihn für längere Zeit nicht benutzen
möchten, stellen Sie den Netzschalter auf OFF, damit kein
unnötiger Strom verbraucht wird.
• Schalten Sie den Strom nicht aus, wenn sich das Gerät im
Operate-ON-Modus befindet, da der DVD-Recorder dadurch
beschädigt werden kann.
• Es kann beim Umschalten auf OPERATE ON zu Fehlfunktio-
nen kommen, wenn Sie gerade auf einer angeschlossenen
USB-Tastatur eine Taste drücken.
2Disc-Fach
Das Disc-Fach dient zum Einlegen von DVDs.
Dieses Fach öffnet sich automatisch, wenn die Taste OPEN/
CLOSE gedrückt wird. Durch erneutes Drücken der Taste
OPEN/CLOSE kann das Fach wieder geschlossen werden.
Hinweise
• Drücken Sie das Disc-Fach nicht, wenn es sich gerade öffnet
oder schließt.
• Legen Sie ausschließlich Discs in das Disc-Fach.
• Drücken Sie das Disc-Fach nicht herunter.
3Anzeige BUSY
Die Anzeige blinkt, wenn sich der DVD-Recorder im Aufnahmepause-Modus befindet oder bei sehr lang andauernden
Arbeitschritten wie z.B. während des Abschließens, Finalisierens oder Löschens eines Titels. Während die Anzeige BUSY
blinkt, ist keine der Tasten am DVD-Recorder aktiv.
4Taste OPEN/CLOSE und Leuchtanzeige
Mit dieser Taste können Sie das Fach öffnen und schließen.
Außerdem leuchtet die Anzeige OPEN/CLOSE, wenn sich das
Disc-Fach öffnet oder offen steht.
• Wenn Sie diese Taste drücken und mindestens 7 Sekunden
lang gedrückt halten, wird die Disc nach der Finalisierung
ausgeworfen.
• Der folgende Vorgang wird beim Auswerfen einer CD-R/RW
durchgeführt.
Alle im Speicher dieses DVD-Recorders erfassten JPEGBilder werden automatisch auf die CD-R/RW aufgenommen. Danach wird das Disc-Fach geöffnet.
Hinweis
Das Drücken der Taste OPEN/CLOSE ist nicht wirksam, wenn
sich der DVD-Recorder im Aufnahme- oder AufnahmepauseModus befindet. Dies gilt ebenfalls, wenn gerade ein Finalisieroder Löschvorgang durchgeführt wird.
5Tonpegelanzeige
Die Tonpegelmesser zeigen die aktuellen Tonpegel für Kanal 1
und Kanal 2 an.
Die Tonpegelmesser zeigen die Tonaufnahmepegel an, wenn
sich der DVD-Recorder im Aufnahmemodus befindet, sowie
die Tonwiedergabepegel, wenn sich der DVD-Recorder im
Wiedergabemodus befindet. (Einstellen der Tonaufnahmepegel: X Seite 33.)
6LCD-Anzeige
Die LCD-Anzeige zeigt Ihnen wichtige Informationen an. Während der Aufnahme oder Wiedergabe können Sie auf der LEDAnzeige z.B. den Titel, die Kapitelnummer und die abgelaufene Zeit ablesen. (Weitere Informationen finden Sie auf
X Seite 15.)
G-9
Page 93

Bedienelemente und Funktionen
Vorderseite des Geräts (Fortsetzung)
8
90abc
7
7Video-Eingangssignal-Anzeige
Anzeige OPTION
Diese Anzeige leuchtet oder blinkt, wenn Sie im Bildschirmmenü INPUT SELECT MENU im Menüpunkt INPUT SELECT
die Option OPTION ausgewählt haben. (Diese Einstellung ist
nicht möglich, wenn Sie den DVD-Recorder ohne ein angeschlossenes Gerät betreiben.)
Anzeige DV
Diese Anzeige leuchtet oder blinkt, wenn Sie im Bildschirmmenü INPUT SELECT MENU im Menüpunkt INPUT SELECT
die Option DV ausgewählt haben. Die Anzeige leuchtet insbesondere immer dann, wenn ein Eingangssignal vorhanden ist.
Wenn kein Signal vorhanden ist, blinkt die Anzeige.
Anzeige Y/C
Die Anzeige leuchtet oder blinkt, wenn Sie im Bildschirmmenü
INPUT SELECT MENU im Menüpunkt INPUT SELECT die
Option Y/C ausgewählt haben. Die Anzeige leuchtet insbesondere immer dann, wenn ein Eingangssignal vorhanden ist.
Wenn kein Signal vorhanden ist, blinkt die Anzeige.
Anzeige LINE
Diese Anzeige leuchtet oder blinkt, wenn Sie im Bildschirmmenü INPUT SELECT MENU im Menüpunkt INPUT SELECT
die Option LINE ausgewählt haben. Die Anzeige leuchtet insbesondere immer dann, wenn ein Eingangssignal vorhanden
ist. Wenn kein Signal vorhanden ist, blinkt die Anzeige.
8Kopfhörereingang und Lautstärkeregler
Am Kopfhörereingang können Sie Kopfhörer an den DVDRecorder anschließen, um die Tonpegel zu überwachen. Mit
dem Lautstärkeregler können Sie außerdem die Lautstärke für
die Kopfhörer einstellen. Beachten Sie, dass dieser Lautstärkeregler keinen Einfluss auf die tatsächlichen Aufnahmepegel
hat.
9Taste REV und Leuchtanzeige
• Wenn Sie diese Taste während der Wiedergabe oder im
Schnellvorlauf-Modus drücken, wechselt der DVD-Recorder
in den Schnellrücklauf. Wird diese Taste während des
Schnellrücklaufs gedrückt, wechselt die Rücklaufgeschwindigkeit zwischen gering und hoch.
• Wenn Sie diese Taste im Standbildmodus oder während
des langsamen Vorlaufs drücken, wechselt der DVD-Recorder in den langsamen Rücklauf. Wird diese Taste während
des langsamen Rücklaufs gedrückt, wechselt die Rücklaufgeschwindigkeit zwischen gering und hoch.
• Während des langsamen und des schnellen Rücklaufs
leuchtet die Anzeige REV.
0Taste STOP
• Mit dieser Taste können Sie im Aufnahme- oder Aufnahme-
pause-Modus die folgenden Funktionen ausführen:
Wenn Sie im Bildschirmmenü DVD MENU im Menüpunkt
EDIT MENU die Option DISABLE gewählt haben, unterbricht der DVD-Recorder die Aufnahme (d.h. er schließt den
Titel ab).
Wenn Sie im Bildschirmmenü DVD MENU im Menüpunkt
EDIT MENU die Option ENABLE ausgewählt haben, unterbricht der DVD-Recorder die Aufnahme, und die Bildschirmanzeige THUMBNAIL EDIT wird angezeigt. Sie können
dann das Kapitelmenü ändern.
• Wenn die Taste STOP im Wiedergabemodus gedrückt wird,
wird die Wiedergabe auf dem DVD-Recorder unterbrochen.
aTaste PLAY und Leuchtanzeige
• Wird diese Taste zusammen mit der Taste REC gedrückt,
während eine bespielbare Disc in den DVD-Recorder eingelegt ist, wird die Aufnahme gestartet.
• Wird die Taste PLAY während des Aufnahmepause-Modus
gedrückt, beginnt der DVD-Recorder die Aufnahme neu zu
starten.
• Wenn eine nicht-finalisierte Disc eingelegt ist und diese
Taste gedrückt wird, beginnt die Wiedergabe des aktuellen
Titels.
• Die Anzeige PLAY leuchtet im Aufnahme- und Wiedergabe-
modus.
bTaste FWD und Leuchtanzeige
• Wenn Sie diese Taste während der Wiedergabe oder im
Schnellrücklauf-Modus drücken, wechselt der DVD-Recorder in den Schnellvorlauf. Wird diese Taste während des
Schnellvorlaufs gedrückt, wechselt die Vorlaufgeschwindigkeit zwischen gering und schnell.
• Wenn Sie diese Taste im Standbildmodus oder während
des langsamen Rücklaufs drücken, wechselt der DVDRecorder in den langsamen Vorlauf. Wird diese Taste während des langsamen Vorlaufs gedrückt, wechselt die Vorlaufgeschwindigkeit zwischen gering und hoch.
• Während des langsamen und des schnellen Vorlaufs leuch-
tet die Anzeige FWD.
cTaste PAUSE und Leuchtanzeige
• Wird diese Taste während der Aufnahme gedrückt, wech-
selt der Recorder in den Aufnahmepause-Modus.
• Wenn Sie die Taste PAUSE während der Wiedergabe drü-
cken, wechselt der DVD-Recorder in den Standbildmodus
und hält die Wiedergabe an. Wenn Sie dann die Taste
PAUSE im Standbildmodus erneut drücken, zeigt der DVDRecorder die Einzelbilder nacheinander an.
• Die Anzeige PAUSE leuchtet im Aufnahmepause- und
Standbildmodus.
G-10
Page 94

Bedienelemente und Funktionen
j
h
g
k
l
ef i
d
dTaste REC und Leuchtanzeige
• Wird diese Taste zusammen mit der Taste PLAY im Stopp-
Modus gedrückt, wird die Aufnahme gestartet.
• Wenn die aktuelle Disc leer ist oder der Titel abgeschlos-
sen ist, wird ein neuer Titel erstellt und die Aufnahme
beginnt mit Kapitel 1.
• Wenn diese Taste während der Aufnahme gedrückt wird,
wird ein neues Kapitel und Index innerhalb der laufenden
Videodaten erstellt.
• Wird diese Taste gedrückt, wenn gerade eine nicht-finali-
sierte DVD mit freiem Speicherplatz wiedergegeben wird,
wird das angezeigte Wiedergabebild (Standbild) im internen
Speicher dieses DVD-Recorders abgelegt.
Die Aufnahme auf die Disc erfolgt, wenn die Wiedergabe
gestoppt wird. Wird keine Aufnahme durchgeführt und der
DVD-Recorder in den OPERATE OFF-Modus geschaltet,
werden die im internen Speicher des DVD-Recorders
gespeicherten Bilddaten gelöscht. (Es können auch mehrere erfasste Bilder gleichzeitig aufgenommen werden.)
• Wird diese Taste im Stoppmodus gedrückt, wenn gerade
eine CD-R/RW mit verfügbarem Speicherplatz eingelegt ist,
wird ein Standbild des eingegebenen Videosignals (E-EBild) im internen Speicher des DVD-Recorders abgelegt.
Die Aufnahme auf die Disc erfolgt, wenn die Disc ausgeworfen oder FILE VIEWER (X Seite 45) gestartet wird.
Wird keine Aufnahme durchgeführt und der DVD-Recorder
in den OPERATE OFF-Modus geschaltet, werden die im
internen Speicher des DVD-Recorders gespeicherten Bilddaten gelöscht. (Es können auch mehrere erfasste Bilder
gleichzeitig aufgenommen werden.)
• Wenn diese Taste mehr als 2 Sekunden lang gedrückt wird
während der DVD-Recorder angehalten wurde oder wenn
sich keine Disc im DVD-Recorder befindet, wird das ins
MPEG-Format kodierte/dekodierte Eingangssignal über
den Anschluss VIDEO OUT auf der Rückseite des Gerätes
ausgegeben. Solange diese Taste gedrückt wird, wird dieser Vorgang fortgesetzt und damit die DVD-Aufnahmequalität sichergestellt. Der Ton wird an dieser Stelle stumm
geschaltet.
• Die Anzeige REC leuchtet im Aufnahme- und Aufnahme-
pause-Modus.
eTaste TOP MENU
Wenn die Taste TOP MENU gedrückt wird während sich der
DVD-Recorder im Wiedergabemodus befindet, wird das aktuelle DVD-Hauptmenü oder die Titelliste auf dem Bildschirm
angezeigt.
• Die Titelliste wird angezeigt, wenn die Disc nicht-finalisiert
ist oder der Menüpunkt PLAYBACK NAVIGATION im Bildschirmmenü SYSTEM MENU (2/2) auf OFF gesetzt wurde.
• Das TOP MENU wird angezeigt, wenn Sie eine finalisierte
Disc verwenden und der Menüpunkt PLAYBACK NAVIGATION im Bildschirmmenü SYSTEM MENU (2/2) auf ON
gesetzt wurde.
fTaste MENU
Wenn die Taste MENU gedrückt wird während sich der DVDRecorder im Wiedergabemodus befindet, wird das Kapitelmenü des aktuell ausgewählten Titels auf dem Bildschirm
angezeigt.
Wenn die DVD kein Kapitelmenü hat, wird beim Drücken der
Taste MENU nichts angezeigt.
gTaste SET UP
• Durch Drücken der Taste SET UP wird das Setup-Menü auf
dem Bildschirm angezeigt. Im Setup-Menü können eine
Vielzahl an Einstellungen vorgenommen werden.
(X Seite 63)
Durch erneutes Drücken der Taste SET UP wird das SetupMenü geschlossen.
• Wird die Taste SET UP im Aufnahme- oder Aufnahme-
pause-Modus gedrückt, werden die relevanten Daten für
die Aufnahme (d.h. Video-Bitrate und Audio-Kodierungsformat) auf dem Bildschirm angezeigt. Durch erneutes Drücken der Taste SET UP warden diese Informationen nicht
mehr angezeigt.
• Wird diese Taste im Wiedergabemodus gedrückt, wird das
Bildschirmmenü INDEX MANAGER angezeigt.
Wenn diese Taste während der Anzeige des Bildschirmmenüs INDEX MANAGER gedrückt wird, kehren Sie wieder
zum ursprünglichen Bildschirm zurück. (X Seite 61)
• FILE VIEWER wird aufgerufen, wenn eine nicht-finalisierte
Disc eingelegt ist und diese Taste mindestens 2 Sekunden
lang gedrückt wird. Der DVD-Recorder muss sich dabei im
Stoppzustand befinden. (X Seite 45)
• Wenn diese Taste und die Taste STOP gleichzeitig mindes-
tens 2 Sekunden lang gedrückt werden, während sich der
DVD-Recorder im Stoppzustand befindet, wird das NTSC/
PAL-Signalsystem geändert. (Die Einstellung NTSC gilt für
die USA.) (X Seite 80)
G-11
Page 95

Bedienelemente und Funktionen
Vorderseite des Geräts (Fortsetzung)
hTaste [g]
• Mit dieser Taste können Sie Menüpunkte oder Einstellun-
gen im Setup-Menü auswählen.
• Wenn Sie diese Taste während der Wiedergabe drücken,
wird der nächste Titel wiedergegeben.
• Wenn ein Titel- oder ein Kapitelmenü angezeigt wird, kön-
nen Sie mit dieser Taste die Menünummer für die Wiedergabe auswählen. Mit dieser Taste können Sie die
Auswahlposition nach oben bewegen.
• Mit der Taste g können Sie den Aufnahmepegel anpassen,
wenn der DVD-Recorder angehalten wurde oder sich im
Aufnahmepause-Modus befindet.
• Wenn Sie im Bildschirmmenü RECORDER MENU (2/2)
im Menüpunkt AUDIO REC VOLUME MODE die Option
BOTH ausgewählt haben und diese Taste sowie eine der
Tasten i oder j gedrückt halten, werden die Aufnahmepegel für Kanal 1 und Kanal 2 erhöht.
• Wenn Sie im Bildschirmmenü RECORDER MENU (2/2)
im Menüpunkt AUDIO REC VOLUME MODE die Option
INDEPENDENCE ausgewählt haben und gleichzeitig
diese Taste sowie die Taste i gedrückt halten, wird der
Aufnahmepegel für Kanal 1 erhöht. Wenn Sie die Taste
g drücken und dabei die Taste j gedrückt halten,
erhöht sich der Tonaufnahmepegel für Kanal 2.
iTaste [h]
• Mit dieser Taste können Sie Menüpunkte oder Einstellun-
gen im Setup-Menü auswählen.
• Wenn Sie diese Taste während der Wiedergabe drücken,
wird der vorherige Titel wiedergegeben.
• Wenn ein Titel- oder ein Kapitelmenü angezeigt wird, kön-
nen Sie mit dieser Taste die Menünummer für die Wiedergabe auswählen. Mit dieser Taste können Sie die
Auswahlposition nach unten bewegen.
• Mit der Taste h können Sie den Aufnahmepegel anpassen,
wenn der DVD-Recorder angehalten wurde oder sich im
Aufnahmepause-Modus befindet.
• Wenn Sie im Bildschirmmenü RECORDER MENU (2/2)
im Menüpunkt AUDIO REC VOLUME MODE die Option
BOTH ausgewählt haben und diese Taste sowie eine der
Tasten i oder j gedrückt halten, werden die Aufnahmepegel für Kanal 1 und Kanal 2 verringert.
• Wenn Sie im Bildschirmmenü RECORDER MENU (2/2)
im Menüpunkt AUDIO REC VOLUME MODE die Option
INDEPENDENCE ausgewählt haben und gleichzeitig
diese Taste sowie die Taste i gedrückt halten, wird der
Aufnahmepegel für Kanal 1 verringert. Wenn Sie die
Tas te h drücken und dabei die Taste j gedrückt halten,
verringert sich der Tonaufnahmepegel für Kanal 2.
jTaste [i]
• Wenn ein Titel- oder ein Kapitelmenü angezeigt wird, kön-
nen Sie mit dieser Taste die Menünummer für die Wiedergabe auswählen. Mit dieser Taste können Sie die
Auswahlposition nach links bewegen.
• Drücken Sie diese Taste bei der Wiedergabe, um die Wie-
dergabe am Anfang des aktuellen Kapitels neu zu starten.
• Mit der Taste i können Sie den Aufnahmepegel anpassen,
wenn der DVD-Recorder angehalten wurde oder sich im
Aufnahmepause-Modus befindet.
• Wenn Sie im Bildschirmmenü RECORDER MENU (2/2)
im Menüpunkt AUDIO REC VOLUME MODE die Option
INDEPENDENCE auswählen und diese Taste gedrückt
halten und gleichzeitig die Taste g oder h drücken,
wird der Tonaufnahmepegel für Kanal 1 entsprechend
angepasst.
• Wenn Sie im Bildschirmmenü RECORDER MENU (2/2)
im Menüpunkt AUDIO REC VOLUME MODE die Option
BOTH auswählen und diese Taste gedrückt halten und
gleichzeitig die Taste g oder h drücken, werden die
Tonaufnahmepegel für Kanal 1 und Kanal 2 entsprechend angepasst.
• Wenn Sie diese Taste gleichzeitig mit der Taste j drü-
cken, werden die Tonaufnahmepegel wieder auf ihre
werkseitigen Voreinstellungen zurückgesetzt (d.h. Verstärkungsfaktor Eins).
kTaste [j]
• Wenn ein Titel- oder ein Kapitelmenü angezeigt wird, kön-
nen Sie mit dieser Taste die Menünummer für die Wiedergabe auswählen. Mit dieser Taste können Sie die
Auswahlposition nach rechts bewegen.
• Drücken Sie diese Taste, während der DVD-Recorder im
Wiedergabemodus ist, um die Wiedergabe am Anfang des
nächsten Kapitels neu zu starten.
• Mit der Taste j können Sie den Aufnahmepegel anpassen,
wenn der DVD-Recorder angehalten wurde oder sich im
Aufnahmepause-Modus befindet.
• Wenn Sie im Bildschirmmenü RECORDER MENU (2/2)
im Menüpunkt AUDIO REC VOLUME MODE die Option
INDEPENDENCE auswählen und diese Taste gedrückt
halten und gleichzeitig die Taste g oder h drücken,
wird der Tonaufnahmepegel für Kanal 2 entsprechend
angepasst.
• Wenn Sie im Bildschirmmenü RECORDER MENU (2/2)
im Menüpunkt AUDIO REC VOLUME MODE die Option
BOTH auswählen und diese Taste gedrückt halten und
gleichzeitig die Taste g oder h drücken, werden die
Tonaufnahmepegel für Kanal 1 und Kanal 2 entsprechend angepasst.
• Wenn Sie diese Taste gleichzeitig mit der Taste i drü-
cken, werden die Tonaufnahmepegel wieder auf ihre
werkseitigen Voreinstellungen zurückgesetzt (d.h. Verstärkungsfaktor Eins).
lTaste SET
• Drücken Sie die Taste SET, um die Auswahl von Menü-
punkten oder Einstellungen zu bestätigen, wenn das SetupMenü angezeigt wird.
• Wenn Sie die Taste SET während der normalen Bildschirm-
anzeige drücken, zeigt der Zähler auf der LCD-Anzeige des
DVD-Recorders entweder die abgelaufene Aufnahme-/Wiedergabezeit oder die noch verbleibende Disc-/Titelzeit.
G-12
Page 96

Rückseite des Geräts
f
e
134567
2
Bedienelemente und Funktionen
8
90abcd
1Anschluss VIDEO LINE IN (BNC)
Über diesen Anschluss kann der DVD-Recorder CompositeVideo-Signale empfangen.
Um diese Signale als Eingangssignale festzulegen, wählen
Sie im Bildschirmmenü INPUT SELECT MENU im Menüpunkt
INPUT SELECT die Option LINE.
• Die Einstellung der Option SETUP des Bildschirmmenüs
SYSTEM MENU (1/2) sollte je nachdem, ob dieses Eingangssignal ein Setup-Signal ist, vorgenommen werden.
(nur NTSC)
2Anschluss VIDEO Y/C IN (4-Pin)
Über diesen Anschluss empfängt der DVD-Recorder separate
Y/C Video-Signale.
Um diese Signale als Eingangssignale festzulegen, wählen
Sie im Bildschirmmenü INPUT SELECT MENU im Menüpunkt
INPUT SELECT die Option Y/C.
• Die Einstellung der Option SETUP des Bildschirmmenüs
SYSTEM MENU (1/2) sollte je nachdem, ob dieses Eingangssignal ein Setup-Signal ist, vorgenommen werden.
(nur NTSC)
• Die Spezifikationen des Anschlusses (d.h. S1 oder S2) kön-
nen Sie im Bildschirmmenü SYSTEM MENU (2/2) im Menüpunkt Y/C TERMINAL MODE festlegen.
3Anschluss VIDEO LINE OUT (BNC)
Über diesen Anschluss können Sie den DVD-Recorder an
einen Monitor anschließen.
• Wenn sich der DVD-Recorder im Stopp- oder im Aufnahme-
modus befindet, wird das Video-Eingangssignal direkt als
Composite-Video-Signal an diesen Ausgang weitergeleitet.
• Wenn Sie die Taste REC mindestens 2 Sekunden lang
gedrückt halten während der DVD-Recorder angehalten
wird, wird das Eingangssignal dem MPEG-Kodierungs-/
Dekodierungsverfahren unterzogen und dann über den
Anschluss VIDEO LINE OUT ausgegeben. Solange Sie die
Taste REC halten, wird dieser Vorgang fortgesetzt und die
DVD-Aufnahmequalität sichergestellt.
• Die Wiedergabe von der DVD wird im Wiedergabemodus
als Composite-Signal ausgegeben.
• Das Setup-Menü, das Titel- und Kapitelmenü und andere
Bildschirmanzeigen für die Einstellungen und Steuerung
werden auf dem Bildschirm angezeigt, der an diesen
Anschluss angeschlossen ist.
• Status- und Alarminformationen werden auch auf dem Bild-
schirm angezeigt. (Im Bildschirmmenü DISPLAY MENU
können Sie auswählen, welche Informationen Sie auf dem
Bildschirm sehen möchten.)
4Anschluss VIDEO Y/C OUT (4-Pin)
Dient zur Ausgabe von separaten Y/C-Videosignalen.
• Es werden Informationen ausgegeben, die mit den Informa-
tionen des Anschlusses VIDEO LINE OUT identisch sind.
• Die Spezifikationen des Anschlusses (d.h. S1 oder S2) kön-
nen Sie im Bildschirmmenü SYSTEM MENU (2/2) im Menüpunkt Y/C TERMINAL MODE festlegen.
5Schalter AUDIO INPUT LEVEL
Mit diesem Schalter können Sie den Standardpegel für den
Audio-Eingang einstellen.
+4 dB : Der Standardpegel ist auf +4 dB eingestellt.
–8 dB : Der Standardpegel ist auf –8 dB eingestellt.
6Anschlüsse AUDIO IN (2 × RCA)
Über diesen Anschluss werden die analogen Audio-Signale in
den DVD-Recorder eingespeist.
• Um diese Signale als Eingangssignale festzulegen, wählen
Sie im Bildschirmmenü INPUT SELECT MENU im Menüpunkt INPUT SELECT die Option LINE oder Y/C.
7Anschlüsse AUDIO OUT (2 × RCA)
Über diese Anschlüsse werden die analogen Audiosignale aus
dem DVD-Recorder ausgegeben.
• Wenn sich der DVD-Recorder im Stopp- oder im Aufnahme-
modus befindet, werden die Audio-Eingangssignale (d.h. EE-Signale) über diese Anschlüsse ausgegeben.
• Audiosignale von der DVD werden im Wiedergabemodus
ausgegeben.
8Anschluss RS-232C REMOTE (D-Sub 9-Pin-Buchse)
Dieses Gerät kann extern gesteuert werden, indem es an ein
RS-232C-Steuergerät angeschlossen wird.
9USB-Anschlüsse (2 ×)
Dienen zum Anschluss an eine Tastatur mit USB-Unterstützung.
Mit der Tastatur können Sie Text in die Einstellungsmenüs eingeben.
• Sie können zum Ausführen der Bedienschritte keine ande-
ren Geräte als die Tastatur an den USB-Anschluss
anschließen.
• Im Bildschirmmenü SYSTEM MENU (1/2) im Menüpunkt
KEYBOARD STYLE können Sie die Sprache für die Tastatur einstellen.
Empfohlene Hersteller: Logitech
G-13
Page 97

Bedienelemente und Funktionen
Rückseite des Geräts (Fortsetzung)
0Anschluss DV IN/OUT
Der Anschluss I/O für digitale Signale entspricht den
IEEE1394-Spezifikationen.
• Um die Audio- und Videosignale als Eingangssignale fest-
zulegen, wählen Sie im Bildschirmmenü INPUT SELECT
MENU im Menüpunkt INPUT SELECT die Option DV.
• Im Bildschirmmenü REMOTE MENU können Sie im Menü-
punkt REMOTE SELECT auswählen, welches Steuerungsverfahren für die Anschlüsse gewählt werden soll.
DV (SLAVE) : Der DVD-Recorder wird als Slave-Gerät
betrieben und durch die Befehle eines
Master-Geräts gesteuert.
DV (TRIGGER) : Der DVD-Recorder startet die Aufnahme
durch das Drücken einer Auslösetaste an
einer Kamera, die DV-Triggering unterstützt (z.B. einer GY-DV5000 von JVC).
aAnschluss FOOT SW 1/2
FOOT SW 1 : Dient zur Steuerung der Aufnahme/Aufnahme-
pause-Funktion dieses Geräts per Anschluss
an einen externen Schalter (Fußschalter usw.).
FOOT SW 2 : Wenn ein externer Schalter (Fußschalter usw.)
angeschlossen ist, werden als Reaktion auf die
Signale des Schalters folgende Bedienschritte
ausgeführt.
• Einfügen von Kapitelmarkierungen und Indi-
zes bei der Aufnahme auf eine DVD.
• Erfassen von Standbildern (JPEG) während
der Wiedergabe einer nicht-finalisierten DVD
mit verfügbarem Speicherplatz.
• Erfassen von Standbildern (JPEG) des ein-
gespeisten Videosignals, wenn eine CD-R/
RW mit freiem Speicherplatz eingelegt wird.
Dient zum Auswählen der Steuerungsmethode über diesen
Anschluss anhand der Menüpunkte FOOT SW1/2 im Bildschirmmenü REMOTE MENU (1/2). (X Seite 75)
bAnschluss FOR SERVICE (RJ-45) (Wartungsanschluss)
• Verbinden Sie diesen Anschluss mit einem PC, auf dem
Dienstprogramme für dieses Gerät installiert sind, wie z.B.
Anwendungssoftware zum Erstellen von Titel-/Kapitelmenüs.
• Die Netzwerkeinstellungen müssen Sie im Bildschirmmenü
NETWORK MENU vornehmen.
cSlot-Abdeckung für zusätzliche Steckkarten
Entfernen Sie die Abdeckung, um zusätzliche handelsübliche
Steckkarten zu installieren.
dÄquipotentialanschluss
Stellen Sie eine einwandfreie Verbindung des Äquipotentialanschlusses für jedes Gerät sicher, wenn Sie dieses Gerät an
andere Geräte anschließen.
eAnschluss AC IN (3-Pin)
Dient zum Anschluss an die Netzsteckdose mithilfe des im
Lieferumfang enthaltenen Stromkabels.
fSchalter MAIN POWER (Hauptschalter)
Dient zum Ein-/Ausschalten des Stroms.
• Wenn das Gerät eingeschaltet ist, kann der Betriebsmodus
über den Menüpunkt AC IN MODE des Bildschirmmenüs
SYSTEM MENU (2/2) gewählt werden. (X Seite 69)
G-14
Page 98

LCD-Anzeigen und Bildschirmanzeigen
LCD-Anzeige
Die folgenden Informationen und Daten werden auf der LCD-Anzeige des DVD-Recorders angezeigt.
1
2
Nr. Beschreibung
1 Kodierungsformat für Audio-Aufnahmen (LPCM / DOLBY DIGITAL / MPEG) …… MPEG kann nur im PAL-
Modus gewählt werden.
Aufnahmemodus : Das Kodierungsformat, das im Bildschirmmenü RECORDER MENU (1/2) im Menüpunkt
AUDIO ENCODE eingestellt wurde, wird angezeigt. Diese Information wird nicht eingeblendet, wenn der Menüpunkt AUDIO ENCODE auf NO AUDIO gesetzt wurde.
Wiedergabemodus : Das Kodierungsformat für die Audiodaten der aktuellen Disc wird angezeigt. Diese Infor-
mation wird bei der Wiedergabe einer aufgenommenen Disc nicht eingeblendet, wenn
der Menüpunkt AUDIO ENCODE auf NO AUDIO gesetzt wurde.
2 Informationen zum aktuellen Modus.
Titelnummer / Kapitelnummer/ Indexnummer / Zähler
Anzeigedetails können über den Menüpunkt LCD des Bildschirmmenüs DISPLAY ausgewählt werden.
• Zeigt Titel-Nr., Kapitel-Nr. und abgelaufene Zeit eines Titels an, wenn der Menüpunkt LCD auf
TITLE+CHAPTER gesetzt wurde.
• Zeigt Index-Nr. und abgelaufene Zeit eines Titels an, wenn der Menüpunkt LCD auf INDEX gesetzt wurde.
Drücken Sie die Taste SET, um die Zähleranzeige zwischen abgelaufener Zeit und Restzeit umzuschalten.
Restzeit: Zeigt bei der Aufnahme die Restzeit der Disc (Stunde : Minute) und bei der Wiedergabe die Restzeit des Titels an.
Wenn der Menüpunkt LCD auf TITLE+CHAPTER gesetzt wurde
Tast e SET
Titel-Nr. Kapitel-Nr. Abgelaufene Titel-Aufnahmezeit (Stunde : Minute : Sekunde)
Restzeit der Disc
Wenn der Menüpunkt LCD auf INDEX gesetzt wurde
Tast e SET
Index-Nr. (4 Stellen)
Hinweise
• Die verbleibende Disc- und Titelzeit hängt von der Größe der Videodaten ab. Sie ist nur ein Annährungswert
und kann nicht genau angegeben werden.
• Wenn der Menüpunkt PLAYBACK & 232C TYPE des Bildschirmmenüs SYSTEM MENU (1/2) auf VTR
gesetzt wurde, zeigen die abgelaufene Zeit und die Index-Nr. die ab Titel 1 abgespielte Gesamtzeit bzw.
Gesamtzahl an. (X Seite 68)
(Stunde : Minute)
G-15
Page 99

LCD-Anzeigen und Bildschirmanzeigen
LCD-Anzeige (Fortsetzung)
Nr. Beschreibung
2 Anzeige des aktuellen Betriebsmodus
PLEASE WAIT : Der DVD-Recorder schaltet sich ein.
OPERATE OFF : Der DVD-Recorder schaltet sich ab.
NO DISC : Es ist keine Disc im DVD-Recorder eingelegt.
LOADING : Eine Disc wird in den DVD-Recorder geladen.
DVD-R : Die aktuelle Disc ist eine nicht-finalisierte DVD-R. (Circa 3 Sekunden)
DVD-RW : Die aktuelle Disc ist eine nicht-finalisierte DVD-RW. (Circa 3 Sekunden)
DVD+R : Die aktuelle Disc ist eine nicht-finalisierte DVD+R. (Circa 3 Sekunden)
DVD+RW : Die aktuelle Disc ist eine nicht-finalisierte DVD+RW. (Circa 3 Sekunden)
DVD : Die aktuelle Disc ist eine finalisierte DVD-R/DVD-RW/DVD+R/DVD+RW. (Circa 3 Sekun-
den)
CD-R : Die aktuelle Disc ist eine nicht-finalisierte CD-R. (Circa 3 Sekunden)
CD-RW : Die aktuelle Disc ist eine nicht-finalisierte CD-RW. (Circa 3 Sekunden)
CD : Die aktuelle Disc ist eine finalisierte CD-R oder CD-RW. (Circa 3 Sekunden)
REC PAUSE : Der DVD-Recorder wechselt vom Aufnahmemodus zum Aufnahmepause-Modus.
REC STOP : Der DVD-Recorder wechselt vom Aufnahmemodus zum Stoppmodus.
MENU EDIT : Ein Titel- oder Kapitelmenü wird gerade bearbeitet.
EJECT : Die aktuelle Disc wird ausgeworfen.
TITLE CLOSE : Der DVD-Recorder schließt gerade einen Titel ab.
FINALIZE : Der DVD-Recorder finalisiert die Disc.
QUICK ERASE : Der DVD-Recorder löscht Daten von einer DVD-RW-Disc.
FULL ERASE : Der DVD-Recorder löscht Daten von einer DVD-RW-Disc.
INDEX WRITE : Wird angezeigt, wenn der Index geschrieben wird. (Circa 3 Sekunden)
INDEX ERASE : Wird angezeigt, wenn der Index gelöscht wird. (Circa 3 Sekunden)
CAPTURE : Wird angezeigt, wenn ein Standbild (JPEG) erfasst wird.
WRITE IMAGE FILES:
Wird angezeigt, wenn ein Standbild (JPEG) auf Disc geschrieben wird.
TOP MENU : Das Hauptmenü der Disc wird wiedergegeben.
MENU : Ein Menü wird abgespielt.
ENCODE XX : Die kodierten Videodaten werden ausgegeben. (XX: Kodierungsqualität (UXP, XP, SP, LP,
EP, DLP, DEP))
RESTORE XX : Wird angezeigt, wenn eine Disc-Wiederherstellung durchgeführt wird. XX: Fortschritt (%)
2
G-16
Anzeige des Setup-Menüs
Die Menüpunkte und Einstellungen des Setup-Menüs werden angezeigt. (X Seite 64)
Ereignismeldungen
Meldungen zum fehlerhaften Betrieb und Ähnliches werden für circa 3 Sekunden angezeigt. (X Seite 19)
Alarmmeldungen
Alarmmeldungen werden angezeigt, wenn der DVD-Recorder einen Befehl nicht ausführen kann.
(X Seite 20)
Page 100

LCD-Anzeigen und Bildschirmanzeigen
Bildschirmanzeigen
Zusätzlich zu den E-E- und Bildschirmanzeigen (im Wiedergabemodus) kann ein Monitor, der an den DVD-Recorder-Anschluss VIDEO
LINE OUT angeschlossen ist, das Folgende darstellen:
• Statusmeldungen
• Ereignismeldungen
• Alarmmeldungen
• Setup-Menü (X Seite 63)
Statusmeldungen
Die Einstellungen und der Betriebszustand des DVD-Recorders werden als Statusmeldungen in der E-E- oder Bildschirmanzeige (im
Wiedergabemodus) angezeigt.
Im Bildschirmmenü DISPLAY MENU können Sie auswählen, ob die Statusmeldungen angezeigt werden sollen oder nicht.
Bildschirmmenü DISPLAY MENU
DISPLAY MENU
MENU
DISPLAY
TITLE/CHAPTER/INDEX
RECORDER MODE
TIME/DATE
REMAIN
DATE STYLE
LCD
ON
TITLE+CHAPTER
ON
TIME+DATE
ON
MM/DD/YY
TITLE+CHAPTER
Um Statusmeldungen anzuzeigen:
Wählen Sie im Bildschirmmenü DISPLAY MENU im Menüpunkt DISPLAY die
Option ON.
Sie können wählen, welche Informationen oder Statusanzeigen angezeigt
werden sollen.
Wenn Sie im Menüpunkt DISPLAY die Option OFF wählen, werden keine Sta-
tusinformationen angezeigt.
Informationen zur Auf-
Statusmeldungen
4
nahme:
Wenn Sie die Taste SET UP
000 min
im Aufnahmemodus drücken, werden die Video-
DVD -RW
Kodierungsqualität und das
Audio-Kodierungsformat
angezeigt. Wenn Sie die
Taste SET UP dann erneut
drücken, werden diese
Informationen nicht mehr
angezeigt.
1
2
3
04/05/06
11:20:00
TITLE 01 0:11:22
CHAPTER
01 0:11:22
REC
5
Nr. Feld Beschreibung
1 Betriebszustand Der aktuelle Betriebszustand des DVD-Recorders wird in diesem Feld angezeigt.
Stellen Sie im Bildschirmmenü DISPLAY MENU im Menüpunkt RECORDER MODE ein,
ob diese Anzeige eingeblendet werden soll oder nicht.
NO DISC : Es ist keine Disc im DVD-Recorder eingelegt.
EJECT : Die aktuelle Disc wird ausgeworfen.
STOP : Stoppmodus
REC : Aufnahmemodus
REC PAUSE : Aufnahmepause-Modus
PLAY : Wiedergabemodus
STL : Standbildmodus
FWD >> : Schnellvorlauf (geringe Geschwindigkeit)
FWD >>> : Schnellvorlauf (hohe Geschwindigkeit)
REV << : Schnellrücklauf (geringe Geschwindigkeit)
REV <<< : Schnellrücklauf (hohe Geschwindigkeit)
SLOW FWD >>> : Langsamer Vorlauf (hohe Geschwindigkeit)
SLOW FWD >> : Langsamer Vorlauf (geringe Geschwindigkeit)
SLOW REV <<< : Langsamer Rücklauf (hohe Geschwindigkeit)
SLOW REV << : Langsamer Rücklauf (geringe Geschwindigkeit)
LOADING : Eine Disc wird geladen.
RESTORE : Disc-Wiederherstellung wird durchgeführt. (X Seite 41)
G-17
 Loading...