

Page 1

1
COMPLETE BALANCE
SUPPORT
COMFORTABLE
TEMPORARY SEAT
HEIGHT ADJUSTABLE
250 POUND
WEIGHT CAPACITY
INSTRUCTION GUIDE
ALL INSTRUCTIONS ENCLOSED MUST
BE READ, UNDERSTOOD, BEFORE USE.
250
ROLLATOR-
TRANSPORT
CHAIR
ROLLATOR
Page 2
32
CONTENTS:
Carefully remove the Rollator-Transport Chair frame
and parts from the box and inspect them for any
damage or missing parts that may have resulted
from shipping.
Call 1.844.277.6191 TOLLFREE with any questions.
PARTS INSIDE BOX:
(1) Unit (backrest, wheels, seat already attached)
(1) Carry bag
(2) Foot rests (left and right)
(1) Instruction Guide (Must be read completely
before use)
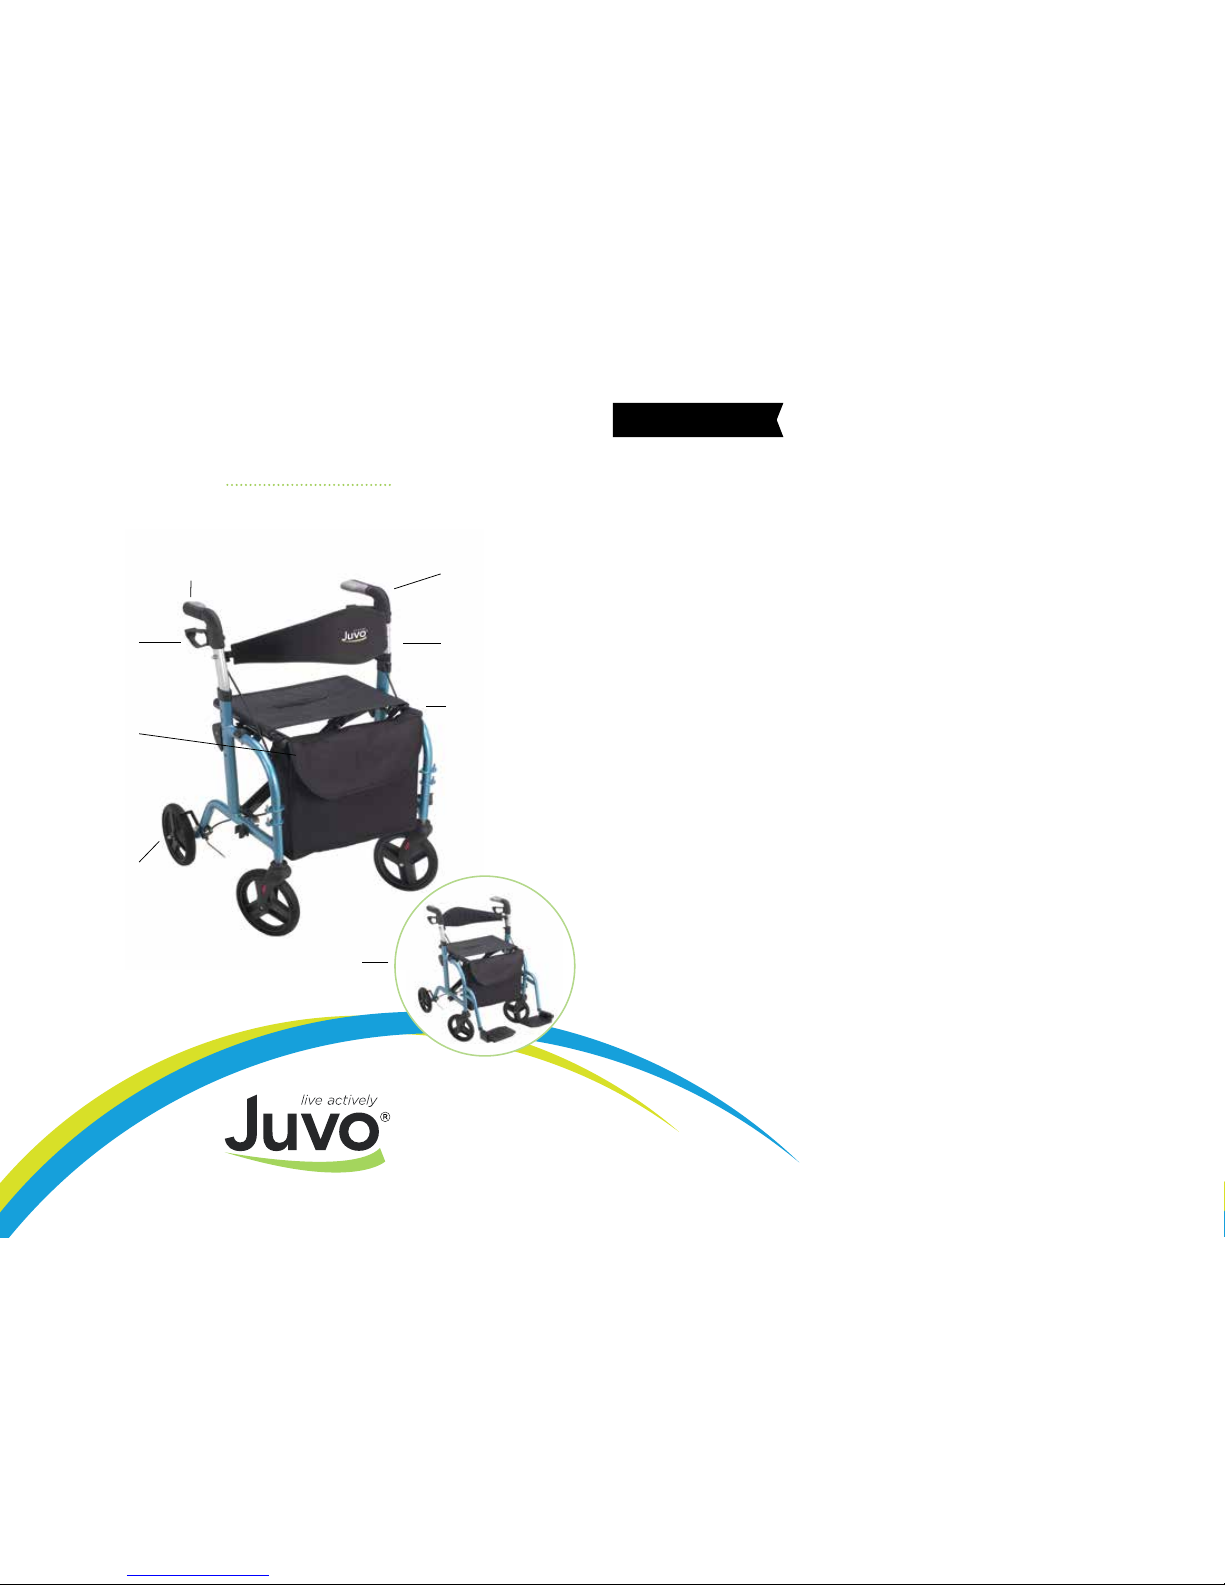
walk safely.
walk in style.
ergonomic
comfort handles
height
adjustable
handles
locking
brakes
Deluxe 8”
indoor/outdoor
wheels
TWO PRODUCTS IN ONE
detachable
carry bag
250 lb weight
capacity
footrests convert
rollator into
transport chair
EZ fold design
for storage,
transport
Page 3
54
7
9
10
11
OPERATING INSTRUCTIONS:
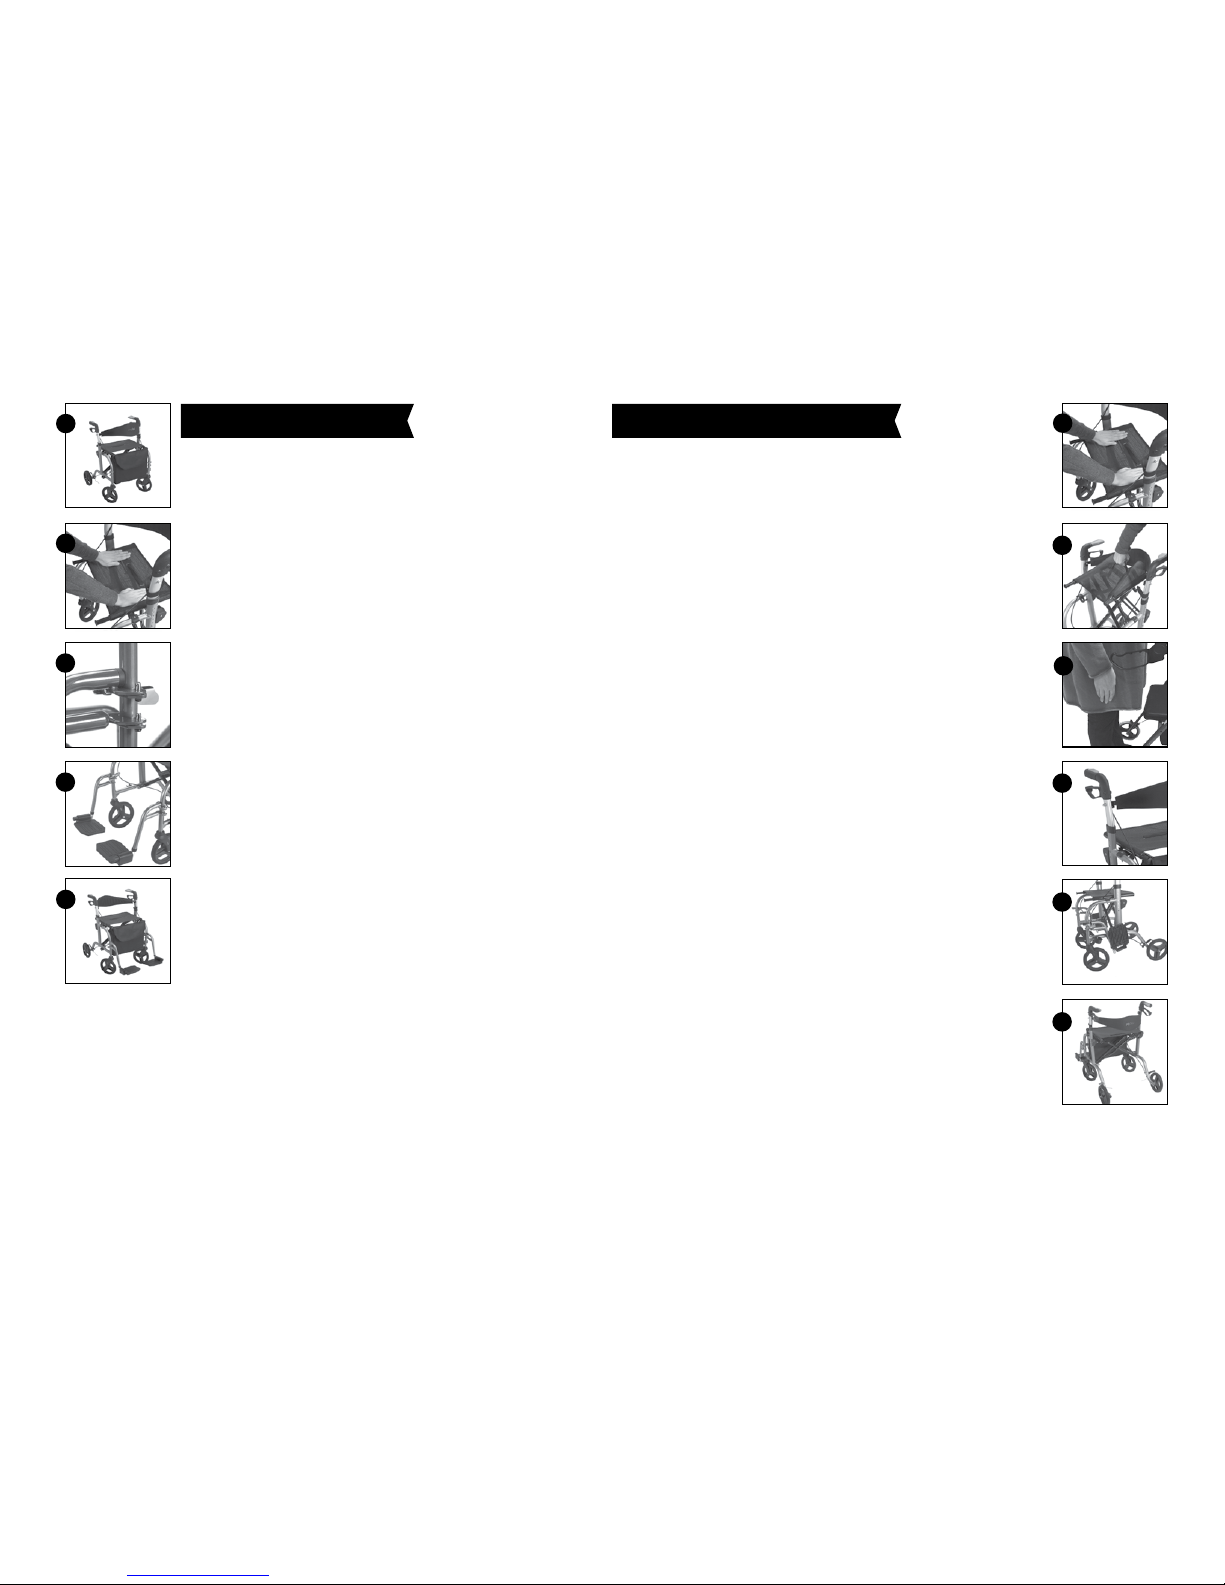
1. TO OPEN ROLLATOR-TRANSPORT CHAIR
• Place unit upright on floor (see image 1)
• Push down on seat until it is locked in place
(see image 6).
2. TO CLOSE ROLLATOR-TRANSPORT CHAIR
• Lift up on sewn handle in middle of seat until
unit folds in (see image 7).
3. TO ADJUST HANDLE HEIGHT:
• User should stand behind unit with arms
hanging at their side and feet lined up with rear
wheels (see image 8).
• Handles should be even with wrists for proper fit.
• Use push pins on sides of handle uprights to
adjust height accordingly. Make sure push pins
are fully engaged in holes and handles are same
height (see image 9).
4. ROLLATOR MODE
• Backrest should be flipped to front of unit over
front wheels (see image 1).
• Footrests can be removed (see Assembly
Instructions) or folded back and clipped to side
of unit. Flip front footrests up. Unclip latches near
extension pins by pulling away from the unit to
release the footrest. Swing footrests back on side
of unit. Click footrests into plastic clamps to hold
into place (see image 10).
5. TRANSPORT CHAIR MODE
• Flip backrest so that it faces back of unit, over
back wheel (see image 5, 11).
• Make sure footrests are in correct position
(see image 12, next page) Refer to Assembly
Instructions #3.
6
8
1
5
2
3
4
ASSEMBLY INSTRUCTIONS:
1. Place unit on the floor, seat facing up (see
image 1). Push down on seat until it is locked
in place (see image 2).
2. Place carry bag over plastic extensions at the
front of the seat, with bag opening facing
toward the front (see image 1).
3. For Transport Chair mode:
Attach footrests over extension pins above the
front wheels and swing into postion until latches
click securely into place (see image 3,4). Fold
footplates down into position.
4. Backrest should face back of unit, over back
wheels, for Transport Chair mode
(see image 5, 11).
5. Backrest should face forward, over front wheels,
for Rollator mode (see image 1).
Page 4
76
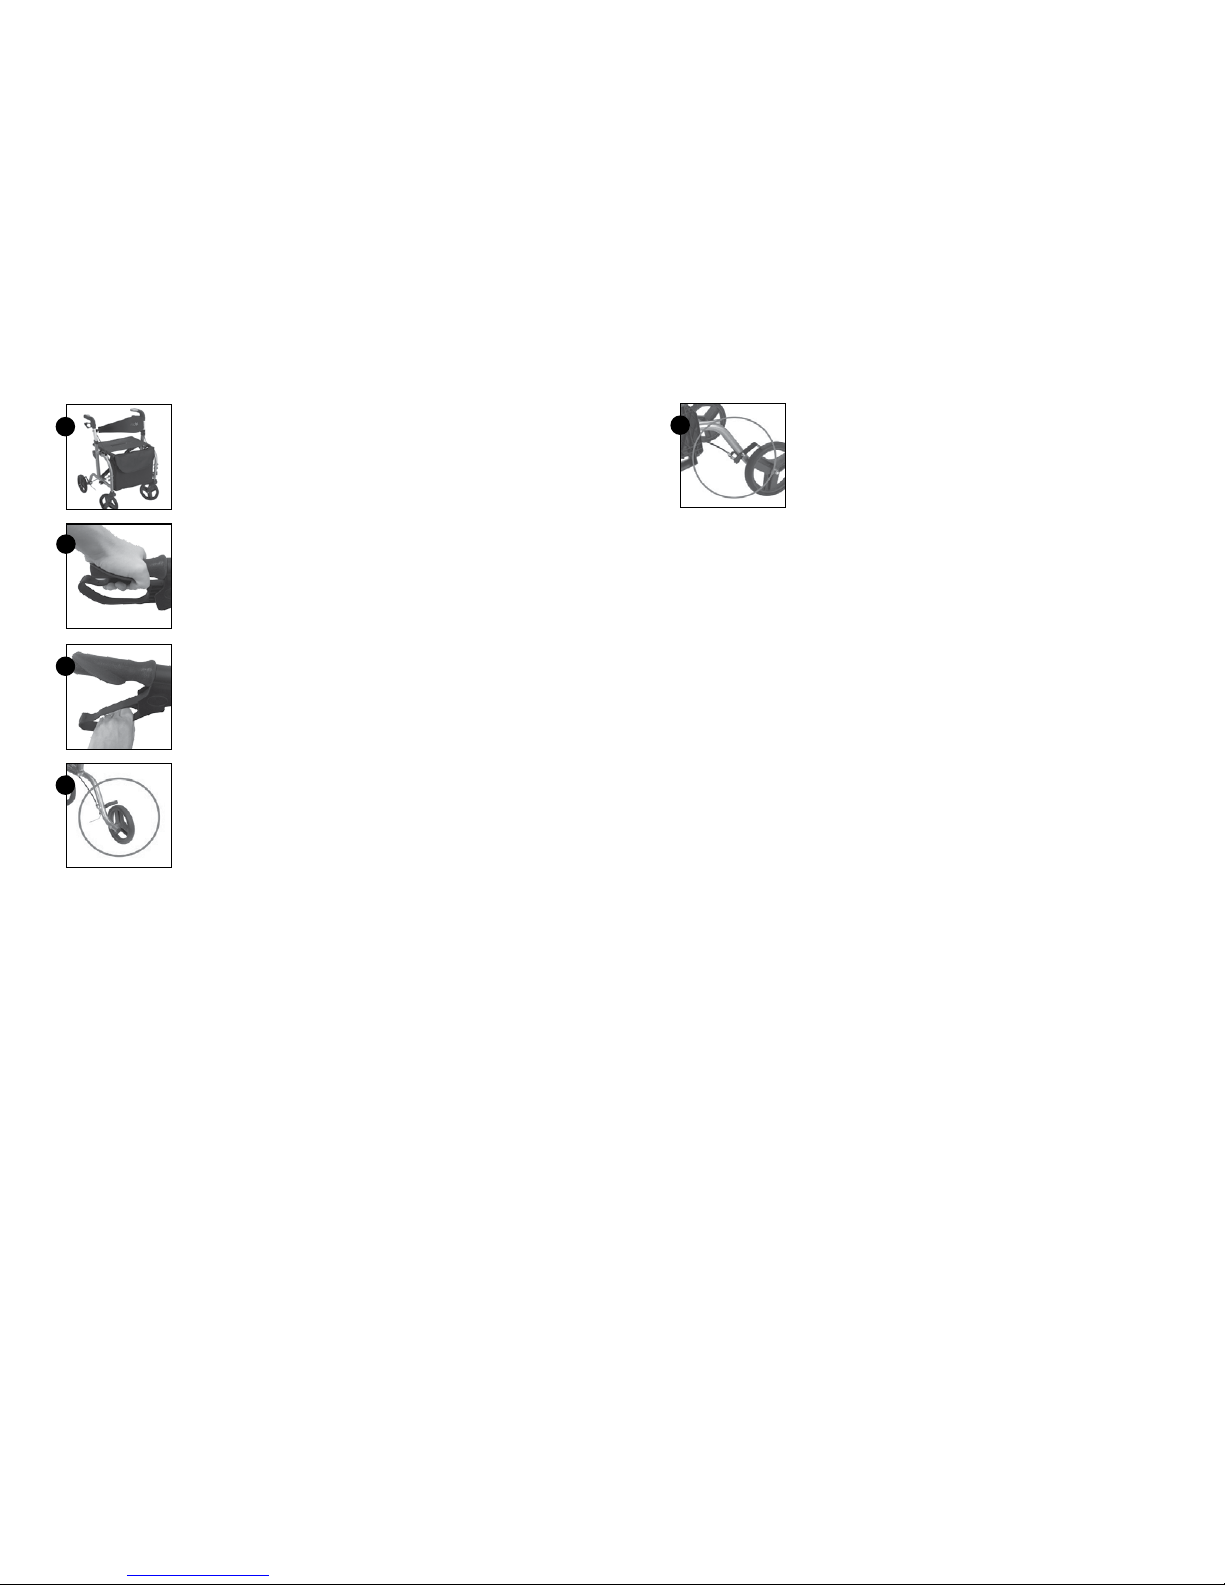
LOOSEN BRAKES
• Place Rollator-Transport Chair upright
on floor.
• Loosen nut at top of brake shoe assembly,
near wheel. Turn clockwise until desired
tension is achieved (see image 16).
• Test by squeezing hand brake — ensure that
metal brake shoe fully engages the wheel.
• Adjust as needed.
16
14
15
12
6. BRAKES
• Squeeze the brakes to stop the Rollator-Transport
Chair (see image 13).
• Push the brakes straight down to the locking
position (see image 14).
• BRAKES MUST BE IN THE LOCKED POSITION
WHENEVER SITTING ON THE ROLLATORTRANSPORT CHAIR. ALWAYS ENGAGE,
DISENGAGE BRAKES SIMULTANEOUSLY.
4. CHECK HAND BRAKES
• Hand Brakes should be in working order
after assembly.
• Check Hand Brakes periodically for proper
function.
• Squeeze the hand brakes and check to ensure
that the metal brake arms engage the wheels
and stop the Rollator-Transport Chair
(see Image 15).
• Push the Hand Brakes DOWN into their locking
position and check to ensure that the metal
brake arms engage the wheels and stop the
Rollator-Transport Chair (see Image 15).
5. HAND BRAKE ADJUSTMENT
• Hand Brakes should be in working order after
assembly.
• However brakes can loosen during normal use.
TIGHTEN BRAKES
• Place Rollator-Transport-Chair upright on floor.
• Loosen nut at top of brake shoe assembly,
near back wheel. Turn counter-clockwise until
desired tension is achieved (see image 16).
• Test by squeezing hand brake — ensure that
metal brake shoe fully engages the wheel.
• Adjust as needed.
13
Page 5

98
JUVO PRODUCTS, LLC
ROLLATOR LIMITED LIFETIME WARRANTY
Juvo takes great pride in providing products of superior quality, design
and function.
This Limited Lifetime Warranty applies to Rollator products manufactured
by or on behalf of Juvo Products, LLC, (Juvo), under the brand name
“Juvo®” and referred to in this Limited Lifetime Warranty as “Product.”
Product is warranted to be free from defects in materials and workmanship for
so long as the original owner owns such Product. In the event of any such defect
during the warranty period, Juvo® will remedy the defect as described herein,
without charge to the purchaser, as soon as practicable. The remedy will consist
of repair or replacement of the Product, or refund of the purchase price, at the
discretion of Juvo
®
after opportunity to inspect the alleged defect or photographs
thereof. All freight and labor charges will be the responsibility of the purchaser.
This Limited Lifetime Warranty applies to the original owner only and is
non-transferable. This Limited Warranty does not cover:
• Labor for any inspection.
• Labor for replacement of any defective item(s).
• Incidental or consequential damages.
• Minor cosmetic defects, which do not affect performance or integrity of
a part or the entire Product.
• Non-durable parts that are subject to normal wear and tear, such as Wheels,
Hand Grips, Padding,
Cables-Brakes, Upholstery, Bag, Plastic Parts.
• Vandalism, improper use, or negligence of the owner.
• Scratches or scrapes to materials or parts, dents, tears in fabric, or other
issues that arise out of normal use of the Product.
This Limited Lifetime Warranty applies to Product purchased for personal use
only. Product purchased for institutional multi-use environments are excluded
from this warranty.
Juvo® Products have been designed for safety and quality. Any mod ifications
made to the original Product could damage the structural integrity of the unit
leading to fai lure and possible inj ury. Modification of the original Product voids
any and all warranties and Juvo® assumes no liability for any modified Products
or consequences resulting from failure of a modified Product.
SAFETY PRECAUTIONS:
1. READ ALL ASSEMBLY, OPERATING INSTRUCTIONS BEFORE USE
2. Please make sure Rollator-Transport Chair is fully opened, seat is
pushed down all the way (see image 2).
3. Make sure all knobs, nuts, bolts are fully tightened. Check regularly
to ensure they are secure at all times
4. Make sure Rollator-Transport Chair is level, handles are level as per
Operating Instructions #3.
5. Test Rollator-Transport Chair for stability before applying full weight
to hand grips or seat.
6. Test brakes before using
7. ALWAYS LOCK BRAKES BEFORE SITTING, please refer to Operating
Instructions, #6 Brakes and Image 14
8. Replace tires when significantly worn or damaged
9. Caution: Keep hands clear of frame when folding
10. Maximum weight capacity 250 lbs.
Call Juvo Products
Customer Service
Toll Free: 1.844.277.6191
with any questions
Page 6

1110
Warranty Claims: The purchaser must notify Juvo directly of any claims under
this Limited Lifetime Warranty within seven (7) days following the discovery
of the problem. To make a claim under this Limited Lifetime Warranty, the Buyer
should contact Juvo Products, LLC at:
111 North Street, Suite 205
Barrington, Illinois 60010
Attention: Customer Service
TOLL FREE CUSTOMER SERVICE: 844.277.6191
A copy of the original purchase receipt should accompany any claim under this
Limited Lifetime Warranty.
Juvo shall have no obligations under this Limited Lifetime Warranty if the
purchaser fails or refuses to reasonably cooperate in Juvo’s investigation of the
claim (such as failing to provide photographs and or written documentation of
the claim). If Juvo determines there are defects covered by this Limited Lifetime
Warranty, Juvo will have up to thirty (30) days after receipt of notification to
process the purchaser’s claim.
This Warranty gives you specific legal rights. You may have other rights as well
which vary from state to state or province to province. This warranty excludes
all consequential damages, however, some states do not allow the limitation or
exclusion of consequential damages and therefore this limitation may not apply
to you.
(844) 277-6191
SEE ALL JUVO LIFESTYLE PRODUCTS
AT JUVOPRODUCTS.COM
Made in China
LIFESTYLE PRODUCTS
that improve mobility and safety
around the home
BALANCE &
MOBILITY
REACHING
BATHING
OPENING
SAFETY
CARRYING
DAILY LIVING AIDS
DRESSING
TOILETING
SURGERY
RECOVERY
Page 7

12
juvoproducts.com
111 North Street, Suite 205
Barrington, Illinois 60010
1.844.277.6191 TOLL FREE
 Loading...