

Justin JP-140-3000i User Manual
3,000mAh Power Case
Designed for iPhone® 5s/5
by
Model:
JP-140-3000i
USER MANUAL
1
BEFORE INSTALLING AND USING THE PRODUCT,
PLEASE READ THE INSTRUCTIONS THOROUGHLY,
AND RETAIN THEM FOR FUTURE REFERENCE.
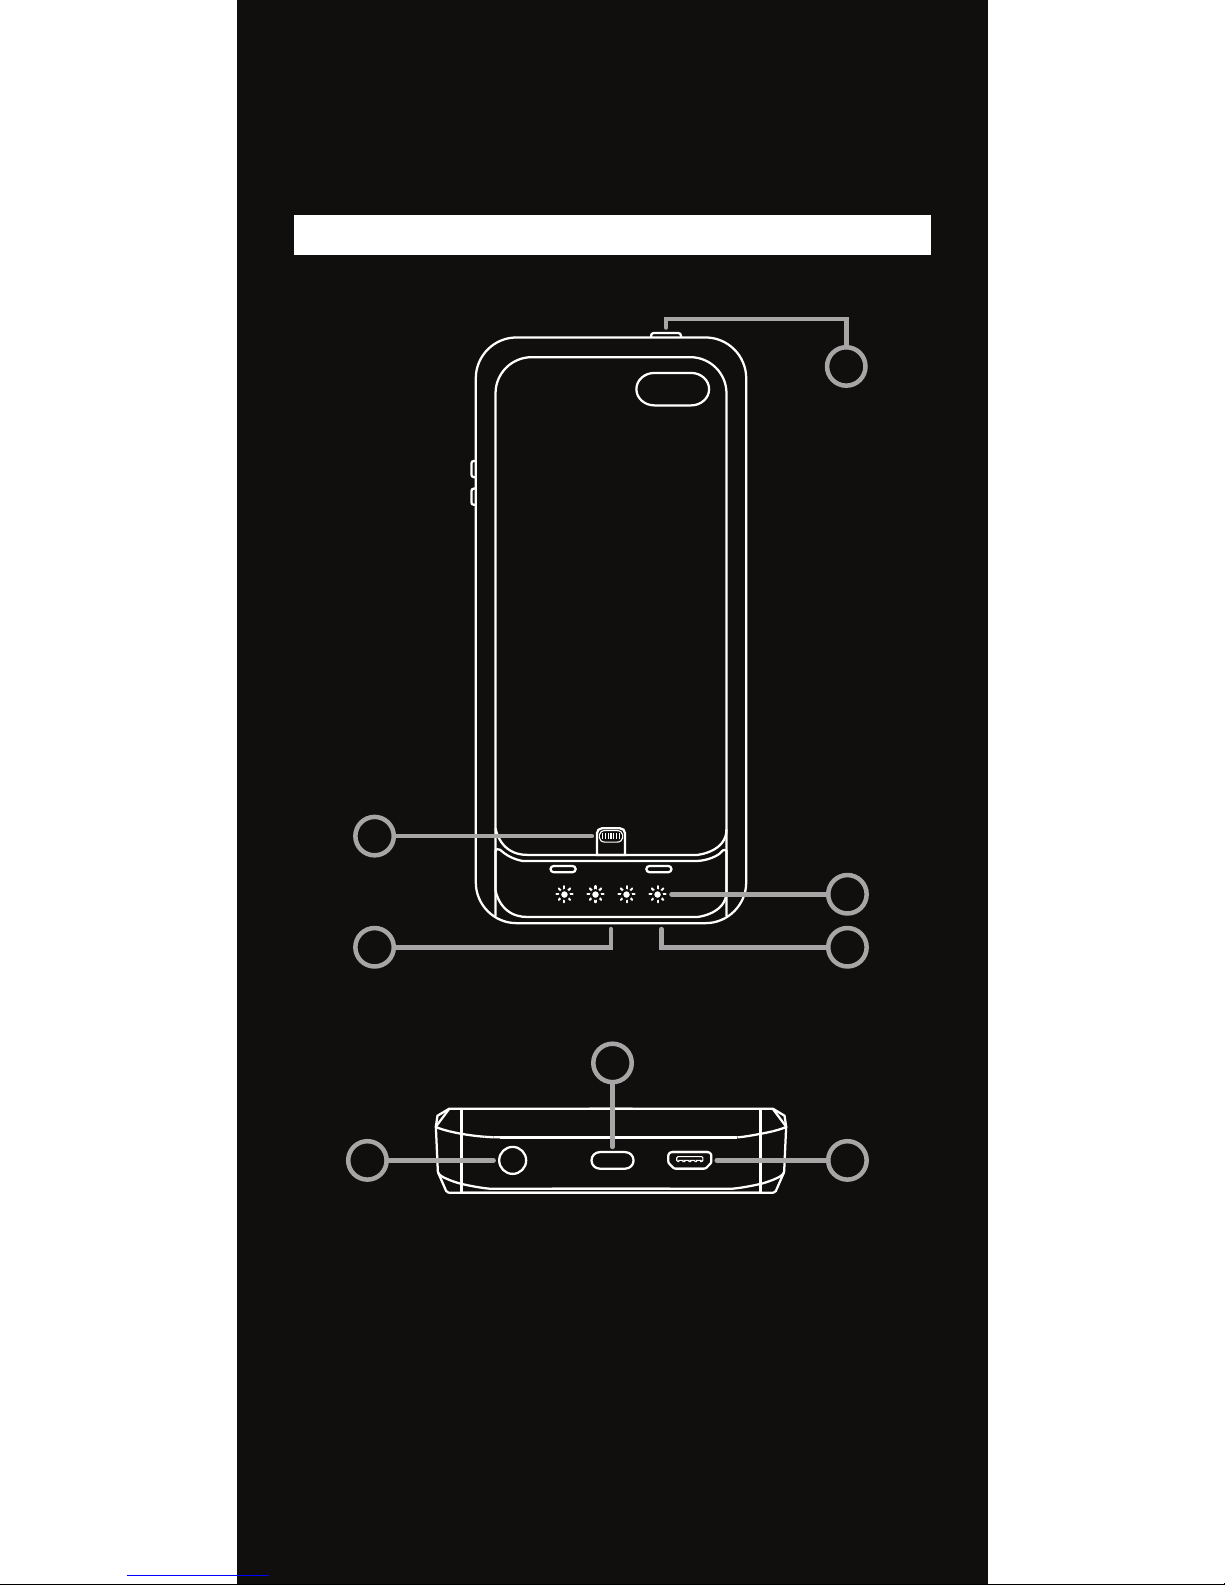
PRODUCT OVERVIEW
Included:
(1x) iPhone 5s/5 Power Case, (1x) Charging Cable
(1x) 3.5mm Headphone Extension Cable
1. Power Button
2. Lightning
™
Connector
3. Power Indicator LEDs
4. Stand Release Button
5. Micro USB Input
6. Headphone Opening
SPECIFICATIONS
To ensure safe operation, check your device’s
compatibility with Power Case specifications
prior to use.
CHECKING THE POWER LEVELS
1
2
BOTTOM
1
5
6
2
3
1
5
4
FRONT

SPECIFICATIONS
To ensure safe operation, check your device’s
compatibility with Power Case specifications
prior to use.
CHECKING THE POWER LEVELS
Battery Cell: Lithium-Polymer
Capacity: 3,000mAh/3.7V; 11.1W
Input: 5V-1A
Output: 5V-1A (Max)
Charging Time: 5.5 hours
Dimensions: 5.7 x 2.6 x .6in (146 x 66 x 16mm)
To view the battery status, press the Power Button.
The Power Indicator LEDs indicate the Power Case’s
power level according to the diagram.
When charging the Power Case, the LEDs will FLASH
according to the current power level (i.e., at 40%
charged, one
LED will be lit.
the second will
be flashing).
Once the Case is
fully charged,
the LEDs will
stop flashing.
To view the
power level
while charging
your iPhone,
press the Power
Button. The LEDs
will light up for
approximately 3
seconds, then
turn OFF.
1–25% Charge
Completely Drained
51–75% Charge
76–100% Charge
26–50% Charge
LEDs While Charging iPhone:
26–50% Charged
1–25% Charged
76–99% Charged
100% Charged
51–75% Charged
LEDs While Recharging
Power Case:
USE
Before first use, it is recommended you charge the
Power Case via AC power plug (not included). The
Case will take approximately 5.5 hours to charge
from 0-100%.
1. Charging the Power Case:
Plug the supplied Micro USB Charging Cable into
the Case’s Micro USB Input. Insert the USB end of
the cable into a computer or AC power source
with a 5V USB output. The Power Indicator LEDs
will begin flashing. Once fully charged, the LEDs
will remain lit.
Note: It is recommended to keep charging the
Power Case for approximately 1 hour after the
LEDs stop flashing.
2. Inserting iPhone 5s/5 into Power Case:
Place your iPhone into the Power Case by sliding
the Stand Release Button to the left and pulling
the stand forward. Carefully dock your iPhone
onto the Lightning Connector. Clip the stand back
into place.
3. Charging your iPhone 5s/5:
Once your iPhone has been inserted into the
Power Case, press the Power Button on the
bottom of the Power Case for 3 seconds to
begin charging. Charging will continue until
your iPhone is fully charged or the Case’s internal
battery has drained.
4. Using the Headphone Jack:
Undock your iPhone from the Power Case. Feed
your headphone jack through the Headphone
Opening, then plug it into your iPhone. Re-dock
your iPhone into the case. Please note: In some
cases, it is required to use the 3.5mm
2
3

USE
Before first use, it is recommended you charge the
Power Case via AC power plug (not included). The
Case will take approximately 5.5 hours to charge
from 0-100%.
1. Charging the Power Case:
Plug the supplied Micro USB Charging Cable into
the Case’s Micro USB Input. Insert the USB end of
the cable into a computer or AC power source
with a 5V USB output. The Power Indicator LEDs
will begin flashing. Once fully charged, the LEDs
will remain lit.
Note: It is recommended to keep charging the
Power Case for approximately 1 hour after the
LEDs stop flashing.
2. Inserting iPhone 5s/5 into Power Case:
Place your iPhone into the Power Case by sliding
the Stand Release Button to the left and pulling
the stand forward. Carefully dock your iPhone
onto the Lightning Connector. Clip the stand back
into place.
3. Charging your iPhone 5s/5:
Once your iPhone has been inserted into the
Power Case, press the Power Button on the
bottom of the Power Case for 3 seconds to
begin charging. Charging will continue until
your iPhone is fully charged or the Case’s internal
battery has drained.
4. Using the Headphone Jack:
Undock your iPhone from the Power Case. Feed
your headphone jack through the Headphone
Opening, then plug it into your iPhone. Re-dock
your iPhone into the case. Please note: In some
cases, it is required to use the 3.5mm
Headphone Extension Cable. To use, plug your
headphone jack into the extension cable. Take the
Headphone Extension Cable’s jack and feed it
through the Headphone Opening and plug it into
the iPhone. Re-dock your iPhone into the case.
TROUBLESHOOTING
1. iPhone is Not Charging:
• Power Button has not been activated; press the
Power Button for 3 seconds and check that the
LEDs light up
• iPhone is not docked correctly on the Lightning
Connector; re-dock the iPhone
• Lightning Connector is damaged; please
contact manufacturer
•
Power level of Case is too low; recharge the Case
• The voltage of the device you are attempting to
charge is incompatible; check voltage
specifications
2. Power Case is Not Charging:
• Charging cable/tips are not connected
correctly; re-connect and attempt charging
again
• Charging cable/tips are damaged; please
contact manufacturer
• Charging source is not compatible; check
voltage specifications
PLEASE NOTE
• The Power Case comes pre-packaged with a
partial charge, NOT a full charge. We recommend
fully charging your Case before first use for best
performance.
• If your iPhone is not charging, this may be a sign
that the battery level of the Power Case is very
low and you need to recharge it.
3
4

Headphone Extension Cable. To use, plug your
headphone jack into the extension cable. Take the
Headphone Extension Cable’s jack and feed it
through the Headphone Opening and plug it into
the iPhone. Re-dock your iPhone into the case.
TROUBLESHOOTING
1. iPhone is Not Charging:
• Power Button has not been activated; press the
Power Button for 3 seconds and check that the
LEDs light up
• iPhone is not docked correctly on the Lightning
Connector; re-dock the iPhone
• Lightning Connector is damaged; please
contact manufacturer
•
Power level of Case is too low; recharge the Case
• The voltage of the device you are attempting to
charge is incompatible; check voltage
specifications
2. Power Case is Not Charging:
• Charging cable/tips are not connected
correctly; re-connect and attempt charging
again
• Charging cable/tips are damaged; please
contact manufacturer
• Charging source is not compatible; check
voltage specifications
PLEASE NOTE
• The Power Case comes pre-packaged with a
partial charge, NOT a full charge. We recommend
fully charging your Case before first use for best
performance.
• If your iPhone is not charging, this may be a sign
that the battery level of the Power Case is very
low and you need to recharge it.
• It is normal for the Power Case to become slightly
warm during use.
MAINTENANCE
In order to keep your Power Case operating at
maximum potential, please follow these guidelines:
1. Recharge the Power Case every 2 months when
not in use. Charge to at least 40%, as this will
extend the battery life.
2. Keep your Power Case dry and away from moist
and corrosive materials. DO NOT get wet. In
addition, never expose to high heat environments.
Avoid extreme temperatures of hot or cold as it
will decrease the overall battery performance.
SAFETY PRECAUTIONS
Please read this section carefully before using.
• Only use this product with confirmed power
sources that follow device specifications.
• Only use specified charging methods or reputable
branded chargers that are compatible with device
specifications.
• Do not use product beside or in close proximity to
a heat source such as a ventilation heat vent,
convection heater, burner, etc.
• Do not expose device to moisture or submerge it
in liquid. Do not leave device inside an excessively
hot or cold environment. Store device in a cool
and dry environment at all times.
• Avoid dropping or applying excessive shock and
force to device. Do not use in unprotected outdoor
environments or in exposed sunlight for a
prolonged period of time.
• Do not use device in a confined space. Restricted
or insufficient airflow will put device at risk of
4
5
 Loading...