

Justin JED700M Owner's Manual
OWNER’S GUIDE
Module: SKD203
JustIn JED700M E-Drumset

Congratulations!
Thank y ou for purch asing this d igital dru m set. The dru m set has been D eveloped t o
act and p lay like a dru m set but with g reater eas e. Before yo u use the inst rument, we
recom mend you to re ad through t his manual .
Taking care of Your Digital Drum Set
Location
- Do not expose the unit to the following
Conditions to avoid deformation,
discoloration or more serious damage.
- Direct sunlight.
- High temperature (near a heat)source,
Or in car during the day time).
- Disconnect all cables before moving
The instru ment.
Power Supply
-make sure to use the suitable AC adaptor,
and also make sure the ac outlet voltage
at your country matches the input voltage
specified on the AC
AC adaptor's label.
-Turn the power switch OFF When the
Instrument is not in use.
-An AC adaptor should be unplugged
from the AC outlet if the instrument is
not be used for an extended period of
time.
- Unplug the AC adaptor during electric
storms.
-Avoid plugging the AC adaptor into
-The same AC outlet as appliance with
high power consumption, such as
electric heaters or ovens. Also avoid
using multi-plug adaptors since these
can result in reducing the sound quality,
operation errors, and possibly damage.
The unit (ui nyl can stic k to and
- Disco nnect all ca bles befor e movin g
bumpi ng, or placi ng heavy objects on
the ins trument ca n result in sc ratches
more se rious dama ge.
- C le an th e uni t with a dry s oft c lo th.
- A Sligh tly damp clo th may be used t o
Remov e stubborn g rime and dirt.
- Never u se cleaner s such as alcohol
or thin ner.
- Avoid placi ng vinyl object on to p of
disco lor the surf ace).
- This instr ument cont ains digital
circu itry and may c ause inter ference
Handling and Transport
- Ne ver a p pl y e xce ssi ve for ce to the
contr ols, conne ctors or oth er parts of
the ins trument.
- Always u nplug cables by gri pping the
plug fi rmly, but not pull ing on the cable.
- Physi cal shocks caused b y dropping ,
Cleaning
Electrical Interference
if pl
telev ision rece ivers . If this occu rs,
move th e instrume nt further a way
from th e aff ected equi pment.
aced to o close to rad io or
Turn Power OFF When Making
Connections
- To avoid damage to the instrument
and other devices to which it is
Connected, turn the power switches of
all related device OFF prior to connecting
or disconnecting cables.

Content:
Panel description.................................1
Connect with external devices ..........6
Connect audio system&drum amp.....6
Connect heahpone ....6.........................
Connect MP3 or CD player................6
Connect PC .......................................6
Connect MIDI keyboard.....................7
Power supply and switch...................7
Basic o perating ........ ........ ........ ...8
Select drum kit .8..................................
Playing the pads.................................8
Perfo rming... ........ ........ ..............10
Use metronome ...............................10
Adjust click.......................................10
Adjust click tempo............................10
Edit and create owner’s drum kit......11
Change pad voice.............................11
Change pad volume..........................11
Change pad L/R CH pan 11..................
Change MIDI output pitch 12................
Save setting to user drum kit............12
Adjus t pad Trigger. ........ ........ ....13
Adjust pad curve 13...............................
Adjust pad threshold.........................14
Eliminate pad crosstalk 14.....................
Adjust pad sensitivity
Eliminate pad crosstalk 4.....................1
..... ........ ..14
Mask Time........................ ..... 14
Retri g Cancel: .. ...... 15..... ........ .....
SAVE TRIGGER SET TING . 5..... ..1
Adjust pad effect 16........................................
EQ setting................................................16
Ambience setting 16.....................................
Reloa d to default s etting.. ........ ........ .17
Drumrim opt ion
DEMO SONG playing 18.................................
Select DEMO SONG 18..................................
Selec t DEMO SONG. ........ ........ .......1 8
Adjus t volume of ac compa niment
& drum. ........ ........ ........ ........... .......1 6
Mute Dr ums of DEMO SO NG...... .....18
Adjus t DEMO SONG te mpo..... ........ .18
Recor d your perfo rmance ... ........ .....19
Recording quickly 19.....................................
Play ba ck perform ance............ .......1 9
MIDI setting 20.................................................
MIDI connection.......................................20
Conne ct with exte rnal audio device . .20
Chang e pad voice......... ........ ........ ...20
MIDI list 21.......................................................
Trouble shooting 23........................................
Audio source parameter 23.............................
Drum kit list 24................................................
Voice list 26.....................................................
DEMO SONGlist 28.........................................
..... ........ ........ ........17
Panel Description
Front panel
2
1
3
4
5
6
7
8
9
10
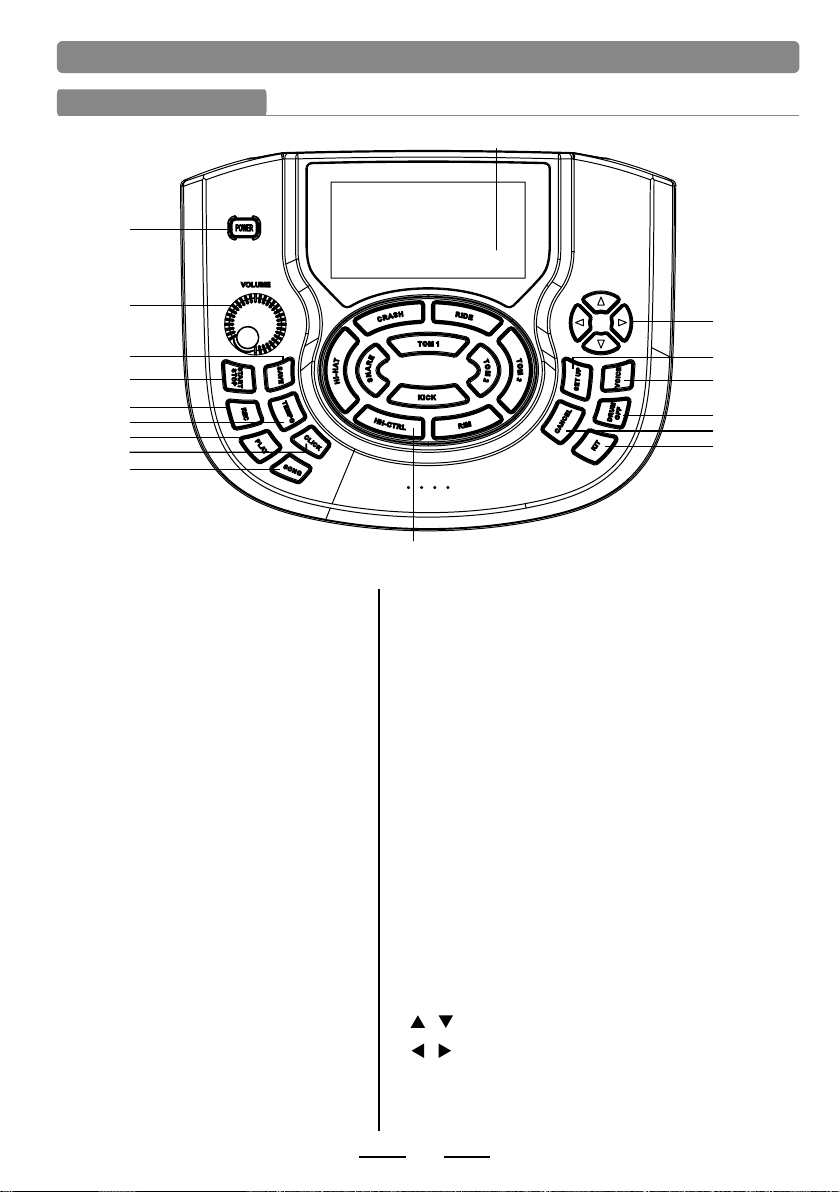
1. LCD
Displays the menu content.
2. Power switch
Turns on /off the power supply.
3. MASTER VOLUME
Adjust the volume of phone and line output.
4. SAVE
Save the parameter setting.
Save the current kit setting.
5. START/STOP
Start or stop playing DEMO SONG.
6. RECORD
Record the drum set sound.
7. TEMPO
Enter into the tempo setting quickly.
8. PLAY
Play/pause the recorded sound.
9. CLICK
Play the
metronome.
10. SONG
Enter into DEMO SONG setting quickly.
17
16
15
14
13
12
11
11. Pad indication
Indicates the working pad or tests the pad, or set
the pad parameter.
12. KIT
Switch to drum kit quickly.
13. CANCEL
Cancel the operation or go back to the former menu.
14. DRUM OFF
drum mutes when DEMO SONG is being played.
15. VOICE
Quickly switch to voice setting.
16. SET UP
metronome/drum/DEMO SONG etc.
Set up
17. Direction key
:Menu selection
:change the parameter
(hold the button to change the value continuously.)
1
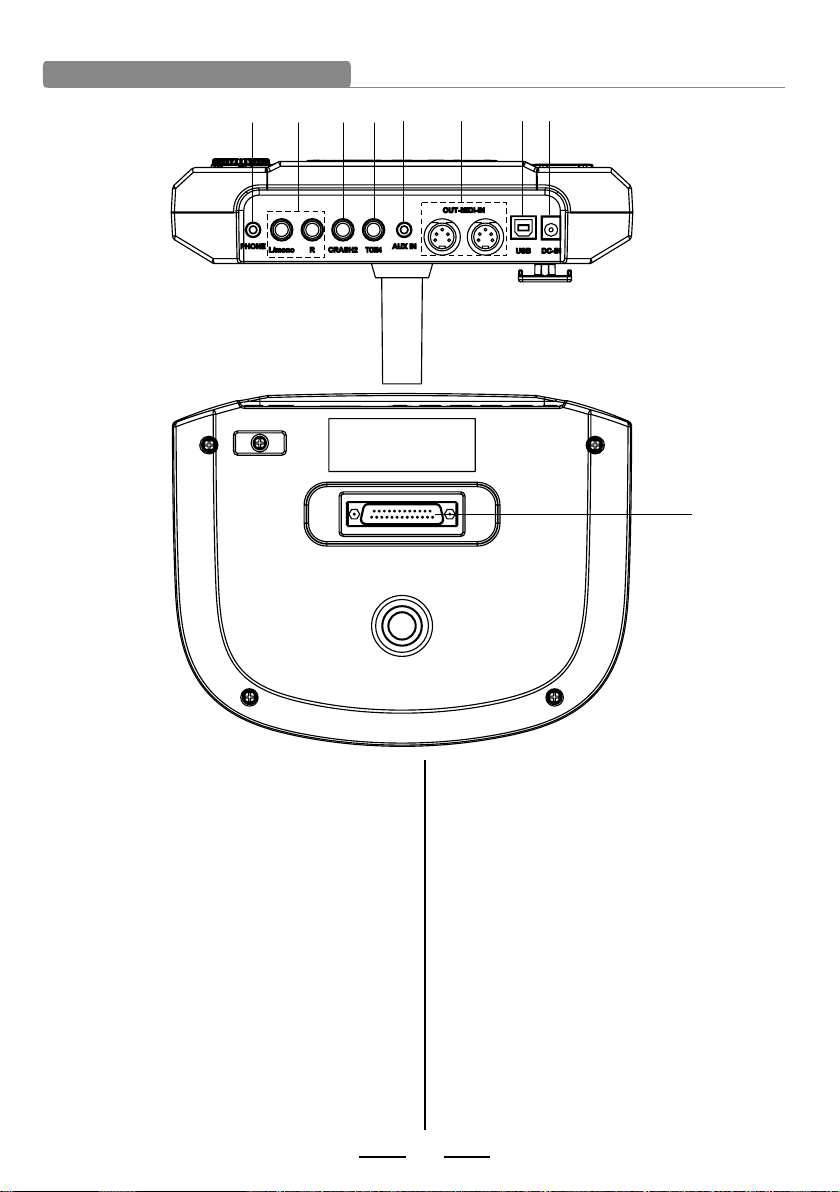
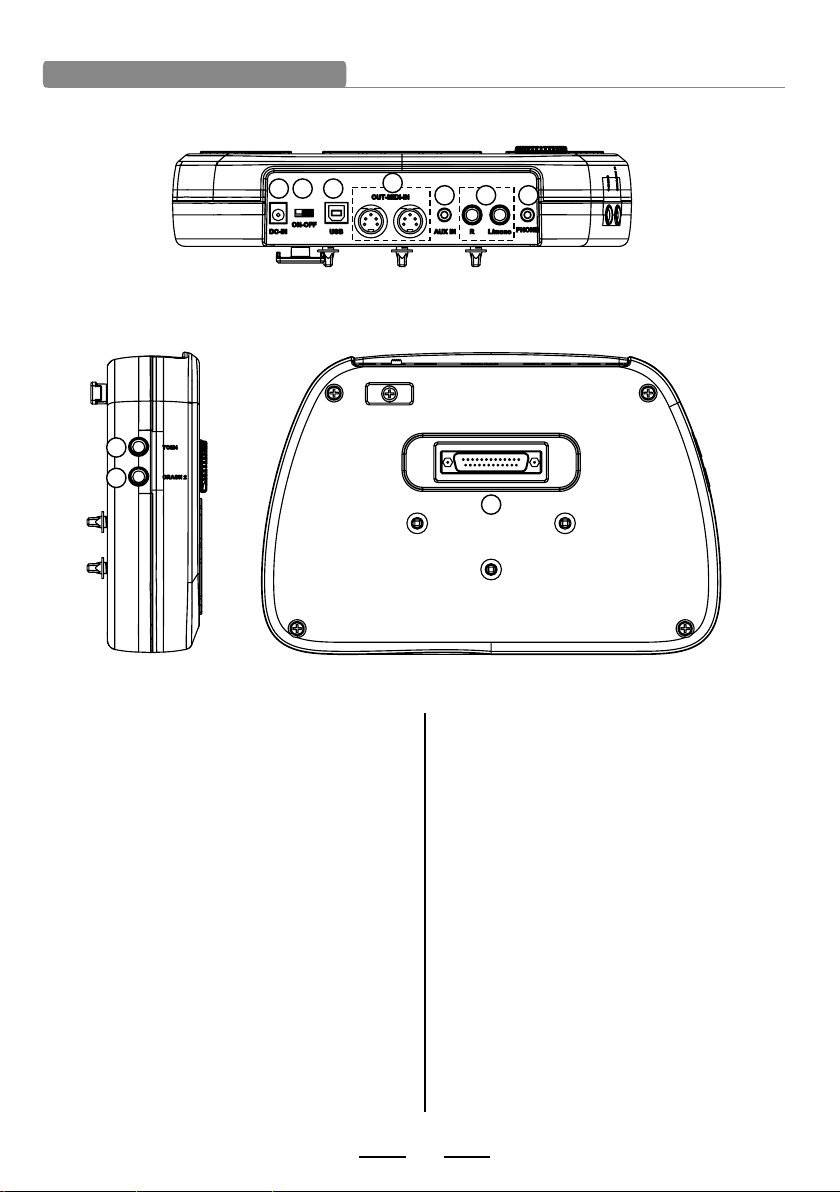
Rear panel co nnection
1918 20 21 22 23 24 25
26
18. PHONE
Headphone output connector.
19 -OUT PUT- L/mono R
L/R channel, connect with the output
connector of audio system or drum
amplifier.
20. CRASH2
Connect with CRASH2
21. TOM4
Connect with TOM4
22. AUX IN
External stereo input connector, e.g.
Mp3 or CD player.
23. IN---MIDI---OUT
Connect with the connector of external
device which has MIDI.
24. USB
Connect with PC connector (MIDI in/out
via USB)
25. DC IN
Adaptor connector, 5V DC.
26. PAD connection
Pad signal input connector, including: KICK,
TOM1--3, SNARE, RIDE,CRASH,HI-HAT
CTRL
2
Panel Description
Front panel
2
4
3
8
5
7
6
9
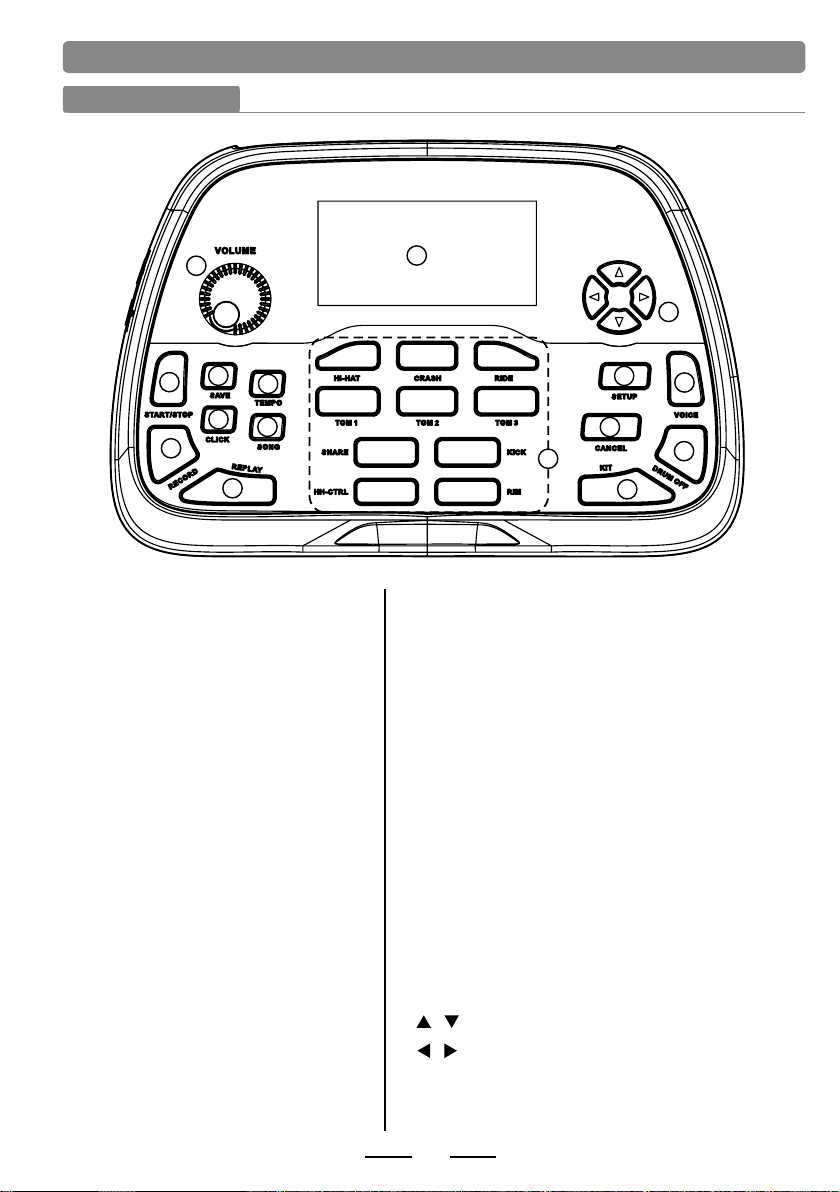
1. LCD
Displays the menu content.
2. MASTER VOLUME
Adjust the volume of phone and line output.
3. START/STOP
Start or stop playing DEMO SONG.
4. SAVE
Save the parameter setting.
Save the current kit setting.
5. TEMPO
Enter into the tempo setting quickly.
6. SONG
Enter into DEMO SONG setting quickly.
7. CLICK
Play the
metronome.
8. RECORD
Record the drum set sound.
9. PLAY
Play/pause the recorded sound.
1
16
15
14
13
10
12
11
10. Pad indication
Indicates the working pad or tests the pad, or set
the pad parameter.
11. KIT
Switch to drum kit quickly.
12. DRUM OFF
drum mutes when DEMO SONG is being played.
13. CANCEL
Cancel the operation or go back to the former menu.
14. VOICE
Quickly switch to voice setting.
15. SET UP
metronome/drum/DEMO SONG etc.
Set up
16. Direction key
:Menu selection
:change the parameter
(hold the button to change the value continuously.)
3
Rear panel co nnection
17 18 19
24
25
17. DC IN
Adaptor connector, 5V DC.
18. Power switch
Turns on /off the power supply.
19. USB
Connect with PC connector (MIDI in/out
via USB)
20. IN---MIDI---OUT
Connect with the connector of external
device which has MIDI.
21. AUX IN
External stereo input connector, e.g.
Mp3 or CD player.
20
2221 23
26
22 -OUT PUT- L/mono R
L/R channel, connect with the output
connector of audio system or drum
amplifier.
23. PHONE
Headphone output connector.
24. TOM4
Connect with TOM4
25. CRASH2
Connect with CRASH2
26. PAD connection
Pad signal input connector, including: KICK,
TOM1--3, SNARE, RIDE,CRASH,HI-HAT
CTRL
4

LCD initial i nterfaces
1).CLICK=4/4(default value when on):metronome parameter indication
2).TEMPO=100(default value when on):tempo parameter indication
3).KIT01 POP01(default value when on): drum kit indication
4).SONG01(default value when on): demo song indication
5).DRUM ON(default value when on): mutes the drum sound of demo song.
CLICK=4/4 T EMPO=100
KIT01 POP01
SONG01 DRUM O N
5
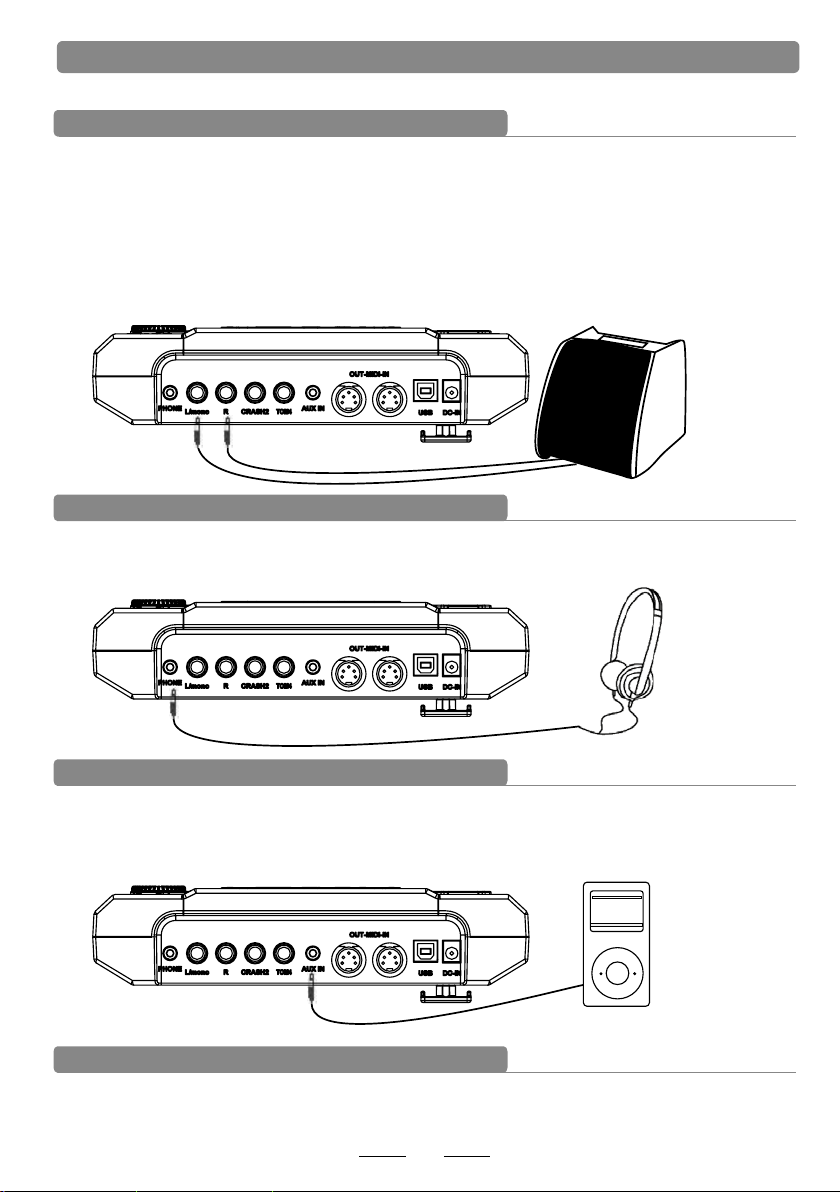
Connect with external devices
Connect to audio system or amplifier
When connecting with audio system or drum amplifier, use a cable to connect with L/mono R of the
audio system and the drum amplifier.
Note:
1).Connect with L/mono connector when connecting with mono audio device.
2).Connect with L/mono and R connector when connecting with stereo audio device.
3).The volume is controlled by the master volume knob of drum kit and of the audio device.
Connect headphone sto
The aud io source box has 1/4” h eadphone c onnector (if use a 1/8” he adphone ,u se an
adapt or), the vol ume is controlled b y the volume k nob of the aud io source bo x.
Connect to MP3 or CD player
Conne ct the outpu t of MP3 or CD player or ot her audio so urces with AU X.IN conne ctor. The
input s ignal can be mixed wi th the drum si gnal, stri ke the pads ac cording to t he rhythm of
the inp ut signal.
Connect to PC
1. Conn ect the comp uter via USB Receiv e and send MID I signal.
6
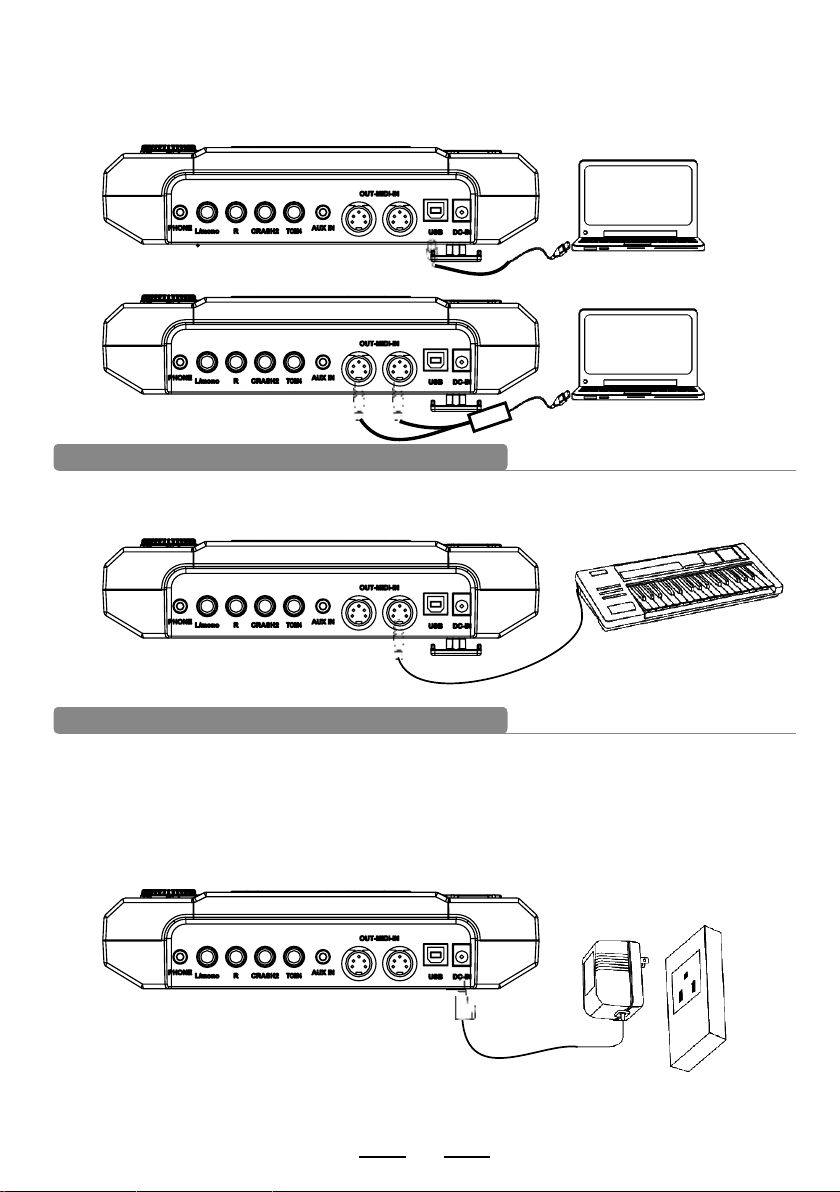
2.Con nect the com puter via MIDI port
MIDI IN : receiver M IDI signal o f computer or other d evices.
MIDI OU T: send pad perf ormance signal to e xternal MI DI devices o r computer.
Connect wit h a MIDI keyboard
MIDI co nnector:
connectio ns as s how n. Here, it is used as a so und m odu le.
If you're usi ng an e xte rnal MIDI keyboar d or pa ds to c ontrol the dig ita l dru m, make
Power supply and switch
Make sure the p owe r is sw itched OFF. Connect t he po wer a daptor to the DC I N jac k on th e side panel.
After confi rmi ng th at all connection s hav e bee n completed, r ota te th e volume knob to t he le ft (m ini mum
volume leve l) be for e swi tchin
indicator o n LCD w ill l igh t up and the displ ay wi ll sh ow kit number 01 pop 01 .
No te:
Make sure the p owe r is sw itched OFF when con nec tin g the drum modul e wit h ext ernal devices.
g the power on. S et th e pow er switch to the “O N” pos iti on. The KIT
7
 Loading...