

Justin JED650 User Manual
U S ER 'S M A N U A L
SKD200/210/220/230
JustIn JED650 E-Drumset

Congratulations!
Thank you for purchasing this digital drum set. The drum set has been Developed to
act and play like a drum set but with greater ease. Before you use the instrument, we
recommend you to read through this manual.
Taking care of Your Digital Drum Set
Location
- Do not expose the unit to the following
Conditions to avoid deformation,
discoloration or more serious damage.
- Direct sunlight.
- High temperature (near a heat)source,
Or in car during the day time).
- Disconnect all cables before moving
Power Supply
-make sure to use the suitable AC adaptor,
and also make sure the ac outlet voltage
at your country matches the input voltage
specified on the AC
AC adaptor's label.
-Turn the power switch OFF When the
Instrument is not in use.
-An AC adaptor should be unplugged
from the AC outlet if the instrument is
not be used for an extended period of
time.
- Unplug the AC adaptor during electric
storms.
-Avoid plugging the AC adaptor into
-The same AC outlet as appliance with
high power consumption, such as
electric heaters or ovens. Also avoid
using multi-plug adaptors since these
can result in reducing the sound quality,
operation errors, and possibly damage.
Turn Power OFF When Making
Connections
- To avoid damage to the instrument
and other devices to which it is
Connected, turn the power switches of
all related device OFF prior to connecting
or disconnecting cables.
Handling and Transport
- Ne v er app l y e xce s siv e f o rce to the
controls, connectors or other parts of
the instrument.
- Always unplug cables by gripping the
plug firmly, but not pulling on the cable.
- Disconnect all cables before moving
The instrument.
- Physical shocks caused by dropping,
bumping, or placing heavy objects on
the instrument can result in scratches
more serious damage.
Cleaning
- C lean t h e unit with a dry s o ft clo t h .
- A Slightly damp cloth may be used to
Remove stubborn grime and dirt.
- Never use cleaners such as alcohol
or thinner.
- Avoid placing vinyl object on top of
The unit (uinyl can stick to and
discolor the surface).
Electrical Interference
- This instrument contains digital
circuitry and may cause interference
if pl
aced too close to radio or
television receivers. If this occurs,
move the instrument further away
from the affected equipment.

Content:
Assembly.............................................1
connection. ........................................2
connect pad and module................ 2.....
Panel description...............................3
Front pane............................................3
Rear panel/top....................................4
Side panel ..........................................5
LCD initial interface..............................5
Connect with external devices .........6
Connect audio system&drum amp .......6
Connect heahpone ......6.........................
Connect MP3 or CD player...................6
Connect PC .........................................6
Connect MIDI keyboard .....................7
Power supply and switch.....................7
Performing..........................................8
Select drum kit .9 ..................................
Performing ...........................................9
Playing the pads...................................9
Adjust pad sensitivity .....................10
Use metronome .................................11
Adjust click.......................................12
Adjust click tempo 12..............................
Edit/save a drum kit 12 ............................
Change pad voice.............................13
Change pad volume 13...........................
Change pad L/R CH pan 13...................
Change MIDI output pitch 13...................
Save setting to user drum kit..............13
Adjust pad sensitivity 13..........................
Adjust pad curve 13.................................
Adjust pad threshold 4...........................1
Eliminate pad crosstalk 14.......................
Adjust pad effect 15.................................
EQ setting 5...........................................1
Ambience setting 15................................
User drum kit default setting 15........................
Pad parameter setting instruction............16
DEMO SONG playing 16..................................
Select DEMO SONG 16...................................
A
djust volume of accompaniment& pad 17
...............
Mute drums of DEMO SONG 17.......................
Adjust DEMO SONG tempo 17........................
Recording your own performance............17
Recording quickly 17.........................................
Play back variation 18......................................
LOGO backlight function 8..............................1
Create your own drum kit 18.........................
Relative information of drum kit 18...................
How to select a drum kit 18..............................
Change pad voice 9........................................1
Change pad volume.....................................19
Change pad pan of L/R channel 20...............
Change MIDI output pitch 20............................
Adjust pad sensitivity 20....................................
Adjust PAD CURVE 20.....................................
Adjust pad threshold 21.................................
Eliminate pad crosstalk 21................................
Adjust pad effect 22........................................
MIDI setting 22..................................................
MIDI connection 22...........................................
Connect external audio sourc 23......................
Used as audio source device 23....................
MIDI list 24........................................................
Trouble shooting 26........................................
Audio source parameter 26................................
Drum kit list 27................................................
Voice list 28.....................................................
DEMO SONGlist 32.........................................
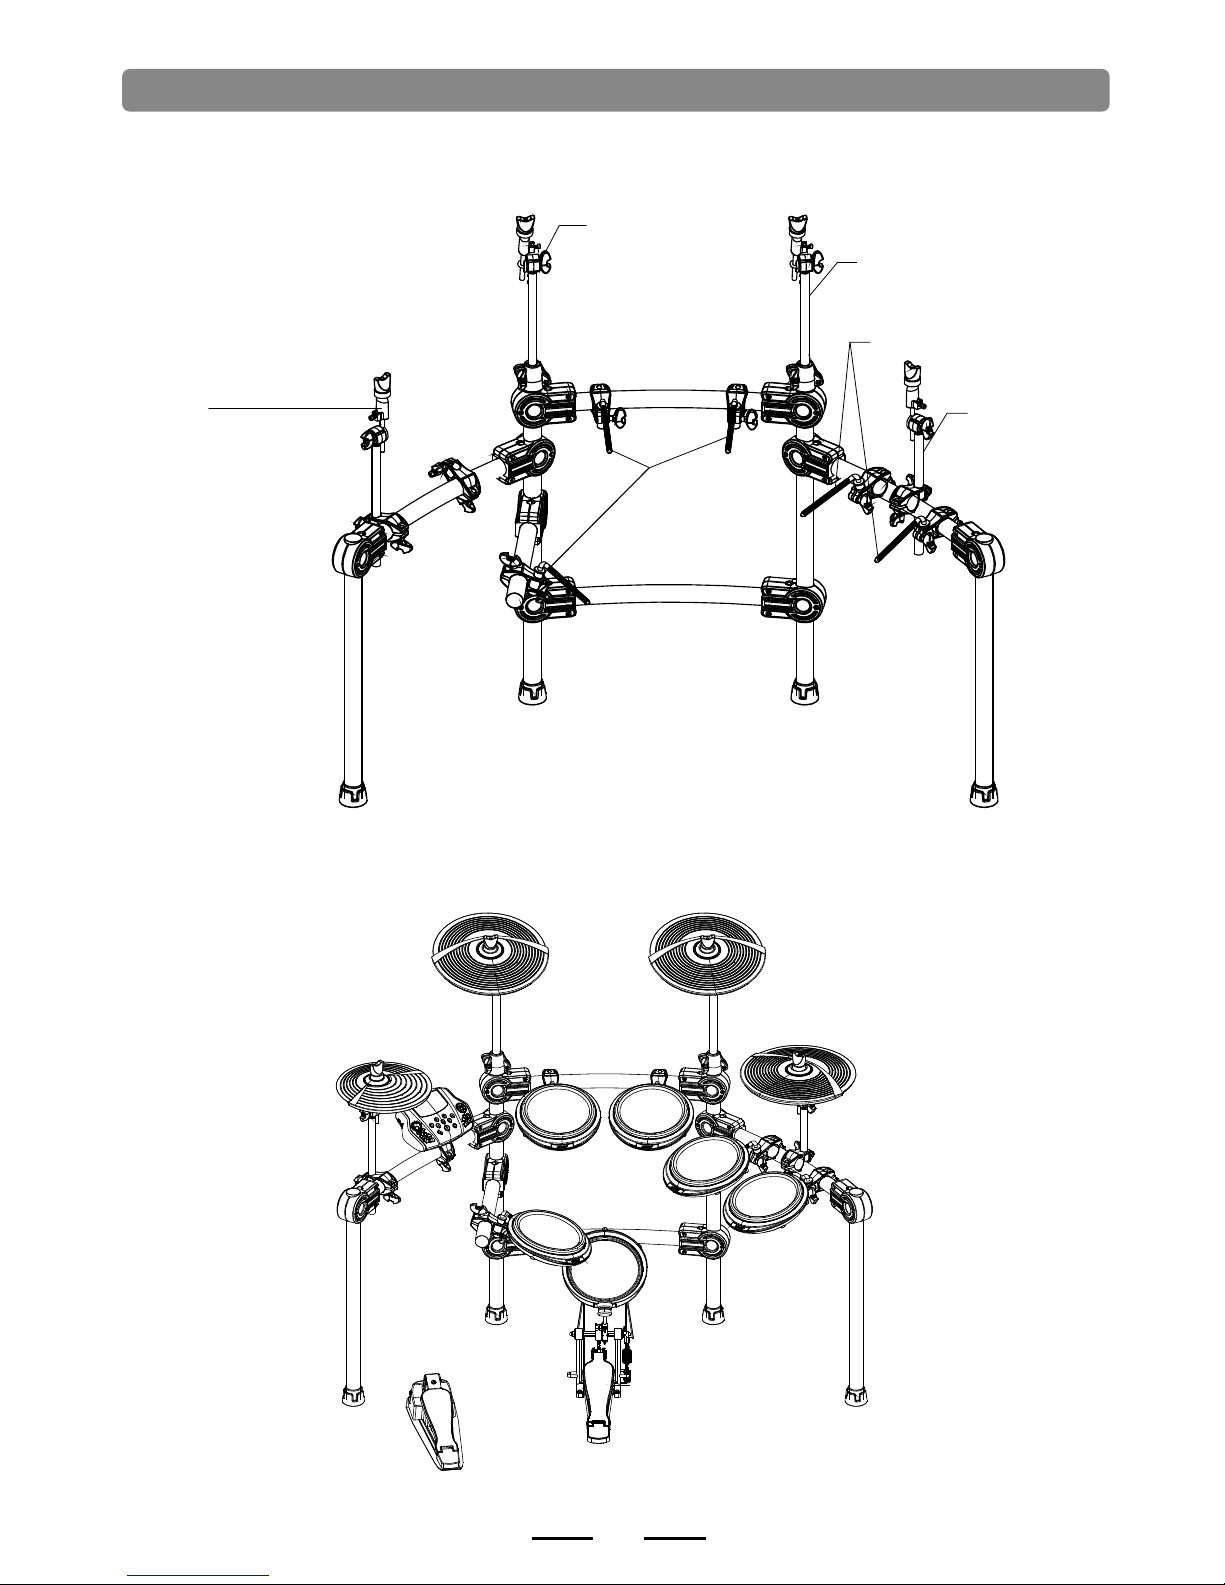
Drum stand assembly
1.Set up the drum stand. Different model has different configuration
2.Put the long cymbal tube/short cymbal tube/L shape pad rod into the drum stand.
( )
3.Put the pa ds/cymbal/module to the relative position.
1
CRASH
RIDE
HI-HAT
TOM1 TOM2
KICK
SNARE
HI-HAT CO NTROL
MODULE
TOM3
TOM 4
CRASH 2
long cymb al tube
L shape pad rod
short cymbal tube
long cymb al tube
L shape pa d rod
short cymbal tube
CRASH
RIDE
HI-HAT
TOM1 TOM2
KICK
SNARE
HI-HAT CO NTROL
MODULE
TOM3
TOM 4
CRASH 2
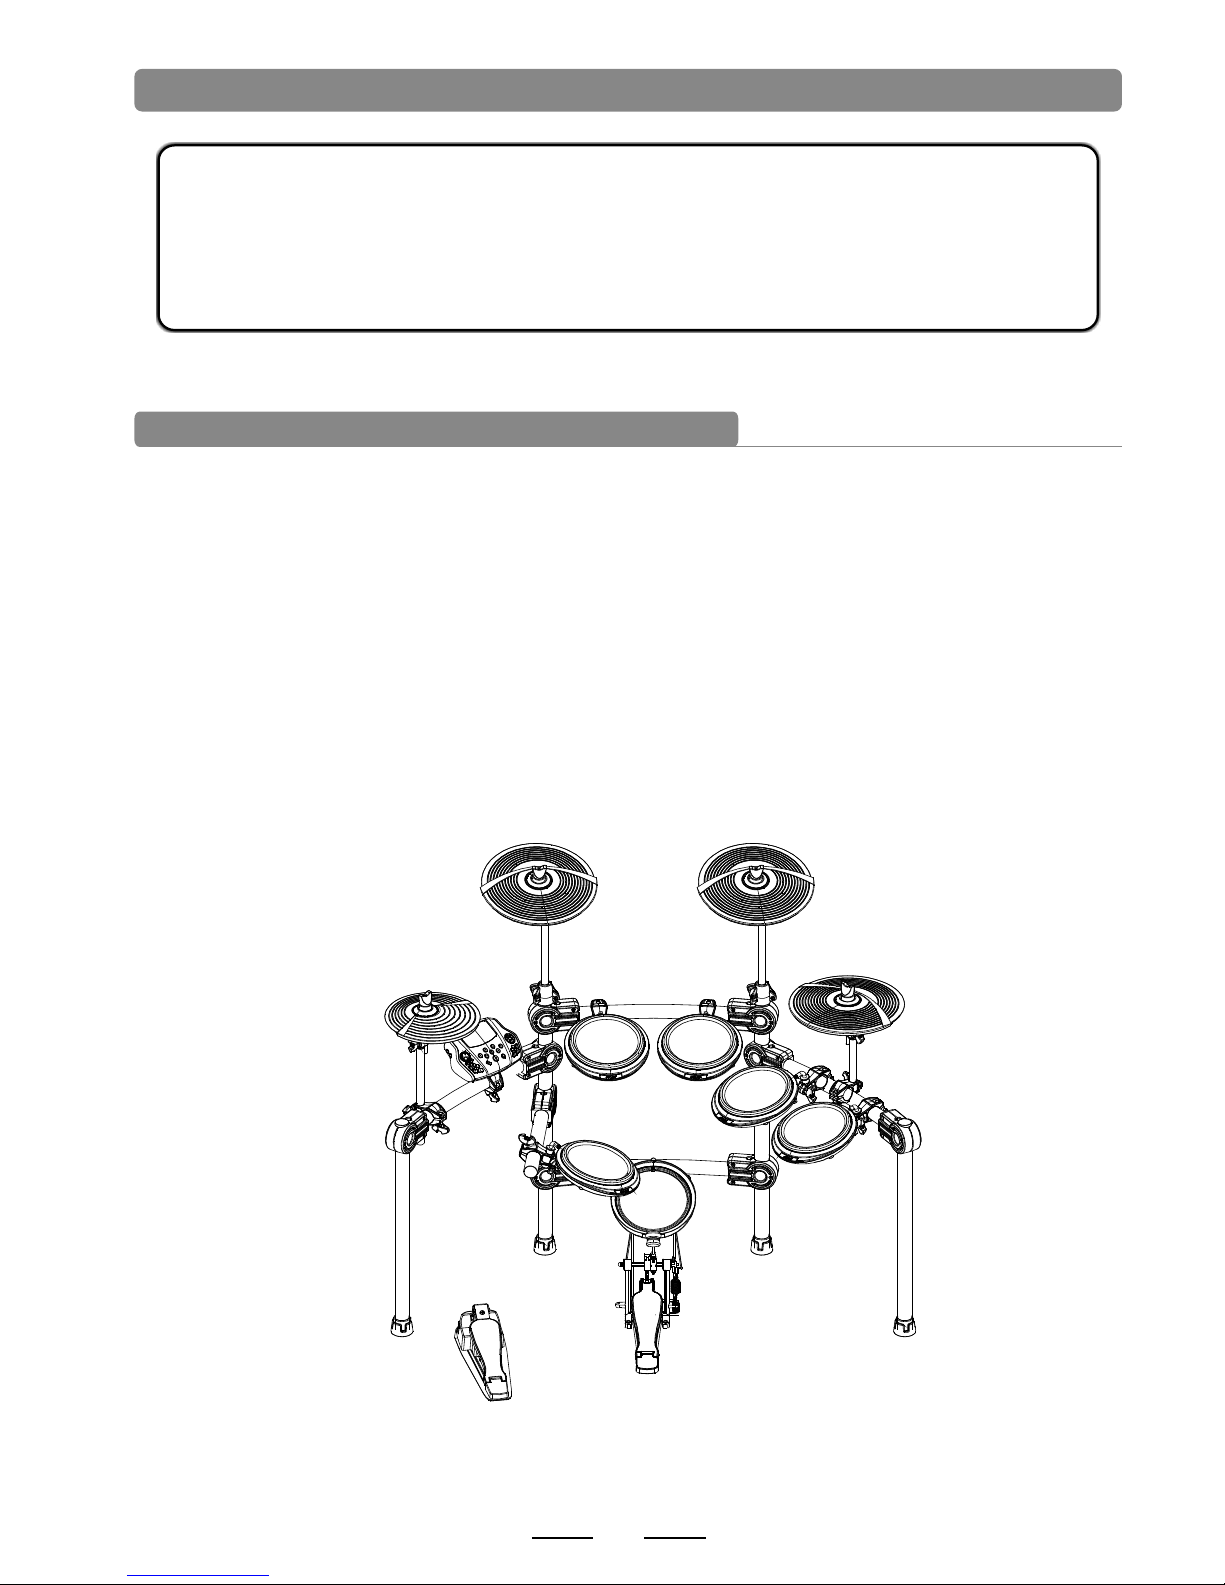
Connection
Note
When connecting the pads and audio source box, turn off the power switch
please, otherwise it will destroy the drum kit!
Connecting the pads and module
2
1.SKD200/210/220/230 configuration:
SKD200/210 configuration:TOM1-3(dual CH),SNARE( ),KICK( ),HI-HAT
(mono),RIDE(dual CH),CRASH(dual CH),HI-HAT CTRL
dual CH mono
SKD220/230 configuration:TOM1-4(dual CH),SNARE(dual CH),KICK(mono),HI-HAT
(mono),RIDE(dual CH),CRASH1and CRASH2(dual CH),HI-HAT CTRL
Use the pad cable and connect one end with pad and the other with DSP of module, then
tight it.
JED650 configuration:
TOM1-3(dual CH), SNARE( dual CH), KICK(mono ), HI-HAT (mono),
RIDE(dual CH), CRASH(dual CH), HI-HAT CTRL.
3
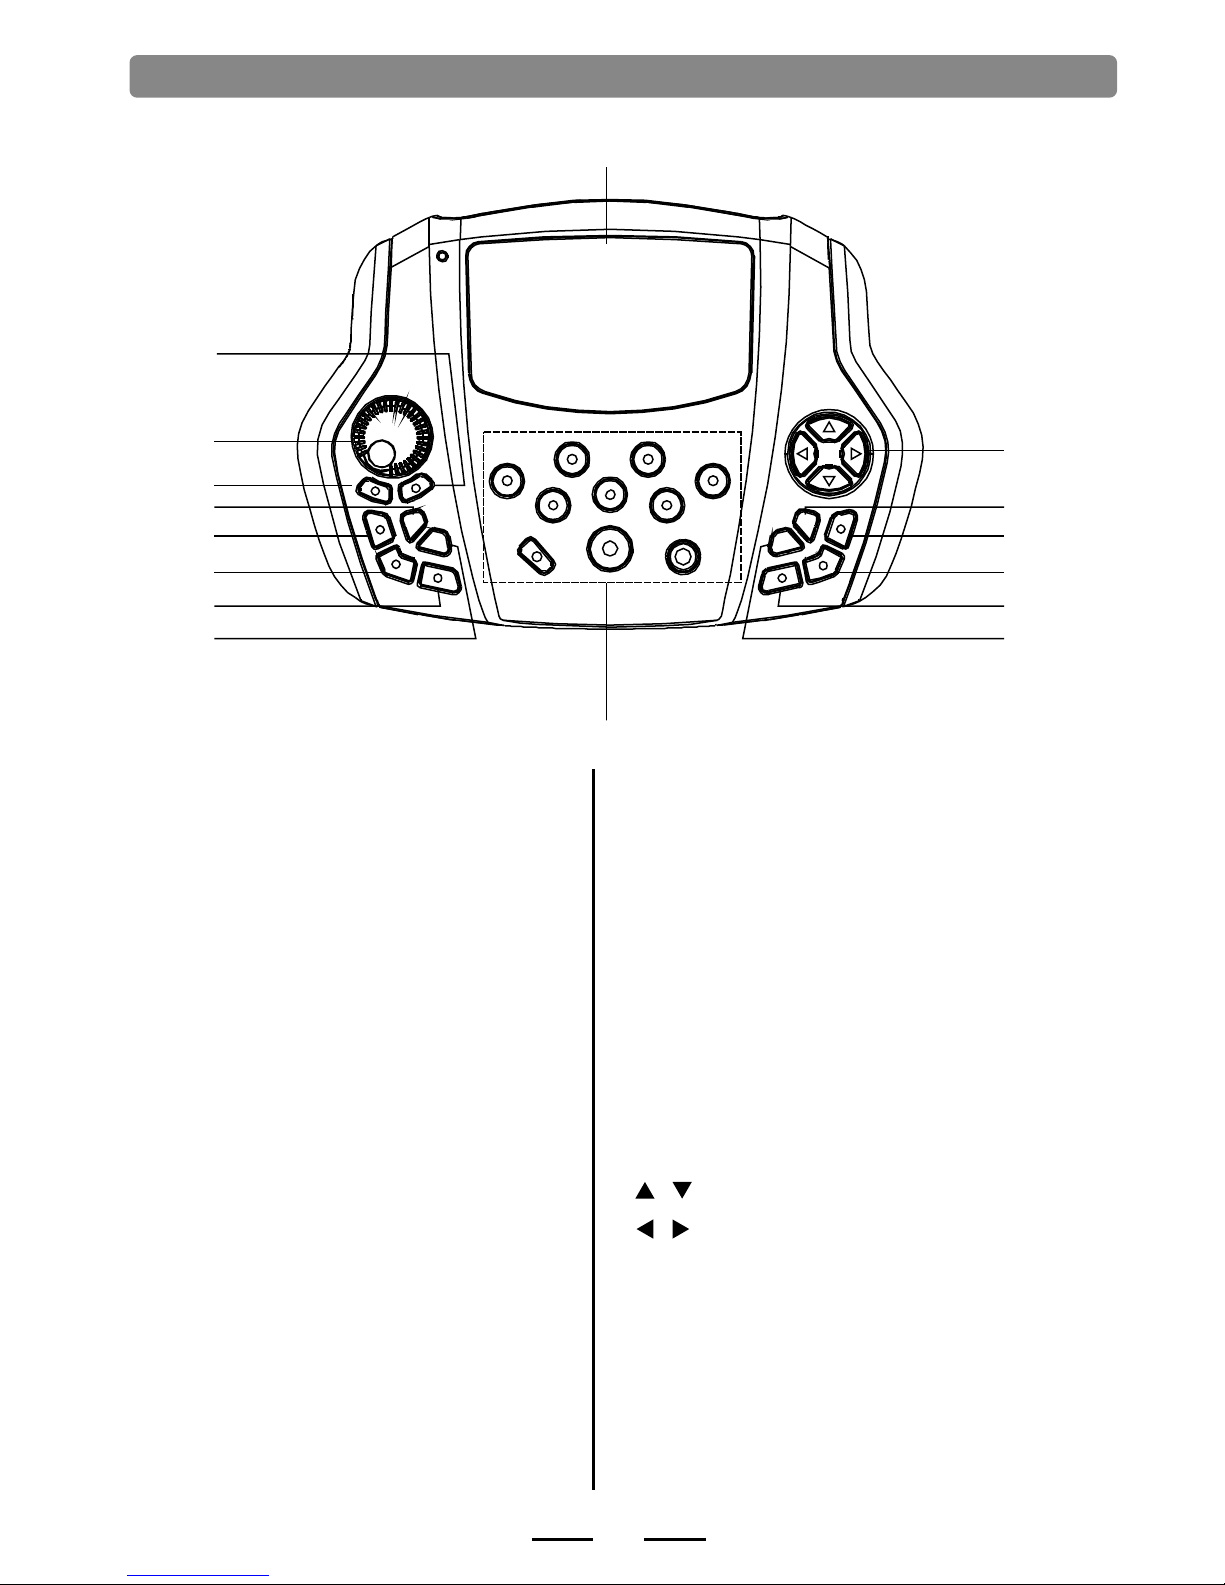
Panel Description
Front panel
2
3
1
5
6
7
8
4
9
15
13
12
11
10
14
16
9. Pad indication
2. MASTER VOLUME
3. START/STOP
1. SAVE
Start or stop playing DEMO SONG
5. RECORD
Record the drum set sound.
6. VOICE PLAY
Play/pause the recorded sound.
7. CLICK
Play the metronome.
4. TEMPO
Enter into the tempo setting quickly.
8. SONG
Enter into DEMO SONG setting quickly.
Adjust the volume of phone and line output.
Start or stop playing DEMO SONG
11. KIT
Switch to drum kit quickly.
13. VOICE
Quickly switch to voice setting.
14. SET UP
Set up /drum/metronome DEMO SONG etc.
10. CANCEL
Cancel the operation or go back to the former menu.
12. DRUM OFF
It mutes the DEMO SONG.
16. LCD
Displays the menu content.
(hold the button to change the value continuously.)
15. Direction key
:Menu selection
:change the parameter
Indicates the working pad or tests the
the pad parameter. pad, or set
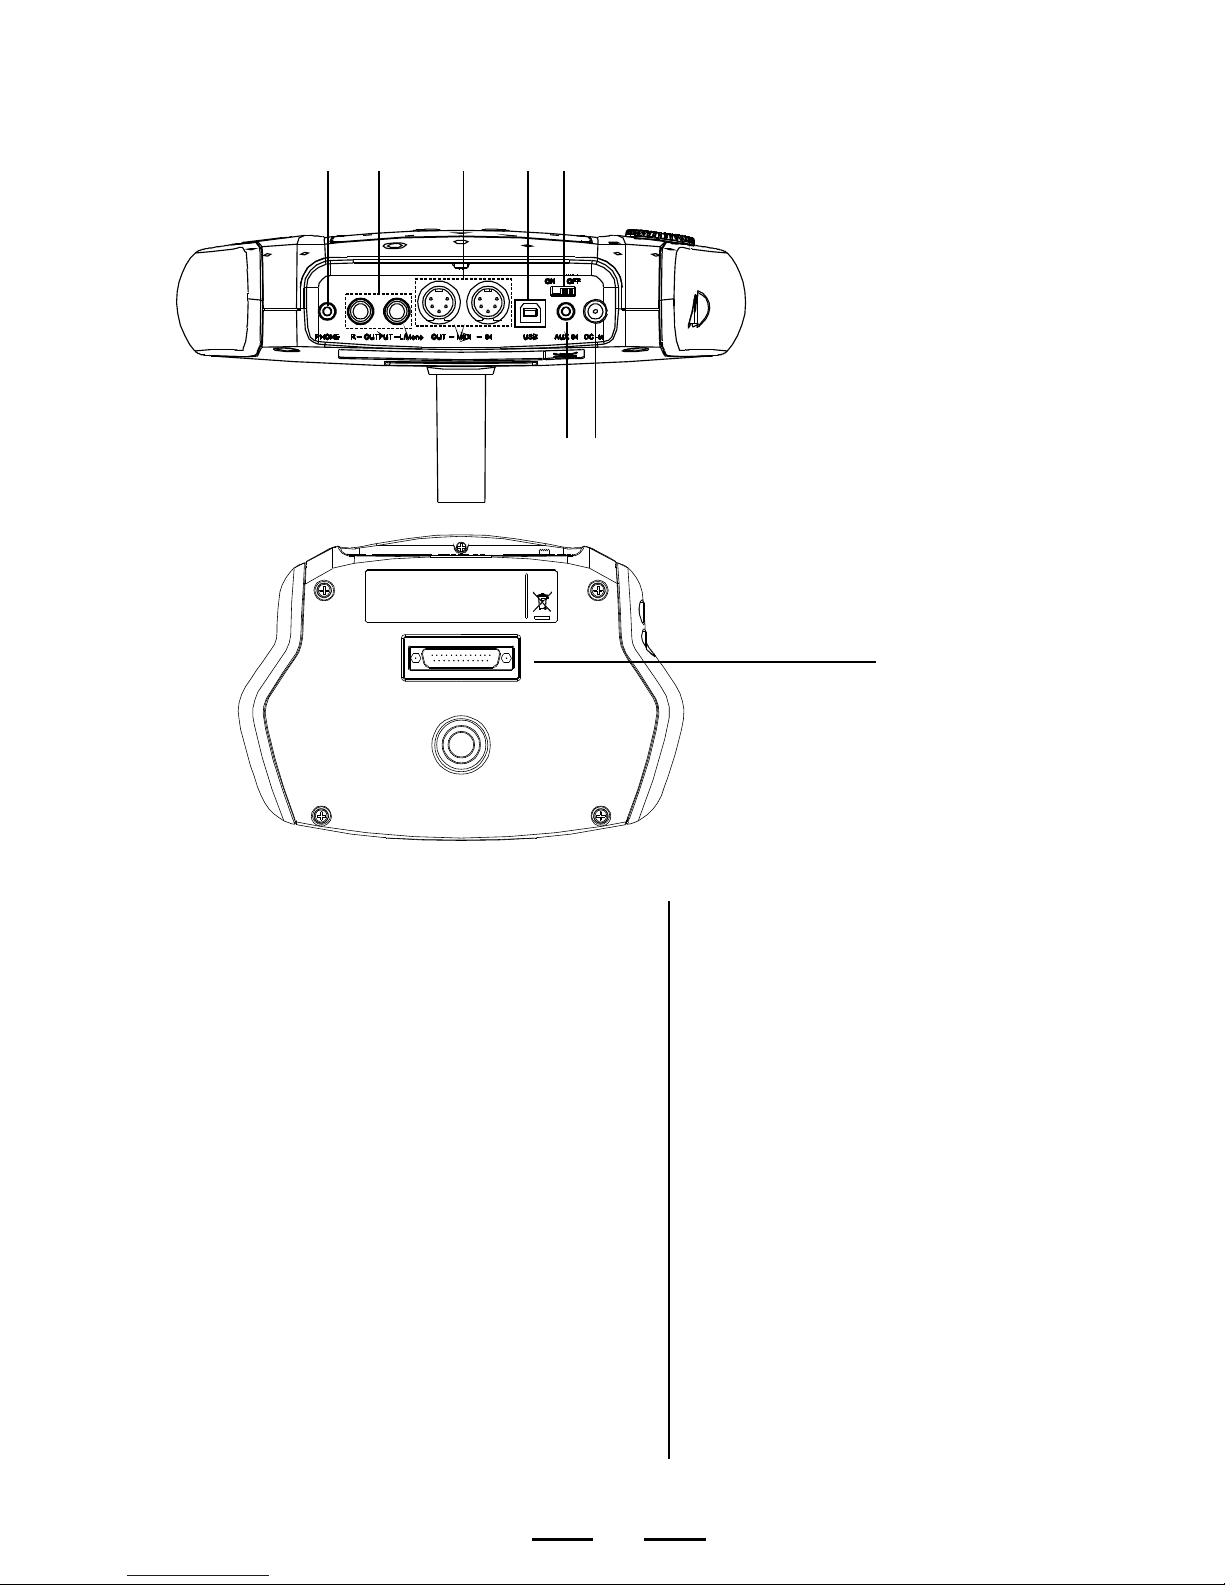
Rear panel connection
4
24
17 18 19 20 21
22 23
23. AUX IN
External stereo input connector, e.g.
22. DC IN
Adaptor connector, 9V DC.
24. PAD connection
Pad signal input connector, including:
KICK,TOM1--3, SNARE, RIDE,CRASH,
HI-HAT CTRL
20. USB
Connect with PC connector (MIDI in/out
19. IN---MIDI---OUT
Connect with the connector of external
device which has MIDI.
18. -OUT PUT- L/mono R
L/R channel, connect with the output
connector of audio system or drum amplifier.
17. PHONE
Headphone output connector.
21. POWER SWITCH
It turns on/off the drum.

LCD initial interfaces
Side button
1).CLICK=4/4(default value when on):metronome parameter indication
2).TEMPO=100(default value when on):tempo parameter indication
3).KIT01 POP01(default value when on): drum kit indication
4).SONG01(default value when on): demo song indication
5).DRUM ON(default value when on): mutes the drum sound of demo song.
KIT01 POP01
SONG01 DRUM ON
CLICK=4/4 TEMPO=100
5
25
26. CRASH2
It connects with CRASH2
25. TOM4
It connects with TOM4
26
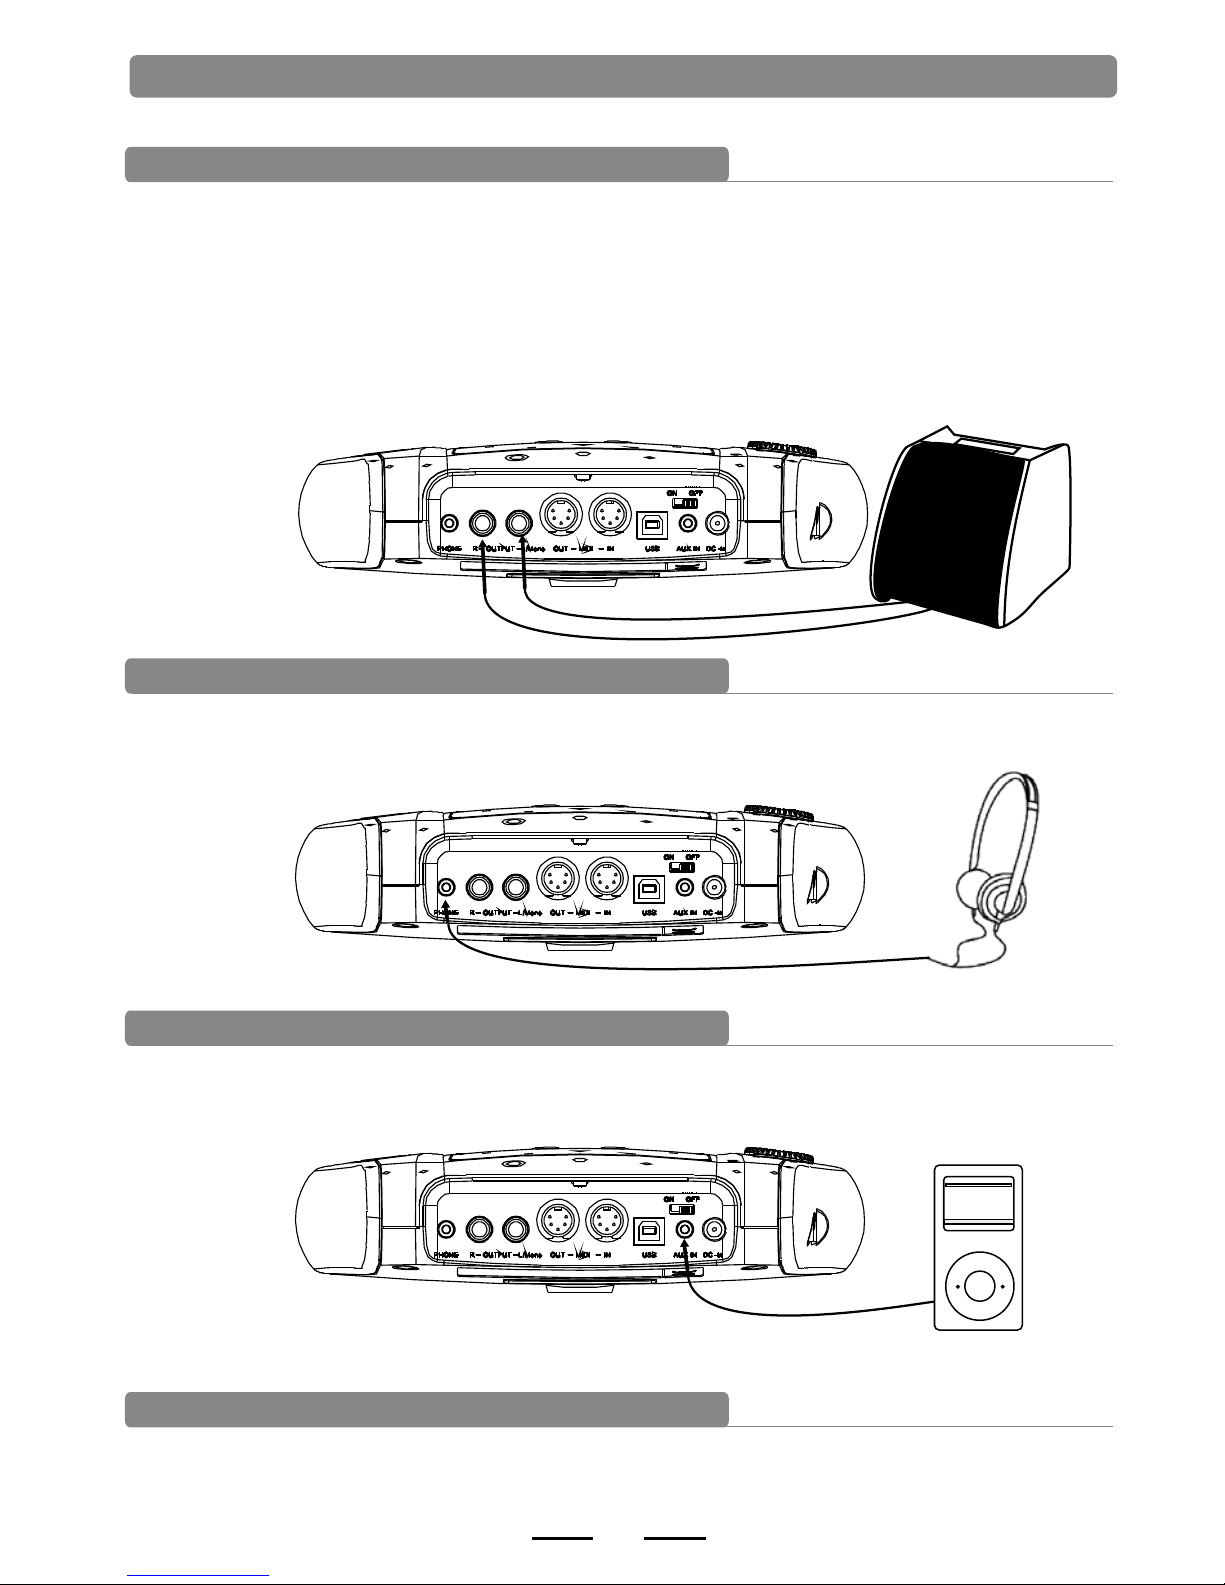
Connect to audio system or amplifier
When connecting with audio system or drum amplifier, use a cable to connect with L/mono R of the
audio system and the drum amplifier.
Note:
1).Connect with L/mono connector when connecting with mono audio device.
2).Connect with L/mono and R connector when connecting with stereo audio device.
3).The volume is controlled by the master volume knob of drum kit and of the audio device.
Connecting the headphones
The audio source box has 1/4” headphone connector(if use a 1/8” headphone ,use an
adaptor), the volume is controlled by the volume knob of the audio source box.
Connect to MP3 or CD player
Connect the output of MP3 or CD player or other audio sources with AUX.IN connector. The
input signal can be mixed with the drum signal, strike the pads according to the rhythm of
the input signal.
1. Connect the computer via USB Receive and send MIDI signal.
Connect to a computer
6
Connect with external devices
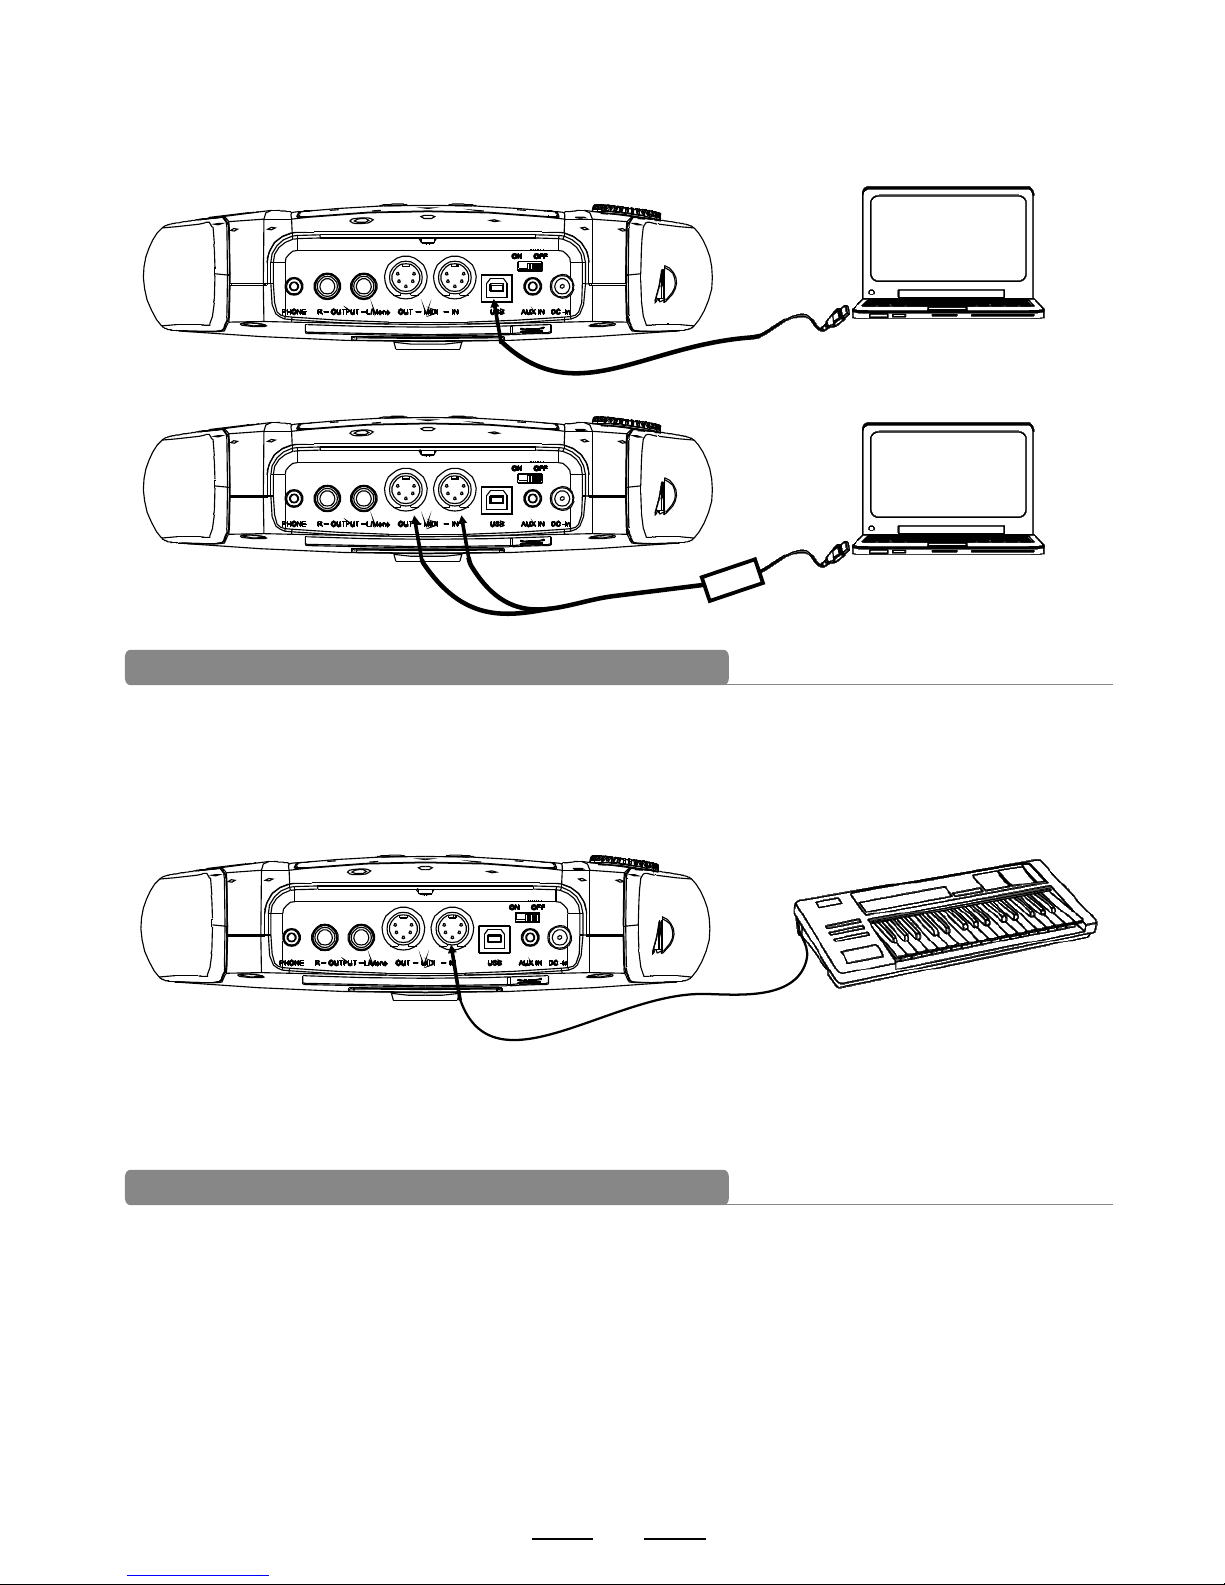
2.Connect the computer via MIDI port
MIDI IN: receiver MIDI signal of computer or other devices.
MIDI OUT: send pad performance signal to external MIDI devices or computer.
MIDI connector:
If you're u sing an exte rnal MIDI ke yboard or pa ds to control the dig ital drum, m ake
connect ions as show n. Here, it is u sed as a sound module.
Connect with a MIDI keyboard
Make sure t he power is sw itched OFF. Co nnect the power adaptor to the DC I N jack on the si de panel.
After con firming th at all connections have been completed, r otate the vo lume knob to t he left (min imum
volume le vel) befor e switchin
g the power o n. Set the pow er switch to the “ON” pos ition. The KIT
indicat or on LCD will l ight up and th e display wi ll show kit nu mber 01 pop 01 .
No t e:
Make sure t he power is sw itched OFF when
connect ing the drum m odule with e xternal de vices.
Power supply and switch
7
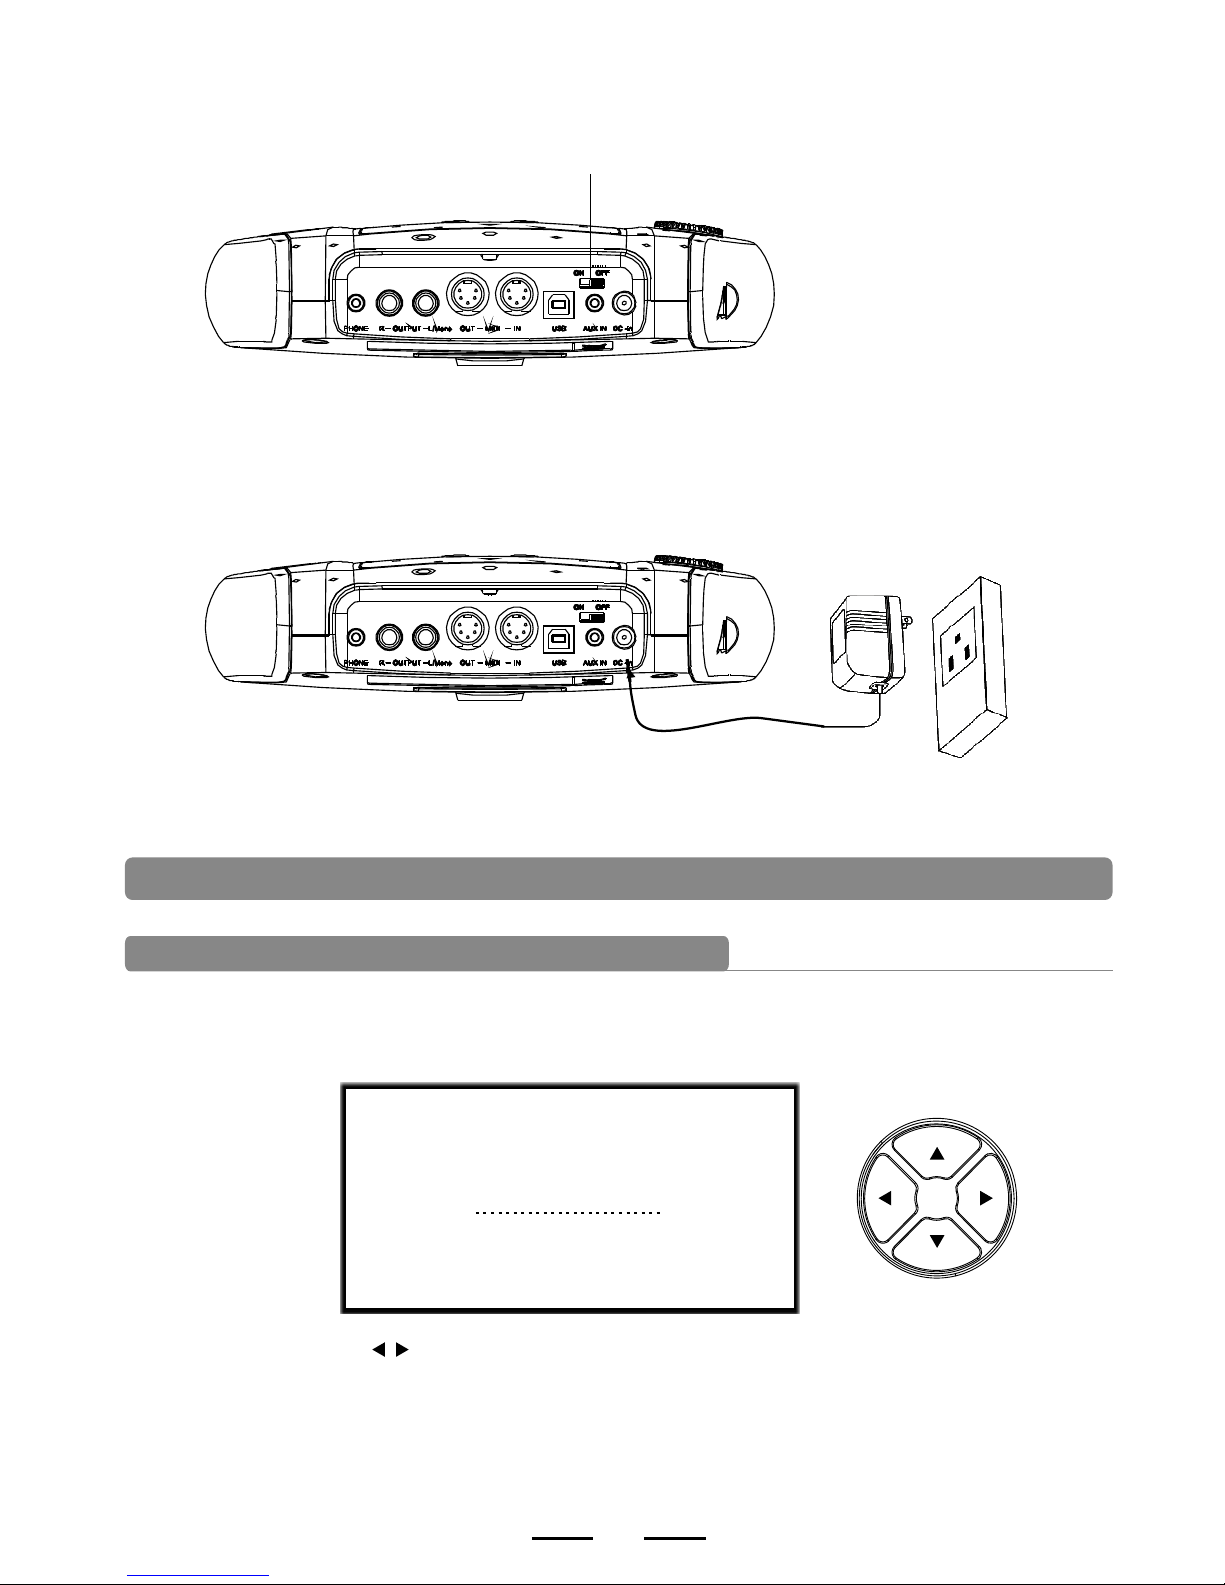
Basic operating
Selecting a drum kit
after powering up, the digital drum will be in kit menu (kit indicator on ). the display should
look like the following figure. there are 3 ways to activate the drum kit menu:
KIT01 POP01
SONG01 DRUM ON
CLICK=4/4 TEMPO=100
1.Use the direction key to select drum kit.41 sets of drum kits in all.
20 sets of preset drum kits:KIT01---26
15 sets of user drum kits: USER01---15
2.Pressing the Pad Select buttons allows you to preview the
current kit (fixed tempo).
8
ON / OFF
 Loading...