

Page 1
The IMPRESSA C5 Manual
The “IMPRESSA C5 Manual” has been awarded the seal of
approval by the independent German Tech nical Inspection
Agency, TÜV SÜD, due to its easy-to-understand style, its
thoroughness and coverage of safety aspects.
Page 2

Table of contents
Your IMPRESSA C5
Control elements and accessories 4
Proper use
For your safety
The IMPRESSA C5 Manual
Welcome to the world of IMPRESSA! 10
1 IMPRESSA C5 – Click & Drink
2 Preparing and using your IMPRESSA for the first time 13
3 Familiarising yourself with the control options 21
4 Recipes 24
5 Preparing drinks at the touch of a button
6
6
8
Model variants ..............................................................................................................................................9
Symbol description ......................................................................................................................................9
11
Coffee that fulfils your wildest dreams ................................................................................................... 11
Click & Drink .................................................................................................................................................11
JURA on the Internet .................................................................................................................................. 12
Knowledge Builder ..................................................................................................................................... 12
Supplied as standard ..................................................................................................................................13
Setting up and connecting ........................................................................................................................13
Filling the water tank ................................................................................................................................. 14
Filling the bean container ......................................................................................................................... 14
First-time use .............................................................................................................................................. 15
Using and activating filter ....................................................................................................................... 16
Assessing and setting water hardness ...................................................................................................18
Adjusting grinder .......................................................................................................................................19
Switching on .............................................................................................................................................. 20
Switching off(standby mode)..................................................................................................................20
Preparing drinks at the touch of a button ............................................................................................. 21
One-off setting during drink preparation ..............................................................................................22
Adjusting the permanent cup size settings ...........................................................................................23
30
Barista tips .................................................................................................................................................. 30
Espresso ....................................................................................................................................................... 31
Coffee ........................................................................................................................................................... 31
Cappuccino..................................................................................................................................................32
Pre-ground coffee ......................................................................................................................................33
Milk foam .................................................................................................................................................... 34
Hot water .....................................................................................................................................................35
2
Page 3

Table of contents
6 Adjusting the permanent cup size settings 36
7 Adjusting the permanent settings in programming mode
37
Programmable switch-off time ...............................................................................................................37
8 Maintenance 39
Maintenance tips ....................................................................................................................................... 39
Rinsing the machine ................................................................................................................................. 40
Changing the filter .................................................................................................................................... 40
Cleaning the machine .............................................................................................................................. 41
Descaling the machine ............................................................................................................................43
Rinsing the Easy Cappuccino Frother ...................................................................................................46
Cleaning the Easy Cappuccino Frother ................................................................................................. 46
Descaling the water tank ......................................................................................................................... 48
9 CLARIS plus filter cartridge – Water for perfect coffee 49
As fresh as from the spring .....................................................................................................................49
Water – always pleasant and freshly filtered ........................................................................................49
Quality knows no compromises .............................................................................................................50
Water freshly filtered on the “just in time” principle .......................................................................... 50
10 “The milk makes the difference” 57
Trendy specialities with milk ....................................................................................................................57
Frothing as done by a professional .........................................................................................................57
11 Accessories and Service 59
12 Messages in the maintenance field and symbol display
13 Troubleshooting
71
14 Transport and environmentally neutral disposal
69
72
Empty system .............................................................................................................................................72
Transport ......................................................................................................................................................72
Disposal ........................................................................................................................................................72
15 Technical data and guide values 73
Technical data .............................................................................................................................................73
Basic settings in programming mode ....................................................................................................73
16 Key technologies and products 74
17 JURA contact details
Index
84
79
3
Page 4
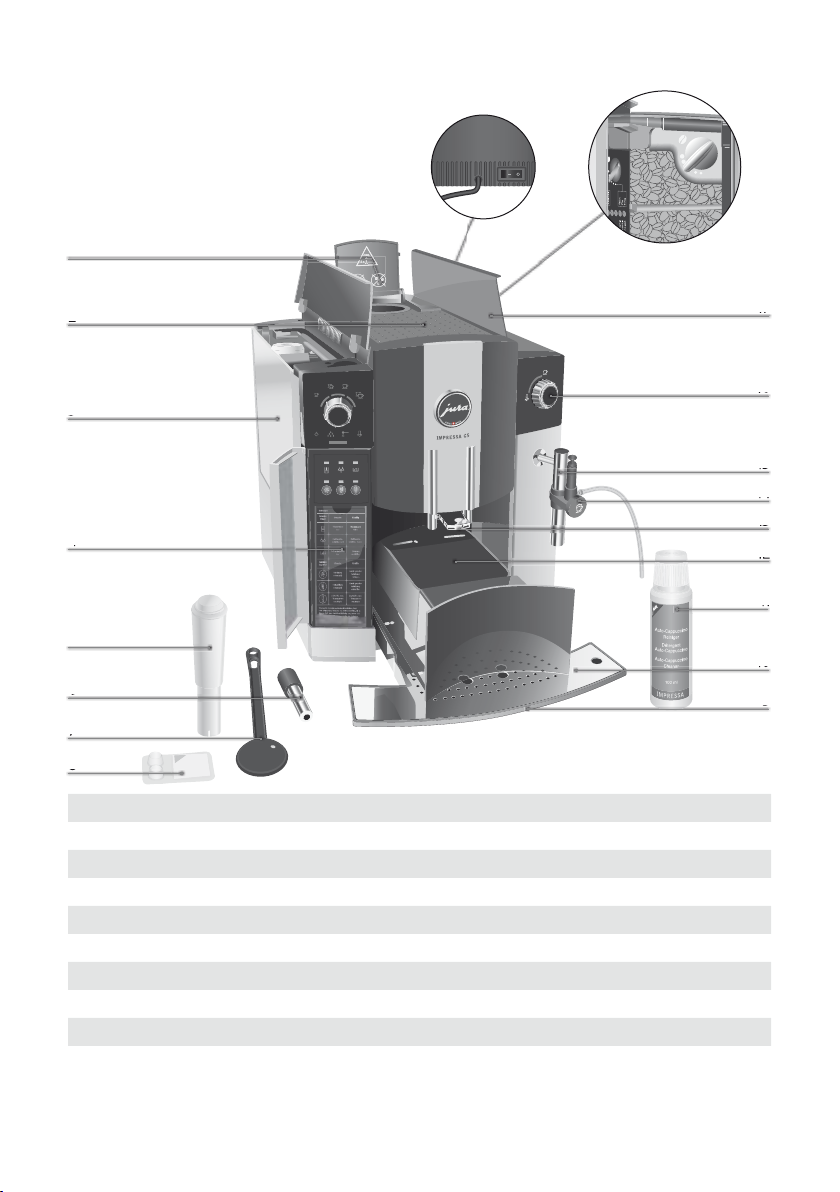
Control elements and accessories
Control elements and accessories
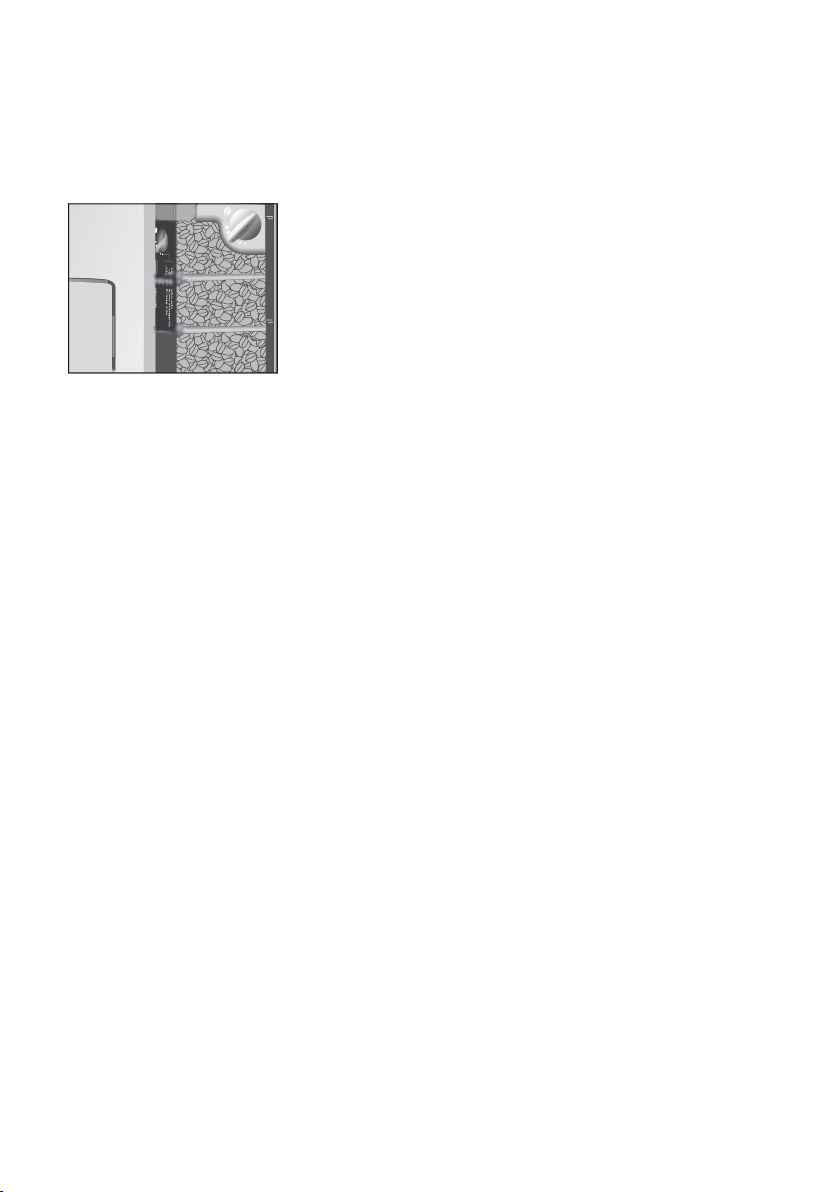
Power switch and cable (see rear side)
1
Switch for setting fineness
of grind
2
3
4
5
6
7
Figure: IMPRESSA C5 platinum
8
1 Filler funnel for pre-ground coffee 10 Cup platform
2 Cup tray 11 JURA Auto-Cappuccino Cleaner
3 Water tank with level indicator 12 Drawer with coffee grounds container
4 Overview of maintenance indicators 13 Height-adjustable coffee spout
5 CLARIS plus filter cartridge
6 Hot water nozzle 15 Connector System
7 Measuring spoon for pre-ground coffee
8 JURA cleaning tablets
9 Drip tray
14 Easy Cappuccino Frother with milk pipe
©
for removable nozzles
16 Switch for water and milk preparation
17 Bean container, aroma preservation cover
17
16
15
14
13
12
11
10
9
4
Page 5
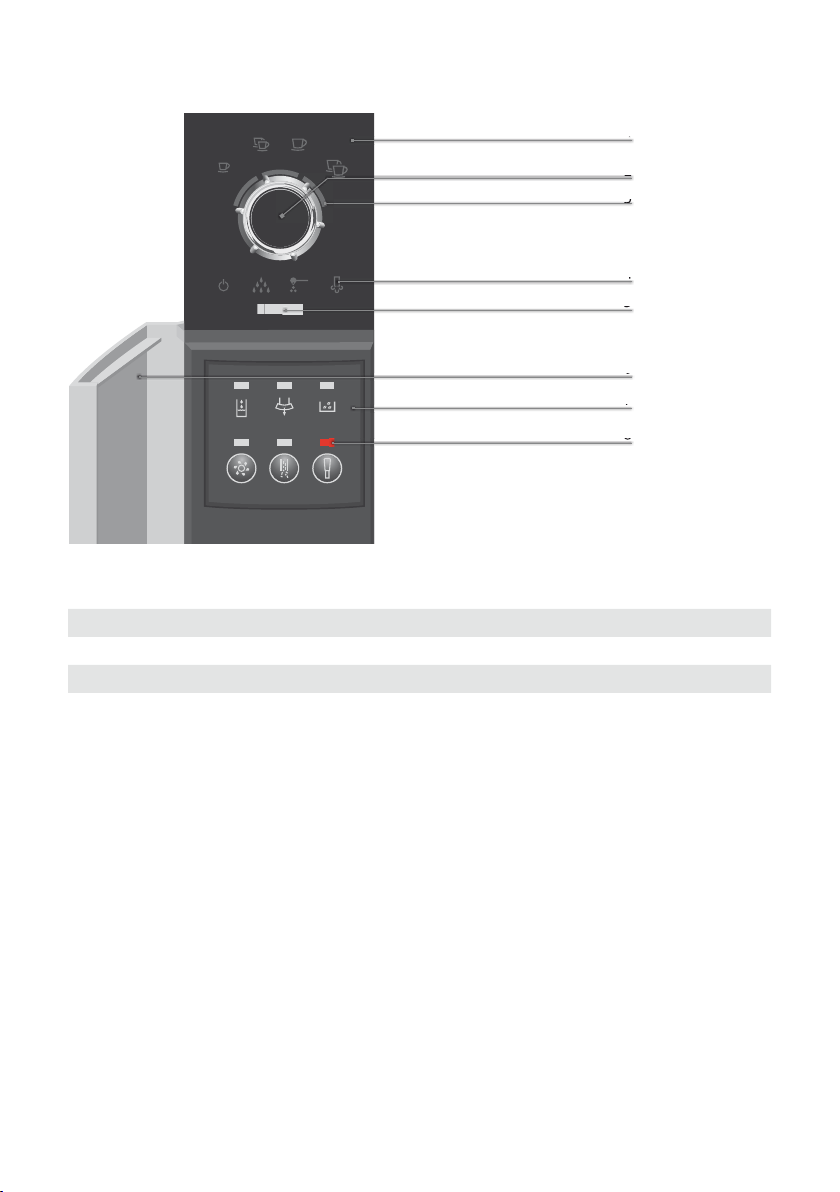
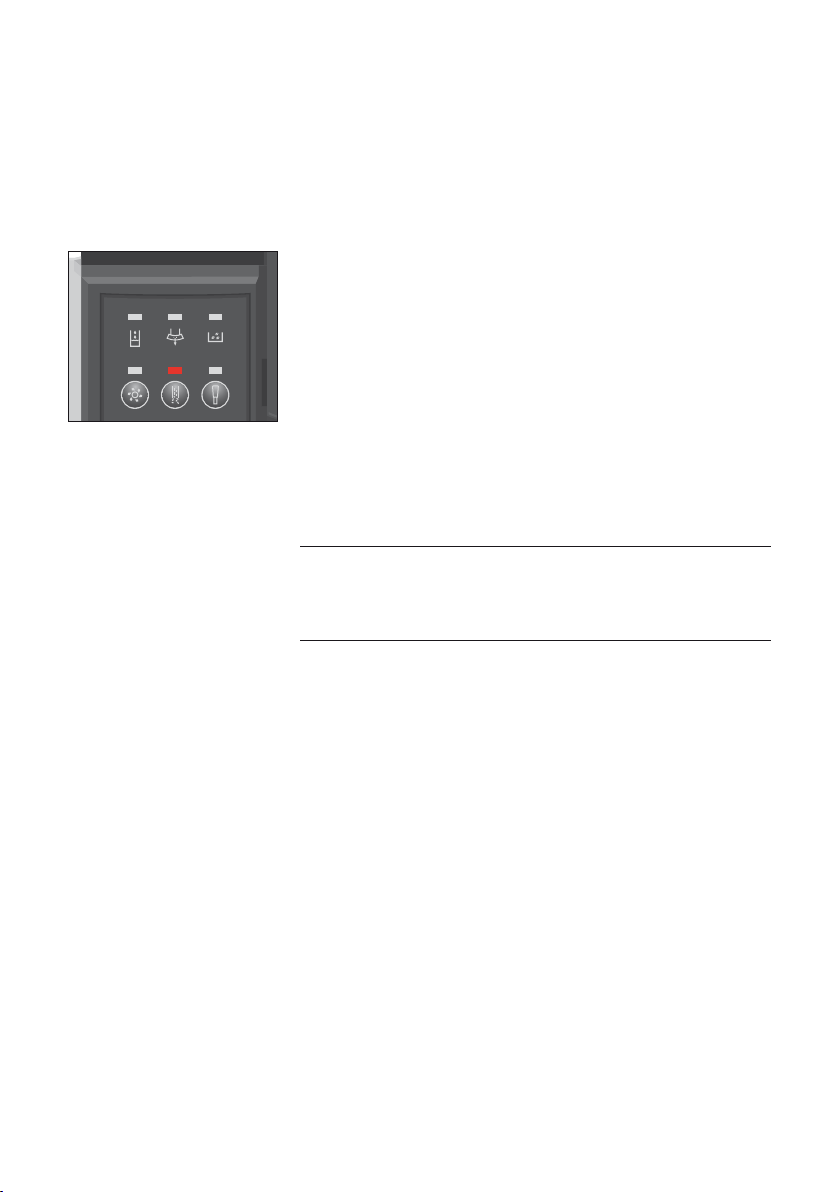
Symbol display Maintenance field
1 Symbol display 5 Maintenance indicator
2 Rotary Switch 6 Access door
3 Light segments 7 Maintenance field
4 Symbols 8 Indicators
1 Espresso
a
2 Espressos
s
1 coffee
d
2 coffees
f
On/off
g
Maintenance
h
Pre-ground coffee
j
Steam
k
Water tank
y
Coffee grounds container
x
Bean container
c
Cleaning button
v
Descaling button
b
Filter button
n
Control elements and accessories
1
2
3
4
5
6
7
8
5
Page 6

Important information
Proper useProper use
For your safetyFor your safety
The machine has been designed and built for private use in the
home. It should only be used to prepare coffee and to heat milk and
water. Use for any other purpose will be deemed improper. JURA
cannot accept any responsibility for the consequences of improper
use.
Please read and note carefully the important safety information set
out below, which is intended to ensure that any danger of electric
shock is avoided.
p
Never use a machine which has been damaged or with a
defective power cable.
For information on what to do in case of damage, for example
p
if there is a smell of burning, unplug the machine immedi ately
from the mains supply and contact the JURA service centre.
If the power cable for this machine is damaged, it must be
p
repaired either directly by JURA or by a JURA approved service
centre.
Make sure that the IMPRESSA and the power cable are not
p
close to hot surfaces, for example, a gas or electric cooker.
Be careful to ensure that the power cable does not get caught
p
and does not rub against sharp edges.
Never open and repair the machine yourself. Do not modify
p
the machine in any way that is not described in the IMPRESSA
Manual. The machine contains live parts. If opened, there is a
danger of serious injury. Repairs may only be carried out by
JURA approved service centres, using original spare parts and
accessories.
There is a risk of scalds or burns on the spouts or in the nozzle:
Place the machine out of the reach of children.
p
Do not touch any hot parts. Use the handles provided.
p
Be careful to ensure that the appropriate nozzle is installed
p
and clean. The nozzle or parts of the nozzle might come off if
the parts are not assembled correctly or a blockage occurs.
6
Page 7

Important information
A defective machine is not safe and could cause injury or fire. To
avoid damage and any associated risk of injury or fire:
Never allow the power cable to trail, as someone could trip
p
over the power cable and/or it could get damaged.
Protect your IMPRESSA from environmental influences such
p
as rain, frost and direct sunlight.
Do not put the IMPRESSA, cable or connections in water.
p
Do not put the IMPRESSA or any individual parts in the dish-
p
washer.
Turn your IMPRESSA off at the power switch before starting
p
any cleaning operation. Always wipe your IMPRESSA with a
damp cloth rather than a wet one, and protect it from prolonged water splash.
Only connect the machine to a power supply in accordance
p
with the technical data. (See rating plate and Chapter 15,
“Technical data and guide values”)
Use only original JURA care products. Use of accessories that
p
are not explicitly recommended by JURA could damage the
IMPRESSA.
Do not use any coffee beans treated with additives or caramel-
p
ised coffee beans.
Always fill the water tank with cold, fresh mains water.
p
If you will be absent for an extended period, turn the machine
p
off and unplug.
Keep this manual close to the IMPRESSA and, if appropriate,
p
pass it on to the next user.
7
Page 8

The IMPRESSA C5 Manual
The IMPRESSA C5 ManualThe IMPRESSA C5 Manual
You are holding the manual for your IMPRESSA C5 in your hand. The
information contained in this manual will help you to familiarise
yourself with your IMPRESSA safely and quickly and teach you the
full range of facilities it offers.
Chapter 2, “Preparing and using your IMPRESSA for the first time”,
explains step-by-step how to set up and prepare the IMPRESSA.
Chapter 3, “Familiarising yourself with the control options” is important for you to read as you are familiarising yourself with your
IMPRESSA. It invites you to actively explore all the different coffee
experiences that it offers.
As coffee and coffee specialities are very important to JURA, we have
compiled a selection of tasty suggestions for you in Chapter 4,
“Recipes”.
All the other chapters are intended to help you when you have a
specific query.
If you use the IMPRESSA C5 Manual, you will become a past master
at preparing exciting coffee specialities, you will be a Barista!
8
Page 9
Model variants
Model variantsModel variants
Symbol descriptionSymbol description
Symbol descriptionSymbol description
The IMPRESSA C5 Manual covers all C series IMPRESSA models.
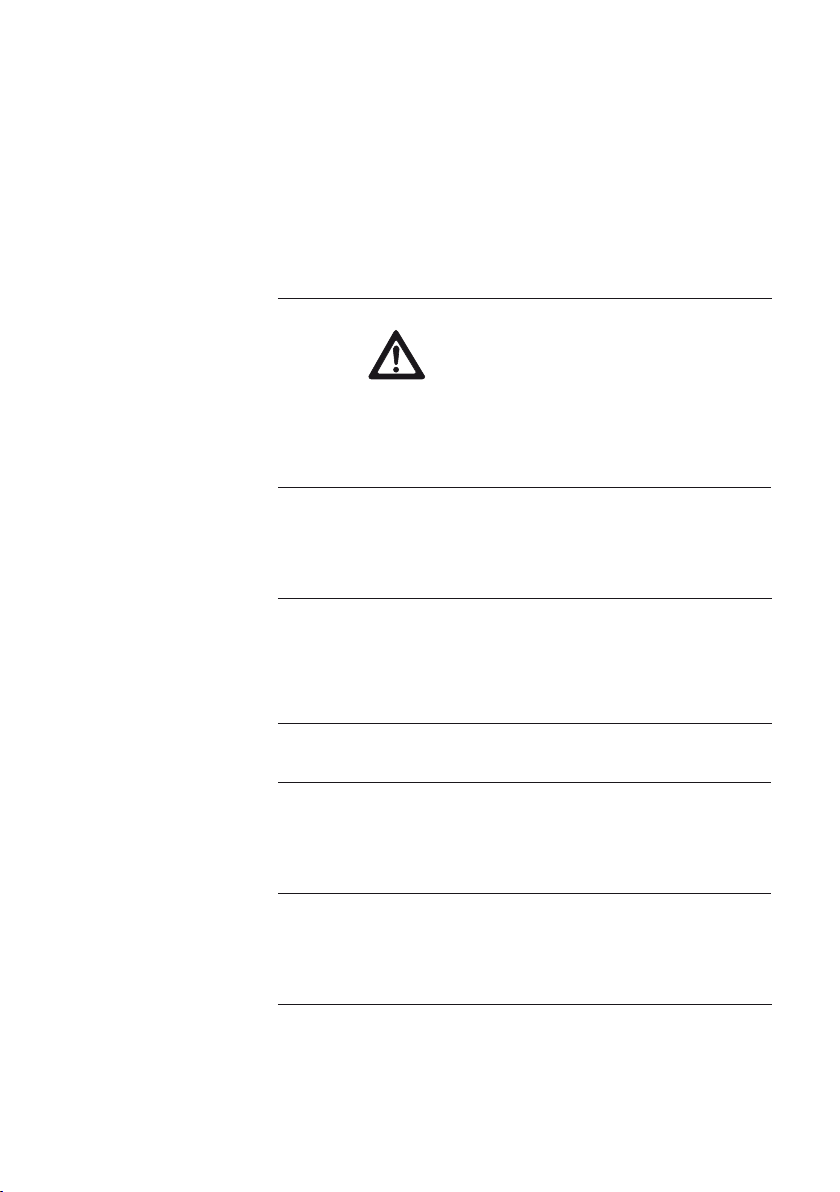
Warnings
Warnings
Always take note of any informa-
Always take note of any information marked with the CAUTION or
tion marked with the CAUTION or
WARNING symbol. The WARNING
WARNING symbol. The WARNING
symbol is used where there is a risk
CAUTION
CAUTION
CAUTION
CAUTION
Symbols used
Symbols used
symbol is used where there is a risk
of injury. The CAUTION symbol is
of injury. The CAUTION symbol is
used where there is a risk of dam-
used where there is a risk of damage to property.
age to property.
The CAUTION symbol is used to
The CAUTION symbol is used to
draw attention to circumstances
draw attention to circumstances
which could cause the machine to
which could cause the machine to
become damaged.
become damaged.
o
o
@
@
L
L
Information and tips to ease things
Information and tips to ease things
for you as you use your IMPRESSA.
for you as you use your IMPRESSA.
References to the online JURA web-
References to the online JURA website, where you can find interesting
site, where you can find interesting
further information:
further information:
www.jura.com
www.jura.com
Prompt to take action.
Prompt to take action.
This symbol means that you are
This symbol means that you are
being prompted to perform some
being prompted to perform some
action.
action.
9
Page 10

Welcome to the world of IMPRESSA!
Welcome to the world of IMPRESSA!Welcome to the world of IMPRESSA!
Dear customer,
We thank you for the trust that you have placed in us by purchasing
a JURA IMPRESSA coffee machine. The machines, which are produced in Switzerland, have already impressed independent, critical
testers of goods and design award juries. We will do everything we
can to ensure that this genuine 2-cup Espresso and coffee fully
automated machine continues to deliver perfect coffee specialities
at the press of a button to your family and your guests for years to
come.
The IMPRESSA Manual will teach you everything you need to know
on the subject of operating and tailoring your IMPRESSA to your
particular preferences. Other subjects covered include how to solve
the problem of scale build-up and important tips on care. Our primary concern is to stimulate your imagination with attractive coffee
recipes and to invite you to put the wealth of possibilities offered by
the JURA fully automated machine to use on a daily basis.
We wish you many stimulating and enjoyable moments with your
IMPRESSA.
Yours sincerely,
Emanuel Probst
General Manager
10
Page 11
1 IMPRESSA C5 – Click & Drink1 IMPRESSA C5 – Click & Drink
Coffee that fulfils your
Coffee that fulfils your
wildest dreams
wildest dreams
JURA‘s avowed mission is to develop superior machines which get
the best out of every blend and roast of coffee. This it delivers
through a unique, intelligent pre-brew system combined with loving attention to detail.
1 IMPRESSA C5 – Click & Drink
Click & DrinkClick & Drink
The IMPRESSA C5 demonstrates just how wonderful a perfect cup
of coffee can taste and how easy it is to prepare one. Thus, the further development of the IMPRESSA compact series is setting new
standards in coffee quality while at the same time maintaining a
visually pleasing appearance from every angle. The smart control
philosophy is especially to be admired. The various speciality coffees
can be selected simply and intuitively using a single control
element.
Click & Drink
p
Thanks to the revolutionary one-switch operation philosophy
with the smart Rotary Switch, you are only a single touch of a
button away from enjoying a perfect cup of coffee. To make
your choice, all you have to do is to rotate the switch between
coffee and Espresso, one or two cups. Just click the control and
seconds later you can be enjoying your drink.
Indicators
p
The easy-to-understand indicators light up in a regal red, providing the information that you need. Just one click of the
Rotary Switch away, unobtrusively concealed, are the maintenance buttons with associated indicators.
p
Height-adjustable coffee spout
Whether you are after a small cup of Espresso or a large cup
of breakfast coffee, the height-adjustable coffee spout, which
can be raised and lowered between 65 and 111 mm, can be
adjusted on a continuous scale to suit all sizes of cup. This prevents coffee splashing on the machine and is your guarantee
of a rich, thick crema. The superior design and feel of the
machine are also evident.
11
Page 12

1 IMPRESSA C5 – Click & Drink
JURA on the InternetJURA on the Internet
Knowledge BuilderKnowledge Builder
Connector System
p
The Connector System© allows one to use the Easy Cappuccino Frother, which is fitted as standard, a hot water nozzle for
an even jet of water and the optionally available 2-stage frothing nozzle or the Professional Cappuccino Frother for perfect
milk foam or hot milk.
Further information on this subject can be found in Chapter 11,
“Accessories and Service”.
Visit us on the Internet.
At www.jura.com you will find interesting and up-to-date
@
information on your IMPRESSA and on every aspect of the
subject of coffee.
You can familiarise yourself with your IMPRESSA C5 in a fun way on
the PC.
The Knowledge Builder awaits you at www.jura.com. The
@
interactive assistant, LEO, will support you and explain the
benefits of and how to use your IMPRESSA.
©
12
Page 13

2 Preparing and using your IMPRESSA for the first time
2 Preparing and using your IMPRESSA for the first time2 Preparing and using your IMPRESSA for the first time
This chapter provides you with the information you need to use your
IMPRESSA without any problems. You will prepare your IMPRESSA
step-by-step for your first coffee experience using it.
Supplied as standardSupplied as standard
Setting up and
Setting up and
connecting
connecting
The following items are supplied as standard:
Your JURA IMPRESSA fully automatic coffee machine
p
CLARIS plus filter cartridge
p
JURA Auto-Cappuccino Cleaner
p
The Welcome Pack, which includes:
p
The IMPRESSA C5 Manual
u
IMPRESSA C5 Quick Reference Guide
u
Milk pipe
u
JURA cleaning tablets
u
Measuring spoon for pre-ground coffee
u
Hot water nozzle
u
Aquadur® test strips
u
Overview of maintenance indicators, multi-lingual
u
Keep the packaging for your IMPRESSA. It is used to protect the machine during transportation.
When setting up and connecting your IMPRESSA, please proceed as
follows:
Set the IMPRESSA down on a horizontal surface that is not
p
sensitive to water.
Choose a spot which is protected against overheating to set
p
up your IMPRESSA.
Never place the IMPRESSA on a hot surface, such as a hob.
p
Check that the mains voltage agrees with the specification on
p
the rating plate.
Make sure that no one can trip over the power cable.
p
13
Page 14

2 Preparing and using your IMPRESSA for the first time
Filling the water tankFilling the water tank
Filling the bean
Filling the bean
container
container
CAUTIONCAUTION
To enjoy perfect coffee, we recommend that you change the water
every day.
Only use fresh, cold water to refill the water tank and never
o
milk, mineral water or other liquids.
Open the cover of the water tank.
l
Remove the water tank and rinse it with cold water.
l
Fill the water tank with fresh, cold mains water and rein-
l
sert.
Close the cover of the water tank.
l
The bean container has an aroma preservation cover. This will ensure
that your coffee beans retain their aroma for longer.
Coffee beans which have been treated with additives (e.g. sugar),
either pre-ground or in the form of freeze-dried coffee, will damage
the grinder.
Only use untreated coffee beans to refill the bean container.
l
Open the cover of the bean container and remove the aroma
l
preservation cover.
Remove any dirt or foreign objects inside the bean con-
l
tainer.
New machines contain an information sheet in the bean
l
container. Remove this information sheet.
Fill the bean container with coffee beans, then close the
l
aroma preservation cover and the bean container cover.
14
Page 15
First-time use First-time use
WARNINGWARNING
2 Preparing and using your IMPRESSA for the first time
If the machine is operated with a defective power cable, there is a
danger of electric shock.
Never use a machine which has a defective power cable.
l
Precondition: the water tank must be full.
Remove the protective film from the symbol display.
l
Insert the mains plug into a power socket.
l
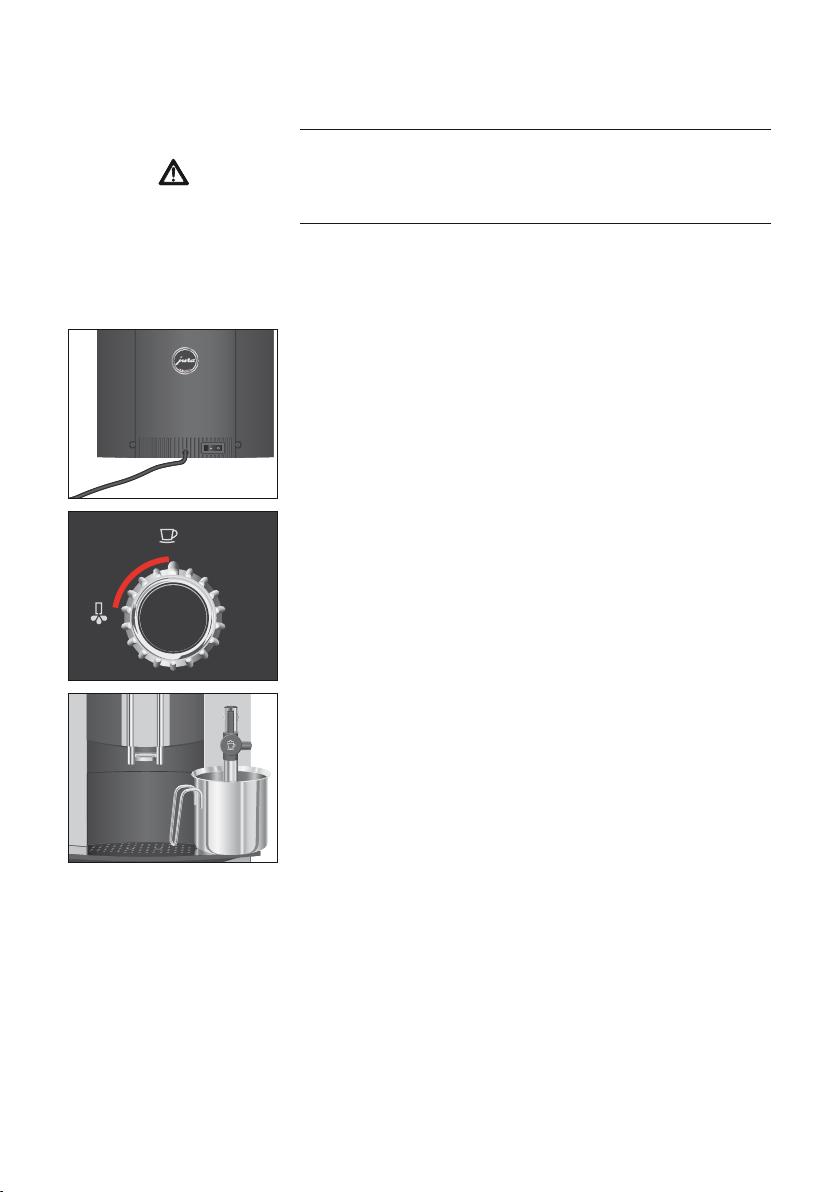
e l Switch on the IMPRESSA using the power switch on the back
of the machine.
The On/Off symbol
machine is on standby.
G will light up to indicate that the
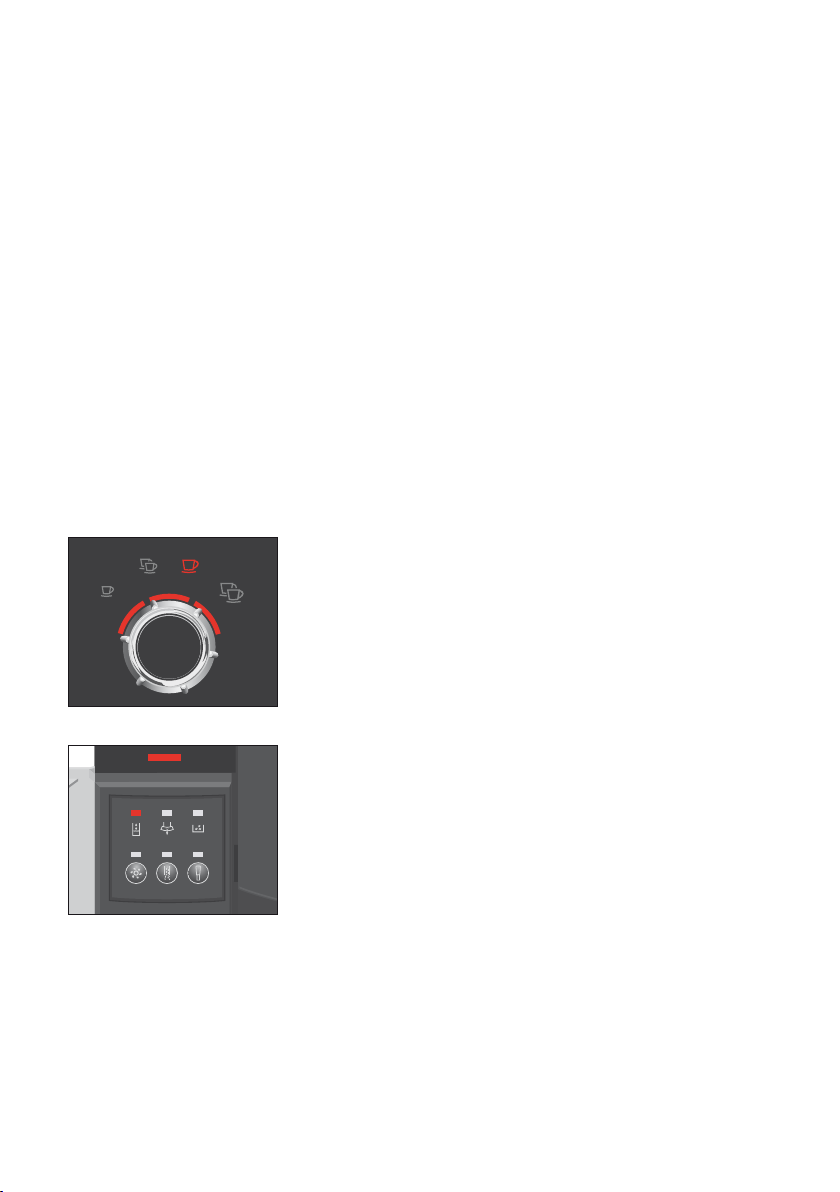
m l Press the Rotary Switch to switch the IMPRESSA on.
The light segment by the switch will now flash.
Place a receptacle under the Easy Cappuccino Frother.
l
r l Turn the switch in the anticlockwise direction.
The light segment by the switch will now light up. The system
will now be filled with water. A small amount of water will
flow out of the Easy Cappuccino Frother.
The operation stops automatically. The light segment by the
switch will now flash.
t l Turn the switch in the clockwise direction.
As long as the machine is heating up, the Maintenance
symbol
h will flash. The Maintenance symbol h lights up.
Place a receptacle under the coffee spout.
l
15
Page 16
2 Preparing and using your IMPRESSA for the first time
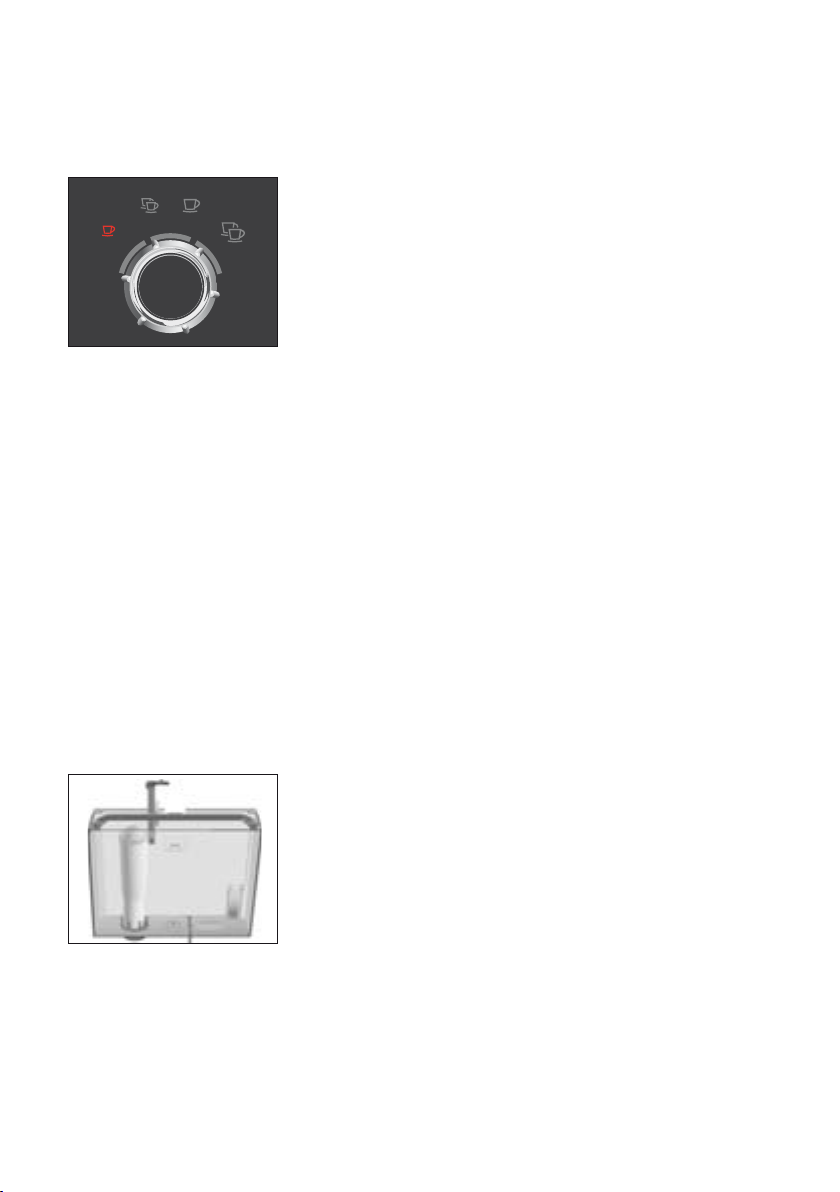
m l Press the Rotary Switch.
The machine will rinse itself, stopping automatically.
The 1 Espresso symbol
IMPRESSA is ready to use.
o
After the first time that a coffee speciality has been prepared,
you may find that the maintenance indicator and the bean
container
with coffee beans. In that case, prepare a different coffee
speciality.
Using and activating
Using and activating
filter
filter
Your IMPRESSA no longer has to be descaled if you are using CLARIS
plus filter cartridges.
Perform the “Using filter” operation without a break. This will
o
ensure that your IMPRESSA always produces its best.
You can also try out the “Using filter” operation online. Visit
@
the Knowledge Builder on www.jura.com.
Further information on CLARIS can be found in Chapter 9, “CLARIS
plus filter cartridge – Water for perfect coffee”.
a will light up indicating that your
c display flash if the grinder has not yet been filled
Remove the packaging on the CLARIS plus filter cartridge.
l
Remove the water tank and empty it.
l
Lift the cartridge holder and insert the filter cartridge into
l
the water tank, applying a light pressure.
Close the cartridge holder. It will lock into place audibly.
l
Fill the water tank with cold, fresh mains water and rein-
l
sert.
After two months, the filter will cease to work. Monitor the
o
elapsed time as shown on the date plate on the cartridge
holder.
16
Page 17
2 Preparing and using your IMPRESSA for the first time
Precondition: your IMPRESSA must be switched off (standby
mode).
Open the access door.
l
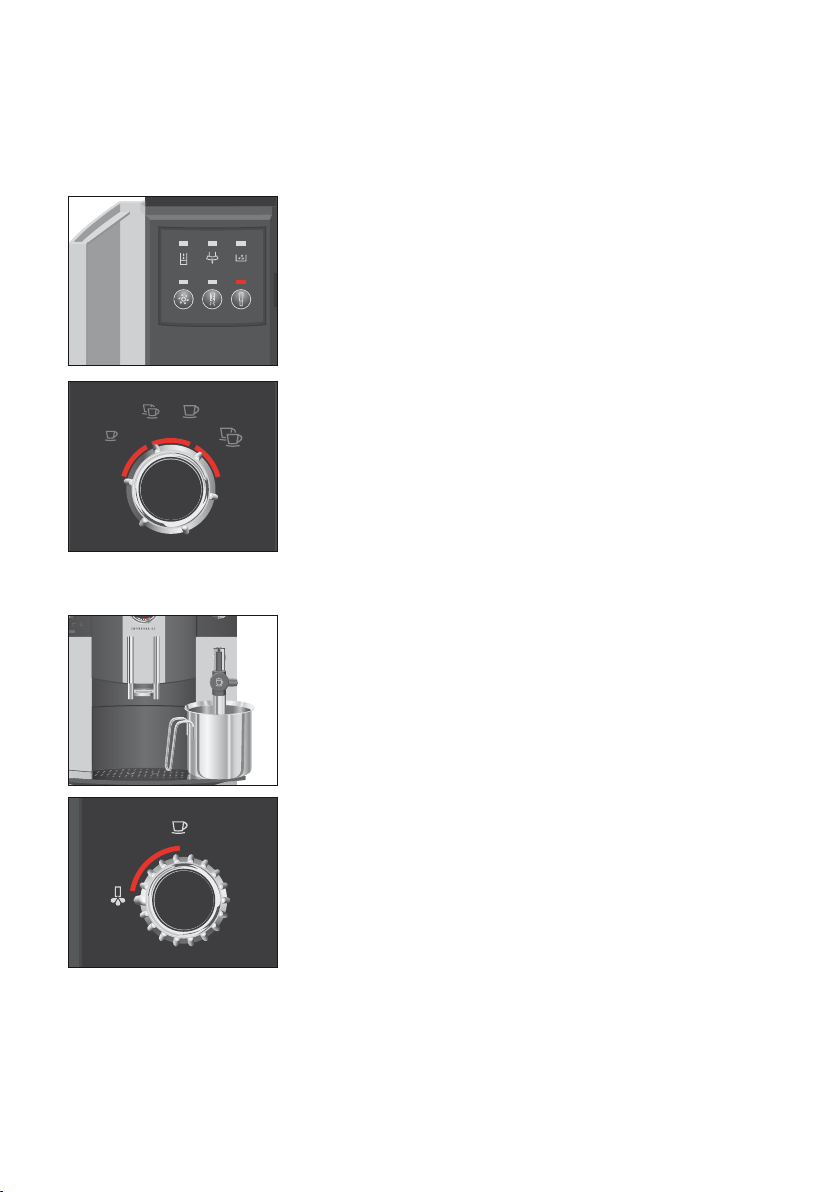
n l Hold down the Filter button until the Filter indicator n
lights up.
ä l Turn the Rotary Switch until the 3 light segments around the
Rotary Switch light up.
When the 3 light segments light up, the filter is activated. If
o
none of the light segments light up, this means that the filter
has not been activated.
m l Press the Rotary Switch to confirm the setting.
The light segment by the switch will now flash.
l
Place a receptacle (containing at least 500 ml) under the
Easy Cappuccino Frother.
l
If the milk pipe is connected, remove it.
r l Turn the switch in the anticlockwise direction.
Rinsing of the filter will now begin. The light segment by the
switch will light up.
The water could be slightly discoloured. This is not harmful to health,
nor does it affect the taste.
Rinsing of the filter will automatically stop after approx.
500 ml, and the light segment by the switch will then flash.
t l Turn the switch in the clockwise direction.
The IMPRESSA will switch itself off (into standby mode). The
filter is now activated.
17
Page 18

2 Preparing and using your IMPRESSA for the first time
Assessing and setting
Assessing and setting
water hardness
water hardness
Level
Level
Water hardness Shown in display
Water hardness Shown in display
0 The water hardness is switched off, the automatic
0 The water hardness is switched off, the automatic
calcification indicator is switched off
calcification indicator is switched off
1 German degree of water hardness 1 – 7° dH
1 German degree of water hardness 1 – 7° dH
French degree of water hardness 1.79 – 12.53° f
French degree of water hardness 1.79 – 12.53° f
2 German degree of water hardness 8 – 15° dH
2 German degree of water hardness 8 – 15° dH
French degree of water hardness 14.32 – 26.85° f
French degree of water hardness 14.32 – 26.85° f
3 German degree of water hardness 16 – 23° dH
3 German degree of water hardness 16 – 23° dH
French degree of water hardness 28.64 – 41.14° f
French degree of water hardness 28.64 – 41.14° f
4 German degree of water hardness 24 – 30° dH
4 German degree of water hardness 24 – 30° dH
French degree of water hardness 42.96 – 53.7° f
French degree of water hardness 42.96 – 53.7° f
The harder the water is, the more frequently the IMPRESSA needs to
be descaled. It is therefore important to set the water hardness.
o
However, if you are using the CLARIS plus filter cartridge and
have activated the filter, you will not be able to adjust the
water hardness.
The water hardness is set to level 3 in the factory.
o
The symbols in the symbol display show the configured degree of
water hardness. The number of symbols corresponds to the relevant
level.
No symbol is illuminated
No symbol is illuminated
1 symbol is illuminated
1 symbol is illuminated
A
A
2 symbols are illuminated
2 symbols are illuminated
A S
A S
3 symbols are illuminated
3 symbols are illuminated
A S D
A S D
4 symbols are illuminated
4 symbols are illuminated
A S D F
A S D F
You can find out what the water hardness is, using the Aquadur®
test strips enclosed in the Welcome Pack.
Hold the test strip briefly (for one second) under flowing
l
mains water. Shake off the water.
Wait for about 1 minute.
l
You will then be able to read the degree of water hardness
l
from the discoloration of the Aquadur® test strip and the
description on the packaging.
You can now configure the water hardness.
18
Page 19
2 Preparing and using your IMPRESSA for the first time
Example: to change the water hardness from level 3 to level 4,
proceed as follows:
Precondition: your IMPRESSA must be switched off (standby
mode).
Open the access door.
l
b l Hold down the Descaling button until the Descaling indi-
cator
b lights up.
The Descaling indicator
now light up.
ä l
Turn the Rotary Switch until the four symbols a s d f
light up.
b and the symbols A S D will
m l Press the Rotary Switch to confirm the level 4 setting.
The IMPRESSA will switch itself off (into standby mode). The
water hardness is now set.
Adjusting grinder Adjusting grinder
CAUTIONCAUTION
You can adjust the grinder to suit the roast of your coffee.
If you adjust the fineness of grind when the grinder is not operating,
the fineness of grind switch could be damaged.
Only adjust the fineness of grind when the grinder is running.
l
Our recommendations:
Select a fine setting for a light roast.
p
Select a coarse setting for a darker roast.
p
Example: to change the fineness of grinding during preparation of
a coffee, proceed as follows:
Open the cover of the bean container and remove the aroma
l
preservation cover.
Place a cup under the coffee spout.
l
ä l Turn the Rotary Switch to the 1 coffee setting D.
19
Page 20
2 Preparing and using your IMPRESSA for the first time
m l Press the Rotary Switch to initiate preparation of the coffee.
The grinder will now start up, and the 1 coffee symbol D
flashes
l
Turn the fineness of grind switch to the desired position
while the grinder is running.
The coffee will be prepared and the fineness of grind is set.
.
Switching on Switching on
Switching off
Switching off
(standby mode)
(standby mode)
When the IMPRESSA is switched on, a prompt to perform a rinse
operation automatically appears.
Precondition: your IMPRESSA is switched on at the power switch
and the On/Off symbol g is illuminated (standby).
m l Press the Rotary Switch to switch the IMPRESSA on.
As long as the machine is heating up, the Maintenance
sym bol
h will flash. The Maintenance symbol h lights up.
l
Place a receptacle under the coffee spout.
m l Press the Rotary Switch to start the rinse operation.
The coffee spout will be rinsed. The operation stops auto-
matically and your IMPRESSA is now ready for use.
When you switch off your IMPRESSA, the system is automatically
rinsed.
Place a receptacle under the coffee spout.
l
ä l Turn the Rotary Switch to the On/Off symbol g.
m l Press the Rotary Switch to switch the IMPRESSA off.
The system is rinsed and the Maintenance symbol
The operation stops automatically.
The IMPRESSA is switched off (in standby mode), and the
On/Off symbol
G is illuminated.
H flashes.
20
Page 21

3 Familiarising yourself with the control options
3 Familiarising yourself with the control options3 Familiarising yourself with the control options
With the IMPRESSA, you can prepare an excellent coffee speciality
at the touch of a button. You also have the option of adjusting the
coffee strength and amount of water to your personal taste while
the coffee is brewing.
This chapter will show you how to operate the machine with the aid
of examples. To familiarise yourself with your IMPRESSA, we recommend that you make a point of actively trying the facilities described
in this chapter. You will find this is well worthwhile.
Learn how to perform the following:
Preparing drinks at the touch of a button
p
Adjusting the settings on a one-off basis while your drink is
p
being prepared
Adjusting the permanent cup size settings
p
You can stop the machine at any time while a coffee speciality
o
is being prepared. To do this press the Rotary Switch.
Preparing drinks at the
Preparing drinks at the
touch of a button
touch of a button
If you prefer to familiarise yourself with your IMPRESSA in a fun
@
way on the PC, the interactive Knowledge Builder tutorial pro-
gram can be found on the Internet at www.jura.com
Prepare your favourite coffee speciality at the touch of a button.
All coffee specialities are prepared following this model at the touch
of a button.
Unless you change the permanent settings, all coffee speci-
o
alities prepared at the touch of a button will have a coffee
strength of mild.
.
21
Page 22
3 Familiarising yourself with the control options
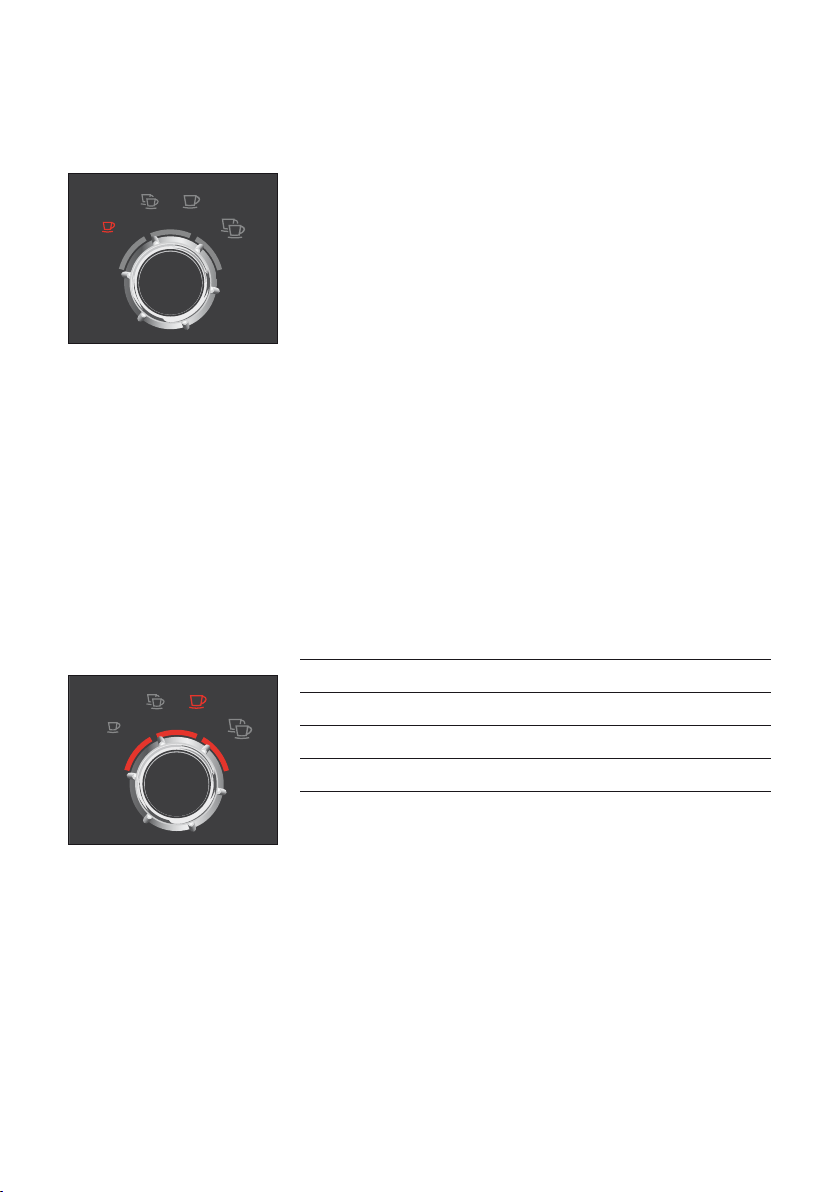
Example: this is how to prepare an Espresso.
ä l Turn the Rotary Switch to the 1 Espresso setting a.
m l Press the Rotary Switch to initiate preparation of the
O ne-off setting during
O ne-off setting during
drink preparation
drink preparation
You can change both the coffee strength and the amount of water
while your drink is being prepared. These settings are not saved.
One-off settings during coffee preparation always follow this
model.
o
The coffee strength options available are as follows:
Coffee strength Shown in symbol display
Mild 1 light segment is illuminated
Normal 2 light segments are illuminated
Strong 3 light segments are illuminated
Place an Espresso cup under the coffee spout.
l
Espresso.
The 1 Espresso symbol
amount of water wll flow into the cup.
Drink preparation stops automatically.
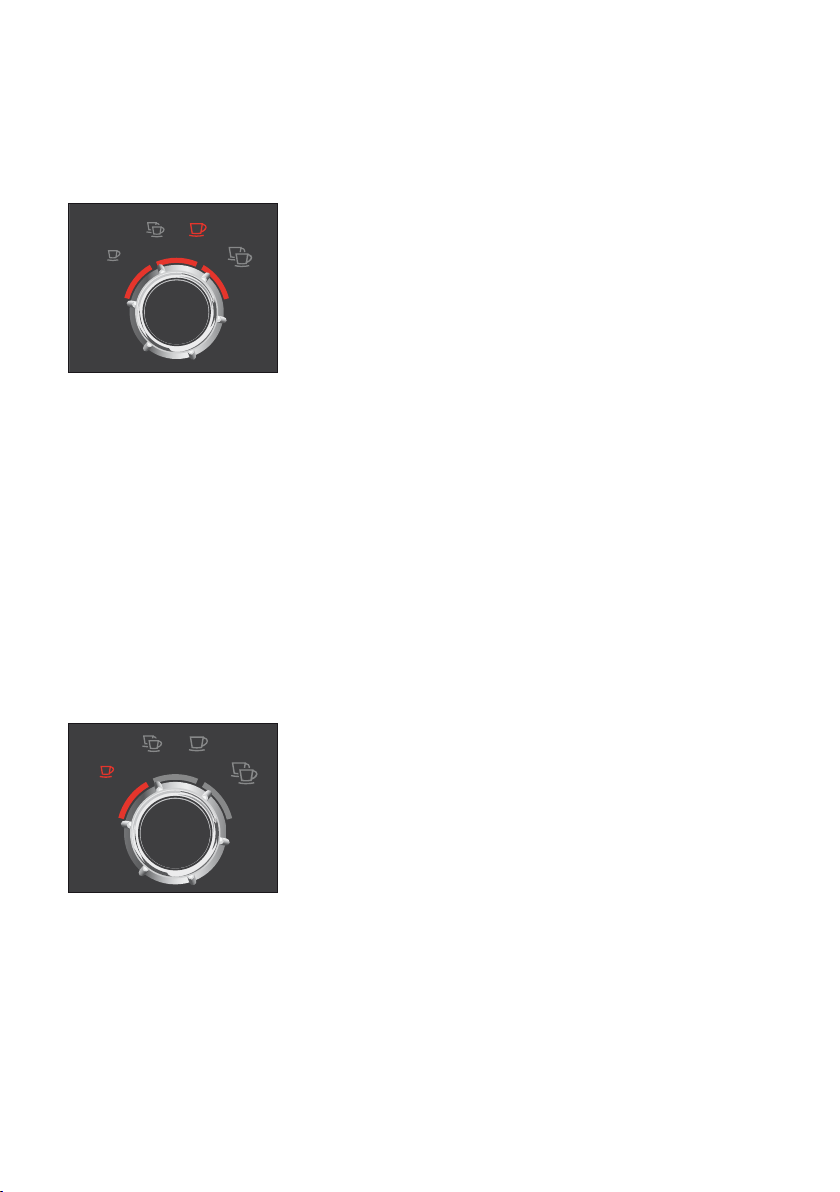
During the grinding operation, the light segments above the
Rotary Switch indicate the coffee strength. The coffee strength
can be altered while 1 Espresso or 1 coffee is being prepared.
a will now flash, and the pre-set
22
During the brew operation, the light segments indicate the
o
amount of water. At this stage of the operation, you can change
the amount of water by turning the Rotary Switch.
Example: this is how to prepare a strong coffee.
Place a cup under the coffee spout.
l
ä l Turn the Rotary Switch to the 1 coffee setting d.
Page 23
Adjusting the perma-
Adjusting the permanent cup size settings
nent cup size settings
3 Familiarising yourself with the control options
m l Press the Rotary Switch to initiate preparation of the coffee.
The grinder starts up, the 1 coffee symbol
light segment above the Rotary Switch is illuminated.
ä l
While the grinder is running, turn the Rotary Switch in a
clockwise direction until three light segments have lit up.
The grinding operation stops, brewing begins and the predefined quantity of water flows into the cup.
Drink preparation stops automatically.
It is easy to adjust the amount of water for all coffee specialities to
the cup size for good. As in the following example, adjust the amount
of water once. Every time you prepare a drink in the future, this
amount of water will be dispensed.
Permanent adjustment of cup size works the same way for all coffee
specialities.
Example: to permanently adjust the amount of water for an
Espresso, you should proceed as follows:
Place an Espresso cup under the coffee spout.
l
d flashes, and one
ä l Turn the Rotary Switch to the 1 Espresso setting a.
m l Keep the Rotary Switch pressed down until the light seg-
ment flashes above the Rotary Switch.
Coffee preparation will start and the Espresso will flow into
the cup.
m l Press the Rotary Switch again when enough Espresso has
flown into the cup.
Espresso preparation will now stop. Your IMPRESSA will
remember the amount of water you have specified for an
Espresso for good.
You can alter these settings at any time by repeating the
o
above procedure.
23
Page 24

4 Recipes
4 Recipes
You can use your IMPRESSA to prepare not only coffee classics but also unusual specialities in your
home. You can find additional coffee recipes online at www.jura.com.
Further information on how to operate your IMPRESSA can be found in Chapter 3, “Familiarising
yourself with the control options”.
Cappuzino
Ingredients
(for two people)
Divide the cinnamon syrup into Cappuccino cups.
l
Place cup under Easy Cappuccino Frother and half fill with milk foam.
l
Pour Espresso directly into the milk foam and scatter some cinnamon powder.
l
200 ml cold milk
2 strong Espressos
20 ml cinnamon syrup
Powdered cinnamon for decoration purposes
Café Chocolat Blanc
Ingredients
(for two people)
Use the Easy Cappuccino Frother to froth some milk in two decorative glasses.
l
Melt white chocolate in a bain marie.
l
Prepare two Espressos, stir with the melted chocolate and pour into the milk foam.
l
Shake some grated white chocolate over the drinks.
l
24
50 g white chocolate
2 Espressos
200 ml milk
Grated white chocolate for decoration purposes
Page 25

4 Recipes
25
Page 26

4 Recipes
26
Page 27

4 Recipes
27
Page 28

4 Recipes
28
Page 29

Winter’s dream coffee
Ingredients
(for two people)
Prepare 2 Espressos.
l
Stir Espresso with cocoa and gingerbread seasoning and divide into two glasses.
l
Froth the milk and add to the Espressos.
l
Sprinkle with small pieces of gingerbread.
l
2 strong Espressos
200 ml of hot cocoa
1 pinch of gingerbread seasoning
100 ml milk
Sugar to suit personal taste
1-2 gingerbread cakes for decoration
4 Recipes
Latte Macchiato Frio
Ingredients
(for two people)
Prepare Espresso and leave to cool.
l
Put cold milk, the maple syrup and crushed ice in a glass and mix.
l
Add the cold Espresso.
l
2 cold Espressos
200 ml cold milk
1 small cup crushed ice
20 ml maple syrup
Milk foam
29
Page 30

5 Preparing drinks at the touch of a button
5 Preparing drinks at the touch of a button5 Preparing drinks at the touch of a button
This chapter will explain how to prepare coffee specialities, milk and
hot water.
Chapter 3, “Familiarising yourself with the control options”, will
teach you how to adjust the settings to your personal preferences.
Alternatively, you can use Chapter 6, “Adjusting the permanent cup
size settings”.
You can stop the machine at any time while a coffee speciality
o
is being prepared. To do this press the Rotary Switch.
You can also try out the preparation of coffee specialities
@
online. Visit the Knowledge Builder on www.jura.com.
Barista tips Barista tips
A “Barista” is someone who is a professional at preparing Espressos
and coffee. In Italy this is a respected profession. The Barista knows
every coffee speciality and is a master at preparing perfect drinks. In
conjunction with your JURA IMPRESSA, you too can achieve perfect
results.
To do this, follow these Barista tips:
Store your coffee in a dry place. Oxygen, light, heat and mois-
p
ture will spoil the coffee.
Use only fresh, cold mains water so that the coffee aroma can
p
be at its best.
To enjoy perfect coffee, please change the water every day.
p
Set the grinder to your preferred roasting. The correct fineness
p
of grind will ensure that the flavours are released in the
optimal way.
Heat your cup up in advance.
p
Use a teaspoon for sugar and avoid sugar lumps to ensure
p
that the crema or milk foam are not spoilt.
Adjust the height-adjustable coffee spout to the height of
p
your cup. This will ensure that you get a really good crema.
30
Page 31

5 Preparing drinks at the touch of a button
Espresso Espresso
Coffee Coffee
The classic coffee drink from Italy. There is a definite crema on the
surface of the Espresso.
Example: this is how to prepare an Espresso.
Place an Espresso cup under the coffee spout.
l
ä l Turn the Rotary Switch to the 1 Espresso setting a.
m l Press the Rotary Switch to initiate preparation of the
Espresso.
The 1 Espresso symbol
amount of water will flow into the cup.
Drink preparation stops automatically.
To prepare two cups of Espresso, place two cups under the coffee
spout and turn the Rotary Switch to the symbol for 2 Espressos
then press the switch to initiate coffee preparation.
Example: this is how to prepare a coffee.
Place a cup under the coffee spout.
l
a will now flash, and the pre-set
s,
ä l Turn the Rotary Switch to the 1 coffee setting d.
m l Press the Rotary Switch to initiate preparation of the coffee.
The 1 coffee symbol
of water will flow into the cup.
Drink preparation stops automatically.
d will now flash, and the pre-set amount
To prepare two cups of coffee, place two cups under the coffee spout
and turn the Rotary Switch to the symbol for 2 coffees
the switch to initiate coffee preparation.
f, then press
31
Page 32

5 Preparing drinks at the touch of a button
Cappuccino Cappuccino
A classic Italian recipe. The Cappuccino consists one-third of
Espresso, hot milk and milk foam. It is finished with a sprinkling of
cocoa powder.
Precondition: your IMPRESSA is ready to use, the Easy Cappuccino
Frother is mounted.
Take the milk pipe out of the Welcome Pack.
l
Take the protective cap off the Easy Cappuccino Frother.
l
Attach the milk pipe to the frother.
l
Insert the other end in a milk Tetrapack or connect it to a
l
milk container.
Place a cup under the Easy Cappuccino Frother.
l
ä l Turn the Rotary Switch so that it points to the Steam symbol
k.
m l Press the Rotary Switch to confirm your choice.
The Steam symbol
IMPRESSA has warmed up. As soon as the required temperature has been reached, the light segment by the switch will
flash.
k will continue flashing until the
r l Turn the switch in the anticlockwise direction.
The milk foam will be prepared.
t l Turn the switch in the clockwise direction when there is suf-
ficient milk foam in the cup.
32
As long as the light segment continues to flash on the switch,
o
you can continue preparing milk foam.
Move the cup under the coffee spout.
l
ä l Turn the Rotary Switch to the 1 Espresso setting a.
m l Press the Rotary Switch to initiate preparation of the
Espresso.
The 1 Espresso symbol
amount of water will flow into the cup.
Drink preparation stops automatically.
a will now flash, and the pre-set
Page 33

5 Preparing drinks at the touch of a button
To ensure that the Easy Cappuccino Frother works perfectly, you
should clean it regularly. For further information on cleaning, see
Chapter 8, “Maintenance
The high-quality milk containers available from JURA are a useful
addition for all lovers of milk specialities. Further information on
JURA accessories can be found in Chapter 11, “Accessories and
Service”.
– cleaning the Easy Cappuccino Frother”.
Pre-ground coffee Pre-ground coffee
You can choose a second variety of coffee with the filler funnel for
pre-ground coffee.
All coffee specialities using pre-ground coffee are prepared in the
same way.
Never add more than two level measuring spoons of pre-
o
ground coffee.
Use pre-ground coffee which is not ground too finely. Very
o
fine coffee can block up the system so that the coffee only
comes out in drips.
If you have added too little pre-ground coffee, the IMPRESSA
o
will come to a halt ready for further use.
Example: this is how to prepare a coffee using pre-ground coffee.
Take the measuring spoon for pre-ground coffee out of the
l
Welcome Pack.
ä l Turn the Rotary Switch so that it points to the pre-ground
coffee symbol
j.
m l Press the Rotary Switch to confirm your choice.
The pre-ground coffee symbol
l Place a cup under the coffee spout.
j will flash.
33
Page 34

5 Preparing drinks at the touch of a button
Open the filler funnel for pre-ground coffee.
l
Place one level measuring spoon of pre-ground coffee in the
l
filler funnel.
ä l Turn the Rotary Switch to the 1 coffee setting d.
m l Press the Rotary Switch to initiate preparation of the coffee.
The symbols for pre-ground coffee
flash, and the pre-configured amount of water will flow into
the cup.
Drink preparation stops automatically.
To prepare two cups of pre-ground coffee, place two cups under the
coffee spout, add two level measuring spoons of pre-ground coffee
to the filler funnel, turn the Rotary Switch to the symbol for 2
coffees
f and then press to initiate preparation of the coffee.
j and 1 coffee d will
Milk foam Milk foam
Precondition: your IMPRESSA is ready to use, the Easy Cappuccino
Frother is mounted.
Take the milk pipe out of the Welcome Pack.
l
Take the protective cap off the Easy Cappuccino Frother.
l
Attach the milk pipe to the frother.
l
Insert the other end in a milk Tetrapack or connect it to a
l
milk container.
Place a cup under the Easy Cappuccino Frother.
l
ä l Turn the Rotary Switch so that it points to the Steam
symbol
k.
m l Press the Rotary Switch to confirm your choice.
The Steam symbol
IMPRESSA has warmed up. As soon as the required temperature has been reached, the light segment by the switch will
flash.
k will continue flashing until the
34
Page 35

5 Preparing drinks at the touch of a button
r l Turn the switch in the anticlockwise direction.
The milk foam will be prepared.
t l Turn the switch in the clockwise direction when there is
sufficient milk foam in the cup.
As long as the light segment continues to flash by the switch,
o
you can continue preparing milk foam.
To ensure that the Easy Cappuccino Frother works perfectly, you
should clean it daily. Further information can be found in Chapter 8,
“Maintenance
– cleaning the Easy Cappuccino Frother”.
Hot water Hot water
CAUTIONCAUTION
To obtain a perfect water flow, attach the removable hot water
nozzle.
There is a danger of scalding from hot water splashes.
Avoid direct contact with the skin.
l
Start by replacing the nozzle:
Carefully remove the Easy Cappuccino Frother from the
l
Connector System
l
Take the hot water nozzle out of the Welcome Pack.
Insert this into the Connector System
l
motion.
l
Place a cup under the hot water nozzle.
Precondition: your IMPRESSA is ready for use.
©
.
©
with a light turning
r l Turn the switch in the anticlockwise direction.
The light segment on the switch will light up and hot water
will flow into the cup.
t l Turn the switch in the clockwise direction when there is
sufficient water in the cup.
35
Page 36

6 Adjusting the permanent cup size settings
6 Adjusting the permanent cup size settings6 Adjusting the permanent cup size settings
It is easy to adjust the amount of water for all coffee specialities to
the cup size for good. As in the following example, adjust the amount
of water once. Every time you prepare a drink in the future, this
amount of water will be dispensed.
Permanent adjustment of cup size works the same way for all coffee
specialities.
Example: to permanently adjust the amount of water for an
Espresso, you should proceed as follows:
l
Place an Espresso cup under the coffee spout.
ä l Turn the Rotary Switch to the 1 Espresso setting a.
m l Keep the Rotary Switch pressed down until the light seg-
ment flashes above the Rotary Switch.
Coffee preparation will start and the Espresso will flow into
the cup.
m l Press the Rotary Switch again when enough Espresso has
flown into the cup.
Espresso preparation will now stop. Your IMPRESSA will
remember the amount of water you have specified for an
Espresso for good.
36
You can alter these settings at any time by repeating the
o
above procedure.
Page 37

7 Adjusting the permanent settings in programming mode
7 Adjusting the permanent settings in programming mode7 Adjusting the permanent settings in programming mode
Programmable
Programmable
switch-off time
switch-off time
Switch-off time Shown in symbol display Meaning
Switch-off time Shown in symbol display Meaning
Not active No symbol is illuminated Switch-off time not
Not active No symbol is illuminated Switch-off time not
1 hour 1 symbol is illuminated
1 hour 1 symbol is illuminated
2 hours 2 symbols are illuminated
2 hours 2 symbols are illuminated
4 hours 3 symbols are illuminated
4 hours 3 symbols are illuminated
8 hours 4 symbols are illuminated
8 hours 4 symbols are illuminated
By instructing your IMPRESSA to switch itself off, you can cut down
your energy consumption.
o
The permanent setting for programmable switch-off time is
4 hours.
The number of symbols illuminated indicates the programmable
switch-off time that has been activated in hours:
programmed
programmed
Switch-off after 1 hour
Switch-off after 1 hour
a
a
Switch-off after 2 hours
Switch-off after 2 hours
a s
a s
Switch-off after 4 hours
Switch-off after 4 hours
a s d
a s d
Switch-off after 8 hours
Switch-off after 8 hours
a s d f
a s d f
Example: to amend the programmable switch-off time from 4 hours
to 2, you should proceed as follows:
Precondition: your IMPRESSA must be switched off (standby
mode).
Open the access door.
l
v l Hold down the Cleaning button until the Cleaning indicator
v lights up.
The IMPRESSA is in programming mode, the Cleaning indicator
v and the symbols a s d are illuminated.
37
Page 38

7 Adjusting the permanent settings in programming mode
ä l Turn the Rotary Switch until the 2 symbols a s light up.
m l Press the Rotary Switch to confirm the setting.
The IMPRESSA will switch itself off (into standby mode).
The programmable switch-off time is now configured at
2 hours.
38
Page 39

8 Maintenance8 Maintenance
8 Maintenance
Your IMPRESSA has the following integrated maintenance programs:
Rinse the machine
p
Change the filter
p
Clean the machine
p
Descale the machine
p
The illuminated maintenance indicator draws your attention to the
maintenance actions that are necessary. Open the access door and
note the further indicators in the maintenance field. In the example
shown on the left, your IMPRESSA is prompting you to clean it.
Clean or descale the machine or change the filter whenever
o
the appropriate indicator is lit up.
Maintenance tipsMaintenance tips
To ensure that you get many years' reliable service out of your
IMPRESSA and to guarantee the optimum coffee quality, the
machine requires daily maintenance.
You should proceed as follows:
Empty the coffee grounds container and the drip tray. Rinse
p
them with warm water.
Rinse the water tank with clean water.
p
Dismantle and rinse the Easy Cappuccino Frother (see Chapter
p
8, “Maintenance
Wipe the surface of the machine with a damp cloth.
p
– rinsing the Easy Cappuccino Frother”).
39
Page 40

8 Maintenance
Rinsing the machine Rinsing the machine
Changing the filter Changing the filter
Once the IMPRESSA has heated up following switch-on, the
o
Maintenance symbol
form a rinse operation. To initiate the rinse operation, press
the Rotary Switch.
When the IMPRESSA is switched off, a rinse operation is auto-
o
matically performed.
Precondition: the IMPRESSA is ready for use.
Place a receptacle under the coffee spout.
l
h will light up, prompting you to per-
ä l Turn the Rotary Switch so that it points to the Maintenance
symbol
h .
m l Press the Rotary Switch to start the rinse operation.
The rinse operation now starts and the Maintenance
symbol
h flashes.
Rinsing stops automatically.
Your IMPRESSA is ready for use.
After 50 litres of water have been dispensed, the filter will
o
cease to work. Your IMPRESSA will automatically prompt you
to replace the filter.
After two months, the filter will cease to work. Monitor the
o
elapsed time as shown on the date plate on the cartridge
holder.
If the CLARIS plus filter cartridge is not activated, you will not
o
be prompted to change the filter.
Replacement following a
Replacement following a
prompt
prompt
40
To change the CLARIS plus filter cartridge when prompted to do so
by your IMPRESSA, you should proceed as follows:
Precondition: the Maintenance indicator and the Filter indicator
are illuminated.
Remove the water tank and empty it.
l
n
Page 41

8 Maintenance
Lift the cartridge holder.
l
Take out the old CLARIS plus filter cartridge.
l
Insert the new CLARIS plus filter cartridge into the water
l
tank, pressing it lightly.
Close the cartridge holder.
l
It will lock into place audibly.
Fill the water tank with cold, fresh mains water and
l
reinsert.
Place a receptacle (containing at least 500 ml) under the
l
Easy Cappuccino Frother.
If the milk pipe is connected, remove it.
l
n l Hold down the Filter button until the Filter indicator n
flashes.
The light segment by the switch will now flash.
r l Turn the switch in the anticlockwise direction.
Rinsing of the filter will now begin. The light segment by the
switch will now light up.
The water could be slightly discoloured. This is not harmful to health,
nor does it affect the taste.
Rinsing of the filter will automatically stop after approx.
500 ml, and the light segment by the switch will then flash.
t l Turn the switch in the clockwise direction.
The Maintenance symbol
and is once again ready for use.
h flashes, the IMPRESSA heats up
Manual filter changeManual filter change
Cleaning the machine Cleaning the machine
CAUTIONCAUTION
You can initiate the “Changing the filter” operation manually. Start
when the first prompt appears
following a prompt”.
After dispensing 200 cups of coffee or performing 80 switch-on
rinses, the IMPRESSA will prompt you to clean it.
If the wrong cleaning agent is used, the machine could be damaged
and/or traces of detergent could be left behind in the water.
Use only original JURA care products.
l
l, as described under “Replacement
41
Page 42

8 Maintenance
Cleaning following
Cleaning following
a prompt
a prompt
The cleaning program only lasts about 15 minutes.
o
Do not interrupt the cleaning program, as this will impair the
o
quality of cleaning.
Your dealer will stock JURA cleaning tablets.
o
Try out the “Cleaning the machine” operation online. Visit the
@
Knowledge Builder on www.jura.com.
To clean your IMPRESSA when prompted to do so, you should
proceed as follows:
Precondition: the Maintenance indicator and the Cleaning
indicator
v are illuminated.
v l Hold down the Cleaning button until the Cleaning
indicator
The coffee grounds container indicator
Empty the drip tray and the coffee grounds container.
l
Insert the empty drip tray and coffee grounds container
l
back in the machine.
The Cleaning indicator
Place a receptacle under the coffee spout.
l
v flashes.
x now flashes.
v will now light up.
v l Press the Cleaning button.
The Cleaning indicator
the coffee spout.
The process is interrupted. The pre-ground coffee symbol j
flashes and the Cleaning indicator
l
Open the cover of the filler funnel for pre-ground coffee.
Insert a JURA cleaning tablet into the filler funnel.
l
Close the cover of the filler funnel.
l
v l Press the Cleaning button.
The Cleaning indicator
the coffee spout once again.
The operation stops, the coffee grounds container
indicator
Empty the drip tray and the coffee grounds container.
l
x flashes.
v now flashes. Water flows out of
v lights up.
v now flashes. Water flows out of
42
Page 43

8 Maintenance
Insert the empty drip tray and coffee grounds container
l
back in the machine.
The cleaning operation is now complete. The Maintenance
symbol
h flashes, the IMPRESSA heats up and is once again
ready for use.
Manual cleaningManual cleaning
Descaling the machine Descaling the machine
CAUTIONCAUTION
CAUTIONCAUTION
CAUTIONCAUTION
CAUTIONCAUTION
You can initiate the “Cleaning the machine” operation manually.
Start when the first prompt appears
following a prompt”.
The IMPRESSA builds up deposits of limescale over time and automatically prompts you to descale it when necessary. The degree of
calcification depends on the degree of hardness of your water.
If the descaling agent comes into contact with the skin or eyes, this
can cause irritation.
Avoid contact with the skin or eyes.
l
Rinse the descaling agent off with clean water. Should you get
l
any descaling agent in your eye, see a doctor.
If the wrong descaling agent is used, the machine could be damaged and/or traces of detergent could be left behind in the water.
Use only original JURA care products.
l
If the descaling operation is interrupted, it is possible that the
machine could be damaged.
Allow the descaling program to run to the end.
l
If the descaling agent comes into contact with sensitive surfaces, the
possibility of damage cannot be excluded.
Clean up any splashes immediately.
l
l, as described under “Cleaning
The descaling program lasts approx. 40 minutes.
o
Your dealer will stock JURA descaling tablets.
o
Try out the “Descaling the machine” operation online. Visit
@
the Knowledge Builder on www.jura.com.
43
Page 44

8 Maintenance
Descaling following
Descaling following
a prompt
a prompt
To descale your IMPRESSA when prompted to do so, you should
proceed as follows:
Precondition: the maintenance indicator and the
cator
b are lit up.
Descaling indi-
b l Hold down the Descaling button until the Descaling indi-
cator
b flashes.
The coffee grounds container indicator
Empty the drip tray and the coffee grounds container.
l
Insert the empty drip tray and coffee grounds container
l
back in the machine.
The Water Tank indicator
Remove the water tank and empty it.
l
Completely dissolve the contents of one blister (3 JURA des-
l
caling tablets) in a container that holds 500 ml of water. This
can take a few minutes.
Pour the solution into the empty water tank.
l
Insert the water tank.
l
The light segment by the switch will now flash.
Remove the frother.
l
Place a container under the Connector System
l
y now flashes.
x now flashes.
©
.
44
r l Turn the switch in the anticlockwise direction.
This causes water to flow out of the Connector System
The light segment by the switch lights up during the descal-
ing operation.
The operation stops automatically, and the light segment by
the switch flashes.
©
.
Page 45

t l Turn the switch in the clockwise direction.
The descaling operation will resume. After a few minutes,
the coffee grounds container indicator
l
Empty the container under the Connector System
Empty the drip tray and the coffee grounds container.
l
Insert the empty drip tray and coffee grounds container
l
back in the machine.
The Water Tank indicator
Rinse the water tank thoroughly and fill it with cold, fresh
l
mains water.
Put the water tank back in.
l
Place a container under the Connector System
l
The light segment by the switch will now flash.
y now flashes.
x flashes.
r l Turn the switch in the anticlockwise direction.
This causes water to flow out of the Connector System
The operation stops automatically, and the light segment by
the switch flashes.
t l Turn the switch in the clockwise direction.
The descaling operation will resume. After a few minutes,
the coffee grounds container indicator
Empty the drip tray and the coffee grounds container.
l
Insert the empty drip tray and coffee grounds container
l
back in the machine.
Put back the frother.
l
The descaling operation is now complete. The Maintenance
symbol
h flashes, the IMPRESSA heats up and is once
again ready for use.
x flashes.
8 Maintenance
©
.
©
.
©
.
Manual descalingManual descaling
You can initiate the operation “Descaling the machine” manually.
Start when the first prompt appears
ing following a prompt”.
If the descaling operation stops unexpectedly, rinse the water
o
tank thoroughly.
l, as described under “Descal-
45
Page 46

8 Maintenance
Rinsing the Easy
Rinsing the Easy
Cappuccino Frother
Cappuccino Frother
Cleaning the Easy
Cleaning the Easy
Cappuccino Frother
Cappuccino Frother
To ensure that the Easy Cappuccino Frother works perfectly, you
should rinse it with water whenever you have prepared some milk.
o
The IMPRESSA will not prompt you to rinse the Easy Cappuccino Frother.
Carefully remove the Easy Cappuccino Frother from the
l
Connector System
l
Take the Easy Cappuccino Frother apart.
l
Rinse all the frother parts thoroughly under running water.
Reassemble the Easy Cappuccino Frother and attach it to the
l
Connector System
To ensure that the Easy Cappuccino Frother works perfectly, you
should clean it daily when you have been preparing milk.
The IMPRESSA will not prompt you to clean the Easy Cappuc-
o
cino Frother.
Your dealer will stock the JURA Auto-Cappuccino Cleaner.
o
©
.
©
.
46
CAUTIONCAUTION
If the wrong cleaning agent is used, the machine could be damaged
and/or traces of detergent could be left behind in the water.
Use only original JURA care products.
l
@
Try this operation out on the Internet. Visit the Knowledge
Builder on www.jura.com.
Precondition: your IMPRESSA is ready for use.
Place a receptacle under the Easy Cappuccino Frother.
l
Pour 250 ml of fresh water into a container and add one
l
capful (max. 15 ml) of Auto-Cappuccino Cleaner.
Page 47

8 Maintenance
Immerse the milk pipe in the receptacle.
l
ä l Turn the Rotary Switch so that it points to the Steam
symbol
k .
m l Press the Rotary Switch to confirm the action.
The Steam symbol
IMPRESSA has warmed up.
As soon as the required temperature has been reached, the
light segment by the switch will flash.
k will continue flashing until the
r l Turn the switch in the anticlockwise direction.
The frother and pipe will be cleaned.
t l
Turn the switch in the clockwise direction as soon as the con-
tainer holding the Auto-Cappuccino Cleaner is empty.
The light segment by the switch will now flash.
Fill the receptacle with 250 ml of fresh water and immerse
l
the milk pipe in it.
Perform the next step as soon as the light segment by the
o
switch is flashing. This means that the IMPRESSA has reached
the temperature necessary for steam. If the light segment is
no longer flashing, turn the Rotary Switch once again to the
Steam symbol
required temperature has been reached, the light segment by
the switch will flash again.
k and press the Rotary Switch. As soon as the
r l Turn the switch in the anticlockwise direction.
The frother and pipe are rinsed with fresh water.
t l Turn the switch in the clockwise direction as soon as the con-
tainer holding the water is empty.
Cleaning of the Easy Cappuccino Frother is now complete
and your IMPRESSA is ready to use again.
47
Page 48

8 Maintenance
Descaling
Descaling
the water tank
the water tank
The water tank may build up deposits of limescale. In order to
ensure perfect working order, descale the water tank from time to
time.
l
Remove the water tank.
If you use a CLARIS plus filter cartridge, remove this.
l
Descale the tank with a mild conventional descaling agent.
l
Rinse the water tank with clean water afterwards.
l
If you use a CLARIS plus filter cartridge, insert this again.
l
Fill the water tank with fresh water and insert it again.
l
48
Page 49

9 CLARIS plus filter cartridge – Water for perfect coffee
9 CLARIS plus filter cartridge – Water for perfect coffee9 CLARIS plus filter cartridge – Water for perfect coffee
As fresh as from the
As fresh as from the
spring
spring
Water – always
Water – always
pleasant and freshly
pleasant and freshly
filtered
filtered
Anyone who has ever drunk fresh spring water knows: There is a
world of difference between the elixir of life in its natural form and
the processed fluid that comes out of our taps. Very few of us have
ready access to a spring.
The answer to this is: CLARIS plus filter cartridge from JURA. It transforms the hardness of the mains water into pH-neutral water. On top
of this, CLARIS plus can protect your fully automated coffee/
Espresso machine against scale, and used properly, can prolong the
service life of your machine.
Our mains water is of very high quality and is excellent for drinking.
It is subject to ongoing health checks, meets strict, legally binding
quality requirements and contains the most important minerals
and fluorides.
Use of CLARIS plus filter cartridges guarantees you freshly filtered,
delicious-tasting water for your tea and coffee at all times. Designed
specially for JURA coffee machines, it has neutral pH and is placed
directly in the water tank.
This gives you three important benefits:
The guarantee that your water is freshly filtered before any
p
cup of coffee is prepared;
Fresh water and unadulterated aromas guarantee your palate
p
the coffee experience of a lifetime;
Lifelong protection for your IMPRESSA (eliminating the need
p
for descaling).
CLARIS plus from JURA is hard on scale, but soft on your coffee
machine.
49
Page 50

9 CLARIS plus filter cartridge – Water for perfect coffee
Quality knows no
Quality knows no
compromises
compromises
You can see it at work on your household appliances every day. Left
to its own devices, scale can cause serious damage. Over time, scale
is deposited on the heating elements, clogging the heating elements and pipes. Scale is also detrimental to the quality of your
chosen drinks because, with the passage of time, the water will no
longer be properly heated. Consequently: The result is that the
coffee will taste weaker, Espresso will lose its strength and tea will
taste bland. In other words: All enjoyment will be lost.
Quality from A to ZQuality from A to Z
No more descalingNo more descaling
Interaction of organic
Interaction of organic
materials
materials
When you buy coffee, Espresso or tea specialities, aren‘t you careful
to buy top quality? In that case, you should insist on the same for
your water. You will taste and smell the difference the moment you
start using the CLARIS plus filter cartridge. The water will taste purer
and you will be thrilled by the flavour of your coffee specialities.
If you use CLARIS plus filter cartridges regularly, you will be able to
omit the time-consuming business of regular descaling. And your
coffee machine will reward you with a longer service life. We recommend use of CLARIS plus wherever water is harder than 10° German
hardness (dH). You can determine the water hardness before using
your JURA coffee machine for the first time with the Aquadur® test
strip included in the Welcome Pack.
The CLARIS plus filter cartridge was developed specially for JURA
fully automatic coffee/Espresso machines. It contains a granulate
consisting of ion exchangers and active carbon – in other words,
pure, organic materials with no chemical additives. These agents
work together to reduce the formation of calcium deposits, heavy
metals and other harmful substances contained in mains water.
Other substances detrimental to flavour and aroma, such as chlorine,
are also largely eliminated. Minerals and fluorides contained in the
water are, of course, retained.
Water freshly filtered
Water freshly filtered
on the “just in time”
on the “just in time”
principle
principle
50
Unlike other water filtering systems for domestic use, CLARIS plus
works according to the professional up-flow principle. Practically
speaking: Only the precise amount of water required for a given
beverage is drawn in, and this is filtered directly before use.
Page 51

9 CLARIS plus filter cartridge – Water for perfect coffee
Up-flow principleUp-flow principle
Easy to operateEasy to operate
Economical in useEconomical in use
Maintenance and storageMaintenance and storage
The water flows through the filter at a constant speed, disturbing the
granulate and ensuring that it is used evenly. This system ensures
that the filter is used to optimum effect. The remaining water in the
tank is left untouched until the next cup of coffee is made.
Inserting the CLARIS plus filter cartridge couldn‘t be easier. It is described in Chapter 2, “Preparing and using for the first time – Using
and activating filter”.
After 50 litres of water have been dispensed or after two months at
the latest, the filter will cease to work. After this, the cartridge must
be replaced. Your JURA coffee machine will prompt you to change
the filter.
This process is described in detail in Chapter 8, “Maintenance –
changing the filter”.
You can return used filter cartridges to the stockist. They are returned
for recycling to protect the environment.
The CLARIS plus filter cartridge only needs to be removed from the
water tank if you are away for a lengthy period of time or if you wish
to clean or descale the tank using a conventional product.
If you do plan to be away for some time (e.g. for a holiday), we
recommend that you do the following to store the filter cartridge.
Remove the cartridge from the water tank. Place it in a glass with
about two centimetres of water and put it in the fridge.
We recommend that you run about half a litre of water through the
machine before starting to make coffee again. The water could be
discoloured, but this is not harmful to your health.
51
Page 52

9 CLARIS plus filter cartridge – Water for perfect coffee
Safe handlingSafe handling
CLARIS plus filter cartridges should be kept out of the reach of
p
children.
Store them dry in the sealed package.
p
Protect them from heat and direct sunlight.
p
Do NOT use damaged CLARIS plus filter cartridges.
p
Do NOT open CLARIS filter cartridges.
p
Pictures on the next few pages:
1
Water – always pleasant and freshly filtered.
52
2
CLARIS plus filter cartridges do not require any accessories and do not
take up any extra space. They can be inserted directly into the water tank.
3 4
Water for perfect coffee specialities.
5
The professional up-flow principle: Only the precise amount of water
required for a given beverage is drawn in, and this is filtered directly before
use.
6
Stainless steel pipes in the heater element: With CLARIS plus (left) you
can omit the time-consuming descaling operation (right).
7
The following substances are filtered out through the interaction with
organic materials: calcium (Ca), chlorine (Cl), lead (Pb), copper (Cu),
aluminium (Al).
Page 53

1
32
Page 54

4
Page 55

Page 56

5
6 7
Page 57

10 “The milk makes the difference”10 “The milk makes the difference”
Coffee specialities are taking the entire planet by storm. Up until a
few years ago, classics, such as Espresso and Café Crème were the
most popular choices. Today, Cappuccino, Latte Macchiato & co.
have well surpassed them.
Trendy specialities
Trendy specialities
with milk
with milk
Most modern
Most modern
technology
technology
More and more often, one finds milk among the ingredients of the
trendy specialities. It doesn‘t matter whether whole milk or skim
milk is used. It isn‘t the fat content which is crucial for the wonderful
foam, but the protein. Heated or frothed, as cream or whipped
cream, no other natural product is combined with coffee as often or
with as much pleasure as milk. There is a wide variety of alternatives
available to allergy sufferers as well: goat/sheep milk, rice milk or soy
milk.
The most modern technology and ingenious Cappuccino nozzles
allow you to delve into the multi-faceted world of coffee specialities
with every IMPRESSA. Here, the milk is not heated to above 75 °C.
This is namely the only way that the inimitable fine foam can be
fully developed.
10 “The milk makes the difference”
Frothing as done by a
Frothing as done by a
professional
professional
Thanks to the variable brewing unit, which can prepare between 5
and 16 grams of coffee powder under ideal conditions, you can make
sure that the tastes of the coffee and milk are harmoniously balanced.
Simply allow your imagination to run free in creating new recipes
and add flavour and fineness to your personal favourite coffee
specialities according to your mood.
Make sure you try out the secret Barista tip: Because milk can form
a vortex on the rough surface of a stainless steel pot especially well,
perfect foam can be formed in these receptacles. And the professional also knows what must also be given special attention: Regularly and thoroughly clean the Cappuccino nozzle, rinse out the milk
container well every evening and store the milk in the refrigerator
overnight.
57
Page 58

10 “The milk makes the difference”
58
Page 59

11 Accessories and Service11 Accessories and Service
11 Accessories and Service
Machine accessories –
Machine accessories –
extend your coffee
extend your coffee
horizon
horizon
Professional Cappuccino
Professional Cappuccino
Frother
Frother
Easy Cappuccino FrotherEasy Cappuccino Frother
2-stage frothing nozzle2-stage frothing nozzle
Hot water nozzleHot water nozzle
1
Coffee specialities made with milk are very fashionable these
©
days. The Connector System
and the wide range of accessories
open the door to the world of trendy drinks. Any accessories that do
not come supplied with your IMPRESSA can be obtained from
authorised stockists.
2
Cappuccino, Latte Macchiato at the touch of a button – nothing
could be easier with the Professional Cappuccino Frother. It draws
milk in directly from the container, heats it up, froths it and delivers
perfect milk foam for the ultimate Cappuccino experience, or warm
milk for your Latte Macchiato.
3
The Easy Cappuccino Frother provides milk foam at the touch
of a button. It is compatible with the Connector System
©
.
When steam is drawn, a negative pressure is created and this draws
milk from the container. Every Cappuccino is made successfully in
this way.
4
The 2-stage frothing nozzle is suitable for heating and frothing
drinks.
5
The hot water nozzle provides an even jet of water.
Stainless steel vacuum milk
Stainless steel vacuum milk
container
container
Deluxe milk containerDeluxe milk container
6
The high-quality stainless steel vacuum milk container holds
0.6 litres and keeps the milk cool throughout the day.
7
In the attractive chrome steel design, the milk is suitably attired.
The container holds 0.6 litres.
59
Page 60

11 Accessories and Service
Care products Care products
CLARIS plus filter
CLARIS plus filter
cartridge
cartridge
Cleaning tabletsCleaning tablets
Descaling tabletsDescaling tablets
Auto-Cappuccino CleanerAuto-Cappuccino Cleaner
8
Original JURA care products are optimally tailored to the maintenance programmes. You should therefore use only original JURA
care products. Your IMPRESSA will thank you for it.
9
The CLARIS plus filter cartridge was developed specially for JURA
coffee machines. It is placed directly into the water tank. CLARIS plus
works according to the professional up-flow principle.
Further information on this subject can be found in Chapter 9,
“CLARIS plus filter cartridge – water for perfect coffee”.
10
Your IMPRESSA machine comes with an integrated cleaning
programme. The original JURA cleaning tablets are specifically
tailored for the machine and optimally dissolve accumulated coffee
oils.
11
Scale is the biggest enemy of all household appliances that
involve the use of mains water. JURA has developed a descaling
tablet for the IMPRESSA which removes scale and at the same time
is easy on your machine.
12
Clean your Professional Cappuccino Frother and Easy Cappuccino Frother with the original Auto-Cappuccino Cleaner from
JURA. This will ensure that it is 100% clean.
Service Service
60
13
Competent, high-quality service is a top priority as far as JURA
is concerned, irrespective of whether it is provided by the glassy
service factory of the Swiss parent company or in the authorised
JURA service centres all around the world.
14
Every IMPRESSA service is preceded by an electronically controlled diagnostic run.
15
Service work is performed competently and professionally by
JURA‘s trained technicians.
Page 61

1
61
Page 62

2
3 4 5
62
6 7
Page 63

8
63
Page 64

64
9
Page 65

10
11 12
65
Page 66

66
13
Page 67

67
Page 68

14
15
68
Page 69

12 Messages in the maintenance field and symbol display
12 Messages in the maintenance field and symbol display
Message Cause Action
l
Maintenance indicator is
illuminated or is flashing
Maintenance indicator and
Water Tank indicator
flashing
Maintenance indicator and
coffee grounds container
indicator
Maintenance indicator and
bean container indicator
are flashing
Maintenance indicator
and Cleaning indicator
light up
Maintenance indicator
and Descaling indicator
light up
Maintenance indicator
and Filter indicator
light up
x are flashing
y are
c
v
b
n
The IMPRESSA wants to tell
you something
Water tank is empty.
You cannot prepare any
coffee or hot water
Coffee grounds container is
full.
You cannot prepare any coffee
but you can obtain hot water
Bean container is empty.
You cannot prepare any
coffee but you can obtain
hot water
The IMPRESSA will prompt you
to clean it after 200 cups of
coffee or 80 switch-on rinses
The IMPRESSA is prompting
you to descale it
The CLARIS plus filter cartridge
is exhausted
Open the access door and
note the other indicators
l
Fill the water tank
(See Chapter 2, “Preparing and
using your IMPRESSA for the
first time – filling the water
tank”)
l Empty the coffee grounds
container and the drip tray
l Fill the bean container.
The indicator will go out after
you have prepared one coffee
speciality
(See Chapter 2, “Preparing and
using your IMPRESSA for the
first time – filling the bean
container”)
l Perform cleaning operation
(See Chapter 8,
“Maintenance – cleaning the
machine”)
l Perform descaling operation
(See Chapter 8,
“Maintenance – descaling the
machine”)
l Change the CLARIS plus filter
cartridge (See Chapter 8,
“Maintenance – changing the
filter”)
69
Page 70

12 Messages in the maintenance field and symbol display
Message Cause Action
Maintenance indicator
and Cleaning indicator
flash twice.
Maintenance indicator and
Descaling indicator
twice
Maintenance symbol
flashes twice
v
b flash
h
System is too hot to clean
System is too hot to descale
System is too hot for maintenance and switch-off rinses
l Wait a few minutes
l Wait a few minutes
l Wait a few minutes
Maintenance indicator
all the indicators
and
y x c v b n behind
the access door are flashing
synchronously
There is a general fault
l Switch the IMPRESSA off
completely by turning off the
power switch
If the problem persists when
you turn the machine back on
again, contact Customer
Support in your country. You
will find the telephone number
in Chapter 17, “JURA contact
details”
e .
70
Page 71

13 Troubleshooting
Problem Cause Action
Grinder is making a very
loud noise
The coffee grounds
container indicator
flashing continuously
The frother does not
produce enough milk
foam
Coffee only comes out
in drips
Water hardness cannot
be adjusted
The maintenance indicator
lights up and the bean
container indicator
continues to flash although
it has been filled
x is
c
There are some
foreign bodies in the
grinder
Drawer with coffee
grounds container has
not been correctly
inserted
Easy Cappuccino
Frother is dirty
Coffee or pre-ground
coffee has been
ground too fine and is
blocking the sieve
CLARIS plus filter
cartridge is activated
The machine will not
be able to tell that the
bean container has
been filled until the
next time you make a
coffee
l Contact Customer Support in your
country
(See Chapter 17, “JURA contact details”)
l Insert the drawer correctly
l Clean the Easy Cappuccino Frother
(See Chapter 8, “Maintenance – cleaning
the Easy Cappuccino Frother”)
l Put the grinder on a coarser setting or
use coarser pre-ground coffee
(See Chapter 2, “Preparing and using your
IMPRESSA for the first time – adjusting
grinder”)
l Deactivate the CLARIS plus filter
cartridge
(See Chapter 2, “Preparing and using your
IMPRESSA for the first time – using and
activating filter”)
l Prepare a coffee speciality
13 Troubleshooting
If you have not been able to solve the problem, contact Customer Support in your country.
You will find the phone number in Chapter 17, “
JURA contact details”.
71
Page 72

14 Transport and environmentally neutral disposal
14 Transport and environmentally neutral disposal14 Transport and environmentally neutral disposal
Empty systemEmpty system
To protect the IMPRESSA from damage caused by frost during transportation, the system needs to be emptied.
Precondition: the IMPRESSA is ready for use.
l Place a receptacle under the frother.
ä l Turn the Rotary Switch so that it points to the Steam
symbol
k.
m l Press the Rotary Switch to confirm your choice.
The Steam symbol
chine has warmed up. As soon as the required temperature
has been reached, the light segment by the switch will
flash.
k will continue flashing until the ma-
r l Turn the switch in the anticlockwise direction.
Steam will now come out of the frother.
l Remove the water tank and empty it.
Steam will continue to flow out of the frother until the system
is empty. The light segment by the switch will now flash.
t l Turn the switch in the clockwise direction.
o
The Maintenance indicator and the Water Tank indicator
both flash. Please ignore these indicators.
m l Press the Rotary Switch to turn the machine off.
e l Turn your IMPRESSA off at the power switch.
y
TransportTransport
DisposalDisposal
72
o
The next time you use the machine, you will need to refill the
system (see Chapter 2, “Preparing and using your IMPRESSA
for the first time – first-time use”).
Keep the packaging for your IMPRESSA. It is used to protect the
machine during transportation.
Please dispose of old machines in an environmentally neutral way.
Old machines contain valuable materials capable of being recycled
which should be salvaged for recycling. Please therefore dispose of
old machines via suitable collection systems.
Page 73

15 Technical data and guide values15 Technical data and guide values
15 Technical data and guide values
Technical dataTechnical data
Rating plateRating plate
Meaning of symbolsMeaning of symbols
Voltage 220 to 240V AC, 50 Hz
Power output 1450 W
Current 6.6 to 6.0 A
Safety test
Pump pressure Static max. 15 bar
Holding capacity of water tank 1.9 litres
Holding capacity of coffee grounds
container
Cable length Approx. 1.1 m
Weight 9 kg
Dimensions (W x H x D) 28 x 34.5 x 41 cm
The rating plate is located on the bottom of your IMPRESSA. The
information shown on this should be interpreted as follows:
V AC = alternating current in volts
p
W = power output in watts
p
This product complies with all applicable EU directives.
Approx. 16 portions
Basic settings in
Basic settings in
programming mode
programming mode
This product meets the requirements of the Decree concerning
Low Voltage Electrical Products and the Decree concerning
Electromagnetic Compatibility (VEMV). This product complies
with all the pertinent ESTI requirements (Swiss Federal Inspectorate for Heavy Current Installations)
CLARIS plus filter cartridge No
Water hardness Level 3
Automatic switch-off time After 4 hours
73
Page 74

16 Key technologies
16 Key technologies and products16 Key technologies and products
1
Intelligent Pre Brew Aroma System (I.P.B.A.S.©).
Perfect coffee is no accident. The Intelligent Pre Brew Aroma
©
System
and roast.
cylinder as a powder from the grinder.
the flavours are released.
by a velvety, soft crema for perfect enjoyment.
Obtain the advice of the JURA experts.
produces the very best in flavour from every coffee blend
1a
The freshly ground coffee beans are delivered to the infusing
1b
There it is optimally compressed.
1c
Prior to brewing, the powder is moistened. The pores swell and
1d
During brewing, perfect coffee is delivered to the cup, crowned
2
The IMPRESSA range of products includes the following series:
IMPRESSA Z series, Cappuccino at the touch of a button, pre-
p
mium professional technology for domestic use.
IMPRESSA S series for demanding households
p
IMPRESSA J series, Perfect Enjoyment, Perfect Aesthetics
p
IMPRESSA F series, simple operation, multi-winner
p
IMPRESSA C series, Click & Drink
p
IMPRESSA X series for catering and office applications
p
74
You will find the purchase advisor at www.jura.com.
@
3
For perfect coffee quality it is important to get the grinding
right. To this end, a powerful 6-level powerful conical burr grinder
with grinding cones constructed out of hardened steel is provided.
4
The variable brewing unit holds between 5 and 16 g of coffee.
This means that two cups can be prepared at once in a single brewing
operation.
5
Durable pipes constructed from a high-quality steel alloy conduct the water through the thermoblocks where it is heated to the
correct temperature.
Page 75

1
1b1a
1d1c
Page 76

IMPRESSA Z
IMPRESSA S
2
IMPRESSA J
IMPRESSA F
Page 77

IMPRESSA C
IMPRESSA X
IMPRESSA XF
Page 78

3
4 5
Page 79

17 JURA contact details
17 JURA contact details
A
Australia
Global Coffee Solutions Pty Ltd
Customer Service JURA Australia Head Office and
Opening Hours Monday to Friday 8am – 5pm
Distributor Address/
Service Address
Service Centre
Phone +61 1300 552 883
Fax +61 0242 846 099
E-Mail info@globalcoffee.com.au
5/77 Jardine Street,
Fairy Meadow NSW 2519
B
Bangladesh
Please contact the Singapore office for details.
Brunei
Please contact the East Malaysian office for details.
Burma
Please contact the Singapore office for details.
C
Cambodia
Please contact the Singapore office for details.
Czech Republic
Petraco, Spol. S.R.O., Brno
Customer Service JURA servis - Ing. P. Dokladal
Opening Hours Po-Pá 09.00 – 17.00
Distributor Address/
Service Address
Phone +420 775 997 557
E-Mail servis@juraswiss.cz
JURA - zákaznické centrum
Kounicova 271/13, BRNO 602 00
D
Denmark
Scandinavian CoffeeSystem ApS
Customer Service Phone +45 7020 7333
Opening Hours Mandag-Torsdag 09.00 - 16.30
Fax +45 7020 7343
E-Mail service@coffeesystem.com
Fredag 09.00 - 16.00
E
Estonia
OU Info Melton, Tallinn
Customer Service Phone +372 651 8850
Opening Hours E-R 09.00 - 17.00
Distributor Address/
Service Address
E-Mail andres@lavazza.ee
Weizenbergi 27
Tallinn 10150, Estland
F
Finland
Home Appliance Brokers HAB Oy
Customer Service Phone +358 207 300 090
Opening Hours Maanantai – Perjantai 08.00 – 16.00
Distributor Address Home Appliance Brokers HAB Oy
Service Address Monilaite-Thomeko Oy
E-Mail info@haboy.fi
Elimäenkatu 29
00510 Helsinki
Salpakuja 6
01200 Vantaa
G
Greece
COFFEE CONNECTION A.B.E.E.
Customer Service Phone +30 210 66 40 640
Opening Hours Monday to Friday 09:00 - 17:00
Distributor Address/
Service Address
E-Mail coffeeway@coffeeway.com
Agiou Louka str. Peania
Attica 190 02, Greece
79
Page 80

17 JURA contact details
H
Hong Kong PRC
Pacific Coffee Company Ltd
Customer Service Pacific Coffee Company Ltd
Opening Hours Monday to Friday 9:00am – 6:00pm
Distributor Address 701–704 Hollywood Center
Service Address 204 Hollywood Center
Phone +852 2290 6011
E-Mail sales@pacificcoffee.com
Saturday 9:00am – 1:00pm
233 Hollywood Road
Sheung Wan, Hong Kong
233 Hollywood Road
Sheung Wan, Hong Kong
I
Iceland
Karl K. Karlsson, Reykjavík
Customer Service Phone +354-540-9000
Opening Hours virka daga 09.00 – 18.00
Distributor Address/
Service Address
Indonesia Bali
BHINEKA JAYA
Customer Service Phone +62 361 724746
Opening Hours Monday to Saturday 08.30 – 16.30
Distributor Address/
Service Address
Indonesia Jakarta
SUKSES PRATAMA JAYA P.T.
Customer Service Phone +62 21 6331177
Opening Hours Monday to Saturday 09:00 – 17:00
Distributor Address/
Service Address
E-Mail karlk@karlsson.is
Skútuvogur 5
104 Reykjavík, Island
Mobile Nr. +62 81 23817951 or
+62 361 7460521
E-Mail vivi@kopibali.com
Jl. Pulau Moyo 9A, Denpasar
Bali, Indonesia
Fax +62 21 63857008
E-Mail cs@suprajaya.com
Jalan: K.H. Hasyim Ashari 125
Pusat Niaga Roxy Mas
Blok C.4 No.14–15
Jakarta 10150, Indonesia
Israel
Global Coffee Solutions Pty Ltd
Customer Service J.Feffer l.t.d., Israel
Opening Hours Sunday–Thursday 8.00–18.00
Distributor Address/
Service Address
Phone +972 353 350 38
Fax +972 353 305 54
E-Mail feffer-j@barak-online.net
Friday 9.00–13.00
9,Simtat Ma‘ale Hachoma
Ind. Zone
Or-Yehuda 60370, Israel
K
Korea
HLI Company Limited
Customer Service Phone +82 234 522 127
Opening Hours Monday to Friday 9:00 – 18:00
Distributor Address/
Service Address
E-Mail wj_lee@hlikorea.com
7floor, Sungwon Bldg
Yeoksam-Dong
Kangnam-Ku
Seoul, Korea
L
Lebanon
Please contact the East Malaysian office for details.
M
Malaysia, East
RICMAS Borneo Sdn. Bhd.
Customer Service Phone +60 88 456 100, –200
Opening Hours Monday to Friday 09:00 – 17:30
Distributor Address/
Service Address
Fax +60 88 241 600
E-Mail ricmaskk@streamyx.com
Service Number during off hours: +60
16 830 60 83
Unit # E3–8, 3rd Floor
Block E, Plaza Tanjung Aru
Jalan Mat Salleh, Tanjung Aru
88150 Kota Kinabalu
Sabah, Malaysia
80
Page 81

17 JURA contact details
Malaysia, West
RICMAS Peninsular Sdn. Bhd.
Customer Service Phone +6 03 4296 5989
Opening Hours Monday to Friday 09:00 – 17:30
Office Address/ Service
Address
Fax +6 03 4297 5636
E-Mail ricmaskl@streamyx.com
Service Number during off hours:
016-201 5789
3A-1 Jalan Perubatan 3
Pandan Indah
55100 Kuala Lumpur, Malaysia
N
New Zealand
Euro Espresso Ltd, Auckland
Customer Service Phone +64 9 277 1334
Opening Hours Monday to Friday 8.30am – 5pm
Distributor Address/
Service Address
Fax +64 9 277 9375
E-Mail info@euroespresso.co.nz
6 Mepal Place, Manukau City,
Auckland
PO Box 76–342, Manukau City,
Auckland 1730
Norway
Black Cat Kaffe og Tehus AS, Oslo
Customer Service Phone + 47 22 06 29 90
Opening Hours Mandag – Fredag 08:30 – 16:30
Distributor Address/
Service Address
E-Mail
info@blackcatkaffeogtehus.no
Aslakveien 20h
N– 0753 Oslo, Norge
P
Philippines
Pacific Continental Company Inc.
Customer Service Phone +63 2 551-3216
Opening Hours Monday to Friday 09:00 – 18:00
Distributor Address/
Service Address
Fax +63 2 831-8314
E-Mail jura@conlinscoffee.com
Service Number during off hours: +63
916 5294052
2753 Park Avenue,
Pasay City
Metro Manila 1300, Philippines
S
Singapore
RICMAS INTERNATIONAL Pte. Ltd.
Customer Service Phone +65 6562 8853
Opening Hours Monday to Friday 09:00 – 17:30
Office Address/ Service
Address
Fax +65 6562 8854
E-Mail jura@ricmas.com
Service Number during off hours: +65
90210314
25 International Business Park
German Center #01–57/58
Singapore 609916
South Africa
International Coffee Equipment CC
Customer Service Phone +27 11 708 2481
Opening Hours Monday to Friday 08.00 – 17.00
Office Address/
Service Address
E-Mail info@icesa.za.net
Saturday 08.00 – 13.00
JURA Corner Building, 1st Floor
475/3 Hans Strydom Drive
KYA Sand
T
Thailand
RICMAS (Thailand) Co., Ltd.
Customer Service Phone +66 2262 0543
Opening Hours Monday to Friday 09.00 – 17.00
Office Address/ Service
Address
Turkey
John’s Coffee
Customer Service Phone +90 216 420 2400
Opening Hours Pazertesinden cumaya 08:30–18:00
Office Address/ Service
Address
Fax +66 2262 0542
E-mail jura@ricmas-thailand.com
Service Number during off hours:
+66 1828 6996
55 Biohouse Building Sukhumvit 39 Rd.,
Klongtan-nue, Wattana
Bangkok 10110, Thailand
E-mail info@johnscoffee.com.tr
Imes Sanayi Sitesi C Blok 308 Sok.
Yukari Dudullu-Istanbul
81
Page 82

17 JURA contact details
U
United Arab Emirates
Boncafé Middle East LLC.
Customer Service Phone +97 14 28 28 742
Opening Hours Saturday to Thursday 8.30 – 17.30
Distributor Address/
Service Address
Fax +97 14 28 28 743
E-Mail info@boncafeme.com
P.O. Box 74044
DUBAI, United Arab Emirates
United Kingdom
Fairfax Coffee Ltd, London
Customer Service Phone +44 870 165 0429
Opening Hours Monday to Friday 09.00 – 17.30
Distributor Address/
Service Address
Fax +44 207 722 7646
E-Mail info@fairfaxcookshop.com
1 Regency Parade, Finchley Road,
London NW3 5EQ
V
Vietnam
Please contact the Singapore office for details.
82
Page 83

17 JURA contact details
83
Page 84

Index
Index
A
Accessories 59
Activate fi lter 16
Adjusting
Grinder 19
Permanent cup size settings 36
Programmable switch-off time 37
Adjusting the amount of water
One-off setting during drink preparation
22
Permanent adjusting the permanent cup
size settings 23
Altering coffee strength
One-off setting during drink preparation
22
B
Barista 30
Bean container 4
Filling 14
C
Cappuccino preparation 32
Care products 60
Changing
Filter 40
CLARIS plus 49
CLARIS plus fi lter cartridge
Activating 16
Changing 40
Using 16
Cleaning
Easy Cappuccino Frother 46
Machine 41
Coffee powder
Pre-ground coffee preparation 33
Coffee preparation 31
Coffee speciality 30
Coffee strength
One-off setting during drink preparation
22
D
Descale
Water tank 48
Descaling 43
E
Easy Cappuccino Frother 4
Cleaning 46
Rinsing 46
Espresso preparation 31
F
Filling
Bean container 14
Water tank 14
Filter
Activating 16
Changing 40
Using 16
First-time use 15
G
Grinder
Adjust 19
Ground coffee
Pre-ground coffee preparation 33
H
Hot water preparation 35
M
Machine
Cleaning 41
Descaling 43
Rinsing 40
Setting up 13
Swiching off 20
Switching on 20
Machine accessories 59
Milk 57
Milk foam preparation 34
84
Page 85

Index
O
One-off setting during drink preparation
22
P
Pre-ground coffee preparation 33
Preparation
Cappuccino 32
Coffee 31
Espresso 31
Hot water 35
Milk foam 34
Pre-ground coffee 33
Putting into service
First-time use 15
R
Recipes 24
Rinsing
Easy Cappuccino Frother 46
Machine 40
Rotary switch 11
S
Service 60
Setting
Water hardness 18
Specialities
Trendy specialities with milk 57
Standby mode
Switching off 20
Switch-off time
Adjustment of automatic switch-off time
37
Switching off 20
Switching on 20
W
Water hardness 18
Assessing 18
Setting 18
Water tank 4
Descaling 48
Filling 14
U
Using fi lter 16
85
Page 86

Page 87

Page 88

Art. 65928/C5/en/0702
DirectivesDirectives
Technical changesTechnical changes
FeedbackFeedback
The machine complies with the following EU directives:
73/23/EEC of 19 February 1973, Low Voltage Directive including
p
Amending Directive 93/68/EEC.
89/336/EEC of 3 May 1989, Electromagnetic Compatibility,
p
incl. Amending Directive 92/31/EEC.
We reserve the right to make technical changes.
The illustrations used in the IMPRESSA C5 Manual show the
IMPRESSA C5 platinum model. Your IMPRESSA could incorporate
minor changes.
Your opinion is important to us!
Use the contact link at www.jura.com.
JURA Elektroapparate AG
Kaffeeweltstraße 10
CH-4626 Niederbuchsiten
www.jura.com
 Loading...