

Jura IMPRESSA XS, IMPRESSA X7, IMPRESSA X9 Instructions For Use Manual
Festwasseranschluss
Bedienungsanleitung
Permanent water connection
Instructions for use
Raccord d’eau fixe
Mode d’emploi
Allacciamento acqua fisso
Istruzioni per l’uso
Vaste wateraansluiting
Gebruiksaanwijzing
Toma fija de agua
Modo de empleo
Conexão fixa de água
Manual de instruções
Vattenanslutning
Bruksanvisning
Стационарное подключение к водопроводу
Руководство по эксплуатации
de
en
fr
it
nl
es
pt
sv
ru

2
Festwasseranschluss
Inhaltsverzeichnis
Symbolbeschreibung
Verwendete Symbole
T Handlungsaufforderung. Hier werden Sie zu einer Aktion aufgefordert.
E Hinweise und Tipps, damit Ihnen der Umgang mit Ihrem Festwasseranschluss noch leichter fällt.
Bedienelemente 3
Sicherheitshinweise 4
1 Festwasseranschluss in Betrieb nehmen 4
Voraussetzungen zur Installation ..........................................................................................................................4
Erste Inbetriebnahme .............................................................................................................................................4
2 Entkalken 4
3 Störungen beheben 5
4 Technische Daten 5
5 JURA-Kontakte / Rechtliche Hinweise 5

3
Festwasseranschluss
de
en
fr
it
nl
es
pt
sv
ru
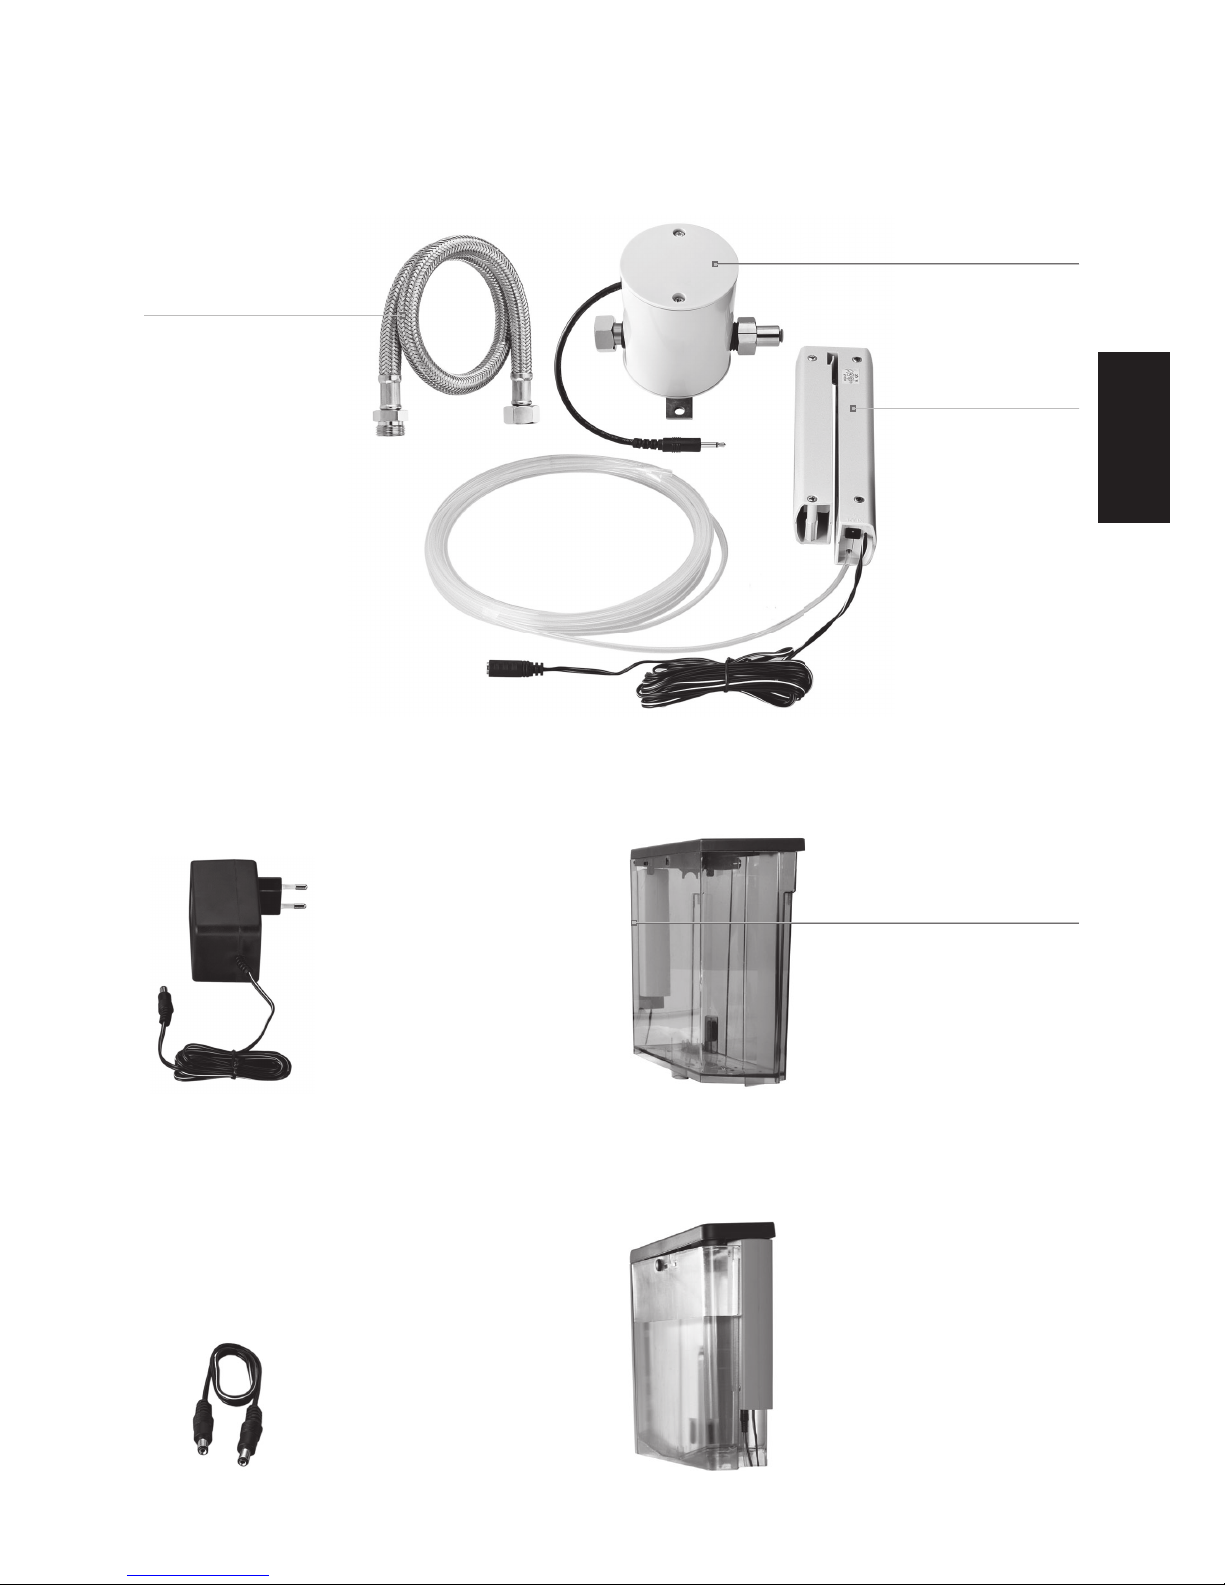
Bedienelemente
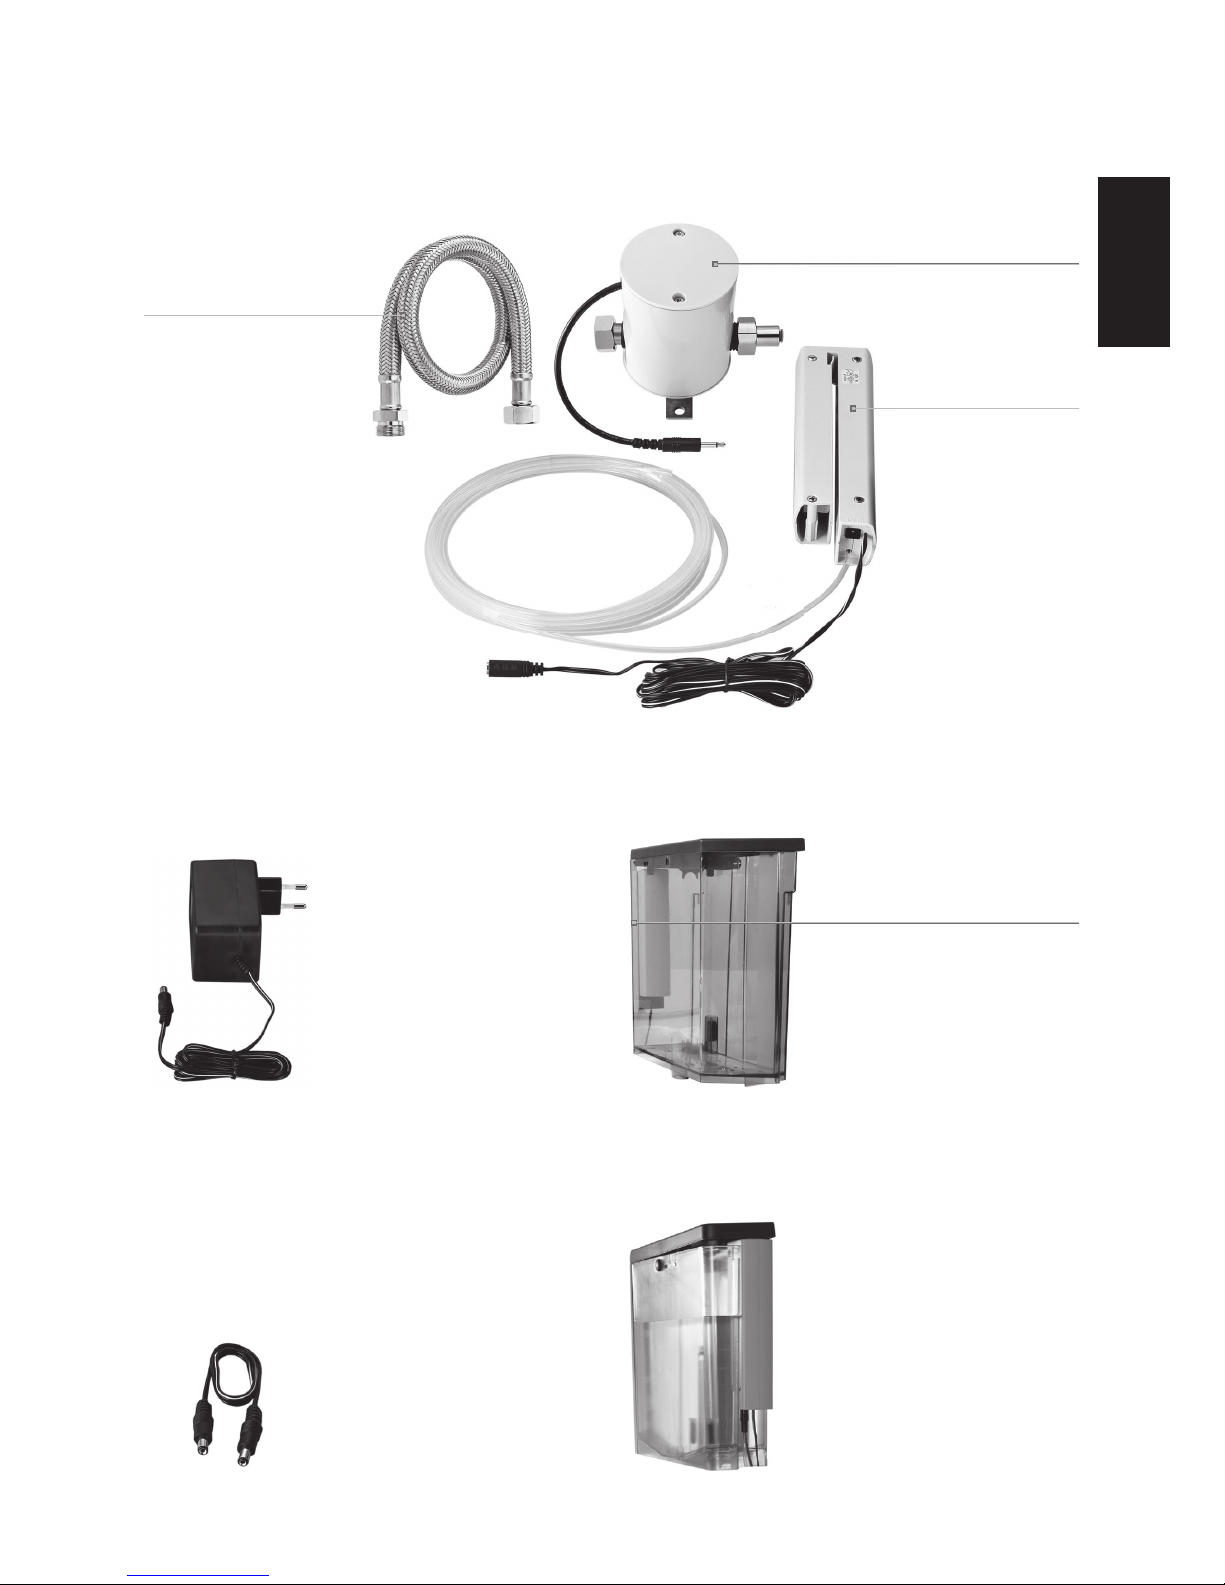
Panzerschlauch
Ventilblock
Für IMPRESSA-XS-Linie:
Clip
LED
Externe Speisung
Netzadapter (12 V DC) Positionierung im Wassertank
Für IMPRESSA-X7- und X9-Linie:
Interne Speisung
Kabel (12 V DC) Positionierung im Wassertank
4
Festwasseranschluss
Sicherheitshinweise
U
Die Leitung darf nicht unmittelbar bei einer
Wärmequelle durchgeführt werden, da bei
Berührung die Wasserleitung und das
Elektrokabel schmelzen und zum Kurzschluss
führen können.
U
Bei Undichtheit (Ventilanschluss) Absperrhahn
schließen und sich an den Sanitärinstallateur
wenden.
U
Nie das Gerät oder Teile des Gerätes in den
Geschirrspüler stellen.
U
Der Festwasseranschluss muss über Nacht
oder bei längerer Abwesenheit am Absperrhahn geschlossen werden.
1 Festwasseranschluss in Betrieb
nehmen
Voraussetzungen zur Installation
Damit Sie den Festwasseranschluss ordnungsgemäß in Betrieb nehmen können, sind einige
Vorbereitungen nötig. Folgende Vorbereitungen
müssen fachgerecht ausgeführt sein:
U
Der Netzanschluss für Ihren Kaffeevollautomaten muss durch einen Fehlerstromschutzschalter (FI-Schalter) abgesichert sein.
U
Durch einen Hauptschalter muss die Stromversorgung des Kaffeevollautomaten unterbrochen werden können.
U
Der hausseitige Festwasseranschluss (bis zum
mitgelieferten Ventilblock) muss über einen
Absperrhahn mit Rückschlagventil (Typ EA)
und Filter verfügen.
U
Der Festwasseranschluss muss gemäß
technischen Daten ausgeführt sein (siehe
Kapitel 4 »Technische Daten«).
E Lassen Sie die nötigen Vorbereitungen durch
eine Fachperson ausführen.
E Die Vorbereitungen müssen ausgeführt sein,
bevor Sie den Festwasseranschluss in Betrieb
nehmen können.
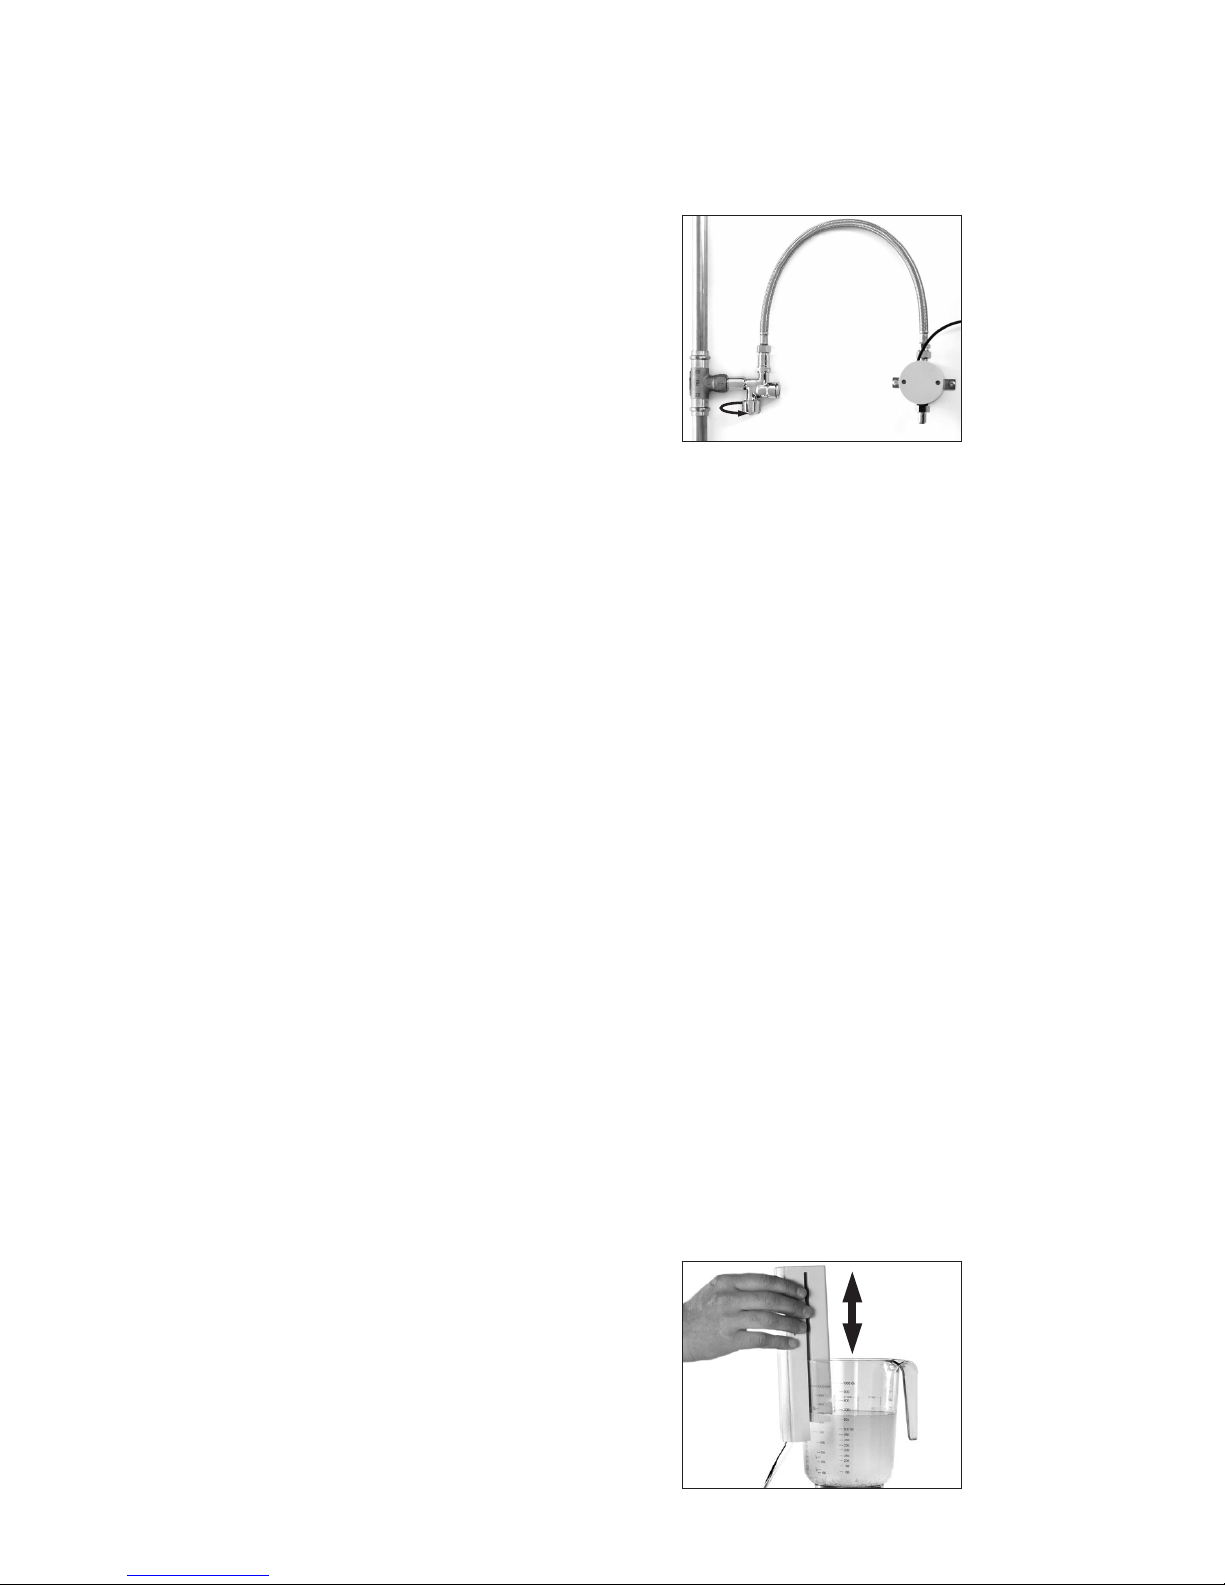
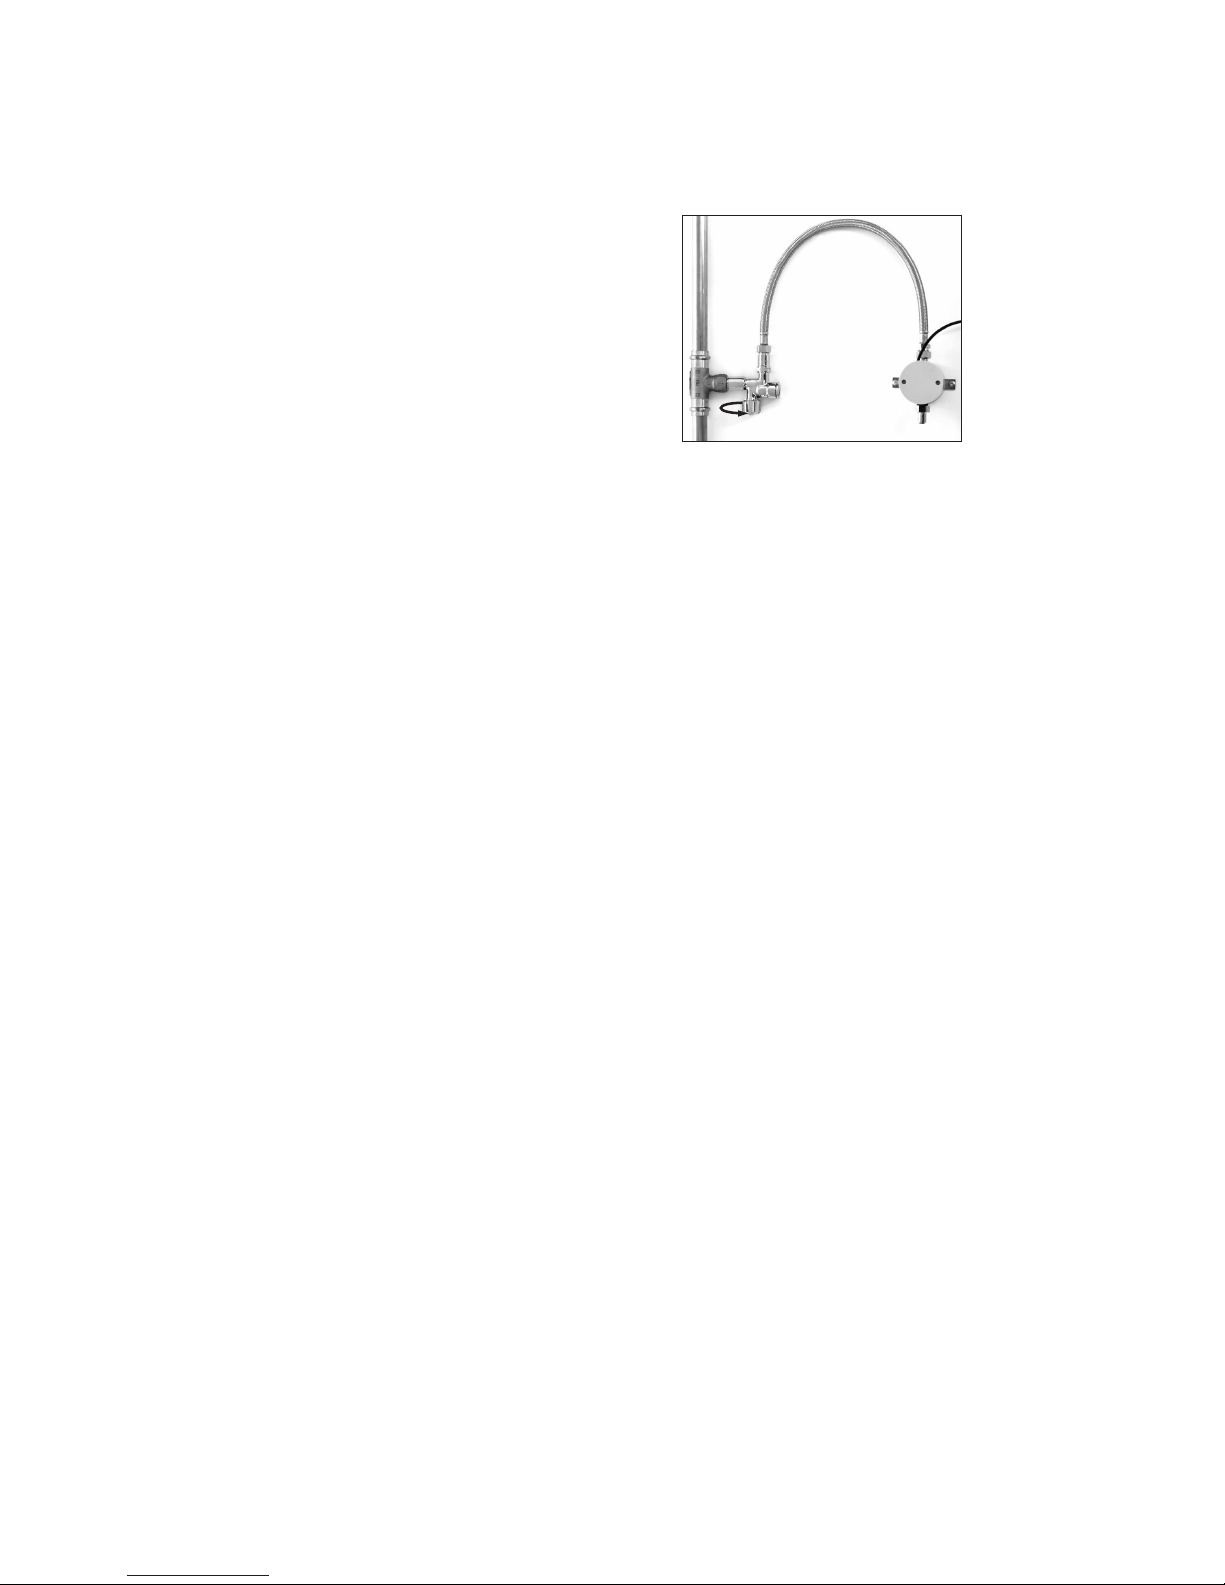
Wir empfehlen, den Ventilblock an der Wand zu
befestigen (siehe Abbildung).
Erste Inbetriebnahme
T Netzadapter einstecken.
Die LED leuchtet.
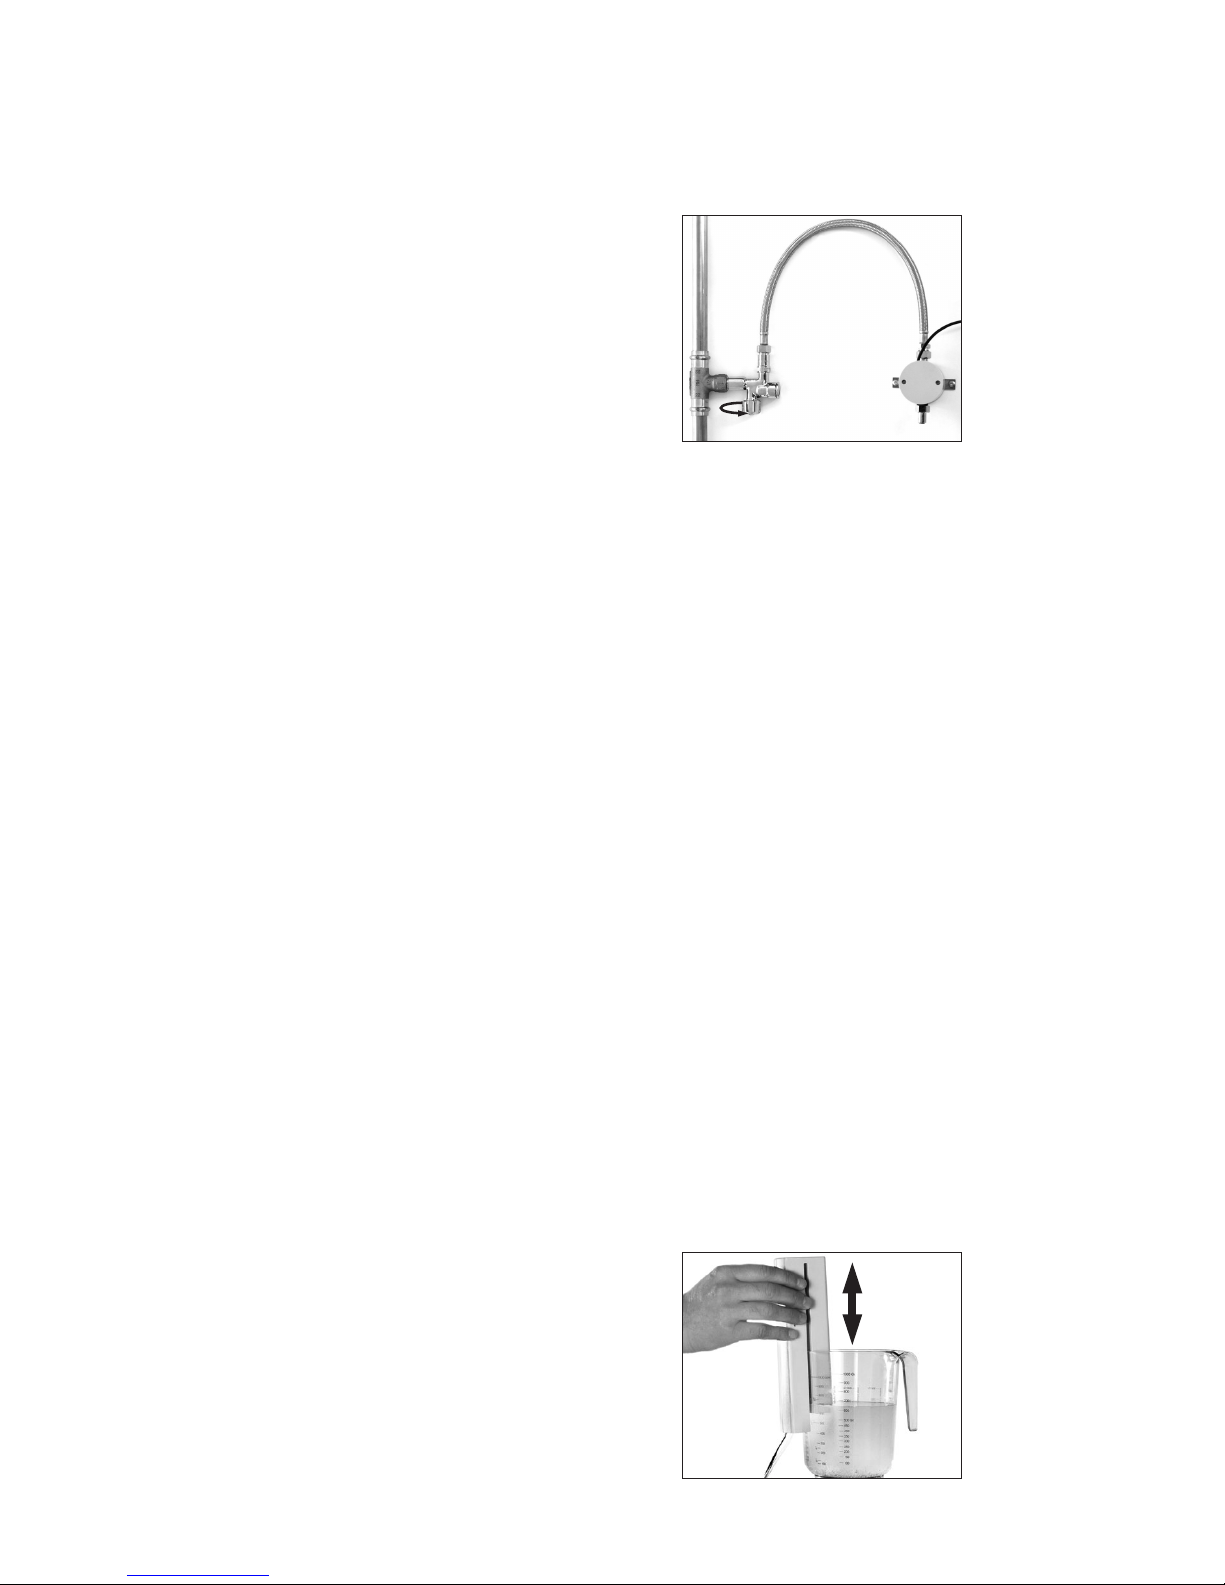
T Clip im Wassertank einhängen.
Der Microschalter öffnet das Ventil. Die LED
leuchtet nicht. Der Wassertank wird gefüllt.
Der Arbeitsschwimmer schaltet bei
gegebenem Niveau das Ventil aus. Je nach
Zubereitung reguliert der Arbeitsschwimmer
die Füllmenge.
E Bleibt der Arbeitsschwimmer hängen , bspw.
durch eine Verkalkung, steigt das Niveau des
Wassers und der Sicherheitsschwimmer
schaltet das Ventil aus. Die LED leuchtet.
2 Entkalken
T Absperrhahn zudrehen und Wassertank
leeren.
T Stromzufuhr zum Ventilblock unterbrechen.
T Drei JURA-Entkalkungstabletten in einem
Gefäß in 700 ml Wasser auflösen.
T Eine Stunde lang ca. alle 5 Minuten den Clip
herausziehen und wieder eintauchen.

5
Festwasseranschluss
de
en
fr
it
nl
es
pt
sv
ru
T Gefäß gründlich ausspülen und mit frischem
Wasser füllen.
T Clip ca. 10 mal eintauchen und wieder
herausziehen, um Reste der Entkalkungslösung abzuspülen.
T Clip im Wassertank einhängen.
T Stromzufuhr zum Ventilblock wieder
herstellen.
T Clip nochmals entfernen.
T Wassertank leeren und wieder einsetzen.
T Clip im leeren Wassertank einhängen und
kontrollieren, ob der Arbeitsschwimmer das
Ventil bei gegebenem Niveau ausschaltet.
3 Störungen beheben
Leuchtet die rote LED am Clip, kontrollieren Sie:
U
ob der Clip richtig im Tank eingehängt ist.
U
die Höhe des Wasserstandes (der Wasserstand
sollte die Hälfte des Tankinhaltes nicht
übersteigen).
U
ob der Clip verkalkt ist. Entkalken Sie in diesem
Fall den Clip (siehe Kapitel 2 »Entkalken«).
E Konnten die Störungen nicht behoben
werden, kontaktieren Sie den Kundendienst
in Ihrem Land oder Ihren JURA-Servicepartner.
4 Technische Daten
Spannung 230 V ~ / 12 V DC
Konformitätszeichen
A
Leistung 12 W
Füllleistung 700 ml/min
Länge Adpaterkabel max. 5 m
Technische Daten des hausseitigen Festwasseranschlusses:
Festwasseranschluss
G 3/8“ Außengewinde
Zuleitung Panzerschlauch mit Überwurf-
mutter G 3/8“ (Schlauch muss
die jeweils gültigen, länderspezifischen Normen erfüllen)
Absperrhahn mit Rückschlagventil (Typ EA)
und Filter
5 JURA-Kontakte / Rechtliche
Hinweise
JURA Elektroapparate AG
Kaffeeweltstraße 10
CH-4626 Niederbuchsiten
Tel. +41 (0)62 38 98 233
@ Weitere Kontaktdaten für Ihr Land finden Sie
online unter www.jura.com.
Copyright
Die Bedienungsanleitung enthält Informationen,
die durch Copyright geschützt sind. Fotokopieren
oder Übersetzen in eine andere Sprache ist ohne
vorherige schriftliche Zustimmung durch die JURA
Elektroapparate AG nicht zulässig.

6
Permanent water connection
Table of contents
Symbol description
Symbols used
T Prompt to take action. This symbol means that you are being prompted to perform an action.
E Information and tips to make use of your permanent water connection even easier.
Control elements 7
Safety information 8
1 Setting up the permanent water connection 8
Requirements for installation ................................................................................................................................8
First-time use ............................................................................................................................................................8
2 Descaling 8
3 Troubleshooting 9
4 Technical data 9
5 JURA contact details / legal information 9
7
Permanent water connection
de
en
fr
it
nl
es
pt
sv
ru
Control elements
Reinforced hose
Valve block
For IMPRESSA XS line:
Clip
LED
External power supply
mains adapter (12 V DC) Position in water tank
For IMPRESSA X7 and X9 line:
Internal power supply
cable (12 V DC) Position in water tank
8
Permanent water connection
Safety information
U
The supply lines must not be too close to a
source of heat, as contact with the heat source
will melt the tube and electric cable and may
lead to a short circuit.
U
If a leak occurs, close the (valve connection)
shut-off valve and contact a plumber.
U
Never put the machine or its parts in the
dishwasher.
U
The permanent water connection must be
shut off at the shut-off valve overnight and
when the user is absent for long periods.
1 Setting up the permanent
water connection
Requirements for installation
A few preparations are necessary before you can
set up the permanent water connection. The
following preparations must be carried out by a
professionally qualified person:
U
The mains connection for the coffee machine
must be protected by a residual current device
(RCD).
U
There must be a power switch to disconnect
the power supply to the coffee machine.
U
The house end of the permanent water
connection (up to the supplied valve block)
must have a shut-off valve with a non-return
valve (type EA) and filter.
U
The connection must be accomplished in
accordance with the technical data (see
chapter 4, "Technical data").
E These preparations must be carried out by a
qualified person.
E The preparations must be carried out before
the permanent water connection can be set
up.
We recommend mounting the valve block on a
wall (see diagram).
First-time use
T Plug in mains adapter.
The LED lights up.
T Attach clip to water tank.
The microswitch opens the valve. The LED
does not light up. The water tank is filled.
The float switch shuts off the valve when the
water reaches a certain level. The float switch
regulates the water level according to the
number of beverages prepared.
E If the float does not move, for example
because it is calcified, the water level will rise
and the safety float will shut off the valve.
The LED lights up.
2 Descaling
T Close the shut-off valve and empty the tank.
T Disconnect the power supply to the valve
block.
T Dissolve three JURA descaling tablets in a
container holding 700 ml water.
T For one hour, remove and replace the clip
every 5 minutes.

9
Permanent water connection
de
en
fr
it
nl
es
pt
sv
ru
T Rinse the container thoroughly and fill with
fresh water.
T Immerse and remove the clip approximately
10 times to rinse out the remains of the
descaling solution.
T Attach clip to water tank.
T Reconnect the power supply to the valve
block.
T Remove clip again.
T Empty water tank and replace in position.
T Attach the clip to the empty tank and check
that the float switch shuts off the valve at
the defined level.
3 Troubleshooting
If the red LED on the clip lights up, check:
U
that the clip is properly attached to the tank.
U
the water level (should not exceed half of the
tank's capacity).
U
whether the clip is calcified. If this is the case,
descale the clip (see chapter 2, "Descaling").
E If you are unable to solve the problem,
contact customer support in your country or
your JURA service partner.
4 Technical data
Voltage 230 V ~ / 12 V DC
Conformity symbol
A
Power 12 W
Filling capacity 700 ml/min
Adapter cable length max. 5 m
Technical data for house end of permanent
water connection:
Permanent
water connection
G 3/8" external thread
Water supply
line
Reinforced hose with G 3/8"
union nut (hose must comply
with the applicable regulations
for your country)
Shut-off valve with non-return valve (type EA)
and filter
5 JURA contact details / legal
information
JURA Elektroapparate AG
Kaffeeweltstrasse 10
CH-4626 Niederbuchsiten
Tel. +41 (0)62 38 98 233
@ You will find additional contact details for
your country at www.jura.com.
Copyright
The instructions for use contain information which
is protected by copyright. It is not permitted to
photocopy these instructions for use or translate
them into another language without the prior
written consent of JURA Elektroapparate AG.

10
Raccord d'eau fixe
Table des matières
Description des symboles
Symboles utilisés
T Demande d'action. Une action vous est demandée.
E Remarques et conseils destinés à faciliter encore l'utilisation de votre raccord d'eau fixe.
Eléments de commande 11
Consignes de sécurité 12
1 Mise en service du raccord d'eau fixe 12
Conditions requises pour l'installation ...............................................................................................................12
Première mise en service ......................................................................................................................................12
2 Détartrage 12
3 Dépannage 13
4 Caractéristiques techniques 13
5 Contacts JURA / Mentions légales 13
11
Raccord d'eau fixe
de
en
fr
it
nl
es
pt
sv
ru
Eléments de commande
Tuyau renforcé
Bloc de valve
Pour la ligne IMPRESSA X
S :
Clip
LED
Alimentation externe,
adaptateur secteur (12 V c.c.)
Positionnement dans le
réservoir d'eau
Pour les lignes IMPRESSA X7 et X9 :
Alimentation interne,
câble (12 V c.c.)
Positionnement dans le
réservoir d'eau
12
Raccord d'eau fixe
Consignes de sécurité
U
La conduite ne doit pas être placée à proximité
immédiate d'une source de chaleur : en cas de
contact, le tuyau d'eau et le câble électrique
peuvent fondre et provoquer un court-circuit.
U
En cas de fuite (raccord de valve), fermez le
robinet d'arrêt et contactez l'installateur
sanitaire.
U
Ne passez jamais l'appareil ou ses pièces
constitutives au lave-vaisselle.
U
Le raccord d'eau fixe doit obligatoirement
être fermé au niveau du robinet d'arrêt
pendant la nuit ou en cas d'absence prolongée.
1 Mise en service du raccord
d'eau fixe
Conditions requises pour l'installation
Quelques préparatifs sont nécessaires pour que
vous puissiez mettre en service le raccord d'eau
fixe correctement. Les préparatifs suivants doivent
être effectués dans les règles :
U
Le raccordement au secteur de votre machine
automatique à café doit être protégé par un
disjoncteur différentiel.
U
Un interrupteur d'alimentation doit permettre
de couper l'alimentation électrique de la
machine automatique à café.
U
Le raccord d'eau fixe au niveau du bâtiment
(jusqu'au bloc de valve fourni) doit être doté
d'un robinet d'arrêt avec clapet anti-retour
(type EA) et filtre.
U
Le raccord d'eau fixe doit être réalisé conformément aux caractéristiques techniques (voir
chapitre 4 « Caractéristiques techniques »).
E Faites réaliser les préparatifs nécessaires par
un spécialiste.
E Les préparatifs doivent être effectués avant
que vous ne puissiez mettre en service le
raccord d'eau fixe.
Nous recommandons de fixer le bloc de valve au
mur (voir illustration).
Première mise en service
T Branchez l'adaptateur secteur.
La LED s'allume.
T Accrochez le clip dans le réservoir d'eau.
Le microrupteur ouvre la valve. La LED est
éteinte. Le réservoir d'eau est rempli. Le
flotteur de travail ferme la valve lorsque le
niveau défini est atteint. Le flotteur de travail
régule le volume de remplissage en fonction
de la préparation.
E Si le flotteur de travail reste bloqué, par
exemple s'il est entartré, le niveau d'eau
monte et le flotteur de sécurité ferme la
valve. La LED s'allume.
2 Détartrage
T Fermez le robinet d'arrêt et videz le réservoir
d'eau.
T Coupez l'alimentation électrique du bloc de
valve.
T Dissolvez trois tablettes de détartrage JURA
dans un récipient contenant 700 ml d'eau.
 Loading...