

Page 1
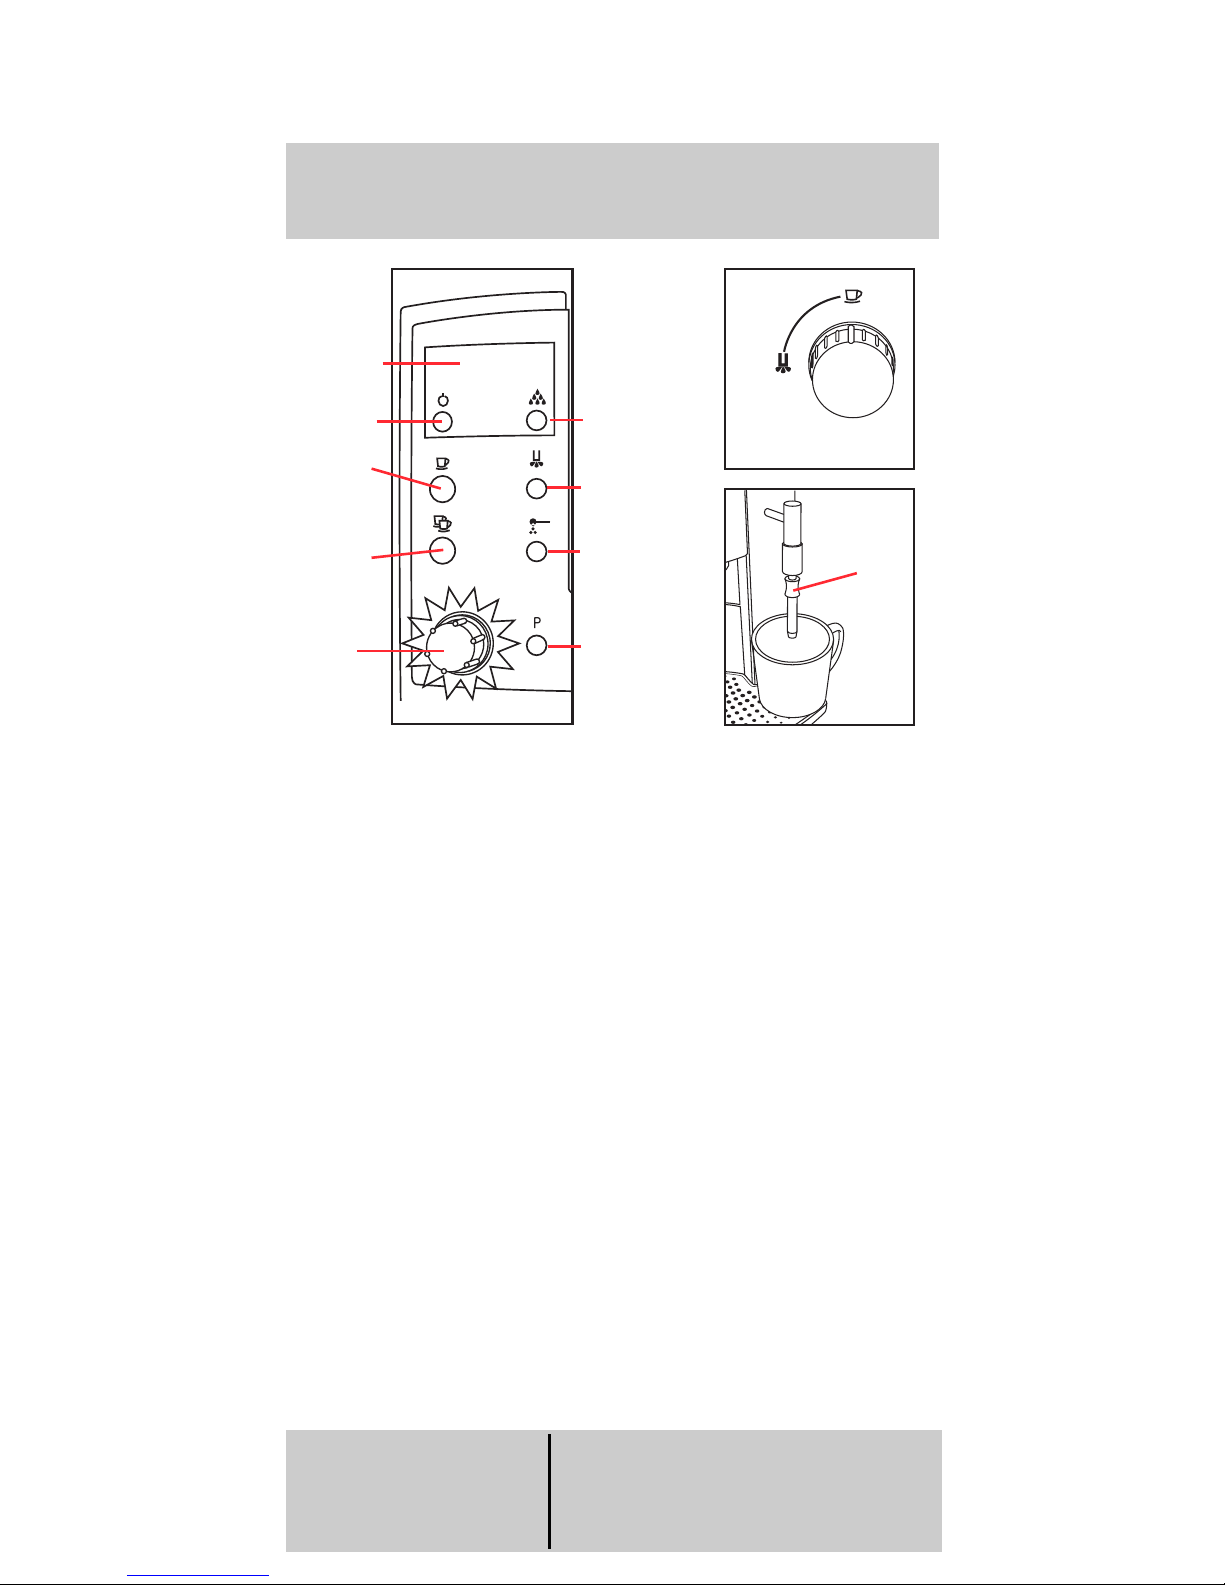
Impressa E Quick Reference Guide
This Guide does not replace the Operating Instructions.
For details and cautions you must read all instructions.
Traces of Coffee Grounds in New Machine?
This is normal! Grinder was tested during assembly with beans.
Despite cleaning, traces of ground coffee may be found.
RED TEXT represents information in the display.
A) First Time Ever Preparation
Place machine on flat, hard surface. Remove sticker from
LED display.
1. Fill water in tank and beans in bean container.
2. DO NOT install the Water Filter Cartridge now!
3. Push
ON/OFF button. OPEN TAP. Place a cup under-
neath the frother and turn the SELECTOR to the water
symbol.
FILLING. Water pumps through the frother into
the cup and stops automatically. SHUT TAP. Turn the
SELECTOR to the Cup Symbol. SYSTEM FILLING.
HEATING. After two minutes PRESS RINSE.
4. Place a cup underneath the coffee spouts and push the
RINSE button. READY. Place a large cup underneath the
coffee spout and press the
1-CUP button. The machine
starts grinding and brews coffee. Discard the first two
cups.
READY. You can only brew coffee when the display
shows READY.
B) Daily Preparation
• Fill fresh water in tank and check bean container.
• Push ON/OFF button: HEATING. RINSE.
• Place a cup under the coffee spouts and press the RINSE
button. READY.
C) Factor
y Settings:
Filter:
–
Har
dness: Level 2
Aroma: ROBUST
Auto Off: 2 HRS
Stats:
Language: English
ML / OZ:
OZ.
Rinse:
✔
a. Coffee
b. Steam/Hot Water
a
b
Selector
f
. Rinse
g. Steam
h. Pre-Ground
Coffee
e. Programming
a. On/Off
b. 1-Cup
mild
normal
strong
d. 2-Cup
e. Dial
READY
LED
D
isplay
Frother
sleeve
slides up
and down
Page 2

D) Grinding and Brewing
• Push the DIAL. Display shows the cup size, e.g. 4.0 OZ.
• Turn the DIAL to change the cup size from 1.0 to 8.0 OZ.
• Coffee Strengths: Push the 1-CUP button once: MILD,
twice NORMAL, three times STRONG.
• When pushing the 2-CUP button, the machine will brew
twice as much coffee as set with the
1-CUP button.
HOTTER COFFEE? Pre-warm cup with hot water through
frother. See chapter F "Using Hot Water". Empty cup and
brew coffee.
E) Changing the Grinder Fineness
Important: You can only adjust the fineness during the actual
grinding process.
• Open the bean container lid and turn the dial while grinding:
thicker bars: coarser grind; thinner bars: finer grind.
• For darker, oily beans – grind somewhat coarser.
For lighter beans – grind somewhat finer.
F) Using Hot Water
• Place a cup underneath the frother. Turn the SELECTOR
to the water symbol, e.g. 5 OZ.
• Turn the DIAL to select to desired amount of water.
WATER. SHUT TAP. Turn the SELECTOR to the Coffee
Symbol. You can always stop the hot water flow before
the display shows
SHUT TAP.
G) Using Steam (Frothing and Steaming)
Important: Frother parts must be tightly connected and clean.
• Cappuccino: One shot espresso plus ~4 oz. of steamed
and frothed milk. Frother sleeve DOWN.
• Latte: One shot espresso plus ~4 to 5 oz. of steamed
milk. Frother sleeve UP: steaming only (no frothing).
1. Push the
STEAM button. HEATING. After ~20 sec.:
STEAM READY.
2. Immerse the frother into a pitcher with milk and turn the
SELECTOR to the water symbol, e.g. 40 SEC. Turn the
DIAL to select to desired steaming time (3 to 120 sec).
STEAM. Steam pushes into the milk.
3. SHUT TAP. Turn the SELECTOR to the Cup Symbol. You
can always stop the steam output with the
SELECTOR.
4. Repeat process for additional steam.
5. After steaming you can immediately brew coffee.
Knocking Noise during Frothing: The pumps dispenses
water droplets into the heating system.
Please note: Skim and 1% milk will produce more froth
than 2% and r
egular milk.
HOTTER MILK? After frothing the milk, use the steaming
position (Frother sleeve UP) to increase the milk temperature.
H) Cleaning the Fr
other
W
ithin 10 min. after last use, place a cup under
the frother.
Turn the
SELECTOR for 5 sec. to the Hot Water symbol. For
thor
ough cleaning see page 15 of the Operating Instr
uctions.
Page 3

J) Programming
Push and hold the P button until the display shows FILTER -.
Turn the
DIAL to access the other functions: HARDNESS,
AROMA, AUTO OFF, STATS, LANGUAGE, ML/OZ, RINSE
✔.
Select the function, push the
DIAL, turn DIAL to see or
select option. Push DIAL to confirm. Push P button to get
back to READY. For details see Operating Instructions.
K) Installing and Activating the Clearyl Water Filter
NOTE: Using the Clearyl Water Filter avoids decalcifying.
1. Rinse cartridge under running water. Insert cartridge
into water tank reception and close the cartridge holder.
2. Fill tank with cold water. Push and hold the
P button:
FILTER -. Push the DIAL: NO -. Turn DIAL: YES ✔.
3. Push
DIAL. INSERT / OPEN TAP. Place a container
(20 oz.) under the frother. Turn the
SELECTOR to the
water symbol. FILTER RINSING.
4. After 90 sec.: SHUT TAP. Turn the SELECTOR to the cup
symbol.
HEATING. READY.
The display will remind you when to replace the filter.
Please note: When the filter program is activated, the
decalcifying program (HARDNESS) is turned off.
Important: Do not let the filter dry out. Filter needs to be
submersed in water. See page 16, Operating Instructions.
L) Replacing and Activating the Clearyl Water Filter
When display shows CHANGE FILTER / MACHINE READY
• Remove old filter, rinse new filter under running water and
insert (see above). Place a large container (20 oz.) under
the frother and push the
RINSE button. The DIAL illuminates.
• Turn the
DIAL until the display shows FILTER.
• Push the DIAL. the display shows REPLACE OPEN TAP.
• Turn the SELECTOR to the water symbol. FILTER
RINSING. See Chapter K,4 above.
Important: If message CHANGE FILTER / MACHINE READY
does not show up after 3 months, you must replace the filter.
M) Cleaning with Special Tablet
This cleaning cycle removes coffee oils inside the machine.
This message will appear after 200 cups of coffee: CLEAN
MACHINE / MACHINE READY. Takes less than 15 minutes!
Important: Only use the special white round cleaning tablet!
Important: Once started, do not interrupt the program!
1. Fill water tank. Push the RINSE button. EMPTY DRAWER.
Please note: You must remove the drawer for 20 seconds
even if it is empty. Replace complete drawer.
2.
PRESS RINSE. Push the RINSE button. CLEANING. After
a moment the display shows
ADD TABLET / PRESS RINSE.
3. Drop one white tablet into the "ground coffee funnel."
Push the
RINSE button. CLEANING. After a few minutes:
EMPTY DRAWER. Carefully lift, remove and empty drawer
and r
eplace.
READY. The machine r
esets itself and
r
eminds you to clean again after the next 200 cups.
Page 4

N) Decalcifying DESCALE MACHINE / MACHINE READY
For different water hardness levels see Operating Instructions.
If a water hardness level is selected, the decalcifying monitor
is active.
Decalcify when above message appears.
Important: If you use the Clearyl Filter and the above
message appears, then the Clearyl Installation procedure
was not performed properly. See chapter K2 to K4 above.
Important: The decalcifying program must not be interrupted.
• Use only the special decalcifying tablets (not the cleaning
tablets!). For decalc tablet supply see below.
1. Push the
RINSE button; the display shows EMPTY
DRAWER.
2. Remove and empty drawer. You must remove the drawer
for 20 seconds, even if it is empty. Replace complete
drawer.
Decalcifying Session:
3. SOLVENT IN TANK. Dissolve three large square tablets in
16 oz. of water, remove tank and pour mixture into empty
water tank and replace.
4. Place a container (at least 16 oz.) underneath frother.
SOLVENT IN TANK OPEN TAP. Turn the SELECTOR to
the water symbol. DECAL ON. After a few minutes:
SHUT TAP. Turn the SELECTOR to the cup symbol.
DECAL ON. After a few minutes EMPTY DRAWER.
5. Carefully remove container and drawer, empty and
replace.
Cleaning Session:
6. FILL WATER. Rinse water tank and fill with cold water
(16 oz.) and replace. Place a container under the frother.
7. OPEN TAP. Turn the SELECTOR to the water symbol.
DECAL ON. After a few minutes: SHUT TAP. Turn the
SELECTOR to the cup symbol. DECAL ON. After a few
minutes EMPTY DRAWER. Carefully remove container
and drawer, empty and replace.
8.
PRESS RINSE. Push the RINSE button. The machine
returns to READY and resets itself.
CAPRESSO CUSTOMER SERVICE 1-800-220-5701
Monday – Thursday: 9AM – 9PM EST
Friday: 9AM – 8PM EST
Saturday: 9AM – 5PM EST
email: [email protected]
Fax: 201-767-9684
O) Supplies can be ordered through:
Customer Service or Mail Order Form or www.capresso.com:
• Clear
yl W
ater Filter Cartridge: #64553
• Special Cleaning Tablets: #62205
• Decalcifying Tablets: #61848
• Cappuccino Cleaner: #63801, removes milk fat from frother
• Grand Aroma Coffee Beans: #921, regular, decaf, espresso
64716R2/1006
 Loading...