

Page 1
de
en
fr
micro 9
Instructions for use for ENA Micro 9 One T ouch
The Instructions for Use has been awarded the seal of
approval by the independent German Technical
Inspection Agency, TÜV SÜD, due to its easy-tounderstand style, its thoroughness and coverage of
safety aspects.
it
nl
es
pt
ru
Page 2

Table of contents
Your ENA Micro 9 One Touch
Control elements 32
Important information 34
Proper use ...............................................................................................................................................................34
For your safety .......................................................................................................................................................34
1 Preparing and using for the first time 35
JURA on the Internet .............................................................................................................................................35
3-colour plain text display ....................................................................................................................................35
Setting up the machine ........................................................................................................................................35
Filling the bean container ....................................................................................................................................35
First-time use ..........................................................................................................................................................35
First-time use with filter cartridge activation ...................................................................................................36
First-time use without filter cartridge activation .............................................................................................37
Determining the water hardness ........................................................................................................................37
Adjusting the grinder ............................................................................................................................................37
Filling the water tank ............................................................................................................................................38
2 Preparation 38
Espresso, coffee ......................................................................................................................................................38
Latte macchiato, cappuccino ...............................................................................................................................38
Permanently setting the amount of water for the cup size ...........................................................................39
Ground coffee .........................................................................................................................................................39
Hot water................................................................................................................................................................40
3 Daily operation 40
Switching on the machine ..................................................................................................................................40
Daily maintenance ................................................................................................................................................40
Switching off the machine ................................................................................................................................... 41
4 Permanent settings in programming mode 41
Products .................................................................................................................................................................. 41
Setting the water hardness ..................................................................................................................................42
Energy-saving mode .............................................................................................................................................42
Automatic switch-off .............................................................................................................................................43
Rinses .......................................................................................................................................................................43
Unit for amount of water ....................................................................................................................................44
Language ................................................................................................................................................................44
5 Maintenance 44
Rinsing the machine ............................................................................................................................................44
Rinsing the milk system ......................................................................................................................................45
Cleaning the milk system ....................................................................................................................................45
Dismantling and rinsing the dual spout ...........................................................................................................46
Inserting and activating the filter ......................................................................................................................46
Changing the filter.................................................................................................................................................47
Cleaning the machine ..........................................................................................................................................48
30
Page 3

Table of contents
de
Descaling the machine .......................................................................................................................................48
Descaling the water tank .....................................................................................................................................49
Cleaning the bean container ..............................................................................................................................50
6 Display messages 51
7 Troubleshooting 52
8 Transport and environmentally friendly disposal 53
Transport / Emptying the system .......................................................................................................................53
Disposal ...................................................................................................................................................................53
9 Technical data 53
10 Index 54
11 JURA contact details / Legal information 56
en
fr
it
nl
es
Symbol description
Warnings
JWARNING
JCAUTION
CAUTION CAUTION draws your attention to potential damage to the machine.
Symbols used
T Prompt to take action. This symbol means that you are being prompted to perform
E Information and tips to make it even easier to use your ENA.
ESPRESSO
Always take note of any information marked with the words CAUTION or WARNING
and a warning sign. The signal word WARNING draws your attention to potential
serious injury, and the signal word CAUTION to potential minor injury.
some action.
Display
pt
ru
31
Page 4
Control elements
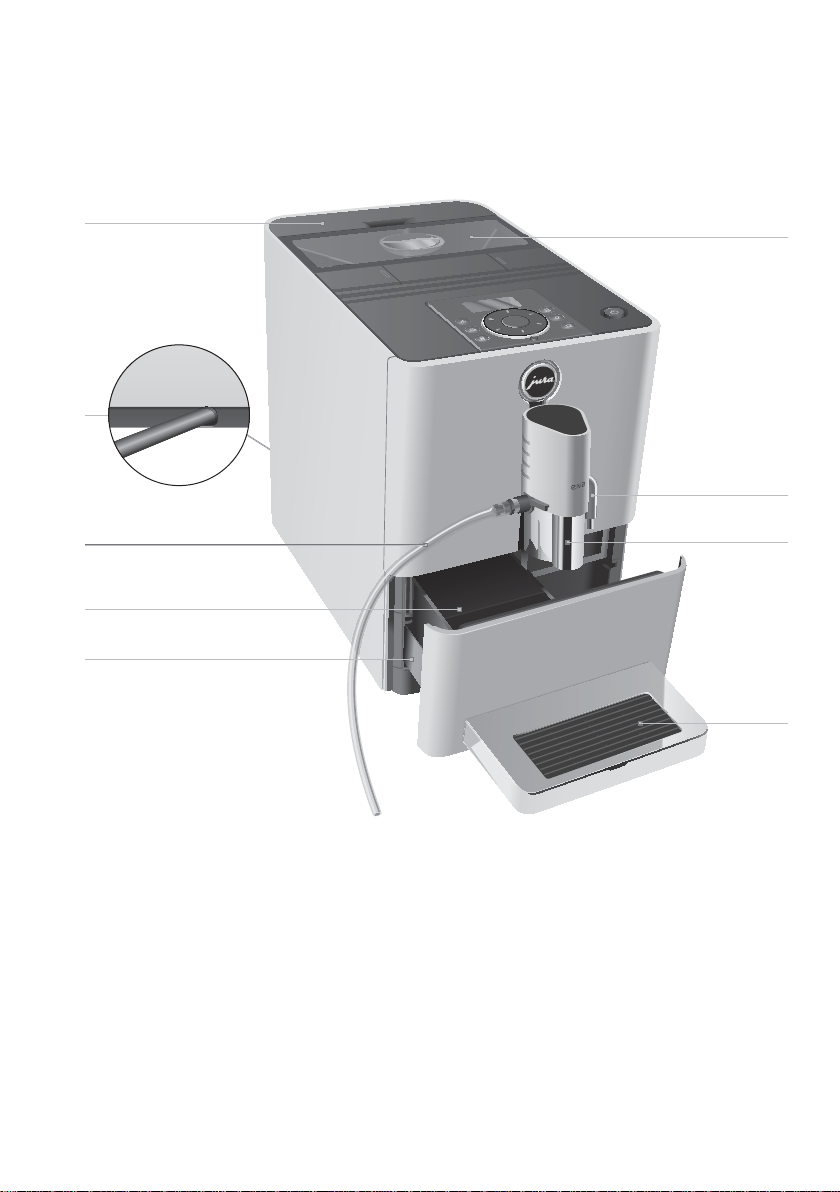
Control elements
micro 9
1 Water tank
2 Mains cable (back of the machine)
3 Milk pipe
4 Coffee grounds container
5 Drip tray
32
6 Bean container with aroma preservation
cover
7 Hot-water spout
8 Height-adjustable dual spout
9 Cup grille
Page 5
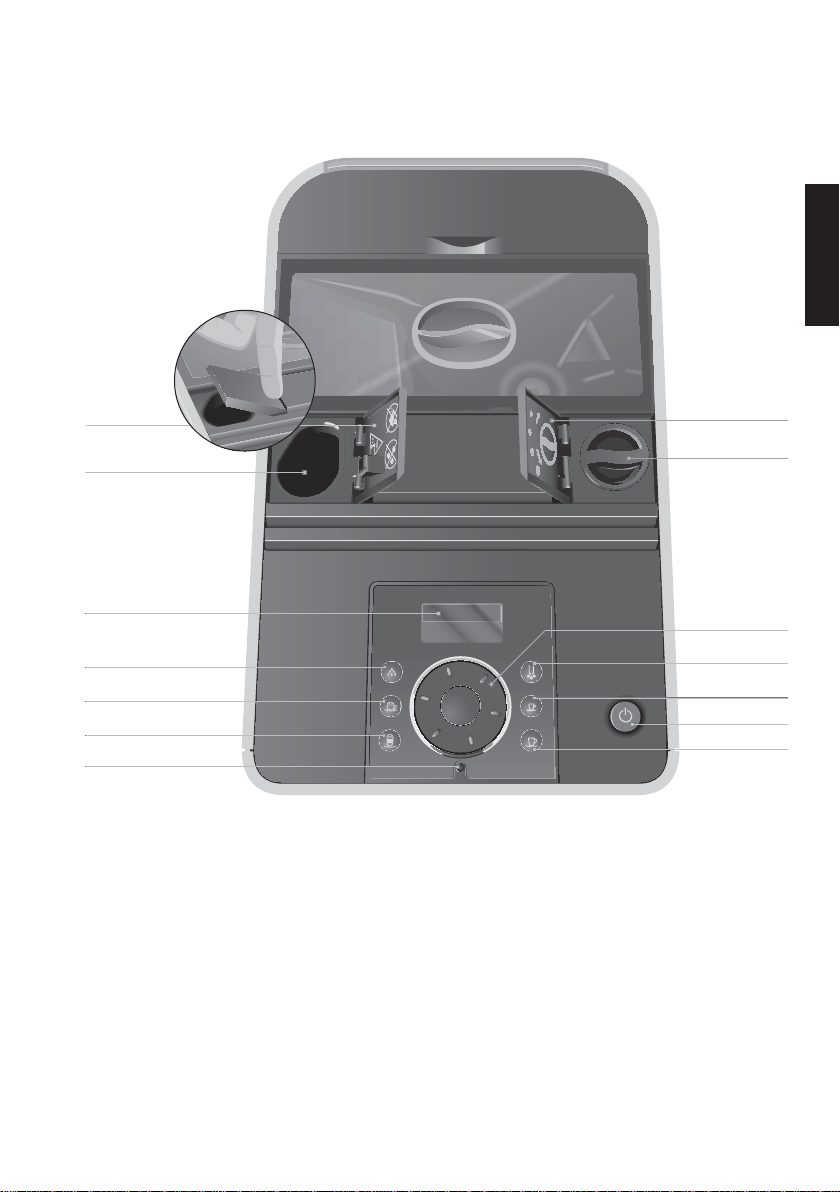
Control elements
de
en
fr
1 Cover for powder chute for ground coffee
2 Powder chute for ground coffee
3 Display
4 c Maintenance button
5 / Cappuccino button
6 ( Latte Macchiato button
7 Rotary Switch status display
8 Cover cap for grinder adjustment switch
9 Grinder adjustment switch
10 g Rotary Switch
11 m Hot Water button
12 < Espresso button
13 Q On/Off button
14 > Coffee button
it
nl
es
pt
33
ru
Page 6

Important information
Important information
Proper use
The machine is designed and intended for private
domestic use. It should only be used for coffee
preparation and to heat milk and water. Use for
any other purpose will be deemed improper. JURA
Elektroapparate AG cannot accept any responsibility for the consequences of improper use.
Before using the machine read these instructions
for use thoroughly and completely and comply
with the instructions they contain. A warranty
service is not applicable for damage or defects
caused by non-compliance with the instructions
for use. Keep these instructions for use close to the
machine and pass them on to the next user.
For your safety
Please carefully read and observe the important
safety information set out below.
To avoid danger of potentially fatal electric shock:
Never use a machine which is damaged or has
U
a defective mains cable.
In the event of signs of damage, for example
U
if there is a smell of burning, unplug the
machine immediately from the mains supply
and contact JURA service.
If the mains cable of this machine is damaged,
U
it must be repaired either directly by JURA or
by an authorised JURA service centre.
Make sure that the ENA and the mains cable
U
are not located close to hot surfaces.
Be careful to ensure that the mains cable is not
U
trapped and does not rub against sharp edges.
Never open and repair the machine yourself.
U
Do not modify the machine in any way that is
not described in these instructions for use.
The machine contains live parts. If opened,
there is a danger of potentially fatal injury.
Repairs may only be carried out by authorised
JURA service centres, using original spare parts
and accessories.
A defective machine is not safe and could cause
injury or fire. To avoid damage and any associated
risk of injury or fire:
Never allow the mains cable to loosely hang
U
down. The mains cable could pose a tripping
hazard or become damaged.
Protect the ENA from environmental influ-
U
ences such as rain, frost and direct sunlight.
Do not immerse the ENA, mains cable or
U
connections in water.
Do not put the ENA or any individual parts in
U
the dishwasher.
Switch your ENA off before cleaning work with
U
the On/Off button. Always wipe the ENA with a
damp cloth rather than a wet one, and protect
it from prolonged exposure to water splash.
Only connect the machine to the mains
U
voltage in accordance with the information on
the rating plate. The rating plate is located on
the underside of your ENA. Further technical
data is provided in these instructions for use
(see Chapter 9 ‘Technical data’).
Please only use original JURA maintenance
U
products. Use of products that are not
explicitly recommended by JURA could
damage the ENA.
Do not use any coffee beans treated with
U
additives or caramelised coffee beans.
Only fill the water tank with fresh, cold water.
U
Do not fill the bean container with water.
U
Switch the machine off with the On/Off button
U
if you are going to be absent for a longer
period of time and remove the mains plug
from the power socket.
People, including children, who
do not have the physical, sensory or mental
U
capabilities to use the machine safely or
are inexperienced or lack knowledge in how to
U
use the machine safely
must be supervised by a responsible person when
using it, or must be instructed in how to use it
correctly.
34
Page 7

1 Preparing and using for the first time
de
Safety when handling the CLARIS Blue filter
cartridge:
Filter cartridges should be kept out of the
U
reach of children.
Store filter cartridges in a dry place in the
U
sealed packaging.
Protect cartridges from heat and direct
U
sunlight.
Do not use damaged filter cartridges.
U
Do not open filter cartridges.
U
1 Preparing and using for the
first time
This chapter provides you with the information
you need to use your ENA without any problems.
You will prepare your ENA step-by-step to enjoy
your first perfect cup of coffee.
JURA on the Internet
Visit us on the Internet.
On the JURA website (www.jura.com) you will find
interesting and up-to-date information on your
ENA and on every aspect of coffee.
3-colour plain text display
Your ENA features a 3-colour plain text display. The
colours of the display texts have the following
meanings:
Green: The ENA is ready for use.
U
Red: The ENA is prompting you to perform
U
some action.
Yellow: You are in programming mode.
U
Setting up the machine
When setting up your ENA, please note the
following:
Place the machine on a horizontal surface that
U
is not sensitive to water.
Choose a spot for your ENA which protects the
U
machine against overheating. Ensure that the
ventilation slots are not covered.
Filling the bean container
CAUTION
Coffee beans which have been treated with
additives (e.g. sugar), ground coffee or freeze-dried
coffee will damage the grinder.
T Only use untreated coffee beans to fill the
bean container.
T Remove the aroma preservation cover of the
bean container.
T Remove any dirt or foreign objects from
inside the bean container.
T Fill the bean container with coffee beans.
T Close the bean container.
First-time use
When using the machine for the first time, you can
choose whether you want to operate the ENA with
or without the CLARIS Blue filter cartridge. If the
water hardness is 10° dH or more, we recommend
using the filter cartridge. If you do not know the
hardness of your water, you can find this out first
(see Chapter 1 ‘Preparing and using for the first
time – Determining the water hardness’).
E The On/Off button also acts as a power
switch. When the ENA is switched off, the
machine does not consume standby energy.
J WARNING
If the machine is operated with a defective mains
cable, there is a danger of potentially fatal electric
shock.
T Never use a machine which is damaged or
has a defective mains cable.
en
fr
it
nl
es
pt
ru
35
Page 8
1 Preparing and using for the first time
Precondition: Bean container is filled.
T Insert the mains plug into a power socket.
Q T Press the On/Off button to switch the
machine on.
SPRACHE DEUTSCH
g T Turn the Rotary Switch until the required
language is displayed, for example
LANGUAGE ENGLISH.
k T Press the Rotary Switch to confirm the
language setting.
OK, the language is set.
FILTERp / YESp
E Now decide whether you want to operate
your ENA with or without a CLARIS Blue
filter cartridge.
First-time use with filter cartridge
activation
k T Press the Rotary Switch.
OK
INSERT FILTER
T Remove the water tank.
T Open the filter holder.
T Insert the filter cartridge into the water tank,
exerting slight pressure.
T Close the filter holder. It will click into place
audibly.
E After two months, the filter will cease to
work. Set the date on the date plate on the
filter holder in the water tank.
T Fill the water tank with fresh, cold water and
reinsert it.
T Place a receptacle (at least 500 ml) under the
hot-water and dual spout.
micro 9
k T Press the Rotary Switch.
FILTER RINSING, water flows out of
the hot-water spout.
E You can interrupt rinsing of the filter at any
time by pressing any button. Press the
Maintenance button c, to continue with
rinsing of the filter.
E The water may be slightly discoloured. This
is not harmful to health and does not affect
the taste.
Rinsing of the filter stops automatically.
SYSTEM FILLING, water flows out of
the dual spout.
HEATING
RINSING
operation stops automatically.
, the system rinses itself. The
READY
36
Page 9
1 Preparing and using for the first time
de
First-time use without filter cartridge
activation
g T Turn the Rotary Switch until
FILTER- / NO- is displayed.
k T Press the Rotary Switch.
OK
16°dH
g T Turn the Rotary Switch to change the water
hardness setting, e.g. to
k T Press the Rotary Switch.
25°dH.
OK
FILL WATER TANK
T Remove the water tank.
T Fill the water tank with fresh, cold water and
reinsert it.
PRESS RINSE
T Place a receptacle under the dual spout.
c T Press the Maintenance button.
SYSTEM FILLING, the system fills up
with water.
HEATING
RINSING
operation stops automatically.
, the system rinses itself. The
READY
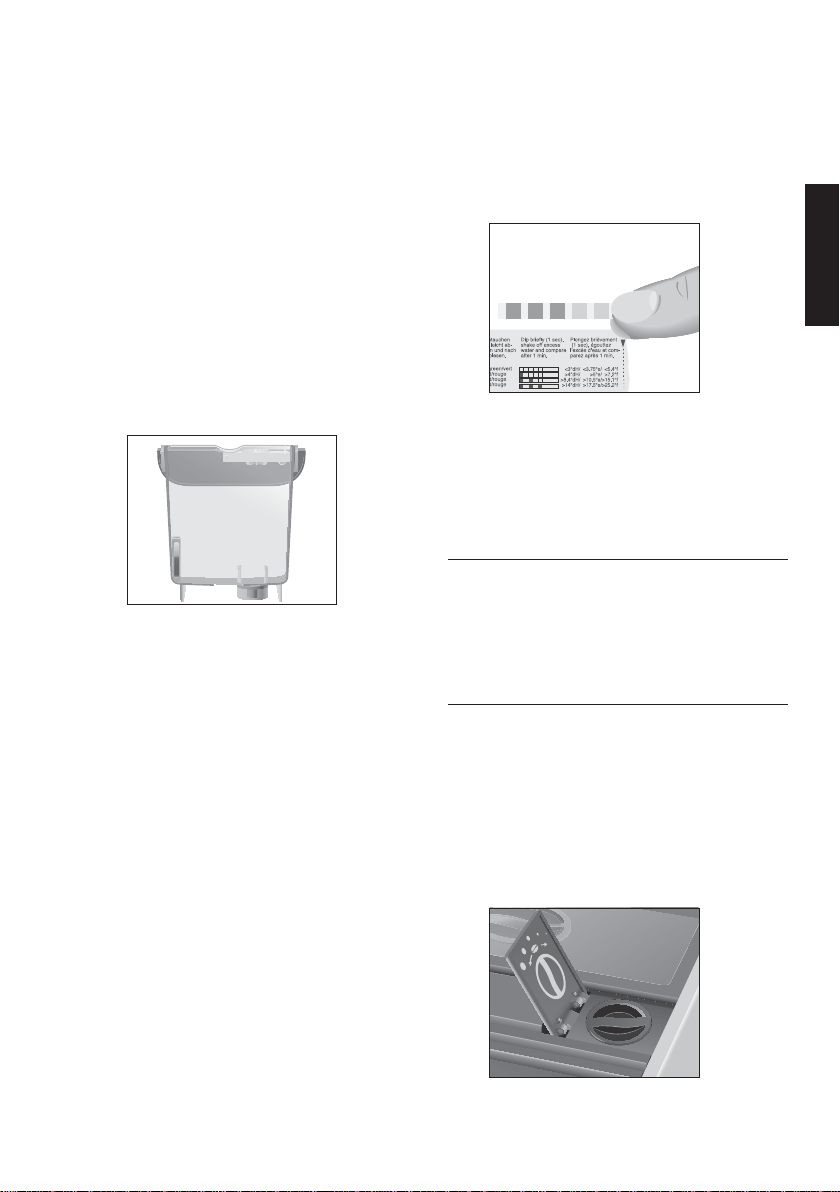
Determining the water hardness
You can find out what the water hardness is by
using the Aquadur® test strip supplied as standard.
T Hold the test strip briefly (for one second)
under running water.
T Shake off the water.
T Wait for about one minute.
T You will then be able to read the degree of
water hardness from the discolouration of
the Aquadur® test strip and the description
on the packaging.
The water hardness can now be adjusted.
Adjusting the grinder
You can adjust the grinder on a continuous scale to
suit the degree of roast of your coffee.
CAUTION
If you adjust the consistency of grind when the
grinder is not operating, the grinder adjustment
switch could be damaged.
T Only adjust the consistency of grind when
the grinder is running.
The consistency of grind setting is correct if the
coffee flows regularly from the dual spout. In
addition a fine, thick crema forms.
Example: Change the consistency of grind during
the preparation of an espresso.
T Place a cup under the dual spout.
T Open the cover cap of the grinder adjust-
ment switch.
en
fr
it
nl
es
pt
ru
37
Page 10

2 Preparation
< T Press the Espresso button to start prepara-
tion.
T Turn the grinder adjustment switch to the
desired position while the grinder is
running.
The preset amount of water flows into the
cup. Preparation stops automatically.
READY
Filling the water tank
Daily maintenance of the machine and hygiene
when handling milk, coffee and water are key to a
perfect coffee result in the cup every time. You
should therefore change the water daily.
CAUTION
Milk, sparkling mineral water or other liquids can
damage the water tank or the machine.
T Only fill the water tank with fresh, cold water.
T Remove the water tank and rinse with cold
water.
E During preparation, you can change the
preset amounts (e.g. amount of milk foam
or water) by turning the Rotary Switch g.
E You can follow the current status of
preparation on the progress bar.
Coffee tastes best served hot. A cold porcelain cup
cools the beverage – and impairs the taste. We
therefore recommend prewarming the cups. The
full coffee aroma can develop only in prewarmed
cups. You can purchase a JURA cup warmer from
your specialised dealer.
You can make permanent settings for all products
in programming mode (see Chapter 4 ‘Permanent
settings in programming mode – Products’).
Espresso, coffee
Preparation of espresso < and coffee > follows
this model.
Example: Proceed as follows to prepare one coffee.
Precondition:
T Place a cup under the dual spout.
> T Press the Coffee button to start preparation.
READY is displayed.
COFFEE, the preset amount of water
flows into the cup.
Preparation stops automatically.
READY
T Fill the water tank with fresh, cold water and
reinsert it.
2 Preparation
E You can interrupt preparation at any time
while a speciality coffee, speciality coffee
with milk or hot water is being prepared.
Just press any button.
E Before and during the grinding operation
you can select the coffee strength of
espresso <, coffee >, cappuccino / and
latte macchiato ( :
38
NORMAL, STRONG.
Latte macchiato, cappuccino
Your ENA can prepare a latte macchiato or
cappuccino at the touch of a button. There is no
need to move the glass or cup.
Preparation of latte macchiato ( and cappuccino /
follows this model.
Example: Proceed as follows to prepare one latte
macchiato.
Precondition:
T Place a glass under the dual spout.
T Remove the protective cover of the dual
READY is displayed.
spout.
Page 11

2 Preparation
de
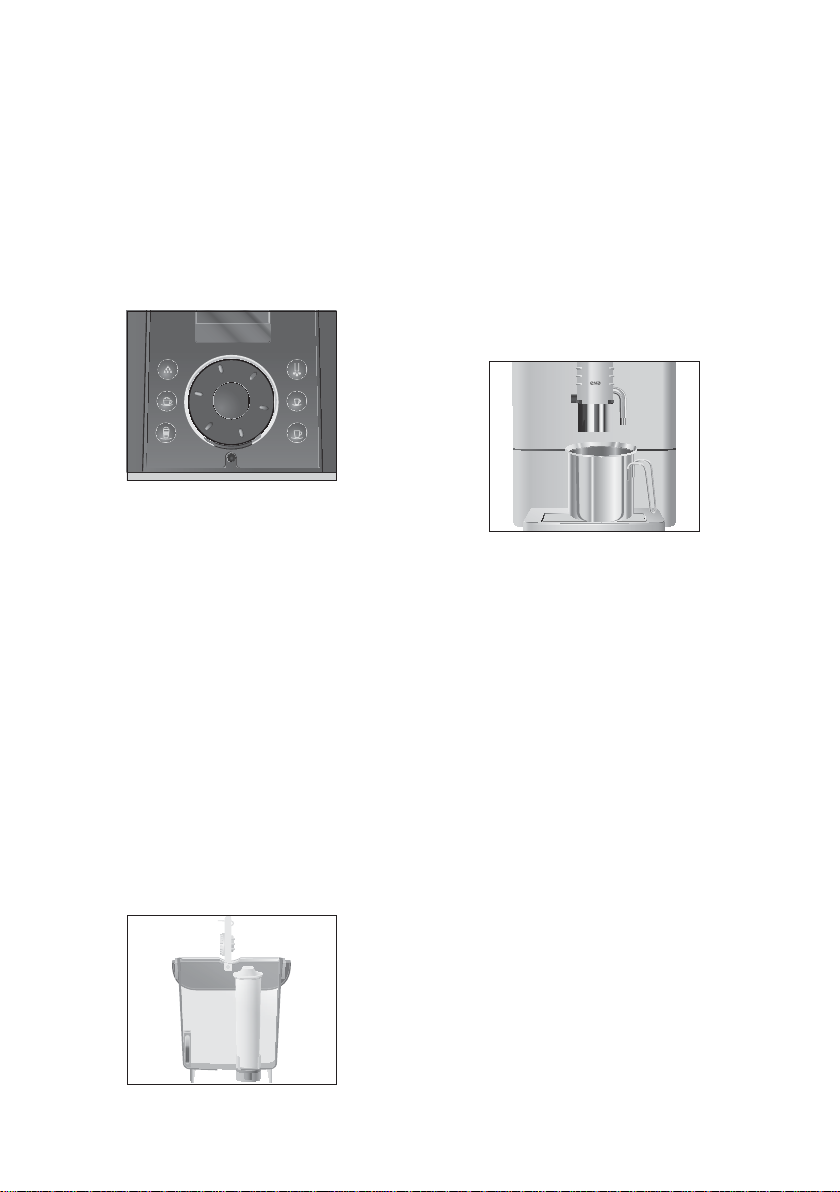
T Connect the milk pipe to the dual spout.
micro 9
T Immerse the other end of the milk pipe in a
receptacle with milk (figure: optional JURA
0.4 litre stainless steel vacuum milk
container).
micro 9
E Ensure that the filling height of the milk is
no higher than the milk pipe connection on
the dual spout.
( T Press the Latte Macchiato button.
LATTE MAC., the milk foam is prepared.
Preparation stops automatically when the
preset amount of milk is reached.
PAUSE
E There is a short interval while the hot milk
separates from the milk foam. This allows
the typical layers of a latte macchiato to
form. You can choose the length of this
interval in programming mode (see
Chapter 4 ‘Permanent settings in programming mode – Products’).
LATTE MAC., coffee preparation starts.
The preset amount of water flows into the
glass.
Preparation stops automatically.
READY
Permanently setting the amount of water
for the cup size
It is easy to make permanent settings for the
amount of water for all speciality coffees and hot
water according to the cup size. Adjust the amount
once as shown in the following example. Every
time you prepare a drink in the future, this amount
of water will be dispensed.
Example: Permanently adjust the amount of
water for one coffee to the cup size.
Precondition:
connected to the dual spout.
T Place a cup under the dual spout.
/ T Press and hold the Cappuccino button.
READY is displayed. Milk is
CAPPUCCINO
/ T Continue to hold the Cappuccino button
down until
/ T Release the Cappuccino button.
The milk foam is prepared.
T Press any button as soon as there is
sufficient milk foam in the cup.
ENOUGH MILK? appears.
OK
ENOUGH COFFEE?, the coffee flows
into the cup.
T Press any button as soon as there is
sufficient coffee in the cup.
OK, CAPPUCCINO, the set amounts for
one cappuccino are permanently stored.
READY
E You can alter this setting at any time by
repeating the above procedure.
Ground coffee
You can choose to use a second coffee variety, for
example decaffeinated coffee, with the powder
chute for ground coffee.
E Never add more than one level measuring
spoon of ground coffee.
E Use ground coffee which is not ground too
finely. Very fine coffee can block up the
system so that the coffee only comes out in
drips.
en
fr
it
nl
es
pt
ru
39
Page 12

3 Daily operation
E If you did not fill the machine with a
sufficient amount of ground coffee,
NOT
ENOUGH POWDER is displayed and the
ENA stops the operation.
E The desired speciality coffee must be
prepared within approximately one minute
after filling with the ground coffee.
Otherwise the ENA stops the operation and
is once more ready for use.
The preparation of coffee, espresso, cappuccino
and latte macchiato with ground coffee follows
this model.
Example: Prepare a cup of coffee using ground
coffee.
Precondition:
T Place a cup under the dual spout.
T Open the powder chute for ground coffee.
READY is displayed.
FILL POWDER
T Place the filler funnel for ground coffee on
the powder chute.
T Place one level measuring spoon of ground
coffee into the filler funnel.
T Close the powder chute for ground coffee.
SELECT BUTTON
> T Press the Coffee button to start preparation.
COFFEE, the preset amount of water
flows into the cup.
Preparation stops automatically.
READY
Hot water
CAUTION
J
There is a danger of scalding from hot water
splashes.
T Avoid direct contact with the skin.
Precondition:
T Place a cup under the hot-water spout.
m T Press the Hot Water button.
READY is displayed.
WATER, the preset amount of water flows
into the cup.
Preparation stops automatically.
READY
3 Daily operation
Switching on the machine
Daily maintenance of the machine and hygiene
when handling milk, coffee and water are key
to a perfect coffee result in the cup every time.
You should therefore change the water daily.
T Place a receptacle under the dual spout.
Q T Press the On/Off button to switch the
machine on.
HEATING
RINSING, the system rinses itself.
The operation stops automatically.
READY
Daily maintenance
To ensure that you get many years of reliable
service out of your ENA and to guarantee the
optimum coffee quality, the machine requires
daily maintenance.
T Remove the drip tray.
T Empty the coffee grounds container and
drip tray and rinse with warm water.
T Reinsert the coffee grounds container and
the drip tray.
T Rinse the water tank with clean water.
40
Page 13

4 Permanent settings in programming mode
de
T Dismantle and rinse the dual spout (see
Chapter 5 ‘Maintenance – Dismantling and
rinsing the dual spout’).
T Wipe the surface of the machine with a
clean, soft, damp cloth (e.g. microfibre
cloth).
E In the interests of hygiene, we recommend
changing the milk pipe on a regular basis
(approx. every 6 months). Replacement
pipes are available from specialised dealers.
Switching off the machine
When the ENA is switched off, the system is
automatically rinsed if a speciality coffee has been
prepared. If cappuccino or latte macchiato has
been prepared, cappuccino frother rinsing also
takes place.
T Place a receptacle under the dual spout.
Q T Press the On/Off button.
RINSING, CAPPUCCINO
RINSING, the system rinses itself. The
operation stops automatically. Your ENA is
switched off.
E When the ENA is switched off with the
On/Off button, the machine does not
consume standby energy.
4 Permanent settings in pro-
gramming mode
Products
You can make the following permanent settings for
espresso and coffee:
Amount of water: 25ML – 240ML
U
Coffee strength: NORMAL, STRONG
U
Temperature: NORMAL, HIGH
U
You can make the following permanent settings for
latte macchiato and cappuccino:
Amount of milk foam: 3SEC – 120SEC
U
Interval: 0SEC – 60SEC
U
Coffee strength: NORMAL, STRONG
U
Amount of water: 25ML – 240ML
U
Temperature: NORMAL, HIGH
U
You can make the following permanent setting for
hot water:
Amount of water: 25ML – 450ML
U
Permanent settings in programming mode always
follow the same model.
Example: Permanently change the coffee strength
(
FLAVOUR) for espresso from STRONG to
NORMAL.
Precondition:
k T Press and hold the Rotary Switch until
READY is displayed.
RINSE appears.
g T Turn the Rotary Switch until
displayed.
k T Press the Rotary Switch to enter the
programme item.
PRODUCT is
SELECT BUTTON
E Next select the button of the product for
which you would like to make settings.
No product is prepared at this point.
< T Press the Espresso button.
ESPRESSO
WATER
g T Turn the Rotary Switch until FLAVOUR is
displayed.
k T Press the Rotary Switch to enter the
programme item.
STRONG
g T Turn the Rotary Switch until NORMAL is
displayed.
k T Press the Rotary Switch to confirm the
setting.
OK, the coffee strength is set.
FLAVOUR
g T Turn the Rotary Switch until EXIT is
displayed.
en
fr
it
nl
es
pt
ru
41
Page 14

4 Permanent settings in programming mode
k T Press the Rotary Switch to exit the pro-
gramme item.
PRODUCT
g T Turn the Rotary Switch until EXIT is
displayed.
k T Press the Rotary Switch to exit programming
mode.
READY
Setting the water hardness
E If you are using the CLARIS Blue filter
cartridge and have activated it in programming mode, you will not be able to adjust
the water hardness.
The harder the water is, the more frequently the
ENA needs to be descaled. It is therefore important
to adjust the water hardness.
The water hardness can be adjusted on a continuous scale between 1° dH and 30° dH.
Example: Change the water hardness setting from
16°dH to 25°dH.
Precondition:
k T Press and hold the Rotary Switch until
READY is displayed.
RINSE appears.
g T Turn the Rotary Switch until
is displayed.
k T Press the Rotary Switch to enter the
programme item.
HARDNESS
16°dH
g T Turn the Rotary Switch until 25°dH is
displayed.
k T Press the Rotary Switch to confirm the
setting.
OK, the water hardness is set.
HARDNESS
g T Turn the Rotary Switch until EXIT is
displayed.
k T Press the Rotary Switch to exit programming
mode.
READY
Energy-saving mode
The energy-saving mode (Energy Save Mode,
©
E.S.M.
) helps you to prevent your machine from
consuming power unnecessarily and to actively
save energy:
ENERGYp
U
Soon after the last preparation, the ENA
U
stops heating up. After about 5 minutes the
message
Before you can prepare a speciality coffee,
U
speciality coffee with milk, or hot water, the
machine must heat up.
ENERGY-
U
The ENA is constantly ready for use.
U
All speciality coffees as well as hot water can
U
be prepared without having to wait.
Example: Change the energy-saving mode from
ENERGY ON is displayed.
ENERGYp to ENERGY-.
Precondition:
k T Press and hold the Rotary Switch until
READY is displayed.
RINSE appears.
g T Turn the Rotary Switch until
displayed.
k T Press the Rotary Switch to enter the
programme item.
ENERGYp is
ECONOMYp
g T Turn the Rotary Switch until ECONOMY-
is displayed.
k T Press the Rotary Switch to confirm the
setting.
OK, the energy-saving mode is set.
ENERGY-
g T Turn the Rotary Switch until EXIT is
displayed.
k T Press the Rotary Switch to exit programming
mode.
READY
42
Page 15

4 Permanent settings in programming mode
de
Automatic switch-off
By instructing your ENA to automatically switch
itself off, you can cut down your energy consumption. If this function is activated, your ENA switches
off automatically after the preset time following
the last action on the machine.
The automatic switch-off can be set to between
15 minutes and 9 hours.
Example: Change the switch-off time from
2HRS to 1HRS.
Precondition:
k T Press and hold the Rotary Switch until
READY is displayed.
RINSE appears.
g T Turn the Rotary Switch until
is displayed.
k T Press the Rotary Switch to enter the
programme item.
OFF AFTER
2HRS
g T Turn the Rotary Switch until 1HRS is
displayed.
k T Press the Rotary Switch to confirm the
setting.
OK, the switch-off time is set.
OFF AFTER
g T Turn the Rotary Switch until EXIT is
displayed.
k T Press the Rotary Switch to exit programming
mode.
READY
Rinses
In the programme item RINSES you can make
the following settings:
INIT RINSE MANUAL
U
The switch-on rinse must be started
U
manually.
INIT RINSE AUTOMATIC
U
The switch-on rinse is started automatically.
U
C-RINSE AFTER10'
U
You are prompted to perform a cappuccino
U
rinse 10 minutes after preparation of a
speciality coffee with milk.
C-RINSE NOW
U
You are prompted to perform a cappuccino
U
rinse immediately after preparation of a
speciality coffee with milk.
Example: Change the setting such that cappuccino
frother rinsing is performed immediately after
preparation of a speciality coffee with milk.
Precondition:
k T Press and hold the Rotary Switch until
READY is displayed.
RINSE appears.
g T Turn the Rotary Switch until
displayed.
k T Press the Rotary Switch to enter the
programme item.
RINSES is
INIT RINSE
g T Turn the Rotary Switch until C-RINSE is
displayed.
k T Press the Rotary Switch to enter the
programme item.
AFTER10'
g T Turn the Rotary Switch until NOW is
displayed.
k T Press the Rotary Switch to confirm the
setting.
OK
C-RINSE
g T Turn the Rotary Switch until EXIT is
displayed.
k T Press the Rotary Switch to exit the pro-
gramme item.
RINSES
g T Turn the Rotary Switch until EXIT is
displayed.
k T Press the Rotary Switch to exit programming
mode.
READY
en
fr
it
nl
es
pt
ru
43
Page 16

5 Maintenance
Unit for amount of water
You can change the unit for the amount of water
from ‘ml’ to ‘oz’.
Example: Change the unit for the amount of water
from
ML to OZ.
Precondition:
k T Press and hold the Rotary Switch until
READY is displayed.
RINSE appears.
g T Turn the Rotary Switch until
displayed.
k T Press the Rotary Switch to enter the
programme item.
DISPLAY is
ML
g T Turn the Rotary Switch until OZ is displayed.
k T Press the Rotary Switch to confirm the
setting.
OK, the unit for the amount of water is set.
DISPLAY
g T Turn the Rotary Switch until EXIT is
displayed.
k T Press the Rotary Switch to exit programming
mode.
READY
Language
In this programme item you can set the language
used by your ENA.
Example: Change the language from
to
DEUTSCH.
Precondition:
k T Press and hold the Rotary Switch until
READY is displayed.
ENGLISH
RINSE appears.
g T Turn the Rotary Switch until
is displayed.
k T Press the Rotary Switch to enter the
programme item.
LANGUAGE
ENGLISH
g T Turn the Rotary Switch until DEUTSCH is
displayed.
k T Press the Rotary Switch to confirm the
setting.
OK, the language is set.
SPRACHE
g T Turn the Rotary Switch until EXIT is
displayed.
k T Press the Rotary Switch to exit programming
mode.
BEREIT
5 Maintenance
Your ENA has the following integrated maintenance programmes:
Cappuccino frother cleaning (C-CLEAN)
U
Rinsing the machine (RINSE)
U
Cappuccino frother rinsing (C-RINSE)
U
Cleaning the machine (CLEAN)
U
Changing the filter (FILTER)
U
Descaling the machine (DE-SCALE)
U
E You can start the maintenance programmes
at any time in programming mode
(programme item
taken in this programme item, programming mode is exited automatically after
approximately 5 seconds.
Rinsing the machine
You can initiate the rinse operation manually at
any time.
Precondition:
T Place a receptacle under the dual spout.
k T Press and hold the Rotary Switch until
READY is displayed.
RINSE appears.
k T Press the Rotary Switch to enter the
programme item.
C-CLEAN
RINSE). If no action is
micro 9
44
Page 17

5 Maintenance
de
g T Turn the Rotary Switch until RINSE is
displayed.
k T Press the Rotary Switch to initiate the rinse
operation.
RINSING, the system rinses itself.
The operation stops automatically.
READY
Rinsing the milk system
After each milk preparation, the ENA prompts you
to perform a cappuccino rinse.
Precondition:
displayed.
T Place a receptacle under the dual spout.
c T Press the Maintenance button to start
CAPPUCCINO RINSE is
micro 9
cappuccino frother rinsing.
CAPPUCCINO RINSING, the milk
system is rinsed.
The rinse stops automatically.
appears on the display.
READY
Cleaning the milk system
The dual spout must be cleaned daily if milk has
been prepared to make sure it functions perfectly
and also in the interests of hygiene. Your ENA will
not prompt you to clean the dual spout.
CAUTION
If the wrong cleaning agent is used, the machine
could be damaged and/or traces could be left
behind in the milk.
T Use only original JURA maintenance
products.
E JURA Cappuccino Cleaner is available from
specialized dealers.
k T Press and hold the Rotary Switch until
RINSE appears.
k T Press the Rotary Switch to enter the
programme item.
C-CLEAN
k T Press the Rotary Switch to start cappuccino
frother cleaning.
CLEANER FOR CAPPU.
T Remove the milk pipe from the receptacle
with milk.
T Pour 250 ml of fresh water into a receptacle
and add one capful (max. 15 ml) of Cappuccino Cleaner.
T Immerse the milk pipe in the receptacle.
T Place another receptacle under the dual
spout.
micro 9
c T Press the Maintenance button.
CLEANING, the milk system and the pipe
are cleaned.
The operation is interrupted,
WATER FOR
CAPPUCCINO.
T Rinse the receptacle thoroughly, fill it with
250 ml of fresh water and immerse the milk
pipe in it.
T Empty the receptacle under the dual spout
and place it back underneath.
c T Press the Maintenance button.
CLEANING, the milk system and the pipe
are rinsed with fresh water.
The operation stops automatically.
READY
en
fr
it
nl
es
pt
ru
45
Page 18

5 Maintenance
Dismantling and rinsing the dual spout
The dual spout must be dismantled and rinsed
daily if milk has been prepared to make sure it
functions perfectly and also in the interests of
hygiene. Your ENA will not prompt you to clean the
dual spout.
T Remove the milk pipe and rinse thoroughly
under running water.
T Press the releasing devices and pull the dual
spout down and off.
T Push the milk system down and remove it.
T Fit the air intake pipe.
T Reassemble the milk system, noting the
numbering on the parts.
T Insert the assembled individual parts into
the dual spout and press them together.
T Fit the dual spout on the machine. It will
click into place audibly.
T Dismantle the milk system into its individual
parts.
T Rinse all parts under running water. If there
are severely dried on milk residues, firstly
immerse the individual parts in JURA
Cappuccino Cleaner and then clean them
thoroughly.
46
Inserting and activating the filter
Your ENA no longer has to be descaled if you are
using the CLARIS Blue filter cartridge. If you did not
activate the filter cartridge the first time you used
the machine, you can do this now as follows.
E Perform the ‘inserting the filter’ operation
without any interruptions. This will ensure
that your ENA always produces its best.
Page 19

5 Maintenance
de
Precondition: READY is displayed.
k T Press and hold the Rotary Switch until
RINSE appears.
g T Turn the Rotary Switch until
displayed.
k T Press the Rotary Switch to enter the
programme item.
FILTER- is
NO-
g T Turn the Rotary Switch until YESp is
displayed.
k T Press the Rotary Switch to confirm the
setting.
OK
INSERT FILTER
T Remove and empty the water tank.
T Open the filter holder.
T Insert the filter cartridge into the water tank,
exerting slight pressure.
T Close the filter holder. It will click into place
audibly.
E After two months, the filter will cease to
work. Set the date on the date plate on the
filter holder in the water tank.
E The water may be slightly discoloured. This
is not harmful to health and does not affect
the taste.
Rinsing of the filter stops automatically.
HEATING
READY
The filter is now activated.
Changing the filter
E After 50 litres of water have flowed through,
the filter will cease to work. Your ENA will
automatically prompt you to change the
filter.
E After two months, the filter will cease to
work. Set the date on the date plate on the
filter holder in the water tank.
E If the CLARIS Blue filter cartridge is not
activated in programming mode, you will
not be prompted to change the filter.
Precondition:
c T Press the Maintenance button.
FILTER / READY is displayed.
INSERT FILTER
T Remove and empty the water tank.
T Open the filter holder and remove the old fil-
ter cartridge.
T Insert a new filter cartridge into the water
tank, exerting slight pressure.
en
fr
it
nl
es
T Fill the water tank with fresh, cold water and
reinsert it.
T Place a receptacle (at least 500 ml) under the
hot-water spout.
c T Press the Maintenance button.
FILTER RINSING, water flows out of
the hot-water spout.
E You can interrupt rinsing of the filter at any
time by pressing any button. Press the
Maintenance button c, to continue with
rinsing of the filter.
T Close the filter holder. It will click into place
audibly.
T Fill the water tank with fresh, cold water and
reinsert it.
T Place a receptacle (at least 500 ml) under the
hot-water spout.
47
pt
ru
Page 20

5 Maintenance
k T Press the Rotary Switch.
FILTER RINSING, water flows out of
the hot-water spout.
E You can interrupt rinsing of the filter at any
time by pressing any button. Press the
Maintenance button c, to continue with
rinsing of the filter.
E The water may be slightly discoloured. This
is not harmful to health and does not affect
the taste.
Rinsing of the filter stops automatically.
HEATING
READY
Cleaning the machine
After 180 preparations or 80 switch-on rinses, the
ENA will prompt you to clean it.
CAUTION
If the wrong cleaning agent is used, the machine
could be damaged and/or traces could be left
behind in the water.
T Use only original JURA maintenance
products.
E The cleaning programme lasts approxi-
mately 15 minutes.
E Do not interrupt the cleaning programme.
The quality of cleaning will be impaired if
you do so.
E JURA cleaning tablets are available from
specialized dealers.
Precondition:
c T Press the Maintenance button.
CLEAN / READY is displayed.
EMPTY TRAY
T Empty the drip tray and coffee grounds
container and reinsert them.
PRESS RINSE
T Place a receptacle under the dual spout.
c T Press the Maintenance button.
CLEANING, water flows out of the dual
spout.
The operation is interrupted, ADD
TABLET.
T Open the powder chute for ground coffee
and drop in a JURA cleaning tablet.
T Close the powder chute for ground coffee.
PRESS RINSE
c T Press the Maintenance button.
CLEANING, water flows out of the dual
spout repeatedly.
EMPTY TRAY
T Empty the drip tray and coffee grounds
container and reinsert them.
HEATING
READY
Descaling the machine
The ENA builds up deposits of limescale over time
and automatically prompts you to descale it when
necessary. The degree of calcification depends on
the hardness of your water.
J CAUTION
If the descaling agent comes into contact with the
skin or eyes, this can cause irritation.
T Avoid contact with the skin or eyes.
T Rinse off descaling agent with clean water.
Should you get any descaling agent in your
eye, see a doctor.
CAUTION
If the wrong descaling agent is used, the machine
could be damaged and/or traces could be left
behind in the water.
T Use only original JURA maintenance
products.
48
Page 21

5 Maintenance
de
CAUTION
If the descaling operation is interrupted, there may
be damage to the machine.
T Allow the descaling programme to run to
the end.
CAUTION
If the descaling agent comes into contact with
sensitive surfaces (e.g. marble), damage cannot be
ruled out.
T Clean up any splashes immediately.
E The descaling programme lasts approxi-
mately 40 minutes.
E JURA descaling tablets are available from
specialized dealers.
E If you use a CLARIS Blue filter cartridge and
this is activated, you will not be prompted to
descale.
Precondition:
displayed.
c T Press the Maintenance button.
DE-SCALE / READY is
EMPTY TRAY
T Empty the drip tray and coffee grounds
container and reinsert them.
AGENT IN TANK
T Remove and empty the water tank.
T Completely dissolve the contents of one
blister (three JURA descaling tablets)
in a receptacle holding 500 ml of water.
This may take several minutes.
T Pour the solution into the empty water tank
and reinsert the tank.
PRESS RINSE
T Place a receptacle under the hot-water
spout.
c T Press the Maintenance button.
DE-SCALING, water flows out of the
hot-water spout repeatedly.
EMPTY TRAY
T Empty the drip tray and coffee grounds
container and reinsert them.
FILL WATER TANK
T Empty the receptacle and place it under the
dual and hot-water spout.
T Remove the water tank, rinse thoroughly,
fill with fresh, cold water and reinsert.
PRESS RINSE
c T Press the Maintenance button.
DE-SCALING, water flows out of the
dual and hot-water spout.
The operation is interrupted,
TRAY
.
T Empty the drip tray and coffee grounds
container and reinsert them.
EMPTY
READY
E If the descaling operation stops unexpect-
edly, rinse the water tank thoroughly.
Descaling the water tank
Limescale deposits may form in the water tank.
To ensure correct function of the machine, descale
the water tank from time to time.
T Remove the water tank.
T If you use a CLARIS Blue filter cartridge,
remove it.
T Descale the tank with a mild conventional
descaling agent in accordance with the
manufacturer's instructions.
T Rinse the water tank thoroughly.
T If you use a CLARIS Blue filter cartridge,
reinsert it.
T Fill the water tank with fresh, cold water and
reinsert it.
en
fr
it
nl
es
pt
ru
49
Page 22

5 Maintenance
Cleaning the bean container
Coffee beans may be covered with a slight oil film
which remains on the walls of the bean container.
These traces may negatively affect the coffee
result. For this reason clean the bean container
from time to time.
Q T Press the On/Off button to switch the
machine off.
T Disconnect the mains plug.
T Remove the bean container cover.
T Remove the coffee beans with a vacuum
cleaner.
T Clean the bean container with a soft, dry
cloth.
T Fill the bean container with fresh coffee
beans, then close the bean container cover.
50
Page 23

6 Display messages
de
6 Display messages
Message Cause/Result Action
FILL WATER
TANK
EMPTY
GROUNDS
TRAY
MISSING
FILL BEANS
CLOSE
COVER
PRESS
RINSE
CAPPUCCINO
RINSE
READY /
CLEAN
READY /
DE-SCALE
READY /
FILTER
NOT ENOUGH
POWDER
TOO HOT
The water tank is empty or
not correctly inserted. You
cannot prepare any products.
The coffee grounds container
is full. No speciality coffees
can be prepared, but hot
water preparation is possible.
The drip tray is not inserted
correctly or is not inserted at
all. You cannot prepare any
products.
The bean container is empty.
No speciality coffees can be
prepared, but hot water
preparation is possible.
The aroma preservation cover
for the bean container is not
fitted or not fitted correctly.
The ENA is prompting you to
perform a rinse or continue a
maintenance programme that
was already started.
The ENA requests a cappuccino rinse.
The ENA is prompting you to
clean it.
The ENA is prompting you to
descale it.
After 50 litres of water have
flowed through the CLARIS
Blue filter cartridge, it will
cease to work.
There is insufficient ground
coffee in the machine; the
ENA stops the operation.
The system is too hot to start
a maintenance programme.
T Fill the water tank (see Chapter 1 ‘Preparing and
using for the first time – Filling the water tank’).
T Insert the water tank.
T Empty the coffee grounds container and the
drip tray (see Chapter 3 ‘Daily operation – Daily
maintenance’).
T Insert the drip tray.
T Fill the bean container (see Chapter 1 ‘Preparing
and using for the first time – Filling the bean
container’).
T Fit the aroma preservation cover correctly.
T Press the Maintenance button to start the rinse
or to continue the maintenance programme.
T Press the Maintenance button to start
cappuccino frother rinsing.
T Perform cleaning (see Chapter 5 ‘Maintenanc e –
Cleaning the machine’).
T Perform descaling (see Chapter 5 ‘Maintenance –
Descaling the machine ’).
T Replace the CLARIS Blue filter cartridge (see
Chapter 5 ‘Maintenance – Changing the filter’).
T The next time you prepare a beverage, add
more ground coffee (see Chapt e r 2 ‘ Preparati o n –
Ground coffee’).
T Wait for several minutes until the system has
cooled or prepare a speciality coffee or hot water.
en
fr
it
nl
es
pt
ru
51
Page 24

7 Troubleshooting
7 Troubleshooting
Problem Cause/Result Action
Insufficient foam is
produced when the milk is
frothed or milk sprays
from the dual spout.
Coffee only comes out in
drips when it is being
prepared.
Water hardness cannot be
adjusted.
FILL WATER TANK
is displayed although the
water tank is full.
Grinder is making a very
loud noise.
ERROR2 is displayed. If the machine was
Other
ERROR messages
are displayed.
The dual spout is dirty.
Coffee or ground coffee
has been ground too
finely and is blocking
the system.
The CLARIS Blue filter
cartridge is activated.
The water tank float is
trapped.
There are foreign objects
in the grinder.
exposed to the cold for
a long period of time,
heating is disabled for
safety reasons.
–
T Clean the dual spout (see Chapter 5
‘Maintenance – Cleaning the milk system’).
T Dismantle and rinse the dual spout
(see Chapter 5 ‘Maintenance – Dismantling
and rinsing the dual spout’).
T Set the grinder to a coarser setting or use
coarser ground coffee (see Chapter 1
‘Preparing and using for the first time –
Adjusting the grinder’).
T Deactivate the CLARIS Blue filter cartridge
in programming mode.
T Descale the water tank (see Chapter 5
‘Maintenance – Descaling the water tank’).
T Contact customer support in your country
(see Chapter 11 ‘JURA contact details / Legal
information’).
T Warm the machine at room temperature.
T Switch off the ENA with the On/Off button.
Contact customer support in your country
(see Chapter 11 ‘JURA contact details / Legal
information’).
E If you were unable to solve the problem,
contact customer support in your country
(see Chapter 11 ‘JURA contact details /
Legal information’).
52
Page 25

8 Transport and environmentally friendly disposal
de
8 Transport and environmentally
friendly disposal
Transport / Emptying the system
Keep the packaging for your ENA. It should be used
to protect the machine during transport.
In order to protect the ENA from frost during
transport, the system must be emptied.
Precondition:
T Place a receptacle under the hot-water
m T Press the Hot Water button.
T Remove and empty the water tank.
Q T Press the On/Off button to switch the
READY is displayed.
spout.
micro 9
WATER, hot water flows out of the
hot-water spout.
Hot water will continue to flow until the
system is empty.
FILL WATER TANK
machine off.
9 Technical data
Voltage 220–240 V ~, 50 Hz
Power 1450 W
Conformity mark
Energy consumption
ECONOMY-
Energy consumption
ECONOMYp
Pump pressure Static, max. 15 bar
Holding capacity of water
tank (without filter)
Holding capacity of bean
container
Holding capacity of
coffee grounds container
Cable length Approx. 1.1 m
Weight Approx. 9.4 kg
Dimensions (W × H × D) 23 × 32.3 × 44.5 cm
A S
Approx. 10.6 Wh
Approx. 4.3 Wh
1.1 l
125 g
Approx. 10 servings
en
fr
it
nl
es
Disposal
Please dispose of old machines in an environmentally neutral way.
H
Old machines contain valuable, recyclable
materials which should be recycled. Please
therefore dispose of old machines via suitable
collection systems.
pt
ru
53
Page 26

10 Index
10 Index
A
Addresses 56
Aroma preservation cover
Bean container with aroma preservation cover
32
Automatic switch-off 43
B
Bean container
Bean container with aroma preservation cover
32
Cleaning 50
Filling 35
Bus bar
Technical data 53
Button
Cappuccino button 33
Coffee button 33
Espresso button 33
Hot Water button 33
Latte Macchiato button 33
Maintenance button 33
On/Off button 33
C
Cappuccino 38
Cappuccino frother cleaning
Cleaning the milk system 45
Cappuccino frother rinsing
Rinsing the milk system 45
CLARIS Blue filter cartridge
Changing 47
Inserting and activating the filter 46
Cleaning
Bean container 50
Machine 48
Coffee 38
Coffee grounds container 32
Consistency of grind
Adjusting the grinder 37
Grinder adjustment switch 33
Contact details 56
Cup grille 32
Customer support 56
D
Descaling
Machine 48
Water tank 49
Display 33, 35
Display messages 51
Disposal 53
Drip tray 32
Dual spout
Dismantling and cleaning 46
Height-adjustable dual spout 32
E
Emptying the system 53
Energy-saving mode 42
Errors
Troubleshooting 52
Espresso 38
F
Filling
Bean container 35
Water tank 38
Filter
Changing 47
Inserting and activating the filter 46
First-time use 35
With filter cartridge activation 36
Without filter cartridge activation 37
G
Ground coffee 39
Powder chute for ground coffee 33
H
Hotline 56
Hot water 40
Hot-water spout 32
I
Instant coffee
Ground coffee 39
Internet 35
J
JURA
Contact details 56
Internet 35
54
Page 27

10 Index
de
L
Language 44
Latte macchiato 38
M
Machine
Cleaning 48
Descaling 48
Rinsing 44
Setting up 35
Switching off 41
Switching on 40
Mains cable 32
Maintenance
Daily maintenance 40
Maintenance 44
Messages, display 51
Milk system
Cleaning 45
Rinsing 45
P
Permanently setting the water for the cup size
39
Permanent settings in programming mode 41
Powder chute
Powder chute for ground coffee 33
Preparation 38
Cappuccino 38
Coffee 38
Espresso 38
Ground coffee 39
Hot water 40
Latte macchiato 38
Problems
Troubleshooting 52
Programming mode 41
Automatic switch-off 43
Energy-saving mode 42
Language 44
Products 41
Rinses 43
Setting the water hardness 42
Unit for amount of water 44
Proper use 34
R
Rinses 43
Rinsing
Machine 44
Rotary Switch 33
Status display 33
Rotary Switch status display 33
S
Safety 34
Safety information 34
Settings
Permanent settings in programming mode
41
Setting up
Setting up the machine 35
Spout
Height-adjustable dual spout 32
Hot-water spout 32
Switching off 41
Switching on 40
Switch-off
Automatic switch-off 43
Symbol description 31
T
Technical data 53
Tel 56
Transport 53
Troubleshooting 52
U
Unit for amount of water 44
Use, First-time 35
W
Water hardness
Determining the water hardness 37
Setting the water hardness 42
Water tank 32
Descaling 49
Filling 38
Website 35
en
fr
it
nl
es
pt
ru
55
Page 28

11 JURA contact details / Legal information
11 JURA contact details / Legal
information
JURA Elektroapparate AG
Kaffeeweltstrasse 10
CH-4626 Niederbuchsiten
Tel. +41 (0)62 38 98 233
@ You will find additional contact details for
your country at www.jura.com.
Directives
The machine complies with the following
directives:
2006/95/EC – Low Voltage Directive
U
2004/108/EC – Electromagnetic Compatibility
U
2009/125/EC – Ecodesign Directive
U
Technical changes
We reserve the right to make technical changes.
The diagrams used in these instructions for use are
for illustration purposes only and do not represent
the original colours of the machine. Some details
of your ENA may vary.
Feedback
Your opinion is important to us! Use the contact
link at www.jura.com.
Copyright
The instructions for use contain information which
is protected by copyright. It is not permitted to
photocopy these instructions for use or translate
them into another language without the prior
written consent of JURA Elektroapparate AG.
56
 Loading...