

Juplink Vanin RX4-1500 Wi-Fi6 Quick Start Manual
V A N I N
Quick Start Guide-2
RX4-1500
Wi-Fi6 Router
POWER
WPS
2.4G
5
G
LED Status Indicators
LED indicator
Green LED Indicator
Ports / Buttons
WPS
RST
LAN 1. 2. 3. 4
WAN Port
Power
Status Description
Solid on
The router is starting to connect or has been successfully connected
to the internet.
Fast blinking
The router is performing WPS negotiation
Description
To start the WPS negotiation process of the router
To reset the router
To connect to the wired devices such as computers, switches, ect
To conncet this router to the internet
To connect to the power cord
Website : www.juplink.com
Email : Support@juplink.com
Before Setting
To customize your wireless network
connection and other advanced repeater
settings, please go to
www.juplink.com/pages/contact-us
to download RX4-1500 updated Firmware
and User Guide for more information.
Operating Conditions
Working Temperature: 0~45°C / 32~113°F
Working Humidity: 10%~90% RH
(No condensation)
Storage Temperature:-40~85°C / -40~185°F
Storage Humidity: 5%~95% RH
(No condensation)
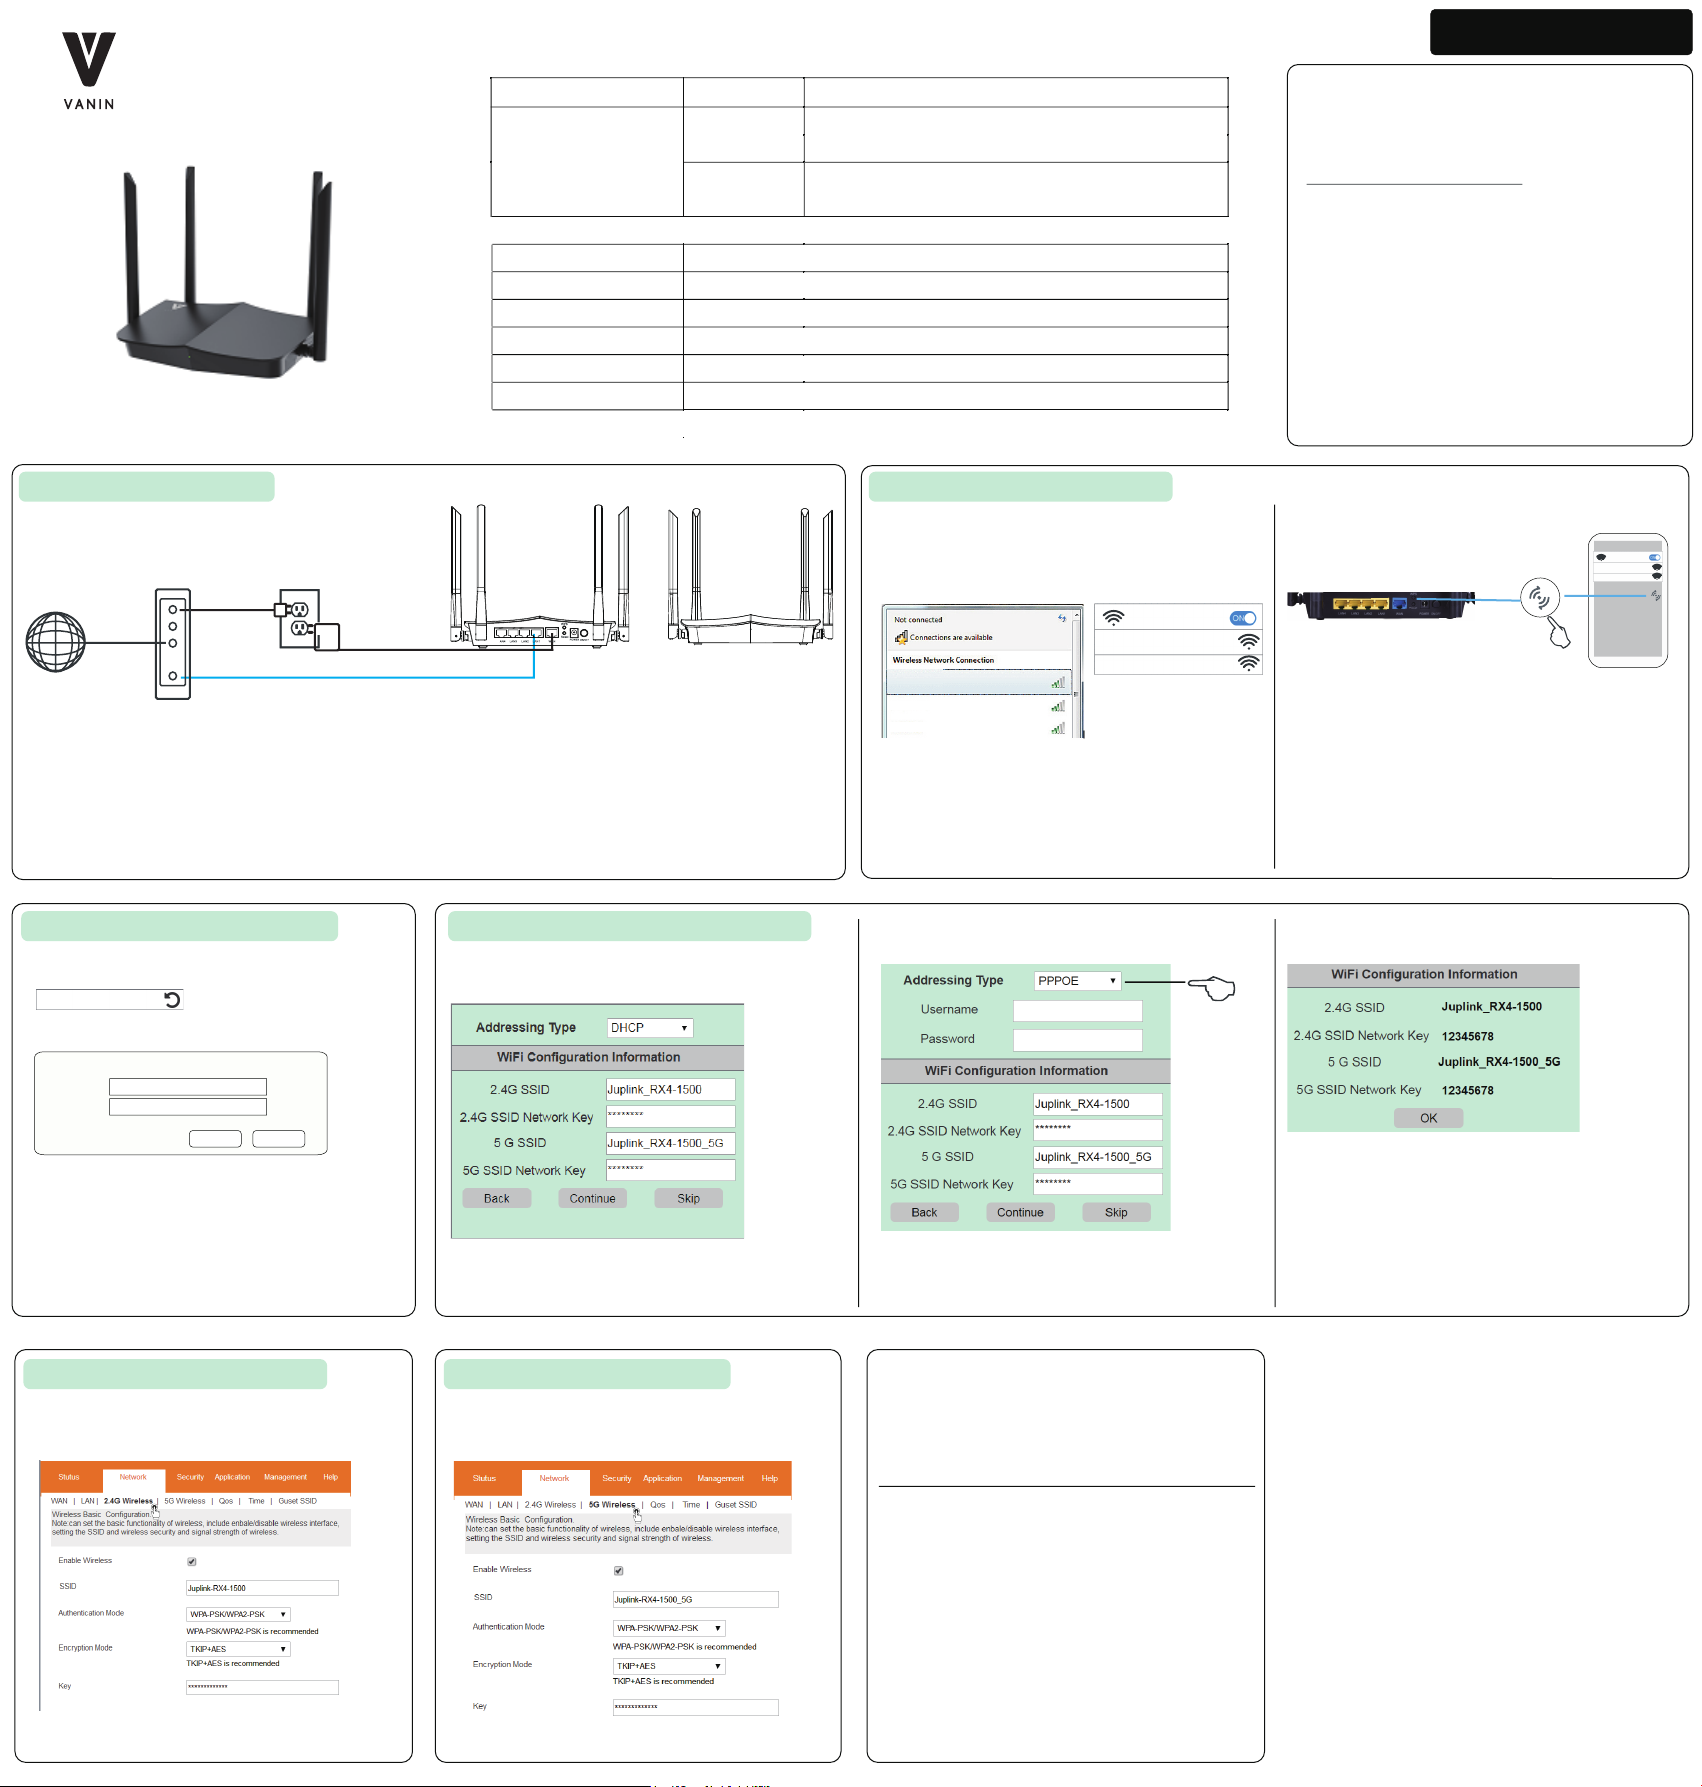
Step 1: Basic Installation
Modem Apower Outlet
AC-DC Power cord
Ethernet WAN in Front Panel LED Green
Internet
Modem LAN out
Please ensure that the router has been turned on and connected to the Internet Service Provider(ISP)
① Connect the power adapter to the router’s power port and plug the other end into a power outlet. The LED indicator becomes solid green
POWER
WPS
2.4G
② Connect the WAN port of the router to a LAN port of your modem
5G
③ Connect your device to the router.
Step 3: Log In to Your Router Step 4: Set up Internet Connection
① Lauch a web browser on the device which has been connected
to the repeater,Enter 192.168.0.1 in the address bar to log in.
http://192.168.0.1
② Username:admin / Passwrod:admin
Login 192.168.0.1 Juplink RX4-1500 router
Username
Password
admin
admin
Cancel Login
③ Click Login Button below
Method 1 : Connect to the Internet Automatically
① Select DHCP type from the Addressing Type drop-down list
② Set 2.4G /5G SSID ( Wi-Fi Name ) and
2.4G /5G SSID Network Key ( Wi-Fi password ) then click Continue
Note: The Default Password Both 2.4G and 5G is: 12345678
Step 2: Connect Your Router
1. Basic connection - Wirelessly
① Find the SSID (Network Name) Juplink-RX4-1500_5G or
Juplink-RX4-1500 on phone or computer
Computer Smart Device
WLAN
Juplink-RX4-1500
Juplink-RX4-1500_5G
Juplink-RX4-1500
Juplink Wi-Fi 6 Router
② Click the network icon of your device or go to Wi-Fi Settings of your
smart device, and then select the SSID Juplink-RX4-1500_5G or
Juplink-RX4-1500 to join the network.
Ensure that Mobile Data ( if any ) is disabled.
Method 2 : Connect to the Internet - PPPoE
① Select PPPoE type from the Addressing Type drop-down list
② Enter the Username and Password provided by your ISP.
② Set 2.4G /5G SSID ( Wi-Fi Name ) and
2.4G /5G SSID Network Key ( Wi-Fi password ) then click Continue
Juplink-RX4-1500_5G
2. Basic connection - WPS Button
Wireless devices that support WPS, including Android phones, tablets,
and most USB network adapters, can be connected to your router
through this method.
Back of your router view
① Tap the WPS icon on the device’s
② Within two minutes, press the button on your router.
Note : ① WPS is not supported by iOS devices.
② The WPS function cannot be configured if the wireless function
of the router is disabled. Also, the WPS function will be disabled if
your wireless encryption is WEP. Please make sure the wireless
function is enabled and is configured with the appropriate
encryption before configuring the WPS.
③ Confirm your WiFi name and password and click OK button
④ The router will reboot and you can reconnect by using the new
Wi-Fi Name ( SSID ) and new password in 10 Seconds.
Note: Generally, the addressing type is DHCP. If it is PPPOE,
you need to fill in the username and password which
was provided by your ISP
Please refer to
Method 2: Connect to the Internet - PPPoE
POWER
WPS
2.4G
WLAN
Juplink-RX4-1500
Juplink-RX4-1500_5G
5G
Step 5: 2.4G Network Setting
① Select Network then select 2.4G setting.
② You can modify your Wi-Fi Name (SSID) , Wi-Fi Password (Key)
Authentication Mode and Encryption Mode
POWER
WPS
2.4G 5G
③ After click Apply/Save Button, The router will reboot and you can
reconnected by using the new SSID and New Key (Password)
Step 6: 5G Network Setting
① Select Network then select 5G setting.
② You can modify your Wi-Fi Name (SSID) , Wi-Fi Password (Key)
Authentication Mode and Encryption Mode
③ After click Apply/Save Button, The router will reboot and you can
reconnected by using the new SSID and New Key (Password)
What’s in the Box
1 x Juplink RX4-1500 Router
1 x Ethernet Cable
1 x AC-DC Adapter
1 x Quick Start Guide
Manufacturer’s information
Nanjing Juplink Intelligent Technologies Co.,Ltd.
Address: No. 757 Dixiu Road, Binjiang Economic Development Zone
Jiangning District, Nanjing Technical
Support Email: Support@juplink.com
Made in China
Quick Start Guide
RX4-1500
V A N I N
Wi-Fi6 Router
Other Setting
Before Setting
To customize your wireless network
connection and other advanced repeater
settings, please go to
https://www.juplink.com/pages/contact-us
to download RX4-1500 updated Firmware
and User Guide for more information.
Operating Conditions
Working Temperature: 0~45°C / 32~113°F
Working Humidity: 10%~90% RH
Storage Temperature:-40~85°C / -40~185°F
Storage Humidity: 5%~95% RH (No condensation)
POWER
WPS
2.4G 5G
(No condensation)
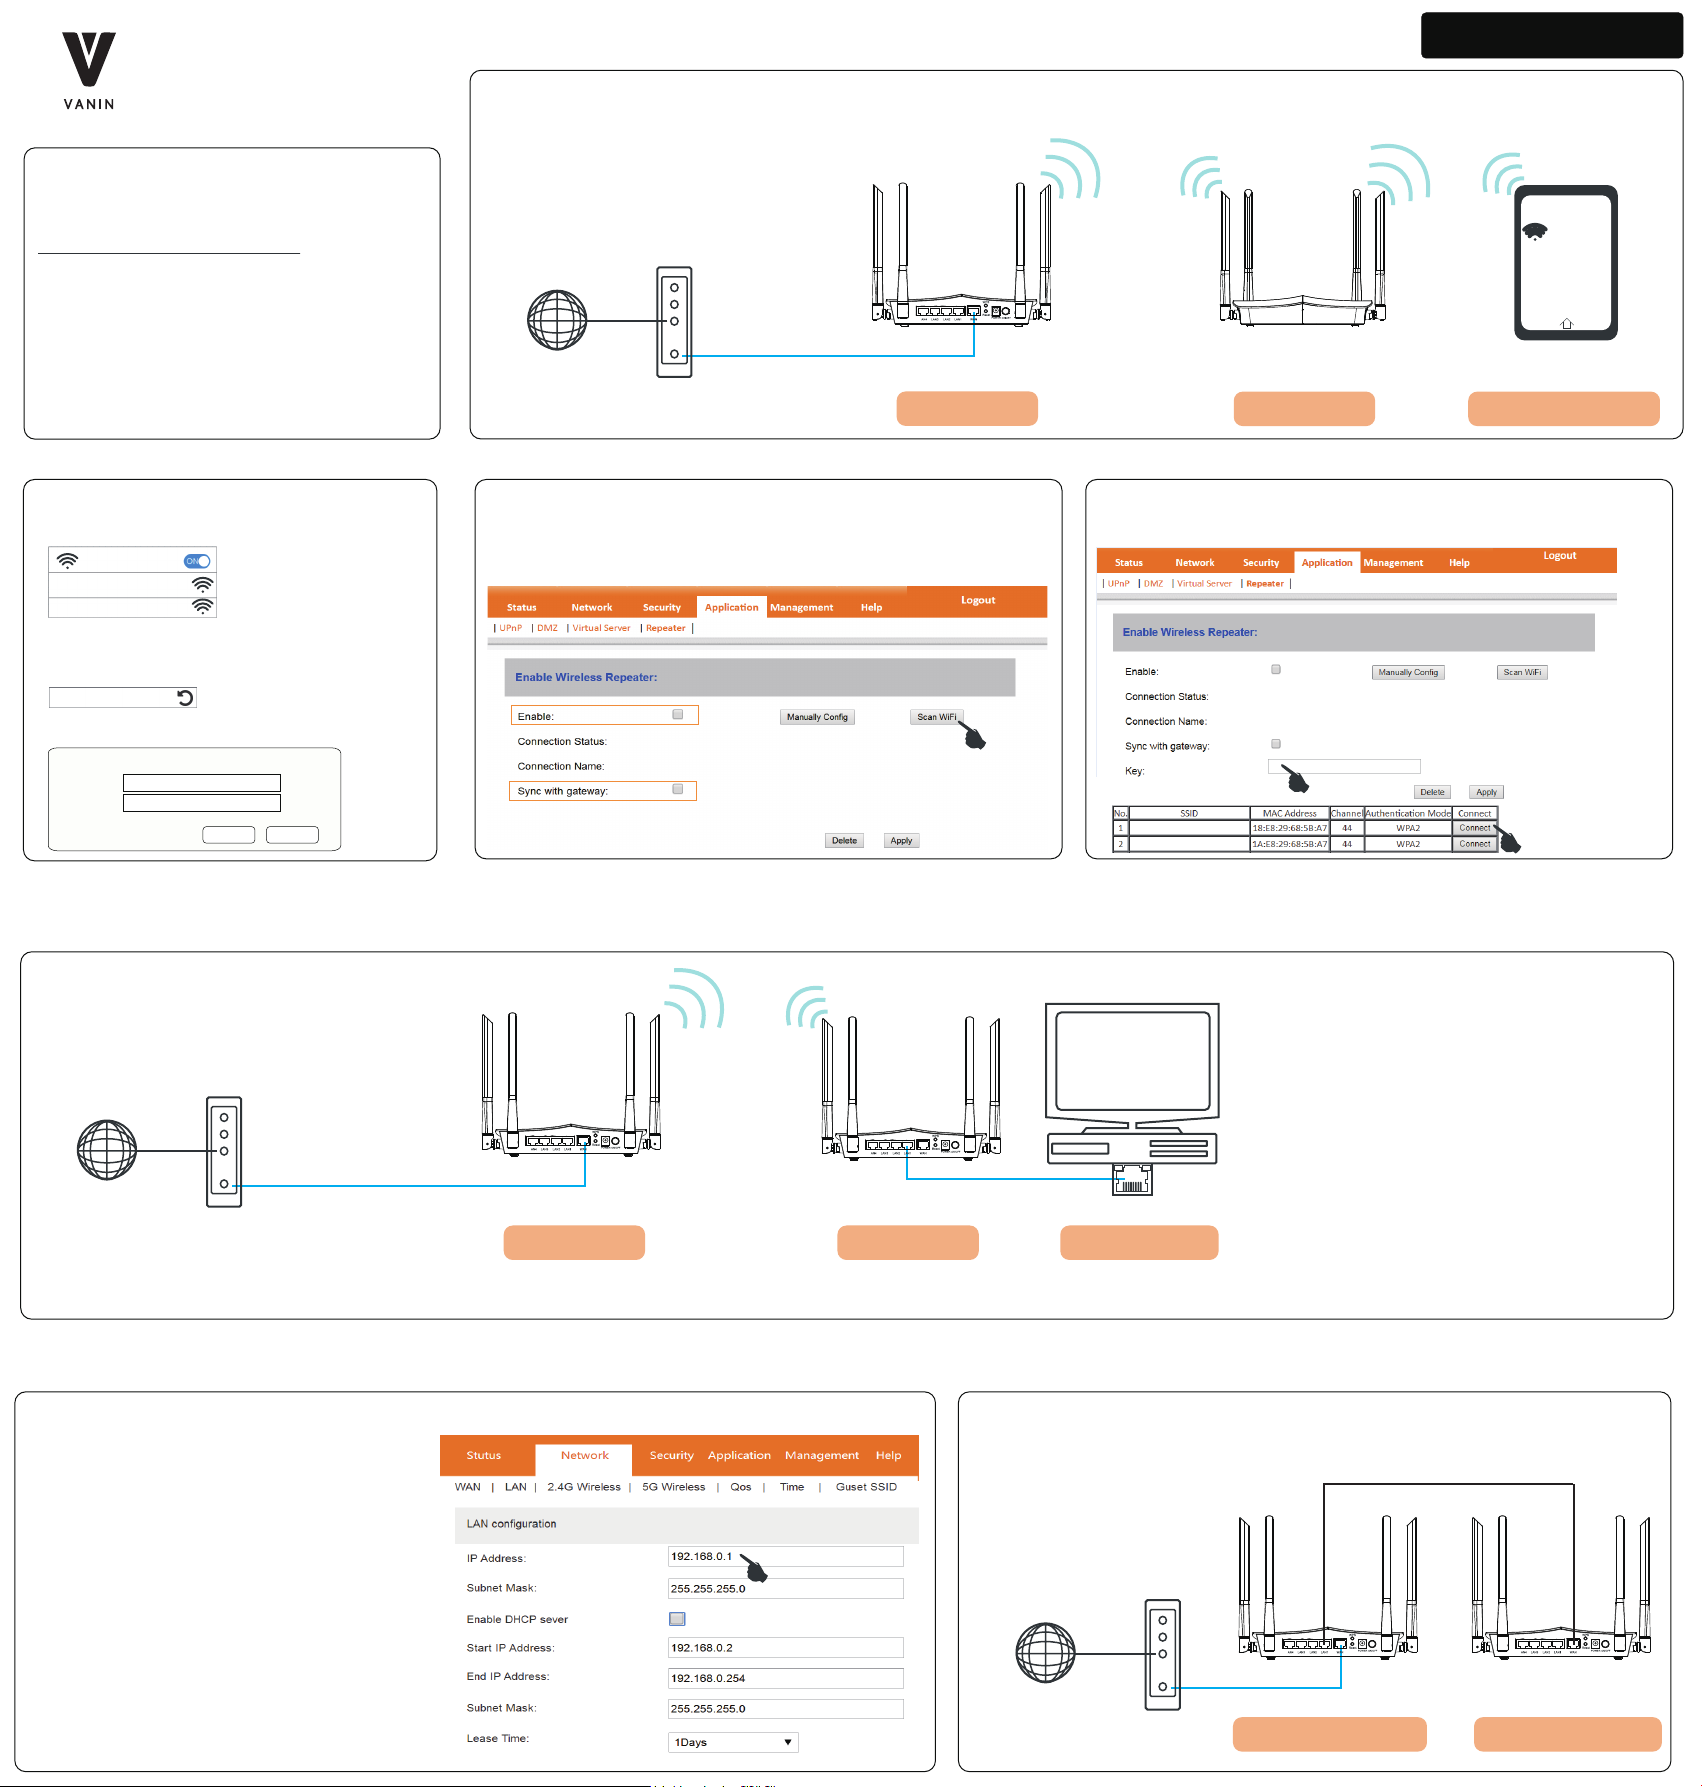
1 Repeater Mode
Step 1 : Common Connection
Modem
Internet
Modem LAN out
POWER
WPS
2.4G 5G
Ethernet WAN in
Router
Website : www.juplink.com
Email : Support@juplink.com
Existing Wi-Fi Extended Wi-FiReceive signal
WLAN
RX4-1500
Repeater Your Wireless Device
Step 2 : Login Web UI
1. Connect your Wi-Fi device to the repeater’s Wi-Fi network
Juplink-RX4-1500_5G or Juplink-RX4-1500.
WLAN
Juplink-RX4-1500
Juplink-RX4-1500_5G
Ensure that Mobile Data ( if any ) is disabled.
2. Lauch a web browser on the device which has been connected
to the repeater,Enter 192.168.0.1 in the address bar to log in.
http://192.168.0.1
3. Username:admin / Passwrod:admin
Login 192.168.0.1” Juplink RX4-1500 router
Username
Password
admin
admin
Cancel Login
2 Repeater Mode - Client
Modem
Step 3 : Setup Your Repeater 4. Enter the password of the Wi-Fi that will be extended in Key blank
1. Click on Application and go to the Repeater interface.
2. Click the Scan WiFi button, Then wait about 5 seconds.
3. Select Enable & Sync with gateway( suggest )
5. Click Connect button
Juplink_RX4-1500_5G
Juplink_RX4-1500_2.4G
Existing Wi-Fi Receive signal
Step 1 : Setup Your Repeater
Follow the instructions to complete the setup of repeater
Step 2 : Connect Your Device
Connect the LAN port of repeater to the WAN port of wired device
Internet
Modem LAN out
3 AP ( Access Point ) Mode
Step 1: AP Mode Setting
Before Installation Please complete the following settings:
1. D isconnecting the WAN port. Connect a device
to your to the Juplink router and launch a web browser.
2. Visit http://192.168.0.1 you are prompted to enter
a username ( admin ) and password ( admin ) .
3. Select Network and click LAN
Manually set IP address as the following format
192.168.0.XXX ( XXX is any number of 2~254)
Then you need to enter this address to log in to the
web UI instead of the default 192.168.0.1
Note:
If the default login credentials do not work, you might have
changed the admin password. If you cannot remember your
new password, you must perform a factory reset to restore the
router to its factory default settings. For more information, see
Restoring a Juplink home router to the factory default settings.
Ethernet WAN in
PC or other device WAN inRepeater LAN out
Reapeater Your DeviceRouter
Step 2 : AP mode Connection
Ethernet WAN inEthernet LAN out
Modem
Ethernet WAN in
Internet
Modem LAN out
Access Control Router Access Point Router
 Loading...