

Page 1

INSTALLATION INSTRUCTIONS
Surface Mount Power Units
TF6150E 12 volt, 150 watt, single output
TF6300 12 volt, 300 watt, single output
SAVE THESE INSTRUCTIONS
IMPORTANT SAFEGUARDS:
When using electrical equipment, always adhere to basic safety precautions including the following:
IMPORTANT SAFETY/ OPERATING INSTRUCTIONS
1. Read all instructions.
2. Do not conceal or extend bus bar con-
ductors (Flex 12 Trac) through a building
wall.
3. Do not install this system in damp or wet
locations.
4. To reduce the risk of fire and burns, do
not install this lighting system where the
uninsulated open bus bar conductors
can be shorted or contact any conductive materials.
5. Do not install any luminaire closer than
6 inches (15.25 cm) from any curtain, or
similar combustible material.
6. To reduce the risk of fire and overheating, make sure all connections are tight.
7. Turn off electrical power before installing
or modifying the system in any way.
8. Use 10 or 12 gauge wire to connect the
output to the Trac.
9. These transformers are intended for use
with Juno Flex 12 Series or Trac 12/25
Series low voltage lighting systems only.
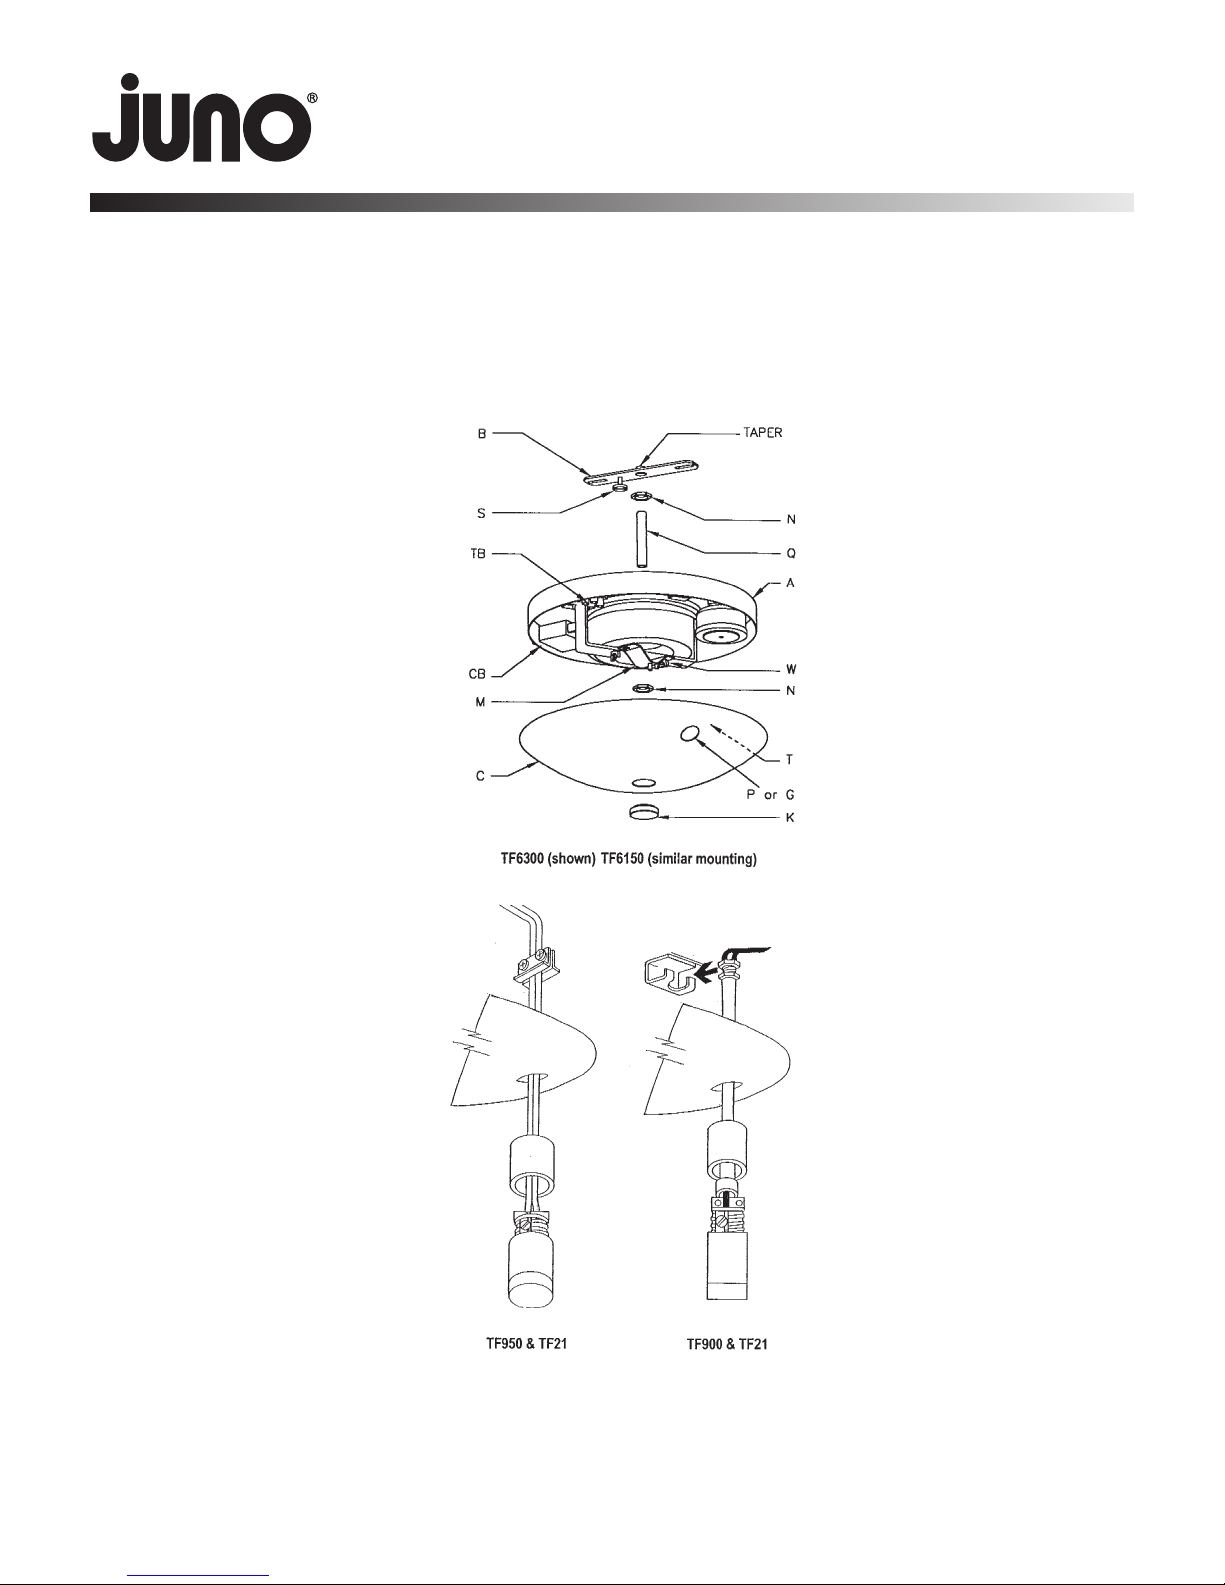
PARTS LIST
Open the carton and identify all of the following parts:
(1) Chassis / transformer assembly (A)
(1) Cover (C)
(1) Knob (K)
(1) Parts bag including:
(1) Mounting strap (B)
(1) Grommet (G)
(2) Nuts, 1/8 inch (N)
(1) Nipple, 1/8 x 2 3/4 inch (Q)
(1) Ground screw (S)
(2) Wire nuts
PRODUCT FEATURES
Juno’s surface mounted power units are
used to convert 120 volts AC to 12 volts
nominal to provide power to the Flex 12
trac. The Trac length should not exceed 24
feet in either direction from the feed. The
power units are designed to be mounted
to a standard ceiling mounted junction box
that is adequately supported. They can
be used with one or two Pendants, or with
the Flexible Feed (Pendants and Flexible
Feed sold separately). The power units are
capable of supporting up to 20 lbs. They
should not be mounted in any location that
may entrap heat.
The TF6150E is capable of operating from
50 to 150 watts of lamp load and is dimmable with most higher quality incandescent
dimmers. In some cases, dimmers designed
for electronic transformers may be necessary for optimal dimming results. The unit
has short circuit and overload protection that
will automatically reset itself when the short
or overload is removed.
The TF6300 is capable of operating from
150 to 300 watts of lamp load and is dimmable only with dimmers specifically
designed for magnetic transformers. To
protect against an overload or short circuit,
the unit contains a circuit breaker that must
be manually reset after the short or overload
has been removed.
INSTALLATION
WARNING: Make sure power is off
before assembly
1. Make sure that the supply wires protrude
from the junction box at least 7 inches.
2. Thread the nipple (Q) through the nut
(N) and strap (B) with the tapered side
away from the nut as shown. Attach the
ground screw (S) to the strap.
3. Pass the supply wires from the junction
box through the nipple as shown. Secure
the strap to the junction box with two
screws. Connect the ground wire from
the junction box to the ground screw on
the strap.
4. Adjust the nipple to protrude 2 inches
from the mounting surface and lock in
place with the nut.
5. (TF6300 only) Loosen the two wing nuts
(W) on the center mounting bracket (M)
of the transformer assembly and rotate
the bracket out of the way.
6. Pass the supply wires and the nipple
through the center of the assembly (A).
Raise the assembly to the mounting
surface. Place the remaining nut over
the supply wires and thread it onto the
nipple to hold the assembly in place.
7. Rotate the assembly if necessary to orient the pendant(s) as desired, and finish
tightening the nut to secure the assembly in place.
8. Connect the white and black supply
wires to the stranded input wires from
the assembly with the wire nuts provided.
9. (TF6300 only) Carefully bend the supply
wires to the side, rotate the top bracket
back in place, and tighten the wing nuts.
10. Install the Pendant Feed or Flexible
Feed per the appropriate instructions on
the following page.
----- See steps 11-15 on back. -----
16. Connect the feed wires to the terminal
block (TB). CAUTION: For all connections, make sure that the stripped wire
is fully inserted into the connector, all
strands of copper are inserted in the terminal and all 4 screws are tight.
17. Connect the green ground wire from the
assembly to the tab (T) on the inside of
the cover (C).
18. (TF6300 only) Make sure that the circuit
breaker switch (CB) located on the side
of the assembly, is on.
19. Put the cover in place and secure it to
the assembly with the knob (K). Install
the Trac and fixtures per the instructions
included with them.
20. Apply AC power. Confirm that all fixtures
function acceptably. Adjust fixtures as
desired.
pg 1 of 3
Page 2
INSTALLATION INSTRUCTIONS
Surface Mount Power Units
TF6150E 12 volt, 150 watt, single output
TF6300 12 volt, 300 watt, single output
SAVE THESE INSTRUCTIONS
Flexible Feed, Using:
TF950 Flexible Feed Kit &
TF21 Electrical Feed Cylinder
Note: The Flexible Feed is not intended to
support the Trac or any weight, only to provide power to the Trac.
11. Insert tinned end of wires through holes
in top of feed cylinder and firmly tighten
terminal screws.
12. Pass wires through top cap and screw
cap onto feed cylinder.
13. Pass wires through grommet (G) in
cover. Determine cord length, leaving
some slack and tighten clamp in place.
14. Hook wire onto bracket.
15. Return to step 16 on the previous page.
Pendant Feed, Using:
TF900 Series Pendant Stem, &
TF21 Electrical Feed Cylinder
11. Thread two nuts on top of stem leaving
space between nuts. Slide top cap onto
stem. Install and tighten bushing onto
stem.
12. Cut two pieces of 10-ga. solid copper
wire to length. Strip one end of each
wire 5/8”. Tightly bind one wire under
each feed cylinder terminal screw.
13. Push wire through stem and screw top
cap onto Feed Cylinder as shown. Pass
assembly through cover.
14. Carefully bend wires at top of stem
90˚ and push assembly onto bracket.
Tighten nuts.
15. Return to step 16 on the previous page.
pg 2 of 3
Page 3

INSTALLATION INSTRUCTIONS
GUIDELINES FOR A TROUBLE-FREE LOW VOLTAGE INSTALLATION
1. IMPROPER WIRE GAUGE OR POOR WIRE CONNECTIONS CAN RESULT IN PRODUCT FAILURE.
These transformers reduce the line voltage by a factor of ten. To achieve the same power levels at the lamp, the output current is increased
by the same factor of ten. To accommodate these high current levels, heavy gauge wire and secure connections are essential, or product
failure can result.
300 WATTS = 120 VOLTS x 2.5 AMPS 300 WATTS = 12 VOLTS x 25 AMPS
2. LAMP VOLTAGE CAN BE AFFECTED BY NUMEROUS FACTORS.
Many factors will affect the voltage delivered to the load. Below is a list of these factors and examples of their affects:
A. Variations in transformer input voltage. 11.8 V @ 120v input 12.4 V @ 126v input (+5%)
B. Use of a dimmer to control the transformer. 11.8 V (no dimmer) 11.2 V (with dimmer set at maximum)
C. The amount of load applied to the transformer. 11.8 V @ 300w 12.0 V @ 150v
D. Length of wire between transformer and trac. 11.5 V @ 5 feet (#10) 10.8 V 20 feet (#10)
E. Transformer operating temperature 11.8 V room temp. 11.5 V max lamp
3. EXCESSIVE LAMP VOLTAGE AND TEMPERATURE CAN DRASTICALLY REDUCE LAMP LIFE.
Lamp life is directly affected by the applied voltage. Excess voltage as little as 1/4 volt over 12 volts can reduce lamp life by as much as 40%.
Some of the factors listed above can be chosen, while others cannot, and therefore must be compensulated for.
TABLE PREDICTING VOLTAGE AT FIRST LAMP FOR VARIOUS WIRE LENGTHS AND LOADS USING TF6300 TRANSFORM
Distance from
Transformer
to 1st Lamp
0’ 12.067 12.000 11.933 11.867 11.800
1’ 12.050 11.975 11.899 11.824 11.749
2’ 12.033 11.949 11.865 11.782 11.698
3’ 12.016 11.924 11.832 11.739 11.647
4’ 11.999 11.898 11.798 11.697 11.596
5’ 11.982 11.873 11.764 11.655 11.546
6’ 11.965 11.847 11.730 11.612 11.495
7’ 11.948 11.822 11.696 11.570 11.444
8’ 11.931 11.796 11.662 11.527 11.393
10’ 11.897 11.746 11.594 11.443 11.291
12’ 11.863 11.695 11.526 11.358 11.189
14’ 11.829 11.644 11.458 11.273 11.087
16’ 11.795 11.593 11.390 11.188 10.986
20’ 11.727 11.491 11.255 11.018 10.782
24’ 11.659 11.389 11.119 10.849 10.578
28’ 11.592 11.287 10.983 10.679 10.375
4. A VOLTMETER SHOULD BE USED TO CONFIRM THAT THE PROPER VOLTAGE IS PRESENT
After the installation is complete, a voltmeter should be used to insure that suggested lamp voltages are not being exceeded. The voltage
should be measured at the first lamp on the trac. Since some of the factors listed above are constantly changing some allowance should be
made for variations in voltage.
12V, 8.33A, 100W 12V, 12.5A, 150W 12V, 16.67A, 200W 12V, 20.83A, 250W 12V, 25A, 300W
The shaded areas represent the suggested operating range of 11.0 to 11.8 volts at the first lamp on the Trac.
120V INPUT
#10 AWGr
ER
WARRANTY
Juno Lighting Group warrants that its products are free from defects in material and workmanship. Juno Lighting Group’s obligation
is expressly limited to repair or replacement, without charge, at Juno Lighting Group’s factory after prior written return authorization has been
granted. This warranty shall not apply to products which have been altered or repaired outside of Juno Lighting Group’s factory. This warranty is
in lieu of all other warranties, expressed or implied, and without limiting the generality of the foregoing phrase, excludes any implied warranty of
merchantability. Also, there are no warranties which extend beyond the description of the product on the company’s literature setting forth terms
of sale.
Product Services Phone (888) 387-2212
1300 South Wolf Road • Des Plaines, IL 60018 • Phone 800-323-5068 • www.junolightinggroup.com
© 2016 Acuity Brands Lighting, Inc. Printed in USA Rev 6/07 P3008 pg 3 of 3
 Loading...