

Page 1

JGIN60318
User Manual
Dishwasher
Käyttöohje
Astianpesu‐
kone
Page 2

CONTENTS
Safety information 2
Safety instructions 3
Product description 5
Control panel 6
Programmes 7
Settings 7
Before first use 9
Daily use 10
Hints and tips 12
Care and cleaning 13
Troubleshooting 15
Technical information 18
Subject to change without notice.
SAFETY INFORMATION
Before the installation and use of the appliance, carefully
read the supplied instructions. The manufacturer is not
responsible for any injuries or damages that are the result of
incorrect installation or usage. Always keep the instructions
in a safe and accessible location for future reference.
Children and vulnerable people safety
• This appliance can be used by children aged from 8 years
and above and persons with reduced physical, sensory or
mental capabilities or lack of experience and knowledge if
they have been given supervision or instruction concerning
the use of the appliance in a safe way and understand the
hazards involved.
• Do not let children play with the appliance.
• Keep detergents away from children.
• Keep children and pets away from the appliance when the
door is open.
• Children shall not carry out cleaning and user maintenance
of the appliance without supervision.
General Safety
• This appliance is intended to be used in household and
similar applications such as:
– farm houses; staff kitchen areas in shops, offices and
other working environments;
– by clients in hotels, motels, bed & breakfast and other
residential type environments.
2
Page 3

• Do not change the specification of this appliance.
• The operating water pressure (minimum and maximum)
must be between 0.5 (0.05) / 8 (0.8) bar (MPa)
• Obey the maximum number of 13 place settings.
• If the supply cord is damaged, it must be replaced by the
manufacturer, its Authorised Service Centre or similarly
qualified persons in order to avoid a hazard.
• Put the cutlery in the cutlery basket with the sharp ends
pointing down or put them in the cutlery drawer in a
horizontal position with the sharp edges down.
• Do not leave the appliance with the open door unattended
to avoid stepping accidentally onto it.
• Before any maintenance operation, deactivate the
appliance and disconnect the mains plug from the socket.
• Do not use high pressure water sprays and/or steam to
clean the appliance.
• If the appliance has ventilation openings in the base, they
must not be covered e.g. by a carpet.
• The appliance is to be connected to the water mains using
the new supplied hose-sets. Old hose sets must not be
reused.
SAFETY INSTRUCTIONS
Installation
WARNING! Only a qualified
person must install this
appliance.
• Remove all the packaging.
• Do not install or use a damaged
appliance.
• Do not install or use the appliance
where the temperature is less than 0
°C.
• Follow the installation instruction
supplied with the appliance.
• Always take care when moving the
appliance as it is heavy. Always use
safety gloves and enclosed footwear.
• Make sure that the appliance is
installed below and adjacent to safe
structures.
Electrical connection
WARNING! Risk of fire and
electrical shock.
• The appliance must be earthed.
• Make sure that the parameters on the
rating plate are compatible with the
electrical ratings of the mains power
supply.
• Always use a correctly installed
shockproof socket.
• Do not use multi-plug adapters and
extension cables.
• Make sure not to cause damage to the
mains plug and to the mains cable.
Should the mains cable need to be
replaced, this must be carried out by
our Authorised Service Centre.
3
Page 4
• Connect the mains plug to the mains
socket only at the end of the
installation. Make sure that there is
access to the mains plug after the
installation.
• Do not pull the mains cable to
disconnect the appliance. Always pull
the mains plug.
• This appliance complies with the E.E.C.
Directives.
• UK and Ireland only. This appliance is
fitted with a 13 A mains plug. If it is
necessary to change the mains plug
fuse, use only a 13 A ASTA (BS 1362)
fuse.
Water connection
• Do not cause damage to the water
hoses.
• Before connection to new pipes, pipes
not used for a long time, where repair
work has been carried out or new
devices fitted (water meters, etc.), let
the water flow until it is clean and clear.
• Ensure that there are no visible water
leaks during and after the first use of
the appliance.
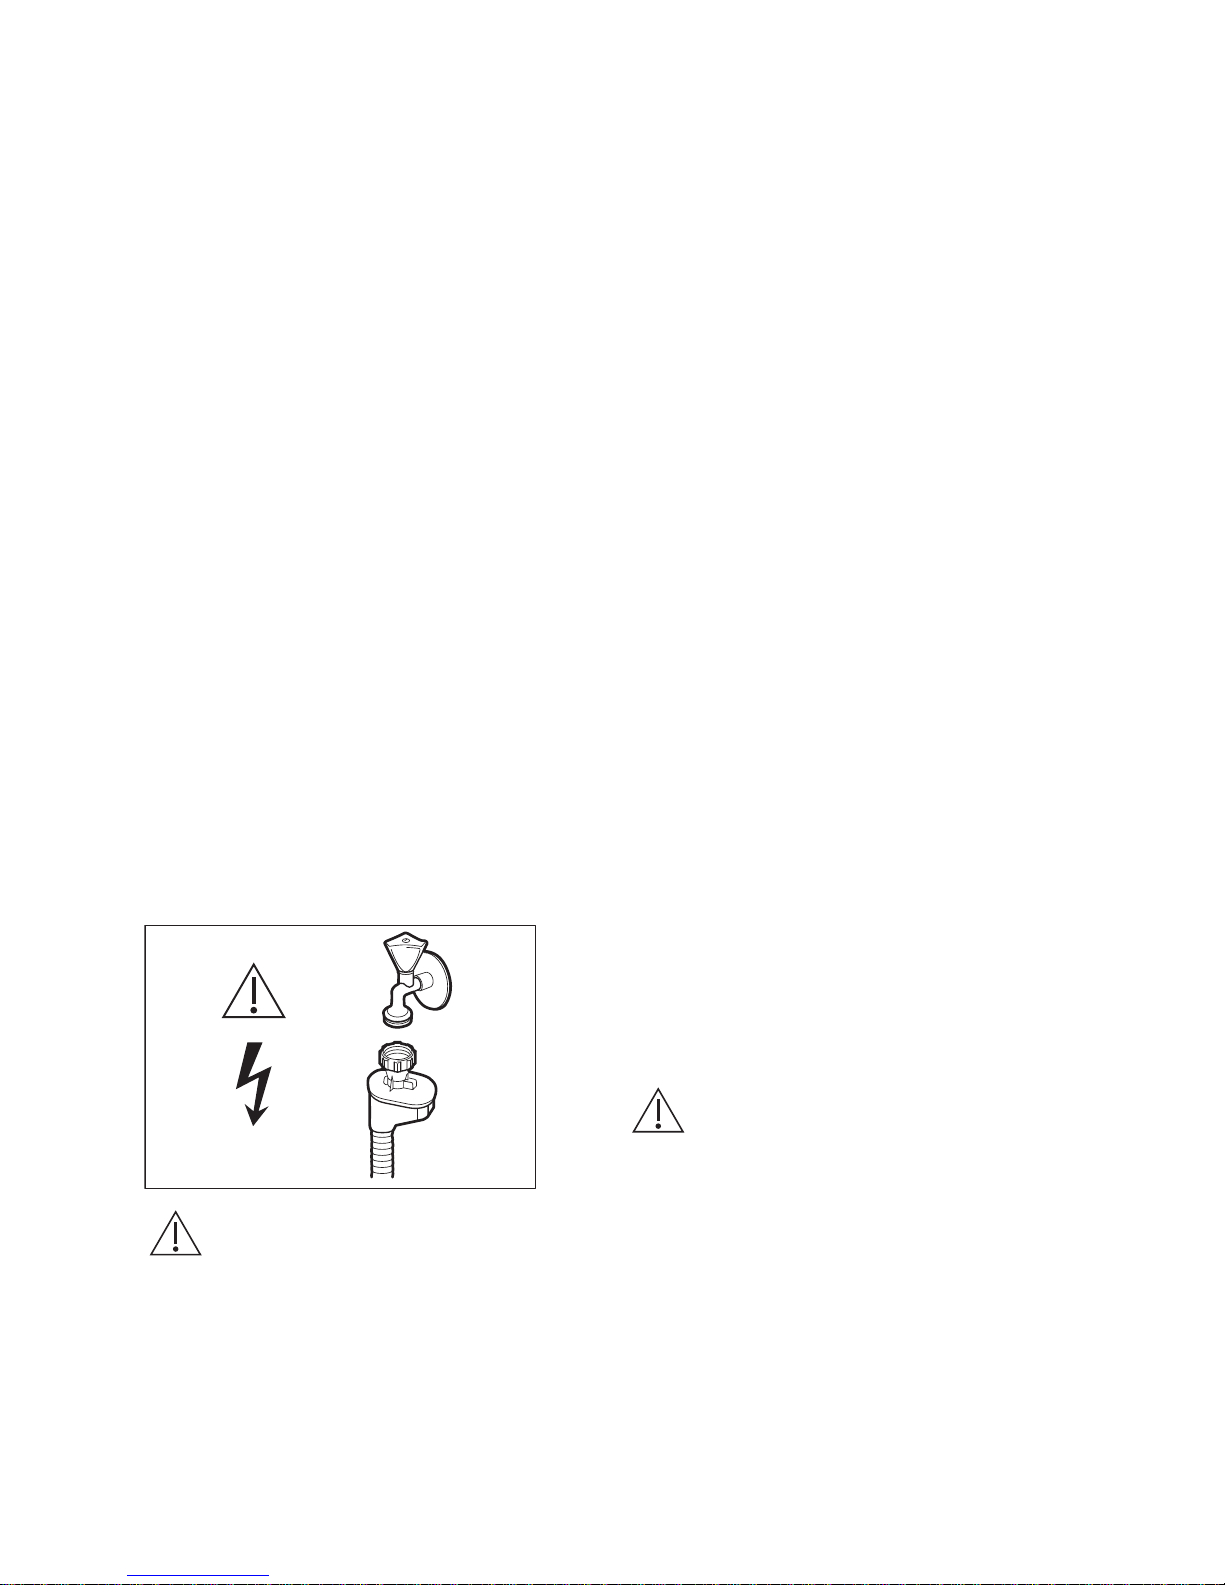
• The water inlet hose has a safety valve
and a sheath with an inner mains
cable.
WARNING! Dangerous
voltage.
• If the water inlet hose is damaged,
immediately close the water tap and
disconnect the mains plug from the
mains socket. Contact the Authorised
Service Centre to replace the water
inlet hose.
Use
• Do not sit or stand on the open door.
• Dishwasher detergents are dangerous.
Obey the safety instructions on the
detergent packaging.
• Do not drink and play with the water in
the appliance.
• Do not remove the dishes from the
appliance until the programme is
complete. Some detergent may remain
on the dishes.
• The appliance can release hot steam if
you open the door while a programme
operates.
• Do not put flammable products or items
that are wet with flammable products
in, near or on the appliance.
Service
• Contact the Authorised Service Centre
to repair the appliance. We recommend
only the use of original spare parts.
• When you contact the Authorised
Service Centre, ensure that you have
the following information that is
available on the rating plate.
Model :
PNC :
Serial Number :
Disposal
WARNING! Risk of injury or
suffocation.
• Disconnect the appliance from the
mains supply.
• Cut off the mains cable and discard it.
• Remove the door catch to prevent
children and pets to get closed in the
appliance.
4
Page 5
PRODUCT DESCRIPTION
4
3
7
9
8
10
56
11
1
2
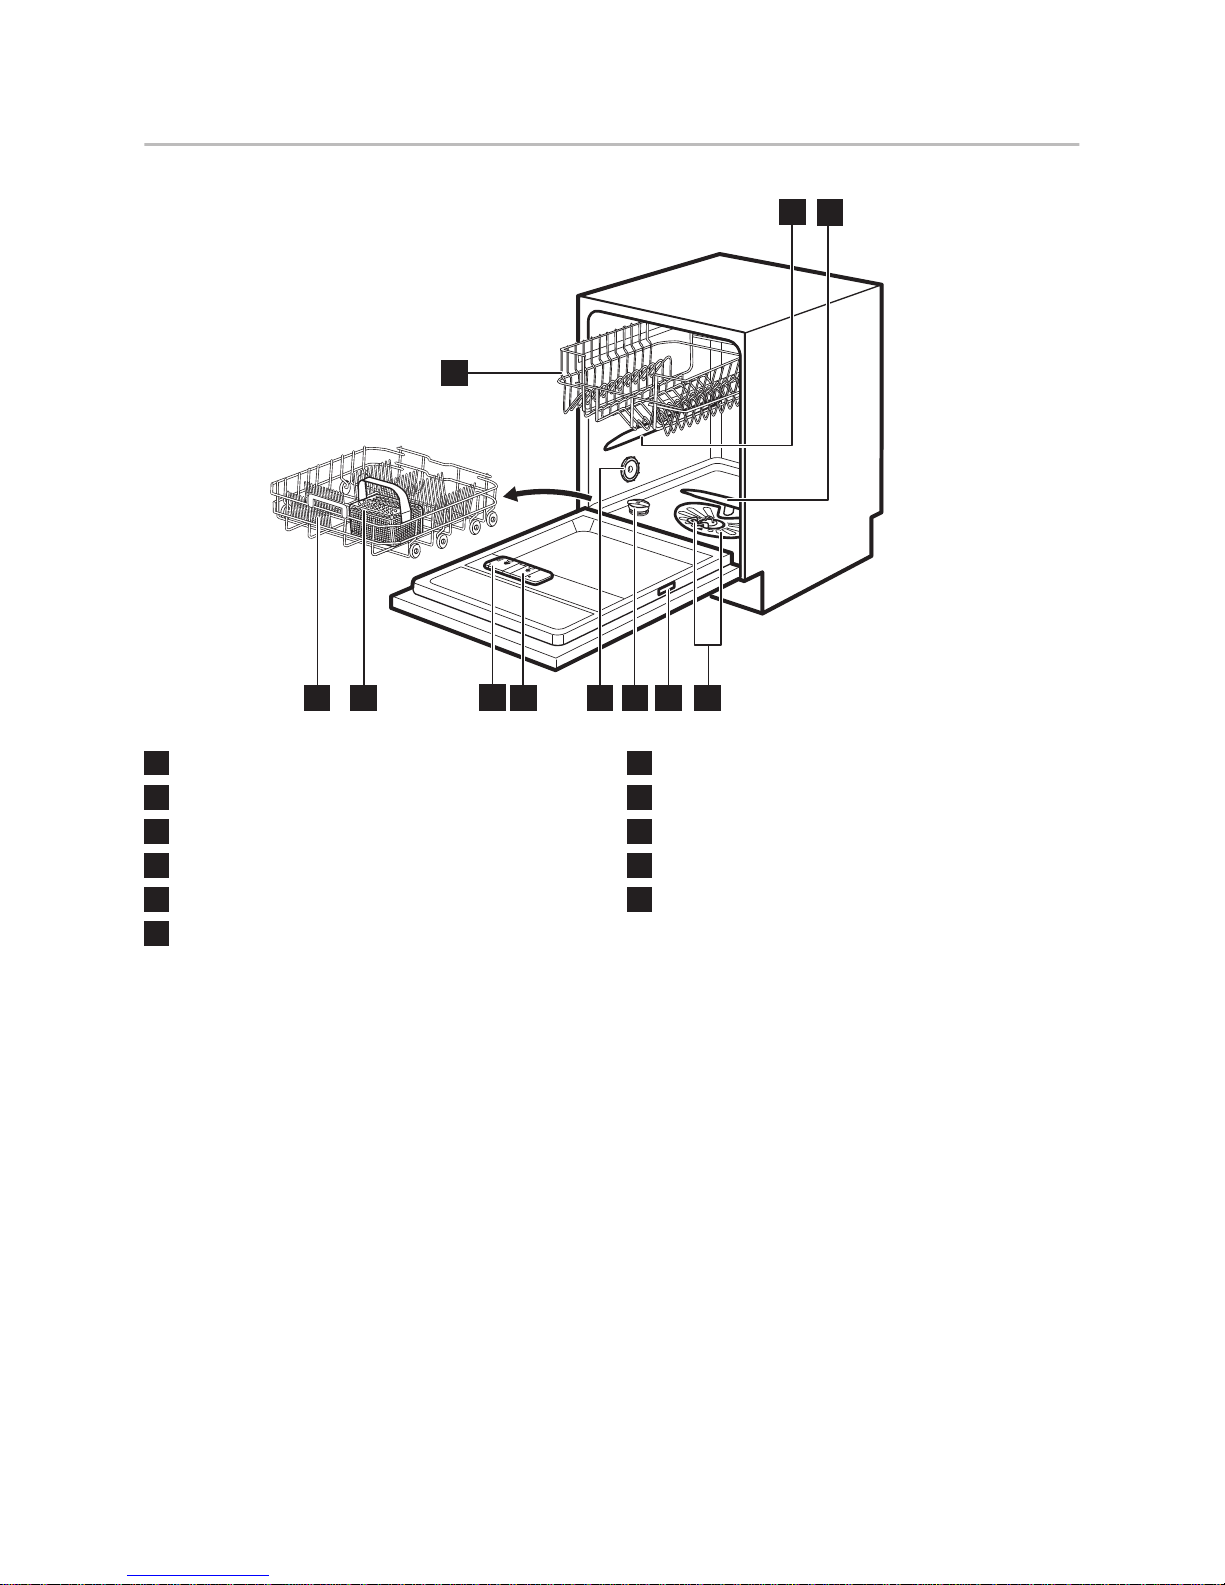
1
Upper spray arm
2
Lower spray arm
3
Filters
4
Rating plate
5
Salt container
6
Air vent
7
Rinse aid dispenser
8
Detergent dispenser
9
Cutlery basket
10
Lower basket
11
Upper basket
5
Page 6
CONTROL PANEL
1 2
4
56
3
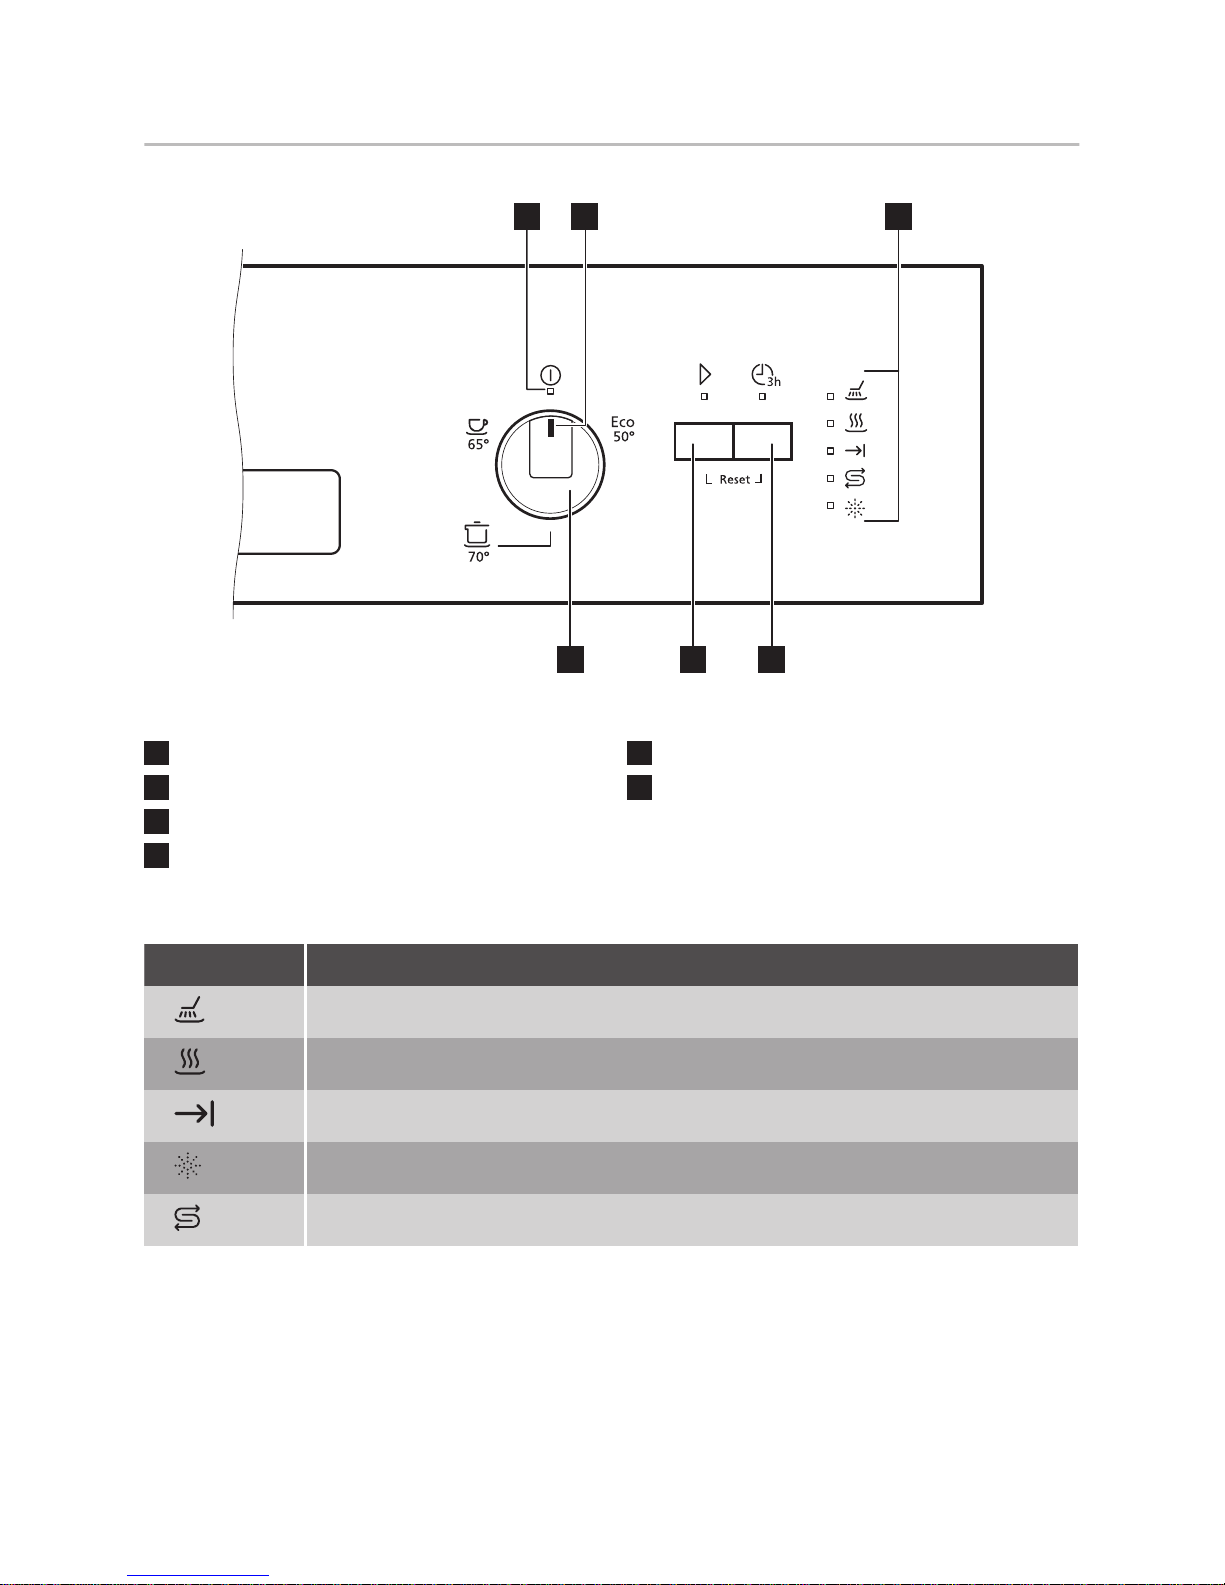
1
On/off indicator
2
Programme marker
3
Indicators
4
Delay button
5
Start button
6
Programme knob
Indicators
Indicator Description
Washing phase. It comes on when the washing phase operates.
Drying phase. It comes on when the drying phase operates.
End indicator.
Rinse aid indicator. It is always off while the programme operates.
Salt indicator. It is always off while the programme operates.
6
Page 7
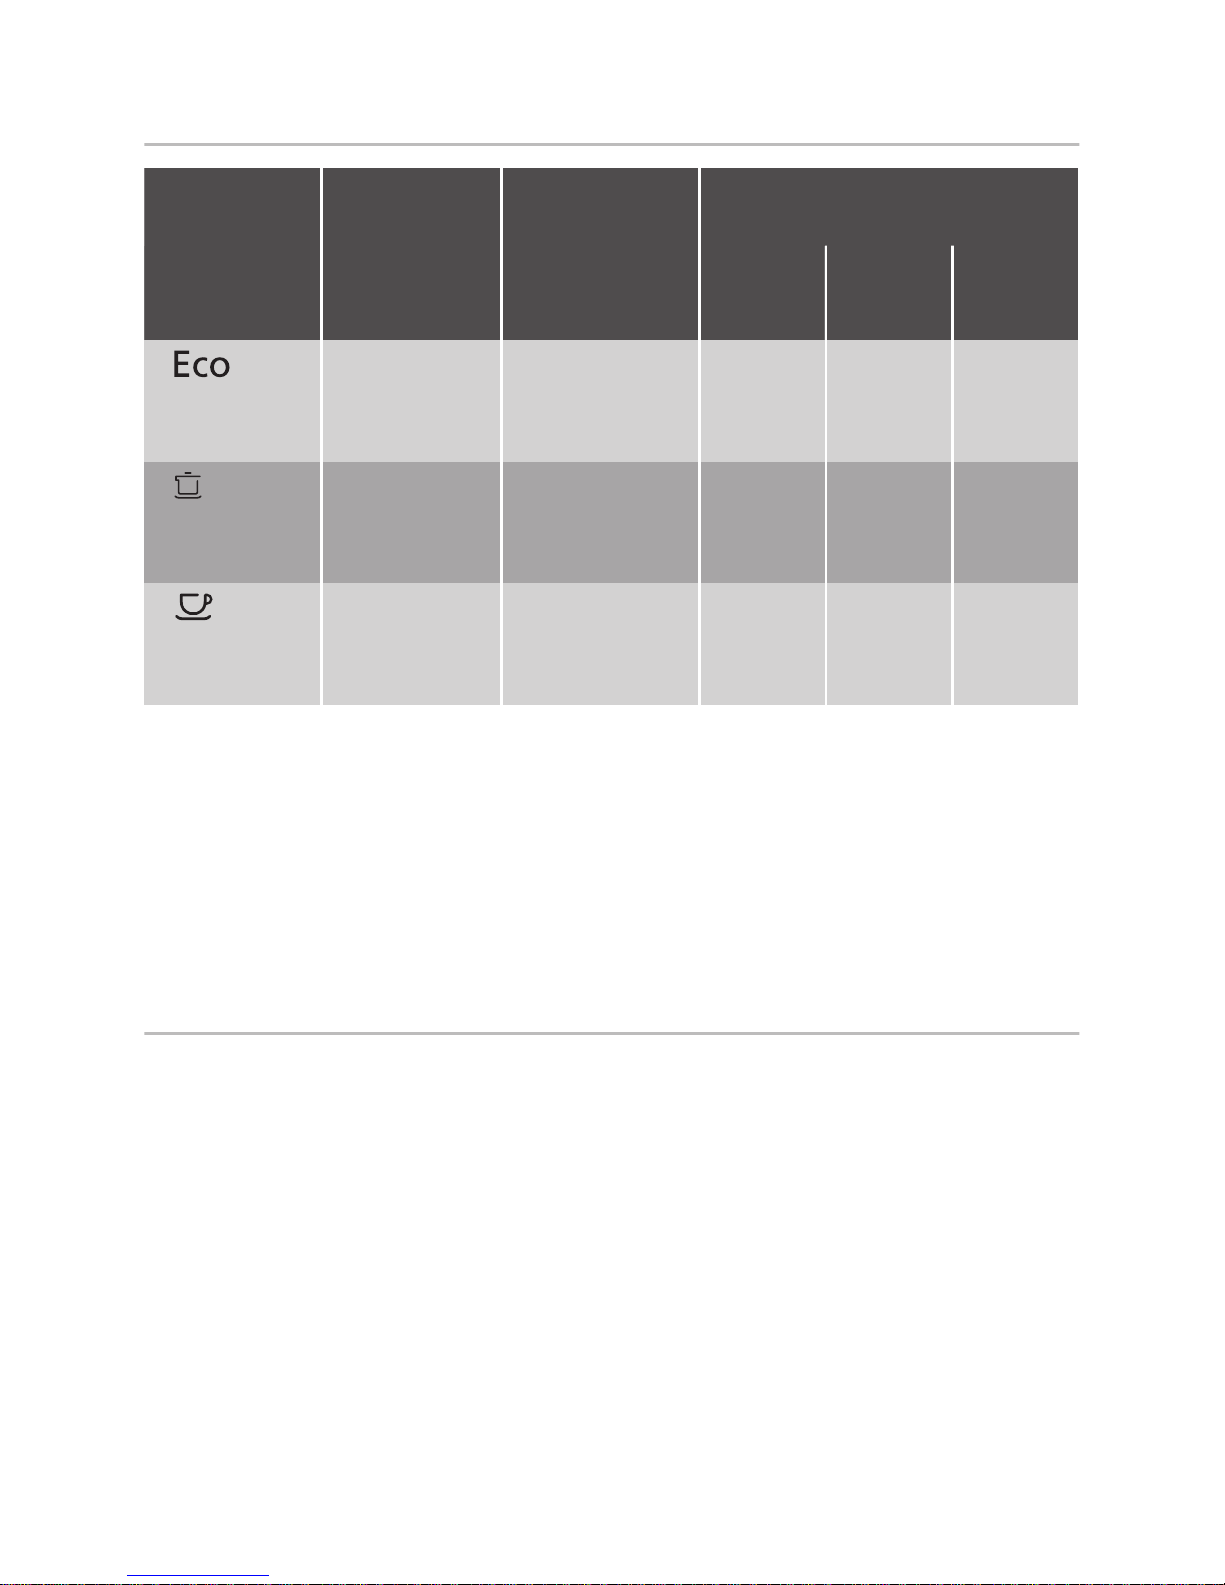
PROGRAMMES
Programme Degree of
soil
Type of load
Programme
phases
Consumption values
1)
Dura‐
tion
(min)
Energy
(kWh)
Water
(l)
2)
Normal soil
Crockery and
cutlery
• Pre-wash
• Wash 50 °C
• Rinses
• Dry
227 1.039 11
Heavy soil
Crockery, cut‐
lery, pots and
pans
• Pre-wash
• Wash 70 °C
• Rinses
• Dry
155 170
1.5 - 1.7 14-15
Normal soil
Crockery and
cutlery
• Pre-wash
• Wash 65 °C
• Rinses
• Dry
130 140
1.4 - 1.6 15-17
1)
The pressure and the temperature of the water, the variations of the mains supply, the options and the quantity
of dishes can change the values.
2)
With this programme you have the most efficient use of water and energy consumption for crockery and cutlery
with normal soil. (Also, it is a standard programme for test institutes).
Information for test institutes
For all the necessary information for test
performance, send an email to:
info.test@dishwasher-production.com
Write down the product number (PNC)
that is on the rating plate.
SETTINGS
Programme selection mode and
user mode
When the appliance is in programme
selection mode it is possible to set a
programme and to enter the user mode.
Settings available in the user mode:
• The level of water softener according to
the water hardness.
• Activation or deactivation of AirDry.
As the appliance stores the saved
settings, there is no need to configure
it before every cycle.
How to set the programme
selection mode
The appliance is in programme selection
mode when the on/off indicator is on and
Start indicator flashes.
After activation, the appliance is in
programme selection mode by default. If
not, set the programme selection mode
the following way:
Press and hold simultaneously Start and
Delay until the appliance is in programme
selection mode.
7
Page 8

The water softener
The water softener removes minerals from
the water supply, which would have a
detrimental effect on the washing results
and on the appliance.
The higher the content of these minerals,
the harder your water is. Water hardness
is measured in equivalent scales.
The water softener should be adjusted
according to the hardness of the water in
your area. Your local water authority can
advise you on the hardness of the water in
your area. It is important to set the right
level of the water softener to assure good
washing results.
Water hardness
German de‐
grees (°dH)
French de‐
grees (°fH)
mmol/l Clarke de‐
grees
Water softener
level
47 - 50 84 - 90 8.4 - 9.0 58 - 63 10
43 - 46 76 - 83 7.6 - 8.3 53 - 57 9
37 - 42 65 - 75 6.5 - 7.5 46 - 52 8
29 - 36 51 - 64 5.1 - 6.4 36 - 45 7
23 - 28 40 - 50 4.0 - 5.0 28 - 35 6
19 - 22 33 - 39 3.3 - 3.9 23 - 27
5
1)
15 - 18 26 - 32 2.6 - 3.2 18 - 22 4
11 - 14 19 - 25 1.9 - 2.5 13 - 17 3
4 - 10 7 - 18 0.7 - 1.8 5 - 12 2
<4 <7 <0.7 < 5
1
2)
1)
Factory setting.
2)
Do not use salt at this level.
Whether you use a standard detergent
or multi-tabs (with or without salt), set
the proper water hardness level to keep
the salt refill indicator active.
Multi-tabs containing salt are
not effective enough to soften
hard water.
How to set the water softener
level
The appliance must be in programme
selection mode.
1. Make sure that the programme marker
on the knob is in on/off position.
2. To enter the user mode, press and
hold Delay. At the same time turn the
knob counterclockwise until the
programme marker indicates the first
programme. Release the Delay when
the indicators Start and on/off start
flashing.
• The intermittent flashing of
shows the current setting, e.g. 5
flashes + pause + 5 flashes = level
5.
3. Press Delay repeatedly to change the
setting. Each pressing of Delay
increases the level number. After
reaching level 10, the count starts
again from level 1.
8
Page 9
4. To confirm the setting, turn the
programme knob until the programme
marker is again in on/off position
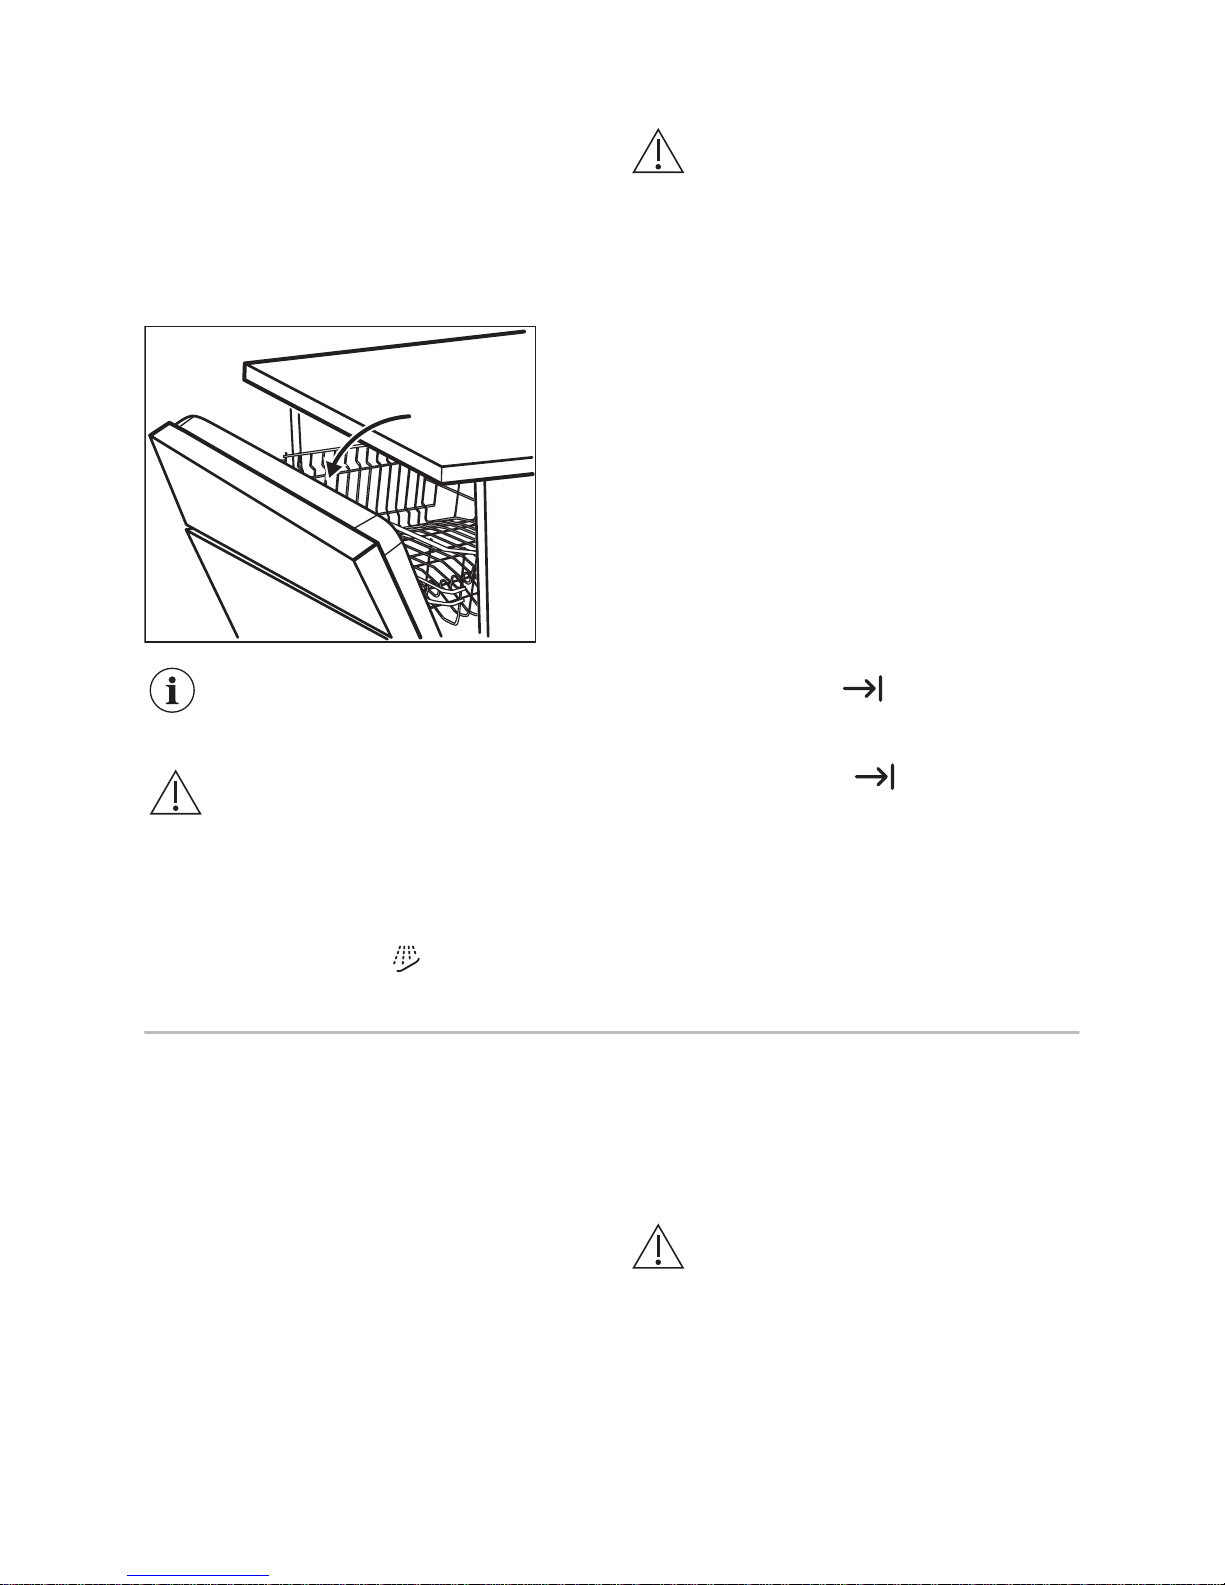
AirDry
AirDry improves the drying results with
less energy consumption.
During the drying phase, the
door opens automatically and
remains ajar.
CAUTION! Do not try to close
the appliance door within 2
minutes after automatic
opening. This can cause
damage to the appliance.
AirDry is automatically activated with all
programmes excluding .
CAUTION! If children have
access to the appliance, it is
advised to deactivate AirDry as
opening the door may pose a
danger.
How to deactivate AirDry
The appliance must be in programme
selection mode.
1. To enter the user mode, press and
hold Delay. At the same time turn the
knob counterclockwise until the
programme marker indicates the first
programme. Release Delay when the
indicators Start and on/off start
flashing.
2. Turn the knob counterclockwise until
the programme marker indicates the
second programme.
• The indicator shows the current
setting: on = AirDry is activated.
3. Press Delay to change the setting.
• If the indicator is off = AirDry is
deactivated.
4. To confirm the setting, keep turning
the programme knob until the
programme marker is back in the
on/off position.
BEFORE FIRST USE
1. Make sure that the current level of
the water softener agrees with the
hardness of the water supply. If not,
adjust the level of the water
softener.
2. Fill the salt container.
3. Fill the rinse aid dispenser.
4. Open the water tap.
5. Start a programme to remove any
processing residuals that can still be
inside the appliance. Do not use
detergent and do not load the baskets.
After starting a programme, it may take up
to 5 minutes for the appliance to recharge
the resin in the water softener. It seems
that the appliance is not working. The
washing phase starts only after this
procedure is completed. The procedure is
repeated periodically.
The salt container
CAUTION! Use rough salt
designed for dishwashers only.
Fine salt increases the risk of
corrosion.
The salt is used to recharge the resin in
the water softener and to assure good
washing results in daily use.
9
Page 10
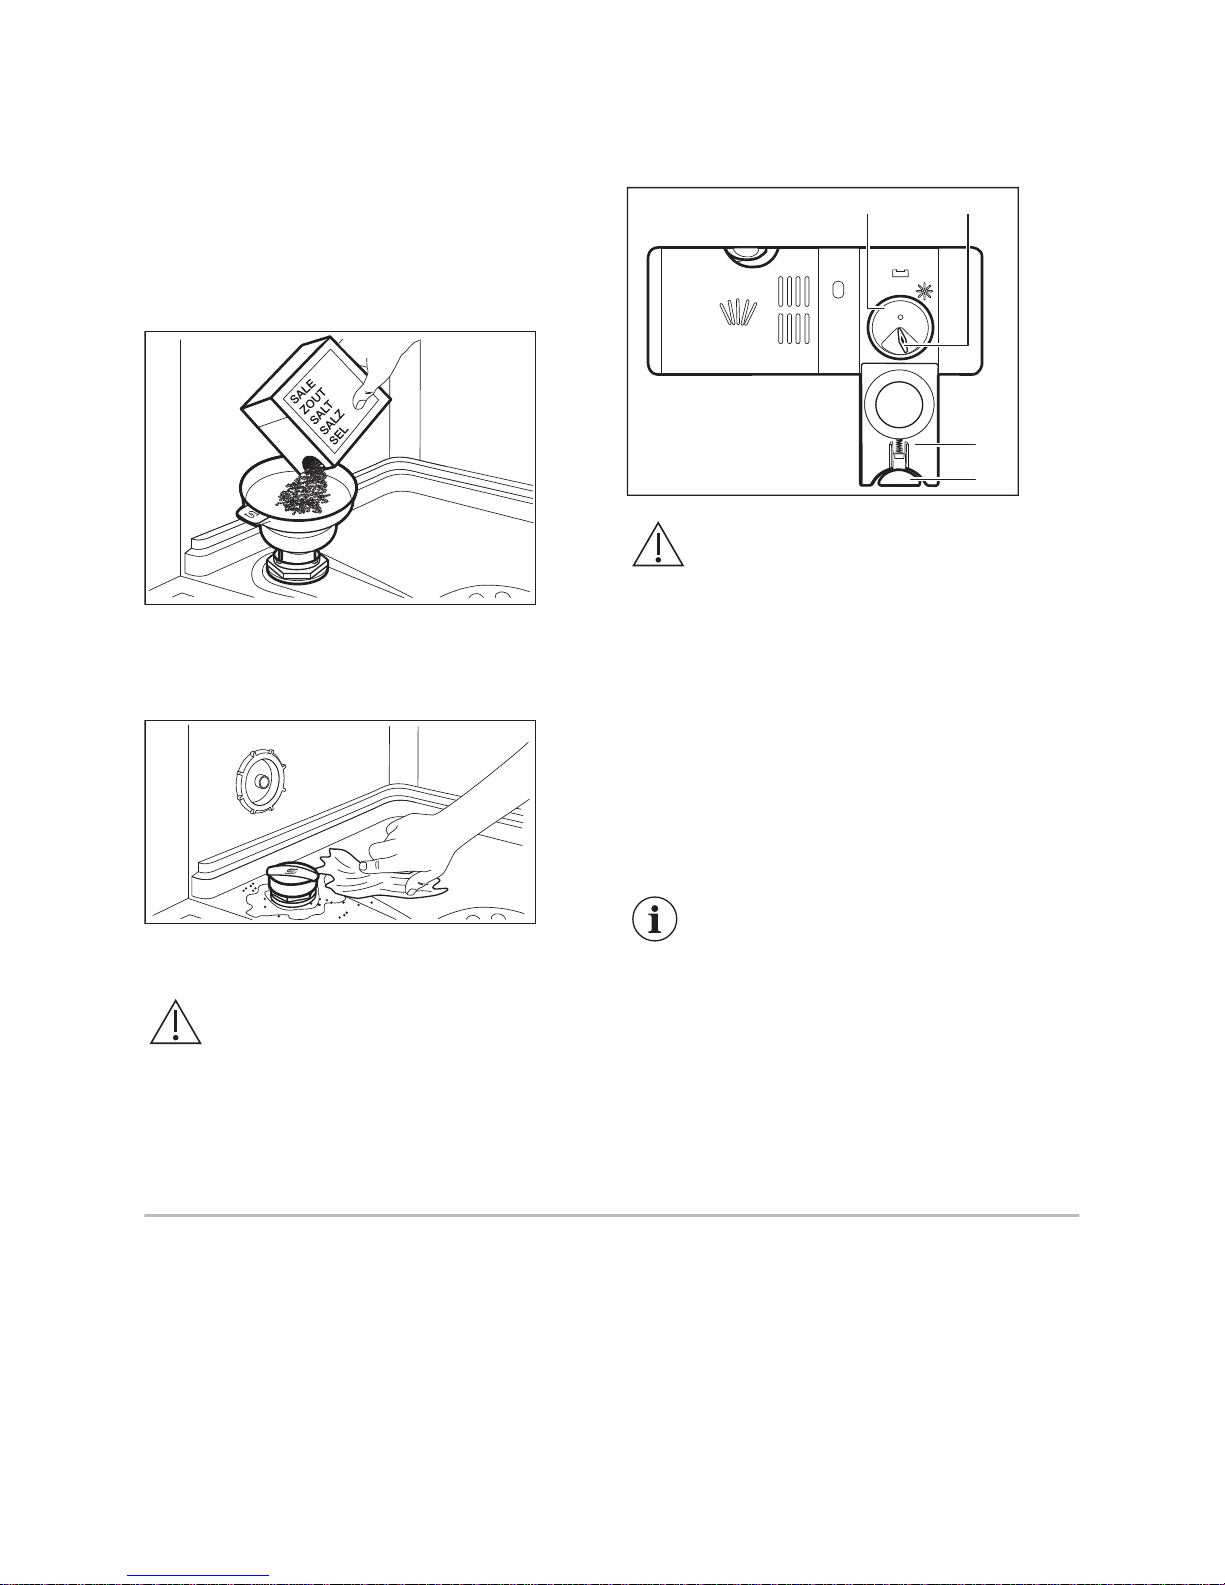
How to fill the salt container
1. Turn the cap of the salt container
counterclockwise and remove it.
2. Put 1 litre of water in the salt container
(only for the first time).
3. Fill the salt container with 1 kg of salt
(until it is full).
4. Carefully shake the funnel by its
handle to get the last granules inside.
5. Remove the salt around the opening of
the salt container.
6. Turn the cap of the salt container
clockwise to close the salt container.
CAUTION! Water and salt can
come out of the salt container
when you fill it. After you fill the
salt container, immediately
start a programme to prevent
corrosion.
How to fill the rinse aid
dispenser
M
A
X
1
2
3
4
+
-
A
B
D
C
CAUTION! Only use rinse aid
specifically designed for
dishwashers.
1. Press the release button (D) to open
the lid (C).
2. Pour the rinse aid in the dispenser (A)
until the liquid reaches the fill level
'max'.
3. Remove the spilled rinse aid with an
absorbent cloth to prevent too much
foam.
4. Close the lid. Make sure that the
release button locks into position.
You can turn the selector of the
released quantity (B) between
position 1 (lowest quantity) and
position 4 or 6 (highest
quantity).
DAILY USE
1. Open the water tap.
2. Turn the knob until the symbol of the
programme you want to set is aligned
with the on/off indicator. Set the
correct programme for the type of load
and the degree of soil.
• If the salt indicators is on, fill the
salt container.
• If the rinse aid indicator is on, fill the
rinse aid dispenser.
3. Load the baskets.
4. Add the detergent.
5. Start the programme.
10
Page 11
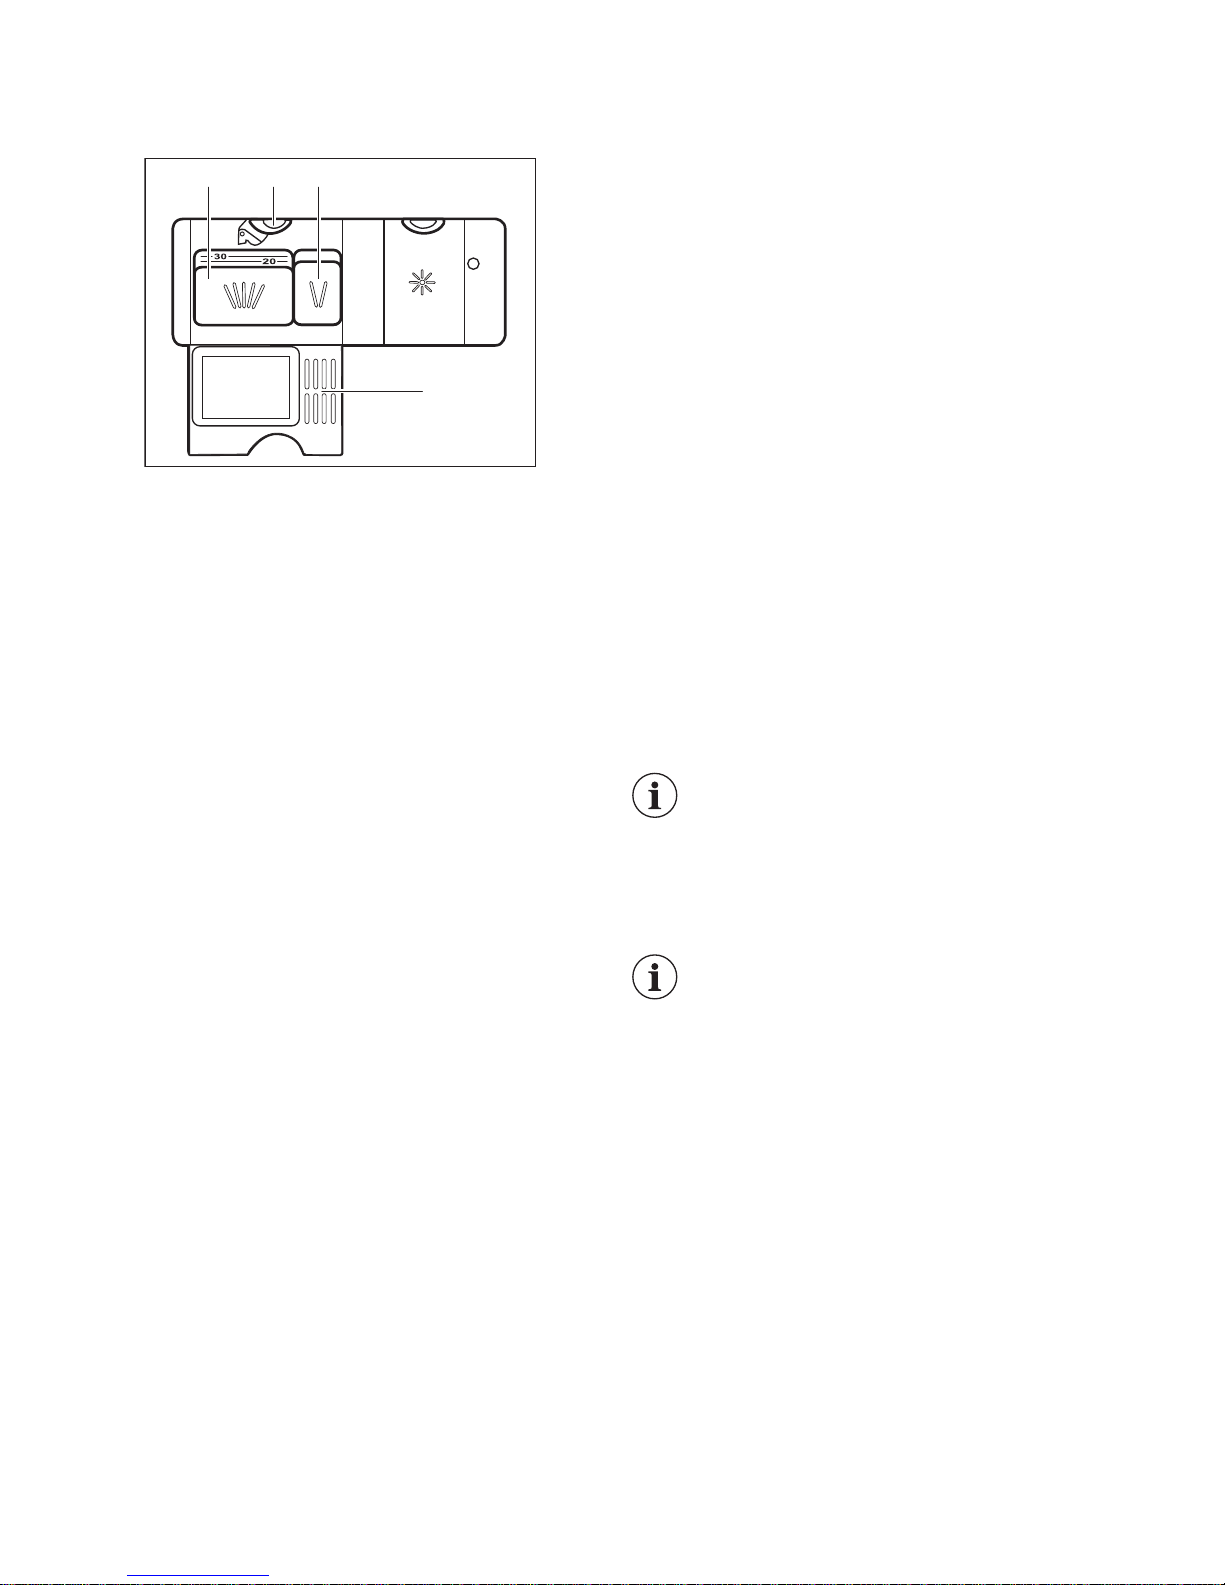
Using the detergent
20
30
BA D
C
1. Press the release button (B) to open
the lid (C).
2. Put the detergent, in powder or tablets,
in the compartment (A).
3. If the programme has a prewash
phase, put a small quantity of
detergent in the compartment (D).
4. Close the lid. Make sure that the
release button locks into position.
Using the multi-tablets
When you use tablets, that contain salt
and rinse aid, do not fill the salt container
and the rinse aid dispenser.
1. Adjust the water softener to the lowest
level.
2. Set the rinse aid dispenser to the
lowest position.
Setting and starting a
programme
Starting a programme
1. Open the water tap.
2. Close the appliance door.
3. Turn the knob until the symbol of a
programme you want to set is aligned
with the on/off indicator.
• On/off indicator comes on.
• Start indicator starts to flash.
4. Press Start.
• The programme starts and the
indicator of the washing phase is
on.
• On/off indicator and start indicator
are on.
Starting a programme with
delay start
1. Set the programme.
2. Press Delay to delay the start of the
programme of 3 hours.
The delay indicator comes on.
3. Press Start.
Start indicator comes on.
When the countdown is completed, the
programme starts.
Opening the door while the
appliance operates
Opening the door while a programme is
running stops the appliance. It may affect
the energy consumption and the
programme duration. After closing the
door, the appliance continues from the
point of interruption.
If the door is opened for more
than 30 seconds during the
drying phase, the running
programme ends. It does not
happen if the door is opened by
AirDry function.
Do not try to close the
appliance door within 2 minutes
after AirDry automatically
opens it, as this may cause
damage to the appliance.
If, afterwards, the door is
closed for another 3 minutes,
the running programme ends.
Cancelling the delay start while
the countdown operates
1. Press and hold Start and Delay until
the start indicator starts to flash.
2. Press Start to start the programme.
11
Page 12

Cancelling the programme
Press and hold Start and Delay until the
start indicator starts to flash.
Make sure that there is detergent in the
detergent dispenser before you start a
new programme.
End of the programme
When the programme is completed the
indicator is on. After 5 minutes of non-
use, the appliance enters standby mode
and all the indicators are off. It decreases
energy consumption.
1. To deactivate the appliance, turn the
programme knob until the programme
marker is in on/off position.
2. Close the water tap.
HINTS AND TIPS
General
The following hints will ensure optimal
cleaning and drying results in daily use
and also help to protect the environment.
• Remove larger residues of food from
the dishes into the waste bin.
• Do not pre-rinse dishes by hand. When
needed, use the prewash programme
(if available) or select a programme
with a prewash phase.
• Always use the whole space of the
baskets.
• When loading the appliance, make sure
that the dishes can be completely
reached and washed by the water
released from the spray arm nozzles.
Make sure that items do not touch or
cover each other.
• You can use dishwasher detergent,
rinse aid and salt separately or you can
use the multi-tablets (e.g. ''3in1'',
''4in1'', ''All in 1''). Follow the
instructions written on the packaging.
• Select the programme according to the
type of load and degree of soil. With
the ECO programme you have the
most efficient use of water and energy
consumption for crockery and cutlery
with normal soil.
Using salt, rinse aid and
detergent
• Only use salt, rinse aid and detergent
for dishwasher. Other products can
cause damage to the appliance.
• In areas with hard and very hard water
we recommend to use plain dishwasher
detergent (powder, gel, tablets
containing no additional agents), rinse
aid and salt separately for optimal
cleaning and drying results.
• At least once a month run the
appliance with the use of appliance
cleaner which is particularly suitable for
this purpose.
• Detergent tablets do not fully dissolve
with short programmes. To prevent
detergent residues on the tableware,
we recommend that you use the tablets
with long programmes.
• Do not use more than the correct
quantity of detergent. Refer to the
instructions on the detergent
packaging.
What to do if you want to stop
using multi-tablets
Before you start to use separately
detergent, salt and rinse aid do the
following procedure.
1. Set the highest level of the water
softener.
2. Make sure that the salt and rinse aid
containers are full.
3. Start the shortest programme with a
rinsing phase. Do not add detergent
and do not load the baskets.
4. When the programme is completed,
adjust the water softener according to
the water hardness in your area.
12
Page 13

5. Adjust the released quantity of rinse
aid.
Loading the baskets
• Only use the appliance to wash items
that are dishwasher-safe.
• Do not put in the appliance items made
of wood, horn, aluminium, pewter and
copper.
• Do not put in the appliance items that
can absorb water (sponges, household
cloths).
• Remove larger residues of food from
the dishes into the waste bin.
• Make soft the remaining burned food
on the items.
• Put hollow items (cups, glasses and
pans) with the opening down.
• Make sure that glasses do not touch
other glasses.
• Put cutlery and small items in the
cutlery basket.
• Put light items in the upper basket.
Make sure that the items do not move.
• Make sure that the spray arms can
move freely before you start a
programme.
Before starting a programme
Make sure that:
• The filters are clean and correctly
installed.
• The cap of the salt container is tight.
• The spray arms are not clogged.
• There is dishwasher salt and rinse aid
(unless you use multi- tablets).
• The position of the items in the baskets
is correct.
• The programme is applicable for the
type of load and for the degree of soil.
• The correct quantity of detergent is
used.
Unloading the baskets
1. Let the tableware cool down before
you remove it from the appliance. Hot
items can be easily damaged.
2. First remove items from the lower
basket, then from the upper basket.
At the end of the program
water can still remain on the
sides and on the door of the
appliance.
CARE AND CLEANING
WARNING! Before
maintenance, deactivate the
appliance and disconnect the
mains plug from the main
socket.
Dirty filters and clogged spray
arms decrease the washing
results. Make a check regularly
and, if necessary, clean them.
Cleaning the filters
The filter system is made of 3 parts.
C
B
A
1. Turn the filter (B) counterclockwise
and remove it.
13
Page 14

2. Remove the filter (C) out of filter (B).
3. Remove the flat filter (A).
4. Wash the filters.
5. Make sure that there are no residues
of food or soil in or around the edge of
the sump.
6. Put back in place the flat filter (A).
Make sure that it is correctly positioned
under the 2 guides.
7. Reassemble the filters (B) and (C).
8. Put back the filter (B) in the flat filter
(A). Turn it clockwise until it locks.
CAUTION! An incorrect
position of the filters can cause
bad washing results and
damage to the appliance.
Cleaning the spray arms
Do not remove the spray arms. If the holes
in the spray arms are clogged, remove
remaining parts of soil with a thin pointed
object.
External cleaning
• Clean the appliance with a moist soft
cloth.
• Only use neutral detergents.
• Do not use abrasive products, abrasive
cleaning pads or solvents.
Internal cleaning
• Carefully clean the appliance, including
the rubber gasket of the door, with a
soft damp cloth.
14
Page 15

• If you regularly use short duration
programmes, these can leave deposits
of grease and limescale inside the
appliance. To prevent this, we
recommend to run long duration
programmes at least 2 times per
month.
• To maintain the performance of your
appliance at its best, we recommend to
use monthly a specific cleaning product
for dishwashers. Follow carefully the
instructions on the packaging of the
product.
TROUBLESHOOTING
If the appliance does not start or it stops
during operation, before you contact an
Authorised Service Centre, check if you
can solve the problem by yourself with the
help of the information in the table.
WARNING! Repairs not
properly done may result in
serious risk to the safety of the
user. Any repairs must be
performed by qualified
personnel.
With some problems the end indicator
flashes intermittently indicating a
malfunction.
The majority of problems that can
occur can be solved without the need
to contact an Authorised Service
Centre.
Problem and alarm code Possible cause and solution
You cannot activate the appliance. • Make sure that the mains plug is connected to
the mains socket.
• Make sure that there is no damaged fuse in the
fuse box.
The programme does not start. • Make sure that the appliance door is closed.
• Press Start.
• If the delay start is set, cancel the setting or wait
for the end of the countdown.
• The appliance has started the procedure to re‐
charge the resin inside the water softener. The
duration of the procedure is approximately 5 mi‐
nutes.
The appliance does not fill with water.
• The end indicator flashes 1 time in‐
termittently.
• The Start indicator flashes continu‐
ously.
• Make sure that the water tap is open.
• Make sure that the pressure of the water supply
is not too low. For this information, contact your
local water authority.
• Make sure that the water tap is not clogged.
• Make sure that the filter in the inlet hose is not
clogged.
• Make sure that the inlet hose has no kinks or
bends.
15
Page 16

Problem and alarm code Possible cause and solution
The appliance does not drain the wa‐
ter.
• The end indicator flashes 2 times
intermittently.
• The Start indicator flashes continu‐
ously.
• Make sure that the sink spigot is not clogged.
• Make sure that the drain hose has no kinks or
bends.
The anti-flood device is on.
• The end indicator flashes 3 times
intermittently.
• The Start indicator flashes continu‐
ously.
• Close the water tap and contact an Authorised
Service Centre.
The appliance stops and starts more
times during operation.
• It is normal. It provides optimal cleaning results
and energy savings.
The program lasts too long. • If the delayed start option is set, cancel the de‐
lay setting or wait for the end of the countdown.
Small leak from the appliance door. • The appliance is not levelled. Loosen or tighten
the adjustable feet (if applicable).
• The appliance door is not centred on the tub.
Adjust the rear foot (if applicable).
The appliance door is difficult to close. • The appliance is not levelled. Loosen or tighten
the adjustable feet (if applicable).
• Parts of the tableware are protruding from the
baskets.
Rattling/knocking sounds from inside
the appliance.
• The tableware is not properly arranged in the
baskets. Refer to basket loading leaflet.
• Make sure that the spray arms can rotate freely.
The appliance trips the circuit-beaker. • The amperage is insufficient to supply simulta‐
neously all the appliances in use. Check the
socket amperage and the capacity of the meter
or turn off one of the appliances in use.
• Internal electrical fault of the appliance. Contact
an Authorised Service Centre.
Refer to "Before first use",
"Daily use", or "Hints and
tips" for other possible causes.
Once you have checked the appliance,
press Start. If the problem occurs again,
contact an Authorised Service Centre.
For alarm codes not described in the
table, contact an Authorised Service
Centre.
16
Page 17

The washing and drying results are not satisfactory
Problem Possible cause and solution
Poor washing results. • Refer to "Daily use", "Hints and tips" and basket load‐
ing leaflet.
• Use more intensive washing programmes.
• Clean spray arm jets and filter. Refer to "Care and
Cleaning".
Poor drying results. • Tableware has been left for too long inside a closed ap‐
pliance.
• There is no rinse aid or the dosage of rinse aid is not
enough. Set the rinse aid dispenser to a higher level.
• Plastic items may need to be towel dried.
• For the best drying performance activate AirDry.
• We recommend to always use rinse aid, even in combi‐
nation with multi-tablets.
There are whitish streaks or
bluish layers on glasses and
dishes.
• The release quantity of rinse aid is too much. Adjust the
rinse aid level to a lower level.
• The quantity of detergent is too much.
There are stains and dry water
drops on glasses and dishes.
• The released quantity of rinse aid is not sufficient. Adjust
the rinse aid level to a higher level.
• The quality of the rinse aid can be the cause.
The dishes are wet. • For the best drying performance activate AirDry.
• The programme does not have a drying phase or has a
drying phase with low temperature.
• The rinse aid dispenser is empty.
• The quality of the rinse aid can be the cause.
• The quality of the multi-tablets can be the cause. Try a
different brand or activate the rinse aid dispenser and
use rinse aid and multi-tablets together.
The interior of the appliance is
wet.
• This is not a defect of the appliance. it is caused by the
humidity in the air that condenses on the walls.
Unusual foam during washing. • Use the detergent for dishwashers only.
• There is a leak in the rinse aid dispenser. Contact an
Authorised Service Centre.
Traces of rust on cutlery. • There is too much salt in the water used for washing.
Refer to "The water softener".
• Silver and stainless steel cutlery were placed together.
Avoid to put silver and stainless steel items close togeth‐
er.
17
Page 18

Problem Possible cause and solution
There are residues of deter‐
gent in the dispenser at the
end of the programme.
• The detergent tablet got stuck in the dispenser and
therefore was not completely washed away by water.
• Water cannot wash away the detergent from the dis‐
penser. Make sure that the spray arm is not blocked or
clogged.
• Make sure that items in the baskets do not impede the
lid of the detergent dispenser from opening.
Odours inside the appliance. • Refer to "Internal cleaning".
Limescale deposits on the ta‐
bleware, on the tub and on the
inside of the door.
• The level of salt is low, check the refill indicator.
• The cap of the salt container is loose.
• Your tap water is hard. Refer to "The water softener".
• Even using multi-functional tabs use salt and set regen‐
eration of the water softener. Refer to "The water soft‐
ener".
• If lime scale deposits still remain, clean the appliance
with appliance cleaners which are particularly suitable
for this purpose.
• Try different detergent.
• Contact the detergent manufacturer.
Dull, discoloured or chipped
tableware.
• Make sure that only dishwasher-safe items are washed
in the appliance.
• Load and unload the basket carefully. Refer to basket
loading leaflet.
• Place delicate items in the upper basket.
Refer to "Before first use",
"Daily use" or "Hints and
tips" for other possible causes.
TECHNICAL INFORMATION
Dimensions Width / height / depth (mm) 596 / 818 - 898 / 575
Electrical connection
1)
Voltage (V) 220 - 240
Frequency (Hz) 50
Water supply pressure Min. / max. bar (MPa) 0.5 (0.05) / 8 (0.8)
Water supply
Cold water or hot water
2)
max 60 °C
Capacity Place settings 13
Power consumption Left-on mode (W) 5.0
18
Page 19

Power consumption Off-mode (W) 0.50
1)
Refer to the rating plate for other values.
2)
If the hot water comes from alternative source of energy, (e.g. solar panels, aeolian energy), use the hot water
supply to decrease energy consumption.
ENVIRONMENTAL CONCERNS
Recycle materials with the symbol . Put
the packaging in relevant containers to
recycle it. Help protect the environment
and human health by recycling waste of
electrical and electronic appliances. Do
not dispose of appliances marked with the
symbol with the household waste.
Return the product to your local recycling
facility or contact your municipal office.
19
Page 20

SISÄLTÖ
Turvallisuustiedot 20
Turvallisuusohjeet 21
Laitteen kuvaus 23
Käyttöpaneeli 24
Ohjelmat 25
Asetukset 25
Käyttöönotto 27
Päivittäinen käyttö 29
Vihjeitä ja neuvoja 30
Hoito ja puhdistus 31
Vianmääritys 33
Tekniset tiedot 36
Oikeus muutoksiin pidätetään.
TURVALLISUUSTIEDOT
Lue laitteen mukana toimitetut ohjeet ennen laitteen
asennusta ja käyttöä. Valmistaja ei ota vastuuta
henkilövahingoista tai vahingoista, jotka aiheutuvat
virheellisestä asennuksesta tai käytöstä. Säilytä ohjeita aina
varmassa ja helppopääsyisessä paikassa tulevia
käyttökertoja varten.
Lasten ja taitamattomien henkilöiden turvallisuus
• Vähintään 8 vuotta täyttäneet lapset ja sellaiset henkilöt,
joiden fyysiset, sensoriset tai henkiset kyvyt eivät ole tähän
riittäviä tai joilla ei ole laitteen tuntemusta tai kokemusta
sen käytöstä, saavat käyttää tätä laitetta ainoastaan silloin,
kun heidän turvallisuudestaan vastaava henkilö valvoo ja
ohjaa heitä käyttämään laitetta turvallisesti ja
ymmärtämään sen käyttöön liittyvät vaarat.
• Älä anna lasten leikkiä laitteella.
• Pidä pesuaineet lasten ulottumattomissa.
• Pidä lapset ja kotieläimet poissa laitteen luota silloin, kun
laitteen luukku on auki.
• Lapset eivät saa puhdistaa laitetta tai suorittaa laitteeseen
käyttäjän huoltotoimenpiteitä.
Yleiset turvallisuusohjeet
• Laite on tarkoitettu käytettäväksi kotiympäristöissä ja
vastaavissa ympäristöissä, kuten:
– maatalot, henkilöstön keittiöympäristöt liikkeissä,
toimistoissa ja muissa työympäristöissä
20
Page 21

– hotellien, motellien ja muiden majatalojen asiakkaiden
käyttöympäristöt.
• Älä muuta laitteen teknisiä ominaisuuksia.
• Vedenpaineen (minimi ja maksimi) on oltava käytön aikana
välillä 0.5 (0.05) / 8 (0.8) baaria (MPa)
• Noudata astiaston maksimimäärää 13 .
• Jos virtajohto vaurioituu, sen saa vaaratilanteiden
välttämiseksi vaihtaa vain valmistaja, valtuutettu huoltoliike
tai vastaava ammattitaitoinen henkilö.
• Aseta ruokailuvälineet ruokailuvälinekoriin terävät päät
alaspäin tai aseta ne ruokailuvälinekoteloon
vaakasuunnassa terävät päät alaspäin.
• Älä jätä laitteen luukkua auki ilman valvontaa, jotta siihen
ei astu kukaan vahingossa.
• Kytke laite pois toiminnasta ja irrota pistoke pistorasiasta
ennen ylläpitotoimien aloittamista.
• Älä käytä painepesureita ja/tai höyryä laitteen
puhdistamiseen.
• Jos laitteen alaosassa on tuuletusaukkoja, ne eivät saa
olla maton yms. peitossa.
• Laite tulee liittää vesijohtoverkkoon pakkauksen mukana
toimitettua uutta letkua käyttäen. Vanhaa letkua ei saa
käyttää uudelleen.
TURVALLISUUSOHJEET
Asennus
VAROITUS! Asennuksen saa
suorittaa vain ammattitaitoinen
henkilö.
• Poista kaikki pakkausmateriaalit.
• Vaurioitunutta laitetta ei saa asentaa tai
käyttää.
• Laitetta ei saa asentaa tilaan tai käyttää
tilassa, jossa lämpötila on alle 0 °C.
• Noudata koneen mukana toimitettuja
ohjeita.
• Siirrä laitetta aina varoen, sillä se on
raskas. Käytä aina suojakäsineitä ja
suojaavia jalkineita.
• Varmista, että laite asennetaan
turvallisten rakenteiden alapuolelle ja
lähelle.
Sähköliitäntä
VAROITUS! Tulipalo- ja
sähköiskuvaara.
• Laite on kytkettävä maadoitettuun
pistorasiaan.
• Varmista, että arvokilvessä olevat
parametrit ovat verkkovirtalähteen
sähköarvojen mukaisia.
• Kytke pistoke maadoitettuun
pistorasiaan.
• Älä käytä jakorasioita tai jatkojohtoja.
21
Page 22

• Varmista, ettei pistoke ja virtajohto
vaurioidu. Jos virtajohto joudutaan
vaihtamaan, vaihdon saa suorittaa vain
valtuutettu huoltoliike.
• Kytke pistoke pistorasiaan vasta
asennuksen jälkeen. Varmista, että
laitteen verkkovirtakytkentä on
ulottuvilla laitteen asennuksen jälkeen.
• Älä vedä virtajohdosta pistoketta
irrottaessasi. Vedä aina pistokkeesta.
• Tämä kodinkone vastaa Euroopan
yhteisön direktiivejä.
• Koskee vain Isoa-Britanniaa ja Irlantia.
Laitteessa on 13 A pistoke. Jos
pistokkeen sulakkeen vaihto on
tarpeen, käytä vain 13 A ASTA (BS
1362) sulaketta.
Vesiliitäntä
• Varo, etteivät vesiletkut vaurioidu.
• Anna veden valua, kunnes se on
puhdasta ja kirkasta ennen uusien
putkien liittämistä, kun putkia ei ole
käytetty pitkään aikaan, korjaustöiden
jälkeen tai kun uusia laitteita
(vesimittarit, jne.) on asennettu.
• Tarkista ensimmäisen käyttökerran
aikana ja sen jälkeen, ettei laitteessa
ole vesivuotojen merkkejä.
• Vedenottoletkussa on varoventtiili ja
vaippa, jonka sisällä on virtajohto.
VAROITUS! Vaarallinen
jännite.
• Jos vedenottoletku vaurioituu, sulje heti
vesihana ja irrota pistoke
verkkopistorasiasta. Ota yhteyttä
valtuutettuun huoltoliikkeeseen
vedenottoletkun vaihtamiseksi.
Käyttö
• Älä istu tai seiso avoimen luukun
päällä.
• Konetiskiaineet ovat vaarallisia. Lue
konetiskiaineen pakkauksen
turvallisuusohjeet.
• Älä juo laitteessa olevaa vettä tai leiki
sillä.
• Älä poista astioita laitteesta, ennen kuin
ohjelma on päättynyt. Astioihin voi
jäädä hiukan pesuainetta.
• Laitteesta voi tulla kuumaa höyryä, jos
luukku avataan ohjelman ollessa
käynnissä.
• Älä aseta laitteeseen, sen lähelle tai
päälle syttyviä tuotteita tai syttyviin
tuotteisiin kostutettuja esineitä.
Huolto
• Ota yhteyttä valtuutettuun
huoltoliikkeeseen laitteen
korjaamiseksi. Suosittelemme vain
alkuperäisten varaosien käyttöä.
• Kun otat yhteyttä valtuutettuun
huoltoliikkeeseen, pidä seuraavat
arvokilvessä olevat tiedot saatavilla.
Malli:
Tuotenumero:
Sarjanumero:
Hävittäminen
VAROITUS! Henkilövahinko-
tai tukehtumisvaara.
• Irrota pistoke pistorasiasta.
• Leikkaa johto irti ja hävitä se.
• Poista luukun lukitus, jotta lapset ja
eläimet eivät voisi jäädä kiinni laitteen
sisälle.
22
Page 23

LAITTEEN KUVAUS
4
3
7
9
8
10
56
11
1
2
1
Ylempi suihkuvarsi
2
Alempi suihkuvarsi
3
Sihdit
4
Arvokilpi
5
Suolasäiliö
6
Tuuletuskanava
7
Huuhtelukirkastelokero
8
Pesuainelokero
9
Ruokailuvälinekori
10
Alakori
11
Yläkori
23
Page 24

KÄYTTÖPANEELI
1 2
4
56
3
1
Virran merkkivalo
2
Ohjelmanvalitsimen osoitin
3
Merkkivalot
4
Ajastimen painike
5
Käynnistyspainike
6
Ohjelmanvalitsin
Merkkivalot
Merkkivalo Kuvaus
Pesuvaihe. Syttyy, kun pesuvaihe on käynnissä.
Kuivausvaihe. Syttyy, kun kuivausvaihe on käynnissä.
Ohjelma loppu -merkkivalo.
Huuhtelukirkasteen merkkivalo. Merkkivalo on sammunut, kun ohjelma on toi‐
minnassa.
Suolan merkkivalo. Merkkivalo on sammunut, kun ohjelma on toiminnassa.
24
Page 25

OHJELMAT
Ohjelma Likaisuusas‐
te
Pestävä
pyykki
Ohjelman vai‐
heet
Kulutusarvot
1)
Kestoai‐
ka
(min)
Energia
(kWh)
Vesi
(l)
2)
Normaalilikai‐
set astiat
Ruokailuastiat
ja ruokailuväli‐
neet
• Esipesu
• Pesu 50 °C
• Huuhtelut
• Kuivaus
227 1.039 11
Erittäin likaiset
astiat
Ruokailua‐
stiat, ruokailu‐
välineet, katti‐
lat ja pannut
• Esipesu
• Pesu 70 °C
• Huuhtelut
• Kuivaus
155 170
1.5 - 1.7 14-15
Normaalilikai‐
set astiat
Ruokailuastiat
ja ruokailuväli‐
neet
• Esipesu
• Pesu 65 °C
• Huuhtelut
• Kuivaus
130 140
1.4 - 1.6 15-17
1)
Arvot voivat vaihdella paineen ja veden lämpötilan, energiansyötön vaihteluiden, lisätoimintojen ja astioiden
määrän mukaisesti.
2)
Tämä ohjelma pesee normaalilikaiset astiat ja ruokailuvälineet tehokkaimmalla veden- ja energiankulutuksella.
(Tämä on testilaitoksien standardiohjelma).
Tietoja testilaitokselle
Pyydä kaikki vaaditut testitiedot
osoitteesta:
info.test@dishwasher-production.com
Kirjoita ylös tuotenumero (PNC), joka
löytyy arvokilvestä.
ASETUKSET
Ohjelman valintatila ja
käyttäjätila
Kun laite on ohjelman valintatilassa, voit
asettaa ohjelman ja siirtyä käyttäjätilaan.
Käyttäjätilassa saatavilla olevat
asetukset:
• Vedenpehmentimen taso veden
kovuuden mukaan.
• AirDry-toiminnon käyttöönotto tai
käytöstäpoisto.
Laite tallentaa tallennetut asetukset,
joten niitä ei tarvitse määrittää ennen
jokaista ohjelmaa.
Ohjelman valintatilan
asettaminen
Laite on ohjelman valintatilassa, kun virran
merkkivalo syttyy ja Start merkkivalo alkaa
vilkkua.
25
Page 26

Päälle kytkemisen jälkeen laite on
oletuksena ohjelman valintatilassa. Aseta
muutoin ohjelman valintatila seuraavasti:
Paina ja pidä alhaalla samanaikaisesti
painiketta Start ja Delay, kunnes laite on
ohjelman valintatilassa.
Vedenpehmennin
Vedenpehmennin poistaa vedestä
mineraalit, joilla on negatiivisia vaikutuksia
pesutulokseen ja laitteeseen.
Mitä enemmän vedessä on
mineraaliaineita, sitä kovempaa vesi on.
Vedenkovuus määritetään toisiaan
vastaavilla asteikoilla.
Vedenpehmentimen asetukset tulee
määrittää vesijohtoverkon vedenkovuuden
mukaisesti. Voit kysyä vedenkovuustiedot
paikkakuntasi vesilaitokselta. On tärkeää
asettaa oikea vedenpehmentimen taso
hyvän pesutuloksen saavuttamiseksi.
Veden kovuus
Saksalainen
järjestelmä
(°dH)
Ranskalainen
järjestelmä
(°fH)
mmol/l Clarken
järjestel‐
mä
Vedenpehmenti‐
men asetus
47 - 50 84 - 90 8,4 - 9,0 58 - 63 10
43 - 46 76 - 83 7,6 - 8,3 53 - 57 9
37 - 42 65 - 75 6,5 - 7,5 46 - 52 8
29 - 36 51 - 64 5,1 - 6,4 36 - 45 7
23 - 28 40 - 50 4,0 - 5,0 28 - 35 6
19 - 22 33 - 39 3,3 - 3,9 23 - 27
5
1)
15 - 18 26 - 32 2,6 - 3,2 18 - 22 4
11 - 14 19 - 25 1,9 - 2,5 13 - 17 3
4 - 10 7 - 18 0,7 - 1,8 5 - 12 2
<4 <7 <0,7 < 5
1
2)
1)
Tehdasasetus.
2)
Älä käytä suolaa tällä tasolla.
Käytitpä sitten tavallista
konetiskiainetta tai
yhdistelmäpesuainetabletteja (suolalla
tai sitä ilman), aseta oikea
vedenkovuuden taso, jotta suolan
lisäämisen merkkivalo on käytössä.
Suolaa sisältävät
yhdistelmäpesuainetabletit
eivät ole riittävän tehokkaita
kovan veden pehmentämiseen.
Vedenpehmentimen tason
asettaminen
Laitteen on oltava ohjelman valintatilassa.
1. Varmista, että ohjelmanvalitsimen
osoitin on on/off-asennon kohdalla.
2. Siirry käyttäjätilaan painamalla ja
pitämällä alhaalla painiketta Delay.
Käännä valitsinta samanaikaisesti
vastapäivään, kunnes
ohjelmanvalitsimen osoitin on
ensimmäisen ohjelman kohdalla.
Vapauta Delay-painike, kun Start-
26
Page 27

merkkivalo ja virran merkkivalo alkavat
vilkkua.
• Merkkivalon jaksottainen
vilkkuminen osoittaa valitun
asetuksen (esim. 5 vilkkumista +
tauko + 5 vilkkumista = taso 5).
3. Voit muuttaa asetusta painamalla
painiketta Delay toistuvasti.
Tasonumero kasvaa jokaisella
painikkeen Delay painalluksella.
Tason 10 saavuttamisen jälkeen taso
alkaa uudelleen numerosta 1.
4. Vahvista asetus kääntämällä
ohjelmanvalitsinta, kunnes osoitin on
jälleen on/off-asennon kohdalla.
AirDry
AirDry parantaa kuivaustulosta
pienemmällä energiankulutuksella.
Luukku avautuu
automaattisesti kuivausvaiheen
aikana ja se jää raolleen.
HUOMIO! Älä yritä sulkea
laitteen luukkua 2 minuutin
kuluessa sen automaattisesta
avautumisesta. Muutoin laite
voi vaurioitua.
AirDry kytkeytyy automaattisesti
toimintaan kaikkien ohjelmien yhteydessä
lukuun ottamatta ohjelmaa .
HUOMIO! Jos lapset pääsevät
käsiksi laitteeseen, toiminto
AirDry on suositeltavaa kytkeä
pois toiminnasta, sillä luukun
avaaminen voi aiheuttaa
vaaratilanteita.
Pois päältä kytkeminen AirDry
Laitteen on oltava ohjelman valintatilassa.
1. Siirry käyttäjätilaan painamalla ja
pitämällä alhaalla painiketta Delay.
Käännä valitsinta samanaikaisesti
vastapäivään, kunnes
ohjelmanvalitsimen osoitin on
ensimmäisen ohjelman kohdalla.
Vapauta Delay-painike, kun
merkkivalot Start ja on/off vilkkuvat.
2. Käännä valitsinta vastapäivään,
kunnes ohjelmanvalitsimen osoitin on
toisen ohjelman kohdalla.
•
-merkkivalo osoittaa nykyisen
asetuksen: päällä = AirDry
kytketään toimintaan.
3. Voit muuttaa asetusta painamalla
Delay.
• Jos merkkivalo
on sammunut =
AirDry on pois toiminnasta.
4. Vahvista asetus kääntämällä
ohjelmanvalitsinta, kunnes osoitin on
jälleen uudelleen on/off-asennon
kohdalla.
KÄYTTÖÖNOTTO
1. Varmista, että vedenpehmentimen
nykyinen taso vastaa
vesijohtoverkon veden kovuutta.
Säädä muussa tapauksessa
vedenpehmentimen taso.
2. Täytä suolasäiliö.
3. Täytä huuhtelukirkastelokero.
4. Avaa vesihana.
5. Käynnistä ohjelma mahdollisten
koneen sisällä olevien prosessijäämien
poistamiseksi. Älä käytä pesuainetta
tai täytä koreja.
27
Page 28

Ohjelman käynnistämisen jälkeen
vedenpehmentimen hartsin lataus voi
kestää jopa 5 minuuttia. Näyttää, ettei laite
toimisi. Pesuvaihe käynnistyy vasta tämän
toiminnon jälkeen. Toiminto toistetaan
säännöllisesti.
Suolasäiliö
HUOMIO! Käytä ainoastaan
astianpesukoneisiin tarkoitettua
karkeaa suolaa. Hieno suola
lisää korroosion vaaraa.
Suolaa käytetään vedenpehmentimen
hartsin puhdistukseen ja hyvän
pesutuloksen takaamiseksi päivittäisessä
käytössä.
Suolasäiliön täyttäminen
1. Kierrä suolasäiliön korkkia
vastapäivään ja poista se.
2. Kaada suolasäiliöön 1 litra vettä (vain
ensimmäisellä käyttökerralla).
3. Täytä suolasäiliöön 1 kg suolaa
(kunnes se on täysi).
4. Loput rakeista voidaan lisätä säiliöön
ravistamalla suppiloa varoen kahvasta
kiinnipitäen.
5. Poista suolasäiliön suun ympärille
roiskunut suola.
6. Sulje suolasäiliön korkki kiertämällä
sitä myötäpäivään.
HUOMIO! Vettä ja suolaa voi
tulla ulos suolasäiliöstä, kun
täytät sen. Käynnistä ohjelma
välittömästi suolasäiliön
täyttämisen jälkeen korroosion
estämiseksi.
Huuhtelukirkastelokeron
täyttäminen
M
A
X
1
2
3
4
+
-
A
B
D
C
HUOMIO! Käytä ainoastaan
astianpesukoneille tarkoitettuja
huuhtelukirkasteita.
1. Paina vapautuspainiketta (D) kannen
(C) avaamiseksi.
2. Kaada huuhtelukirkastetta lokeroon
(A), kunnes neste saavuttaa
täyttötason 'max'.
3. Pyyhi yliroiskunut huuhtelukirkaste
imukykyisellä liinalla välttääksesi
liiallisen vaahdonmuodostuksen.
4. Sulje kansi. Varmista, että
vapautuspainike lukittuu paikoilleen.
Voit kääntää annostelun
valitsimen (B) asennon 1
(pienin määrä) ja 4 tai 6 (suurin
määrä) välille.
28
Page 29

PÄIVITTÄINEN KÄYTTÖ
1. Avaa vesihana.
2. Käännä valitsinta, kunnes haluamasi
ohjelman symboli on virran osoittimen
kohdalla. Aseta astioiden tyypille ja
likaisuusasteelle sopiva ohjelma.
• Jos suolan merkkivalo palaa, täytä
suolasäiliö.
• Jos huuhtelukirkasteen merkkivalo
palaa, täytä huuhtelukirkastelokero.
3. Täytä korit.
4. Lisää konetiskiaine.
5. Käynnistä ohjelma.
Pesuaineen käyttäminen
20
30
BA D
C
1. Paina vapautuspainiketta (B) kannen
(C) avaamiseksi.
2. Laita konetiskiaine tai pesuainetabletti
lokeroon (A).
3. Jos ohjelmassa on esipesuvaihe, laita
pieni määrä konetiskiainetta
pesuainelokeroon (D).
4. Sulje kansi. Varmista, että
vapautuspainike lukittuu paikoilleen.
Pesuainetablettien käyttäminen
Jos käytät suolaa ja huuhtelukirkastetta
sisältäviä pesuainetabletteja, älä täytä
suolasäiliötä ja huuhtelukirkastelokeroa.
1. Aseta vedenpehmennin alhaisimpaan
asetukseen.
2. Aseta huuhtelukirkastelokero
alhaisimpaan asentoon.
Ohjelman asettaminen ja
käynnistäminen
Ohjelman käynnistys
1. Avaa vesihana.
2. Sulje laitteen luukku.
3. Käännä säädintä, kunnes haluamasi
ohjelman symboli on virran osoittimen
kohdalla.
• Virran merkkivalo syttyy.
• Käynnistyksen merkkivalo alkaa
vilkkua.
4. Paina painiketta Start.
• Ohjelma käynnistyy ja pesuvaiheen
merkkivalo palaa.
• Virran merkkivalo ja käynnistyksen
merkkivalo palavat.
Ohjelman käynnistäminen
ajastuksella
1. Valitse ohjelma.
2. Paina Delay-painiketta asettaaksesi
ohjelman käynnistymään
myöhempänä ajankohtana 3 tunnin
välein.
Ajastuksen merkkivalo syttyy.
3. Paina painiketta Start.
Käynnistyksen merkkivalo syttyy.
Kun asetettu aika on kulunut loppuun,
ohjelma käynnistyy.
Luukun avaaminen laitteen
ollessa toiminnassa
Jos luukku avataan ohjelman ollessa
käynnissä, laite sammuu. Se voi vaikuttaa
energiankulutukseen ja ohjelman kestoon.
Kun suljet luukun, laite käynnistyy
uudelleen keskeytyskohdasta.
29
Page 30

Jos luukku avataan yli 30
sekunnin ajaksi kuivausvaiheen
aikana, käynnissä oleva
ohjelma päättyy. Tämä ei
koske niitä tilanteita, jolloin
AirDry-toiminto on avannut
luukun.
Älä yritä sulkea laitteen luukkua
2 minuutin kuluessa siitä, kun
AirDry-toiminto on avannut sen
automaattisesti. Muutoin laite
voi vaurioitua.
Jos luukku suljetaan sen
jälkeen 3 minuutin ajaksi,
käynnissä oleva ohjelma
päättyy.
Ajastimen peruuttaminen
ajanlaskennan ollessa
käynnissä
1. Paina ja pidä alhaalla Start ja Delay -
painiketta, kunnes käynnistyksen
merkkivalo alkaa vilkkua.
2. Käynnistä ohjelma painamalla Start.
Ohjelman peruuttaminen
Paina ja pidä alhaalla Start ja Delay painiketta, kunnes käynnistyksen
merkkivalo alkaa vilkkua.
Varmista, että pesuainelokerossa on
konetiskiainetta ennen uuden ohjelman
käynnistämistä.
Ohjelman päättyminen
Kun ohjelma on päättynyt, -merkkivalo
palaa. Jos laitetta ei käytetä 5 minuuttiin,
se siirtyy valmiustilaan ja kaikki
merkkivalot sammuvat. Energiankulutus
on tällöin pienempi.
1. Kytke laite pois päältä kääntämällä
ohjelmanvalitsinta, kunnes
ohjelmanvalitsimen osoitin on on/offasennon kohdalla.
2. Sulje vesihana.
VIHJEITÄ JA NEUVOJA
Yleistä
Seuraavat neuvot takaavat optimaaliset
puhdistus- ja kuivaustulokset
päivittäisessä käytössä ja ne auttavat
suojelemaan ympäristöä.
• Poista suuremmat ruokajäämät
astioista roska-astiaan.
• Älä esihuuhtele astioita käsin. Käytä
tarvittaessa esipesuohjelmaa (jos
saatavilla) tai valitse esipesuvaiheen
sisältävä ohjelma.
• Käytä aina hyväksi korien koko tila.
• Laitteen täyttämisen yhteydessä tulee
varmistaa, että suihkuvarren
suuttimista tuleva vesi kattaa ja pesee
kaikki astiat kokonaan. Varmista, että
astiat eivät kosketa tai peitä toisiaan.
• Voit käyttää konetiskiainetta,
huuhtelukirkastetta ja suolaa erikseen
tai yhdistelmäpesuainetabletteja (esim.
''3in1'', ''4in1'', ''All in 1''). Noudata
pakkauksen ohjeita.
• Valitse ohjelma pestävien astioiden ja
likaisuustason perusteella. ECOohjelma pesee normaalilikaiset astiat ja
ruokailuvälineet tehokkaimmalla vedenja energiankulutuksella.
Suolan, huuhtelukirkasteen ja
konetiskiaineen käyttö
• Käytä ainoastaan
astianpesukoneeseen tarkoitettua
suolaa, huuhtelukirkastetta ja
konetiskiainetta. Muut tuotteet voivat
vahingoittaa laitetta.
• Jos alueen veden kovuus on kovaa tai
erittäin kovaa, suosittelemme
käyttämään pelkkää konetiskiainetta
(jauhe, geeli, tabletit ilman lisäaineita),
huuhtelukirkastetta ja suolaa erikseen
optimaalisen puhdistus- ja
kuivaustuloksen saavuttamiseksi.
30
Page 31

• Puhdista laite tähän tarkoitukseen
tarkoitetulla puhdistusaineella
vähintään kerran kuukaudessa.
• Pesuainetabletit eivät liukene täysin
lyhyissä ohjelmissa. Jotta astioihin ei
jäisi pesuainejäämiä, suosittelemme
pitkien ohjelmien käyttöä tablettien
kanssa.
• Älä aseta koneeseen liikaa
konetiskiainetta. Lue konetiskiaineen
pakkauksen ohjeet.
Yhdistelmäpesuainetablettien
käytön lopettaminen
Toimi seuraavasti ennen kuin aloitat
käyttämään erikseen pesuainetta, suolaa
ja huuhtelukirkastetta:
1. Aseta vedenpehmentimen korkein
taso.
2. Varmista, että suolasäiliö ja
huuhtelukirkastelokero on täytetty
täyteen.
3. Käynnistä lyhin ohjelma, joka sisältää
huuhteluvaiheen. Älä lisää
konetiskiainetta tai täytä koreja.
4. Kun ohjelma on suoritettu loppuun,
säädä vedenpehmennin alueesi veden
kovuuden mukaan.
5. Säädä huuhtelukirkasteen määrä.
Korien täyttäminen
• Käytä laitetta vain astianpesukonetta
kestävien astioiden pesemiseen.
• Älä aseta laitteeseen puu-, sarviaines-,
alumiini-, tina- ja kupariastioita.
• Älä aseta astianpesukoneeseen
esineitä, jotka imevät vettä (sienet,
erilaiset kankaat).
• Poista suuremmat ruokajäämät
astioista roska-astiaan.
• Pehmennä astioihin palaneet
ruokajäämät.
• Aseta kupit, lasit, padat yms. alassuin.
• Tarkista, että lasit eivät kosketa
toisiaan.
• Aseta ruokailuvälineet ja pienet esineet
ruokailuvälinekoriin.
• Laita kevyet astiat yläkoriin. Tarkista,
että astiat eivät pääse liikkumaan.
• Tarkista ennen ohjelman
käynnistämistä, että suihkuvarret
pyörivät esteettä.
Ennen ohjelman käynnistämistä
Varmista, että:
• Sihdit ovat puhtaat tai oikein paikallaan.
• Suolasäiliön kansi on tiivis.
• Suihkuvarret eivät ole tukkiutuneet.
• Koneessa on astianpesukoneen suolaa
ja huuhtelukirkastetta (ellet käytä
yhdistelmäpesuainetabletteja).
• Astiat on asetettu oikein koreihin.
• Ohjelma sopii astioiden tyypille ja
likaisuusasteelle.
• Käytät oikeaa pesuainemäärää.
Korien tyhjentäminen
1. Anna astioiden jäähtyä, ennen kuin
tyhjennät ne koneesta. Kuumat astiat
särkyvät helposti.
2. Tyhjennä ensin alakori ja vasta sen
jälkeen yläkori.
Vettä voi jäädä laitteen sivuille
ja luukkuun ohjelman päätyttyä.
HOITO JA PUHDISTUS
VAROITUS! Ennen kuin aloitat
hoitoa tai puhdistusta, kytke
laite pois toiminnasta ja irrota
pistoke pistorasiasta.
Likaiset sihdit ja tukkiutuneet
suihkuvarret heikentävät
pesutuloksia. Tarkista sihdit
säännöllisin välein ja puhdista
ne tarvittaessa.
31
Page 32

Sihtien puhdistaminen
Sihti koostuu 3 osasta.
C
B
A
1. Kierrä sihtiä (B) vastapäivään ja poista
se.
2. Poista sihti (C) sihdistä (B).
3. Irrota tasosihti (A).
4. Pese sihdit.
5.
Varmista, ettei asennusaukon
reunassa tai sen ympärillä ole
ruokajäämiä tai epäpuhtauksia.
6. Asenna tasosihti (A) takaisin
paikoilleen. Varmista, että se on oikein
paikoillaan 2 ohjaimen alapuolella.
7. Kokoa sihdit (B) ja (C).
8. Asenna sihti (B) tasosihtiin (A).
Käännä sitä myötäpäivään, kunnes se
lukittuu.
32
Page 33

HUOMIO! Sihtien virheellinen
asento voi aiheuttaa heikkoja
pesutuloksia ja vaurioittaa
laitetta.
Suihkuvarsien puhdistaminen
Älä irrota suihkuvarsia. Jos suihkuvarsien
reiät ovat tukkeutuneet, poista lika
ohutpäisellä esineellä.
Ulkopintojen puhdistaminen
• Puhdista laite kostealla pehmeällä
liinalla.
• Käytä vain mietoja puhdistusaineita.
• Älä käytä hankausainetta, hankaavia
pesulappuja tai liuottimia.
Sisätilan puhdistaminen
• Puhdista laite, oven kumitiiviste
mukaan lukien, huolellisesti pehmeällä
ja kostealla liinalla.
• Jos käytät säännöllisesti lyhyitä
ohjelmia, laitteeseen voi jäädä rasva- ja
kalkkijäämiä. Jotta tämä vältettäisiin,
suosittelemme pitkän ohjelman
valitsemista vähintään 2 kertaa
kuukaudessa.
• Suosittelemme käyttämään
kuukausittain erityistä
astianpesukoneiden puhdistusainetta
laitteen parhaan suorituskyvyn
säilyttämiseksi. Noudata tarkoin
tuotepakkauksissa olevia ohjeita.
VIANMÄÄRITYS
Jos laite ei käynnisty tai se pysähtyy
käytön aikana, tarkista ennen valtuutetun
huoltopalvelun puoleen kääntymistä,
pystytkö ratkaisemaan ongelman itse
taulukon ohjeita noudattaen.
VAROITUS! Virheellisesti
suoritetut korjaukset voivat
aiheuttaa käyttäjälle vakavan
turvallisuusvaaran.
Korjaustoimenpiteet saa
suorittaa vain asiantunteva
henkilöstö.
Joidenkin ongelmien kohdalla vilkkuva
Ohjelma loppu -merkkivalo vilkkuu
ilmoittaen häiriöstä.
Suurin osa mahdollisista ongelmista
voidaan ratkaista ilman yhteydenottoa
valtuutettuun huoltoliikkeeseen.
Ongelma ja hälytyskoodi Mahdollinen syy ja korjaustoimenpide
Laite ei kytkeydy toimintaan. • Varmista, että pistoke on kiinnitetty pistorasiaan.
• Varmista, ettei mikään sulakekotelon sulakkeis‐
ta ole palanut.
Pesuohjelma ei käynnisty. • Tarkista, että laitteen luukku on suljettu.
• Paina painiketta Start.
• Jos ajastin on asetettu, peruuta asetus tai odo‐
ta, kunnes ajanlaskenta on kulunut umpeen.
• Laite on käynnistänyt vedenpehmentimen hart‐
sin latauksen. Toiminto kestää noin 5 minuuttia.
33
Page 34

Ongelma ja hälytyskoodi Mahdollinen syy ja korjaustoimenpide
Laitteeseen ei tule vettä.
• Ohjelma loppu -merkkivalo vilkkuu
1 kerran jaksottain.
• Ohjelmanvalintapainikkeen merkki‐
valo Start vilkkuu jatkuvasti.
• Tarkista, että vesihana on auki.
• Varmista, ettei vedensyöttöpaine ole liian alhai‐
nen. Kysy lisätietoa paikalliselta vesilaitokselta.
• Tarkista, ettei vesihana ole tukossa.
• Varmista, ettei vedenottoletkun sihti ole tukossa.
• Varmista, ettei vedenottoletkussa ole vääntymiä
tai taittumia.
Koneeseen jää vettä.
• Ohjelma loppu -merkkivalo vilkkuu
2 kertaa jaksottain.
• Ohjelmanvalintapainikkeen merkki‐
valo Start vilkkuu jatkuvasti.
• Tarkista, ettei altaan poistoviemäri ole tukossa.
• Varmista, ettei tyhjennysletkussa ole vääntymiä
tai taittumia.
Vesivahinkosuojaus on käytössä.
• Ohjelma loppu -merkkivalo vilkkuu
3 kertaa jaksottain.
• Ohjelmanvalintapainikkeen merkki‐
valo Start vilkkuu jatkuvasti.
• Sulje vesihana ja ota yhteyttä valtuutettuun
huoltoliikkeeseen.
Laite pysähtyy ja käynnistyy useita ker‐
toja toiminnan aikana.
• Tämä on normaalia. Täten taataan optimaaliset
puhdistustulokset ja energiansäästö.
Ohjelma kestää liian pitkään. • Jos Ajastin-lisätoiminto on asetettu, peruuta
asetus tai odota, kunnes ajanlaskenta on kulu‐
nut umpeen.
Laitteen luukussa on pieni vuoto. • Laite ei ole oikein tasapainotettu. Löysää tai ki‐
ristä säädettäviä jalkoja (jos soveltuu).
• Laitteen luukkua ei ole keskitetty altaaseen.
Säädä takimmaista jalkaa (jos soveltuu).
Laitteen luukun sulkeminen on vaike‐
aa.
• Laite ei ole oikein tasapainotettu. Löysää tai ki‐
ristä säädettäviä jalkoja (jos soveltuu).
• Astioiden osia tulee ulos koreista.
Laitteen sisältä kuuluu kolinaa/iskuää‐
niä.
• Astioita ei ole sijoitettu oikein koreihin. Katso li‐
sätietoa korin täyttöä koskevasta esitteestä.
• Varmista, että suihkuvarsi pääsee kiertämään
vapaasti.
Laitteen virrankatkaisin laukeaa. • Ampeeriarvo on riittämätön syöttämään virtaa
kaikkiin käytössä oleviin laitteisiin samanaikai‐
sesti. Tarkista pistokkeen ampeeriarvo ja mitta‐
rin kapasiteetti tai kytke jokin käytössä olevista
laitteista pois päältä.
• Laitteen sisäisen sähköjärjestelmän vika. Ota
yhteyttä valtuutettuun huoltoliikkeeseen.
34
Page 35

Katso muita mahdollisia syitä
osiosta "Käyttöönotto",
"Päivittäinen käyttö", tai
"Vihjeitä ja neuvoja".
Kun olet tarkistanut laitteen, paina
painiketta Start. Jos ongelma toistuu, ota
yhteyttä valtuutettuun huoltoliikkeeseen.
Jos jotakin hälytyskoodia ei ole kuvattu
taulukossa, ota yhteyttä valtuutettuun
huoltopalveluun.
Pesu- ja kuivaustulokset eivät ole tyydyttävät
Ongelma Mahdollinen syy ja korjaustoimenpide
Huonot pesutulokset. • Katso lisätietoa osiosta "Päivittäinen käyttö", "Vihjeitä
ja neuvoja" ja korin täyttöä koskevasta esitteestä.
• Käytä tehokkaampia pesuohjelmia.
• Puhdista suihkuvarret ja sihti. Lue ohjeet kohdasta "Hoi‐
to ja puhdistus".
Huonot kuivaustulokset. • Astiat on jätetty liian pitkäksi ajaksi suljetun laitteen si‐
sälle.
• Huuhtelukirkaste on loppunut tai sitä ei ole riittävästi.
Aseta huuhtelukirkastelokero korkeampaan asentoon.
• Muoviset osat voi olla tarpeen kuivata pyyhkeellä.
• Kytke AirDry päälle parhaan kuivaustuloksen saavutta‐
miseksi.
• Suosittelemme käyttämään aina huuhtelukirkastetta,
myös yhdistelmäpesuainetablettien kanssa.
Laseissa ja muissa astioissa
on vaaleita raitoja tai sinertävä
pinta.
• Huuhtelukirkastetta on annosteltu liikaa. Säädä huuhte‐
lukirkasteen taso alhaisempaan tasoon.
• Konetiskiainetta on liian paljon.
Laseissa ja astioissa on tahro‐
ja ja kuivia vesipisaroita.
• Huuhtelukirkastetta on annosteltu liian vähän. Säädä
huuhtelukirkasteen taso korkeampaan tasoon.
• Syynä voi olla käytetyn huuhtelukirkasteen laatu.
Astiat ovat märkiä. • Kytke AirDry päälle parhaan kuivaustuloksen saavutta‐
miseksi.
• Ohjelmassa ei ole kuivausvaihetta tai sen kuivausohjel‐
man lämpötila on alhainen.
• Huuhtelukirkastelokero on tyhjä.
• Syynä voi olla käytetyn huuhtelukirkasteen laatu.
• Syynä voi olla käytettyjen yhdistelmäpesuainetablettien
laatu. Kokeile toista merkkiä tai ota käyttöön huuhtelukir‐
kastelokero ja käytä huuhtelukirkastetta yhdistelmäpe‐
suainetablettien kanssa.
Laitteen sisäosa on märkä. • Tämä ei merkitse laitevikaa, se johtuu seiniin tiivisty‐
neestä ilmankosteudesta.
35
Page 36

Ongelma Mahdollinen syy ja korjaustoimenpide
Epätavallinen määrä vaahtoa
pesun aikana.
• Käytä ainoastaan astianpesukoneisiin tarkoitettua kone‐
tiskiainetta.
• Huuhtelukirkastelokero vuotaa. Ota yhteyttä valtuutet‐
tuun huoltoliikkeeseen.
Ruokailuvälineissä on ruos‐
teen merkkejä.
• Pesuvedessä on liikaa suolaa. Katso kohta "Vedenpeh‐
mennin".
• Hopeisia ja ruostumattomasta teräksestä valmistettuja
ruokailuvälineitä on sekoitettu. Vältä sekoittamasta ho‐
peisia ja ruostumattomasta teräksestä valmistettuja ruo‐
kailuvälineitä.
Lokerossa on pesuainejäämiä
ohjelman päättyessä.
• Pesutabletti juuttui lokeroon and vesi ei huuhdellut sitä
kokonaan pois tämän vuoksi.
• Vesi ei huuhtele pesuainetta pois lokerosta. Varmista,
ettei suihkuvarsi ole juuttunut kiinni tai tukossa.
• Varmista, etteivät korissa olevat astiat estä pesuainelo‐
keron avautumista.
Laitteessa on hajuja. • Katso "Sisätilan puhdistaminen".
Kalkkijäämiä astioissa, altaas‐
sa ja luukun sisäosassa.
• Alhainen suolasäiliön taso, tarkista suolan merkkivalo.
• Suolasäiliön kansi on löysä.
• Huomattava veden kovuus. Katso kohta "Vedenpeh‐
mennin".
• Käytä suolaa ja aseta vedenpehmentimen regenerointi
jopa yhdistelmäpesuainetabletteja käyttäessä. Katso
kohta "Vedenpehmennin".
• Jos kalkkikertymiä on edelleen, puhdista laite tähän tar‐
koitukseen tarkoitetulla puhdistusaineella.
• Kokeile toista konetiskiainetta.
• Ota yhteyttä konetiskiaineen valmistajaan.
Astiat ovat himmeitä, värjäyty‐
neitä tai haljenneita.
• Varmista, että laitteessa pestään ainoastaan konepesun
kestäviä astioita.
• Täytä ja tyhjennä kori varoen. Katso lisätietoa korin täyt‐
töä koskevasta esitteestä.
• Aseta arkalaatuiset astiat yläkoriin.
Katso muita mahdollisia syitä
osiosta "Käyttöönotto",
"Päivittäinen käyttö", tai
"Vihjeitä ja neuvoja".
TEKNISET TIEDOT
Mitat Leveys / korkeus / syvyys
(mm)
596 / 818 - 898 / 575
36
Page 37

Sähköliitäntä
1)
Jännite (V) 220 - 240
Taajuus (Hz) 50
Vedenpaine Min. / maks. baaria (MPa) 0.5 (0.05) / 8 (0.8)
Vesiliitäntä
Kylmä tai kuuma vesi
2)
maks. 60 °C
Kapasiteetti Astiaston koko (henkilölu‐
ku)
13
Energiankulutus Päällä (W) 5.0
Energiankulutus Pois päältä (W) 0.50
1)
Katso arvot arvokilvestä.
2)
Jos vesi kuumennetaan vaihtoehtoisen, ympäristöystävällisemmän energian avulla (esim. aurinkopaneelit, tuu‐
livoima), käytä kuumaa vettä energiankulutuksen vähentämiseksi.
YMPÄRISTÖNSUOJELU
Kierrätä materiaalit, jotka on merkitty
merkillä . Kierrätä pakkaus laittamalla
se asianmukaiseen kierrätysastiaan.
Suojele ympäristöä ja ihmisten terveyttä
kierrättämällä sähkö- ja
elektroniikkaromut. Älä hävitä merkillä
merkittyjä kodinkoneita kotitalousjätteen
mukana. Palauta tuote paikalliseen
kierrätyskeskukseen tai ota yhteyttä
paikalliseen viranomaiseen.
37
*
Page 38

38
Page 39

39
Page 40

156919520-A-322017
 Loading...