

Page 1
Montagevorschrift und Gebrauchsanleitung
für die Dunstabzüge
Prescriptions de montage et mode d’emploi de la hotte aspirante
Instruction on mounting and use of the cooker hood
Istruzioni di montaggio e d’uso della cappa aspirante-filtrante
JDK 8420 E, JDK 9420 E
Der Umwelt zuliebe auf
Recycling-Papier gedruckt
Imprimé sur papier recycle
For this instruction manual has
been used recycled paper
3
12
A
4
5
Questo libretto è stato
stampato su carta riciclata
L 383 Ed. 09/93
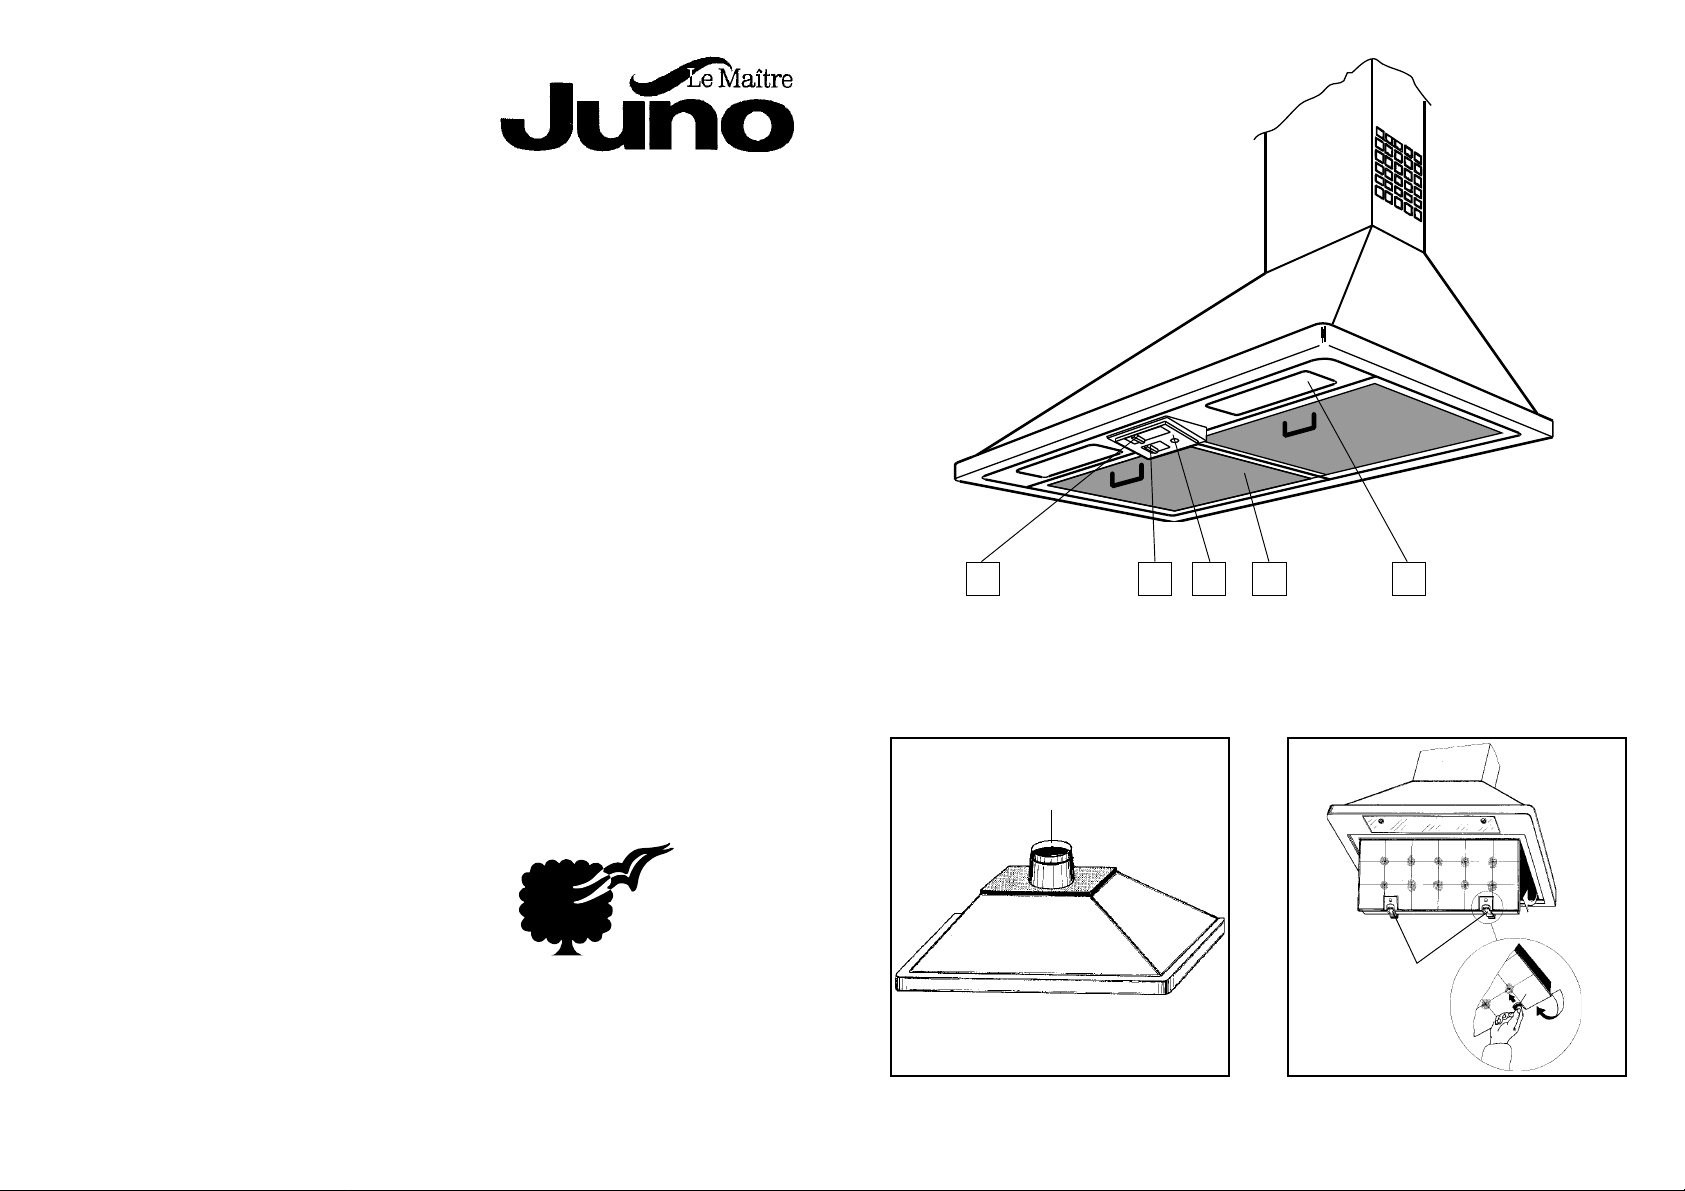
Fig. 1
B
B
Fig. 2
Page 2
Ø5-20
5x45
E
Fig. 3
G (2,9x13)
Ø 8
F (2,9x9,5)
3,5x16
I
C
D
Fig. 4
Fig. 6 Fig. 7
F (2,9x9,5)
E
L
P
M
2,9x13
G
(Ø 2,9 x 13)
Fig. 8 Fig. 9
Fig. 5
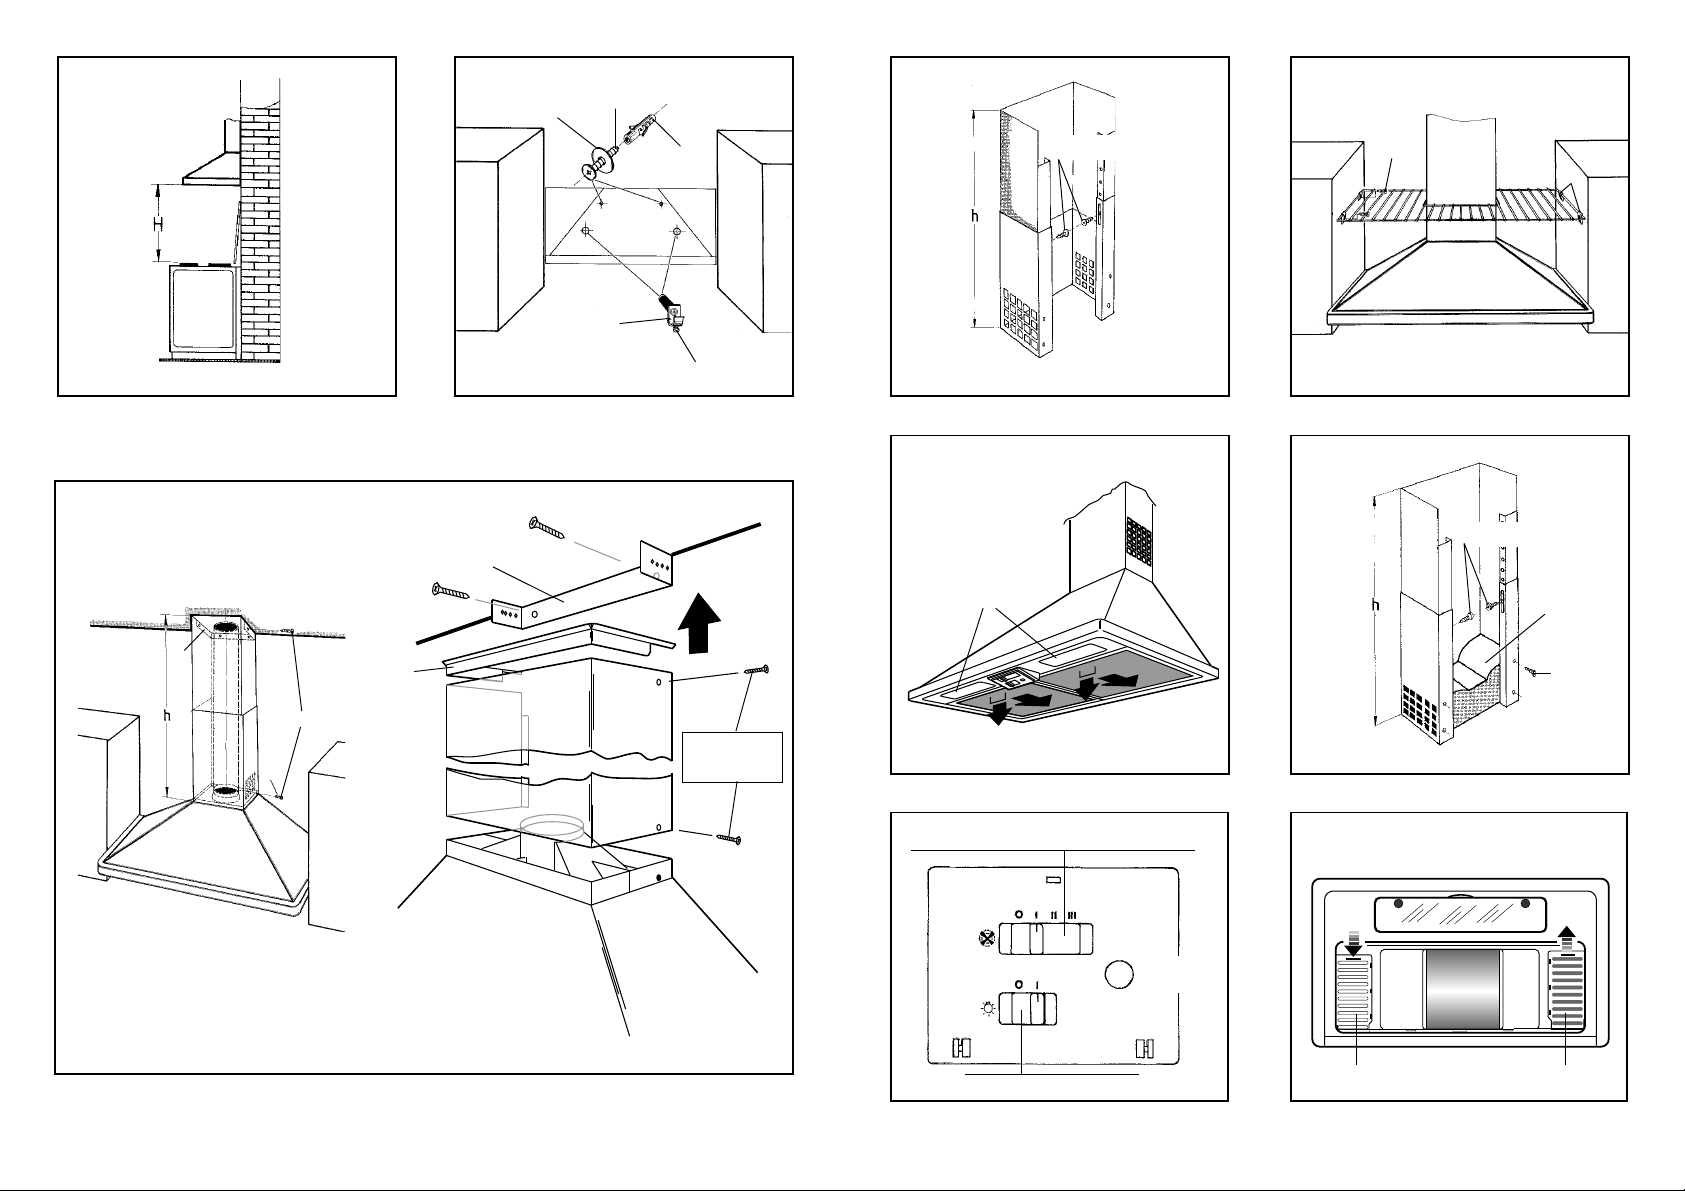
Schalter für die Leistungsregelung des Lüfters
KontrollLeuchte
Schalter für die Beleuchtung
Fig. 10 Fig. 11
SS
Page 3

vis fournies (Fig. 9).
Option: montage des étagères
(Fig. 7)
Sur les meubles adjacents, fixer les 4
supports latéraux I aux dimension voulues
et poser les étagères.
Fonctionnement
Les hottes JDK 8420 et JDK 9420 sont
fournies d’un moteur à plusieurs vitesses.
Pour un bon rendement, on conseille
d’utiliser les basses vitesses en conditions
normales et les vitesses plus élevées en
cas de hautes concentrations d’odeurs et
de vapeurs.
Nous vous recommandons de mettre
l’appareil en marche avant de procéder à la
cuisson d’un plat quelconque et de laisser
fonctionner l’appareil pendant 10 minutes
encore après la cuisson, jusqu’à ce que
toute odeur ait disparu.
Entretien
Débrancher l’appareil du réseau électrique
avant de procéder à toute opération d
entretien.
Filtre à graisse
La hotte est munie d'un filtre à graisse
métallique.
Il sert à retenir les particules de graisses en
suspension.
En cas d'utilisation normale, le filtre à graisse
doit être lavé une fois par mois au lavevaisselle ou bien avec un peu de savon
dissout dans de l'eau tiède; bien laisser
sécher le filtre avant de le remonter.
Pour le démonter, le pousser vers l’arrière
et l’enlever en le tirant vers le bas (fig. 8).
Filtre à charbon
Ce filtre élimine les odeurs et les vapeurs
qui se forment pendant la cuisson.
En conditions d’usage normal, il faut le
remplacer tous les 6-8 mois.
Pour le commander, s’adresser au
fournisseur Ne jamais le laver.
Pour le démonter, enfoncer les touches B
vers l’intérieur et le tirer vers le bas (fig. 2).
Attention
Le non respect des normes d’entretien de
l’appareiI et de remplacement et nettoyage
des filtres comporte des risques d’incendie.
Nous recommandons donc vivement de
respecter ces instructions.
Remplacement de la lampe
—Débrancher l’appareil du réseau
électrique.
— Ouvrir le plafonnieres L en tournant les
verrous et remplacer l’élément
défectueux, par une élément identique
(40 W-max. E14) (fig. 8).
— Si l’éclairage ne marche pas et au cas ou
l’on désirerait s’adresser au service
après-vente, il faudra d’abord contrôler
le montage correct de la lampe.
Nettoyage
Pour le nettoyage extérieur de la hotte,
utiliser un chiffon imbibé d’alcool ou des
détergents liquides neutres. Eviter l’usage
de tout produit abrasif.
Cet appareil est conforme aux normes
87/308/EWG concernant les antiparasites.
GB
Hood Description
1) Motor speed button
2) Light button
3) Operating light
4) Exhaust grate
5) Work-light
Use
The hood may be used as follows:
— Exhausting version
— Recycling version
Exhausting version
The air is vented outdoors by a duct which
must be connected to the coupling ring A
(Fig. 1).
For JDK 9420 hood only:
Check if the internal shutters S are opened
before using the hood (Fig. 11).
Choosing the exhausting pipe
The coupling ring A has a diameter of
120mm.
We suggest to use Ø 120 mm exhausting
pipe.
Recycling version
The air is filtered through a carbon filter and
recirculated into the room through the grating
on the lower chimney part.
This version is used when there is no exhaust
duct for venting outdoors or when it is
impossible to install one.
To use the hood in this version, proceed as
follows:
— If no carbon filter is supplied with the
hood, ask the technical assistance
service or the manufacturing company
for one and specify the hood model.
— Dismount the metal grease filters.
— To install the carbon filter, fit it in the seat
at the back and fasten it at the front with
the two hooks B (Fig. 2).
— Re-fit the metal grease filters.
For JDK 9420 hood only:
Attention! Close the shutters S before using
the hood in this version.
Installation
When installed, the hood must be not less
than 65 cm. above electric burners or 75
cm. above gas or mixed-fuel burners.
(h,Fig.3).
Warning!
— If the hood is run at the same time as a
burner or fireplace that depend on
ambient air (for example gas, Diesel,
coal or wood heaters, water heaters,
etc.) be careful, because the hood, when
it exhausts the air, removes the ambient
air required by the burner or fireplace for
combustion.
— For secure operation and to prevent
discharged gas from coming back in, the
vacuum must not exceed 0,04 mbr.
This may be done by making sure the air
inlet into the room passes through non-
closing openings such as air recycling
wall boxes, doors, windows or with other
technical measures.
—No food must be cooked flambé
underneath the hood.
14
15
Page 4

The use of an unprotected flame is
dangerous for the filters and could cause
fires.
Therefore, never use an open flame
under the hood. When frying foods, never
leave the pan alone because the cooking
oil could flare up.
— The hood must not be connected to fuel
exhaust flues (boilers, heating systems,
water heaters, etc.).
— Please, keep to the provisions of official
directives regarding the question of fume
discharge.
— The manufacturers refuse to accept any
responsibility for damage to the hood or
its catching on fire because of failure to
observe the above instructions.
Suggestions for the installation and
use of the hood
— The horizontal sections of the pipe must
be slanted slightly upwards (about 10%)
to ensure an easy flow of the air outwards.
— The best performance of the unit is
obtained in the external exhaust model
(suction), therefore in the limits of the
possibilities it is advised to use the
external exhaust (suction) type.
— The best performances are obtained with
short pipes (max. 4 m) and with few
curves.
Electric connection
Before completing any connection, make
sure the house voltage corresponds with
the voltage indicated on the label affixed
inside the hood.
The hood is supplied with a standard plug;
connect it to a correspondingly standard
socket. In the case is intended to connect
the appliance permanently to the mains
after having removed the plug supplied,
must be fitted a two-pole switch conforming
to regulations with an opening distance
between contacts of not less than 3mm.
The manufacturers are not liable for any
problems caused by the user’s failure to
observe the above instructions.
Fastening the hood to the wall
(Fig. 4)
— Position the template in the correct
position and make two 8mm diameter
holes and two 12mm diameter holes.
— Fit the two 8mm diameter plugs in the top
holes.
— Fasten the two hooks C in the bottom
holes.
— Hang the hood on the hooks and level it
with the screws D.
— Secure it in place with the two 5x45 mm
screws and 5-20 mm diameter washers
in the top holes. The screws and washers
are standard equipment.
Installing the duct for exhausting
version (Fig. 5-6)
— Fasten the top support E to the wall close
to the ceiling on the perpendicular of the
bottom connections. To do use the two
8mm diameter screws and plugs supplied
as standard equipment.
Insert the plastic mould P on the duct.
— Take the measure between the ceiling
and the hood top, and adjust the duct to
this height. Fasten it with screws F.
— Insert the duct with the slots downwards
and fasten it with the two top screws and
the two bottom screws G.
Installing the duct for recycling
version
Perform the same operations described in
the preceding paragraph. With screws
supplied, fasten the air conveyor M inside
the duct (Fig. 9).
Fastening of shelves (optional)
(Fig. 7)
Fasten the four side supports I to the adjacent
cabinets and place the shelf on the supports.
Operation
The hoods JDK 8420 and JDK 9420 are
provided with a motor with three speed.
For the best performance, we recommend
using the low speeds in normal conditions
and the high speeds in particular cases of
strong odour and vapour concentration.
We recommend starting up the hood a few
minutes before cooking and keeping it
running until all the odours have been
eliminated.
Maintenance
Before performing any maintenance
operation, disconnect the hood from the
electricity.
Grease filter
This serves to hold the grease particles in
suspension.
To remove the filter, push it towards
the back of the hood and pull it
downwards (Fig. 8).
To clean, wash it in hot water and
biodegradable detergent or in a dishwasher.
Let dry before reinstalling.
Clean it at least once a month.
Carbon filter
This filter dissolves cooking odours.
It should be changed every 6-8 months in
normal use. Ask the technical assistance
service or manufacturing company for a
new one.
The carbon filter must never be washed.
To remove the carbon filter, push the pushbuttons B inwards and pull the filter
downwards (Fig. 2).
Important
Failure to observe the rules for cleaning the
appliance and changing and cleaning the
filters may cause fires.
Therefore, we recommend observing these
instructions.
Changing the neon light and starter
— Disconnect the hood from the electricity.
— Remove the light covers L by unscrewing
the fixing screws (Fig. 8).
— Replace the damaged lamp with one of
equal rating (40W-max. E14).
— Before calling for technical service
because the light fails to work, make
sure the lamps are well screwed.
Cleaning
To clean the outside of the hood use a cloth
moistened with denatured alcohol or neutral
liquid detergents. Never use products
containing abrasive.
This appliance meets 87/308 EWG radio
and television noise Standards
16
17
 Loading...