

Page 1

- 1 -
Industrial
Technologies
HP230B 5” x 5” ROSIN PRESS USER MANUAL
Page 2
- 2 -
Page 3

- 3 -
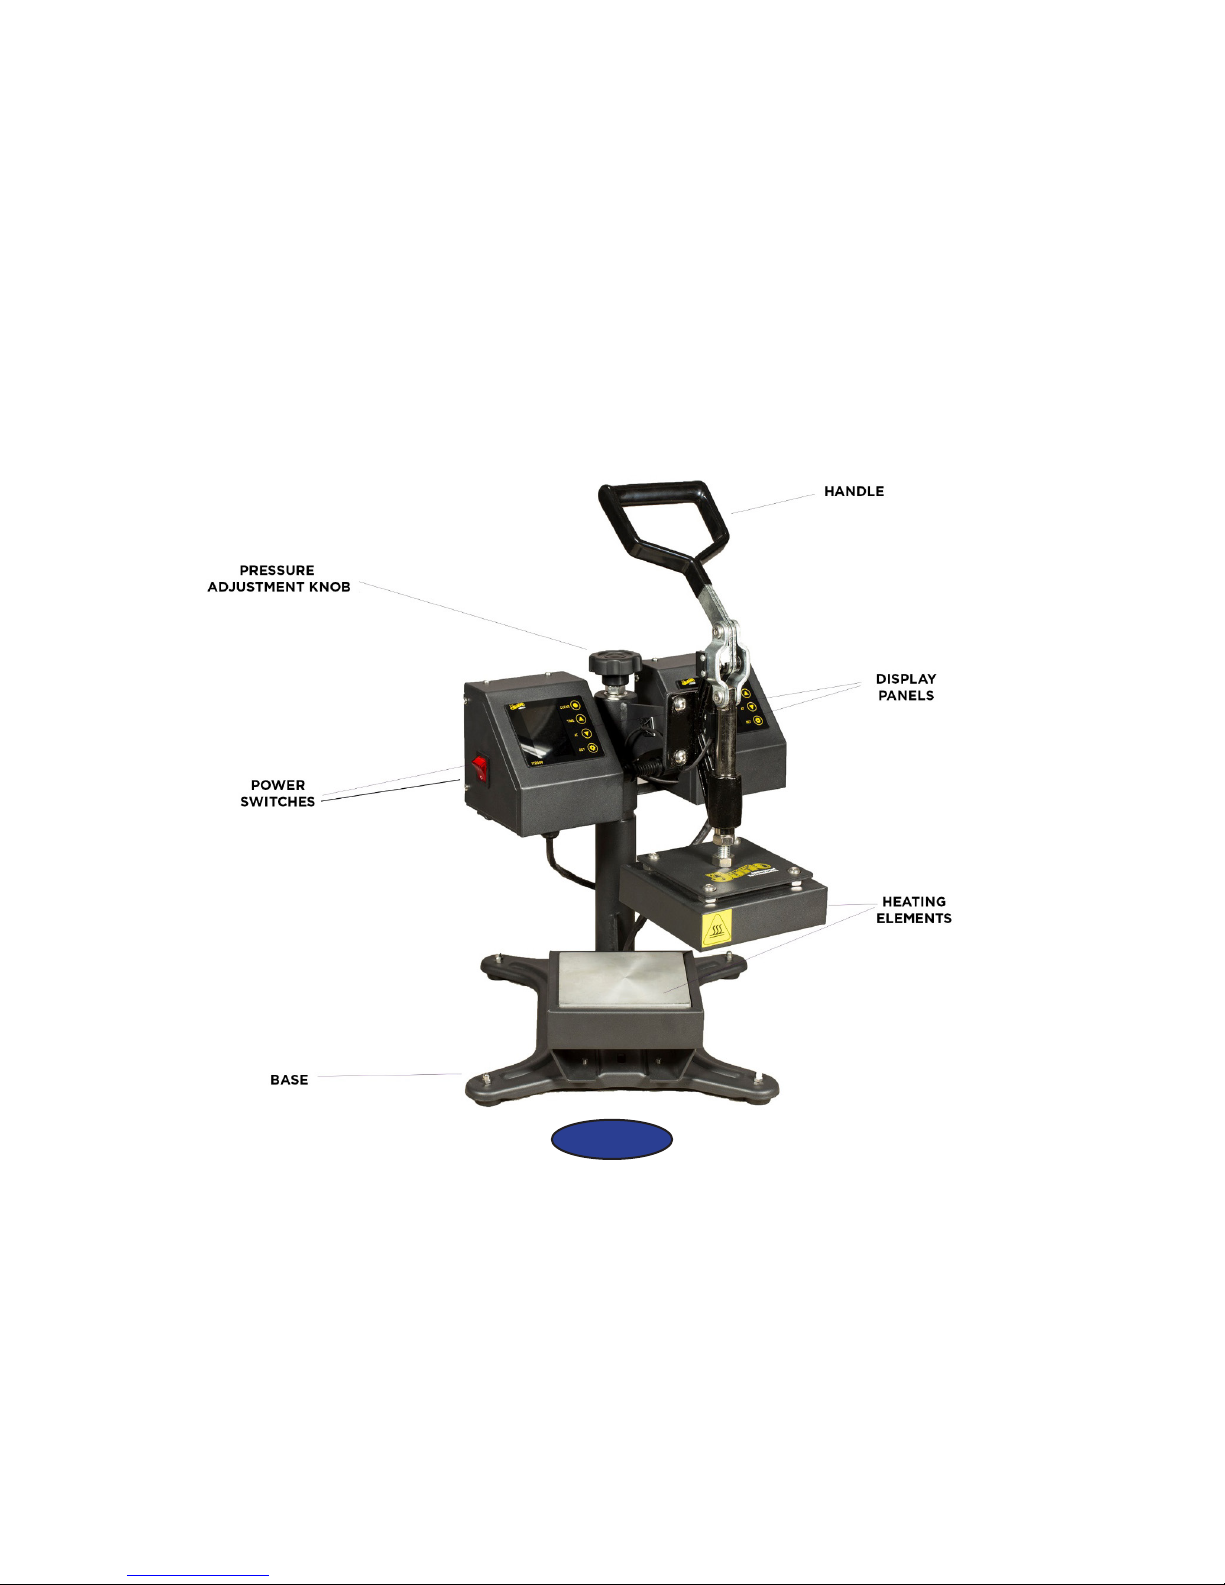
Congratulations on your purchase of this rosin press from Juno Industrial Technologies.
This press is designed to extract rosin from plants under moderate heat and pressure.
The key word here is ‘extract.”
When operating your rosin press, it is important to remember that it’s not about crushing
the plant like one would a piece of fruit when making juice nor “melting” the rosin within
the plant as one would heat up a piece of bacon to remove the fat. Instead, the combination of heat, pressure and time is used to coax the terpenes from the small outgrowths
called trichromes that exist on the plant – particularly on the leaves and flowers.
If you use too much heat, you can actually harm the terpene by burning it or degrading
the potency, and too much pressure can crush plant material into the terpines which also
reduces the quality of your yield.
Instead, use of the lowest possible heat combined with a high even pressure over a reasonable amount of time makes for the best quality and output.
Your Juno press comes equipped with two independently controlled heating plates
(platens) and has the ability to deliver up to 800 lbs of pressure at the pull of a handle.
Though each type of plant is dierent and comes with dierent strains, you can use this
equipment to quickly identify the best combination of temperature, pressure and time to
extract high quality rosins.
Page 4

- 4 -
SAFETY NOTICES
• Use Extreme caution when operating: The platens get hot during operation and moving
parts can cause serious injury.
• Do not set the temperature above 350 degrees Fahrenheit. Excess temperature is un-
safe, diminishes the lifetime of the heating element and will negatively impact rosin yield
and quality.
• Do not use this press in a manner other than intended. Doing so will void the warranty,
damage the machine and may constitute a fire hazard.
• Never leave a powered-on machine unattended. Always power o the machine when
not in use. Allow press to cool completely before storing.
• Keep children away from the press. Burns may occur when touching hot surfaces and
moving parts can cause serious injury.
• Do not allow the power cord to touch hot surfaces.
• Do not operate the rosin press if the equipment has been damaged. Do not attempt
to repair this equipment yourself. Take it to a qualified electrician for inspection and repair.
Incorrect assembly or repair cause fire, electric shock, or other injury and will void all warranties.
• Do not overload your electrical circuitry. To reduce the possibility of circuit over-
load, do not operate other equipment on the same circuit. A minimum 20 amp rated cord
should be used. Cords rated for less amperage may overheat and cause a fire hazard.
Page 5

- 5 -
UNBOXING / FIRST TIME SET-UP
1) Remove the rosin press from the cardboard shipping carton, taking special care to remove all Styrofoam bits, plastic wrap or any other materials that may melt or catch fire.
2) Set-up the press in a well ventilated and dry location, free of any flammable materials
when being used.
3) Place the press on a level flat surface with sucient work area around the press where
it cannot touch other objects when the platen swings fully to either side.
4) For added safety, bolt the feet of the press to the table or flat surface to prevent the
press from tipping over when the handle is pressed down.
5) Connect the power cord into a properly grounded three prong electrical outlet with a
minimum 20 amp rating. Circuits with less than 15 amps, or circuits shared with other high
demand equipment should not be used.
If using an extension cord, it should be as short as possible and not less than 12 gauge.
Heavy duty cords are recommended.
Page 6

- 6 -
Page 7

- 7 -
CALIBRATION
Although your press has been calibrated at the factory, temperature, altitude and pressure
changes during shipping may aect the accuracy of the calibration.
When first opening the box, and after transporting the press to a significantly dierent
environment, it is necessary to perform the AT calibration procedure.
1) Flip both power switches (left and right hand sides of the machine) to the ON position.
Make sure the press is open so that the heating elements are not touching each other.
2) Press and hold the AT button on both control panels for 5 seconds until you hear a
beep and see a blue AT icon start to flash.
The AT calibration will take approx. 2 minutes to complete
Page 8
- 8 -
Page 9

- 9 -
PREPARING FOR OPERATION
1) Flip both power switches (left and right hand sides of the machine) to the ON position.
Make sure the press is open so that the heating elements are not touching each other.
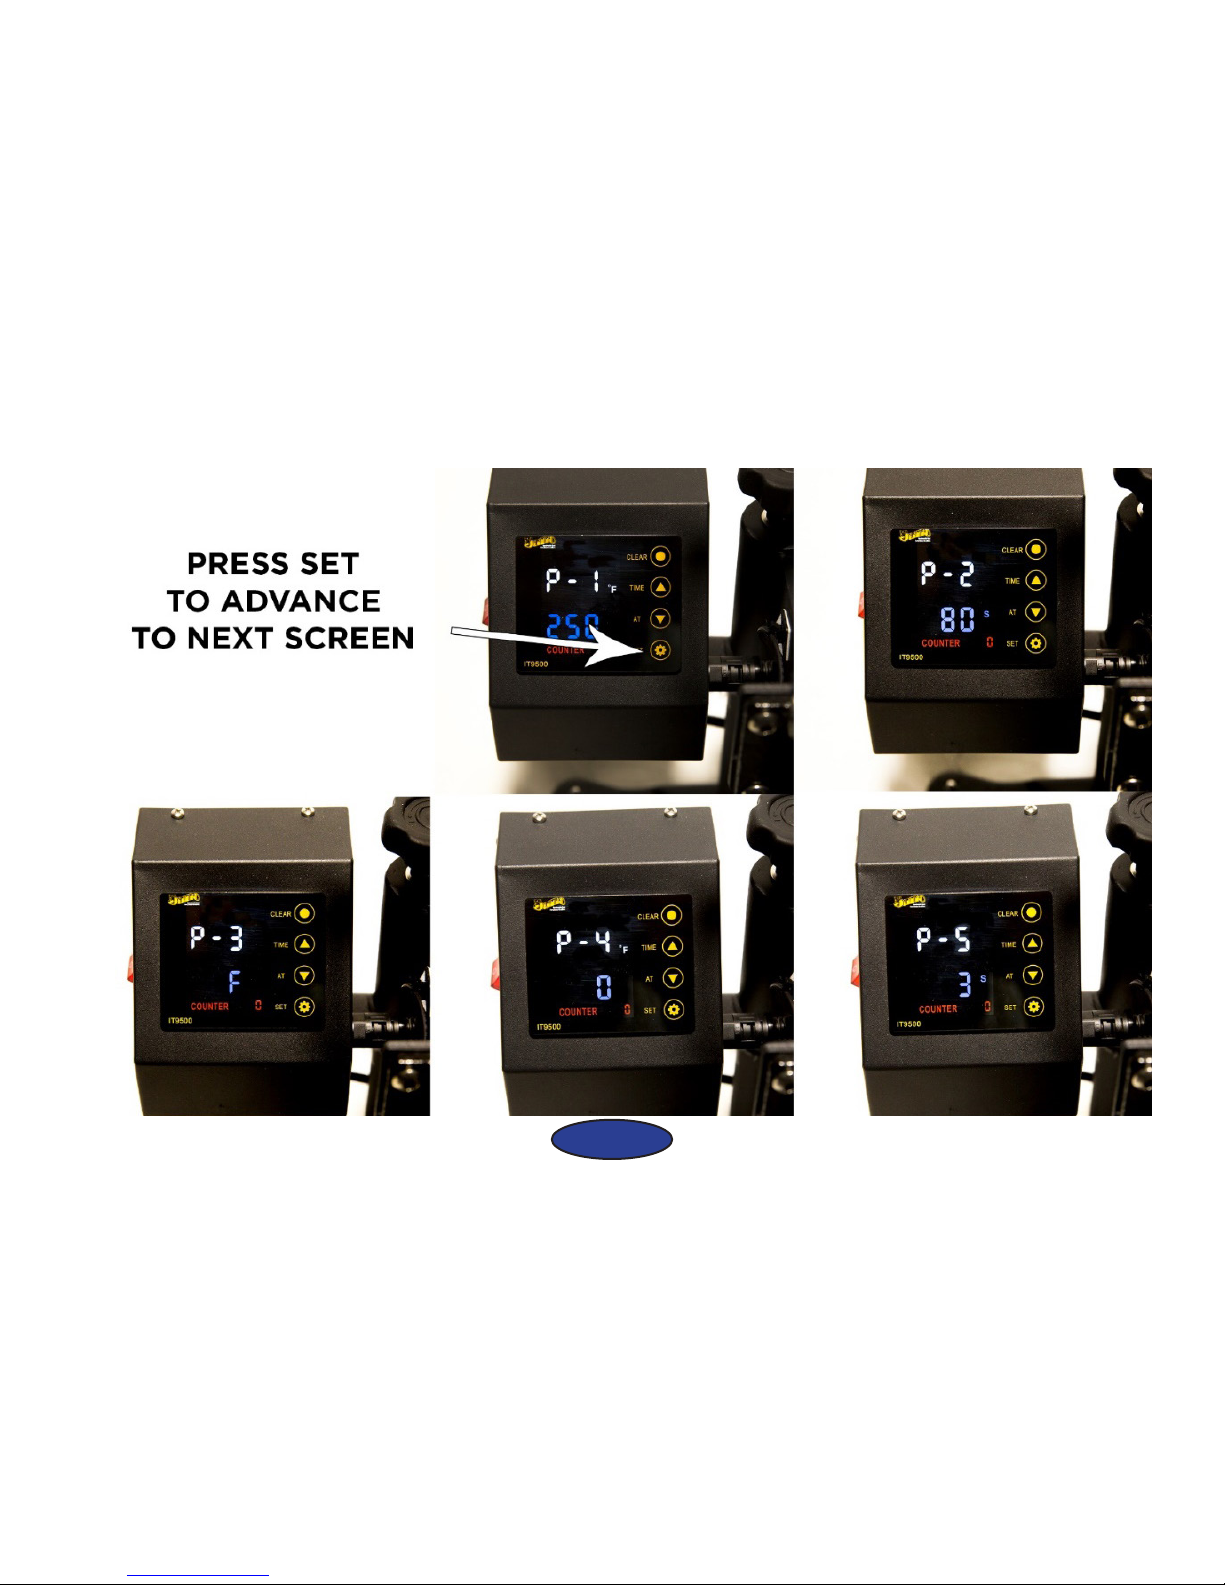
2) The P1 screen allows you to set the requested (SV) temperature. Set the desired temperature for both heating elements by adjusting the up/down arrow keys on both control
panels. The top and bottom heating elements each have separate control panels. Press
SET key when complete to proceed to the P2 control screen. (SV shows requested temperature and PV shows the actual temperature of the platens as they heat up.) Typical
operating temperatures are 170 to 230 degrees Fahrenheit.
3) The P2 screen sets the countdown timer which will issue a beep, signaling you to open
the press and remove the rosin. Use the up/down arrow keys to enter the number of seconds for the countdown timer. Press SET key to advance to the P3 screen.
4) The P3 screen allows you to select Celsius or Fahrenheit for the temperature display.
5) The P4 screen allows you to adjust temperature compensation of the PV value. It is
normal for the PV temperature to vary approx. 12 degrees +/- from the SV setting. In cases
where the two values are more than +/- 12 degrees, it is possible to adjust the PV value. If
the PV is above the SV value, enter a negative number in the P4 setting. If the PV value is
Page 10

- 10 -
below the SV value, enter a positive number in the P4 setting. Note that this is a percentage compensation, not a one-for-one temperature in degrees value.
6) The P5 screen allows you to advance the time for the beep to sound before the countdown timer has expired. This is handy in cases where you want to be notified a few seconds earlier so that you have time to get ready to open the press at the exact moment the
countdown timer expires. Press SET to complete the sequence of adjusting all P1-P5 settings
It should take your press approx. 15-20 minutes to reach requested operating temperature.
IMPORTANT
ALWAYS REMEMBER TO TURN OFF AND UNPLUG YOUR ROSIN PRESS AFTER USE
Page 11

- 11 -
PRESSING ROSIN
1) Adjust the pressure knob at the top of the press to increase or lower the pressure that will be
applied when closing the handle. Correct pressure is achieved when the handle can be closed with
a moderate amount of eort. If the handle becomes too hard to close, you have probably turned
the pressure knob too tightly and you may damage the pressing mechanism.
2) Load plant extract into a filter bag and flatten the plant material to make it as square and as
flat as possible. Fold the ends of the filter bag under itself, place the filter bag between a sheet of
folded parchment paper and place the parchment paper on the lower heating element of the rosin
press so that the filter bag is centered on the bottom element.
3) Push the handle down part way to allow the plant material to flatten in the bag. Once aligned,
fully depress the handle so that full pressure is applied. Closing the press will start the countdown
timer.
4) Once the countdown timer has expired open the press and remove the parchment paper.
5) Depending on the desired yield you may want to fold over the filter bag and press it a second
time. For a second pressing, be sure to use either a fresh piece of parchment paper or a dierent
section of the parchment paper so that extract from the first pressing is not being reheated.
6) Using a rosin tool, scrape the rosin from the parchment paper. The rosin is now ready for use.
Page 12

- 12 -
RECOMMENDED SETTINGS
The greatest single factor impacting the yield of rosin will be the quality and freshness of
the plant product being used. Below are the variables ranked in order if importance.
When considering yield (over quality), the ranking is as follows:
1) Quality and freshness of plant product
2) Humidity of plant product (target 50% - 65%)
3) Pressure (higher pressure is better)
4) Temperature (190 degree Fahrenheit and above)
5) Micron size of filter for type of product pressed
6) Time (less time is needed when temperature is higher)
When considering quality (over yield), the ranking is as follows:
1) Quality and freshness of plant product
2) Humidity of plant product (target 50%-65%)
3) Time (slow is the way to go)
4) Pressure (slowly adding pressure in stages may work best)
5) Micron size of filter for type of product pressed
6) Temperature (170 - 190 degrees typical)
Page 13

- 13 -
In the case of dry or older plant material, you can expect to see significantly less yield no
matter how much pressure/temperature/time you apply. Before using drier material you
should always take steps to increase the moisture content of the plant material to above
50% (or even higher) to allow the rosins to form.
Storing the plant material in a humidor or cigar box with a moisture pad and moisture
gauge is recommended.
The optimal pressure/temperature/time settings will vary, depending on the type of product being pressed, however, typical ranges you might experience are:
170 – 230 degrees Fahrenheit
400 – 800 pounds downward pressure
1 minute to 20 minutes press time.
You will need to test and adjust to get maximum yield for each plant variety.
A colder pressing (170 to 190 degrees Fahrenheit for 90 to 300 seconds) will generally
produce a higher quality rosin but with less yield.
A hotter pressing (190 degrees to 230 degrees for 60 to 180 seconds) will produce more
yield, but quality is more likely to be impacted.
Page 14

- 14 -
For best results, start around 170 degrees and gradually try higher temperatures. If you’re
heating higher than 230 degrees, you’re probably impacting quality.
Recommended Filter Bags:
30 micron – sifted fine powder
90 micron – flower [most versatile micron size]
120 micron – drier flower / moist trim
160 micron – trim
To ensure quality results, Juno recommends using rosin filter bags ideally sized to match
our rosin presses. Juno brand 2” x 4” rosin filter bags are available in a selection of micron
sizes from 30 to 160 microns, depending on the type of material being processed.
Page 15

- 15 -
5 QUICK TIPS TO FIND BEST RESULTS
1 ) Freshness Counts – Just like fresh fruit and fresh flowers, you’ll want to press plant material
that is freshly dried. That smell you get o of fresh material comes from the terpenes. If your
material doesn’t have a strong aroma, your yield will be low to non-existent.
2) Quality ingredients make quality product. Just as better grapes make for better wine, starting
with better product will result in better rosin. The Rosin Press can help you with yield and preserve the quality that is there, but it can’t help improve the quality of the materials you’re starting
with.
3) Use the right bags. Using the wrong bag can reduce your yield or allow plant matter to contaminate your rosin. In general, 90 micron bags are the good all-around bags for most usage, but
feel free to experiment a bit to find a bag that might produce higher yields for your strain without
forgoing quality.
4) Relative Humidity makes for a better batch. If your plant material is dry when you crush it, the
terpenes will be absorbed into it during the crushing process. You might want to invest in a humidor or humidity packs to make sure your plant is moist without being wet before you press.
5) An even crush seems to help. When you pack your bag, an uneven, lumpy bag will result in an
uneven crush. Working to make sure the plant material is close to uniform in the bag will result in
a more even pressing.
Page 16

- 16 -
CLEANING AND MAINTENANCE
To avoid build-up of contaminants on your equipment it is recommended that you periodically clean the press platens and oil the moving parts.
When cleaning the press:
Disconnect the power cord from the wall outlet and make sure it is o and has cooled
down completely.
Clean the press with a soft cloth and a mild household cleaner, taking special care not to
allow liquid to run down below the heating elements and into the circuitry of the equipment.
Allow press to fully dry (24 hours) before resuming operation
Page 17

- 17 -
TROUBLESHOOTING GUIDE
Before contacting service you should see if the problem you are experiencing is already
addressed here:
ROSIN PRESS WILL NOT POWER ON
* Check that both power switches on left and right side of machine are ON. You should see
both displays light up when unit is on. Check that power cord has not come loose from the
press.
* Check that the other end of the power cord has not come loose from the wall socket.
Verify that the power at the wall socket works by unplugging the press and connecting
a lamp to the same exact outlet where the press was connected. (Note that some rooms
have a wall switch that controls the top or bottom plug at an outlet separately from the
other plug in the same outlet. Verify that power is coming to both outlets)
SCREEN IS BLANK
* Verify that power cord is connected and both switches (left and right side) are ON
Page 18

- 18 -
ROSIN PRESS WILL NOT HEAT PROPERLY
* Check that both power switches on the left and right sides of the press are ON. Top and
bottom plattens each need to be turned on separately.
* Re-run AT calibration procedure described on page 7 of this User Manual
* If SV (requested) temperature varies significantly from PV (actual) temperature, adjust
oset using P4 calibration method described on page 9 of this User Manual
If your issue is not resolved here, it may already be addressed in the user forums
or online support section at https://support.uscutter.com/support/home
Preserve the shipping carton: Please do not discard or disassemble the carton this rosin
press came in. It was designed to hold the weight of this machine during shipping.
Should you need to return the equipment due to warranty or repair, you will need it. Do
not attempt to ship this equipment in a dierent container.
Page 19

- 19 -
SPECIFICATIONS
Platens: 5” x 5” Non-Stick coated (heating area is 4.75” x 4.75”)
Heat Press Style: Swing-Away
Voltage: 110V-120V 60Hz
Temperature Range: 0° - 410º F
Time Range: 0-999 Seconds
Micro processor controlled gauges
Net Weight: 34 lbs
Gross Weight / Dimensions: 40 lbs - 18x15x17 inch cardboard carton
Page 20

- 20 -
Warranty and Returns
Juno Rosin Presses are distributed in the United States exclusively through USCutter, and USCutter handles all customer service, repairs and returns on the Juno product line. The warranty for this products product is 180 days from date received.
USCutter will repair or replace parts and equipment found to be defective in materials or workmanship during the warranty period
subject to the following:
USCutter will supply new or rebuilt parts to replace parts that are found to be defective within the warranty period instead of replacing
the equipment outright.
USCutter will ship these parts via UPS ground shipping with no cost to the customer as long as the shipment is within the United
States. Full telephone based support will be given by USCutter representatives to aid the customer in the replacement of any parts
sent.
If USCutter, at its sole discretion, determines that the equipment is not able to be repaired, then an RMA number will be assigned and
the customer authorized to return the equipment for replacement.
Any equipment older than 30 days may be replaced with a certified refurbished unit at our discretion.
Warranty and Exchange Process:
If you are having issues with a product or service purchased from the company, please contact the support department at www.support.uscutter.com. The site features the latest contact information, links to our knowledge base, live chat, troubleshooting documents
and a system for submitting a “ticket” to request customer and product support services or to obtain a product return authorization.
All returns must be authorized by an USCutter representative before the product shipped. The USCutter representative will issue a
Return Merchandise Authorization (RMA) number that must be put on the outside of the returned item packaging.
Any item being returned to USCutter (excluding items over 70 lbs which require freight shipping) are eligible for a flat rate ground
shipping label at the market rate. Items determined to be defective within first 30 days or improperly shipped will receive this label
free of charge. The customer may choose their own shipping method as long as tracking information is communicated to and acknowledged by USCutter.
Page 21

- 21 -
Platens and other elements must be cleaned of any plant matter or residue before they are packed for shipment. All items must be
returned in original packaging. USCutter will not be responsible for any damage of returned items that is a result of improper shipping
methods.
US Cutter will not be responsible for any item sent back without an RMA in place. In the event that an item is sent without an RMA, it
may be returned to customer only if they will be responsible for any shipping costs.
Restocking Fees: Any item returned as defective or under warranty will be assessed a 20% restocking fee if returned for cash refund.
Warranty does not include coverage of “consumables” or any item that is commonly subject to wear and tear. This would include
blades, blade holders, cutting strips and vinyl once packaging is opened.
Defective Items: If any item arrives in unusable condition, USCutter must be notified within 30 days or receiving the product or replacement may not be provided.
USCutter reserves the right to request proof in the form of photos as proof of defects or to document failure of parts replaced under
warranty.
USCutter DOES NOT COVER ANY INDIRECT DAMAGES OR LOSS OF PRODUCT OR REVENUE. Repair or replacement of defective
parts or components is under the terms of this warranty is the EXCLUSIVE REMEDY
. USCutter is not liable for any incidental, consequential, or indirect damages of any kind, including without limitation personal injury,
death, property damage, environmental damage, theft or loss of product, loss of revenue or profits, business interruption, or any other
business or commercial loss. USCutter is not liable for any claims or lawsuits asserted against our customers or any claims or lawsuits
related to the unlawful or fraudulent use of our product.
Damage suered to equipment due to neglect, abuse, misuse, power surge or act of nature is not covered.
THE WARRANTY CONTAINED HEREIN IS EXCLUSIVE AND THEREFORE NO OTHER EXPRESS, IMPLIED OR STATUATORY WARRANTIES APPLY. WARRANTIES OF MERCHANTABILITY OR FITNESS FOR A PARTICULAR APPLICATION ARE EXPRESSLY EXCLUDED.
Page 22

- 22 -
Contact Us
Contact USCutter Support for assistance.
Support: 425-902-1302 M-F 6:30am- 4:30pm
Sales: 425-481-3555 M-F 6:30am- 4:30pm
For more information:
The latest information about this product,
including updated troubleshooting guides and how-to videos,
can be found in the support section at:
www.uscutter.com
Copyright 2017 USCutter
 Loading...