

Page 1

Page 2
CAUTION
RISK OF ELECTRIC SHOCK
DO NOT OPEN
CAUTION: TO REDUCE THE RISK OF ELECTRIC SHOCK, DO NOT
S
P
R
EMOVE COVER (OR BACK). NO USER-SERVICEABLE
I
NSIDE
EFER SERVICING T UALIFIED
O Q. R
S
ERVICE PERSONNEL.
ART
The lightni ng f la sh w it h ar ro wh ea d sy mb ol
within an equ il at er al t ri an gl e is i nt en de d to a le rt
the user to the p re se nc e of u ni ns ul at ed
dangerous v ol ta ge w it hi n th e pr od uc t` s
enclosure that may be o f su ff ic ie nt m ag ni tu de t o
constitute a risk of elec tr ic s ho ck t o pe rs on s.
The exclamation p oi nt w it hi n an e qu il at er al
triangle is inten de d to a le rt t he u se r to t he
presence of impor ta nt o pe ra ti ng a nd
maintenan ce (s er vi ci ng ) in st ru ct io ns i n th e
literature ac co mp an yi ng t he a pp li an ce .
WARNING:
TO RE DU CE THE RISK OF FIRE OR ELECTRIC
SHOCK, DO N OT E XP OS E THIS PRODUCT TO RAIN
OR MOISTURE .
WARNING:
TO RE DU CE THE RISK OF FIRE OR ELECTRIC
SHOCK, AND AN NO YI NG I NT ER FE RE NC E, U SE THE
RECOMMEND ED AC CE SS OR IE S ON LY.
FCC NOTIC E:
This equipment ha s be en t es te d an d fo un d to c om pl y
with the limits for a C la ss B d ig it al d ev ic e, p ur su an t to
part 15 of the FC C Ru le s. T he se l im it s ar e de si gn ed t o
provide reasona bl e pr ot ec ti on a ga in st h ar mf ul
interferenc e in a r es id en ti al i ns ta ll at io n. T hi s eq ui pm en t
generates , us es a nd c an r ad ia te r ad io f re qu en cy e ne rg y
t d ii
and, if no nstalled and us e n accordance wi th t he
instructions, may cause har mf ul i nt er fe re nc e to r ad io
communications.
However, t here i s no gua ra nt ee t ha t in te rf er en ce w il l no t
occur in a particul ar i ns ta ll at io n. I f th is e qu ip me nt d oe s
cause harmful inter fe re nc e to r ad io o r te le vi si on
reception, wh ic h ca n be d et er mi ne d by t ur ni ng t he
equipment off a nd o n, t he u se r is e nc ou ra ge d to t ry t o
correct the inter fe re nc e by o ne o r mo re o f th e fo ll ow in g
measures:
Reorien t or r el oc at e th e re ce iv in g an te nn a.
Increase th e se pa ra ti on b et we en t he e qu ip me nt a nd
receiver.
Connect t he e qu ip me nt i nt o an o ut le t on a c ir cu it
diffe re nt f ro m th at t o wh ic h th e re ce iv er i s co nn ec te d.
Consult the d ea le r or a n ex pe ri en ce d ra di o/ TV
technician for he lp .
This equipment should be installed and operated with minimum
distance 20cm between the radiator and your body.
FCC WARNING:
To assure continued complianc e, f ol lo w th e at ta ch ed
installation instru ct io ns a nd u se o nl y sh ie ld ed c ab le s
when connec ti ng t o ot he r de vi ce s. M od if ic at io ns n ot
authorized by t he m an uf ac tu re r ma y vo id u se r` s au th or it y
to operate th is d ev ic e.
2
Page 3
Before using the unit, be sure to read all operating instructions carefully. Please note that these
are general precautions and may not pertain to your unit.
For example, this unit may not have the capability to be connected to an outdoor antenna.
1) Read these instructions.
All the safety and operating instructions should be read before the product is operated.
2) Keep these instructions.
The safety
3) Heed all warnings.
All warnings on the product and in the operating instructions should be adhered to.
4) Follow all instructions.
All operating and use instructions should be followed.
5) Do not use this apparatus near water.
Do not
sink or laundry tub; in a wet basement; or near a swimming pool.
6) Clean only with dry cloth.
Unplug this product from the wall outlet before cleaning. Do not use liquid cleaners or aerosol
cleaners
7) Do not block any ventilation openings. Install in accordance with the manufacturer's
instructions.
Slots and openings in the cabinet and in the back or bottom are provided for ventilation, to ensure
reliable operation of the product and to protect it from overheating
blocked or covered. The openings should never be blocked by placing the product on a bed, sofa,
rug or other similar surface. This product should never be placed near or over a radiator or heat
source. This product should not be placed in a built
unless proper ventilation is provided or the manufacturer's instructions have been adhered to.
8) Do not install near any heat sources such as radiators, heat registers, stoves, or other
apparatus(including amplifiers) that produce heat.
9) Do not defeat the safety
has two blades with one wider than the other. A grounding type plug has two blades and a
third grounding prong. The wide blade or the third prong are provided for your safety. If the
provided plug does not fit
obsolete outlet.
10) Protect the power cord from being walked on or pinched particularly at plugs, convenience
receptacles, and the point where they exit from the apparatus.
11) Only use attachments/accessories specified by the manufacturer.
12) Use only with
with the apparatus. When a cart is used, use caution when moving the cart/apparatus
combination to avoid injury from tip-over.
An appliance and cart combination should be moved with care.
Quick stop, excessive force and
appliance and cart combination to overturn.
and operating instructions should be retained for future reference.
use this product near water and moisture, for example: near a bathtub, washbowl, kitchen
. Use a dry cloth for cleaning.
. These openings must not be
-in installation such as a bookcase or rack
purpose of the polarized or grounding-type plug. A polarized plug
into your outlet, consult an electrician for replacement of the
the cart, stand, tripod, bracket, or table specified by the manufacturer, or sold
uneven surfaces may cause the
Portable Cart Warning
13) Unplug this apparatus during lightning storms or when unused for long periods of time.
To protect your product from a lightning storm, or when it is left unattended and unused for long
periods of time, unplug it from
will prevent damage to the product due to lightning and power-line surges.
14) Refer all servicing to qualified service personnel. Servicing is required when the apparatus
has been damaged in any way, such as power-supply cord or
been spilled or objects have fallen into the apparatus, the apparatus has been exposed to rain
or moisture does not operate normally, or has been dropped.
15) Power source
This product should be operated only from the type of power source indicated on the marking label
If you are not sure of the type of power supply to your home, consult your appliance dealer or local
power company. For products intended to operate from battery power, or other source, refer to the
operation instructions.
16) Power lines
An outside antenna system should not be located
electric light or power circuits, or where it can fall into such power lines or circuits. When
installing an outside antenna system, extreme care should be taken to keep from touching such
power lines or circuits as contact with them might be
the wall outlet and disconnect the antenna or cable system. This
plug is damaged, liquid has
in the vicinity of overhead power lines or other
fatal.
3
.
Page 4
17) Overloading
Do not overload wall outlets and extension cords as this can result in a risk of fire or electric
18) Object and liquid entry
Never push objects of any kind into the product through openings as they may touch dangerous
voltage points or short out parts that could result in fire or electric shock. Never spill or spray any
type of liquid on the product.
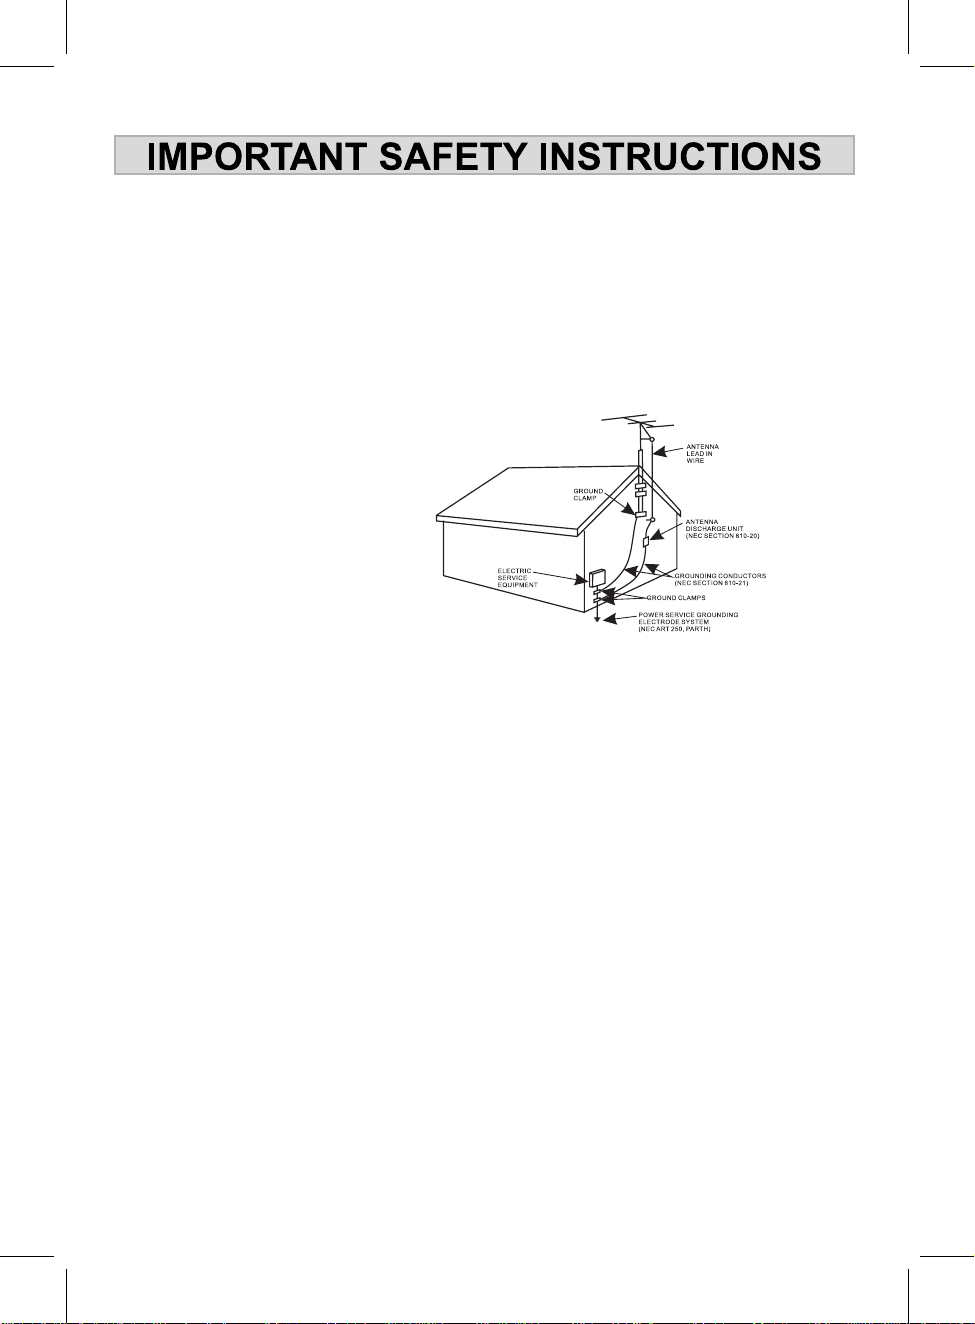
19) Outdoor antenna grounding
If an outside antenna is connected to the product, be sure the antenna system is grounded so as to
Provide some protection against voltage surges and built up static charges. Section 810 of the
National Electric Code ANSI/NFPA 70 provides information with respect to proper to grounding
of the mast and supporting structure, grounding of the lead-in wire to an antenna discharge product,
size of grounding conductors, location of antenna-discharge product, connection to grounding
electrodes and requirements for the grounding electrodes.
20) Service
Do not attempt to service this product yourself as opening or removing covers may expose you to
dangerous voltage or other hazards. Refer all servicing to qualified service personnel.
21) Replacement parts
When replacement parts are required, be sure the service technician uses
specified by the manufacturer or those that have the same characteristics as the original parts.
Unauthorized substitutions may result in fire or electric shock or other hazards.
22) Safety check
Upon completion of any service or repairs to this product, ask the service technician to perform
safety checks to determine that the product is in proper operational condition.
23) Wall or ceiling mounting
The product should be mounted to a wall or ceiling only as recommended by the manufacturer.
24) Damage requiring service
Unplug this product from the wall outlet and refer service to qualified service personnel under the
following conditions.
a) When the power-supply cord or plug is damaged.
b) If liquid has been spilled or objects have fallen into the product.
c) If the product has been exposed to rain or water.
d) If the product does not operate normally by following the operating instructions. Adjust only
those controls that are covered by the operating instructions, as an adjustment of other
controls may result in damage and will and require extensive work by a qualified technician
to restore in the product to its normal operation.
e) If the product has been dropped
f ) When the product exhibits a distinct change in performance-this indicates a need for service.
25) Note to CATV system installer
This reminder is provided to call the CATV system installer
NEC that provides guidelines for proper grounding and, in particular, specifies that the cable
ground shall be connected to the grounding system of the building, as close to the point of cable
entry as practical.
NOTE: Refer all servicing to qualified service personnel. Servicing is required when
the unit has been damaged in any way such as the following: the power-supply cord
or plug has been damaged, liquid has been spilled into unit, the unit has been
exposed to rain or moisture, the unit has been dropped or the unit does not operate normally.
or the cabinet has been damaged.
's attention to Article 820-40 of the
replacement parts
shock.
4
Page 5
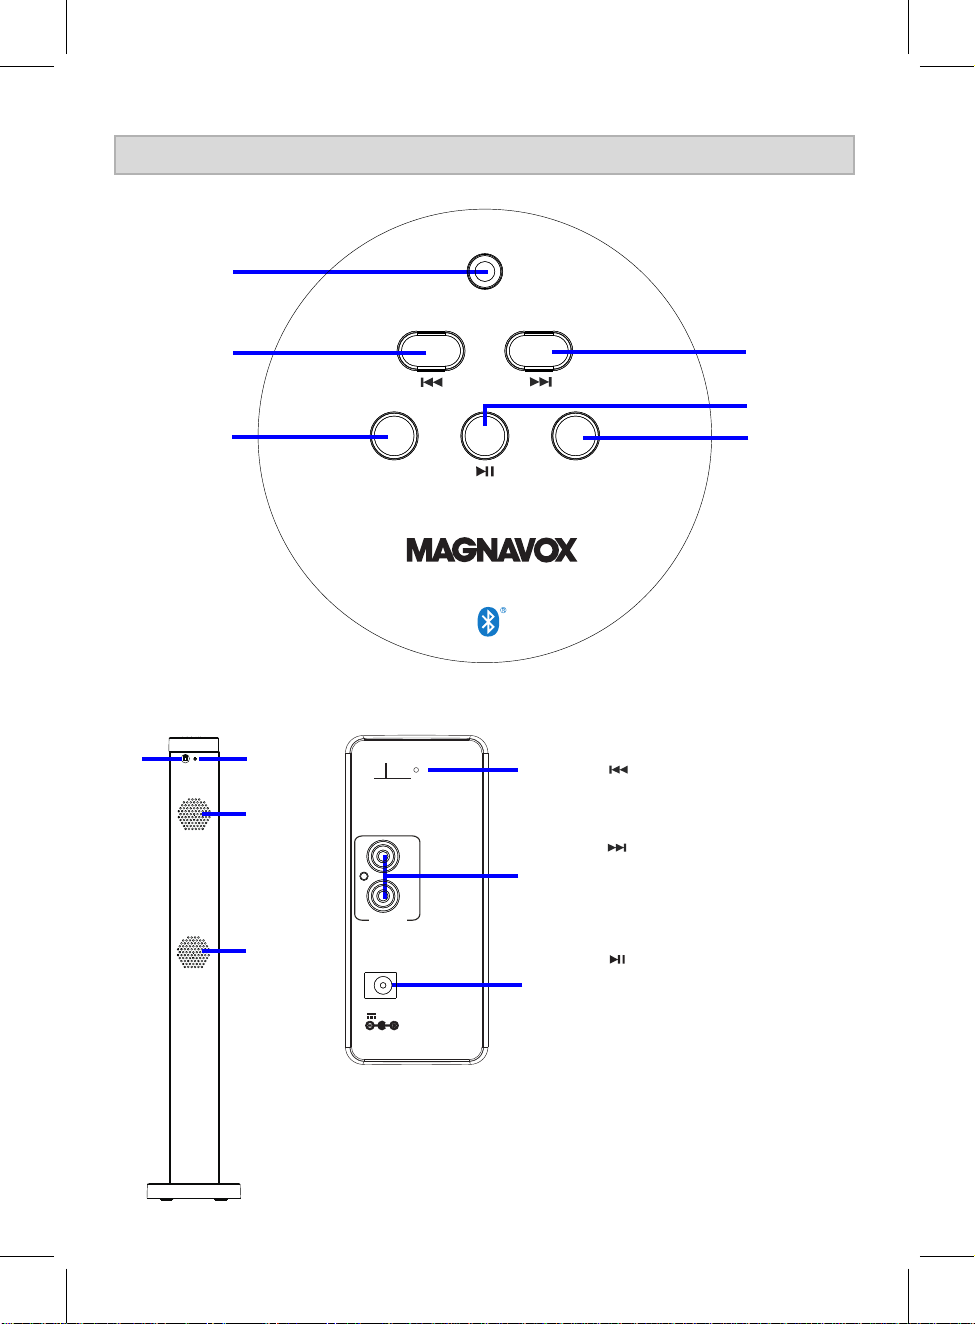
TOP PANEL
LOCATION OF CONTROLS
1
AU X IN
FRONT VIEW
7
2
TU NE- / V OL -
TU NE+ / VO L+
4
STAN DB Y/
SOU RC E
RE SE T
3
5
6
REAR PANEL
1. AUX IN Jack
8
FM ANT
10
2. /TUNE-/VOL- (Skip
backward/Tuning down/
9
L
11
R
LINE I N
9
12
DC IN
DC 9V, 1. 3A
Volume down) Button
3. /TUNE+/VOL+ (Skip
forward/Tuning up/
Volume up) Button
4. STANDBY/SOURCE Button
5. (Play/Pause) Button
6. RESET Button
7. Remote Sensor
8. Indicator
9. Speakers
10. FM ANT (FM wire antenna)
11. LINE IN Jacks
12. DC IN Jack
5
Page 6

REMOTE CONTROL
1
RES ET
7
2
3
8
1. /STANDBY Button
2. RESET Button
3. VOL- (Volume Down) Button
4
5
TUN E TUN E+-
9
6
4. SOURCE Button
5. /TUNE- (Skip backward/
Tuning down Button
6. (Play/Pause) Button
7. (Mute) Button
8. VOL+ (Volume Up) Button
9. /TUNE+ (Skip forward/
Tuning up Button
BATTERY INSTALLATION (REMOTE CONTROL)
First Time Use:
Remove and discard the insulation film as illustrated on the right.
If the button cell is drained, replace it by a new one as below:
1. Push and slide out the button cell holder as Fig.1 below.
2. Replace the button cell with a new CR2025 button cell as the polarity
markings on the rear of the Remote Control as Fig.2 below.
3. Close the button cell holder as Fig.3 below.
Fig.1
Fig.2
Fig.3
6
C
R2025
SN
OPEN
+
PUSH
RELEA SE
Page 7

BATTERY PRECAUTIONS:
Follow these Battery Precaution when using a battery in this device:
1. Use only the size and type of battery specified.
2. Be sure to follow the correct polarity when installing the battery as indicated in the battery
compartment. A reversed battery may cause damage to the device.
3. Do not mix different types of batteries together (e.g. Alkaline and Carbon-zinc) or old batteries
with fresh ones.
4. If the batteries in the device are consumed or the device is not to be used for a long period of
time, remove the batteries to prevent damage or injury from possible battery leakage.
5. Do not try to recharge the battery not intended to be recharged; it can overheat and rupture.
(Follow battery manufacturer’s instructions.)
6. Do not dispose of battery in fire. Battery may explodes or leak.
7. Clean the battery contacts and also those of the device prior to battery installation.
8. This product contains a coin/button cell battery. If the coin/button cell battery is
swallowed, it can cause severe internal burn in just 2 hours and can lead to death.
Keep new and used batteries away from children. If the battery compartment does not close
securely, stop using the product and keep it away from children.
If you think batteries might have been swallowed or placed inside any part of the body, seek
immediate medical attention.
EFFECTIVE DISTANCE OF REMOTE TRANSMITTER
Approx. 16 feet
°
30
°
30
NOTES:
When there is an obstacle between the unit and the transmitter, the unit may not operate.
When direct sunlight, an incandescent lamp, fluorescent lamp or any other strong light shines
on the REMOTE SENSOR of the unit, the operation of the remote may be unstable.
7
Page 8

POWER SOURCE
Connect the small plug from supplied AC/DC Adaptor to the DC IN Jack on the rear of unit then plug the
AC/DC Adaptor to a wall outlet having AC 100-240V~; 50/60Hz.
of unit will illuminate.
The Red Standby Indicator on the top
AC/DC Adapter
To AC outlet
LINE I N
DC IN
DC 9V, 1. 3A
FM ANT
L
R
To the DC IN jack
on the rear of the unit
NOTES:
If you will not use the unit for an extended period of time, unplug the AC/DC Adaptor from wall outlet.
The AC/DC Adaptor is intended to be correctly orientated in a vertical or floor mount position.
8
Page 9

OPERATION
1. Connect the supplied AC/DC Adaptor to the unit and wall outlet as previously instructed. The Red
2. Press and hold the STANDBY/SOURCE Button on the top of unit or press the Button
on the
3. Press the STANDBY/SOURCE Button on the top of unit or press the SOURCE Button on the
4. During playback,
Press the /Tune -/VOL – or /Tune +/VOL + buttons on the unit or the VOL +/- buttons
Press the (MUTE) Button on the Remote Control to turn off the sound temporary, press
Press and hold the SOURCE/LED 1 Button on the top of unit to power On/Off all the
5. When finished, press and hold STANDBY/SOURCE Button on the top of unit or press the
6. If you will not use the unit for an extended period of time, unplug the AC/DC Adaptor from wall outlet.
STANDBY
/
STANDBY
/
GENERAL OPERATION:
Standby Indicator on the top of unit will illuminate.
Remote Control to turn on the unit from standby mode. The color of the indicator will turn to
correspondent color. You will also hear an audible say “Power on”.
Remote Control repeatedly to switch to desired playback mode. The color of the indicator will turn
to correspondent with your selection (see list below):
Playback Mode:
BT (Bluetooth) Blue (and blinking)
FM Radio Green
LINE IN Purple (Red + Blue)
AUX IN Orange (Red + Green)
on the Remote Control to adjust volume level as desired.
again to turn it back.
Decorative LED Lights.
Button the Remote Control to turn the unit to standby mode. The color of the Indicator
will turn to Red.
Color of Indicators:
9
Page 10

BT (Bluetooth):
1. Power on the unit as previously instructed.
2. Press the STANDBY/SOURCE Button on the top of unit or press the SOURCE Button on the
3. Power on the external BT Device and enter to BT searching mode. Start pairing following the on
4. If pairing is complete you may now play music with your external BT Device.
5. During playback:
Press the Button on the unit or Remote Control to pause, press again to resume normal
Press the (MUTE) Button on the Remote Control to turn off the sound temporary, press
Press the buttons on the unit or the VOL +/- buttons
Press and hold the buttons on the unit or press the
When the external BT Device searched the unit, our model number “MHT843n” will appear on
the
If while pairing you are asked for a code please try "0000" or "1234".
1. Power on the external BT Device and enter to BT playback mode.
2. Power on the unit and enter to BT mode as previously instructed. The color of the indicator will turn
3. Wait a few seconds until the unit is automatically paired to the external BT Device. (The Blue
4. After pairing is complete you may now play music with your external BT Device.
/Tune -/VOL – or /Tune +/VOL +
/Tune -/VOL – or /Tune +/VOL +
Listen music from external BT device:
BT (Bluetooth) pairing:
First time use or re-pairing the unit to a new BT Device, pair as follows:
Remote Control repeatedly until the color of the indicator turn to Blue and blink.
screen instructions from the external BT Device. After paired, the Blue Indicator will stop blinking.
playback.
again to turn it back.
on the Remote Control to adjust volume level as desired.
/Tune - or /Tune + buttons on the Remote Control to skip tracks.
Notes:
display of external BT Device.
Normal operation after pairing:
to Blue and blink.
Indicator will stop blinking).
10
Page 11

FM Radio:
1. Power on the unit as previously instructed.
2. Press the STANDBY/SOURCE Button on the top of unit or press the SOURCE Button on the
3. Press and hold the /Tune -/VOL – or /Tune +/VOL + buttons on the unit or press the
4. Repeat the same procedures until the desired station was search and play.
5. If you want researching the stations from beginning (87.5MHz), press the RESET Button on the
Remote
Control repeatedly until the color of the indicator turn to Green.
/Tune - or /Tune + buttons on the Remote Control to search and play the next/previous
available FM station.
unit or Remote Control then search the Radio station as point 3 above again.
Antennas:
This unit has a FM wire antenna on the rear of unit, which provides adequate reception in most areas.
If reception is weak, unwound and extended to its full length or reassemble the other direction/location
to improve reception.
11
Page 12

AUX IN:
1. Connect one side of supplied Audio Connection Cable to the Phones Jack; Line Out Jack or AUX
2. Connect the other side of the cable to the AUX IN Jack on the top of unit as illustrate below:
3. Power on the unit as the instructed earlier.
4. Press the STANDBY/SOURCE Button on the top of unit or press the SOURCE Button on the
5. Plays the music on the connected external Audio Player as usual. (Make sure the volume level
Listen music from external Audio Player such like MP3 Player; Discman … etc:
Out Jack on the external Audio Player.
AUX I N
MP3 Player
Mobile Phone
TUN E- / VOL-
TUN E+/ VOL +
Connect to the Phones; AUX Out;
Line Out Jack of the external devices
(Such like MP3 Player; cell phones;
STAN DBY/
SOU RCE
iPod/iPad ... etc)
Remote Control repeatedly until the color of the indicator turn to Orange (Red + Green).
of the external Audio Player is in high level. Otherwise, sound from this unit may weak).
RES ET
12
Page 13

LINE IN:
1. Connect one side of RCA Connection Cable (not included) to the RCA audio Jacks on the
2. Connect the other side of the cable to the LINE IN Jacks on the rear of unit as illustrate below:
3. Power on the unit as the instructed earlier.
4. Press the STANDBY/SOURCE Button on the top of unit or press the SOURCE Button on the
5. Plays the video/music on the connected external Video/Audio Player as usual. (Make sure the
Listen music from external Video/Audio Player DVD Player/TV …. etc:
external Video/Audio Player.
FM ANT
Video
L
R
LINE I N
DC IN
DC 9V, 1. 3A
white
L
R
red
Line out jacks of
TV/DVD player etc.
Remote Control repeatedly until the color of the indicator turn to Purple (Red + Blue).
volume level of the external Video/Audio Player is in high level. Otherwise, sound from this unit
may weak).
13
Page 14

TROUBLESHOOTING GUIDE
If you are having problems with your unit, please review the guide below before requesting.
SYSTEM POSSIBLE CAUSE POSSIBLE SOLUTION
No power
No sound
Sound
distortion
Radio weak
reception
Remote
not functioning
The unit had not connect to AC power
The unit is in standby mode
Volume is set to minimum
Volume level of paired/connected
device is in low level
Volume level is too high
Volume level of paired/connected
device is too high
The button cell in remote control
is drained
Connect the supplied AC/DC Adaptor to
the unit and wall outlet
Press and hold the STANDBY/SOURCE
Button on the top of unit or press the
/STANDBY Button on the Remote
Control to turn on the unit
Press the /Tune +/VOL + button
on the unit or the VOL + button on
the Remote Control
Rise the volume level of the
paired/connected device
Press the /Tune -/VOL - button
on the unit or the VOL - button on
the Remote Control
Reduce the volume level of the
paired/connected device
Unwound and extended the wire antenna
to its full length or reassemble the other
direction/location to improve reception
Replace with new button cell
Bluetooth
fail to pair
The external BT device is too far
from the unit
The external BT device had
NOT paired to the unit
Place the external BT device
close to the unit
Pair the external BT device to
the unit as page 10 indicates
14
Page 15

GENERAL SPECIFICATIONS
Power source................................................................................DC 9V 1300mA
Speaker...................................................................................................8W x 4ohm per channel
Audio Power..........................................................................5W per channel (Total 10 W, RMS)
Bluetooth version....................................................................................................................V4.2
Bluetooth working range............................................................................ 32 feet in open area
FM radio frequency...............................................................................................87.5-108.0MHz
≤
PACKAGE INCLUDES:
1 x Owner's Manual
1 x Remote Control (Uses 1 x CR2025 Button Cell, included)
1 x AC/DC Adapter
1 x Audio Connection Cable with 3.5mm plugs
(Input: 100-240V~ 50/60Hz 0.5A
Output: 9V 1300mA)
15
Page 16

 Loading...