

Page 1

BLUETOOTH MINI TOWER SPEAKER
MODEL: SP269PL-ASST
INSTRUCTION MANUAL
PLEASE READ CAREFULLY BEFORE OPERATING THIS EQUIPMENT
Page 2
CAUTION: TO REDUCE THE RISK OF ELECTRIC SHOCK, DO NOT
REMOVE COVER (OR BACK). NO USER-SERVICEABLE
PARTS INSIDE. REFER SERVICING TO QUALIFIED
SERVICE PERSONNEL.
The lighting flash with arrowhead symbol within an
equilateral triangle is intended to alert the user to
the presence of uninsulated “dangerous voltage
within the product’s enclosure that may be of
sufficient magnitude to constitute a risk of electric
shock to persons.
The exclamation point within an equilateral triangle
is intended to alert the user to the presence of
important operating and maintenance (servicing)
instructions in the literature accompanying the
appliance.
FCC NOTICE:
This equipment has been tested and found to comply
with the limits for a Class B digital device, pursuant to
part 15 of the FCC Rules. These limits are designed to
provide reasonable protection against harmful
interference in a residential installation. This equipment
generates, uses and can radiate radio frequency energy
and, if not Installed and used in accordance with the
instructions, may cause harmful interference to radio
communications.
However, there is no guarantee that interference will not
occur in a particular installation. If this equipment does
cause harmful interference to radio or television
reception, which can be determined by turning the
equipment off and on, the user is encouraged to try to
correct the interference by one or more of the following
measures:
Reorient or relocate the receiving antenna.
Increase the separation between the equipment and
receiver.
Connect the equipment into an outlet on a circuit
different from that to which the receiver is connected.
Consult the dealer or an experienced radio/TV
technician for help.
FCC WARNING:
To assure continued compliance, follow the attached
installation instructions and use only shielded cables
when connecting to other devices. Modifications not
authorized by the manufacturer may void user`s authority
to operate this device.
WARNING:
TO REDUCE THE RISK OF FIRE OR ELECTRIC
SHOCK, DO NOT EXPOSE THIS PRODUCT TO RAIN
OR MOISTURE.
WARNING:
TO REDUCE THE RISK OF FIRE OR ELECTRIC
SHOCK, AND ANNOYING INTERFERENCE, USE THE
RECOMMENDED ACCESSORIES ONLY.
WARNING:
To reduce the risk of fire or electric shock, do not expose
this apparatus to rain or moisture. The apparatus shall
not be exposed to dripping or splashing
filled with liquids, such as
vases shall not be placed on
and that objects
apparatus.
1
Page 3

Before using the unit, be sure to read all operating instructions carefully. Please note that these
are general precautions and may not pertain to your unit.
For example, this unit may not have the capability to be connected to an outdoor antenna.
1) Read these instructions.
All the safety and operating instructions should be read before the product is operated.
2) Keep these instructions.
The safety
3) Heed all warnings.
All warnings on the product and in the operating instructions should be adhered to.
4) Follow all instructions.
All operating and use instructions should be followed.
5) Do not use this apparatus near water.
Do not
sink or laundry tub; in a wet basement; or near a swimming pool.
6) Clean only with dry cloth.
Unplug this product from the wall outlet before cleaning. Do not use liquid cleaners or aerosol
cleaners
7) Do not block any ventilation openings. Install in accordance with the manufacturer's
instructions.
Slots and openings in the cabinet and in the back or bottom are provided for ventilation, to ensure
reliable operation of the product and to protect it from overheating
blocked or covered. The openings should never be blocked by placing the product on a bed, sofa,
rug or other similar surface. This product should never be placed near or over a radiator or heat
source. This product should not be placed in a built
unless proper ventilation is provided or the manufacturer's instructions have been adhered to.
8) Do not install near any heat sources such as radiators, heat registers, stoves, or other
apparatus(including amplifiers) that produce heat.
9) Do not defeat the safety
has two blades with one wider than the other. A grounding type plug has two blades and a
third grounding prong. The wide blade or the third prong are provided for your safety. If the
provided plug does not fit
obsolete outlet.
10)Protect the power cord from being walked on or pinched particularly at plugs, convenience
receptacles, and the point where they exit from the apparatus.
11)Only use attachments/accessories specified by the manufacturer.
12)Use only with
with the apparatus. When a cart is used, use caution when moving the cart/apparatus
combination to avoid injury from tip-over.
An appliance and cart combination should be moved with care.
Quick stop, excessive force and
appliance and cart combination to overturn.
and operating instructions should be retained for future reference.
use this product near water and moisture, for example: near a bathtub, washbowl, kitchen
. Use a dry cloth for cleaning.
. These openings must not be
-in installation such as a bookcase or rack
purpose of the polarized or grounding-type plug. A polarized plug
into your outlet, consult an electrician for replacement of the
the cart, stand, tripod, bracket, or table specified by the manufacturer, or sold
uneven surfaces may cause the
13) Unplug this apparatus during lightning storms or when unused for long periods of time.
To protect your product from a lightning storm, or when it is left unattended and unused for long
periods of time, unplug it from
will prevent damage to the product due to lightning and power-line surges.
14) Refer all servicing to qualified service personnel. Servicing is required when the apparatus
has been damaged in any way, such as power-supply cord or
been spilled or objects have fallen into the apparatus, the apparatus has been exposed to rain
or moisture does not operate normally, or has been dropped.
15) Power source
This product should be operated only from the type of power source indicated on the marking label
If you are not sure of the type of power supply to your home, consult your appliance dealer or local
power company. For products intended to operate from battery power, or other source, refer to the
operation instructions.
the wall outlet and disconnect the antenna or cable system. This
plug is damaged, liquid has
2
.
Page 4
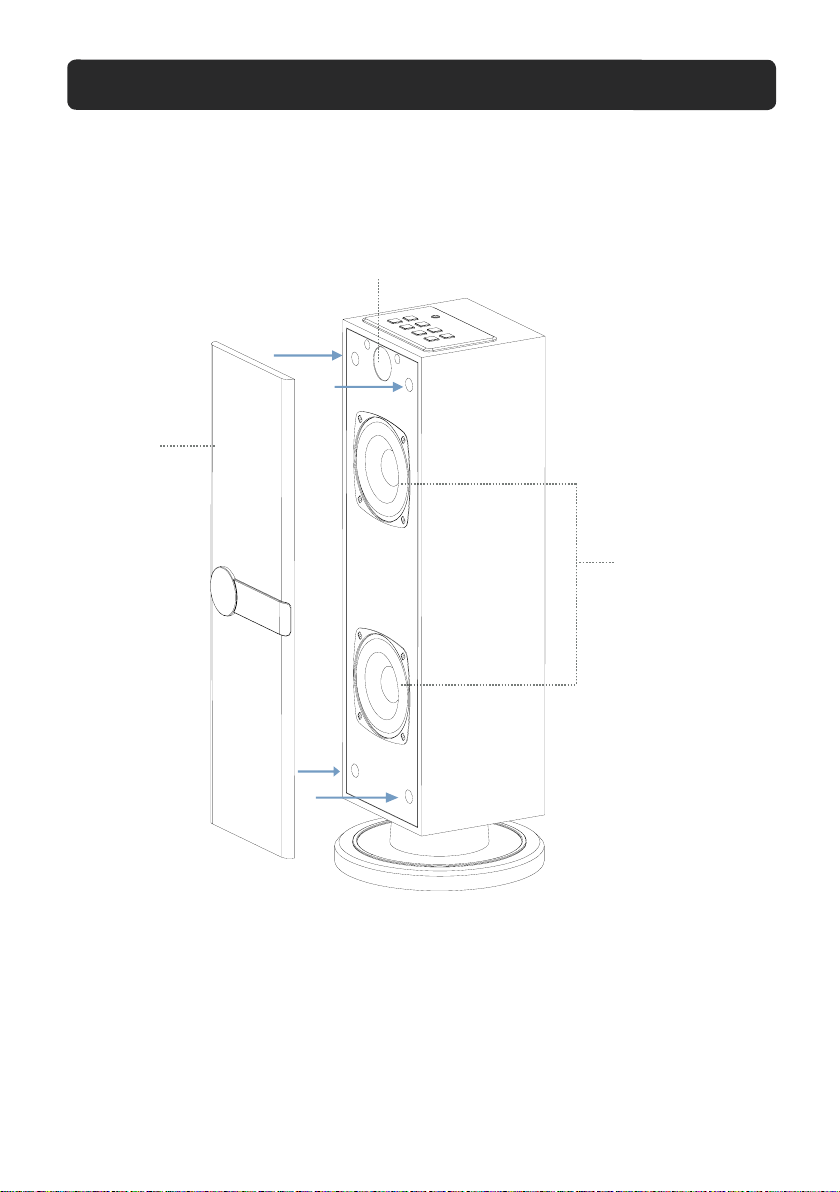
INSTALLATION
1. Remote Sensor
2. Speakers
3. Speaker Net
3
1
2
Note:
The Speaker Net can be taken out and reassembled as Figure above.
3
Page 5

LOCATION OF CONTROLS
MAIN UNIT
1. AUX IN jack
2. Indicator
3. EQ(Equalizer)button
4. POWER button
5. SOURCE button
6. VOL- (Volume Down) button
7. VOL+ (Volume Up) button
8. (Next) button
9. (Previous) button
10. (Play/Pause) button
11. DC IN Jack
6
5
DC 12V, 1A
1
2
3
4
DC IN
AUX IN
EQ SOURCE VOL+VOL-
10
DC IN
DC 12 V, 1A
7
8
9
11
4
Page 6

LOCATION OF CONTROLS
REMOTE CONTROL
POWE R
2
1
2
3
SOURCE
3
VOL
4
5
6
7
EQ
8
1. POWER button
2. (Previous) button
3. VOL (Volume)+/- buttons
4. SOURCE button
5. (Mute) button
6. (Next) button
7. (Play/Pause) button
8. EQ (Equalizer) button
5
Page 7

BATTERY INSTALLATION--- REMOTE CONTROL
-First Time Use
Remove and discard the insulation tab as figure on the right
-Replacing Batteries For Remote Control
1. Push and slide out the battery holder as figure 1 below.
2. Replace the battery with a new CR2025 button cell as the polarity
markings on the rear of the Remote Control.
3. Close the battery holder.
Fig.1 Fig.2
Fig.3
BATTERY PRECAUTIONS
EFFECTIVE DISTANCE OF REMOTE TRANSMITTER
Remote Sensor
Approx.15 feet
6
Page 8

GENERAL OPERATIONS
1. Insert the AC/DC Adapter plug into a conveniently located AC outlet having 100-240V~50/60Hz.
The Indicate (Red) will light.
2. Press the Power button on the unit or remote control to power on the unit.
3. Press the SOURCE button repeatedly to switch to desired mode.The color of Indicator turns
to
corresponding color as below:
~ Blue: Bluetooth
~ Green: AUX IN
4. During Playback:
~ Press the VOL (Volume) buttons to adjust volume level as desired.
~ Press the EQ button repeatedly to select and set equalizer mode as desired.
~ Press (Mute) button on the Remote Control to turn off the sound. Press again to resume.
~ Press the or button to skip track.
~ Press the (Play/Pause) button to pause. Press again to resume normal playback.
~ Press the EQ button on unit or on remote control to change the EQ mode.
5. When finished listening, press the Power button to power off the unit.The indicator will
turn Red.
NOTE:
Pull out the AC/DC Adapter plug
to shut off the unit if no using for long period of time.
7
Page 9

LISTEN TO EXTERNAL AUDIO DEVICES
X I
AUX IN
EQ SOURCE VOL+VOL-
1. Connect one end of supplied audio connection cable to the AUX IN jack on the top of the unit
as the figure above.
2. Connect the other end to the Audio out/Line out/Phone jack on the external player (such like
iPhone, iPad, MP3 player, Discman... etc.).
3. Power ON the unit.
4. Press the SOURCE button repeatedly until the color of Indicator turns to Green.
5. Play the music in the external player as usual.
8
Page 10

BLUETOOTH PARING AND PLAYBACK
1. Power ON the unit.
2. Press the SOURCE button on the unit or remote control until the color of Indicator changed to
Blue.
3. Turn on the BT function on the external BT device and play the music as usual.
4. During palyback:
Press the VOL (Volume) +/- buttons to adjust volume level.
Press the or button to skip track.
Press the (Play/Pause) button to pause. Press again to resume normal playback.
NOTES:
In first time use, pairing the external BT device as below:
A. Power ON the unit, press the SOURCE button repeatedly until the color of
Blue and blinking.
B. Power ON the external BT player and enter to searching mode. Start pairing as the on screen
instructions on the external BT Player (For details pairing procedures, please refer to the user’s
manual of your BT device.).
C. When the external BT player searched the Speaker, our model number “SP269PL” will appear
on the display of external BT device. Select it and make pairing.
D. Pairing code “0000” may need to enter.
E. After successful connection, play music as usual.
Indicator turned to
9
Page 11

TROUBLESHOOTING GUIDE
Check the followings before requesting service
SYMPTOM POSSIBLE CAUSE POSSIBLE SOULTION
No power
No sound
Sound distortion
Remote not
working
Bluetooth
reception failure
AC/DC adapter plug not
connected to the
Volume in minimum position
The connected device is not
in payback mode
Input source incorrect
Bass level of the connected
device too high
Volume level too high
The batterry
The external device is far from
the unit
Have not paired
wall outlet
is consumed
Plug to the wall outlet.
Raise volume level by pressing the VOL
(Volume) + button
Play the music/movie in the connected
device as usual
volume level of it is in high level
Press the SOURCE button repeatedly to
set the input source to the desired mode
Reduce the bass level of the connected
device
Reduce the volume level by pressing
the
VOL (Volume ) - button
Replace with new battery
Put the external BT device close to the
unit
Pair both units as BT pairing page
and make sure the
10
Page 12

TECHNICAL SPECIFICATIONS
AC/DC Adapter
Input........................................................................................................AC 100-240V~50/60Hz
Output...............................................................................................DC 12V 1 A
Speakers ...............................................................................................................................
Bluetooth Working Distance.........................................................................................Up to 30 feet
and structures may affect the effective range.)
(Measured in open area. Wall
Remote Working Distance...........................................................................................Up to 15 feet
Accessories
1 x User Manual
1 x Remote Control
1 x AUX IN Cable
1 x AC/DC Adapter
3W x 2
11
Page 13

You are cautioned that changes or modifications not expressly approved by the party
responsible for compliance could void your authority to operate the equipment.
This device complies with Industry Canada licence-exempt RSS standard(s). Operation is
subject to the following two conditions: (1) this device may not cause interference, and (2) this
device must accept any interference, including interference that may cause undesired
operation of the device.
Le présent appareil est conforme aux CNR d'Industrie Canada ap plica bles aux appa reil s ra dio
exempts de licence. L'exploitation est autorisée aux deux conditions suivantes : (1) l'appareil
ne doit pas produire de brouillage, et (2) l'utilisateur de l'appareil doit accepter tout brouillage
radioélectrique subi, même si le brouillage est susceptible d'en com promettre le
fonctionnement.
 Loading...