

Page 1

Page 2
IMPORTANT SAFETY INSTRUCTIONS
CAUTION: TO REDUCE THE RISK OF ELECTRIC SHOCK, DO NOT
S
P
R
EMOVE COVER (OR BACK). NO USER-SERVICEABLE
I
NSIDE
EFER SERVICING T UALIFIED
The lightni ng f la sh w it h ar ro wh ea d sy mb ol
within an equ il at er al t ri an gl e is i nt en de d to a le rt
the user to the p re se nc e of u ni ns ul at ed
dangerous v ol ta ge w it hi n th e pr od uc t` s
enclosure that may be o f su ff ic ie nt m ag ni tu de t o
constitute a risk of elec tr ic s ho ck t o pe rs on s.
The exclamation p oi nt w it hi n an e qu il at er al
triangle is inten de d to a le rt t he u se r to t he
presence of impor ta nt o pe ra ti ng a nd
maintenance (s er vi ci ng ) in st ru ct io ns i n th e
literature ac co mp an yi ng t he a pp li an ce .
O Q. R
S
ERVICE PERSONNEL.
ART
WARNING:
TO RE DU CE THE RISK OF FIRE OR ELECTRIC
SHOCK, DO N OT E XP OS E THIS PRODUCT TO RAIN
OR MOISTURE .
WARNING:
TO RE DU CE THE RISK OF FIRE OR ELECTRIC
SHOCK, AND AN NO YI NG I NT ER FE RE NC E, U SE THE
RECOMMEND ED AC CE SS OR IE S ON LY.
2
Page 3

IMPORTANT SAFETY INSTRUCTIONS
Before us in g th e un it , be s ur e to r ea d al l op er at in g in st ru ct io ns c ar ef ul ly . Pl ea se n ot e th at t he se
are gener al p re ca ut io ns a nd m ay n ot p er ta in t o yo ur u ni t.
For example, this u ni t ma y no t ha ve t he c ap ab il it y to b e co nn ec te d to a n ou td oo r an te nn a.
1) Read the se i ns tr uc ti on s.
All the safet y an d op er at in g in st ru ct io ns s ho ul d be r ea d be fo re t he p ro du ct i s op er at ed .
2) Keep the se i ns tr uc ti on s.
The safety and op er at in g in st ru ct io ns s ho ul d be r et ai ne d fo r fu tu re r ef er en ce .
3) Heed all w ar ni ng s.
All warni ng s on t he p ro du ct a nd i n th e op er at in g in st ru ct io ns s ho ul d be a dh er ed t o.
4) Follow all i ns tr uc ti on s.
All operati ng a nd u se i ns tr uc ti on s sh ou ld b e fo ll ow ed .
5) Do not use t hi s ap pa ra tu s ne ar w at er .
Do not us e th is p ro du ct n ea r wa te r an d mo is tu re , fo r ex am pl e: n ea r a ba th tu b, w as hb ow l, k it ch en
sink or laundry tub ; in a w et b as em en t; o r ne ar a s wi mm in g po ol .
6) Clean on ly w it h dr y cl ot h.
Unplug this pro du ct f ro m th e wa ll o ut le t be fo re c le an in g. D o no t us e li qu id c le an er s or a er os ol
cleaners. Use a d ry c lo th f or c le an in g.
7) Do not blo ck a ny v en ti la ti on o pe ni ng s. I ns ta ll i n ac co rd an ce w it h th e ma nu fa ct ur er ' s
instruc ti on s.
Slots and ope ni ng s in t he c ab in et a nd i n th e ba ck o r bo tt om a re p ro vi de d fo r ve nt il at io n, t o en su re
reliable oper at io n of t he p ro du ct a nd t o pr ot ec t it f ro m ov er he at in g. T he se o pe ni ng s mu st n ot b e
blocked or covere d. T he o pe ni ng s sh ou ld n ev er b e bl oc ke d by p la ci ng t he p ro du ct o n a be d, s of a,
rug or othe r si mi la r su rf ac e. T hi s pr od uc t sh ou ld n ev er b e pl ac ed n ea r or o ve r a ra di at or o r he at
source. Thi s pr od uc t sh ou ld n ot b e pl ac ed i n a bu il t- in installation s uc h as a b oo kc as e or r ac k
unless proper v en ti la ti on i s pr ov id ed o r th e ma nu fa ct ur er ' s instructions have been adhered to.
8) Do not ins ta ll n ea r an y he at s ou rc es s uc h as r ad ia to rs , he at r eg is te rs , st ov es , or o th er
apparat us ( including amplifiers) that produce heat.
9) Do not def ea t th e sa fe ty p ur po se o f th e po la ri ze d or g ro un di ng - type plug. A polarized plug
has two blade s wi th o ne w id er t ha n th e ot he r. A g ro un di ng t yp e pl ug h as t wo b la de s an d a
third gro un di ng p ro ng . Th e wi de b la de o r th e th ir d pr on g ar e pr ov id ed f or y ou r sa fe ty . If t he
provide d pl ug d oe s no t fi t in to y ou r ou tl et , co ns ul t an e le ct ri ci an f or r ep la ce me nt o f th e
obsolete ou tl et .
10)Protect the power cord from being walked on or pinched particularly at plugs, con ve ni en ce
recepta cl es , an d th e po in t wh er e th ey e xi t fr om t he a pp ar at us .
11) Only use attachments/ accessories specified by the manufacturer.
12)Use only with the cart, stand, tripod, bracket, or table specified by the
manufactu re r, o r so ld
use caution when
avoid injur y fr om t ip - over.
An appliance an d ca rt c om bi na ti on s ho ul d be m ov ed w it h ca re .
Quick stop, excessive force and u ne ve n su rf ac es m ay c au se t he
appliance and c ar t co mb in at io n to o ve rt ur n.
13) Unplu g th is a pp ar at us d ur in g li gh tn in g st or ms o r wh en u nu se d fo r lo ng p er io ds o f ti me .
To protect your pro du ct f ro m a li gh tn in g st or m, o r wh en i t is l ef t un at te nd ed a nd u nu se d fo r lo ng
periods of time, un pl ug i t fr om t he w al l ou tl et a nd d is co nn ec t th e an te nn a or c ab le s ys te m. T hi s
will prevent da ma ge t o th e pr od uc t du e to l ig ht ni ng a nd p ow er - line surges.
14) Refer all servicin g to q ua li fi ed s er vi ce p er so nn el . Se rv ic in g is r eq ui re d wh en t he a pp ar at us
has been da ma ge d in a ny w ay , su ch a s po we r- supply co rd o r pl ug i s da ma ge d, l iq ui d ha s
been spille d or o bj ec ts h av e fa ll en i nt o th e ap pa ra tu s, t he a pp ar at us h as b ee n ex po se d to r ai n
or moistu re d oe s no t op er at e no rm al ly , or h as b ee n dr op pe d.
15) Power source
This product sh ou ld b e op er at ed o nl y fr om t he t yp e of p ow er s ou rc e in di ca te d on t he m ar ki ng l ab el .
If you are not su re o f th e ty pe o f po we r su pp ly t o yo ur h om e, c on su lt y ou r ap pl ia nc e de al er o r lo ca l
power company . Fo r pr od uc ts i nt en de d to o pe ra te f ro m ba tt er y po we r, o r ot he r so ur ce , re fe r to t he
operation ins tr uc ti on s.
16) Power lines
An outside antenna system should not b e lo ca te d in t he v ic in it y of o ve rh ea d po we r li ne s or o th er
electric light or power circuits, or where i t ca n fa ll i nt o su ch p ow er l in es o r ci rc ui ts . Wh en
installing an outside antenna system, extr em e ca re s ho ul d be t ak en t o ke ep f ro m to uc hi ng s uc h
power lines or circuits as contact with them might be fa ta l.
with the appa ra tu s. W he n a ca rt i s us ed ,
moving th e ca rt / apparatus
combinati on t o
3
Page 4
IMPORTANT SAFETY INSTRUCTIONS
17) O verlo ading
Do no t overl oad wal l outle ts and ex tensi on cord s as this c an resu lt in a ris k of fire o r elect ric
sho ck.
18) O bject a nd liqu id entr y
Nev er push o bject s of any ki nd into t he prod uct thr ough op ening s as they m ay touc h dange rous
vol tage po ints or s hort ou t parts t hat cou ld resu lt in fir e or elec tric sh ock. Ne ver spi ll or spr ay any
typ e of liqu id on the p roduc t.
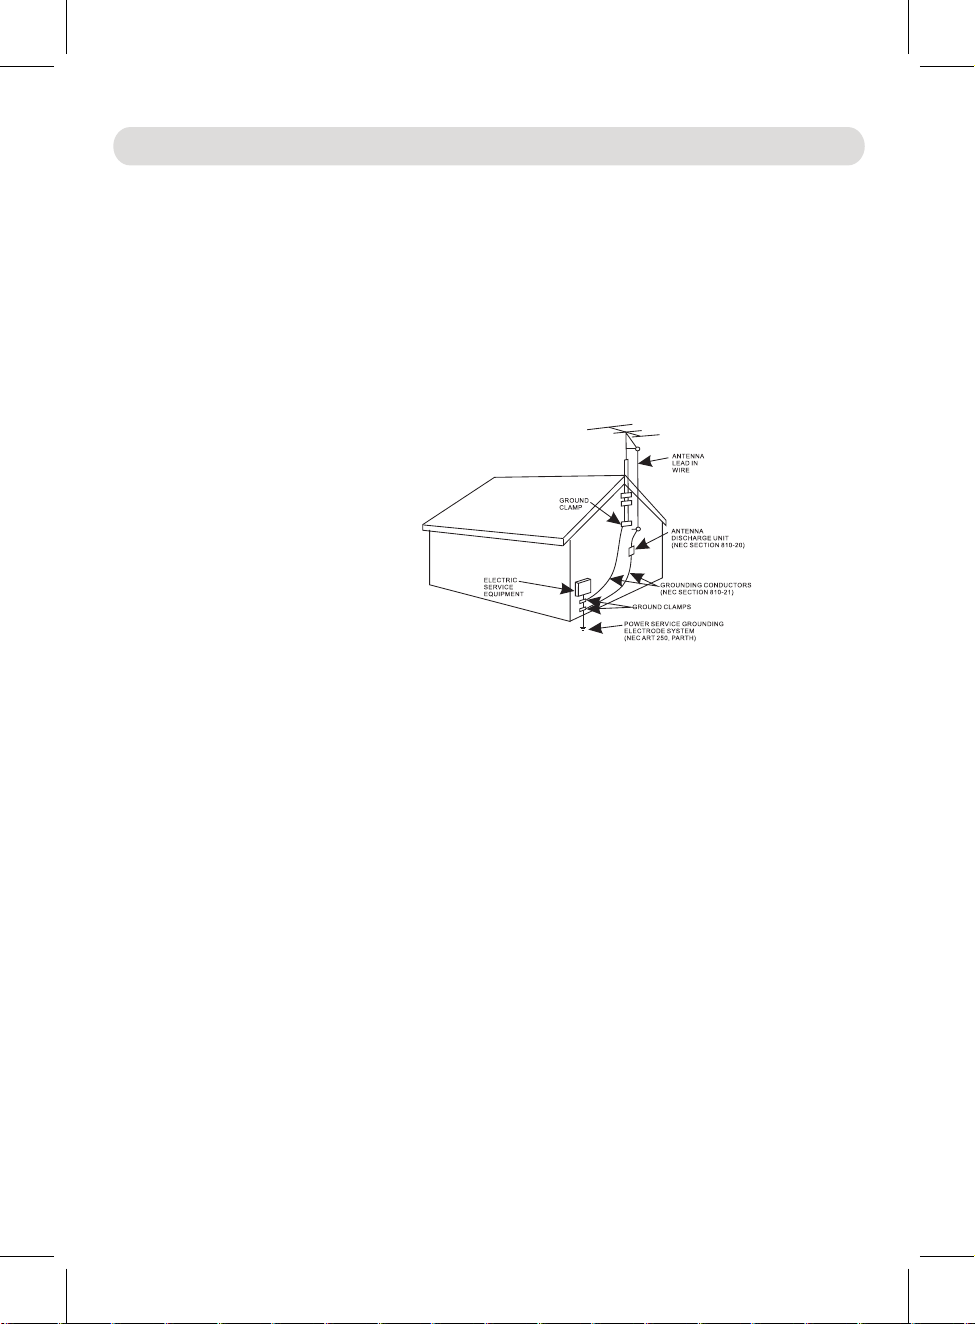
19) O utdoo r anten na grou nding
If an o utsid e anten na is con necte d to the pr oduct , be sure t he ante nna sys tem is gr ounde d so as to
Pro vide so me prot ectio n again st volt age sur ges and b uilt up s tatic c harge s. Sect ion 810 o f the
Nat ional E lectr ic Code A NSI/ NF PA 70 pr ovide s infor matio n with re spect t o prope r groun ding
of th e mast an d suppo rting s truct ure, gr oundi ng of the l ead- in w ire to an a ntenn a disch arge pr oduct ,
siz e of grou nding c onduc tors, l ocati on of ant enna- d ischa rge pro duct, c onnec tion to g round ing
ele ctrod es and re quire ments f or the gr oundi ng elec trode s.
20) S ervic e
Do no t attem pt to ser vice th is prod uct you rself a s openi ng or rem oving c overs m ay expo se you to
dan gerou s volta ge or oth er haza rds. Re fer all s ervic ing to qu alifi ed serv ice per sonne l.
21) R eplac ement p arts
Whe n repla cemen t parts a re requ ired, b e sure th e servi ce tech nicia n uses re place ment pa rts
spe cifie d by the ma nufac turer o r those t hat hav e the sam e chara cteri stics a s the ori ginal p arts.
Una uthor ized su bstit ution s may res ult in fi re or ele ctric s hock or o ther ha zards .
22) S afety c heck
Upo n compl etion o f any ser vice or r epair s to this p roduc t, ask th e servi ce tech nicia n to perf orm
saf ety che cks to de termi ne that t he prod uct is in p roper o perat ing con ditio n.
3
24)Dam age req uirin g servi ce
Unp lug thi s produ ct from t he wall o utlet a nd refe r servi ce to qua lifie d servi ce pers onnel u nder th e
fol lowin g condi tions .
a) Wh en the po wer- su pply co rd or plu g is dama ged.
b) If l iquid h as been s pille d or obje cts hav e falle n into th e produ ct.
c) If t he prod uct has b een exp osed to r ain or wa ter.
d) If t he prod uct doe s not ope rate no rmall y by foll owing t he oper ating i nstru ction s. Adju st only
tho se cont rols th at are co vered b y the ope ratin g instr uctio ns, as an a djust ment of o ther
con trols m ay resu lt in dam age and w ill req uire ex tensi ve work b y a quali fied te chnic ian
to re store t he prod uct to it s norma l opera tion.
e) If t he prod uct has b een dro pped or t he cabi net has b een dam aged.
f) Wh en the pr oduct e xhibi ts a dist inct ch ange in p erfor mance -this in dicat es a need f or serv ice.
2 )Note to CATV s ys tem installer
Thi s remin der is pr ovide d to call t he CATV sy st em installer' s att en ti on to Article 820- 40 o f the
NEC t hat pro vides g uidel ines fo r prope r groun ding an d, in par ticul ar, spe cifie s that th e cable
gro und sha ll be con necte d to the gr oundi ng syst em of the b uildi ng, as cl ose to th e point o f cable
ent ry as pra ctica l.
NOT E: Refe r all ser vicin g to qual ified s ervic e perso nnel. S ervic ing is re quire d when
i
n any w ay such a s the fol lowin g: the po wer-s upply c ord
s
pil led int o unit, t he unit h as been
n
ot op erate n ormal ly.
exp osed to r ain or mo istur e, the un it has be en drop pe
or pl ug has be en dama ged, li quid ha s bee
the u nit has b een dam age
o
r the u nit doe
d
d
n
4
s
Page 5

Location of Controls
Top View
1 2 3
Front View
1. Turntable platter
2. Turntable center spindle
3. 45 RPM adapter
4. Lever
5. Tone arm holder
4
5
6. LINE IN jack
LINE IN
E
N
I
I
N
L
B
O
T
N
O
H
P
ON
OFF
INDICATOR
HEADPHO NE
6
7. Speed selector
7
8. Function knob
8
9
9. Tone arm
10.Power ON-OFF/
10
11
12
11. Indicators
13
12. HEADPHONE jack
Volume knob
13. Stylus
14
15
Rear View
14. Metallic buckle
15. Handle
16. Speakers
16
16
17. DC IN jack for
DC IN
DC 9V,1300mA
Decorative LED lights
18. DC IN jack for main unit
DC IN
LINE
DC 9V,1300mA
17
OUT
L
R
19
18
19. LINE OUT jacks
5
Page 6

Location of Controls
Inner Side View
20
20. Remote Sensor
21. Decorative LED lights
21
Remote Control:
1
4
5
7
8
LED
ON/OFF
LED3
RED
LED1
LED4
GREEN
LED2
LED5
BLUE
2
3
6
9
1. LED ON/OFF button
2. LED 1 button
3. LED 2 button
4. LED 3 button
5. LED 4 button
6. LED 5 button
7. RED button
8. GREEN button
9. BLUE button
6
Page 7

Remote Control
FIRST TIME USE
● Remove and discard the insulation
●
Replacing the button cell when it is drained:
1. Push and slide out the battery holder as figure 1 below.
2. Replace the with a new CR2025 button cell as
button cell
on the rear of the Remote Control.
3. Close the battery holder.
film
as figure on the right.
the polarity markings
Fig.1 Fig.2
Fig.3
BATTERY PRECAUTIONS
Follow these precautions when using a battery in this device:
1. Use only the size and type of battery specified.
2. Be sure to follow the correct polarity when installing the battery as
a reserved battery may cause damage to
the device.
3. Do not mix different types of batteries together ( e.g: Alkaline and
indicated in the battery compartment,
Carbon-zinc ) or old batteries with
fresh ones.
4. If the batteries in the device are consumed or the device is not to be used for
batteries to prevent damage or injury from
5. Do not try to recharge the battery not intended to be recharged; it can
manufacturer’s instructions.)
possible leakage.
6. The batteries shall not be exposed to excessive heat such as sunshine, fire
7. Clean the battery contacts and also those of the device prior to battery
a long period of time, remove the
overheat and rupture. ( Follow battery
or the like.
installation.
8. This product contains a coin/button cell battery. If the coin/button cell battery is swallowed, it can cause
severe internal burn in just 2 hours and can lead to death.Keep new and used batteries away from
children. If the battery compartment does not close securely, stop using the product and keep it away
from children. If you think batteries might have been swallowed or placed inside any part of the body,
seek immediate medical attention.
Remote control operation range
● When there is an obstacle between the remote
and the transmitter, the unit
may not operate.
Remote Sensor
● When direct sunlight, an incandescent lamp,
fluorescent lamp or any other
shines on the
the operation of the
REMOTE
remote may be unstable.
strong light
SENSOR of the unit,
16 feet (5M)
7
LED
LED1
LED2
ON/OFF
LED4
LED3
LED5
RED
GREEN
BLUE
Page 8

Power Source
1. Connect one of the small plug from the supplied AC/DC Adapter to the DC IN jack of Decorative LED lights;
connect the other small plug to the DC IN jack of the Main Unit as illustrated below.
2. Plug the AC/DC Adapter into a conveniently located AC outlet having AC 100-240V~, 50/60Hz.
To DC IN jack of the
Decorative LED Lights
DC 9V, 1300mA
DC IN
AC/DC Adapter
DC IN
LINE
OUT
DC 9V, 1300mA
L
R
To the DC IN jack
of the main unit
Notes:
~ This AC/DC Adapter is intended to be correctly orientated in a vertical or floor mount position.
~ For saving energy, if long period of time will not use the unit.
Unplug the AC/DC Adapter from wall outlet.
Operation
General Operation:
1. Open the top cover as illustrated below:
2
1
To AC outlet
2. Connect the unit to AC power as instructed earlier.
3. Turn the Power ON/OFF--Volume knob clockwise to power on the unit and set the volume to the desired level.
The indicator will illuminate, and the LED light panel will light up.
4. Turn the Function selector to the desired position and set to different LED display modes by using the remote control.
5. For Decorative LED Lights:
Press the LED ON/OFF button on the remote control repeatedly to turn it ON or OFF.
Press the RED; GREEN or BLUE buttons on the remote control to set the color of the lights as desired.
Press the LED 1 - LED 5 buttons on the remote control to set or reset the blinking mode of the lights as desired.
6. When finished listening:
Turn the Power ON/OFF--Volume knob counterclockwise until “Click”
not light.
Press the LED ON/OFF button on the remote control to turn off the
is heard to shut off the
Decorative LED Lights.
unit. The indicators will
7. Close the cover then lock it.
8
Page 9

Listening through Bluetooth
(BT) Bluetooth Pairing:
For first time use or re-pairing to a new BT Device, pairing it as below:
1. Power on the unit and turn the Function selector to BT position as the instructed earlier. The color of indicator will turn
to Blue and blink.
2. Power on the external BT Device and enter to BT searching mode. Start pairing following the on screen instructions
from the external BT Device.
(For details pairing procedures, please refer to the user’s manual of your BT device.).
3. If pairing is complete you may now play music and answer calls with your external BT Device.
4. During playback, using the controls on the paired BT Device to skip the tracks; pause; play... etc.
Notes:
When the external BT Device searched the unit, our model number “MD699” will appear on the display of external
BT Device.
If while pairing you are asked for a code please try "0000" or "1234".
Normal operation after paired:
1. Power on the unit and turn the Function selector to the BT position as the instructed earlier. The color of indicator will
turn to Blue and blink.
2. Wait a few seconds until the unit auto paired to the external BT Device. (The Blue indicator will stop blinking)
3. If pairing is complete you may now play music and answer calls with your external BT Device.
After paired, the Blue indicator will stop blinking.
9
Page 10

Listening a Record
1. For first time use, take out the protective cover from the stylus as the illustrated below:
Plastic protective cover (White color)
2. Place the Record on the center spindle.
Note: If you are playing a 45 RPM Single (small size record), place the supplied 45 RPM
then place the record on it.
3. Slide the Speed selector to 33; 45 or 78 to match the play speed of the record.
4. Unlock the Tone Arm from the holder as the illustrated below:
adapter to the center spindle
clip
5. Power on the unit and turn the Function selector to the PHONO position as the instructed
indicator will turn to Red.
6. Raise the Lever to raising the Tone Arm then move it to the top of the desired location
Lever to put the Tone Arm onto the record. Plays will auto start.
7. When finished playback, the unit will auto stop turning (or you wants to stop immediately);
the Tone Arm then put it back to the Holder.
Release the Lever then lock the Tone Arm on the Holder.
of the record. Release the
10
earlier. The color of
raise the Lever to rising
Page 11

Other Connections
LINE IN:
Listen music from the external Audio Player as follows:
1. Connect one end of the supplied Audio Connection
Cable to the Phones Jack; Line Out Jack or AUX Out
Jack on the external Audio Player.
2. Connect the other end to the LINE IN Jack on the top
of unit as the illustrated below:
Connect to the Phones; AUX Out;
Line Out Jack of the external devices
(Such like MP3 Player; cell phones;
iPod/iPad ... etc)
Mobile Phone
LINE OUT:
To listening from external Audio Amplifier:
1. Connect one end of the RCA Audio Connection Cable
(not supplied) to the Line IN Jacks or AUX IN Jacks on
the external Audio Amplifier.
2. Connect the other end of the cable to the LINE OUT
jacks on the rear of unit as the illustrated below:
LIN E
DC IN
DC 9V,1300mA
White
OUT
L
R
Red
(Audio Connection Cable supplied)
To LINE IN jack on the unit
LINE IN
3. Power on the unit and turn the Function selector to
the LINE IN position as the instructed earlier. The
color of indicator will turn to Purple.
4. Plays the music on the connected external Audio
Player as usual.
Note: Make sure the volume level of the external Audio
Player was set to high. Otherwise, sound from
this unit may weak.
(Connection Cable not included)
To the Line In/AUX In
To the Line In/AUX In
jacks on the external
jacks on the external
Audio Amplifier
Audio Amplifier
3. Power on the unit and plays music as usual as the
instructed earlier.
4. Power on the external Audio Amplifier and set it to
LINE IN mode to plays the music from this unit.
HEADPHONE:
For private listening, connect the 3.5mm plug from the
Earphone/Headphone (not supplied) into the
HEADPHONE
jack on the top of unit. Sound from speaker
will be auto cut.
11
Page 12

Records Handling
Do not touch the record's grooves. Only handle records, by the edges or the label. Make sure your hands are clean. Skin
oils from even clean hands can leave a residue on the record surface that will gradually deteriorate the quality of your
record.
label
Keep your hands away from dust. Keep them in a cool, dry place.
To avoid dust and scratches, keep records in their sleeves and jackets when not in use.
Store records upright on their edges. Records stored horizontally will eventually bend and ward.
Do not expose records to direct sunlight or high humidity and temperature. Long exposure to high temperatures will
will warp the record.
Do not store your records in the trunk of your car. The temperature in a closed trunk can ruin your collection.
Store records in an area with a stable temperature an dlow humidity.
Should the record become dirty, gently wipe the surface in a circular motion, using a soft anti-static cloth.
grooves
edge
Replace the stylus
If the stylus was abrased after long time use, replace it by the supplied extra style as follows:
1. Use a screwdriver (not supplied) to push the stylus off
then pull it out as the illustrated below:
2. Install the new stylus as illustrated below:
Guide Pins (inside)
12
Page 13

Troubleshooting Guide
Symptom Possible Cause Solution
Power
AC/DC Adaptor had not
connected to unit or wall
outlet
Connected the AC/DC
Adaptor to the unit
wall outlet
a dn
No power
Power ON-OFF/Volume
knob is on power off position
Turntable
Speed selector wrong
Noise or sound distorted
setting
The stylus may abrasion
after long time used
BT
BT not functioning
The BT Device had not
paired to the unit
Sound weak or distortion The BT Device
far from the unit
too
Turn the Power
ON-OFF/Volume knob
clockwise to power on
the unit and set the
volume to the desired
level
Set the Speed selector
to the correct posit 33;
45 or 78 as the
record
speed of
oni
playing
Replace it by the
extra stylus
supplied
as page
21
Paired the BT Device
to the unit as page
9
Place the BT Device
close to the unit
13
Page 14

General Specifications
1
2.1
.
8
9V, 1300mA,
Power Source: DC
Audio Power: W (RMS) x 2
Impendence of Speakers: 4 Ohm; 3W x 2
BT Version:
BT Effective Range: 32 feet in open area
Turntable:
Speed: 33; 45; 78 rpm selectable
Type of Stylus: CSC-015
Accessories
1 x User’s Manual
1 x AC/DC Adaptor (Input: AC 100-240V~; 50/60 Hz; 0.5A; Output: DC
2 x Stylus (one pre-mounted)
1 x 45 RPM Adaptor
1 x Audio connect cable with 3.5 mm stereo plugs
1 x Remote Control (with CR2025 button cell)
SPECIFICATIONS AND ACCESSORIES ARE SUBJECT TO CHANGE
WITHOUT NOTICE
1300mA, )
9V,
14
Page 15

Page 16

FCC NOTICE:
Reorient or relocate the receiving antenna.
Increase the separation between the equipment and receiver.
Connect the equipment into an outlet on a circuit different from that to
Consult the dealer or an experienced radio/TV technician for help.
(1) This device may not cause harmful interference, and
(2) This device must accept any interference received, including interference
This equipment has been tested and found to comply with the limits for a Class
B digital device, pursuant to Part 15 of the FCC Rules. These limits are
designed to provide reasonable protection against harmful interference in a
residential installation. This equipment generates, uses and can radiate radio
frequency energy and, if not installed and used in accordance with the
instructions, may cause harmful interference to radio communications.
However, there is no guarantee that interference will not occur in a particular
installation. If this equipment does cause harmful interference to radio or
television reception, which can be determined by turning the equipment off and
on, the user is encouraged to try to correct the interference by one or more of
the following measures:
which the receiver is connected.
FCC STATEMENT:
This device complies with part 15 of the FCC Rules. Operation is subject to the
following two conditions:
that may cause undesired operation.
FCC Radiation Exposure Statement:
This equipment complies with FCC radiation exposure limits set forth for an uncontrolled environment .
This transmitter must not be co-located or operating in conjunction with any other antenna or transmitter.
ISEDC Radiation Exposure Statement:
This equipment complies with ISEDC RF radiation exposure limits set forth for an uncontrolled environment.
This transmitter must not be co-located or operating in conjunction with any other antenna or transmitter.
FCC WARNING:
To assure continued operation, follow the attached installation instructions and
use only shield cables when connecting to other devices. Changes or
modifications not expressly approved by the party responsible for compliance
could void the user's authority to operate the equipment.
 Loading...