

Page 1
BLUETOOTH SOUNDBAR SYSTEM
MODEL: JSB-200
INSTRUCTION MANUAL
Please read this instruction manual carefully and keep it for future reference.
Page 2
Page 3
Page 4
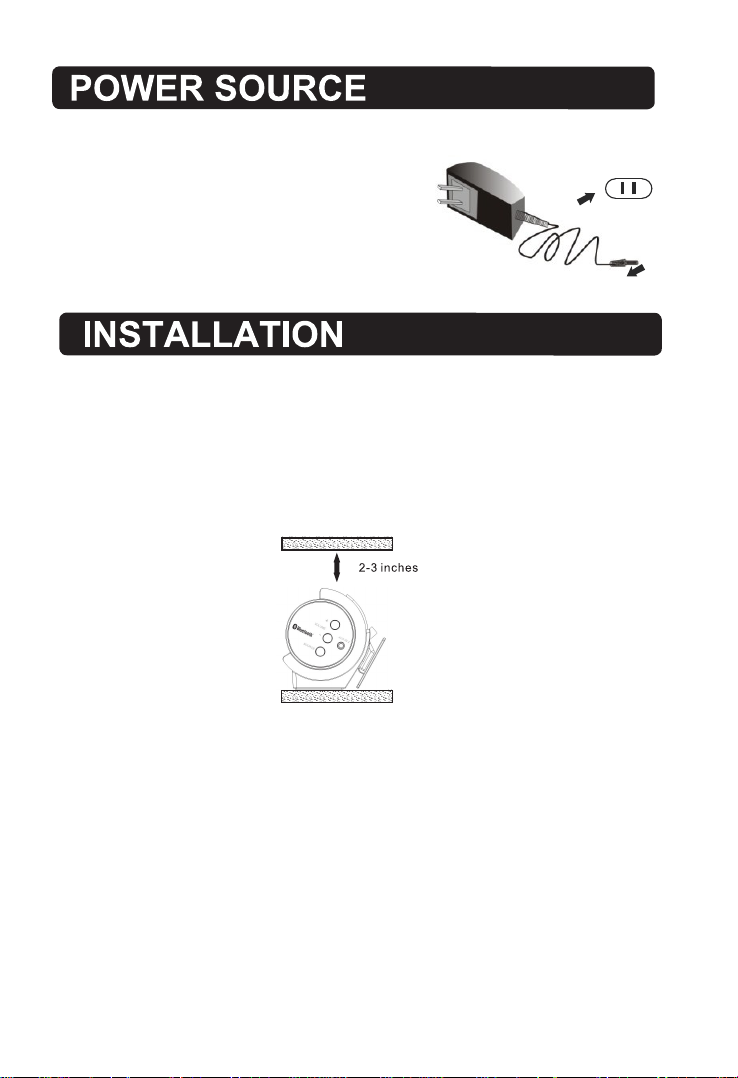
Insert the small plug from supplied AC/DC adaptor to DC IN jack
on the rear of the unit and insert the AC/DC adaptor
to the wall outlet having AC 100-240V~, 50/60 Hz.
NOTE:This AC/DC adapter is intended to be
correctly operated in a vented indoor wall outlet.
AC/DC adapter
To the DC IN jack on the rear of unit.
1. Placing the device on table
Ventilation
When placing the Sound Bar on an entertainment center, bookshelf, or any type of
enclosed space, be sure to allow at least 2-3 inches of space around the Sound Bar
for ventilation. If the Sound Bar is enclosed in a tight space, without ventilation, heat
generated from the Sound Bar could produce a potential heat hazard.
3
Page 5

MOUNTING
1. Mounting the device on wooden wall
We recommend having this speaker professionally mounted. By using the included
wall mounting accessories, the sound bar can be mounted onto a wall.
25.9 inches
Holes distance:25.9 inches
in same horizontal level
supplied Metallic Bracket
supplied Screws
supplied Metallic Bracket
supplied Screws
1. Mark the position of the mounting screws on the wall using a pencil.
2. Drill the supplied screws directly into the marks that you have made on the wall
with the Metallic Bracket as the figure above.
3. Put the sound bar onto the mounting brackets. Make sure they are firm and stable.
2. Mounting the device on wall
2.2 Mounting on the wooden wall:
Holes distance:25.9 inches
in same horizontal level
supplied Plastic Inserts
supplied Metallic Bracket
(1)
Drill holes by powerful electrical drill.
supplied Screws
(2)
supplied Screws
supplied Plastic Inserts
supplied Metallic Bracket
1. Mark the position of the mounting screws on the wall using a pencil.
2. Drill holes by a powerful electric drill( Not supplied )( Drill head diameter:6.0 mm ).
3. Insert the supplied plastic inserts into the holes by hammer.
4. Secure the supplied screws into the plastic inserts with the Metallic Bracket.
5. Put the sound bar onto the mounting brackets. Make sure they are firm and stable.
4
Page 6
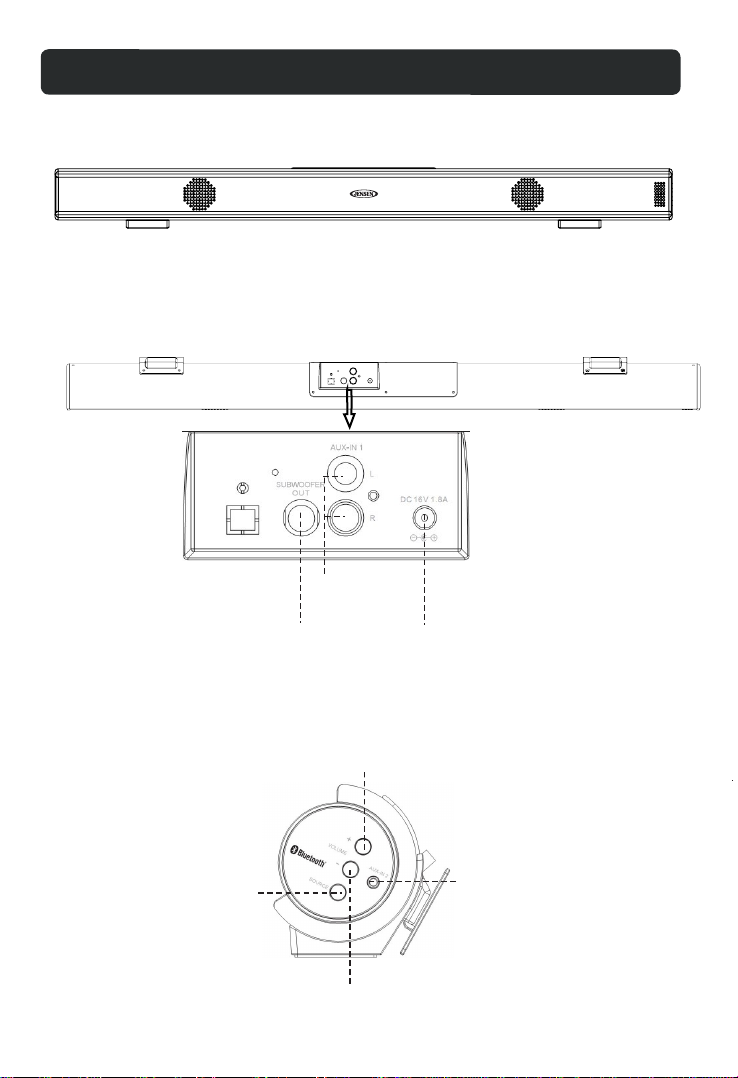
PRODUCT OVERVIEW
Front View
Back View
AUX-IN 1 jacks
Side View
POWER/SOURCE
SUBWOOFER OUT jack
VOLUME +
VOLUME -
5
DC IN jack
AUX-IN 2 Jack
Page 7

REMOTE CONTROL
1. STANDBY
2. VOL- ( volume down )
3. SOURCE
4. BASS-
5. TREBLE-
6.
7. ( play/pause )
8. (mute)
9. VOL+ ( volume up )
10. BASS +
11. PAIR
1
2
3
4
5
6
7
STANDB Y
8
9
PAIR
10
11
12
13
14
12. TREBLE +
13. EQ ( Equalizer )
14.
BATTERY INSTALLATION
- Befo re i nstal la tion
Remo ve a nd disc ar d the insul ation tab . Ou t of the bo x th e Remote Co ntrol
has a ba tt ery and w il l be usable a fter the ta b is r emove d.
-Rep la ce batt er y for the rem ote contr ol
1. Pus h an d slide o ut t he batter y holder as F ig ure 1 bel ow.
2. Rep la ce the ba tt ery with a ne w CR2025 bu tt on cell w it h the polar ity (+)
side u pw ard.
3. Sli de i nto the b at tery hold er.
BATTERY PRECAUSIONS
• Neve r re charg e th e batteri es, apply h ea t to them o r ta ke them apa rt.
• Batt er y shall n ot b e exposed t o excessi ve h eat suc h as s unshine , fire or the l ik e.
• Do not t hr ow the ba tt eries in fi re!
• Atten ti on shou ld b e drawn to th e environ me ntal as pe cts of batt ery dispo sa l.
• If the r em ote con tr ol is not goi ng to be used f or a l ong tim e, r emove the b attery
to avo id d amage c au sed by batt ery leaka ge c orros io n.
POWE R CO NTROL
- To turn the un it o n
• Conn ec t the sup pl ied AC/DC ad apter.
• Pres s STA ND BY but ton to tu rn o n the unit.
- To turn the un it o ff
• Pres s STA ND BY but ton on th e re mote cont rol or hold S TAN DB Y bu tton in
the right side of the unit.
NOTE :
If the u ni t is not us ed f or a long per iod of time , disconnect the AC/DC adapter.
6
Page 8

AUX-IN 1 CONNECTION
- RCA AUX IN so ur ces may inc lu de
•TV/ DV D/VCR
- RCA AUX IN co nn ection
1. Con ne ct the RC A aud io cable (s upplied ) to t he audi o ou tput jack o n DVD
play er a nd AUX 1 or AUX 2 j ac k on the rear o f DVD.
2. Pre ss S OURCE b ut ton repea tedly unt il the indictaor turns green.
Whi te
Red
-Dur in g playb ac k
•Pre ss M UTE but to n to turn off the s ou nd. Pre ss a gain to res um e the sou nd.
•Pre ss V OLUME +/ - buttons t o adjust th e vo lume le ve l.
•Pre ss B ASS+/ - bu ttons to ad just bass l ev el.
•Pre ss T RE BLE+/-b uttons to a dj ust tre bl e level.
•Pre ss E Q butto n to s witch bet ween
JAZZ/POP/CLAS/ROCK/NORM.
7
Page 9

AUX-IN 2 CONNECTION
- AUX I N source ma y in clude :
•Per so nal aud io p layers
•Per so nal com pu ters or lap tops
- AUX IN co nn ectio n:
1. Con ne ct a ster eo 3 .5mm jack c able (sup pl ied) be tw een the hea dphone or
LINE /A udio ou tp ut of the per sonal aud io p layer a nd t he AUX-IN 2 jack on the
right side of the unit.
2. Pow er o n the uni t an d press SOU RCE butto n re peate dl y un
turns orange.
Set y ou r perso na l audio pla yer/com pu ter to pl ay.
NOTE : If t here is n o so und or if the v olume is no t lo ud enou gh , you may
incr ea se the se tt ing on the so ur ce.
til the indicator
Con nect to t he outp ut
soc ket of ex terna l
aud io devi ces (Mp 3,
Com puter, e xt.)
To AUX IN Jack
on the unit
-Dur in g playb ac k
•Pre ss M UTE but to n to turn off the s ou nd. Press a gain to res um e the sou nd .
•Pre ss V OLUME +/ - buttons t o adjust th e vo lume le ve l.
•Pre ss B ASS+/ - bu ttons to ad just bass l ev el.
•Pre ss T RE BLE+/-b uttons to a dj ust tre bl e level.
•Pre ss E Q butto n to s witch bet ween
JAZZ/POP/CLAS/ROCK/NORM.
SUBWOOFER CONNECTION
Subwoofer connection source may include:
Amplifiers and other devices with audio input jack
Connect the RCA cable with the subwoofer out jack, and another end of
RCA cable to the audio in jack of amplifiers or other devices.
8
Page 10

BLUETOOTH
-Pairing
1. Press SOURCE button repeatedly to enter BT mode. The indicator is blue.
2. Turn o ff t he B luetoot h functio na lity of o th er device s that are pa ir ed with y ou r
unit . On ly one de vi ce can be use d with the Bl ue tooth f un ction at a ti me.
3. Turn o n Bl uetoo th f unction ality on yo ur B lueto ot h device. Typi ca lly, Bluetoo th
control s are foun d on the device ’s tools or settin gs me nu (s ee yo ur us er ma nual).
Turn on B lu etoot h co nnectiv ity and mak e yo ur devi ce “ discove rable”.
4. Choose “add a new Bluetooth device”or “setup Bluetooth device”on your device.
It wil l st art to se ar ch. Once “ ”sho ws o n your de vi ce, selec t it. If your
devi ce p rompt s yo u for a pass co de, pleas e en ter"0000". If the pa ir ing attem pt
fail s or t imes ou t, p lease sta rt pairin g pr ocedu re a gain.
5. Afte r yo ur devi ce a nd the “ ”hav e co nnect ed e ach other, a s ound
can be h ea rd.
NOTE :
The un it w ill aut om aticall y reconne ct t he last p ai red devic e when Blue to oth
mode i s re selec te d from othe r mode. If fo r so me reas on t he Blueto oth
conn ec tion is l os t due to exte rnal fact or s or will n ot a uto recon nect, you
must clear the " " from your Blue Tooth device list and begin the paring
proc es s again .
Press PAIR button on remote control to disconnect the current connection of the unit
with the external device.
JSB-200
-During playback
Make sur e the Blue tooth connec tion between the unit and the devic e is activ ated.
•Pre ss
resu me playin g.
•Pre ss button to s ki p forward t o the next tr ac k and b u tt on to
skip b ac kward t o th e previou s track.
•Pre ss M UTE but to n to turn off the s ou nd. Press a gain to res um e the sou nd .
•Pre ss V OLUME +/- bu tt ons to ad ju st the volu me level.
•Pre ss B ASS +/- butt on s to adju st b ass level .
•Pre ss T RE BLE +/- butto ns t o adjust tr eble leve l.
•Pre ss E Q butto n to s witch bet ween
b ut ton to su sp end momen tarily th e pl aying t ra ck. Press
JSB-200
"0000"
JSB-200
again to
JAZZ/POP/CLAS/ROCK/NORM.
9
Page 11

TROUBLESHOOTING GUIDE
&KHFNWKHIROORZLQJVEHIRUHUHTXHVWLQJVHUYLFH
6<03720 3266,%/(&$86( 3266,%/(628/7,21
No power
AC plug not connected to the
wall outlet
Plug to the wall outlet.
No sound
Sound distortion
Remote not
working
Bluetooth
reception failure
Volume in minimum position
The connected device is not
in payback mode
Input source incorrect
Bass level of the connected
device too high
Volume level too high
The battery is
The external device is far from
the unit
Have not paired
consumed
Raise volume level by pressing the VOL
(Volume) + button
Play the music/movie in the connected
device as usual
volume level of it is in high level
Press the SOURCE button repeatedly to
set the input source to the desired mode
Reduce the bass level of the connected
device
Reduce the volume level by pressing
the
VOL (Volume ) - button
Replace with new battery
Put the external BT device close to the
unit
Pair both unit as BT pairing page
and make sure the
10
Page 12

GENERAL SPECIFICATIONS
Powe r so urce of t he r emote con trol... .. ....... ......D C 3V, 1x CR 202 5 button ce ll
Outp ut o f the pow er a dapter.. ....... .. ....... ....... .. ....... ....... .. ..... .. DC 16V,
Audi o ou tput. .. ....... .. ..... .. ....... ....... .. ....... ....... .. ....... ....... .. ....... .............2x10 W
Powe r co nsump ti on..... ....... .. ....... ....... .. ....... ....... .. ....... ....... .. ..... .. ....... .25 W
Blue to oth wor ki ng range. ....... .. ....... ....... .. ..... .. ....... .. ..... .. ....... .. ..... .. ......1 0M
Subwoofer frequency................................................................................80-150Hz
Subwoofer level........................................................................................1V ( max )
ACCESSORIES
1 x Inst ructi on manu al
1 x Remo te cont rol
1 x CR 202 5 butto n cell (A lread y install ed in the r emote c ontro l)
1 x Ster eo audi o conne ction c able with 3 .5mm st ereo pl ug
1 x RCA aud io c able
1 x Adapter
4 x Screws ( For wall mounting )
4 x Wall plugs ( For wall mounting )
2 x Metal brackets ( For wall mounting )
1.8
A
11
Page 13

FCC STATEMENT
1. This device complies with Part 15 of the FCC Rules. Operation is subject to the following
two conditions:
(1) This device may not cause harmful interference.
(2) This device must accept any interference received, including interference that may
cause undesired operation.
Changes or modifications not expressly approved by the party responsible for compliance
could void the user's authority to operate the equipment.
NOTE: This equipment has been tested and found to comply with the limits for a Class B
digital device, pursuant to Part 15 of the FCC Rules. These limits are designed to provide
reasonable protection against harmful interference in a residential installation.
This equipment generates uses and can radiate radio frequency energy and, if not
installed and used in accordance with the instructions, may cause harmful interference to
radio communications. However, there is no guarantee that interference will not occur in a
particular installation. If this equipment does cause harmful interference to radio or
television reception, which can be determined by turning the equipment off and on, the
user is encouraged to try to correct the interference by one or more of the following
measures:
Reorient or relocate the receiving antenna.
Increase the separation between the equipment and receiver.
Connect the equipment into an outlet on a circuit different from that to which the
receiver is connected.
Consult the dealer or an experienced radio/TV technician for help.
 Loading...