


ALEXA PORTABLE
WATER PROOF
SPEAKER VOICE ACTIVATED
OWNER'S MANUAL
PLEASE READ BEFORE OPERATING THIS EQUIPMENT.
MODEL: MSH318
Size: 148.5(W) x 210(H)mm (A5)
IMPORTANT SAFETY INSTRUCTIONS
CAUTION
RISK OF ELECTRIC SHOCK
O Q. R
OPEN
S
P
ART
S
ERVICE PERSONNEL.
DO NOT
CAUTION: TO REDUCE THE RISK OF ELECTRIC SHOCK, DO NOT
R
EMOVE COVER (OR BACK). NO USER-SERVICEABLE
I
NSIDE
EFER SERVICING T UALIFIED
The lightning flash with arrowhead symbol
within an equilateral triangle is intended to alert
the user to the presence of uninsulated
dangerous voltage within the product`s
enclosure that may be of suff ic ie nt m ag ni tu de t o
constitute a risk of electric shock to persons.
The exclamation point within an equilateral
triangle is intended to alert the user to the
presence of important operating and
maintenance(servicing) instructions in the
literature accompanying the appliance.
WARNING:
TO REDUCE THE RISK OF FIRE OR ELECTRIC
SHOCK, DO NOT EXPOSE THIS PRODUCT TO RAIN
OR MOISTURE.
WARNING:
TO REDUCE THE RISK OF FIRE OR ELECTRIC
SHOCK, AND ANNOYING INTERFERENCE, USE THE
RECOMMENDED ACCESSORIES ONLY.
FCC WARNING:
To assure continued compliance, follow the attached
installation instructions and use only shielded cables when
connecting to other devices. Modifications not authorized by
the manufacturer may void user`s authority to operate this device.
To maintain compliance with FCC’s RF Exposure guidelines, This equipment should be installed and operated with
minimum distance between 20cm the radiator your body: Use only the supplied antenna.
Changes or modifications made to this equipment not expressly approved by (manufacturer name) may void the FCC
authorization to operate this equipment
FCC ID:OKUCAW45320
FCC NOTICE:
This equipment has been tested and found to comply
with the limits for a Class B digital device, pursuant to
part 15 of the FCC Rules. The se l im it s ar e de si gn ed t o
provide reasonable protection against harmful
interference in a residential installation. Thi s eq ui pm en t
generates, uses and can radiate radio frequency energy
t d ii
and, if no nstalled and use n accordance with the
instructions, may cause harmful interference to radio
communications.
However, there is no guarantee that interference will not
occur in a particular installation. If this equipment does
cause harmful interference to radio or television
reception, which can be determined by turning the
equipment off a nd o n, t he u se r is e nc ou ra ge d to t ry t o
correct the interference by one or more of the following
measures:
Reorient or relocate the receiving antenna.
Increase the separation between the equipment and
receiver.
Connect the equipment into an outlet on a circuit
diffe re nt f ro m th at t o wh ic h th e re ce iv er i s co nn ec te d.
Consult the dealer or an experienced radio/TV
technician for help.
2

IMPORTANT SAFETY INSTRUCTIONS
Before using the unit, be sure to read all operating instructions carefully. Please note that these
are general precautions and may not pertain to your unit.
For example, this unit may not have the capability to be connected to an outdoor antenna.
1) Read these instructions.
All the safety and operating instructions should be read before the product is operated.
2) Keep these instructions.
The safety and operating instructions should be retained for future reference.
3) Heed all warnings.
All warnings on the product and in the operating instructions should be adhered to.
4) Follow all instructions.
All operating and use instructions should be followed.
5) Do not use this apparatus near water.
Do not use this product near water and moisture, for example: near a bathtub, washbowl, kitchen
sink or laundry tub; in a wet basement; or near a swimming pool.
6) Clean only with dry cloth.
Unplug this product from the wall outlet before cleaning. Do not use liquid cleaners or aerosol
cleaners. Use a dry cloth for cleaning.
7) Do not block any ventilation openings. Install in accordance with the manufacturer' s
instructions.
Slots and openings in the cabinet and in the back or bottom are provided for ventilation, to ensure
reliable operation of the product and to protect it from overheating. These openings must not be
blocked or covered. The openings should never be blocked by placing the product on a bed, sofa,
rug or other similar surface. This product should never be placed near or over a radiator or heat
source. This product should not be placed in a built-in installation such as a bookcase or rack
unless proper ventilation is provided or the manufacturer' s instructions have been adhered to.
8) Do not install near any heat sources such as radiators, heat registers, stoves, or other
apparatus( including amplifiers) that produce heat.
9) Do not defeat the safety purpose of the polarized or grounding- type plug. A polarized plug
has two blades with one wider than the other. A grounding type plug has two blades and a
third grounding prong. The wide blade or the third prong are provided for your safety. If the
provided plug does not fit into your outlet, consult an electrician for replacement of the
obsolete outlet.
10)Protect the power cord from being walked on or pinched particularly at plugs, convenience
receptacles, and the point where they exit from the apparatus.
11) Only use attachments/ accessories specified by the manufacturer.
12)Use only with the cart, stand, tripod, bracket, or table specified by the
manufacturer, or sold
use ca ut io n whe n
avoid injury from tip- over.
An appliance and cart combination should be moved with care.
Quick stop, excessive force and uneven surfaces may cause the
appliance and cart combination to overturn.
13) Unplug this apparatus during lightning storms or when unused for long periods of time.
To protect your product from a lightning storm, or when it is left unattended and unused for long
periods of time, unplug it from the wall outlet and disconnect the antenna or cable system. This
will prevent damage to the product due to lightning and power- line surges.
14) Refer all servicing to qualified service personnel. Servicing is required when the apparatus
has been damaged in any way, such as power-supply cord or plug is damaged, liquid has
been spilled or objects have fallen into the apparatus, the apparatus has been exposed to rain
or moisture does not operate normally, or has been dropped.
15) Power source
This product should be operated only from the type of power source indicated on the marking label.
If you are not sure of the type of power supply to your home, consult your appliance dealer or local
power company. For products intended to operate from battery power, or other source, refer to the
operation instructions.
16) Power lines
An outside antenna system should not be located in the vicinity of overhead power lines or other
electric light or power circuits, or where it can fall into such power lines or circuits. When
installing an outside antenna system, extreme care should be taken to keep from touching such
power lines or circuits as contact with them might be fatal.
with the apparatus. When a cart is used,
moving the cart/ apparatus
combination to
3
IMPORTANT SAFETY INSTRUCTIONS
17) O verlo ading
Do no t overl oad wal l outle ts and ex tensi on cord s as this c an resu lt in a ris k of fire o r elect ric
sho ck.
18) O bject a nd liqu id entr y
Nev er push o bject s of any ki nd into t he prod uct thr ough op ening s as they m ay touc h dange rous
vol tage po ints or s hort ou t parts t hat cou ld resu lt in fir e or elec tric sh ock. Ne ver spi ll or spr ay any
typ e of liqu id on the p roduc t.
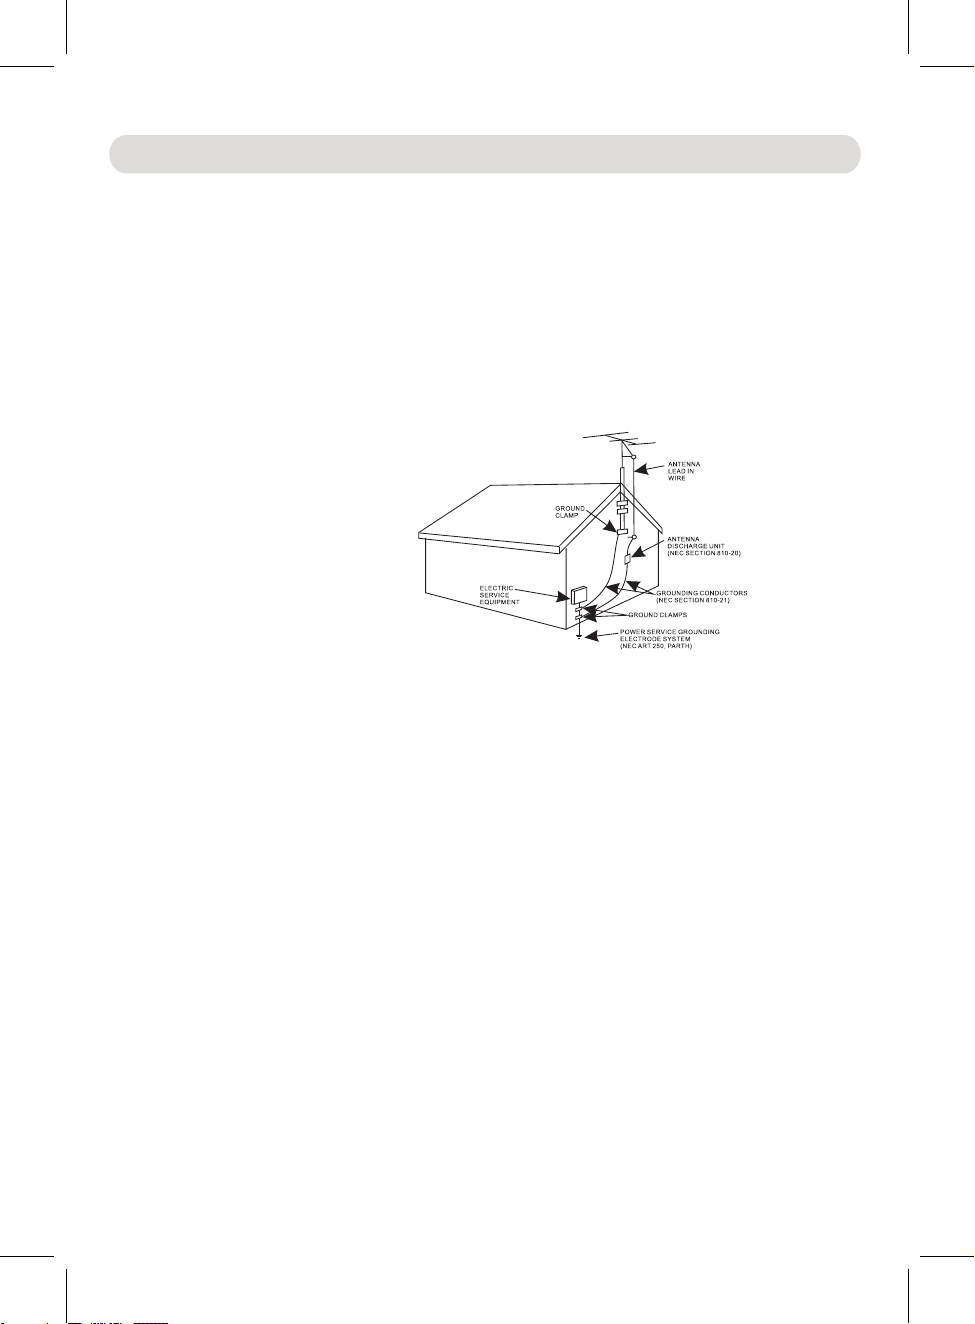
19) O utdoo r anten na grou nding
If an o utsid e anten na is con necte d to the pr oduct , be sure t he ante nna sys tem is gr ounde d so as to
Pro vide so me prot ectio n again st volt age sur ges and b uilt up s tatic c harge s. Sect ion 810 o f the
Nat ional E lectr ic Code A NSI/ NF PA 70 p rovid es info rmati on with r espec t to prop er grou nding
of th e mast an d suppo rting s truct ure, gr oundi ng of the l ead- in w ire to an a ntenn a disch arge pr oduct ,
siz e of grou nding c onduc tors, l ocati on of ant enna- d ischa rge pro duct, c onnec tion to g round ing
ele ctrod es and re quire ments f or the gr oundi ng elec trode s.
20) S ervic e
Do no t attem pt to ser vice th is prod uct you rself a s openi ng or rem oving c overs m ay expo se you to
dan gerou s volta ge or oth er haza rds. Re fer all s ervic ing to qu alifi ed serv ice per sonne l.
21) R eplac ement p arts
Whe n repla cemen t parts a re requ ired, b e sure th e servi ce tech nicia n uses re place ment pa rts
spe cifie d by the ma nufac turer o r those t hat hav e the sam e chara cteri stics a s the ori ginal p arts.
Una uthor ized su bstit ution s may res ult in fi re or ele ctric s hock or o ther ha zards .
22) S afety c heck
Upo n compl etion o f any ser vice or r epair s to this p roduc t, ask th e servi ce tech nicia n to perf orm
saf ety che cks to de termi ne that t he prod uct is in p roper o perat ing con ditio n.
3
24)Dam age req uirin g servi ce
Unp lug thi s produ ct from t he wall o utlet a nd refe r servi ce to qua lifie d servi ce pers onnel u nder th e
fol lowin g condi tions .
a) Wh en the po wer- su pply co rd or plu g is dama ged.
b) If l iquid h as been s pille d or obje cts hav e falle n into th e produ ct.
c) If t he prod uct has b een exp osed to r ain or wa ter.
d) If t he prod uct doe s not ope rate no rmall y by foll owing t he oper ating i nstru ction s. Adju st only
tho se cont rols th at are co vered b y the ope ratin g instr uctio ns, as an a djust ment of o ther
con trols m ay resu lt in dam age and w ill req uire ex tensi ve work b y a quali fied te chnic ian
to re store t he prod uct to it s norma l opera tion.
e) If t he prod uct has b een dro pped or t he cabi net has b een dam aged.
f) Wh en the pr oduct e xhibi ts a dist inct ch ange in p erfor mance -this indi cates a n eed for s ervic e.
2 )Note to CATV s ys tem installer
Thi s remin der is pr ovide d to call t he CATV sy st em installer's att entio n to Arti cle 820 -40 of the
NEC t hat pro vides g uidel ines fo r prope r groun ding an d, in par ticul ar, spe cifie s that th e cable
gro und sha ll be con necte d to the gr oundi ng syst em of the b uildi ng, as cl ose to th e point o f cable
ent ry as pra ctica l.
NOT E: Refe r all ser vicin g to qual ified s ervic e perso nnel. S ervic ing is re quire d when
i
n any w ay such a s the fol lowin g: the po wer-s upply c ord
s
pil led int o unit, t he unit h as been
n
ot op erate n ormal ly.
exp osed to r ain or mo istur e, the un it has be en drop pe
or pl ug has be en dama ged, li quid ha s bee
the u nit has b een dam age
o
r the u nit doe
d
n
4
d
s
Location of Controls
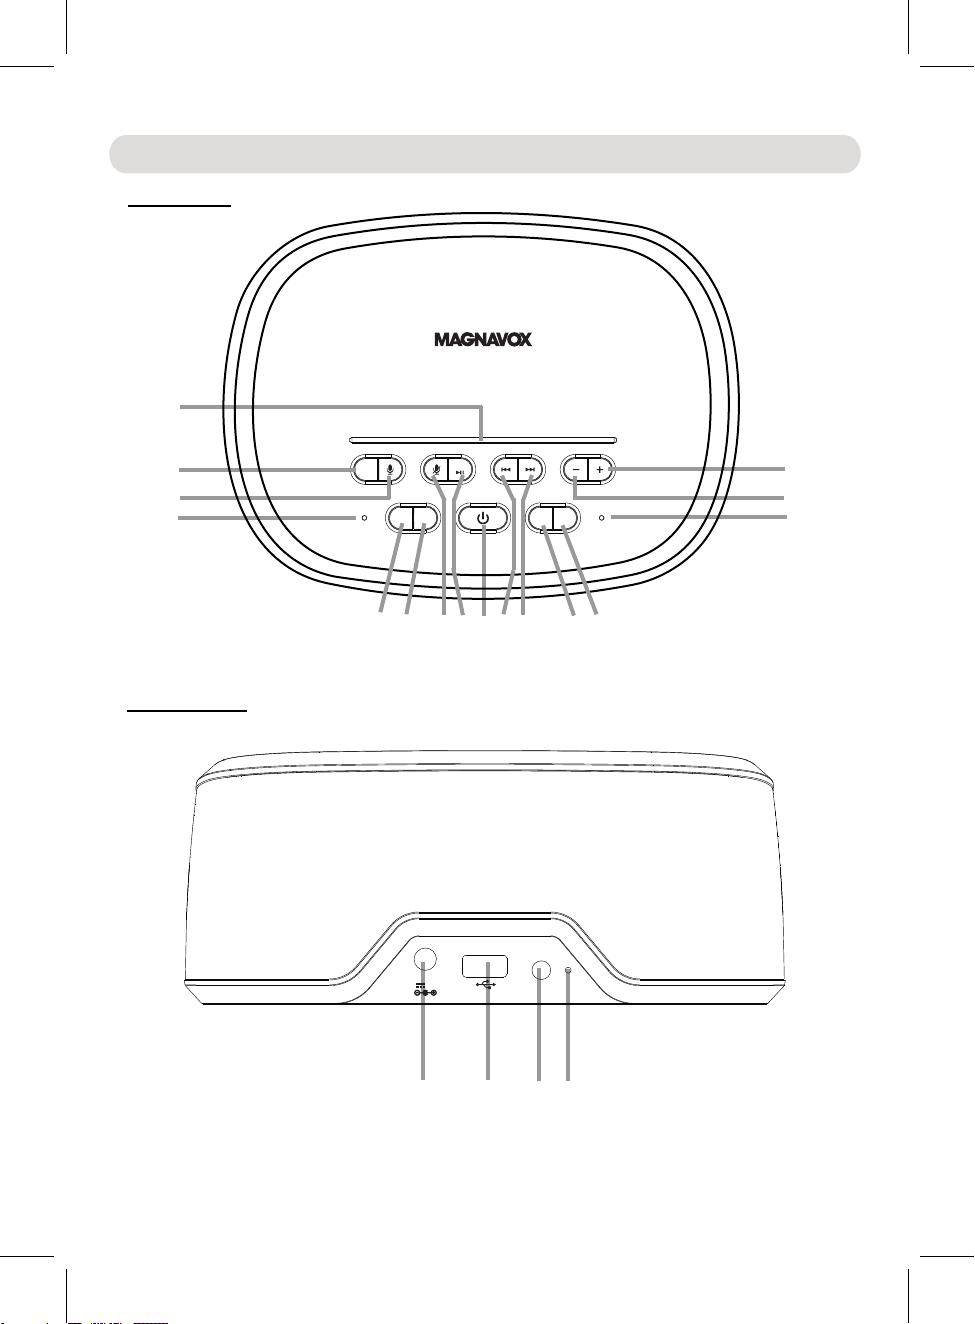
TOP VIEW:
1
2
3
4
REAR VIEW:
FM SCAN
WPS
SNOOZE
SOURCE
SLEEP
5 6 7 8 9 1011 12 13
DC IN
DC 5V, 2A
1A char ge only
Line i n
DIMMER
VOLUME
ANT
15
14
16
17418
5
19
Location of Controls
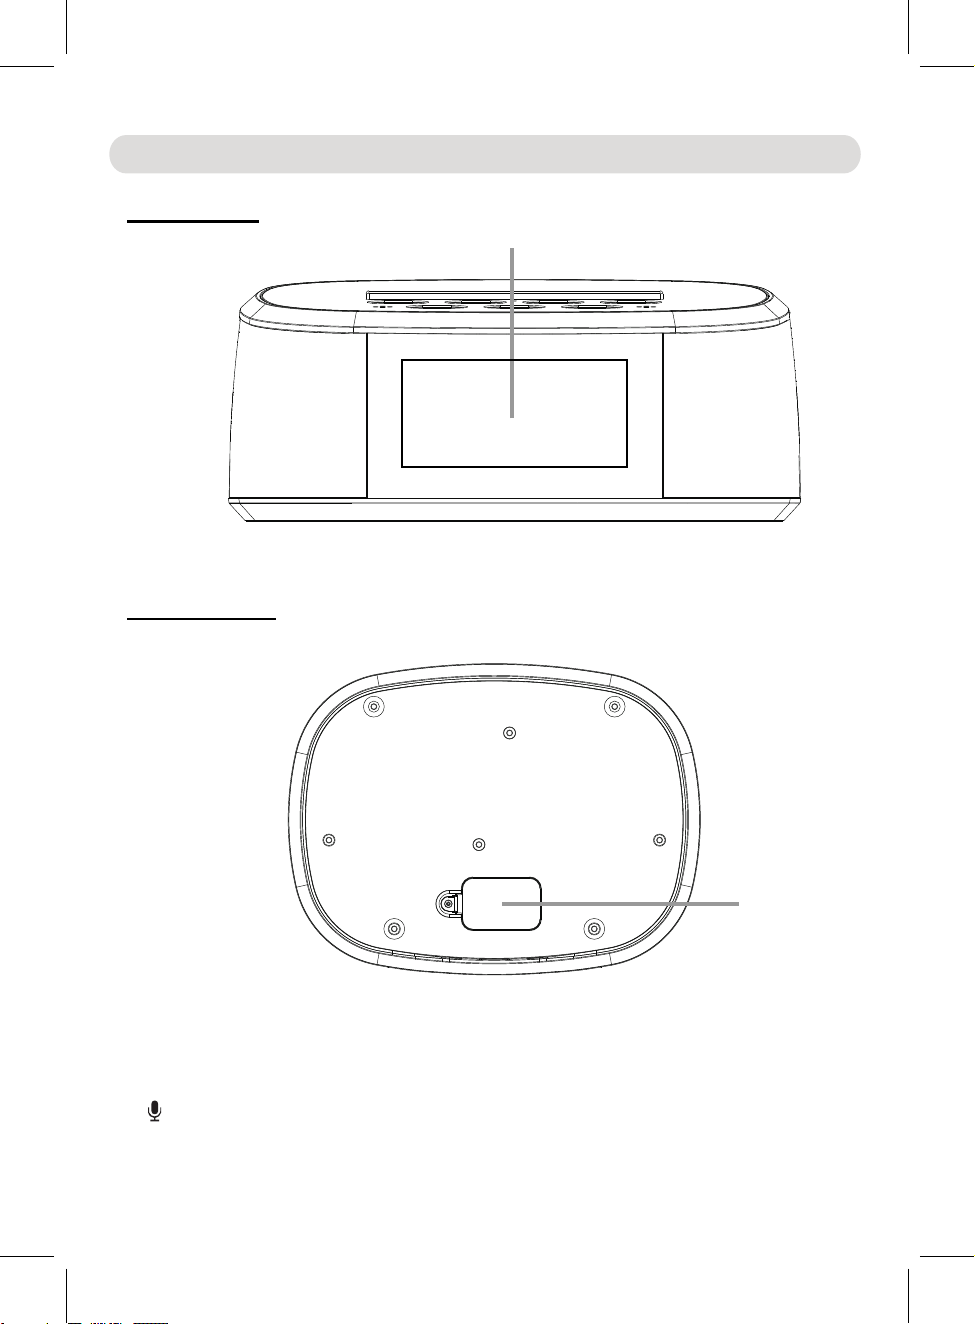
FRONT VIEW:
BOTTOM VIEW:
20
1. LED Indicator Bar
2. SOURCE Button
Press repeatedly to select the playback source
3. Microphone Button
Press to active the Alexa Microphone
4.Built-in Microphones
21
6
Location of Controls
In Wifi connecting mode, press and hold to enter to the Wifi set up
In Wifi connected mode, press and hold to disconnect Wifi network.
In audio playback mode, press to pause. Press again to resume
In Radio mode, press to play the previously stored Radio station.
In music playback mode, press repeatedly to skip to
previous
In Radio mode, press to play the next stored Radio station.
In music playback mode, press repeatedly to skip to
next tracks.
Press to activate
function, the alarm will turn back on
Or, press and hold approximately 1 second to shut off the A
larm.
.
to
5.SLEEP Button
In power on mode, press repeatedly to activate and set the sleep timer.
6.FM SCAN Button
In first time use (or relocated the Clock to a new location), press to search and
available FM stations.
7. Microphone Off Button
Press and hold to turn off the microphone press and hold again to turn it on.
8.WPS (WPS, Play/Pause) Button
9. (Power On/Off) Button
Press and hold to turn on the Clock from standby mode, press and hold
standby mode.
10. (Previous) Button
11. (Next) Button
12. SNOOZE Button
When alarm goes off:
the snooze
minutes later. This feature can be repeatedly
,
tracks.
until the Alarm is shut off.
store the
mode.
normal playback.
again to
automatically nine (9)
back to
13. DIMMER Button
Press repeatedly to adjust the brightness level of the display as desired.
14. - (Volume Down) Button
Press repeatedly to reduce the volume level as desired.
15. + (Volume Up) Button
Press repeatedly to rise the volume level as desired.
16.
IN JackDC
17. USB Port
To recharging the external USB Device.
18. Line in Jack
19. ANT ( WireFM Antenna)
20. Display
21. Button Cell Compartment
7

Button Cell Installation (For Clock Back Up)
1.
Loosen
the screw on the Button Cell Compartment with
a Philips
2.
Press the tab on the door then lift it off.
3.
Install (or replace) th
as
Fig. 2 below according to the polarity
4.
Close
the door and tighten the screw on it as Fig. 3
below.
e
button
cell
shows
If th AC power failure, this electronic clock is designed to continue operating
ere is
(without
(or replace
showing the time on the Clock Display) with a CR2032
it when it is drained) as follows:
button cell (included). Install it
screwdriver (not included) as
Fig. 1 below.
Button
Cell
Compartment.
Fig.1
........................
Fig.2
CR2 03 2
LITHI UM BATTE RY
3V
Fig.3
........................
BATTERY PRECAUTIONS:
internally
diagram inside the
Follow these Battery Precaution when using a battery in this device:
1. Use only the size and type of battery specified.
2. Be sure to follow the correct polarity when installing the battery as indicated in the battery
compartment. A reversed battery may cause damage to the device.
3. Do not mix different types of batteries together (e.g. Alkaline and Carbon-zinc) or old batteries
with fresh ones.
4. If the batteries in the device are consumed or the device is not to be used for a long period of
time, remove the batteries to prevent damage or injury from possible battery leakage.
5. Do not try to recharge the battery not intended to be recharged; it can overheat and rupture.
(Follow battery manufacturer’s instructions.)
6. Do not dispose of battery in fire. Battery may explodes or leak.
7. Clean the battery contacts and also those of the device prior to battery installation.
8. This product contains a coin/button cell battery. If the coin/button cell battery is
swallowed, it can cause severe internal burn in just 2 hours and can lead to death.
Keep new and used batteries away from children. If the battery compartment does not close
securely, stop using the product and keep it away from children.
If you think batteries might have been swallowed or placed inside any part of the body, seek
immediate medical attention.
8

“Amazon Alexa”
“MAGNAVOX Alexa Player”
WiFi Setup
“Magnavox
Alexa
”
To synchronize the correct time to your Clock you must connect your device to the same
Wifi network with the
Note: All Devices must
connect to the same 2.4G Wi-Fi Network.
app following the
Preparation:
1. Create and register an Amazon user account:
(If you already have an Amazon account, you can skip this step. But, please make sure
that you set in the same time zone your clock is located.)
Download the app from the Apps Store into your mobile device
then install it following the on screen instructions from your mobile device.
During installation, you should register the time zone's region your clock will
display. Otherwise, the actual time shown on the clock may be incorrect.
instructions below.
<
MSH318
Edit name
GENERAL
Do Not Disturb
Off
Device Location
Device Time Zone
Pacific Daylight Time(Los Angeleses)
Follow-Up Mode
Off
Measurement Units
Fahrenheit,Miles
Registered To
XXXX
About
Alexa Devices
Deregister
<
United States
TIME ZONES
Alaska Daylight Time
Anchorage
Central Daylight Time
Chicago
Eastern Daylight Time
New York
.
.
.
Device Time Zone
Change
Pacific Daylight Time
Los Angeles
2. Download; install and register the app from the Google
Play or Apple Apps Store into your mobile device following the on screen instructions
from your mobile device.
9

Wifi Connection:
Connect the unit to AC power as below:
Connect the small plug from the AC/DC adaptor to the DC IN Jack
Press and hold the “ ”
Button until the display is illuminated.Time
“12:00”
Power
“Entering
1. Make sure the time zone setting on your mobile device is same
Otherwise, the time showing on the Clock may
differ to your Amazon time.
2. Connect your mobile device to your 2.4G Wifi network.
3.
the Clock.
Connect the AC/DC adaptor to wall outlet having AC 100-240V~, 50/60Hz.
AC/DC Adapter
as your Amazon account.
on the rear of
To AC outlet
DC IN
DC 5V, 2A
1A char ge only
To the DC IN jack
on the rear of the unit
Line i n
ANT
4.
will appear on the display and blink. You will also hear an audible
“Power on; Wi-Fi mode”. The Wifi icon “ ” will appear on
Wait approximately 30 seconds (Or press and hold the Button) until you hear
5.
an audible prompt say
finish set
up”.
set up mode; follow the instruction on the app to
“WPS ”
prompt
the display
say
and blink.
10

Open the APP “MAGNAVOX Alexa Player” in your mobile device.
Add
Device
6.
scan and search the available devices automatically.
Read the on screen instructions and
touch the " " Button on the screen to continue.
Searching for MAGNAVOX
Wireless Hi-Fi System..
Please make sure your device is
powered up.
Your phone is connected to XXXX,
please make sure your device is
connected to the
Experiencing any problems? Give us your feedback>>
Then it will start to
same network.
Add Device
7. The following Fig.A will appear.
appear. Touch the on it. The follows Fig. B will appear. Touch the
Speaker”
Button on the screen to continue.
“MSH318”
Touch the Button on the screen. The devices list will
ADD DEVICE
Please select your device
MSH315V
>
Connect Speaker
“V”
ADD DEVICE
Please select your device
MSH318
WPS
SOURCE
SLEEP
FM SCAN
SNOOZE
Connect Speaker
Fig. A Fig. B
11
VOLUME
DIMMER
“Connect
>

8. The follows screen will appear. Touch the
“Settings”
Button on it to enter to Wifi
setting menu.
NOTE:
If the connection is failure and the follows
screen appear. Press and hold the
“WPS ”
Button approximately 5 seconds to restart
the setting procedures.
<
Go to your Phone's Wi-Fi settings
and select the Wi-Fi starting with
MSH318_XXXX to connect.
Then, come back to this App.
Could not find MSH318_XXXX?
SETUP
Wi-Fi
MSH318_XXXX
Settings
9. Find our Model number
“MSH318_XXX”
(XXX is the identify number of the existing
Clock) in the available Wifi devices list on
your mobile device then touch it to enter.
SETUP
Press and hold the WPS button on your
speaker for 5
10. Touch the Button on the
mobile device's screen to return to
previous setting page. Wait a few
seconds, the Wifi network list will appear.
Select and touch the button of your 2.4G
Wifi network. Then touch the
Button to continue.
Notes:
seconds to put into setup mode.
WPS
SOURCE
SLEEP
FM SCAN
VOLUME
SNOOZE
DIMMER
Continue
“RETURN”
“Continue”
The Wifi network you selected
must same as the 2.4G network
your mobile device using.
Password of the network may
need enter if set.
Settings
<
Wi-Fi
Wi-Fi
MSH318_XXXX
CHOOSE A NETWORK...
ABCDEF
ABC-XXX
Other...
SELECT NETWORK
Choose the network you want the device to
use. MAGNAVOX only supports 2.4G
i
i
networks.
XXXX
ABC123
ABC-XXX
12345
i
Password
Please enter Wi-Fi password
Continue
12

11. Wait a few seconds, the follows screen
will appear. Touch the "Next" Button on
it to continue.
NOTE:
If the connection is failure, the following screen
will appear.
Touch the
“Try Again”
Button on it
to restart the settings follows the on screen
instructions.
CONNECTED
Current Wi-Fi strength of device:100%
Next
12. The follows screen will appear, touch
the Button on it to continue.
“>”
NAME DEVICE
>
CONNECT FAIL
1.Your Phone is connected to wireless
network xxxxx_XXXX and your speaker is
connected to XXXXX. Please go to your
Phone's WiFi Settings and connect to
2.Failed to setup your speaker. Please retry
if you entered the password incorectly.
Check help for alternate setup method for
XXXX.
WiFi setup.
Help
Try Again
Cancel Setup
13. The follows screen will appear, touch
"Sign in with Amazon"
the Button on
it to continue.
Custom...
MSH318_XXXX
Bathroom
Bed Room
Den
Dining Room
Family Room
Foyer
Garage
Garden
13
Your device includes acess to Alexa.
Connect your Amazon account to
access personalized features.
Alexa allows you to use your voice to play music
and get news, sports scores, weather and more-
all hands-free.
All you have to do is ask Alexa.
Sign in with Amazon
Cancel

14. The follows screen will appear, sign in
your Amazon account follows the on
screen instructions.
15. If you do not have an Amazon
“Create a new Amazon account”
touch Button
to start registration and create a new Amazon
account follows the
on screen instructions.
account, then
<
Sign in
Email (phone for mobile accounts)
Amazon password
16. When sign in, the following screen appear,
touch the Button on it to continue.
<
AMAZON LOGIN
Forgot password?
Show password
Keep me signed in. Details
Sign in
New to Amazon?
Create a new Amazon account
“Allow”
AMAZON LOGIN
MSH318 would like access
to:
Alexa Voice Service
Alexa processes and retains audio, interactions,
and other data in the cloud to provide and improve
our services.
Alexa allows purchasing by
default payment and shipping
require a speakable
voice purchaing, and see
details in your Alexa App or on alexa.amazon.com.
Learn more.
By tapping"Allow", you agree to Amazon's
Conidtions of
Use and All terms found here.
voice using your
confirmation code, turn off
settings. You can
product and order
<
AMAZON LOGIN
Create account
Name
Your email address
Create a password
Show password
Create your Amazon account
By create an account, you agree to the terms
and conditions below.
17. The following screen will appear, select
and set the region you are, then touch
“Next”
<
Button to continue.
AMAZON LOGIN
Select your country or
Region
This way, Alexa will give you more
accurate responses.
Allow
Cancel
14
United States
<
Next

18. The following screen will appear, touch the
button of the desired language.
Please choose your prefered
language for Alexa.
19. The following screen will appear, touch
“Next”
the Button on it.
English (United States)
English (United Kingdom)
Deutsch
You can change the language later in
"Amazon Alexa
Settings".
20. The following screen will appear. Then you
can turn off the Alexa Microphone following
the on screen instructions or touch the
“Next”
Button to skip this setting then go to next step.
Alexa is ready
Here are some of the many things
you can ask Alexa.
Alexa, what's the weather?
Alexa, play my Flash Briefing.
Alexa, what are some top-rated
Indian restaurants?
Alexa, set a timer for 20 mins.
Next
21. The following screen will appear, touch
the
“I got it”
Button to complete the
settings.
DEVICE LIST
<
Bedroom
You Belong with Me.
Bedroom
R
L
How to switch between solo and multi mode?
We value your privacy, so you can
disable your microphone as shown in
the image above.
To learn more and acess additional
features, download the Amazon Alexa
App.
I got it!
Next
Pause All
22. Once the set up is finished, press and hold the Power Button to turn the Clock to
standby mode. You will hear an audible prompt say
“ ”
“Power off”.
15

Operation
Press and hold the “ ”
Button approximately
1
second to turn on
the clock
Wait approximately 30 seconds until the clock is automatically connected to
Say“Alexa”tothe
microphoneorpress the
“ ”
Button,
the
(Alexa) Who are you?
(Alexa) What's the time now?
(Alexa) What's the news today?
(Alexa) Play a
song.
(Alexa) Stop (or Pause) the song.
In Wifi connection mode, say
“Alexa” to the microphone or press the
(Alexa) Set an alarm.
(Alexa) Eight AM.
When alarm i
s set and activated, the indicator “alarm1” will appear
When finished, press and hold the “ ”
Button to turn the unit to
standby
Power
Microphone
Power
Alexa
Alexa
Alexa:
After the Clock was connected to Wifi network and sign in to Amazon as
1.
instructed earlier.
from standby mode. Icon “ ” will appear on the
display and you
2.
your Wi-fi network and Amazon, you will hear an audible say
“Connected
3.
Indicator Bar will illuminate. Ask your questions or instructions to
microphone then wait reply fro . For example,
will hear
to your Wifi network”.
an audibl say “Power on; Wi-Fi mode”.
for a m Alexa
e prompt
prompt
You can ask:
the
4.
mode. You will hear an audibl say “Power off”.
ALARM:
Alarm set:
1.
Microphone ask Alexa to:
2.
display.
Button, the Indicator Bar will illuminate. Then,
will reply: Alarm for what time?
will reply: Alarm set for eight AM.
e prompt
16
“ ”
on the

More than one alarm
can be set, repeated the same procedures
(Alexa) Cancel alarm.
will reply: XX alarm cancel.
If more than one alarm time was set, cancel it following her instructions.
Press and hold the “ ”
Button approximately
1 second to turn on
the clock
Press the “Source” Button repeatedly until the indicator “radio” appears
In first time use (or relocated the Clock to a new location), search and
Power
3.
Alexa
until all
alarms are set.
IMPORTANT:
When using the Alexa alarm clock (or timer), make sure the Clock is in
power on mode and connected to the Wifi network and Amazon
continually. Otherwise, the alarm will not function.
Snooze:
When alarm goes off, press the SNOOZE Button, the Indicator Bar will
illuminate and blink. The alarm will turn back on automatically nine (9)
minutes later. This feature can be repeatedly until the Alarm is turned off.
Shut off alarm:
When alarm goes off, press and hold the SNOOZE Button to shut off alarm.
The indicator “alarm1” will disappear on the display.
Cancel alarm:
In Wifi connection mode, say “Alexa” to the microphone or press the “ ”
Microphone
Button, the Indicator Bar will illuminate. Then,
ask Alexa to:
RADIO:
1.
from standby mode. Indicator “ ” will appear on the display and
you will
hear an audibl say “Power on; Wi-Fi mode”.
e prompt
2.
on the display.
3.
store the available FM stations by pressing the “FM SCAN” Button. The
Clock will automatically search and store all available FM radio stations
then play the first stored FM station.
17

Press the
repeatedly to select and play
the desired
Press the VOLUME +/- buttons to adjust volume level as desired.
In power off mode, connect one end of the Audio Connection Cable (not
Connect the other end of the cable to the “Line in” Jack on the rear of the
In power on mode, press the “Source” Button repeatedly until the indicator
Play the music on the connected Player as usual. (Make sure the volume
Press the VOLUME +/- buttons to adjust volume level as desired.
Press and hold the “ ”
1 second to turn on the
clock
Wait approximately 30 seconds until the clock is automatically connected to
o
r
When finished, press and hold the “ ”
to turn the unit to
standby
When finished, press and hold the “ ”
to turn the unit to
standby
4.
5.
6.
(Back or Forward) buttons
stored radio station.
Power Button
mode. You will hear an audibl say “Power off”.
e prompt
Antennas
:
The FM Wire Antenna on the rear of unit is for FM reception. If reception is weak,
unwind it to full length and/or reassemble the other direction/location to improve
reception.
AUX/LINE IN:
Listen music from the external Audio Player such as MP3 Player, Discman…
ETC:
1.
included) to the AUX Out / Line Out / Phone Jack on the external Audio
Player.
2.
Clock.
3.
“line-in” appear on the display.
“ ”
Auxiliary Mode .
You will also hear an audible prompt say
4.
level of the connected Audio Player is turned to high level.)
5.
6.
mode. You will hear an audible say “Power off”.
Power Button
prompt
MUSIC PLAYBACK:
Stream and play music through the Clock from Amazon:
1.
Power Button approximately
from standby mode. Icon “ ” will appear on the display and you will
an audible say “Power on; Wi-Fi mode”.
hear
prompt
2.
your Wi-fi network and Amazon, you will hear an audible say
“Connected to
your Wifi network”.
18
prompt

Say
“Alexa”tothe
microphoneorpress the
“ ”
Button,
the
Then select and play the music
Press and hold the “ ”
1 second to turn on the
clock
Wait approximately 30 seconds until the clock is automatically connected to
Open the “MAGNAVOX Alexa Player” in your mobile device. Play
M
icrophone
a
pp
3.
“ ”
Indicator Bar will illuminate. Say your instructions to
wait the reply from her.
You can say:
4.
(Alexa) Play the
song.
microphone then
the
5.
You can also stream and play music through the Clock from mobile
device on your Wifi network by using the “MAGNAVOX Alexa Player”
1.
Power Button approximately
following Alexa instructions.
your
app.
from standby mode. Icon “ ” will appear on the display and you will
an audible say “Power on; Wi-Fi mode”.
hear
2.
your Wi-fi network and Amazon, you will hear an audible say
prompt
“Connected to your Wifi network”.
3.
the music on your device or through other Music Store following the on
screen instructions.
BUILT-IN USB CHARGER:
The Clock has a built-in USB Charger, connect the external USB Device to
the USB Port on the rear of the Clock for recharging.
Using PROPER USB charging cable
(not included)
To USB Port on the rear of the Clock
To charging port of the external device
DIMMER
Press the
:
“DIMMER”
Button repeatedly to adjust the brightness level of the
1A char ge o nl y
display as desired.
SLEEP TIMER
Press the Button to activate the sleep function, sleep timer will appear
:
SLEEP
“ ”
on the display. Press the button repeatedly to set the sleep timer to 10 – 90
minutes as desired. To turn off the sleep timer before the time is up, press and
hold the Power Button to turn the Clock to standby mode.
19

Cleaning
1. To prevent fire or shock hazard, disconnect your unit from the AC wall outlet
when cleaning.
2. The finish on your unit may be cleaned with a dust cloth and cared for as other
furniture. Use caution when cleaning and wiping the plastic parts.
3. Mild soap and a damp cloth may be used.
Troubleshooting Guide
Check the following before requesting service:
SYMPTOM POSSIBLE CAUSE POSSIBLE SOLUTION
Can’t power on
No sound or
sound weak
Sound
distortion
Wi-Fi not
functioning
FM weak
reception
The adapter is not plugged
Volume level in minimum position
Volume level of paired/connected device
is in low level
Volume level too high
Volume level of the connected
device too high
The Clock had NOT add in the Wi-Fi
network and had NOT sign in Amazon
account
The Clock is in standby mode
The Clock and the mobile devices is not
in the same 2.4G Wi-Fi network
Plug the adapter properly
Raise the volume level by pressing
the + Button on the top
R ise the volume level of the
a
connected device
Reduce the volume level by
pressing the - Button on the
top of Clock
Reduce the volume level of the
connected device
Add the Clock into the Wi-Fi
network and sign in Amazon
account as page 9-15
Press and hold the " " Button to
turn on the Clock from standby
mode
Set the Clock and the mobile
device in the same 2.4G
Wi-Fi network
Unwind the FM Wire Antenna to its
full length and/or reassemble the
other direction/location to improve
reception
of Clock
Amazon Alexa
not
functioning
The unit is not in the
operation
mode
Amazon Alexa
20
Power on the unit and
enter to Amazon Alexa
operate mode as page 16

General Specifications
Power Source:
Wifi Type:
Wi-Fi Operation Range:
FM Radio Coverage:
Clock Back Up:
USB Charger Output:
DC 5V, 2A,
IEEE 802.11 b/g/n
up to 96 feet in open area
87.5-108.0 MHz
1 x CR2032 Button Cell
DC 5V, 1A Max.
Accessories
1 x Owner's Manual
1 x AC/DC Adaptor (Input: AC 100-240V~;50/60 Hz, 0.5A Max
Output: DC 5V, 2A, )
SPECIFICATIONS AND ACCESSORIES ARE SUBJECT TO CHANGE
WITHOUT NOTICE
21

LIMITED WARRANTY
Craig Electronics warrants this product to be free from manufacturing defects in material
and workmanship under normal use for a period of 180 days from date of purchase. If
service is required, please return the product to the store where it was purchased for
exchange; or, pack the unit in the original packing material with all accessories if
applicable, a copy of your sales receipt and a Cashier’s check or Money Order for $15 (to
cover shipping and handling costs) payable to Craig Electronics Inc. For consumers in
Canada, please make sure that the cashier check or money order is redeemable through
a U.S. bank. Ship your product freight pre-paid. Your unit will be repaired, replaced or if
the unit cannot be repaired or replaced, a refund will be forwarded to you within four
weeks of receipt of your unit. Please ship your unit to:
Craig Electronics Inc.
1160 NW 163 Drive
Miami, Fl 33269
This warranty is void if the product has been: a) Used in a commercial application or
rental. b) Damaged through misuse, negligence, or abuse. c) Modified or repaired by
anyone other than an authorized Craig service center. d) Damaged because it is
improperly connected to any other equipment.
Note: This warranty does not cover: a) Ordinary adjustments as outlined in the Owner’s
Manual which can be performed by the customer. b) Damage to equipment not properly
connected to the product. c) Any cost incurred in shipping the product for repair. d)
Damage to the product not used in the USA.
This warranty is not transferable and only applies to the original purchase. Any implied
warranties, including the warranty of merchantability, are limited in duration to the period
of this expressed warranty and no warranty whether expressed or implied shall apply to
the product thereafter.
Under no circumstance shall Craig be liable for any loss or consequential damage arising
out of the use of this product. This warranty gives specific legal rights. However, you may
have other rights which may vary from state to state. Some states do not allow limitations
on implied warranties or exclusion of consequential damage. Therefore, these
restrictions may not apply to you.
This product has been manufactured by and is sold under the responsibility of Craig
Electronics Inc, and Craig Electronics Inc is the warrantor in relation to this product.
MAGNAVOX and SMART. VERY SMART are registered trademarks of Koninklijke Philips
N.V. and are used under license from Koninklijke Philips N.V.
To Obtain Service on your Product
email: magnavox@craigelectronics.com
Printed in China MSH318_WC_E0CL1_B0US
 Loading...