

BLUETOOTH
SPEAKER SYSTEM
In struc ti on Manu al
Model: BT111GB
Read these instructions carefully before use

Safety instructions
Please avoid placing the unit in places with high humidity, high temperature,
grease, contamination, etc. Please do not place the unit in direct sunlight or rain.
Avoid dropping the unit.
When the unit gets dirty on the surface, please clean with damp cloth. Do not use
any organic solvents, paint thinner or abrasive cleaners.
Never privately dissemble, repair or modify unit. Contact our service center for
repair information
1

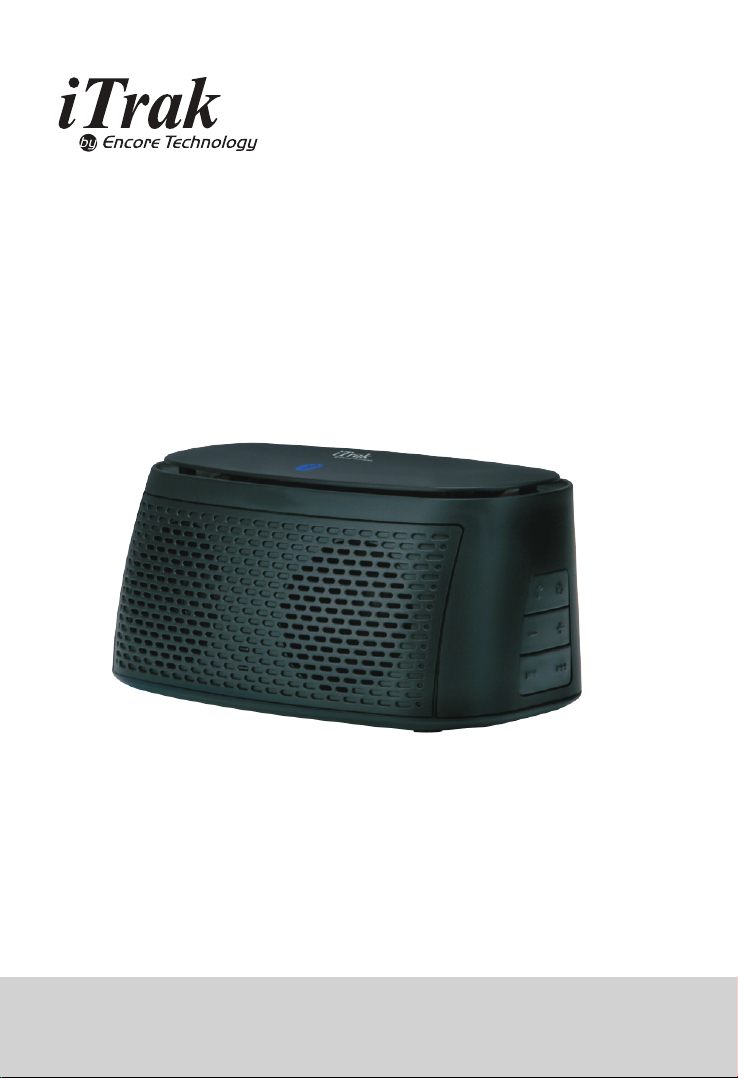
LOCATION OF CONTROLS
1
2
USB CHARGER
3 4 5
1. Ind ica tor s
2. Spe ake rs
3. Pow er ON /OF F swi tch
4. USB C harger: USB cable only for charging
5. Line in jack
6. Hands-off /Po wer b utt on
7. Volume+- button
8. / Pre vio us/ Nex t but ton
6
7
8
2

Bluetooth Connection
1.Connect th e Blu eto oth s peaker via USB cord (included).
2.Mo ve th e Pow er On /Of f but ton o n the r ear o f the u nit t o On po sit ion . Th e
red indicator light will come on.
3.Pr ess t he Po wer B utt on on t he ri ght s ide o f the u nit t o tur n on th e uni t. Th e
blue indicator light will turn on and flash. Press and hold Power Button to
turn t he un it to S tan dby m ode . Dur ing p layback, pr ess P owe r But ton t o
pause and press again to resume the playback.
When the un it is p owered on the Bluetooth indicator blue light will turn on
and fl ash and the unit will enter Bluetooth mode.
4.Al low your cell phone to enter the Bluetooth connection mode. During
searching, the blue Bluetooth indicator will keep flashing. When searching
is completed, select BT111 as the t arg et eq uip men t.
When connected, the Bl uetooth indicator blue light will stay lit.
5. Pre ss. t o ski p to th e pre vio us tr ack . Pre ss to s kip t o the n ext t rac k.
6. Press + button to increase the volume. Press- button to decrease the volume.
7. The b uil t-i n Mic o f thi s uni t ena ble s han ds- fre e fun cti on in B lue too th mo de.
When t he ca ll co mes i n pre ss Ha nds -fr ee bu tto n to an swe r the c all .
Pres s Han ds- fre e but ton a gai n to ha ng up .
Pres s Han ds- fre e but ton t o red ial t he la st ou tgo ing c all .
Line in connection
1. Connect an audio connection cable with 3.5mm stereo plug (not included)
to the l ine i n jac k on th e rea r of th e uni t.
2. Connect the o the r end t o the a udi o out jack/ pho ne jack on the MP 3 or ot her
exte rna l dev ice .
3. Turn on the e xte rna l device and press Play button to s tar t pla yin g the m usi c.
4. Press + butt on to increase the volume. Press- bu tt on to decrease the volume.
3

Battery Charging
The unit provides a built-in 3.7V 1000mAh Lithium battery. Th e sta nda rd
voltage is 3.7 V. The maximum voltage is 4.2V.
1. The m ini mum w ork ing v olt age o f the u nit i s 3.5 V.When the battery voltage
is und er 3. 5V, the re d ind ica tor w ill s tay l it to i ndi cat e the l ow vo lta ge st atu s
and th e bat ter y nee ds to b e rec har ged .
2. Connect one end of the USB cha rging cable (included) to the DC in jack on
the re ar of t he un it. C onn ect t he ot her e nd to y our P C. Or y ou ca n con nec t
the ot her e nd to a 5 V AC/D C ada pte r (no t inc lud ed) to pow er and charge the
unit . The n the g ree n ind ica tor w ill s tay l it to i ndi cat e tha t the b att ery i s in
char gin g sta tus .
3. Whe n the v olt age r eaches the Ma ximum vo lta ge 4.2V, the gr een i ndi cat or
will t urn o ff to i ndi cat e tha t the c har gin g pro ces s is co mpl ete d.
4

SPECIFICATIONS
Bluetooth te chn ology 2. 0+E DR
RMS Ou tpu t 2x 2W
Effe cti ve di sta nce o f Blu eto oth approximately 33 feet
Speaker impedance 4 Oh m 3Wx 2
Playback tim e
(Wit h vol ume s et to ½ o f Max imu m vol ume )
ACCESSORIE S
User Manual 1P C
USB ch arg ing cable 1PC
approximately 3 hours
5

TROUBLE SHOOTING GUIDE
Check the f oll owi ngs b efo re re que sti ng se rvi ce:
SYMP TOM POSS IBL E CAU SE POSS IBL E SOL UTI ON
No power
No sound
Bluetooth
reception failure
The built-in battery runs
out
Power switch is in OF F
position
Power button on the
unit not pr essed
Volume in minimum
position of th e unit
The co nnecte d device is
not in playback mode
Sound output of the
connected device weak
Input sou rce i nco rre ct
Not in Bluetooth mo de
Line in cable in the
Line in jack
Recharge the battery
Move the power switch on the rear
of the unit to ON position
Press the P OWE R but ton o n
the ri ght side of the u nit t o tur n
on the unit
Raise volume by pressing the
VOL+ button
Play the mu sic i n the
connected device
Raise the volume level of the
connected device
Set in put sour ce as L ine-in or
Bluetooth mode
Set to B lue too th mo de an d the
blue indicator will turn on
Disconnect the line in cable
Hands free
not working
Not in Bluetooth mode
Set as Bluetooth mode(Hands
free function is only available in
Bluetooth mode)
6

LIMITED WARRANTY
7

FCC Statement
NOTE: This equipment has been tested and found to comply with the limits for a Class B digital device,
pursuant to Part 15 of the FCC Rules. These limits are designed to provide reasonable protection
against harmful interference in a residential installation. This equipment generates, uses and can radiate
radio frequency energy and, if not installed and used in accordance with the instructions, may cause
harmful interference to radio communications. However, there is no guarantee that interference will not
occur in a particular installation. If this equipment does cause harmful interference to radio or television
reception, which can be determined by turning the equipment off and on, the user is encouraged to try to
correct the interference by one or more of the following measures:
-- Reorient or relocate the receiving antenna.
-- Increase the separation between the equipment and receiver.
-- Connect the equipment into an outlet on a circuit different from that to which the receiver is connected.
-- Consult the dealer or an experienced radio/TV technician for help.
This device complies with part 15 of the FCC Rules. Operation is subject to the following two conditions:
(1) This device may not cause harmful interference, and (2) this device must accept any interference
received, including interference that may cause undesired operation
The antenna(s) used for this transmitter must not be co-located or operating in conjunction with any
other antenna or transmitter
Changes or modifications not expressly approved by the party responsible for compliance could void the
user's authority to operate the equipment.
 Loading...