

Page 1

owner’s manual
Page 2

Mesa Ethernet Dock
The Mesa Ethernet Dock is an optional accessory that
provides an ethernet port for networking, power input
jack, USB client port, and a mounting station for the Mesa
Rugged Notepad.
Ethernet Features and Specications:
10/100 Mbps twisted pair ethernet
IEEE802.3 10 Base-T / 100Base-TX
Manages twisted pair crossover detection and
correction
Supports full duplex and ow control
Supports half duplex with back pressure operation
Ethernet driver software pre-installed on Mesa
Note: Communication software is required to communicate
with the Mesa using an ethernet system. This software is not
included with the ethernet dock.
2 Mesa Ethernet Dock User ’s Manual
Page 3
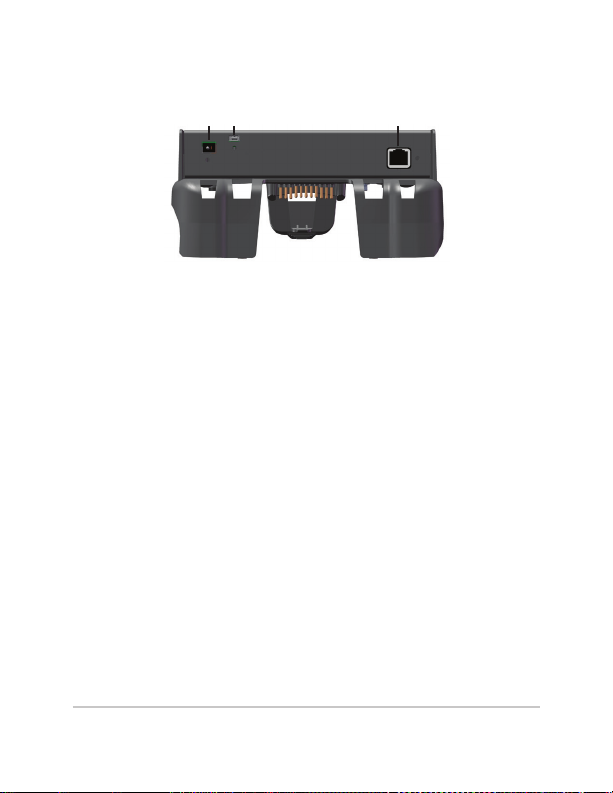
Boom view showing power jack and ports:
2
1
1 Power input jack: 12VDC for power input and battery
charging. This jack is used to power the Ethernet dock
and the Mesa. (The power port on the Mesa is not
accessible when it is in the ethernet dock.)
3
2 USB client port access: This is a through connection
to the Mesa USB client port for connection to the host
computer.
3 Ethernet port: The ethernet port is for RJ45 twisted pair
ethernet cables, 10/100 Mbps.
LED indicators on port:
- Yellow LED indicates a speed of 100 Mbps
- Green LED indicates that there is data activity
Using the Ethernet Dock
1. Secure the ethernet dock to a wall or select another
mounting option (see the next section for details).
2. Connect a 12V power supply to provide power and
charge the Mesa baeries. Options:
Mesa Ethernet Dock User ’s Manual 3
Page 4

a. Wall charger provided with the Mesa
b. Vehicle charger cable (optional)
c. Larger capacity power supply for multiple docks
3. Use a CAT5 or CAT6 twisted pair ethernet cable
to connect the dock to an ethernet switch or to an
internal network. The cable length should not exceed
100 meters.
4. Place the Mesa into the dock (instructions are given
later in this manual). The Mesa automatically turns
on if it isn’t already on. Set the orientation for desired
viewing while in the dock.
5. Use communication software to communication
with the Mesa over an ethernet network. (This
can be custom software for your specic needs or
mobile management software available from third
party vendors such as MobiControl by SOTI, www.
SOTI.net. For more information, go to hp://www.
junipersys.com/Juniper-Systems-Rugged-HandheldComputers/support/Knowledge-Base).
Mounting Options
Accessories are available for using the ethernet dock as a
desktop base, mounting it onto a vehicle, and mounting it
onto a pole. You can also aach it directly to a wall.
4 Mesa Ethernet Dock User ’s Manual
Page 5
Wall Mount
You can mount one or more ethernet docks to a wall. Here
is a recommended way to do this:
1. Cut a plywood panel to the size you need to t the
number of ethernet docks you are going to use.
2. Select a location to mount the panel and docks where
a power supply and access to the computer you will
be using are available. For multiple docks, you can
use a power strip and ethernet hub to connect all the
docks to the computer.
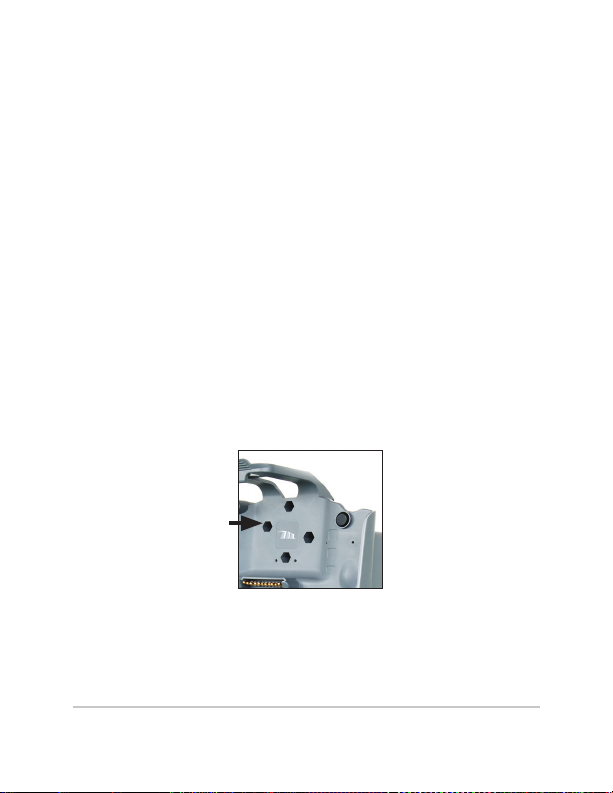
3. You need 2 to 4 #8 wood screws per dock.
4. There are four screw holes for mounting purposes
as shown below. For each dock, put the wood
screws through these holes and screw them into the
plywood and then into the wall.
Desktop Base
The desktop base (optional accessory) allows the ethernet
dock to be used on a desktop or other at, stationary
surface. A metal base and four screws are included.
Mesa Ethernet Dock User ’s Manual 5
Page 6

1. On the back of the dock near the boom are two
small screw holes, one on the left and one on the
right. Place screws into the holes and screw them in
hal f-way.
2. Slide the desktop base up so the screw slots on the
back slide onto the screws and tighten them.
3. On the front of the desktop base near the top and the
front of the dock near the boom are two small screw
holes, one on the left and one on the right. Align the
holes, place screws into the holes, screw them in all
the way, and tighten them. The desktop base is now
ready to use.
6 Mesa Ethernet Dock User ’s Manual
Page 7

Attaching the Mesa to the Ethernet Dock
Follow these instructions to place the Mesa into the
ethernet dock:
1. Close the individual port covers so the Mesa docks
properly. If the hand strap is in the way, move it.
2. Hold the Mesa so the connector protector is at the
boom. Align the Mesa with the lower mounting
points on the ethernet dock.
3. Press the Mesa back to secure it to ethernet Dock. The
top latch snaps into place.
Mesa Ethernet Dock User ’s Manual 7
Page 8

Releasing the Mesa from the Ethernet Dock
To release the Mesa from the ethernet dock, lift up on the
top latch. Pull the Mesa forward and remove it.
Maintenance and Environmental Issues
The ethernet dock is intended for indoor operation only
Temperatures should be between 0°C to 50°C. Avoid
using the dock in situations where water can enter the
connector ports. It is not sealed against water and must be
kept dry, although it sheds moisture that is on the Mesa
when it is placed into the dock.
Do not touch the docking pins (spring loaded contacts)
with conductive items when power is applied to the dock.
Do not drop items on the dock that can damage the pins.
Keep debris o of the docking pins and the connectors to
maintain the best performance.
8 Mesa Ethernet Dock User ’s Manual
Page 9

Battery Warnings
WARNING! These warnings are for the lithium ion
!!
rechargeable baeries in the Mesa:
To reduce the risk of re or burns, do not disassemble,
crush, puncture, short external contacts, or expose to re.
Do not disassemble or open, crush, bend or deform,
puncture or shred.
Do not modify or remanufacture, aempt to insert foreign
objects into the baery, immerse or expose to water or
other liquids, expose to re, explosion or other hazard.
Only use the baery for the system for which it is
specied
Only use the baery with a charging system that has been
qualied with the system per this standard. Use of an
unqualied baery or charger may present a risk of re,
explosion, leakage, or other hazard.
Do not short circuit a baery or allow metallic conductive
objects to contact baery terminals.
Replace the baery only with another baery that has
been qualied with the system.
Use of an unqualied baery may present a risk of re,
explosion, leakage or other hazard.
Promptly dispose of used baeries in accordance with
local regulations
Baery usage by children should be supervised.
Mesa Ethernet Dock User ’s Manual 9
Page 10

Avoid dropping the baery. If the baery is dropped,
especially on a hard surface, and the user suspects
damage, take it to a service center for inspection.
Improper baery use may result in a re, explosion or
other hazard.
Wall Charger Warnings
WARNING! To reduce the risk of personal injury,
!
electrical shock, re or damage to the equipment:
Plug the wall charger into an electrical outlet that is easily
accessible at all times.
Disconnect power from the equipment by unplugging the
wall charger from the electrical outlet.
Do not place anything on the wall charger cord or any
of the other cables. Arrange them so that no one may
accidentally step on or trip over them.
Do not pull on a cord or cable. When unplugging the wall
charger from the electrical outlet, pull on the plug, not the
cord.
Use only wall chargers intended for the Mesa. Using any
other external power source can damage your product
and void your warranty.
10 Mesa Ethernet Dock User’s Manual
Page 11

Regulatory Information
United States (FCC)
This device complies with Part 15 of the FCC Rules.
Operation of this equipment is subject to the following
two conditions:
1. The device may not cause harmful interference.
2. This device must accept any interference received, even
if the interference may cause undesired operation.
This equipment has been tested and found to comply with
the limits for a Class A digital device, pursuant to Part
15 of the FCC Rules. These limits are designed to provide
reasonable protection against harmful interference when
the equipment is operated in a commercial environment.
This equipment generates, uses, and can radiate radio
frequency energy and, if not installed and used in
accordance with the instruction manual, may cause
harmful interference to radio communications. Operation
of this equipment in a residential area is likely to cause
harmful interference in which case the user will be
required to correct the interference at his own expense.
CAUTION: Only approved accessories may be used
!
with this equipment. In general, all cables must be high
quality, shielded, correctly terminated, and normally
restricted to two meters in length. Wall chargers
approved for this product employ special provisions to
avoid radio interference and should not be altered or
substituted.
Mesa Ethernet Dock User ’s Manual 11
Page 12

CAUTION: Changes or modications to the Mesa or dock
!
that are not expressly approved by the manufacturer
could void the user’s authority to operate the equipment.
Industry Canada
This Class A digital apparatus complies with Canadian
ICES-003. Cet appareil numérique de la classe A est
conforme à la norme NMB-003 du Canada.
This device complies with RSS-210 of Industry Canada.
Operation is subject to the following two conditions: (1)
this device may not cause interference, and (2) this device
must accept any interference, including interference that
may cause undesired operation of the device.
CE Marking
Products bearing the CE marking comply with
the 2004/108/EC (EMC Directive) issued by the
Commission of the European Community.
CE compliance of this device is valid only if powered
with/by a CE-marked wall charger provided by the
manufacturer. Compliance with these directives implies
conformity to the following standards:
EN 55022 Electromagnetic Interference
EN 55024 Electromagnetic Immunity
P/N 24096-00 Copyright 12-2013 Juniper Systems, Inc. Mesa
Rugged Notepad is a trademark of Juniper Systems, Inc. Information
is subject to change without notice.
12 Mes a Ethernet Dock User’s Manual
 Loading...