

Page 1

BAR CODE EXPANSION POD
Page 2

Bar Code Expansion Pod
Using the Bar Code Expansion Pod with a Field PC oers
the convenience of scanning bar codes and receiving the
scanned data, all in a single handheld unit. With the Bar
Code Expansion Pod, there are no extra cables that could
get in the way. The Bar Code Expansion Pod includes a
bar code scanner integrated on the Field PC and the Bar
Code Reader program. The Bar Code Reader program is
used to set up the scanner and to transfer the scanned
data to a data collection program.
The Bar Code Expansion Pod integrates the laser bar code
scanning technology of Symbol SE 1224 high-performance
laser scan engine with the Field PC. It features:
High performance bar code scanning in bright,
outdoor light
Scanning distances of 1 to 3 feet from the Field PC
Excellent scan capability for poorly printed or low
contrast bar codes
Low power performance
Compatible with nine dierent bar code symbologies
Bar Code Reader Program
The Bar Code Expansion Pod is shipped with a Bar Code
Reader program factory installed on your Field PC. This
program scans bar codes with the press of a buon. The
2 Bar Code Expansion Pod
Page 3

scanned bar code can be transferred to any application
program on your Field PC.
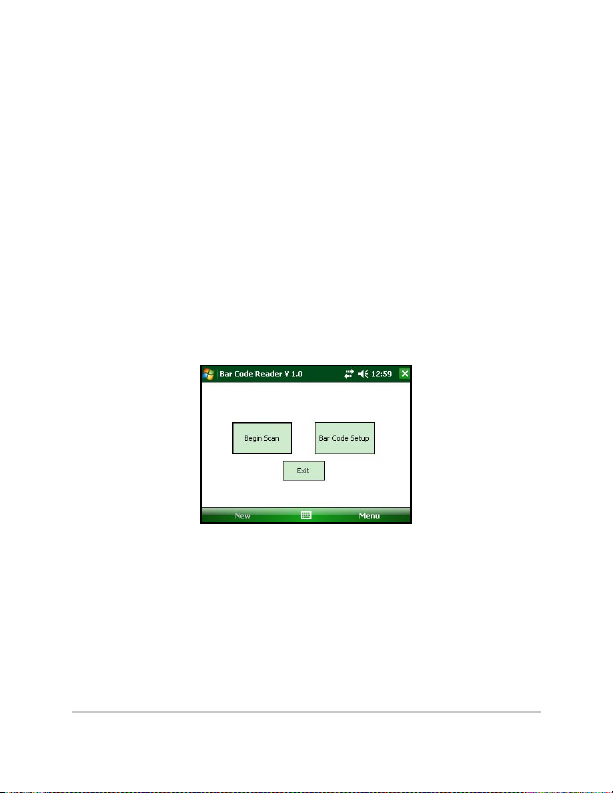
The Bar Code Reader has the following options available:
Help
Begin Scan
Bar Code Setup
Exit
The Help option on the Bar Code Reader title bar opens a
drop down menu with an About option. Tapping on the
About option accesses a pop up screen showing the Bar
Code Reader version number and copyright.
The Begin Scan buon enables the expansion pod to being
scanning bar codes. It takes scanned data and enters it
into an opened data collection program on your Field
PC. The Begin Scan wedges the bar code scan into your
running application.
The Bar Code Setup buon opens the Bar Code Setup
program. This setup contains selectable options to set up
the scanner to operate according to your needs.
The Exit buon at the boom of the program screen closes
the Bar Code Reader program.
To begin using your Field PC’s Bar Code Expansion Pod,
follow the instructions under the Geing Started, Bar Code
Setup, and Begin Scan.
Bar Code Expansion Pod 3
Page 4
Getting Started
Before you begin using your Bar Code Expansion Pod
to scan bar codes, open the Bar Code Reader program
and set up the scanner’s functions. To open the Bar Code
Reader program, complete the following steps:
1. Turn on your Field PC.
2. Go to Start > Programs > Bar Code Reader.
An Initializing Bar Code Scanner message box pops
up, as the Bar Code Reader program loads and the Bar
Code Reader program opens.
3. Tap on the Bar Code Setup buon.
Bar Code Setup
Before you begin scanning, use the Bar Code Setup
program to congure the bar code scanner according to
your needs. The Bar Code Setup options are described
4 Bar Code Expansion Pod
Page 5

throughout this section.
The Bar Code Setup program can be personalized using
the following options:
User
Scanner
Data Format
Code Type
Defaults
The Bar Code Setup program has many options that are
enabled and disabled by tapping on small boxes next
to the option. When an option is selected, a checkmark
appears in the box. When the option is disabled, the
checkmark disappears.
To set up and save your bar code scanning options,
complete the following steps:
1. Read the following set up sections: User, Scanner, Data
Format, Code Type, and Defaults.
ese sections describe the functions in the Bar Code
Th
Setup program informing you of the options that best
suit your bar code scanning needs.
2. Select the seings you want to scan bar codes.
3. Tap on the Exit Setup buon to save your bar code
seings and return you to the Bar Code Reader screen.
4. Go to Begin Scan section of this chapter and follow
the directions there to begin scanning bar codes.
Bar Code Expansion Pod 5
Page 6
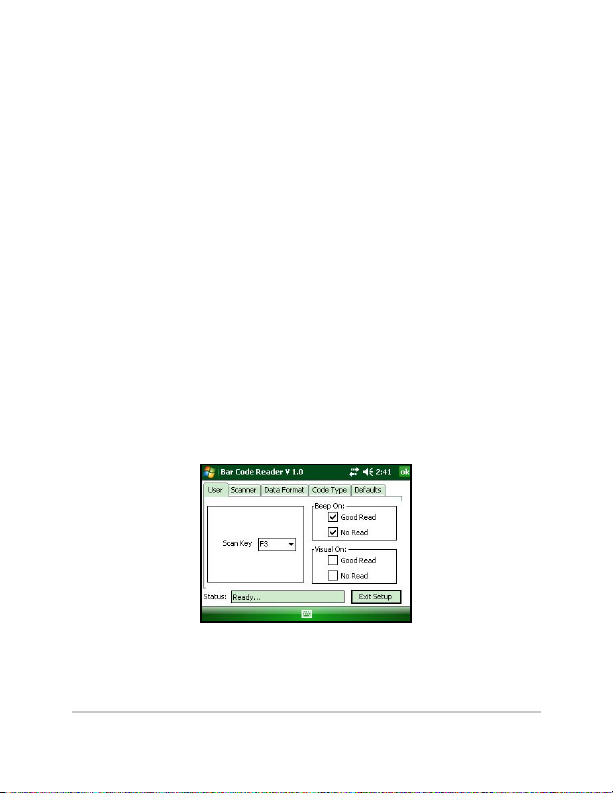
User Setup
The User tab contains the options that eect how you use
and interact with the bar code scanning program. These
options include targeting and scanning key selections,
and audio and visual conrmation if a scan is successful
or not.
To target bar codes, the scanner emits a small laser beam
showing a red dot where the scan takes place. This target
beam allows you to line up the scanner with the bar code.
To scan bar codes, the scanner emits a laser as a thin red line
that covers the entire length of a bar code. In the scanning
process, the bar code is read, decoded, and then transferred
to a data collection program open on your Field PC.
The User tab allows you to select which key your Field PC
uses to initiate a scan, and if you want audio and/or visual
conrmation is a scan is successful or not.
6 Bar Code Expansion Pod
Page 7

Only one Field PC key is used to both target and scan
a bar code. Pressing on the scan key initiates the target
beam rst. The target beam stays on for a set time ranging
from 0.0 to 9.9 seconds. You have the ability to set the
target time, see Scanner Setup. As soon as the target beam
turns o, the scan beam turns on. The scan beam remains
on until a valid scan is completed or until the maximum
scan time is reached.
Note: Holding the Scan Key down during a scan or pressing it
multiple times during the scan does not aect the scan. The key
presses are ignored.
Scan Key Selection
The Scan Key box allows the user to select which key is
pressed to initiate a scan. To select the Scan Key you want
to use, tap on the down arrow on the right side of the
Scan Key box to access a drop-down menu listing all the
available scan keys. Tap on the name of the key you want
to use for scanning.
Beep Key Selection
The Scan Key box allows the user to select which key is
pressed to initiate a scan. To select the Scan Key you want
to use, tap on the down arrow on the right side of the
Scan Key box to access a drop-down menu listing all the
available scan keys. Tap on the name of the key you want
to use for scanning.
Bar Code Expansion Pod 7
Page 8

Beep on Good Read
The bar code scanner program provides audio feedback
to notify you on a successful scan. To activate the audio
feedback, tap in the Good Read box in the Beep On: section
so a checkmark appears. A single beep sounds at the
completion of a successful scan.
Beep on No Read
The bar code scanner program provides audio feedback
to notify you about an unsuccessful scan. To activate the
audio feedback, tap in the No Read box in the Beep On:
section so a checkmark appears. Two beeps sound when a
scan is unsuccessful.
Good Read Message
The bar code scanner program provides visual feedback
when a scan is successful. To activate this visual feedback,
tap in the Good Read in the Visual On: section so a checkmark
appears. A Scan OK! pop-up message displays on the screen
approximately 1.5 seconds aer each successful scan.
No Read Message
The bar code scanner program provides visual feedback
when a scan is unsuccessful. To activate this visual
feedback, tap in the No Read in the Visual On: section so
a checkmark appears. A Scan Failed! pop-up message
8 Bar Code Expansion Pod
Page 9

displays on the screen approximately 1.5 sections aer
each unsuccessful scan.
anner Setup
Sc
The Scanner tab is used to congure the operation of the
scan engine.
Target Time
The Target Time option allows you to set the amount of
time the target beam is on before a scan is initiated.
The Target Time box shows the time, in seconds, that the
target beam is on. The scroll buons allow you to set the
amount of time the target beam is on before a scan is
initiated. The Target Time can vary from 0.0 to 9.9 seconds,
in 0.1 second increments.
If you set the Target Time at 2.0, that means the target
beam remains on for 2.0 seconds and then turns o as
Bar Code Expansion Pod 9
Page 10

the scan beam turns on. The scanner takes approximately
.5 seconds to focus the target beam. Because of this, it is
recommended that the minimum target time be set to 0.5
or longer than the desired target time.
Scan Time
The Scan Time option allows you to set up the amount
of time the scan beam remains on to perform a bar code
scan. The Scan Time window shows the time, in seconds,
that the scan beams is on. The scroll buons allow the
user to set the amount of time the scan beam is on. The
Scan Time can vary from 0.0 to 9.9 seconds, in the 0.1
seconds increments.
A scan terminates as soon as it successfully reads a bar
code or when the scan time has reached the maximum
scan time specied in Scan Time window.
Scan Button
The Scan buon allows you to test the functionality of
the scanner within the setup program. Pressing the Scan
buon turns the target beam on for the Target Time and
then performs a scan.
Scan Data
The Scan Data eld is used to display the results of scans
initiated by the Scan buon.
Scan Angle
The bar code scanner is capable of using two dierent
scan angles. The Scan Angle determines the width of the
scan beam.
10 Bar Code Expansion Pod
Page 11

Tap on the down arrow on the right side of the Scan Angle
box to access a drop-down menu listing two available
scan angles. Tap on the size of the angle you want to use
for scanning. The wide scan angle is 40° and the narrow
angle is 30°.
Bi-Directional Read Select
Selecting the Bi-Directional Read option sets up the
scanner program to read the bar code in both directions
before it is decoded.
Consecutive Read Level
When the bar code scanner performs a scan, it is
performed in two stages. The first stage reads the bar
code image and verifies it is a valid bar code. The second
stage decodes the raw bar code data into ASCII characters
that are sent back to the host application. The user can
specify how many times a bar code is to be successfully
read before it is decoded.
The scanner has four security levels or successful
read levels. A Help button is located to the right of
the Consecutive Read Level box and explains the four
security levels.
Bar Code Expansion Pod 11
Page 12

Data Format Setup
The Data Format tab allows the user to specify the format
of the data that is returned by the scanner.
Format
The Format drop-down box allows you to select if a prefix
and/or suffix character are added to the bar code data.
The prefix character is added before the bar code data.
The Suffix 1 character is appended to the end bar code
data and the Suffix 2 character is appended after the Suffix
1 character. If Suffix 1 is not selected, Suffix 2 is appended
to the end of the bar code.
Tap on the down arrow on the right side of the Format box
to access a drop-down menu of the available data format.
Tap on the format you want to use. The eight Format
options are:
Data
Data, Sux 1
Data, Sux 2
12 B ar Code Expansion Pod
Page 13

Data, Sux 1, Sux 2
Prex, Data
Prex, Data, Sux 1
Prex, Data, Sux 2
Prex, Data, Sux 1, Sux 2
Code ID
The scanner is capable of returning a Code ID character(s)
for the bar code that is scanned. If a Code ID is selected,
the Code ID character(s) is placed before the bar code data
and the prefix character (if enabled).
There are two types of Bar Code ID’s: Symbol and AIM.
The Symbol Code ID is a single character code. The
AIM Code ID contains three characters, a bracket (“]”) is
followed by a code character and a modifier character.
Symbol Code ID
A = UPC-A, UPC-E, UPC-E1, EAN-8, EAN-13
B = Code 39, Code 32
C = Codabar
D = Code 128, ISBT 128
E = Code 93
F = Interleaved 2 of 5
G = Discrete 2 of 5, or Discrete 2 of 5 IATA
J = MISI Plessey
Bar Code Expansion Pod 13
Page 14

K = UCC/EAN-128
L = Bookland EAN
M = Trioptic Code 39
N = Coupon Code
Prefix and Suffix
The Prefix, Suffix 1, and Suffix 2 character selection pulldown window lists the characters that can be used as
a prefix or suffix. Only the prefix or suffix pull-down
windows that are enabled are shown. The prefix and
suffix options are:
p
tion Description
O
None No function is performed.
<LF> <LF>=Line Feed, which moves the cursor down
to the same column on the next line.
R> <CR>=Carriage Return, which causes the cursor
<C
to move to the left margin, often used with line
feed to start a new line of output.
#
Ta
Co
The Code Type tab lists the bar code types that the scanner
can read. You can enable (box checked) and disable (box
Adds a # sign before of after the scanned bar
code (depending on suffix or prefix)
b Performs a Tab key function, which moves the
cursor over to the next column.
de Type Setup
14 Bar Code Exp ansion Pod
Page 15
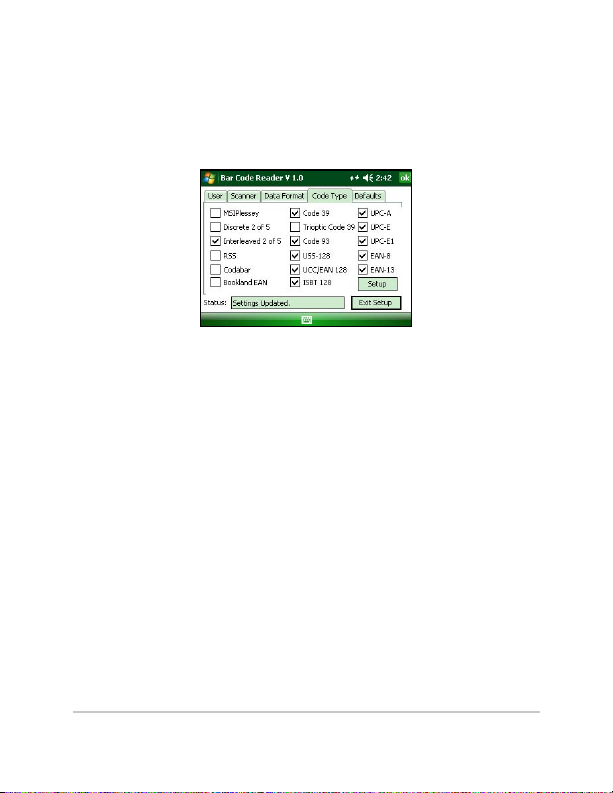
not checked) each of these bar code types. The Setup
button at the bottom right corner of the screen is used to
set up more detailed parameters for the bar code types in
the Setup section below.
Setup
Tapping on the Setup button opens the Additional
Parameter Setup screen, accessing the following seven bar
code setup options:
UPC/EAN 1
UPC/EAN 2
Code39
MSIPlessey
Interleaved
RSS/Code93/Discrete
Codabar
To access one of these options, select the tab with the bar
code type you want to enhance. The tabs are located along
Bar Code Expansion Pod 15
Page 16

the top of the setup window. The additional tabs can be
accessed using the scroll buttons on the upper right of the
screen. For more information about each of the accessible
bar code types, go to the following Web site and read the
Symbologies (Bar Code Fonts) section.
http://www.systemid.com/learning_center/
The setup parameters for each bar code type tab are
accessed by using checkmark boxes or drop-down
menus.
UPC/EAN 1
UPC/EAN 2
16 Bar Code Ex pansion Pod
Page 17

Code39
MSIPlessey
Interleaved
Bar Code Expansion Pod 17
Page 18
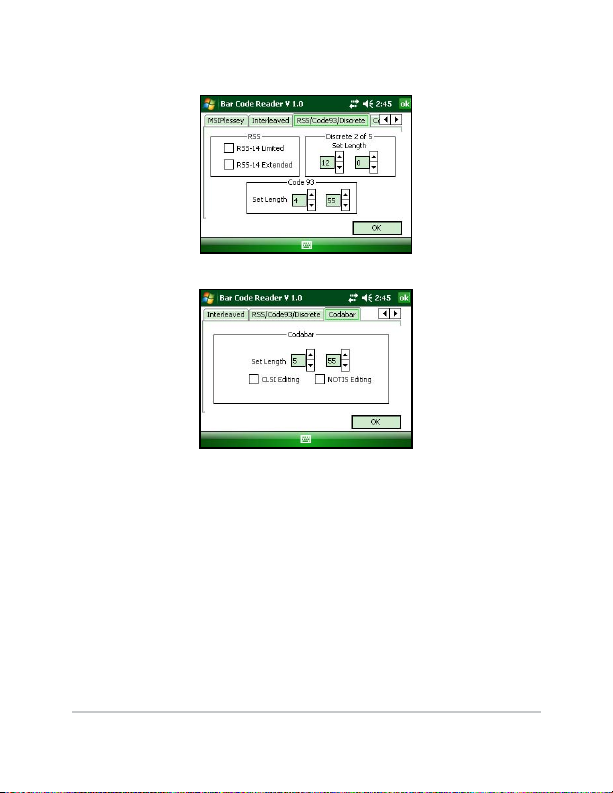
RSS/Code93/Discrete
Codabar
aults Setup
Def
The Defaults tab is used to load either user-defined
configuration parameters or factory-default parameters.
The users can save and reload four different user
18 Bar Code Ex pansion Pod
Page 19

configuration files. The defaults are the settings that come
installed on your Field PC when it is shipped.
t Setup
Exi
The Exit Setup button is available on every Bar Code Setup
tab, allowing you to close the Bar Code program at any
time. Tapping on the Exit Setup button saves all options
you set up and takes you back to the Bar Code Reader
screen.
Tap on Begin Scan to start the bar code scanning program.
Tapping on the Exit or X button, in the top right corner,
exits out of the Bar Code Setup program.
Begin Scanning
The bar code scanning program allows bar code data to
be directly entered into an application program. The bar
code data is entered into the data collection program as
electronic data, as if it were typed on the keyboard.
Bar Code Expansion Pod 19
Page 20

When a scan is initiated, the bar code scanning program
transfers the data into the data collection program
you have open. The scanned data enters at the cursor’s
location in the data collection program. After each scan,
place the cursor at the next location for scanned data
entry.
To start the bar code scanning program and begin
scanning, complete the following steps:
1. Tap on the Bar Code Reader icon on your Field PC’s
desktop and set up your scanner as outlined in
the Setup Bar Code section. If this step is already
completed, proceed to step 2.
2. Tap on Begin Scan buon on the Bar Code Reader
screen.
3. Open the data collection program you want to receive
and store the scanned bar code data. Example: If you
want your bar code scans placed in a Mobile Excel
le, open your Field PC’s Mobile Excel program.
N
ote: Keep the data collection program in the foreground of
your Field PC when scanning; otherwise the scanned data
is not entered.
4. Position the cursor in the data collection program in
the cell you want the scanned data to enter.
5. Press your specied scan buon to target, and then
scan your bar code.
20 Bar Code Expansion Pod
Page 21

Sample Bar Codes
The following bar codes are samples for you to test your
bar code scanner before taking it into the eld. Under
each bar code is the datum that should appear on your
Allegro aer a successful scan.
o
de 39 Scan Sample
C
EAN-13 Scan Sample
EAN-8 Scan Sample
Bar Code Expansion Pod 21
Page 22

UPC-A Scan Sample
UPC-E Scan Sample
Bar Code Installation Program
The Bar Code Setup program is installed on your Field PC
before it is shipped. In the event that the Bar Code Setup
program gets removed from your Field PC and needs
to be reinstalled, use the Bar Code installer on the User
Documentation and Install CD shipped with the Field PC.
22 Bar Code Expansion Pod
P/N 20207-00 Copyri ght 07/2008
 Loading...