

Page 1

owner’s manual
Page 2

© Copyright March 2014 Juniper Systems, Inc. All rights
reserved. Information is subject to change without notice.
Juniper Systems® is a registered trademarks of Juniper
Systems, Inc. Archer Field PC™ and JSNav™ are recognized
trademark of Juniper Systems, Inc.
ActiveSync, Excel, Hotmail, Internet Explorer, Microsoft,
MSN, Outlook, PowerPoint, Visual Studio, Windows, Windows
Media, Windows Mobile, Windows Mobile Device Center,
Windows Vista, Windows Embedded Handheld, and the
Windows logo are trademarks or registered trademarks
of Microsoft Corporation in the United States and/or other
countries.
The Bluetooth® word mark is owned by the Bluetooth SIG,
Inc. and any use of such marks by Juniper Systems, Inc. is
under license.
Adobe® Acrobat® and Adobe® Reader® are registered
trademarks of Adobe Systems Incorporated in the United
States and/or other countries.
Google Earth™ mapping service is a trademark of Google,
Inc.
The names of other companies and products mentioned
herein may be the trademarks of their respective owners.
WARNING! This symbol indicates that failure to follow
!
directions could result in serious injury.
CAUTION: This symbol indicates that failure to follow
!
directions could result in damage to equipment or loss of
information.
Part Number 23417.02
tel: 435.753.1881
1132 W. 1700 N. Logan, UT 84321
ii Archer 2 Rugged Handheld Owner’s Manual
web: www.junipersys.com
l
Page 3

Contents
1 Getting Started
The Anatomy of the Archer 2 2
Perform Initial Tasks 3
Home Screen and Windows Start Menu 8
Navigating Around Your Archer 2 9
2 Hardware Components
Keypad Features 12
Display and Touchscreen 16
Power Management 22
LED Activity Indicators 24
Flashlight 25
SD Cards 26
Connector I/O Module 26
Audio Features 27
3 Programs and Settings
Home Screen 30
Windows Start Menu 35
On-Screen Keyboard 36
Suspend, Reset, Power Off, and Restore Defaults 38
Subdued Lighting (Tactical) Mode 40
Compass and Accelerometer Calibration 41
Communicating with a Desktop Computer 43
Getting Started Application 44
Information for Software Developers 44
4 Bluetooth Wireless Communication
Creating a Partnership 46
Bluetooth Control Panel 47
Serial Device (COM) Control Panel 49
5 Wi-Fi Wireless Networking
Connecting to a Wi-Fi Network 52
Contents iii
Page 4

6 GPS/GNSS
Using GPS/GNSS 56
JSNav Application 59
7 Camera
Camera Settings for Still Images 66
Take Photos and Select Photo Options 70
Videos 72
Photo and Video Library 73
8 3G Data Modem
Set up a Data Account with a Wireless Provider 76
Install the SIM Card 76
Set up the Cell Modem 78
Wireless Safety 79
Maintenance of Your Modem 80
9 Barcode Scanner
Quick Start – Easily Scan a Barcode Now 82
Barcode Connector Utility 83
Barcode Troubleshooting 92
A Storage, Maintenance and Recycling
Storing the Archer 2 and Battery Pack 98
Protecting the Touchscreen 98
Cleaning the Archer 2 99
Recycling the Archer 2 and Batteries 100
B Warranty and Repair Information
Limited Product Warranty 102
Extended Warranties 104
Repairing the Archer 2 105
C Warnings and Regulatory Information
Product Warnings 108
Certications and Standards 109
D Specifications
Archer 2 Rugged Handheld Specications 116
Index
iv Archer 2 Rugged Handheld Owner’s Manual
Page 5

1
Getting Started
Page 6
Getting Started
The Archer 2 Rugged Handheld™ from Juniper Systems
features Bluetooth, Wi-Fi and a numeric keypad. Standard
accessories include a lithium-ion battery pack, AC wall
charger, USB micro client sync cable, hand strap, and a
capacitive stylus and tether. A camera, GPS/GNSS, cellular
data modem, and barcode scanner are options.
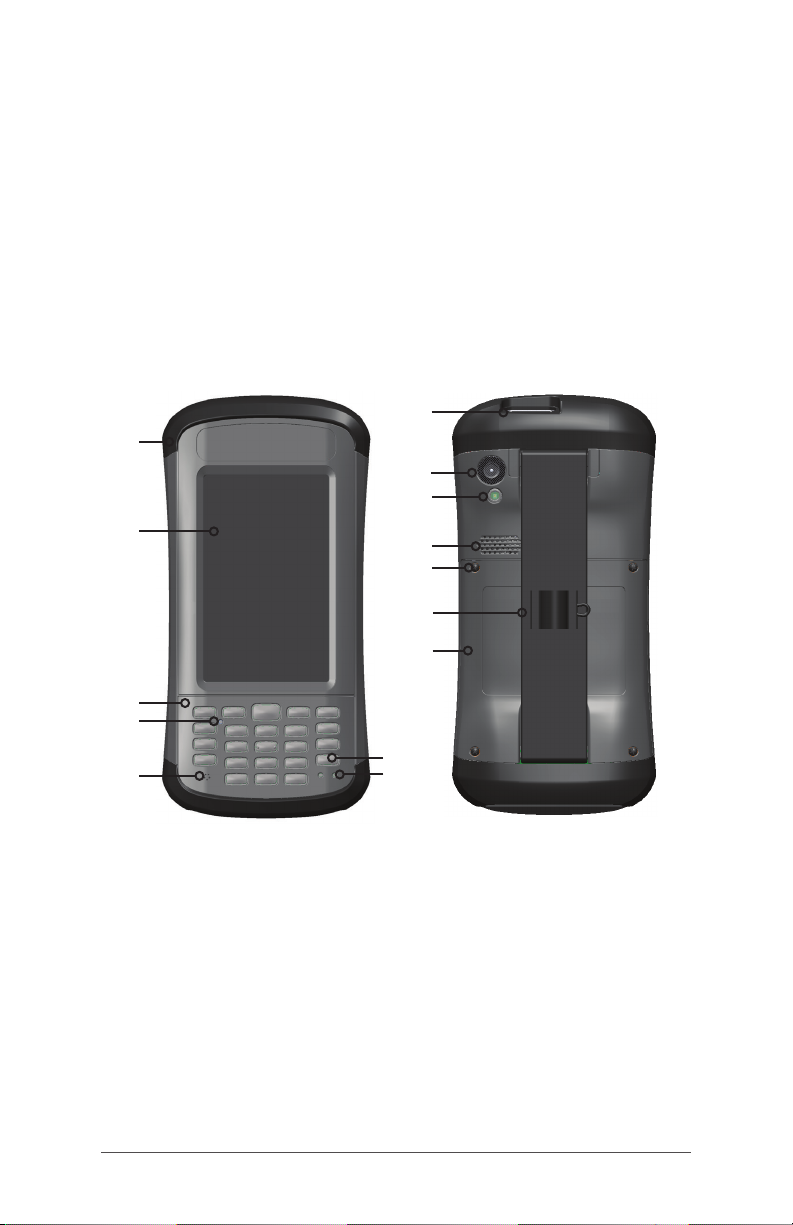
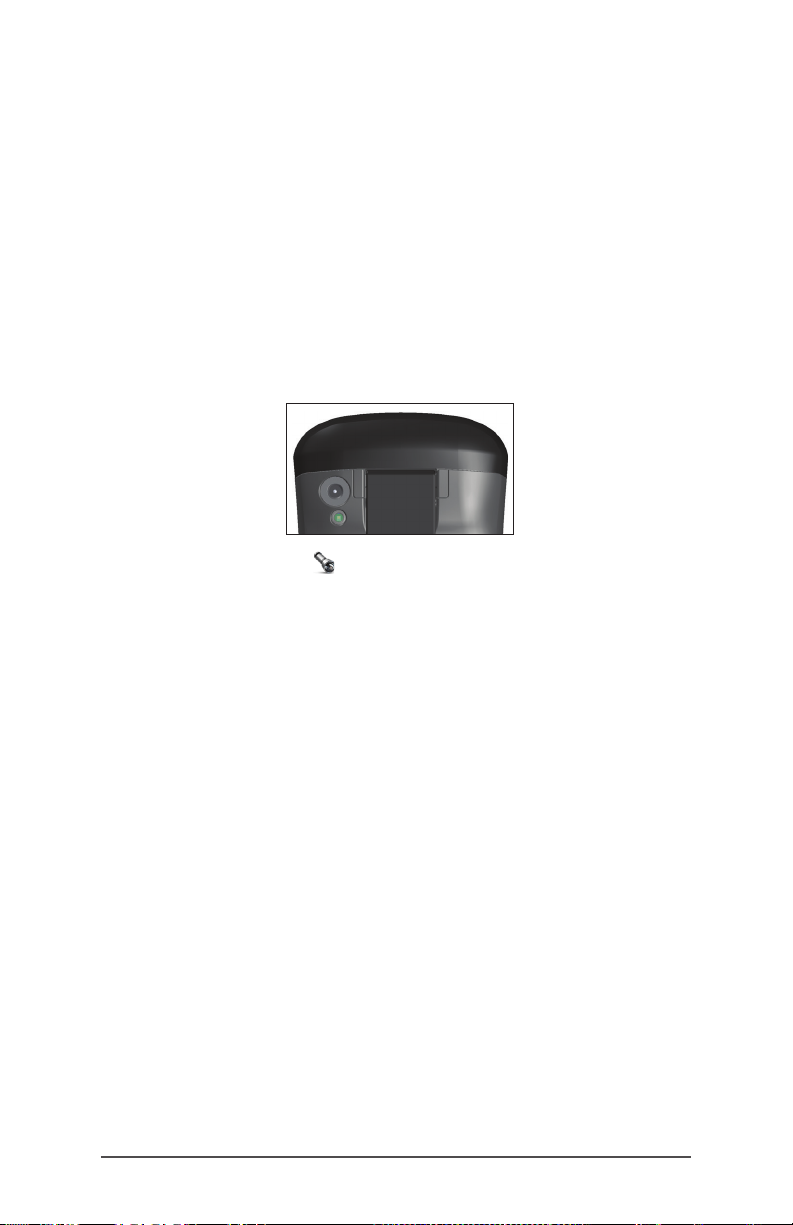
The Anatomy of the Archer 2
Front and Back Features
8
1
9
10
2
3
4
5
1 Bumper, Top
2 Touchscreen
3 Keypad
4 Sensor (option)
5 Microphone
6 Power Button
7 Led Indicators (charging
indicator on the right,
programmable indicator
on the left)
11
12
13
14
6
7
8 Barcode Window (option)
9 Camera Window (option)
10 Camera Flash and Flashlight
Window (option)
11 Speaker
12 Screw Holding Battery Door
in Place (1 of 4 captive screws)
13 Hand Strap with Stylus
Holder and Tether Ring
14 Door to Battery
Compartment and Card Slots
2 Archer 2 Rugged Handheld Owner’s Manual
Page 7
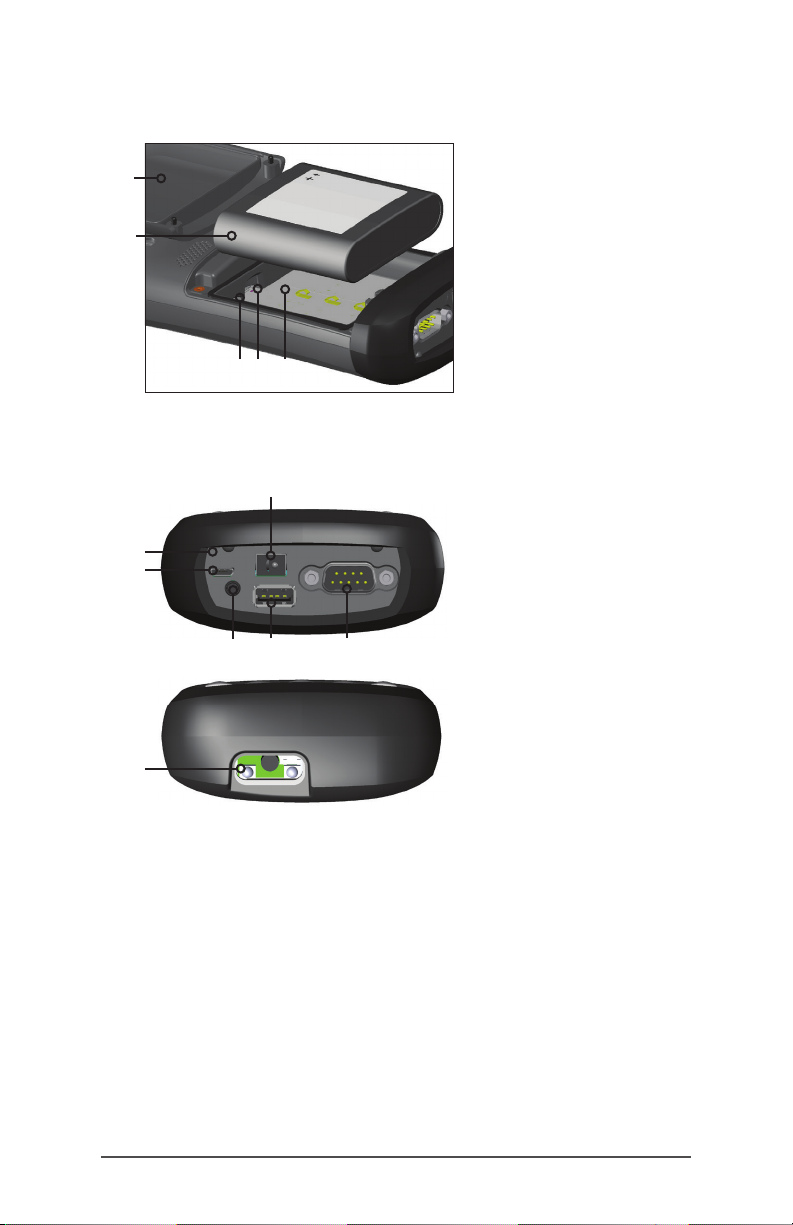
Battery Compartment and Card Slots
1
2
1 Battery Door, Screws, Hand
Strap (door removed)
2 Battery Pack
3 SIM Card Slot
4 SD/SDHC Card Slot, Micro
5 Battery Compartment
3 4 5
Connector Module and Barcode Reader
6
1
2
4
3
5
1 Connector Module
2 USB Client, Micro
3 Microphone/Speaker Jack
4 USB Host, Full Size
5 9-pin Serial Port
6 12-24V DC Jack
7 Barcode Window (option)
7
Perform Initial Tasks
When you receive your Archer 2, perform the tasks outlined
in this section before rst use.
Review Documentation
The owner’s manual, quick start guide, and Microsoft®
License Agreement are available in English, French,
German, Spanish, and Brazilian Portuguese. Other
documents like release notes are available in English.
These documents are located on our website at: www.
junipersys.com/Archer-2/support. View, download, and print
Ch 1 Getting Started 3
Page 8
documents as desired. (Adobe Reader must be installed
on your computer. It is free from Adobe’s website at: www.
adobe.com.)
Apply a Screen Protector (Optional)
The touchscreen is extremely scratch resistant, so a screen
protector is not included with the Archer 2. If you decide to
apply one, refer to the installation instructions included with
your screen protector for specic details.
Install the Battery Pack, SD Card, and SIM Card
The Archer 2 uses a rechargeable Li-Ion battery pack. Install
and charge the battery pack as follows:
1. The battery compartment is accessed from the back of
the handheld. Loosen the 4 captive screws holding the
battery compartment door in place using a #1 Phillips
screwdriver. Remove the door. You do not need to
remove the hand strap.
CAUTION: The Archer 2 is not sealed against water and
!
dust when the battery door is not installed.
2. If you are using a micro SD card for additional memory
or a SIM card with the 3G Data Modem (optional), you
can install them now before you install the battery pack
or at another time. See more details about these cards
in Chapter 2, Hardware Components, Micro SD Cards
and Chapter 8, 3G Data Modem, Install the SIM Card.
3. Place the Li-Ion battery pack in the compartment.
4 Archer 2 Rugged Handheld Owner’s Manual
Page 9
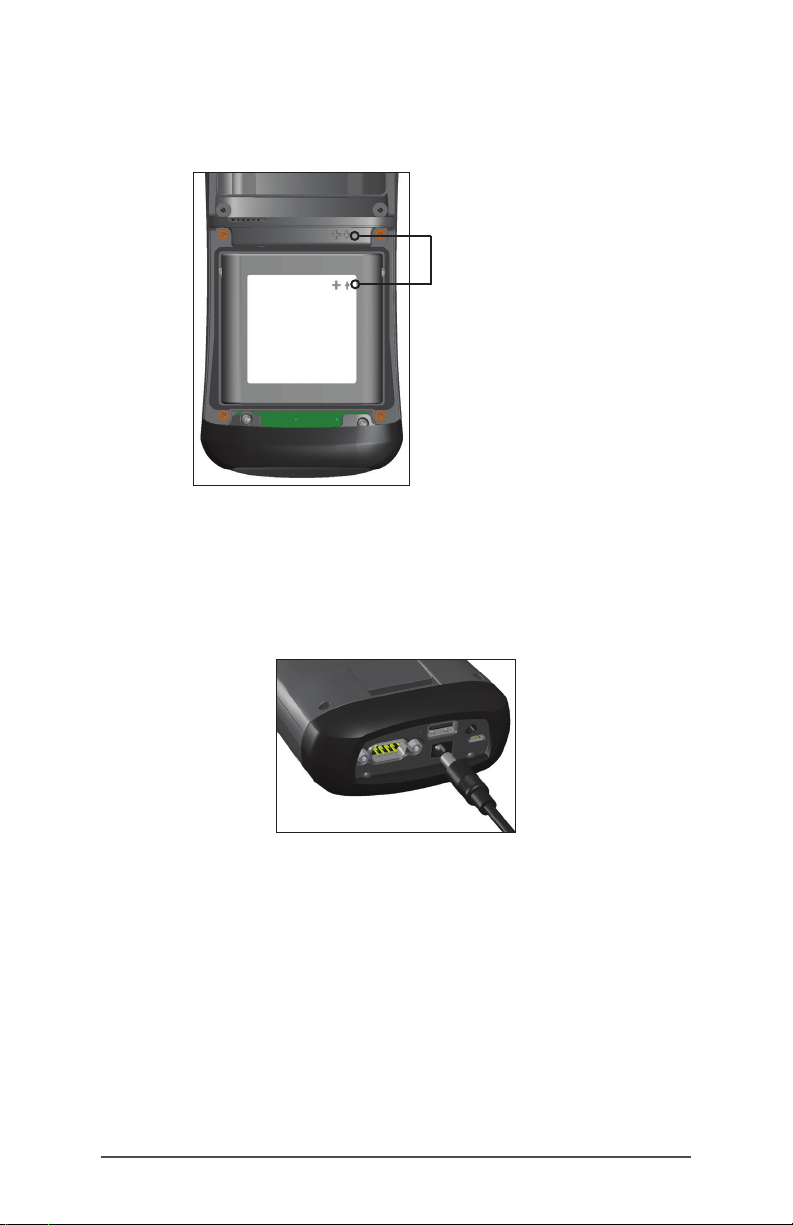
Make sure the symbols on the battery pack label align
with the symbols inside the compartment.
Line the symbols up
on the case and the
battery pack as shown
4. Replace the door and tighten the screws.
5. Plug the AC wall power charger that came with the
Archer 2 into a wall socket. Plug the other end into the
DC power jack on the Archer 2. The red LED on the
keypad blinks when the battery pack is charging.
Ch 1 Getting Started 5
Page 10
Attach the Stylus Tether
A capacitive stylus and tether are included with the
handheld.
Note: A stylus is not required to use the touchscreen. The
optimal way to make selections is by nger touch.
One end of the tether is attached to the stylus. To attach it
to the hand strap, follow these steps:
1. Pull the free tether loop through the tether ring on the
hand strap. Insert the stylus with the attached tether
through this loop and tighten the loop.
2. Place the stylus into the holder on the hand strap.
Perform Set Up
1. The handheld powers on and begins the startup
process. A splash screen is shown that includes a
progress indicator at the bottom of the screen.
2. A Microsoft® Windows Embedded Handheld screen is
shown.
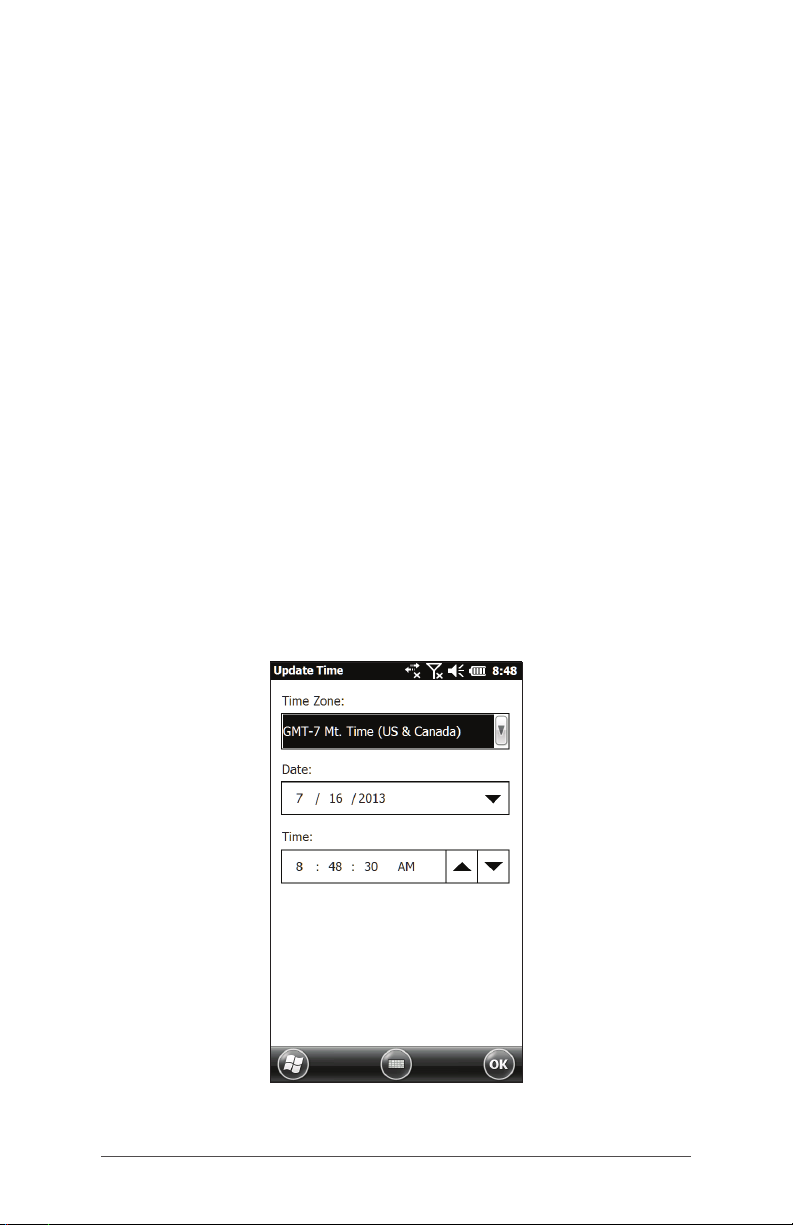
3. The Clock and Alarms control panel appears. Adjust the
time zone, date and time if necessary and tap OK.
6 Archer 2 Rugged Handheld Owner’s Manual
Page 11
The Home screen appears (layout varies by model).
Note: If you have a barcode, the Barcode Connector
screen is shown. Refer to Chapter 9 for details.
4. Press the power button to suspend the handheld.
Charge the battery pack at room temperature (68°
F or 20° C) for 4 to 5 hours. While the battery pack is
charging, the red LED blinks. When it is fully charged, the
red LED is solid.
Install the Operating System in Other Languages
The operating system is provided in English by default. It is
also available in French, German, Spanish and Brazilian
Portuguese. You can download the operating system in one
of these languages from our website. Go to www.junipersys.
com/Archer-2/support and select Downloads, then Archer
2. Full installation instructions are also available here.
Ch 1 Getting Started 7
Page 12
Home Screen and Windows Start Menu
You need to be familiar with two screens as you read
this manual and use the Archer 2: the Home screen and
Windows Start menu.
Note: The Windows soft key and the shift + Home
button sequence toggle back and forth between the Home
screen and Windows Start Menu.
Title Bar
Applications
Dashboard
with Function
Gadgets
Shortcuts
to Favorite
Applications
Tiles/Soft Keys
Home Screen
Windows Start Menu
Home Screen
The Home screen is your main control center for the Archer
2. The content varies based on which model you have and
can be customized. It is automatically shown when the
Archer 2 is turned on. You can get to it from any other
screen by pressing and releasing the Home screen
button on the keypad.
Windows Start Menu
The Windows Start menu gives you access to all of the
applications on the Archer 2. You can get to it from any
screen by tapping the Windows tile (soft key) on the
display or pressing the shift + Home buttons on the
keypad.
More information about these screens is located in Chapter
3, Programs and Settings.
8 Archer 2 Rugged Handheld Owner’s Manual
Page 13
Navigating Around Your Archer 2
Using Gestures and Making Selections
The Windows® Embedded Handheld operating system
enhances the ability of the handheld to recognize touch
gestures, making it easy to use a nger to navigate. Use of
the capacitive stylus is an option. The keypad buttons can
also be used.
Navigation options vary depending on the screen you are
viewing. Here is a partial list of options:
Vertical and Horizontal Movement
Flick up, down or sideways on the touchscreen.
For more precise positioning, touch, hold, and move the
screen up or down.
Use the scroll bar if it is available.
Use the shifted up down right and left keys to
move around on a screen.
A horizontal scrolling menu is located on control panel
screens near the top. Press the left or right arrow keys to
scroll through the topics (this feature replaces tabs).
Make a Selection
Using the Touchscreen
Press or tap the function gadget or application icon you
want to select, turn on, activate, or turn off.
Press and hold a function gadget to bring up a control
panel, menu, or list.
Using the Keypad
Use the shifted up down right and left keys to
select (highlight) a gadget or icon on the screen. A ring
appears around the selection. System Info has been
selected below:
Ch 1 Getting Started 9
Page 14
Perform the selected action by pressing the return
button. For dashboard gadgets like Wi-Fi, one press of the
return key shows you which icon is selected, a second
key press performs the action, and a third key press turns
the action off. For application icons on the Start screen or
in favorites, continue to use the return button until you get
to the screen or menu you want.
Use the shift + OK keypad buttons to select Enter, OK,
etc. on the screen. You can also bring up the control
panel for selected actions on the Home screen.
Updates to the Operating System and Documents
Updates to the operating system and technical documents
are located on our website at www.junipersys.com/
Archer-2/suppor t. Select Downloads, then Archer 2. Full
install instructions are also available here.
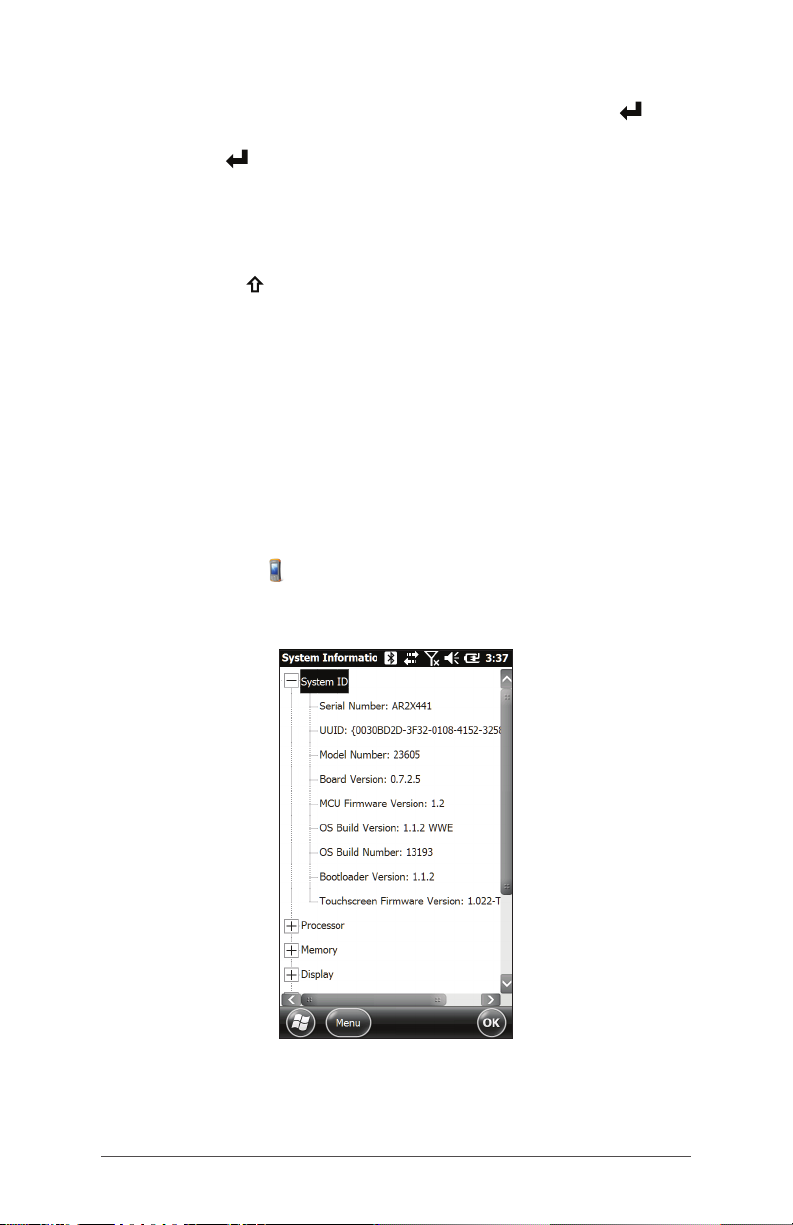
View System Information for Your Archer 2
To view your operating system version number, press the
System Info icon on the Home screen or go to Start >
Settings > System > System Information. Expand System ID.
Compare version numbers to see if your OS is current.
Owner’s Manual and Quick Start Guide Versions
Compare part numbers to see if you have the most recent
version of the Owners Manual and Quick Start Guide.
10 Archer 2 Rugged Handheld Owner’s Manual
Page 15

2
Hardware Components
Page 16
Hardware Components
This chapter discusses the Archer 2 Rugged Handheld
hardware features and usage.
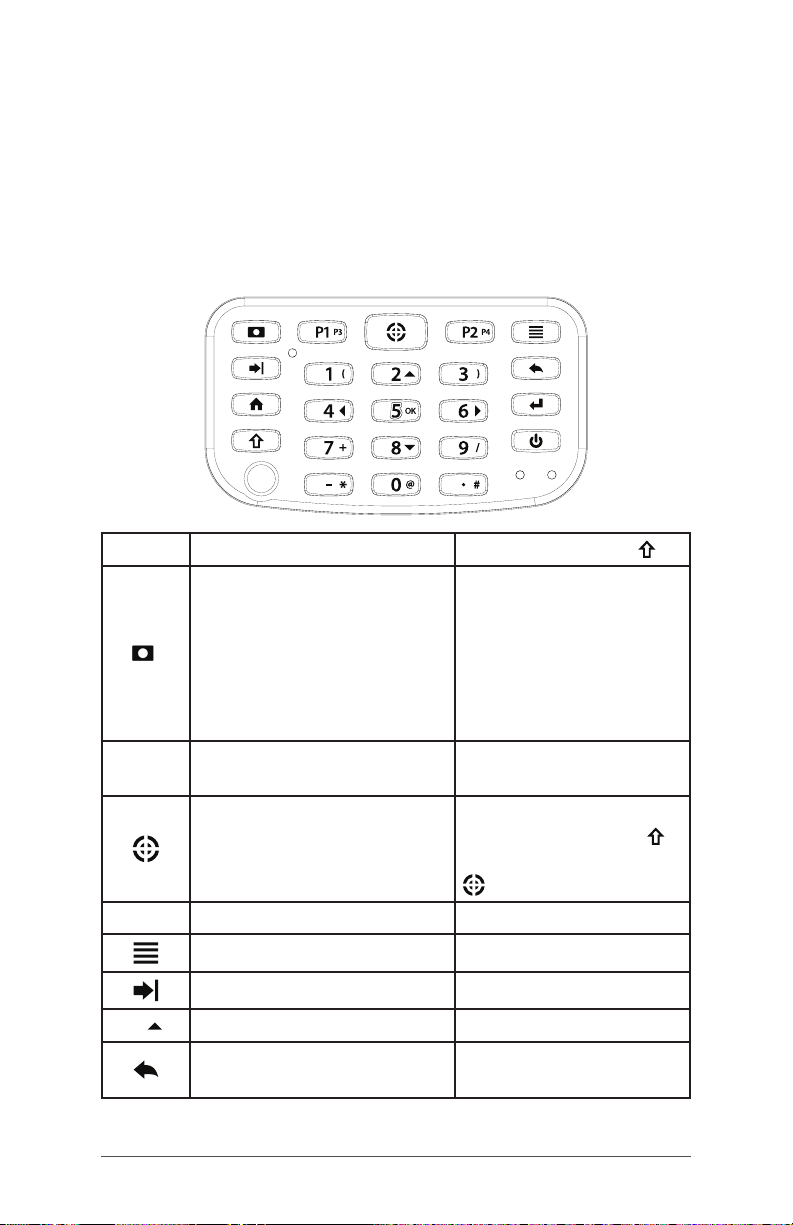
Keypad Features
The Archer 2 has a numeric keypad with sealed buttons,
backlight illumination, and programmable keys and LEDs.
Button
P1 P3
P2 P4
2
Press and Release
Pictures and Videos
Shift Function
Notes application
function; take a
picture or start and
stop video
Photo and video
library (for units
without a camera)
Hold-to-Zoom function
(press and hold)
Barcode scan
Buttons control panel
(for units without a
barcode scanner)
Display brightness
down
Record audio note
(press and release
then press and hold
until complete)
Right soft key Display brightness up
Context Menu Task Manager
Tab Back-tab
2 Up (varies by screen)
Backspace (delete) Enable or disable
touchscreen
12 Archer 2 Rugged Handheld Owner’s Manual
Page 17
Button
4
5 OK
6
8
Press and Release
Shift Function
Home screen Start screen (toggle)
4 Left (varies by screen)
5 Select OK on the
screen
6 Right (varies by
screen)
Return
Take picture or start
video
Perform highlighted
action (use default
action or select using
arrow keys)
Shift (Function)
Use specic shift
Return
Take picture or start
video
Perform highlighted
action (use default
action or select
using arrow keys)
See description of the
specic button
function: Press and
release rst, then
press and release
the button with the
desired shift function.
Turn shift function on
for all keys: Press and
release twice. To
turn shift off, press and
release again.
See blue LED description
8 Down (varies by
screen)
Power
Suspend/Resume
Power Button menu
None
(press and hold)
Ch 2 Hardware Components 13
Page 18
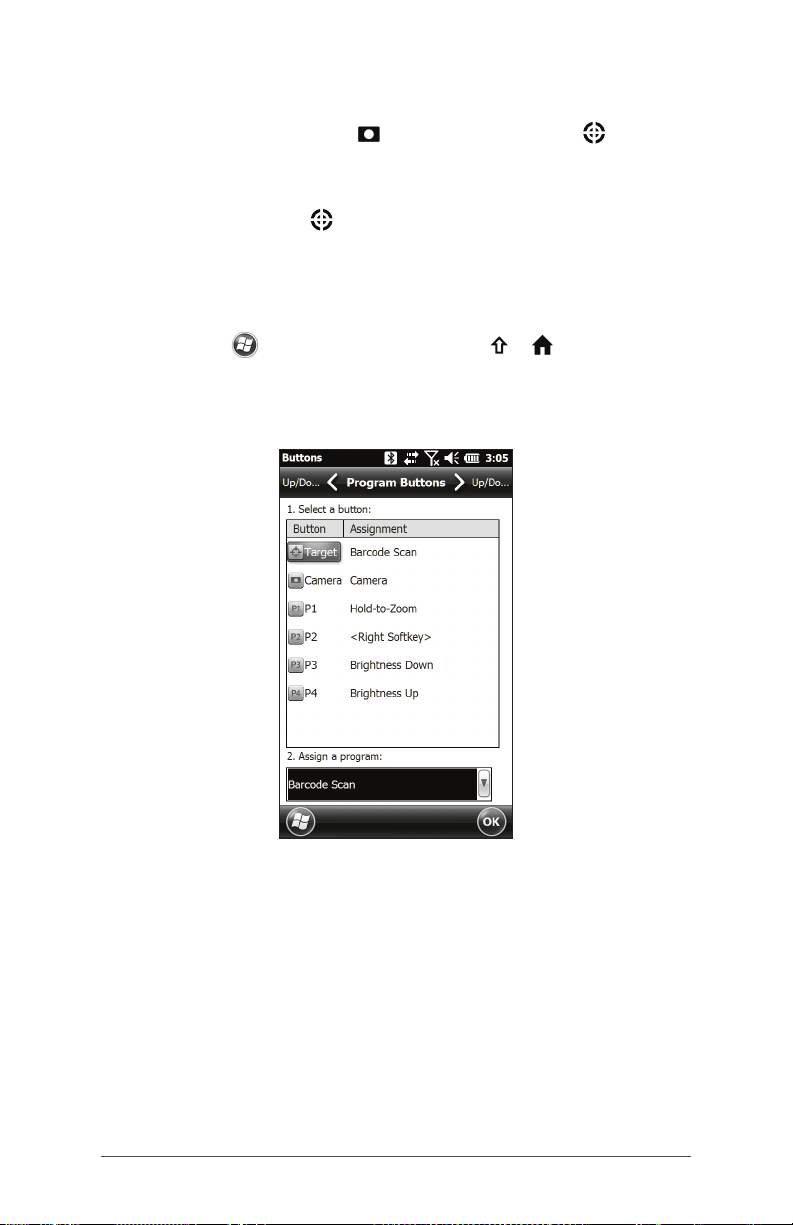
Programmable Buttons
The P1, P2, P3, P4, camera , and target buttons are
programmable.
1. To bring up the Program Buttons screen, you can press
the target button if your handheld does not have a
barcode scanner. If you have a barcode scanner or the
target button has been reassigned, select the Settings
icon on the Home screen, and then Personal > Buttons.
You can also go to the Start screen by selecting the
Windows soft key or pressing the + buttons, then
selecting Settings > Personal > Buttons. Under 1. Select a
button, a list of programmable buttons and their current
assignments is shown.
14 Archer 2 Rugged Handheld Owner’s Manual
Page 19
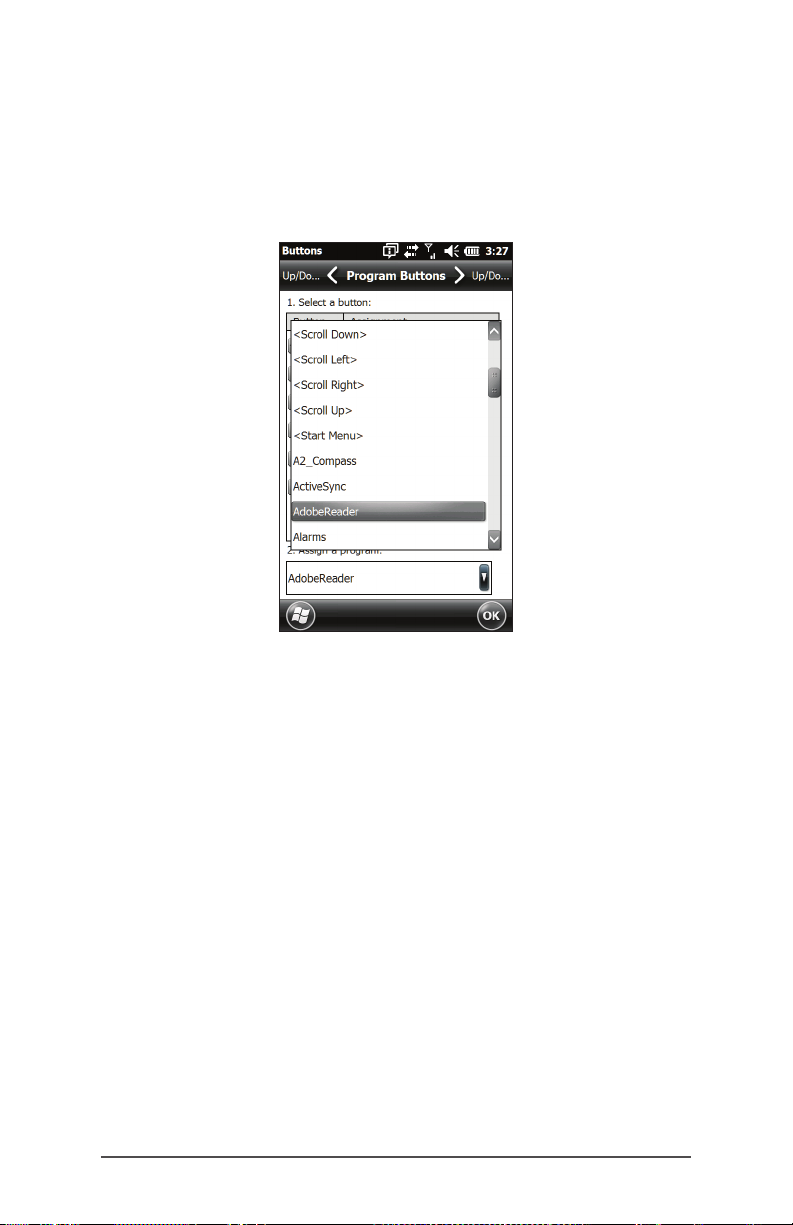
2. Select the button you want to reassign.
3. At the bottom of the screen under 2. Assign a program,
select the down arrow button to display a list of
programs and functions. Select the item you want to
reassign to the selected button.
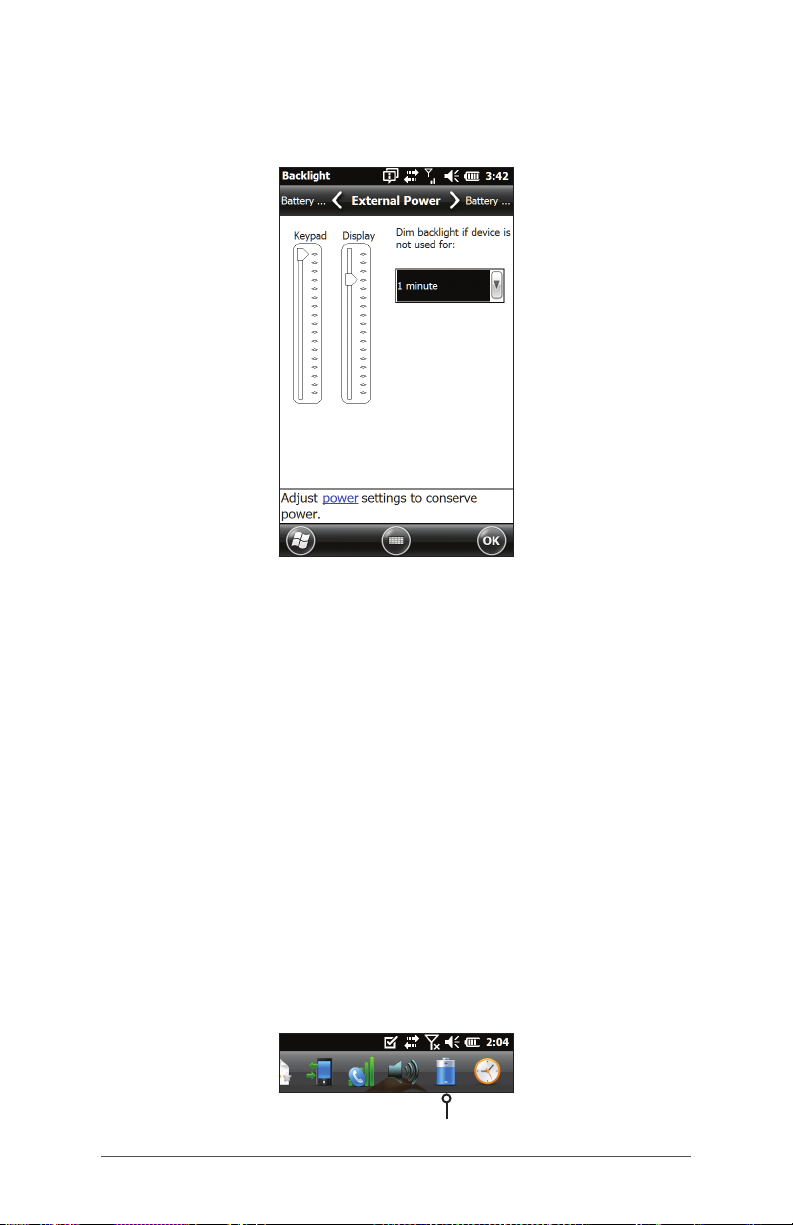
Keypad Backlight
Make keypad brightness adjustments through the Backlight
control panel located at Start > Settings > System >
Backlight. Select the External Power screen or Battery Power
screen from the horizontal menu near the top of the screen.
Ch 2 Hardware Components 15
Page 20
Move the Keypad slider up to brighten the backlight or
down to dim it. Dimming the keypad backlight saves
battery power when the Archer 2 is in use.
Note: The keypad backlight turns off when the display
backlight dims or the Archer 2 is suspended.
Display and Touchscreen
The Archer 2 has a bright color display and capacitive
touchscreen with a diagonal viewing area of 4.3 inches (109
mm). It is easy to view outdoors and is sealed against water
and dust. The Windows® Embedded Handheld operating
system enhances the ability of the Archer 2 to recognize
touch gestures, making it easy to use a nger to make
selections and navigate. You can also use a capacitive
stylus.
16 Archer 2 Rugged Handheld Owner’s Manual
Page 21
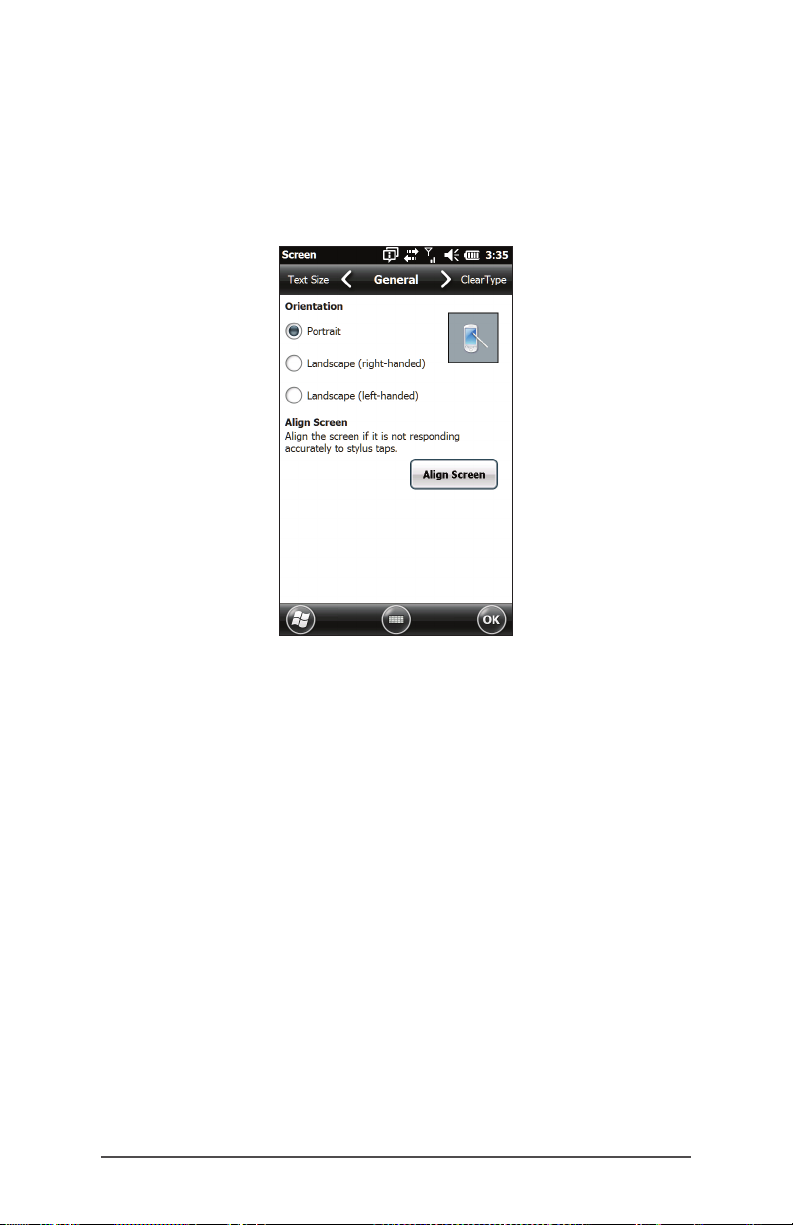
Display and Touchscreen Settings
Type and Orientation
To adjust the display settings, including the text size and
orientation, go to the Screen control panel by pressing Start
> Settings> System > Screen.
The screen is designed to be used in portrait orientation. A
landscape orientation could impact the performance of an
application.
Note: Capacitive touchscreens do not need to be aligned.
Ignore the Align Screen option.
Touchscreen Modes
The touchscreen is optimally designed for nger use. The
default touchscreen mode can be adjusted to best match
your application and environment, especially if you are
using a capacitive stylus.
To adjust the touchscreen prole, go to the Touch control
panel by pressing Start > Settings > System > Touch. Modes
for nger or stylus use are shown. The higher the number
between 10, 20, and 30 the greater the sensitivity.
Ch 2 Hardware Components 17
Page 22
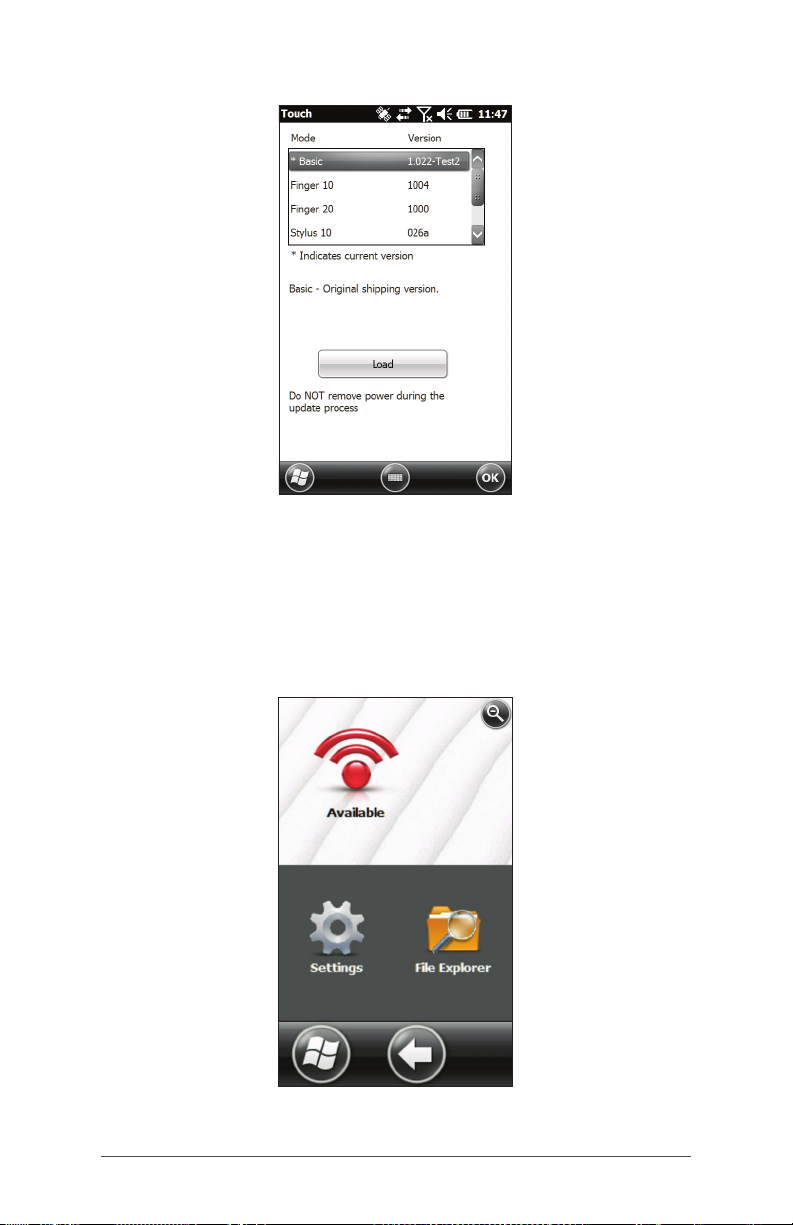
Select the preferred mode, and tap Load. Do not interrupt
the loading process. You can try different modes to see
which one works best for you.
Zooming in on the Display
Zooming in on the display increases the view by 50 percent
and makes selecting content much easier.
18 Archer 2 Rugged Handheld Owner’s Manual
Page 23

Zoom options:
Hold-to-Zoom - Press and hold the P1 button on the
keypad (the default setting), and tap on the screen in the
area on which you want to zoom. The screen focuses on
that location. Make selections as desired. Release the P1
button to return to the regular screen size.
Magnifying glass - Tap on the title bar at the top of the
screen to display the pop-up icons. Select the magnifying
glass on the left.
This zooms in on the content. Move the screen around
with your nger until you nd the information you want.
Select the magnifying glass symbol in the upper right
corner of the screen to return the view to the regular size.
Display Backlight Brightness Settings
The default setting for the display backlight is 80%. Adjust
the display brightness by pressing the brightness down
button sequence, shift + P3, and brightness up button
sequence, shift + P4. You can also make brightness
adjustments through the Backlight control panel by pressing
Start > Settings > System > Backlight. External Power and
Battery Power are adjusted on different screens. Select
these screens from the horizontal scrolling menu near the
top of the screen.
Ch 2 Hardware Components 19
Page 24
Move the Display slider up to brighten the backlight or
down to dim it.
Dimming the Display Automatically
The display has a minimum brightness setting that it dims
to when the Archer 2 is idle for the time interval indicated.
The display backlight dims by 50%, so the display is still
partially visible. You can adjust the dim time interval (see
the previous screen) for battery and/or external power.
Dimming the display backlight saves battery power.
To bring the backlight back up to the full brightness setting,
tap on the dimmed display.
Note: The Archer 2 can be set up in subdued lighting
(tactical) mode. Refer to Chapter 3 for instructions.
Turning the Screen O Automatically
You can set up the display backlight to turn off after set
intervals. Tap on the top title bar from any screen, and
select the battery icon from the list of applications that
appears.
20 Archer 2 Rugged Handheld Owner’s Manual
Page 25
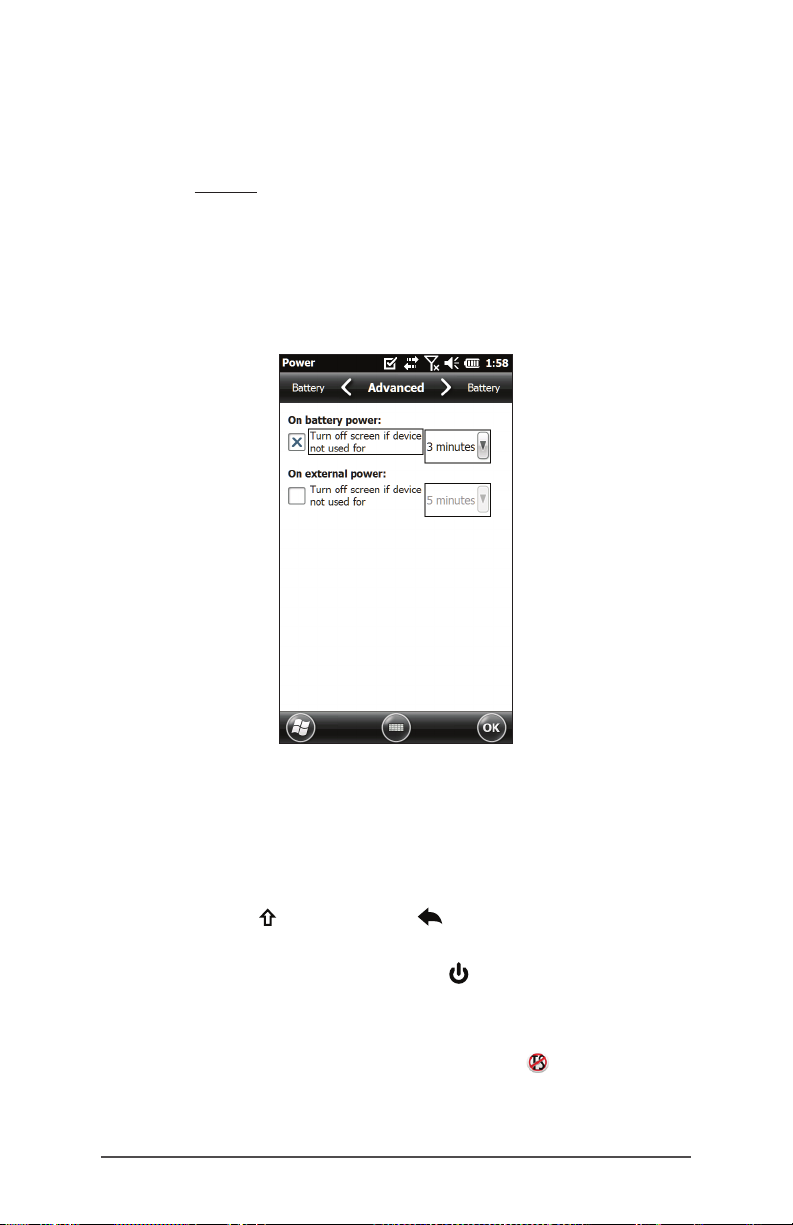
Alternately, go to the Backlight control panel. Press Start >
Settings > System > Backlight. Near the bottom of the screen
it says “Adjust Power Settings to conserve power.” Select the
hyperlink power (see the previous screen shot).
The Power control panel appears. Select Advanced from
the horizontal scrolling menu near the top of the screen.
For battery and external power select how long the screen
stays on when it is not in use. Shorter times save battery
power.
Disabling and Enabling the Touchscreen
You can disable the touchscreen. This is useful when you
are running an application and you want to see the screen
while avoiding accidental touchscreen activation. The
touchscreen can also be disabled for cleaning purposes.
Press the shift + backspace buttons to toggle the
touchscreen on and off.
Press and hold the power button to display the Power
Button menu. Select Disable TS. (You must use the method
described above to enable the touchscreen.)
When the touchscreen is disabled, this icon is shown in
the title bar until the touchscreen is enabled again. You can
move around and make selections using the keypad.
Ch 2 Hardware Components 21
Page 26

Power Management
The Archer 2 uses a Li-Ion rechargeable battery pack.
CAUTION: Only use batteries designed for the Archer 2 from
!
an approved vendor. Use of non-approved batteries may
void your product warranty.
Charging the Battery Pack
To charge the battery pack, suspend the handheld, then
refer to the instructions in Chapter 1, Getting Started. It
typically takes 4 to 5 hours to fully charge a battery pack.
We recommend that you keep the handheld battery pack
charging when it is not in use for up to two weeks. When you
plug the handheld into the wall charger that comes with it,
the batteries are prevented from being overcharged.
The Li-Ion battery pack is charged most efciently at room
temperature (68°F or 20°C). The battery pack will not charge
if it is too hot or too cold.
CAUTION: The Archer 2 is not sealed against water and dust
!
when the battery door is not installed properly.
Battery Life
Battery life on a full charge is generally up to 20 hours. This
can vary depending on the applications used, backlight
usage, and radio usage.
To see the remaining battery power, tap on the top title bar
from any screen and select the battery icon from the list of
applications that drops down.
22 Archer 2 Rugged Handheld Owner’s Manual
Page 27
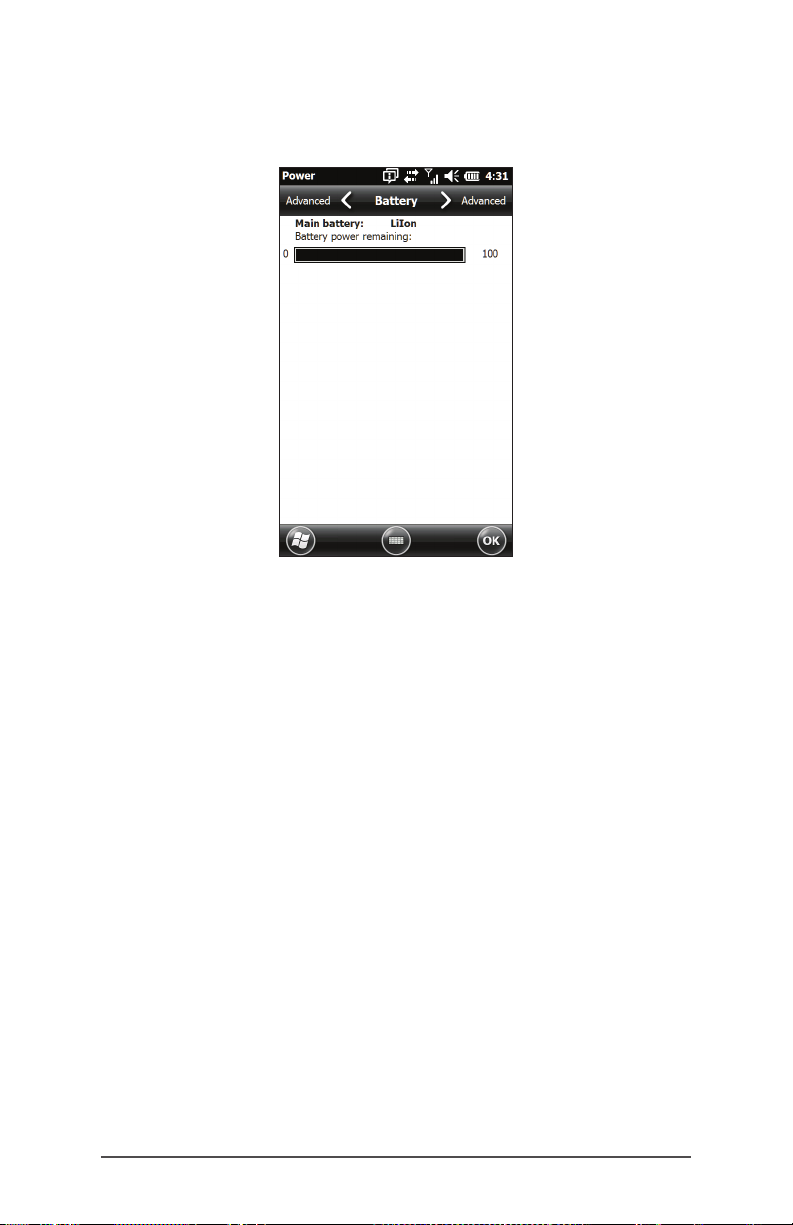
The Power control panel appears, displaying the remaining
battery power.
Battery packs last approximately 1,000 to 3,000 charging
cycles before they need to be replaced. This is impacted by
applications and environmental factors.
Summary of Options to Reduce Power Usage
You can adjust some settings to preserve power:
Turn off the display (suspend) after a set interval. See
Display Backlight Suspend Interval earlier in this chapter.
Dim the backlight after a set interval. See Adjusting the
Keyboard Backlight and Adjusting the Display Backlight
earlier in this chapter.
Ch 2 Hardware Components 23
Page 28
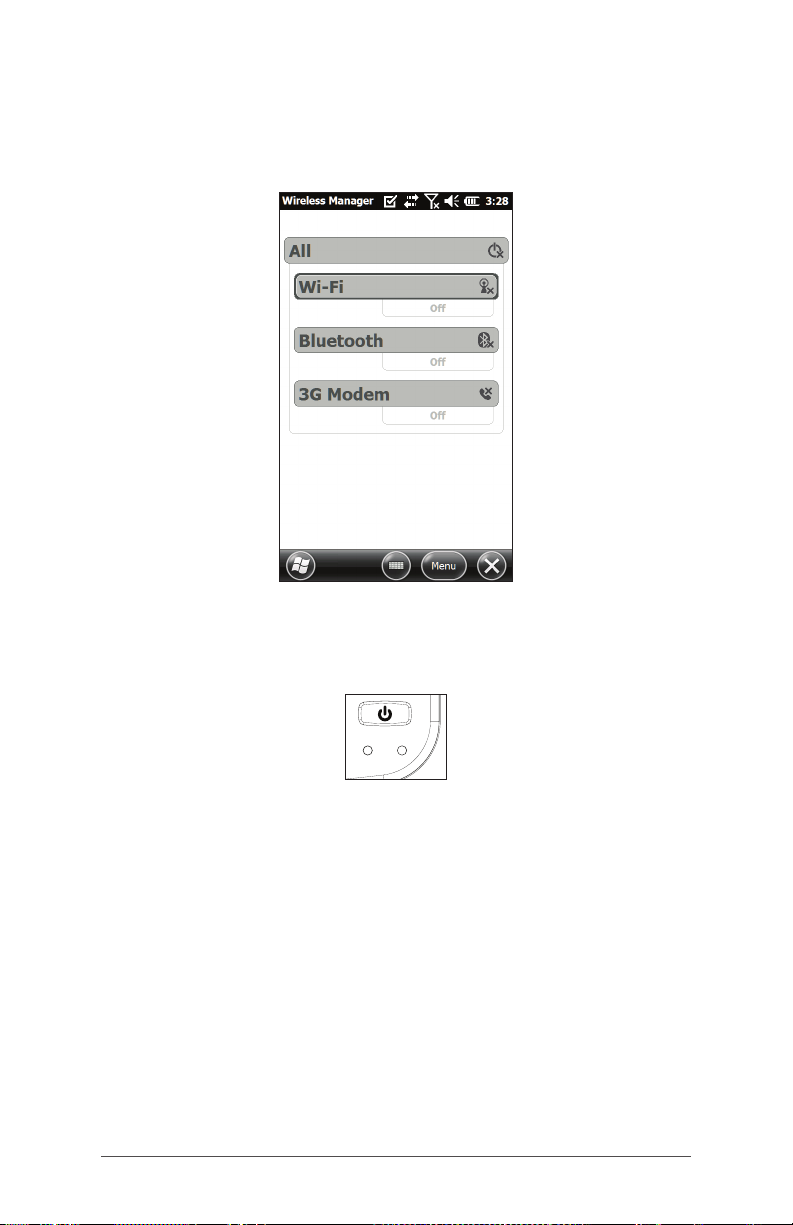
Disable radios when not in use. Turn radios off from the
Home screen or press Start > Settings > Connections >
Wireless Manager.
LED Activity Indicators
LED activity indicators are located on the keypad
underneath the power button.
Red LED on the right (associated with power adapter):
Blinking: AC adapter is plugged in, and the battery is
charging
Solid: AC adapter is plugged in, and the battery is full (not
charging)
Green LED on the left (associated with notications):
When the operating system has something to notify you
of, this LED behaves accordingly. For example, if you turn
on GPS/GNSS the green LED blinks periodically.
24 Archer 2 Rugged Handheld Owner’s Manual
Page 29
Blue LED on the left (associated with shift functions):
Solid: When you press the shift key, the blue LED lights
up and stays on until another key is pressed. If the shift
function is locked, the blue LED stays on.
Only one LED is on at a time. The blue and green LEDs are in
the same location on the left. They are user programmable
through application software.
Flashlight
Geo units have a ashlight located underneath the camera
window in the back of the Archer 2.
The ashlight gadget must be on the Home screen in
order to use it. Tap on the icon once to turn on the brightest
illumination. Tap the gadget again for medium brightness,
and a third time to turn it off.
Note: This is also the camera ash.
Ch 2 Hardware Components 25
Page 30
SD Cards
The Archer 2 has a slot for a micro SD card located in the
battery compartment. To insert or remove a card follow
these steps:
1. Power off the handheld.
2. Loosen the screws to the battery compartment, and
remove the door. The hand strap remains attached.
CAUTION: The Archer 2 is not sealed against water and
!
dust when the battery door is not installed properly.
3. Remove the battery pack.
4. An image on the battery compartment label shows the
correct location and orientation for the SD card (slot
on the right). Push the card into the slot to insert it. To
remove the SD card, pull it out.
5. Replace the battery pack, and attach the battery door.
6. Power up the handheld.
Connector I/O Module
The Archer 2 connector I/O module has the following jacks
and connectors:
5
1
3
2
1. USB client, micro B
2. Audio jack: 3.5mm; supports speaker, microphone or
stereo output (pin detect)
26 Archer 2 Rugged Handheld Owner’s Manual
4
Page 31

3. USB host, full size A
4. COM1: RS-232C 9-pin D-sub connector, 5 V @500 mA
available on pin 9 (ring in) under program control
5. Power input jack: 12 to 24 VDC for power input and
battery charging
The connector module is user-replaceable. Contact our
sales department or your supplier for details.
Note: The connectors are sealed and do not require a
connector protector to prevent water ingress.
Audio Features
The Archer 2 has the following audio features:
Speaker - The speaker sound is loud and clear. Listen to
audio notes, video sound, and music les.
Microphone - Use the microphone to record audio notes
or add sound to a video when using the camera function
(option).
Audio Jack - The audio jack supports a stereo headset
or headset/microphone combination with 3.5mm
connections.
Adjusting Audio Settings
To set audio options, tap on the top title bar and select the
audio icon from the list of applications that drops down. Or,
press Start > Settings > System > Audio.
Ch 2 Hardware Components 27
Page 32

The Audio control panel, Output screen, is shown:
From the Output screen you can adjust the speaker options.
Select the Input screen from the horizontal menu near the
top of the screen. You can adjust the onboard and headset
microphones as desired.
28 Archer 2 Rugged Handheld Owner’s Manual
Page 33

3
Programs and Settings
Page 34

Programs and Settings
This chapter discusses the Archer 2 Rugged Handheld
programs and settings.
Home Screen
The Home screen is your main control center for the
Archer 2. View vital system information and quickly access
functions and applications that are frequently used. The
default home screen for a basic unit is shown below.
Different functions are shown depending on which model
you have. You can customize the Home screen.
Title Bar
Dashboard
Favorites
Tile Bar
You can get to the Home screen from any screen by
pressing the Home button on the keypad. Tap on a
gadget or icon to turn a function or application on or off.
Tap and hold a gadget to go to a control panel. From the
keypad you can use the shifted up down right and
left arrow keys to select (highlight) a gadget or an icon on
the screen. Perform the selected action by pressing the
return button.
30 Archer 2 Rugged Handheld Owner’s Manual
Page 35

Title Bar and Pop-Up Icons
The title bar is at the top of every screen. It identies the
page and shows status icons indicating functions like
connectivity status, audio, power, and time. Tap the title bar
to bring up larger, touchable icons in a horizontal-scrolling
bar. Select a function to use or to view the settings and
adjust them as desired.
Title Bar
Pop-Up Icons
Dashboard
The dashboard consists of a background image and up to
six dashboard gadgets that serve as functional indicators
and control buttons.
You can switch between two color schemes and select
which gadgets are shown. Tap on the menu soft key
and select Switch Color Scheme to change color schemes
or Congure to select gadgets. The current gadgets are
covered with a blue symbol as shown below.
Tap on the gadget you want to replace. A list of available
dashboard gadgets is shown. Tap on your new selection.
Ch 3 Programs and Settings 31
Page 36

The dashboard icon changes when you make a selection. If
“None” is selected, the space becomes blank.
Dashboard Gadget Functions
Wi-Fi: Shows the state of the Wi-Fi radio and provides
the name of the wireless network to which it is
attached.
Bluetooth® wireless technology: Shows the state of
the Bluetooth radio.
Email: Shows the number of unread email messages.
If there are multiple email accounts, the total number
of unread messages is aggregated from all accounts.
Calendar: Shows the next appointment.
Tasks: Shows the current number of tasks.
GPS/GNSS Status (Geo model): Shows the current
state of GPS/GNSS reception and the state of the
GPS/GNSS receiver. It also shows the number of
satellites in view, the number of satellites used to
calculate the x (SV), the type of x (2D, 3D, etc.), and
the quality of the x (PDOP).
JSNav (Geo model): An application that lets you
easily collect waypoint or track data and navigate
back to any saved waypoint or track.
3G Data Modem (Geo model with cell modem):
Shows the on/off state of the optional cellular
modem.
Flashlight: Shows the on/dim/off state of ashlight
feature (included with camera).
32 Archer 2 Rugged Handheld Owner’s Manual
Page 37

Gadget Color Indicators
Wi-Fi, Bluetooth, GPS/GNSS and 3G data modem gadgets
indicate status using these colors:
Gray: Off or inactive
Yellow: Partial state (getting satellite x, etc.)
Green: Active and available
Blue: Notication state (on or connected)
Red: Error state, powering up or down, no GPS/GNSS
x, or unavailable (3G data modem is red when
power is changing from on/off. Wi-Fi is red when an
access point is available but not connected.)
Favorites Bar
The favorites bar consists of shortcuts to specic
applications. It is located below the dashboard when the
screen is in portrait mode and to the side of the dashboard
when it is in landscape mode. Tap on a shortcut icon to
launch an application.
You can use it to jump between the applications you use
most. While running an application, press the Home key
and select a different application from your favorites. To
return to the rst application, press the home key again,
then tap on the rst application you were running.
Ch 3 Programs and Settings 33
Page 38

You can customize which application shortcuts are shown.
Tap and hold on the shortcut you want to change to bring
up a list of available applications.
Tap on your selection. The icon on the home screen
changes to the icon associated with the new application.
Tile Bar
Touchable tiles (or soft keys) are shown in the tile bar at
the bottom of each screen. Up to ve tiles are shown,
depending on which screen you are on.
For example, the Home screen tile bar (shown below)
consists of: 1) the Microsoft® start tile that takes you to
the Start menu, 2) the back tile that takes you to the last
application running, and 3) the menu tile that lists options
for customizing the dashboard. The third and fth tile
positions are empty.
Tap on a tile to perform the actions associated with it.
Note: You can also press the P2 button on the keypad to
select the tile in the fourth position.
34 Archer 2 Rugged Handheld Owner’s Manual
Page 39

Tile examples:
Star t Lock
Minimize Edit
Navigate back Delete
Menu On-screen keyboard
Windows Start Menu
The Windows Start menu gives you access to all of the
applications on the Archer 2.
You can get to the Start menu from any screen by tapping
the Windows tile (soft key) on the display or pressing the
shift + Home buttons on the keypad. On the
touchscreen, tap the application icon you want to select.
From the keypad you can use the shifted up down
right and left arrow keys to select (highlight) an icon on
the screen. (Home is selected on the previous screen.)
Perform the selected action by pressing the return
button.
Ch 3 Programs and Settings 35
Page 40

On-Screen Keyboard
To activate the on-screen keyboard, select the keyboard
tile located at the bottom of active applications like
Notes that use keyboard input.
The default keyboard is Mega Keys, featuring large keys and
increased functionality.
To view and select other options including Block Recognizer,
Letter Recognizer, and Mega Keys Night, press and hold the
keyboard tile . To turn the on-screen keyboard off, press
the keyboard tile.
Mega Keys (and Mega Keys Night) Keyboard Features
Pressing on a character with a nger or stylus highlights it.
Releasing the key prints the character on the screen.
If you accidentally press the wrong character and have
not released the key yet, you can slide to the correct
character before releasing the key.
There are four main keyboard screens: lowercase,
uppercase, numeric, and symbols. To navigate to
different screens, press the modier keys in the lower left
corner of each screen as shown in the following graphic
for the lowercase keyboard. Press the up arrow to go to
36 Archer 2 Rugged Handheld Owner’s Manual
Page 41

the uppercase keyboard, the number key to go to the
numeric keyboard, and the symbol key to go to the
symbols keyboard.
Tap on the shift key for a single uppercase letter. Tap on
the shift key twice to lock the uppercase key. Tap once
more to return to the lowercase keyboard.
To enter a character from another screen (such as a
number or symbol), press and hold on the modier key,
slide to the character you want, then release the key. The
character is printed, and you are returned to the screen
you started from.
Some keys have an extra character bar that includes
items like accented characters or additional symbols.
These keys have three dots in the bottom right corner like
the z key . Press and hold the key to bring up the extra
bar. Tap the desired item or dismiss the bar by tapping
outside of the bar.
A calculator is available from the numeric screen. Press
the Calc key to launch the calculator application.
The backspace and the space keys can be repeated by
pressing and holding those keys.
Ch 3 Programs and Settings 37
Page 42

Suspend, Reset, Power Off, and Restore Defaults
Use the power button to suspend, reset, power off, or
restore the Archer 2 to its factory state. To access the Power
Button menu, press and hold the power button.
Suspending and Resuming the Archer 2
We recommend suspending your handheld if you plan to
turn it off for less than two weeks. While it is suspended, you
should attach it to a wall charger when it is not in use.
Suspending the handheld is different from powering it off.
When the device is suspended it goes into a very low power
mode. Some battery power is used during suspend.
1. Press and release the power button . The backlight
shuts off. It can take several seconds to fully suspend,
especially when the cell modem is on.
2. To resume the device from suspend mode, press and
release the power button again. When it is resumed,
the handheld resumes where it was before it was
suspended.
3. There is also a Suspend option on the Power Button
menu.
38 Archer 2 Rugged Handheld Owner’s Manual
Page 43

Resetting the Archer 2
If the Archer 2 is unresponsive, slow, or programs won’t
launch, performing a reset might solve the issue. You
may be asked to perform a reset when an application is
installed.
CAUTION: Be aware that during a reset, applications are
!
closed and unsaved work may be lost.
Follow these steps to reset your Archer 2:
1. Save open les, and close any running programs.
2. Press and hold the power button until the Power
Button menu appears.
3. Tap Reset.
You can also reset the handheld by pressing the power
button for 10 seconds or until the screen goes dark. After
a few seconds, the handheld automatically turns on. This
method is useful if your Archer 2 locks up.
Powering Off and On the Archer 2
To preserve battery power, we recommend you power off
the Archer 2 if it will not be used for two weeks or longer.
CAUTION: Be aware that when the Archer 2 is powered
!
off, it closes all programs and powers down all system
components except for the real-time clock. Unlike suspend
mode, the device resets when it is powered on again. Any
unsaved data is lost.
1. Save open les, and close any running programs.
2. If you are using external power, unplug it.
3. Press and hold the power button until the Power
Button menu appears.
4. Tap Power Off. A warning dialog appears. Tap OK.
To power on your handheld, press the power button.
Restoring the Archer 2 to its Factory State (Clean Boot)
Follow the steps below to restore user storage, settings, and
icons on your Archer 2 to their original factory defaults.
Ch 3 Programs and Settings 39
Page 44

CAUTION: Restoring the Archer 2 to its original factory state
!
permanently erases data saved on the handheld, any
software you installed, and any changes you made to the
handheld, including changes to settings.
1. Back up les and programs you want to keep onto
another computer.
2. Save open les and close running programs on the
handheld. Press and hold the power button until the
Power Button menu appears. Tap Reset.
3. When the screen turns black, press and hold the
power button again. The bios screen is shown.
4. Move the top slider on the screen to the right to set or
clear factory defaults. This clean boots the handheld.
5. Tap Exit. The boot process continues.
Subdued Lighting (Tactical) Mode
In some environments subdued lighting is preferred. The
display backlight, LEDs, and keypad illumination can be
subdued during the startup process and normal operation.
Set Up During a Reset
1. Save open les and close running programs on the
Archer 2. Press and hold the power button until the
Power Button menu appears. Tap Reset.
2. When the screen turns black, press and hold the
power button again. The bios screen is shown.
3. Move the slider on the screen to the right to turn the
tactical mode on.
4. Tap Exit. The boot process continues.
To restore the handheld to default lighting, follow the same
steps.
Use Buttons on the Keypad
The brightness up + P4 and brightness down + P3
buttons can be used at any time to adjust the screen
brightness. This does not change the keypad brightness.
40 Archer 2 Rugged Handheld Owner’s Manual
Page 45

Adjust the Backlight Control Panel
You can also subdue the keypad and display brightness
through the Backlight control panel. Press Start > Settings
> System > Backlight and then External Power or Battery
Power from the horizontal scrolling menu near the top of the
screen. Adjust the sliders as needed for both power sources.
Changes affect all operations.
Compass and Accelerometer Calibration
The Archer 2 has a built-in compass and accelerometer.
The compass is used for embossing GPS/GNSS information
on pictures taken with the camera, or embedding GPS/
GNSS information into jpg les. The compass is also used by
the JSNav program. The accelerometer assists the compass
in determining direction, even when the device is not
resting at. (See Chapter 6, GPS/GNSS, JSNav Application
and Chapter 7, Camera, Geotagging.)
The compass and accelerometer can also be used by other
user applications.
Ch 3 Programs and Settings 41
Page 46

Sensors Control Panel
The Sensors control panel lets you see the compass and
accelerometer working, set the magnetic declination
angle, and calibrate the sensors. Press Start > Settings >
System > Sensors.
The Magnetic Declination angle is the difference
between true north and magnetic north. Applications
that are using true north use this value to adjust the
readings from the compass.
To calibrate the compass, press Calibrate Compass.
Rotate the handheld around all three axis several times in
every orientation possible (for at least 10 seconds). Press
Stop when you are done. Calibrating the compass is
very important and needs to be done often. Changes in
environment, added attachments to the handheld, and
mounting options can affect the sensor readings. If you
are mounting the handheld to a pole, mount it rst and
then calibrate the compass.
When the accelerometer is calibrated, you are telling the
handheld that this is level, remember this. It is important
that the handheld is laying on its back on a level
surface. If the stylus holder on the hand strap makes the
handheld uneven, you can try placing it on two equal-
42 Archer 2 Rugged Handheld Owner’s Manual
Page 47

sized blocks, one placed on each end. The blocks must
be high enough for the stylus holder to drop in between
them. When the handheld is level, press Calibrate
Accelerometer, and then Start. Samples are averaged
over the next ve seconds and the result is saved. The
accelerometer only needs to be calibrated once. (If you
restore the handheld to its original factor y defaults, you
need to calibrate the accelerometer again.)
Communicating with a Computer
The Archer 2 can connect to a desktop or laptop computer,
allowing you to synchronize information and download
software and les.
Installing the Software
Install free synchronization software from Microsoft® on your
desktop computer.
1. Go to the Microsoft® website on your computer at ht tp://
www.microsoft.com/en-us/download/.
2. If your computer is running Windows® 2000 or Windows®
XP, search for and select ActiveSync® software to
download. If it is running Windows Vista™, Windows® 7,
or Windows® 8, search for and select Windows Mobile®
Device Center software.
3. Follow the download instructions on the website.
Establishing a Partnership
1. Plug the USB Client end (micro B) of the USB
communications cable into the Archer 2.
2. Plug the USB Host end (full size A) of the USB
communications cable into your computer.
3. Establish an ActiveSync® or Windows Mobile® Device
Center partnership by following the instructions on the
computer screen.
4. Once a partnership is established, the synchronization
software automatically opens. Follow the steps on the
screen.
Ch 3 Programs and Settings 43
Page 48

Getting Started Application
Getting Started Screen
The Getting Started screen provides information on current
settings, help for setting up features and applications, and
shortcuts to set up screens. To see a list of topics press Start >
Getting Started.
Information for Software Developers
For Archer 2 SDK information, go to our website: http://www.
junipersys.com/Developers/Archer 2.
44 Archer 2 Rugged Handheld Owner’s Manual
Page 49

4
Bluetooth Wireless Communication
Page 50

Bluetooth® Wireless Communication
The Archer 2 has built-in Bluetooth® wireless technology,
allowing you to connect it to other wireless devices with
Bluetooth technology. Minimum performance between
similar objects in an unobstructed environment is
approximately 100 feet (30 meters).
The handheld provides simple conguration options for the
following types of Bluetooth devices:
Devices such as headphones, keyboards, and modems
(to connect to the Internet with an external cell phone).
Serial devices that use a Bluetooth COM port, such as
GPS/GNSS receivers, bar code scanners, and other data
collection devices.
Creating a Partnership
To create a partnership between the Archer 2 and another
device with Bluetooth technology:
1. Turn both devices on.
2. Place them within at least 100 feet (30 meters) of one
another.
3. Make Bluetooth discoverable on both devices. Bluetooth
on the Archer 2 is on and discoverable by default. The
gadget on the Home screen turns green.
46 Archer 2 Rugged Handheld Owner’s Manual
Page 51

If the Bluetooth gadget is not on your Home screen, you
can get to the desired control panel by selecting Getting
Started and either Set up a Bluetooth device or Set up a
Bluetooth COM Port. You can also press Start > Settings >
Connections.
Note: If the Bluetooth radio is turned on and then the
handheld is suspended, wireless Bluetooth turns off to save
battery power. When the Archer 2 resumes (turns on), the
radio turns on automatically.
Bluetooth Control Panel
To create a partnership with and connect to other Bluetooth
devices, such as headphones, keyboards, and modems,
follow these steps:
1. Tap-hold the Bluetooth icon to bring up the dialog box
shown below.
2. Select Headphones, Modem, Keyboard.
Ch 4 Bluetooth Wireless Communication 47
Page 52

The following Bluetooth control panel, Devices screen is
shown:
3. Tap Add New Device. The Archer 2 searches for other
devices with wireless Bluetooth technology and displays
them in a list. Select the device you want to connect to,
and tap Next.
4. A passcode screen is shown.
48 Archer 2 Rugged Handheld Owner’s Manual
Page 53

a. If the device has an assigned passcode, enter the
number and press Next.
b. If a passcode is required but has not been assigned,
enter an alphanumeric passcode between 1 and 16
characters in length. Press Next.
c. If a passcode is not required, leave the box blank
and press Next.
Note: If you are unsure whether or not the device
requires a passcode and if one has already been
assigned to the device, see the user documentation
that came with the device.
5. You can adjust the Bluetooth settings as needed.
Serial Device (COM) Control Panel
To set up a Bluetooth COM port, follow these steps:
1. Select COM Por t, GPS, RFID from the Bluetooth dialog
box. The following Bluetooth COM conguration screen
is shown. Select Discover Devices.
2. After the handheld searches, a list of discovered devices
is shown. Select the device you want to connect to from
the list and tap Connect. A COM port is automatically
assigned for the device. You can change it to another
COM port if desired.
Ch 4 Bluetooth Wireless Communication 49
Page 54

3. The Archer 2 automatically tries to discover the PIN. You
might be required to enter a PIN.
You should now be connected to the COM device.
50 Archer 2 Rugged Handheld Owner’s Manual
Page 55

5
Wi-Fi Wireless Networking
Page 56

Wi-Fi Wireless Networking
The Archer 2 has built-in Wi-Fi wireless networking to
connect to the Internet or a ofce network.
Connecting to a Wi-Fi Network
To use Wi-Fi, you need to be in range of a Wi-Fi access
point to make a connection. To actively look for a network
connection complete the following steps:
1. From the Home screen, turn Wi-Fi on by tapping the
Wi-Fi gadget . The Archer 2 automatically starts
scanning the area for available Wi-Fi networks. (If the
Wi-Fi gadget is not on the Home screen, open the Start
screen, and select Getting Started. Select Set up Wi-Fi or
press Start > Settings > Connections > Wireless Manager.)
2. Tap-hold the Wi-Fi icon on the Home screen to go to
the Wi-Fi control panel. When the handheld completes
52 Archer 2 Rugged Handheld Owner’s Manual
Page 57

the scan, a list of available networks and their strengths
appears on the Wi-Fi Wireless screen.
3. Tap on the network to which you want to connect. If you
want to add a new network, select Add New from the
top of the list.
4. Conguration and authentication setup screens are
shown. Depending on the network you are connecting
to, you may need to make some selections from
pull down lists and enter information like a passkey.
Some information may not be required or will appear
automatically. When you are nished with the set up
screens, press Finish.
5. Select Network Adapters from the horizontal scrolling
menu near the top of the screen. For connection
options, select The Internet or Work (for ofce networks).
Other settings can be modied if necessary.
6. If you selected The Internet, you can open Internet
Explorer and begin using the Internet.
Once a Wi-Fi network is set up, the icon on the Home Page
turns blue and the name of the network is shown.
The Archer 2 remembers the Wi-Fi network connections
created.
Ch 5 Wi-Fi Wireless Networking 53
Page 58

Wi-Fi Dialog Box
Whenever Wi-Fi is turned on, a dialog box might appear at
the bottom of the screen indicating the Wi-Fi networks the
Archer 2 has located. You can select a new network from
this dialog box without opening the Wi-Fi control panel.
Tap on the screen outside of the dialog box to remove
it temporarily. You can also disable it to keep it from
appearing in the future. When this dialog box is shown,
select the Menu soft key and select Don’t show this
message... from the list.
Adjusting Wi-Fi Settings
To add a new Wi-Fi network or edit settings, open the Wi-Fi
control panel, select the Menu soft key and make desired
selections from the pull-down list.
54 Archer 2 Rugged Handheld Owner’s Manual
Page 59

6
GPS/GNSS
Page 60

GPS/GNSS
Archer 2 Geo models have GPS/GNSS with 2 to 5 meter
accuracy.
Using GPS/GNSS
To use GPS/GNSS, tap on the GPS/GNSS status gadget to
turn it on. The GPS/GNSS starts looking for satellites to use for
a x. The green LED on the keypad blinks periodically, and a
satellite icon is placed on the title top bar.
Once enough satellites are found, information similar to the
following is shown:
5 SV The number of satellites used for the current
position.
56 Archer 2 Rugged Handheld Owner’s Manual
Page 61

3Diff The type of x you have. Three satellites are
required for a 2D x while four are required for a
3D x. 3Diff means an SBAS (WAAS/EGNOS/MSAS)
signal is being used for the GPS/GNSS solution.
PDOP A measure of accuracy. The lower the number,
the more accurate the x is.
Note: When you suspend the Archer 2, the receiver is in a
low power mode to retain its almanac. When you resume, it
takes a few seconds to get a x.
GPS/GNSS Settings
To view or make changes to the GPS/GNSS settings or set
up an external GPS/GNSS receiver, press and hold the GPS/
GNSS status gadget on the Home screen to go to the control
panel.
Select the programs port, hardware port and baud rate
(internal GPS/GNSS uses COM8 at 115200 baud), program
access, data format, NMEA sentences, satellite systems and
module settings (update rate, baud rage, lter).
Several applications can share the COM port setup as the
GPS/GNSS program port using the GPS Intermediate Driver
(GPSID).
Ch 6 GPS/GNSS 57
Page 62

GPS Intermediate Driver
The GPS Intermediate Driver (GPSID) is used to allow more
than one program to use data from the GPS/GNSS receiver.
The GPS/GNSS Settings control panel controls how the GPSID
is used. Internal GPS/GNSS is on COM8 and communicates
at 115200 baud. These settings are found on the Hardware
screen of the GPS/GNSS Settings control panel. If another
GPS/GNSS receiver is to be used, this is where you connect
that GPS/GNSS receiver so that the GPSID can access it.
The GPSID can output data on another COM port in a way
that allows multiple programs to access the same COM
port. This is called the Program Port and defaults to COM2.
This can be set up on the Programs screen of the GPS/GNSS
Settings control panel.
The camera, GPS/GNSS function and JSNav application use
the GPSID to obtain GPS/GNSS information. Turning off the
GPSID through the GPS/GNSS hardware port disables these
functions.
Note: If an application accesses the GPS/GNSS module
directly on COM8, the GPSID will not have access to the
GPS/GNSS, preventing camera geotagging and GPS/GNSS
from functioning.
GPS/GNSS Accuracy
The GPS/GNSS antenna is in the top of the Archer 2. Do not
put your hand or another object over the cap. This reduces
accuracy. The more items between you and the satellites,
the lower the accuracy.
58 Archer 2 Rugged Handheld Owner’s Manual
Page 63

JSNav Application
JSNav is a GPS/GNSS application that lets you easily collect
waypoint or track data.
Note: Calibrate the compass and accelerometer before
you use JSNav. Refer to Chapter 3, Programs and Settings,
Compass and Accelerometer Calibration.
From the Home screen tap on the JSNav gadget . A splash
screen appears while the application opens, and then the
main JSNav screen appears. Tap on the satellite icon in
the upper right corner to turn GPS/GNSS on or off. (A gray
icon means GPS/GNSS is not connected, red means there is
no x, yellow means a 2D x, and green means a 3D x.)
Once there is a x (this may take a few minutes) information
about the current position is given as well as PDOP (position
dilution of precision), EHE (estimated horizontal error), and the
number of satellites used for a x. The bottom portion of the
screen is used to collect waypoint or track data.
Ch 6 GPS/GNSS 59
Page 64

JSNav Settings
Tap on the menu icon in the upper left corner of the
screen, and select Settings from the list. Go through the
menu options to set up JSNav.
Note: These settings only impact the JSNav application.
To set up GPS/GNSS go to the GNSS Settings control panel
discussed earlier in this chapter.
Units: Select English or metric units of measurement and
the display format for latitude and longitude.
GPS Settings: Select the maximum PDOP for collecting
points, minimum navigation speed you need to be
traveling for navigation to update properly, and the
navigation distance threshold. This is the distance you
can be from the point to which you are navigating to
show that you have arrived.
Default File Type: Select .kml (keyhole markup language
used in Google Earth) or .csv (comma separated value).
Note that tracks with more than 1000 points default to
.csv due to memory limitations.
Waypoint Settings: Set up the waypoint le naming
scheme, including the waypoint prex, increment step
size, and current value. For example, if the waypoint
prex is Point, increment step size is 10, current value is
60 Archer 2 Rugged Handheld Owner’s Manual
Page 65

100, and default le type is .kml, le names would be
Point110.kml, Point120.kml, Point130.kml, etc.) Also select
the number of points to average. The default is 1.
Track Settings: Set up the track le naming scheme (see
Waypoint Settings). You can select a minimum time and
minimum distance needed before a point is collected. If
both are enabled, both conditions must be met before a
point is added to a track. You can disable suspend when
track points are being collected.
Audio Notications: You can turn on notications for
waypoint arrival, waypoint collected, and track point
collected.
Some settings can be customized for a particular waypoint
or track using edit on the data collection screens.
View Signal Strength and NMEA Strings
View the strength of satellites being used in a x (shown in
green) by swiping the area where position is shown on the
Home screen to the right. View the NMEA strings that are
coming in through the GNSS receiver by swiping the same
area to the left. Strings can be saved to a le.
Collect Waypoint Data
From the main JSNav screen tap the waypoint icon to
open the Collect Waypoint screen.
Ch 6 GPS/GNSS 61
Page 66

To collect a waypoint, tap the waypoint icon at
the bottom of the screen. Position information for the
waypoint is recorded.
Tap the edit icon to add or edit the name, description,
notes, and le type for this waypoint.
To navigate back to the waypoint you just collected, tap
the compass icon. A rotating compass is shown. Walk
in the direction of the red arrow. The distance shown
decreases as you get closer. Text saying Arrived is shown
and you hear a beep (if audio notications are set up)
when you reach the navigation distance threshold set up
in GPS Settings.
Tap the disc icon to save the waypoint to \My
Documents\My Waypoints.
Collect Track Data
From the main JSNav screen tap the track icon to open
the Collect Track screen.
62 Archer 2 Rugged Handheld Owner’s Manual
Page 67

To collect points in a track, tap the play button and
start moving along the desired track. Tap the pause
button as needed, and tap play to start again. Current
position information, total distance, altitude change, and
points in the track are collected.
When you are nished, tap the stop button. A
dialogue box is shown with the track name. You can use
that name or edit it. Press the check mark when you are
nished. The track is saved in \My Documents\My Tracks.
Tap the edit icon to add or edit the name, description,
notes, and le type for this track
Managing Waypoints and Tracks
To view the waypoints and tracks you have saved, tap the
menu icon, then select Waypoints or Tracks from the
menu. A list of waypoints or tracks is shown.
To open a le, tap on the name. You can view collected
data, select the le for exporting or deletion by tapping the
box to the left of the name, navigate back to the waypoint
or track points , delete the le , or edit the le. To
select all of the les, tap the check box at the bottom of
the screen. You can delete or export all selected les.
Exported les are placed into a directory called Exports
inside of your \My Documents folder.
Ch 6 GPS/GNSS 63
Page 68

Importing Waypoints and Tracks
Waypoint and track le formats must be .kml, .kmz or .csv.
CSV les must contain a column for both latitude and
longitude.
To import a waypoint or track le, place the le into the \
My Documents\My Waypoints or \My Tracks director y. You
can create subdirectories to organize your data if you want.
Once you place a waypoint or track le into the proper
directory or subdirectory it appears in the list of waypoint or
track les.
An imported track le can only contain one track if you
are going to navigate to a specic track. If a le contains
multiple tracks, a button inside of JSNav is available to
extract the tracks into separate les.
Navigating to a Waypoint or Track
You can navigate back to any saved waypoint or track.
Select the le you want to navigate to as described in the
previous section, Managing Waypoints and Tracks. Tap the
compass icon.
A rotating compass is shown. Travel in the direction of the
red arrow. The distance shown decreases as you get closer.
When you reach the navigation distance threshold set up
in the settings, text saying Arrived is shown and you hear a
beep if audio notication has been set up.
64 Archer 2 Rugged Handheld Owner’s Manual
Page 69

7
Camera
Page 70

Camera
Archer 2 Geo models have a 5MP camera and a video
option. Juniper Geotagging™ gives you the ability to
embed and emboss photos with the date, time, and GPS/
GNSS position.
The camera window and ash are located on the back of
the Archer 2.
Note: The ash can also be used as a ashlight. See Chapter
2, Hardware Components, Flashlight.
Camera Settings for Still Images
Press the camera button to turn the camera on and open
the Pictures and Videos application.
Pictures Menu
Select the Menu soft key for a pull-down list of setting options.
View or change the settings before you take photos. These
settings will apply to all photos taken, but can be edited as
needed.
66 Archer 2 Rugged Handheld Owner’s Manual
Page 71

Flash
To use the ash, select Flash from the Menu, then select
On. The ash automatically turns on each time you take a
photo. To turn it off, select Flash from the menu and select
Off.
Pictures & Videos Control Panel
To view or change additional settings, select Options from
the Menu soft key. The Camera control panel is shown. Use
the horizontal scrolling menu near the top of the screen to
see what the setting are and make changes as needed.
Geotagging
When pictures are geotagged, the date, time, latitude,
longitude, le name, and notes can be included with the
pictures with the emboss and embed options.
Note: Calibrate the compass and accelerometer before
you use Geotagging. Refer to Chapter 3, Programs and
Settings, Compass and Accelerometer Calibration.
Follow these steps:
1. Turn on GPS/GNSS by tapping the GPS/GNSS gadget
on the Home screen and waiting for a x.
Ch 7 Camera 67
Page 72

2. Select the Menu soft key, then select Geotag from the
menu. The following Emboss Options screen is shown:
Select the information you want to emboss on pictures,
the position, and the color.
The selected information is embossed on pictures,
making it part of the images.
68 Archer 2 Rugged Handheld Owner’s Manual
Page 73

3. You can build GPS/GNSS information into jpg les from
the Embed Options screen. (This information does not
appear on the images.) You can select Use True North.
Embed GPS allows you to put images into programs like
Google Earth™ and sort them by location, etc. If you
select User Note, the note screen is shown after a photo
is taken. Enter a note for the image and press OK.
Ch 7 Camera 69
Page 74

Take Photos and Select Photo Options
Press the camera button to turn the camera on. Frame
the photo as desired (a portrait orientation works best) and
press the camera button or the return button . A square
yellow line is shown indicating that the camera is in focus. A
screen like the following is shown for a few seconds. Hold
the handheld steady until you hear a click, indicating that
the photo has been taken.
While the photo is being saved, a disk symbol is shown
briey. The full photo is then shown on the screen.
70 Archer 2 Rugged Handheld Owner’s Manual
Page 75

Photo Options
Select the Menu soft key to see a list of options for a
particular photo. (The photo must appear on the screen.)
To take another photo, press the Camera soft key. To see a
library of photos and pictures, press Thumbnails.
Ch 7 Camera 71
Page 76

Videos
Press the camera button to turn on the camera. Select
the Menu soft key, and select Video.
Press Menu again to view and adjust settings as desired.
Note: A portrait orientation is the default for videos.
72 Archer 2 Rugged Handheld Owner’s Manual
Page 77

Press the camera button to start recording a video. Press
it again to end the video.
Note: To take photos instead of videos, press Menu and
select Still (see previous screen).
Audio
You can record sound with videos. From the Pictures &
Videos application screen, tap Menu > Video > Menu >
Options. From the Video screen, tap Include audio when
recording video les to turn audio on.
Photo and Video Library
To view your photo and video library select the Thumbnails
soft key from the Pictures and Videos application screen.
Ch 7 Camera 73
Page 78

Library Menu Options
Select a photo or video, then the Menu soft key. You can
send, delete, edit, etc. the selected photo or video.
74 Archer 2 Rugged Handheld Owner’s Manual
Page 79

8
3G Data Modem
Page 80

3G Data Modem
The 3G data modem is an option for Archer 2 Geo models,
adding Wide Area Network data modem capability. The
modem is installed at the factory.
The modem is a cellular data modem, type GSM/UMTS. It
is ve band modem compatible. The modem operates in
different modes, depending on the wireless provider and
the signal strength. Data speeds will vary anywhere from
10 or 20 Kbps when using GPRS to over 1 Mbps when using
HSD PA.
Set up a Data Account with a Wireless Provider
Contact a wireless provider to set up data service for the
cellular data modem and obtain an account and SIM card
(purchased separately). You need to provide the following
information when setting up an account:
1. Billing Information and business ID, such as your Federal
Tax I.D. or VAT number.
2. The wireless services required. Specify that you need
data service only. You do not need voice or messaging
services.
3. You may be asked for the modem’s IMEI number, which
can be found here: Start > Settings > System > System
Information > 3G Modem with the modem powered on.
4. You may be asked to provide the modem’s model
number. This number allows the carrier to verify this
modem as one of its approved models. If asked for this
by the carrier, it is a Juniper Systems Archer 2.
Install the SIM Card
To insert or remove a card follow these steps:
1. Power off the handheld.
2. The SIM card slot is located in the battery compartment.
Loosen the screws to the door and remove it.
CAUTION: Do not use a micro SIM adapter. The adapter
!
can get stuck and damage the slot.
76 Archer 2 Rugged Handheld Owner’s Manual
Page 81

3. Remove the battery pack.
CAUTION: The Archer 2 is not sealed against water and
!
dust when the battery door is not installed.
4. An image on the battery compartment label shows the
correct location and orientation for the mini SIM card.
Pull out the SIM card tray. Place the card onto the tray
and push the tray in until it catches.
To remove the SIM card, pull the tray open and remove
the card. Push the empty tray in until it catches.
5. Replace the battery pack, and attach the battery door.
6. Power on the Archer 2.
Note: If the modem was on before shutting the Archer
2 down to insert the SIM card, you are prompted to
congure the data connection when you reboot. See
the instructions on the following pages.
Ch 8 3G Data Modem 77
Page 82

Set up the Cell Modem
Tap on the 3G modem gadget . After about 30 seconds it
turns green, indicating that the modem is available.
Once the modem is available, congure it to make a
connection. Tap and hold the modem gadget to open the
Connections control panel.
78 Archer 2 Rugged Handheld Owner’s Manual
Page 83

Select Automatically congure connection. The name
of your carrier appears. Tap Next. A progress graphic is
shown on the next screen while your Internet settings are
congured.
You can now access the Internet. Open Internet Explorer to
test your setup.
Connection Problems
If the connection fails to automatically congure, there
might not be a signal where you are located. You can try
repeating the set up process.
Wireless Safety
RF Interference Issues
It is important to follow any special regulations regarding
the use of radio equipment due in particular to the
possibility of radio frequency (RF), interference. Follow the
safety advice given below carefully.
Switch OFF your cell modem when in an aircraft. The use
of cellular telephones in an aircraft may endanger the
operation of the aircraft, disrupt the cellular network and
is illegal.
Switch OFF your cell modem in hospitals and any other
place where medical equipment may be in use.
Respect restrictions on the use of radio equipment in fuel
depots, chemical plants or where blasting operations are
in progress.
Operating your cell modem close to inadequately
protected personal medical devices, such as hearing
aids and pacemakers, could be hazardous. Consult the
manufacturers of the medical device to determine if it is
adequately protected.
Operation of your cell modem close to other electronic
equipment may also cause interference if the equipment
is inadequately protected. Observe any warning signs
and manufacturers’ recommendations.
Ch 8 3G Data Modem 79
Page 84

Do not place the cell modem alongside computer discs,
credit or travel cards, or other magnetic media. The
modem may affect the information contained on discs or
cards.
Maintenance of Your Modem
Do not attempt to disassemble the cell modem. No user
serviceable parts exist inside the cell modem.
80 Archer 2 Rugged Handheld Owner’s Manual
Page 85

9
Barcode Scanner
Page 86

Barcode Scanner
The Archer 2 Rugged Handheld with a barcode scanner
allows you to read 1D and 2D barcodes and easily import
barcode data into custom or standard programs running on
the Archer 2.
Quick Start – Easily Scan a Barcode Now
When you receive your Archer 2 with the barcode scanner,
you can scan a barcode right away using the default
settings. Follow these steps:
1. Find a barcode to scan (or use this one):
2. If the battery pack has not been charged, plug the AC
wall power charger into a wall socket. Plug the other
end into the DC power jack on the Archer 2.
3. The handheld powers on and a progress indicator is
shown on the screen.
™
4. The Barcode Connector
Minimize the main screen by pressing the X soft key in
the bottom right corner of the screen. The Home screen
is shown.
Note: If the Barcode Connector utility does not
automatically open when the handheld is powered on,
select the Barcode Connector icon from the favorites
bar on the Home screen. If this icon is not shown on the
Home screen, tap the Windows start screen soft key to
locate and select the utility.
5. Open a document to receive the barcode data. (The
Notes application is provided on the Archer 2.)
utility automatically opens.
82 Archer 2 Rugged Handheld Owner’s Manual
Page 87

6. Put the cursor where you want the barcode data to be
placed.
7. Using the red crosshairs, aim the scanner at the barcode
you are scanning. Press the target button to begin
scanning.
8. When the scanner decodes the barcode, the data
is placed in your document. (With Excel, tap on the
column you want the data to appear in.)
Barcode Connector Utility
The Barcode Connector™ utility is a barcode wedge
program provided with the barcode scanner. Depending
on the conguration of your Archer 2 it either loads
automatically when the handheld is turned on or you can
open it from the Home screen.
Note: If the program does not appear in the Home screen
favorites bar as shown below (lower right-hand corner), tap
the Windows Start screen key and nd it in the Start menu.
Ch 9 Barcode Scanner 83
Page 88

When the Barcode Connector utility loads, the main screen
appears:
You can select three options, depending on how you want
the Barcode Connector utility and barcode to behave
during startup and suspend. Tap on the check boxes to turn
options on or off.
Two main functions are accessed from here:
1. Barcode Setup – Use the setup screens to congure
the settings of the barcode hardware and Barcode
Connector utility.
2. Power Down Barcode and Exit – This function shuts
down the barcode scanner. You may want to do this
to prevent accidental triggering of a scan sequence.
Otherwise, we recommend that you leave it powered
on. The barcode is congured to enter a sleep state
when it is inactive and consumes about 8mW of power
when it is in this state.
To minimize the Barcode Connector utility press the X soft
key in the bottom right corner of the display.
84 Archer 2 Rugged Handheld Owner’s Manual
Page 89

Barcode Setup
When you select Barcode Setup, The Barcode Connector
control panel is displayed. Near the top of the screen is a
horizontal scrolling menu. Select screens from the menu to
view or edit the congurations for the Barcode Connector
utility and the barcode hardware. A description of these
screens follows.
User Screen
The User screen has the following functions:
Button Control Panel – The target button is the scan
button by default. You can change this to another
programmable button from the Button control panel.
Select the hyperlink to view that screen.
Trigger Mode While Holding Scan Button – Select Scan to
start scanning the moment the button is pressed. Select
Aim to turn on the aimer when the button is pressed and
to start scanning when the button is released.
Beep On and Visual On – Select options for audio and
visual indicators based on good or bad scan reads.
Ch 9 Barcode Scanner 85
Page 90

Test Screen
The Test screen has the following functions:
Scan – Tap Scan to test the settings and to view
information about a scanned barcode. The trigger
button on the keypad can also be used.
Code Type and Scan Data – After a successful scan, the
barcode code type and the scan data are displayed.
General Screen
86 Archer 2 Rugged Handheld Owner’s Manual
Page 91

The General screen has the following functions:
Scan Time – Adjust the scan time, which is the duration of
time before the scanner times out.
Enable or disable Aiming Crosshairs.
Enable or disable Decoding Illumination (red light).
Illumination Brightness – For better barcode performance,
we recommended that you leave illumination brightness
at the maximum value of 10.
Pick List Mode – Enable this mode if barcodes are close
together. The scanner only decodes barcodes aligned
directly under the center of the aiming crosshairs. Disable
this mode if only one barcode is viewable. The aiming
crosshairs do not have to line up directly on the barcode
in order for the scanner to read it. Just aim the scanner
in the general area where the barcode is located. This
can be helpful in situations where it might be difcult to
precisely aim the scanner, such as in locations with bright
sunlight.
Consecutive Read Level – Select how many successful
consecutive reads the barcode must get before being
decoded.
Data Format Screen
Ch 9 Barcode Scanner 87
Page 92

The Data Format screen has the following function:
Select optional prex and sufxes from the Format
pull-down list to add to the scan data. If you use a
program like Excel, we recommend that you Select
<Data><Sufx1> with Sufx1 set to a carriage return
(<CR>). This puts each scan on a new line.
1D Code Types Screen
The 1D Code Types screen has the following functions:
Inverse 1D – Enable/disable inverse 1D bar codes or select
Auto Detect.
Enable/disable the 1D code types listed.
Tap Options to congure 1D code type specic settings.
A horizontal scrolling menu is shown near the top of the
screen with options for Code 39, Code 128/Code 93/
Discrete, UPC/EAN 1, UPC/EAN 2, Interleaved GS1
DataBar, MSI Plessey, Codabar/Code 11, and Matrix 2 of
5. Depending on which 1D barcodes you are going to
read, you should review the options and congure them
for your needs.
88 Archer 2 Rugged Handheld Owner’s Manual
Page 93

For example, below is the screen for Code 39:
Set Length: This option allows you to specify the length of
the barcodes you want to read. This could be useful if you
know that all valid barcodes will be a specic length or a
range of lengths.
You can specify four barcode lengths (let A refer to the
rst length eld and B refer to the second length eld):
1. One Discrete Length – Set A to the discrete length
and B to 0. Only barcodes with an exact length of A
are decoded.
2. Two Discrete Lengths – Set A greater than B (both
non-zero). Only barcodes with lengths A or B are
decoded.
3. Length Within Range – Set A less than B (both
non-zero). Barcodes between and including A and B
are decoded.
4. Any length – Set A to 0. Any barcode length is
decoded.
Ch 9 Barcode Scanner 89
Page 94

Composite/Postal Code Types Screen
The Composite/Postal Code Types screen has the following
functions:
Composite Codes - Enable or disable composite code
types.
Postal Codes - Enable or disable postal code types.
2D Code Types Screen
90 Archer 2 Rugged Handheld Owner’s Manual
Page 95

The 2D Code Types screen has the following function:
2D Code Types - Enable or disable 2D code types.
Proles Screen
The Proles screen has the following functions:
Select a Prole to Save or Load - A prole is a saved set of
settings. To load a prole, select the prole from the
drop-down list and select Load.
Note: When a setting is changed a hidden prole (called
“last user”) is updated. When this utility is launched, it
loads the settings from the last user prole.
Ch 9 Barcode Scanner 91
Page 96

Up to four proles with different settings can be saved.
To save a new prole, congure the settings previously
discussed, come to this screen, select the prole name
you want to use, and select Save.
Note: Any changes to settings after a prole is loaded will
not automatically get saved out to the prole, but will get
saved out to “last user.”
Barcode Troubleshooting
3 – When I read a barcode, the data returned is not correct.
Reason/Solution: Ensure that the congurations are set up
correctly so you are given the information you need. For
example, to read a Code 32 barcode, on the 1D Code Type
tab, ensure that Code 39 is selected. Select Options, and on
the Code 39 tab ensure that Convert Code 39 to Code 32 is
selected.
4 – I don’t know what type of barcode I am trying to scan.
Reason/Solution: Enable all the barcode types on the 1D
Code Types, Composite/Postal Code Types, and 2D Code
Types tabs (some types are mutually exclusive). Go to the
Test screen. Scan the barcode and the Code Type window
92 Archer 2 Rugged Handheld Owner’s Manual
Page 97

shows the type of barcode scanned. When you are nished,
go back and deselect barcode types you are not using.
5 – My TLC-39 Composite barcode will not scan.
Reason/Solution: On the 1D Code Types screen ensure that
Code 39 is checked. Also select Options, then the Code
39 screen and ensure that Convert Code 39 to Code 32 is
unchecked.
6 – My UPC barcode will not scan.
Reason/Solution: On the 1D Code Types screen ensure that
barcode types UPC-A, UPC-E and UPC-E1 are checked.
If composites codes are also enabled on the Composite/
Postal Code Types screen and you still want to allow a UPC
1D to scan, select Autodiscriminate from the drop down
list. Also go to the 1D Code Types screen, select Options,
then the tabs for UPC/EAN-1 and UPC/EAN-2. Make sure the
settings are correct for your application.
7 – My Code 39 Full ASCII barcode will not scan.
Reason/Solution: On the 1D Code Type screen, select
Options, then the Code 39 screen. Ensure that the lengths
are set to the fullest range.
8 – My Bookland EAN barcode will not scan.
Reason/Solution: Ensure that both Bookland EAN and EAN13 are enabled on the 1D Code Types screen.
9 – My ISBN, ISMN, ISSN, or JAN barcodes will not scan.
Reason/Solution: These barcode types are all subsets of
EAN-13. Ensure that EAN-13 is enabled on the 1D Code Types
screen.
10 – I can’t gure out how to congure Intelligent Mail or
OneMail barcodes.
Reason/Solution: Intelligent Mail and OneMail barcodes are
the same thing. They are also called USPS 4CB (located on
the Composite/Postal Code Types screen).
11 – CLSI editing has no effect.
Reason/Solution: CLSI editing is only supported for 14
character Codabar barcodes.
Ch 9 Barcode Scanner 93
Page 98

Sample 1D Barcodes
Code 39
Co de 128
UPC-A
94 Archer 2 Rugged Handheld Owner’s Manual
Page 99

Sample 2D Barcodes
Aztec
Maxicode
MicroPD F417
QR Code
Ch 9 Barcode Scanner 95
Page 100

96 Archer 2 Rugged Handheld Owner’s Manual
 Loading...