

Page 1

Reference Guide
Page 2

ULTRA-RUGGED
FIELD PC
Reference Guide
Page 3

ActiveSync, Excel, Hotmail, Internet Explorer, Microsoft, MSN, Outlook,
PowerPoint, Visual Studio, Windows, Windows Media, Windows Mobile,
Windows Mobile Device Center, Windows Vista, and the Windows logo
are trademarks or registered trademarks of Microsoft Corporation in the
United States and/or other countries.
The
Bluetooth® word mark is owned by the Bluetooth SIG, Inc. and any
use of such marks by Juniper Systems, Inc. is under license.
Acrobat and Reader are registered trademarks of Adobe Systems
Incorporated in the United States and/or other countries.
The names of actual companies and products mentioned herein may
be the trademarks of their respective owners.
© Copyright 03-2013 Juniper Systems, Inc. All rights reserved.
P/N 14928-06.
WARNING! Text set o in this manner indicates that
!
failure to follow directions could result in serious injury.
CAUTION: Text set o in this manner indicates that failure
!
to follow directions could result in damage to equipment or
loss of information.
Page 4

Contents
1 Introduction 2
Overview of Windows Mobile® 6 .................................................2
Using the documentation .............................................................3
The anatomy of the Field PC .........................................................4
2 Getting Started 8
Step 1: Install the battery pack ....................................................8
Step 2: Charge the battery pack ..................................................9
Step 3: Establish basic settings on the device ........................9
Step 4: Connecting to a desktop computer .........................11
Step 5: Creating a connection to a
desktop computer ......................................................... 12
3 Using the Hardware 14
Identifying button functions ..................................................... 14
Customizing button functions .................................................. 15
Suspending, powering off, resetting, and restoring factory
defaults ........................................................................................ 17
Using the stylus .............................................................................. 19
Using the touchscreen ................................................................. 20
Understanding LED signals ........................................................22
Replacing the battery pack ........................................................ 22
Using peripheral devices such as CF cards,
SD cards, and USB flash drives ............................................24
4 Using the Field PC 30
Understanding the Today screen ............................................. 30
Using the Start menu ...................................................................31
Entering information .................................................................... 31
Recognizing status icons.............................................................33
Recognizing soft keys ..................................................................33
Rotating the screen ....................................................................... 34
Dimming or turning off the backlight .................................... 35
Adjusting the backlight timer ................................................... 36
iii
Page 5

5 Performing Common Tasks on the
Field PC 38
Suspending the device ................................................................38
Powering off the Field PC ............................................................ 39
Resetting the device .....................................................................40
Exploring files .................................................................................. 40
Closing running programs ........................................................ 41
Switching between running programs..................................42
Viewing memory allocation for programs ............................ 42
Changing settings .........................................................................43
Using on-device help ...................................................................43
Backing up data ............................................................................. 44
Copying data from a peripheral device .................................47
6 Communicating with a Desktop
50
Computer
Install ActiveSync® on a desktop computer
(Windows® 2000 and Windows® XP) .................................. 50
Creating an ActiveSync® Connection ......................................51
Install Windows Mobile® Device Center on a
Desktop Computer (Windows Vista™) .............................. 51
Creating Windows Mobile® Device Center
Connection .................................................................................52
7 Getting to Know Programs and
Settings 54
Understanding Start menu programs and utilities ...........54
Understanding applications in the Programs menu .......56
Finding settings ..............................................................................59
8 Using the Integrated Bluetooth
Option 62
Bluetooth drivers and profiles ...................................................62
Identify the power status of Bluetooth using
Wireless Manager ..................................................................... 63
®
iv
Page 6

Create a Bluetooth partnership ................................................65
Bluetooth virtual COM ports .....................................................67
Set up an outgoing Bluetooth COM port ..............................68
Set up an incoming Bluetooth COM port ............................. 71
9 Supported Bluetooth® Profiles 74
Serial Port Profile (SPP) ................................................................75
Dial-Up Networking (DUN) Profile ........................................... 78
Human Interface Device (HID) Profile ....................................81
Object Push Profile (OPP) or beaming ................................... 82
10 Caring for Your Field PC 86
Storing your Field PC and battery packs ............................... 86
Protecting the touchscreen ...................................................... 88
Protecting the Field PC against mechanical shock ...........89
Battery warnings ............................................................................89
Equipment warnings ....................................................................90
Using the Field PC in extreme temperatures ....................... 91
Cleaning the Field PC .................................................................. 91
Repairing the Field PC ................................................................. 93
Disposing of the Field PC and battery packs ....................... 93
11 Troubleshooting and Service
Tips 96
Troubleshooting tips ....................................................................96
Preparing for a service center call ............................................99
12 Information for Software
Developers 102
Programming documentation ................................................102
Software Development Kit (SDK) ...........................................102
Software development tools ...................................................102
Appendix A: Product Specifications 106
9-pin serial port pinouts ............................................................109
v
Page 7

Appendix B: Certifications and
Regulatory Information 112
Regulatory information .............................................................112
CE marking .....................................................................................114
Appendix C: Standard Warranty Terms
and Conditions 118
Limited Product Warranty ........................................................118
Index 124
Additional Section:
Installation Instructions for the
Extended Caps 147
vi
Page 8

1
Introduction
Overview of Windows Mobile® 6
Using the documentation
The anatomy of the Field PC
Page 9

Chapter 1
Introduction
This ultra-rugged Field PC—rock solid and eld ready in
the most extreme environments—is your reliable eld
companion. Designed for Microsoft
Field PC features a wide variety of application software and
accessory choices. Use it to navigate, research, document,
and communicate. Depend on it for your eld information
technology. It is ready for you.
Overview of Windows
Mobile® 6
Your Field PC runs Microsoft® Windows Mobile® 6. This
operating system, designed for mobile devices, provides
you with familiar Microsoft programs to help you increase
your productivity and manage information e ectively.
For example, Microsoft
Microsoft
®
Outlook®, allows you to send and receive email,
keep track of contacts, manage tasks, and take simple notes.
Many Windows
®
Windows Mobile
Word, Excel
®
, and PowerPoint® les on your mobile device, or
you can use Windows Mobile
and contacts from your Microsoft
®
O ce Outlook® Mobile, similar to
applications are already compatible with
®
. You can use Windows Mobile to access
®
Windows Mobile® 6, your
®
to access your email messages
®
Outlook account.
If you need help, the Field PC o ers a variety of information
through its fully featured on-device help system. More
information about Windows Mobile
®
6 can be found at:
http://www.microsoft.com/windowsmobile/6-1/default.mspx
2
Page 10

Chapter 1: Introduction
Using the documentation
Your Field PC is equipped with several reference tools. These
tools include:
• Quick Start Guide
• Getting Started Disc from Microsoft
• User Manual
• User Documentation CD (contains Quick Start Guide,
Reference Guide, and License Agreement)
• On-device help les
Use the following chart to nd the information you need.
What you want Where to nd it
Instructions for setting up the
Field PC
Instructions for using external
devices with the Field PC
®
Quick Start Guide, User
Manual, this guide
This guide
Instructions for basic tasks such
as replacing battery packs,
resetting the device, adjusting the
backlight, or inserting memory
cards
Instructions for using programs
installed on the Field PC
Note: For a more complete listing of topics in this reference
guide, see the index.
Quick Start Guide, this guide
Help les located within
individual programs on the
Field PC
3
Page 11
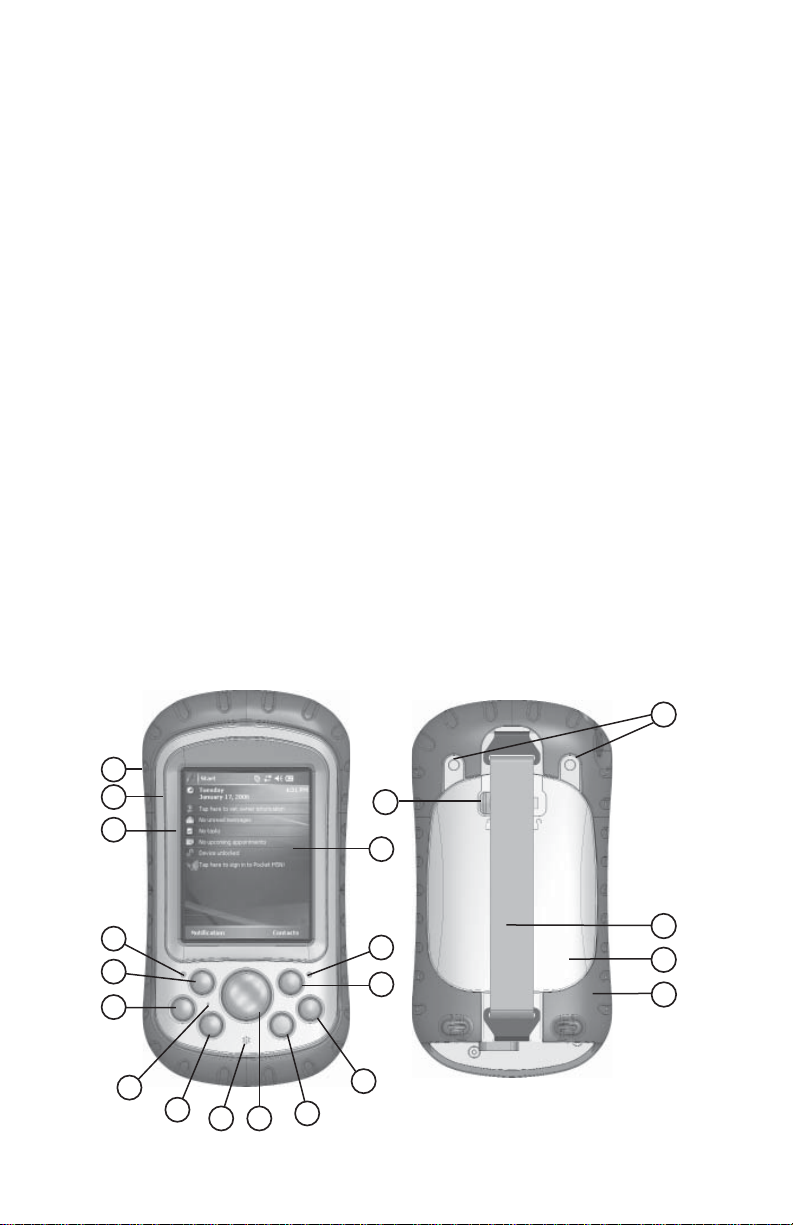
The anatomy of the
Field PC
This section illustrates the di erent parts of the Field PC.
For instructions on using the hardware, see Chapter 3.
For instructions about caring for or cleaning the di erent
parts, see Chapter 10.v
1 Elastomer overmold
2 Magnesium case front
3 Display bezel
4 Charge LED
5 Start menu button
6 Applications Manager
button
7 Microphone
8 Today screen button
9 Speaker
10 Four-way directional
button
1
2
3
4
5
6
11 Power button
12 Context menu button
13 Enter button
14 Notifi cation LED
15 Touchscreen/display
16 Accessory attachment
points (5 cm. center
to center 8-32 UNC
thread)
17 Battery door latch
18 Hand strap
19 Battery door
20 Body molding
17
15
14
13
16
18
19
20
12
7
8
9
10
2
11
4
Page 12
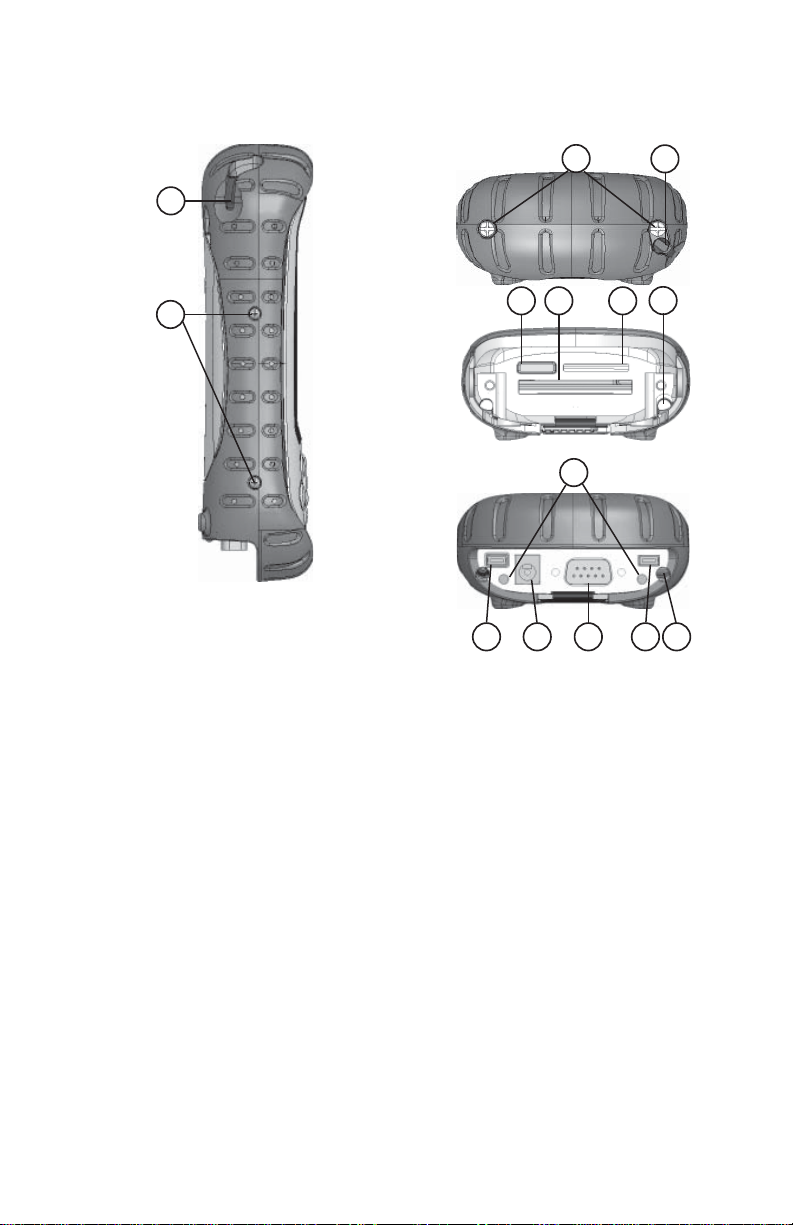
Chapter 1: Introduction
21
22
Top view with standard
cap
Top view without cap
Bottom view showing
communications
module
29 30 31 32
23
24 25 26
28
21
27
33
21 Stylus
22 Body molding screws
23 Standard cap screws (captive)
®
24 Cover for optional Bluetooth
antenna
25 Compact Flash card slot
26 Secure Digital I/O card slot
27 Stylus slot
28 Accessory attachment points (5.3 cm. center to center
4-40 UNC thread)
29 USB Client (mini B)
30 12V DC jack
31 9-pin serial port
32 USB Host (mini A)
33 Cable routing channel
5
Page 13

6
Page 14

2
Getting Started
Install the battery pack
Charge the battery pack
Establish basic settings on the
device
Connecting to a desktop
computer
Creating a connection to a
desktop computer
Page 15
Chapter 2
Getting Started
This chapter repeats—with a few more details—the
installation instructions that came in the Quick Start Guide
and User Manual.
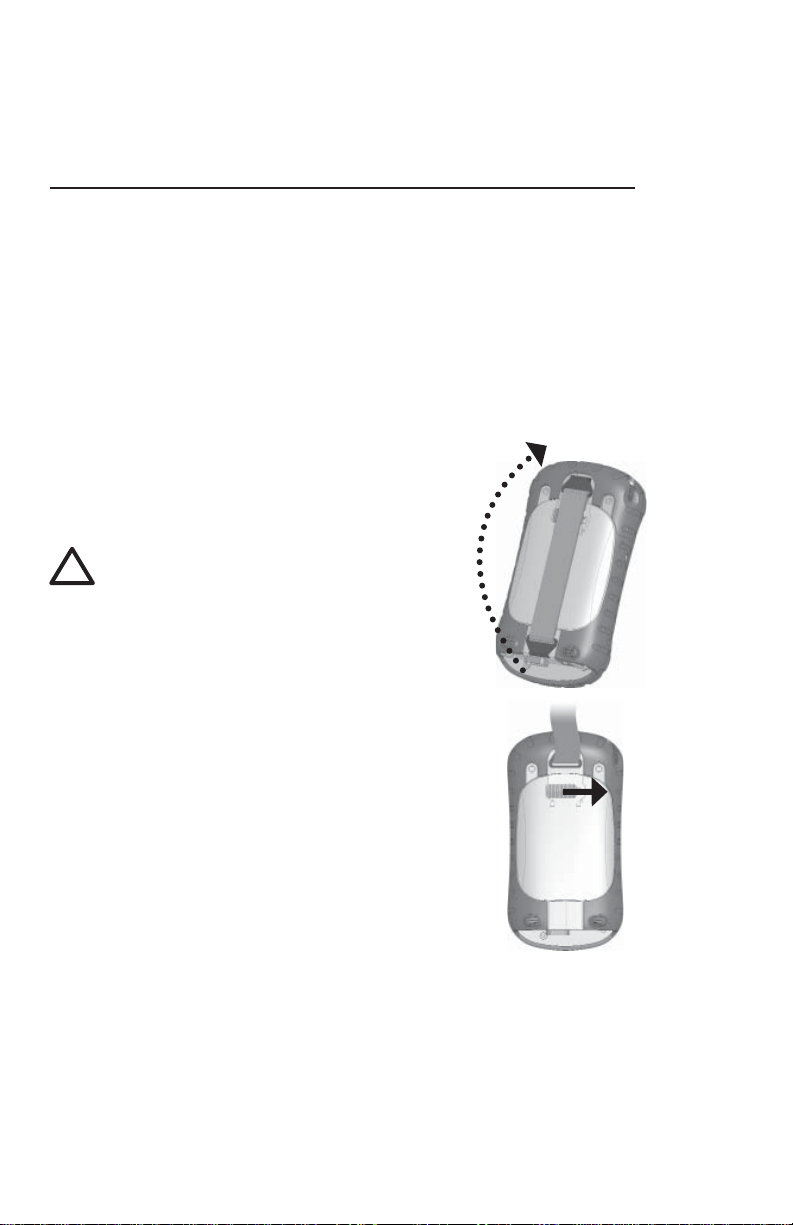
Step 1: Install the
battery pack
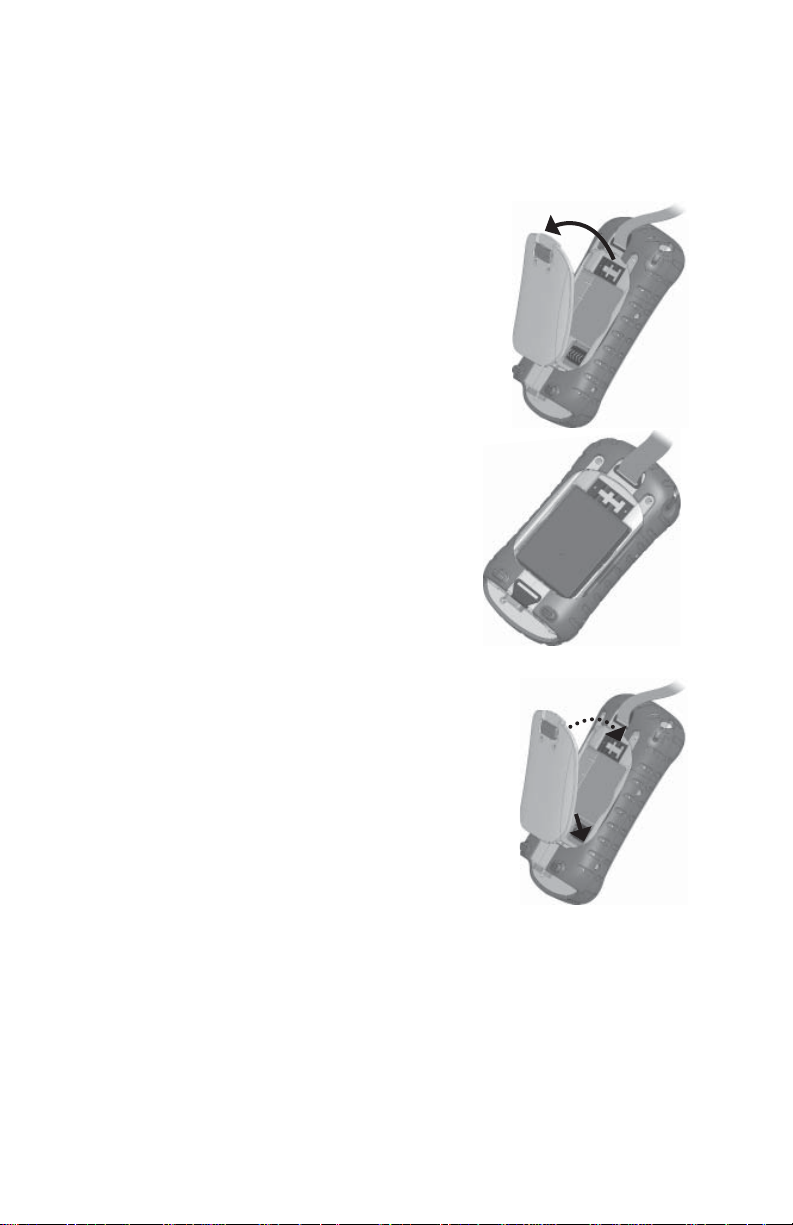
1. Carefully unhook and lift up the bottom
hook of the hand strap, as shown in the
rst picture.
WARNING! Releasing the hand strap hook
!
too quickly may result in injury or damage to
the display. Use caution when undoing the
hook or when holding the Field PC by its hand
strap.
2. Press on the battery door and slide the
door latch to the right to unlock it, as
shown in the second picture.
3. Remove the battery door.
4. Insert the battery pack so battery contacts
match up.
5. Insert the tabs on the bottom of the
battery door into the case slots. Close the
battery door.
6. Press on the battery door. Slide the latch
to the left to lock it.
7. Reattach the hand strap.
8
Page 16

Chapter 2: Getting Started
Step 2: Charge the
battery pack
1. Mount the plug onto the wall charger (if it is not already
assembled).
2. Plug the wall charger into an outlet.
3. Plug the other end of the wall charger
into the DC jack on the Field PC. The
device turns on after a few seconds,
and a ashing red light signals the
device is charging.
4. Charging the Field PC for 4.5 hours
charges it up to 95%. Let the device
charge for 6 hours to get a full charge.
PC suspends and the ashing red LED turns o , the device
keeps charging.
Charging temperatures
Only charge your battery pack in temperatures between 32°F
and 104°F (0°C and 40°C). For best results, charge the battery
pack at room temperature (68°F or 20°C).
Note: If the Field
Step 3: Establish basic
settings on the device
Using the stylus, follow the instructions on the screen to
calibrate the device and establish basic settings.
We recommend creating a name for the Field PC so
external devices like desktop computers or devices that use
Bluetooth
other devices more easily.
®
technology can di erentiate the Field PC from
9
Page 17
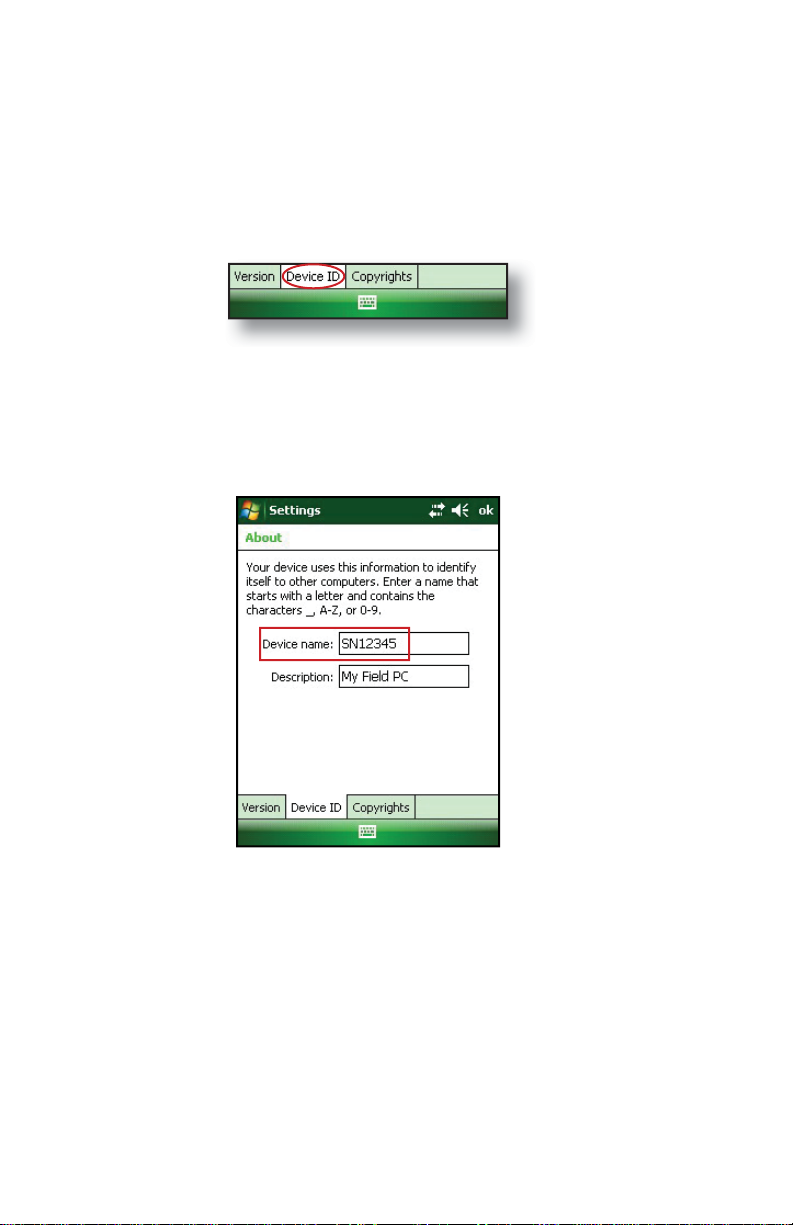
To create a name, follow these steps:
1. Tap Start > Settings.
2. From the System tab, tap
About.
3. Select the Device ID tab at the bottom of the screen.
4. Type in a device name. We recommend using “SN” (serial
number) and the device serial number, which can be
found by tapping
Start > Settings > System and choosing
System Con guration. An example of a device name
appears below.
Your Field PC is now eld ready.
Important: Read the following paragraph before moving on
to Step 4.
If you have Microsoft Windows® Vista™, you already have
basic le synchronization capability with your desktop
computer without installing any additional software.
10
Page 18
Chapter 2: Getting Started
You can skip Steps 4 and 5. To access these basic sync
options, connect the Field PC to the desktop computer
using a USB cable. For full synchronization support such
as Microsoft Outlook
®
contacts, email, calendar, notes, and
tasks, download and install Windows Mobile Device Center
through Windows Update on the Start menu of your desktop
computer.
If you have Windows® 2000 or Windows® XP, follow the next
steps to install Microsoft
®
ActiveSync®, which allows you to
install programs onto your device using a desktop computer.
Step 4: Connecting to a
desktop computer
Important: If you have Microsoft Windows Vista™, read the
section above before beginning.
®
If you use Windows
6 requires that you use Microsoft ActiveSync 4.1 or greater to
connect to your desktop computer. The Getting Started Disc
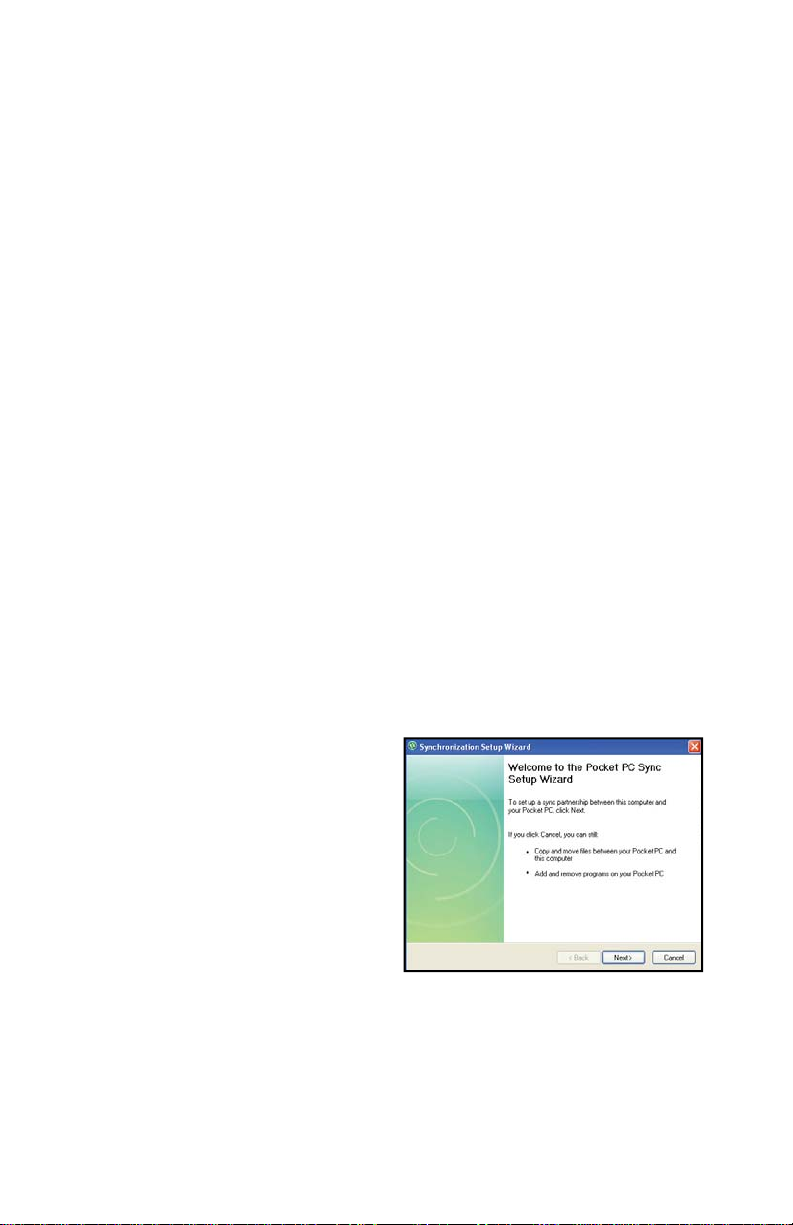
installs ActiveSync
1. Insert the Getting
Started Disc into your
desktop computer. A
window appears on
the display.
2. Select your language.
3. If ActiveSync 4.5
2000 or Windows® XP, Windows Mobile®
4.5 on your desktop computer.
11
Page 19

or greater has not been installed on your desktop
computer, follow the directions on the screen to install it.
Note: Install ActiveSync before attaching the USB cable to
the desktop or Field PC.
Step 5: Creating a
connection to a desktop
computer
1. Plug USB Client end (mini B) of the USB communications
cable into your Field PC.
2. Plug the USB Host end (full size A) of the USB
communications cable into your desktop computer.
3. Establish an ActiveSync partnership by following the
instructions on the desktop computer screen.
You are now ready to use your Field PC. See Chapter 6 for
more details about using ActiveSync and Windows Mobile
Device Center.
®
12
Page 20

3
Using the
Hardware
Identifying button functions
Customizing button functions
Suspending, powering o , resetting, and
restoring defaults
Using the stylus
Using the touchscreen
Understanding LED signals
Replacing the battery pack
Using peripheral devices such as
CF cards, SD cards, and
USB ash drives
Page 21

Chapter 3
Using the Hardware
This chapter teaches you how to use the hardware
components of the Field PC. Speci cally, you learn how to:
• Identify button functions
• Customize button functions
• Use buttons to suspend, power o , and reset the device
• Use the stylus
• Use the touchscreen
• Replace the battery pack
• Understand LED signals
• Use peripheral devices (CF and SD cards and USB drives)
with the device
Identifying button
functions
The following chart shows you the names and functions of
each button on the keyboard.
Button Name Function
Start menu
button
Applications
Manager
button
Home button Returns you to the Today
14
Provides a menu of
applications.
Lets you switch between or
close running applications;
allows you to view memory
allocations.
screen.
Page 22
Chapter 3: Using the Hardware
Context menu
button
Enter
button
Power button Turns the Field PC on and o ,
Four-way
directional
button
Displays the context menu
for the item selected (similar
to a right-click on a desktop
computer).
Enters the selected soft key
or option.
resets, suspends. (See more
details in the Power button
functions section in this
chapter.)
Allows you to navigate.
Customizing button
functions
Each button performs a speci c function. You can customize
the function of the following four buttons to open programs
or perform shortcuts:
• Start menu button
• Applications Manager button
• Home button
• Context menu button
Note: The functions assigned to the Enter button, Power button,
and Four-way directional button cannot be customized.
15
Page 23
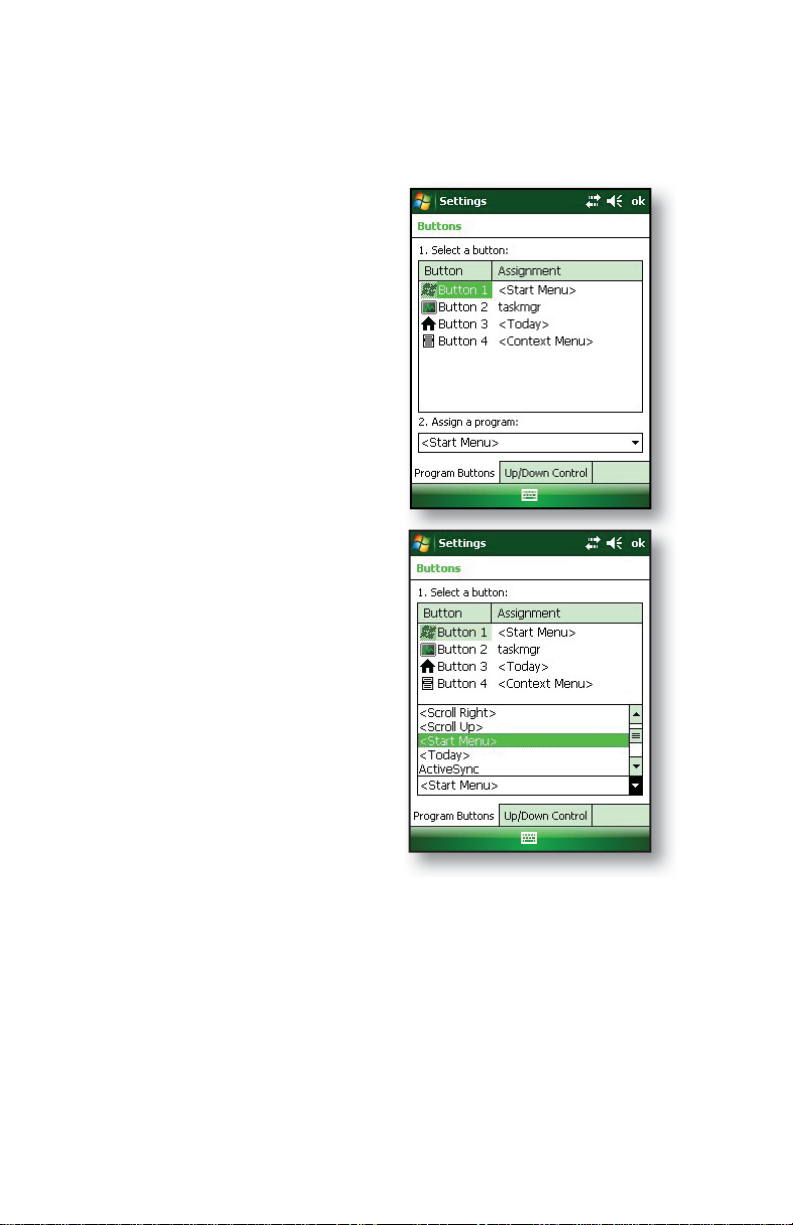
To reassign a program or shortcut to a button, follow these
steps:
1. Tap
Start > Settings >
Personal tab > Buttons. A list
of buttons and their current
assignments is displayed on
the Program Buttons tab.
2. Tap the button you want to
reassign, as shown here.
3. In the Assign a program
box, tap the program or
shortcut you want to assign
to the button. In the example
here, the user has selected
Start Menu.
4. Tap OK.
16
Page 24
Chapter 3: Using the Hardware
Suspending, powering off,
resetting, and restoring
factory defaults
The Power button allows you to suspend, power o , or reset
the device. A series of keyboard actions also lets you restore
the hard drive, settings, and icons to their original factory
defaults. Below are instructions for each action.
Suspending the device. Suspending the Field PC is di erent
from powering it o :
• Suspending the device puts it to sleep, and when it is
turned back on, the device remembers where it was.
Some battery power is used.
• Powering o the device closes all programs and turns o
all of the power. No battery power is used.
We recommend suspending your device if you plan to turn it
o for less than two weeks.
To suspend your
device, press the
Power button brie y
and release. To resume
the device from
suspend mode, press
the Power button
again.
Note: If you suspend
the device while it is
charging, the ashing
red light disappears.
However, the device
continues to charge.
17
Page 25

Powering o the Field PC. Powering o the device ends all
programs and removes power from all system components
except for the real-time clock. Unlike suspend mode, the
device resets when it is powered on again.
To preserve battery power, we recommend you power o the
device if it will be left unused for two weeks or longer.
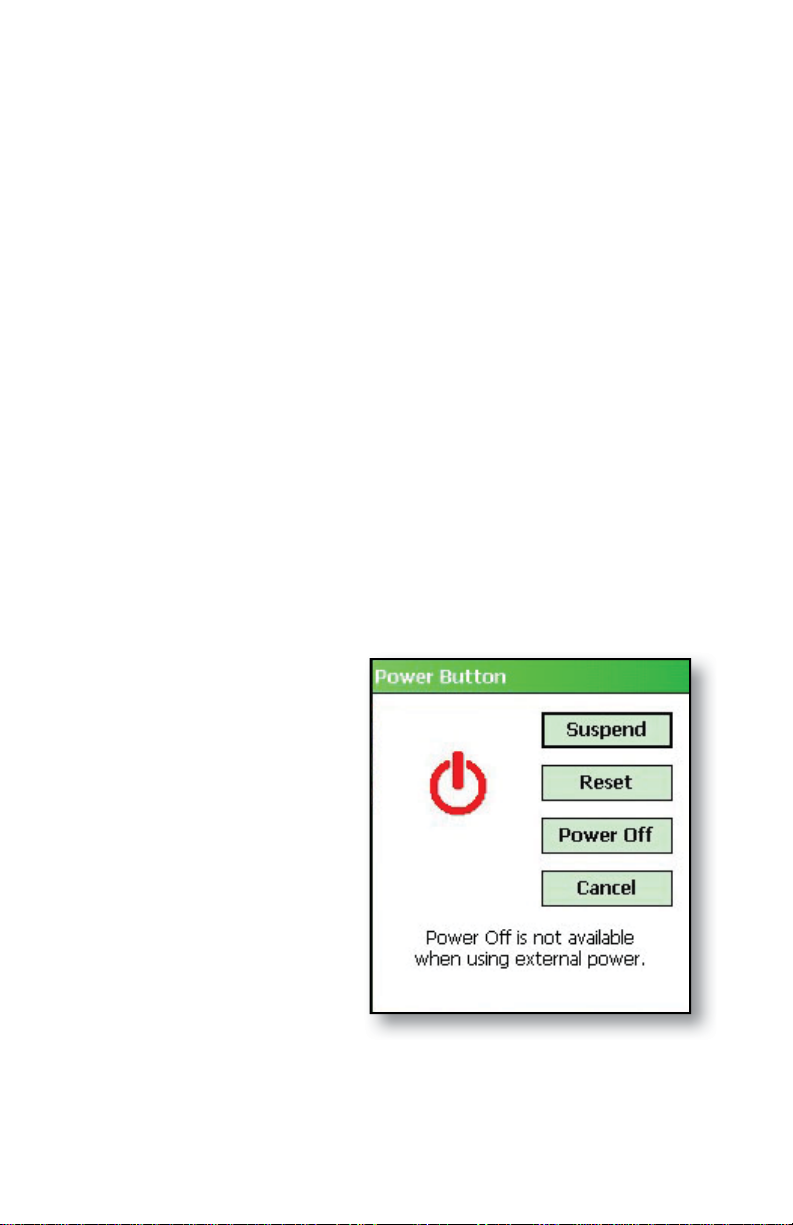
To power o the Field PC,
1. Save your open les and close any running programs.
(For instructions on backing up les, see Backing up data
in Chapter 5.)
2. Press the Power button until the Power Button menu
appears, as shown here.
Note: The device cannot be powered o while it is plugged
into the wall charger.
3. Tap Power O . A warning dialog appears, as shown in the
second picture. Tap OK.
Note: The keyboard backlight
stays on for a few seconds after
the device shuts o . The device
cannot be powered back on until
the keyboard backlight turns o .
To power on your Field PC, hold down the Power button until
you see the green noti cation light appear.
Resetting the device. Some programs require you to reset
your device during the installation process. Follow the steps
below to reset the Field PC:
1. Save your open les and close any running programs.
(For instructions on backing up les, see Backing up data
in Chapter 5.)
2. Press the Power button until the Power Button
menu appears.
3. Choose Reset.
18
Page 26

Chapter 3: Using the Hardware
K
c
E
H
T
S
R
If your device locks up, you can reset the device by pressing
the Power button for 10 seconds or until the screen goes
dark. After a few seconds, the device turns on again.
Restoring the device to its factory state. Follow the steps
below to restore the user storage, settings, and icons on your
Field PC to their original factory defaults.
WARNING! Restoring the Field PC to its original factory
!
state will permanently erase data saved on the Field PC, any
software you installed, and any changes you made to the
Field PC, including settings changes.
1. Reset the device from the power button menu or by
holding down the power button until the display goes
dark.
2. When the green noti cation LED light appears on the
front of the Field PC, simultaneously press and hold the
following buttons for several seconds:
Clean Boot: Home, up arrow, Context
Clean Storage: Task, up arrow, Return
Clean Registry: Start, Context
Clean All: Return, left arrow, Context
•
two pla
ress bar
drawn.
o
boot.
o
o
o
3. Hold the buttons until the progress bar reaches the
second tick mark and then disappears. Factory settings
are restored automatically.
Using the stylus
The stylus is stored in an open slot at the top of the device. A
hole in the stylus end allows you to attach a lanyard.
Like the left button on a desktop computer mouse, the stylus
is a tool that lets you select or deselect items and enter data.
19
Page 27

Like the right button, the stylus lets you perform shortcuts
like cutting and pasting. Instructions for these tasks are listed
in the chart below.
To do this . . . Follow these steps
Select an item Tap once.
Enter data See Entering Information, a section in the
next chapter about data entry options.
Open an item
or le
Cut or copy 1. Tap and hold until the context menu
Paste 1. Tap and hold the area where you
Open a context
menu
for an item
Tap the item or le.
appears.
2. Select Cut or Copy.
want to paste.
2. Select Paste from the context menu
that appears.
Tap and hold the item. The context menu
appears.
Drag and drop 1. Tap and drag the item to the
destination.
2. Lift up the stylus.
Select multiple
items
For instructions on using the transcriber program on your
Field PC, see
Drag the stylus over the items.
Entering Information in Chapter 4.
Using the touchscreen
This section explains how to protect, clean, and calibrate the
touchscreen.
Protecting and cleaning the touchscreen. The touchscreen
20
Page 28
Chapter 3: Using the Hardware
is sealed to protect your device against water and dust. To
protect your touchscreen, we recommend that you apply
a touchscreen protector to the screen. For instructions
about applying a touchscreen protector or cleaning your
touchscreen, see
CAUTION: Be sure to replace the screen protector as often as
!
the screen protector packaging directs.
Calibrating the touchscreen.
If the touchscreen is not
responding accurately to stylus
taps, try calibrating the
touchscreen manually using the
following steps:
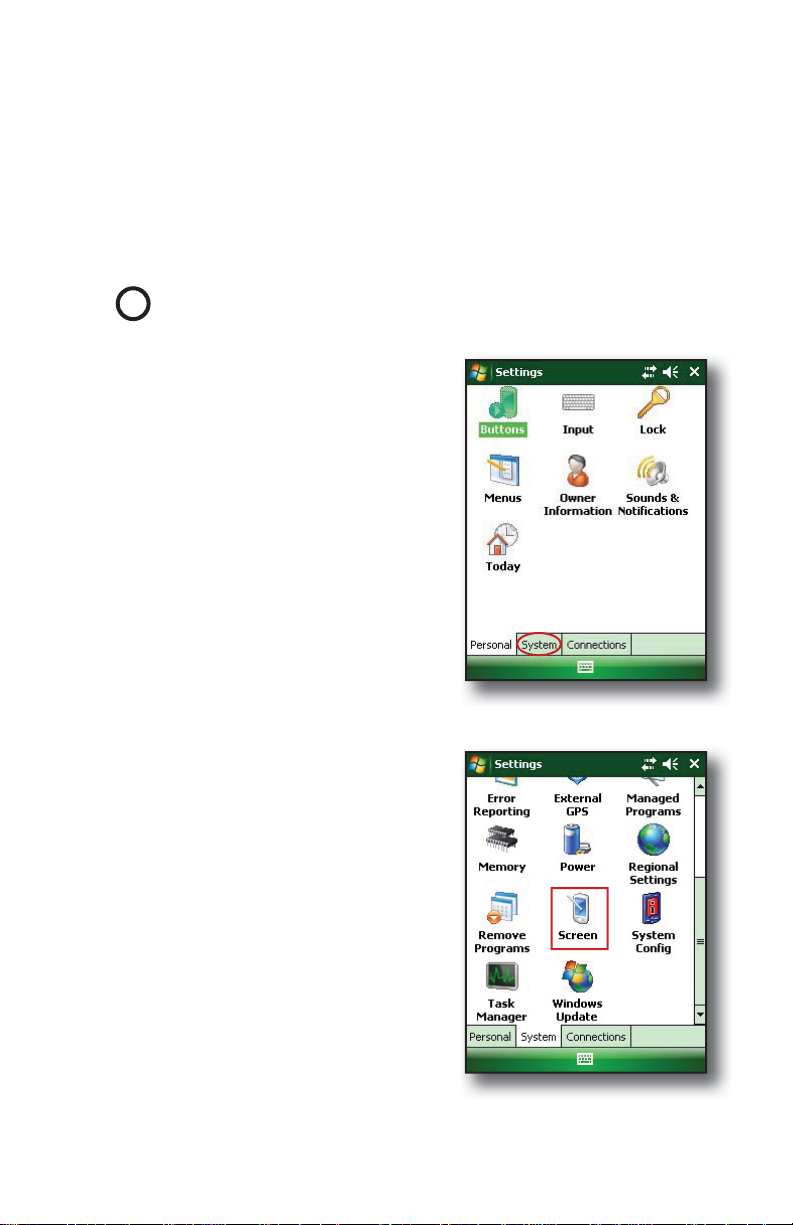
1. Tap Start > Settings. The
Settings window appears, as
shown here.
2. Select the System tab at the
bottom of the display.
Chapter 10: Caring for your Field PC.
3. Scroll down and tap on the
Screen icon, shown at right.
4. When the Screen window
appears, tap Align Screen.
5. Follow the directions on
the display to calibrate the
touchscreen.
6. After you calibrate the
touchscreen, the Screen
window appears again. Tap
OK to exit the screen.
21
Page 29

Understanding LED
signals
The Field PC signals events and processes using a charge
LED and a noti cation LED.
Charge LED. This red light appears to the left of the Start
menu button. A ashing light signals that the battery is
currently charging; a solid light signals that the wall charger
is connected but that the battery is fully charged. Note:
When the device is suspended or powered o , the charge
LED does not appear.
Noti cation LED. Appearing on the right side of the Enter
button, the green noti cation LED appears brie y when
you power on the unit after the device is reset or restored
to factory defaults.
Replacing the battery
pack
To replace the battery pack, follow these steps:
1. Close all running programs.
2. Suspend the device.
CAUTION: The device only stays
!
on for about ve seconds without a power
source. Always suspend your device before
replacing the battery pack.
3. Carefully unhook and lift up the
bottom hand strap hook.
CAUTION:
!
too quickly may result in injury or damage
to the display. Use caution when undoing
the hook or when holding the Field PC by its hand strap.
4. Press on the battery door about 1/4”
22
Releasing the hand strap hook
Page 30
Chapter 3: Using the Hardware
beneath the door latch and slide the door latch to
the right.
5. Remove the battery door. Note:
The door may make a noise
while it is being removed,
caused by the door scraping
against the battery. The sound
is normal; no damage is done
when you hear this sound.
6. Remove the old battery pack.
7. Make sure the battery contacts
of the charged battery pack are
clean and dry.
8. Insert the charged battery pack,
lining up the battery contacts
with the Field PC contacts.
9. Insert the tabs on the bottom of
the battery door into the case
slots.
10. Close the battery door, making
sure the door latch is in the unlock
position as the door meets the
case.
23
Page 31

11. With the door latch in the unlock
position, press on the battery door just
below the door latch and slide the latch to
the left to lock it.
12. Reattach the hand strap.
Note: If you remove the battery pack from your
device and the device is still attached to the wall
charger, the battery icon still appears on the
display. When the battery is replaced, charging
resumes.
For instructions on installing or charging a battery pack, see
Chapter 2: Getting Started. For instructions on maintaining
and caring for your battery pack, see
your Field PC.
Chapter 8: Caring for
Using peripheral devices
such as CF cards, SD
cards, and USB fl ash drives
The Field PC accepts several peripheral devices. The USB
Host (mini A) accepts devices like USB ash drives and
keyboards; the Compact Flash (CF) and Secure Digital (SD)
card slots accept memory cards and IO (Input/Output) cards
such as GPS, modem, and Bluetooth cards.
Note: If your Field PC has integrated Bluetooth
Chapters 8-9 for more details about using peripheral devices
with the Field PC. If you are using an extended cap for larger
peripheral devices, see the extended cap installation instructions
at the end of this guide.
This section explains how to:
• Install and operate USB accessories on the Field PC
24
®
technology, see
Page 32

Chapter 3: Using the Hardware
• Remove the standard cap to access CF and SDIO card
slots
• Install CF and SD cards
• Replace CF and SD cards
• Copy les from a CF or SD card or USB drive
• Reattach the standard cap
Installing and operating USB devices on the Field PC. The
USB Host accepts several USB devices, including keyboards
and USB ash drives.
Note: To be compatible with Windows Mobile
®
6, some USB serial
devices require drivers. Refer to your USB device’s manual or
contact the manufacturer to determine compatibility.
To install a USB device, plug the mini end of a USB
communications cable into the USB Host (labeled A on your
device). You may need to use a USB mini-to-full size adapter.
Removing the standard cap to access CF and SDIO
card slots.
The removable standard cap on the Field PC is
designed to protect peripheral devices (e.g., CF cards) when
they are inserted into the Field PC and to protect the Field PC
when no peripheral device is inserted.
To remove the standard
cap, follow these steps:
1. Remove the stylus.
2. Unscrew the top screws
until you can slide o
the standard cap. The
screws are designed
to stay attached to the
standard cap.
3. Pull o the standard
cap.
4. Insert the CF or SD card.
Note: For instructions on replacing the standard cap, see the
section in this chapter called
Reattaching the standard cap.
25
Page 33

Installing a CF or SD card. To operate a card, insert the card
into the appropriate card slot, located under the standard
cap of the Field PC. (See the instructions in the previous
section for removing the standard cap.) The system should
automatically detect and use the card. However, if the card is
not recognized, try the following:
1. Install an appropriate driver by following the directions
on the device screen.
2. Operate the card by consulting the user’s guide that
came with the card.
Reinserting or changing a CF or SD card. Whenever you
remove or change a CF or SD card on the Field PC, wait at
least 6 seconds before inserting another card into the slot.
The Field PC needs this short time delay to properly identify
and use the newly inserted card. If a card is re-inserted
too quickly, the Field PC may need to reset. To avoid this
problem, close all programs
before changing or re-inserting
a card.
Copying data from a CF card,
SD card, or USB drive.
You
can run or copy data from a
peripheral device onto your
Field PC by following these
steps:
1. On the Field PC, tap Start >
Programs > File Explorer.
2. Tap and hold the le you
want to copy to your Field
PC. A pop-up menu appears, as shown here. Note: If you
want to copy multiple les, tap and drag the stylus over the
les. Once the les are selected, tap and hold the stylus on the
les until a pop-up menu appears.
26
Page 34

Chapter 3: Using the Hardware
3. Select Copy.
4. Open the destination folder
where you want to place your
copied le.
5. Tap and hold the stylus on
the white space below the
existing les until the pop-up
menu appears again.
6. Select Paste. The le is copied
and its name appears on the
screen.
Reattaching the standard cap. To
reattach the standard cap, follow
these steps:
1. Make sure the hand strap is attached to its top latch.
2. Place the standard cap over the case.
3. Use a screwdriver to turn the standard cap screws
until they are rmly in place.
CAUTION: Do not overtighten the screws. Tightening
!
the screws over 12-in-lb (1.36 N-m) could result in a failure.
The torque specs for the standard cap are
2-in-lb (0.23 N-m).
CAUTION: When the standard cap is removed, the Field PC is
!
not sealed. Avoid exposing the Field PC to moisture when the
standard cap is removed, and tighten the standard cap screws
rmly after you replace the standard cap. Failure to replace the
standard cap properly may void your warranty.
27
Page 35

28
Page 36

4
Using the
Field PC
Understanding the Today screen
Using the Start menu
Entering information
Recognizing status icons
Recognizing soft keys
Rotating the screen
Dimming or turning o the backlight
Adjusting the backlight timer
Page 37

Chapter 4
Using the Field PC
Focusing on the interface elements of the Field PC, this
chapter shows you how to:
• Understand the Today screen (the default
display screen)
• Use the Start menu
• Enter information with the stylus
• Recognize status icons
• Recognize soft keys
• Change settings
• Rotate the screen
• Dim or turn o the backlight to save battery power
• Adjust the backlight timer
Understanding the
Today screen
The Today screen is the default
screen you see when your device
powers on. From the Today screen
you can view or select
• Today’s date
• Owner information
• Messages
• Tasks
• Upcoming appointments
The Today screen also allows you
to lock or unlock your device.
Locking the device
disables your screen for easy cleaning.
Go to Start > Settings > Today > Items tab and select Device
30
Page 38

Chapter 4: Using the Field PC
Lock to have the option appear on the Today screen.
To lock the device, simply tap on the words “Device
unlocked.” To unlock the device, tap on the word “Unlock” on
the two screens that appear.
Using the Start menu
The Start menu is the main access point to all programs in
Windows Mobile
system settings.
To access the Start menu, tap the
Start menu icon in the top left
corner of your screen or press the
Start menu button
keypad. The Start menu
appears, giving you links to
programs, settings, and menus.
®
. It allows you to access les, programs, or
on the
Note: For a description of each item
on the Start menu, see
Getting to Know Programs and
Settings.
Chapter 7:
Entering information
At the bottom of the display is a data entry icon.
Tapping on the icon allows you to enter information using
the stylus. Speci cally, you can choose to:
Select alphanumeric characters from the on-screen
Keyboard utility (the default input method).
Use Letter Recognizer. This input method
recognizes character strokes and gestures.
31
Page 39

Enter text using Block Recognizer. This utility
recognizes letters from single strokes.
Use Transcriber, a program that allows you to enter
data using cursive, print, or mixed handwriting.
Note: For more details about using each input method, go to
Start > Settings > Input and choose the input method from
the Input window. For ideas about how to use the transcribing
program more e ectively, we recommend Frank McPherson’s
book, How to Do Everything with Windows Mobile, published
by McGraw-Hill Osborne Media.
When you are ready to enter text, you can switch from the
default input method (keyboard) by following these steps:
1. On the bottom center of the screen, tap the arrow next
to the input method icon.
arrow is not displayed, tap the input method icon.
2. The input method menu
appears, as shown here. Tap
the input method you want
from the list of options.
3. Using the selected input
method, enter your text.
If the input selector
Recognizing status icons
Status icons show the status of operations on the Field PC.
Status icons and their functions are listed in the following
chart.
32
Page 40

Chapter 4: Using the Field PC
Icon Name Function
Charge indicator Tells you when the device
is charging.
Speaker Tap to control volume.
Remaining
battery capacity
Applications
Manager
For an additional list of icons and their functions, follow these
steps:
1. Tap Start > Help > Contents.
2. Select Start Using Your Device screen.
3. Tap on What do those icons mean?
Tap to see how much
battery power remains.
Tap to switch or close
running programs.
Recognizing soft keys
These context-sensitive keys appear as words, buttons, or
tabs on the menu bar. Tap on these keys to perform actions
or open menus. Here you see soft keys on the Today screen.
33
Page 41

Rotating the screen
The Field PC can show
information in portrait or
landscape view. Change the
orientation by following these
steps:
1. Select Start >
Settings > System tab >
Screen.
2. Choose from three screen orientations: Portrait,
Landscape (right-handed), or Landscape (left-handed).
The four-way directional button automatically adjusts for
the screen orientation.
Dimming or turning off the
backlight
Dimming or turning o the display backlight saves battery
34
Page 42

Chapter 4: Using the Field PC
power when the device is running on a battery pack. To dim
or turn o the backlight, follow these steps:
1. Tap Start > Settings > System tab > Backlight.
2. Select the Brightness tab.
The Brightness window for
battery power appears.
3. Drag the backlight slider
downwards to dim the
backlight. Drag the slider all
the way down to turn the
backlight o .
Adjusting the backlight
timer
By default, the display and keypad backlights are set to turn
35
Page 43

o after one minute of inactivity. To adjust the time when
your backlight turns o , follow these steps:
1. Tap Start > Settings >
System tab > Backlight. The
Backlight window appears. To
change the timer for external
power, tap the External
Power tab.
2. Select or deselect the two
options.
3. If you selected the rst
checkbox, choose the length
of time before the backlight
turns o .
36
Page 44

5
Performing
Common Tasks
on the Field PC
Suspending the device
Powering o the Field PC
Resetting the device
Exploring les
Closing running programs
Switching between running programs
Changing settings
Using on-device help
Backing up data
Copying data from a peripheral device
Page 45

Chapter 5
Performing Common
Tasks on the
Field PC
This chapter teaches you how to perform the following
common tasks:
•
Suspend the device
• Power o the device
• Reset the device
• Explore les
• Close programs that are running
• Switch between running programs
• Change settings
• Use on-device help
• Back up data
• Copy les from peripheral devices
Suspending the device
Suspending the Field PC is di erent from powering it o .
During suspend mode, the device sleeps but remembers
where it was when it is turned on again; when you power
o the Field PC, it does a basic reset. We recommend
suspending your device if you want to resume your task or if
you plan to use the device on a daily basis.
To suspend your device, press the power button brie y and
release. To resume the device, press the power button again
brie y.
Note: If you suspend the device while it is charging, the ashing
38
Page 46

Chapter 5: Performing Common Tasks on the Field PC
charge LED disappears. However, the device continues to
charge.
Powering off the Field PC
Powering o the device ends all programs and removes
power from all system components except for the real-time
clock.
Powering o your device saves power without draining
the battery.
We recommend powering o the mobile device if it will be
inactive for more than one week.
To power o the Field PC, follow these steps:
1. Save and close all applications. (For instructions on
backing up your les, see the section in this chapter
called Backing up data.)
2. Press the Power button until the
Power Button
menu appears, as shown here.
3. Tap
Power O , then OK.
Note: The keyboard backlight stays on
for a few seconds after the device shuts
o . Until the keyboard backlight turns
o , the device cannot be powered on
again.
To power on the device, hold the power button until the
green noti cation LED appears. The device is now booting.
This process takes about a minute.
39
Page 47

Resetting the device
Some programs require you to reset your device when you
install them. Follow the steps below to reset the Field PC:
1. Back up your les and close any open applications. (For
instructions on backing up les, see Backing up data in
this chapter.)
2. Press the power button until the power button menu
appears.
3. Choose
Note:
the power button for 10 seconds or until the screen goes dark.
The device resets itself automatically after a few seconds.
Reset.
If your device locks up, you can reset the device by pressing
Exploring fi les
To explore les stored on the Field PC, follow these steps:
1.
Tap Start > Programs > File Explorer. The File Explore
window appears.
2. If the drive you want does not
already appear, tap on the
drop-down menu arrow to
select it, as shown here.
3. Navigate the le directory by
tapping on the folders and
les you want. If you want to
go up a level, tap on the Up
soft key at the bottom of the
screen.
4. Use the Menu soft key at
the bottom of the screen
to manipulate les.
40
Page 48

Chapter 5: Performing Common Tasks on the Field PC
Closing running programs
Closing programs that are not being used frees memory and
allows the device to run faster. We recommend closing any
programs you are not using.
Note: Tapping on the X in the top right corner of a program only
minimizes the program; the program continues to run in the
background.
To close one or more running programs, follow these steps:
1. Press the Applications
Manager button.
screen at the right appears.
2. Select the program(s) you
want to close.
3. Tap End Task.
The
Switching
between
running
programs
To switch between programs running on your Field PC,
follow these steps:
1. Press the Applications Manager button.
2. Tap and hold program you want to switch to.
3. Tap
Switch To from the pop up menu. The program
comes to the forefront.
41
Page 49

Viewing memory
allocation for programs
To see how much memory is available for programs and
storage on the Field PC, follow these steps:
1. Tap Start > Settings > Memory. A new window appears.
2. Select Main tab if is not already selected. Available
memory for storage and programs appears.
Changing settings
To change settings on your device, follow these steps:
1. Tap Start > Settings. The Settings window appears.
2. Choose one of the tabs at the bottom of the screen.
Note: See Chapter 7 for a complete list of settings and their
locations.
3. Tap on the setting you want to change.
4. Adjust the setting controls.
42
Page 50

Chapter 5: Performing Common Tasks on the Field PC
Using on-device help
You can access electronic help les on your Field PC from
each screen. Windows Mobile
is context-sensitive; the help information that appears on the
help screen is directly related to what you are doing on the
device.
To access help les, follow these steps:
1. Tap
2. Select an option from the help menu that appears.
Note: If the topic you want is not listed, try one of these options:
• Option 1: Choose
• Option 2: Choose
• Option 3: If you want help about a certain program
Start > Help.
Contents at the bottom of the screen.
A table of contents appears. Tap on the item you want.
Search at the bottom of the screen.
Search allows you to search for speci c topics within
boundaries you set.
on your mobile device, open the program rst, then
tap
Start > Help. The help menu items that appear are
directly related to the application program.
®
provides help information that
43
Page 51

Backing up data
Your Field PC is designed to protect your data. However, it
is still a good idea to back up your data regularly by saving
information to a desktop computer or to a Compact Flash
(CF) or Secure Digital (SD) card.
Backing up to a desktop computer. To copy les from your
Field PC to a desktop computer, follow these steps:
1. If you have Windows
establish an ActiveSync
instructions) and continue with Steps 2-6.
Note: If you have Microsoft
recommend installing Windows Mobile Device Center™ on
your desktop computer
from the Microsoft
website or by selecting
Start > Programs >
Microsoft Update on
your desktop computer.
You can then sync
your Field PC with your
desktop computer. For
more instructions about
using Windows Vista, visit
Microsoft’s website.
2. In the ActiveSync
window on your desktop
computer, click
Explore Pocket PC, as shown
here.
3. A new window opens,
showing the le directory for
the Field PC.
4. Select the desired les on the
Field PC.
®
2000 or Windows® XP, re-
®
connection (see Chapter 6 for
®
Windows Vista™, we
Tools >
44
Page 52

Chapter 5: Performing Common Tasks on the Field PC
5. Copy the les by
choosing
Edit > Copy
or by right-clicking and
choosing
Copy.
6. Paste the les onto the
desktop computer.
Backing up to a CF or SD
card. To save information
to a card, follow these
steps:
1. Select
File Explorer from
the Start menu. The
File Explore window
appears.
2. If
My device does not
already appear as the
current directory, tap
on the arrow next
to the directory that
appears, as shown
in this image. When
a drop-down menu
appears, select
device
.
My
3. A list of les appears.
Highlight the les you
want to back up and
tap on
Menu in the
lower part of the display. A menu of options appears.
4. Tap and hold the stylus on the
Edit option, as shown
here.
45
Page 53

5. Choose Copy from the
menu that appears.
6. Select the CF or SD card from
the le directory.
7. To paste the les from your
Field PC to the CF or SD card,
tap the
choose
Menu soft key and
Edit > Paste.
8. You can now remove the
card.
46
Page 54

Chapter 5: Performing Common Tasks on the Field PC
Copying data from a
peripheral device
You can copy data from a CF card, SD card, or USB ash drive
onto your Field PC by following these steps:
1. On the Field PC, tap
2. Tap and hold the le you want to copy to your Field PC. A
pop-up menu appears, as shown here. Note: If you want to
copy multiple les, tap and drag the stylus over the les. Once
the les are selected, tap and hold the stylus on the les until
a pop-up menu appears.
3. Select Copy from the pop-up menu.
4. Open the destination folder where you want to place
your
fi le. (To copy the fi le to the device drive, select
My device.)
5. Tap and hold the stylus on the white space below
the list of existing fi les until a pop-up menu appears.
6. Select
Paste. The copied le appears in the folder.
Start > Programs > File Explorer.
47
Page 55

48
Page 56

6
Communicating
with a Desktop
Computer
Install ActiveSync® on a desktop
computer
Creating an ActiveSync
Install Windows Mobile
a desktop computer
Creating a Windows Mobile
center connection
®
connection
®
Device Center on
®
Device
Page 57

Chapter 6
Communicating
with a Desktop
Computer
In Chapter 2, you learned how to create an ActiveSync
partnership between your Field PC and your desktop
computer. In this chapter, learn how to—
• Install ActiveSync
• Create an ActiveSync
• Install Windows Mobile
computer
• Create a Windows Mobile
Install ActiveSync® on
a desktop computer
®
on a desktop computer
®
connection
®
Device Center on a desktop
®
Device center connection
(Windows® 2000 and
Windows® XP)
Note: If you have Windows Vista™, see Install Windows
Mobile Device
1. Insert the Getting Started Disc into your desktop
computer. A window appears on the display.
2. Select your language.
3. Follow the directions on the screen to install Windows
ActiveSync
Note: Install ActiveSync® before a aching the USB cable to the
desktop or Field PC.
50
®
Center.
®
4.5.
®
Page 58

Chapter 6: Communicating with a Desktop Computer
Creating an ActiveSync®
Connection
1. Plug USB Client end (mini B) of the USB communications
cable into your Field PC.
2. Plug the USB Host end (full size A) of the USB
communications cable into your desktop computer.
3. Establish an ActiveSync® partnership by following the
instructions on the desktop computer screen.
Install Windows Mobile®
Device Center on a
Desktop Computer
(Windows Vista™)
To install the Windows Mobile® Device Center on a desktop
computer with Windows Vista™ complete the following
steps:
1. Connect your device to your desktop computer.
2. Download the Windows Mobile® Device Center Installer
to your computer by clicking on the download link that
appears in the pop-up window.
51
Page 59

3. Select “Run this program from its current location” and
click OK.
4. Follow the instructions on the screen.
Creating Windows Mobile®
Device Center Connection
Once Windows Mobile® Device Center has been installed,
create a connection at any time by plugging one end of a
USB cable into the computer and the other end into the
Field PC. Windows Mobile® Device Center automatically
opens. Follow the steps on the screen.
Note: For more information about connecting to a computer
using either ActiveSync® or Windows Mobile® Device center
visit the Microsoft Windows Mobile® website.
52
Page 60

7
Getting
to Know
Programs and
Settings
Understanding Start menu programs
and utilities
Understanding applications in the
Programs menu
Accessing programs on the Getting
Started Disc
Finding settings
Page 61

Chapter 7
Getting to Know
Programs and Settings
This chapter describes
• Programs and utilities on the Start menu
• Applications on the Programs menu
• Programs available on the Getting Started Disc
• How to nd settings on the Field PC
Understanding Start menu
programs and utilities
The Start menu is the main access point to all programs in
Windows Mobile
system settings.
®
. It allows you to access les, programs, or
To access the Start menu, tap
the Start ag icon or press the
Start menu button on the keypad.
The Start menu appears, shown at
right. A description of each Start
menu option follows.
•
Today screen. The default
display of the Field PC. For a
detailed description of this
screen, see
• Calendar. The Calendar tool
54
Chapter 4.
Page 62

Chapter 7: Getting to Know Programs and Settings
shows the date and any appointments you scheduled
for the day, week, or month. Use Calendar to enter your
appointments and notify you of upcoming events.
•
Contacts. Use this program to store the contact
information of your associates.
•
Microsoft Internet Explorer®. Internet browser.
•
Messaging. This email client allows you to send
and receive emails from Microsoft
ActiveSync
®
on your desktop computer. If you have a
®
Outlook® using
direct Internet connection on your Field PC, you can
adjust Messaging to send emails directly from the Field
PC.
•
Running programs. If a program is running, it is
listed on the Start menu. For example, in the picture
of the Start menu shown, Notes and Microsoft
PowerPoint
®
Mobile are running on the Field PC, so they
®
O ce
are listed in the Start menu. Tap on the program name to
open the application.
•
Programs. Tapping on Programs opens the Programs
menu window. The Programs menu allows you to view
and access any installed programs. For more details
about Programs, see the next section,
Options
•
Settings. Options for settings are divided between three
.
Programs Menu
main menus:
• Personal settings
• System settings
• Connections settings
Note: For more details about settings, see the section in this
chapter called
see
Chapter 4: Using the Field PC.
•
Help. On-device help les are context-sensitive; the help
Finding settings. To change your settings,
55
Page 63

information that appears on the help screen is directly
related to what you are doing on the device.
Note: For more instructions on using help, see
Performing Common Tasks.
Chapter 5:
Understanding
applications in the
Programs menu
The Programs menu lists applications installed on your Field
PC. To access the Programs menu, tap
Start > Programs. Applications in the Programs menu are
described below in the order they appear.
For on-device help instructions on how to use a program or
for a more detailed description of a program, follow these
steps:
1. Open the program.
2. Tap
For more detailed instructions about using on-device help,
see the section called
Start > Help.
Using on-device help in Chapter 5.
Applications comprise the following:
•
Games. Choose from Bubble Breaker or Solitaire.
•
ActiveSync®. Use this program to synchronize your Field
PC with a desktop or laptop computer. You can also use
ActiveSync to explore your Field PC and synchronize your
contact information, calendar information, emails, and
more.
•
Calculator. This program simulates a calculator.
•
Download Agent. Download Agent automates the
process of downloading Field PC software updates
56
Page 64

Chapter 7: Getting to Know Programs and Settings
directly to your Field PC. If you are connected through
ActiveSync to a PC with an Internet connection or if you
are connected to the Internet through a modem card
such as a dial-up, Ethernet, Wi-Fi, cellular, or Bluetooth
card, Download Agent automatically displays available
updates to the Field PC. You must have a Microsoft
Exchange Server set up to send software downloads to
the Download Agent on a Field PC.
• Microsoft
®
O ce Excel® Mobile. View and create charts
using this program. Microsoft Excel and Excel Mobile are
designed to be compatible. For example, you can open
and edit a chart you created on your desktop computer
using Microsoft Excel in Microsoft
®
Excel® Mobile on your
Field PC.
•
File Explorer. This utility lets you view, expand, and
collapse the Field PC directory folders so you can locate
les.
•
Notes. Use this program to enter personal notes into the
system or use the Voice Recorder option to record voice
clips. Create stand-alone voice recordings or attach them
to notes.
•
Pictures & Videos. This viewer allows you to preview a
picture or video without opening it.
•
Pocket MSN®. This customizable program gives you
quick access to your MSN Hotmail
®
Inbox and your MSN
Messenger account.
•
Microsoft® O ce PowerPoint® Mobile. This viewer lets
you view or rehearse PowerPoint presentations built on a
desktop computer.
•
Search. The search function helps you nd les or
programs.
•
Tasks. Use this application to enter new tasks or to view
and modify existing tasks.
57
Page 65

• Toggle TS. Tap this icon to
toggle the touch screen on
and o . When the touch
screen is turned o , navigate
by using the directional
buttons and shortcut buttons.
Toggle TS can be applied to a
button for easy access.
•
Microsoft® O ce Word
Mobile
with graphics while maintaining document formatting.
Microsoft Word and Word Mobile are compatible. For
example, you can open and edit a le you created on
your desktop computer using Microsoft Word in Word
Mobile on your Field PC.
. Use this program to create and edit documents
Finding settings
To locate settings, tap Start > Settings. The Settings window
appears, showing three menu tabs:
Connections. Use the following chart to identify the location
58
Personal, System, and
Page 66

Chapter 7: Getting to Know Programs and Settings
of speci c settings.
Setting
Personal
settings
System
settings
Connections
settings
About X
Backlight X
Beam X
Bluetooth X
Buttons X
Backlight X
Certi cates X
Clock and
X
Alarms
Connections X
Error
X
Reporting
Input X
Lock X
Memory X
Menus X
Network
cards
Owner Info X
Power X
Regional
X
settings
Remove
X
programs
X
59
Page 67

Setting
Screen X
Sounds and
noti cations
Today X
For instructions on changing settings, see the on-device help.
Personal
settings
X
System
settings
Connections
settings
60
Page 68

8
Using the
Integrated
Bluetooth®
Option
Bluetooth® drivers and pro les
Identify the power status of Bluetooth
Create a Bluetooth partnership
Bluetooth virtual COM ports
Set up an outgoing Bluetooth COM port
Set up an incoming Bluetooth COM port
Page 69

Chapter 8
Using the
Integrated
®
Bluetooth
This section explains what you need to know about using
integrated
Learn how to—
• Identify the power status of Bluetooth
• Make the Field PC discoverable to other devices that use
• Determine the status of Bluetooth
• Create a Bluetooth partnership
• Set up an outgoing Bluetooth virtual COM port
• Specify a COM port within an application
• Set up an incoming Bluetooth virtual COM port
If your Field PC does not have integrated Bluetooth, you
need an external Bluetooth card to use Bluetooth. See the
instructions associated with the card for details.
have a device with integrated Bluetooth, the Field PC does not
recognize a Bluetooth card.
Bluetooth wireless technology with your Field PC.
Bluetooth
Option
Note: If you
Bluetooth drivers and
profi les
Microsoft Bluetooth drivers are loaded onto your Field PC
at the factory. These drivers support the following pro les:
serial devices, ActiveSync, object exchange ( OBEX), dial-up
networking, and human interface devices (e.g., keyboard
or mouse). Pro les not supported include network access
point and audio. Supported pro les are described in the next
chapter.
62
Page 70

Chapter 8: Using the Integrated Bluetooth Option
Identify the power status
of Bluetooth using
Wireless Manager
A line on the Today Screen indicates whether Bluetooth is
powered on or o , as shown here.
By tapping this line, you open Wireless Manager, a utility that
controls
shows the power status, the Done soft key, and the Menu
soft key (see the following gure).
Bluetooth. The default screen in Wireless Manager
63
Page 71

The Bluetooth bar acts as a toggle switch, allowing you
turn the device on or o easily. If you make the device
discoverable, the toggle switches between
O and
Discoverable. Tapping on the Done soft key closes the
Wireless Manager screen.
Tapping on the Menu soft key takes you to the Bluetooth
Settings screen, shown in the next image. From here, you can
adjust Bluetooth settings, such as turning Bluetooth on or
o and creating a Bluetooth partnership. See the following
sections for more details.
Turn Bluetooth on and o
1. Tap Start > Settings > Connections tab.
2. Tap Bluetooth.
3. Select or clear the Turn on Bluetooth check box. Selecting
it turns
Bluetooth on; clearing it turns it o .
Note: By default, Bluetooth is turned o . If you turn Bluetooth on
and then suspend the device, Bluetooth turns o while the Field
PC is suspended to save battery power. When you resume (turn
on) the Field PC, Bluetooth turns on automatically.
64
Page 72

Chapter 8: Using the Integrated Bluetooth Option
Make the Field PC discoverable to another device
To allow other devices that use Bluetooth wireless
technology to detect the Field PC and communicate with
it, you must make your device discoverable or establish a
partnership with the other device.
Follow these steps to make your device discoverable:
1. Tap Start > Settings > Connections tab.
2. Tap Bluetooth.
3. Select the
the checkbox to Make this device discoverable to other
devices.
Tip: If you do not want the Field PC to be discoverable to other
devices, deselect (clear) the
other devices
Turn on Bluetooth checkbox, and then select
Make this device discoverable to
checkbox.
Create a Bluetooth
partnership
A partnership is a relationship you create between the
Field PC and another device that uses
technology to help exchange information securely.
Follow the steps below to create a partnership between the
Field PC and another device that uses
1. Make sure the two devices are turned on, discoverable,
and within at least 30 feet of one another.
2. Tap Start > Settings and then tap the Connections tab.
3. Tap Bluetooth > Devices tab > Add New Device. Your
device searches for other devices with Bluetooth
Bluetooth wireless
Bluetooth technology:
65
Page 73

capabilities and displays them in
the list, as shown here.
4. The name of the Bluetooth device appears. Tap the
name, then tap Next.
5. If the Bluetooth device has
an assigned a passkey, enter
the number. If the device has
not already been assigned a
passkey but requires one,
enter an alphanumeric
passkey on the Field PC
between 1 and 16 characters
in the Passkey option. Tap
Next.
Note: If you are unsure whether
your device requires a passkey
and whether one has already been assigned to your
Bluetooth device, see the user documentation that came
with the device.
Important: If the Bluetooth device does not use a
passkey, leave the passkey blank and tap Next, as shown
66
Page 74

Chapter 8: Using the Integrated Bluetooth Option
in the rst image below. A message appears, asking if
|you want to add the device to the device list.
Choo se No and skip to
step 7.
Note: It is important to
choose No when you are
asked whether you want to add to the device to the device
list; choosing Yes sends you back to the passkey screen.
6. Enter the same passkey on the other device.
7. In the Partnership Settings screen on the Field PC, you
can assign a new name to the device in the Display Name
option.
8. Select the service you want to use from the Services box,
then tap Finish.
Bluetooth virtual COM
ports
Some application programs connect using a virtual COM port
(serial port) when making a Bluetooth connection. To make a
connection possible for such programs, you must rst set up
a virtual COM port on the Field PC. Once created, this virtual
port can be used like any other COM port. For example, you
can use a virtual COM port for programs that connect to a
GPS receiver. You can also use it to connect to a printer that is
enabled with Bluetooth technology.
When setting up a virtual COM port, you must specify if the
COM port is an outgoing COM port or an incoming COM
port.
67
Page 75

• An outgoing COM port means that the Field PC initiates
communication with the other device. For example,
when you are using a Bluetooth GPS receiver, the Field
PC initiates the request for data; thus, the virtual COM
port connecting with the receiver would be an outgoing
COM port.
• An incoming COM port means that the other device
is initiating the communication with the Field PC. For
example, a desktop computer might initiate a Bluetooth
ActiveSync connection with the device via the virtual
COM port.
For more details about setting up outgoing and incoming
COM Ports, read the following sections.
Set up an outgoing
Bluetooth COM port
Use this option if you want to assign the virtual COM port as
an outgoing COM port (i.e., you want to use the Field PC to
initiate communications with another device).
Follow the steps below to set up an outgoing Bluetooth COM
port.
1. Make sure you have paired with the serial port device
you want to communicate with. To do this, follow the
steps in the section called
in this chapter.
2. Select the COM Ports tab.
3. Tap New Outgoing Port, the second option.
68
Create a Bluetooth partnership
Page 76

Chapter 8: Using the Integrated Bluetooth Option
4. The Add a Device screen appears. Tap on the name of the
device you want to set up as an outgoing port, as shown
in the following image.
69
Page 77

5. Select a numbered COM port from the list of ports that
appear. If the port cannot be created, it is in use. Select a
di erent numbered port.
6. Important: Deselect the Secure Connection option below
the list of COM ports, as shown above. Deselecting this
option ensures that the device disconnects its Bluetooth
connection only when you tell it to.
7. Tap Finish.
Once the virtual COM port is assigned using the outgoing
Bluetooth COM port, specify the COM port assignment within
your application as explained in the user documentation for
the application. An example follows.
Suppose you are using a Bluetooth-enabled GPS receiver
with the device and a navigation program on the Field PC.
In this example, assume you have set up a virtual COM port
between the Field PC and the GPS receiver and that you
assigned the outgoing COM port as COM 6. To assign the
COM port in your navigation program, you would then follow
70
Page 78

Chapter 8: Using the Integrated Bluetooth Option
these steps:
1. Locate the place in the navigation program where the
COM port is chosen.
2. Select COM Port 6 as the COM port for the Bluetooth GPS
receiver.
Set up an incoming
Bluetooth COM port
Use this option if you want to assign the virtual COM port
as an Incoming COM port (i.e., you want another device
to initiate communications with the Field PC). If you are
connected with a Bluetooth device that supports serial
communications, follow these steps to set up the incoming
Bluetooth COM port:
1. Press the COM Ports tab.
2. Tap on New Incoming Port.
3. Select a numbered COM port from the list.
Note: If the port cannot be created, it is in use. Select a
di erent numbered port.
4. Important: Deselect (clear) the Secure Connection
checkbox. Deselecting this option ensures that the
device disconnects its Bluetooth connection only when
you tell it to.
5. Tap Finish.
For more information about using Bluetooth to connect to
other devices, see the next chapter, Supported Bluetooth
Pro les.
71
Page 79

72
Page 80

9
Supported
Bluetooth®
profi les
Serial Port Pro le
Dial-Up Networking (DUN) Pro le
Human Interface Device (HID) Pro le
Object Push Pro le (OPP)
Page 81

Chapter 9
Supported
®
Bluetooth
This chapter describes the Bluetooth® pro les recognized
by the Microsoft drivers installed on your Field PC. Drivers
determine which devices your Field PC can communicate
with. If you are using an external Bluetooth CF or SDIO
card and you installed a new driver speci c to this card
(recommended), consult the documentation that came with
the driver for instructions about its pro les.
Note: Bluetooth cards are not recognized by modules with
integrated Bluetooth. For general instructions about using an
integrated Bluetooth module, see Chapter 8.
This chapter is organized by Bluetooth pro le, each of which
is brie y described below. Instructions for using each pro le
to create Bluetooth partnerships follow.
• Serial Port Pro le (SPP). Similar to a serial cable, this pro le
acts as a liaison between two devices, such as the Field
PC and a GPS receiver, using virtual ports. (These ports
are described in the previous chapter.)
• Dial-Up Networking (DUN). Lets you connect to a
computer through a cell phone or a Bluetooth-enabled
modem.
• Human Interface Device (HID). Allows you to
communicate between the Field PC and a Bluetooth
keyboard or mouse.
• Object Push Pro le (OPP). This pro le lets you exchange
les like data, audio, business cards, appointments, and
contacts. Similar to the well-known object exchange
pro le (OBEX).
Profi les
74
Page 82

Chapter 9: Supported Bluetooth Profi les
Serial Port Profi le (SPP)
This section explains how to:
• Communicate with another device using the Serial Port
Pro le
• Con gure ActiveSync
Port Pro le
• Connect to a desktop computer that has a Bluetooth
dongle
• Print from the Field PC to a Bluetooth printer using the
Serial Port Pro le
Communicating with another device using the
Serial Port Pro le
Follow the instructions below to communicate with a device
using the Serial Port Pro le.
1. On the Field PC, tap on the Wireless Manager icon
to make sure Bluetooth is on and that the Field PC is
discoverable. (For instructions on doing this, see the
previous chapter.)
2. In the Wireless Manager, tap Menu > Bluetooth Settings >
Device tab > New partnership.
3. Select your target device and tap Next to create a
Bluetooth partnership with the target device. Note: After
you have created a partnership with a device, the device
automatically appears in the list of Bluetooth devices. You
do not have to re-create a device partnership.
4. Enter the passkey on the Field PC and on the device. (See
the documentation for the device for details. If there is
no passkey listed for the device, tap Next, then No.)
5. On the Field PC, select Serial Port and tap Finish.
6. The device appears on the list of partnerships.
7. Choose the COM Ports tab. Choose New Outgoing Port
and tap Next. Select a COM port that is available.
®
to synchronize through the Serial
75
Page 83

8. Important: Deselect (clear) the Secure Connection
checkbox. Deselecting this option ensures that the
device disconnects the Bluetooth connection only when
you tell it to.
9. Tap Finish to save the settings. Tap OK and Done to close
the Wireless Manager application.
Con guring ActiveSync on a Bluetooth-enabled desktop
computer to synchronize through the Serial Port Pro le
1. Make sure ActiveSync is set up properly on your desktop
computer.
2. Make sure there are no current ActiveSync connections
on your desktop. Note: If another device is already
connected to the desktop, serial ports do not appear
available. To x this, unplug the connected device, then tap
Refresh on the Field PC.
3. On the Today screen of the Field PC, tap on the Wireless
Manager icon and make sure Bluetooth is on or
discoverable.
4. Within Wireless Manager, select Menu then tap Bluetooth
Settings.
5. Select the Devices tab.
6. Tap New Partnership.
7. Tap on the name of the desktop computer, then tap Next.
8. Enter a passkey on the Field PC.
9. Enter the same passkey on your desktop computer.
10. Select ActiveSync on the Field PC. If no ActiveSync option
appears in the list of available services on the Field PC,
check the ActiveSync con guration on your desktop.
11. Tap Finish to save the settings. Tap OK > Done to close the
Wireless Manager application.
12. On the Field PC, tap Start > Programs > ActiveSync.
Choose Connect via Bluetooth.
Connecting to a desktop computer using a Bluetooth
76
Page 84

Chapter 9: Supported Bluetooth Profi les
dongle
1. Make the Field PC discoverable.
2. Select the COM Ports tab.
3. Choose New Outgoing Port.
4. Select the device and tap Next.
5. Select an available COM Port.
6. Important: Deselect (clear) the Secure connection
option. Deselecting this option ensures that the device
disconnects its Bluetooth connection only when you tell
it to.
7. Tap Finish to save your settings.
8. On your desktop PC, right-click the Bluetooth icon on
your menu bar.
9. Select Add Bluetooth device.
10. Select Let me choose passkey.
11. Type in a passkey.
12. On the Field PC, type in the same passkey.
13. Tap Next, OK, and Done.
Print from the Field PC to a Bluetooth printer using the
Serial Port Pro le
Currently, no built-in Windows Mobile 6 application supports
printers. However, you can use third-party printing programs
such as PrintBoy
®
to print data from the Field PC with a
Bluetooth printer.
Before you set up a third-party print application, you need
to rst discover the Bluetooth printer. To do so, follow these
steps:
1. On the Field PC, make sure Bluetooth is on and that the
Field PC is discoverable. (See the previous chapter for
instructions.)
2. In the Wireless Manager, tap Menu then Bluetooth
Settings.
77
Page 85

3. From the Devices tab, select New partnership.
4. When the printer appears on the list of devices, select it.
5. Tap Next.
6. Enter the passkey and tap Next.
7. Select Serial Port.
8. From the COM Ports tab, tap New Outgoing port.
9. Select the printer.
10. Tap New COM port.
11. Deselect the Secure Connection option.
You can now print using a third-party print application
you install on the Field PC. For details about using the
application to print, see the documentation that came with
the application.
Dial-Up Networking (DUN)
Profi le
This pro le allows you to connect to the Internet using a cell
phone dial-up connection or cordless modem. Instructions
for partnering with both device types are described below.
Connecting to the Internet using a cell phone dial-up
connection
1. Make your cell phone discoverable. (See the user
documentation that came with your cell phone for
instructions.)
2. On the Field PC, tap on the Wireless Manager icon on
the Today screen. (For more details, see the previous
chapter.)
3. Tap Menu > Bluetooth Settings.
4. Select the Turn on Bluetooth checkbox and make
sure Make the device discoverable to other devices is
deselected.
78
Page 86

Chapter 9: Supported Bluetooth Profi les
5. In the Devices tab, choose New Partnership.
6. Select your cell phone from the list of devices and tap
Next.
7. Enter any passkey on the Field PC.
8. Enter the same passkey and any other requested
information on your cell phone.
9. On the Field PC, select Dialup Networking, then tap Next.
10. Tap Start > Settings > Connections tab > Connections.
11. Choose Add a new modem connection.
12. Enter a name for the connection and select Bluetooth as
the modem.
13. Tap Next.
14. Select the name of your cell phone, then tap Next.
15. Enter the phone access number according to your phone
carrier’s speci cations. Tap Next.
16. Enter a user name, password, and domain as speci ed by
your network administrator.
17. Tap Advanced.
18. Fill in the remaining boxes as appropriate. Tap OK when
you are done.
19. Tap Finish. Now you should be able to connect to the
Internet on the Field PC through your phone’s dialup
connection.
Connecting to the Internet using a cordless modem
To connect to the Internet using a cordless modem, follow
the steps below:
1. Tap on the Bluetooth icon on the Today screen to open
Wireless Manager. Make sure Bluetooth is on. (See the
previous chapter for details.)
2. Tap Menu > Bluetooth Settings.
3. In the Mode tab, make sure Turn on Bluetooth is selected
and that Make the device discoverable to other devices is
79
Page 87

deselected.
4. Open the Devices tab and choose New Partnership.
5. When the cordless modem device is found, tap on it.
6. Enter the passkey.
7. In the Partnership Settings screen, make sure Serial Port
is not selected and that Dialup Networking is selected.
8. Tap Save.
9. Tap once on the device name to select it.
10. Tap Start > Settings > Connections tab > Connections.
11. Choose Add a new modem connection.
12. Enter a name.
13. Select Bluetooth as the modem.
14. Tap Next.
15. Select the name of the modem and tap Next.
16. Enter your ISP number as provided by your ISP provider
and tap Next.
17. Type in a user name and password.
18. Choose Advanced.
19. Change the baud rate to 115200.
20. Fill in the remaining boxes as appropriate. Click OK when
you’re done.
21. Tap Finish.
Now that you have established a dial-up network connection,
you can check email or look at a webpage using one of two
methods. The rst method is to let an application do the
work. (This option is especially useful with cell phones.) The
second method is to do the work yourself. Instructions for
each method follow.
Method 1: Use an Internet browser or application
1. Open Internet Explorer
®
.
2. Fill in the network login boxes.
Method 2: Do it yourself
1. From the Today screen, tap
80
Start > Settings > Connections
Page 88

Chapter 9: Supported Bluetooth Profi les
tab > Connections.
2. Choose
3. Tap and hold on a connection and choose
the menu that appears.
Manage existing connections.
Connect from
Human Interface Device
(HID) Profi le
This pro le allows you to connect with Human Interface
Devices like Bluetooth keyboards and mice. To make a
connection, follow these steps:
1. Make sure Bluetooth is on or discoverable. Create a
Bluetooth partnership with the device. (See the previous
chapter for instructions on how to do these tasks.)
2. Make sure the HID is ready for pairing and select
Partnership
3. Select the name of the HID and tap Next.
4. If the device has an assigned passkey or accepts a
passkey you give it, enter the passkey on the Field PC
and tap Next. If the device needs no passkey, leave the
Passkey eld blank, tap Next, and choose No when you
are asked whether you want the device to be added to
the device list.
Note: Saying
add the device to the device list allows you to proceed to the
next screen; saying
5. If appropriate, enter the same passkey on the HID to
establish a partnership.
6. Select Input Device.
7. Tap Finish. You now have a partnership with the HID.
Note: If no partnership appears for the HID on the Devices
tab screen, try resetting your Field PC.
to search for a Bluetooth device.
No when you are asked whether you want to
Ye s returns you to the passkey screen.
New
81
Page 89

Object Push Profi le (OPP)
or beaming
Your Field PC uses Object Exchange File (OBEX) protocol
to transfer or “push” electronic objects such as business
cards from one Bluetooth-enabled device to another. For
instructions, read on.
Transferring data from a Bluetooth-enabled device
To send data from a Bluetooth-enabled device to the Field
PC, follow these steps:
1. Make sure the Field PC is discoverable. (See the previous
chapter or the on-device help on the Field PC for
instructions.)
2. On the Bluetooth-enabled device, tap and hold the stylus
on the lename you want to beam. A menu appears.
3. Choose
4. Send data from the device to the Field PC. The Field PC
receives the data.
To send data from your Field PC to a Bluetooth device, follow
these steps:
1. Make sure the device is discoverable. (For instructions,
see the user documentation that came with your device.)
2. On the Field PC, make sure Bluetooth is on. (See the
previous chapter for instructions.)
3. In File Explorer, tap and hold on the name of the le you
want to transfer, then choose Beam File from the menu
that appears.
4. When the name of the device becomes visible, tap on
the name.
5. On the Bluetooth device, accept the le. The le is
Beam File. The device nds the Field PC.
82
Page 90

Chapter 9: Supported Bluetooth Profi les
transferred.
83
Page 91

84
Page 92

10
Caring for Your
Field PC
Storing the Field PC and battery packs
Protecting the touchscreen
Protecting the Field PC against
mechanical shock
Battery pack warnings
Equipment warnings
Using the Field PC in extreme
temperatures
Cleaning the Field PC
Repairing the Field PC
Disposing of the Field PC and battery packs
Page 93

Chapter 10
Caring for Your
Field PC
This chapter explains how to store, clean, and protect your
Field PC and battery packs. Speci cally, it provides guidelines
for—
• storing your Field PC and battery packs
• protecting the touchscreen
• protecting the Field PC against mechanical shock
• battery pack warning
• equipment warnings
• using the Field PC in extreme temperatures
• cleaning the Field PC
• repairing the Field PC
• disposing of the Field PC and battery packs
Storing your Field PC and
battery packs
This section describes what you need to know about storing
your device and battery packs, including
• the storage temperature range of the Field PC
• how to store the Field PC for less than two weeks
• how to store the device for more than two weeks
• how to take the Field PC out of extended storage
Storage temperature range of the Field PC. The Field PC
can be stored at temperatures between -22° F and 140° F
(-30° C to 60° C).
86
Page 94

Chapter 10: Caring for Your Field PC
If possible, store your Field PC indoors. Doing so helps
protect your device from extreme temperatures and helps
your device run e ciently at startup.
Storing the Field PC for less than two weeks. If you plan to
store your device for less than two weeks, suspend the device
by following these steps:
1. As a precaution, back up your data onto a desktop
computer or an external storage device such as a CF
or SD card. (See Chapter 3: Using the Hardware for more
instructions on backing up your data.)
2. Leave the battery pack in the device.
3. If you plan to store the device longer than a few
days, it is a good idea to leave the device connected to
the wall charger or to make sure the battery pack is fully
charged.
4. Suspend the device.
Storing the Field PC for more than two weeks. To store the
device safely for longer than two weeks, follow these steps:
1. Back up your data.
2. Press the Applications Manager button
to close
all running application programs.
3. Charge the battery pack to full capacity (100%).
4. Unplug the wall charger.
5. Press the Power button until the
Power Button menu appears.
6. Select
Power O from the menu,
then tap
OK.
7. Place the Field PC in a safe, dry
place.
Taking the Field PC out of extended storage. The battery
pack discharges slightly during extended storage periods.
87
Page 95

When you are ready to use your Field PC again, follow these
steps so your battery pack runs e ciently:
1. Plug the Field PC into a charger.
2. Charge the battery pack. (To check the battery power
status, tap on the battery icon at the top of the screen.
) Only charge the battery pack in temperatures
between 32°F and 104°F (0°C and 40°C). For best results,
charge the battery pack at room temperature (68°F or
20°C).
Protecting the touchscreen
Protect the touchscreen from impact, pressure, or abrasive
substances that could damage it. To further protect the
touchscreen, apply one of the screen protectors that came
with your Field PC.
CAUTION: Be sure to replace the screen protector as often as
!
the screen protector packaging directs.
To apply a screen protector, follow these steps:
1. Make sure the Field PC screen is free
of oils and
dirt. You can wipe it with a
micro ber cloth.
2. Align bottom corners of the
screen protector with the
Field PC screen.
3. Smooth the screen protector while peeling back the
liner, working out air bubbles as you go. Continue
smoothing until the paper liner is removed.
Note: Some air bubbles may still be visible, but they fade away
in a short time. You can use a credit card to gently push out any
excess air.
88
Page 96

Chapter 10: Caring for Your Field PC
Protecting the Field PC
against mechanical shock
The Field PC is designed for protection from mechanical
shock. It can be dropped from up to ve feet (1.524m) onto
concrete. Shock protection is guaranteed only when the top
cap and body molding are securely in place.
Battery warnings
WARNING! This device comes with a lithium ion
!
rechargeable battery pack. To reduce the risk of re or burns,
do not disassemble, crush, puncture, short external contacts,
or expose the battery pack to re.
Follow these additional safety guidelines:
• Use only battery packs approved for use with this device.
• Do not store or leave your device or battery pack near a
heat source such as a radiator, replace, stove, electric
heater, or other heat-generating appliance, or otherwise
expose it to temperatures in excess of 140° F (60° C).
• Do not try to open the battery pack.
• Do not carry a battery pack in your pocket, purse, or
other container where metal objects (such as car keys
or paper clips) could short-circuit the battery pack
terminals.
• Keep the battery pack contacts clean. If they get dirty,
wipe them o with a soft cloth.
• Dispose of the battery pack properly. See the section
called Disposing of the Field PC and battery packs in this
manual for instructions.
• Do not install the battery pack backwards so that the
polarity is reversed.
89
Page 97

• Do not connect the positive terminal and the negative
terminal of the battery pack to each other with any metal
object (such as wire).
• Do not solder directly onto the battery pack.
• Do not place the battery pack in direct sunshine.
• In the rare event that the battery pack leaks and uid
gets into the eye, do not rub the eye. Rinse well with
water and immediately seek medical care.
• Dispose of the battery pack properly. See the section
below,
instructions.
Disposing of your Field PC and battery packs for
Equipment warnings
WARNING! To reduce the risk of personal injury, electrical
!
shock, re or damage to the equipment:
• Plug the wall charger into an electrical outlet that is
easily accessible at all times.
• Disconnect power from the equipment by unplugging
the wall charger from the electrical outlet or unplugging
the synchronization cable from the host computer.
• Do not place anything on the wall charger cord or any
of the other cables. Arrange them so that no one may
accidentally step on or trip over them.
• Do not pull on a cord or cable. When unplugging the wall
charger from the electrical outlet, pull on the plug, not
the cord.
• Use only wall chargers intended for the Field PC.
other external power source can damage your product
and void your warranty.
Using any
90
Page 98

Chapter 10: Caring for Your Field PC
Using the Field PC in
extreme temperatures
The Field PC operates in ranges from -22° F to 122° F (-30°
C to 50° C). To help your device function properly, store the
device indoors when possible.
Other tips:
• If the Field PC is exposed to temperatures below 14°F
(-10°C ), the device may slow down or the display
backlight may become dim to reduce the load on the
battery power.
• Extremely low or high temperatures may prevent the
battery pack from charging. Charge the battery pack
in temperatures between 32°F and 104°F (0° C and 40°
C). For best results, charge the battery pack at room
temperature (68°F or 20°C)
Cleaning the Field PC
This section explains how to clean
• the touchscreen
• the communications module (area housing the USB port,
DC jack, and serial port)
• the speaker or microphone
• the stylus slot
• the display bezel
CAUTION: Always make sure the top cap is on and screws are
!
tted tightly before you begin cleaning your Field PC.
91
Page 99

Touchscreen. To clean the touchscreen, follow these steps:
1. Press the power button brie y to suspend the device.
2. If you applied a protector to the touchscreen, carefully
remove it.
3. Apply water or a mild cleaning solution such as
or
409® to a micro ber cloth and gently wipe o the
touchscreen. Other approved cleaners include
Wonder
CAUTION: Do not use tissues, paper towels, or harsh
!
cleaning agents to clean the touchscreen.
4. If you used a cleaning solution, rinse the touchscreen
with water and dry it with a micro ber cloth.
5. Press the power button to resume the device.
CAUTION: Long exposure to the following solutions may
!
damage your device:
• pine oil
• oil based paint
• automotive brake cleaner
• isopropyl alcohol
• carburetor cleaner
In case the device is exposed to one of these solutions, wipe
it o with a mild cleaning solution.
®
and Citrus All Purpose Cleaner®.
Windex®
Citrus
Case o vermolding. Clean the rubber-like overmolding that
surrounds the case with a cloth and a mild cleaning solution
like
409 or Citrus Wonder. After you are done cleaning, rinse
the device with water.
Communications module (area housing the USB port, DC
jack, serial port). To clean the communications module, run it
under a faucet. Use a soft toothbrush or toothpick to clean out
any remaining dirt.
Speaker and microphone. If debris gets in the speaker or
microphone, use a soft bristle brush to remove it. Do not
92
Page 100

Chapter 10: Caring for Your Field PC
insert any object into the speaker or microphone holes.
Stylus slot. Rinse the stylus slot with water.
Display bezel. If the edge under the bezel gets dirty, use a
micro ber cloth to remove the debris. Do not remove the
bezel.
Repairing the Field PC
If the Field PC is in need of repair, call your service center for a
Return Materials Authorization number (RMA). IMPORTANT:
Do not attempt to service the device yourself. This action
voids the warranty.
Disposing of the Field PC
and battery packs
This product must not be disposed of with
municipal waste. It is your responsibility to
dispose of your waste equipment by handing it
over to a designated collection point for the
recycling of waste electrical and electronic
equipment. If you cannot nd a location, contact
the manufacturer for information about disposal.
The lithium-ion battery packs for your Field PC are recyclable.
Avoid placing them in the trash or municipal waste system.
To nd the nearest battery recycling center in the USA, visit
the Rechargeable Battery Recycling Corporation’s website at
www.rbrc.org/call2recycle/index.html or call 1-800-8-battery.
The Field PC contains no mercury or cadmium.
93
 Loading...