

Page 1
Allegro CETM Field PC Quick Start Guide
Complete all of the steps in this guide before using your Allegro CE
Step 1
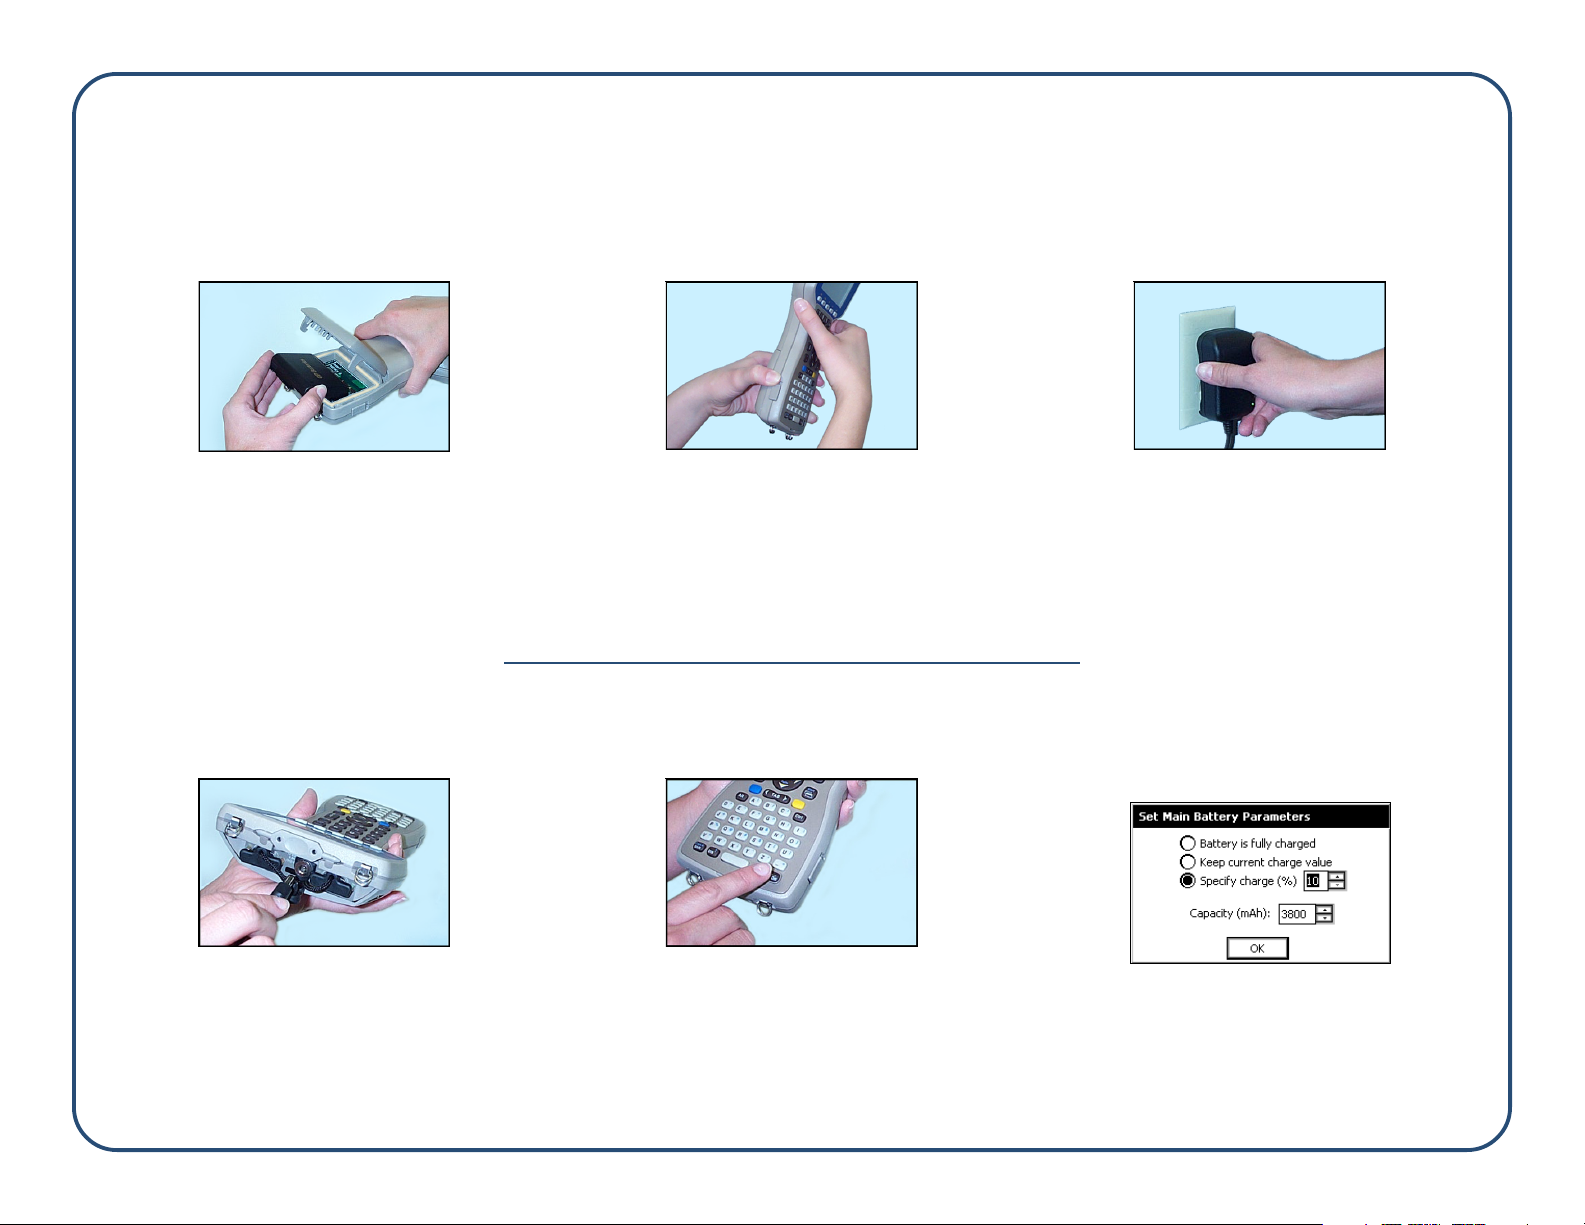
Insert the battery pack into the Allegro
1. Push up on the release latches on the sides of
the Allegro to open the battery compartment
door.
2. Place the NiMH battery pack in the left side of
the battery compartment, push down, and
slide it all the way to the right.
Step 4
Plug the charger into the Allegro
Step 2
Close and latch the battery door
1. Push the battery door closed until each release
latch clicks into place.
2. Slide the release latches downward until they
cannot slide any further to securely latch the
battery door closed.
Do not turn on the Allegro yet.
Step 5
Turn the Allegro on
Step 3
Plug the charger into the wall
1. Plug the AC wall charger that came with the
Allegro into the wall socket.
The small green light on the wall adapter
turns on when it is plugged into the wall.
Step 6
Fill out the Set Main Battery Parameters
screen and charge the battery pack
1. Remove the rubber protector from the Allegro’s
external power input jack.
2. Plug the power connector end of the charger
into the Allegro.
1. Push the On/Off button on the Allegro.
As Windows CE loads, a progress bar is
shown that does not require any action until it
gets to the Set Main Battery Parameters screen.
1. Set the charge to 10% and tap on OK.
2. Charge the installed battery pack for 3 to 4
hours. This is to ensure the batteries are
charged to full capacity.
Page 2

Allegro CE Field PC Quick Start Guide Continued
Step 7
Set time and date
Double tap on the clock on your Allegro’s
desktop. Complete the following steps:
1. Tap on the correct day on the Date tab.
2. Tap on the Time tab, select the time zone you
are in, and tap on the Apply button.
3. Select the Daylight savings time in effect
option and tap on the Apply button (only if it
applies to your time zone).
4. Set the correct time, tap on the Apply button,
and tap on OK in the upper right corner.
ActiveSync facilitates communication between
the Allegro and the desktop PC. Read the
following sections in the manual for details:
• Establishing a Connection Using ActiveSync
• Setting Up a Partnership
Step 10
Install the PTab Converter
1) Click on the Install PTab Converter option
located on the Allegro CD menu page.
2) Follow the installation instructions.
PTab is the spreadsheet program installed on
the Allegro CE. To use it correctly, you must
install the converter.
Step 8
Insert the Allegro CD-ROM into your PC and
install Acrobat Reader on the desktop PC
1) Insert the Allegro CD into the PC’s CD-ROM
drive.
2) Wait for the Allegro CD Menu screen to appear
on the screen of your desktop PC.
3) Click on the Install Acrobat Reader option on the
Allegro CD menu page.
4) Follow the installation instructions.
Acrobat Reader is required to read the on-line
Allegro CE Owner’s Manual.
Step 11
Read the Owner’s Manual
1) Click on the Read Owner’s Manual option on
the Allegro CD menu page.
2) Refer to this on-line Owner’s Manual as
needed.
We recommend that you read the following
sections right away:
• Batteries - Chapter 2
• Communication Ports - Chapter 2
• USB/Power Dock (if purchased) - Chapter 2
• Save System Utility - Chapter 4
• ActiveSync File Transfer Program - Chapter 4
• Warranty Statement - Chapter 7
Thank you for your purchase of the Allegro CE
Field Computer. We know you will be pleased
with the features the Allegro offers.
Step 9
Install ActiveSync on the desktop PC
1) Click on the Read Owner’s Manual option on
the Allegro CD menu page.
2) Go to Chapter 4 of the Owner’s Manual and
find the section entitled ActiveSync Transfer
Program.
Note: The USB port is the default communication
port for the Allegro CE. If you are using a different
communication port you need to change the COM
setting on your Allegro CE (refer to the
Establishing a Connection Using ActiveSync
section in Chapter 4 of the Allegro CE Owner’s
Manual).
3) Complete all of the steps in the download and
installation sections.
a Campbell Scientific Company
1740 N. Research Park Way
Logan, UT 84341-1977 USA
Telephone: 435-753-1881
Fax: 435-753-1896
Email: js@junipersys.com
Websites: www.junipersys.com
www.harvestmaster.com
Mobile Field Computers and Mobile GIS/GPS
HarvestMaster™ Brand Data Collection Tools for
Agriculture
Part Number: 12942-02
Release Date: Jan. 2003
 Loading...