

Juniper STRM 500 II, STRM 2500 II, STRM 5000 II, STRM 500, STRM 5000 Hardware Installation Manual
...
Security Threat Response Manager
STRM Series II
Hardware Installation Guide
Release 2013.1
Juniper Networks, Inc.
1194 North Mathilda Avenue
Sunnyvale, CA 94089
USA
408-745-2000
www.juniper.net
Published: 2013-03-15

Copyright Notice
Copyright © 2013 Juniper Networks, Inc. All rights reserved.
Juniper Networks, Junos, Steel-Belted Radius, NetScreen, and ScreenOS are registered trademarks of Juniper Networks, Inc. in the United States and
other countries. The Juniper Networks Logo, the Junos logo, and JunosE are trademarks of Juniper Networks, Inc. All other trademarks, service marks,
registered trademarks, or registered service marks are the property of their respective owners.
All specifications are subject to change without notice. Juniper Networks assumes no responsibility for any inaccuracies in this document or for any
obligation to update information in this document. Juniper Networks reserves the right to change, modify, transfer, or otherwise revise this publication
without notice.
FCC Statement
The following information is for FCC compliance of Class A devices: This equipment has been tested and found to comply with the limits for a Class A
digital device, pursuant to part 15 of the FCC rules. These limits are designed to provide reasonable protection against harmful interference when the
equipment is operated in a commercial environment. The equipment generates, uses, and can radiate radio-frequency energy and, if not installed and
used in accordance with the instruction manual, may cause harmful interference to radio communications. Operation of this equipment in a residential
area is likely to cause harmful interference, in which case users will be required to correct the interference at their own expense. The following
information is for FCC compliance of Class B devices: The equipment described in this manual generates and may radiate radio-frequency energy. If it
is not installed in accordance with Juniper Networks' installation instructions, it may cause interference with radio and television reception. This equipment has
been tested and found to comply with the limits for a Class B digital device in accordance with the specifications in part 15 of the FCC rules. These
specifications are designed to provide reasonable protection against such interference in a residential installation. However, there is no guarantee that
interference will not occur in a particular installation. If this equipment does cause harmful interference to radio or television reception, which can be
determined by turning the equipment off and on, the user is encouraged to try to correct the interference by one or more of the following measures:
Reorient or relocate the receiving antenna. Increase the separation between the equipment and receiver. Consult the dealer or an experienced radio/TV
technician for help. Connect the equipment to an outlet on a circuit different from that to which the receiver is connected.
Caution: Changes or modifications to this product could void the user's warranty and authority to operate this device.
Disclaimer
THE SOFTWARE LICENSE AND LIMITED WARRANTY FOR THE ACCOMPANYING PRODUCT ARE SET FORTH IN THE INFORMATION PACKET
THAT SHIPPED WITH THE PRODUCT AND ARE INCORPORATED HEREIN BY THIS REFERENCE. IF YOU ARE UNABLE TO LOCATE THE
SOFTWARE LICENSE OR LIMITED WARRANTY, CONTACT YOUR JUNIPER NETWORKS REPRESENTATIVE FOR A COPY.
STRM Hardware Installation Guide
Release 2013.1
Copyright © 2013, Juniper Networks, Inc.
All rights reserved. Printed in USA.
Revision History
March 2013—
The info
STRM Hardware Installation Guide
rmation in this document is current as of the date listed in the revision history.
2

LIST OF FIGURES
Figure 1: STRM 500 II Front Panel . . . . . . . . . . . . . . . . . . . . . . . . . . . . . . . . 6
Figure 2: STRM 500 II Back Panel . . . . . . . . . . . . . . . . . . . . . . . . . . . . . . . . 7
Figure 3: STRM 2500 II Front Panel . . . . . . . . . . . . . . . . . . . . . . . . . . . . . . . 8
Figure 4: STRM 2500 II Back Pane . . . . . . . . . . . . . . . . . . . . . . . . . . . . . . . . 9
Figure 5: STRM 5000 II Front Panel . . . . . . . . . . . . . . . . . . . . . . . . . . . . . . 10
Figure 6: STRM 5000 II Front Panel . . . . . . . . . . . . . . . . . . . . . . . . . . . . . . 10
Figure 7: STRM 5000 II Back Panel . . . . . . . . . . . . . . . . . . . . . . . . . . . . . . 12
Figure 8: Rear Panel of STRM 500 II . . . . . . . . . . . . . . . . . . . . . . . . . . . . . 14
Figure 9: Front Panel of STRM 500 II . . . . . . . . . . . . . . . . . . . . . . . . . . . . . 15
Figure 10: STRM 500 II with the Flow Collector 4-port LAN card inserted 17
Figure 11: System Console Window . . . . . . . . . . . . . . . . . . . . . . . . . . . . . . 26
Figure 12: Set the Date and Time Window . . . . . . . . . . . . . . . . . . . . . . . . . 26
Figure 13: Time Zone Continent Window . . . . . . . . . . . . . . . . . . . . . . . . . . 27
Figure 14: Time Zone Region Window . . . . . . . . . . . . . . . . . . . . . . . . . . . . 28
Figure 15: Configure STRM Window . . . . . . . . . . . . . . . . . . . . . . . . . . . . . 28
Figure 16: New Root Password Window . . . . . . . . . . . . . . . . . . . . . . . . . . . 29
Figure 17: Confirm New Root Password Window . . . . . . . . . . . . . . . . . . . 29
Figure 18: Front-Mounting flush to rack . . . . . . . . . . . . . . . . . . . . . . . . . . . 32
Figure 19: Front-Mounting recessed in rack. . . . . . . . . . . . . . . . . . . . . . . . . 33

Figure 20: Front-Rear-Mounting flush to rack . . . . . . . . . . . . . . . . . . . . . . 33
Figure 21: Front-Rear-Mounting recessed in rack . . . . . . . . . . . . . . . . . . . . 34
Figure 22: Mid-Mount in two post equipment rack . . . . . . . . . . . . . . . . . . 35

LIST OF TABLES
Table 1: Text Conventions . . . . . . . . . . . . . . . . . . . . . . . . . . . . . . . . . . . . . . . 1
Table 2: STRM 500 II Front Panel LEDs . . . . . . . . . . . . . . . . . . . . . . . . . . . 6
Table 3: STRM 500 II Front Panel Ports . . . . . . . . . . . . . . . . . . . . . . . . . . . . 7
Table 4: STRM 500 II Rear View Components . . . . . . . . . . . . . . . . . . . . . . . 7
Table 5: STRM 2500 II Front Panel LEDs . . . . . . . . . . . . . . . . . . . . . . . . . . 8
Table 6: STRM 2500 II Front Panel Ports . . . . . . . . . . . . . . . . . . . . . . . . . . . 9
Table 7: STRM 2500 II Back Panel Components . . . . . . . . . . . . . . . . . . . . . 9
Table 8: STRM 5000 II Front Panel LEDs . . . . . . . . . . . . . . . . . . . . . . . . . 11
Table 9: STRM 5000 II Front Panel Ports . . . . . . . . . . . . . . . . . . . . . . . . . . 11
Table 10: STRM 5000 II Back Panel Components. . . . . . . . . . . . . . . . . . . . 12
Table 11: Required Ports of STRM . . . . . . . . . . . . . . . . . . . . . . . . . . . . . . . 13
Table 12: Ethernet Port LEDs . . . . . . . . . . . . . . . . . . . . . . . . . . . . . . . . . . . 15
Table 13: RJ-45 Console Connector Pinout . . . . . . . . . . . . . . . . . . . . . . . . . 15
Table 14: Network Hierarchy . . . . . . . . . . . . . . . . . . . . . . . . . . . . . . . . . . . . 21
Table 15: Devices . . . . . . . . . . . . . . . . . . . . . . . . . . . . . . . . . . . . . . . . . . . . . 22
Table 16: Asset Identification . . . . . . . . . . . . . . . . . . . . . . . . . . . . . . . . . . . 23
Table 17: STRM 500 II, STRM 2500 II and STRM 5000 II Hardware Specifi-
cations . . . . . . . . . . . . . . . . . . . . . . . . . . . . . . . . . . . . . . . . . . . . . . . . . . . . . . 41


CONTENTS
ABOUT THIS GUIDE
Documentation Conventions 1
Documentation Feedback 1
Requesting Technical Support 2
1 STRM OVERVIEW
2 HARDWARE OVERVIEW
STRM 500 II Front Panel and Back Panel Indicators and Features 5
Front Panel Indicators 5
Back Panel Features 7
STRM 2500 II Front Panel and Back Panel Indicators and Features 8
Front Panel Indicators 8
Back Panel Features 9
STRM 5000 II Front Panel and Back Panel Indicators and Features 10
Front Panel Indicators 10
Back Panel Features 12
3 INSTALLING AND CONNECTING THE STRM HARDWARE
Additional Hardware Requirements 13
Installing the Hardware 14
LED Behavior 16
Chassis Console Port Pinouts 16
Installing the Flow Collector 4-port LAN Card on STRM 500 II 17
Connecting a Laptop or Keyboard and a Monitor 18
4 PREPARING YOUR SYSTEM FOR STRM SOFTWARE INSTALATION
STRM Components 19
Browser Support 20
Preparing Your Network Hierarchy 20
Identifying Network Settings 21
Identifying Security Monitoring Devices and Flow Data Sources 21
Identifying Network Assets 22

5 SETTING UP STRM SOFTWARE AND CONFIGURING NETWORK
S
ETTINGS
Logging Into STRM for the First Time 25
Accessing STRM 30
A NEW OR CHANGED INFORMATION
B RACK-MOUNTING THE STRM SERIES II APPLIANCE
Front-Mounting Flush to Rack 35
Front-Mounting Recessed in Rack 36
Front-Rear-
Mounting Flush to Rack 37
Front-Rear-
Mounting Recessed in Rack 38
Mid-Mount in Two Post Equipment Rack 39
C MAINTAINING AND SERVICING THE HARDWARE
RAID Array 41
Power Supply 41
Cooling Fans 42
D HARDWARE SPECIFICATIONS

ABOUT THIS GUIDE
This preface provides the following guidelines for using the STRM Series II
Hardware Installation Guide:
• Documentation Conventions
• Documentation Feedback
• Requesting Technical Support
Documentation
Conventions
Documentation
Feedback
The sample screens used throughout this guide are representations of the screens
that appear when you install and configure the STRM Series II appliances. The
actual screens may differ.
Table 1 shows the text conventions used in this guide.
Table 1 Text Conventions
Conventions Description Example
Bold typeface Represents
commands and key
strokes in text
Italics Identify book names Security Threat Response Manager
We encourage you to provide feedback, comments, and suggestions so that we
can improve the documentation. You can send your comments to
techpubs-comments@juniper.net, or fill out the documentation feedback form at
https://www.juniper.net/cgi-bin/docbugreport/. If you are using e-mail, be sure to
include the following information with your comments:
• Document or topic name
• URL or page number
Click Next
Administration Guide
• Software release version (if applicable)
STRM Series II Hardware Installation Guide

ABOUT THIS GUIDE
Requesting
Technical Support
Technical product support is available through the Juniper Networks Technical
Assistance Center (JTAC). If you are a customer with an active J-Care or JNASC
support contract, or are covered under warranty, and need postsales technical
support, you can access our tools and resources online or open a case with JTAC.
• JTAC policies—For a complete understanding of our JTAC procedures and
policies, review the JTAC User Guide located at
http://www.juniper.net/us/en/local/pdf/resource-guides/7100059-en.pdf .
• Product warranties—For product warranty information, visit
http://www.juniper.net/support/warranty/ .
• JTAC Hours of Operation —The JTAC centers have resources available 24
hours a day, 7 days a week, 365 days a year.
Self-Help Online Tools and Resources
For quick and easy problem resolution, Juniper Networks has designed an online
self-service portal called the Customer Support Center (CSC) that provides you
with the following features:
• Find CSC offerings: http://www.juniper.net/customers/support/
• Search for known bugs: http://www2.juniper.net/kb/
• Find product documentation: http://www.juniper.net/techpubs/
• Find solutions and answer questions using our Knowledge Base:
http://kb.juniper.net/
• Download the latest versions of software and review release notes:
http://www.juniper.net/customers/csc/software/
• Search technical bulletins for relevant hardware and software notifications:
https://www.juniper.net/alerts/
• Join and participate in the Juniper Networks Community Forum:
http://www.juniper.net/company/communities/
• Open a case online in the CSC Case Management tool:
http://www.juniper.net/cm/
To verify service entitlement by product serial number, use our Serial Number
Entitlement (SNE) Tool: https://tools.juniper.net/SerialNumberEntitlementSearch/
Opening a Case with JTAC
You can open a case with JTAC on the Web or by telephone.
• Use the Case Management tool in the CSC at http://www.juniper.net/cm/ .
• Call 1-888-314-JTAC (1-888-314-5822 toll-free in the USA, Canada, and
Mexico).
For international or direct-dial options in countries without toll-free numbers, visit
us at http://www.juniper.net/support/requesting-support.html.
STRM Series II Hardware Installation Guide

1
STRM OVERVIEW
STRM appliances are designed to respond to the right threats at the right time
through effective analysis of networks, events, and audit log files. STRM has the
ability to identify environmental anomalies in the network, an attack path, and the
source of a threat. STRM provides network remediation for threat responses
across all security products.
The STRM appliances use two drivers, Security Information Management (SIM)
and Security Event Management (SEM), for security analysis of external and
internal threats. SIM provides reporting and analysis of data from host systems,
applications, and security devices to support security policy compliance
management, internal threat management, and regulatory compliance initiatives.
SEM improves security incident response capabilities by processing data from
security devices and network devices. It helps network administrators to provide
effective responses to external and internal threats.
STRM Series II Hardware Installation Guide

4 STRM OVERVIEW
STRM Series II Hardware Installation Guide

2
HARDWARE OVERVIEW
This chapter provides an overview of the STRM series II appliances. It contains the
following sections:
STRM 500 II Front Panel and Back Panel Indicators and Features
•
• STRM 2500 II Front Panel and Back Panel Indicators and Features
• STRM 5000 II Front Panel and Back Panel Indicators and Features
STRM 500 II Front
Panel and Back
Panel Indicators
and Features
Front Panel
Indicators
The STRM 500 II appliance has a 2U rack-mountable chassis with optional redundant
AC and DC power supplies, a 2U hot-swappable dual redundant RAID1 array, 8 GB of
memory, and a 4 Gigabit Ethernet controller.
See Figure 1 for the front panel features of the system. Table 2 and Table 3 describes
the front panel features.
STRM Series II Hardware Installation Guide
6 HARDWARE OVERVIEW
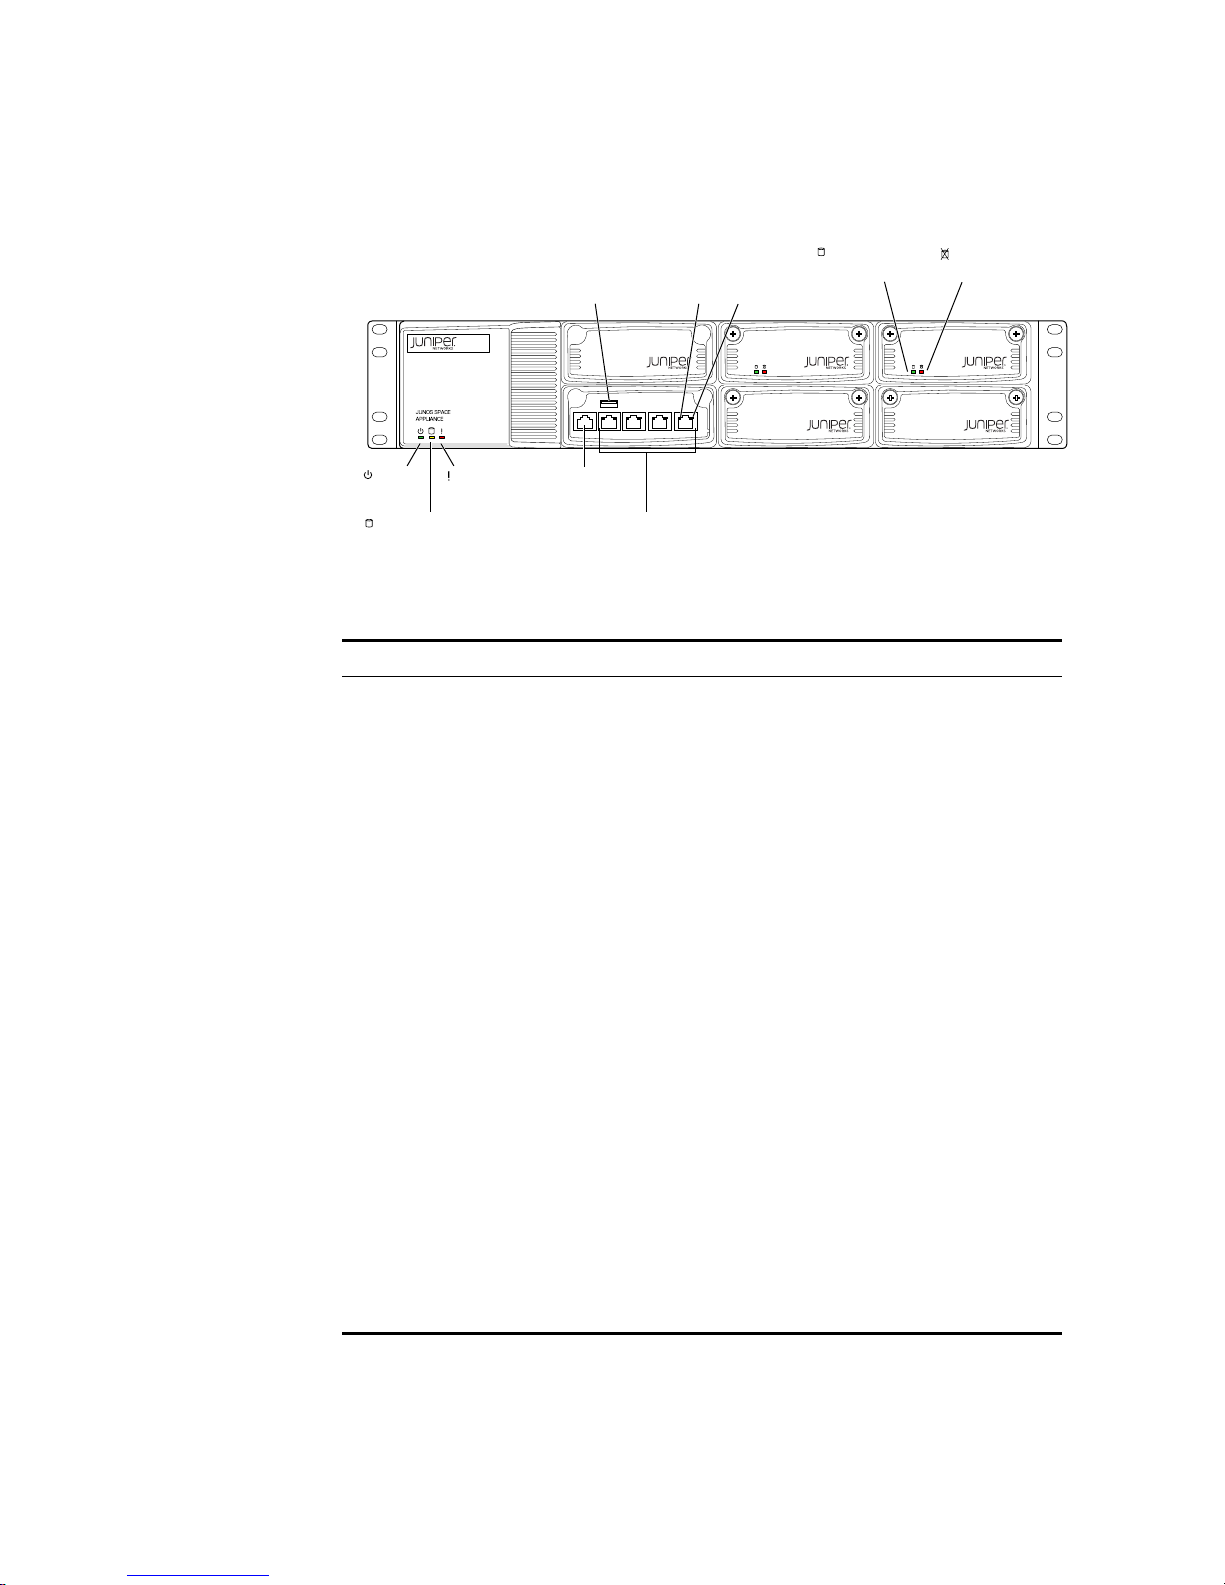
CONSOLE ETH3 ETH2 ETH1 ETH0
g040400
Power
LED
Hardware
LED
Hard disk LED Network ports
Console
port
Left
LAN
LED
Right
LAN
LED
STRM 500 II
Hard disk
Activity LED
Hard disk
Failure LED
USB
maintenance
port
Figure 1 STRM 500 II Front Panel
l
Table 2 STRM 500 II Front Panel LEDs
LEDs Description
LED
Chassis LEDs
• Power (green) - Indicates that the
appliance is powered on
• Hard disk (yellow) - Indicates the
hard disk is in use (writing or reading
data)
• Hardware (red) - Indicates that a
fan, power supply, or temperature
alarm has occurred
LAN LEDs
• Left LED (green) - Indicates that the
link is active, Momentary blinks for
activity
• Right LED - Indicates the link speed
- off -10 Mbps
- green - 100 Mbps
- yellow - 1 Gbps
• Hard disk tray LEDs
- Left (green) - For disk activity
- Right (red) - For disk failure
Solid - disk failure
STRM Series II Hardware Installation Guide
Slow blink - mirror re-sync

STRM 500 II Front Panel and Back Panel Indicators and Features 7
g040042
AC Power supply
receptacle
AC Power
switch
Table 3 STRM 500 II Front Panel Ports
Ports Description
Console port One RJ-45 console port
Network port Four RJ-45 Ethernet 10/100/1000
Back Panel Features See Figure 2 for the back panel features of the system.Table 4 describes the back
panel features.
Figure 2 STRM 500 II Back Panel
Table 4 STRM 500 II Rear View Components
Components Description
Cooling fans Draws air through vents of the chassis
and exhaust it through vents on the
other side of the chassis
Power supply Provides power to all components
STRM Series II Hardware Installation Guide
8 HARDWARE OVERVIEW
STRM 2500 II
!
"#$%
&'
(
"
)*
"
+,
-#
STRM 2500 II Front
Panel and Back
Panel Indicators
and Features
Front Panel
Indicators
The STRM 2500 II appliance has a 2U rack-mountable chassis with optional redundant
AC and DC power supplies, 2U hot-swappable dual redundant RAID10 array, 8 GB of
memory, and a Gigabit Ethernet controller.
See Figure 3 for the front panel features of the system. Table 5 and Table 6 describes
the front panel features.
Figure 3 STRM 2500 II Front Panel
STRM Series II Hardware Installation Guide

STRM 2500 II Front Panel and Back Panel Indicators and Features 9
g040042
AC Power supply
receptacle
AC Power
switch
Table 5 STRM 2500 II Front Panel LEDs
LEDs Description
LED
Chassis LEDs
• Power (green) - Indicates that the
appliance is powered on
• Hardware (red) - Indicates that a
fan, power supply, or temperature
alarm has occurred
LAN LEDs
• Left LED (green) - Indicates that the
link is active
• Right LED - Indicates the link speed
- off -10 Mbps
- green - 100 Mbps
- yellow - 1Gbps
• Hard disk module LEDs
- Top (green) - For disk activity
- Bottom (red) -For disk failure
Table 6 STRM 2500 II Front Panel Ports
Ports Description
Console port One RJ-45 console port
Network port Four RJ-45 Ethernet 10/100/1000
Back Panel Features See Figure 4 for the back panel features of the system. Table 7 describes the back
panel features.
Figure 4 STRM 2500 II Back Pane
STRM Series II Hardware Installation Guide

10 HARDWARE OVERVIEW
OPEN OPENOPEN
OPEN OPENOPEN
STRM5000
ETH 1 ETH 0CONSOLE
g040037
Console
port
Eth 1 Eth 0
Drive 3 Drive 4 Drive 5
Drive 0 Drive 1 Drive 2
CONSOLE ETH0 ETH1 ETH2 ETH3
STRM 5000 II
Drive 2Drive 1Drive 0
Drive 3 Drive 4
Drive 5
Left
LAN
LED
Right
LAN
LED
OPEN OPENOPEN
OPEN OPENOPEN
STRM5000
ETH 1 ETH 0CONSOLE
g040039
Power
LED
Hardware
LED
Left
LAN
LED
Right
LAN
LED
Hard disk
Activity LED
Hard disk
Failure LED
CONSOLE ETH0 ETH1 ETH2 ETH3
g040403
STRM 5000 II
USB maintenance
port
Power
LED
Alarm/Fail
LED
Network portsConsole
port
IOC expansion slots
Hard disk
Activity LED
Hard disk
Failure LED
Table 7 STRM 2500 II Back Panel Components
Components Description
Cooling fans Draws air through vents of the chassis
and exhaust it through vents on the
other side of the chassis
Power supply Provides power to all components
STRM 5000 II Front
Panel and Back
Panel Indicators
and Features
Front Panel
Indicators
The STRM 5000 II appliance has a 2U rack-mountable chassis with optional redundant
AC and DC power supplies, 2U hot-swappable dual redundant RAID10 array, 12 GB of
memory, and a Gigabit Ethernet controller.
See Figure 5 and Figure 6 for the front panel features of the system. Table 8 and
Table 9 describes the front panel features.
Figure 5 STRM 5000 II Front Panel
Figure 6 STRM 5000 II Front Panel
STRM Series II Hardware Installation Guide

STRM 5000 II Front Panel and Back Panel Indicators and Features 11
Table 8 STRM 5000 II Front Panel LEDs
LEDs Description
LED
Chassis LEDs
• Power (green) - Indicates that the
appliance is powered on
• Hardware (red) - Indicates that a
fan, power supply, or temperature
alarm has occurred
LAN LEDs
• Left LED (green) - Indicates that the
link is active
• Right LED - Indicates the link speed
- off -10 Mbps
- green - 100 Mbps
- yellow - 1Gbps
• Hard disk module LEDs
- Top (green) - For disk activity
- Bottom (red) -For disk failure
Table 9 STRM 5000 II Front Panel Ports
Ports Description
Console port One RJ-45 console port
Network port Four RJ-45 Ethernet 10/100/1000
STRM Series II Hardware Installation Guide

12 HARDWARE OVERVIEW
g033301
AC Power
supply
receptacle
AC Power switch
Back Panel Features See Figure 7 for the back panel features of the system. Table 10 describes the back
panel features.
Figure 7 STRM 5000 II Back Panel
Table 10 STRM 5000 II Back Panel Components
Components Description
Cooling fans Draws air through vents of the chassis
and exhaust it through vents on the
other side of the chassis
Power supply Provides power to all components
STRM Series II Hardware Installation Guide

3
INSTALLING AND CONNECTING THE
STRM H
This chapter explains how to install and connect the STRM Series II hardware.
This chapter contains the following section:
• Additional Hardware Requirements
• Installing the Hardware
• Installing the Flow Collector 4-port LAN Card on STRM 500 II
• Connecting a Laptop or Keyboard and a Monitor
ARDWARE
Additional
Hardware
Requirements
Before installing your STRM systems, ensure that you have access to the following
additional hardware components:
• A serial console.
• To make sure that your STRM data is preserved during a power failure, we
recommend that all STRM appliances or systems running STRM software
storing data (such as, Consoles, Event Processors, or Flow Processors) be
equipped with an Uninterrupted Power Supply (UPS).
We recommend that you install STRM on your LAN to ensure that it can
communicate with your applicable resources, such as authentication servers, DNS
servers, internal Web servers through HTTP/HTTPS, external Web sites through
HTTP/HTTPS (optional), the Juniper Networks update server via HTTP, Network
File System (NFS) file servers (optional), and client/server applications (optional).
Table 11 shows port information on the STRM appliance.
Table 11 Required Ports of STRM
Depends on
Direction Port Description LAN Internet
In 22 SSH command-line
management
443 Web interface Yes No No
Out 22 SSH connection to
new managed device
Yes No No
Yes Yes No
Configuration
STRM Series II Hardware Installation Guide

14 INSTALLING AND CONNECTING THE STRM HARDWARE
g040042
AC Power supply
receptacle
AC Power
switch
Table 11 Required Ports of STRM
Direction Port Description LAN Internet
23 Telnet connection to
new managed device
53 DNS lookups Yes No No
80 System Security
Updates from Juniper
Networks
123 Network Time Protocol
(NTP) time
synchronization
Depends on
Configuration
Yes No Yes
Yes Yes Yes
Yes Yes Yes
Installing the
Hardware
Place the shipping container on a flat surface and remove the hardware components
with care.
To install the STRM appliance:
Step 1 Mount the STRM appliance in your server rack using the attached mounting
brackets.
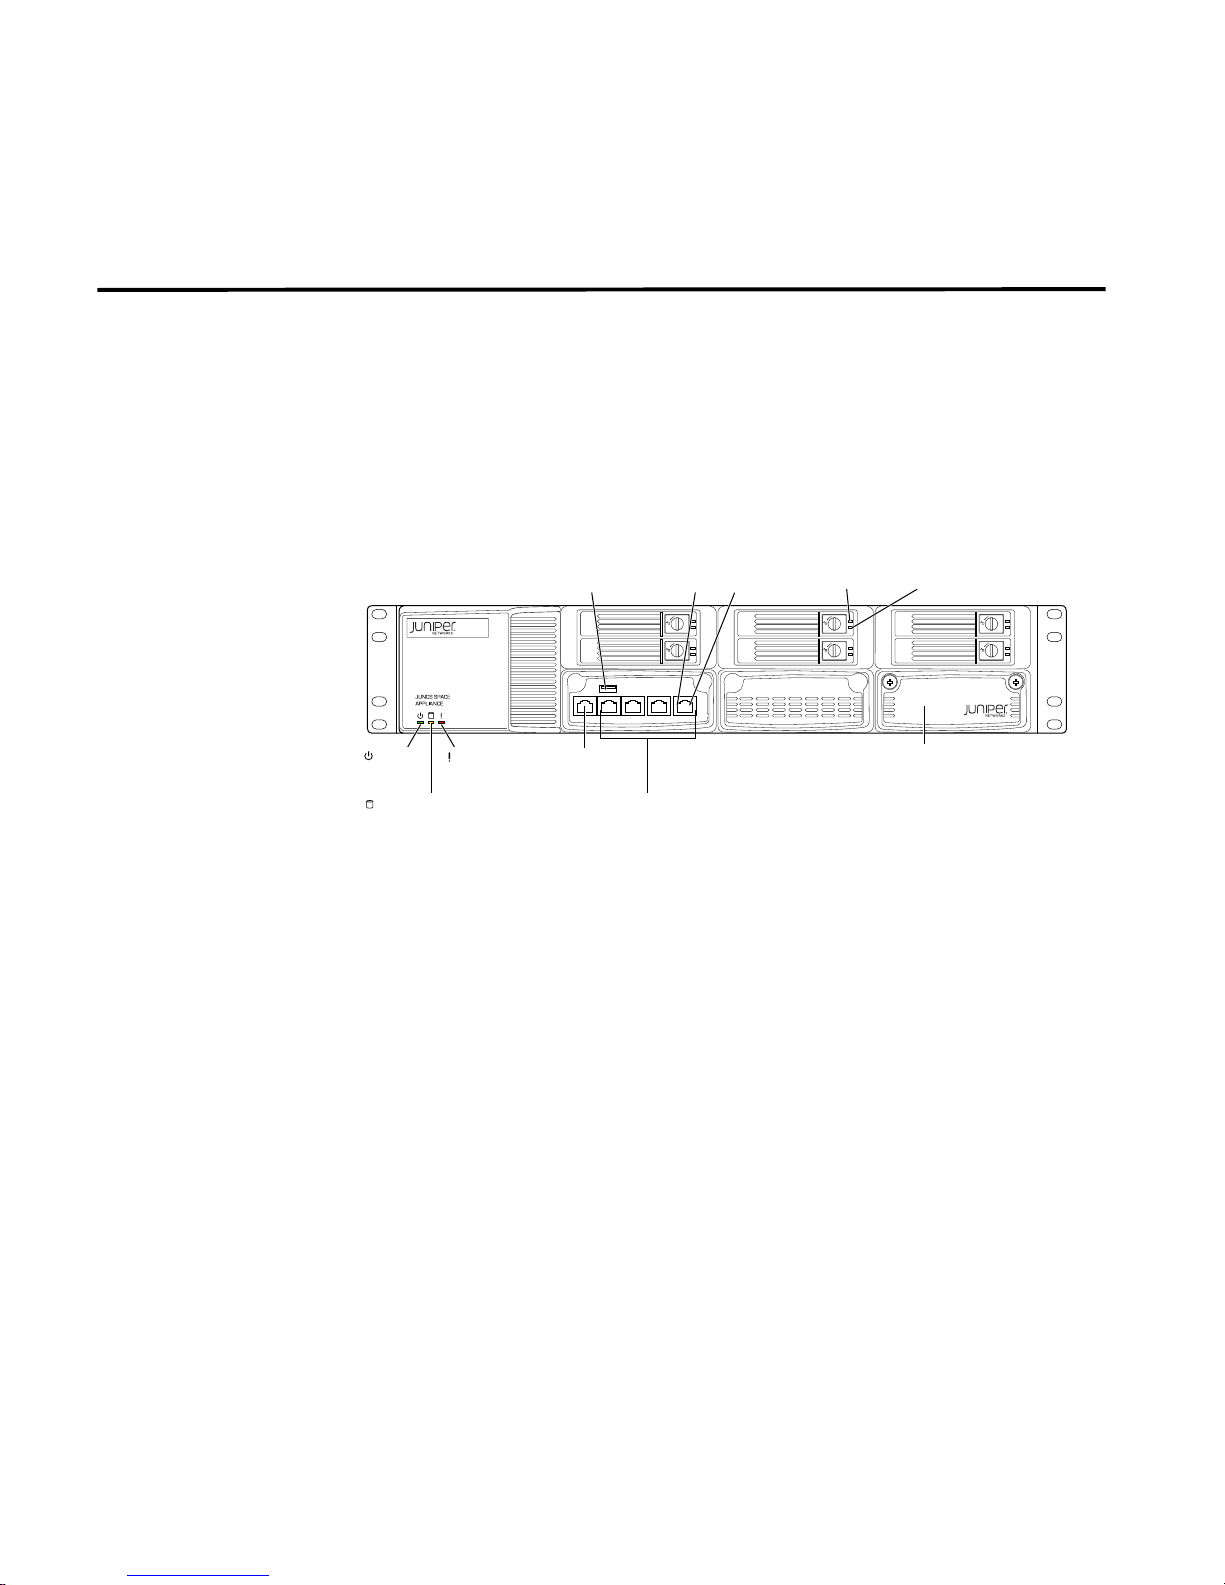
Step 2 Plug the power cord into the AC receptacle on the rear panel. See Figure 8.
If your STRM contains two power supplies, plug a power cord into each of the AC
receptacles.
Figure 8 Rear Panel of STRM 500 II
Step 3 Plug the other end of the power cord into a wall socket.
If your STRM appliance contains two power supplies, plug each power cord into a
separate power circuit to ensure that the device continues to receive power if one
of the power circuits fails.
Step 4 Plug the Ethernet cable into the port labeled ETH0 on the front panel. See Figure 9.
STRM Series II Hardware Installation Guide

Installing the Hardware 15
Console
port
STRM 500
Ethernet 1 Ethernet 0
Drive 0 Drive 1
g040020
CONSOLE ETH3 ETH2 ETH1 ETH0
g040400
Power
LED
Hardware
LED
Hard disk LED Network ports
Console
port
Left
LAN
LED
Right
LAN
LED
STRM 500 II
Hard disk
Activity LED
Hard disk
Failure LED
USB
maintenance
port
Figure 9 Front Panel of STRM 500 II
When you turn on the power, the internal port uses two LEDs to indicate the LAN
connection status, See
Step 5 Plug straight-through or crossover cable into the console port. See Figure 9
Table 12.
This cable is shipped with your STRM appliance. It is a console cable and DB-9
connector with 1-8 pinouts. See Table 13 for RJ-45 chassis console connector
pinout information.
Step 6 Push the power button on the front panel.
The green LED below the power button turns on. The STRM hard disk LED turns
on whenever the appliance reads data from or writes data to the STRM hard disk.
STRM Series II Hardware Installation Guide

16 INSTALLING AND CONNECTING THE STRM HARDWARE
LED Behavior
Table 12 Ethernet Port LEDs
LEDs Description
LED
Chassis LEDs
• Power (green) - Indicates that the appliance
• Hard disk (yellow) - Indicates the hard disk is
• Hardware (red) - Indicates that a fan, power
LAN LEDs
• Left LED (green) - Indicates that the link is
• Right LED - Indicates the link speed
is powered on
in use (writing or reading data)
supply, or temperature alarm has occurred
active, Momentary blinks for activity
- off -10 Mbps
- green - 100 Mbps
- yellow - 1 Gbps
Chassis Console Port
Pinouts
• Hard disk tray LEDs
- Top (green) - For disk activity
- Left (red) - For disk failure
- Solid: disk failure
- Slow blink: mirror re-sync
Table 13 RJ-45 Console Connector Pinout
Pin Signal Description
1 RTS Output Request to Send
2 DTR Output Data Terminal Ready
3 TxD Output Transmit Data
4 GND Chassis Ground
4 GND Chassis Ground
6 RxD Input Receive Data
7 DSR Input Data Set Ready
8 CTS Input Clear to Send
STRM Series II Hardware Installation Guide

Installing the Flow Collector 4-port LAN Card on STRM 500 II 17
CONSOLE ETH3 ETH2 ETH1 ETH0
g040405
Power
LED
Hardware
LED
Hard disk LED Network ports
Console
port
Left
LAN
LED
Right
LAN
LED
STRM 500 II
Hard disk
Activity LED
Hard disk
Failure LED
USB
maintenance
port
Installing the Flow
Collector 4-port
LAN Card on STRM
500 II
Step 1 Power down the STRM 500 II unit.
Step 2 Unscrew the two thumbscrews on the right-most blank IO module and remove the
Step 3 Insert the 4-port 1GB LAN module firmly and screw in the two thumbscrews.
The Flow Collector collects data from devices and various live and recorded feeds
such as network taps, span/mirror ports, NetFlow, and STRM flow logs. The Flow
Collector then groups related individual packets into a flow. A flow starts when the Flow
Collector detects the first packet with a unique source IP address, destination IP
address, source port, and destination port as well as other specific protocol options,
which may determine the start of a communication. Each additional packet is
evaluated and counts of bytes and packets are added to the statistical counters in the
flow record. At the end of an interval a status record of the flow is sent to a Flow
Processor and statistical counters for the flow are reset. A flow ends when no activity
for the flow is seen within the configured period of time. Flow reporting generates
records of all the active or expired flows during a specified period of time. STRM
defines these flows as a communication sessionbetween two pairs of unique IP
address/ports that use the same protocol. If the protocol does not support port-based
connections, STRM combines all packets between the two hosts into a single flow
record. However, a Flow Collector does not record flows until a connection is made to
another STRM component and data is retrieved.
To install the Flow Collector 4-port LAN card on an STRM 500 II unit:
dummy tray.
Figure 10 STRM 500 II with the Flow Collector 4-port LAN card inserted
Step 4 Power on the STRM 500 II unit and watch it boot on the serial console.
Step 5 Verify the link and activity LED on the new 4-port 1GB LAN module light up when
Step 6 Login to the admin console and you should now see 4 more Ethernet interfaces appear
Drive 0 Drive 1
STRM 500
Console
Eth 1 Eth 0
port
connecting the ports to your Ethernet switch with a standard CAT5e or CAT6 LAN
cable.
as eth4-eth7. The 4-port are labeled 0, 1, 2 and 3 and should map to Ethernet
interfaces as follows:
- 0 = eth7
- 1 = eth6
- 2 = eth5
g040038
STRM Series II Hardware Installation Guide

18 INSTALLING AND CONNECTING THE STRM HARDWARE
- 3 = eth4
Connecting a
Laptop or
Keyboard and a
Monitor
A STRM appliance includes the STRM software. You control the appliance through
a connected laptop or keyboard and monitor.
Follow the appropriate step:
• Connect a laptop to the RJ-45 serial port on the front panel of the appliance.
• Connect a keyboard and monitor to their respective ports on the front panel.
See Table 3 and Table 4 for the location of the ports.
STRM Series II Hardware Installation Guide

4
PREPARING YOUR SYSTEM FOR
STRM S
This chapter explains how to prepare your system and network before you install the
STRM software. It contains the following sections:
STRM Components
•
• Browser Support
• Preparing Your Network Hierarchy
• Identifying Network Settings
• Identifying Security Monitoring Devices and Flow Data Sources
• Identifying Network Assets
STRM deployment may consist of STRM installed on one or multiple systems. You
can install any or all components on a single server for small enterprises or
distributed across multiple servers for maximum performance and scalability in
large enterprise environments.
OFTWARE INSTALATION
To ensure a successful STRM deployment, adhere to the recommendations in this
document.
STRM Components STRM components that may exist in your deployment include:
• Flow Processor - The Flow Processor creates superflows (aggregate flows)
before the flows reach the Classification Engine.
• Classification Engine - Analyzes flows to classify and identify all traffic in the
enterprise network into multiple objects.
• Console - Provides the interface for STRM. The Console provides real time
views, reports, alerts, and in-depth flow views of network traffic and security
threats. This Console is also used to manage distributed STRM deployments.
The Console is accessed from a standard Web browser. When you access the
system, it prompts you to enter the user name and password, which must be
configured during the installation process.
• Update Daemon - Stores the database and TopN data. Typically, the Update
Daemon is installed on the Console.
• Flow Writer - Stores the flow and asset profile data.
• Event Collector - Gathers events from local and remote device sources. The
Event Collector normalizes events and sends the information to the Event
STRM Series II Hardware Installation Guide

20 PREPARING YOUR SYSTEM FOR STRM SOFTWARE INSTALATION
Processor. Before being sent to the Event Processor, the Event Collector
bundles identical events to conserve system usage. During this process,
Magistrate risk factors map the events to the STRM Identification System and
create the bundles.
• Event Processor - Processes events collected from one or more Event
Collectors. When events are received, the Event Processor correlates the
information from STRM and distributes it to the appropriate area, depending on
the type of event. The Event Processor also includes information gathered by
STRM to indicate any behavioral changes or policy violations for the event.
Rules are applied to the events that allow the Event Processor to process
according to the configured rules. Once complete, the Event Processor sends
the events to the Magistrate.
• Magistrate - Provides the core processing components. You can add one
Magistrate component for each deployment. The Magistrate provides views,
reports, alerts, and analysis of network traffic and security events. The
Magistrate processes the event against the defined custom rules to create an
offense. If no custom rules exist, the Magistrate uses the default rules to
process the event. An offense is an event that has been processed through
STRM using multiple inputs, individual events, and events combined with
analyzed behavior and vulnerabilities. The Magistrate prioritizes the offenses
and assigns a magnitude value based on several factors, including number of
events, severity, relevance, and credibility.
Browser Support To access the STRM interface, you must have a browser installed on your client
system. STRM supports the following Web browsers:
• Microsoft Internet Explorer 7.0
• Firefox 2.0
Preparing Your
Network Hierarchy
STRM uses the network hierarchy to understand your network traffic and provides
you with the ability to view network activity for your entire deployment. STRM
supports any network hierarchy that can be defined by a range of IP addresses.
You can create your network based on many different variables, including
geographical or business units. For example, your network hierarchy may include
corporate IP address ranges (internal or external), physical departments or areas,
mails servers, and Web servers.
Once you define the components you wish to add to your network hierarchy, install
STRM, and then configure the network hierarchy using the STRM interface. For
each component you wish to add to the network hierarchy, use Table 14 to indicate
each component in your network map.
At a minimum, we recommend that you define objects in the network hierarchy for:
Internal/external demilitarized zone (DMZ)
STRM Series II Hardware Installation Guide

Identifying Network Settings 21
• VPN
• All internal IP address space (for example, 0.0.0.0/8)
• Proxy servers
• Network Address Translation (NAT) IP address range
• Server network subnets
• Voice over IP (VoIP) subnets
Table 14 Network Hierarchy
Description Name IP/CIDR Value Weight
Identifying Network
Settings
Identifying Security
Monitoring Devices
and Flow Data
Sources
For more information, see the STRM Aministration Guide.
Before you install STRM, you must have the following information for each system
you wish to install:
• Hostname
• IP address
• Network mask address
• Subnet mask
• Default gateway
• Primary DNS server
• Secondary DNS server (Optional)
• Public IP address for networks using Network Address Translation (NAT)
• E-mail server
• NTP server (Console only) or Time server
STRM can collect and correlate events received from external sources such as
security equipment (for example, firewalls, VPNs, or IDSs) and host or application
security logs, such as - window logs. Device Support Modules (DSMs) and Flow
Collectors allow you to integrate STRM with this external data. STRM
automatically discovers sensor devices that are sending system log (syslog)
messages to an Event Collector. The sensor devices that are automatically
STRM Series II Hardware Installation Guide

22 PREPARING YOUR SYSTEM FOR STRM SOFTWARE INSTALATION
discovered by STRM appear in the Sensor Devices window within the STRM
Administration Console. Once auto discovery is completed, you should disable the
Auto Detection Enabled option in the Event Collector configuration. For more
information, see the STRM Administration Guide.
Non-syslog-based information sources must be added to your deployment manually.
For more information, see the Managing Sensor Devices Guide. For each device you
wish to add to your deployment, record the device in
Table 15 Devices
Device
Type
QTY
Product
Name/
Version
Link
Speed
& Type
Msg
Level
Avg
Log
Rate
(Event /
Sec)
No. of
Users
Table 15.
Network
Location
Geograp
hic
Location
Credibi
lity (0
to 10)
Identifying Network
Assets
In this table:
• Link Speed & Type indicates the maximum network link (in Kbps) for firewall,
router, and VPN devices. Record the primary application of the host system for example, e-mail, anti-virus, domain controller, or workstation.
• Msg Level indicates the message level you wish to log - for example, critical,
informational, or debug.
• No. of Users indicates the maximum number of hosts and users using or being
served by this device.
• Network Location indicates whether this device is located on the Internet
demilitarized zone (DMZ), Intranet, or Extranet DMZ.
• Geographic Location indicates whether the devices are located on the same
LAN as STRM or sending logs over the WAN identified in the Link Speed &
Type column.
Credibility indicates the integrity of an event or offense as determined by the credibility
rating from source devices. Credibility increases as multiple sources report the same
event.
STRM can learn about your network and server infrastructure based on flow data.
The Server Discovery function uses the STRM Asset Profile database to discover
many types of servers.
STRM Series II Hardware Installation Guide

Identifying Network Assets 23
Defining certain additional server and IP address types also improves tuning
results. Table 16 provides a list of possible servers. See the STRM Users Guide
for information on defining servers within STRM. If your network includes a large
number of servers, you can use CIDR or IP subnet addresses within the server
networks category.
Table 16 Asset Identification
Server IP Address(es) QTY Name
NAT Address
Range
Vulnerability
Scanners
Network
Management
Servers
Proxy Servers
Virus definition and
Other Update
Servers
Windows Server
Networks, such as,
domain controllers
or exchange
servers
STRM Series II Hardware Installation Guide

24 PREPARING YOUR SYSTEM FOR STRM SOFTWARE INSTALATION
STRM Series II Hardware Installation Guide

5
SETTING UP STRM SOFTWARE AND
C
ONFIGURING NETWORK SETTINGS
This chapter provides information on setting up your STRM software and
configuring network settings:
• Logging Into STRM for the First Time
• Accessing STRM
Logging Into STRM
for the First Time
Step 1 Connect your laptop or keyboard and monitor to the STRM device, as described in
Step 2 Power on the system and log in to STRM:
Step 3 Press Enter. The End User License Agreement (EULA) appears.
Step 4 Read the information in the window. Press the Spacebar to advance each window until
To log into STRM for the first time:
Chapter 2.
Note: When using a laptop to connect to the system, you must use a terminal
program, such as HyperTerminal. Be sure to set Connect Using to the appropriate
COM port of the serial connector and Bits per second to 9600. You must also set
Stop Bits(1), Data bits (8), and Parity (None).
Username: root
No password is required.
Note: The username is case sensitive.
you have reached the end of the document. Type YES to accept the agreement, then
press Enter. The System Console window appears.
STRM Series II Hardware Installation Guide

26 SETTING UP STRM SOFTWARE AND CONFIGURING NETWORK SETTINGS
Figure 11 System Console Window
Step 5 Using the up/down arrow keys, highlight one of the following options:
- Yes - Select this option only if this system is a Console. If you select this
option, the Tuning Template window appears. Go to Step 6.
- No - Select this option only if this system is not a Console. If you select this
option the Time Zone Continent window appears. Go to Step 11.
Step 6 Using the up or down arrow keys, select one of the following tuning templates:
- Enterprise - Tunes properties for internal network activity.
- University - Tunes properties for education-specific concerns.
- ISP - Tunes properties for Internet Service Provider (ISP) concerns.
Step 7 Using the left or right arrow keys, select Set Template. Press the Enter key. The
Set the Date and Time window appears.
Figure 12 Set the Date and Time Window
Step 8 Using the up or down arrow keys, select the method you wish to use to set the date
and time:
- Manual - Allows you to manually input the time and date. Use the Spacebar
to select the option and then use the Tab key to select the Next option.
Press Enter. The Current Date and Time window appears. Go to Step 8.
STRM Series II Hardware Installation Guide

- Server - Allows you to specify your time server. Use the Spacebar to select
the option and then use the Tab key to select the Next option. Press Enter.
The Enter Time Server window appears. Go to Step 9.
Step 9 To manually enter the time and date:
a Enter the current date and time.
b Using the left or right arrow keys, select Next. Press Enter.
c Go to Step 10.
Step 10 To specify a time server:
a In the text field, enter the time server name or IP address.
b Using the left or right arrow keys, select Next. Press Enter. The Time Zone
Continent window appears.
Figure 13 Time Zone Continent Window
Logging Into STRM for the First Time 27
Step 11 To select the time zone continent:
a Using the up or down arrow keys, or the PageUp or PageDown keys, select
your time zone continent or area.
b Using the left or right arrow keys, select Next, then press Enter. The Time Zone
Region window appears.
STRM Series II Hardware Installation Guide

28 SETTING UP STRM SOFTWARE AND CONFIGURING NETWORK SETTINGS
Figure 14 Time Zone Region Window
Note: The options that appear in this window are regions that are associated with
the continent or area previously selected.
c Using the up or down arrow keys, or the page up/page down keys, select your
time zone region.
d Using the left or right arrow keys, select Next. Press the Enter key. The
Configure STRM window appears.
Figure 15 Configure STRM Window
Step 12 To configure the STRM network settings, enter values for the following
parameters. Use the up or down arrow keys to navigate the fields:
- Hostname - Specify a fully qualified domain name as the system hostname.
- IP Address - Specify the IP address of the system.
- Netmask - Specify the network mask address for the system.
- Gateway - Specify the default gateway of the system.
- Primary DNS - Specify the primary DNS server.
STRM Series II Hardware Installation Guide

Logging Into STRM for the First Time 29
- Secondary DNS - Optional. Specify the secondary DNS server.
- Public IP - Optional. Specify the public IP address of the server. The server
uses this IP address to communicate with another server that belongs to a
different network using Network Address Translation (NAT). NAT translates
an IP address in one network to a different IP address in another network.
- Email Server - Specify the e-mail server. If you do not have an e-mail server,
specify localhost in this field.
Step 13 Use the Tab key to move to the Next option. Press Enter. The New Root Password
window appears.
Figure 16 New Root Password Window
Step 14 To configure the STRM root password:
a Type a new password.
b Use the Tab key to move to the Next option. Press Enter. The Confirm New
Root Password window appears.
Figure 17 Confirm New Root Password Window
c Retype your new password to confirm it.
d Use the Tab key to move to the Finish option. Press Enter. A series of
messages appear as STRM continues with the installation. This is typically a
three to five minute process. The Configuration is Complete window appears.
Step 15 Press Enter to select OK.
You are now ready to access STRM. For more information, see the section Accessing
STRM
.
STRM Series II Hardware Installation Guide

30 SETTING UP STRM SOFTWARE AND CONFIGURING NETWORK SETTINGS
Accessing STRM To access the STRM interface:
Step 1 Open your Web browser.
Step 2 Log in to STRM:
https://<IP Address>
<IP Address>
is the IP address of the STRM system.
The default values are:
Username
: admin
Password: <root password>
<root password>
process.
Step 3 Click Login To STRM.
STRM includes a default license key that allows you to access the interface for five
weeks. A window shows the expiry date of the temporary license key. For
information on installing a permanent license key, see the STRM Administration
Guide.
Note: You will need a permanent license for the STRM appliance to upgrade to a
higher version. If you have a temporary license, the upgrade will fail; re-run the
installer to upgrade to a higher version.
is the new root password you set during the installation
STRM Series II Hardware Installation Guide

A
NEW OR CHANGED INFORMATION
This section describes the general known issues and limitations related to STRM
Series II appliances:
The recovery partition “Normal reboot” and “Factory Install” will not be
visible on a reboot of a STRM 5000 II appliance
This happens because the grub menus get wedged on the serial console grub
menu.
Workaround: The next patch will have the fix for this issue. For now, you can Call
1-888-314-JTAC (from the United States,Canada, or Mexico) or 1-408-745-9500
(from elsewhere), for assistance on resolving the issue.
The eth0 port might not show link connectivity on STRM 5000 II appliance
even when eth0 is connected
This happens with the STRM 5000 II LAN ports after a clean installation of STRM
2009.1 only.
Workaround: Run the STRMswap tool for the Ethernet ports.
Note: This method should only be used on a STRM 5000 II appliance, fresh from
manufacturing if the eth0 or eth1 port does not come up even when there is
physical connectivity. The fix will be applied readily to all the new STRM 5000 II
appliances from manufacturing.
To run the STRMswap tool:
Step 1 Reimage the STRM 5000 II appliance with STRM 2009.1 USB. Boot the STRM
2009.1 OS after it is imaged.
Step 2 Download the tool STRMswap_eth.sh from https://www.juniper.net/support.
Step 3 Copy this script to a DOS USB stick (FAT32 formatted). Insert the USB stick with
script in the front USB port.
Step 4 Login as root.
Step 5 Enter Ctrl-C at the Unix prompt.
Step 6 Enter the following commands:
mount /dev/sdb1 /mnt
STRM Series II Hardware Installation Guide

32 NEW OR CHANGED INFORMATION
/mnt/STRMswap_eth.sh
The following is the sample output which will be displayed within the command
line:
Found S7012 Motherboard - Product: STRM 5000 NEBS/II
This script will swap eth0 with eth2 and eth1 with eth3...
Starting ethernet interfaces swap.
Disabling ethernet ports.
Old eth interface configuration files are:
=======================================================
# Intel Corporation 82574L Gigabit Network Connection
DEVICE=eth0
BOOTPROTO=dhcp
DHCPCLASS=
HWADDR=00:E0:81:C2:7F:9B
ONBOOT=yes
DHCP_HOSTNAME=strm.juniper.net
# Intel Corporation 82574L Gigabit Network Connection
DEVICE=eth1
HWADDR=00:E0:81:C2:7F:9A
ONBOOT=no
# Intel Corporation 82576 Gigabit Network Connection
DEVICE=eth2
HWADDR=00:E0:81:C2:7F:DE
ONBOOT=no
# Intel Corporation 82576 Gigabit Network Connection
DEVICE=eth3
HWADDR=00:E0:81:C2:7F:DF
ONBOOT=no
=======================================================
STRM Series II Hardware Installation Guide

Updating...
Done.
New eth interface configuration files are:
=======================================================
# Intel Corporation 82576 Gigabit Network Connection
DEVICE=eth0
BOOTPROTO=dhcp
DHCPCLASS=
HWADDR=00:E0:81:C2:7F:DE
ONBOOT=yes
DHCP_HOSTNAME=strm.juniper.net
# Intel Corporation 82576 Gigabit Network Connection
33
DEVICE=eth1
HWADDR=00:E0:81:C2:7F:DF
ONBOOT=no
# Intel Corporation 82574L Gigabit Network Connection
DEVICE=eth2
HWADDR=00:E0:81:C2:7F:9B
ONBOOT=no
# Intel Corporation 82574L Gigabit Network Connection
DEVICE=eth3
HWADDR=00:E0:81:C2:7F:9A
ONBOOT=no
=======================================================
Step 7
Step 8 Enter the following command and remove the USB stick:
Reboot your system for ethernet port changes to take effect.
umount /mnt
STRM Series II Hardware Installation Guide

34 NEW OR CHANGED INFORMATION
Step 9 Enter the following commad to reboot:
reboot
STRM Series II Hardware Installation Guide

B
RACK-MOUNTING THE STRM
S
ERIES II APPLIANCE
This appendix provides the types and procedures for mounting the STRM Series II
appliances on the Juniper UNIMOUNT rack-mount systems.
The following rack type is supported by these procedures:
• 19” 4-post rack
• 19" 2-post rack
The rack-mount system is flexible and offers several options for rack-mounting the
hardware. The different options include:
• Front-Mounting Flush to Rack
• Front-Mounting Recessed in Rack
• Front-Rear- Mounting Flush to Rack
Front-Mounting
Flush to Rack
• Front-Rear- Mounting Recessed in Rack
• Mid-Mount in Two Post Equipment Rack
Note: If you are installing multiple STRM appliances in one rack, you should install
the lowest one first and proceed upward in the rack. Install heavier STRM
appliances in the lower part of the rack.
This option is the default configuration for STRM 500 II and STRM 2500 II
appliances.
To mount the appliance using this option:
Step 1 Attach the chassis to the equipment rack using 4 rack-mount screws on each side
of the system. See Figure 18.
Step 2 Verify that the mounting screws on one side of the rack are aligned with the
mounting screws on the opposite side and that the appliance is level.
STRM Series II Hardware Installation Guide

36 RACK-MOUNTING THE STRM SERIES II APPLIANCE
g040407
Figure 18 Front-Mounting flush to rack
Front-Mounting
Recessed in Rack
Step 1 Remove the rear screws on each side of the system’s front rails and the two small
Step 2 Loosen the side rail screws of the chassis and slide the front rails of the system
Step 3 Tighten the side rail screws. Insert the two small screws in the recessed holes on
Step 4 Insert 4 rack-mount screws on each side of the system to secure the chassis to the
Step 5 Verify that the mounting screws on one side of the rack are aligned with the
This option allows sites with no front-of-rack clearance to recess the STRM system
in the equipment rack.
To mount the appliance using this option:
screws towards the front of the chassis.
forward, as far as they will move. See Figure 19.
the front rails and tighten.
rack-mount system.
mounting screws on the opposite side and that the appliance is level.
The recessed position allows network and console cables to be routed through the
sides of the equipment rack and throught the holes of the recessed front rails on
either side of the unit. This enables easy cable routing on the racks with limited
cable management.
STRM Series II Hardware Installation Guide

Front-Rear- Mounting Flush to Rack 37
g040408
Mounting bracket, positioned forward for recessed mounting.
!DJUSTRAILLENGTHTOFITTHERACK
THENSECURETHEREARRAILS
WITHASCREWONBOTHSIDESOFTHE
CHASSIS
G
Figure 19 Front-Mounting recessed in rack
Front-RearMounting Flush to
Rack
Step 1 Insert 4 rack-mount screws on each side of the system to secure the front of the
Step 2 Slide the rear mount rail brackets into the backs of the front rails on either side of
Step 3 Insert locking screws on the sides of the rear mount brackets to secure the front
Step 4 Verify that the mounting screws on one side of the rack are aligned with the
This option is used for larger chassis that require additional support when mounted
on the rack-mount system. The STRM 5000 II appliance is mounted using this
option as its default configuration.
To mount STRM 5000 II using this option:
chassis to the equipment rack.
the chassis and align with your rear equipment rack posts. Secure the rear mount
rail brackets to your equipment rack with 2 rack mount screws each.
and rear mounting brackets in place. See Figure 20.
mounting screws on the opposite side and that the appliance is level.
Figure 20 Front-Rear-Mounting flush to rack
STRM Series II Hardware Installation Guide

38 RACK-MOUNTING THE STRM SERIES II APPLIANCE
Front-RearMounting
Recessed in Rack
Step 1 Remove the rear screws on each side of the system’s front rails and the two small
Step 2 Loosen the side rail screws of the chassis and slide the front rails of the system
Step 3 Tighten the side rail screws. Insert the two small screws in the recessed holes on
Step 4 Slide the rear mount rail brackets into the backs of the front rails on either side of
Step 5 Insert locking screws on the sides of the rear mount brackets to secure the front
Step 6 Verify that the mounting screws on one side of the rack are aligned with the
This option provides additional front clearance in the equipment rack. It is used for
larger chassis, like the STRM 5000 II appliance, that requires additional support
when mounted on the rack-mount system.
To mount the appliance using this option:
screws towards the front of the chassis.
backward, as far as they will move.
the front rails and tighten.
the chassis and align with your rear equipment rack posts. Secure the rear mount
rail brackets to your equipment rack with 2 rack mount screws each. See
Figure 21.
and rear mounting brackets in place.
mounting screws on the opposite side and that the appliance is level.
The recessed position allows network and console cables to be routed through the
sides of the equipment rack and throught the holes of the recessed front rails on
either side of the unit. This enables easy cable routing on the racks with limited
cable management.
Figure 21 Front-Rear-Mounting recessed in rack
g040408
Mounting bracket, positioned forward for recessed mounting.
STRM Series II Hardware Installation Guide

Mid-Mount in Two Post Equipment Rack 39
!TTACHTHEFRONTBRACKETTOTHECHASSISANDSECURE
THECHASSISTOTHEPOST!TTACHTHEREARBRACKETTOTHE
OTHERSIDEOFTHEPOSTANDSECURETHECHASSISTO
THEREARBRACKETADJUSTINGTHEBRACKETWIDTHASNEEDED
G
Mid-Mount in Two
Post Equipment
Rack
Step 1 Remove the two front mount rails from either side of the chassis.
Step 2 Insert one mid-mount bracket to the center on either side of the chassis.
Step 3 Attach the chassis to the equipment rack and insert the other two mid-mount
Step 4 Verify that the mounting screws on one side of the rack are aligned with the
This option is suitable for a two post euipment rack. It allows the appliance to be
mid-mounted so that there is even clearance on the front and rear of the rack.
To mount the appliance using this option:
brackets on either side of the system to secure the chassis to the backs of the
post. See Figure 22.
mounting screws on the opposite side and that the appliance is level.
Figure 22 Mid-Mount in two post equipment rack
STRM Series II Hardware Installation Guide

40 RACK-MOUNTING THE STRM SERIES II APPLIANCE
STRM Series II Hardware Installation Guide

MAINTAINING AND SERVICING THE
C
H
ARDWARE
This appendix provides an overview of the field-replaceable units (FRUs)
supported by the STRM Series II apppliances. The FRUs you can add or replace
include:
• RAID Array
• Power Supply
• Cooling Fans
RAID Array The STRM Series II appliance ships with hot-swappable hard disks to offer
component redundancy. The STRM 500 II appliance has a RAID1 configuration
(two 500 GB hard disks). The second (redundant) disk maintains a copy of the
software image and configuration information on the working hard disk. If the
working hard disk fails, the redundant hard disk immediately assumes
responsibility for STRM operations. STRM 2500 II and STRM 5000 II have RAID10
configuration (six 500 GB hard disks). You can hot-swap the disk if any one of the
disks fails.
Redundant array of independent disk (RAID) is an organization of multiple disks of
fault tolerance and performance. It is used in the servers for data storage and to
replicate data among multiple hark disk drives. There are different RAID levels
designed to increase data reliability and increased I/O performance.
The key concepts in RAID are:
• Mirroring - copy data to more than one disk
• Striping - split data across more than one disk
• Error correction - redundant data storage to detect and resolve problems
STRM 500 II uses RAID1 and STRM 2500 II and STRM 5000 II use RAID10.
RAID1 uses mirroring and duplexing techniques to copy data to the redundant
disk. In RAID10, drives are striped for performance, and all striped drives are
duplicated for fault tolerance.
Power Supply The STRM Series II appliance has a single AC power supply module. But the
appliances can support dual redundant power supply modules. If one power
supply fails, the optional second power supply assumes responsibility for the entire
STRM Series II Hardware Installation Guide

42 MAINTAINING AND SERVICING THE HARDWARE
power load. STRM Series II appliances also have a DC power supply option if you
need DC power.
Cooling Fans The STRM 500 II and STRM 2500 II appliances have two cooling fans and the
STRM 5000 II appliance has three cooling fans. The fans are hot-swappable.
STRM Series II Hardware Installation Guide

HARDWARE SPECIFICATIONS
D
See Table 17 for hardware specifications of STRM 500 II, STRM 2500 II and
STRM 5000 II appliances.
Table 17 STRM 500 II, STRM 2500 II and STRM 5000 II Hardware Specifications
STRM 500 II STRM 2500 II STRM 5000 II
Physical
Specification
Depth 450 mm
17.72 in.
Width 438.4 mm
17.26 in.
Height 88 mm
3.5 in.
Weight 27lbs 8oz 28lbs 41lbs 5oz
Warranty 1 year HW, 90 days SW 1 year HW, 90 days SW 1 year HW, 90 days SW
Peak inrush 40A Max. at 115VAC and 25C
80A Max. at 240VAC and 25C
Fans 2x80 mm hot-swap 2x80 mm hot-swap 3 x 80mm hot-swap
Rack mountable Front and rear or mid-mount Front and rear or mid-mount Front and rear or mid-mount
Ports 1 console, 4x RJ-45
10/100/1000 Intel 82573
Power 90 V to 264 V hot-swap dual
redundant 250 watt AC power
module.
450 mm
17.72 in.
438.4 mm
17.26 in.
88 mm
3.5 in.
40A Max. at 115VAC and 25C
80A Max. at 240VAC and 25C
1 console, 4x RJ-45
10/100/1000 Intel 82573
90 V to 264 V hot-swap dual
redundant 250 watt AC power
module.
597.5 mm
23.52 in.
438.4 mm
17.26 in.
88 mm
3.5 in.
<60 A for both AC and DC
modules
1 console, 2x RJ-45
10/100/1000 Intel 82574, 2x
RJ45 10/100/1000 Intel 82576
90 V to 264 V hot-swap dual
redundant 560 watt AC power
module, 90 V to 264 V
hot-swap dual redundant 560
watt DC power module -48 V
DC power supply (optional)
Max efficiency: 80% 560 watt
AC, 89% 560 watt DC
STRM Series II Hardware Installation Guide

46 HARDWARE SPECIFICATIONS
Table 17 STRM 500 II, STRM 2500 II and STRM 5000 II Hardware Specifications
STRM 500 II STRM 2500 II STRM 5000 II
Environmental
specifications
Temperature
operating
Temperature
storage
Humidity
5°C – 40°C
41°F – 104°F
-40°C – 70°C
-40°F – 158°F
5°C – 40°C
41°F – 104°F
-40°C – 70°C
-40°F – 158°F
5°C – 40°C
41°F – 104°F
-40°C – 70°C
-40°F – 158°F
8% - 90% non-condensing 8% - 90% non-condensing 8% - 90% non-condensing
operating
Humidity storage 5% - 95% non-condensing 5% - 95% non-condensing 5% - 95% non-condensing
Altitude operating 10000’ maximum 10000’ maximum 10000’ maximum
Altitude storage 40000’ maximum 40000’ maximum 40000’ maximum
Compliance and
safety
Safety certification CAN/CSA-C22.2 No.
60950-1-03
UL60950-1:2003
EN60950-1:2001+A11
IEC 60950-1:2001
Emissions
certification
(FCC Class A with
-6dB margin is a
minimum
requirement)
FCC Class A,
EN 55022 Class A,
EN 55024 Immunity,
EN 61000-3-2,
VCCI Class A
CAN/CSA-C22.2 No.
60950-1-03
UL60950-1:2003
EN60950-1:2001+A11
IEC 60950-1:2001
FCC Class A,
EN 55022 Class A,
EN 55024 Immunity,
EN 61000-3-2,
VCCI Class A
CAN/CSA-C22.2 No.
60950-1-03
UL60950-1:2003
EN60950-1:2001+A11
IEC 60950-1:2001
FCC Class A,
EN 55022 Class A,
EN 55024 Immunity,
EN 61000-3-2,
VCCI Class A
STRM Series II Hardware Installation Guide
 Loading...