

Page 1
JUNIPER NETWORKS STRM
T
ECHNICAL NOTE
CHANGING NETWORK SETTINGS
JUNE 2008
This document provides information on changing network settings for the Console
and non-Console systems when us ing Trustix or CentOS-4 operating systems in
your deployment including:
• Changing Network Settings in an All-in-One Console
• Changing the Network Settings of a Console in a Multi-System Deployment
• Changing the Network Settings of a Non-Console in a Multi-System
Deployment
Note: This Technical Note applies to systems running STRM 2008.2 and above.
Changing Network
Settings in an
All-in-One Console
Step 1 Log in to the Console, as root.
Step 2 Enter the following command:
You can change the network settings in your All-In-One system. An All-In-One
system has all STRM components, including the Administration Console, installed
on one system.
To change the settings on the STRM Console:
Note: You must have a local connection to your Console before executing the
script.
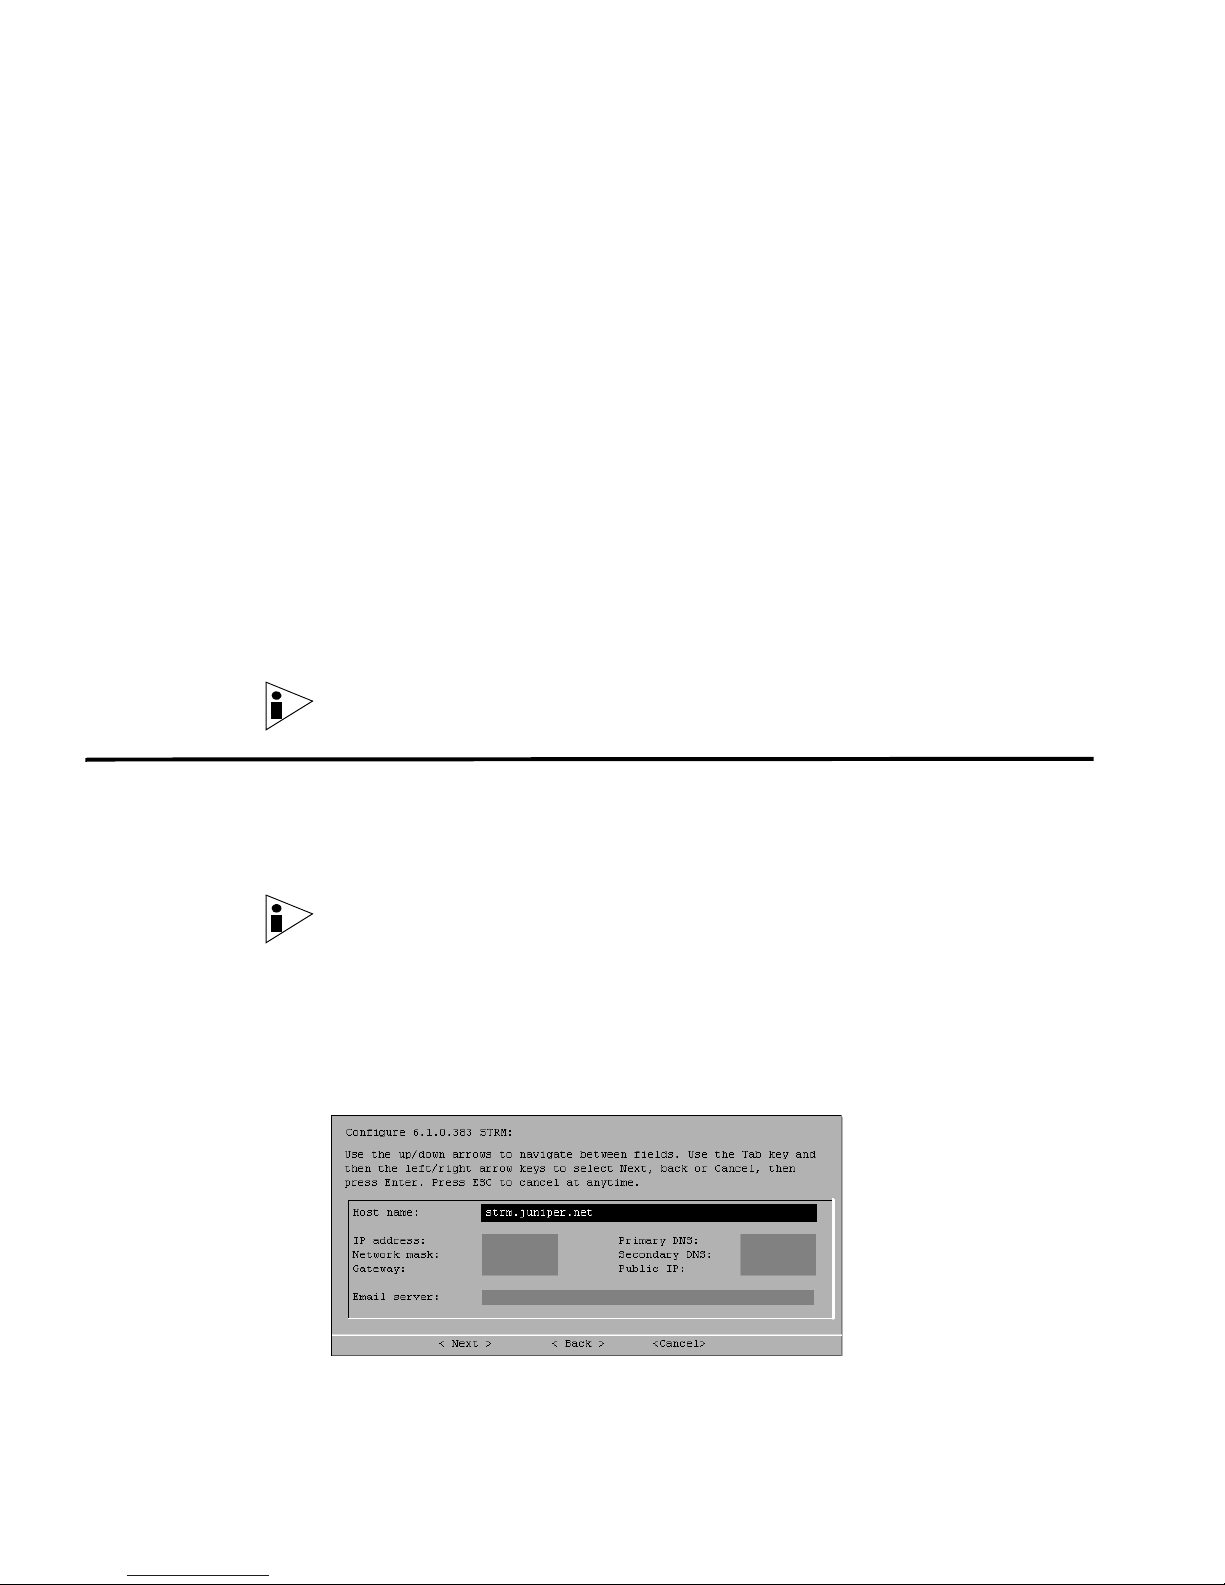
qchange_netsetup
The Configure STRM window appears.
Release 2008.2
Page 2

2
Step 3 Using the up/down arrow keys to navigate the fields, change the necessar y
parameters:
• Hostname — Specify a fully qualified domain name as the system hostname.
Note: If you change the hostname and you are using Offense Resolution, we
recommend you also update the Resolver Agent name, if a Resolver Agent is
assigned to the host.
• IP Address - Specify the IP address of the system.
• Netmask - Specify the network mask address for the system.
• Gateway - Specify the default gateway of the system.
• Primary DNS - Specify the primary DNS server.
• Secondary DNS - Optional. Specify the secondary DNS server.
• Public IP - Optional. Specify the Public IP address of the server. This is a
secondary IP address that is used to access the server, usually from a dif ferent
network or the Internet, and is managed by your network administrator. This
Public IP address is often configured using Network Address Translation (NAT)
services on your network or firewall settings on your network. NAT translates an
IP address in one network to a different IP address in another network.
Step 4 Use the TAB key to navigate to the Finish option. Press Enter.
Changing the
Network Settings of
a Console in a
Multi-System
Deployment
Removing
Non-Console
Managed Hosts
• Email Server - Specify the email server. If you do not have an email server,
specify localhost in this field.
A series of messages appear as STRM processes the requested changes. After
the requested changes are processed, the STRM system is automatically
shutdown and rebooted.
To change the network settings in a multi-system deployment, you must remove all
non-Console managed hosts from the deployment, change the network settings,
re-add the managed host(s), and then re-assign the co mponent(s).
You must perform this procedure in the following order:
• Removing Non-Console Managed Hosts
• Changing the Network Settings
• Re-Adding Managed Host(s) and Re-Assigning the Components
Note: This procedure requires you to use the Deployment Editor. For more
information on using the Deployment Editor, see the STRM Administration Guide.
To remove non-Console managed hosts from your deployment, you must:
Step 1 Log in to STRM:
https://
Release 2008.2
<IP Address>
Page 3

Changing the Network Settings of a Console in a Multi-System Deployment 3
Where <IP Address> is the IP address of the STRM system.
Step 2 In the main STRM Interface, click Config.
Step 3 Click the deployment editor icon.
Step 4 Click the System View tab.
Step 5 Select the managed host you wish to delete.
Step 6 Use the right mouse button (right-click) to access the menu, select Remove host.
Step 7 From the Administrative Console menu, select Configurations > Deploy
Step 8 Exit from the Administration Console.
Changing the
Network Settings
Username:
admin
Password: <root password>
Where <root password> is the password assigned to STRM during the
installation process.
Repeat for each non-Console managed host until all hosts are deleted.
Configuration Changes.
Note: If the Administration Console is still active on your system tray, use the
right-mouse button (right-click) to access the menu and select Exit.
Changes are deployed.
To change the network settings, you must:
Step 1 Log in to the Console as root.
Step 2 Enter the following command:
qchange_netsetup
The Network Settings window appears.
Step 3 Using the up/down arrow keys to navigate the fields, make the necessary changes
to the following parameters:
• Hostname — Specify a fully qualified domain name as the system hostname.
Note: If you change the hostname and you are using Offense Resolution, we
recommend you also update the Resolver Agent name, if a Resolver Agent is
assigned to the host.
• IP Address - Specify the IP address of the system.
• Netmask - Specify the network mask address for the system.
• Gateway - Specify the default gateway of the system.
• Primary DNS - Specify the primary DNS server.
• Secondary DNS - Optional. Specify the secondary DNS server.
• Public IP - Optional. Specify the Public IP address of the server. This is a
secondary IP address that is used to access the server, usually from a different
network or the Internet, and is managed by yo ur network administrator. This
Release 2008.2
Page 4

4
Public IP address is often configured using Network Address Translation (NAT)
services on your network or firewall settings on your network. NAT translates an
IP address in one network to a different IP address in another network.
• Email Server - Specify the email server. If you do not have an email server,
specify localhost in this field.
Step 4 Use the TAB key to move to the Finish option. Press Enter.
A series of messages appear as STRM processes the requested changes. After
the requested changes are processed, the STRM system is automatically
shutdown and rebooted.
Re-Adding Managed
Host(s) and
Re-Assigning the
Components
Step 1 Log in to STRM and access the System View in the Deployment Editor, as defined
Step 2 From the menu, select Actions > Add a managed host.
Step 3 Click Next.
Step 4 Enter values for the parameters:
Step 5 Click Next.
To re-add the managed host(s) and re-assign component(s), you must:
in Step 1, Removing Non-Console Managed Hosts.
Re-add managed host(s) to your deployment.
The Add a new host wizard appears.
The Enter the host’s IP window appears.
• Enter the IP of the server or appliance to add — Specify the IP address of
the host you wish to add to your System View.
• Enter the root password of the host — Specify the root password for the
host.
• Confirm the root password of the host — Specify the password again, for
confirmation.
Step 6 Click Finish.
Step 7 Re-assign all components to your non-Console managed host.
a In the STRM Deployment Editor, click the Flow View or Event View tab.
b Select the component you wish to re-assign to the managed host.
c From the menu, select Actions > Assign
Note: You can also use the right mouse button (right-click) to access the Actions
menu items.
The Assign Component wizard appears.
d From a Select a host drop-down list box, select the host you wish to re-assign
to this component. Click Next.
Release 2008.2
Page 5

Changing the Network Settings of a Non-Console in a Multi-System Deployment 5
e Click Finish.
Step 8 Repeat for each non-Console managed host until all hosts are re-added and
re-assigned.
Step 9 From the Administrative Console menu, select Configurations > Deploy
Configuration Changes.
Changes are deployed.
Changing the
Network Settings of
a Non-Console in a
Multi-System
Deployment
Removing the
Non-Console
Managed Host
Step 1 Log in to STRM:
To change the network settings of a non-Console in a multi-system deployment,
you must remove all non-Console managed host from the deployment, change the
network settings, re-add the managed host, and then re-assign the component(s).
You must perform this procedure in the following order:
• Removing the Non-Console Managed Host
• Changing the Network Settings
• Re-Adding the Managed Host and Re-Assigning the Components
Note: This procedure requires you to use the Deployment Editor. For more
information on using the Deployment Editor, see the STRM Administration Guide.
To remove non-Console managed host from your deployment, you must:
https://<
Where <
IP Address>
IP Address> is the IP address of the STRM system.
Username: admin
Password: <root password>
Where <root password> is the password assigned to STRM during the
installation process.
Step 2 In the main STRM Interface, click Config.
Step 3 In the main STRM Interface, click Config.
Step 4 Click the deployment editor icon.
Step 5 Click the System View tab.
Step 6 Select the managed host you wish to delete.
Step 7 Use the right mouse button (right-click) to access the menu, select Remove host.
Step 8 From the Administrative Console menu, select Configurations > Deploy
Configuration Changes.
Step 9 Exit from the Administration Console.
Release 2008.2
Page 6

6
Note: If the Administration Console is still active on your system tray, use the
right-mouse button (right-click) to access the menu and select Exit.
Changes are deployed.
Changing the
Network Settings
Step 1 Log in to the non-Console as root.
Step 2 Enter the following command:
Step 3 Using the up/down arrow keys to navigate the fields, make the necessary changes
To change the network settings, you must:
qchange_netsetup
The Network Settings window appears.
to the following parameters:
• Hostname — Specify a fully qualified domain name as the system hostname.
Note: If you change the hostname and you are using Offense Resolution, we
recommend you also update the Resolver Agent name, if a Resolver Agent is
assigned to the host.
• IP Address - Specify the IP address of the system.
• Netmask - Specify the network mask address for the system.
• Gateway - Specify the default gateway of the system.
• Primary DNS - Specify the primary DNS server.
• Secondary DNS - Optional. Specify the secondary DNS server.
• Public IP - Optional. Specify the Public IP address of the server. This is a
secondary IP address that is used to access the server, usually from a dif ferent
network or the Internet, and is managed by your network administrator. This
Public IP address is often configured using Network Address Translation (NAT)
services on your network or firewall settings on your network. NAT translates an
IP address in one network to a different IP address in another network.
• Email Server - Specify the email server. If you do not have an email server,
specify localhost in this field.
Step 4 Use the TAB key to move to the Finish option. Press Enter.
A series of messages appear as STRM processes the requested changes. After
the requested changes are processed, the STRM system is automatically
shutdown and rebooted.
Release 2008.2
Page 7

Changing the Network Settings of a Non-Console in a Multi-System Deployment 7
Re-Adding the
Managed Host and
Re-Assigning the
Components
Step 1 Log in to STRM and access the System View in the Deployment Editor, as defined
Step 2 From the menu, select Actions > Add a managed host.
Step 3 Click Next.
Step 4 Enter values for the parameters:
Step 5 Click Next.
To re-add the managed host and re-assign component(s), you must:
in Step 1, Removing the Non-Console Managed Host.
Re-add managed host to your deployment.
The Add a new host wizard appears.
The Enter the host’s IP window appears.
• Enter the IP of the server or appliance to add — Specify the IP address of
the host you wish to add to your System View.
• Enter the root password of the host — Specify the root password for the
host.
• Confirm the root password of the host — Specify the password again, for
confirmation.
Step 6 Click Finish.
Step 7 Re-assign all components to your non-Console managed host.
a In the STRM Deployment Editor, click the Flow View or Event View tab.
b Select the component you wish to re-assign to the managed host.
c From the menu, select Actions > Assign
Note: You can also use the right mouse button (right-click) to access the Actions
menu items.
The Assign Component wizard appears.
d From a Select a host drop-down list box, select the host you wish to re-assign
to this component. Click Next.
e Click Finish.
Step 8 From the Administrative Console menu, select Configurations > Deploy
Configuration Changes.
Changes are deployed.
Release 2008.2
Page 8

Copyright Notice
Copyright © 2008 Juniper Networks, Inc. All rights reserved. Juniper Networks and the Juniper Net works logo ar e regi stere d tr adema rks of Juniper Net works Inc. in
the United States and other countries. All other trademarks, service marks, registered trademarks, or registered service marks in this document are the property of
Juniper Networks or their respective owners. All specifications are subject to change without notice. Juniper Networks assumes no responsibility for any
inaccuracies in this document or for any obligation to update information in th is document. Juniper Networks reserves the right to change, modify, transfer, or
otherwise revise this publication without notice.
Part Number 530-025616-01
 Loading...