

Page 1
Day One+
SRX380
IN THIS GUIDE
Step 1: Begin | 1
Step 2: Up and Running | 6
Step 3: Keep Going | 9
Step 1: Begin
IN THIS SECTION
Meet the SRX380 | 1
Install the SRX380 | 2
Power On | 4
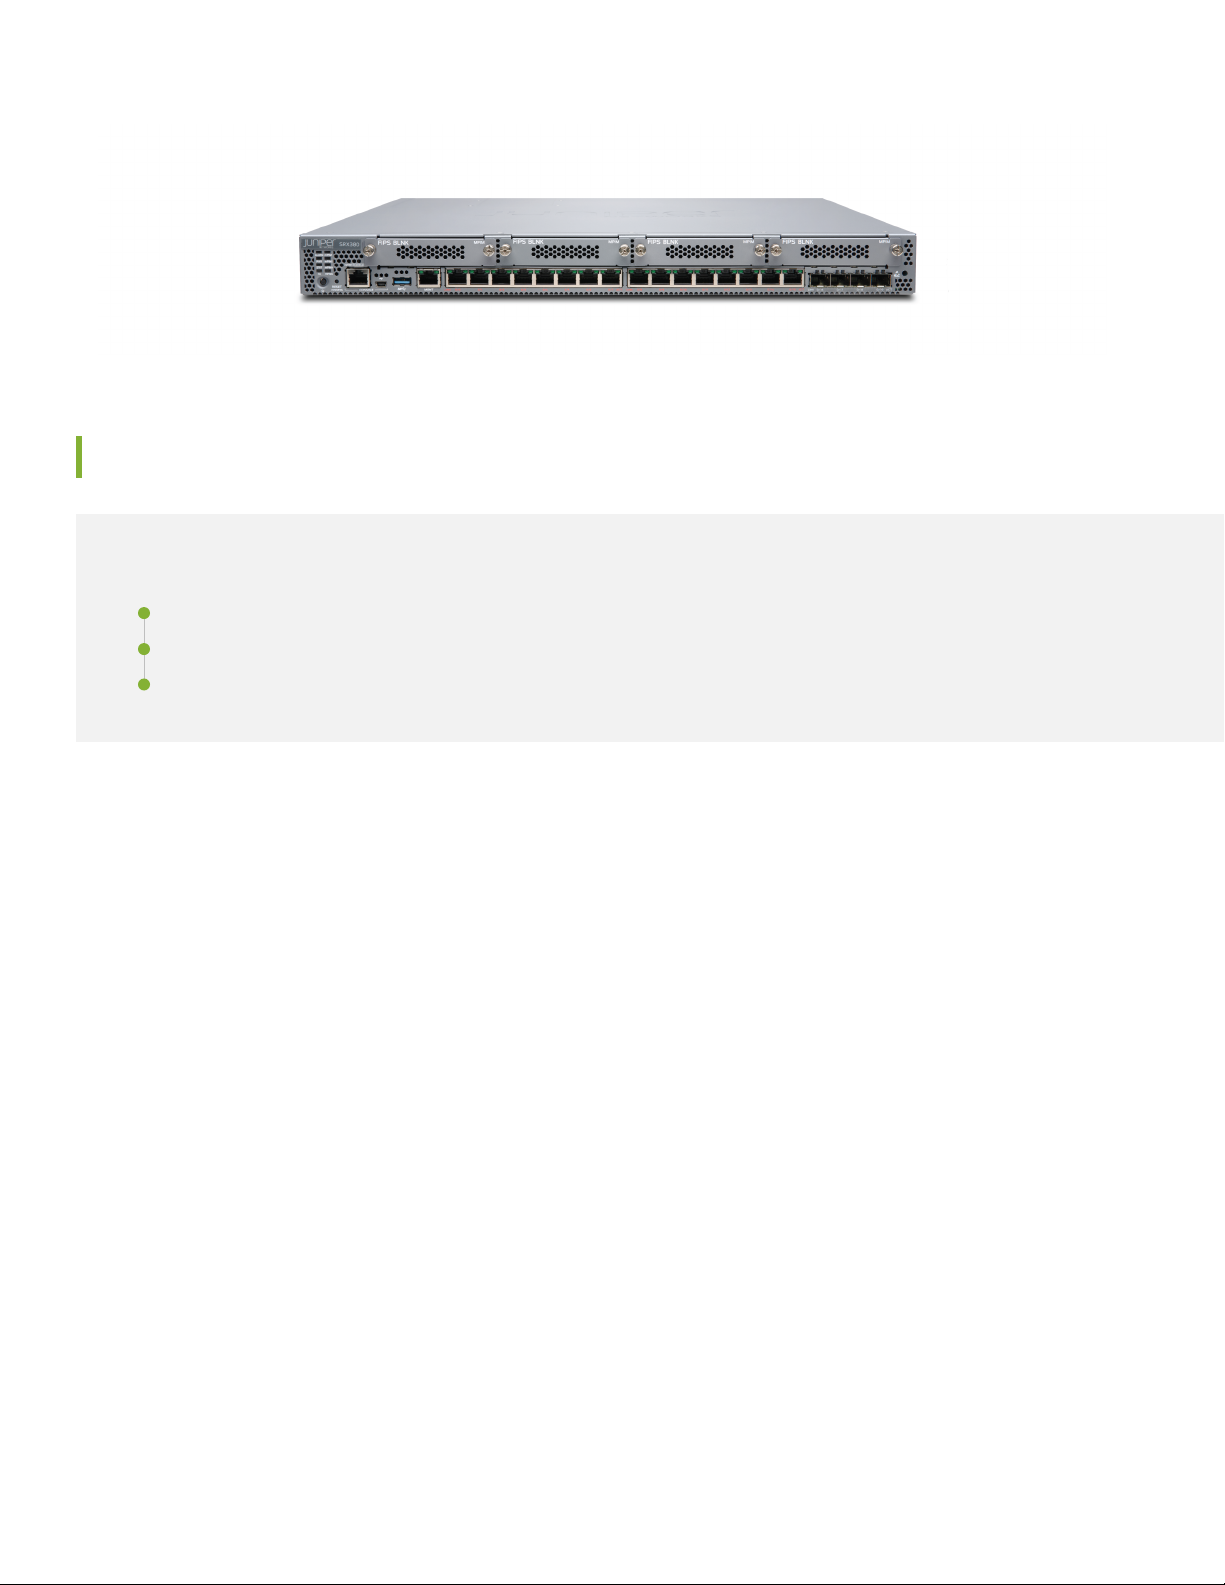
Meet the SRX380
The Juniper Networks®SRX380 Services Gateway is a high-performance, all-in-one secure SD-WAN gateway. It provides
your network with superior and reliable WAN connectivity while consolidating security, routing, and switching for distributed
enterprise offices. With sixteen 1-Gigabit Ethernet PoE+ ports and four 10-Gigabit Ethernet ports, the SRX380 provides
greater port density than other models in the SRX300 line of devices, all in a 1-U form factor.
Page 2
Install the SRX380
IN THIS SECTION
What’s in the Box? | 2
What Else Do I Need? | 2
2
Install the SRX380 in a Rack | 3
What’s in the Box?
SRX380 Services Gateway
•
Power cord appropriate for your geographic location
•
RJ-45 cable
•
DB-9 adapter
•
USB console cable
•
Power cord retainer clip
•
Rack mount kit with:
•
Six flat-head 4-40 mounting screws
•
Twelve flat-head M4x6-mm Phillips mounting screws
•
Four mounting brackets (includes two 2-inch-recess brackets) that attach to the mounting rails
•
Two mounting rails
•
Two mounting blades
•
What Else Do I Need?
You’ll need to provide:
Page 3
Someone to help you screw the SRX380 into the rack
g100945
1
2
12
g100946
•
Eight rack mount screws
•
A number two Phillips (+) screwdriver
•
Install the SRX380 in a Rack
Before you begin the installation, review General Safety Guidelines and Warnings.
Here’s how to install the SRX380 in a rack:
1. Review General Safety Guidelines and Warnings
2. Wrap and fasten one end of the electrostatic discharge (ESD) grounding strap around your bare wrist, and connect the
other end to a site ESD point.
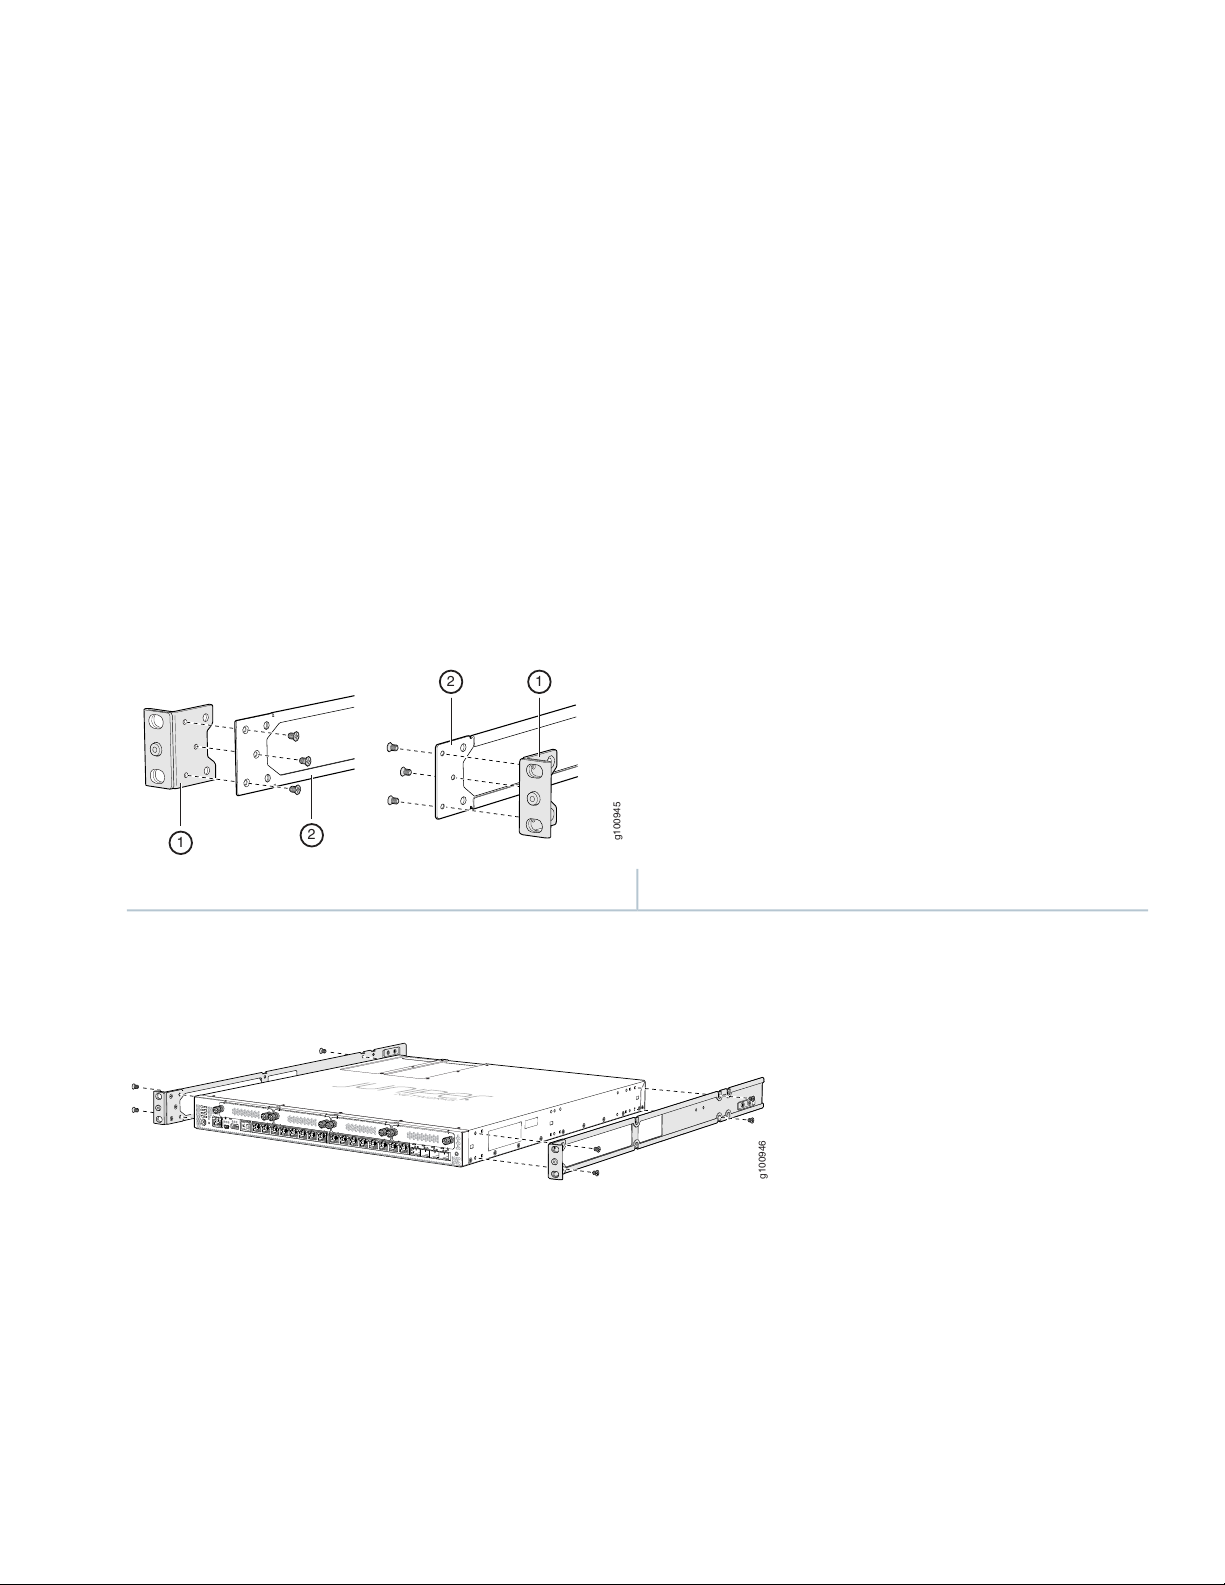
3. Attach the mounting brackets to the side mounting rails using the six flat-head mounting screws.
3
2—1— Mounting railMounting bracket
4. Attach the mounting rails to the sides of the SRX380 using the M4x6-mm Phillips flat-head mounting screws.
5. Lift the SRX380 and position it in the rack. Line up the bottom hole in each mounting bracket with a hole in each rack
rail, making sure the SRX380 is level.
Page 4

6. While you’re holding the SRX380 in place, have a second person insert and tighten the rack mount screws to secure
g100947
g100948
the mounting brackets to the rack rails. Make sure they tighten the screws in the two bottom holes first and then
tighten the screws in the two top holes.
7. Continue holding the SRX380 in place and have the second person slide the mounting blades into the channel of the
mounting rails.
4
8. Screw the mounting blades to the rack using the rack mount screws.
9. Check that the mounting brackets on each side of the rack are level.
Power On
Now that you’ve installed your SRX380 in the rack, you’re ready to connect it to power.
Page 5

1. Wrap and fasten one end of the electrostatic discharge (ESD) grounding strap around your bare wrist, and connect the
g100950
g100940
other end to a site ESD point.
2. Attach a grounding cable to earth ground and then attach it to the SRX380’s grounding points.
3. On the SRX380 rear panel, push the end of the retainer strip into the slot above the power cord socket until the strip
snaps into place.
4. Press the small tab on the retainer strip to loosen the loop.
5
5. Slide the loop until you have enough space to insert the power cord into the power cord socket.
6. Insert the power cord firmly into the power cord socket.
7. Slide the loop on the retainer strip toward the power supply until it is snug against the base of the power cord coupler.
8. Press the tab on the loop and draw out the loop into a tight circle.
9. If the AC power source outlet has a power switch, turn it off.
10. Plug in the AC power cord to the power source outlet.
11. If the AC power source outlet has a power switch, turn it on.
12. Verify that the PWR LED on the front panel is solid green.
Page 6

Step 2: Up and Running
g100951
2
3
1
IN THIS SECTION
Configure Root Authentication | 6
Plug and Play | 7
Customize the Basic Configuration | 8
Now that the SRX380 is powered on, let’s do some initial configuration to get the switch up and running on the network.
It’s simple to provision and manage the SRX380 and other devices on your network. You can choose the configuration
tool that’s right for you:
J-Web—This tool comes preinstalled on the SRX380 and includes a Setup wizard that walks you through the configuration.
•
6
CLI commands
•
Juniper Sky™ Enterprise, Juniper Networks-hosted public cloud-based Software as a Service (SaaS) solution.
•
NOTE: You’ll need to have a Juniper Sky Enterprise subscription service before you can use it to configure
the SRX380. For more information, check out the Juniper Sky Enterprise Getting Started Guide.
Configure Root Authentication
1. Connect the management port (MGMT) on the SRX380 front panel to the Ethernet port on your laptop.
Page 7

The SRX380 functions as a DHCP server and automatically assigns an IP address to the laptop.
Ensure that the laptop acquires an IP address on the 192.168.1.0/24 network.
2. If the laptop is unable to get an IP address, manually configure an IP address in the 192.168.1.0/24 network.
Be sure you don’t assign the IP address 192.168.1.1 to the laptop because this is the IP address assigned to the SRX380.
3. Set the root authentication password:
a. Open a browser and type https://192.168.1.1. You don’t need to log in.
The J-Web Setup wizard opens on your screen.
b. Click Skip in the upper-right corner of the Setup wizard.
c. Set a root authentication password and click OK. The J-Web login page appears.
7
Plug and Play
The SRX380 already has factory-default settings configured right out of the box to make it a plug-and-play device. So all
you have to do to get the SRX380 up and running is connect it to your LAN and WAN networks. Here’s how:
1. Connect the WAN network to port 0/0.
2. Connect the LAN network to any of the ports from 0/1 through 0/18.
3. Check to see if the SRX380 is connected to the Internet. Go to http://www.juniper.net. If the page doesn’t load, check
the Internet connection.
After you complete these steps, you can start using the SRX380 on your network right away. You can go back and customize
settings at anytime. The J-Web Setup wizard is always available to you.
Page 8

Customize the Basic Configuration
To customize basic settings using the J-Web Setup wizard, have these values handy:
Hostname
•
Root authentication password
•
IP address for the NTP server
•
IP address for the DNS server
•
IP address for the management interface
•
1. In the J-Web application, select Configure > Setup Wizard. The Setup wizard opens on your screen.
8
2. Select the configuration mode that’s right for you and then follow the screens as they appear in the Setup wizard:
Standard—Configure basic security settings for the SRX380.
•
Cluster (HA)—Set up the SRX380 in chassis cluster mode.
•
Passive—Set up the SRX380 in Tap mode. Tap mode enables the SRX380 to passively monitor traffic flows across
•
a network.
Page 9

Step 3: Keep Going
Congratulations! Your SRX380 is configured and ready to go. Here are some things you can do next:
ThenIf you want to
9
Download, activate, and manage your software licenses
to unlock additional features for your SRX services
gateway
Change configuration settings, get another device up
and running, or both
See all documentation available for the SRX380
configuring the SRX380
Set up your SRX380 with advanced security measures
to protect and defend your network
See Activate Junos OS Licenses in the Juniper Licensing
Guide
Log in to J-Web and use the wizard. Alternatively, log in to
Juniper Sky Enterprise and use the more advanced
configuration features it offers.
NOTE: You’ll need an account activation code to access the
Juniper Sky Enterprise portal. For more information see the
Juniper Sky Enterprise Getting Started Guide.
Visit the SRX380 Documentation page in the Juniper
TechLibrary
See the SRX380 Hardware Installation GuideFind more in-depth information about installing and
Visit Day One: SRX Series Up and Running With Advanced
Security Services
See Installing Software on SRX Series DevicesManage software upgrades for your SRX380
See the Junos OS Release NotesStay up-to-date on new and changed features and
known and resolved issues
Juniper Networks, the Juniper Networks logo, Juniper, and Junos are registered trademarks of Juniper Networks, Inc. in the
United States and other countries. All other trademarks, service marks, registered marks, or registered service marks are the
property of their respective owners. Juniper Networks assumes no responsibility for any inaccuracies in this document. Juniper
Networks reserves the right to change, modify, transfer, or otherwise revise this publication without notice. Copyright © 2021
Juniper Networks, Inc. All rights reserved. Rev. 04, March 2021.
 Loading...