

Juniper SECURITY THREAT RESPONSE MANAGER - APPLICATION CONFIGURATION GUIDE REV 1, STRM Configuration Manual
Page 1

Security Threat Response Manager
STRM Application Configuration Guide
Release 2008.2
Juniper Networks, Inc.
1194 North Mathilda Avenue
Sunnyvale, CA 94089
USA
408-745-2000
www.juniper.net
Part Number: 530-025610-01, Revision 1
Page 2

Copyright Notice
Copyright © 2008 Juniper Networks, Inc. All rights reserved. Juniper Networks and the Juniper Networks logo are registered trademarks of Juniper
Networks Inc. in the United States and other countries. All other trademarks, service marks, registered trademarks, or registered service marks in this
document are the property of Juniper Networks or their respective owners. All specifications are subject to chang e without notice. Juniper Networks
assumes no responsibility for any inaccuracies in this document or for any obligation to update information in this document. Juniper Networks reserves
the right to change, modify, transfer, or otherwise revise this publicati on without notice.
FCC Statement
The following information is for FCC compliance of Class A devices: This equipment has been tested and found to comply with the limits for a Class A
digital device, pursuant to part 15 of the FCC rules. These limits are designed to provide reasonable protection against harmful interference when the
equipment is operated in a commercial environment. The equipment generates, uses, and can radiate radio-frequency energy and, if not installed and
used in accordance with the instruction manual, may cause harmful interference to radio communications. Operation of this equipment in a residential
area is likely to cause harmful interference, in which case users will be required to correct the interference at their own expense. The following
information is for FCC compliance of Class B devices: The equipment described in this manual generates and may radiate radio-frequency energy. If it
is not installed in accordance with NetScreen’s installation instructions, i t may cause interference wi th radio and tele vision reception. This equip ment has
been tested and found to comply with the limits for a Class B digital device in accordance with the specifications in part 15 of the FCC rules. These
specifications are designed to provide reasonable protection against such interference in a residential installation. However, there is no guarantee that
interference will not occur in a particular installation. If this equipmen t does cause harmful interference to radio or television reception, which can be
determined by turning the equipment off and on, the user is encouraged to try to correct the interference by one or more of the following measures:
Reorient or relocate the receiving antenna. Increase the separation between the equipme nt and receive r. Consult t he dealer o r an experienced ra dio/TV
technician for help. Connect the equipment to an outlet on a circuit different from that to which the receiver is connected.
Caution: Changes or modifications to this product could void the user's warrant y and authority to operate this device.
Disclaimer
THE SOFTWARE LICENSE AND LIMITED WARRANTY FOR THE ACCOMPANYING PRODUCT ARE SET FORTH IN THE INFORMATION PACKET
THAT SHIPPED WITH THE PRODUCT AND ARE INCORPORATED HEREIN BY THIS REFERENCE. IF YOU ARE UNABLE TO LOCATE THE
SOFTWARE LICENSE OR LIMITED WARRANTY, CONTACT YOUR JUNIPER NETWORKS REPRESENTATIVE FOR A COPY.
STRM Application Configuration Guide
Release 2008.2
Copyright © 2008, Juniper Networks, Inc.
All rights reserved. Printed in USA.
Revision History
June 2008—Revision 1
The information in this document is current as of the date listed in the revision history.
2
Page 3

CONTENTS
ABOUT THIS GUIDE
Conventions 1
Technical Documentation 1
Documentation Feedback 1
Requesting Support 2
1 DEFINING APPLICATION MAPPINGS
About the STRM Applications View 1
Defining Application Mappings 2
Example of a Mapping File 4
2 DEFAULT APPLICATIONS
3 ICMP TYPE AND CODE IDS
Identifying Default ICMP Types 23
Identifying Default ICMP Codes 24
4 PROTOCOL IDS
5 PORT IDS
Page 4

Page 5

ABOUT THIS GUIDE
The STRM Application Configuration Guide provides you with information on how
to investigate various types of security threats using th e Offense Manager, Event
Viewer, or the Flow Viewer.
Conventions Table 1 lists conventions that are used throughout this guide.
Table 1 Icons
Icon Type Description
Information note Information that describes important features or
instructions.
Caution Information that alerts you to potential loss of
data or potential damage to an application,
system, device, or network.
Warning Information that alerts you to potential personal
injury.
Technical
Documentation
Documentation
Feedback
You can access technical documentation, technical notes, and release notes
directly from the Juniper networks Support Web site at
www.juniper.net/support/.
http://
We encourage you to provide feedback, comments, and suggestions so that we
can improve the documentation. Send your comments to
techpubs-comments@juniper.net, or fill out the documentation feedback form at
http://www.juniper.net/techpubs/docbug/docbugreport.html. If you are using e-mail, be
sure to include the following information with your comments:
• Document name
• Document part number
• Page number
• Software release version
STRM Default Application Configuration Guide
Page 6

2 ABOUT THIS GUIDE
Requesting
Support
• Open a support case using the Case Management link at
http://www.juniper.net/support/ or call 1-888-314-JTAC (from the United States,
Canada, or Mexico) or 1-408-745-9500 (from elsewher e).
STRM Default Application Configuration Guide
Page 7

1
DEFINING APPLICATION MAPPINGS
By default, STRM can classify many applications. When creating new or
customized application mappings, you must:
Step 1 Update the Application Views in the STRM Administration interface, which
contains group and object information. For more information on updating the
Applications Views, see the STRM Administration Guide.
Step 2 Configure the application mapping parameters in the Flow Collector parameters.
For more information, see the STRM Administration Guide.
Step 3 Update the mapping file, which contains user defined application mappings. This
file maps user defined applications with STRM’s Application Views.
Step 4 Deploy the changes to other systems through the Administration Console. For
more information, see the STRM Administration Guide.
This chapter provides information on configuring and editing applications in STRM
including:
About the STRM
Applications View
• About the STRM Applications View
• Defining Application Mappings
Once a flow is detected, STRM assigns an application ID to the flow based on the
content of the flow, the protocol used for the flow, and the port. The particular
application ID assigned to a flow depends on the values configured in the mapping
files. This file also allows the application ID to be mapped to values defined in the
Application View of your STRM interface, which also allows the classified data to
be stored and displayed on the STRM graphs, based on the defined application ID.
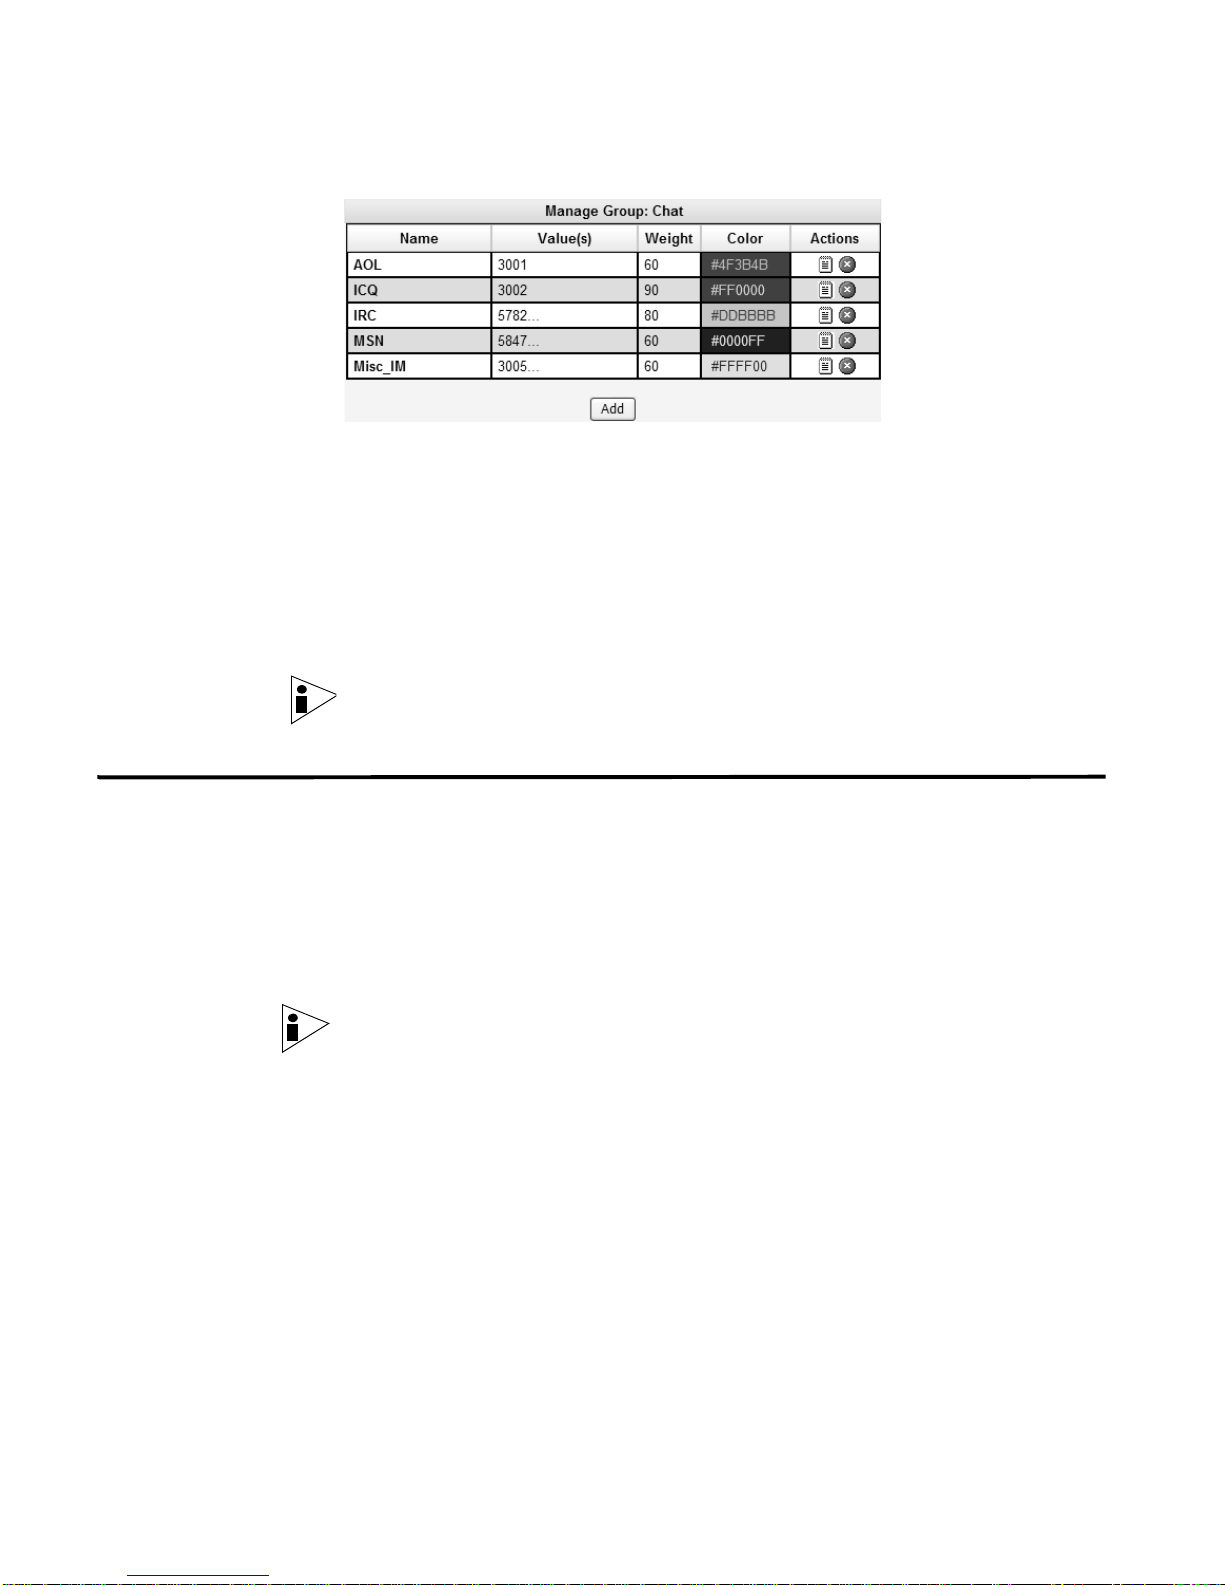
Figure 1-1 shows an example of the Chat Application View in the STRM interface,
which shows the associated ID in the Values column.
STRM Default Application Configuration Guide
Page 8
2 DEFINING APPLICATION MAPPINGS
Figure 1-1 Example of Application View
Y o u can edit the user defined mapping file to ensure specific traffic is appropriately
classified in the STRM interf ace. Ho wever, STRM also includes default application
IDs, which you can view in the Applications View of the STRM interface. For
example, in Figure 1-1, the Chat group includes the default AOL group, which is
defined in the default mapping file to ensure all AOL traffic is assigned a value of
3001. For more information on the default values, see Chapter 2 Default
Applications.
Note: For more information on enabling or disabling application detection, see the
STRM Administration Guide.
Defining
Application
Mappings
To define application mappings:
Step 1 Using SSH, log in to STRM.
Step 2 Open the following file:
/store/configservices/staging/globalconfig/user_application_
mapping.conf
Note: To edit the name of the user_application_mapping.conf file, you can edit the
User Application Mapping parameter in the Flow Processor configuration window.
For more information, see the STRM Administration Guide. If the
user_application_mapping.conf does not exist in your system, create the file and
place the empty in the above directory.
Step 3 Update the file, as necessary.
When updating the file, note the following:
• Each line in the file indicates a new mapped application. You can specify
multiple mappings (each on a seperate line) for the same application.
• You can specify a wildcard character * for any of the fields. The wildcard
character must be used alone and not part of a comma separated list. The
wildcard character indicates that this field applies to all flows.
STRM Default Application Configuration Guide
Page 9

Defining Application Mappings 3
• Since it is possible for a flow to be associated with multiple mappings, a flow is
mapped to an application ID based on the order of the file. The first mapping
that applies in the file is assigned to the flow.
• When adding new application identification numbers, we recommend that you
apply numbers ranging between 15,000 to 20,000 . Contact Juniper Networks
Customer Support for further information.
The format of the entry must resemble the following:
<New ID> <Old ID> <Source IP Address>:<Source Port> <Dest IP
Address>:<Dest Port> <Name>
Where:
• <New ID> specifies the application ID you wish to assign to the flow. A value of
1 indicates an unknown application. If the ID you wish to assign does not exist,
you must create the ID using the Application View in the STRM interface. For
more information, see the STRM Administration Guide.
• <Old ID> specifies the default application ID of the flow, as assigned by
STRM. A value of * indicates a wildcard. For more information on the default
values, see Chapter 2 Default Applications.
• <Source IP Address> specifies the source IP address of the flow. This field
may contain either a comma separated list of addresses or CIDR values. A
value of * indicates a wildcard, which means that this field applies to all flows.
• <Source Port> specifies the associated port. This field may contain a comma
separated list of values or ranges specifies in the format: <lower port
number>-<upper port number>. A value of * indicates a wildcard, which means
that this field applies to all flows.
• <Dest IP Address> specifies the destination IP address of the flow. This field
may contain either a comma separated list of addresses or CIDR values. A
value of * indicates a wildcard, which means that this field applies to all flows.
• <Dest Port> specifies the associated destination source port. This field may
contain a comma separated list of values or ranges specifies in the format:
<lower port number>-<upper port number>. A value of * indicates a wildcard,
which means that this field applies to all flows.
• <Name> specifies a name you wish to assign to this mapping. This field is
optional.
For example, the below example maps all flows that match the IP addresses and
ports for which the Flow Collector has assigned to the Old ID of 1010 and assign
the new ID of 15000:
15000 1010 10.100.100/24,10.100.50.10:* 172.14.33.33:80,443
Step 4 Save and exit the file.
Step 5 Log-in to STRM.
Step 6 Click Config to access the Administration Console.
Step 7 If necessary, edit your Application View.
STRM Default Application Configuration Guide
Page 10

4 DEFINING APPLICATION MAPPINGS
Note: For information on creating or editing views, see the STRM Administration
Guide.
Step 8 From the menu, select Configurations > Deploy configuration changes.
The Deploy configuration changes window appears:
Step 9 Click Close.
You have successfully deployed your changes.
Example of a
Mapping File
15000 1010 10.100.100/24,10.100.50.10:* 172.14.33.33:80,443 AllowedWebTypeA
15000 1010 10.100.30/24:* 172.14.33.20:80 AllowedWebTypeA
15100 * *:33333 64.35.20/24,64.33/16,64.77.34.12:33333,33350-33400 GameX
15100 1,34803,34809 *:33333 *:33333,33350-33400 GameX
STRM Default Application Configuration Guide
Page 11

2
DEFAULT APPLICATIONS
STRM includes default application IDs, which you can view in the Applications
View of the STRM interface. This chapter provides the default application values
as they appear in the Applications View. The default application values apply to all
source and destination flows, however, the destination port is specific to the
application.
For more information on the Application View, see the STRM Administration
Guide.
Table 2-1 provides the default Application values for STRM:
Table 2-1 Default Applications
Application View
Group
Chat AOL-ICQ 3001 AOL Instant Messenger
Chat CUSeeMe 60016 CUSeeMe traffic.
Chat Google 3006 Google IM traffic.
Chat ICQ 3002 ICQ traffic.
Chat Jabber 3004 Jabber protocol traffic.
Chat Lotus-IM 60162 Lotus IM traffic.
Chat MSN 3000 MSN traffic.
Chat Misc_IM 3005 Misc IM traffic.
Chat Windows-POPUP 60170 Windows Messenger Service
Chat Yahoo 1033 Yahoo traffic.
Chat iChat 3008 iChat traffic.
Chat IRC 3003 IRC traffic.
Chat IRC 3003 IRC traffic.
Chat IRC 5668 IRC traffic.
Chat IRC 5669 IRC traffic.
Chat IRC 5782 IRC traffic.
Chat MSN 5672 MSN Traffic
Sub-Component Value Description
(AIM) traffic.
Pop-up.
STRM Default Application Configuration Guide
Page 12

6 DEFAULT APPLICATIONS
Table 2-1 Default Applications (continued)
Application View
Group
Sub-Component Value Description
Chat MSN 5685 MSN Traffic
Chat MSN 5695 MSN Traffic
Chat MSN 5831 MSN Traffic
Chat MSN 5832 MSN Traffic
Chat MSN 5847 MSN Traffic
ClientServer CVSpserver 60150 CVS traffic.
CientServer CVSup 60129 CVS traffic.
ClientServer CitrixIMA 60115 Citrix IMA traffic.
ClientServer FIX 60057 FIX traffic.
ClientServer FoldingAtHome 60121 FoldingAtHome traffic.
ClientServer INFOC-RTMS 60102 RTMS information traffic.
ClientServer INT-1 60111 INT-1 server traffic.
ClientServer MATIP 60101 MATIP traffic.
ClientServer MeetingMaker 60108 Meeting maker traffic.
ClientServer NetIQ 60127 NetIQ traffic.
ClientServer PEPGate 60104 PEPGate traffic.
ClientServer Unisys-TCPA 60105 Unisys TCPA traffic.
ContentDelivery Ariel-419 60166 Ariel content delivery.
ContentDelivery Ariel-422 60167 Ariel content delivery.
ContentDelivery BackWeb 60024 BackWeb traffic.
ContentDelivery Chaincast 60156 Chaincast traffic.
ContentDelivery EntryPoint 60000 EntryPoint traffic.
ContentDelivery Kontiki 60148 Kontiki traffic.
ContentDelivery NewsStand 60146 New strand traffic.
ContentDelivery Webshots 60147 Webshots Desktop traffic.
DataTransfer AFS 60126 AFS file system traffic.
DataTransfer Apple-iTunes 60163 iTunes traffic.
DataTransfer BITS 60178 Background intelligent
transfer service. (Windows
Updates)
DataTransfer CU-Dev 60070 CU-dev traffic.
DataTransfer DLS 60002 DLS traffic.
DataTransfer FNAonTCP 60069 FNA traffic.
DataTransfer FTP 1002 File Transfer Protocol (FTP)
on common port.
DataTransfer MSMQ 34806 MSMQ traffic.
STRM Default Application Configuration Guide
Page 13

Table 2-1 Default Applications (continued)
Application View
Group
Sub-Component Value Description
DataTransfer Microsoft-ds 60142 Microsoft directory server
traffic.
DataTransfer Misc-Transfer-Ports 21878 Misc common data traffic
ports.
DataTransfer NFS 1007 Network File System (NFS)
traffic.
DataTransfer NNTPNews 1013 NNTP traffic.
DataTransfer NW5-CMD 60078 Netware traffic.
DataTransfer NW5-NCP 60076 Netware traffic.
DataTransfer NetBIOS-IP 60013 Windows/Netbios
networking.
DataTransfer NortonGhost 60194 Norton Ghost traffic.
DataTransfer SHARESUDP 60106 UDP sharing traffic.
DataTransfer SunND 60173 Sun ND traffic.
DataTransfer TFTP 1003 TFTP traffic.
DataTransfer UUCP 60012 UUCP traffic.
DataTransfer WindowsFileSharing 1014 Windows file sharing.
DataTransfer WindowNetworkPorts 51336 NETBIOS. Windows
networking.
DataTransfer WindowsNetworkPorts 51337 NETBIOS. Windows
networking.
DataTransfer WindowsNetworkPorts 51338 NETBIOS. Windows
networking.
DataTransfer WindowsNetworkPorts 51339 NETBIOS. Windows
networking.
DataTransfer WindowsNetworkPorts 51340 NETBIOS. Windows
networking.
DataTransfer XFER 21984 XFER traffic.
DataTransfer lockd 60068 lockd traffic.
DataTransfer FTP 27719 FTP traffic.
DataTransfer FTP 27720 FTP traffic.
DataTransfer FTP 5787 FTP traffic.
DataTransfer FTP 5788 FTP traffic.
DataTransfer FTP 5789 FTP traffic.
DataTransfer FTP 5820 FTP traffic.
DataTransfer FTP 5821 FTP traffic.
DataTransfer FTP 5833 FTP traffic.
DataTransfer FTP 5844 FTP traffic.
7
STRM Default Application Configuration Guide
Page 14

8 DEFAULT APPLICATIONS
Table 2-1 Default Applications (continued)
Application View
Group
Sub-Component Value Description
DataTransfer FTP 5845 FTP traffic.
DataTransfer Misc-Transfer-Ports 21879 Miscellane ou s da ta traffic
ports.
DataTransfer Misc-Transfer-Ports 21910 Miscellane ou s da ta traffic
ports.
DataTransfer Misc-Transfer-Ports 21919 Miscellane ou s da ta traffic
ports.
DataTransfer Misc-Transfer-Ports 22012 Miscellane ou s da ta traffic
ports.
DataTransfer NNTPNews 51335 NNTP traffic.
DataTransfer TFTP 21930 TFTP traffic.
DataTransfer WindowsFileSharing 1021 Windows file sharing.
DataWarehousing ARCserverBackup 34730 ARC server backup.
DataWarehousing BAAN 60082 BAAN traffic.
DataWarehousing FileMaker 60112 FileMaker traffic.
DataWarehousing Filenet 34800 Filenet traffic.
DataWarehousing GuptaSQLBase 34841 GuptaSQLBase traffic.
DataWarehousing JDENet 60099 JDENet traffic.
DataWarehousing MS-SQL 10002 Database MS SQL Server.
DataWarehousing Misc-DB 37309 Oracle list service.
DataWarehousing Misc-DB 35298 Oracle list service.
DataWarehousing Misc-DB 39044 Oracle list service.
DataWarehousing Misc-DB 39045 Oracle list service.
DataWarehousing Misc-DB 51249 Oracle list service.
DataWarehousing MySQL 37291 M ySQ L tr aff ic.
DataWarehousing ORA 37302 ORA traffic.
DataWarehousing ORA 37299 ORA traffic.
DataWarehousing Oracle 42069 Oracle traffic.
DataWarehousing Oracle 37289 Oracle traffic.
DataWarehousing Oracle 37290 Oracle traffic.
DataWarehousing Oracle 37394 Oracle traffic.
DataWarehousing Oracle 37401 Oracle traffic.
DataWarehousing Oracle 37512 Oracle traffic.
DataWarehousing Oracle 37751 Oracle traffic.
DataWarehousing Oracle 37762 Oracle traffic.
DataWarehousing Oracle 37870 Oracle traffic.
STRM Default Application Configuration Guide
Page 15

Table 2-1 Default Applications (continued)
Application View
Group
Sub-Component Value Description
DataWarehousing Oracle 37871 Oracle traffic.
DataWarehousing Oracle 37914 Oracle traffic.
DataWarehousing Oracle 38292 Oracle traffic.
DataWarehousing Oracle 42060 Oracle traffic.
DataWarehousing OracleClient 60086 OracleClient traffic.
DataWarehousing PostgreSQL 37292 PostgreSQL traffic.
DataWarehousing Progress 60110 Progress traffic.
DataWarehousing SAP 40380 SAP R/3 application server.
DataWarehousing SAP 40456 SAP R/3 application server.
DataWarehousing SAP 40695 SAP R/3 application server.
DataWarehousing SQL-NET 35159 SQL-NET
DataWarehousing SQL-NET 34923 SQL-NET
DataWarehousing giop-ssl 39043 giop-ssl traffic.
DirectoryServices CRS 60060 CRS traffic.
DirectoryServices Ident 60059 Ident traffic.
DirectoryServices LDAP 34801 LDAP traffic.
DirectoryServices RRP 60133 RRP traffic.
DirectoryServices SSDP 60158 SSDP traffic.
DirectoryServices WINS 60088 WINS traffic.
DirectoryServices mDNS 60183 mDNS traffic.
FilePrint IPP 60097 IPP traffic.
FilePrint Printer 60051 Printer traffic.
FilePrint tn3287 60062 tn3287 traffic.
FilePrint tn5250p 60064 tn5250p traffic.
Games AsheronsCall 60122 AsheronsCall traffic.
Games Battle.net 60116 Battle.net traffic.
Games Doom 60039 Doom traffic.
Games Half-Life 60119 Half-life traffic.
Games Kali 60042 Kali traffic.
Games LucasArts 60157 LucasArts traffic.
Games MSN-Zone 60123 MSN-Zone traffic.
Games Mythic 60149 Mythic traffic.
Games Quake 60040 Quake traffic.
Games SonyOnline 60138 SonyOnline traffic.
Games Tribes 60124 Tribes traffic.
9
STRM Default Application Configuration Guide
Page 16

10 DEFAULT APPLICATIONS
Table 2-1 Default Applications (continued)
Application View
Group
Sub-Component Value Description
Games Unreal 60117 Unreal traffic.
Games YahooGames 60120 YahooGames traffic.
Healthcare DICOM 60143 DICOM traffic.
Healthcare HL7 60154 HL7 traffic.
InnerSystem Flowgen 1023 Flow Collector and Flow
Processor traffic.
InnerSystem Common-Ports 51332 Flow Processor
InnerSystem UpdateDaemon 1024 Update Daemon traffic.
InnerSystem Common-Ports 51333 Common ports traffic.
InnerSystem Common-Ports 51334 Common ports traffic.
InternetProtocol ActiveX 60056 ActiveX traffic.
InternetProtocol IPHeaderCompression 34843 IPHeaderCompression
traffic.
InternetProtocol SOAP-HTTP 60179 SOAP-HTTP traffic.
Known_to_client_
known -1 Known traffic.
or_server
Legacy AFP 60058 AFT traffic.
Legacy FNA 60008 FNA traffic.
Legacy IPX 34837 IPX traffic.
Legacy LAT 60030 LAT traffic.
Legacy MOP-DL 60130 MOP-DL traffic.
Legacy MOP-RC 60131 MOP-RC traffic.
Legacy NETBEUI 60006 NETBEUI traffic.
Legacy PPP 34846 PPP traffic.
Legacy PPPoE 60137 PPPoE traffic.
Legacy SLP 60077 SLP traffic.
Legacy SNA 60007 SNA traffic.
Mail ESMTP 5673 ESMTP traffic.
Mail Groupwise 60084 Groupwise traffic.
Mail IMAP 1009 IMAP traffic.
Mail IMAP 5689 IMAP traffic.
Mail IMAP 5690 IMAP traffic.
Mail IMAP 5794 IMAP traffic.
Mail IMAP 5808 IMAP traffic.
Mail MSExchange 34817 MSExchange traffic.
Mail MSSQ 60048 MSSQ traffic.
STRM Default Application Configuration Guide
Page 17

Table 2-1 Default Applications (continued)
Application View
Group
Sub-Component Value Description
Mail Misc-Mail-Port 27668 Misc-Mail-Port traffic.
Mail Misc-Mail-Port 22079 Misc-Mail-Port traffic.
Mail Misc-Mail-Port 22158 Misc-Mail-Port traffic.
Mail Misc-Mail-Port 22177 Misc-Mail-Port traffic.
Mail Misc-Mail-Port 22178 Misc-Mail-Port traffic.
Mail Misc-Mail-Port 22184 Misc-Mail-Port traffic.
Mail Misc-Mail-Port 22314 Misc-Mail-Port traffic.
Mail Misc-Mail-Port 22550 Misc-Mail-Port traffic.
Mail Misc-Mail-Port 22551 Misc-Mail-Port traffic.
Mail OSI 60071 OSI traffic.
Mail POP 1008 Mail POP3 traffic.
Mail POP 5687 Mail POP3 traffic.
Mail POP-port 22315 POP-port traffic.
Mail SMTP 1004 Mail SMTP request
Mail SMTP 5686 Mail SMTP request
Mail SMTP 5688 Mail SMTP request
Mail SMTP 5691 Mail SMTP request
Mail SMTP 5812 Mail SMTP request
Mail SMTP 5850 Mail SMTP request
Mail SMTP 5851 Mail SMTP request
Mail SMTP-port 22080 SMTP-port traffic.
Mail biff 60083 biff traffic.
Misc Anet 34812 Anet traffic.
Misc AppleOUI 34819 AppleOUI traffic.
Misc Appletalk-IP 51326 Appletalk-IP traffic.
Misc Appletalk-IP 51324 Appletalk-IP traffic.
Misc Appletalk-IP 51325 Appletalk-IP traffic.
Misc Appletalk-IP 51327 Appletalk-IP traffic.
Misc Appletalk-IP 51328 Appletalk-IP traffic.
Misc Appletalk-IP 51329 Appletalk-IP traffic.
Misc Appletalk-IP 51330 Appletalk-IP traffic.
Misc Appletalk-IP 51331 Appletalk-IP traffic.
Misc Authentication 21122 Authentication traffic.
Misc Authentication 21028 Authentication traffic.
Misc Authentication 21061 Authentication traffic.
11
STRM Default Application Configuration Guide
Page 18

12 DEFAULT APPLICATIONS
Table 2-1 Default Applications (continued)
Application View
Group
Sub-Component Value Description
Misc Authentication 21140 Authentication traffic.
Misc Authentication 21624 Authentication traffic.
Misc Authentication 51341 Authentication traffic.
Misc Authentication 51342 Authentication traffic.
Misc Authentication 51343 Authentication traffic.
Misc Authentication 51344 Authentication traffic.
Misc Authentication 51345 Authentication traffic.
Misc Authentication 51346 Authentication traffic.
Misc Authentication 51347 Authentication traffic.
Misc Authentication 51348 Authentication traffic.
Misc CHAOSnet 34822 CHAOSnet traffic.
Misc DHCP 21065 DHCP traffic.
Misc DHCP 21064 DHCP traffic.
Misc DNS 1017 DNS traffic.
Misc DNS-Port 21125 DNS-Port traffic.
Misc DNS-Port 21036 DNS-Port traffic.
Misc Daynachip 34815 Daynachip traffic.
Misc GSM 34830 GSM traffic.
Misc GSS-SPNEGO 5861 GSS-SPNEGO traffic.
Misc Hosts2-Ns 36804 Hosts2-Ns traffic
Misc Hosts2-Ns 34804 Hosts2-Ns traffic
Misc IPIX 34826 IPIX traffic.
Misc IPv4 34844 IPv 4 traffic.
Misc IPv6 34845 IPv6 traffic.
Misc Ingres 34805 Ingres traffic.
Misc JPEG 34840 JPEG traffic.
Misc Kerberos 34810 Kerberos traffic.
Misc LotusNotes 34732 LotusNotes traffic.
Misc ManagementServices 34054 ManagementServices traffic.
Misc ManagementServices 34057 ManagementServices traffic.
Misc ManagementServices 34205 ManagementServices traffic.
Misc ManagementServices 34208 ManagementServices traffic.
Misc ManagementServices 34209 ManagementServices traffic.
Misc ManagementServices 34213 ManagementServices traffic.
Misc ManagementServices 34216 ManagementServices traffic.
STRM Default Application Configuration Guide
Page 19

Table 2-1 Default Applications (continued)
Application View
Group
Sub-Component Value Description
Misc ManagementServices 34221 ManagementServices traffic.
Misc ManagementServices 34556 ManagementServices traffic.
Misc ManagementServices 34557 ManagementServices traffic.
Misc ManagementServices 34560 ManagementServices traffic.
Misc ManagementServices 34563 ManagementServices traffic.
Misc ManagementServices 34564 ManagementServices traffic.
Misc ManagementServices 34636 ManagementServices traffic.
Misc ManagementServices 34661 ManagementServices traffic.
Misc ManagementServices 34727 ManagementServices traffic.
Misc ManagementServices 34728 ManagementServices traffic.
Misc ManagementServices 34735 ManagementServices traffic.
Misc Marimba 60015 Marimba traffic.
Misc Misc-Ports 21302 Misc-Ports traffic.
Misc Misc-Ports 20908 Misc-Ports traffic.
Misc Misc-Ports 20909 Misc-Ports traffic.
Misc Misc-Ports 20915 Misc-Ports traffic.
Misc Misc-Ports 20916 Misc-Ports traffic.
Misc Misc-Ports 20996 Misc-Ports traffic.
Misc Misc-Ports 20998 Misc-Ports traffic.
Misc Misc-Ports 21003 Misc-Ports traffic.
Misc Misc-Ports 21007 Misc-Ports traffic.
Misc Misc-Ports 21008 Misc-Ports traffic.
Misc Misc-Ports 21015 Misc-Ports traffic.
Misc Misc-Ports 21016 Misc-Ports traffic.
Misc Misc-Ports 21020 Misc-Ports traffic.
Misc Misc-Ports 21021 Misc-Ports traffic.
Misc Misc-Ports 21035 Misc-Ports traffic.
Misc Misc-Ports 21039 Misc-Ports traffic.
Misc Misc-Ports 21042 Misc-Ports traffic.
Misc Misc-Ports 21043 Misc-Ports traffic.
Misc Misc-Ports 21056 Misc-Ports traffic.
Misc Misc-Ports 21069 Misc-Ports traffic.
Misc Misc-Ports 21070 Misc-Ports traffic.
Misc Misc-Ports 21071 Misc-Ports traffic.
Misc Misc-Ports 21072 Misc-Ports traffic.
13
STRM Default Application Configuration Guide
Page 20

14 DEFAULT APPLICATIONS
Table 2-1 Default Applications (continued)
Application View
Group
Sub-Component Value Description
Misc Misc-Ports 21073 Misc-Ports traffic.
Misc Misc-Ports 21074 Misc-Ports traffic.
Misc Misc-Ports 21081 Misc-Ports traffic.
Misc Misc-Ports 21109 Misc-Ports traffic.
Misc Misc-Ports 21116 Misc-Ports traffic.
Misc Misc-Ports 21121 Misc-Ports traffic.
Misc Misc-Ports 21130 Misc-Ports traffic.
Misc Misc-Ports 21141 Misc-Ports traffic.
Misc Misc-Ports 21147 Misc-Ports traffic.
Misc Misc-Ports 21148 Misc-Ports traffic.
Misc Misc-Ports 21160 Misc-Ports traffic.
Misc Misc-Ports 21301 Misc-Ports traffic.
Misc Misc-Ports 21303 Misc-Ports traffic.
Misc Misc-Ports 37305 Misc-Ports traffic.
Misc Misc-Ports 39042 Misc-Ports traffic.
Misc Misc-Ports 42372 Misc-Ports traffic.
Misc Misc-Ports 50643 Misc-Ports traffic.
Misc Misc-Ports 50795 Misc-Ports traffic.
Misc MiscApp 1016 MiscApp traffic.
Misc MiscApp 1018 MiscApp traffic.
Misc MiscApp 1019 MiscApp traffic.
Misc MiscApp 1022 MiscApp traffic.
Misc MiscApplication 34847 MiscApplication traffic.
Misc MiscProtocol 34848 MiscProtocol traffic.
Misc NFS 51349 NFS traffic.
Misc NSP 34842 NSP traffic.
Misc NTP 34811 NTP traffic.
Misc Nessus 34731 Nessus traffic.
Misc Network-Config-Ports 21470 Network-Config-Ports traffic
Misc Network-Config-Ports 5700 Network-Config-Ports traffic
Misc Network-Config-Ports 20912 Network-Config-Ports traffic
Misc Network-Config-Ports 20913 Network-Config-Ports traffic
Misc Network-Config-Ports 21139 Network-Config-Ports traffic
Misc RPC 21167 RPC traffic.
Misc SNMP-Ports 21299 SNMP-Ports traffic.
STRM Default Application Configuration Guide
Page 21

Table 2-1 Default Applications (continued)
Application View
Group
Sub-Component Value Description
Misc SNMP-Ports 21300 SNMP-Ports traffic.
Misc SymantecGhost 34729 Symantec Ghost traffic.
Misc Syslog 1015 Syslog traffic
Misc Time 21200 Time traffic.
Misc Time 21006 Time traffic.
Misc Unknown_TCP 34803 Unknown TCP traffic.
Misc Unknown_UDP 34809 Unknown UDP traffic.
Misc VMTP 34813 VMTP traffic.
Misc at-nbp 34813 at-nbp traffic.
Misc dsp3270 34816 dsp3270 traffic.
Multimedia Intellex 6000 Intellex traffic.
Multimedia VideoFrame 60091 VideoFrame traffic.
Multimedia WebEx 60139 WebEx traffic.
Network
CiscoDiscovery 60055 CiscoDiscovery traffic.
Management
Network
FlowRecords 60176 Flow records traffic .
Management
Network
ICMP 60009 ICMP traffic.
Management
Network
IPComp 60161 IPComp traffic.
Management
Network
NetFlowV5 60175 NetFlow v5 traffic.
Management
Network
RSVP 60096 RSVP traffic.
Management
Network
SMS 60087 SMS traffic.
Management
Network
TimeServer 60125 TimeServer traffic.
Management
Network
VIPC 34802 VIPC traffic.
Management
No_Detect_
nodetectattempt 0 nodetectattempt traff ic.
Attempt
P2P Aimster 60132 Aimster traffic.
P2P Audiogalaxy 60118 Audiogalaxy traffic.
P2P BitTorrent 2006 BitTorrent traffic.
P2P Blubster 2003 Blubster traffic.
P2P Common-P2P-Port 33954 Common P2P port traffic.
15
STRM Default Application Configuration Guide
Page 22

16 DEFAULT APPLICATIONS
Table 2-1 Default Applications (continued)
Application View
Group
Sub-Component Value Description
P2P Common-P2P-Port 33955 Common P2P port traffic.
P2P Common-P2P-Port 33956 Common P2P port traffic.
P2P DirectConnect 5863 DirectConnect traffic.
P2P DirectConnect 5864 DirectConnect traffic.
P2P DirectConnect 5865 DirectConnect traffic.
P2P DirectConnect 5866 DirectConnect traffic.
P2P DirectConnect 5867 DirectConnect traffic.
P2P EarthStationV 60182 EarthStationV traffic.
P2P FileRogue 60145 FileRogue traffic.
P2P Filetopia 60168 Filetopia traffic.
P2P Furthurnet 60160 Furthernet traffic.
P2P GnuCleusLan 2009 GnuCleusLan traffic.
P2P Gnutella 2000 Gnutella traffic.
P2P Groove 60134 Groove traffic.
P2P Hotline 60136 Hotline traffic.
P2P Kazaa 2001 Fastrack (Kazaa) traffic.
P2P LimeWire 2008 LimeWire traffic.
P2P Morpheus 2010 Morpheus traffic.
P2P Napster 2011 Napster traffic.
P2P Napster2 60181 Napster2 traffic.
P2P OpenNap 2007 OpenNap traffic.
P2P PeerEnabler 2204 P2P PeerEnabler traffic
P2P PeerEnabler 2004 P2P PeerEnabler traffic
P2P Piolet 2005 Piolet traffic.
P2P ScourExchange 60113 ScourExchange traffic.
P2P Soulseek 60184 Soulseek traffic.
P2P Tripnosis 60135 Tripnosis traffic.
P2P eDonkey 2002 eDonkey traffic.
P2P iMesh 60114 iM es h tra ff i c.
RemoteAccess ATSTCP 60107 ATSTCP traffic.
RemoteAccess Attachmate-GW 60100 Attachmate-GW traffic.
RemoteAccess CORBA 60043 COBRA traffic.
RemoteAccess Citrix 34814 Citrix traff ic.
RemoteAccess CitrixICA 5670 Remote Access Citrix ICA
Traffic.
STRM Default Application Configuration Guide
Page 23

Table 2-1 Default Applications (continued)
Application View
Group
Sub-Component Value Description
RemoteAccess CitrixICA 5671 Remote Access Citrix ICA
Traffic.
RemoteAccess GoToMyPC 60164 GoToMyPC traffic.
RemoteAccess JavaRMI 60109 JavaRMI traffic.
RemoteAccess MSTerminalServices 6001 MS terminal services.
RemoteAccess OpenConnect-JCP 60085 OpenConnect-JCP traffic.
RemoteAccess OpenWindows 34807 OpenWindows traffic.
RemoteAccess PCanywhere 20948 PCanywhere application.
RemoteAccess PCanywhere 50528 PCanywhere application.
RemoteAccess Persona 60093 Persona traffic.
RemoteAccess RDP 60052 RDP traffic.
RemoteAccess RemotelyAnywhere 60188 RemotelyAnywhere traffic.
RemoteAccess SMTBF 60103 SMTBF traffic.
RemoteAccess SSH 1005 SSH traffic.
RemoteAccess SSH-Ports 20947 SSH-Ports traffic.
RemoteAccess SSH-Ports 20949 SSH-Ports traffic.
RemoteAccess SSL 60001 SSL traffic.
RemoteAccess SSL-Shell 60092 SSL-Shell traffic.
RemoteAccess SmartSockets 60169 SmartSockets traffic.
RemoteAccess SunRPC 60027 SunRPC traffic.
RemoteAccess Tacacs 34808 Tacacs traffic.
RemoteAccess Telnet 1000 Telnet traffic.
RemoteAccess Telnet-Port 20950 Telnet-Port traffic.
RemoteAccess Timbuktu 60017 Timbuktu traffic.
RemoteAccess VNC 1006 VNC traffic.
RemoteAccess XWindows 60050 XWindows traffic.
RemoteAccess radmin 60177 radmin traffic.
RemoteAccess rexec 60081 rexec traffic.
RemoteAccess rlogin 60089 rlogin traffic.
RemoteAccess rsh 60128 rsh traffic.
RemoteAccess rsynch 60159 rsynch traffic.
RemoteAccess rwho 60090 rwho traffic.
RemoteAccess tn3270 60010 tn3270
RemoteAccess tn5250 60063 tn5250 traffic.
RoutingProtocols ARP 34820 ARP traffic.
17
STRM Default Application Configuration Guide
Page 24

18 DEFAULT APPLICATIONS
Table 2-1 Default Applications (continued)
Application View
Group
Sub-Component Value Description
RoutingProtocols AURP 60011 AURP traffic.
RoutingProtocols BGP 60029 BGP traffic.
RoutingProtocols BPDU 34821 BPDU traffic.
RoutingProtocols Banyan-VINES 34838 Banyan-VINES traffic.
RoutingProtocols CBT 60045 CBT traffic.
RoutingProtocols CiscoOUI 34823 CiscoOUI traffic.
RoutingProtocols DRP 60038 DRP traffic.
RoutingProtocols DTP 60192 DTP traffic.
RoutingProtocols EGP 60032 EGP traffic.
RoutingProtocols EIGRP 60065 EIGRP traffic.
RoutingProtocols GatewayRouting 34836 Gateway Routing traffic.
RoutingProtocols IDP 34825 IDP traffic.
RoutingProtocols IGMP 60041 IGMP traffic.
RoutingProtocols IGP 60098 IGP traffic.
RoutingProtocols IanaProtocol-IP 34835 IanaProtocol-IP traffic.
RoutingProtocols OSPF 60031 OSPF traffic.
RoutingProtocols PAgP 60190 PAgP traffic.
RoutingProtocols PIM 60044 PIM traffic.
RoutingProtocols PVSTP 60189 PVSTP traffic.
RoutingProtocols RARP 60047 RARP traffic.
RoutingProtocols RIP 60028 RIP traffic.
RoutingProtocols SpanningTree 60046 Spanning tree traffic.
RoutingProtocols VLAN-Bridge 60191 VLAN-Bridge traffic.
RoutingProtocols VTP 60193 VTP traffic.
SecurityProtocols DPA 60061 DPA traffic.
SecurityProtocols GRE 60033 GRE traffic.
SecurityProtocols IPMobility 60172 IPMobility traffic.
SecurityProtocols IPSec 60037 IPSec traffic.
SecurityProtocols ISAKMP 60080 ISAKMP traffic.
SecurityProtocols L2TP 60026 L2TP traffic.
SecurityProtocols PPTP 60036 PPTP traffic.
SecurityProtocols RC5DES 60067 RC5DES traffic.
SecurityProtocols SOCKS 60079 SOCKS traffic.
SecurityProtocols SWIPE 60171 SWIPE traffic.
SecurityProtocols SoftEther 60186 SoftEther traffic.
STRM Default Application Configuration Guide
Page 25

Table 2-1 Default Applications (continued)
Application View
Group
Sub-Component Value Description
Streaming Abacast 60174 Abacast traffic.
Streaming H.261 34829 H.261 traffic.
Streaming H.262 34828 H.262 traffic.
Streaming H.263 34827 H.263 traffic.
Streaming MPEG-Audio 60053 MPEG-Audio traffic.
Streaming MPEG-Video 60054 MPEG-Video traffic.
Streaming MicrosoftMediaServer 4002 Streaming Microsoft Media
Server Protocol (MMS)
Streaming Motion 60185 Motion traffic.
Streaming RTP-Skinny 34834 RTP-Skinny traffic.
Streaming RTSP 5071 RTSP traffic.
Streaming RadioNetscape 60180 RadioNetscape tr aff ic.
Streaming Real 60003 Real traffic.
Streaming ST2 60034 ST2 traffic.
Streaming StreamWorks 60014 StreamWorks traffic.
Streaming StreamingAudio 4000 Shoutcast MP3 stream
Streaming StreamingAudio 4001 Shoutcast MP3 stream
Streaming WinMedia 60025 WinMedia traffic.
Streaming WinampStream 60165 WinampStream traffic.
Streaming WindowsMediaPlayer 5005 WindowsMediaPlayer traffic.
Streaming WindowsMediaPlayer 5006 WindowsMediaPlayer traffic.
Uncommon
DEC 34824 DEC traffic.
Protocol
Uncommon
UncommonProtocol 34850 Uncommo nPr ot oc ol tra ff ic.
Protocol
Unknown_apps Unknown 1 Unknown traffic.
VoIP CiscoCTI 60144 CiscoCTI traffic.
VoIP Clarent-CC 60075 Clarent-CC traffic.
VoIP Clarent-Complex 60074 Clarent-Complex traffic.
VoIP Clarent-Mgmt 60072 Clarent-Mgmt traffic.
VoIP Clarent-Voice-S 60073 Clarent-Voice-S traffic.
VoIP Dialpad 60140 Dialpad traffic.
VoIP G711 34833 G711 traffic.
VoIP G722 34832 G722 traffic.
VoIP G729 34831 G729 traffic.
VoIP H.323 60018 H.323 traffic.
19
STRM Default Application Configuration Guide
Page 26

20 DEFAULT APPLICATIONS
Table 2-1 Default Applications (continued)
Application View
Group
Sub-Component Value Description
VoIP I-Phone 60066 I-Phone traffic.
VoIP MCK-Signaling 60094 MCK-Signaling traffic.
VoIP MCK-Voice 60095 MCK-Voice traffic.
VoIP MGCP 60152 MGCP traffic.
VoIP Megaco 60155 Megaco traffic.
VoIP Micom-VIP 60035 Micom-VIP traffic.
VoIP Net2Phone 60153 Net2Phone traffic.
VoIP RTCP-B 60022 RTCP-B traffic.
VoIP RTCP-I 60020 RTCP-I traffic.
VoIP RTP-B 60021 RTP-B traffic.
VoIP RTP-I 60019 RTP-I traffic.
VoIP SIP 60151 SIP traffic.
VoIP Skype 3007 Skype traffic.
VoIP T.120 60023 T.120 traffic.
VoIP VDOPhone 60004 VDOPhone traffic.
VoIP Vonage 60187 Vonage traffic.
Web HTTPImageTransfer 1034 HTTPImage transfer traffic.
Web HTTPWeb 1010 HTTPWeb traffic.
Web HTTPWeb 1012 HTTPWeb traffic.
Web HTTPWeb 1020 HTTPWeb traffic.
Web JAVA 5050 Java traffic.
Web NortonAntiVirus 1025 Norton AntiVirus traffic.
Web SecureWeb 1011 Web HTTPS traffic
Web SiteMinder 1026 SiteMinder traffic.
Web Squid 5070 Squid traffic.
Web Web-Port 21085 World Wide Web HTTP.
Web Web-Port 21739 World Wide Web HTTP.
Web Web-Port 21085 World Wide Web HTTP.
Web Webdocument 5013 WebDocument traffic.
Web WebFileTransfer 5000 WebFileTransfer traffic.
Web WebFileTransfer 5060 WebFileTransfer traffic.
Web WebFileTransfer 5061 WebFileTransfer traffic.
Web WebFileTransfer 5062 WebFileTransfer traffic.
Web WebGraphic 5014 WebGraphic traffic.
Web WebMediaAudio 5001 WebMediaAudio traffic.
STRM Default Application Configuration Guide
Page 27

Table 2-1 Default Applications (continued)
Application View
Group
Sub-Component Value Description
Web WebMediaAudio 5003 WebMediaAudio traffic.
Web WebMediaAudio 5004 WebMediaAudio traffic.
Web WebMediaAudio 5021 WebMediaAudio traffic.
Web WebMediaAudio 5031 WebMediaAudio traffic.
Web WebMediaDocuments 5010 WebMediaDocuments traffic.
Web WebMediaDocuments 5011 WebMediaDocuments traffic.
Web WebMediaDocuments 5012 WebMediaDocuments traffic.
Web WebMediaDocuments 5030 WebMediaDocuments traffic.
Web WebMediaDocuments 5040 WebMediaDocuments traffic.
Web WebMediaVideo 5002 WebMediaVideo traffic.
Web WebMediaVideo 5007 WebMediaVideo traffic.
Web WebMediaVideo 5008 WebMediaVideo traffic.
Web WebMediaVideo 5020 WebMediaVideo traffic.
Web Webmin 51350 Web-based syste m
administration interface.
21
STRM Default Application Configuration Guide
Page 28

Page 29

3
ICMP TYPE AND CODE IDS
This chapter provides information on default ICMP type and Code IDs in cluding:
• Identifying Default ICMP Types
• Identifying Default ICMP Codes
Identifying Default
ICMP Types
Table 3-1 lists the default ICMP Codes:
Table 3-1 ICMP Types
ICMP Type Description
0 EchoReply
3 DestinationUnreachable
4 SourceQuench
5 Redirect
8 Echo
9 RouterAdvertisement
10 RouterSelection
11 TimeExceeded
12 ParameterProblem
13 Timestamp
14 TimestampReply
15 InformationRequest
16 InformationReply
17 AddressMaskRequest
18 AddressMaskReply
30 Traceroute
STRM Default Application Configuration Guide
Page 30

24 ICMP TYPE AND CODE IDS
Identifying Default
ICMP Codes
Table 3-2 lists the default ICMP codes:
Table 3-2 ICMP Codes
ICMP Code Description
3 Destination Unreachable Codes
0 Net Unreachable
1 Host Unreachable
2 Protocol Unreachable
3 Port Unreachable
4 Fragmentation Needed and Don't Fragment
was Set
5 Source Route Failed
6 Destination Network Unknown
7 Destination Host Unknown
3 Destination Unreachable Codes
8 Source Host Isolated
9 Communication with Destination Network is
Administratively Prohibited
10 Communication with Destination host is
Administratively Prohibited
11 Destination Network Unreachable for Type of
Service
12 Destination Host Unreachable for Type of
Service
13 Communication Administratively Prohibited
14 Host Precedence Violation
15 Precedence cutoff in effect
5 Redirect Codes
0 Redirect Datagram for the Network (o r subn et)
1 Redirect Datagram for the Host
2 Redirect Datagram for the Type of Service and
Network
3 Redirect Datagram for the Type of Service and
Host
11 Time Exceeded Codes
0 Time to Live exceeded in Transit
1 Fragment Reassembly Time Exceeded
12 Parameter Problem Codes
0 Pointer indicates the error
1 Missing a Required Option
STRM Default Application Configuration Guide
Page 31

Table 3-2 ICMP Codes (continued)
ICMP Code Description
2 Bad Length
Identifying Default ICMP Codes 25
STRM Default Application Configuration Guide
Page 32

Page 33

4
PROTOCOL IDS
This chapter provides information on default protocols IDs used in STRM.
Table 4-1 lists the default common protocols:
Table 4-1 Protocol ID
Protocol ID Protocol Port Description
6 TCP
17 UDP
1 ICMP
2 IGMP
38 IDPR-CMTP
40 IPv6
46 RSVP
47 GRE
50 ESP
51 AH
54 NARP
99 ANY
89 OSPFIGP
94 IPIP
132 SCTP
STRM Default Application Configuration Guide
Page 34

Page 35

5
PORT IDS
This chapter provides information on default port IDs used by STRM.
Table 5-1 lists the default common ports:
Table 5-1 Port ID
Port Protocol Protocol Description
20 FTP File Transfer Protocol
21 FTP File Transfer Protocol
22 SSH Secure Shell
23 Telnet
25 SMTP Send Mail Transfer Protocol
53 DNS Domain Name Service
68 DHCP Dynamic Host Control Protocol
80 HTTP HyperText Transfer Protocol
81 HTTP HyperText Transfer Protocol
110 POP3 Post Office Protocol - version 3
115 SFTP Secure File Transfer Protocol
119 NNTP Network New Transfer Protocol
123 NTP Network Time Protocol
137 NetBIOS-ns
138 NetBIOS-dgm
139 NetBIOS
143 IMAP Internet Message Access Protocol
161 SNMP Simple Network Management Protocol
194 IRC Internet Relay Chat
220 IMAP3 Internet Message Access Protocol 3
389 LDAP Lightweight Directory Access Protocol
443 SSL Secure Socket Layer
445 SMB NetBIOS over TCP
995 SPOP Secure Post Office Protocol
STRM Default Application Configuration Guide
Page 36

30 PORT IDS
Table 5-1 Port ID (continued)
Port Protocol Protocol Description
1243 SubSeven and other trojans
1433 Microsoft SQL Server
1521 Oracle SQL
2049 NFS Network File System
3306 mySQL
4000 ICQ
6000 X Windowing System
6699 Napster
6667 IRC
6776 SubSeven and other trojans
8080 HTTP
31337 ackOrifice and other Trojans spells Elite
STRM Default Application Configuration Guide
 Loading...