

Juniper SECURITY THREAT RESPONSE MANAGER 2008.2 - MANAGING VULNERABILITY ASSESSMENT V1, Security Threat Response Manager User Manual
Page 1

Security Threat Response Manager
Managing Vulnerability Assessment
Release 2008.2
Juniper Networks, Inc.
1194 North Mathilda Avenue
Sunnyvale, CA 94089
USA
408-745-2000
www.juniper.net
Part Number: 530-025614-01, Revision 1
Page 2

Copyright Notice
Copyright © 2008 Juniper Networks, Inc. All rights reserved. Juniper Networks and the Juniper Networks logo are registered trademarks of Juniper
Networks Inc. in the United States and other countries. All other trademarks, service marks, registered trademarks, or registered service marks in this
document are the property of Juniper Networks or their respective owners. All specifications are subject to change without notice. Juniper Networks
assumes no responsibility for any inaccuracies in this document or for any obligation to update information in this document. Juniper Networks reserves
the right to change, modify, transfer, or otherwise revise this publicati on without notice.
FCC Statement
The following information is for FCC compliance of Class A devices: This equipment has been tested and found to comply with the limits for a Class A
digital device, pursuant to part 15 of the FCC rules. These limits are designed to provide reasonable protection against harmful interference when the
equipment is operated in a commercial environment. The equipment generates, uses, and can radiate radio-frequency energy and, if not installed and
used in accordance with the instruction manual, may cause harmful interference to radio communications. Operation of this equipment in a residential
area is likely to cause harmful interference, in which case users will be required to correct the interference at their own expense. The following
information is for FCC compliance of Class B devices: The equipment described in this manual generates and may radiate radio-frequency energy. If it
is not installed in accordance with NetScreen’s installation instructions, i t may cause interference wi th radio and tele vision reception. This equip ment has
been tested and found to comply with the limits for a Class B digital device in accordance with the specifications in part 15 of the FCC rules. These
specifications are designed to provide reasonable protection against such interference in a residential installation. However, there is no guarantee that
interference will not occur in a particular installation. If this equipmen t does cause harmful interference to radio or television reception, which can be
determined by turning the equipment off and on, the user is encouraged to try to correct the interference by one or more of the following measures:
Reorient or relocate the receiving antenna. Increase the separation between the equipme nt and receive r. Consult t he dealer o r an experienced ra dio/TV
technician for help. Connect the equipment to an outlet on a circuit different from that to which the receiver is connected.
Caution: Changes or modifications to this product could void the user's warrant y and authority to operate this device.
Disclaimer
THE SOFTWARE LICENSE AND LIMITED WARRANTY FOR THE ACCOMPANYING PRODUCT ARE SET FORTH IN THE INFORMATION PACKET
THAT SHIPPED WITH THE PRODUCT AND ARE INCORPORATED HEREIN BY THIS REFERENCE. IF YOU ARE UNABLE TO LOCATE THE
SOFTWARE LICENSE OR LIMITED WARRANTY, CONTACT YOUR JUNIPER NETWORKS REPRESENTATIVE FOR A COPY.
Managing Vulnerability Assessment
Release 2008.2
Copyright © 2008, Juniper Networks, Inc.
All rights reserved. Printed in USA.
Revision History
June 2008—Revision 1
The information in this document is current as of the date listed in the revision history.
2
Page 3

CONTENTS
ABOUT THIS GUIDE
Conventions 3
Technical Documentation 3
Documentation Feedback 3
Requesting Support 4
1 OVERVIEW
Configuring Vulnerability Assessment 5
Viewing Scanners 6
2 MANAGING IP360 SCANNERS
Adding an ip360 Scanner 9
Editing an ip360 Scanner 11
Deleting an ip360 Scanner 11
Exporting Reports 12
3 MANAGING NESSUS SCANNERS
Adding a Nessus Scanner 13
Editing an Nessus Scanner 16
Deleting a Nessus Scanner 16
4 MANAGING NESSUS SCAN RESULT IMPORTERS
Adding a Nessus Scan Result Importer 17
Editing a Nessus Scan Result Importer 19
Deleting a Nessus Scan Result Importer 20
5 MANAGING NMAP SCANNERS
Adding a Nmap Scanner 21
Editing an Nmap Scanner 23
Deleting an Nmap Scanner 24
6 MANAGING QUALYS SCANNERS
Adding a Qualys Scanner 25
Editing a Qualys Scanner 27
Deleting a Qualys Scanner 27
Page 4

7 MANAGING FOUNDSCAN SCANNERS
Adding a FoundScan Scanner 29
Editing a FoundScan Scanner 32
Deleting a FoundScan Scanner 32
Importing Custom Certificates 32
Example Of TrustedCA.pem File 34
Example of Portal.pem File 34
8 MANAGING JUNIPER NSM PROFILER SCANNERS
Adding a Juniper NSM Profiler Scanner 39
Editing a Profiler Scanner 41
Deleting a Profiler Scanner 41
9 MANAGING RAPID7 NEXPOSE SCANNERS
Adding a Rapid7 NeXpose Scanner 43
Editing a Rapid7 NeXpose Scanner 45
Deleting a Rapid7 NeXpose Scanner 45
10 MANAGING SCAN SCHEDULES
Scheduling a Scan 47
Editing a Scan Schedule 49
Deleting a Scheduled Scan 50
11 VIEWING ASSET PROFILE INFORMATION
INDEX
Page 5
ABOUT THIS GUIDE
The Managing Vulnerability Assessment Guide provides you with information for
managing vulnerability scanners and scan schedules using STRM.
Conventions Table 1 lists conventions that are used throughout this guide.
Table 1 Icons
Icon Type Description
Information note Information that describes important features or
instructions.
Caution Information that alerts you to potential loss of
data or potential damage to an application,
system, device, or network.
Warning Information that alerts you to potential personal
injury.
Technical
Documentation
Documentation
Feedback
You can access technical documentation, technical notes, and release notes
directly from the Juniper networks Support Web site at
www.juniper.net/support/.
http://
We encourage you to provide feedback, comments, and suggestions so that we
can improve the documentation. Send your comments to
[email protected], or fill out the documentation feedback form at
http://www.juniper.net/techpubs/docbug/docbugreport.html. If you are using e-mail, be
sure to include the following information with your comments:
• Document name
• Document part number
• Page number
• Software release version
Managing Vulnerability Assessment
Page 6

4 ABOUT THIS GUIDE
Requesting
Support
• Open a support case using the Case Management link at
http://www.juniper.net/support/ or call 1-888-314-JTAC (from the United States,
Canada, or Mexico) or 1-408-745-9500 (from elsewher e).
Managing Vulnerability Assessment
Page 7

1
OVERVIEW
Vulnerability assessment integration enables vulnerability assessment data to
build profiles of attackers and targets. Vulnerability assessment data uses
correlated event data, network activity, and behavioral changes to remove false
positives to determine the threat level for ea ch critical business asset.
STRM's integration with vulnerability assessment tools allows you to schedule
scans to keep your vulnerability assessment data up-to-date.
Note: You must have permissions to all CIDRs you wish to scan. Also, do not
include CIDRs in your vulnerability assessment that are configured in your global
exclusions list. For more information on global exclusions, see the Offense
Resolutions Users Guide.
This chapter provides an overview of configuring vulnerability assessment ,
including:
• Configuring Vulnerability Assessment
Configuring
Vulnerability
Assessment
• Viewing Scanners
To configure vulnerability assessment, you must:
Step 1 Configure your scanner using one of the following supported scanners:
• Chapter 2 Managing ip360 Scanners
• Chapter 3 Managing Nessus Scanners
• Chapter 4 Managing Nessus Scan Result Importers
• Chapter 5 Managing Nmap Scanners
• Chapter 6 Managing Qualys Scanners
• Chapter 7 Managing FoundScan Scanners
• Chapter 8 Managing Juniper NSM Profiler Scanners
• Chapter 9 Managing Rapid7 NeXpose Scanners
Managing Vulnerability Assessment
Page 8
6 OVERVIEW
The scanner determines the tests performed during the scanning of a host. The
selected scanner populates your asset profile data including the host information,
ports, and potential vulnerabilities.
Y ou must configure scanners using the Administration Console. For information on
accessing the Administration Console, see the STRM Administration Guide.
Step 2 Schedule vulnerability assessment. See Chapter 10 Managing Scan Schedules.
Step 3 View the results of the asset profile. See Chapter 11 Viewing Asset Profile
Information.
Note: If you add, edit, or delete a scanner or if you add, edit, or delete a scheduled
vulnerability assessment scan, you must select Configurations > Deploy
Configuration Changes from the Administration Console menu for the changes to
take effect.
The results of the scan provides the operating system and version on each CIDR,
server, and version of each port. Also, the scan provides the known vulnerabilities
on discovered ports and services.
Viewing Scanners To view currently co nfigured scanners:
Step 1 In the Administration Console, click the SIM Configuration tab.
The SIM Configuration panel appears.
Step 2 Click the VA Scanners icon.
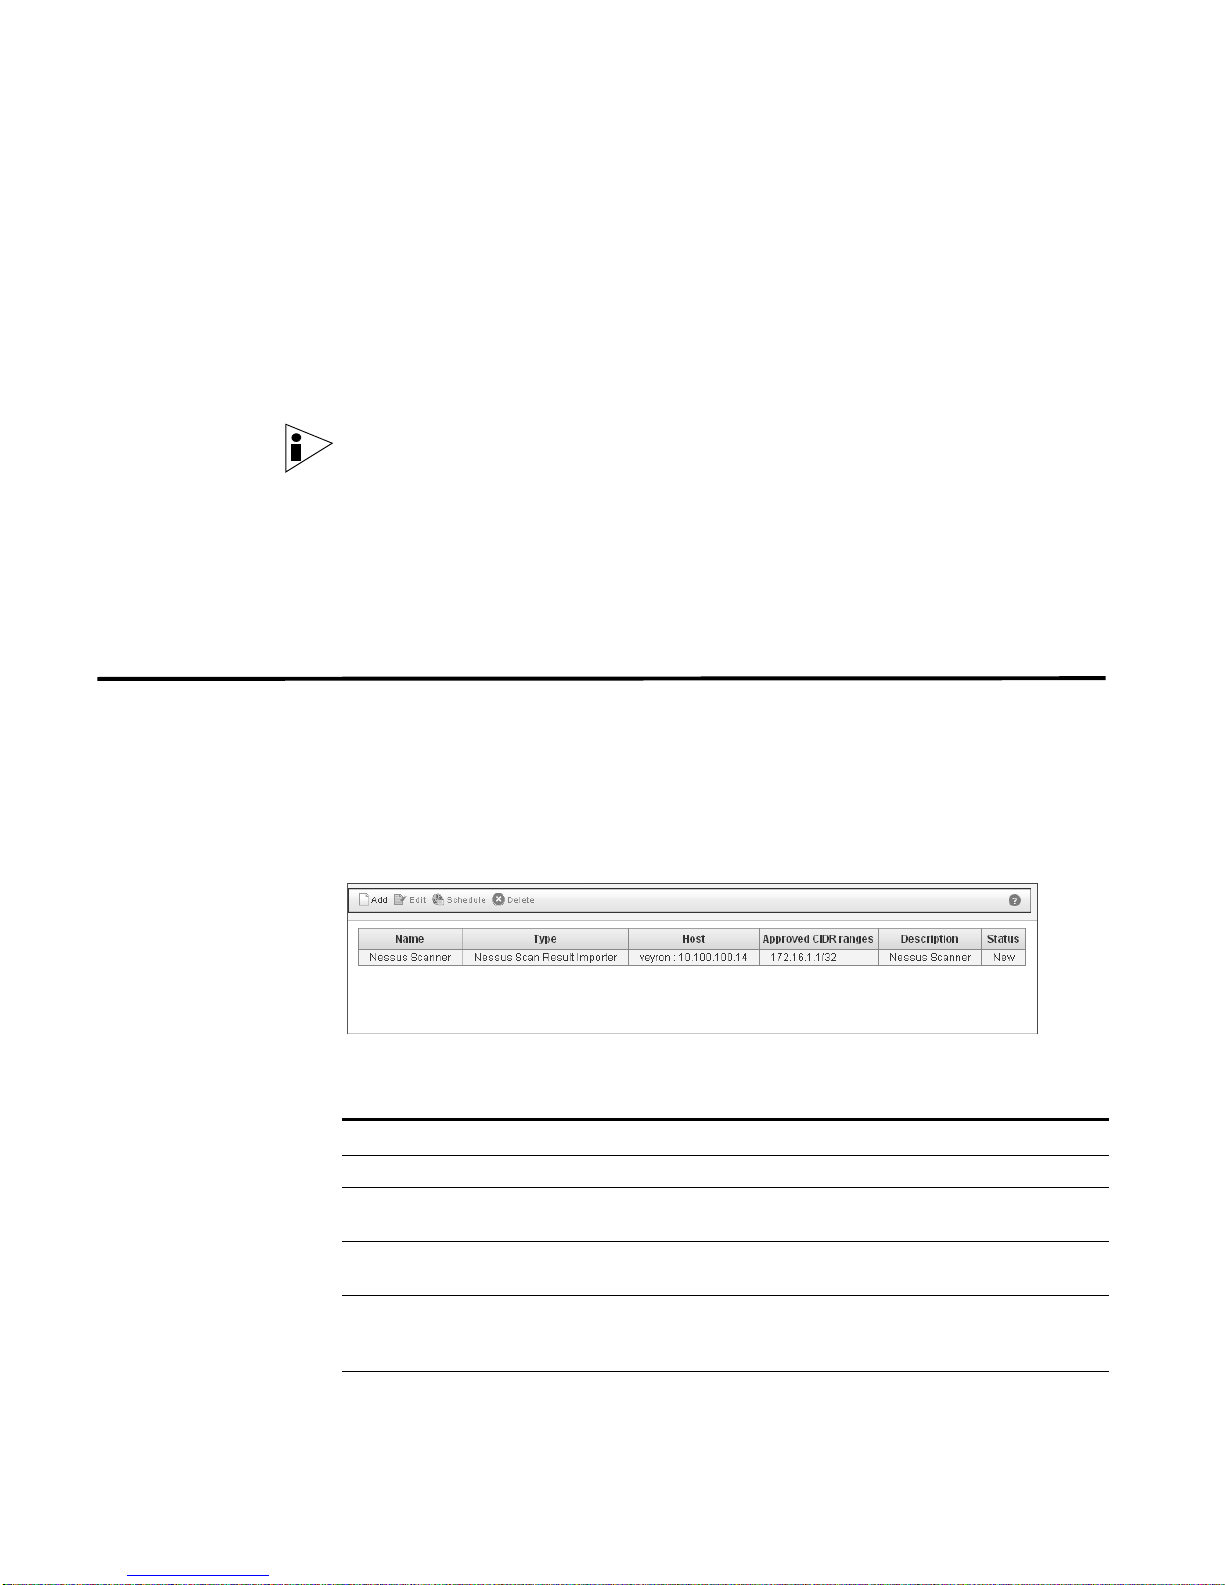
The VA Scanners window appears.
The VA Scanners window provides the following details for each scanner:
Table 1-1 Scanner Parameters
Parameter Description
Name Specifies the name of the scanner.
Type Specifies the type of scanner, for example, Nessus Scan Results
Importer.
Host Specifies the IP address or host name of the host on which the
scanner operates.
Approved CIDR
Ranges
Description Specifies a description for this scanner.
Specifies the CIDR range(s) you wish this scanner to consider.
Multiple CIDR ranges are displayed using a comma separated
list.
Managing Vulnerability Assessment
Page 9

Viewing Scanners 7
Table 1-1 Scanner Parameters (continued)
Parameter Description
Status Specifies the status of the scanner schedule.
Managing Vulnerability Assessment
Page 10

Page 11

2
MANAGING ip360 SCANNERS
STRM uses SSH to access the remote server (SS H ex port server) then retrieves
and interprets the scanned data. STRM supports VnE Manager version
IP360-6.5.2 - 6.7.1.
This chapter includes information on configuring an ip360 scanner including:
• Adding an ip360 Scanner
• Editing an ip360 Scanner
• Deleting an ip360 Scanner
• Adding an ip360 Scanner
Adding an ip360
Scanner
To add an ip360 scanner:
Step 1 In the Administration Console, click the SIM Configuration tab.
The SIM Configuration panel appears.
Step 2 Click the VA Scanners icon.
The VA Scanners window appears.
Step 3 Click Add.
The Add Scanner window appears.
Step 4 Enter values for the following parameters:
Table 2-1 Scanner Parameters
Parameter Description
Scanner Name Specify the name you wish to assign to this scanner. The name
may be up to 255 characters in length.
Description Specify a description for this scanner. The description may be up
to 255 characters in length.
Managed Host Using the drop-down list box, select the managed host you wish
to configure this scanner.
Type Using the drop-down list box, select nCircle IP360 Scanner.
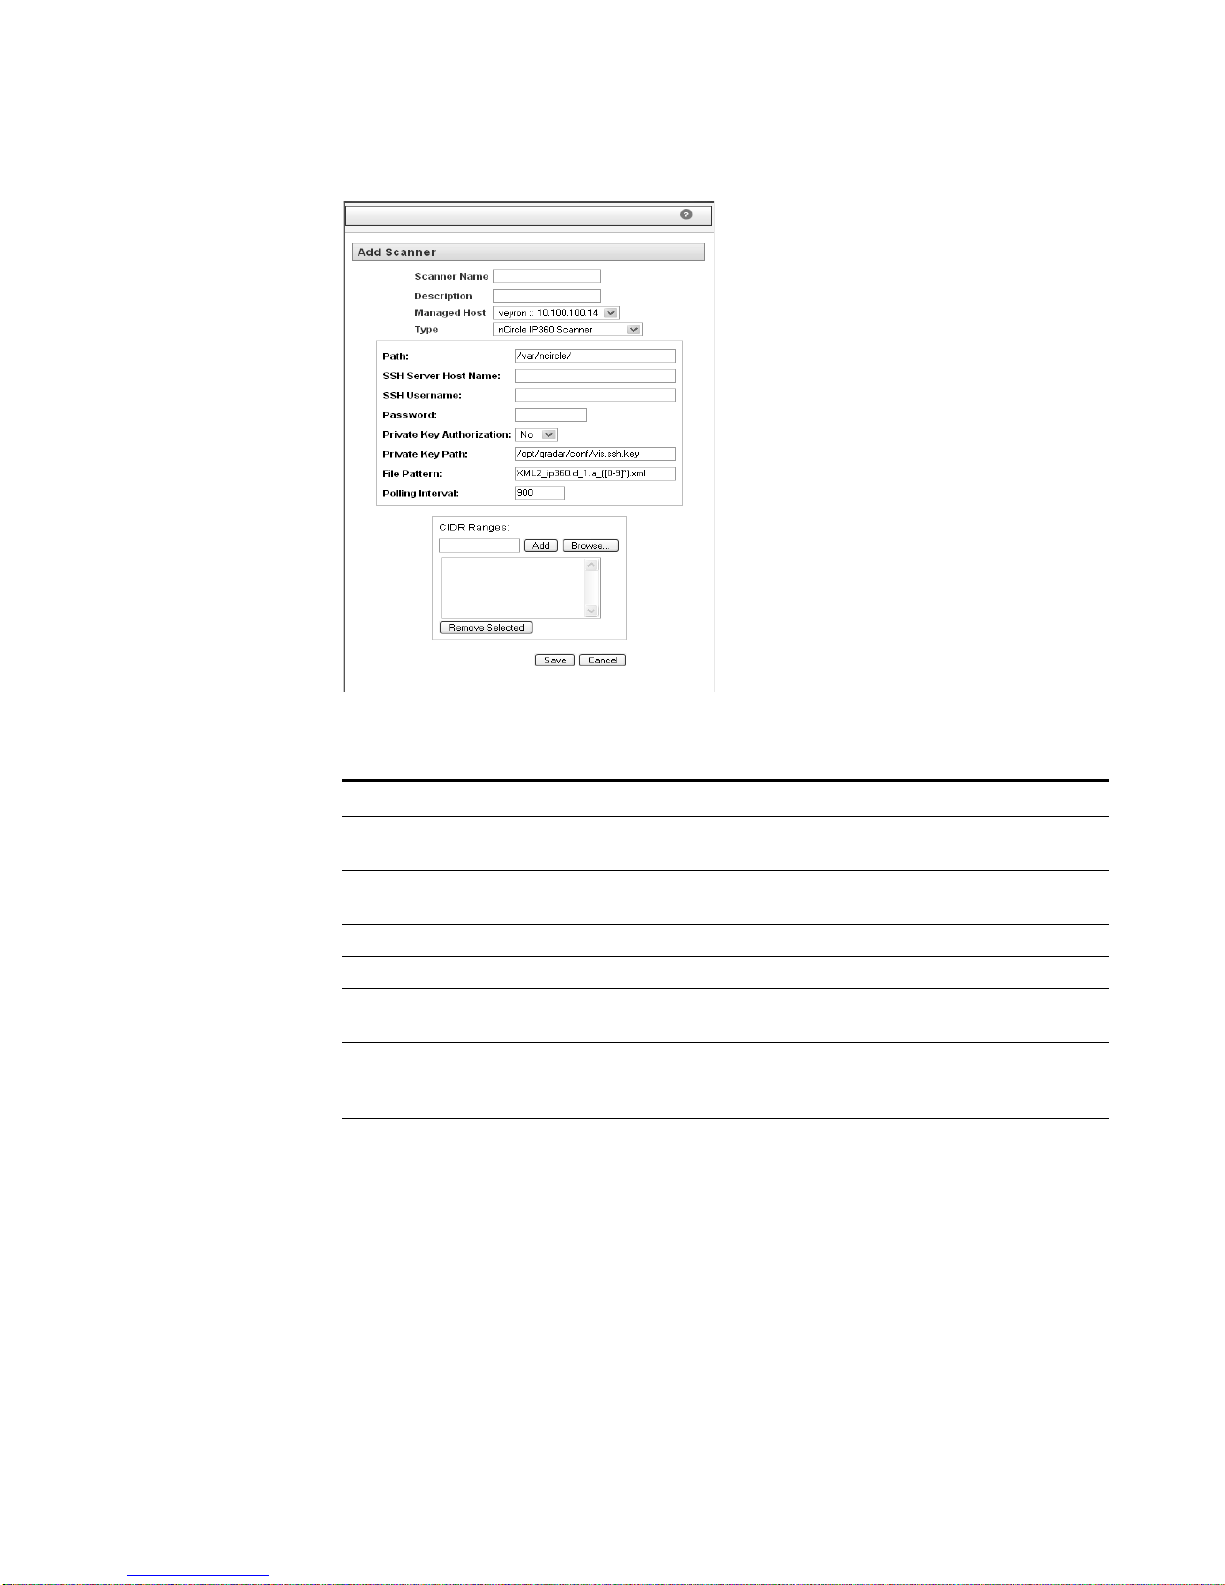
The list of parameters for the selected scanner type appears.
Managing Vulnerability Assessment
Page 12
10 MANAGING IP360 SCANNERS
Step 5 Enter values for the parameters:
Table 2-2 ip360 Parameters
Parameter Description
Path Specify the location on the remote server where the scan results
are stored. The default is /var/ncircle/.
SSH Server Host
Specify the IP address or host name to the remote server.
Name
SSH Username Specify the SSH remote server username.
Password Specify the password to the remote server.
Private Key
Authorization
Enable (Yes) or disable (No) private key authorization for the
server. The default value is No.
Private Key Path Specify the private key path. The default is
/opt/qradar/conf/vis.ssh.key. This parameter is not used if the
Private Key Authorization parameter is set to false.
File Pattern The Vulnerability Assessment Integration Server (VIS) retrieves
reports, at the configured polling interval, from the nCircle device.
Specify the file pattern you wish to retrieve. The filename pattern
used should select only the ip360 exported XML files. It is
important to ensure that only ip360 XML files are included in the
listing. Typical values for this parameter are:
XML2_ip360.d_([0-9]*).a_([0-9]*).xml
We recommend that you use the above pattern, however, you
can also use the below pattern:
XML2_ip360.d_1.a_([0-9]*).xml
Managing Vulnerability Assessment
Page 13

Editing an ip360 Scanner 11
Table 2-2 ip360 Parameters (continued)
Parameter Description
Polling Interval Specify the frequency that you wish the VIS to retrieve reports
from the nCircle device. The default value is 900 seconds.
Note: If the scanner is configured to use a password, the SSH scanner server to
which STRM connects must support password authentication. If it does not, SSH
authentication for the scanner may fail. Make sure the following line appears
exactly as shown in your sshd_config file, which is typically found in the /etc/ssh
directory on the SSH server:
PasswordAuthentication yes. If your scanner
server does not use OpenSSH, the configuration may be slightly different.
Step 6 To configure the CIDR ranges you wish this scanner to consider:
a In the text field, enter the CIDR range you wish this scanner to consider or click
Browse to select the CIDR range from the network list.
b Click Add.
Step 7 Click Save.
Step 8 From the STRM Administration Console menu, select Configurations > Deploy
Configuration Changes.
Editing an ip360
Scanner
Step 1 In the Administration Console, click the SIM Configuration tab.
Step 2 Click the VA Scanners icon.
Step 3 Select the scanner you wish to edit.
Step 4 Click Edit.
Step 5 Update parameters, as necessary. See Table 2-2.
Step 6 Click Save. From the STRM Administration Console menu, select Configurations
Deleting an ip360
Scanner
Step 1 In the Administration Console, click the SIM Configuration tab.
Step 2 Click the VA Scanners icon.
To edit a scanner:
The SIM Configuration panel appears.
The V A Scanners window appears.
The Edit Scanner window appears.
> Deploy Configuration Changes.
To delete a scanner:
The SIM Configuration panel appears.
The V A Scanners window appears.
Managing Vulnerability Assessment
Page 14

12 MANAGING IP360 SCANNERS
Step 3 Select the scanner you wish to delete.
Step 4 Click Delete.
A confirmation window appears.
Step 5 Click Ok.
Step 6 From the STRM Administration Console menu, select Configurations > Deploy
Configuration Changes.
Exporting Reports For the VIS to retrieve reports that are exported from the ip360 device, you must
configure the automated export of reports on the ip360 device.
To co nfigure automated export of reports:
Step 1 Log in to the IP360 VNE Manager UI.
Step 2 Select Administer -> System -> VNE Manager -> Automated Export from the
left-hand navigation area.
The Automated Export menu appears.
Step 3 From the Automated Export menu, click the Export to File tab.
Step 4 Click the Help link at the top right-hand corner of the menu.
The help that appears provides a link to instructions for configuring automated
exports of reports using ssh. To integrate with STRM, the export must be
configured to use the XML2 format.
Managing Vulnerability Assessment
Page 15

3
MANAGING NESSUS SCANNERS
Nessus software includes separate client and server components. You can install
the client on the same system as the server. However, for performance reasons,
you can provide a dedicated Nessus server with distributed clients, which means a
separate client and server. The Nessus client may consume significant system
resources during large or detailed scans.
Note: Since Nessus may require high CPU usage, we recommend that you do not
install your Nessus software on a network critical system.
STRM supports Nessus version 2.2.x to 3.0.4. For more information on installing
and configuring Nessus, see your Nessus documentation.
This chapter provides information on managing your Nessus scanner including:
• Adding a Nessus Scanner
• Editing an Nessus Scanner
Adding a Nessus
Scanner
Step 1 In the Administration Console, click the SIM Configuration tab.
Step 2 Click the VA Scanners icon.
Step 3 Click Add.
Step 4 Enter values for the following parameters:
• Deleting a Nessus Scanner
To add a Nessus scanner:
The SIM Configuration panel appears.
The VA Scanners window appears.
The Add Scanner window appears.
Table 3-1 Scanner Parameters
Parameter Description
Scanner Name Specify the name you wish to assign to this scanner. The name
may be up to 255 characters in length.
Managing Vulnerability Assessment
Page 16
14 MANAGING NESSUS SCANNERS
Table 3-1 Scanner Parameters (continued)
Parameter Description
Description Specify a description for this scanner. The description may be up
Managed Host Using the drop-down list box, select the managed host you wish
Type Using the drop-down list box, select Nessus Scanner.
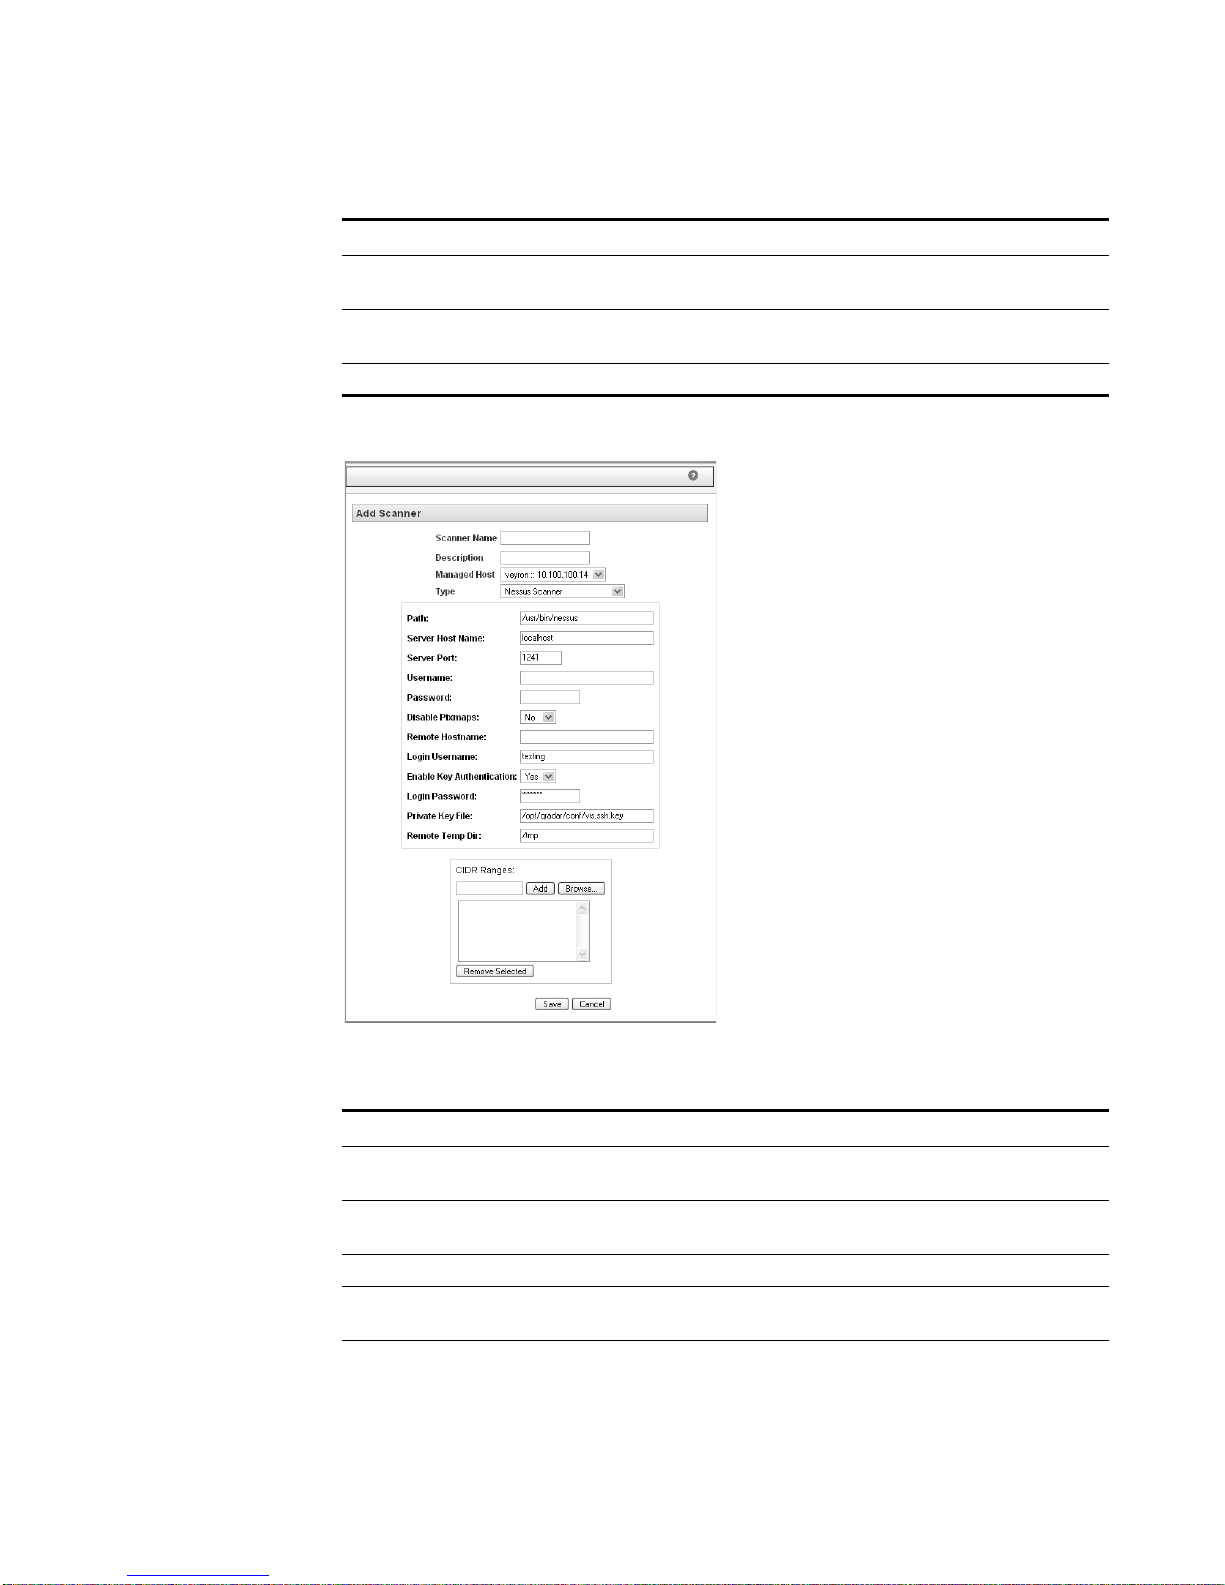
The list of parameters for the selected scanner type appears.
to 255 characters in length.
to configure this scanner.
Step 5 Enter values for the parameters:
Table 3-2 Nessus Parameters
Parameter Description
Path Specify the location of the Nessus client executable file on the
Server Host Name Specify the IP address or DNS name of the Nessus server as
Server Port Specify the port for the nessus server. The default is port 1241.
Username Specify the Nessus username that the Nessus client uses to
Password Specify the Nessus password.
Nessus client host. The default is /usr/bin/nessus.
seen by the Nessus client. The default is localhost.
authenticate with the Nessus server.
Managing Vulnerability Assessment
Page 17

Adding a Nessus Scanner 15
Table 3-2 Nessus Parameters (continued)
Parameter Description
Disable Pixmaps Enables (Yes) or Disables (No) pixmaps. If the Nessus
installation includes a graphical client, set this parameter to Yes.
The default is No.
To determine if the Nessus client has graphical interf ace support,
you must log in to the system that is hosting the Nessus client
and execute the client with no parameters. An error message
appears if no graphical client is installed.
Remote
Hostname
Specify the DNS name or IP address of the system hosting the
Nessus client.
Login Username Specifies the username used by STRM to authenticate the SSH
connection.
Enable Key
Authentication
Enables (Yes) or disables (No) public/private key authentication.
If enabled, STRM attempts to authenticate the SSH connection
using the provided private key. The default is Yes. For more
information, see your SSH documentation for configuring public
key authentication.
Login Password If Enable Key Authentication is disabled, specify the password
that STRM uses to authenticate the SSH connection.
If key authentication is disabled, you must set a login password.
Private Key File Specify the directory path to the file that contains the private key
information. STRM uses the private key to auth e ntic at e the S SH
connection, if you are using SSH key based authentication. The
default is /opt/qradar/conf/vis.ssh.key.
This parameter is mandatory if key authentication is enabled.
Remote Temp Dir Specify the directory on the Nessus client that STRM may use to
store temporary files used during the execution of the Nessus
client. These files are removed once the client has successfully
executed. Default setting is /tmp.
Note: If the scanner is configured to use a password, the SSH scanner server to
which STRM connects must support password authentication. If it does not, SSH
authentication for the scanner will fail. Make sure the following line appears exactly
as shown in your sshd_config file, which is typically found in the /etc/ssh directory
on the SSH server:
does not use OpenSSH, the configuration may be slightly different.
Step 6 To configure the CIDR ranges you wish this scanner to consider:
a In the text field, enter the CIDR range you wish this scanner to consider or click
Browse to select the CIDR range from the network list.
b Click Add.
Step 7 Click Save.
Step 8 From the STRM Administration Console menu, select Configurations > Deploy
Configuration Changes.
PasswordAuthentication yes. If your scanner server
Managing Vulnerability Assessment
Page 18

16 MANAGING NESSUS SCANNERS
Editing an Nessus
Scanner
Step 1 In the Administration Console, click the SIM Configuration tab.
Step 2 Click the VA Scanners icon.
Step 3 Select the scanner you wish to edit.
Step 4 Click Edit.
Step 5 Update parameters, as necessary. See Table 3-2.
Step 6 Click Save.
Step 7 From the STRM Administration Console menu, select Configurations > Deploy
Deleting a Nessus
Scanner
Step 1 In the Administration Console, click the SIM Configuration tab.
To edit a scanner:
The SIM Configuration panel appears.
The VA Scanners window appears.
The Edit Scanner window appears.
Configuration Changes.
To delete a scanner:
The SIM Configuration panel appears.
Step 2 Click the VA Scanners icon.
The VA Scanners window appears.
Step 3 Select the scanner you wish to delete.
Step 4 Click Delete.
A confirmation window appears.
Step 5 Click Ok.
Step 6 From the STRM Administration Console menu, select Configurations > Deploy
Configuration Changes.
Managing Vulnerability Assessment
Page 19

4
MANAGING NESSUS SCAN RESULT
I
MPORTERS
When you configure a Nessus Scan Result Importer, STRM connects to the host
storing the Nessus scan results file. STRM then retrieves the previously run scan
results for processing. STRM supports scan results from Nessus version 2.2.x to
3.0.4. For more information on installing and configuring Nessus, see your Nessus
documentation.
This chapter provides information on managing your Nessus Scan Result
Importers including:
• Adding a Nessus Scan Result Importer
• Editing a Nessus Scan Result Importer
• Deleting a Nessus Scan Result Importer
Adding a Nessus
Scan Result
Importer
Step 1 In the Administration Console, click the SIM Configuration tab.
Step 2 Click the VA Scanners icon.
Step 3 Click Add.
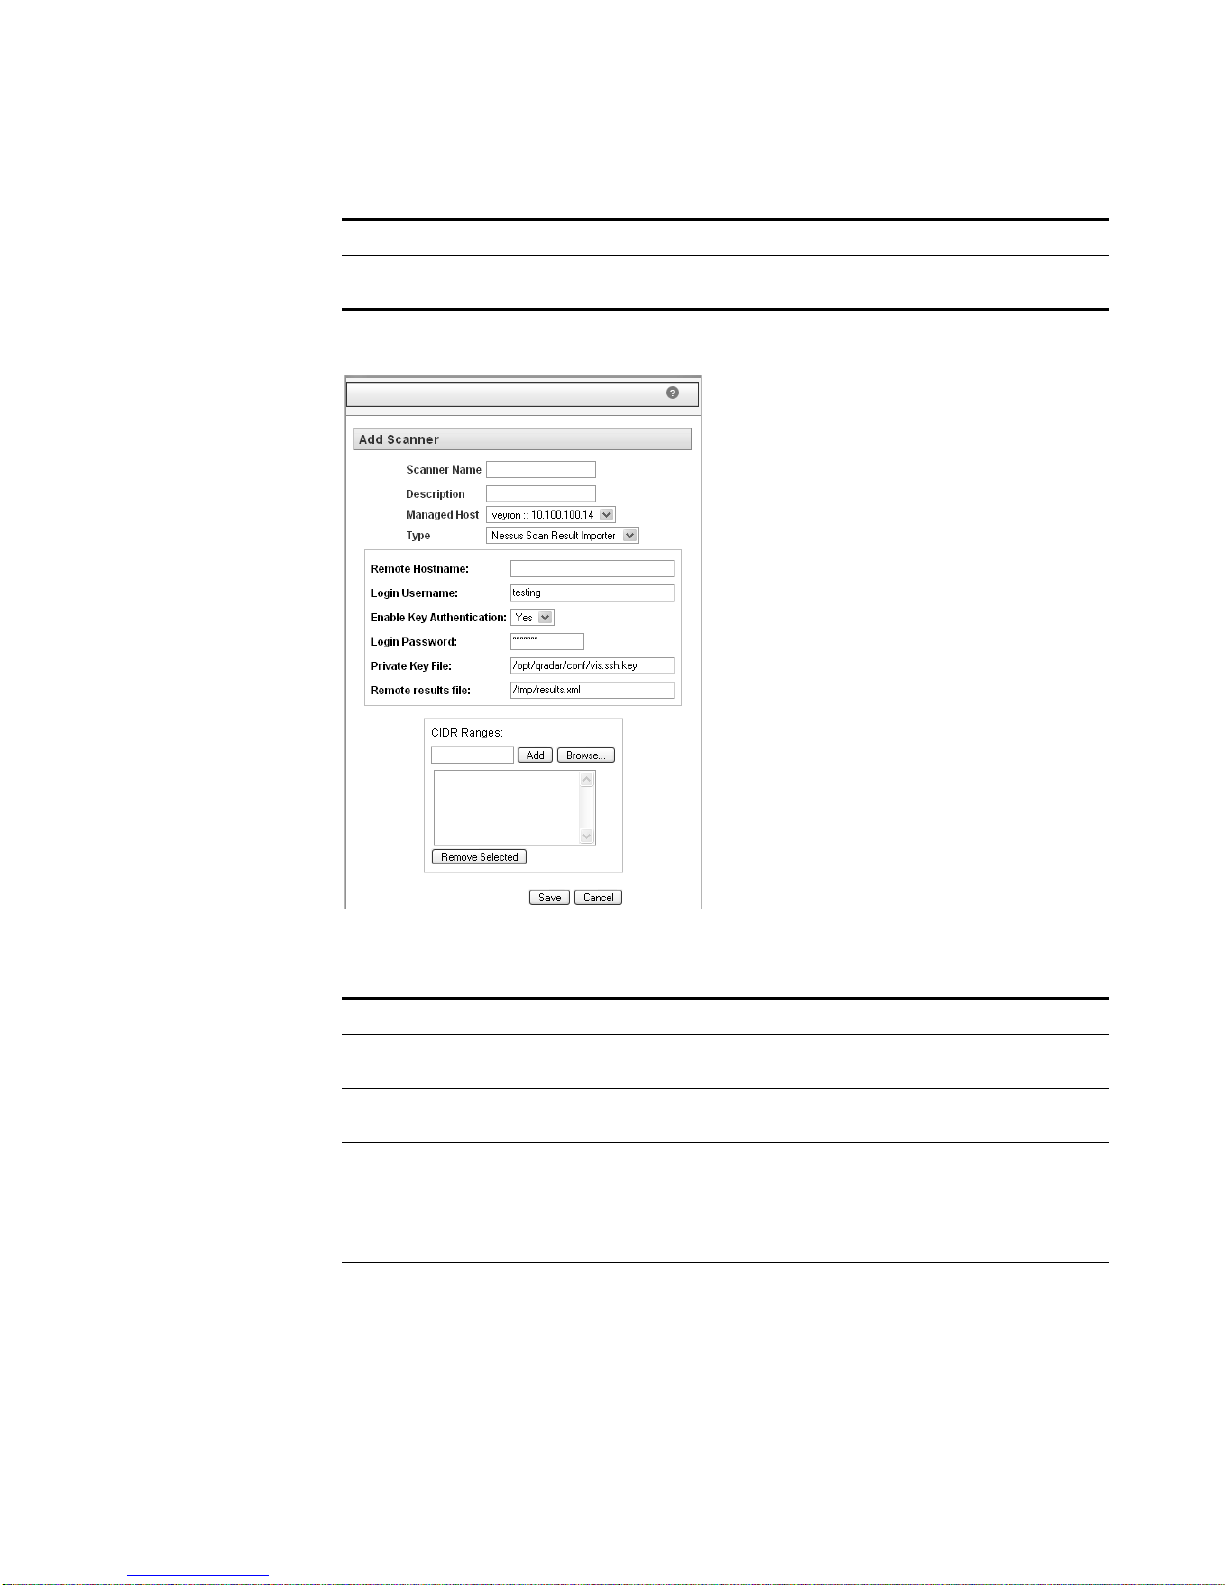
Step 4 Enter values for the following parameters:
To add a Nessus Scan Result Importer:
The SIM Configuration panel appears.
The VA Scanners window appears.
The Add Scanner window appears.
Table 4-1 Scanner Parameters
Parameter Description
Scanner Name Specify the name you wish to assign to this scanner. The name
may be up to 255 characters in length.
Description Specify a description for this scanner. The description may be up
to 255 characters in length.
Managed Host Using the drop-down list box, select the managed host you wish
to configure this scanner.
Managing Vulnerability Assessment
Page 20
18 MANAGING NESSUS SCAN RESULT IMPORTERS
Table 4-1 Scanner Parameters (continued)
Parameter Description
Type Using the drop-down list box, select Nessus Scan Result
The list of parameters for the selected scanner type appears.
Importer.
Step 5 Enter values for the parameters:
Table 4-2 Nessus Scan Result Importer Parameters
Parameter Description
Remote
Hostname
Specify the DNS name or IP address of the system hosting the
Nessus scan results file.
Login Username Specifies the username used by STRM to authenticate the SSH
connection.
Enable Key
Authentication
Enables (Yes) or disables (No) public/private key authentication.
If enabled, STRM attempts to authenticate the SSH connection
using the provided private key. The default is Yes. For more
information, see your SSH documentation for configuring public
key authentication.
Login Password If Enable Key Authentication is disabled, specify the password
that STRM uses to authenticate the SSH connection.
If key authentication is disabled, you must set a login password.
Managing Vulnerability Assessment
Page 21

Editing a Nessus Scan Result Importer 19
Table 4-2 Nessus Scan Result Importer Parameters (continued)
Parameter Description
Private Key File Specify the directory path to the file that contains the private key
information. STRM uses the private key to auth e ntic at e the S SH
connection, if you are using SSH key based authentication. The
default is /opt/qradar/conf/vis.ssh.key.
This parameter is mandatory if key authentication is enabled.
Remote Results
File
Specify the directory and filename on the Nessus server from
which STRM retrieves the scan results.
Note: If the scanner is configured to use a password, the SSH scanner server to
which STRM connects must support password authentication. If it does not, SSH
authentication for the scanner will fail. Make sure the following line appears exactly
as shown in your sshd_config file, which is typically found in the /etc/ssh directory
on the SSH server.
PasswordAuthentication yes. If your scanner server
does not use OpenSSH, the configuration may be slightly different.
Step 6 To configure the CIDR ranges you wish this scanner to consider:
a In the text field, enter the CIDR range you wish this scanner to consider or click
Browse to select the CIDR range from the network list.
Editing a Nessus
Scan Result
Importer
b Click Add.
Step 7 Click Save.
Step 8 From the STRM Administration Console menu, select Configurations > Deploy
Configuration Changes.
To edit a Nessus Scan Result Importer:
Step 1 In the Administration Console, click the SIM Configuration tab.
The SIM Configuration panel appears.
Step 2 Click the VA Scanners icon.
The V A Scanners window appears.
Step 3 Select the scanner you wish to edit.
Step 4 Click Edit.
The Edit Scanner window appears.
Step 5 Update parameters, as necessary. See Table 4-2.
Step 6 Click Save.
Step 7 From the STRM Administration Console menu, select Configurations > Deploy
Configuration Changes.
Managing Vulnerability Assessment
Page 22

20 MANAGING NESSUS SCAN RESULT IMPORTERS
Deleting a Nessus
Scan Result
Importer
Step 1 In the Administration Console, click the SIM Configuration tab.
Step 2 Click the Scanner Configuration Management icon.
Step 3 Using the Existing Configurations drop-down list box, select the scanner you wish
Step 4 Click Delete.
Step 5 Click Ok.
Step 6 From the STRM Administration Console menu, select Configurations > Deploy
To delete a Nessus Scan Result Importer:
The SIM Configuration panel appears.
The Scanner Configurations window appears.
to delete.
The confirmation window appears.
Configuration Changes.
Managing Vulnerability Assessment
Page 23

5
MANAGING NMAP SCANNERS
You can integrate Network Mapper (Nmap) scanners (version 3.83 to 4.20) with
STRM. Since certain types of Nmap port scans require Nmap to be run as root,
STRM must have access as root or you must operate the Nmap binary with setuid
root. For assistance, contact your system administrator.
STRM uses SSH to communicate with a remote server (the scanner server) and
executes the nmap binary on that server.
This chapter includes information on managing your Nmap scanner including:
• Adding a Nmap Scanner
• Editing an Nmap Scanner
• Deleting an Nmap Scanner
Adding a Nmap
Scanner
To add a Nmap scanner:
Step 1 In the Administration Console, click the SIM Configuration tab.
The SIM Configuration panel appears.
Step 2 Click the VA Scanners icon.
The VA Scanners window appears.
Step 3 Click Add.
The Add Scanner window appears.
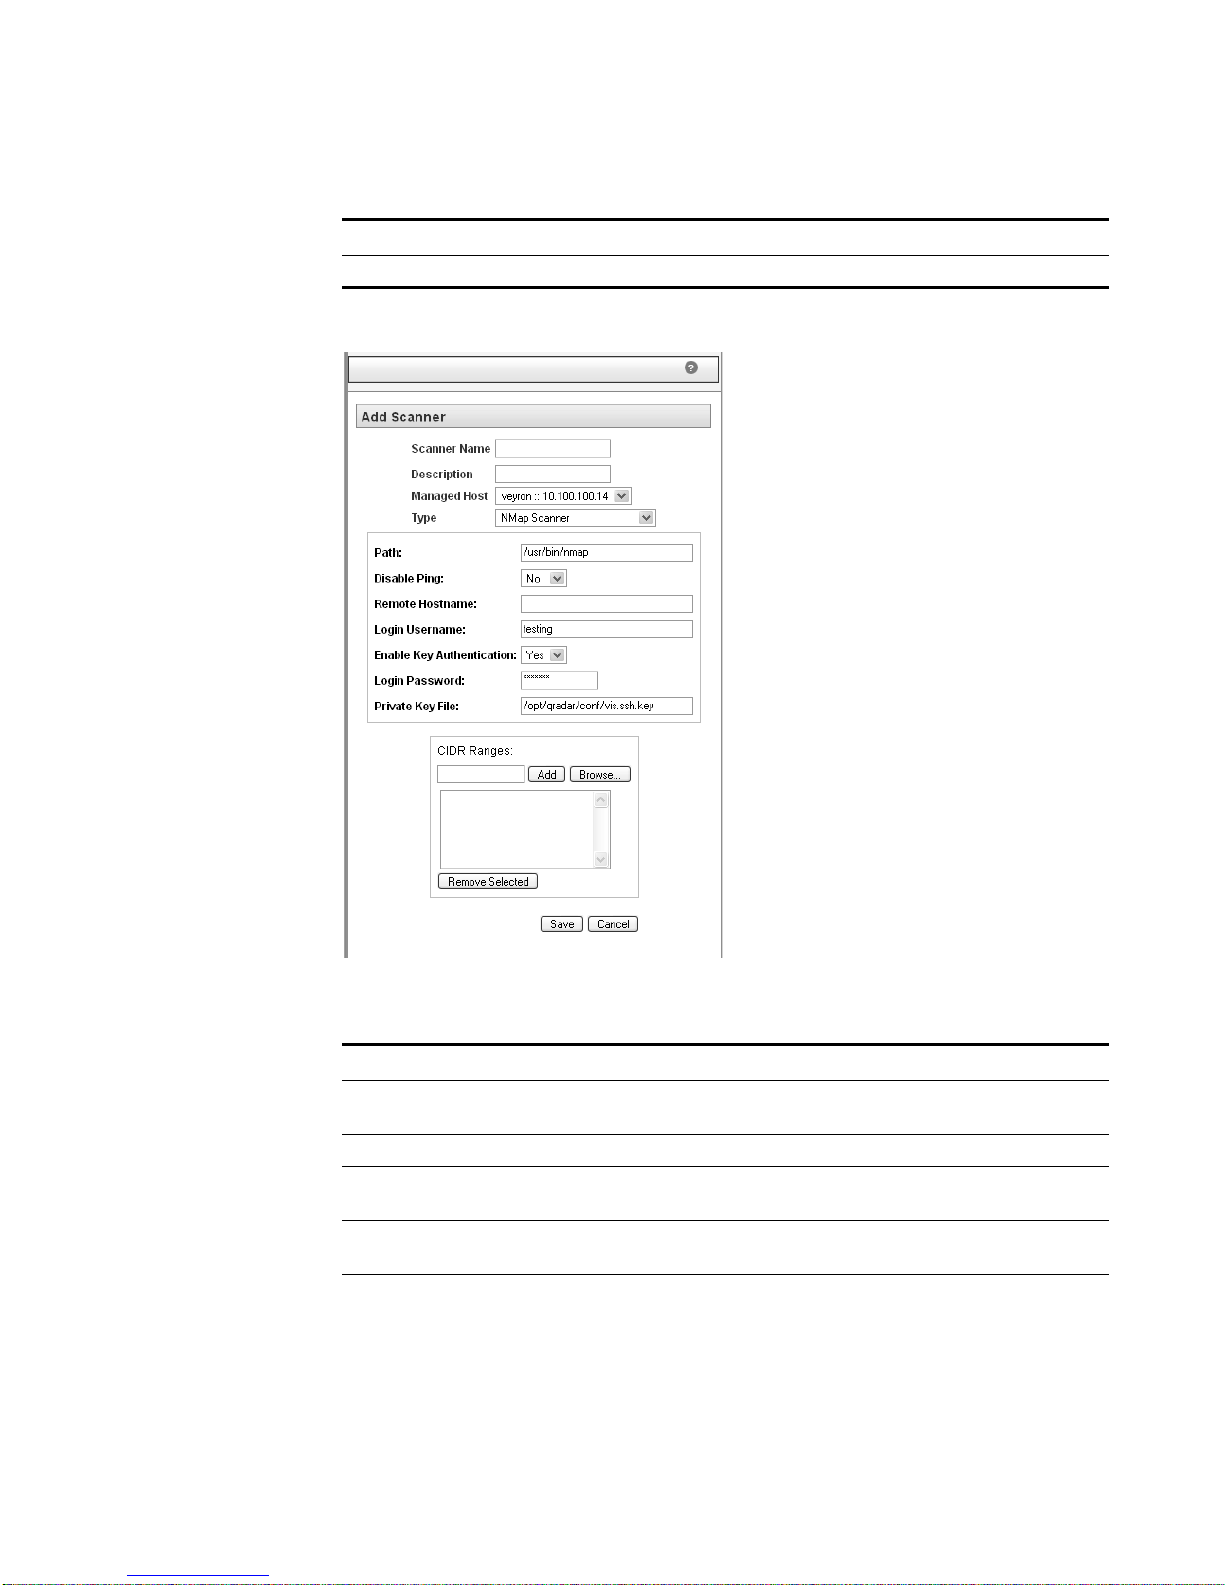
Step 4 Enter values for the following parameters:
Table 5-1 Scanner Parameters
Parameter Description
Scanner Name Specify the name you wish to assign to this scanner. The name
may be up to 255 characters in length.
Description Specify a description for this scanner. The description may be up
to 255 characters in length.
Managed Host Using the drop-down list box, select the managed host you wish
to configure this scanner.
Managing Vulnerability Assessment
Page 24
22 MANAGING NMAP SCANNERS
Table 5-1 Scanner Parameters (continued)
Parameter Description
Type Using the drop-down list box, select NMap Scanner.
The list of parameters for the selected scanner type appears.
Step 5 Enter values for the parameters:
Table 5-2 Nmap Parameters
Parameter Description
Path Specify the location of the executable file for the Nmap
application. The default is /usr/bin/nmap.
Disable Ping Enables or disables ICMP pings. The default is No.
Remote
Hostname
Specify the hostname or IP address of the system hosting the
Nmap client.
Login Username Specify the username necessary to access the system hosting
the Nmap client.
Enable Key
Authentication
Enables (Yes) or disables (No) public/private key authentication.
The default is Yes.
Managing Vulnerability Assessment
Page 25

Editing an Nmap Scanner 23
Table 5-2 Nmap Parameters (continued)
Parameter Description
Login Password If Enable Key Authentication is disabled, specify the password
necessary to log in to the Nessus client system.
If key authentication is disabled, you must set a login password.
Private Key File Specify the directory path to the file that contains the private key
information. The default is /opt/qradar/conf/vis.ssh.key.
This parameter is mandatory if key authentication is enabled.
Note: If the scanner is configured to use a password, the SSH scanner server to
which STRM connects must support password authentication. If it does not, SSH
authentication for the scanner will fail. Make sure the following line appears exactly
as shown in your sshd_config file, which is typically found in the /etc/ssh directory
on the SSH server:
PasswordAuthentication yes. If your scanner server
does not use OpenSSH, the configuration may be slightly different.
Step 6 To configure the CIDR ranges you wish this scanner to consider:
a In the text field, enter the CIDR range you wish this scanner to consider or click
Browse to select the CIDR range from the network list.
Editing an Nmap
Scanner
b Click Add.
Step 7 Click Save.
Step 8 From the STRM Administration Console menu, select Configurations > Deploy
Configuration Changes.
To edit an Nmap scanner:
Step 1 In the Administration Console, click the SIM Configuration tab.
The SIM Configuration panel appears.
Step 2 Click the VA Scanners icon.
The V A Scanners window appears.
Step 3 Select the scanner you wish to edit.
Step 4 Click Edit.
The Edit Scanner window appears.
Step 5 Update parameters, as necessary. See Table 5-2.
Step 6 Click Save.
Step 7 From the STRM Administration Console menu, select Configurations > Deploy
Configuration Changes.
Managing Vulnerability Assessment
Page 26

24 MANAGING NMAP SCANNERS
Deleting an Nmap
Scanner
Step 1 In the Administration Console, click the SIM Configuration tab.
Step 2 Click the VA Scanners icon.
Step 3 Select the scanner you wish to delete.
Step 4 Click Delete.
Step 5 Click Ok.
Step 6 From the STRM Administration Console menu, select Configurations > Deploy
To delete an Nmap scanner:
The SIM Configuration panel appears.
The VA Scanners window appears.
A confirmation window appears.
Configuration Changes.
Managing Vulnerability Assessment
Page 27

6
MANAGING QUALYS SCANNERS
A QualysGuard vulnerability scanner runs on a remote web server. STRM must
access this server through an HTTPS connection to run and retrie ve scan results.
STRM supports Qualys version 4.7 to 6.0.44-1. For more information, see your
Qualys documentation.
This chapter includes information on configuring a Qualys scanner including:
• Adding a Qualys Scanner
• Editing a Qualys Scanner
• Deleting a Qualys Scanner
Adding a Qualys
Scanner
To add a Qualys scanner:
Step 1 In the Administration Console, click the SIM Configuration tab.
The SIM Configuration panel appears.
Step 2 Click the VA Scanners icon.
The VA Scanners window appears.
Step 3 Click Add.
The Add Scanner window appears.
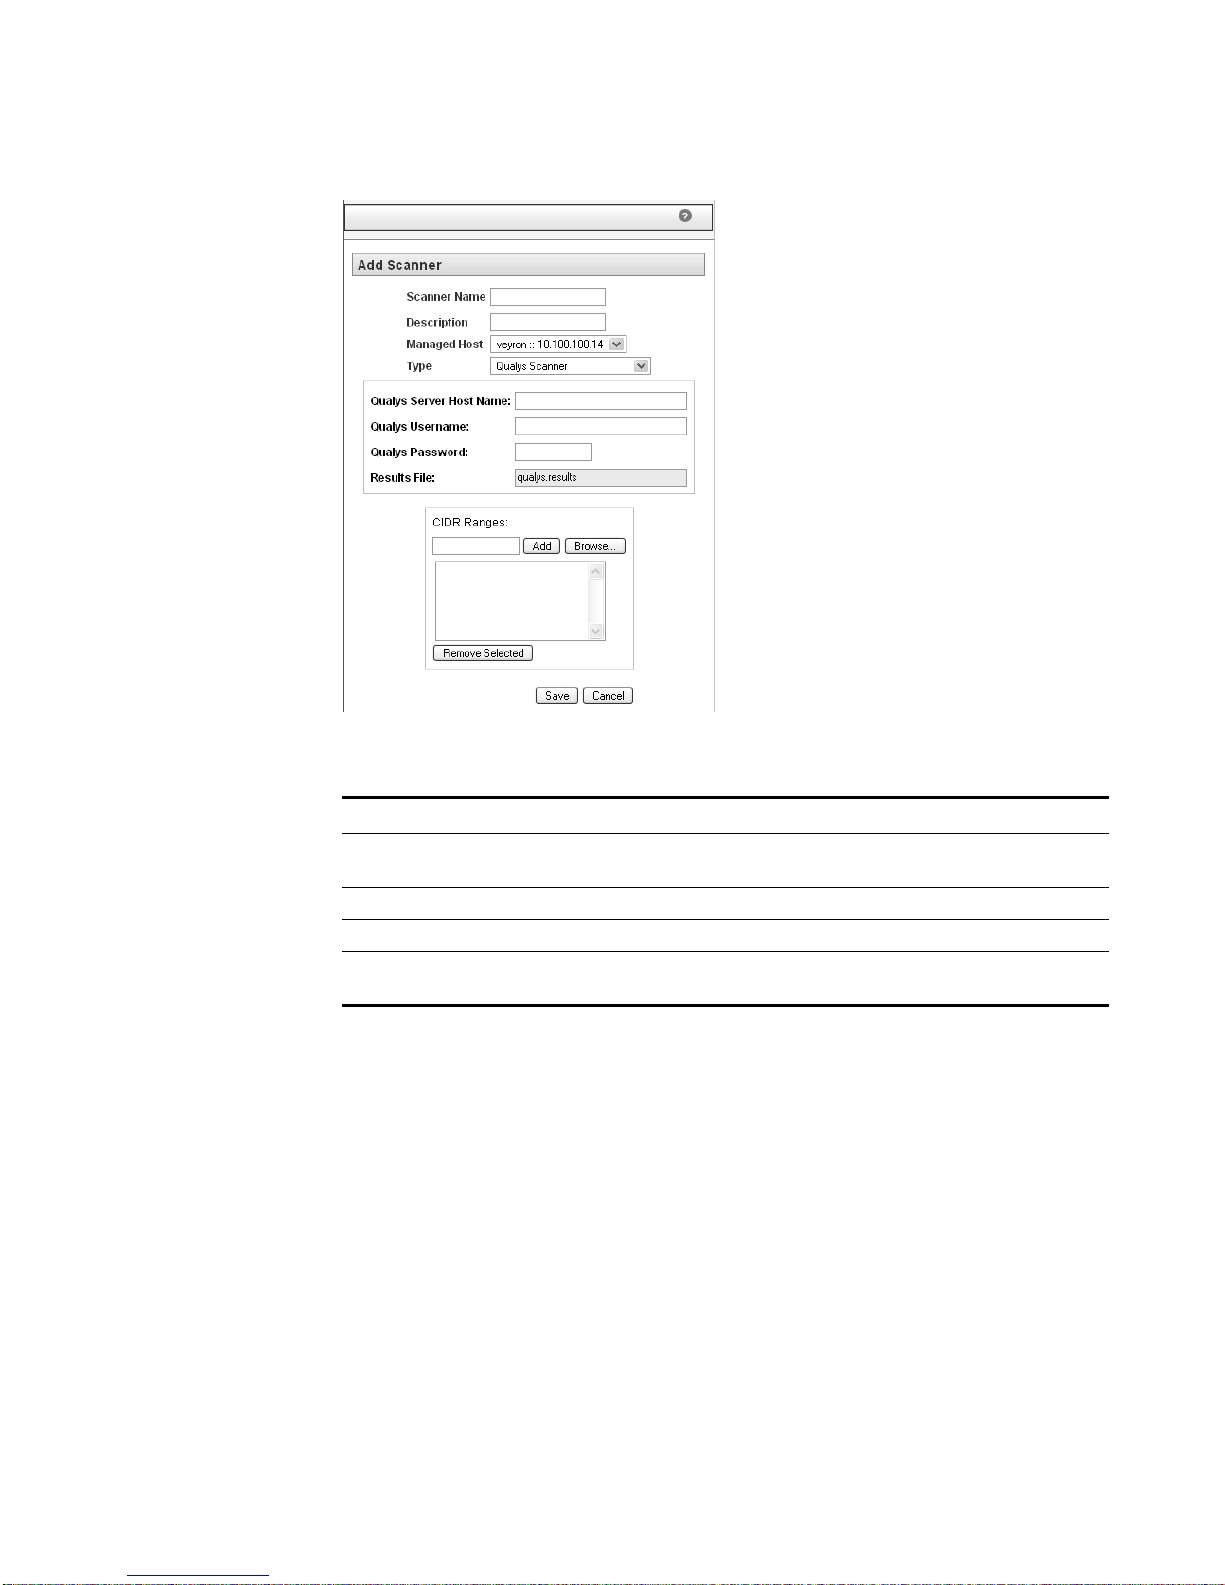
Step 4 Enter values for the following parameters:
Table 6-1 Scanner Parameters
Parameter Description
Scanner Name Specify the name you wish to assign to this scanner. The name
may be up to 255 characters in length.
Description Specify a description for this scanner. The description may be up
to 255 characters in length.
Managed Host Using the drop-down list box, select the managed host you wish
to configure this scanner.
Type Using the drop-down list box, select Qualys Scanner.
The list of parameters for the selected scanner type appears.
Managing Vulnerability Assessment
Page 28
26 MANAGING QUALYS SCANNERS
Step 5 Enter values for the parameters:
Table 6-2 Qualys Parameters
Parameter Description
Qualys Server
Specify the hostname or IP address of the QualysGuard server.
Host Name
Qualys Username Specify the username to log in to the Qualys server.
Qualys Password Specify the password to log in to the Qualy s server.
Results File Specify the temporary file name you wish to store the Qualys
scan results. The default is qualys.results.
Step 6 To configure the CIDR ranges you wish this scanner to consider:
a In the text field, enter the CIDR range you wish this scanner to consider or click
Browse to select the CIDR range from the network list.
b Click Add.
Step 7 Click Save.
Step 8 From the STRM Administration Console menu, select Configurations > Deploy
Configuration Changes.
Managing Vulnerability Assessment
Page 29

Editing a Qualys Scanner 27
Editing a Qualys
Scanner
Step 1 In the Administration Console, click the SIM Configuration tab.
Step 2 Click the VA Scanners icon.
Step 3 Select the scanner you wish to edit.
Step 4 Click Edit.
Step 5 Update parameters, as necessary. See Table 6-2.
Step 6 Click Save.
Step 7 From the STRM Administration Console menu, select Configurations > Deploy
Deleting a Qualys
Scanner
Step 1 In the Administration Console, click the SIM Configuration tab.
To edit a Qualys scanner:
The SIM Configuration panel appears.
The V A Scanners window appears.
The Edit Scanner window appears.
Configuration Changes.
To delete an Qualys scanner:
The SIM Configuration panel appears.
Step 2 Click the VA Scanners icon.
The V A Scanners window appears.
Step 3 Select the scanner you wish to delete.
Step 4 Click Delete.
A confirmation window appears.
Step 5 Click Ok.
Step 6 From the STRM Administration Console menu, select Configurations > Deploy
Configuration Changes.
Managing Vulnerability Assessment
Page 30

Page 31

7
MANAGING FOUNDSCAN SCANNERS
Once you install the STRM Foundstone FoundScan scanner, the scanner queries
the FoundScan Engine using the FoundScan OpenAPI. STRM collects
vulnerability data from existing scan results with FoundScan. Therefore, your
FoundScan system must include a configuration appropriate for STRM to use and
a scan that runs regularly to keep the results current. Since the API provides
access to the FoundScan application, make sure the FoundScan application runs
continuously on the FoundScan server.
When using SSL (default) to connect to FoundScan, the FoundScan Engine
requires STRM to authenticate using client-side certificates. By default,
FoundScan includes default certificate authority and client certificates that are the
same for all installations. The STRM FoundScan plugin also includes these same
certificates for use with FoundScan 5.0. If the FoundScan Server uses custom
certificates, or is using a version of FoundScan earlier than 5.1, you must import
the appropriate certificates and keys on the STRM host(s). For more information,
see Importing Custom Certificates.
Adding a
FoundScan
Scanner
This chapter includes information on configuring a FoundScan scanner including:
• Adding a FoundScan Scanner
• Editing a FoundScan Scanner
• Deleting a FoundScan Scanner
• Importing Custom Certificates
To add a FoundScan scanner:
Step 1 In the Administration Console, click the SIM Configuration tab.
The SIM Configuration panel appears.
Step 2 Click the VA Scanners icon.
The VA Scanners window appears.
Step 3 Click Add.
The Add Scanner window appears.
Managing Vulnerability Assessment
Page 32

30 MANAGING FOUNDSCAN SCANNERS
Step 4 Enter values for the following parameters:
Table 7-1 Scanner Parameters
Parameter Description
Scanner Name Specify the name you wish to assign to this scanner. The name
Description Specify a description for this scanner. The description may be up
Managed Host Using the drop-down list box, select the managed host you wish
Type Using the drop-down list box, select FoundScan Scanner.
The list of parameters for the selected scanner type appears.
may be up to 255 characters in length.
to 255 characters in length.
to configure this scanner.
Step 5 Enter values for the parameters:
Managing Vulnerability Assessment
Page 33

Adding a FoundScan Scanner 31
Table 7-2 FoundScan Parameters
Parameter Description
SOAP API URL Specify the web address for the SOAP API in the following
format:
https://<foundstone IP address>:<SOAP port>
Where:
<foundstone IP address> is the IP address or hostname of
the FoundScan scanner server.
<SOAP port> is the port number for the FoundScan engine.
The default is https://localhost:3800
Customer Name Specify the name of the customer under which the Login User
Name belongs.
User Name Specify the user name you wish STRM to use for authenticating
the FoundScan engine. This user must have access to the scan
configuration.
Password Specify the password corresponding to the Login User Name.
Client IP Address Specify the IP address of the STRM server. By default, this value
is not used, however, is necessary for validating some
environments.
Portal Name Specify the IP address or hostname of the FoundScan server.
This field is optional, however, may be necessary for
authentication. See your FoundScan administrator for more
information.
Configuration
Name
Specify the scan configuration name that exists in FoundScan
and to which the user has access. Make sure this scan is active
or at least runs frequently.
CA Truststore Specifies the directory path and filename for the CA truststore file.
The default is /opt/qradar/conf/foundscan.keystore.
Client Keystore Specifies the directory path and filename for the client keystore.
The default is /opt/qradar/conf/foundscan.truststore.
Step 6
To configure th e CIDR ranges you wish this scanner to consider:
a In the text field, enter the CIDR range you wish this scanner to consider or click
Browse to select the CIDR range from the network list.
b Click Add.
Step 7 Click Save.
Step 8 From the STRM Administration Console menu, select Configurations > Deploy
Configuration Changes.
Managing Vulnerability Assessment
Page 34

32 MANAGING FOUNDSCAN SCANNERS
Editing a
FoundScan
Scanner
Deleting a
FoundScan
Scanner
To edit an FoundScan scanner :
Step 1 In the Administration Console, click the SIM Configuration tab.
The SIM Configuration panel appears.
Step 2 Click the VA Scanners icon.
The VA Scanners window appears.
Step 3 Select the scanner you wish to edit.
Step 4 Click Edit.
The Edit Scanner window appears.
Step 5 Update parameters, as necessary. See Table 7-2.
Step 6 Click Save.
Step 7 From the STRM Administration Console menu, select Configurations > Deploy
Configuration Changes.
To delete a FoundScan scanner:
Step 1 In the Administration Console, click the SIM Configuration tab.
Step 2 Click the VA Scanners icon.
Step 3 Select the scanner you wish to delete.
Step 4 Click Delete.
Step 5 Click Ok.
Step 6 From the STRM Administration Console menu, select Configurations > Deploy
Importing Custom
Certificates
Step 1 Obtain two certificate files from your FoundScan administrator.
The SIM Configuration panel appears.
The VA Scanners window appears.
A confirmation window appears.
Configuration Changes.
If the FoundScan Engine includes custom certificates, you must import the
certificates on each STRM managed host that will host the VIS component. Before
you perform the below procedure, make sure the FoundScan scanner is installed.
To import custom certificates:
The first file is the CA certificate for the FoundScan engine. The second certificate
is the private key plus certificate chain for the client.
Managing Vulnerability Assessment
Page 35

Importing Custom Certificates 33
Both of these files must be in PEM format. For examples of these files, see
Example Of TrustedCA.pem File and Example of Portal.pem File.
Step 2 Copy the two PEM files to your STRM system, either to the root user's home
directory or to a new directory created for the certificates. Make sure the filename
allows you to easily distinguish the CA certificate file from the private key chain file.
Step 3 On the STRM host, change the directory to where the two PEM files are copied.
Step 4 Enter the following command:
/opt/qradar/bin/foundstone-cert-import.sh <TrustedCA.pem>
<Portal.pem>
Where:
<TrustedCA.pem> is the CA certificate filename.
<Portal.pem> is the private keychain PEM file.
The output may resemble the following:
Certificate was added to keystore
Using keystore-file : /opt/qradar/conf/foundscan.keystore
One certificate, no chain.
Key and certificate stored.
Alias:Portal.pem Password:foundscan
Contents of Trust Store:
Keystore type: jks
Keystore provider: SUN
Your keystore contains 1 entry
Alias name: trustedca.pem
Creation date: Mar 8, 2007
Entry type: trustedCertEntry
Owner: CN=Foundstone CA
Issuer: CN=Foundstone CA
Serial number: 0
Valid from: Fri Sep 12 20:29:11 ADT 2003 until: Mon Oct 20
20:29:11 ADT 2008 Certificate fingerprints:
MD5: 14:7E:68:02:38:EC:A5:A8:AE:3D:3C:C6:F5:F6:33:6C
SHA1:
37:C3:48:36:87:B0:F2:41:48:6A:A2:F6:43:B7:76:55:92:C5:6E:11
*******************************************
*******************************************
Content of Key Store:
Keystore type: jks
Keystore provider: SUN
Your keystore contains 1 entry
Managing Vulnerability Assessment
Page 36

34 MANAGING FOUNDSCAN SCANNERS
Alias name: portal.pem
Creation date: Mar 8, 2007
Entry type: keyEntry
Certificate chain length: 1
Certificate[1]:
Owner: CN=Foundstone Enterprise Manager
Issuer: CN=Foundstone CA
Serial number: 2
Valid from: Fri Sep 12 20:36:54 ADT 2003 until: Mon Oct 20
20:36:54 ADT 2008 Certificate fingerprints:
MD5: 0A:CD:06:36:B2:ED:62:8C:98:8D:10:3C:99:95:BA:7D
SHA1:
3A:B4:9C:59:D0:AD:26:C9:6D:B9:05:E9:F1:33:CB:23:F2:0A:E7:26
*******************************************
*******************************************
Step 5 Repeat for all managed hosts in your deployment, which will host the VIS.
Example Of
TrustedCA.pem File
Example of
Portal.pem File
-----BEGIN CERTIFICATE----MIICFzCCAYCgAwIBAgIBADANBgkqhkiG9w0BAQQFADAYMRYwFAYDVQQDEw1Gb3Vu
ZHN0b25lIENBMB4XDTAzMDkxMjIzMjkxMVoXDTA4MTAyMDIzMjkxMVowGDEWMBQG
A1UEAxMNRm91bmRzdG9uZSBDQTCBnzANBgkqhkiG9w0BAQEFAAOBjQAwgYkCgYEA
sWN8ZqqREMZ7qByvuIqr2q4XaP5TfP3hRCo8mjvqWsQjk2B8WMRAgZjHqvPN/qfG
5uZw5gm1M6IyoVbLkaQwDF34McRpqlTLvjeDadjPuRaZGVu4zVknC8s83EPqKU9+
fdqmhtCwwqVYq+sQFp1S3kKUvXIBEGV0r9mnFAD3InUCAwEAAaNxMG8wHQYDVR0O
BBYEFGQ8UJTPbqSP202Mygs2sqzU2h7LMEAGA1UdIwQ5MDeAFGQ8UJTPbqSP202M
ygs2sqzU2h7LoRykGjAYMRYwFAYDVQQDEw1Gb3VuZHN0b25lIENBggEAMAwGA1Ud
EwQFMAMBAf8wDQYJKoZIhvcNAQEEBQADgYEAQ7F9nq4X/RemMag+0ORM+mnEp/0i
j0ynMtEM2mtuf95uxeGFe581k31w9d3IGt19uahtyqG860kr4/ys3r7LjA0f9rjf
J9PUXhzRqqh8yzh795R9Dloj7hsyZtq4My6gKu8RuHVBscYvJVwPMUkPmDHMnpjl
4p7dh7GKk7ymFYs=
-----END CERTIFICATE-----
-----BEGIN RSA PRIVATE KEY-----
MIICXgIBAAKBgQC5DOnQtMtDXAHth/4M/lI9gVlyoch9EYvCiAsZmtO2JMTjEDse
mH0DQkxSKv0gvsCqKXHx6nNegyyiCM1GuEDvFYPCI5FrkrzEwtndTILGXT5asDXu
SbPTMrBKR5pfMJoPJ/Sjc0vf6A48Nn8FiYLDiyBLKhunzM03EZ22VrZxBwIDAQAB
AoGARZfkqzgDJZ8JnpJBahOPTFBEGodbhiW+IPfW7Nc8fcjQPvDQuw3wHfSmDVTb
g6AZhyU1FBzvLIE6nOmggdMzn9KIN8WMD+XDAAR4AaWOGkN18Ib4h1VVnsa90hYS
ncnAl/9am4jAhADDPFb9ZRMoE6aFE13XD21o49gJG4sH+VkCQQDrf6OGfnR6YaYz
4QFLQzPOQz4bN+vIFLWBZX2r6gCDlPkLfZEYijnycbtJdmATccSf9qLOt9VP28y+
Managing Vulnerability Assessment
Page 37

Importing Custom Certificates 35
BPIWVsfbAkEAySj6iwto1LVsXC5cIP4YzNzNsj2QBqeEhEfUmLtZl8vD1sj+EM2L
JggOcRpYMxIj64ob/hevavXeW1CFeRmpRQJBAKaq6OKQsILEhUoGHlJTt2BtOpEs
3JP4BBUV7QE0VTTKxA8byQqjGSu6zh/JxWk9hTjo5oSCmlcwahC5k1O4Cy0CQQCt
vnwv7mncFtsB/3TJdk67Wxc7FRs59CRsEJKaXG80weVjtXRj1PSTo6+9ltCJQ+jM
fxxQaeq0SqqEWlb+UuC1AkEAr6Z503v5p1rVUWTo+L8JaygumdzZRuBZi/EVuxqG
j79b6Xa+UvXtXquU2qlo1weanry/Glm47qSwPBcFoOse4Q==
-----END RSA PRIVATE KEY-----
Certificate:
Data:
Version: 3 (0x2)
Serial Number: 2 (0x2)
Signature Algorithm: md5WithRSAEncryption
Issuer: CN=Foundstone CA
Validity
Not Before: Sep 12 23:36:54 2003 GMT
Not After : Oct 20 23:36:54 2008 GMT
Subject: CN=Foundstone Enterprise Manager
Subject Public Key Info:
Public Key Algorithm: rsaEncryption
RSA Public Key: (1024 bit)
Modulus (1024 bit):
00:b9:0c:e9:d0:b4:cb:43:5c:01:ed:87:fe:0c:fe:
52:3d:81:59:72:a1:c8:7d:11:8b:c2:88:0b:19:9a:
d3:b6:24:c4:e3:10:3b:1e:98:7d:03:42:4c:52:2a:
fd:20:be:c0:aa:29:71:f1:ea:73:5e:83:2c:a2:08:
cd:46:b8:40:ef:15:83:c2:23:91:6b:92:bc:c4:c2:
d9:dd:4c:82:c6:5d:3e:5a:b0:35:ee:49:b3:d3:32:
b0:4a:47:9a:5f:30:9a:0f:27:f4:a3:73:4b:df:e8:
0e:3c:36:7f:05:89:82:c3:8b:20:4b:2a:1b:a7:cc:
cd:37:11:9d:b6:56:b6:71:07
Exponent: 65537 (0x10001)
X509v3 extensions:
X509v3 Basic Constraints:
Managing Vulnerability Assessment
Page 38

36 MANAGING FOUNDSCAN SCANNERS
CA:FALSE
Netscape Comment:
OpenSSL Generated Certificate
X509v3 Subject Key Identifier:
0D:52:54:EF:A0:B3:91:9D:3D:47:AC:D8:9E:62:2A:34:0F:09:FF:8D
X509v3 Authority Key Identifier:
keyid:64:3C:50:94:CF:6E:A4:8F:DB:4D:8C:CA:0B:36:B2:AC:D4:DA:
1E:CB
DirName:/CN=Foundstone CA
serial:00
Signature Algorithm: md5WithRSAEncryption
4a:88:3f:51:34:5b:30:3b:5b:7c:57:31:86:22:3b:00:16:61:
ac:7b:b7:ae:cd:68:11:01:a2:52:b7:59:1e:c6:5b:af:2a:ed:
f9:ee:ef:64:11:b2:b9:14:21:7d:2c:35:d3:cb:09:08:a1:ab:
26:93:0f:aa:97:eb:cc:65:ab:95:a3:0d:77:0b:23:20:4a:0d:
04:18:47:2d:58:a7:de:61:9f:aa:3c:da:a5:00:9d:b5:eb:52:
fb:e2:5b:56:45:02:02:79:df:0f:87:bc:f3:82:d1:3d:39:79:
9e:ef:64:e2:f5:61:9b:ea:29:94:fb:00:8f:b8:08:7c:f0:ee:
68:b6
-----BEGIN CERTIFICATE-----
MIICVDCCAb2gAwIBAgIBAjANBgkqhkiG9w0BAQQFADAYMRYwFAYDVQQDEw1Gb3Vu
ZHN0b25lIENBMB4XDTAzMDkxMjIzMzY1NFoXDTA4MTAyMDIzMzY1NFowKDEmMCQG
A1UEAxMdRm91bmRzdG9uZSBFbnRlcnByaXNlIE1hbmFnZXIwgZ8wDQYJKoZIhvcN
AQEBBQADgY0AMIGJAoGBALkM6dC0y0NcAe2H/gz+Uj2BWXKhyH0Ri8KICxma07Yk
xOMQOx6YfQNCTFIq/SC+wKopcfHqc16DLKIIzUa4QO8Vg8IjkWuSvMTC2d1MgsZd
PlqwNe5Js9MysEpHml8wmg8n9KNzS9/oDjw2fwWJgsOLIEsqG6fMzTcRnbZWtnEH
AgMBAAGjgZ0wgZowCQYDVR0TBAIwADAsBglghkgBhvhCAQ0EHxYdT3BlblNTTCBH
ZW5lcmF0ZWQgQ2VydGlmaWNhdGUwHQYDVR0OBBYEFA1SVO+gs5GdPUes2J5iKjQP
Cf+NMEAGA1UdIwQ5MDeAFGQ8UJTPbqSP202Mygs2sqzU2h7LoRykGjAYMRYwFAYD
Managing Vulnerability Assessment
Page 39

Importing Custom Certificates 37
VQQDEw1Gb3VuZHN0b25lIENBggEAMA0GCSqGSIb3DQEBBAUAA4GBAEqIP1E0WzA7
W3xXMYYiOwAWYax7t67NaBEBolK3WR7GW68q7fnu72QRsrkUIX0sNdPLCQihqyaT
D6qX68xlq5WjDXcLIyBKDQQYRy1Yp95hn6o82qUAnbXrUvviW1ZFAgJ53w+HvPOC
0T05eZ7vZOL1YZvqKZT7AI+4CHzw7mi2
-----END CERTIFICATE-----
Managing Vulnerability Assessment
Page 40

Page 41

8
MANAGING JUNIPER NSM
P
ROFILER SCANNERS
The Juniper Networks NSM console passively collects valuable asset information
from your network through deployed Juniper IDP sensors. STRM connects to the
Profiler database stored on the NSM server to retrieve these records. The STRM
server must have access to the Profiler database. STRM supports NSM versions
2007.1r2 to 2007.2r2. For more information, see your vendor documentation.
STRM collects data from the PostgreSQL database on the NSM using JDBC. For
STRM to collect the data, access to the profilerDb from the STRM host must be
granted. This access is provided in the pg_hba.conf file, which is typically located
in /var/netscreen/DevSvr/pgsql/data/pg_hba.conf on the NSM host.
This chapter includes information on configuring a Juniper scanner including:
• Adding a Juniper NSM Profiler Scanner
• Editing a Profiler Scanner
• Deleting a Profiler Scanner
Adding a Juniper
NSM Profiler
Scanner
Step 1 In the Administration Console, click the SIM Configuration tab.
Step 2 Click the VA Scanners icon.
Step 3 Click Add.
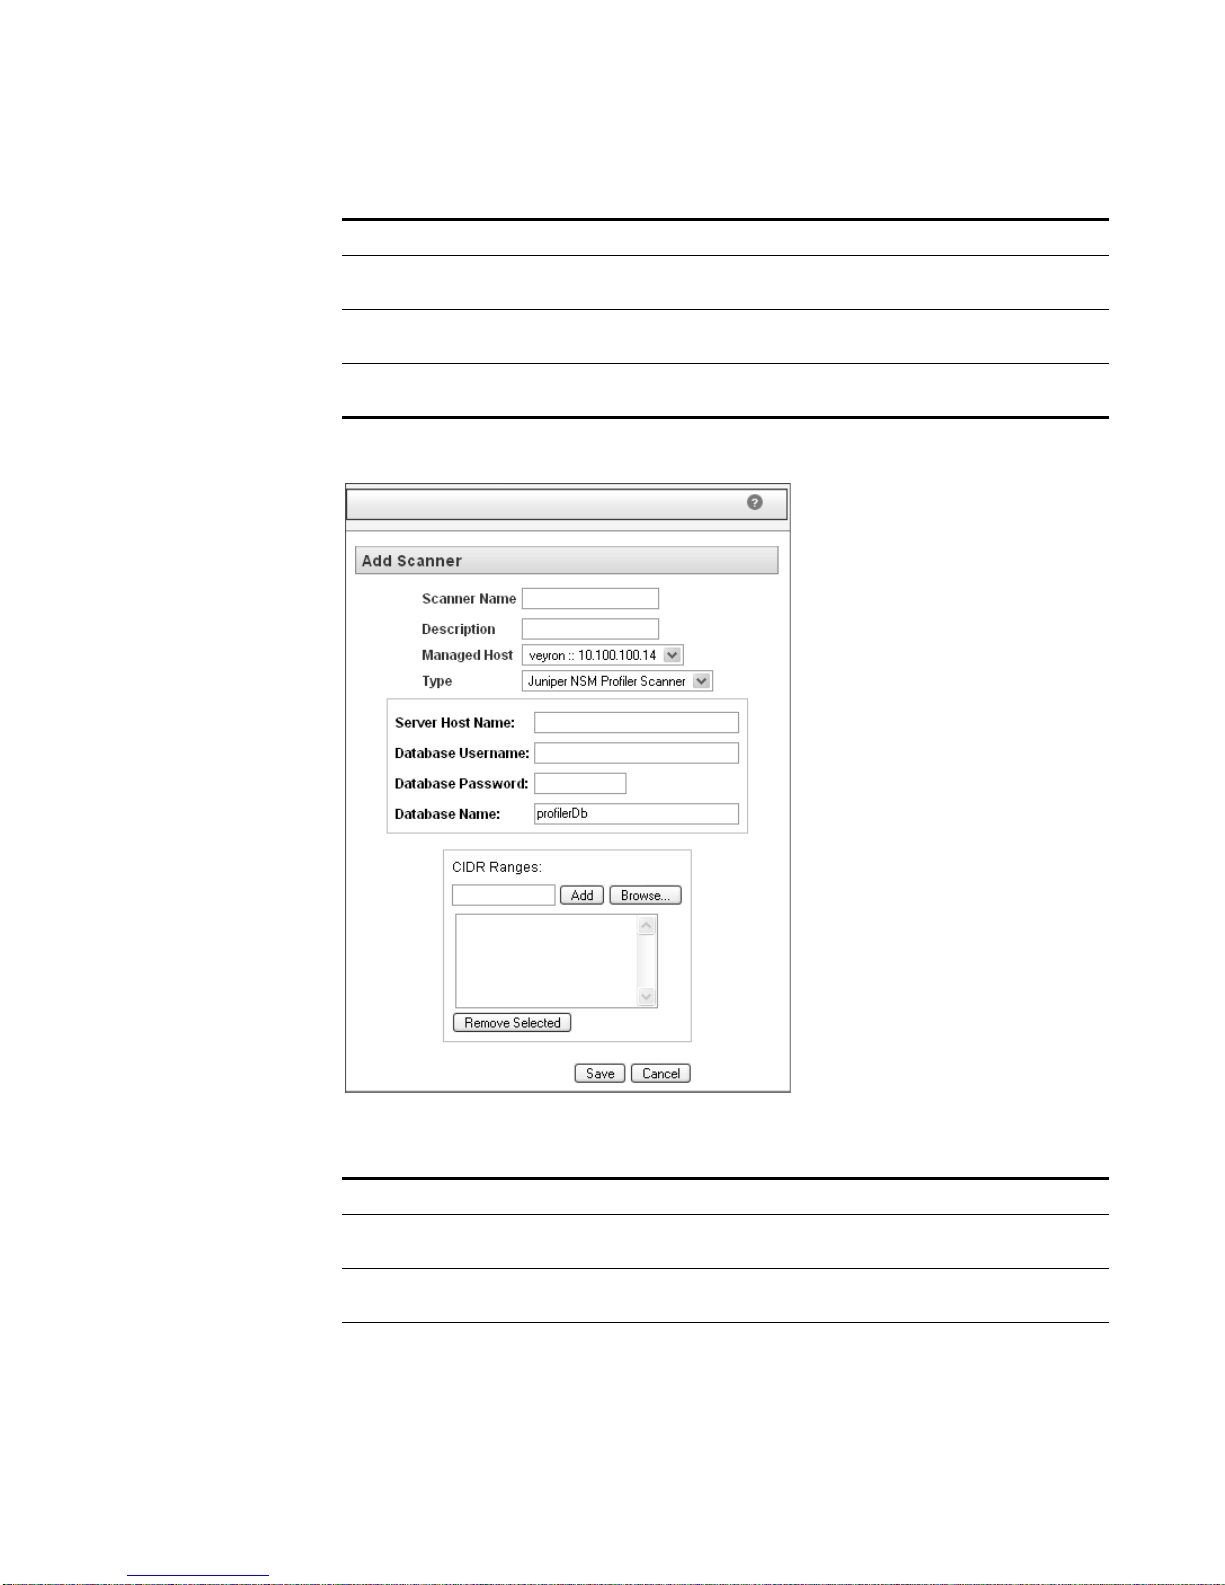
Step 4 Enter values for the following parameters:
To add a Juniper NSM Profiler scann er:
The SIM Configuration panel appears.
The VA Scanners window appears.
The Add Scanner window appears.
Table 8-1 Scanner Parameters
Parameter Description
Scanner Name Specify the name you wish to assign to this scanner. The name
may be up to 255 characters in length.
Managing Vulnerability Assessment
Page 42
40 MANAGING JUNIPER NSM PROFILER SCANNERS
Table 8-1 Scanner Parameters (continued)
Parameter Description
Description Specify a description for this scanner. The description may be up
Managed Host Using the drop-down list box, select the managed host you wish
Type Using the drop-down list box, select Juniper NSM Profiler
The list of parameters for the selected scanner type appears.
to 255 characters in length.
to configure this scanner.
Scanner.
Step 5 Enter values for the parameters:
Table 8-2 Juniper NSM Profiler Parameters
Parameter Description
Server Host Name Specify the hostname or IP address of the NetScree n Se cur i ty
Database
Username
Database
Password
Manager (NSM) server.
Specify the username to log in to the Profiler database stored on
the NSM server.
Specify the password to log in to the server.
Managing Vulnerability Assessment
Page 43

Editing a Profiler Scanner 41
Table 8-2 Juniper NSM Profiler Parameters (continued)
Parameter Description
Database Name Specify the name of the Profiler database. The default is
profilerDB.
Step 6 To configure the CIDR ranges you wish this scanner to consider:
a In the text field, enter the CIDR range you wish this scanner to consider or click
Browse to select the CIDR range from the network list.
b Click Add.
Step 7 Click Save.
Step 8 From the STRM Administration Console menu, select Configurations > Deploy
Configuration Changes.
Editing a Profiler
Scanner
Step 1 In the Administration Console, click the SIM Configuration tab.
Step 2 Click the VA Scanners icon.
Step 3 Select the scanner you wish to edit.
Step 4 Click Edit.
Step 5 Update parameters, as necessary. See Table 8-2.
Step 6 Click Save.
Step 7 From the STRM Administration Console menu, select Configurations > Deploy
Deleting a Profiler
Scanner
Step 1 In the Administration Console, click the SIM Configuration tab.
To edit an Juniper NSM Profiler scanner:
The SIM Configuration panel appears.
The V A Scanners window appears.
The Edit Scanner window appears.
Configuration Changes.
To delete an Juniper NSM Profiler scanner:
The SIM Configuration panel appears.
Step 2 Click the VA Scanners icon.
The V A Scanners window appears.
Step 3 Select the scanner you wish to delete.
Step 4 Click Delete.
A confirmation window appears.
Managing Vulnerability Assessment
Page 44

42 MANAGING JUNIPER NSM PROFILER SCANNERS
Step 5 Click Ok.
Step 6 From the STRM Administration Console menu, select Configurations > Deploy
Configuration Changes.
Managing Vulnerability Assessment
Page 45

9
MANAGING RAPID7 NEXPOSE
S
CANNERS
This chapter includes information on configuring a Rapid7 NeXpose scanner
including:
• Adding a Rapid7 NeXpose Scanner
• Editing a Rapid7 NeXpose Scanner
• Deleting a Rapid7 NeXpose Scanner
STRM supports Rapid7 NeXpose version 4.5 and above. For more information,
see your Rapid7 NeXpose documentation.
Adding a Rapid7
NeXpose Scanner
Step 1 In the Administration Console, click the SIM Configuration tab.
Step 2 Click the VA Scanners icon.
Step 3 Click Add.
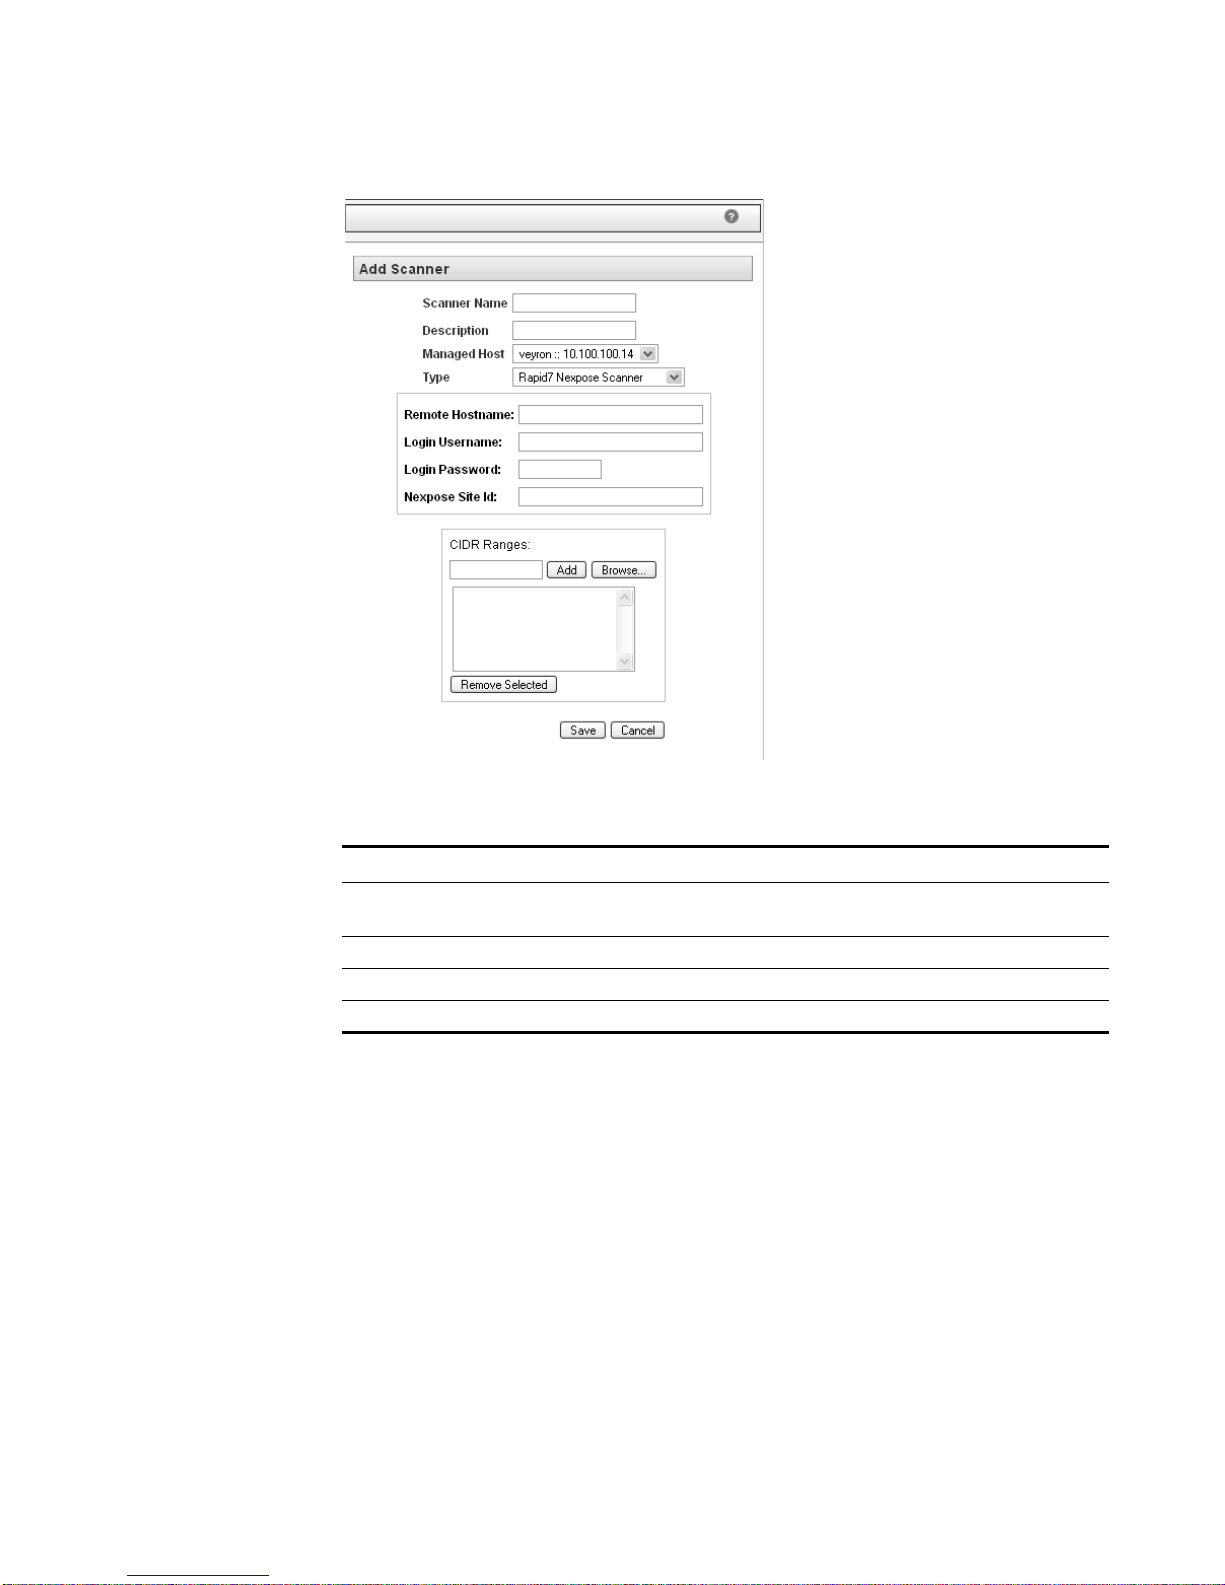
Step 4 Enter values for the following parameters:
To add a Rapid7 NeXpose scanner:
The SIM Configuration panel appears.
The VA Scanners window appears.
The Add Scanner window appears.
Table 9-1 Scanner Parameters
Parameter Description
Scanner Name Specify the name you wish to assign to this scanner. The name
may be up to 255 characters in length.
Description Specify a description for this scanner. The description may be up
to 255 characters in length.
Managed Host Using the drop-down list box, select the managed host you wish
to configure this scanner.
Type Using the drop-down list box, select Rapid7 Nexpose Scanner.
The list of parameters for the selected scanner type appears.
Managing Vulnerability Assessment
Page 46
44 MANAGING RAPID7 NEXPOSE SCANNERS
Step 5 Enter values for the parameters:
Table 9-2 Rapid7 NeXpose Parameters
Parameter Description
Remote
Hostname
Specify the hostname or IP address of the Rapid7 NeXpose
server.
Login Username Specify the username to log in to the Rapid7 NeXpose server.
Login Password Specify the password to log in to the Rapid7 NeXpose server.
Nexpose Site Id Specify the site identifier you wish the scan to use.
Step 6 To configure the CIDR ranges you wish this scanner to consider:
a In the text field, enter the CIDR range you wish this scanner to consider or click
Browse to select the CIDR range from the network list.
b Click Add.
Step 7 Click Save.
Step 8 From the STRM Administration Console menu, select Configurations > Deploy
Configuration Changes.
Managing Vulnerability Assessment
Page 47

Editing a Rapid7 NeXpose Scanner 45
Editing a Rapid7
NeXpose Scanner
Step 1 In the Administration Console, click the SIM Configuration tab.
Step 2 Click the VA Scanners icon.
Step 3 Select the scanner you wish to edit.
Step 4 Click Edit.
Step 5 Update parameters, as necessary. See Table 9-2.
Step 6 Click Save.
Step 7 From the STRM Administration Console menu, select Configurations > Deploy
Deleting a Rapid7
NeXpose Scanner
Step 1 In the Administration Console, click the SIM Configuration tab.
To edit a Rapid7 NeXpose scanner:
The SIM Configuration panel appears.
The V A Scanners window appears.
The Edit Scanner window appears.
Configuration Changes.
To delete a Rapid7 NeXpose scanner:
The SIM Configuration panel appears.
Step 2 Click the VA Scanners icon.
The V A Scanners window appears.
Step 3 Select the scanner you wish to delete.
Step 4 Click Delete.
A confirmation window appears.
Step 5 Click Ok.
Step 6 From the STRM Administration Console menu, select Configurations > Deploy
Configuration Changes.
Managing Vulnerability Assessment
Page 48

Page 49
MANAGING SCAN SCHEDULES
10
This chapter provides information on managing the vulnerability assessme nt scan
schedule including:
• Scheduling a Scan
• Editing a Scan Schedule
• Deleting a Scheduled Scan
Note: The below procedure describes how to manage scan schedules using the
Administration Console interface. You can also manage scan schedules using the
VA Scan option in the Asset tab of the STRM interface.
Scheduling a Scan To schedule a Vulnerability Assessment scan:
Step 1 In the Administration Console, click the SIM Configuration tab.
The SIM Configuration panel appears.
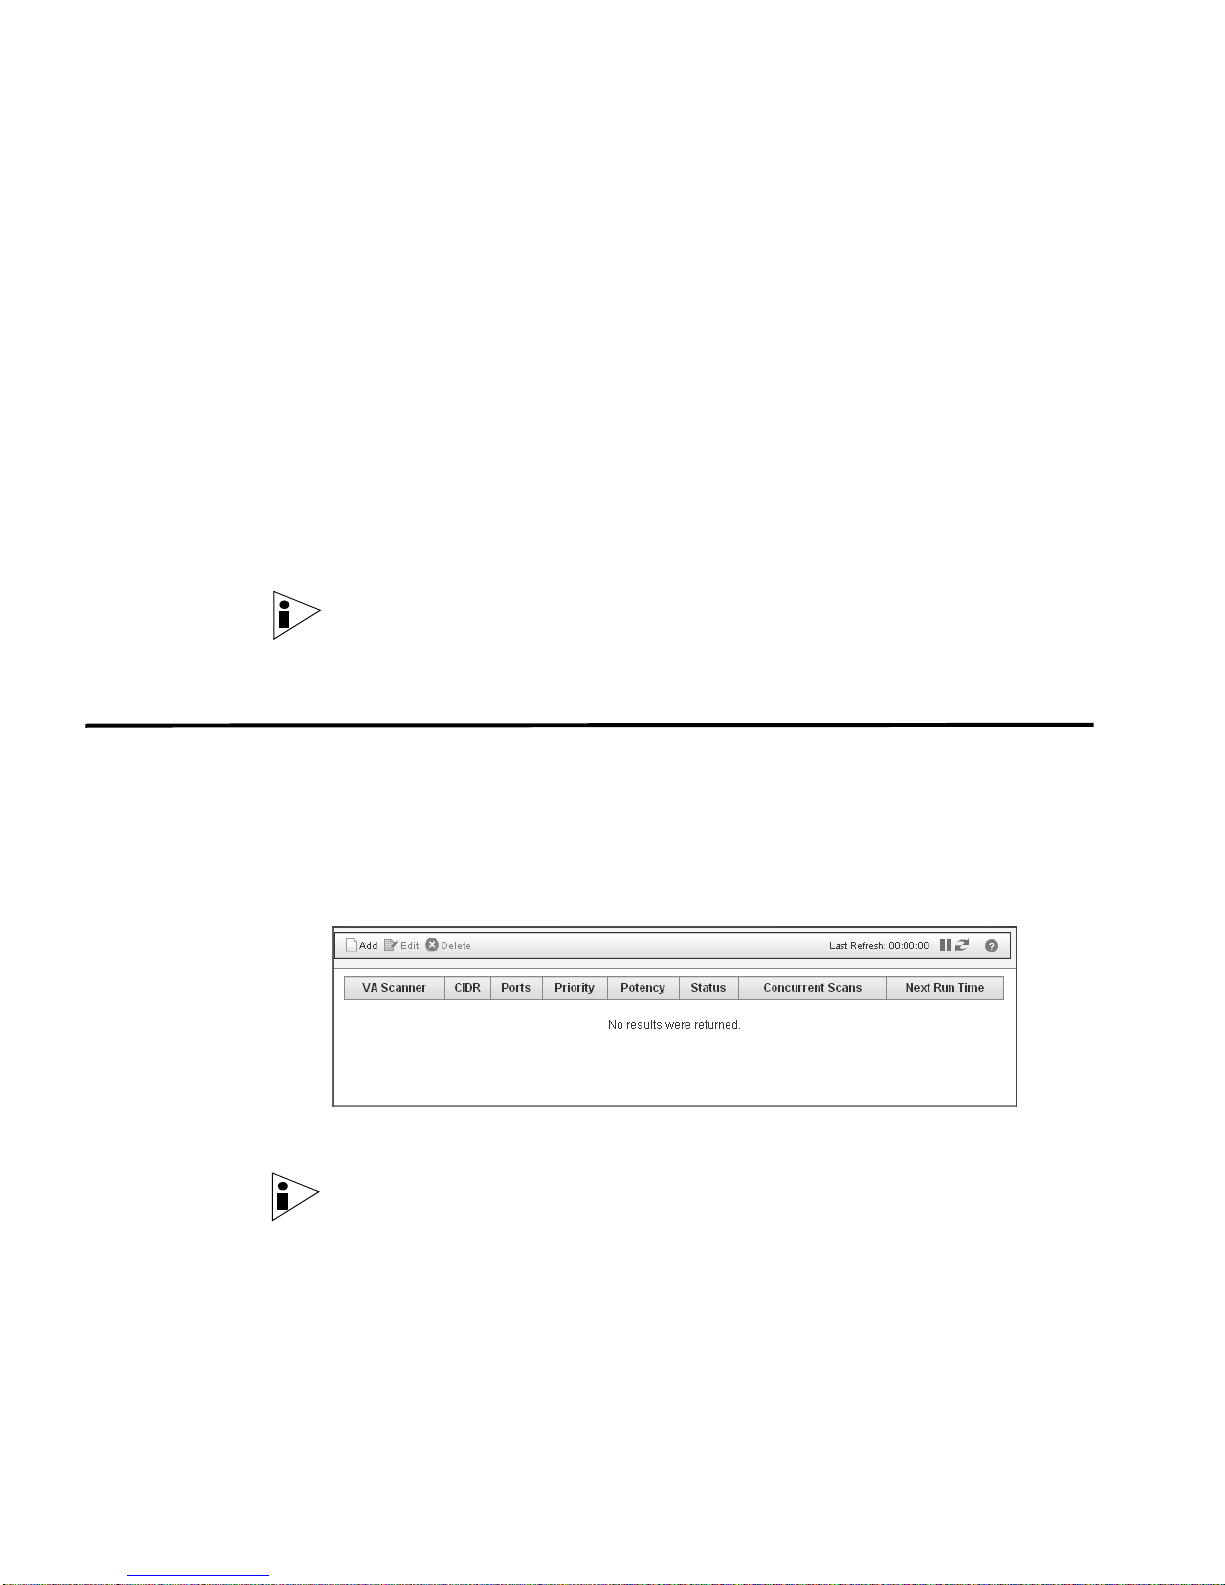
Step 2 Click the Schedule VA Scanner icon.
The VA Scanners appears.
Step 3 Click Add.
The Add Schedule window appears.
Note: If you do not have any scanners configured, an error message appears. You
must configure the scanners before you can schedule a scan. For more
information on configuring scanners, see Chapter 1 Overview.
Managing Vulnerability Assessment
Page 50
48 MANAGING SCAN SCHEDULES
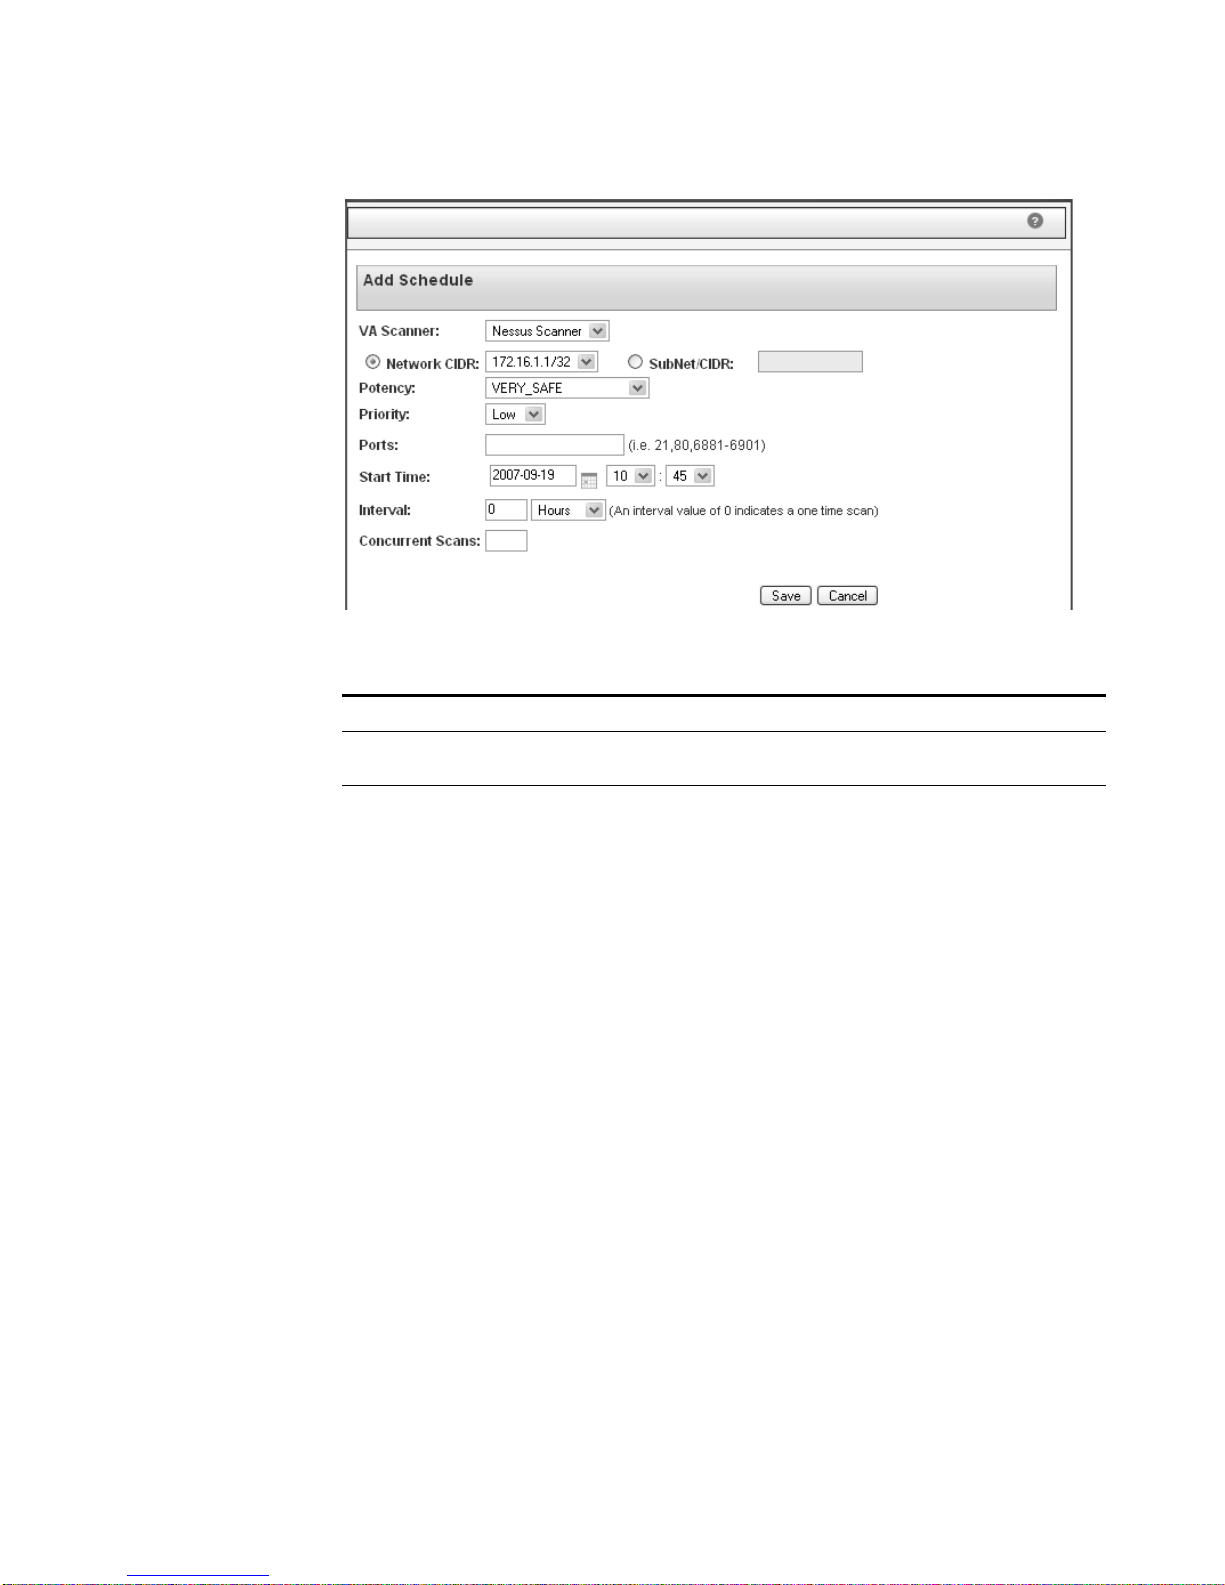
Step 4 Enter values for the parameters:
Table 10-1 Scan Schedule Parameters
Parameter Description
VA Scanner Using the drop-down list box, select the scanner for which you
wish to create a schedule.
Network CIDR Choose one of the following options:
• Network CIDR - Select the option and specify the network
CIDR range to which you wish this scan to apply.
• Subnet/CIDR - Select the option and specify the subnet or
CIDR range to which you wish this scan to apply. The entered
subnet/CIDR must be within the selected Network CIDR.
The entered values must reflect the values configured in your VIS
configuration.
Managing Vulnerability Assessment
Page 51

Editing a Scan Schedule 49
Table 10-1 Scan Schedule Parameters (continued)
Parameter Description
Potency Specify the level of scan you wish to perform. The precise
interpretation of the levels depends on the scanner, however,
typically, the levels indicate:
• Very safe - Specifies a safe, non-intrusive assessment. They
may generate false results.
• Safe - Specifies an intermediate assessment and produces
safe, banner-based results.
• Medium - Specifies a safe intermediate assessment with
accurate results.
• Somewhat safe - Specifies an intermediate assessment but
may leave service unresponsive.
• Somewhat unsafe - Specifies an intermediate assessment,
however, may result in your host or server cease functioning.
• Unsafe - Specifies an intermediate assessment, however, this
may cause your service to become unresponsive.
• Very unsafe - Specifies an unsafe, aggressive assessment
that may result in your host or server becoming unresponsive.
Priority Specify the priority you wish to assign to this scan. The options
are: High or Low.
Ports Specify the ports you wish this scan to apply.
Start Time Specify the start date and time for the scan. The default is the
local time of your STRM system.
Interval Specify how often you wish this scan to run. An interval of 0
indicates that the scan will run once.
Concurrent Scans Specify the number of vulnerability scans you wish to occur at the
same time.
Step 5 Click Save.
Step 6 From the STRM Administration Console menu, select Configurations > Deploy
Configuration Changes.
Editing a Scan
To edit a Vulnerability Assessment scan schedule:
Schedule
Step 1 In the Administration Console, click the SIM Configuration tab.
The SIM Configuration panel appears.
Step 2 Click the Schedule VA Scanner icon.
The V A Scanners appears.
Managing Vulnerability Assessment
Page 52
50 MANAGING SCAN SCHEDULES
Step 3 Select the schedule you wish to edit.
Note: If you do not have any scanners configured, an error message appears. You
must configure the scanners before you can schedule a scan. For more
information on configuring scanners, see Chapter 1 Overview.
Step 4 Click Edit.
The Edit Schedule window appears.
Step 5 Update values, as necessary. See Table 10-1.
Step 6 Click Save.
Step 7 From the STRM Administration Console menu, select Configurations > Deploy
Configuration Changes.
Deleting a
Scheduled Scan
To delete a schedule Vulnerability Assessment scan:
Step 1 In the Administration Console, click the SIM Configuration tab.
The SIM Configuration panel appears.
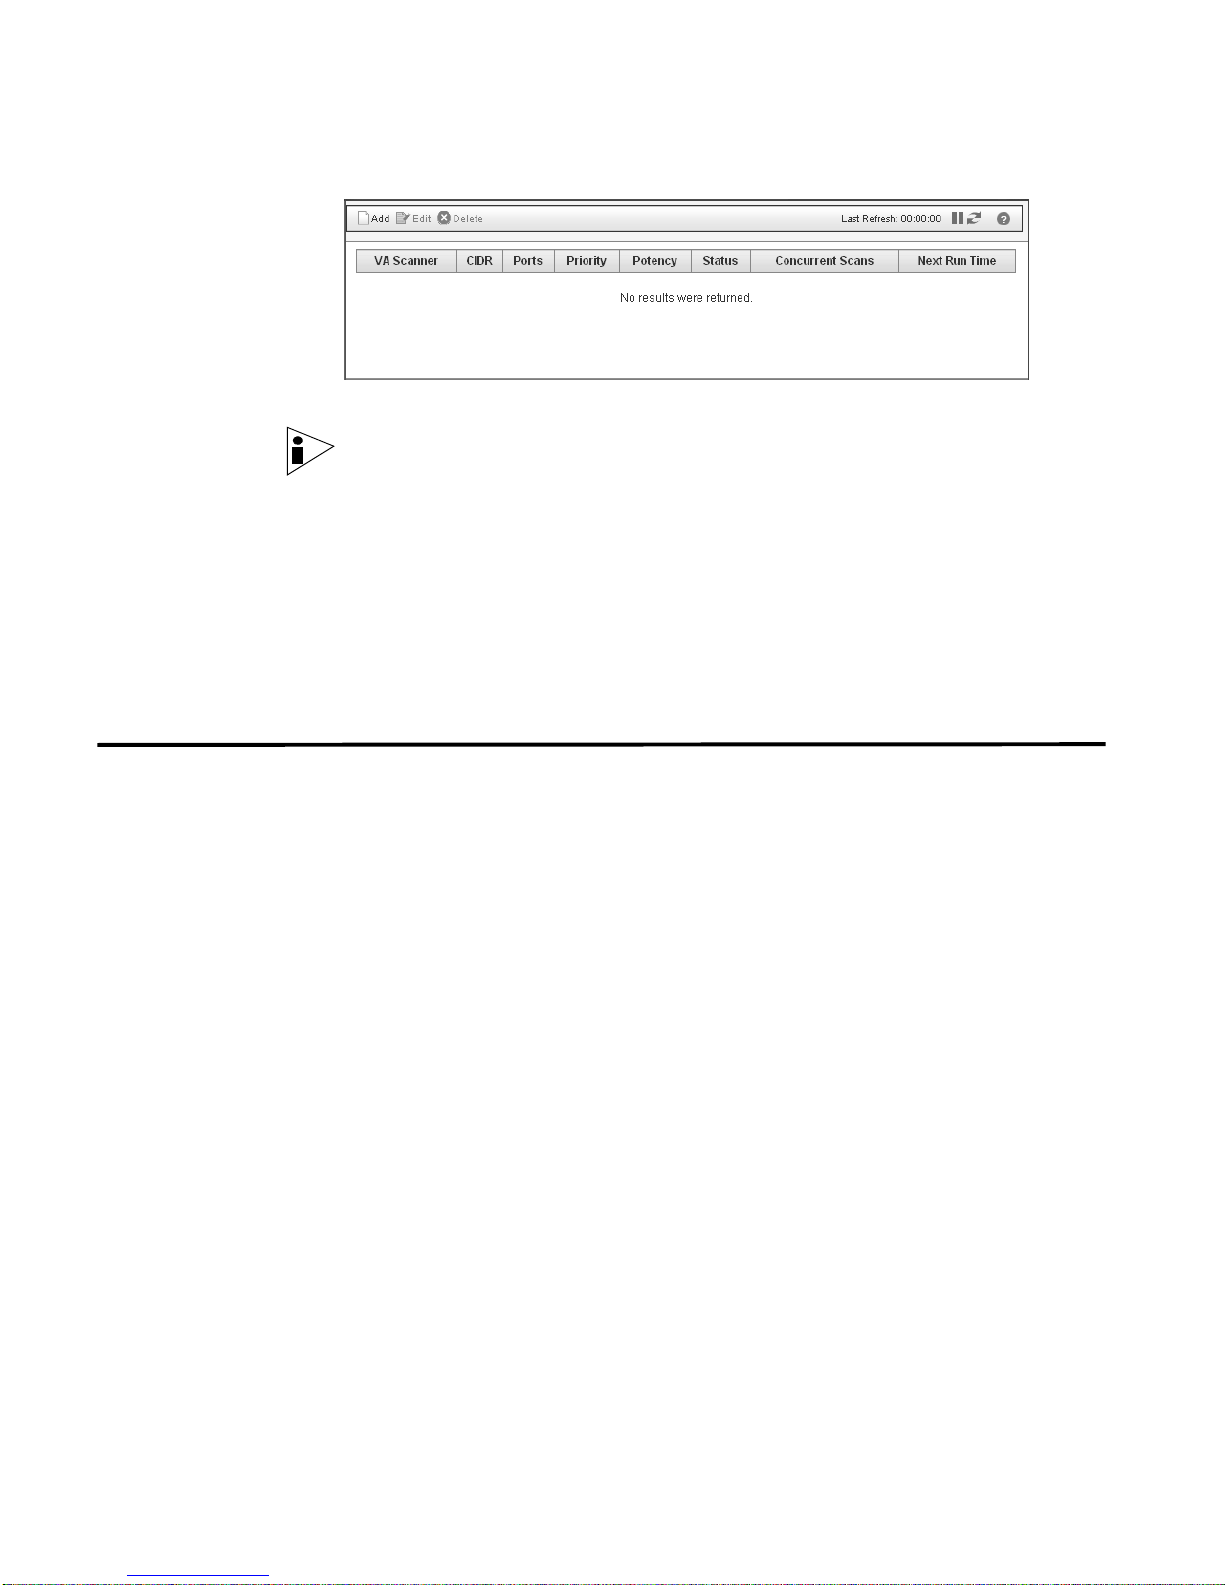
Step 2 Click the Schedule VA Scanner icon.
The VA Scanners appears.
Step 3 Select the scan you wish to delete.
Step 4 Click Delete.
A confirmation window appears.
Step 5 Click OK.
Step 6 From the STRM Administration Console menu, select Configurations > Deploy
Configuration Changes.
Managing Vulnerability Assessment
Page 53
11
VIEWING ASSET PROFILE
I
NFORMATION
You can access asset profile data for any IP address that appears in the asset
profile.
Note: For more information on Assets, see the Managing Assets Chapter in the
STRM Users Guide
To view asset profile data:
Step 1 On any IP address in the STRM interface, use the right mouse button (right-click)
to access the menu.
The menu appears.
Step 2 Select Information > Asset Profile.
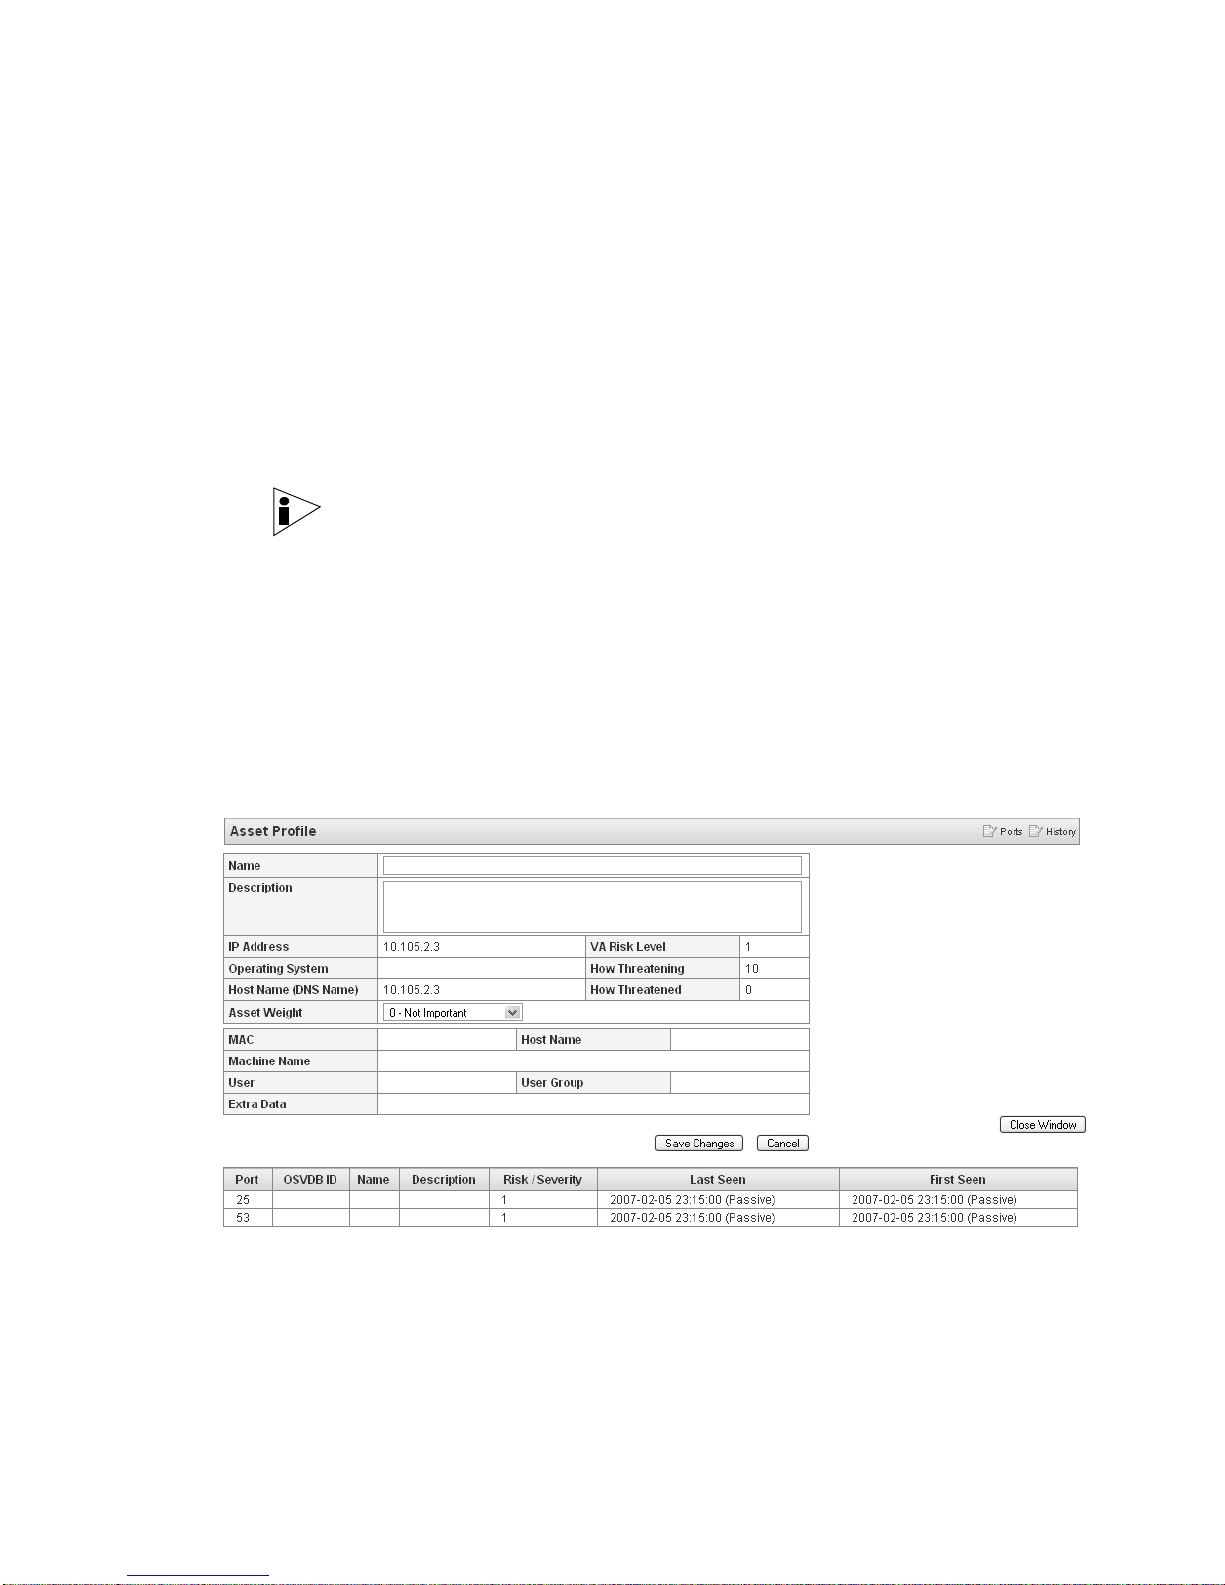
The Asset Profile window appears. If the Asset Profile menu option is not
available, no data is available for the selected IP address.
The Asset Profile window provides the following:
Managing Vulnerability Assessment
Page 54

52 VIEWING ASSET PROFILE INFORMATION
Table 11-2 Asset Profile Window
Parameter Description
Name Specify a name you wish to associate with this asset
Description Specify a description that you wish to associate with this
IP Address Specifies the IP address of the asset.
Operating System Specifies the operating system running on the asset.
Host Name (DNS Name) Specifies the IP address or DNS name of the asset.
Asset Weight Using the drop-down list box, specify the level of
VA Risk Level Specifies the vulnerability assessment risk level (0 to 10)
How Threatening Specifies the threat level (0 to 10) posed by the asset
How Threatened Specifies the threat level (0 to 10) to the asset where 0 is
MAC Specifies the MAC address of the asset.
Machine Name Specifies the name of the asset system.
User Specifies the last user associated with this asset.
Extra Data Specifies any additional information associated with this
Host Name Specifies the host name of this asset.
User Group Specifies the user group associated with this asset.
profile.
asset profile.
importance you wish to associate with this asset. The
range is 0 (not valuable) to 10 (very valuable).
for the asset where 0 is the lowest and 10 is the highest.
This is a weighted value against all other hosts in your
deployment.
where 0 is the lowest and 10 is the highest. This is a
weighted value against all other hosts in your deployment.
the lowest and 10 is the highest. This is a weighted value
against all other hosts in your deployment.
asset.
Step 3 To view port information, click Ports. This is the default display for assets.
Table 11-3 Ports Information
Parameter Description
Port Specifies the port number for the services discovered
OSVDB ID Specifies the vulnerability identifier for the asset. Click the
Name Specifies the name of the detected vulnerability. This value
Description Specifies a description of the detected vulnerability. This
Risk/Severity Specifies the risk level for the vulnerability.
running on the asset.
ID to obtain more information.
is only available when integrating with VA tools.
value is only available when integrating with VA tools.
Managing Vulnerability Assessment
Page 55

Table 11-3 Ports Information (continued)
Parameter Description
Last Seen Specifies the date and time that the service was last
detected running on the asset both either passively or
actively.
First Seen Specifies the date and time when the service was first
detected running on the asset both either passively or
actively.
53
Step 4
To view History information, click History.
Table 11-4 History Information
Parameter Description
MAC Specifies the MAC address for this asset. If unknown, this
Host Name Specifies the host name of this asset. If unknown, this field
Machine Name Specifies the machine name of this asset. If unknown, this
User Specifies the user for this asset. If unknown, this field is
User Group Specifies the user group for this asset. If unknown, this
Extra Data Specifies any extra information for this asset. If the text f or
Last Observed Specifies the last time data was recorded for this asset.
Step 5 Click Save Changes.
Step 6 Click Close Window.
field is blank.
is blank.
field is blank.
blank.
field is blank.
this field is greater than 50 characters, click the text to view
the full text in a separate window.
Managing Vulnerability Assessment
Page 56

Page 57

INDEX
C
conventions 3
F
FoundScan
about
29
29
adding
custom certificates
deleting
editing
32
32
I
ip360
about
9
9
adding
deleting
editing
exporting reports
11
11
J
Juniper NSM Profiler
adding
39
deleting
editing
41
41
12
32
R
Rapid7 NeXpose
adding
43
deleting
editing
45
45
S
scan
deleting schedule
editing schedule
scheduling
50
49
47
V
VA 5
vulnerability assessment
configuring
5
5
N
Nessus
adding
13
deleting
editing
nessus scan result importer
adding
deleting
editing
Nmap
adding
deleting
editing
16
16
17
20
19
21
24
23
Q
Qualys
adding
25
deleting
editing
27
27
Managing Vulnerability Assessment
Page 58

 Loading...