

Juniper SECURITY THREAT RESPONSE MANAGER 2008.2 - GETTING STARTED WITH STRM APPLIANCES REV 1, Security Threat Response Manager Getting Started

Security Threat Response Manager
Getting Started With STRM Appliances
Release 2008.2
Juniper Networks, Inc.
1194 North Mathilda Avenue
Sunnyvale, CA 94089
USA
408-745-2000
www.juniper.net
Part Number: 530-025620-01, Revision 1

Copyright Notice
Copyright © 2008 Juniper Networks, Inc. All rights reserved. Juniper Networks and the Juniper Networks logo are registered trademarks of Juniper
Networks Inc. in the United States and other countries. All other trademarks, service marks, registered trademarks, or registered service marks in this
document are the property of Juniper Networks or their respective owners. All specifications are subject to change without notice. Juniper Networks
assumes no responsibility for any inaccuracies in this document or for any obligation to update information in this document. Juniper Networks reserves
the right to change, modify, transfer, or otherwise revise this publicati on without notice.
FCC Statement
The following information is for FCC compliance of Class A devices: This equipment has been tested and found to comply with the limits for a Class A
digital device, pursuant to part 15 of the FCC rules. These limits are designed to provide reasonable protection against harmful interference when the
equipment is operated in a commercial environment. The equipment generates, uses, and can radiate radio-frequency energy and, if not installed and
used in accordance with the instruction manual, may cause harmful interference to radio communications. Operation of this equipment in a residential
area is likely to cause harmful interference, in which case users will be required to correct the interference at their own expense. The following
information is for FCC compliance of Class B devices: The equipment described in this manual generates and may radiate radio-frequency energy. If it
is not installed in accordance with NetScreen’s installation instructions, i t may cause interference wi th radio and tele vision reception. This equip ment has
been tested and found to comply with the limits for a Class B digital device in accordance with the specifications in part 15 of the FCC rules. These
specifications are designed to provide reasonable protection against such interference in a residential installation. However, there is no guarantee that
interference will not occur in a particular installation. If this equipmen t does cause harmful interference to radio or television reception, which can be
determined by turning the equipment off and on, the user is encouraged to try to correct the interference by one or more of the following measures:
Reorient or relocate the receiving antenna. Increase the separation between the equipme nt and receive r. Consult t he dealer o r an experienced ra dio/TV
technician for help. Connect the equipment to an outlet on a circuit different from that to which the receiver is connected.
Caution: Changes or modifications to this product could void the user's warrant y and authority to operate this device.
Disclaimer
THE SOFTWARE LICENSE AND LIMITED WARRANTY FOR THE ACCOMPANYING PRODUCT ARE SET FORTH IN THE INFORMATION PACKET
THAT SHIPPED WITH THE PRODUCT AND ARE INCORPORATED HEREIN BY THIS REFERENCE. IF YOU ARE UNABLE TO LOCATE THE
SOFTWARE LICENSE OR LIMITED WARRANTY, CONTACT YOUR JUNIPER NETWORKS REPRESENTATIVE FOR A COPY.
Getting Started With STRM Appliances
Release 2008.2
Copyright © 2008, Juniper Networks, Inc.
All rights reserved. Printed in USA.
Revision History
June 2008—Revision 1
The information in this document is current as of the date listed in the revision history.
2
CONTENTS
Before You Begin 1
STRM Appliance Installation and Configuration 3
QFlow Installation and Configuration 8
Before You Begin Before performing these procedures, you must have access to the following:
• Hardware Requirements — You must have access to a hard drive, monitor,
keyboard, and mouse to log in to the application.
• Java Requirements — You must install Java versio n 1.5.0_12. For more
information see http://java.com/.
• Browser Requirements — You must have Internet Explorer 6.0/7.0 or Firefox
2.0.
Warning: Before performing these procedures, see the safety instructions and
important regulatory information in your QRadar Installation Guide and the
Hardware Installation Guide.
Note: The graphics in this guide are representations of a QRadar appliance. Your
appliance may vary, depending on the version of QRadar or QFlow appliance you
have purchased. See the QRadar Installation Guide.
Note: When using a laptop to connect to the appliance you must use a terminal
program, such as HyperTerminal, to connect to the appliance. Be sure to set
Connect Using to the appropriate COM port of the serial connector and Bits per
second to 9600. You must also set Stop Bits (1), Data bits (8), and Parity
(None).

STRM Appliance Installation and Configuration
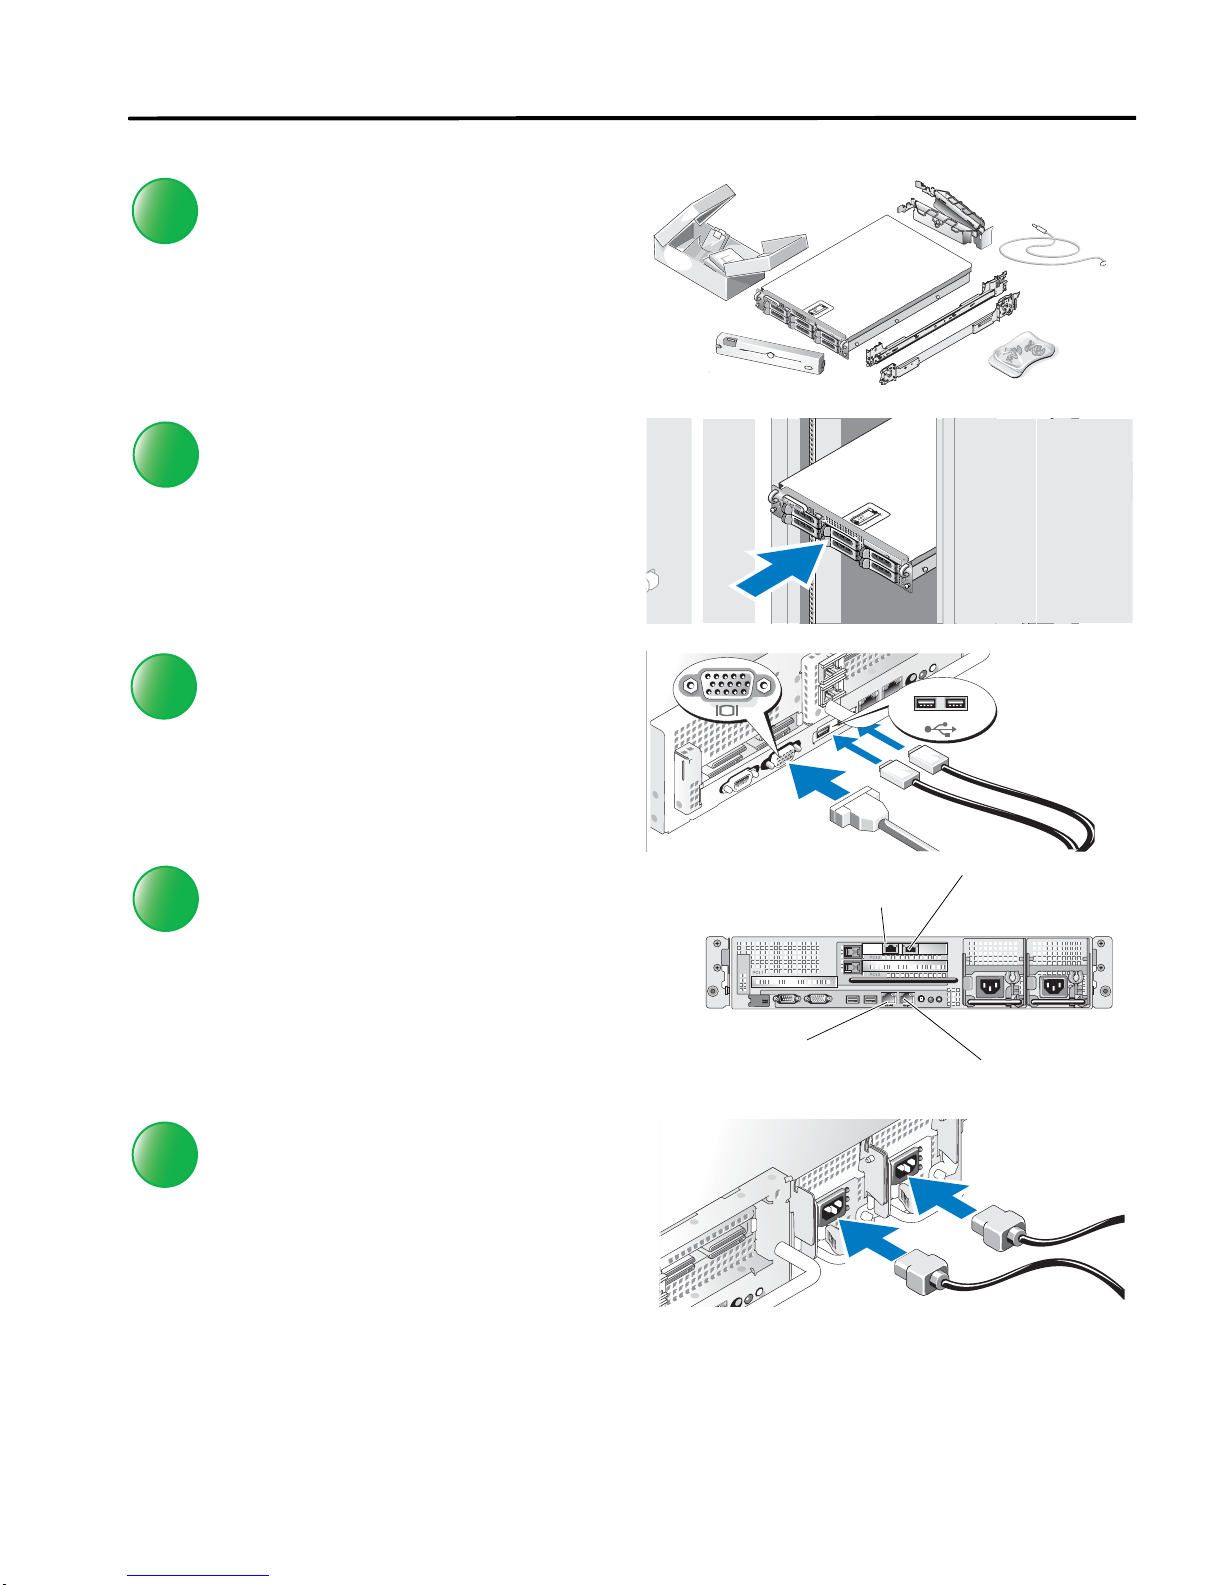
Unpack Your Appliance
Save all shipping materials in case you need
1
them later. (Your appliance may not include all
accessories shown.)
Install the Appliance in a Rack
See the Hardware Installation Guide for
2
instructions on installing your appliance in a
rack.
Connect to External Devices
Connect external devices using the ports on the
3
rear of the appliance. If you are using a monitor
with a keyboard, tighten the screws on the
monitor’s cable connector. You must use a USB
keyboard or a PS2 to USB adapter. If you use a
laptop, connect the laptop to the serial conn ector
on the rear of the appliance.
Connect to the Network
Connect the appliance to your network using the
4
ports on the rear of the appliance. The
Management Interface is the communications
port for your appliance; the Monitoring Interfaces
allow you to connect to span ports or taps.
If you wish to connect to a tap, see your tap
vendor documentation.
Connect to Power Source
Connect the power cable(s) to the appliance.
5
Next, plug the other end of the cable into a
grounded outlet on a separate power source,
such as an Uninterruptible Power Supply (UPS)
or a Power Distribution Unit (PDU). Connect the
monitor’s (or laptop) power cable to a grounded
electrical outlet.
Monitoring Interface (ETH3)
Monitoring Interface (ETH2)
Monitoring Interface (ETH1)
Management Interface (ETH0)
3
 Loading...