

Juniper SECURITY THREAT RESPONSE MANAGER 2008.2 - CATEGORY OFFENSE INVESTIGATION GUIDE REV 1, Security Threat Response Manager User Manual
Page 1

Security Threat Response Manager
Category Offense Investigation Guide
Release 2008.2
Juniper Networks, Inc.
1194 North Mathilda Avenue
Sunnyvale, CA 94089
USA
408-745-2000
www.juniper.net
Part Number: 530-025609-01, Revision 1
Page 2

Copyright Notice
Copyright © 2008 Juniper Networks, Inc. All rights reserved. Juniper Networks and the Juniper Networks logo are registered trademarks of Juniper
Networks Inc. in the United States and other countries. All other trademarks, service marks, registered trademarks, or registered service marks in this
document are the property of Juniper Networks or their respective owners. All specifications are subject to chang e without notice. Juniper Networks
assumes no responsibility for any inaccuracies in this document or for any obligation to update information in this document. Juniper Networks reserves
the right to change, modify, transfer, or otherwise revise this publicati on without notice.
FCC Statement
The following information is for FCC compliance of Class A devices: This equipment has been tested and found to comply with the limits for a Class A
digital device, pursuant to part 15 of the FCC rules. These limits are designed to provide reasonable protection against harmful interference when the
equipment is operated in a commercial environment. The equipment generates, uses, and can radiate radio-frequency energy and, if not installed and
used in accordance with the instruction manual, may cause harmful interference to radio communications. Operation of this equipment in a residential
area is likely to cause harmful interference, in which case users will be required to correct the interference at their own expense. The following
information is for FCC compliance of Class B devices: The equipment described in this manual generates and may radiate radio-frequency energy. If it
is not installed in accordance with NetScreen’s installation instructions, i t may cause interference wi th radio and tele vision reception. This equip ment has
been tested and found to comply with the limits for a Class B digital device in accordance with the specifications in part 15 of the FCC rules. These
specifications are designed to provide reasonable protection against such interference in a residential installation. However, there is no guarantee that
interference will not occur in a particular installation. If this equipmen t does cause harmful interference to radio or television reception, which can be
determined by turning the equipment off and on, the user is encouraged to try to correct the interference by one or more of the following measures:
Reorient or relocate the receiving antenna. Increase the separation between the equipme nt and receive r. Consult t he dealer o r an experienced ra dio/TV
technician for help. Connect the equipment to an outlet on a circuit different from that to which the receiver is connected.
Caution: Changes or modifications to this product could void the user's warrant y and authority to operate this device.
Disclaimer
THE SOFTWARE LICENSE AND LIMITED WARRANTY FOR THE ACCOMPANYING PRODUCT ARE SET FORTH IN THE INFORMATION PACKET
THAT SHIPPED WITH THE PRODUCT AND ARE INCORPORATED HEREIN BY THIS REFERENCE. IF YOU ARE UNABLE TO LOCATE THE
SOFTWARE LICENSE OR LIMITED WARRANTY, CONTACT YOUR JUNIPER NETWORKS REPRESENTATIVE FOR A COPY.
Category Offense Investigation Guide
Release 2008.2
Copyright © 2008, Juniper Networks, Inc.
All rights reserved. Printed in USA.
Revision History
June 2008—Revision 1
The information in this document is current as of the date listed in the revision history.
2
Page 3

CONTENTS
ABOUT THIS GUIDE
Documentation Feedback 1
Requesting Support 1
1 ACCESS OFFENSES
What is an Access Offense? 3
How do I Investigate an Access Offense? 4
How do I Tune an Access Offense? 7
2 SIM AUDIT OFFENSES
What is SIM Audit? 9
How do I Investigate a SIM Audit Offense? 9
How do I Tune a SIM Audit Offense? 12
Tuning Using False Positive Function 12
Tuning Using Custom Rules Wizard 14
3 AUTHENTICATION OFFENSES
What is an Authentication Offense? 17
How do I Investigate an Authentication Offense? 17
How do I Tune an Authentication Offense? 21
4 CRE OFFENSES
What is a CRE Offense? 23
How do I Investigate a CRE Offense? 23
How do I Tune a CRE Offense? 26
5 DENIAL OF SERVICE (DOS) OFFENSES
What is a DoS Offense? 27
What is a DoS Flood Attack? 27
What is a DoS Service Exploit? 28
How do I Investigate a DoS Offense? 28
How do I Tune a DoS Offense? 32
Tuning Using False Positive Function 32
Tuning Using Sentries 33
Tuning Using Custom Rules Wizard 33
Page 4

How Can I Verify If STRM is Receiving Valid DoS Offenses? 34
6 EXPLOIT OFFENSES
What is an Exploit Attack? 35
How do I Investigate an Exploit Offense 35
How do I Tune an Exploit Offenses? 39
How Can I Verify That STRM is Receiving Valid Exploit Offenses? 40
7 MALWARE OFFENSES
What is Malware? 41
What is Malware? 41
What is a Malware Offense? 41
How do I Investigate a Malware Offense? 42
How do I Tune a Malware Offense? 45
8 NETWORK ANOMALIES OFFENSES
What is an Network Anomaly Offense? 47
Policy 47
Threshold 47
Anomaly 48
Behavior 48
How do I Investigate a Network Anomaly Offense 48
How do I Tune a Network Anomaly Offense? 50
9 POLICY OFFENSES
What is a Policy Offense? 51
How do I Investigate a Policy Offense? 51
How do I Tune a Policy Offense? 54
Tuning Using False Positive Function 54
Tuning Using Custom Rules Wizard 55
How Can I Verify That STRM is Receiving Valid Offenses? 55
10 POTENTIAL EXPLOIT OFFENSES
What is a Potential Exploit Offense? 57
How do I Investigate a Potential Exploit Offense? 57
How do I Tune a Potential Exploit Offense? 59
11 RECONNAISSANCE OFFENSES
What is Reconnaissance? 61
What is Network Reconnaissance? 6 1
What is a Reconnaissances Offense? 61
How do I Investigate a Reconnaissance Offense? 62
How do I Tune a Reconnaissance Offense? 65
Tuning Using False Positive Function 65
Tuning Using Custom Rules Wizard 67
Page 5

12 SUSPICIOUS ACTIVITY OFFENSES
What is a Suspicious Attack? 69
What is Suspicious Traffic? 69
What is a Suspicious Offense? 69
How do I Investigate Suspicious Offense 70
How do I Tune a Suspicious Offenses? 73
13 SYSTEM OFFENSES
What is a System Offense? 77
How do I Investigate a System Offense? 77
How do I Tune a System Offense? 80
How Can I Verify That STRM is Receiving Valid Offenses? 81
14 USER DEFINED OFFENSES
What is a User Defined Offense? 83
How do I Investigate a User Defined Offense? 83
How do I Tune a User Defined Offense? 86
Page 6

Page 7

ABOUT THIS GUIDE
This preface provides the following guidelines for using the Category Offense
Investigation Guide:
• Documentation Feedback
• Requesting Support
Documentation
Feedback
Requesting
Support
We encourage you to provide feedback, comments, and suggestions so that we
can improve the documentation. Send your comments to
techpubs-comments@juniper.net, or fill out the documentation feedback form at
http://www.juniper.net/techpubs/docbug/docbugreport.html. If you are using e-mail,
be sure to include the following information with your comments:
• Document name
• Document part number
• Page number
• Software release version
Open a support case using the Case Management link at http://www.juniper.net/support/
or call 1-888-314-JTAC (from the United States, Canada, or Mexico) or
1-408-745-9500 (from elsewhere).
Category Offense Investigation Guide
Page 8

Page 9

1
ACCESS OFFENSES
This chapter provides information on access offenses including:
• What is an Access Offense?
• How do I Investigate an Access Of fense?
• How do I Tune an Access Offense?
What is an Access
Offense?
Limiting access to your network and networked resources is an essential
component of any network security strategy. In most cases, this is accomplished
using firewalls. Monitoring the activity of the firewalls in your network is a massive
undertaking for most organizations since the amount of logs generated can be
overwhelming. STRM intelligently collects and analyzes firewall logs and then
automatically reports any abnormal and/or suspicious behavior.
STRM generates offenses based on access related behavior when a user is
attempting to gain illegal access to your network. By analyzing the firewall and
other intrusion prevention device logs, STRM determines when a particular IP
address has been denied access in a manner that requires investigation. STRM
can also detect suspicious failed access to the same destination as well as
multiple attempts across many distributed destinations.
Offense Category Investigation Guide
Page 10
4 ACCESS OFFENSES
How do I
Investigate an
Access Offense?
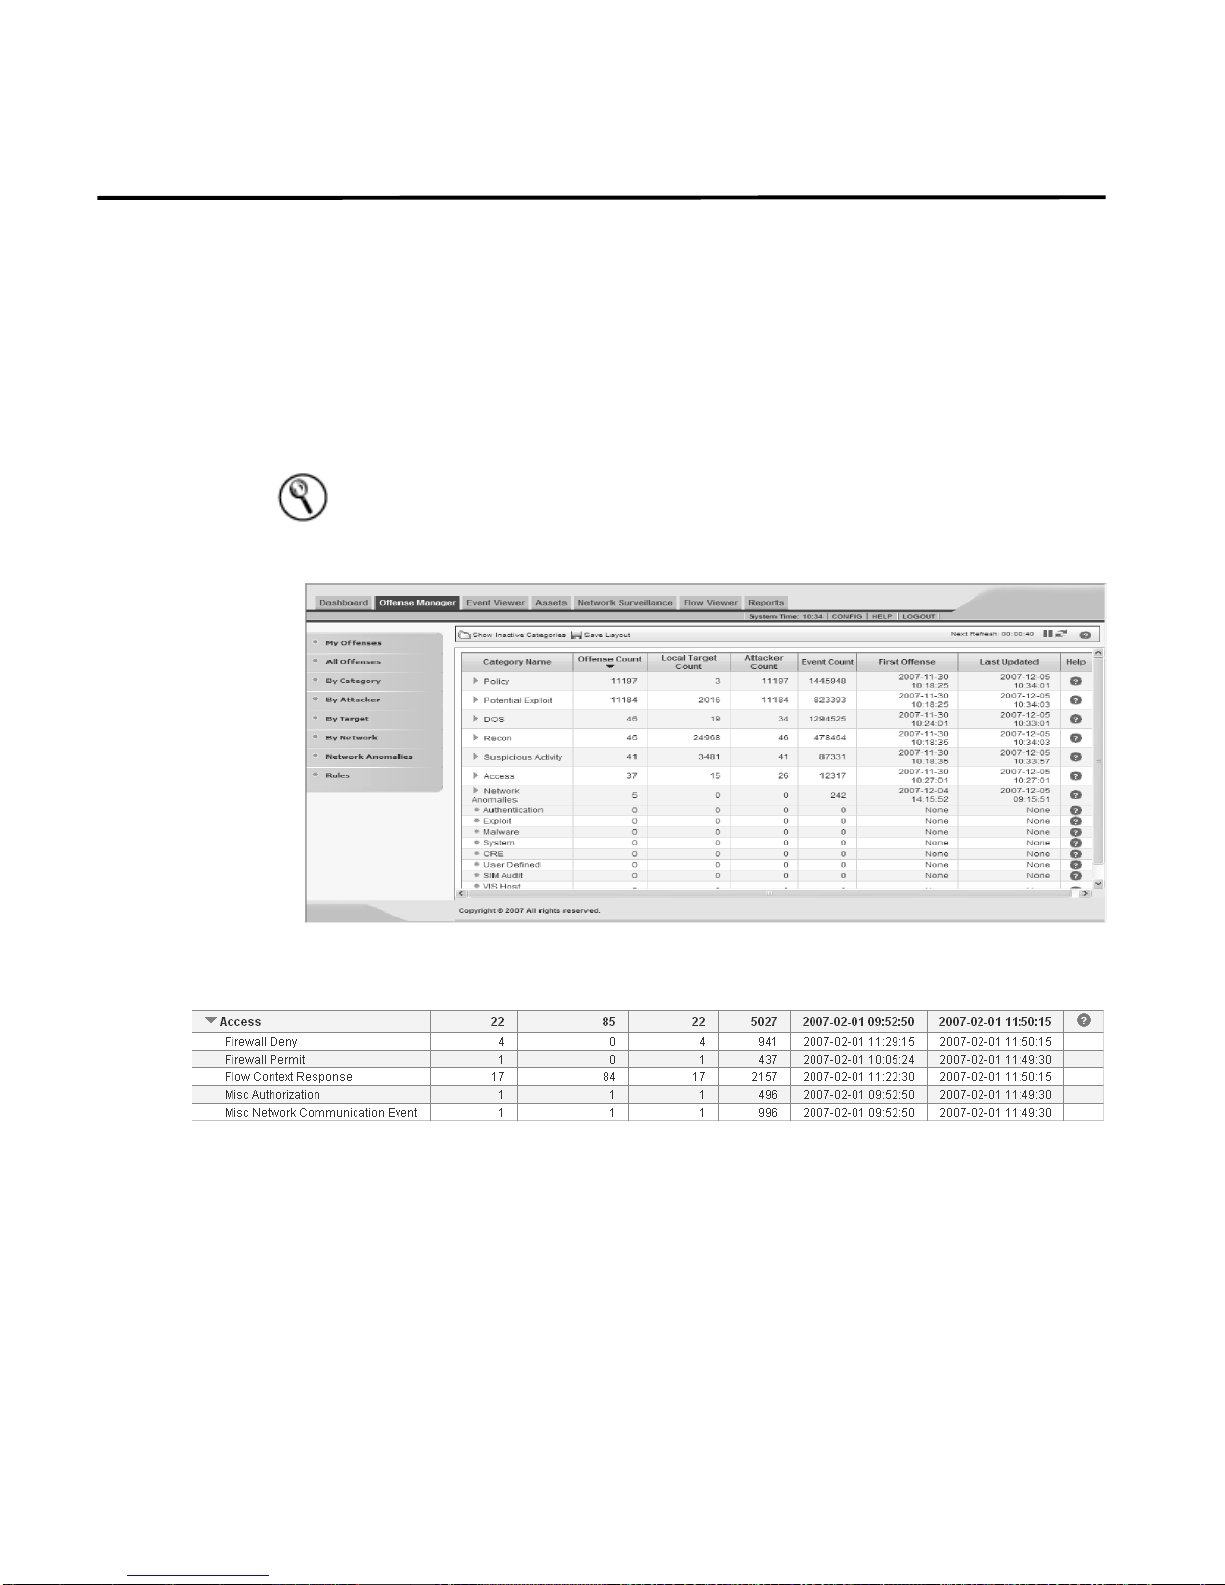
To investigate an access offense:
Step 1 Click the Offense Manager tab.
The Offense Manager window appears.
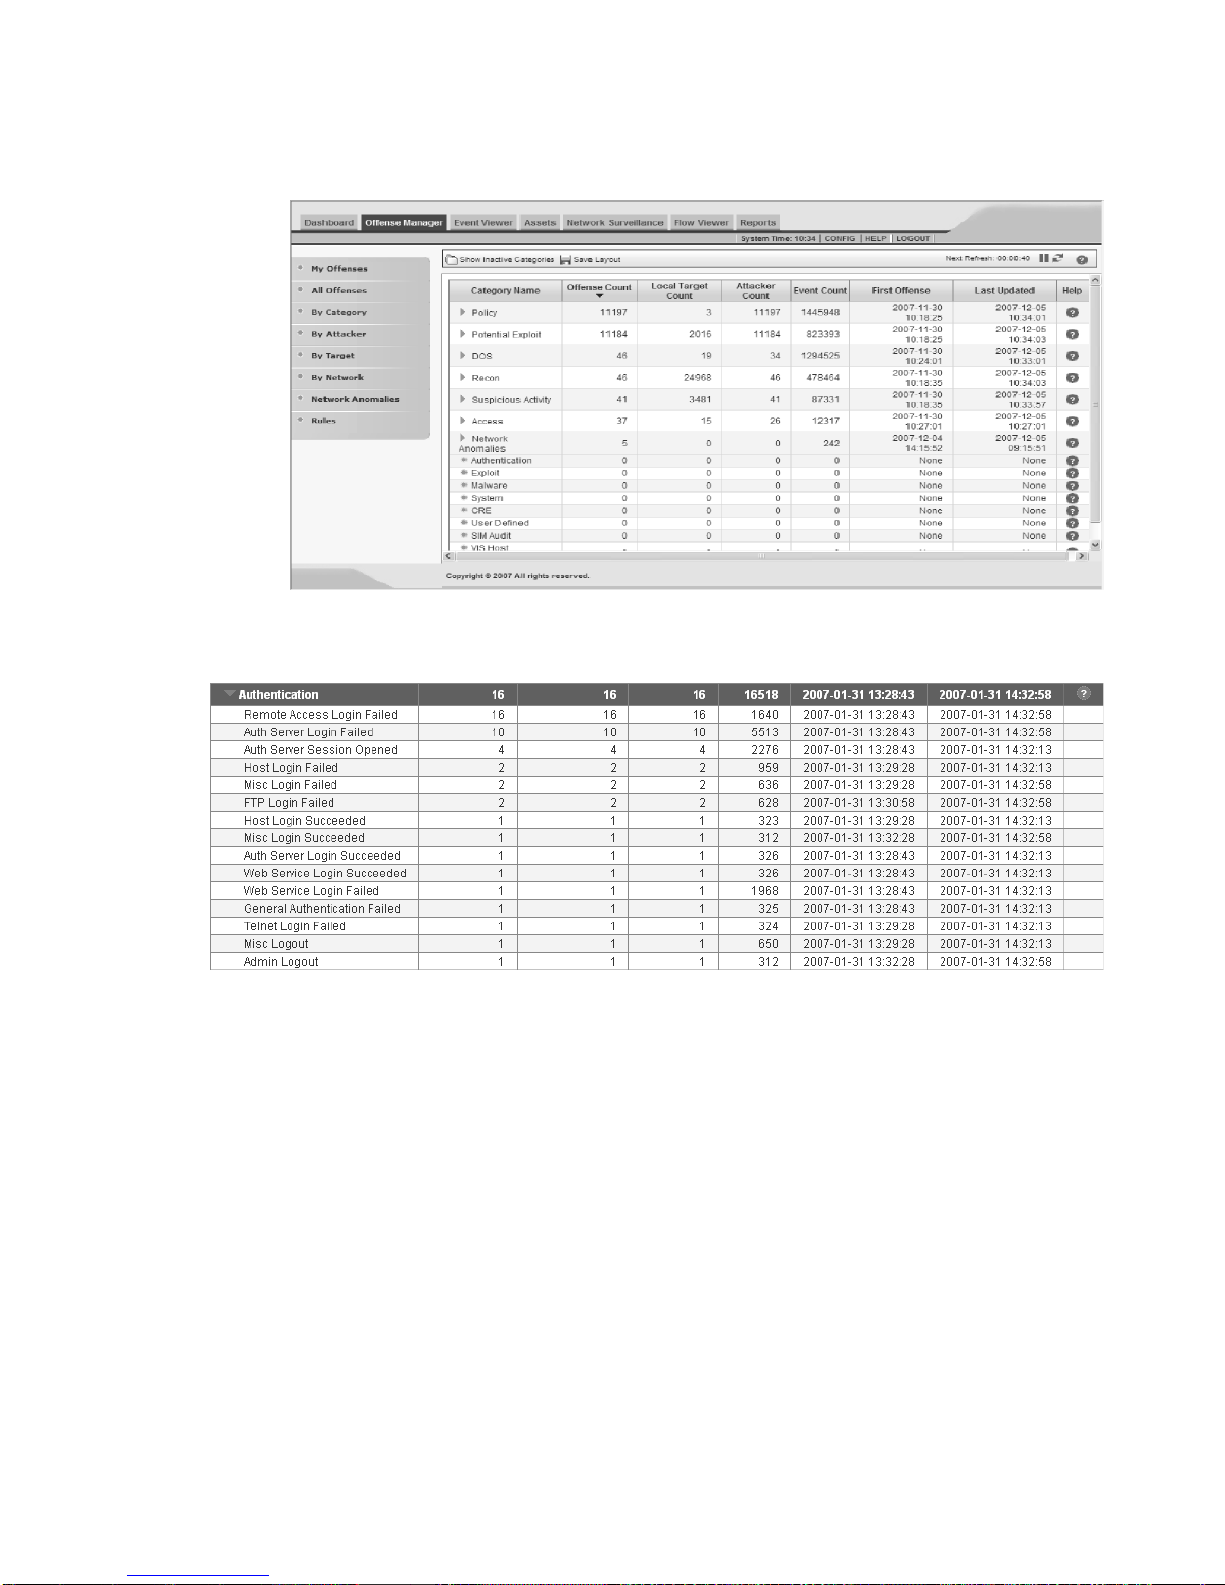
Step 2 Click By Category from the navigation menu.
The By Category view appears displaying high-level categories. The counts for
each category are accumulated from the values in the low-level categories.
Hint: Only low-level categories with associated offenses appear with an arrow.
You can click the arrow to view the associated low-level categories. If you wish to
view all categories, click Show Inactive Categories.
Step 3 To view additional low-level category information for the Access category , click the
arrow icon next to Access.
Step 4 Double-click any low-level category to view the list of associated offenses.
The list of offenses appear.
Offense Category Investigation Guide
Page 11
How do I Investigate an Access Offense? 5
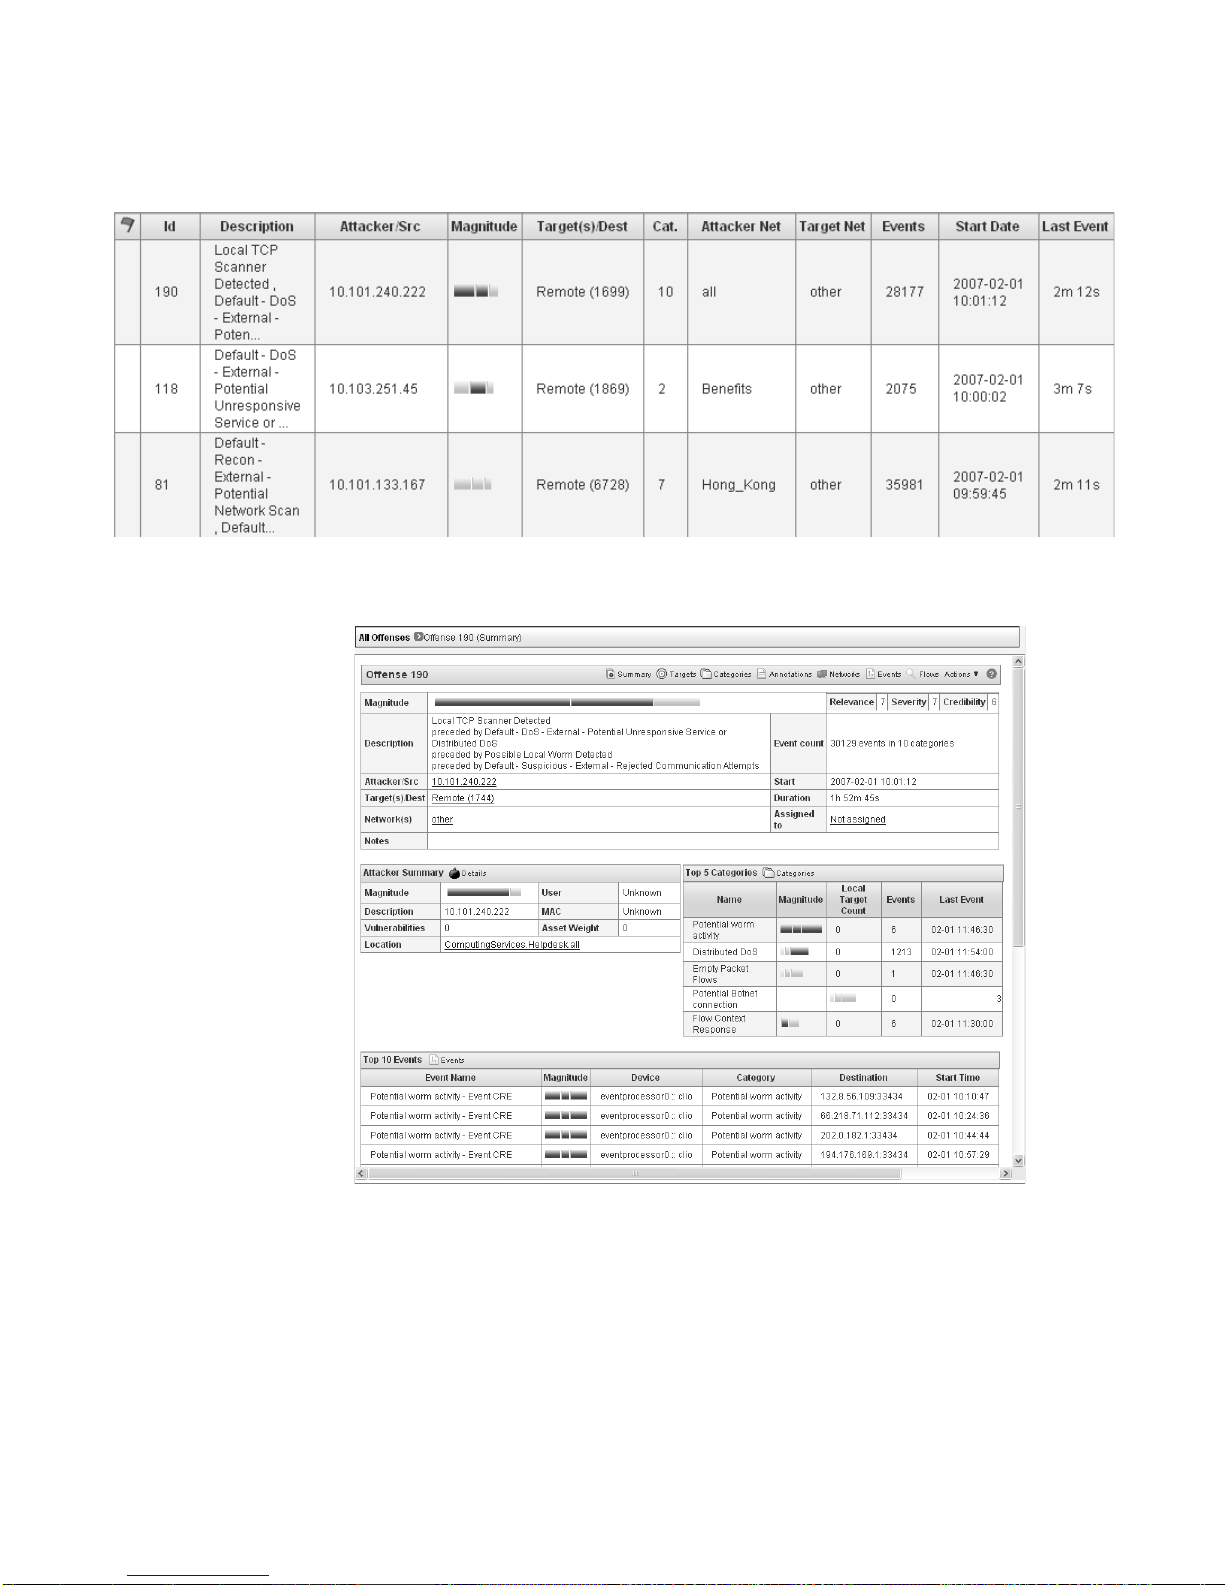
Step 5 Double-click the offense you wish to view.
The details panel appears.
Step 6 To investigate the attacker , view the Attacker Summary box:
• Location - Allows you to determine if the attacker is local or remote:
- Local - This field specifies the network (group) in which it is located.
- Remote - This field specifies the geographic location of the attacker, for
example, Asia. We recommend that you investigate the traffic from the
remote source IP address to make sure that your firewalls are probably
configured to block any threatening traffic. If firewall logs are being sent to
Offense Category Investigation Guide
Page 12
6 ACCESS OFFENSES
Step 7 Determine if the user associated with the offense was attempting to illegally gain
STRM, use the Event Viewer to investigate firewall logs to make sure it is
probably configured. For more information on the Event Viewer, see the
STRM Users Guide.
• User - If the attacker is local or a VPN user and STRM is receiving user identity
logs, this field indicates user identity information. This allows you identify the
user who is the source of the traffic. To obtain further information about the
user, right-click on the IP address in the Description field to access additional
menu options. From the menu, select use the Select Information > Asset
Profile. The Asset Profile window allows you to determine additional
information regarding the identify of the source user. You can also determine if
the user associated to the offense is a valid user on the device they are
attempting to access.
STRM generates access events when the same source IP address causes
multiple failed access attempts, such as, from a firewall. If you determine that this
is normal behavior, you can tune STRM to no longer create offenses for this
behavior. For information, see How do I Tune an Access Offense?.
access to the network or a restricted area of the network. If you determine that the
user had malicious intent:
a Click Flows to further the user’s activity to make sure that the user did not
obtain access to a restricted area of the network.
The Flow Search window appears.
b Use the Event Viewer to search for events relating to this user associated with
firewall accept messages. For more information on the Event Viewer, see Using
the Event Viewer in the STRM Users Guide.
Offense Category Investigation Guide
Page 13
How do I Tune an Access Offense? 7
Step 8 Once you have determined the impact of the offense, you must perform the
necessary steps to rectify the source of the activity. If you have determined this
behavior is normal, you can tune STRM to no longer detect this activity. For more
information, see How do I Tune an Access Offense?.
Step 9 Once you are satisfied that you have resolved the offense, you can close or hide
the offense.
For more information on closing or hiding an offense, see Investigating Offenses in
the STRM Users Guide.
How do I Tune an
Access Offense?
Step 1 In the offense details interface, click Events.
If you determine that the access activity is normal and STRM is creating false
positive offenses, you can tune STRM to make sure no more offenses are created
due to this activity.
To tune access activity using the false positive function:
The List of Events window appears.
Step 2 Select the event that includes the known source IP address that is repo r te d to
produce suspicious activity.
Step 3 Click False Positive.
The False Positive window appears with information derived from the selected
event.
Offense Category Investigation Guide
Page 14
8 ACCESS OFFENSES
Step 4 Select the necessary event properties to tune as a false positive.
Step 5 Click Tune.
STRM will no longer create additional offense for this source IP address when this
type of activity occurs.
Offense Category Investigation Guide
Page 15

SIM AUDIT OFFENSES
2
This chapter provides information on SIM audit offenses including:
• What is SIM Audit?
• How do I Investigate a SIM Audit Offense?
• How do I Tune a SIM Audit Offense?
What is SIM Audit? STRM generates an records SIM audit events for system and configuration
changes occurring within the STRM deployment. This information may be required
for compliance regulations, troubleshooting, or internal tracking.
When STRM detects suspicious or unapproved SIM audit events, a SIM audit
offense is created. STRM is able to monitor SIM audit activity for many different
aspects of the STRM product. In certain situations, this data may also be combined
with other events and flows associated to the attacker, and correlated into one
offense. If an attacker does gain access to the STRM system, they may try and
de-activate certain features or turn monitoring off on certain areas of the network.
These suspicious changes would generate an offense in STRM.
How do I
Investigate a SIM
Audit Offense?
Step 1 Click the Offense Manager tab.
Step 2 Click By Category from the navigation menu.
This section provides information on further investigating SIM audit offenses.
To investigate SIM audit offenses:
The Offense Manager window appears.
The By Category view appears displaying high-level categories. The counts for
each category are accumulated from the values in the low-level categories.
Hint: Only low-level categories with associated offenses appear with an arrow.
You can click the arrow to view the associated low-level categories. If you wish to
view all categories, click Show Inactive Categories.
Category Offense Investigation Guide
Page 16
10 SIM AUDIT OFFENSES
Step 3 To view additional low-level category information for the SIM Audit category, click
Step 4 Double-click any low-level category to view the list of associated offenses.
the arrow icon next to SIM Audit.
The list of offenses appear.
Step 5 Double-click the offense you wish to view.
The details panel appears.
Step 6 View the Attacker Summary box to understand the attacker:
• Location - Allows you to determine if the attacker is local or remote:
- Local - This field specifies the network (group) in which it is located.
- Remote - This field specifies the geographic location of the attacker, for
example, Asia. We recommend that you investigate the traffic from the
remote source IP address to make sure that your firewalls are probably
configured to block any threatening traffic. If firewall logs are being sent to
STRM, use the Event Viewer to investigate firewall logs to make sure it is
probably configured. For more information on the Event Viewer, see the
STRM Users Guide.
Category Offense Investigation Guide
Page 17
How do I Investigate a SIM Audit Offense? 11
• User - If the attacker is local or a VPN user and STRM is receiving user identity
logs, this field indicates user identity information. This allows you identify the
user who is the source of the suspicious traffic. To obtain further information
about the user, right-click on the IP address in the Description field to access
additional menu options. From the menu, select use the Select Information >
Asset Profile. The Asset Profile window allows you to determine additional
information regarding the identify of the source user.
If the activity is normal (for example, a valid user is making approved configuration
changes to the STRM deployment), then you can use the Rules function in the
Offense Manager to tune out this activity. For more information, see How do I Tune
a SIM Audit Offense?.
Step 7 In the Attacker Summary box, place your mouse over the Description text. If the
number of offenses is greater than 1, we recommend that you investigate the
attacker to determine if the attacker is attempting to disguise his activities from
other offenses. Unauthorized changes to your STRM deployment can lead to
serious threats and attacks to the network being undetected.
Step 8 Click Events.
The List of Events appears for the selected offense.
The Device column provides the device that detected the event. If multiple devices
are reporting similar events, the credibility value for this offense increases.
Step 9 To further investigate the target, right-click on an IP address in the Source column.
The right-click menu appears.
Step 10 Select Information > Asset Profile.
The Asset Profile appears.
Category Offense Investigation Guide
Page 18
12 SIM AUDIT OFFENSES
Step 11 Once you have determined the impact of the offense, you must either block the
Step 12 Once you have resolved the offense, close or hide the offense.
source of the unauthorized configuration activity, then take the desired action
against the offense.
How do I Tune a
SIM Audit Offense?
Tuning Using False
Positive Function
Step 1 In the SIM audit offense details interface, click Events.
For more information on closing or hiding an offense, see the STRM Users Guide.
If you determine that the SIM audit activity is normal and STRM is creating false
positive offenses, you ca n tu ne STR M t o make sure no more offenses are created
due to this activity.
You can tune STRM using one of the following methods:
• Tuning Using False Positive Function
• Tuning Using Custom Rules Wizard
To tune SIM audit activity using the false positive function:
The List of Events appears for the selected offense.
Category Offense Investigation Guide
Page 19

How do I Tune a SIM Audit Offense? 13
Step 2
Select the event with the source IP address known to be producing the SIM audit
activity.
Step 3 Click False Positive.
The False Positive window appears with information derived from the selected
event.
Step 4 Select the necessary event properties to tune as a false positive.
For example, in the window above, the Events with specific QID option is selected
to tune the specific IP address and the event high-level category that is creating
the false positive SIM audit event.
For additional information on using the False Positive tuning function, see the
STRM Users Guide.
Step 5 Click Tune.
STRM will no longer create additional offenses for this source IP address when
performing normal VA or network management tasks.
Category Offense Investigation Guide
Page 20
14 SIM AUDIT OFFENSES
T uning Using Custom
Rules Wizard
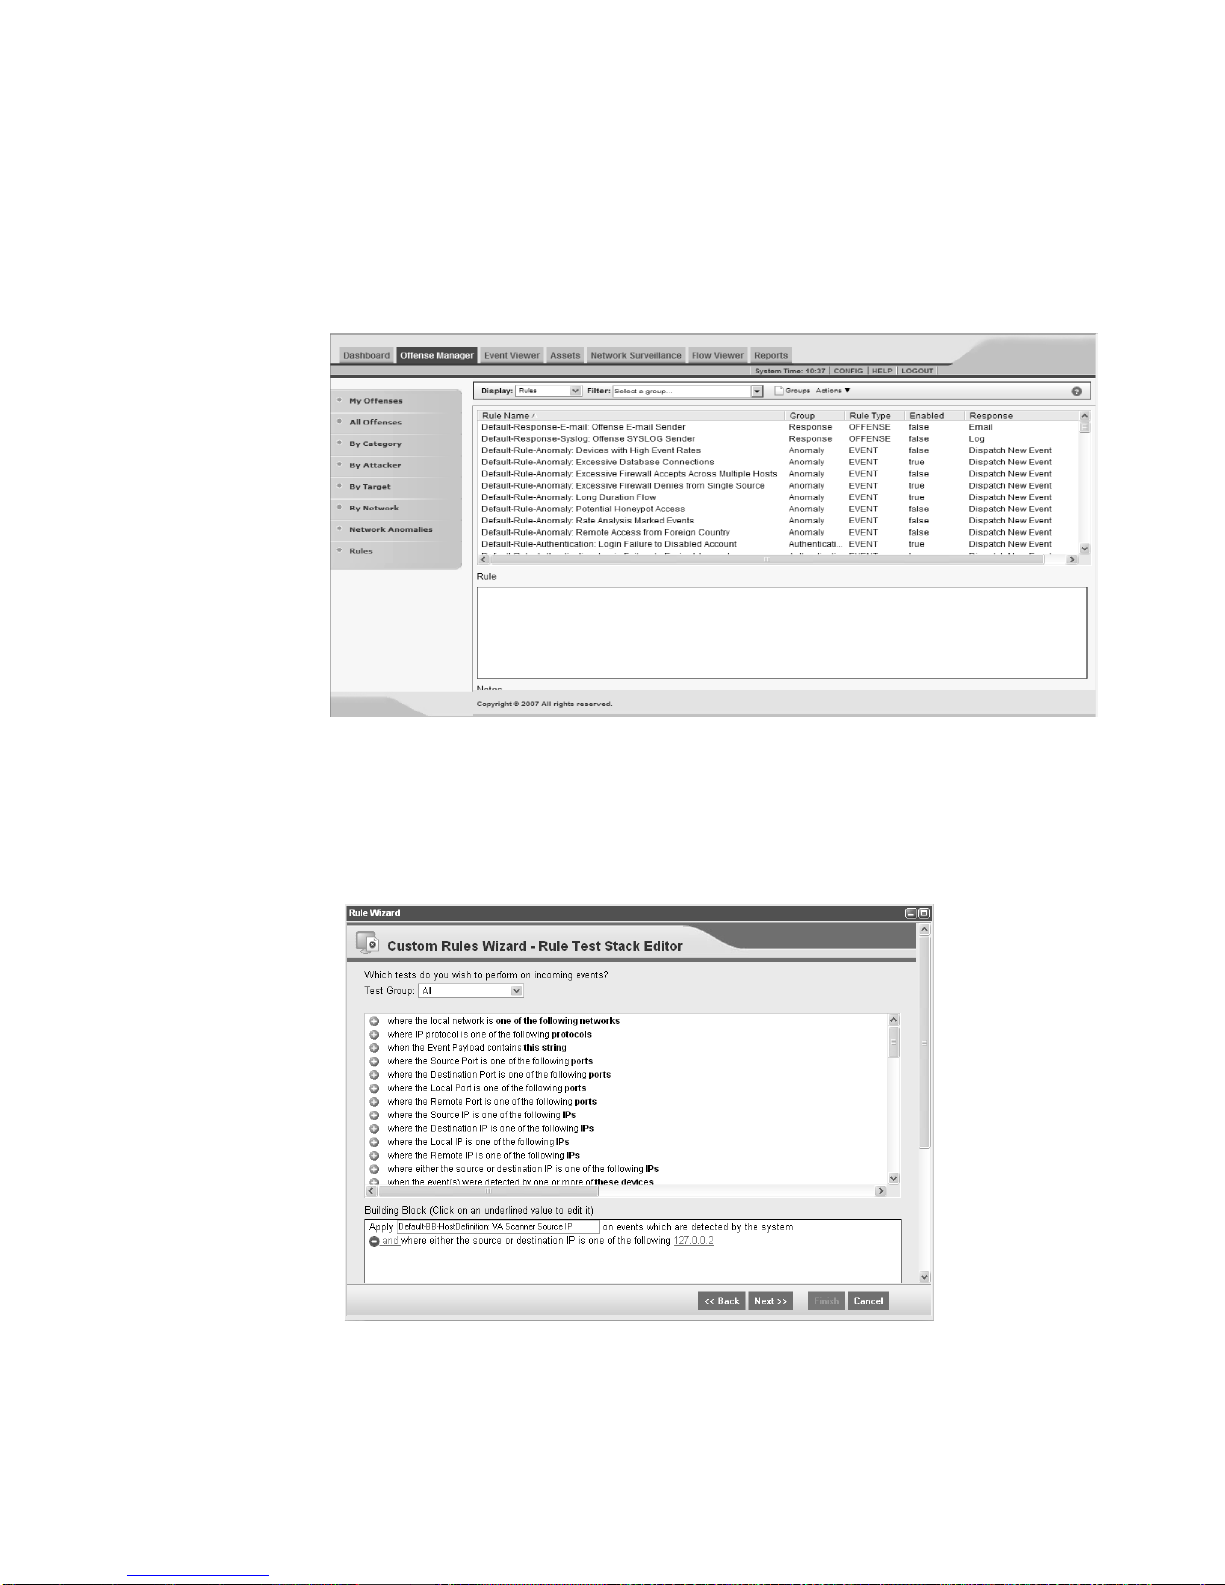
Step 1 In the navigation bar of the Offense Manager, click Rules.
Step 2 Using the Display drop-down list box, select Building Blocks.
Step 3 In the Block Name list, locate the Default-BB-HostDefinition: VA Scanner
To tune SIM audit activity using the custom rules wizard:
The Rules interface appears.
Source IP building block.
Step 4 From the Actions drop-down list box, select Edit.
The Rules Wizard appears.
Step 5 In the Building Block section, click the IP address that appears.
A configuration window appears.
Category Offense Investigation Guide
Page 21
How do I Tune a SIM Audit Offense? 15
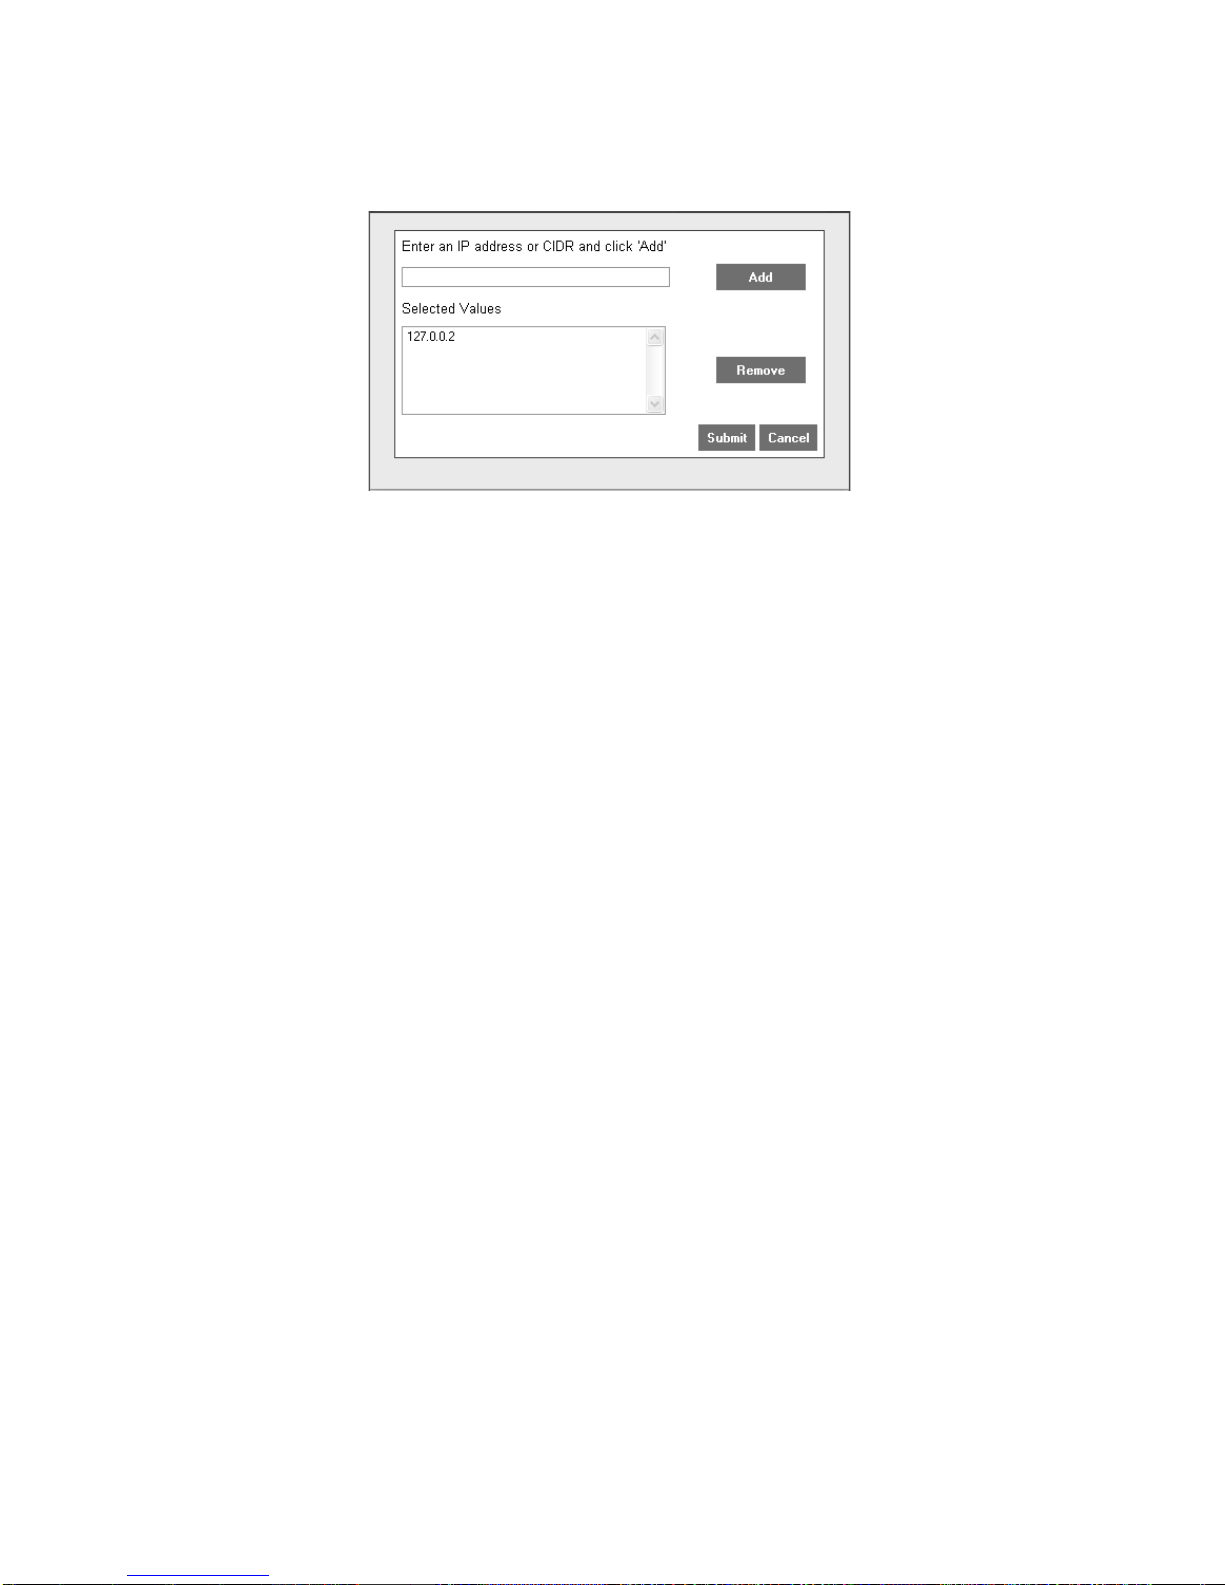
Step 6
In the Enter an IP address or CIDR and click ‘Add’ field, enter the IP address of
the VA scanner or IP address that is producing false positives.
Step 7 Click Add.
Step 8 Repeat for all VA scanners or IP address(es).
Step 9 Click Submit.
Step 10 Complete the rules wizard.
For more information on using the Custom Rules Wizard, see the STRM
Administration Guide.
Category Offense Investigation Guide
Page 22

Page 23

3
AUTHENTICATION OFFENSES
This chapter provides information on authentication offenses including:
• What is an Authentication Offense?
• How do I Investigate an Authentication Offense?
• How do I Tune an Authentication Offense?
What is an
Authentication
Offense?
How do I
Investigate an
Authentication
Offense?
Typically, the first level of network security starts with authentication. When a user
navigates a protected network, the network generally requires authentication at
various level of the network infrastructure. STRM supports the monitoring of many
authentication points throughout a network, including host machines, firewalls,
databases, application servers, and authentication servers.
While analyzing authentication events from devices, STRM detects any abnormal
or potentially threatening activity, for example, when there are multiple log in
failures followed by a successful login. Since authentication activity is based on
access to the network, STRM creates offenses when invalid users are attempting
to, or more importantly, have already gained access to the network. STRM
features intelligent security event logic capable of filtering authentication-bas e d
activity and creating offenses on truly suspicious behavior.
To investigate an authentication offense:
Step 1 Click the Offense Manager tab.
The Offense Manager window appears.
Step 2 Click By Category from the navigation menu.
The By Category view appears displaying high-level categories. The counts for
each category are accumulated from the values in the low-level categories.
Hint: Only low-level categories with associated offenses appear with an arrow.
You can click the arrow to view the associated low-level categories. If you wish to
view all categories, click Show Inactive Categories.
Offense Category Investigation Guide
Page 24
18 AUTHENTICATION OFFENSES
Step 3 To view additional low-level category information for the Authentication cate gory,
click the arrow icon next to Authentication.
Step 4 Double-click any low-level category to view the list of associated offenses.
The list of offenses appear.
Offense Category Investigation Guide
Page 25
How do I Investigate an Authentication Offense? 19
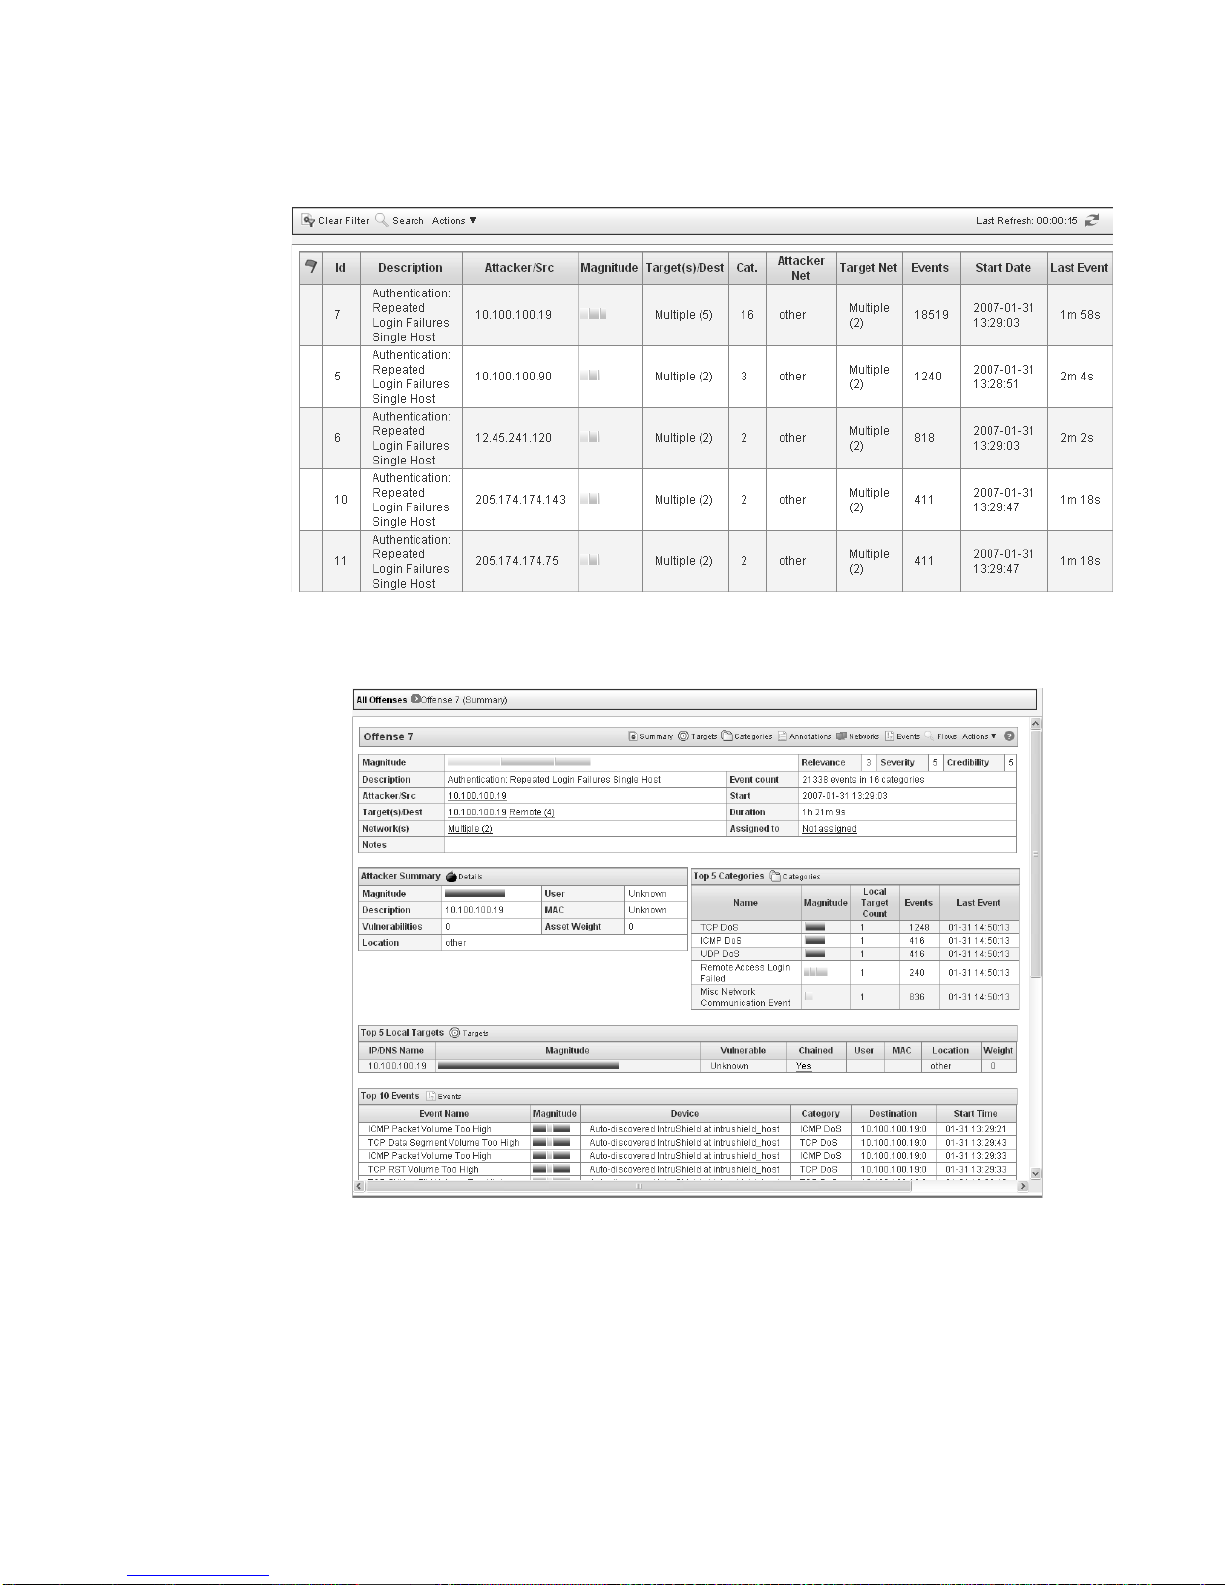
Step 5
Double-click the offense you wish to view.
The details panel appears.
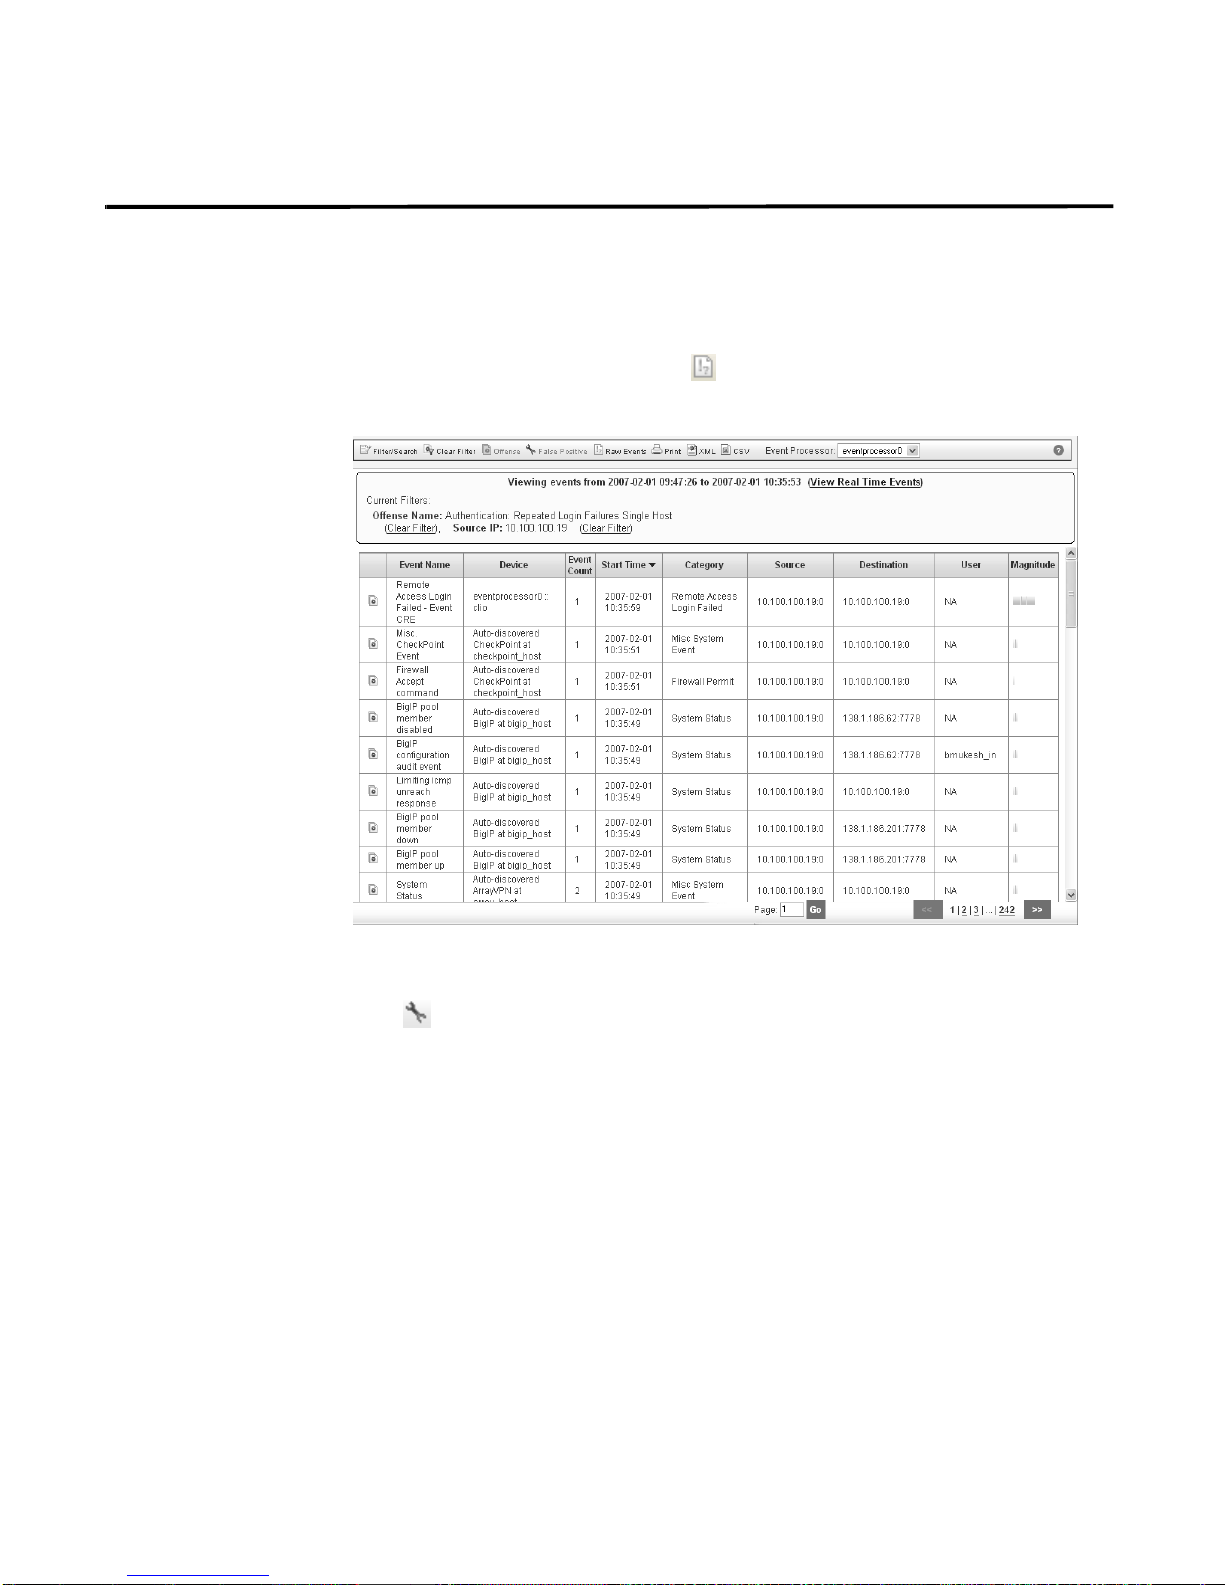
Step 6 To investigate the attacker , view the Attacker Summary box:
• Location - Allows you to determine if the attacker is local or remote:
- Local - This field specifies the network (group) in which it is located.
- Remote - This field specifies the geographic location of the attacker, for
example, Asia. We recommend that you investigate the traffic from the
remote source IP address to make sure that your firewalls are probably
configured to block any threatening traffic. If firewall logs are being sent to
Offense Category Investigation Guide
Page 26

20 AUTHENTICATION OFFENSES
• User - If the attacker is local or a VPN user and STRM is receiving user identity
Authentication offenses occur when the same source IP address causes multiple
log in failures. This may be ca used b y many users using the same network p ath to
reach a particular server. Your network may also include an entire development
team accessing a Windows server from the same Linux or Solaris server. In this
case, false positive offenses may be generated when multiple users attempt to log
in to different servers from the same server incorrectly. If this is the case, you can
tune STRM to no longer create offenses for this behavior. For more information,
see How do I Tune an Authentication Offense?.
Step 7 Determine if the user associated with the offense was attempting to illegally gain
access to the network with malicious intent or a user who has forgotten their
password. If you determine that the user had malicious intent, we recommend that
you restrict this user’s access to the network. We also recommend that you use the
Event Viewer to search for events relating to this user to determine if your network
was successfully breached. For more information on the Event Viewer, see the
STRM Users Guide.
STRM, use the Event Viewer to investigate firewall logs to make sure it is
probably configured. For more information on the Event Viewer, see the
STRM Users Guide.
logs, this field indicates user identity information. This allows you identify the
user who is the source of the traffic. To obtain further information about the
user, right-click on the IP address in the Description field to access additional
menu options. From the menu, select use the Select Information > Asset
Profile. The Asset Profile window allows you to determine additional
information regarding the identify of the source user.
Step 8 Once you have determined the impact of the offense, you must perform the
necessary steps to rectify the source of the activity. If you have determined this
behavior is normal, you can tune STRM to no longer detect this activity. For more
information, see How do I Tune an Authentication Offense?.
Step 9 Once you are satisfied that you have resolved the offense, you can close or hide
the offense.
For more information on closing or hiding an offense, see Investigating Offenses in
the STRM Users Guide.
Offense Category Investigation Guide
Page 27
How do I Tune an Authentication Offense? 21
How do I Tune an
Authentication
Offense?
Step 1 In the offense details interface, click Events.
If you determine that the authentication activity is normal and STRM is creating
false positive offenses, you can tune STRM to make sure no more offenses are
created due to this activity.
To tune authentication activity using the false positive function:
The List of Events window appears.
Step 2 Select the event that includes the known source IP address that is repo r te d to
produce suspicious activity.
Step 3 Click False Positive.
The False Positive window appears with information derived from the selected
event.
Offense Category Investigation Guide
Page 28

22 AUTHENTICATION OFFENSES
Step 4 Select the necessary event properties to tune as a false positive.
Step 5 Click Tune.
STRM will no longer create additional offense for this source IP address when this
type of activity occurs.
Offense Category Investigation Guide
Page 29

4
CRE OFFENSES
This chapter provides information on CRE offenses including:
• What is a CRE Offense?
• How do I Investigate a CRE Offense?
What is a CRE
Offense?
How do I
Investigate a CRE
Offense?
Step 1 Click the Offense Manager tab.
Step 2 Click By Category from the navigation menu.
Custom Rule Engine (CRE) offenses are generated through user defined custom
rules or sentries. A CRE offense appears in the Offense Manager by a custom rule
when a user attempts to map an event to a category not supported by STRM. You
should not receive CRE events in offenses or reports using the standard templates
with STRM.
For more information on rules, sentries, or templates, see the STRM
Administration Guide.
To investigate a CRE offense:
The Offense Manager window appears.
The By Category view appears displaying high-level categories. The counts for
each category are accumulated from the values in the low-level categories.
Hint: Only low-level categories with associated offenses appear with an arrow.
You can click the arrow to view the associated low-level categories. If you wish to
view all categories, click Show Inactive Categories.
Category Offense Investigation Guide
Page 30

24 CRE OFFENSES
Step 3 To view additional low-level category information for the CRE category, click the
arrow icon next to CRE
Step 4 Double-click any low-level category to view the list of associated offenses.
The list of offenses appear.
Step 5 Double-click the offense you wish to view.
The details panel appears.
Category Offense Investigation Guide
Page 31

How do I Investigate a CRE Offense? 25
Step 6
View the Attacker Summary box to understand the attacker:
• Location - Allows you to determine if the attacker is local or remote:
- Local - This field specifies the network (group) in which it is located.
- Remote - This field specifies the geographic location of the attacker, for
example, Asia. We recommend that you investigate the traffic from the
remote source IP address to make sure that your firewalls are probably
configured to block any threatening traffic. If firewall logs are being sent to
STRM, use the Event Viewer to investigate firewall logs to make sure it is
probably configured. For more information on the Event Viewer, see the
STRM Users Guide.
• User - If the attacker is local or a VPN user and STRM is receiving user identity
logs, this field indicates user identity information. This allows you identify the
user who is the source of the suspicious traffic. To obtain further information
about the user, right-click on the IP address in the Description field to access
additional menu options. From the menu, select use the Select Information >
Asset Profile. The Asset Profile window allows you to determine additional
information regarding the identify of the source user.
Step 7 Once you have determined the impact of the offense, you must either block the
source of the scan, patch, or shut down services on the appropriate systems, then
take the desired action against the offense.
Step 8 Once you have resolved the offense, close or hide the offense.
For more information on closing or hi ding an offense, see the STRM Users Guide.
Category Offense Investigation Guide
Page 32

26 CRE OFFENSES
How do I Tune a
CRE Offense?
If you determine that the CRE activity is normal and STRM is creating false
positive offenses, you ca n tu ne STR M t o make sure no more offenses are created
due to this activity . You can use the Custom Rules wizard in the Offense Manager
to create a building block to allow this behavior. For more information on using the
Custom Rules Wizard, see the STRM Administration Guide.
Category Offense Investigation Guide
Page 33

5
DENIAL OF SERVICE (DOS)
O
FFENSES
This chapter provides information on DoS offenses including:
• What is a DoS Offense?
• How do I Investigate a DoS Offense ?
• How do I Tune a DoS Offense?
• How Can I Verify If STRM is Receiving Valid DoS Offenses?
What is a DoS
Offense?
What is a DoS Flood
Attack?
A DoS attack is an attempt to prevent an application or host from behaving in
accordance with its intended purpose. When STRM detects a correlated series of
events, a DoS offense is created. DoS attacks may include:
• What is a DoS Flood Attack?
• What is a DoS Service Exploit?
A DoS flood attack includes one or more source attempts to flood the target hosts
or application with transaction requests until the host is unable to process
transactions for users in a timely manner. There are three types of DoS flood
offenses including:
• Network DoS - Includes a packet flood targeted at an IP address intended to
overwhelm a host in a flood of data until the host becomes unable to process
transaction for the users.
• DDoS - Includes a DoS attack from many sources and may target a host or a
listening port.
• Service DoS - Includes an attack targeted at a specific port used by an
application. A flood of empty or invalid transaction requests are directed at an
application port, with the intention of overwhelming the application.
Category Offense Investigation Guide
Page 34

28 DENIAL OF SERVICE (DOS) OFFENSES
What is a DoS
Service Exploit?
How do I
Investigate a DoS
Offense?
Step 1 Click the Offense Manager tab.
Step 2 Click By Category from the navigation menu.
The intention of a DoS service exploit is to cause a disruption in service for a host
or service. A DoS explo it attempt s to disrupt a service by sending an exploit, which
may be a single packet containing a DoS exploit, to a port where a vulnerable
service is listening. Such an exploit may cause memory corruption that results in a
failure of service or the operating system to cease functioning. These events are
created by STRM sentries using Network Behavioral Anomaly Detection (NBAD).
DoS events are also created by intrusion detection and prevention sensors.
STRM correlates DoS events with other relevant data, such as the presence or
absence of the target host and vulnerabilities on the target port, when vulnerability
assessment data is available. DoS exploits are ineffective when the target host
vulnerability has been patched or when the exploit packs are blocked by firewalls
or in-line devices, such as proxy servers or IPSs.
To investigate a DoS offenses:
The Offense Manager window appears.
The By Category view appears displaying high-level categories. The counts for
each category are accumulated from the values in the low-level categories.
Hint: Only low-level categories with associated offenses appear with an arrow.
You can click the arrow to view the associated low-level categories. If you wish to
view all categories, click Show Inactive Categories.
Step 3 To view additional low-level category information for the DoS category, click the
arrow icon next to DOS.
Category Offense Investigation Guide
Page 35

How do I Investigate a DoS Offense? 29
Step 4 Double-click any low-level category to view the list of associated offenses.
The list of offenses appear.
Step 5 Double-click the offense you wish to view.
The details panel appears.
Category Offense Investigation Guide
Page 36

30 DENIAL OF SERVICE (DOS) OFFENSES
Step 6 View the Description field and determine the activity associated with this offense.
This may indicate multiple types of activity. If the offense is a DDoS attack, the
following terms appear:
• Distributed DoS Attack (Low, Medium, or High Number of Hosts)
• Potential Unresponsive Service or Distributed DoS
In a DDoS attack, the I P address listed in the Attack er Summary box is th e address
of the target since DDoS offenses are correlated by the target address. Also, in the
Top 5 Lo cal Targets box, the IP addresses listed are the sources of the DDoS
attack.
Step 7 View the Attacker Summary box to understand the attacker:
• Location - Allows you to determine if the attacker is local or remote:
- Local - This field specifies the network (group) in which it is located. If the
attack is local, contact the user associated with the IP address to determine
the source of the attack. If this is deemed normal behavior, you can tune
STRM to no longer create offenses for this activity. See How do I Tune a
DoS Offense?. If this is not normal behavior, go to Step 9.
- Remote - This field specifies the geographic location of the attacker, for
example, Asia. If the attacker is remote, go to Step 8.
• User - If the attacker is local or a VPN user and STRM is receiving user identity
logs, this field indicates user identity information. This allows you identify the
user who is the source of the traffic. To obtain further information about the
user, right-click on the IP address in the Description field to access additional
menu options. From the menu, select use the Select Information > Asset
Profile. The Asset Profile window allows you to determine additional
information regarding the identify of the source user.
Step 8 If the attack is remote:
a Investigate the traffic from the remote source IP address to make sure that your
firewalls are probably configured to block any threatening traffic.
b Determine if STRM is correlating firewall events. If you are correlating firewall
events, the Offense Manager includes firewall or ACL deny events that indicate
the attack is being blocked.
c Determine if the target is an Internet facing server, which means that the traffic
may be permitted through the firewall. For assistance, contact your network
administrator.
If the target is an Inte r net facing server and you are investigating a DoS attack,
right-click on the IP address located in the Description field of the Attacker
Summary box to determine the ownership of the IP address sen ding the DoS
attack. From the right-click menu, select Information > WHOIS Lookup or
DNS Lookup. For more information on using the right-click menu, see the
STRM Users Guide.
If the target is an Internet facing server and you are investigating a DDoS
attack, right-click on an IP address located in the Destination field of the Top 5
Local Targets box to determine the ownership of the IP address sending the
Category Offense Investigation Guide
Page 37

How do I Investigate a DoS Offense? 31
DoS attack. From the right-click menu, select Information > WHOIS Lookup or
DNS Lookup. For more information on using the right-click menu, see the
STRM Users Guide.
Once you have determined ownership, contact your network administrator to
determine if the source IP address(es) of the DoS attack may be blocked using
your firewall or intrusion prevention device.
Step 9 Determine if the IP address of the attacker is being spoofed (using an IP address
that is invalid), trace the path of the traffic back to the switch port in the original
form. To determine if the IP address is being spoofed, contact your network
administrator. If you determine that the IP address is being spoofed, use one of the
following methods to determine the originator of the traffic:
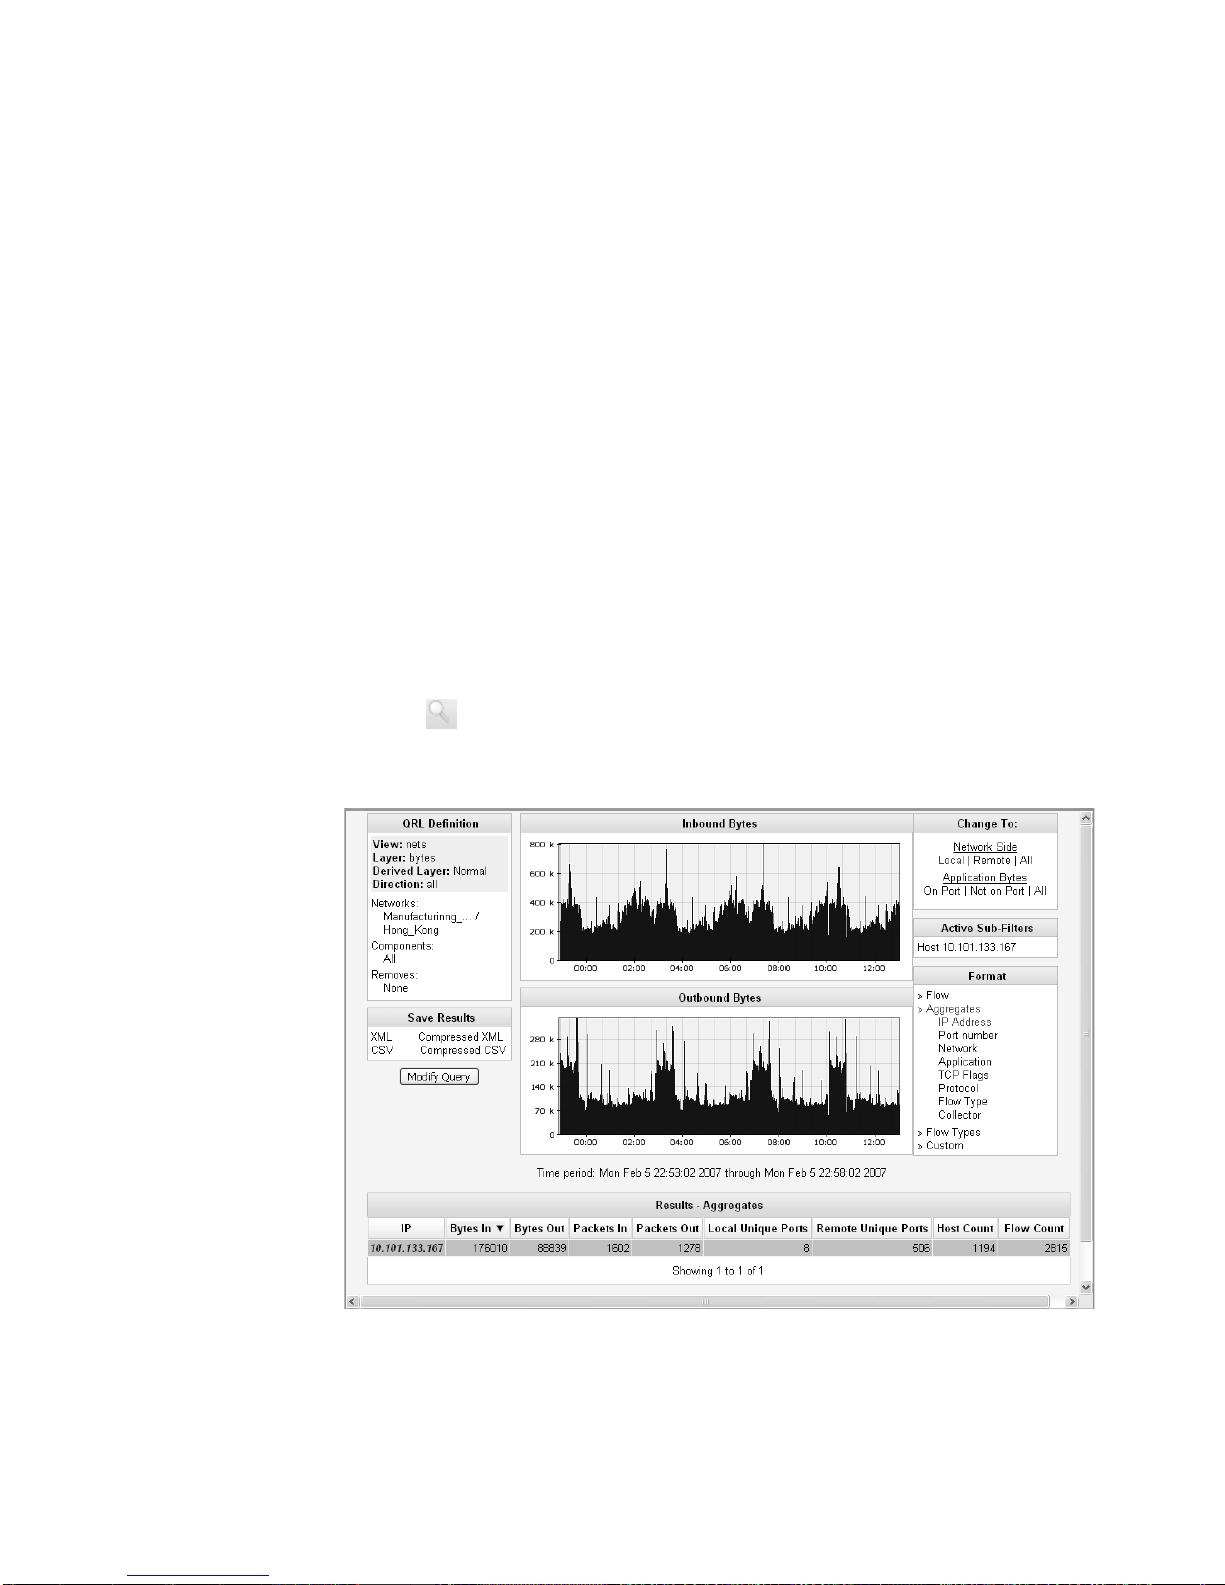
• STRM Collector View. For more information on views, see the STRM
Administration Guide.
• Switch and router port statistics.
• Egress filtering, which is useful for stopping outbound spoofed traffic.
Step 10 Determine if the attacker is a desktop computer, which may be running a network
application or infected with malware. For assistance, contact your network
administrator. If the desktop is running a network application, you can tune STRM
to no longer generate offenses for this behavior. See How do I Tune a DoS
Offense?
Step 11 Once you have determined the impact of the offense, you must perform the
necessary steps to rectify the source of the activity. If you have determined this
behavior is normal, you can tune STRM to no longer detect this activity. For more
information, see How do I Tune a DoS Offense?.
Step 12 Once you are satisfied that you have resolved the offense, you can close or hide
the offense.
For more information on closing or hi ding an offense, see the STRM Users Guide.
Category Offense Investigation Guide
Page 38

32 DENIAL OF SERVICE (DOS) OFFENSES
How do I Tune a
DoS Offense?
Tuning Using False
Positive Function
If you determine that the DoS activity is normal and STRM is creating false positive
offenses, you can tune STRM to make sure no more offenses are created due to
this activity.
You can tune STRM using one of the following methods:
• Tuning Using False Positive Function
• Tuning Usin g Se ntries
• Tuning Using Custom Rules Wizard
To tune DoS activity using the false positive function:
Step 1 In the offense details interface, click Events.
The List of Events appears.
Step 2 Select the event that includes the known source IP addr ess that is reported to
produce suspicious activity.
Step 3 Click False Positive.
The False Positive window appears with information derived from the selected
event.
Category Offense Investigation Guide
Page 39

How do I Tune a DoS Offense? 33
Step 4
Step 5 In the Traffic Direction option, choose one of the following options:
Step 6 Click Tune.
Tuning Using
Sentries
T uning Using Custo m
Rules Wizard
In the Event Properties option, select the first option.
a For a DoS attack, select the <IP address> to Any Destination option.
b For a DDos attack, select the <IP address> to DoS target option, which is listed
as the Attacker source and Any Destination option.
For example, in the window above, the source IP address and the event high-level
category that is creating the false positive suspicious offense. For additional
information on using the False Positive tuning function, see the STRM Us ers
Guide.
STRM will no longer create additional offense for this source IP address when this
type of activity occurs.
If the attacker is local and events are being received from the Classification
Engine, you can assume that the events are being created as a result of a STRM
sentry. You can enable or disable DoS sentries for internal and external networks.
For more information on sentries, see the STRM Administration Guide.
You can use the Custom Rules wizard to edit a building block that contains the IP
address(es) of the attackers and the DoS category. For more information on
creating or editing a building block, see the STRM Administration Guide.
Category Offense Investigation Guide
Page 40

34 DENIAL OF SERVICE (DOS) OFFENSES
How Can I Verify If
STRM is Receiving
Valid DoS
Offenses?
If you believe STRM should be receiving DoS offenses but none have appeared in
the Offense Manager, verify that the events were received and processed using
the Event Viewer interface. If no events are being received, verify that the
appropriate DoS sentries within STRM and other security devices are enabled, as
appropriate. For more information, see Configuring Rules in the STRM
Administration Guide.
Category Offense Investigation Guide
Page 41

6
EXPLOIT OFFENSES
This chapter provides information on an exploit attack including:
• What is an Exploit Attack?
• How do I Investigate an Exploit Offense
• How do I Tune an Exploit Offenses?
What is an Exploit
Attack?
How do I
Investigate an
Exploit Offense
Step 1 Click the Offense Manager tab.
Step 2 Click By Category from the navigation menu.
STRM generates exploit offenses when the events associated to an offense are
part of the exploit category. Typically, exploit events are generated by Intrusion
Detection Systems (IDSs) or Intrusion Prevention System (IPSs). These systems
may include stand-alone network sensors such as Sourcefire or Enterasys
Dragon, part of an IPS within a firewall (such as Juniper Networks ISG), or
host-based IDS systems (such as the Cisco Security Agent). By default, STR M
attempts to detect high exploits that are likely to be successful or show a pattern of
the attacker attempting to exploit multiple host or using multiple types of attacks.
Unfortunately, these devices may cause the creation of false positive offenses so
you can tune STRM to no longer create offenses for these events while
maintaining an audit of all events generated from the device for compliance and
forensics purposes.
To investigate an exploit offense:
The Offense Manager window appears.
The By Category view appears displaying high-level categories. The counts for
each category are accumulated from the values in the low-level categories.
Hint: Only low-level categories with associated offenses appear with an arrow.
You can click the arrow to view the associated low-level categories. If you wish to
view all categories, click Show Inactive Categories.
Category Offense Investigation Guide
Page 42

36 EXPLOIT OFFENSES
Step 3 To view additional low-level category information for the Exploit category, click the
arrow icon next to Exploit.
Step 4 Double-click any low-level category to view the list of associated offenses.
The list of offenses appear.
Step 5 Double-click the offense you wish to view.
The details panel appears.
Category Offense Investigation Guide
Page 43

How do I Investigate an Exploit Offense 37
Step 6
Determine if the offense is a result of a remote host attempting to exploit one or
more local hosts.
Typically the target of the attacker is located inside the Demilitarized Zone (DMZ)
or in the public facing Network Address Translation (NAT) range. However, if you
have assigned public addresses to internal hosts, this behavior could be occurring
on any host in the network. To determine if the offense is a result of a remote host
attempting to exploit one or more local hosts:
a View the Attacker/Src field to determine if the attacker is associated with this
offense is local or remote. If local, go to step Step 7.
b View the Target(s)/Dest field to determine if the target for this offense is local or
remote. If remote, go to Step 8.
c View the Description field to determine the behavior associated with this
offense. If the exploit was followed by suspicious behavior, you can determine
the validity of the event if a Flow Context Response events appears. If the
offense does not include any Flow Context Response events, this indicates that
no flow context was detected, which is desired.
Note: For you to view Flow Context Response events, your network must include
a flow source monitoring the same location as the IDS product.
d View the Annotations box to view the details of the offense. If the annotation
indicates that this offense includes chaining, this indicates that the target of the
attack is now attacking other hosts. If the chained offense started after the
exploit, this may indicate that the host was successfully exploited.
Category Offense Investigation Guide
Page 44

38 EXPLOIT OFFENSES
Step 7 Determine if the offense is the result of a local host attempting to exploit another
Step 8 Determine if the offense is the result of a remote host attempting to exploit another
local host on your network.
If this is the case, this is one of the most serious types of offenses, but also the
most likely to be a false positive offense. To determine if the offense is a result of a
local host attempting to exploit another local host:
a View the Attacker/Src field to determine if the attacker is associated with this
offense is local or remote.
b View the Target(s)/Dest field to determine if the target for this offense is local or
remote.
c View the Description field to determine the behavior associated with this
offense. To determine the intention of this offense, determine if the attacker
attempted some form of reconnaissance or suspicious activity before the
exploit. You can also determine if the attacker attempted different types of
attacks on the same host or tried multiple targets.
remote host:
a Verify your network hierarchy con figuration. For more information on yo ur
network hierarchy, see Managing STRM in the STRM Administration Guide.
b Verify if one of the hosts involved in the offense belongs to the local network. If
you do not recognize the hosts involved in the offense, right-click on the IP
address in either the Target(s)/Dest or Attacker/Src fields and select
Information > WHOIS to obtain further information.
c If you recognize either host involved in the offense, add that information to your
network hierarchy.
d View the Description field to determine the behavior associated with this
offense. To determine the intention of this offense, determine if the attacker
attempted some form of reconnaissance or suspicious activity before the
exploit. You can also determine if the attacker attempted different types of
attacks on the same host or tried multiple targets.
Step 9 Once you have determined the impact of the offense, you must perform the
necessary steps to rectify the source of the activity. If you have determined this
behavior is normal, you can tune STRM to no longer detect this activity. For more
information, see How do I Tune an Exploit Offenses?.
Step 10 Once you are satisfied that you have resolved the offense, you can close or hide
the offense.
For more information on closing or hiding an offense, see the STRM Users Guide.
Category Offense Investigation Guide
Page 45

How do I Tune an Exploit Offenses? 39
How do I Tune an
Exploit Offenses?
Step 1 In the offense details interface, click Categories.
Step 2 In the List of Event Categories, double-click the related category to display
Step 3 Select the event that includes the known source IP address that is repo r te d to
Step 4 Click False Positive.
If you determine that the exploit activity is normal and STRM is creating false
positive offenses, you can tune STRM to make sure no more offenses are created
due to this activity.
To tune exploi t offenses using the false positive function:
The category details appear.
associated events. These categories should be low-level exploit categories, such
as, buffer overflow, FTP exploit, or worm active.
produce suspicious activity.
The False Positive window appears with information derived from the selected
event.
Step 5 If only a single offense of this type exists and the offense contains only a single
target, select the first option in the Event Property options.
Step 6 If this offense includes multiple attackers generating similar offenses but all to the
same destination (typically a multiple host communicating with a single server),
use the SRC to any option.
Note: If all the hosts associated to this offense are related, you can also create a
building block using the Rules Wizard to include all the hosts and QIDs (events)
that are creating the false positives. Then, add this new building block to the
Default-Rule-FalsePositives: All false positive buildin g blocks rule.
Step 7 If this event includes a single offense of this type but the same event (QID) has
been used against many targets, select the second option in the Traffic Properties
options.
Category Offense Investigation Guide
Page 46

40 EXPLOIT OFFENSES
Step 8 Click Tune.
STRM will no longer create additional offense for this source IP address when this
type of activity occurs.
How Can I Verify
That STRM is
Receiving Valid
Exploit Offenses?
Step 1 By default, STRM au tomatically removes noise and false positives commonly
Step 2 If you are not able to use vulnerability information, STRM provides additional
To ve rify that STRM is receiving valid offenses:
associated with IDS devices. However, there are certain circumstances where
STRM may not create an offense for an attack. For example, when no vulnerability
information exists in the asset profile and an attempt is made to exploit that asset
(using a common tool, such as Metasploit), STRM may not create an offense for
this attack if no other corresponding suspicious activity is detected or could be
correlated to indicates a successful attack. If you wish all exploit attempts to
become offenses, see Step 3.
STRM may also not generate an offense for an exploit as a result of the data
source. We recommend that you verify that the IDS is monitoring a location where
it is able to detect the attack. You can also use the Event Viewer to search for the
attacker’s IP address. If an exploit event is not detected, verify your IDS
configuration.
options. For example, STRM searches for an att acker attempting multiple methods
of exploits against a target so if you run multiple exploits, STRM creates an
offense. You can also exploit multiple targets with the same attack, which
generates an offense. You can adjust these thresholds by editing the Custom
Rules with exploits.
Step 3 In the Rules function within the Offense Manager, you can enable or disable rules,
as necessary. You can enable any rules that allow STRM to make all exploit
attempts become offenses. We do not recommend that you do not deploy this
within a live environment but is useful for testing purposes.
Category Offense Investigation Guide
Page 47

MALWARE OFFENSES
7
This chapter provides information on malware offenses including:
• What is Malware?
• How do I Investigate a Malware Offense?
• How do I Tune a Malware Offense?
What is Malware? This section provides information regarding malware including:
• What is Malware?
• What is a Malware Offense?
What is Malware? Malware is a broad term associated with many types of treats, such as, trojans
viruses, adware, spyware, and worms. The term malware describes any software
that is intended to gain access to a host or damage a host without the consent of
the owner.
What is a Malware
Offense?
STRM detects malware by correlating events and flows from security devices. The
default STRM rules report on spyware, viruses, hostile mail attachments, backdoor
detection, and other relevant events and logs from security devices. STRM also
adds additional information to the malware offenses to provide additional network
context to the offense. For example, if your network does not include IDSs
monitoring host port scanning, STRM detects this type of behavior leading up to an
attack, such as, a backdoor exploit by monitoring the network flows and correlating
this behavior to the malware offense.
Category Offense Investigation Guide
Page 48

42 MALWARE OFFENSES
How do I
Investigate a
Malware Offense?
Step 1 Click the Offense Manager tab.
Step 2 Click By Category from the navigation menu.
To investigate a malware offenses:
The Offense Manager window appears.
The By Category view appears displaying high-level categories. The counts for
each category are accumulated from the values in the low-level categories.
Hint: Only low-level categories with associated offenses appear with an arrow.
You can click the arrow to view the associated low-level categories. If you wish to
view all categories, click Show Inactive Categories.
Step 3 To view additional low-level category information for the Malware category, click
the arrow icon next to Malware.
Step 4 Double-click any low-level category to view the list of associated offenses.
The list of offenses appear.
Step 5 Double-click the offense you wish to view.
The details panel appears.
Category Offense Investigation Guide
Page 49

How do I Investigate a Malware Offense? 43
Step 6
View the Attacker Summary box to understand the attacker:
• Location - Allows you to determine if the attacker is local or remote:
- Local - This field specifies the network (group) in which it is located.
- Remote - This field specifies the geographic location of the attacker, for
example, Asia. We recommend that you investigate the traffic from the
remote source IP address to make sure that your firewalls are probably
configured to block any threatening traffic. If firewall logs are being sent to
STRM, use the Event Viewer to investigate firewall logs to make sure it is
probably configured. For more information on the Event Viewer, see the
STRM Users Guide.
• User - If the attacker is local or a VPN user and STRM is receiving user identity
logs, this field indicates user identity information. This allows you identify the
user who is the source of the traffic. To obtain further information about the
user, right-click on the IP address in the Description field to access additional
menu options. From the menu, select use the Select Information > Asset
Profile. The Asset Profile window allows you to determine additional
information regarding the identify of the source user.
Normal activity may be detected by security devices as malware. For example, if a
user telecommutes and uses a wireless network at home, when they return to the
office, their computer may attempt to connect to their own ISPs name server. This
activity may generate a botnet detection.
Step 7 View the Top 5 Local Targets box, which displays the targets that are most
vulnerable or have the highest business value. This box also indicates if the target
Category Offense Investigation Guide
Page 50

44 MALWARE OFFENSES
Step 8 View the Top 5 Categories box, which displays the various types of activities
Step 9 View the Top 10 Events box, which displays the top events for this offense,
Step 10 View the Top 5 An notations box, which displays the most significant correlation
Step 11 Double-click any event that you wish to investigate in further details and view the
Step 12 In the offense details window, click Flows to view network flows from the
has become chained to another offense. Chaining means that the target has
become an attacker of another offense. This indicates a self-propagating malware.
Note: Any remote targets associated to a malware offense may be foreign or
unknown servers that the source IP address is communicating with to receive
instructions to upload data .
associated to the attacker during the time of the offense.
organized by severity.
tests that contributed to the overall magnitude of the offense. Annot ations provide
important information, such as, which devices have contributed events to the
offense.
Source Port field. Port 6667 is commonly used by bots as an IRC-based control
channel. Spyware commonly use ports 80 and 443.
attacker IP address. When investigating flows, select the port or application in
question. If the traffic volume and the number of conversation pairs seem to be too
high for the user, this may indicate potenti al malw are.
Step 13 In the offense details window, click Targets, which are organized by
vulnerability risk and business value.
Step 14 Right-click on a targets IP address and select Information > Asset Profile, which
displays which services the targets are responding to.
Step 15 Once you have determined the impact of the offense, you must either block the
source of the scan, patch or shut down services on the appropriate systems, then
take the desired action against the offense.
Step 16 Once you have resolved the offense, close or hide the offense.
For more information on closing or hiding an offense, see the STRM Users Guide.
Category Offense Investigation Guide
Page 51

How do I Tune a Malware Offense? 45
How do I Tune a
Malware Offense?
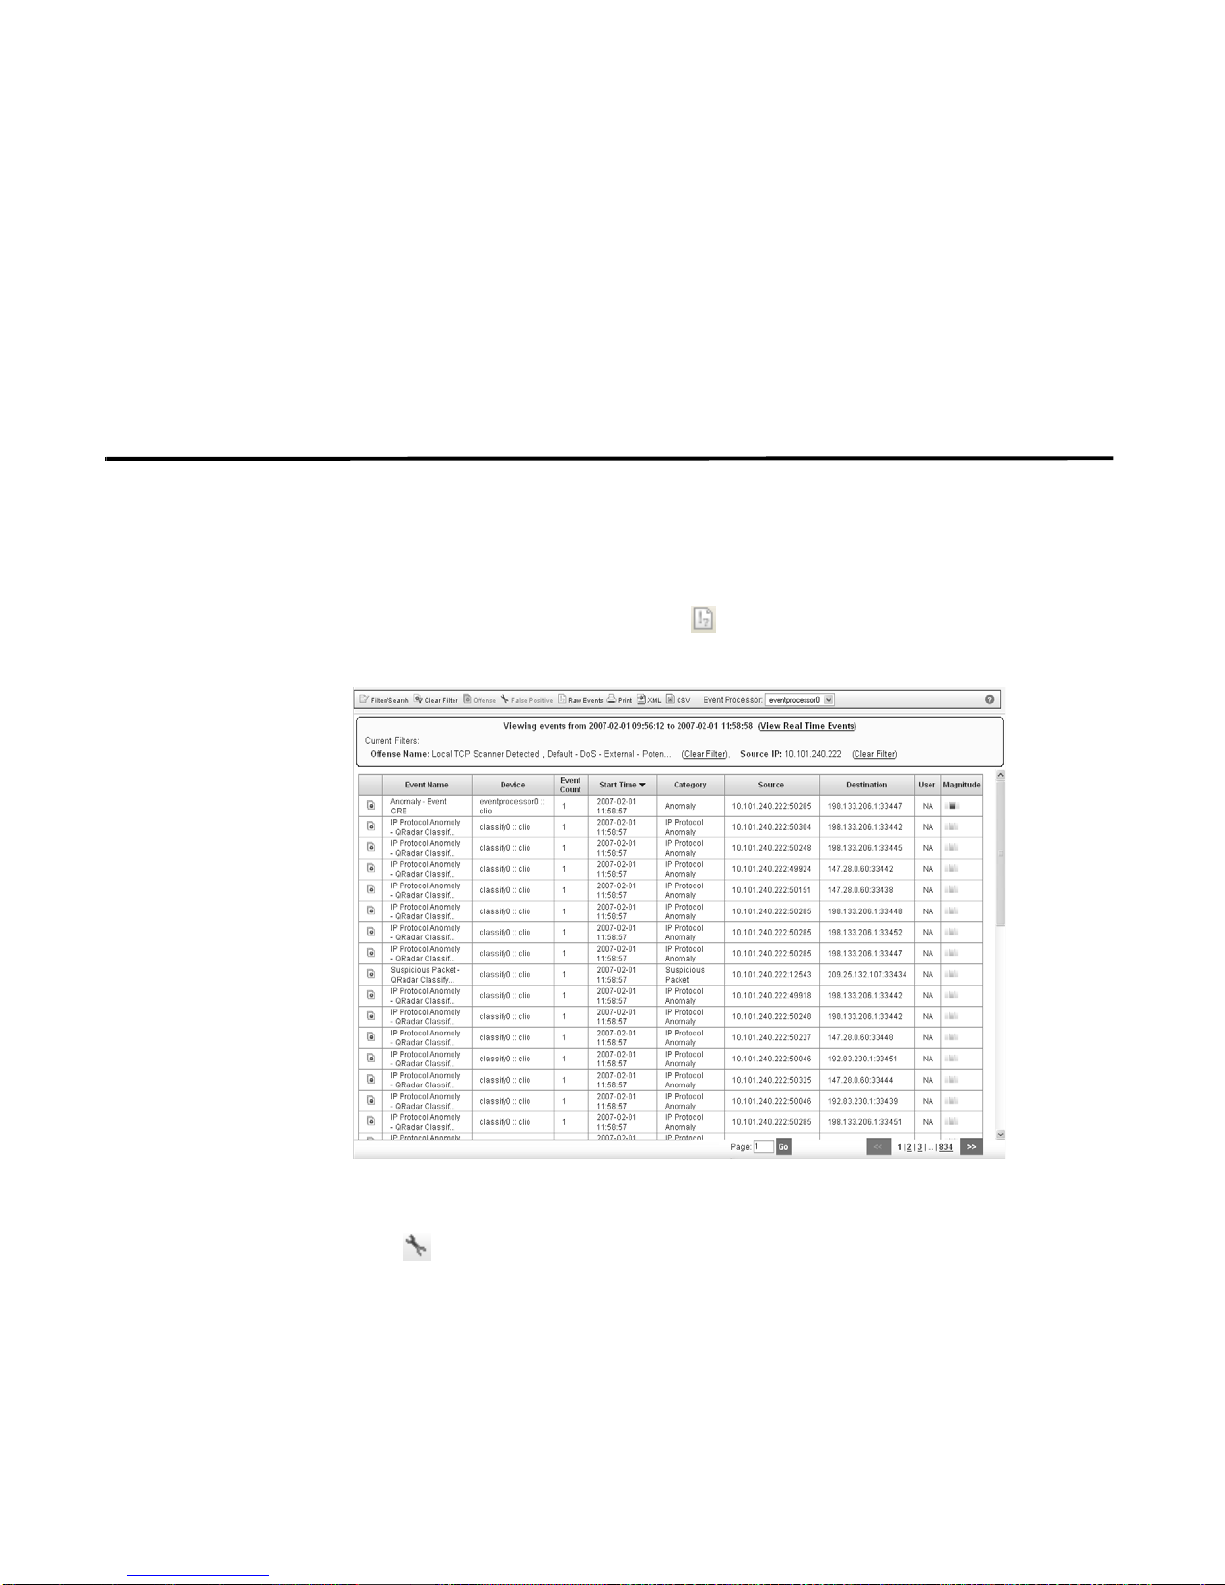
Step 1 In the reconnaissance offense details interface, click Events.
If you determine that the malware activity is normal and STRM is creating false
positive offenses, you can tune STRM to make sure no more offenses are created
due to this activity.
To tune reconnaissance activity using the false positive function:
The List of Events appears for the selected offense.
Step 2 Select the event with the source IP address known to be producing
reconnaissance activity.
Step 3 Click False Positive.
The False Positive window appears with information derived from the selected
event.
Category Offense Investigation Guide
Page 52

46 MALWARE OFFENSES
Step 4 Select the necessary event properties to tune as a false positive. In the case of a
malware offense, select the type of event and the event high-level category, which
is creating the false positive malware offense.
For additional information on using the False Positive tuning function, see the
STRM Users Guide.
Step 5 Click Tune.
STRM will no longer create additional offenses for this source IP address when
performing normal VA or network management tasks.
Category Offense Investigation Guide
Page 53

8
NETWORK ANOMALIES OFFENSES
This chapter provides information on an network anomaly offenses including:
• What is an Network Anomaly Offense?
• How do I Investigate a Network Anomaly Offense
• How do I Tune a Network Anomaly Offense?
What is an Network
Anomaly Offense?
Policy Using the Network Surveillance interface, you can configure policy sentries with
Network anomaly offenses are generated using Network Behavior Anomaly
Detection (NBAD) and occur if STRM is receiving flow data (for example, NetFlow,
sFlow, or J-Flow) or monitoring the network using a SPAN or TAP. There are four
types of network anomaly offenses:
• Policy
• Threshold
• Anomaly
• Behavior
Note: For more information on sentries, see Managing Sentries in the STRM
Users Guide.
the auto-learn policy option enabled. This type of sentry learns what services are
present in an area of the network and sends an alert when a new sentry is
detected. Once the services have been learned, any new services continue to alert
until the sentry generates another alert. If you wish to apply a policy sentry that
adjusts to changes in traffic over time, see Anomaly.
By default, STRM does not include any auto-learn policy sentries, so you must
create a policy sentry with the auto-learn policy enabled if you wish to monitor this
type of traffic.
Threshold A threshold offense includes time series flow data being above, below, or outside
the range (threshold) being monitored. You can create a threshold sentry to
monitor activity, such as, high bandwidth on a particular link or monitoring above
noise of a certain type of suspicious traffic. By default, STRM includes several
Category Offense Investigation Guide
Page 54

48 NETWORK ANOMALIES OFFENSES
threshold sentries, however, we recommend that you edit the value of the
threshold sentries to values that meet the needs of your network.
Anomaly An anomaly based offense includes changes in the amount of time particular
services or networks are active. This includes three states:
• Detection of services, such as a mail server being installed in the Demilitarized
Zone (DMZ) or FTP being installed on a server that has not previously included
FTP.
• Detecting failed services, for example, a web server that is active 100% of the
time stops responding to communications.
• Monitoring for change in the activity level of commonly used services. For
example, if your network includes a corporate mail server that has SSH
installed but is only used a few times a week. Then, if a user attempts to exploit
the mail server and starts using the SSH service, an alert generates and an
offense is created.
Behavior Behavior offenses includes changes in rate or volume levels at a particular time of
day on a certain day of the week. For example, the level of an alert that activates at
2 am when traffic is low is very different than an alert for traffic at 3 pm when traffic
volume is much higher. This makes it much harder for a malicious user to trick or
train the learning system.
How do I
Investigate a
Network Anomaly
Offense
Step 1 Click the Offense Manager tab.
Step 2 Click By Category from the navigation menu.
These offenses detects issues, such as, mail viruses that leverages the corporate
SMTP in the middle of the night or a slow increase in Syn traffic. Behavior offenses
also alert to abnormal decreases in traffic as well, which may represent failed
backups or if a web server stops responding.
To investigate a network anomaly offense:
The Offense Manager window appears.
The By Category view appears displaying high-level categories. The counts for
each category are accumulated from the values in the low-level categories.
Hint: Only low-level categories with associated offenses appear with an arrow.
You can click the arrow to view the associated low-level categories. If you wish to
view all categories, click Show Inactive Categories.
Category Offense Investigation Guide
Page 55

How do I Investigate a Network Anomaly Offense 49
Step 3 To view additional low-level category information for the Network Anomalies
category, click the arrow icon next to Network Anomalies.
Step 4 Double-click any low-level category to view the list of associated offenses.
The list of offenses appear.
Step 5 Double-click the offense you wish to view.
The details panel appears.
Category Offense Investigation Guide
Page 56

50 NETWORK ANOMALIES OFFENSES
Step 6 Click the At Time of Alert graph to investigate the flows creating this offense.
Step 7 Click the graph to zoom in on the information.
Step 8 Click the legend with the corresponding color to isolate the problem.
Step 9 Click on the lower half of the graph.
Step 10 In the Pivot To Box, click By Networks to further investigate the network location
of the issue.
Step 11 In the View Flows Box, click Full.
Step 12 Click the portion of the graph you wish to investigate.
Step 13 In the table, click an IP address to further investigate the traffic for the host.
How do I Tune a
Network Anomaly
Offense?
If you determine that the suspicious activity is normal and STRM is creating false
positive offenses, you ca n tu ne STR M t o make sure no more offenses are created
due to this activity.
If you are monitoring an area of the network and need to remove a host from the
profile, you must add the host to a different network object and then remove that
object before applying the sentry. This action removes that host from the profile. If
the exception is complete, you may need to create an object in a view and remove
that as object as well.
Also, when creating a behavioral sentry, we recommend that you select the Test
Objects as Group check box.
For more information on STRM sentries, see the STRM Administration Guide.
Category Offense Investigation Guide
Page 57

9
POLICY OFFENSES
This chapter provides information on policy offenses including:
• What is a Policy Offense?
• How do I Investigate a Policy Offense?
• How do I Tune a Policy Offense?
• How Can I Verify That STRM is Receiving Valid Offenses?
What is a Policy
Offense?
How do I
Investigate a Policy
Offense?
Step 1 Click the Offense Manager tab.
Step 2 Click By Category from the navigation menu.
Policy offenses include correlated events that may constitute violations of security
policy, misuse, or wasted resources. This may include Peer-to-Peer (P2P) traffic,
instant messaging traffic, gaming, potential information leaks, or suspicious web
browsing activity. You can configure STRM to adhere to your company policy and
create offenses on traffic that you consider outside your policy.
To investigate a policy offense:
The Offense Manager window appears.
The By Category view appears displaying high-level categories. The counts for
each category are accumulated from the values in the low-level categories.
Hint: Only low-level categories with associated offenses appear with an arrow.
You can click the arrow to view the associated low-level categories. If you wish to
view all categories, click Show Inactive Categories.
Category Offense Investigation Guide
Page 58

52 POLICY OFFENSES
Step 3 To view additional low-level category information for the Policy category, click the
arrow icon next to Policy
Step 4 Double-click any low-level category to view the list of associated offenses.
The list of offenses appear.
Step 5 Double-click the offense you wish to view.
The details panel appears.
Category Offense Investigation Guide
Page 59

How do I Investigate a Policy Offense? 53
Step 6 View the Attacker Summary box to understand the attacker:
• Location - Allows you to determine if the attacker is local or remote:
- Local - This field specifies the network (group) in which it is located.
- Remote - This field specifies the geographic location of the attacker, for
example, Asia. We recommend that you investigate the traffic from the
remote source IP address to make sure that your firewalls are probably
configured to block any threatening traffic. If firewall logs are being sent to
STRM, use the Event Viewer to investigate firewall logs to make sure it is
probably configured. For more information on the Event Viewer, see the
STRM Users Guide.
• User - If the attacker is local or a VPN user and STRM is receiving user identity
logs, this field indicates user identity information. This allows you identify the
user who is the source of the traffic. To obtain further information about the
user, right-click on the IP address in the Description field to access additional
menu options. From the menu, select use the Select Information > Asset
Profile. The Asset Profile window allows you to determine additional
information regarding the identify of the source user. You can also select
Information > DNS Lookup or WHOIS Lookup to further investigate the user
associated with the attacker IP address.
Step 7 Once you have identified the user associated with an IP address, contact your
system administrator to determine the appropriate action. You can use several
methods to determine the user associated with an IP address. For example, you
can use Windows active directory event logs, VPN authentication logs, or the
Windows nbstat command.
Step 8 View the Top 10 Events box. This box contains the top 10 events that contributed
to this offense. To view all events, click Events.
Category Offense Investigation Guide
Page 60

54 POLICY OFFENSES
Step 9 Once you have determined the impact of the offense, you must perform the
Step 10 Once you are satisfied that you have resolved the offense, you can close or hide
necessary steps to rectify the source of the activity. If you have determined this
behavior is normal, you can tune STRM to no longer detect this activity. For more
information, see How do I Tune a Policy Offense?.
the offense.
For more information on closing or hiding an offense, see the STRM Users Guide.
How do I Tune a
Policy Offense?
Tuning Using False
Positive Function
If you determine that the policy activity is normal and STRM is creating false
positive offenses, you ca n tu ne STR M t o make sure no more offenses are created
due to this activity.
You can tune STRM using one of the following methods:
• Tuning Using False Positive Function
• Tuning Using Custom Rules Wizard
To tune policy activity using the false positive function:
Step 1 In the offense details interface, click Events.
The List of Events appears.
Step 2 Select the event that includes the known source IP addr ess that is reported to
produce suspicious activity.
Step 3 Click False Positive.
The False Positive window appears with information derived from the selected
event.
Category Offense Investigation Guide
Page 61

How Can I Verify That STRM is Receiving Valid Offenses? 55
Step 4 Select the necessary event properties to tune as a false positive.
Step 5 Click Tune.
STRM will no longer create additional offense for this source IP address when this
type of activity occurs.
T uning Using Custo m
Rules Wizard
How Can I Verify
That STRM is
Receiving Valid
Offenses?
Step 1 If an expected policy violation did not occur, verify that the appropriate rules and
Step 2 Verify that the appropriate rules are enabled with other security devices, as
Step 3 Using the Event Viewer, verify that the low-level policy events were received and
You can use the Custom Rules wizard in the Offense Manager to create a building
block that includes the IP address(es) or CIDRs that you wish to exclude from
creating policy offenses. This allows you to suppress policy offenses for groups of
IP addresses. For more information on using the Custom Rules Wizard, see the
STRM Administration Guide.
By default, only P2P events cause the creation of a policy offense. You can enable
other types of policy offenses to create offenses if those behaviors constitute policy
violations on your network. To verify valid offense creation:
sentries are enabled. For more information on enabling rules and sentries, see the
STRM Administration Guide.
appropriate.
processed by STRM or from other security devices.
Category Offense Investigation Guide
Page 62

Page 63

10
POTENTIAL EXPLOIT OFFENSES
This chapter provides information on potential exploit offenses including:
• What is a Potential Exploit Offense?
• How do I Investigate a Potential Exploit Offense?
• How do I Tune a Potential Exploit Offense?
What is a Potential
Exploit Offense?
How do I
Investigate a
Potential Exploit
Offense?
Step 1 Click the Offense Manager tab.
Step 2 Click By Category from the navigation menu.
Potential exploit offenses may be generated from many different sources, such as,
a custom rule created in STRM or from an Intrusion Detection System
(IDS)/Intrusion Prevention System (IPS) product with a high false positive prone
signature. If offenses are categorized as potential exploits, we recommend that
you investigate the users associated with the offense to validate the authenticity of
the offense.
This section provides information on further investigating a potential exploit
offense.
To investigate a potential exploit offenses:
The Offense Manager window appears.
The By Category view appears displaying high-level categories. The counts for
each category are accumulated from the values in the low-level categories.
Hint: Only low-level categories with associated offenses appear with an arrow.
You can click the arrow to view the associated low-level categories. If you wish to
view all categories, click Show Inactive Categories.
Category Offense Investigation Guide
Page 64

58 POTENTIAL EXPLOIT OFFENSES
Step 3 T o view additional low-level category information for the Potential Exploit category,
click the arrow icon next to Potential Exploit.
Step 4 Double-click any low-level category to view the list of associated offenses.
The list of offenses appear.
Step 5 Double-click the offense you wish to view.
The details panel appears.
Step 6 View the Attacker Summary box to understand the attacker:
• Location - Allows you to determine if the attacker is local or remote:
- Local - This field specifies the network (group) in which it is located.
- Remote - This field specifies the geographic location of the attacker, for
example, Asia. We recommend that you investigate the traffic from the
Category Offense Investigation Guide
Page 65

How do I Tune a Potential Exploit Offense? 59
remote source IP address to make sure that your firewalls are probably
configured to block any threatening traffic. If firewall logs are being sent to
STRM, use the Event Viewer to investigate firewall logs to make sure it is
probably configured. For more information on the Event Viewer, see the
STRM Users Guide.
• User - If the attacker is local or a VPN user and STRM is receiving user identity
logs, this field indicates user identity information. This allows you identify the
user who is the source of the suspicious traffic. To obtain further information
about the user, right-click on the IP address in the Description field to access
additional menu options. From the menu, select use the Select Information >
Asset Profile. The Asset Profile window allows you to determine additional
information regarding the identify of the source user.
Step 7 View the Annotations box and locate any CRE Event annotation, which means that
this offense is the result of a custom rule created for STRM. The annotations for an
offense describes the offense details and the reasons for investigating this offense.
For example, an annotation may indicate that a system, which is not known to be a
DNS server, communicates to a DNS server outside the customer networks. The
annotations for this offense explains that many bots that get installed on client
hosts have a built in DNS client to avoid DNS-based remediation techniques and
that you should investigate this communication.
Step 10 Once you have resolved the offense, close or hide the offense.
How do I Tune a
Potential Exploit
Offense?
Step 8 View the Annotations box and locate any real-time flow analysis annotation, which
describes the behavior of the host or other exploit attempts from the same
attacker. This type of annotation occurs when the offense is generated by IDS or
IPS products.
Step 9 Once you have determined the impact of the offense, you must either block the
source of the scan, patch or shut down services on the appropriate systems, then
take the desired action against the offense.
For more information on closing or hi ding an offense, see the STRM Users Guide.
If you determine that the potential exploit activity is normal and STRM is creating
false positive offenses, you can tune STRM to make sure no more offenses are
created due to this activity.
To tune potential exploit activity using the false positive function:
Step 1 In the offense details interface, click Events.
The List of Events appears for the selected offense.
Category Offense Investigation Guide
Page 66

60 POTENTIAL EXPLOIT OFFENSES
Step 2 Select the event with the source IP address known to be producing this activity.
Step 3 Click False Positive.
The False Positive window appears with information derived from the selected
event.
Step 4 Select the necessary event properties to tune as a false positive.
For additional information on using the False Positive tuning function, see the
STRM Users Guide.
Step 5 Click Tune.
STRM will no longer create additional offenses for this source IP address when
performing normal VA or network management tasks.
Category Offense Investigation Guide
Page 67

11
RECONNAISSANCE OFFENSES
This chapter provides information on reconnaissance offenses including:
• What is Reconnaissance?
• How do I Investigate a Reconnaissance Offense?
• How do I Tune a Reconnaissance Offense?
What is
Reconnaissance?
What is Network
Reconnaissance?
What is a
Reconnaissances
Offense?
STRM detects reconnaissance activity, which is the first step in thwarting and
blocking serious network attacks. This section provides additional information
regarding reconnaissance including:
• What is Network Reconnaissance?
• What is a Reconnaissances Offense?
Malicious users (attackers) use network reconnaissance to obtain information
about your network’s vulnerabilities with malicious and exploitive intentions.
Network reconnaissance can provide malicious users with a significant amount of
detail regarding your network including:
• Potential targets within your network.
• Target information, such as, vulnerabilities (open ports and services) and
operating systems.
• Potential vulnerabilities (holes) in your security. For example, if your firewalls
are configured improperly.
• Network topology.
When STRM detects reconnaissance activity , a reconnaissance offense is created.
STRM is able to detect many different methods that attackers use to scan and
probe a network. STRM also combines network flow and event correlation for a
comprehensive view of the network. By examining network traffic, STRM may
detect scanning and probing activity by analyzing flow behavior. Typically,
attackers attempt to remain undetected by using a lower frequency and scan
intensity, perhaps only scanning a small number of hosts over a long period of
time. STRM detects low, medium, and high intensity scans by monitoring a single
source IP address attempting to connect to an abnormal amount of target hosts
over a long period of time.
Category Offense Investigation Guide
Page 68

62 RECONNAISSANCE OFFENSES
If reconnaissance activity from a specific attacker is followed by an exploit attack,
STRM correlates this information to the offense to provide full details of the
attacks.
How do I
Investigate a
Reconnaissance
Offense?
This section provides information on further investigating a reconnaissance
offense.
To investigate a reconnaissance offenses:
Step 1 Click the Offense Manager tab.
The Offense Manager window appears.
Step 2 Click By Category from the navigation menu.
The By Category view appears displaying high-level categories. The counts for
each category are accumulated from the values in the low-level categories.
Hint: Only low-level categories with associated offenses appear with an arrow.
You can click the arrow to view the associated low-level categories. If you wish to
view all categories, click Show Inactive Categories.
Step 3 To view additional low-level category information for the Recon categ ory, click the
arrow icon next to Recon.
Step 4 Double-click any low-level category to view the list of associated offenses.
Category Offense Investigation Guide
Page 69

How do I Investigate a Reconnaissance Offense? 63
The list of offenses appear.
Step 5 Double-click the offense you wish to view.
The details panel appears.
Step 6 View the Attacker Summary box to understand the attacker:
• Location - Allows you to determine if the attacker is local or remote:
- Local - This field specifies the network (group) in which it is located.
- Remote - This field specifies the geographic location of the attacker, for
example, Asia. We recommend that you investigate the traffic from the
remote source IP address to make sure that your firewalls are probably
configured to block any threatening traffic. If firewall logs are being sent to
STRM, use the Event Viewer to investigate firewall logs to make sure it is
probably configured. For more information on the Event Viewer, see the
STRM Users Guide.
• User - If the attacker is local or a VPN user and STRM is receiving user identity
logs, this field indicates user identity information. This allows you identify the
user who is the source of the suspicious traffic. To obtain further information
about the user, right-click on the IP address in the Description field to access
additional menu options. From the menu, select use the Select Information >
Asset Profile. The Asset Profile window allows you to determine additional
information regarding the identify of the source user.
If the activity is normal (for example, scanning originating from a known
vulnerability scanner or network management system that may be probing the
network with SNMP traffic) then you can use the Rules function in the Offense
Manager to tune out this activity. For more information, see How do I Tune a
Reconnaissance Offense?.
Step 7 In the Attacker Summary box, place your mouse over the Magnitude bar. If the VA
Risk value is greater than 0, we recommend that you investigate the target to
Category Offense Investigation Guide
Page 70

64 RECONNAISSANCE OFFENSES
determine if the target responded to the scan. A scan is worth investigating if it
receives a reply. This may indicate the initial behavior of a worm or an employee
operating an unauthorized VA scanner.
Step 8 Click Events.
The List of Events appears for the selected offense.
The Device column provides the device that detected the event. If multiple devices
are reporting similar events, the credibility value for this offense increases.
Step 9 To further investigate the target, right-click on an IP address in the Source column.
The right-click menu appears.
Step 10 Select Information > Asset Profile.
The Asset Profile appears.
Category Offense Investigation Guide
Page 71

How do I Tune a Reconnaissance Offense? 65
Step 11 Once you have determined the impact of the offense, you must either block the
source of the scan, patch or shut down services on the appropriate systems, then
take the desired action against the offense.
Step 12 Once you have resolved the offense, close or hide the offense.
How do I Tune a
Reconnaissance
Offense?
Tuning Using False
Positive Function
For more information on closing or hi ding an offense, see the STRM Users Guide.
If you determine that the reconnaissance activity is normal and STRM is creating
false positive offenses, you can tune STRM to make sure no more offenses are
created due to this activity.
You can tune STRM using one of the following methods:
• Tuning Using False Positive Function
• Tuning Using Custom Rules Wizard
To tune reconnaissance activity using the false positive function:
Step 1 In the reconnaissance offense details interface, click Events.
The List of Events appears for the selected offense.
Category Offense Investigation Guide
Page 72

66 RECONNAISSANCE OFFENSES
Step 2 Select the event with the source IP address known to be producing
reconnaissance activity.
Step 3 Click False Positive.
The False Positive window appears with information derived from the selected
event.
Step 4 Select the necessary event properties to tune as a false positive.
For example, in the window above, the Events with specific QID option is selected
to tune the specific IP address and the event high-level category that is creating
the false positive reconnaissance event.
For additional information on using the False Positive tuning function, see the
STRM Users Guide.
Category Offense Investigation Guide
Page 73

How do I Tune a Reconnaissance Offense? 67
Step 5
T uning Using Custo m
Rules Wizard
Step 1 In the navigation bar of the Offense Manager, click Rules.
Click Tune.
STRM will no longer create additional offenses for this source IP address when
performing normal VA or network management tasks.
To tune reconnaissance activity using th e custom rules wizard:
The Rules interface appears.
Step 2 Using the Display drop-down list box, select Building Blocks.
Step 3 In the Block Name list, locate the Default-BB-HostDefinition: VA Scanner
Source IP building block.
Step 4 Click Edit.
The Rules Wizard appears.
Category Offense Investigation Guide
Page 74

68 RECONNAISSANCE OFFENSES
Step 5 In the Building Block section, click the IP address that appears.
A configuration window appears.
Step 6 In the Enter an IP address or CIDR and click ‘Add’ field, enter the IP address of
the VA scanner or IP address that is producing false positives.
Step 7 Click Add.
Step 8 Repeat for all VA scanners or IP address(es).
Step 9 Click Submit.
Step 10 Complete the rules wizard.
For more information on using the Custom Rules Wizard, see the STRM
Administration Guide.
Category Offense Investigation Guide
Page 75

12
SUSPICIOUS ACTIVITY OFFENSES
This chapter provides information on a suspicious attack including:
• What is a Suspicious Attack?
• How do I Investigate Suspicious Offense
• How do I Tune a Suspicious Offenses?
What is a
Suspicious Attack?
What is Suspicious
Traffic?
What is a Suspicious
Offense?
This section provides information on a suspicious attack including:
• What is Suspicious Traffic?
• What is a Suspicious Offense?
STRM detects suspicious activity, which is security events, patterns of security
events, or network flows that have been classified as suspicious and may
represent a potential threat to the network. A potential threat is traffic that may
include a virus, potential vulnerability, or potential unauthorized access. Many
devices, such as IDSs, report events when suspicious packets are detected. For
example, STRM should not detect data on a SYN packet. STRM also monitors for
patterns of events that may be considered suspicious, such as multiple log in
failures by the same source IP address followed by a successful log in. When
STRM detects these types of events, a suspicious offense is created.
STRM performs several tests on suspicious events and network flows prior to
creating a suspicious off e nse to rule out false positives. Suspicious events and
flows are correlated into an offense based on the results of the STRM correlation
rules.
For example, STRM considers the following questions when analyzing suspicious
traffic and events:
• What is the event rate?
• Who is the attacker (source IP address)?
• Who are the targets (destination IP addresses)?
• Are the targets vulnerable?
• Are there any patterns in the events or flows that can be suspicious?
Category Offense Investigation Guide
Page 76

70 SUSPICIOUS ACTIVITY OFFENSES
What is the event rate?
STRM profiles the event rate for a device to determine the normal and abnormal
rate for a device. If STRM detects a sudden increase in event rate from a device,
or related to a specific source IP address, an offense is created.
Who is the attacker (source IP address)?
STRM profiles attackers and maintains a historical record of all detected attackers.
For each attacker, the following information is recorded:
• Types of offenses in which these attackers were involved
• Targets attacked
• Potential of threat for this source IP address.
If the source IP address of the suspicious activity is known as a threat, STRM
creates an offense.
Who are the targets (destination IP addresses)?
You can associate weights (value) to hosts, such as mission critical business
servers. This weight allows you to tu n e STRM to create an offense when any type
of threatening or suspicious traffic is directed at a critical business asset with high
asset weighting.
How do I
Investigate
Suspicious Offense
Step 1 Click the Offense Manager tab.
Step 2 Click By Category from the navigation menu.
Are the targets vulnerable?
If STRM receives suspicious events, the asset profile database co rrelates
vulnerability assessment data and passive host profile data to correlate if the target
has a vulnerability to the suspicious activity.
Are there any patterns in the events or flows that can be suspicious?
STRM’s correlation rules searches for patterns of behavior that may be a potential
threat, such as multiple log in failures followed by a successful log in.
To investigate a suspicious offense:
The Offense Manager window appears.
The By Category view appears displaying high-level categories. The counts for
each category are accumulated from the values in the low-level categories.
Hint: Only low-level categories with associated offenses appear with an arrow.
You can click the arrow to view the associated low-level categories. If you wish to
view all categories, click Show Inactive Categories.
Category Offense Investigation Guide
Page 77

How do I Investigate Suspicious Offense 71
Step 3 To view additional low-level category information for the Suspicious Activity
category , click the arrow icon next to Suspicious Activity.
Step 4 Double-click any low-level category to view the list of associated offenses.
The list of offenses appear.
Step 5 Double-click the offense you wish to view.
The details panel appears.
Category Offense Investigation Guide
Page 78

72 SUSPICIOUS ACTIVITY OFFENSES
Step 6 View the Description field and determine the suspicious activity associated with
this offense. This may include multiple types of activity.
Step 7 View the Attacker Summary box to understand the attacker:
• Location - Allows you to determine if the attacker is local or remote:
- Local - This field specifies the network object (group) in which it is located.
- Remote - This field specifies the geographic location of the attacker, for
example, Asia. We recommend that you investigate the traffic from the
remote source IP address to make sure that your firewalls are probably
configured to block any threatening traffic. If firewall logs are being sent to
STRM, use the Event Viewer to investigate firewall logs to make sure it is
probably configured. For more information on the Event Viewer, see the
STRM Users Guide.
• User - If the attacker is local or a VPN user and STRM is receiving user identity
logs, this field indicates user identity information. This allows you identify the
user who is the source of the suspicious traffic. To obtain further information
about the user, right-click on the IP address in the Description field to access
additional menu options. From the menu, select use the Select Information >
Asset Profile. The Asset Profile window allows you to determine additional
information regarding the identify of the source user.
Step 8 View the Top 10 Events box to view the most severe events correlated to this
offense. This box provides a view of the type of events that are being correlated to
the offense, the devices from which event are being received, and the detailed
event names.
Category Offense Investigation Guide
Page 79

How do I Tune a Suspicious Offenses? 73
Step 9 If this offense includes local targets, the Top 5 Local Targets box appears. This box
displays the top 5 destination IP addresses associated with this offense. Targets
are rated based on their overall magnitude, which takes into consideration th e
severity of the overall offense, if the target is vulnerable, or if the asset has been
assigned a high weight value (indicating that this is a critical business asset). This
box allows you to determine the overall impact of this offense on your network
since you are able to determine if the host is being targeted.
Step 10 If you determine that the observed activity is not normal, click Flows to further
investigate the events and network flows correlated to the offense to further
understand all suspicious activity.
The Flow Search window appears to view the network flows for this offense. This
provides you with a detailed view of the communications for the attacker on your
network and allow you to visually identify unacceptable behavior.
Step 11 From the Format box, select Flow > Unioned flows.
A comprehensive view of the flow data appears. If the Flow Collector is deployed,
you can use the actual content from the flows for forensic investigation.
Step 12 In the Offense Summary details panel, view the Top 10 Events box. This box
provides detailed information on the most severe events correlated to this offense
such as the reporting device, destination IP address, severity, and when STRM
first received the event. If you wish to view additional events, click Events to
view all events.
How do I Tune a
Suspicious
Offenses?
Step 13 Once you have determined the impact of the offense, you must perform the
necessary steps to rectify the source of the suspicious traffic. If you have
determined this behavior is normal, you can tune STRM to no longer detect this
activity. For more information, see How do I Tune a Suspicious Offenses?.
Step 14 Once you are satisfied that you have resolved the offense, you can close or hide
the offense.
For more information on closing or hi ding an offense, see the STRM Users Guide.
If you determine that the suspicious activity is normal and STRM is creating false
positive offenses, you can tune STRM to make sure no more offenses are created
due to this activity.
To tune suspicious offenses using the false positive function:
Step 1 In the offense details interface, click Categories.
The category details appear.
Category Offense Investigation Guide
Page 80

74 SUSPICIOUS ACTIVITY OFFENSES
Step 2 In the List of Event Categories, double-click the related category to display
associated events.
Step 3 Select the event that includes the known source IP addr ess that is reported to
produce suspicious activity.
Step 4 Click False Positive.
The False Positive window appears with information derived from the selected
event.
Step 5 Select the necessary event properties to tune as a false positive.
For example, in the window above, the source IP address and the event high-level
category that is creating the false positive suspicious offense. For additional
information on using the False Positive tuning function, see the STRM Users
Guide.
Step 6 Click Tune.
Category Offense Investigation Guide
Page 81

How do I Tune a Suspicious Offenses? 75
STRM will no longer create additional offense for this source IP address when this
type of activity occurs.
Category Offense Investigation Guide
Page 82

Page 83

13
SYSTEM OFFENSES
This chapter provides information on system offenses including:
• What is a System Offense?
• How do I Investigate a System Offense?
• How do I Tune a System Offense?
What is a System
Offense?
How do I
Investigate a
System Offense?
Step 1 Click the Offense Manager tab.
Step 2 Click By Category from the navigation menu.
An important component of a network security solution is monitoring the health
status of the hosts and connected devices. The possibility of a critical network
device or vital component of your network malfunctioning is a serious threat to your
network’s security. STRM monitors system logs from security devices, network
devices, and host computers.
STRM generates a system offense when a host or device on your network reaches
a critical system state. By analyzing system logs from all supported devices, STRM
can accurately determine when a system has reached a critical state, potentially
leaving the network vulnerable or inoperable.
To investigate a system offense:
The Offense Manager window appears.
The By Category view appears displaying high-level categories. The counts for
each category are accumulated from the values in the low-level categories.
Hint: Only low-level categories with associated offenses appear with an arrow.
You can click the arrow to view the associated low-level categories. If you wish to
view all categories, click Show Inactive Categories.
Offense Category Investigation Guide
Page 84

78 SYSTEM OFFENSES
Step 3 T o view additional low-level category information for the System category, click the
arrow icon next to System.
Step 4 Double-click any low-level category to view the list of associated offenses.
The list of offenses appear.
Step 5 Double-click the offense you wish to view.
The details panel appears.
Offense Category Investigation Guide
Page 85

How do I Investigate a System Offense? 79
Step 6
View the Attacker Summary box to understand the attacker:
• Location - Allows you to determine if the attacker is local or remote:
- Local - This field specifies the network (group) in which it is located.
- Remote - This field specifies the geographic location of the attacker, for
example, Asia. We recommend that you investigate the traffic from the
remote source IP address to make sure that your firewalls are probably
configured to block any threatening traffic. If firewall logs are being sent to
STRM, use the Event Viewer to investigate firewall logs to make sure it is
probably configured. For more information on the Event Viewer, see the
STRM Users Guide.
• User - If the attacker is local or a VPN user and STRM is receiving user identity
logs, this field indicates user identity information. This allows you identify the
user who is the source of the traffic. To obtain further information about the
user, right-click on the IP address in the Description field to access additional
menu options. From the menu, select use the Select Information > Asset
Profile. The Asset Profile window allows you to determine additional
information regarding the identify of the source user.
When a system event occurs, the source and destination IP addresses may
indicate the same host. This host may have suffered a system error. For example,
a memory issue, configuration errors, or hardware issues.
Step 7 Once you determine the nature of the error, you must determine the root cause, for
example, user error, hardware failure, or an unexpected spike in traffic.
Offense Category Investigation Guide
Page 86

80 SYSTEM OFFENSES
Step 8 Once you determine the root cause of the error, notify the proper administrators to
Step 9 Once you are satisfied that you have resolved the offense, you can close or hide
rectify the situation. If you have determined this behavior is normal, you can tune
STRM to no longer detect this activity. For more information, see How do I Tune a
System Offense?.
the offense.
For more information on closing or hiding an offense, see the STRM Users Guide.
How do I Tune a
System Offense?
If you determine that the system activity is normal and STRM is creating false
positive offenses, you ca n tu ne STR M t o make sure no more offenses are created
due to this activity.
To tune system activity using the fa lse positive function:
Step 1 In the offense details interface, click Events.
The List of Events window appears.
Step 2 Select the event that includes the known source IP addr ess that is reported to
produce system activity.
Step 3 Click False Positive.
The False Positive window appears with information derived from the selected
event.
Step 4 Select the necessary event properties to tune as a false positive.
Step 5 Click Tune.
Offense Category Investigation Guide
Page 87

How Can I Verify That STRM is Receiving Valid Offenses? 81
STRM will no longer create additional offense for this source IP address when this
type of activity occurs.
How Can I Verify
That STRM is
Receiving Valid
Offenses?
By default, STRM generates system offenses as a result of multiple system errors
occurring within a specified time frame on the same host. If STRM detects system
errors occurring on your network that are not creating offenses, this is likely related
to the number of errors that have occurred or the time frame in which the errors
have occurred. To tune these values using the Custom Rule s Wizard:.
Step 1 In the navigation bar of the Offense Manager, click Rules.
The Rules interface appears.
Step 2 Using the Display drop-down list box, select All Deployed Rules.
Step 3 Locate the Default-Rule-System: Multiple System Errors rule.
Step 4 Click Edit.
The Rules Wizard appears.
Offense Category Investigation Guide
Page 88

82 SYSTEM OFFENSES
Step 5 In the Rule box, click the number that appears in the more than 10 times
statement.
Step 6 In the Enter a rule count field, enter the number that meets the needs of your
network.
Step 7 In the Rule box, click the number that appears in the within 3 minutes statement.
Step 8 Edit the time frame, as necessary
Step 9 Complete the rules wizard.
Offense Category Investigation Guide
Page 89

14
USER DEFINED OFFENSES
This chapter provides information on user defined offenses including:
• What is a User Defined Offense?
• How do I Investigate a User Defined Offense?
• How do I Tune a User Defined Offense?
What is a User
Defined Offense?
How do I
Investigate a User
Defined Offense?
Step 1 Click the Offense Manager tab.
Step 2 Click By Category from the navigation menu.
You can use many different tools, techniques, and strategies to protect your
network. The variety of techniques implemented by the numerous security devices
available makes defining network attacks and offenses an increasingly complex
task. STRM allows you to map events that do not belong to traditional event
categories as user defined offenses.
STRM generates a user defined offense when many user defined events are
detected by the system. You can define your own custom algorithm’s into the
system and map the resulting offenses to the user defined category. This allows
you to identify extraordinary or non-traditional network offenses.
To investigate a user defined offense:
The Offense Manager window appears.
The By Category view appears displaying high-level categories. The counts for
each category are accumulated from the values in the low-level categories.
Hint: Only low-level categories with associated offenses appear with an arrow.
You can click the arrow to view the associated low-level categories. If you wish to
view all categories, click Show Inactive Categories.
Offense Category Investigation Guide
Page 90

84 USER DEFINED OFFENSES
Step 3 To view additional low-level category information for the User Defined cate gory,
click the arrow icon next to User Defined.
Step 4 Double-click any low-level category to view the list of associated offenses.
The list of offenses appear.
Step 5 Double-click the offense you wish to view.
The details panel appears.
Offense Category Investigation Guide
Page 91

How do I Investigate a User Defined Offense? 85
Step 6
To investigate the attacker, view the Attacker Summary box:
• Location - Allows you to determine if the attacker is local or remote:
- Local - This field specifies the network (group) in which it is located.
- Remote - This field specifies the geographic location of the attacker, for
example, Asia. We recommend that you investigate the traffic from the
remote source IP address to make sure that your firewalls are probably
configured to block any threatening traffic. If firewall logs are being sent to
STRM, use the Event Viewer to investigate firewall logs to make sure it is
probably configured. For more information on the Event Viewer, see the
STRM Users Guide.
• User - If the attacker is local or a VPN user and STRM is receiving user identity
logs, this field indicates user identity information. This allows you identify the
user who is the source of the traffic. To obtain further information about the
user, right-click on the IP address in the Description field to access additional
menu options. From the menu, select use the Select Information > Asset
Profile. The Asset Profile window allows you to determine additional
information regarding the identify of the source user. You can also determine if
the user associated to the offense is a valid user on the device they are
attempting to access.
Step 7 Since user defined offenses are based on configurable user defined data, there
are a variety of methods for investigating these offenses. You must understand the
logic used to create the offense and inspect the network events associated with
this offense.
Offense Category Investigation Guide
Page 92

86 USER DEFINED OFFENSES
Step 8 Once you have determined the impact of the offense, you must perform the
necessary steps to rectify the source of the activity. If you have determined this
behavior is normal, you can tune STRM to no longer detect this activity. For more
information, see How do I Tune a User Defined Offense?.
Step 9 Once you are satisfied that you have resolved the offense, you can close or hide
the offense.
For more information on closing or hiding an offense, see Investigating Offenses in
the STRM Users Guide.
How do I Tune a
User Defined
Offense?
If you determine that the activity is normal and STRM is creating false positive
offenses, you can tune STRM to make sure no more offenses are created due to
this activity.
To tune reconnaissance activity using the custom rules wizard:
Step 1 In the navigation bar of the Offense Manager, click Rules.
The Rules interface appears.
Step 2 Click New Event Rule.
Offense Category Investigation Guide
Page 93

How do I Tune a User Defined Offense? 87
Step 3
Use the available rules and building blocks to create the required logic necessary
to generate the offense.
Step 4 Click Next.
Step 5 The Rules Response Window appears.
Step 6 Select the Dispatch New Events check box.
Additional optional appears.
Step 7 From the High-Level Category drop-down list box, select User Defined.
Step 8 Select the Ensure the dispatched event is part of an offense check box.
Offense Category Investigation Guide
Page 94

88 USER DEFINED OFFENSES
Step 9 Complete the rules wizard.
For more information on using the Custom Rules Wizard, see the STRM
Administration Guide.
Offense Category Investigation Guide
 Loading...