

Page 1

Juniper Secure Analytics Installation Guide
Published
2021-03-26
Release
7.4.1
Page 2

Juniper Networks, Inc.
1133 Innovation Way
Sunnyvale, California 94089
USA
408-745-2000
www.juniper.net
Juniper Networks, the Juniper Networks logo, Juniper, and Junos are registered trademarks of Juniper Networks, Inc. in
the United States and other countries. All other trademarks, service marks, registered marks, or registered service marks
are the property of their respective owners.
Juniper Networks assumes no responsibility for any inaccuracies in this document. Juniper Networks reserves the right
to change, modify, transfer, or otherwise revise this publication without notice.
Juniper Secure Analytics Installation Guide
7.4.1
Copyright © 2021 Juniper Networks, Inc. All rights reserved.
The information in this document is current as of the date on the title page.
ii
YEAR 2000 NOTICE
Juniper Networks hardware and software products are Year 2000 compliant. Junos OS has no known time-related
limitations through the year 2038. However, the NTP application is known to have some difficulty in the year 2036.
END USER LICENSE AGREEMENT
The Juniper Networks product that is the subject of this technical documentation consists of (or is intended for use with)
Juniper Networks software. Use of such software is subject to the terms and conditions of the End User License Agreement
(“EULA”) posted at https://support.juniper.net/support/eula/. By downloading, installing or using such software, you
agree to the terms and conditions of that EULA.
Page 3

Table of Contents
1
About the Documentation | vii
Documentation and Release Notes | vii
Documentation Conventions | vii
Documentation Feedback | x
Requesting Technical Support | x
Self-Help Online Tools and Resources | xi
Creating a Service Request with JTAC | xi
JSA Deployment Overview
JSA Deployment Overview | 13
iii
Management Controller | 13
License Keys | 14
JSA Components | 14
Prerequisite Hardware Accessories for JSA Installations | 17
Hardware Accessories | 17
Environmental Restrictions | 17
Supported Web Browsers | 18
USB Flash Drive Installations | 18
Supported Versions | 19
Installation Overview | 19
Creating a Bootable USB Flash Drive with Microsoft Windows | 19
Creating a Bootable USB Flash Drive on an Apple Mac OS X System | 20
Creating a Bootable USB Flash Drive with Red Hat Linux | 21
Installing JSA with a USB Flash Drive | 22
Standard Linux Users | 23
Third-party Software on JSA Appliances | 26
Page 4

Bandwidth for Managed Hosts
2
3
4
5
Bandwidth for Managed Hosts | 29
Installing a JSA Console or Managed Host
Installing a JSA Console or Managed Host | 31
Installing a JSA Console or Managed Host (applicable only for JSA 7.3.1 Patch 9, JSA
7.3.2 Patch 2, and JSA 7.3.2 Patch 3) | 33
Virtual Appliance Installations for JSA and Log Manager
Virtual Appliance Installations for JSA and Log Manager | 37
Overview Of Supported Virtual Appliances | 38
JSA Threat Analytics “All-in-one” or Console 3199 | 38
JSA Event and Flow Processor Combo | 39
iv
JSA Flow Processor Virtual 1799 | 39
JSA Event Processor Virtual 1699 | 40
JSA Event Collector Virtual 1599 | 40
JSA Flow Processor | 40
JSA Flow Processor Virtual 1299 | 41
JSA Vulnerability Manager Processor | 41
JSA Vulnerability Manager Scanner | 42
JSA Risk Manager | 42
JSA App Host 4000 | 42
System Requirements for Virtual Appliances | 42
Storage Requirements | 47
Creating Your Virtual Machine | 48
Installing JSA on a Virtual Machine | 49
Adding Your Virtual Appliance to Your Deployment | 51
Installations from the Recovery Partition
Installations from the Recovery Partition | 54
Reinstalling from the Recovery Partition | 54
Page 5

Reinstalling JSA from Media
6
7
8
9
10
Reinstalling JSA from Media | 57
Data Node Overview
Data Node Overview | 59
JSA Software Installations (applicable only for JSA 7.3.1 Patch 9, JSA 7.3.2 Patch 2, and
JSA 7.3.2 Patch 3) | 62
Prerequisites for Installing JSA on Your Hardware | 62
Appliance Storage Requirements for Virtual and Software Installations | 65
Installing RHEL on Your System | 66
Linux Operating System Partition Properties for JSA Installations on Your Own System | 67
Console Partition Configurations for Multiple Disk Deployments | 68
Installing JSA After the RHEL Installation | 69
v
Configuring Bonded Management Interfaces
Configuring Bonded Management Interfaces | 73
Network Settings Management
Network Settings Management | 75
Changing the Network Settings in an All-in-one System | 75
Changing the Network Settings Of a JSA Console in a Multi-system Deployment | 76
Updating Network Settings After a NIC Replacement | 78
Troubleshooting Problems
Troubleshooting Problems | 82
Troubleshooting Resources | 83
JSA Log Files | 83
Common Ports and Servers Used by JSA | 84
SSH Communication on Port 22 | 84
Open Ports That Are Not Required by JSA | 84
Page 6

JSA Port Usage | 85
WinCollect Remote Polling | 85
JSA Listening Ports | 85
Viewing IMQ Port Associations | 97
Searching for Ports in Use by JSA | 98
JSA Public Servers | 98
Public Servers | 98
RSS Feeds for JSA Products | 99
vi
Page 7
About the Documentation
IN THIS SECTION
Documentation and Release Notes | vii
Documentation Conventions | vii
Documentation Feedback | x
Requesting Technical Support | x
Use this guide to understand how to install JSA in your network.
vii
Documentation and Release Notes
To obtain the most current version of all Juniper Networks®technical documentation, see the product
documentation page on the Juniper Networks website at https://www.juniper.net/documentation/.
If the information in the latest release notes differs from the information in the documentation, follow the
product Release Notes.
Juniper Networks Books publishes books by Juniper Networks engineers and subject matter experts.
These books go beyond the technical documentation to explore the nuances of network architecture,
deployment, and administration. The current list can be viewed at https://www.juniper.net/books.
Documentation Conventions
Table 1 on page viii defines notice icons used in this guide.
Page 8

Table 1: Notice Icons
viii
DescriptionMeaningIcon
Indicates important features or instructions.Informational note
Caution
Indicates a situation that might result in loss of data or hardware
damage.
Alerts you to the risk of personal injury or death.Warning
Alerts you to the risk of personal injury from a laser.Laser warning
Indicates helpful information.Tip
Alerts you to a recommended use or implementation.Best practice
Table 2 on page viii defines the text and syntax conventions used in this guide.
Table 2: Text and Syntax Conventions
ExamplesDescriptionConvention
Fixed-width text like this
Italic text like this
Represents text that you type.Bold text like this
Represents output that appears on
the terminal screen.
Introduces or emphasizes important
•
new terms.
Identifies guide names.
•
Identifies RFC and Internet draft
•
titles.
To enter configuration mode, type
the configure command:
user@host> configure
user@host> show chassis alarms
No alarms currently active
A policy term is a named structure
•
that defines match conditions and
actions.
Junos OS CLI User Guide
•
RFC 1997, BGP Communities
•
Attribute
Page 9

Table 2: Text and Syntax Conventions (continued)
ix
ExamplesDescriptionConvention
Italic text like this
Text like this
< > (angle brackets)
| (pipe symbol)
Represents variables (options for
which you substitute a value) in
commands or configuration
statements.
Represents names of configuration
statements, commands, files, and
directories; configuration hierarchy
levels; or labels on routing platform
components.
variables.
Indicates a choice between the
mutually exclusive keywords or
variables on either side of the symbol.
The set of choices is often enclosed
in parentheses for clarity.
Configure the machine’s domain
name:
[edit]
root@# set system domain-name
domain-name
To configure a stub area, include
•
the stub statement at the [edit
protocols ospf area area-id]
hierarchy level.
The console port is labeled
•
CONSOLE.
stub <default-metric metric>;Encloses optional keywords or
broadcast | multicast
(string1 | string2 | string3)
# (pound sign)
[ ] (square brackets)
Indention and braces ( { } )
; (semicolon)
GUI Conventions
Indicates a comment specified on the
same line as the configuration
statement to which it applies.
Encloses a variable for which you can
substitute one or more values.
Identifies a level in the configuration
hierarchy.
Identifies a leaf statement at a
configuration hierarchy level.
rsvp { # Required for dynamic MPLS
only
community name members [
community-ids ]
[edit]
routing-options {
static {
route default {
nexthop address;
retain;
}
}
}
Page 10
Table 2: Text and Syntax Conventions (continued)
x
ExamplesDescriptionConvention
Bold text like this
> (bold right angle bracket)
Represents graphical user interface
(GUI) items you click or select.
Separates levels in a hierarchy of
menu selections.
In the Logical Interfaces box, select
•
All Interfaces.
To cancel the configuration, click
•
Cancel.
In the configuration editor hierarchy,
select Protocols>Ospf.
Documentation Feedback
We encourage you to provide feedback so that we can improve our documentation. You can use either
of the following methods:
Online feedback system—Click TechLibrary Feedback, on the lower right of any page on the Juniper
•
Networks TechLibrary site, and do one of the following:
Click the thumbs-up icon if the information on the page was helpful to you.
•
Click the thumbs-down icon if the information on the page was not helpful to you or if you have
•
suggestions for improvement, and use the pop-up form to provide feedback.
E-mail—Send your comments to techpubs-comments@juniper.net. Include the document or topic name,
•
URL or page number, and software version (if applicable).
Requesting Technical Support
Technical product support is available through the Juniper Networks Technical Assistance Center (JTAC).
If you are a customer with an active Juniper Care or Partner Support Services support contract, or are
Page 11

covered under warranty, and need post-sales technical support, you can access our tools and resources
online or open a case with JTAC.
JTAC policies—For a complete understanding of our JTAC procedures and policies, review the JTAC User
•
Guide located at https://www.juniper.net/us/en/local/pdf/resource-guides/7100059-en.pdf.
Product warranties—For product warranty information, visit https://www.juniper.net/support/warranty/.
•
JTAC hours of operation—The JTAC centers have resources available 24 hours a day, 7 days a week,
•
365 days a year.
Self-Help Online Tools and Resources
For quick and easy problem resolution, Juniper Networks has designed an online self-service portal called
the Customer Support Center (CSC) that provides you with the following features:
Find CSC offerings: https://www.juniper.net/customers/support/
•
Search for known bugs: https://prsearch.juniper.net/
•
xi
Find product documentation: https://www.juniper.net/documentation/
•
Find solutions and answer questions using our Knowledge Base: https://kb.juniper.net/
•
Download the latest versions of software and review release notes:
•
https://www.juniper.net/customers/csc/software/
Search technical bulletins for relevant hardware and software notifications:
•
https://kb.juniper.net/InfoCenter/
Join and participate in the Juniper Networks Community Forum:
•
https://www.juniper.net/company/communities/
Create a service request online: https://myjuniper.juniper.net
•
To verify service entitlement by product serial number, use our Serial Number Entitlement (SNE) Tool:
https://entitlementsearch.juniper.net/entitlementsearch/
Creating a Service Request with JTAC
You can create a service request with JTAC on the Web or by telephone.
Visit https://myjuniper.juniper.net.
•
Call 1-888-314-JTAC (1-888-314-5822 toll-free in the USA, Canada, and Mexico).
•
For international or direct-dial options in countries without toll-free numbers, see
https://support.juniper.net/support/requesting-support/.
Page 12

1
CHAPTER
JSA Deployment Overview
JSA Deployment Overview | 13
Management Controller | 13
License Keys | 14
JSA Components | 14
Prerequisite Hardware Accessories for JSA Installations | 17
Environmental Restrictions | 17
Supported Web Browsers | 18
USB Flash Drive Installations | 18
Standard Linux Users | 23
Third-party Software on JSA Appliances | 26
Page 13

JSA Deployment Overview
You can install JSA on a single server for small enterprises, or across multiple servers for large enterprise
environments.
For maximum performance and scalability, you must install a high-availability (HA) managed host appliance
for each system that requires HA protection. For more information about installing or recovering an HA
system, see the Juniper Secure Analytics High Availability Guide.
RELATED DOCUMENTATION
License Keys | 14
JSA Components | 14
Prerequisite Hardware Accessories for JSA Installations | 17
13
Management Controller
The JSA appliances use a management controller for systems-management functions.
JSA appliances contain an integrated service processor, which provides advanced service processor control,
monitoring, and alerting functions and consolidates the service processor functionality, super I/O, video
controller, and remote presence capabilities into a single chip on the server system board.
For more information about the Lenovo management controller, see Lenovo XClarity Controller.
For instructions on how to configure the Lenovo management controller, see XClarity Controller User
Guide.
RELATED DOCUMENTATION
JSA Components | 14
Prerequisite Hardware Accessories for JSA Installations | 17
Supported Web Browsers | 18
Page 14

License Keys
After you install JSA, you must apply your license keys.
Your system includes a temporary license key that provides you with access to JSA software for five weeks.
After you install the software and before the default license key expires, you must add your purchased
licenses.
The following table describes the restrictions for the default license key:
Table 3: Restrictions for the Default License Key for JSA Installations
LimitUsage
5000Events per second threshold
NOTE: This restriction also applies to the default license key for Log Manager.
14
200000Flows per interval
When you purchase a JSA product, an email that contains your permanent license key is sent from Juniper
Networks. These license keys extend the capabilities of your appliance type and define your system
operating parameters. You must apply your license keys before your default license expires.
RELATED DOCUMENTATION
JSA Components | 14
Prerequisite Hardware Accessories for JSA Installations | 17
Supported Web Browsers | 18
JSA Components
JSA consolidates event data from log sources that are used by devices and applications in your network.
Figure 1 on page 15 shows JSA components.
NOTE: Software versions for all JSA appliances in a deployment must be same version and patch
level. Deployments that use different versions of software are not supported.
Page 15
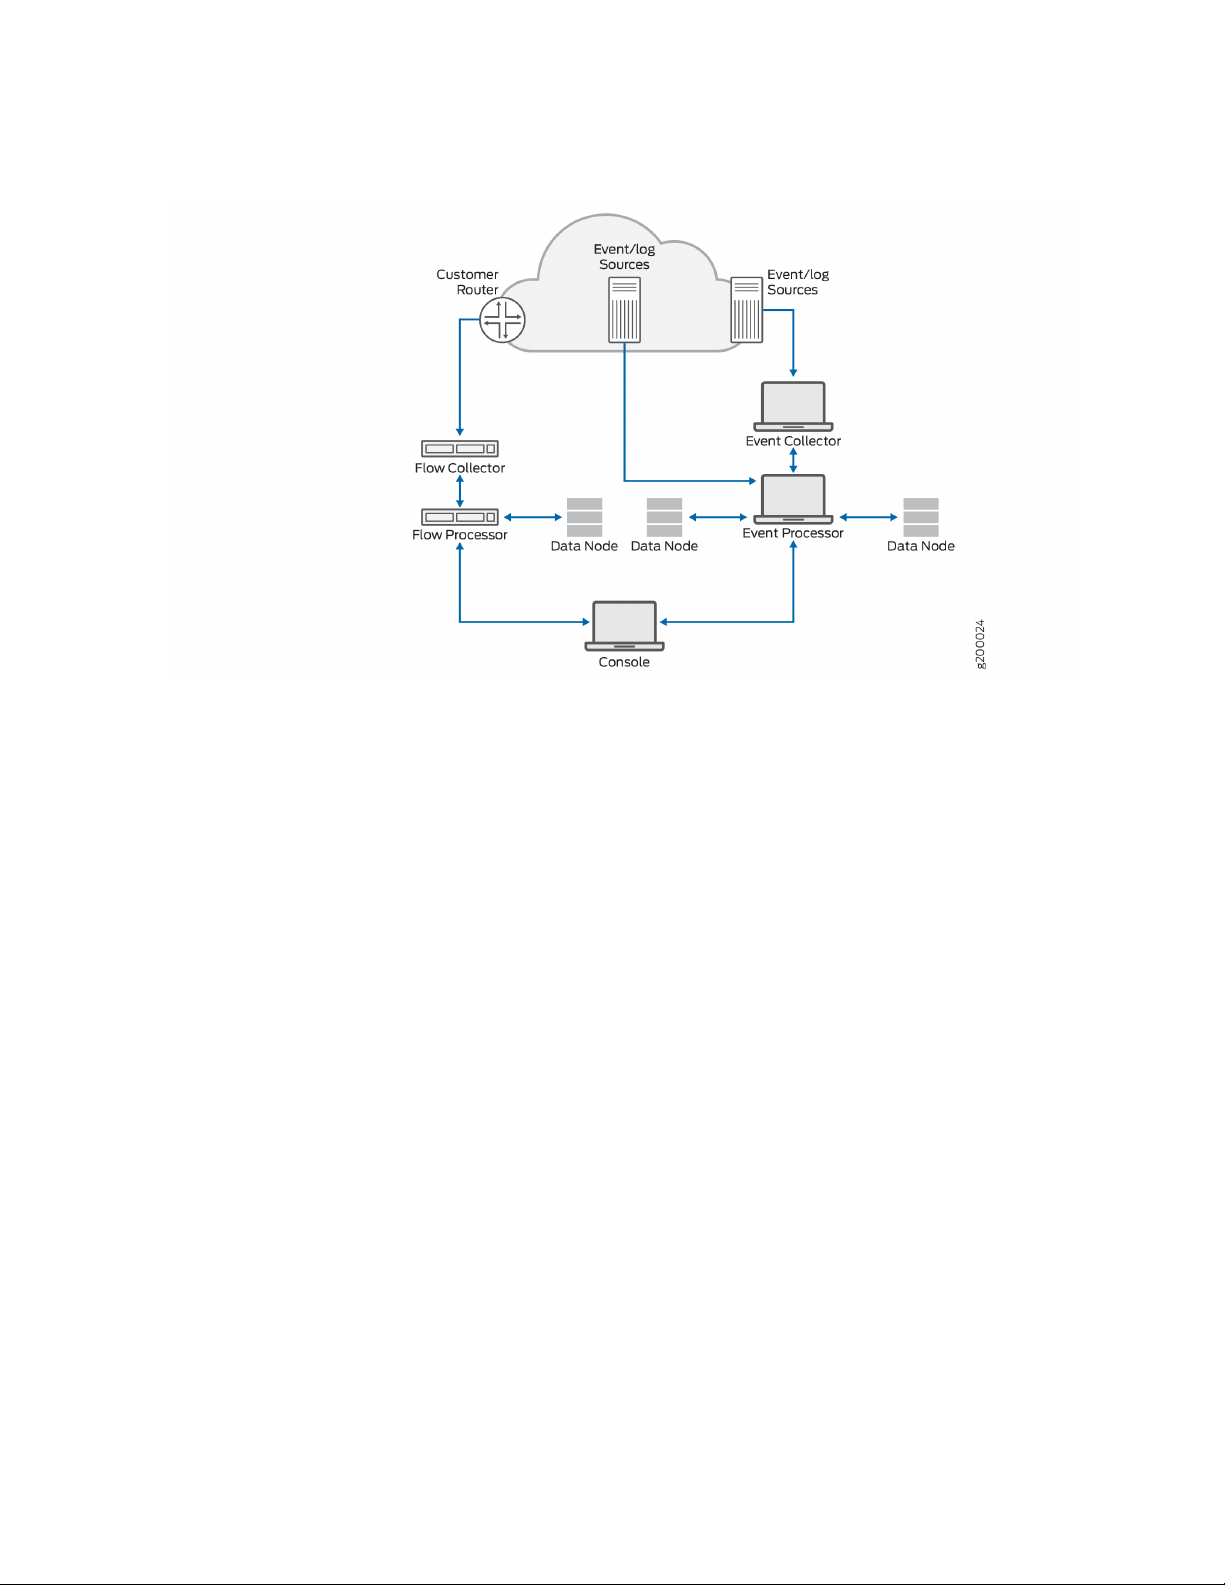
Figure 1: JSA Components
15
JSA deployments can include the following components:
JSA Flow Processor
Passively collects traffic flows from your network through span ports or network taps. The JSA Flow
Processor also supports the collection of external flow-based data sources, such as NetFlow.
JSA Console
Provides the JSA product user interface. The interface delivers real-time event and flow views, reports,
offenses, asset information, and administrative functions.
In distributed JSA deployments, use the JSA console to manage hosts that include other components.
Magistrate
A service running on the JSA console, the Magistrate provides the core processing components. You can
add one Magistrate component for each deployment. The Magistrate provides views, reports, alerts, and
analysis of network traffic and security events.
The Magistrate component processes events against the custom rules. If an event matches a rule, the
Magistrate component generates the response that is configured in the custom rule.
For example, the custom rule might indicate that when an event matches the rule, an offense is created.
If there is no match to a custom rule, the Magistrate component uses default rules to process the event.
An offense is an alert that is processed by using multiple inputs, individual events, and events that are
combined with analyzed behavior and vulnerabilities. The Magistrate component prioritizes the offenses
Page 16

and assigns a magnitude value that is based on several factors, including number of events, severity,
relevance, and credibility.
JSA Event Collector
Gathers events from local and remote log sources. Normalizes raw log source events. During this process,
the Magistrate component, on the JSA Console, examines the event from the log source and maps the
event to a JSA Identifier (QID). Then, the Event Collector bundles identical events to conserve system
usage and sends the information to the Event Processor.
JSA Event Processor
Processes events that are collected from one or more Event Collector components. The Event Processor
correlates the information from JSA products and distributes the information to the appropriate area,
depending on the type of event. The Event Processor can also collect events if you do not have an Event
Collector in your deployment.
The Event Processor also includes information that is gathered by JSA products to indicate behavioral
changes or policy violations for the event. When complete, the Event Processor sends the events to the
Magistrate component.
16
When to add Event Processors: if you collect and store events in a different country or state, you may
need to add Event Processors to comply with local data collection laws.
Data Node
Data Nodes enable new and existing JSA deployments to add storage and processing capacity on demand
as required. Data Notes increase the search speed on your deployment by allowing you to keep more of
your data uncompressed.
You can scale storage and processing power independently of data collection, which results in a deployment
that has the appropriate storage and processing capacity. Data Nodes are plug-n-play and can be added
to a deployment at any time. Data Nodes seamlessly integrate with the existing deployment.
Increasing data volumes in deployments require data compression sooner. Data compression slows down
system performance as the system must decompress queried data before analysis is possible. Adding Data
Node appliances to a deployment allows you to keep data uncompressed longer.
For more information about Data Nodes, see the “Data Node Overview” on page 59.
RELATED DOCUMENTATION
Prerequisite Hardware Accessories for JSA Installations | 17
Supported Web Browsers | 18
USB Flash Drive Installations | 18
Page 17

Prerequisite Hardware Accessories for JSA Installations
Before you install JSA products, ensure that you have access to the required hardware accessories and
desktop software.
Hardware Accessories
Ensure that you have access to the following hardware components:
Monitor and keyboard, or a serial console
•
Uninterrupted Power Supply (UPS) for all systems that store data, such as JSA console, Event Processor
•
components, or JSA flow processor components
17
Null modem cable if you want to connect the system to a serial console
•
NOTE: JSA products support hardware-based Redundant Array of Independent Disks (RAID)
implementations, but do not support software-based RAID installations or hardware assisted
RAID installations.
RELATED DOCUMENTATION
Supported Web Browsers | 18
USB Flash Drive Installations | 18
Third-party Software on JSA Appliances | 26
Environmental Restrictions
JSA performance can be affected by other devices in your deployment.
For any DNS server that you point a JSA appliance to, you cannot have a DNS registry entry with the
hostname set to localhost.
Page 18

Supported Web Browsers
For the features in JSA products to work properly, you must use a supported web browser.
The following table lists the supported versions of web browsers.
Table 4: Supported Web Browsers for JSA Products
Supported versionsWeb browser
60 Extended Support Release and later64 bit Mozilla Firefox
38.14393 and later64-bit Microsoft Edge
Latest64 bit Google Chrome
The Microsoft Internet Explorer web browser is no longer supported as of JSA 7.4.0.
18
Security Exceptions and Certificates
If you are using the Mozilla Firefox web browser, you must add an exception to Mozilla Firefox to log in
to JSA. For more information, see your Mozilla Firefox web browser documentation.
Navigate the Web-Based Application
When you use JSA, use the navigation options available in the JSA user interface instead of your web
browser Back button.
RELATED DOCUMENTATION
USB Flash Drive Installations | 18
Third-party Software on JSA Appliances | 26
JSA Components | 14
USB Flash Drive Installations
You can install JSA software with a USB flash drive.
USB flash drive installations are full product installations. You cannot use a USB flash drive to upgrade or
apply product patches. For information about applying patches, see the latest Patch Release Notes.
Page 19

Supported Versions
The following appliances or operating systems can be used to create a bootable USB flash drive:
A Linux system that is installed with Red Hat Enterprise Linux V7.7
•
Apple Mac OS X
•
Microsoft Windows
•
Installation Overview
Follow this procedure to install JSA software from a USB flash drive:
1. Create the bootable USB flash drive.
2. Install the software for your JSA appliance.
19
3. Install any product maintenance releases or patches.
See latest patch Release Notes for installation instructions for patches..
Creating a Bootable USB Flash Drive with Microsoft Windows
Use the Fedora Media Writer app on a Windows system to create a bootable USB flash drive that you can
use to install JSA software.
You must have access to an 8 GB or larger USB flash drive.
NOTE: It is recommended to download the latest version of the Fedora Media Writer app.
1. On your Windows system, download and install the Fedora Media Writer app from the Fedora Media
Writer GitHub repository.
Other media creation tools might work to create the bootable flash drive, but the JSA ISO is a modified
Red Hat ISO, and Red Hat suggests Fedora Media Writer. For more information, see Making Installation
USB Media.
2. On your Windows system, download the JSA ISO image file from
https://support.juniper.net/support/downloads/ to a local drive.
Page 20

3. Insert the USB flash drive into a USB port on your Windows system.
NOTE: Any files stored on the USB flash drive are overwritten when creating the bootable
flash drive.
4. Open Fedora Media Writer and in the main window, click Custom Image.
5. Browse to where you downloaded the JSA ISO on your Windows system and select it.
6. Select the USB flash drive from the Fedora Media Writer menu, and then click Write to disk.
7. When the writing process is complete, click Close and remove the USB flash drive from your system.
For more information about installing JSA software, see “Installing JSA with a USB Flash Drive” on
page 22.
20
Creating a Bootable USB Flash Drive on an Apple Mac OS X System
You can use an Apple Mac OS X computer to create a bootable USB flash drive that you can use to install
JSA software.
You must have access to the following items:
A 8 GB or larger USB flash drive
•
A JSA 7.3.1 or later ISO image file
•
When you create a bootable USB flash drive, the contents of the flash drive are deleted.
1. Download the JSA ISO image file from the https://support.juniper.net/support/downloads/.
2. . Insert the USB flash drive into a USB port on your system.
3. Open a terminal and type the following command to unmount the USB flash drive:
diskutil unmountDisk /dev/<name_of_the_connected_USB_flash_drive>
4. Type the following command to write the JSA ISO to your USB flash drive:
dd if=/<jsa.iso>of=/dev/ r <name_of_the_connected_USB_flash_drive>bs=1m
Page 21

NOTE: The r before the name of the connected USB flash drive is for raw mode, which makes
the transfer much faster. There is no space between the r and the name of the connected
USB flash drive.
5. Remove the USB flash drive from your system.
Creating a Bootable USB Flash Drive with Red Hat Linux
You can use a Linux desktop or notebook system with Red Hat V7 or higher to create a bootable USB
flash drive that you can use to install JSA software.
You must have access to the following items:
21
An 8 GB or larger USB flash drive
•
A JSA 7.4.1 or later ISO image file
•
When you create a bootable USB flash drive, the contents of the flash drive are deleted.
1. Download the JSA ISO image file from the https://support.juniper.net/support/downloads/.
2. Insert the USB flash drive in the USB port on your system.
It might take up to 30 seconds for the system to recognize the USB flash drive.
3. Open a terminal and type the following command to determine the name of the USB flash drive:
dmesg | grep SCSI
The system outputs the messages produced by device drivers. The following example shows the name
of the connected USB flash drive as sdb.
[ 170.171135] sd 5:0:0:0: [sdb] Attached SCSI removable disk
4. Type the following commands to unmount the USB flash drive:
df -h | grep<name_of_the_connected_USB_flash_drive>
umount /dev/<name_of_the_connected_USB_flash_drive>
Example:
Page 22

[root@jsa ~]# dmesg | grep SCSI
[93425.566934] sd 14:0:0:0: [sdb] Attached SCSI removable disk
[root@jsa ~]# df -h | grep sdb
[root@jsa ~]# umount /dev/sdb
umount: /dev/sdb: not mounted
5. Type the following command to write the JSA ISO to your USB flash drive:
dd if=/<jsa.iso>of=/dev/<name_of_the_connected_USB_flash_drive> bs=512k
Example:
[root@jsa ~]# dd if=7.4.1.20200716115107.iso of=/dev/sdb bs=512k
11112+0 records in
11112+0 records out
5825888256 bytes (5.8 GB) copied, 1085.26 s, 5.4 MB/s
22
6. Remove the USB flash drive from your system. For more information about installing JSA software,
see “Installing JSA with a USB Flash Drive” on page 22.
Installing JSA with a USB Flash Drive
Follow this procedure to install JSA from a bootable USB flash drive.
You must create the bootable USB flash drive before you can use it to install JSA software.
This procedure provides general guidance on how to use a bootable USB flash drive to install JSA software.
The complete installation process is documented in the product Installation Guide.
1. Install all necessary hardware.
2. Choose one of the following options:
Connect a notebook to the serial port at the back of the appliance.
•
Connect a keyboard and monitor to their respective ports.
•
3. Insert the bootable USB flash drive into the USB port of your appliance.
4. Restart the appliance.
Page 23

Most appliances can boot from a USB flash drive by default. If you are installing JSA software on your
own hardware (only supported for Data Nodes), you might have to set the device boot order to prioritize
USB.
After the appliance starts, the USB flash drive prepares the appliance for installation. This process can
take up to an hour to complete.
5. When the login prompt is displayed, type root to log in to the system as the root user.
The user name is case-sensitive.
6. Press Enter and follow the prompts to install JSA.
The complete installation process is documented in the product Installation Guide.
RELATED DOCUMENTATION
23
Third-party Software on JSA Appliances | 26
JSA Components | 14
Supported Web Browsers | 18
Standard Linux Users | 23
Standard Linux Users
The tables describe the standard Linux user accounts that are created on the JSA console and other JSA
product components (All In One console, JSA Risk Manager, QRadar Network Insights, App Host, and all
other managed hosts).
The following tables show standard Linux user accounts for RedHat and JSA.
Table 5: Standard Linux User Accounts for RedHat
Login to the Login
ShellUser Account
Purpose
RedHat userYesroot (password required)
Linux Standard BaseNobin
Linux Standard BaseNodaemon
Page 24

Table 5: Standard Linux User Accounts for RedHat (continued)
Login to the Login
ShellUser Account
Purpose
Linux Standard BaseNoadm
Linux Standard BaseNolp
Linux Standard BaseNosync
Linux Standard BaseNoshutdown
Linux Standard BaseNohalt
Linux Standard BaseNomail
Linux Standard BaseNooperator
24
RedHat userNogames
RedHat userNoftp
Linux Standard BaseNonobody
RedHat userNosystemd-network
RedHat userNodbus
RedHat userNopolkitd
RedHat userNosshd
RedHat userNorpc
RedHat userNorpcuser
RedHat userNonfsnobody
RedHat userNoabrt
RedHat userNontp
RedHat userNotcpdump
Page 25

Table 5: Standard Linux User Accounts for RedHat (continued)
Login to the Login
ShellUser Account
Purpose
RedHat userNotss
RedHat userNosaslauth
RedHat userNosssd
Table 6: Standard Linux User Accounts for JSA
25
PurposeLogin to the Login ShellUser Account
Noziptie
Nosi-vault
Novis
Nosi-registry
Nocustomactionuser
Nomks
Ziptie service used by JSA Risk
Manager
JSA Vault service used by JSA to
store secrets and manage internal
certificates
JSA VIS service used by JSA to
process scan results
JSA Docker Registry Service used by
JSA for App Framework
JSA Custom Actions used to isolate
custom actions into a chroot jail
MKS JSA component for handling
secrets
General user for JSANoqradar
JSA Vulnerability ManagerNoqvmuser
PostgreSQL database used by JSANo (account locked)postgres
Notlsdated
Notraefik
Tlsdate legacy time sync tool that was
previously used by JSA
Traefik service proxies Docker
Containers for JSA App Framework
Page 26

Table 6: Standard Linux User Accounts for JSA (continued)
26
PurposeLogin to the Login ShellUser Account
Nogluster
Noopenvpn
Nochrony
Nopostfix
RELATED DOCUMENTATION
USB Flash Drive Installations | 18
Third-party Software on JSA Appliances | 26
GlusterFS used by JSA HA on event
collectors
OpenVPN optional VPN tool installed
by JSA
Chronyd service time sync tool used
by JSA
Apache Web Server used by JSANoapache
Mail Service used by JSA to send
email
JSA Components | 14
Third-party Software on JSA Appliances
JSA is a security appliance that is built on Linux, and is designed to resist attacks. JSA is not intended as a
multi-user, general-purpose server. It is designed and developed specifically to support its intended
functions. The operating system and the services are designed for secure operation. JSA has a built-in
firewall, and allows administrative access only through a secure connection that requires encrypted and
authenticated access, and provides controlled upgrades and updates. JSA does not require or support
traditional anti-virus or malware agents, or support the installation of third-party packages or programs.
RELATED DOCUMENTATION
JSA Components | 14
Supported Web Browsers | 18
Page 27

USB Flash Drive Installations | 18
27
Page 28

2
CHAPTER
Bandwidth for Managed Hosts
Bandwidth for Managed Hosts | 29
Page 29

Bandwidth for Managed Hosts
To replicate state and configuration data, ensure that you have a minimum bandwidth of 100 Mbps between
the JSA console and all managed hosts. Higher bandwidth is necessary when you search log and network
activity, and you have over 10,000 events per second (EPS).
An Event Collector that is configured to store and forward data to an Event Processor forwards the data
according to the schedule that you set. Ensure that you have sufficient bandwidth to cover the amount
of data that is collected, otherwise the forwarding appliance cannot maintain the scheduled pace.
Use the following methods to mitigate bandwidth limitations between data centers:
Process and send data to hosts at the primary data center-- Design your deployment to process and
•
send data as it's collected to hosts at the primary data center where the console resides. In this design,
all user-based searches query the data from the local data center rather than waiting for remote sites
to send back data.
29
You can deploy a store and forward event collector, such as a JSA physical or virtual appliance, in the
remote locations to control bursts of data across the network. Bandwidth is used in the remote locations,
and searches for data occur at the primary data center, rather than at a remote location.
Don't run data-intensive searches over limited bandwidth connections-- Ensure that users don't run
•
data-intensive searches over links that have limited bandwidth. Specifying precise filters on the search
limits the amount of data that is retrieved from the remote locations, and reduces the bandwidth that
is required to send the query result back.
For more information about deploying managed hosts and components after installation, see the Juniper
Secure Analytics Administration Guide.
Page 30

3
CHAPTER
Installing a JSA Console or Managed
Host
Installing a JSA Console or Managed Host | 31
Installing a JSA Console or Managed Host (applicable only for JSA 7.3.1 Patch 9, JSA
7.3.2 Patch 2, and JSA 7.3.2 Patch 3) | 33
Page 31

Installing a JSA Console or Managed Host
Install JSA Console or a managed host on the JSA appliance.
Software versions for all JSA appliances in a deployment must be same version and patch level. Deployments
that use different versions of software is not supported.
Ensure that the following requirements are met:
The required hardware is installed.
•
You have the required license key for your appliance.
•
A keyboard and monitor are connected by using the VGA connection.
•
There are no expired licenses on either the console or the managed hosts.
•
1. Use SSH to log in as the root user.
31
2. Accept the End User License Agreement.
3. Select the appliance assignment, and then select Next.
4. If you selected an appliance for high-availability (HA), select whether the appliance is a console.
5. For the type of setup, select Normal Setup (default) or HA Recovery Setup, and set up the time.
6. If you selected HA Recovery Setup, enter the cluster virtual IP address.
7. Select the Internet Protocol version:
Select ipv4 or ipv6.
•
8. If you selected ipv6, select manual or auto for the Configuration type.
9. Select the bonded interface setup, if required.
10. Select the management interface.
11. In the wizard, enter a fully qualified domain name in the Hostname field.
12. In the IP address field, enter a static IP address, or use the assigned IP address.
Page 32

NOTE: If you are configuring this host as a primary host for a high availability (HA) cluster,
and you selected Yes for auto-configure, you must record the automatically-generated IP
address. The generated IP address is entered during HA configuration.
For more information, see the Juniper Secure Analytics High Availability Guide.
13. If you do not have an email server, enter localhost in the Email server name field.
14. Enter root and admin passwords that meet the following criteria:
Contains at least 5 characters
•
Contains no spaces
•
Can include the following special characters: @, #, ^, and *.
•
15. Click Finish.
32
16. Follow the instructions in the installation wizard to complete the installation.
A series of messages appears as JSA continues with the installation. Based on the appliance ID selected,
the installation process may take from several minutes to few hours to complete. TA All-In-One or
Console installation may take up to 2.5 hours. When the JSA installation process is complete, the
message window appears.
17. Apply your license key.
a. Log in to JSA:
The default user name is admin. The password is the password of the admin user account.
b. Click Login To JSA.
c. Click the Admin tab.
d. In the navigation pane, click System Configuration.
e. Click the System and License Management icon.
f. From the Display list box, select Licenses, and upload your license key.
g. Select the unallocated license and click Allocate System to License.
h. From the list of systems, select a system, and click Allocate System to License.
18. If you want to add managed hosts, see the Juniper Secure Analytics Administration Guide.
Page 33

Installing a JSA Console or Managed Host (applicable
only for JSA 7.3.1 Patch 9, JSA 7.3.2 Patch 2, and JSA
7.3.2 Patch 3)
Install JSA Console or a managed host on the JSA appliance.
Software versions for all JSA appliances in a deployment must be same version and patch level. Deployments
that use different versions of software is not supported.
Ensure that the following requirements are met:
The required hardware is installed.
•
You have the required license key for your appliance.
•
A keyboard and monitor are connected by using the VGA connection.
•
33
There are no expired licenses on either the console or the managed hosts.
•
1. Use SSH to log in as the root user.
2. Accept the End User License Agreement.
3. Select the appliance type from the following options, and then select Next.
Appliance Install (purchased as an appliance)—Choose this option if you have purchased JSA appliances
•
or wish to install virtual machines.
Software Install (hardware was purchased separately)—Choose this option if you want to install the
•
software on your own hardware.
NOTE: Software only installations are supported for the 7.3.1 patch 9, 7.3.2 Patch 2, and
7.3.2 Patch 3 releases. Choose Appliance Install (purchased as an appliance) for all other
implementation choices.
High Availability Appliance—Choose this option to use high-availability (HA) appliances.
•
4. Select the non-software appliance type and then select Next.
5. For the type of setup, select Normal Setup (default) or HA Recovery Setup, and set up the time.
6. If you selected HA Recovery Setup, enter the cluster virtual IP address.
Page 34

7. Select the Internet Protocol version:
Select ipv4 or ipv6.
•
8. If you selected ipv6, select manual or auto for the Configuration type.
9. Select the bonded interface setup, if required.
10. Select the management interface.
11. In the wizard, enter a fully qualified domain name in the Hostname field.
12. In the IP address field, enter a static IP address, or use the assigned IP address.
NOTE: If you are configuring this host as a primary host for a high availability (HA) cluster,
and you selected Yes for auto-configure, you must record the automatically-generated IP
address. The generated IP address is entered during HA configuration.
34
For more information, see the Juniper Secure Analytics High Availability Guide.
13. If you do not have an email server, enter localhost in the Email server name field.
14. Enter root and admin passwords that meet the following criteria:
Contains at least 5 characters
•
Contains no spaces
•
Can include the following special characters: @, #, ^, and *.
•
15. Click Finish.
16. Follow the instructions in the installation wizard to complete the installation.
A series of messages appears as JSA continues with the installation. Based on the appliance ID selected,
the installation process may take from several minutes to few hours to complete. TA All-In-One or
Console installation may take up to 2.5 hours. When the JSA installation process is complete, the
message window appears.
17. Apply your license key.
a. Log in to JSA:
The default user name is admin. The password is the password of the admin user account.
b. Click Login To JSA.
Page 35

c. Click the Admin tab.
d. In the navigation pane, click System Configuration.
e. Click the System and License Management icon.
f. From the Display list box, select Licenses, and upload your license key.
g. Select the unallocated license and click Allocate System to License.
h. From the list of systems, select a system, and click Allocate System to License.
18. If you want to add managed hosts, see the Juniper Secure Analytics Administration Guide.
35
Page 36

4
CHAPTER
Virtual Appliance Installations for JSA
and Log Manager
Virtual Appliance Installations for JSA and Log Manager | 37
Overview Of Supported Virtual Appliances | 38
System Requirements for Virtual Appliances | 42
Creating Your Virtual Machine | 48
Installing JSA on a Virtual Machine | 49
Adding Your Virtual Appliance to Your Deployment | 51
Page 37

Virtual Appliance Installations for JSA and Log Manager
You can install JSA and Log Manager on a virtual appliance. Ensure that you use a supported virtual
appliance that meets the minimum system requirements.
You can install JSA on your virtual appliance through an appliance installation.
Appliance installation
An appliance installation is a JSA installation that uses the version of RHEL included on the JSA ISO. An
appliance installation requires you purchase an RHEL license. Contact your JSA sales representative for
more information about purchasing an RHEL license. You do not need to configure partitions or perform
other RHEL preparation as part of an appliance installation. Choose this option if RHEL is not already
installed.
37
NOTE: If the installer does not detect that RHEL is installed, an appliance installation is performed
automatically.
To install a virtual appliance, complete the following tasks in sequence:
Create a virtual machine.
•
Install JSA software on the virtual machine.
•
If your virtual appliance is a managed host, add your virtual appliance to the deployment.
•
NOTE: Install no software other than JSA and Red Hat Enterprise Linux on the virtual machine.
RELATED DOCUMENTATION
Overview Of Supported Virtual Appliances | 38
Creating Your Virtual Machine | 48
Installing JSA on a Virtual Machine | 49
Page 38

Overview Of Supported Virtual Appliances
A virtual appliance provides the same visibility and function in your virtual network infrastructure that JSA
appliances provide in your physical environment.
The following virtual appliances are available:
JSA Threat Analytics “All-in-one” or Console 3199
•
JSA Event and Flow Processor Combo
•
JSA Flow Processor Virtual 1799
•
JSA Event Processor Virtual 1699
•
JSA Event Collector Virtual 1599
•
JSA Flow Processor
•
JSA Flow Processor Virtual 1299
•
38
JSA Risk Manager 700
•
JSA Vulnerability Manager Processor 600
•
JSA Vulnerability Manager Scanner 610
•
JSA App Host 4000
•
JSA Threat Analytics “All-in-one” or Console 3199
This virtual appliance is a Juniper Secure Analytics system that profiles network behavior and identifies
network security threats. The JSA JSA Threat Analytics “All-in-one” or Console 3199 virtual appliance
includes an on-board Event Collector, a combined Event Processor and Flow Processor, and internal storage
for events.
The JSA Threat Analytics “All-in-one” or Console 3199 virtual appliance supports the following items:
Up to 1,000 network objects
•
1,200,000 flows per interval, depending on your license
•
30,000 Events Per Second (EPS), depending on your license
•
External flow data sources for NetFlow, sFlow, J-Flow, Packeteer, and Flowlog files
•
Flow Processor and Layer 7 network activity monitoring
•
Page 39

To expand the capacity of the JSA Threat Analytics “All-in-one” or Console 3199 beyond the license-based
upgrade options, you can add one or more of the JSA Virtual Event Processor Virtual 1699 or Flow processor
Virtual 1799 virtual appliances.
JSA Event and Flow Processor Combo
This virtual appliance is deployed with any JSA Console. The virtual appliance is used to increase storage
and includes a combined Event Processor and Flow Processor and internal storage for events and flows.
JSA Event and Flow Processor Combo appliance supports the following items:
1,200,000 flows per interval, depending on traffic types
•
30,000 Events Per Second (EPS), depending on your license
•
2 TB or larger dedicated flow storage
•
1,000 network objects
•
39
JSA Flow Collector and Layer 7 network activity monitoring
•
You can add JSA Event and Flow Processor Combo appliances to any JSA Console to increase the storage
and performance of your deployment.
JSA Flow Processor Virtual 1799
This virtual appliance is a dedicated Flow Processor that you can use to scale your JSA deployment to
manage higher flows per interval rates. The JSA Flow Processor Virtual 1799 includes an onboard Flow
Processor and internal storage for flows.
JSA Flow Processor Virtual 1799 appliance supports the following items:
3,600,000 flows per interval, depending on traffic types
•
2 TB or larger dedicated flow storage
•
1,000 network objects
•
Flow Processor and Layer 7 network activity monitoring
•
The JSA Flow Processor Virtual 1799 is a distributed Flow Processor virtual appliance and requires a
connection to JSA console. Flow Processor appliance and requires a connection to any series appliance.
Page 40

JSA Event Processor Virtual 1699
This virtual appliance is a dedicated Event Processor that allows to scale your Juniper Secure Analytics
(JSA) deployment to manage higher EPS rates. The JSA Event Processor Virtual 1699 includes an onboard
Event Collector, Event Processor, and internal storage for events.
JSA Event Processor Virtual 1699 appliance supports the following items:
Up to 80,000 events per second
•
2 TB or larger dedicated event storage
•
The JSA Event Processor Virtual 1699 is a distributed Event Processor virtual appliance and requires a
connection to JSA console. Event Processor appliance and requires a connection to any series appliance.
JSA Event Collector Virtual 1599
40
This virtual appliance is a dedicated Event Collector that you can use to scale your JSA deployment to
manage higher EPS rates. The JSA Event Collector Virtual 1599 includes an onboard Event Collector.
JSA Event Collector Virtual 1599 appliance supports the following items:
Up to 80,000 events per second
•
2 TB or larger dedicated event storage
•
The JSA Event Collector Virtual 1599 is a distributed Event Collector virtual appliance and requires a
connection to JSA console. Event Collector appliance and requires a connection to any series appliance.
JSA Flow Processor
This virtual appliance provides retention and storage for events and flows. The virtual appliance expands
the available data storage of Event Processors and Flow Processors, and also improves search performance.
NOTE: Encrypted data transmission between Data Nodes and Event Processors is not supported.
The following firewall ports must be opened for Data Node communication with the Event
Processor:
Port 32006 between Flow Processor and the Event Processor appliance
•
Port 32006 between Flow Processor and the Event Processor appliance
•
Page 41

Size your JSA Flow Processor appliance based on the EPS rate and data retention rules of the deployment.
Data retention policies are applied to a JSA Flow Processor appliance in the same way that they are applied
to stand-alone Event Processors and Flow Processors. The data retention policies are evaluated on a
node-by-node basis. Criteria, such as free space, is based on the individual JSA Flow Processor appliance
and not the cluster as a whole.
JSA Flow Processor can be added to the following appliances:
Event Processor (16XX)
•
Flow Processor (17XX)
•
Event/Flow Processor (18XX)
•
All-In-One (31XX)
•
To enable all features included in the JSA Flow Processor appliance, install it by using the Flow Processor
appliance type.
41
JSA Flow Processor Virtual 1299
This virtual appliance provides the same visibility and function in your virtual network infrastructure that
a JSA Flow Processor offers in your physical environment. The JSA Flow Processor virtual appliance
analyzes network behavior and provides Layer 7 visibility within your virtual infrastructure. Network
visibility is derived from a direct connection to the virtual switch.
The JSA Flow Processor Virtual 1299 virtual appliance supports a maximum of the following items:
10,000 flows per minute
•
Three virtual switches, with one more switch that is designated as the management interface.
•
JSA Vulnerability Manager Processor
This appliance is used to process vulnerabilities within the applications, systems, and devices on your
network or within your DMZ. The vulnerability processor provides a scanning component by default. If
required, you can deploy more scanners, either on dedicated JSA Vulnerability Manager managed host
scanner appliances or JSA managed hosts. For example, you can deploy a vulnerability scanner on an Event
Collector or JSA Flow Processor.
Page 42

JSA Vulnerability Manager Scanner
This appliance is used to scan for vulnerabilities within the applications, systems, and devices on your
network or within your DMZ.
JSA Risk Manager
This appliance is used for monitoring device configurations, simulating changes to your network environment,
and prioritizing risks and vulnerabilities in your network.
JSA App Host 4000
This appliance is a managed host that is dedicated to running apps. App Hosts provide extra storage,
memory, and CPU resources for your apps without impacting the processing capacity of your JSA Console.
Apps such as User Behavior Analytics with Machine Learning Analytics require more resources than are
currently available on the Console.
42
RELATED DOCUMENTATION
Creating Your Virtual Machine | 48
Installing JSA on a Virtual Machine | 49
Adding Your Virtual Appliance to Your Deployment | 51
System Requirements for Virtual Appliances
To ensure that JSA works correctly, you must use virtual appliances that meet the minimum requirements.
For more information about supported hypervisors and virtual hardware versions, see “Creating Your
Virtual Machine” on page 48.
Page 43

NOTE: The minimum requirements support JSA functionality with minimum data sets and
performance. The minimum requirements support a JSA system that uses only the default apps.
For optimal performance, use the suggested requirements.
Memory Requirements
The following table describes the memory requirements for virtual appliances.
Table 7: Minimum and Suggested Memory Requirements for JSA Virtual Appliances
Suggested memory requirementMinimum memory requirementAppliance
6 GB6 GBJSA Flow Processor Virtual 1299
48 GB24 GBJSA Flow Processor
16 GB12 GBJSA Event Collector Virtual 1599
43
up to 20,000 EPS
20,000 EPS or higher
up to 1,200,000 FPM
1,200,000 FPM or higher
Combo
5,000 EPS or less
200,000 FPM or less
48 GB12 GBJSA Event Processor Virtual 1699
128 GB128 GBJSA Event Processor Virtual 1699
48 GB12 GBJSA Flow Processor Virtual 1799
128 GB128 GBJSA Flow Processor Virtual 1799
48 GB12 GBJSA Event and Flow Processor
Combo
30,000 EPS or less
1,000,000 FPM or less
128 GB128 GBJSA Event and Flow Processor
Page 44

Table 7: Minimum and Suggested Memory Requirements for JSA Virtual Appliances (continued)
Suggested memory requirementMinimum memory requirementAppliance
48 GB32 GBJSA Threat Analytics “All-in-one”
or Console 3199
5,000 EPS or less
200,000 FPM or less
128 GB64 GBJSA Threat Analytics “All-in-one”
or Console 3199
30,000 EPS or less
1,000,000 FPM or less
48 GB24 GBVirtual JSA Log Manager
44
48 GB24 GBJSA Risk Manager
32 GB32 GBJSA Vulnerability Manager
Processor
16 GB16 GBJSA Vulnerability Manager
Scanner
12 GBJSA App Host
64 GB or more for a medium sized App
Host
128 GB or more for a large sized App
Host
Processor requirements
The following table describes the CPU requirements for virtual appliances.
Table 8: CPU Requirements for JSA Virtual Appliances
Minimum number of CPU
coresThresholdAppliance
Suggested number of
CPU cores
1299
4410,000 FPM or lessJSA Flow Processor
Page 45

Table 8: CPU Requirements for JSA Virtual Appliances (continued)
45
Virtual 1599
Virtual 1699
Virtual 1799
Minimum number of CPU
coresThresholdAppliance
Suggested number of
CPU cores
1642,500 EPS or lessJSA Event Collector
1685,000 EPS or less
161620,000 EPS or less
2442,500 EPS or lessJSA Event Processor
2485,000 EPS or less
241620,000 EPS or less
404040,000 EPS or less
565680,000 EPS or less
244150,000 FPM or lessJSA Flow Processor
248300,000 FPM or less
JSA Event and Flow
Processor Combo
24161,200,000 FPM or less
48482,400,000 FPM or less
56563,600,000 FPM or less
2416200,000 FPM or less
5,000 EPS or less
4848300,000 FPM or less
15,000 EPS or less
56561,200,000 FPM or less
30,000 EPS or less
Page 46

Table 8: CPU Requirements for JSA Virtual Appliances (continued)
46
JSA Threat Analytics
“All-in-one” or Console
3199
(FPM) or less
500 EPS or less
1,000 EPS or less
1,000 EPS or less
5,000 EPS or less
15,000 EPS or less
Minimum number of CPU
coresThresholdAppliance
Suggested number of
CPU cores
24425,000 Flows per minute
24850,000 FPM or less
2412100,000 FPM or less
2416200,000 FPM or less
4848300,000 FPM or less
JSA Virtual Log
Manager
Manager Processor
Manager Scanner
56561,200,000 FPM or less
30,000 EPS or less
1642,500 Events per second
(EPS) or less
1685,000 EPS or less
44JSA Vulnerability
44JSA Vulnerability
88JSA Risk Manager
164JSA Flow Processor
Page 47

Table 8: CPU Requirements for JSA Virtual Appliances (continued)
47
Minimum number of CPU
coresThresholdAppliance
4JSA App Host
Suggested number of
CPU cores
12 or more for a medium
sized App Host
24 or more for a large sized
App Host
Storage Requirements
Your virtual appliance must have at least 256 GB of storage available. Before you install your virtual
appliance, use the following formula to determine your storage needs:
(Number of Days) x (Seconds in a day) x (Events per second rate) x (Average size of a log event x 1.5 JSA
normalized event overhead) x 1.05 / (1000 x 1000 x 1000) + 40 GB
30 x 86,400 x 1,000 EPS x 600 bytes x 1.05 / (1000 x 1000 x 1000) + 40 GB =
1673 GB
The following table shows the storage requirements for installing JSA by using the virtual or software only
option.
Table 9: Minimum storage requirements for appliances when you use the virtual installation option.
Data transfer rate (MB/s)IOPSAppliance informationSystem classification
500800Supports XX05 licensingMinimum performance
10001200Supports XX29 licensingMedium performance
200010,000Supports XX48 licensingHigh Performance
300300Event/Flow ProcessorsSmall All-in-One or
1600
300300Event/Flow CollectorsEvent/Flow Processors
Page 48

RELATED DOCUMENTATION
Creating Your Virtual Machine | 48
Installing JSA on a Virtual Machine | 49
Adding Your Virtual Appliance to Your Deployment | 51
Creating Your Virtual Machine
To install a JSA virtual appliance, you must first create a virtual machine.
1. Create a virtual machine by using one of the following hypervisors:
VMWare ESXi with hardware version 13
•
KVM on CentOS or Red Hat Enterprise Linux 7.7 with QEMU KVM 1.5.3-141
•
48
The Hyper-V plugin on Windows Server 2016 with all Windows updates applied
•
NOTE: If you are installing a JSA appliance in Hyper-V, you must do a software installation,
not an appliance installation. If you are using a version of Hyper-V that includes a secure boot
option, secure boot must be disabled.
If you are installing JSA on a Unified Extensible Firmware Interface (UEFI) system, secure
boot must be disabled.
The listed hypervisor versions are tested by Juniper Networks, but other untested versions
might also work. If you install JSA on an unsupported version and encounter an issue that
can be produced on the listed version of that hypervisor, Juniper Networks supports that
issue.
2. Configure your virtual machine to meet the requirements for CPUs, RAM, and storage parameters. See
“System Requirements for Virtual Appliances” on page 42.
3. Configure at least one network interface for your virtual machine.
RELATED DOCUMENTATION
Installing JSA on a Virtual Machine | 49
Adding Your Virtual Appliance to Your Deployment | 51
Page 49

Overview Of Supported Virtual Appliances | 38
Installing JSA on a Virtual Machine
After you create your virtual machine, you must install the JSA software on the virtual machine.
Create a virtual machine. For more information, see “Creating Your Virtual Machine” on page 48.
Determine if you need to do an appliance installation or a software installation. For more information
about appliance installations and software installations, see “Virtual Appliance Installations for JSA and
Log Manager” on page 37 .
For a software installation, you must install Red Hat Enterprise Linux (RHEL) before you install JSA. For
more information about installing RHEL for JSA, see "Installing RHEL on Your System".
1. Log in to the virtual machine by typing root for the user name.
49
The user name is case-sensitive.
2. Accept the End User License Agreement.
3. Select the appliance type:
Non-Software Appliance for an appliance installation.
•
Software Appliance for a software installation.
•
4. Select the appliance assignment, and then select Next.
5. If you selected an appliance for high-availability (HA), select whether the appliance is a console.
6. For the type of setup, select Normal Setup (default) or HA Recovery Setup, and set up the time.
7. If you selected HA Recovery Setup, enter the cluster virtual IP address.
8. Select the Internet Protocol version:
Select ipv4 or ipv6.
•
9. If you selected ipv6, select manual or auto for the Configuration type.
10. Select the bonded interface setup, if required.
11. Select the management interface.
Page 50

12. In the wizard, enter a fully qualified domain name in the Hostname field.
13. In the IP address field, enter a static IP address, or use the assigned IP address.
NOTE: If you are configuring this host as a primary host for a high availability (HA) cluster,
and you selected Yes for auto-configure, you must record the automatically-generated IP
address. The generated IP address is entered during HA configuration.
For more information, see the Juniper Secure Analytics High Availability Guide.
14. If you do not have an email server, enter localhost in the Email server name field.
15. Enter root and admin passwords that meet the following criteria:
Contains at least 5 characters
•
50
Contains no spaces
•
Can include the following special characters: @, #, ^, and *.
•
16. Click Finish.
17. Follow the instructions in the installation wizard to complete the installation.
The installation process might take several minutes. When the installation is complete, if you are
installing a JSA Console, proceed to step 18. If you are installing a managed host, proceed to “Adding
Your Virtual Appliance to Your Deployment” on page 51.
18. Apply your license key.
a. Log in to JSA.
The default user name is admin. The password is the password of the admin user account.
b. Click Login To JSA.
c. Click the Admin tab.
d. In the navigation pane, click System Configuration.
e. Click the System and License Management icon.
f. From the Display list box, select Licenses, and upload your license key.
g. Select the unallocated license and click Allocate System to License.
h. From the list of systems, select a system, and click Allocate System to License.
Page 51

RELATED DOCUMENTATION
Adding Your Virtual Appliance to Your Deployment | 51
Overview Of Supported Virtual Appliances | 38
Creating Your Virtual Machine | 48
Adding Your Virtual Appliance to Your Deployment
After the JSA software is installed, add your virtual appliance to your deployment.
1. Log in to the JSA console.
2. Click Admin tab.
51
3. In the Admin settings, click the System and License Management icon.
4. On the Deployment Actions menu, click Add Host.
5. Configure the settings for the managed host by providing the fixed IP address, and the root password
to access the operating system shell on the appliance.
6. Click Add.
7. In the Admin settings, click Deploy Changes.
8. Apply your license key.
a. Log in to JSA.
The default user name is admin. The password is the password of the root user account.
b. Click Login.
c. Click the Admin tab.
d. In the navigation pane, click System Configuration.
e. Click the System and License Management icon.
f. From the Display list box, select Licenses, and upload your license key.
g. Select the unallocated license and click Allocate System to License.
h. From the list of systems, select a system, and click Allocate System to License.
Page 52

RELATED DOCUMENTATION
Overview Of Supported Virtual Appliances | 38
Creating Your Virtual Machine | 48
Installing JSA on a Virtual Machine | 49
52
Page 53

5
CHAPTER
Installations from the Recovery
Partition
Installations from the Recovery Partition | 54
Reinstalling from the Recovery Partition | 54
Page 54

Installations from the Recovery Partition
When you install JSA products, the installer (ISO image) is copied to the recovery partition. From this
partition, you can reinstall JSA products. Your system is restored back to the default configuration. Your
current configuration and data files are overwritten.
When you restart your JSA appliance, an option to reinstall the software is displayed. If you do not respond
to the prompt within 5 seconds, the system continues to start as normal. Your configuration and data files
are maintained. If you choose the reinstall option, a warning message is displayed and you must confirm
that you want to reinstall.
NOTE: The retain option is not available on High-Availability systems. See the Juniper Secure
Analytics High Availability Guide for information on recovering High-Availability appliances.
54
RELATED DOCUMENTATION
Adding Your Virtual Appliance to Your Deployment | 51
Reinstalling from the Recovery Partition | 54
Installing JSA on a Virtual Machine | 49
Reinstalling from the Recovery Partition
You can reinstall JSA products from the recovery partition.
If your deployment includes offboard storage solutions, you must disconnect your offboard storage before
you reinstall JSA. After you reinstall, you can remount your external storage solutions. For more information
on configuring offboard storage, see the Juniper Secure Analytics Configuring Offboard Storage Guide.
1. Restart your JSA appliance and select Factory re-install.
2. Type flatten or retain.
The installer partitions and reformats the hard disk, installs the OS, and then re-installs the JSA product.
You must wait for the flatten or retain process to complete. This process can take up to several minutes.
When the process is complete, a confirmation is displayed.
Page 55

3. Type SETUP.
4. Log in as the root user.
5. Ensure that the End User License Agreement (EULA) is displayed.
TIP: Press the Spacebar key to advance through the document.
6. For JSA console installations, select the Enterprise tuning template.
7. Follow the instructions in the installation wizard to complete the installation.
8. Apply your license key.
a. Log in to JSA:
55
The default user name is admin. The password is the password of the root user account.
b. Click Login To JSA.
c. Click the Admin tab.
d. In the navigation pane, click System Configuration.
e. Click the System and License Management icon.
f. From the Display list box, select Licenses, and upload your license key.
g. Select the unallocated license and click Allocate System to License.
h. From the list of systems, select a system, and click Allocate System to License.
RELATED DOCUMENTATION
Adding Your Virtual Appliance to Your Deployment | 51
Installations from the Recovery Partition | 54
Installing JSA on a Virtual Machine | 49
Page 56

6
CHAPTER
Reinstalling JSA from Media
Reinstalling JSA from Media | 57
Page 57

Reinstalling JSA from Media
You can reinstall JSA products from media such as the ISO file or a USB flash drive.
Back up your data.
•
On a Unified Extensible Firmware Interface (UEFI) system, remove the Grand Unified Bootloader (GRUB)
•
entries for the existing JSA installation from the UEFI boot loader before you reinstall JSA.
1. At boot time, press F1 to enter System Configuration and Boot Management.
2. Select Boot Manager.
3. Select Delete Boot Option.
4. Check grub, then select Commit Changes and Exit.
1. At boot time, press F12 to enter Boot Devices Manager.
57
2. Select your installation media from the list.
3. At the prompt, type flatten.
RELATED DOCUMENTATION
Data Node Overview | 59
Page 58

7
CHAPTER
Data Node Overview
Data Node Overview | 59
JSA Software Installations (applicable only for JSA 7.3.1 Patch 9, JSA 7.3.2 Patch 2,
and JSA 7.3.2 Patch 3) | 62
Page 59

Data Node Overview
Event Collector
Console
Before Applying Data Node Appliance After Applying Data Node Appliance
Event Processor
Data Node Data Node
Event Collector
Console
Event Processor
g200023
Understand how to use Data Nodes in your Juniper Secure Analytics (JSA) deployment.
Data Nodes enable new and existing JSA deployments to add storage and processing capacity on demand
as required.
Users can scale storage and processing power independently of data collection, which results in a
deployment that has the appropriate storage and processing capacity. Data Nodes are plug-n-play and
can be added to a deployment at any time. Data Nodes seamlessly integrate with the existing deployment.
Increasing data volumes in deployments require data compression sooner. Data compression slows down
system performance as the system must decompress queried data before analysis is possible. Adding Data
Node appliances to a deployment allows you to keep data uncompressed longer.
The JSA deployment distributes all new data across the Event and Flow processors and the attached Data
Nodes. Figure 2 on page 59 shows the JSA deployment before and after adding Data Node appliances.
59
Figure 2: JSA deployment before and after adding Data Node appliances
Clustering
Data Nodes add storage capacity to a deployment, and also improve performance by distributing data
collected on a processor across multiple storage volumes. When the data is searched, multiple hosts, or a
Page 60

cluster, do the search. The cluster can greatly improve search performance, but do not require the addition
of multiple event processors. Data Nodes multiply the storage for each processor.
NOTE: You can connect a Data Node to only one processor at a time, but a processor can support
multiple data nodes.
Deployment Considerations
Data Nodes are available on JSA 2014.2 and later.
•
Data Nodes perform similar search and analytic functions as Event and Flow processors in a JSA
•
deployment. Operations on a cluster are affected by the slowest member of a cluster. Data Node system
performance improves if Data Nodes are sized similarly to the event and flow processors in a deployment.
To facilitate similar sizing between Data Nodes and event and flow processors, Data Nodes are available
on core appliances.
Data Nodes can be installed as VM or on JSA appliances. You can mix these in a single deployment.
•
60
Bandwidth and latency
Ensure a 1 GBps link and less than 10 ms between hosts in the cluster. Searches that yield many results
require more bandwidth.
Compatibility
Data Nodes are compatible with all existing JSA appliances that have an Event or Flow Processor component,
including All-In-One appliances.
Data Nodes support high-availability (HA).
Installation
Data Nodes use standard TCP/IP networking, and do not require proprietary or specialized interconnect
hardware. Install each Data Node that you want to add to your deployment as you would install any other
JSA appliance. Associate Data Nodes with event or flow processors in the JSA Deployment Editor. See
Juniper Secure Analytics Administration Guide.
You can attach multiple Data Nodes to a single Event or Flow Processor, in a many-to-one configuration.
When you deploy high availability pairs with Data Node appliances, install, deploy and rebalance data with
the high availability appliances before synchronizing the high availability pair. The combined effect of the
data rebalancing, and the replication process utilized for high availability results in significant performance
degradation. If high availability is present on the existing appliances to which Data Nodes are being
introduced, it is also preferable that the high availability connection be broken and reestablished once the
rebalance of the cluster is completed.
Decommissioning
Page 61

Remove Data Nodes from your deployment with the Deployment Editor, as with any other JSA appliance.
Decommissioning does not erase balanced data on the host. You can retrieve the data for archiving and
redistribution.
Data Rebalancing
Adding a Data Node to a cluster distributes data evenly to each Data Node. Each Data Node appliance
maintains the same percentage of available space. New Data Nodes added to a cluster initiate additional
rebalancing from cluster event and flow processors to achieve efficient disk usage on the newly added
Data Node appliances.
Starting in JSA 2014.3, data rebalancing is automatic and concurrent with other cluster activity, such as
queries and data collection. No downtime is experienced during data rebalancing.
Data Nodes offer no performance improvement in the cluster until data rebalancing is complete. Rebalancing
can cause minor performance degradation during search operations, but data collection and processing
continue unaffected.
Management and Operations
61
Data Nodes are self-managed and require no regular user intervention to maintain normal operation. JSA
manages activities, such as data backups, high availability and retention policies, for all hosts, including
Data Node appliances.
Failures
If a Data Node fails, the remaining members of the cluster continue to process data.
When the failed Data Node returns to service, data balancing resumes. During the downtime, data on the
failed Data Node is unavailable.
For catastrophic failures requiring appliance replacement or the reinstallation of JSA, decommission Data
Nodes from the deployment and replace them using standard installation steps. Copy any data not lost in
the failure to the new Data Node before deploying. The rebalancing algorithm accounts for old data and
shuffles only data collected during the failure.
For Data Nodes deployed with an high availability pair, a hardware failure causes a failover, and operations
continue to function normally.
For more information about each component, see the Juniper Secure Analytics Administration Guide.
RELATED DOCUMENTATION
Network Settings Management | 75
Changing the Network Settings in an All-in-one System | 75
Changing the Network Settings Of a JSA Console in a Multi-system Deployment | 76
Page 62

JSA Software Installations (applicable only for JSA
7.3.1 Patch 9, JSA 7.3.2 Patch 2, and JSA 7.3.2 Patch
3)
A software installation is a JSA installation on your hardware that uses an RHEL operating system that you
provide. You must configure partitions and perform other RHEL preparation before a JSA software
installation.
Important
Ensure that your hardware meets the system requirements for JSA deployments. For more information
•
about system requirements, see "Prerequisites for Installing JSA on Your Hardware" and "Appliance
Storage Requirements for Virtual and Software Installations".
Install no software other than JSA and RHEL on your hardware. Unapproved RPM installations can cause
•
dependency errors when you upgrade JSA software and can also cause performance issues in your
deployment.
62
Do not update your operating system or packages before or after JSA installation.
•
If you are installing JSA on a Unified Extensible Firmware Interface (UEFI) system, secure boot must be
•
disabled.
Complete the following tasks in order:
Installing RHEL on Your System on page 66
•
Installing JSA After the RHEL Installation on page 69
•
Prerequisites for Installing JSA on Your Hardware
Before you install Red Hat Enterprise Linux (RHEL) operating system on your hardware, ensure that your
system meets the system requirements.
JSA and RHEL version compatibility
The following table describes the version of Red Hat Enterprise Linux used with the JSA version.
Table 10: Red Hat Version
Red Hat Enterprise Linux VersionJSA Version
Red Hat Enterprise Linux V7.6 64-bitJSA 7.4.0
Page 63

Table 10: Red Hat Version (continued)
Red Hat Enterprise Linux VersionJSA Version
Red Hat Enterprise Linux V7.7 64-bitJSA 7.4.1
The following table describes the system requirements:
Table 11: System Requirements for RHEL Installations on your own Appliance
DescriptionRequirements
Not supportedKickstart disks
63
Network Time Protocol (NTP) package
Firewall configuration
Hardware
Optional
If you want to use NTP as your time server, ensure that
you install the NTP package.
WWW (http, https) enabled
SSH-enabled
See the tables below for memory, processor, and storage
requirements.
Memory and processor requirements
The following table describes the memory and processor requirements for your hardware.
Table 12: Minimum and Suggested Memory Requirements for JSA Virtual Appliances
Suggested number
of CPU cores
241648 GB12 GBJSA Event
Processor 1605
Minimum memory
requirementAppliance
Suggested memory
requirement
Minimum number of
CPU cores
Processor 1629
Processor 1648
Processor 1705
4040128 GB128 GBJSA Event
5656128 GB128 GBJSA Event
241648 GB12 GBJSA Flow
Page 64

Table 12: Minimum and Suggested Memory Requirements for JSA Virtual Appliances (continued)
64
Processor 1729
Processor 1748
Flow Processor
1805
Flow Processor
1829
Flow Processor
1829
Minimum memory
requirementAppliance
Suggested memory
requirement
Minimum number of
CPU cores
Suggested number
of CPU cores
4848128 GB128 GBJSA Flow
5656128 GB128 GBJSA Flow
2416JSA Event and
4848JSA Event and
5656JSA Event and
“All-in-one” or
Console
JSA 3129
“All-in-one” or
Console
“All-in-one” or
Console
Processor
1202/1301
Processor 1310
Processor 1501
241648 GB32 GBJSA 3105
5656128 GB64 GBJSA 3148
1464 GBJSA Flow
1464 GBJSA Flow
864 GBJSA Flow
Page 65

Storage requirements
Your appliance must have at least 256 GB of storage available.
The following table shows the storage requirements for installing JSA on your hardware.
Table 13: Minimum Storage Requirements for Appliances when you use the Virtual or Software Installation
Option
Data transfer rate (MB/s)IOPSAppliance InformationSystem classification
500800Supports XX05 licensingMinimum performance
10001200Supports XX29 licensingMedium performance
200010,000Supports XX48 licensingHigh Performance
300300Less than 500 EPSSmall All-in-One or 1600
65
300300Events and flowsEvent/Flow Processors
Appliance Storage Requirements for Virtual and Software Installations
To install JSA using virtual or software options, the device must meet minimum storage requirements.
The following table shows the recommended minimum storage requirements for installing JSA by using
the virtual or software only option.
NOTE: The minimum required storage size will vary, based in factors such as event size, event
per second (EPS), and retention requirements.
Table 14: Minimum Storage Requirements for Appliances When You Use the Virtual or Software Installation
Option
Data transfer rate (MB/s)IOPSAppliance InformationSystem classification
500800Supports XX05 licensingMinimum performance
10001200Supports XX29 licensingMedium performance
200010,000Supports XX48 licensingHigh Performance
300300Less than 500 EPSSmall All-in-One or 1600
Page 66

Table 14: Minimum Storage Requirements for Appliances When You Use the Virtual or Software Installation
Option (continued)
Data transfer rate (MB/s)IOPSAppliance InformationSystem classification
300300Events and flowsEvent/Flow Processors
Installing RHEL on Your System
You can install the Red Hat Enterprise Linux (RHEL) operating system on your own system to use with
JSA.
Download the Red Hat Enterprise Linux Server ISO x86_64 Boot ISO from https://access.redhat.com.
Refer to the Red Hat version table to choose the correct version.
66
Table 15: Red Hat Version
Red Hat Enterprise Linux versionJSA Version
Red Hat Enterprise Linux Server V7.6 x86_64 Boot ISO7.4.0
Red Hat Enterprise Linux Server V7.7 x86_64 Boot ISO7.4.1
You can provide your own RHEL, or acquire entitlement to a JSA Software Node. To acquire entitlement
to a JSA Software Node, contact your JSA Sales Representative.
If there are circumstances where you need install to RHEL separately, proceed with the following
instructions.
1. Map the ISO to a device for your appliance by using the bootable USB flash drive with the ISO.
For information about creating a bootable USB flash drive, see “USB Flash Drive Installations” on
page 18.
2. Insert the portable storage device into your appliance and restart your appliance.
3. From the starting menu, do one of the following options:
Select the device that you mapped the ISO to, or the USB drive, as the boot option.
•
To install on a system that supports Extensible Firmware Interface (EFI), you must start the system
•
in legacy mode.
4. When prompted, log in to the system as the root user.
Page 67

5. Follow the instructions in the installation wizard to complete the installation:
a. Set the language to English (US).
b. Click Date & Time and set the time for your deployment.
c. Click Software selection and select Minimal Install.
d. Click Installation Destination and select the I will configure partitioning option.
e. Select LVM from the list.
f. Click the Add button to add the mount points and capacities for your partitions, and then click Done.
For more information about RHEL7 partitions, see "Linux Operating System Partition Properties for
JSA Installations on Your Own Hardware".
g. Click Network & Host Name.
h. Enter a fully qualified domain name for your appliance host name.
i. Select the interface in the list, move the switch to the ON position, and click Configure.
j. On the General tab, select Automatically connect to this network when it is available option.
67
k. On the IPv4 Settings tab, select Manual in the Method list.
l. Click Add to enter the IP address, Netmask, and Gateway for the appliance in the Addresses field.
m. Add two DNS servers.
n. Click Save > Done > Begin Installation.
6. Set the root password, and then click Finish configuration.
7. After the installation finishes, disable SELinux by modifying the /etc/selinux/config file, and restart
the appliance.
Linux Operating System Partition Properties for JSA Installations on Your Own System
If you use your own appliance hardware, you can delete and re-create partitions on your Red Hat Enterprise
Linux operating system rather than modify the default partitions.
Use the values in the following table as a guide when you re-create the partitioning on your Red hat
Enterprise Linux Operating system.
The file system for each partition is XFS.
Table 16: Partitioning Guide for RHEL
Exists on Software
InstallationLVM Supported?Mount Path
Size
1 GBYesNo/boot
Page 68

Table 16: Partitioning Guide for RHEL (continued)
Exists on Software
InstallationLVM Supported?Mount Path
68
Size
200 MBYesNo/boot/efi
8 GBNoNo/recovery
5 GBYesYes/var
15 GBYesYes/var/log
3 GBYesYes/var/log/audit
13 GBYesYes/opt
1 GBYesYes/home
YesN/Aswap
Console Partition Configurations for Multiple Disk Deployments
15 GBYesYes/storetmp
3 GBYesYes/tmp
swap formula:
Configure the swap
partition size to be 75
percent of RAM, with a
minimum value of 12 GB
and a maximum value of 24
GB
Upto 15 GBYesYes/
80% of remaining spaceYesYes/store
20 % of remaining spaceYesYes/transient
For systems with multiple disks, configure the following partitions for JSA.
Disk 1
boot, swap, OS, JSA temporary files, and log files
Page 69

Remaining Disks
Use the default storage configurations for JSA appliances as a guideline to determine what RAID type
•
to use.
Mounted as /store
•
Store JSA data
•
The following table shows the default storage configuration for JSA appliances.
Table 17: Default Storage Configurations for JSA Appliances
Storage ConfigurationJSA host role
RAID1Flow processor
QRadar Network Insights (QNI)
RAID6Data Node
69
Event processor
Flow processor
Event and flow processor
All-in-one console
RAID10Event collector
Installing JSA After the RHEL Installation
Install Security JSA on your own device after you install RHEL.
A fresh software install erases all data in /store as part of the installation process. If you want to preserve
the contents of /store when performing a software install (such as when performing a manual retain), back
up the data you want to preserve apart from the host where the software is to be installed.
1. Copy the JSA ISO to /root or /storetmp directory of the device.
2. Create the media/cdrom directory by typing the following command:
mkdir/media/cdrom
3. Mount the JSA ISO by using the following command:
Page 70

mount - o loop <path_to_iso>/<qradar.iso> / media/cdrom
4. Run the JSA setup by using the following command:
/media/cdrom/setup
NOTE: A new kernel might be installed as part of the installation, which requires a system
restart. Repeat the commands in steps 3 and 4 after the system restart to continue the
installation.
5. Select the appliance type:
Software Install
•
High Availability Appliance
•
6. Select the appliance assignment, and then select Next.
70
7. If you selected an appliance for high-availability (HA), select whether the appliance is a console.
8. For the type of setup, select Normal Setup (default) or HA Recovery Setup, and set up the time.
9. If you selected HA Recovery Setup, enter the cluster virtual IP address.
10. Select the Internet Protocol version.
11. If you selected ipv6, select manual or auto for the Configuration type.
12. Select the bonded interface setup, if required.
13. Select the management interface.
14. In the wizard, enter a fully qualified domain name in the Hostname field.
15. In the IP address field, enter a static IP address, or use the assigned IP address.
Page 71

NOTE: If you are configuring this host as primary host for a high availability (HA) cluster, and
you selected Yes for auto-configure, you must record the automatically-generated IP address.
The generated IP address is entered during HA configuration.
For more information, see Juniper Security Analytics High Availability Guide.
16. If you do not have a email server, enter localhost in the Email server name field.
17. Leave the root password as it is.
18. If you are installing a Console, enter an admin password that meets the following criteria:
Contains at least 5 characters
•
Contains no spaces
•
71
Can include the following special characters: @, #, ^, and *.
•
19. Click Finish.
20. Follow the instructions in the installation wizard to complete the installation.
The installation process might take several minutes.
21. If you are installing a Console, apply your license key.
a. Log in to JSA as the admin user:
b. Click Login.
c. In the navigation menu, click Admin.
d. In the navigation pane, click System configuration.
e. Click the System and License Management icon.
f. From the Display list box, select Licenses, and upload your license key.
g. Select the unallocated license and click Allocate System to License.
h. From the list of systems, select a system, and click Allocate System to License.
22. If you want to add managed hosts, see Juniper Security Analytics Administration Guide.
Page 72

8
CHAPTER
Configuring Bonded Management
Interfaces
Configuring Bonded Management Interfaces | 73
Page 73

Configuring Bonded Management Interfaces
You can bond the management interface on JSA hardware.
You can bond the management interfaces during the JSA installation process, or after installation by
following these steps.
You can bond non-management interfaces in the JSA user interface after installation. See “Configuring
network interfaces” in Juniper Secure Analytics Administration Guide for more information about configuring
non-management interfaces.
Bonding modes 1 and 4 are supported. Mode 4 is the default.
NOTE: You must be physically logged in to your appliance, for example through IMM or iDRAC,
for these steps. Do not use ssh for these steps.
73
1. Change your network setup by typing the command qchange_netsetup:
NOTE: If you attempt to run qchange_netsetup over a serial connection, the connection can
be misidentified as a network connection. To run over a serial connection use
qchange_netsetup -y . This command allows you to bypass the validation check that detects
a network connection.
2. Select the protocol version that is used for the appliance.
3. Select Yes to continue with bonded network interface configuration.
4. Select interfaces to configure as bonded interfaces. The interfaces that you select must not already be
configured.
5. Enter the bonding options. For more information about configuring specific bonding options, see your
vendor-specific operating system documentation.
6. Update any network information settings as needed. Your appliance restarts automatically.
7. Log in to the appliance and verify the configuration.
Page 74

9
CHAPTER
Network Settings Management
Network Settings Management | 75
Changing the Network Settings in an All-in-one System | 75
Changing the Network Settings Of a JSA Console in a Multi-system Deployment | 76
Updating Network Settings After a NIC Replacement | 78
Page 75

Network Settings Management
Use the qchange_netsetup script to change the network settings of your JSA system. Configurable network
settings include host name, IP address, network mask, gateway, DNS addresses, public IP address, and
email server.
RELATED DOCUMENTATION
Changing the Network Settings in an All-in-one System | 75
Changing the Network Settings Of a JSA Console in a Multi-system Deployment | 76
Changing the Network Settings in an All-in-one System
75
You can change the network settings in your All-in-one system. An All-in-one system has all JSA components
that are installed on one system.
You must have a local connection to your JSA console
•
Confirm that there are no undeployed changes.
•
If you are changing the IP address host name of a box in the deployment you must remove it from the
•
deployment.
If this system is part of an HA pair you must disable HA first before you change any network settings.
•
If the system that you want to change is the console, you must remove all hosts in the deployment before
•
proceeding.
1. Log in to as the root user.
2. Type the following command:
qchange_netsetup
NOTE: If you attempt to run qchange_netsetup over a serial connection, the connection can
be misidentified as a network connection. To run over a serial connection use
qchange_netsetup -y. This command allows you to bypass the validation check that detects
a network connection.
Page 76

3. Follow the instructions in the wizard to complete the configuration.
The following table contains descriptions and notes to help you configure the network settings.
Table 18: Description Of Network Settings for an All-in-one JSA Console
DescriptionNetwork Setting
IPv4 or IPv6Internet Protocol
Fully qualified domain nameHost name
OptionalSecondary DNS server address
76
Public IP address for networks that use
Network Address Translation (NAT)
A series of messages are displayed as JSA processes the requested changes. After the requested changes
are processed, the JSA system is automatically shutdown and restarted.
RELATED DOCUMENTATION
Network Settings Management | 75
Changing the Network Settings Of a JSA Console in a Multi-system Deployment | 76
Optional
Used to access the server, usually from a different network or the
Internet.
Configured by using Network Address Translation (NAT) services on
your network or firewall settings on your network. (NAT translates an
IP address in one network to a different IP address in another network).
If you do not have an email server, use localhost.Email server name
Changing the Network Settings Of a JSA Console in a Multi-system Deployment
To change the network settings in a multi-system JSA deployment, remove all managed hosts, change the
network settings, add the managed hosts again, and then reassign the component.
Page 77

You must have a local connection to your JSA console
•
1. To remove managed hosts, log in to JSA.
The Username is admin.
a. Click the Admin tab.
b. Click the System and License Management icon.
c. Select the managed host that you want to remove.
d. Select Deployment Actions >Remove Host.
e. In the Admin tab, click Deploy Changes.
2. Type the following command: qchange_netsetup.
NOTE: If you attempt to run qchange_netsetup over a serial connection, the connection can
be misidentified as a network connection. To run over a serial connection use
qchange_netsetup -y. This command allows you to bypass the validation check that detects
a network connection.
77
3. Follow the instructions in the wizard to complete the configuration.
The following table contains descriptions and notes to help you configure the network settings.
Table 19: Description Of Network Settings for a Multi-system JSA Console Deployment
DescriptionNetwork Setting
IPv4 or IPv6Internet Protocol
Fully qualified domain nameHost name
OptionalSecondary DNS server address
Public IP address for networks that use
Network Address Translation (NAT)
Optional
Used to access the server, usually from a different network or the
Internet.
Configured by using Network Address Translation (NAT) services on
your network or firewall settings on your network. (NAT translates an
IP address in one network to a different IP address in another network).
If you do not have an email server, use localhost.Email server name
Page 78

After you configure the installation parameters, a series of messages are displayed. The installation
process might take several minutes.
4. To re-add and reassign the managed hosts, log in to JSA.
The Username is admin.
a. Click the Admin tab.
b. Click the System and License Management icon.
c. Click Deployment Actions >Add Host.
d. Follow the instructions in the wizard to add a host.
Select the Network Address Translation option to configure a public IP address for the server. This
IP address is a secondary IP address that is used to access the server, usually from a different network
or the Internet. The Public IP address is often configured by using Network Address Translation
(NAT) services on your network or firewall settings on your network. NAT translates an IP address
in one network to a different IP address in another network.
78
5. Reassign all components that are not your JSA console to your managed hosts.
a. Click the Admin tab.
b. Click the System and License Management icon.
c. Select the host that you want to reassign.
d. Click Deployment Actions >Edit Host Connection.
e. Enter the IP address of the source host in the Modify Connection window.
RELATED DOCUMENTATION
Network Settings Management | 75
Changing the Network Settings in an All-in-one System | 75
Updating Network Settings After a NIC Replacement
If you replace your integrated system board or stand-alone (Network Interface Cards) NICs, you must
update your JSA network settings to ensure that your hardware remains operational.
The network settings file contains one pair of lines for each NIC that is installed and one pair of lines for
each NIC that was removed. You must remove the lines for the NIC that you removed and then rename
the NIC that you installed.
Page 79

NOTE: In previous releases of JSA, interfaces were named in the following format: eth0, eth1,
eth4, and so on. JSA 7.3.0 interface naming includes a greater range of possible interface names.
For example, ens192, enp2s0, and so on.
Your network settings file might resemble the following example, where NAME="<old_name>" is the NIC
that was replaced and NAME="<new_name>" is the NIC that was installed.
# PCI device 0x14e4:0x163b (bnx2)
SUBSYSTEM=="net", ACTION=="add", DRIVERS=="?*",
ATTR{address}=="78:2a:cb:23:1a:2f", ATTR{type}=="1",
KERNEL=="eth*", NAME="eth0"
79
# PCI device 0x14e4:0x163b (bnx2)
SUBSYSTEM=="net", ACTION=="add", DRIVERS=="?*",
ATTR{address}=="78:2a:cb:23:1a:2f", ATTR{type}=="1",
KERNEL=="eth*", NAME="eth0
# PCI device 0x14e4:0x163b (bnx2)
SUBSYSTEM=="net", ACTION=="add", DRIVERS=="?*",
ATTR{address}=="78:2a:cb:23:1a:2f", ATTR{type}=="1",
KERNEL=="eth*", NAME="eth4
# PCI device 0x14e4:0x163b (bnx2)
SUBSYSTEM=="net", ACTION=="add", DRIVERS=="?*",
ATTR{address}=="78:2a:cb:23:1a:2f", ATTR{type}=="1",
KERNEL=="eth*", NAME="eth4
1. Use SSH to log in to the JSA product as the root user.
The user name is root.
2. Type the following command:
Page 80

cd /etc/udev/rules.d/
3. To edit the network settings file, type the following command:
vi 70-persistent-net.rules
4. Remove the pair of lines for the NIC that was replaced: NAME=”<old_name>”.
5. Rename the Name=<name> values for the newly installed NIC.
6. Save and close the file.
7. Type the following command: reboot.
RELATED DOCUMENTATION
80
Changing the Network Settings in an All-in-one System | 75
Changing the Network Settings Of a JSA Console in a Multi-system Deployment | 76
Page 81

10
CHAPTER
Troubleshooting Problems
Troubleshooting Problems | 82
Troubleshooting Resources | 83
JSA Log Files | 83
Common Ports and Servers Used by JSA | 84
Page 82

Troubleshooting Problems
Troubleshooting is a systematic approach to solving a problem. The goal of troubleshooting is to determine
why something does not work as expected and how to resolve the problem.
Review the following table to help you or customer support resolve a problem.
Table 20: Troubleshooting Actions to Prevent Problems
DescriptionAction
A product fix might be available to fix the problem.Apply all known patches, service levels, or program
temporary fixes (PTF).
82
Ensure that the configuration is supported.
Check kb.juniper.net for known issues/fixes.
Reproduce the problem to ensure that it is not just a
simple error.
Check the installation directory structure and file
permissions.
Review relevant documentation, such as release notes,
tech notes, and proven practices documentation.
Review recent changes in your computing
environment.
Review the software and hardware requirements.
Error messages give important information to help you identify
the component that is causing the problem.
If samples are available with the product, you might try to
reproduce the problem by using the sample data.
The installation location must contain the appropriate file
structure and the file permissions.
For example, if the product requires write access to log files,
ensure that the directory has the correct permission.
Search the Juniper Networks knowledge bases to determine
whether your problem is known, has a workaround, or if it is
already resolved and documented.
Sometimes installing new software might cause compatibility
issues.
If you still need to resolve problems, you must collect diagnostic data. This data is necessary for an Juniper
Networks technical-support representative to effectively troubleshoot and assist you in resolving the
problem. You can also collect diagnostic data and analyze it yourself.
RELATED DOCUMENTATION
Troubleshooting Resources | 83
Page 83

JSA Log Files | 83
Common Ports and Servers Used by JSA | 84
Troubleshooting Resources
Troubleshooting resources are sources of information that can help you resolve a problem that you have
with a product.
Find the Juniper Secure Analytics (JSA) content that you need by selecting your products from the
https://support.juniper.net/support/downloads/.
RELATED DOCUMENTATION
83
JSA Log Files | 83
Common Ports and Servers Used by JSA | 84
JSA Log Files
Use the JSA log files to help you troubleshoot problems.
You can review the log files for the current session individually or you can collect them to review later.
Follow these steps to review the JSA log files.
1. To help you troubleshoot errors or exceptions, review the following log files.
/var/log/qradar.log
•
/var/log/qradar.error
•
2. If you require more information, review the following log files:
/var/log/qradar-sql.log
•
/opt/tomcat6/logs/catalina.out
•
/var/log/qflow.debug
•
3. Review all logs by selecting Admin >System & License Mgmt >Actions >Collect Log Files.
Page 84

RELATED DOCUMENTATION
Common Ports and Servers Used by JSA | 84
Troubleshooting Resources | 83
Common Ports and Servers Used by JSA
JSA requires that certain ports are ready to receive information from JSA components and external
infrastructure. To ensure that JSA is using the most recent security information, it also requires access to
public servers and RSS feeds.
SSH Communication on Port 22
84
All the ports that are used by the JSA console to communicate with managed hosts can be tunneled, by
encryption, through port 22 over SSH.
The console connects to the managed hosts using an encrypted SSH session to communicate securely.
These SSH sessions are initiated from the console to provide data to the managed host. For example, the
JSA console can initiate multiple SSH sessions to the Event Processor appliances for secure communication.
This communication can include tunneled ports over SSH, such as HTTPS data for port 443 and Ariel query
data for port 32006. Flow Processors that use encryption can initiate SSH sessions to Flow Processor
appliances that require data.
Open Ports That Are Not Required by JSA
You might find additional open ports in the following situations:
Page 85

When you mount or export a network file share, you might see dynamically assigned ports that are
•
required for RPC services, such as rpc.mountd and rpc.rquotad.
JSA Port Usage
Review the list of common ports that JSA services and components use to communicate across the network.
You can use the port list to determine which ports must be open in your network. For example, you can
determine which ports must be open for the JSA console to communicate with remote event processors.
WinCollect Remote Polling
WinCollect agents that remotely poll other Microsoft Windows operating systems might require additional
port assignments.
For more information, see the Juniper Secure Analytics WinCollect User Guide.
85
JSA Listening Ports
The following table shows the JSA ports that are open in a LISTEN state. The LISTEN ports are valid only
when iptables is enabled on your system. Unless otherwise noted, information about the assigned port
number applies to all JSA products.
Table 21: Listening Ports That Are Used by JSA Services and Components
RequirementDirectionProtocolDescriptionPort
TCPSSH22
Bidirectional from the JSA
console to all other components.
Remote management
access.
Adding a remote system
as a managed host.
Log source protocols to
retrieve files from external
devices, for example the
log file protocol.
Users who use the
command-line interface to
communicate from
desktops to the Console.
High-availability (HA).
Page 86

Table 21: Listening Ports That Are Used by JSA Services and Components (continued)
RequirementDirectionProtocolDescriptionPort
86
123
(NTP)
TCPSMTP25
TCP/UDPPort mapper111
UDPNetwork Time Protocol
From all managed hosts to the
SMTP gateway.
Managed hosts (MH) that
communicate with the JSA
console.
Users that connect to the JSA
console.
Outbound from the JSA Console
to the NTP Server
Outbound from the MH to the
JSA Console
Emails from JSA to an
SMTP gateway.
Delivery of error and
warning email messages
to an administrative email
contact.
Remote Procedure Calls
(RPC) for required
services, such as Network
File System (NFS).
Time synchronization via
Chrony between:
JSA Console and NTP
•
server
Managed Hosts and JSA
•
Console
dynamically
allocated
ports above
1024 for
RPC calls.
TCPDCOM135 and
Bidirectional traffic between
WinCollect agents and Windows
operating systems that are
remotely polled for events.
Bidirectional traffic between JSA
console components or JSA
event collectors that use either
Microsoft Security Event Log
Protocol or Adaptive Log
Exporter agents and Windows
operating systems that are
remotely polled for events.
This traffic is generated by
WinCollect, Microsoft
Security Event Log
Protocol, or Adaptive Log
Exporter.
NOTE: DCOM typically
allocates a random port
range for communication.
You can configure
Microsoft Windows
products to use a specific
port. For more
information, see your
Microsoft Windows
documentation.
Page 87

Table 21: Listening Ports That Are Used by JSA Services and Components (continued)
RequirementDirectionProtocolDescriptionPort
87
137
138
service
datagram service
UDPWindows NetBIOS name
UDPWindows NetBIOS
Bidirectional traffic between
WinCollect agents and Windows
operating systems that are
remotely polled for events.
Bidirectional traffic between JSA
console components or JSA
Event Collectors that use either
Microsoft Security Event Log
Protocol or Adaptive Log
Exporter agents and Windows
operating systems that are
remotely polled for events.
This traffic is generated by
WinCollect, Microsoft
Security Event Log
Protocol, or Adaptive Log
Exporter.
This traffic is generated by
WinCollect, Microsoft
Security Event Log
Protocol, or Adaptive Log
Exporter.
139
session service
TCPWindows NetBIOS
Bidirectional traffic between
WinCollect agents and Windows
operating systems that are
remotely polled for events.
Bidirectional traffic between JSA
console components or JSA
Event Collectors that use either
Microsoft Security Event Log
Protocol or Adaptive Log
Exporter agents and Windows
operating systems that are
remotely polled for events.
This traffic is generated by
WinCollect, Microsoft
Security Event Log
Protocol, or Adaptive Log
Exporter.
Page 88

Table 21: Listening Ports That Are Used by JSA Services and Components (continued)
RequirementDirectionProtocolDescriptionPort
88
UDPNetSNMP162
TCPNetSNMP199
TCPApache/HTTPS443
JSA managed hosts that connect
to the JSA console.
External log sources to JSA Event
Collectors.
JSA managed hosts that connect
to the JSA console.
External log sources to JSA Event
Collectors.
Bidirectional traffic for secure
communications from all
products to the JSA console.
UDP port for the
NetSNMP daemon that
listens for communications
(v1, v2c, and v3) from
external log sources. The
port is open only when
the SNMP agent is
enabled.
TCP port for the
NetSNMP daemon that
listens for communications
(v1, v2c, and v3) from
external log sources. The
port is open only when
the SNMP agent is
enabled.
Configuration downloads
to managed hosts from
the JSA console.
Unidirectional traffic from the
App Host to th JSA Console.
JSA managed hosts that
connect to the JSA
console.
Users to have log in
access to JSA.
JSA console that manage
and provide configuration
updates for WinCollect
agents.
Apps that require access
to the JSA API.
Page 89

Table 21: Listening Ports That Are Used by JSA Services and Components (continued)
RequirementDirectionProtocolDescriptionPort
89
445
Service
TCPMicrosoft Directory
UDP/TCPSyslog514
Bidirectional traffic between
WinCollect agents and Windows
operating systems that are
remotely polled for events.
Bidirectional traffic between JSA
console components or JSA
Event Collectors that use the
Microsoft Security Event Log
Protocol and Windows operating
systems that are remotely polled
for events.
Bidirectional traffic between
Adaptive Log Exporter agents
and Windows operating systems
that are remotely polled for
events.
External network appliances that
provide TCP syslog events use
bidirectional traffic.
This traffic is generated by
WinCollect, Microsoft
Security Event Log
Protocol, or Adaptive Log
Exporter.
External log sources to
send event data to JSA
components.
762
(NFS) mount daemon
(mountd)
External network appliances that
provide UDP syslog events use
uni-directional traffic.
Internal syslog traffic from JSA
hosts to the JSA console.
TCP/UDPNetwork File System
TCP/UDPSyslog-ng1514
Connections between the JSA
console and NFS server.
Connection between the local
Event Collector component and
local Event Processor component
to the syslog-ng daemon for
logging.
Syslog traffic includes
WinCollect agents, event
collectors, and Adaptive
Log Exporter agents
capable of sending either
UDP or TCP events to
JSA.
The Network File System
(NFS) mount daemon,
which processes requests
to mount a file system at
a specified location.
Internal logging port for
syslog-ng.
Page 90

Table 21: Listening Ports That Are Used by JSA Services and Components (continued)
RequirementDirectionProtocolDescriptionPort
90
3389
(RDP) and Ethernet over
USB is enabled
TCPNFS2049
UDPNetFlow data2055
TCPDocker command port2375
TCP/UDPRemote Desktop Protocol
Connections between the JSA
console and NFS server.
From the management interface
on the flow source (typically a
router) to the JSA Flow
Processor.
Internal communications. This
port is not available externally.
The Network File System
(NFS) protocol to share
files or data between
components.
NetFlow datagram from
components, such as
routers.
Used to manage JSA
application framework
resources.
If the Microsoft Windows
operating system is
configured to support
RDP and Ethernet over
USB, a user can initiate a
session to the server over
the management network.
This means the default
port for RDP, 3389 must
be open.
5000
communication to the
docker si-registry running
on the Console. This
allows all managed hosts
to pull images from the
Console that will be used
to create local containers.
TCPRedirect port4333
TCPUsed to allow
Unidirectional from the JSA
managed host to the JSA
Console. The port is only opened
on the Console. Managed hosts
must pull from the Console.
This port is assigned as a
redirect port for Address
Resolution Protocol (ARP)
requests in JSA offense
resolution.
Required for apps running
on an App Host.
Page 91

Table 21: Listening Ports That Are Used by JSA Services and Components (continued)
RequirementDirectionProtocolDescriptionPort
91
7676, 7677,
and four
randomly
bound ports
above
32000.
(IMQ)
TCPPostgres5432
TCPSyslog6514
TCPMessaging connections
Communication for the managed
host that is used to access the
local database instance.
External network appliances that
provide encrypted TCP syslog
events use bidirectional traffic.
Message queue communications
between components on a
managed host.
Required for provisioning
managed hosts from the
Admin tab.
External log sources to
send encrypted event data
to JSA components.
Message queue broker for
communications between
components on a
managed host.
NOTE: You must permit
access to these ports from
the JSA console to
unencrypted hosts.
Ports 7676 and 7677 are
static TCP ports, and four
extra connections are
created on random ports.
7779, 7780,
7781, 7782,
7783, 7788,
7790, 7791,
7792, 7793,
7795, 7799,
and 8989.
For more information
about finding randomly
bound ports, see "Viewing
IMQ Port Associations".
TCPJMX server ports7777, 7778,
Internal communications. These
ports are not available externally.
JMX server (Java
Management Beans)
monitoring for all internal
JSA processes to expose
supportability metrics.
These ports are used by
JSA support.
Page 92

Table 21: Listening Ports That Are Used by JSA Services and Components (continued)
RequirementDirectionProtocolDescriptionPort
92
7789
7803
7804
Block Device (DRBD)
Engine
builder
TCP/UDPHA Distributed Replicated
TCPApache Tomcat7800
TCPApache Tomcat7801
TCPAnomaly Detection
TCPJSA Risk Manager Arc
Bidirectional between the
secondary host and primary host
in an HA cluster.
From the Event Collector to the
JSA console.
From the Event Collector to the
JSA console.
From the Event Collector to the
JSA console.
Internal control communications
between JSA processes and ARC
builder.
Distributed Replicated
Block Device (DRBD) used
to keep drives
synchronized between the
primary and secondary
hosts in HA
configurations.
Real-time (streaming) for
events.
Real-time (streaming) for
flows.
Anomaly detection engine
port.
This port is used for JSA
Risk Manager only. It is
not available externally.
7805
8000
communication
(ECS)
TCPSyslog tunnel
TCPEvent Collection service
TCPSNMP daemon port8001
TCPApache Tomcat8005
Bidirectional between the JSA
Console and managed hosts
From the Event Collector to the
JSA console.
External SNMP systems that
request SNMP trap information
from the JSA console.
Internal communications. Not
available externally.
Used for encrypted
communication between
the console and managed
hosts.
Listening port for specific
Event Collection Service
(ECS).
Listening port for external
SNMP data requests.
Open to control tomcat.
This port is bound and
only accepts connections
from the local host.
Page 93

Table 21: Listening Ports That Are Used by JSA Services and Components (continued)
RequirementDirectionProtocolDescriptionPort
93
8082
Manager
TCPApache Tomcat8009
TCPApache Tomcat8080
TCPSecure tunnel for JSA Risk
TCPWinCollect agents8413
From the HTTP daemon (HTTPd)
process to Tomcat.
From the HTTP daemon (HTTPd)
process to Tomcat.
Bidirectional traffic between the
JSA Console and JSA Risk
Manager
Bidirectional traffic between
WinCollect agent and JSA
console.
Tomcat connector, where
the request is used and
proxied for the web
service.
Tomcat connector, where
the request is used and
proxied for the web
service.
Required when encryption
is used between JSA Risk
Manager and the JSA
Console.
This traffic is generated by
the WinCollect agent and
communication is
encrypted. It is required to
provide configuration
updates to the WinCollect
agent and to use
WinCollect in connected
mode.
9090
Conman9000
database and server
TCPApache Tomcat8844
TCPXForce IP Reputation
Unidirectional from the JSA
console to the appliance that is
running the JSA Vulnerability
Manager processor.
Unidirectional from the JSA
Console to a JSA App Host.
Internal communications. Not
available externally.
Used by Apache Tomcat
to read RSS feeds from
the host that is running
the JSA Vulnerability
Manager processor.
Used with an App Host. It
allows the Console to
deploy apps to an App
Host and to manage those
apps.
Communications between
JSA processes and the
XForce Reputation IP
database.
Page 94

Table 21: Listening Ports That Are Used by JSA Services and Components (continued)
RequirementDirectionProtocolDescriptionPort
94
one
dynamically
assigned
port
9999
processor
TCPCertificate files download9381
TCPWeb application container9913 plus
UDPNetFlow data9995
TCPJSA Vulnerability Manager
Unidirectional from JSA managed
host or external network to JSA
Console.
Bidirectional Java Remote
Method Invocation (RMI)
communication between Java
Virtual Machines
From the management interface
on the flow source (typically a
router) to the JSA flow processor.
Unidirectional from the scanner
to the appliance running the JSA
Vulnerability Manager processor
Downloading JSA CA
certificate and CRL files,
which can be used to
validate JSA generated
certificates.
When the web application
is registered, one
additional port is
dynamically assigned.
NetFlow datagram from
components, such as
routers.
Used for JSA Vulnerability
Manager command
information. The JSA
console connects to this
port on the host that is
running the JSA
Vulnerability Manager
processor. This port is
only used when JSA
Vulnerability Manager is
enabled.
10000
10102
administration interface
TCP/UDPJSA web-based, system
TCPHeartbeat command10101,
User desktop systems to all JSA
hosts.
Bidirectional traffic between the
primary and secondary HA nodes.
In JSA 2014.5 and earlier,
this port is used for server
changes, such as the hosts
root password and firewall
access.
Port 10000 is disabled in
2014.6.
Required to ensure that
the HA nodes are still
active.
Page 95

Table 21: Listening Ports That Are Used by JSA Services and Components (continued)
RequirementDirectionProtocolDescriptionPort
95
15432
TCPSocat binary12500
TCPPostgres15433
TCPSSH Tunnel20000-23000
Outbound from MH to the JSA
Console
Communication for the managed
host that is used to access the
local database instance.
Bidirectional from the JSA
Console to all other encrypted
managed hosts.
Port used for tunneling
chrony udp requests over
tcp when JSA Console or
MH is encrypted
Required to be open for
internal communication
between JSA Risk
Manager and JSA.
Used for JSA Vulnerability
Manager configuration
and storage. This port is
only used when JSA
Vulnerability Manager is
enabled.
Local listening point for
SSH tunnels used for Java
Message Service (JMS)
communication with
encrypted managed hosts.
Used to perform
long-running
asynchronous tasks, such
as updating networking
configuration via System
and License Management.
32000
forwarding
TCPSOAP web server23111
TCPNormalized flow
Bidirectional between JSA
components.
SOAP web server port for
the Event Collection
Service (ECS).
Normalized flow data that
is communicated from an
off-site source or between
JSA Flow Processors.
Page 96

Table 21: Listening Ports That Are Used by JSA Services and Components (continued)
RequirementDirectionProtocolDescriptionPort
96
32004
forwarding
TCPNormalized event
TCPData flow32005
TCPAriel queries32006
TCPOffense data32007
Bidirectional between JSA
components.
Bidirectional between JSA
components.
Bidirectional between JSA
components.
Bidirectional between JSA
components.
Normalized event data
that is communicated
from an off-site source or
between JSA Event
Collectors.
Data flow communication
port between JSA Event
Collectors when on
separate managed hosts.
Communication port
between the Ariel proxy
server and the Ariel query
server.
Events and flows
contributing to an offense
or involved in global
correlation.
32000-33999
flow context)
TCPIdentity data32009
TCPFlow listening source port32010
TCPAriel listening port32011
TCPData flow (flows, events,
Bidirectional between JSA
components.
Bidirectional between JSA
components.
Bidirectional between JSA
components.
Bidirectional between JSA
components.
Identity data that is
communicated between
the passive Vulnerability
Information Service (VIS)
and the Event Collection
Service (ECS).
Flow listening port to
collect data from JSA Flow
Processor.
Ariel listening port for
database searches,
progress information, and
other associated
commands.
Data flows, such as
events, flows, flow
context, and event search
queries.
Page 97

Table 21: Listening Ports That Are Used by JSA Services and Components (continued)
RequirementDirectionProtocolDescriptionPort
97
ICMPICMP
Bidirectional traffic between the
secondary host and primary host
in an HA cluster.
Testing the network
connection between the
secondary host and
primary host in an HA
cluster by using Internet
Control Message Protocol
(ICMP).
Viewing IMQ Port Associations
Several ports that are used by JSA allocate extra random port numbers. For example, Message Queues
(IMQ) open random ports for communication between components on a managed host. You can view the
random port assignments for IMQ by using telnet to connect to the local host and doing a lookup on the
port number.
Random port associations are not static port numbers. If a service is restarted, the ports that are generated
for the service are reallocated and the service is provided with a new set of port numbers.
1. Using SSH, log in to the JSA console as the root user.
2. To display a list of associated ports for the IMQ messaging connection, type the following command:
telnet localhost 7676
The results from the telnet command might look similar to this output:
[root@domain ~]# telnet localhost 7676 Trying 127.0.0.1... Connected to
localhost. Escape character is '^]'. 101 imqbroker 4.4 Update 1 portmapper
tcp PORTMAPPER 7676
[imqvarhome=/opt/openmq/mq/var,imqhome=/opt/openmq/mq,sessionid=<session_id>]
cluster_discovery tcp CLUSTER_DISCOVERY 44913 jmxrmi rmi JMX 0
[url=service:jmx:rmi://domain.ibm.com/stub/<urlpath>] admin tcp ADMIN 43691
jms tcp NORMAL 7677 cluster tcp CLUSTER 36615
The telnet output shows 3 of the 4 random high-numbered TCP ports for IMQ. The fourth port, which
is not shown, is a JMX Remote Method Invocation (RMI) port that is available over the JMX URL that
is shown in the output.
If the telnet connection is refused, it means that IMQ is not currently running. It is probable that the
system is either starting up or shutting down, or that services were shut down manually.
Page 98

Searching for Ports in Use by JSA
Use the netstat command to determine which ports are in use on the JSA Console or managed host. Use
the netstat command to view all listening and established ports on the system.
1. Using SSH, log in to your JSA console, as the root user.
2. To display all active connections and the TCP and UDP ports on which the computer is listening, type
the following command:
netstat -nap
3. To search for specific information from the netstat port list, type the following command:
netstat -nap | grep port
To display all ports that match 199, type the following command:
•
98
netstat -nap | grep 199
To display information on all listening ports, type the following command:
•
netstat -nap | grep LISTEN
JSA Public Servers
To provide you with the most current security information, JSA requires access to a number of public
servers and RSS feeds.
Public Servers
Table 22: Public Servers That JSA Must Access
DescriptionIP address or hostname
JSA Vulnerability Manager DMZ scanner194.153.113.31
JSA Vulnerability Manager DMZ scanner194.153.113.32
JSA auto-update servers.download.juniper.net
Page 99

Table 22: Public Servers That JSA Must Access (continued)
DescriptionIP address or hostname
99
www.iss.net
RSS Feeds for JSA Products
Table 23: RSS feeds
http://feeds.feedburner.com/SecurityIntelligenceSecurity
Intelligence
http://securityintelligence.com/topics/vulnerabilities-threats/feedSecurity
Intelligence Vulns
/ Threats
Juniper X-Force Threat Intelligence Threat Information
Center dashboard item
X-Force Threat Feed update serverupdate.xforce-security.com
X-Force Threat Feed licensing serverlicense.xforce-security.com
RequirementsURLTitle
JSA and an Internet
connection
JSA and an Internet
connection
Juniper My
Notifications
Security News
Security
Advisories
Latest Published
Vulnerabilities
Scans Completed
Scans In Progress
http://IP_address_of_QVM_processor
:8844/rss/research/news.rss
http://IP_address_of_QVM_processor
:8844/rss/research/news.rss
http://IP_address_of_QVM_processor
:8844/rss/research/vulnerabilities.rss
http://IP_address_of_QVM_processor
:8844/rss/scanresults/completedScans.rss
http://IP_address_of_QVM_processor
:8844/rss/scanresults/runningScans.rss
JSA and an Internet
connection
JSA Vulnerability Manager
processor is deployed
JSA Vulnerability Manager
processor is deployed
JSA Vulnerability Manager
processor deployed
JSA Vulnerability Manager
processor is deployed
JSA Vulnerability Manager
processor is deployed
Page 100

RELATED DOCUMENTATION
Troubleshooting Resources | 83
JSA Log Files | 83
100
 Loading...