

Page 1

Salt for Junos OS Quick Start Guide
Published
2020-10-26
Page 2

Juniper Networks, Inc.
1133 Innovation Way
Sunnyvale, California 94089
USA
408-745-2000
www.juniper.net
Juniper Networks, the Juniper Networks logo, Juniper, and Junos are registered trademarks of Juniper Networks, Inc. in
the United States and other countries. All other trademarks, service marks, registered marks, or registered service marks
are the property of their respective owners.
Juniper Networks assumes no responsibility for any inaccuracies in this document. Juniper Networks reserves the right
to change, modify, transfer, or otherwise revise this publication without notice.
Salt for Junos OS Quick Start Guide
Copyright © 2020 Juniper Networks, Inc. All rights reserved.
The information in this document is current as of the date on the title page.
ii
YEAR 2000 NOTICE
Juniper Networks hardware and software products are Year 2000 compliant. Junos OS has no known time-related
limitations through the year 2038. However, the NTP application is known to have some difficulty in the year 2036.
END USER LICENSE AGREEMENT
The Juniper Networks product that is the subject of this technical documentation consists of (or is intended for use with)
Juniper Networks software. Use of such software is subject to the terms and conditions of the End User License Agreement
(“EULA”) posted at https://support.juniper.net/support/eula/. By downloading, installing or using such software, you
agree to the terms and conditions of that EULA.
Page 3

Table of Contents
1
2
3
Disclaimer
Salt for Junos OS Disclaimer | 5
Learn About Salt for Junos OS
Salt for Junos OS Overview | 7
Get Started
How to Install Salt for Junos OS | 10
Configure the Device Running Junos OS | 11
Set Up the Salt Master | 12
iii
Set Up the Junos Proxy Minion Server | 15
Authorize the Proxy Minion Keys on the Salt Master | 17
Verify the Connection to the Managed Device | 18
(Optional) Configure the Junos Syslog Engine | 20
How to Authenticate Salt for Junos OS Users | 22
Salt for Junos OS User Authentication Overview | 22
Authenticating the Salt User By Using a Password | 25
Authenticating the Salt User By Using SSH Keys | 25
Generating and Configuring SSH Keys | 26
Referencing SSH Keys in the Salt Proxy Configuration File | 27
Page 4

1
CHAPTER
Disclaimer
Salt for Junos OS Disclaimer | 5
Page 5

Salt for Junos OS Disclaimer
Use of the Salt for Junos OS software implies acceptance of the terms of this disclaimer, in addition to any
other licenses and terms required by Juniper Networks.
Juniper Networks is willing to make the Salt for Junos OS software available to you only upon the condition
that you accept all of the terms contained in this disclaimer. Please read the terms and conditions of this
disclaimer carefully.
The Salt for Junos OS software is provided as is. Juniper Networks makes no warranties of any kind
whatsoever with respect to this software. All express or implied conditions, representations and warranties,
including any warranty of non-infringement or warranty of merchantability or fitness for a particular
purpose, are hereby disclaimed and excluded to the extent allowed by applicable law.
In no event will Juniper Networks be liable for any direct or indirect damages, including but not limited to
lost revenue, profit or data, or for direct, special, indirect, consequential, incidental or punitive damages
however caused and regardless of the theory of liability arising out of the use of or inability to use the
software, even if Juniper Networks has been advised of the possibility of such damages.
5
Page 6

2
CHAPTER
Learn About Salt for Junos OS
Salt for Junos OS Overview | 7
Page 7
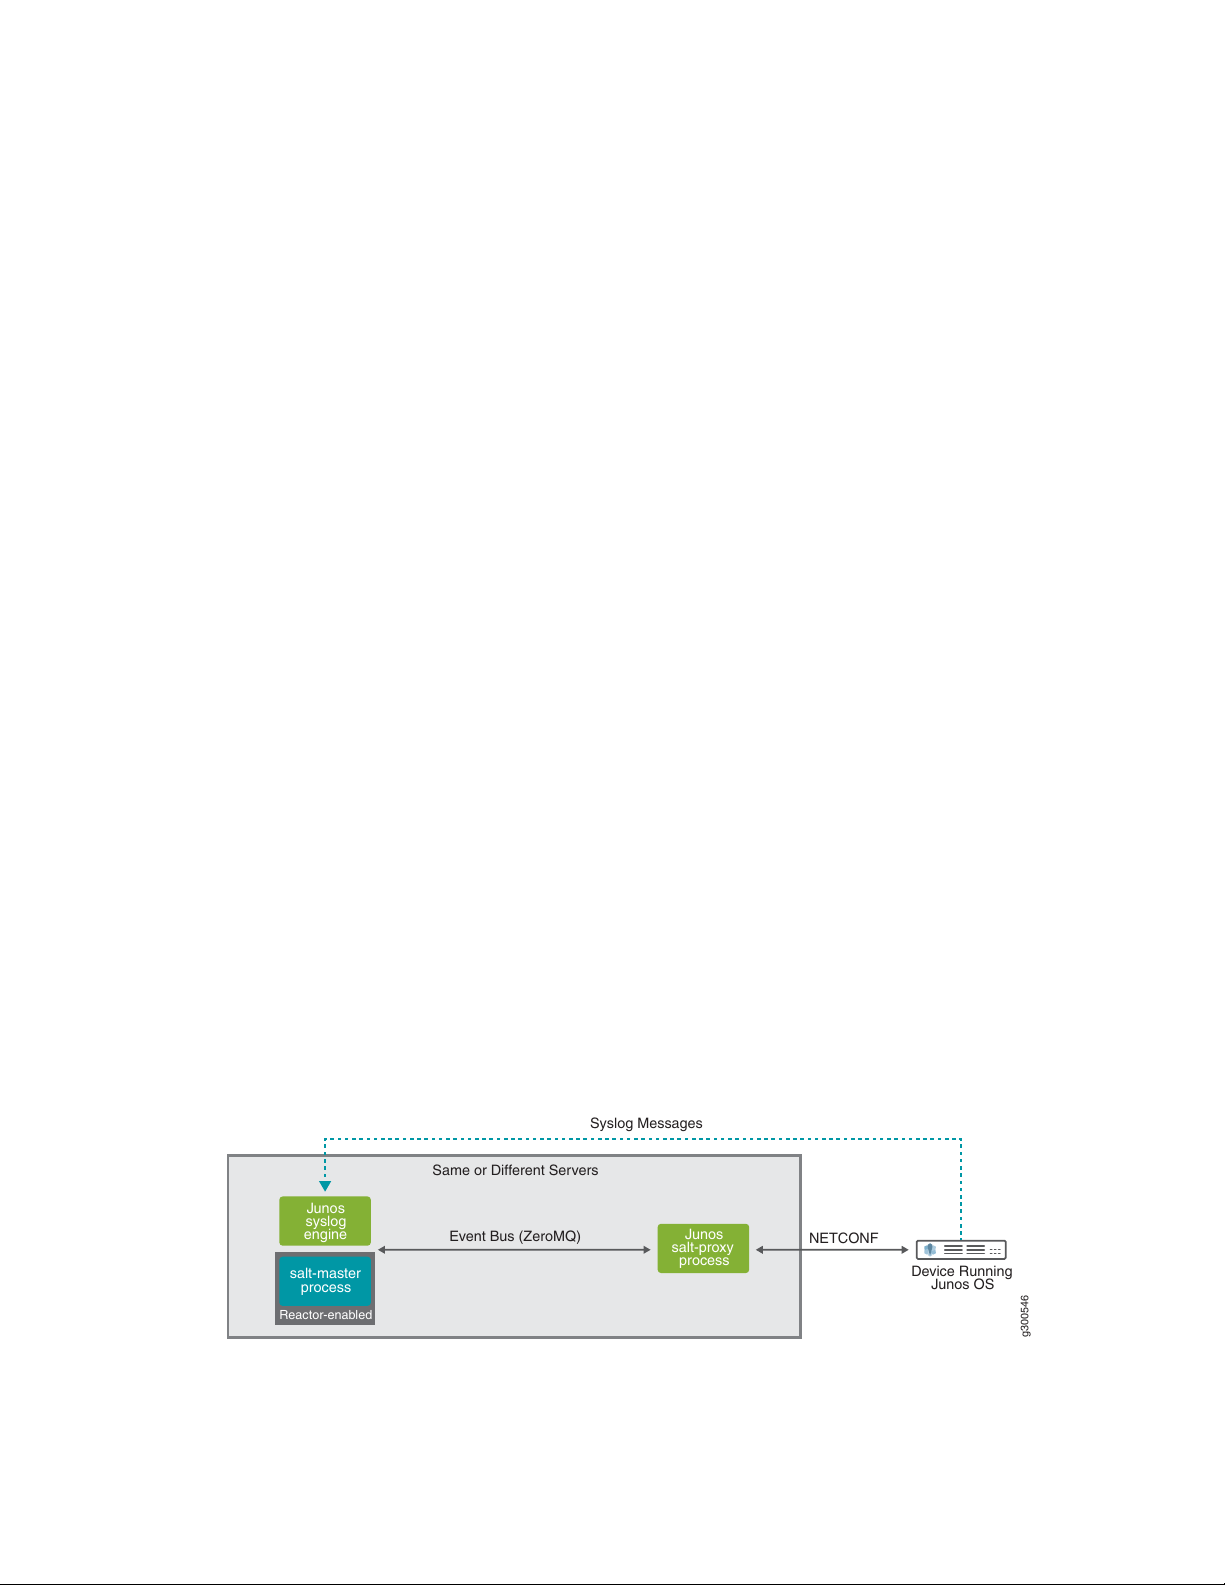
Salt for Junos OS Overview
g300546
Device Running
Junos OS
NETCONF
Event Bus (ZeroMQ)
Syslog Messages
Same or Different Servers
Reactor-enabled
salt-master
process
Junos
syslog
engine
Junos
salt-proxy
process
Salt, or the SaltStack Platform, is a Python-based, open-source remote execution and configuration
management tool. You can use Salt to define and enforce the state of a system or execute ad hoc commands
on a device. Salt is highly scalable and can manage thousands of devices, including devices running Junos
OS.
The Salt master is the main control server that manages one or more nodes, or Salt minions. The Salt master
can manage devices running Junos OS through a Salt proxy minion. A proxy minion enables you to manage
a device that does not directly run a Salt minion but can be managed through another protocol, for example,
the Network Configuration Protocol (NETCONF).
The Salt installation includes the following components and modules, which enable you to use Salt to
manage devices running Junos OS:
Junos proxy—Translates Salt operations into Junos OS-specific instructions and enables the Salt system
•
to connect to and manage devices running Junos OS.
7
Junos execution module—Defines execution functions that enable you to perform ad hoc tasks on devices
•
running Junos OS from the Salt master command line.
Junos state module—Defines state functions that enable you to declare and enforce the desired state
•
of a device running Junos OS.
Junos syslog engine—Monitors system log messages sent from devices running Junos OS, extracts the
•
event information, and publishes it in Salt format on the Salt event bus.
The Junos proxy connects to the Salt master using the ZeroMQ event bus and uses the Juniper Junos
PyEZ library to establish a NETCONF session over SSH with the device running Junos OS. Junos PyEZ is
a microframework for Python that enables you to manage and automate devices running Junos OS.
Figure 1 on page 7 illustrates a typical Salt setup with devices running Junos OS.
Figure 1: Junos Syslog Engine
Page 8

RELATED DOCUMENTATION
Understanding Salt for Junos OS
Understanding the Salt for Junos OS Components
Understanding the Junos Execution and State Salt Modules
8
Page 9

3
CHAPTER
Get Started
How to Install Salt for Junos OS | 10
How to Authenticate Salt for Junos OS Users | 22
Page 10

How to Install Salt for Junos OS
IN THIS SECTION
Configure the Device Running Junos OS | 11
Set Up the Salt Master | 12
Set Up the Junos Proxy Minion Server | 15
Authorize the Proxy Minion Keys on the Salt Master | 17
Verify the Connection to the Managed Device | 18
(Optional) Configure the Junos Syslog Engine | 20
10
You can use Salt version 3001 (Sodium) or later to manage devices running Junos OS. The Salt master can
manage devices running Junos OS through a Salt proxy minion, which can run on either the Salt master
or a separate server. You must have one proxy minion per managed device, and each proxy minion requires
approximately 40 MB to 100 MB of RAM.
The general installation process is:
1. On each device running Junos OS:
Enable NETCONF over SSH.
•
Configure the user account and authentication method that Salt will use to connect to the device.
•
2. On the Salt master:
Install Salt and its dependencies.
•
Define the proxy configuration for each managed device.
•
Start the salt-master process.
•
3. On each Junos proxy minion server:
Install Junos PyEZ and the jxmlease and yamlordereddictloader Python modules.
•
Install Salt and its dependencies, if the server is separate from the Salt master.
•
Start the Junos proxy minion process for each managed device.
•
4. On the Salt master, accept the keys for each Junos proxy minion.
5. (Optional) Enable the Junos syslog engine (for Salt).
Page 11

The following sections provide details for each part of the installation process for a server running Ubuntu
18.04. If you are running a different operating system, use the commands appropriate for your OS. We
recommend using Python 3.
Configure the Device Running Junos OS
The Junos proxy minion accesses the NETCONF server on devices running Junos OS using the SSH protocol
and standard SSH authentication mechanisms. To establish an SSHv2 connection with a device running
Junos OS, you must ensure that the following requirements are met:
The NETCONF service over SSH is enabled on each device where a NETCONF session will be established.
•
The client application has a user account and can log in to each device where a NETCONF session will
•
be established.
The login account used by the client application has an SSH public/private key pair or a text-based
•
password configured.
11
The client application can access the public/private keys or text-based password.
•
If you are using SSH keys to authenticate with the device running Junos OS and the keys do not already
exist, generate the public and private SSH key pair for the desired user on the proxy minion server, and
provide any required or desired options, for example:
saltuser@minion:~$ cd ~/.ssh
saltuser@minion:~/.ssh$ ssh-keygen -t rsa -b 2048
Generating public/private rsa key pair.
Enter file in which to save the key (/home/saltuser/.ssh/id_rsa): id_rsa_salt
Enter passphrase (empty for no passphrase): *****
Enter same passphrase again: *****
To configure the device running Junos OS:
1. Configure the NETCONF-over-SSH service.
[edit]
user@router1# set system services netconf ssh
2. Configure the user account and authentication method that Salt will use to connect to the device. For
example:
[edit]
user@router1# set system login user saltuser class super-user uid 5555 authentication plain-text-password
Page 12

New password:
Retype new password:
user@router1# set system login user saltuser authentication ssh-rsa "public-key"
3. Commit the configuration.
[edit]
user@router1# commit
commit complete
4. Verify that the password or SSH key works by logging in to the device from the proxy minion server
using the configured username and authentication method.
saltuser@minion:~$ ssh router1.example.com
Password: *****
saltuser@router1>
12
saltuser@minion:~$ ssh -i ~/.ssh/id_rsa_salt router1.example.com
Enter passphrase for key '/home/saltuser/.ssh/id_rsa_salt': *****
saltuser@router1>
5. Repeat this process for each managed device running Junos OS.
For information about enabling NETCONF on a device running Junos OS and satisfying the requirements
for establishing an SSH session, see the NETCONF XML Management Protocol Developer Guide.
SEE ALSO
How to Authenticate Salt for Junos OS Users | 22
Set Up the Salt Master
The Salt master is the main control server that manages one or more nodes, or minions. SaltStack
recommends installing a Salt master on a dedicated management server or virtual machine (VM). You must
install Salt Release 3001 (Sodium) or later to manage devices running Junos OS.
Page 13

To install and configure a Salt master:
1. Install the Salt dependencies and Salt master on the Salt master server.
To install a Salt master, either manually install the packages and dependencies for your platform or run
the Salt bootstrap script.
For a list of dependencies and platform-specific installation instructions, see
•
https://docs.saltstack.com/en/latest/topics/installation/index.html.
To use the Salt bootstrap script, which performs a series of checks and installs Salt binaries, see
•
https://docs.saltstack.com/en/latest/topics/tutorials/salt_bootstrap.html.
For example, to use the bootstrap script to install the Python 3 packages for a Salt master, issue the
following commands:
saltuser@salt-master~$ curl -o bootstrap_salt.sh -L https://bootstrap.saltstack.com
saltuser@salt-master~$ sudo sh bootstrap_salt.sh -M -x python3
13
2. Customize the Salt master configuration file, which is typically located at /etc/salt/master, for your
environments.
#/etc/salt/master
file_roots:
base:
- /srv/salt
pillar_roots:
base:
- /srv/pillar
NOTE: For detailed information about customizing the Salt master configuration file, see
https://docs.saltstack.com/en/latest/ref/configuration/master.html.
3. Create the necessary directory structure as defined in the Salt master configuration file.
saltuser@salt-master:~$ sudo mkdir /srv/salt
saltuser@salt-master:~$ sudo mkdir /srv/pillar
4. Define the proxy configuration by creating a pillar file for each managed device that specifies
proxytype: junos, the hostname or IP address of the corresponding managed device running Junos OS,
and the appropriate connection and authentication parameters for that device.
Page 14

See salt.proxy.junos for more information about the proxy configuration.
saltuser@salt-master:~$ cat /srv/pillar/router1-proxy.sls
proxy:
proxytype: junos
host: router1.example.com
username: saltuser
password: lab123 # SSH password or SSH key file password
ssh_private_key_file: /home/saltuser/.ssh/id_rsa_salt # non-default SSH key
location
port: 830 # NETCONF port
saltuser@salt-master:~$ cat /srv/pillar/router2-proxy.sls
proxy:
proxytype: junos
host: router2.example.com
username: saltuser
password: lab123 # SSH password or SSH key file password
ssh_private_key_file: /home/saltuser/.ssh/id_rsa_salt # non-default SSH key
location
port: 830 # NETCONF port
14
NOTE: For information about securely storing sensitive data in Salt, see
https://docs.saltstack.com/en/latest/topics/best_practices.html#storing-secure-data.
5. Create the pillar top file, and for each managed device, define a proxy minion name and map it to the
pillar file containing the proxy configuration for that device.
In the following example, the Junos proxy minion identified as 'router1' is mapped to the
router1-proxy.sls file.
saltuser@salt-master:~$ cat /srv/pillar/top.sls
base:
'router1': # proxy minion name
- router1-proxy # pillar file
'router2':
- router2-proxy
6. Start the salt-master process, if it is not already running.
Page 15

saltuser@salt-master:~$ sudo salt-master -d
NOTE: To start the process in debug mode for troubleshooting purposes, use
sudo salt-master -l debug.
Set Up the Junos Proxy Minion Server
You must install the following software on a proxy minion server that will manage devices running Junos
OS:
Salt software
•
Juniper Network’s Junos PyEZ library
•
15
jxmlease and yamlordereddictloader Python modules
•
The Junos proxy minion uses the Junos PyEZ library to connect to the device’s NETCONF server and
perform management tasks.
NOTE: If you run the Salt master and Junos proxy minions on the same server, the minion
hostname in this section will be identical to the Salt master hostname in the previous section.
To set up a Junos proxy minion on either the Salt master server or a separate server:
1. Install the Python package manager for the same Python version that Salt uses.
saltuser@minion:~$ sudo apt install python3-pip
2. Install Junos PyEZ (junos-eznc) under the same Python version that Salt uses.
For platform-specific requirements, prerequisite software, and installation instructions, see:
Installing Junos PyEZ
•
Junos PyEZ GitHub repository
•
saltuser@minion:~$ sudo pip3 install junos-eznc
3. Install the jxmlease and yamlordereddictloader Python modules under the same Python version that
Salt uses.
Page 16

saltuser@minion:~$ sudo pip3 install jxmlease yamlordereddictloader
4. If the proxy minion server is separate from the Salt master server, install Salt and its dependencies on
the server.
To install Salt, either manually install the packages and dependencies for your platform or run the Salt
bootstrap script.
For a list of dependencies and platform-specific installation instructions, see
•
https://docs.saltstack.com/en/latest/topics/installation/index.html.
To use the Salt bootstrap script, which performs a series of checks and installs Salt binaries, see
•
https://docs.saltstack.com/en/latest/topics/tutorials/salt_bootstrap.html.
For example, to use the bootstrap script to install the Python 3 packages for Salt, issue the following
commands:
saltuser@minion:~$ curl -o bootstrap_salt.sh -L https://bootstrap.saltstack.com
saltuser@minion:~$ sudo sh bootstrap_salt.sh -x python3
16
5. Configure the master parameter in the /etc/salt/proxy file with the Salt master’s hostname or IP
address, which enables the proxy minion process to find the Salt master.
If the salt-master and proxy minion processes run on the same server, you can specify localhost instead.
# Set the location of the salt master server. If the master server cannot be
# resolved, then the minion will fail to start.
#master: salt
master: 198.51.100.1
6. Start the Junos proxy minion process for each device running Junos OS, and include the -d option to
run it as a daemon.
The proxy IDs should be the same as those defined in the pillar top file on the Salt master.
saltuser@minion:~$ sudo salt-proxy --proxyid=router1 -d
saltuser@minion:~$ sudo salt-proxy --proxyid=router2 -d
NOTE: If you encounter an AttributeError: 'module' object has no attribute 'SSL_ST_INIT'
error when starting the proxy process, you might need to update the OpenSSL package on
your platform.
Page 17

NOTE: To start the process in debug mode for troubleshooting purposes, use sudo salt-proxy
--proxyid=router1 -l debug.
The proxy minion connects to the Salt master and sends its public key. The Salt master must accept the
key before the Salt master and proxy minion can communicate.
Authorize the Proxy Minion Keys on the Salt Master
Salt uses public keys for authentication with the Salt master process. By default, the Salt master does not
authorize any minion or proxy minion keys. You must accept the keys before you can manage the
corresponding devices.
You can accept the keys manually, as described in this section. Alternatively, if you know that the incoming
keys do not pose a security threat, for example, if the salt-master and salt-proxy processes run on the
same server, you can include the auto_accept: True option in the Salt master configuration file to accept
all incoming keys automatically. For security purposes, this option is disabled by default.
17
To list and accept the pending keys:
1. View the proxy minions’ public key status.
saltuser@salt-master:~$ sudo salt-key --list-all
Accepted Keys:
Denied Keys:
Unaccepted Keys:
router1
router2
Rejected Keys:
2. Accept the key for each Junos proxy minion.
saltuser@salt-master:~$ sudo salt-key -a router1
The following keys are going to be accepted:
Unaccepted Keys:
router1
Proceed? [n/Y] y
Key for minion router1 accepted.
Page 18

saltuser@salt-master:~$ sudo salt-key -a router2
The following keys are going to be accepted:
Unaccepted Keys:
router2
Proceed? [n/Y] y
Key for minion router2 accepted.
NOTE: Use the -A option to accept all pending keys, for example, sudo salt-key -A.
Verify the Connection to the Managed Device
18
After accepting the keys on the Salt master, call the test.ping execution function to ping the proxy minion
over the message bus and verify that the minion is up and communicating. You can specify a target minion
or use '*' to ping all minions.
The following example pings the device running Junos OS that is associated with the Junos proxy minion
router1.
saltuser@salt-master:~$ sudo salt 'router1' test.ping
router1:
True
The following example pings all minions that the Salt master manages:
saltuser@salt-master:~$ sudo salt '*' test.ping
router1:
True
router2:
True
The following example uses the junos.cli function to issue the show version command on the specified
device running Junos OS:
saltuser@salt-master:~$ sudo salt 'router1' junos.cli 'show version'
Page 19

router1:
--------- message:
Hostname: router1
Model: mx104
Junos: 18.4R1.8
JUNOS Base OS boot [18.4R1.8]
JUNOS Base OS Software Suite [18.4R1.8]
JUNOS Crypto Software Suite [18.4R1.8]
JUNOS Packet Forwarding Engine Support (TRIO) [18.4R1.8]
JUNOS Web Management [18.4R1.8]
JUNOS Online Documentation [18.4R1.8]
JUNOS SDN Software Suite [18.4R1.8]
JUNOS Services Application Level Gateways [18.4R1.8]
JUNOS Services COS [18.4R1.8]
JUNOS Services Jflow Container package [18.4R1.8]
JUNOS Services Stateful Firewall [18.4R1.8]
JUNOS Services NAT [18.4R1.8]
JUNOS Services RPM [18.4R1.8]
JUNOS Services SOFTWIRE [18.4R1.8]
JUNOS Services Captive Portal and Content Delivery Container package
[18.4R1.8]
JUNOS Macsec Software Suite [18.4R1.8]
JUNOS Services Crypto [18.4R1.8]
JUNOS Services IPSec [18.4R1.8]
JUNOS DP Crypto Software Software Suite [18.4R1.8]
JUNOS py-base-powerpc [18.4R1.8]
JUNOS py-extensions-powerpc [18.4R1.8]
JUNOS jsd [powerpc-18.4R1.8-jet-1]
JUNOS Kernel Software Suite [18.4R1.8]
JUNOS Routing Software Suite [18.4R1.8]
out:
True
19
NOTE: If you encounter the error 'junos' __virtual__ returned False: The junos or dependent
module could not be loaded: junos-eznc or jxmlease or yamlordereddictloader or proxy could
not be loaded, the Junos proxy minion server might not have Junos PyEZ or the jxmlease or
yamlordereddictloader modules installed, or the Junos proxy minion process might not be running
or it can’t authenticate with the device.
Page 20

(Optional) Configure the Junos Syslog Engine
The Junos syslog engine (for Salt) can be used for event-based state management of devices running Junos
OS. When you enable the Junos syslog engine, it listens for syslog events, extracts the event information,
translates it to Salt format, and publishes it on the Salt event bus. To enable the Junos syslog engine, you
must configure the Junos syslog engine on the Salt master, and you must also configure the device running
Junos OS to send syslog events to the configured port on the Salt server.
NOTE: The Junos syslog engine can also run on the proxy minion server.
To enable the Junos syslog engine on the Salt master:
1. Install the Python package manager for the same Python version that Salt uses.
saltuser@salt-master:~$ sudo apt install python3-pip
20
2. Install the pyparsing and twisted Python modules for the same Python version that Salt uses.
saltuser@salt-master:~$ sudo pip3 install pyparsing
saltuser@salt-master:~$ sudo pip3 install twisted
3. Configure the Junos syslog engine under the engines section in the Salt master configuration file, and
configure the port on which the engine listens for events.
#/etc/salt/master
engines:
- junos_syslog:
port: 9999
4. (Optional) Configure the topic parameter to specify the fields that appear after jnpr/syslog/ in the
event’s topic title when it is published to the event bus.
#/etc/salt/master
engines:
- junos_syslog:
port: 9999
topic: jnpr/syslog/hostname/daemon/event
Page 21

5. (Optional) Configure the daemon parameter to instruct the engine to only subscribe to and publish the
events that are generated by specific Junos OS processes.
#/etc/salt/master
engines:
- junos_syslog:
port: 9999
topic: jnpr/syslog/hostname/daemon/event
daemon:
- mgd
- sshd
6. Restart the Salt master process to apply the new configuration.
saltuser@salt-master:~$ sudo killall salt-master
saltuser@salt-master:~$ sudo salt-master –d
21
To configure the device running Junos OS to send syslog events to the host on which the Junos syslog
engine is running:
1. Configure the hostname or IP address of the server on which the Junos syslog engine is running, and
configure the port on which it is listening.
[edit]
saltuser@router1# set system syslog host salt-master.example.com port 9999
2. Configure the types of events to send.
To send all events, configure any any to indicate all facilities and all message severity levels.
•
[edit]
saltuser@router1# set system syslog host salt-master.example.com any any
To send only specific events, configure the facility and message severity level of the events to capture,
•
for example:
[edit]
saltuser@router1# set system syslog host salt-master.example.com kernel info
saltuser@router1# set system syslog host salt-master.example.com security any
3. Commit the configuration.
Page 22

[edit]
saltuser@router1# commit
SEE ALSO
Junos Syslog Engine for Salt
RELATED DOCUMENTATION
How to Authenticate Salt for Junos OS Users | 22
Understanding the Salt for Junos OS Components
22
How to Authenticate Salt for Junos OS Users
IN THIS SECTION
Salt for Junos OS User Authentication Overview | 22
Authenticating the Salt User By Using a Password | 25
Authenticating the Salt User By Using SSH Keys | 25
Salt for Junos OS User Authentication Overview
When you use Salt to manage devices running Junos OS, the Junos proxy minion connects to the Salt
master using the ZeroMQ event bus and uses the Juniper Junos PyEZ library to establish a NETCONF
session over SSH with the device running Junos OS. The managed device must be able to authenticate
the Salt user by using either a password or other standard SSH authentication mechanisms, depending on
the connection method. When you use Salt to manage devices running Junos OS, the most convenient
and secure way to access a device is to configure SSH keys, which enable the remote device to identify
trusted users. Alternatively, you can provide username and password authentication credentials in the
proxy configuration file for a given device.
Page 23

To use Salt to connect to and manage a device running Junos OS, you define the necessary connection
and authentication information for the device under the proxy key in a pillar file on the Salt master. When
you specify proxytype: junos, you can define many of the same connection and authentication parameters
in the pillar data that you can specify in the Junos PyEZ Device() constructor.
The following sample pillar file shows the general connection and authentication parameters that you can
define under the proxy key when you specify proxytype: junos. Table 1 on page 23 outlines the parameters.
# /srv/pillar/router1-proxy.sls
proxy:
proxytype: junos
host: router1.example.com
username: saltuser
password: lab123 # SSH password or SSH key file password
ssh_config: /home/saltuser/.ssh/my_config # non-default SSH configuration file
ssh_private_key_file: /home/saltuser/.ssh/id_rsa_salt # non-default SSH key
location
port: 830
23
Table 1: Junos Proxy Parameters
DescriptionParameter
Hostname or IP address of the device running Junos OS.host: hostname
password: secret
proxytype: junos
ssh_config: file-path
ssh_private_key_file: file-path
Passphrase for the user or the user’s SSH private key file used to authenticate with
the device running Junos OS.
Port on which to establish the connection to the device running Junos OS.port: port
Specify that Salt should use the Junos proxy module to interface with the device
running Junos OS.
Path to the Salt user’s SSH configuration file on the proxy minion server. You can
omit this parameter if the SSH configuration file is in the default path.
Path to the Salt user’s SSH private key file on the proxy minion server that the Junos
proxy uses to authenticate with the device running Junos OS. You can omit this
parameter if the user’s SSH key file is in the default path or if the path is already
defined in the SSH configuration file.
username: user
Username used to authenticate with the device running Junos OS and under whose
Junos OS account privileges the Salt operations are performed.
Page 24

Salt can perform device operations using any user account that has access to the managed device running
Junos OS. You can explicitly specify the user by including the username parameter in the proxy configuration
for a given device running Junos OS. You can also specify the user within an SSH configuration file. If you
do not specify a user, it defaults to the current user.
The Salt connection through Junos PyEZ automatically queries the user’s default SSH configuration file
at ~/.ssh/config on the proxy minion server, if one exists, unless the proxy configuration for that device
includes the ssh_config argument to specify a different configuration file. Salt uses any relevant settings
in the SSH configuration file for the given connection that are not overridden by the parameters defined
in the proxy configuration for that device, such as the user or the identity file.
The Junos proxy first attempts SSH public key-based authentication and then tries password-based
authentication. The Junos proxy checks for SSH keys that are actively loaded in the SSH key agent and
then checks for SSH keys in the default location. When SSH keys are in use, the supplied password is used
as the passphrase for unlocking the private key. When password-based authentication is used, the supplied
password is used as the device password. If SSH public key-based authentication is being used and the
SSH private key has an empty passphrase, then a password is not required. However, we don’t recommend
using an SSH private key with an empty passphrase.
24
On the Salt master, the pillar top file maps the proxy ID to the pillar file containing the device’s proxy
configuration.
saltuser@salt-master:~$ cat /srv/pillar/top.sls
base:
'router1':
- router1-proxy
When you start the Junos proxy minion process for the device running Junos OS and authorize the keys
on the Salt master, it connects using the configured authentication method.
saltuser@minion:~$ sudo salt-proxy --proxyid=router1 -d
saltuser@salt-master:~$ sudo salt-key -a router1
For detailed information about configuring the Salt servers, see “How to Install Salt for Junos OS” on
page 10.
Page 25

Authenticating the Salt User By Using a Password
To authenticate a Salt user by using a password:
1. On the device running Junos OS, configure the user account with the password that will be used to
connect to the device, and commit the configuration. For example:
[edit]
admin@router1# set system login user saltuser class super-user uid 5555 authentication plain-text-password
New password:
Retype new password:
admin@router1# commit
2. On the Salt master, in the pillar file containing the device’s proxy configuration, set the username and
password parameters to the Junos OS login credentials for that device.
saltuser@salt-master:~$ cat /srv/pillar/router1-proxy.sls
25
proxy:
proxytype: junos
host: router1.example.com
username: saltuser
password: lab123
port: 830
NOTE: For information about securely storing sensitive data in Salt, see
https://docs.saltstack.com/en/latest/topics/best_practices.html#storing-secure-data.
Authenticating the Salt User By Using SSH Keys
To use SSH keys to authenticate the Salt user, you must first generate the keys on the Salt proxy minion
server and configure the public key on each device running Junos OS to which Salt will connect. To use
the keys, you must include the appropriate parameters in the device’s proxy configuration on the Salt
master. Salt connections through Junos PyEZ can use SSH keys that are actively loaded into an SSH key
agent, SSH keys that are generated in either the default location or a user-defined location, and keys that
either use or forgo password protection. The Junos proxy first checks for SSH keys that are actively loaded
in the SSH key agent and then checks for SSH keys in the default location under the user’s .ssh directory.
Page 26

The following sections outline the steps for generating the SSH keys, configuring the keys on a device
running Junos OS, and using the keys to connect to the managed device.
1.
Generating and Configuring SSH Keys | 26
2.
Referencing SSH Keys in the Salt Proxy Configuration File | 27
Generating and Configuring SSH Keys
To generate SSH keys on the Salt proxy minion server and configure the public key on devices running
Junos OS:
1. On the Salt proxy minion server, generate the public and private SSH key pair for the desired user, and
provide any required or desired options, for example:
saltuser@minion:~$ cd ~/.ssh
saltuser@minion:~/.ssh$ ssh-keygen -t rsa -b 2048
Generating public/private rsa key pair.
Enter file in which to save the key (/home/saltuser/.ssh/id_rsa): id_rsa_salt
Enter passphrase (empty for no passphrase): *****
Enter same passphrase again: *****
26
2. (Optional) Load the key into the native SSH key agent using the commands specific to your OS and
agent. For example:
saltuser@minion:~$ ssh-add /home/saltuser/.ssh/id_rsa_salt
Enter passphrase for /home/saltuser/.ssh/id_rsa_salt
Identity added: /home/saltuser/.ssh/id_rsa_salt (/home/saltuser/.ssh/id_rsa_salt)
3. Configure the public key under the appropriate user account on each device running Junos OS to which
Salt will connect.
The easiest method to configure the public key on a device running Junos OS is to load a file containing
the public key.
[edit]
admin@router1# set system login user saltuser authentication load-key-file id-rsa-salt.pub
admin@router1# commit
4. Verify that the key works by logging in to the device using the key.
saltuser@minion:~$ ssh -i ~/.ssh/id_rsa_salt router1.example.com
Page 27

Enter passphrase for key '/home/saltuser/.ssh/id_rsa_salt':
saltuser@router1>
Referencing SSH Keys in the Salt Proxy Configuration File
After generating the SSH key pair and configuring the public key on the managed device running Junos
OS, the Junos proxy can use the key to connect to the device. To use the key, you must include the
appropriate parameters in the device’s proxy configuration on the Salt master. In addition to the required
proxytype and host parameters, the parameters required to use the SSH key are determined by the location
of the key, whether the key is password-protected, whether the key is actively loaded into an SSH key
agent, and whether the user’s SSH configuration file already defines settings for that host.
The Junos proxy queries the default SSH configuration file at ~/.ssh/config on the proxy minion server,
if one exists, unless the proxy configuration for that device includes the ssh_config argument to specify a
different configuration file. Salt uses any relevant settings in the SSH configuration file for the given
connection that are not overridden by the parameters defined in the proxy configuration for that device.
When connecting to a device, the Junos proxy first checks for SSH keys that are actively loaded in the
SSH key agent and then checks for SSH keys in the default location under the user’s .ssh directory.
27
To use an SSH key that is actively loaded into the native SSH key agent:
In the pillar file containing the device’s proxy configuration, you must define the username parameter.
•
saltuser@salt-master:~$ cat /srv/pillar/router1-proxy.sls
proxy:
proxytype: junos
host: router1.example.com
username: saltuser
port: 830
To use an SSH key that is in the default location and does not have password protection:
In the pillar file containing the device’s proxy configuration, you only need to supply the username
•
parameter when it does not default to the user whose keys are used to authenticate with the device.
saltuser@salt-master:~$ cat /srv/pillar/router1-proxy.sls
proxy:
proxytype: junos
host: router1.example.com
username: saltuser
port: 830
Page 28

To use an SSH key that is not in the default location or that uses password protection:
In the pillar file containing the device’s proxy configuration, set the ssh_private_key_file parameter to
•
the path of the SSH private key on the proxy minion server, and set the password parameter to the SSH
key file password, if the key is password protected.
saltuser@salt-master:~$ cat /srv/pillar/router1-proxy.sls
proxy:
proxytype: junos
host: router1.example.com
username: saltuser
password: ssh123 # SSH key file password
ssh_private_key_file: /home/saltuser/.ssh/id_rsa_salt # SSH key in non-default
location
port: 830
28
NOTE: If the user’s SSH configuration file already specifies the SSH private key file path for
a given host, you can omit the ssh_private_key_file parameter in the proxy configuration.
Including the ssh_private_key_file parameter overrides any existing IdentityFile value defined
for a host in the SSH configuration file.
 Loading...