

Juniper PTX10002-60C Quick Start Manual

PTX10002-60C Quick Start Guide
PTX10002-60C Packet Transport Router Overview
The PTX10002-60C Packet Transport Router is a second-generation PTX Series fixed-configuration core router, featuring a
compact, 2 U form factor that is easy to deploy in space-constrained Internet exchange locations, remote central offices, and
embedded peering points throughout the network, including cloud-hosted services. The PTX10002-60C operates at 6 Tbps in
a fixed core router configuration. It supports flexible interface configuration options, offering 60 physical 100-Gigabit Ethernet
ports that support the quad small form-factor pluggable transceiver QSFP28.
For more information about the PTX10002-60C hardware, see the PTX10002-60C Packet Transport Router Hardware Guide
available at:
https://www.juniper.net/documentation/en_US/release-independent/junos/information-products/pathway-pages/ptx-series/index.html
Register the Product
Register product serial numbers on the Juniper Networks website and update the installation base data if there is any addition
or change to the installation base or if the installation base is moved. Juniper Networks will not be held accountable for not
meeting the hardware replacement service-level agreement for products that do not have registered serial numbers or accurate
installation base data.
Register your product at https://tools.juniper.net/svcreg/SRegSerialNum.jsp.
Update your installation base at https://www.juniper.net/customers/csc/management/updateinstallbase.jsp.
PTX10002-60C Clearance Requirements for Airflow and Hardware Maintenance
When planning the site for a PTX10002-60C installation, you must allow sufficient clearance around the installed chassis. Follow
these guidelines:
•
For the cooling system to function properly, the airflow around the chassis must be unrestricted. See PTX10002-60C Cooling
System Description and Airflow in the PTX10002-60C Packet Transport Router Hardware Guide for more information about the
airflow through the chassis.
•
If you are mounting a PTX10002-60C in a rack with other equipment, ensure that the exhaust from other equipment does not
blow into the intake vents of the chassis.
•
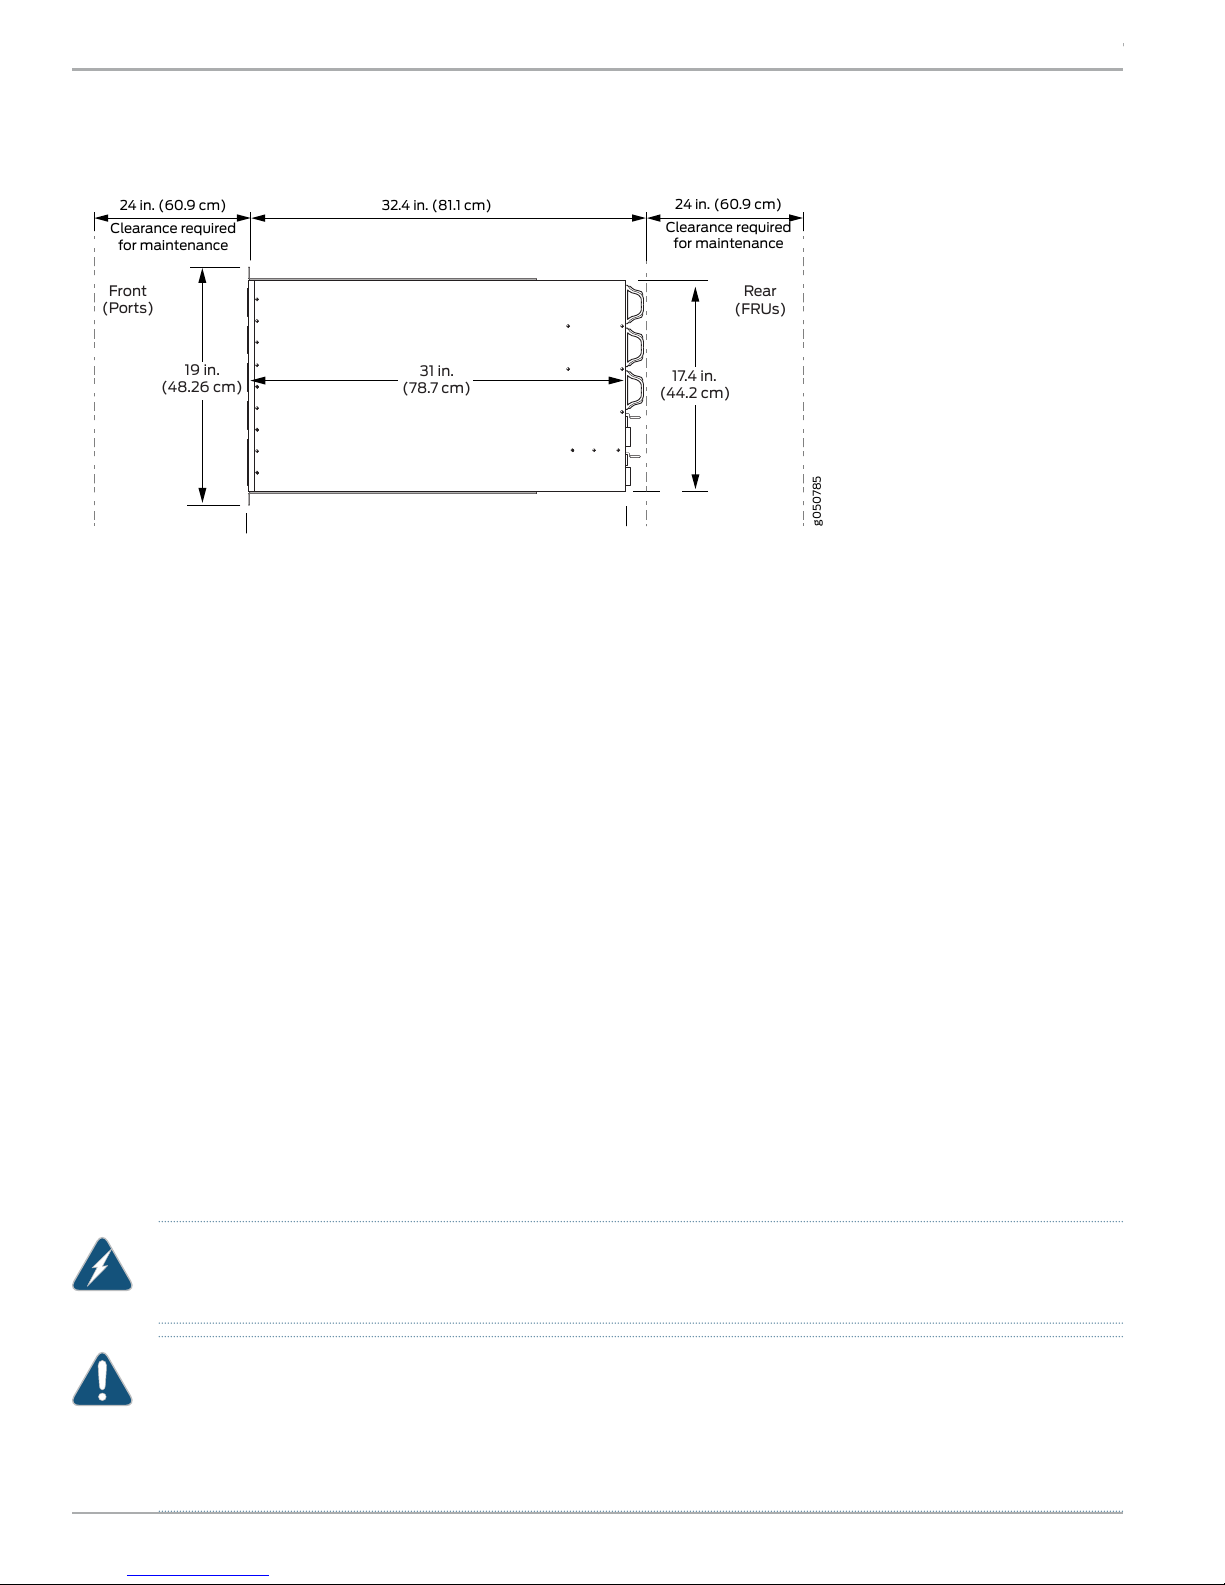
You must leave at least 24 in. (60.9 cm) both in front of and behind the PTX10002-60C. For service personnel to remove and
install hardware components, you must leave adequate space at the front and back of the router. NEBS GR-63 recommends
that you allow at least 30 in. (76.2 cm) in front of the rack and 24 in. (60.9 cm) behind the rack. See Figure 1.
31 in.
(78.7 cm)
g050785
Clearance required
for maintenance
24 in. (60.9 cm)
17.4 in.
(44.2 cm)
19 in.
(48.26 cm)
Front
(Ports)
Rear
(FRUs)
Clearance required
for maintenance
24 in. (60.9 cm)
32.4 in. (81.1 cm)
Clearance required
for maintenance
24 in. (60.9 cm)
PTX10002-60C Quick Start Guide
Figure 1: Clearance Requirements for Airflow and Hardware Maintenance for a PTX10002-60C
Prepare for Installation
To install and configure the PTX10002-60C router, you need:
•
Either a mechanical lift or two persons to lift the PTX10002-60C into place. An additional person is needed to secure the router
to the rack.
•
ESD grounding strap (not provided).
•
One pair of front-mounting rails (provided).
•
One pair of rear-mounting blades (provided). These mounting blades support the rear of the chassis and must be installed.
•
Flat-head M4x6-mm Phillips mounting screws to secure the mounting rail to the chassis (24 screws are provided—11 for each
side and 2 extra screws).
•
Sixteen screws to secure the chassis and mounting blades to the rack (not provided).
•
Screwdriver appropriate for the rack-mounting screws (not provided).
•
For AC installations, four power cords with plugs that are appropriate for your geographical location (provided).
•
For DC installations, a DC power cable (CBL-JNP-PWR-DSUB straight cable) (provided).
•
RJ-45 cable and RJ-45 to DB-9 serial port adapter (provided).
•
Management host, such as a PC laptop, with a serial port (not provided).
•
(Optional) Grounding cable kit with bracket, lug, and three nuts with integrated washers.
WARNING: PTX10002-60C routers must be supported at all four corners. Mounting the chassis by using only the
front brackets will damage the chassis and can result in serious bodily injury.
CAUTION: A fully-loaded PTX10002-60C weighs 80.5 lb (36.5 kg). If you are installing the PTX10002-60C above
60 in. (152.4 cm) from the floor, remove the power supplies and fan modules before attempting to install the router.
Unless you are using a mechanical lift, at least three people are required to perform the rack installation. If you are
mounting multiple units in the rack, mount the heaviest unit at the bottom and mount the others from bottom to top
in order of decreasing weight.
Copyright © 2018, Juniper Networks, Inc.2

PTX10002-60C Quick Start Guide
Unpack the PTX10002-60C
The PTX10002-60C chassisisa rigid sheet metalstructure that houses the hardwarecomponents.The PTX10002-60C is shipped
in a cardboard carton, secured with foam packing material. The carton also contains an accessory kit with a Documentation
Roadmap card. The Documentation Roadmap includes the warranty and WEEE compliance statement, as well as a QR code
and useful links that help you find more detailed information about the PTX10002-60C.
CAUTION: PTX10002-60C routers are maximally protected inside the shipping carton. Do not unpack the
PTX10002-60C until you are ready to begin installation.
1. Move the shipping carton to a staging area as close to the installation site as possible, but where you have enough room to
remove the system components.
2. Position the carton so that the arrows point upward.
3. Open the top flaps on the shipping carton.
4. Remove the accessory kit and verify the package contents: One pair of front-mounting rails, One pair of rear-mounting blades,
24 flat-head M4x6-mm Phillips mounting screws, RJ-45 cable and RJ-45 to DB-9 serial port adapter, AC or DC power cords
with plugs that are appropriate for your geographical location, Documentation Roadmap card, End User License Agreement.
5. Pull out the packing material holding the PTX10002-60C in place.
6. Remove the chassis from the box.
7. Save the shipping carton and packing materials in case you need to move or ship the chassis later.
Mount the PTX10002-60C in a Rack
Mount the PTX10002-60C in a 19-in four-post rack using the included mounting brackets. The shipping carton contains two
front-mounting rails with two matching rear-mounting blades. This configuration allows either end of the PTX10002-60C to be
mounted flush with the rack and still be adjustable for racks with different depths. The minimum distance the front and rear rack
rails can be spaced apart is 28 in. (71.1 cm) front to back. The maximum distance the front and rear rack rails can be spaced apart
is 36 in. (91.4 cm) front to back.
NOTE: If you are mounting multiple units in the rack, mount the heaviest unit at the bottom and mount the others
from bottom to top in order of decreasing weight. The PTX10002-60C weighs 80.5 lbs (36.5 kgs). Installing the
switch in a rack requires either a mechanical lift or two people to lift the device and another person to secure it to
the rack.
1. Attach the ESD grounding strap to your bare wrist and to a site ESD point.
2. Place the rack in its permanent location, allowing adequate clearance for airflow and maintenance, and secure it to the building
structure.
3. Decide whether the field-replaceable unit (FRU) end or the port end of the PTX10002-60C must be placed at the front of the
rack. Position the PTX10002-60C in such a manner that the AIR OUT labels on components are next to the hot aisle.
4. Using a Phillips screwdriver, remove the six screws on each side of the chassis that hold the cover to the chassis (see Figure 2).
These screws will be replaced with the mounting screws included in the box.
3Copyright © 2018, Juniper Networks, Inc.
 Loading...