

Page 1
Security Director
Published
2021-04-11
VMware NSX-T Integration with Juniper
Connected Security
Page 2

Juniper Networks, Inc.
1133 Innovation Way
Sunnyvale, California 94089
USA
408-745-2000
www.juniper.net
Juniper Networks, the Juniper Networks logo, Juniper, and Junos are registered trademarks of Juniper Networks, Inc. in
the United States and other countries. All other trademarks, service marks, registered marks, or registered service marks
are the property of their respective owners.
Juniper Networks assumes no responsibility for any inaccuracies in this document. Juniper Networks reserves the right
to change, modify, transfer, or otherwise revise this publication without notice.
Security Director VMware NSX-T Integration with Juniper Connected Security
Copyright © 2021 Juniper Networks, Inc. All rights reserved.
The information in this document is current as of the date on the title page.
ii
YEAR 2000 NOTICE
Juniper Networks hardware and software products are Year 2000 compliant. Junos OS has no known time-related
limitations through the year 2038. However, the NTP application is known to have some difficulty in the year 2036.
END USER LICENSE AGREEMENT
The Juniper Networks product that is the subject of this technical documentation consists of (or is intended for use with)
Juniper Networks software. Use of such software is subject to the terms and conditions of the End User License Agreement
(“EULA”) posted at https://support.juniper.net/support/eula/. By downloading, installing or using such software, you
agree to the terms and conditions of that EULA.
Page 3

Table of Contents
1
About the Documentation | v
Documentation and Release Notes | v
Documentation Conventions | v
Documentation Feedback | viii
Requesting Technical Support | viii
Self-Help Online Tools and Resources | ix
Creating a Service Request with JTAC | ix
VMWare NSX-T Integration
NSX Managers | 2
iii
Understanding Juniper Connected Security for VMware NSX-T Integration | 2
VMware NSX-T Overview | 3
vSRX Integration with NSX-T Manager and Junos Space Security Director | 3
High-Level Workflow | 4
Before You Deploy vSRX in VMware NSX-T Environment | 5
About the NSX Managers Page | 7
Tasks You Can Perform | 8
Field Descriptions | 8
Downloading the SSH Key File | 9
Add the NSX Manager | 11
Registering Security Services | 13
Deploy the vSRX as an Advanced Security Service in a VMware NSX-T Environment | 14
Create a Security Group | 15
Discover the NSX-T Manager and Register vSRX as a Security Service | 16
Deploy vSRX as a Security Service | 19
Verify vSRX Agent VM Deployment in Security Director | 20
Automatic Creation of Security Policy in the NSX-T Environment to Direct Traffic Through
the vSRX Agent VMs | 21
Delete the NSX-T Manager | 23
Delete NSX-T Manager Services | 24
Page 4

About the vCenter Servers Page | 25
Tasks You Can Perform | 26
Field Descriptions | 26
About the Security Groups Page | 26
Tasks You Can Perform | 27
Field Descriptions | 27
View Members of a Security Group | 27
About the Virtual Machines Page | 28
Tasks You Can Perform | 28
Field Descriptions | 28
View Network Details of a Virtual Machine | 29
View Security Groups of a Virtual Machine | 30
Implement Threat Policy on VMWare NSX-T | 31
VMWare NSX-T Integration with Policy Enforcer and Sky ATP Overview | 31
iv
Implementation of Infected Hosts Policy Overview | 32
Register NSX Micro Service as Policy Enforcer Connector Instance Overview | 33
Before You Begin | 33
Infected Hosts Workflow in VMware NSX-T | 33
Configure VMware NSX-T with Policy Enforcer | 36
Example: Create a Firewall Rule in VMware NSX-T Using SDSN_BLOCK Tag | 38
Page 5
About the Documentation
IN THIS SECTION
Documentation and Release Notes | v
Documentation Conventions | v
Documentation Feedback | viii
Requesting Technical Support | viii
Use this guide to understand how Juniper Networks vSRX Virtual Services Gateway integrates in VMware
NSX-T environment as an advanced security service with Junos Space Security Director as its security
manager. Policy Enforcer integrates with the VMware NSX solution to deliver an advanced next-generation
firewall feature set that uses vSRX for VMware microsegmentation deployments.
v
Documentation and Release Notes
To obtain the most current version of all Juniper Networks®technical documentation, see the product
documentation page on the Juniper Networks website at https://www.juniper.net/documentation/.
If the information in the latest release notes differs from the information in the documentation, follow the
product Release Notes.
Juniper Networks Books publishes books by Juniper Networks engineers and subject matter experts.
These books go beyond the technical documentation to explore the nuances of network architecture,
deployment, and administration. The current list can be viewed at https://www.juniper.net/books.
Documentation Conventions
Table 1 on page vi defines notice icons used in this guide.
Page 6
Table 1: Notice Icons
vi
DescriptionMeaningIcon
Indicates important features or instructions.Informational note
Caution
Indicates a situation that might result in loss of data or hardware
damage.
Alerts you to the risk of personal injury or death.Warning
Alerts you to the risk of personal injury from a laser.Laser warning
Indicates helpful information.Tip
Alerts you to a recommended use or implementation.Best practice
Table 2 on page vi defines the text and syntax conventions used in this guide.
Table 2: Text and Syntax Conventions
ExamplesDescriptionConvention
Fixed-width text like this
Italic text like this
Represents text that you type.Bold text like this
Represents output that appears on
the terminal screen.
Introduces or emphasizes important
•
new terms.
Identifies guide names.
•
Identifies RFC and Internet draft
•
titles.
To enter configuration mode, type
the configure command:
user@host> configure
user@host> show chassis alarms
No alarms currently active
A policy term is a named structure
•
that defines match conditions and
actions.
Junos OS CLI User Guide
•
RFC 1997, BGP Communities
•
Attribute
Page 7

Table 2: Text and Syntax Conventions (continued)
vii
ExamplesDescriptionConvention
Italic text like this
Text like this
< > (angle brackets)
| (pipe symbol)
Represents variables (options for
which you substitute a value) in
commands or configuration
statements.
Represents names of configuration
statements, commands, files, and
directories; configuration hierarchy
levels; or labels on routing platform
components.
variables.
Indicates a choice between the
mutually exclusive keywords or
variables on either side of the symbol.
The set of choices is often enclosed
in parentheses for clarity.
Configure the machine’s domain
name:
[edit]
root@# set system domain-name
domain-name
To configure a stub area, include
•
the stub statement at the [edit
protocols ospf area area-id]
hierarchy level.
The console port is labeled
•
CONSOLE.
stub <default-metric metric>;Encloses optional keywords or
broadcast | multicast
(string1 | string2 | string3)
# (pound sign)
[ ] (square brackets)
Indention and braces ( { } )
; (semicolon)
GUI Conventions
Indicates a comment specified on the
same line as the configuration
statement to which it applies.
Encloses a variable for which you can
substitute one or more values.
Identifies a level in the configuration
hierarchy.
Identifies a leaf statement at a
configuration hierarchy level.
rsvp { # Required for dynamic MPLS
only
community name members [
community-ids ]
[edit]
routing-options {
static {
route default {
nexthop address;
retain;
}
}
}
Page 8
Table 2: Text and Syntax Conventions (continued)
viii
ExamplesDescriptionConvention
Bold text like this
> (bold right angle bracket)
Represents graphical user interface
(GUI) items you click or select.
Separates levels in a hierarchy of
menu selections.
In the Logical Interfaces box, select
•
All Interfaces.
To cancel the configuration, click
•
Cancel.
In the configuration editor hierarchy,
select Protocols>Ospf.
Documentation Feedback
We encourage you to provide feedback so that we can improve our documentation. You can use either
of the following methods:
Online feedback system—Click TechLibrary Feedback, on the lower right of any page on the Juniper
•
Networks TechLibrary site, and do one of the following:
Click the thumbs-up icon if the information on the page was helpful to you.
•
Click the thumbs-down icon if the information on the page was not helpful to you or if you have
•
suggestions for improvement, and use the pop-up form to provide feedback.
E-mail—Send your comments to techpubs-comments@juniper.net. Include the document or topic name,
•
URL or page number, and software version (if applicable).
Requesting Technical Support
Technical product support is available through the Juniper Networks Technical Assistance Center (JTAC).
If you are a customer with an active Juniper Care or Partner Support Services support contract, or are
Page 9

covered under warranty, and need post-sales technical support, you can access our tools and resources
online or open a case with JTAC.
JTAC policies—For a complete understanding of our JTAC procedures and policies, review the JTAC User
•
Guide located at https://www.juniper.net/us/en/local/pdf/resource-guides/7100059-en.pdf.
Product warranties—For product warranty information, visit https://www.juniper.net/support/warranty/.
•
JTAC hours of operation—The JTAC centers have resources available 24 hours a day, 7 days a week,
•
365 days a year.
Self-Help Online Tools and Resources
For quick and easy problem resolution, Juniper Networks has designed an online self-service portal called
the Customer Support Center (CSC) that provides you with the following features:
Find CSC offerings: https://www.juniper.net/customers/support/
•
Search for known bugs: https://prsearch.juniper.net/
•
ix
Find product documentation: https://www.juniper.net/documentation/
•
Find solutions and answer questions using our Knowledge Base: https://kb.juniper.net/
•
Download the latest versions of software and review release notes:
•
https://www.juniper.net/customers/csc/software/
Search technical bulletins for relevant hardware and software notifications:
•
https://kb.juniper.net/InfoCenter/
Join and participate in the Juniper Networks Community Forum:
•
https://www.juniper.net/company/communities/
Create a service request online: https://myjuniper.juniper.net
•
To verify service entitlement by product serial number, use our Serial Number Entitlement (SNE) Tool:
https://entitlementsearch.juniper.net/entitlementsearch/
Creating a Service Request with JTAC
You can create a service request with JTAC on the Web or by telephone.
Visit https://myjuniper.juniper.net.
•
Call 1-888-314-JTAC (1-888-314-5822 toll-free in the USA, Canada, and Mexico).
•
For international or direct-dial options in countries without toll-free numbers, see
https://support.juniper.net/support/requesting-support/.
Page 10

1
PART
VMWare NSX-T Integration
NSX Managers | 2
Page 11
CHAPTER 1
NSX Managers
IN THIS CHAPTER
Understanding Juniper Connected Security for VMware NSX-T Integration | 2
Before You Deploy vSRX in VMware NSX-T Environment | 5
About the NSX Managers Page | 7
Downloading the SSH Key File | 9
Add the NSX Manager | 11
Registering Security Services | 13
Deploy the vSRX as an Advanced Security Service in a VMware NSX-T Environment | 14
2
Delete the NSX-T Manager | 23
Delete NSX-T Manager Services | 24
About the vCenter Servers Page | 25
About the Security Groups Page | 26
View Members of a Security Group | 27
About the Virtual Machines Page | 28
View Network Details of a Virtual Machine | 29
View Security Groups of a Virtual Machine | 30
Implement Threat Policy on VMWare NSX-T | 31
Understanding Juniper Connected Security for VMware NSX-T Integration
IN THIS SECTION
VMware NSX-T Overview | 3
vSRX Integration with NSX-T Manager and Junos Space Security Director | 3
High-Level Workflow | 4
Page 12

This section presents an overview of how Juniper Networks vSRX Virtual Services Gateway integrates in
the VMware NSX-T environment as an advanced security service with Junos Space Security Director as
its security manager.
VMware NSX-T Overview
VMware NSX-T is VMware’s network virtualization platform for the Software Defined Data Center (SDDC).
Like server virtualization, network virtualization de-couples the network functions from the physical devices.
VMware NSX-T is designed to address application frameworks and architectures that have heterogeneous
endpoints and technology stacks. VMware NSX-T is not directly coupled with vShpere and therefore it
supports various Hypervisors, Containers, BareMetal, and public clouds such as Amazon Web Service and
Azure. With VMware NSX-T, you can design hybrid cloud for organizations where critical data and services
are hosted within private cloud and web services or high availability application in Public clouds.
VMware NSX-T is the latest generation of VMware’s network virtualization product series. NSX-T is the
successor to NSX-V. NSX-T supports third-party Hypervisors and next generation overlay encapsulation
protocols such as Generic Network Virtualization Encapsulation (Geneve). NSX-T acts as a network
Hypervisor that allows software abstraction of various network services that include logical switch
(segments), logical routers (Tier-0 or Tier-1 Gateway), logical firewalls, logical load balancers, and logical
VPNs.
3
VMware NSX-T provides L2-L4 stateful firewall features, network segmentations, multi tenancy support,
L2/L3 VPN, load balancer, DHCP, source/destination NAT and many more services at Edge Gateway.
VMware NSX-T provides framework to integrate the advanced security services as North-South at Edge
Gateway.
Each virtual machine running in NSX-T environment can be protected with a full stateful firewall engine
at a very granular level policy. Such policies can be application specific including services. vSRX runs as a
service virtual machine and provides advanced services such as L4 to L7 services.
To deploy the advanced security features of the vSRX Virtual Services Gateway in the VMware NSX-T
environment, the Junos Space Security Director, vSRX, and NSX-T Manager operate together as a solution
to fully automate the provisioning and deployment of the vSRX to protect applications and data from
advanced cyberattacks.
vSRX Integration with NSX-T Manager and Junos Space Security Director
To deploy the advanced security features of the vSRX Virtual Services Gateway in the VMware NSX-T
environment, the Junos Space Security Director, vSRX, and NSX-T Manager operate together as a joint
solution to fully automate the provisioning and deployment of the vSRX to protect applications and data
from advanced cyberattacks.
Integration of the vSRX VM in the VMware NSX-T environment involves use with the following management
software:
Page 13
Junos Space Security Director—The centralized security management platform responsible for service
g301445
NSX-T Manager
Security Director/
Policy Enforcer
OVF
1
2 3
4
NSX Edge Cluster
vSRX
•
registration and configuration of each vSRX instance. The Security Director provides you with the ability
to manage a distributed network of virtualized and physical firewalls from a single location. The Security
Director functions as the management interface between the NSX-T Manager and the vSRX Services
Gateway. Security Director manages the firewall policies on all vSRX instances.
NSX-T Manager—The centralized network management component of VMware NSX.
•
The NSX-T Manager is added as a registered device in the Security Director and communication is
bidirectionally synchronized by the Junos Space Policy Enforcer between the two management platforms.
All shared objects (such as security groups) are synchronized between the NSX-T Manager and Security
Director. This includes the IP addresses of all VMs, including the vSRX agent VMs. Security Director creates
an address group for each security group synchronized from the NSX-T Manager, along with the addresses
of each member of the security group. The security groups discovered from the NSX-T Manager are
mapped to dynamic address groups (DAG) in Security Director. Policy Enforcer retains the mapping of all
IP addresses between security groups and dynamic address groups.
The vSRX Services Gateway is deployed as a partner service appliance in the VMware NSX-T environment.
Use the security policies to direct all VM traffic through the vSRX VM for L4 through L7 advanced security
analysis.
4
High-Level Workflow
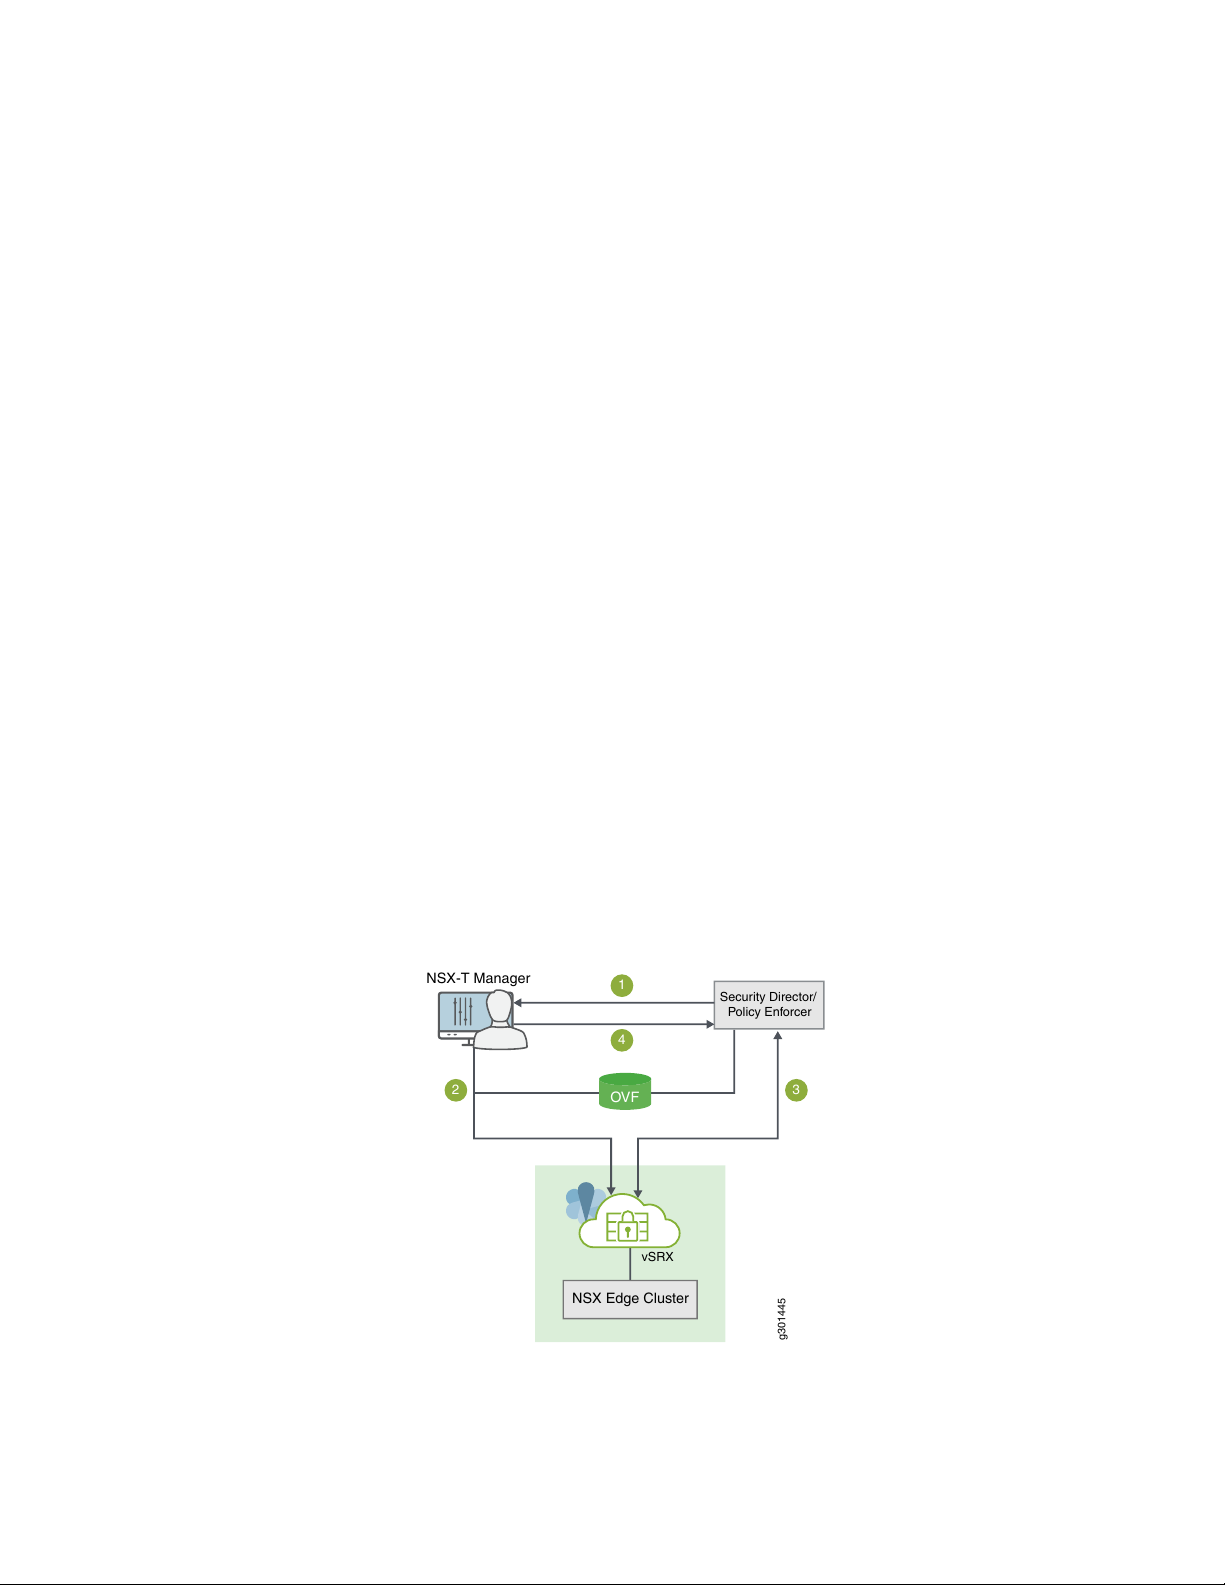
Figure 1 on page 4 provides a high-level workflow of how the NSX-T Manager, Security Director, and
vSRX interact to deploy vSRX as a security service in the VMware NSX-T environment.
Figure 1: vSRX, Security Director, and VMware NSX-T Integration Workflow
Page 14

1. The Junos Space Security Director initiates communication with the NSX-T Manager. The Security
Director discovers, registers, and adds the NSX-T Manager as a device in its database. The Security
Director also deploys the vSRX instance from the .ovf file and registers it as a security service. The
NSX-T Manager and its inventory of shared objects (for example, security groups) and addresses are
then synchronized with the Security Director. The registration process uses Policy Enforcer to enable
bidirectional communication between Security Director and the NSX-T Manager.
2. The NSX-T Manager deploys the registered vSRX instance as a Juniper security service to the NSX
Edge Cluster. The deployment is based on the vSRX .ovf file.
3. After the vSRX agent VM is provisioned as a security service, NSX-T Manager notifies Security Director
by using REST API callbacks. Security Director pushes the initial boot configurations and Junos OS
configuration policies to each vSRX agent VM to support the NSX-T security group. Security Director
is aware of the NSX-T security groups and corresponding address groups, and all deployed vSRX agent
VMs are automatically discovered.
Security policies redirect relevant network traffic originating from the VMs in a specific security group
to the Juniper security service vSRX agent VM for further analysis.
5
The Security Director dynamically synchronizes the object database to all vSRX agent VMs deployed
in NSX Edge Cluster. Security groups discovered from NSX-T Manager are mapped to a dynamic address
group (DAG) in Security Director. The Security Director manages the firewall policies on the vSRX agent
VMs. Using Security Director, you create advanced security service policies (for example, an application
firewall policy or an IPS policy) and then push those policies.
4. The NSX-T Manager continue to send real-time updates on changes in the virtual environment to
Security Director.
RELATED DOCUMENTATION
VMware NSX-T Data Sheet
Junos Space Security Director
vSRX
Before You Deploy vSRX in VMware NSX-T Environment
Before you begin deploying the vSRX Virtual Services Gateway as an advanced security service in VMware
NSX-T:
Page 15

Download the .ovf file of the vSRX software image from Juniper Networks website and save it to the
•
Policy Enforcer. The vSRX OVF URL automatically appears in the Register Security Service page of the
Security Director when you register the vSRX virtual machine (VM) as a Juniper security service on the
NSX-T Manager.
Obtain the Juniper SDSN for NSX license key (see Juniper SDSN for VMware NSX Licensing).
•
Install the VMware vCenter Server on a Windows VM or physical server, or deploy the VMware vCenter
•
Server Appliance. Connect to the vCenter Server from the vSphere Web Client. See the VMware
documentation for details.
Install NSX-T Manager. NSX-T manager can be installed on ESXI or KVM servers. See the VMware
•
documentation for details.
NOTE: Juniper Networks devices require a license to activate the feature. To understand more
about VMWare NSX Licensing, see, Licenses for Network Management. Please refer to the
Licensing Guide for general information about License Management.
6
Table 3 on page 6 lists the system software requirement specifications for the components of a vSRX,
Security Director, and VMware NSX-T Manager.
Table 3: System Software Specifications for vSRX in VMware NSX Environment
SpecificationComponent
6.5 and 6.7VMware ESXi Server
6.7 and 7.0VMware vCenter Server
3.0VMware NSX-T Manager
21.1 or laterJunos Space Security Director
21.1 or laterJunos Space Policy Enforcer
Junos OS Release vSRX 3.0 21.1 or latervSRX
4 GBMemory
16 GB (IDE or SCSI drives)Disk space
2 vCPUsvCPUs
Page 16

Table 3: System Software Specifications for vSRX in VMware NSX Environment (continued)
SpecificationComponent
7
vNICs
A single vNIC for management traffic. Network traffic is
forwarded to the vSRX over a Virtual Machine Communication
Interface (VMCI) communication channel by the ESXi
hypervisor.
NOTE: VMCI is not a network interface (NIC) but a
VMWare-proprietary device for Host to Guest Communication.
About the NSX Managers Page
To access this page, click Security Director > Devices > NSX Managers.
Use the NSX Managers page to discover the NSX Manager and perform service registration of the vSRX
VM with the NSX Manager. The NSX Manager is added as a device in the Security Director and its inventory
is synchronized with Security Director.
When you add an NSX Manager in Security Director, the NSX Management RESTful API configures Policy
Enforcer as a system log server in NSX Manager. The system log server handler runs in the Policy Enforcer
virtual machine. On receiving the security group membership changes from system log, the system log
service handler parses the system log and extracts the changed security group details. The security policies
with rules having the modified security groups (dynamic address groups) as source or destination addresses
are filtered and the perimeter firewall devices assigned to those policies are obtained. A remote procedure
call (RPC) is sent to those perimeter firewall devices to update the dynamic address groups. The perimeter
firewall devices then obtains and update the IP address feeds from Policy Enforcer.
Before you Begin
1. Install the Policy Enforcer Release OVA image.
a. After the installation is complete, log in to the Policy Enforcer VM through SSH. Run the service
commands to verify the status of the following services:
service nsxmicro status
service sd_event_listener status
service nsx_callback_listener status
service ssh_listener status
b. If services are stopped, initiate the services again by running the following commands:
Page 17

service nsxmicro start
service sd_event_listener start
service nsx_callback_listener start
service ssh_listener start
2. Select Security Director > Administration > Policy Enforcer > Settings, and add Policy Enforcer to
Security Director. For more information, see Identifying the Policy Enforcer Virtual Machine In Security
Director.
3. Download the SSH Key. Copy the vSRX OVA file to the Policy Enforcer VM along with the downloaded
SSH key. See Download the SSH Key File.
4. Obtain the vSRX license key before adding the NSX Manager to the Security Director.
Tasks You Can Perform
8
You can perform the following tasks from this page:
Download the SSH Key. See Download the SSH Key File.
•
Add the NSX Manager. See “Add the NSX Manager” on page 11.
•
Register security services. See “Registering Security Services” on page 13.
•
Synchronize the NSX inventory.
•
Field Descriptions
Table 4 on page 8 provides guidelines on using the fields on the NSX Managers page.
Table 4: Fields on the NSX Managers Page
DescriptionField
Specifies the hostname or the IPv4 address of the NSX Manager.Hostname/IP Address
Specifies the name of the NSX Manager.Name
Associated vCenter
Specifies the hostname or the IP address of the vCenter associated with the
NSX Manager that is automatically fetched by Security Director.
Specifies the connection status of an associated vCenter.Associated vCenter Status
Specifies the registration status of the security services.Service Manager Registration Status
Page 18
Table 4: Fields on the NSX Managers Page (continued)
DescriptionField
9
Services
Username
Specifies the service definition of a selected NSX Manager.
Click View to view the service definition.
Specifies the port number of the NSX Manager.Port
Specifies the username of the NSX Manager. The user must have the
administrator privileges to access the NSX Manager.
Specifies the connection status of the NSX Manager.Connection Status
RELATED DOCUMENTATION
Add the NSX Manager | 11
Downloading the SSH Key File
You must copy the vSRX OVA image to the Policy Enforcer virtual machine (VM) before adding the NSX
Manager.
Use the Upload Image page to download the SSH key file and copy the vSRX OVA file to the Policy Enforcer
VM by using the SFTP command with the downloaded SSH key. You must perform this as a first step
before adding the NSX Manager.
To download the SSH key:
1. Select Security Director > Devices > NSX Managers.
The NSX Managers page appears.
2. Click Download SSH Key.
The Download SSH Key page appears.
3. Click Download SSH Key.
The SSH key is downloaded and saved in your local drive.
Copying vSRX OVA Image File to Policy Enforcer from Linux Machines
Page 19

To copy the vSRX OVA file to a Policy Enforcer VM from a Linux machine:
1. Copy the downloaded SSH key file to the same directory where the vSRX OVA image file is saved.
2. Navigate to the directory path where vSRX OVA and SSH key files are located.
3. Run the chmod 600 <<SSHKEYFILE>> command to change the permission of the SSH key file.
4. Run the following commands:
sftp -o “IdentityFile=<<SSHKEYFILE>>" nsxmicro@<<pe_ipaddress>>
•
cd publish
•
put <<VSRX OVA FILE>>
•
The vSRX OVA file will be copied to the Policy Enforcer VM after sometime.
5. After the vSRX OVA file is copied, you can add the NSX Manager and register its services in the Security
Director.
10
Copying vSRX OVA Image File to Policy Enforcer from MAC Machines
To copy the vSRX OVA file to a Policy Enforcer VM from a MAC machine:
1. Copy the downloaded SSH key file to the same directory where the vSRX OVA image file is saved.
2. Navigate to the directory path where vSRX OVA and SSH key files are located.
3. Run the chmod 600 <<SSHKEYFILE>> command to change the permission of the SSH key file.
4. Run the following commands:
sftp –i sshkey nsxmicro@<pe_ip>
•
cd publish
•
put *<<VSRX OVA FILE>>
•
The vSRX OVA file will be copied to the Policy Enforcer VM after sometime.
5. After the vSRX OVA file is copied, you can add the NSX Manager and register its services in the Security
Director.
RELATED DOCUMENTATION
About the NSX Managers Page | 7
Page 20

Add the NSX Manager
Use the Add NSX Manager page to add the NSX Manager in to the Security Director database. Based on
the NSX details provided, the Security Director automatically fetches the associated VMware vCenter
Server hostname from NSX.
To add a NSX Manager:
1. Select Devices > NSX Managers.
The NSX Managers page appears.
2. Click the add icon (+).
The Add NSX Manager page appears.
3. Complete the configuration by using the guidelines in Table 5 on page 11.
11
4. Click Finish to complete the configuration.
After adding the NSX Manager, you must register the vSRX VM as a Juniper security service with the
NSX Manager. See “Registering Security Services” on page 13.
Table 5: Fields on the Add NSX Manager Page
DescriptionField
Enter the name of the NSX manager.Name
Enter the IPv4 address of the NSX manager.Host
Port
Username
Password
Enter the port number of the NSX Manager. The NSX Manager and Security Director use
SSL to communicate on TCP port 443.
Enter the username of the NSX Manager to allow Security Director to authenticate the
communication.
Enter the password of the NSX Manager to allow Security Director to authenticate the
communication.
Enter a description about the NSX Manager; you can use a maximum of 255 characters.Description
View the SSL certificate required to authenticate the NSX Manager.SSL Certificate
Select this option to accept the SSL certificate. This is a mandatory field.Accept SSL Certificate
Page 21

Table 5: Fields on the Add NSX Manager Page (continued)
DescriptionField
12
Type
Firewall Type
Service Manager Registration
SD Username
Select an option: NSX-V or NSX-T.
VMware NSX-T is the latest generation of VMware’s network virtualization product series.
NSX-T is the successor to NSX-V. NSX-T supports third-party Hypervisors and next
generation overlay encapsulation protocols such as Generic Network Virtualization
Encapsulation (Geneve).
Select the type of perimeter firewall for your datacenter.
East-West Firewall—vSRX is spawned in each ESX server of VMware NSX for the
•
east-west traffic. This provides east-west security for members of the security groups
within a datacenter.
North-South Firewall—Perimeter firewall for the north-south traffic. This provides a
•
consistent north-south security for members of the security groups, if the members
move across datacenters.
You can select both the types or any one of the firewall types.
NOTE: Firewall Type is applicable only if you select the Type as NSX-V.
Enter the username of Security Director to allow the NSX Manager to authenticate its
communication with Security Director.
SD Password
Associated vCenter - vCenter Server
Username
Enter the password of Security Director to allow the NSX Manager to authenticate its
communication with Security Director.
Enter the license key of vSRX VM.License Key
To add multiple vCenter servers:
Click the + icon.
The Associate vCenter page is displayed.
Enter the IPv4 address of the VMware vCenter Server.Host
Enter the port number of the VMware vCenter Server. Default: 443Port
Enter the username of the VMware vCenter Server. Security Director uses these credentials
to discover the vCenter server and fetch the VM inventory details.
Page 22
Table 5: Fields on the Add NSX Manager Page (continued)
DescriptionField
13
Password
Enter the password of the VMware vCenter Server. Security Director uses these credentials
to discover the vCenter Server and fetch the VM inventory details.
View the SSL certificate required to authenticate the vCenter Server.SSL Certificate
Select this option to accept the SSL certificate. This is a mandatory field.Accept SSL Certificate
RELATED DOCUMENTATION
About the NSX Managers Page | 7
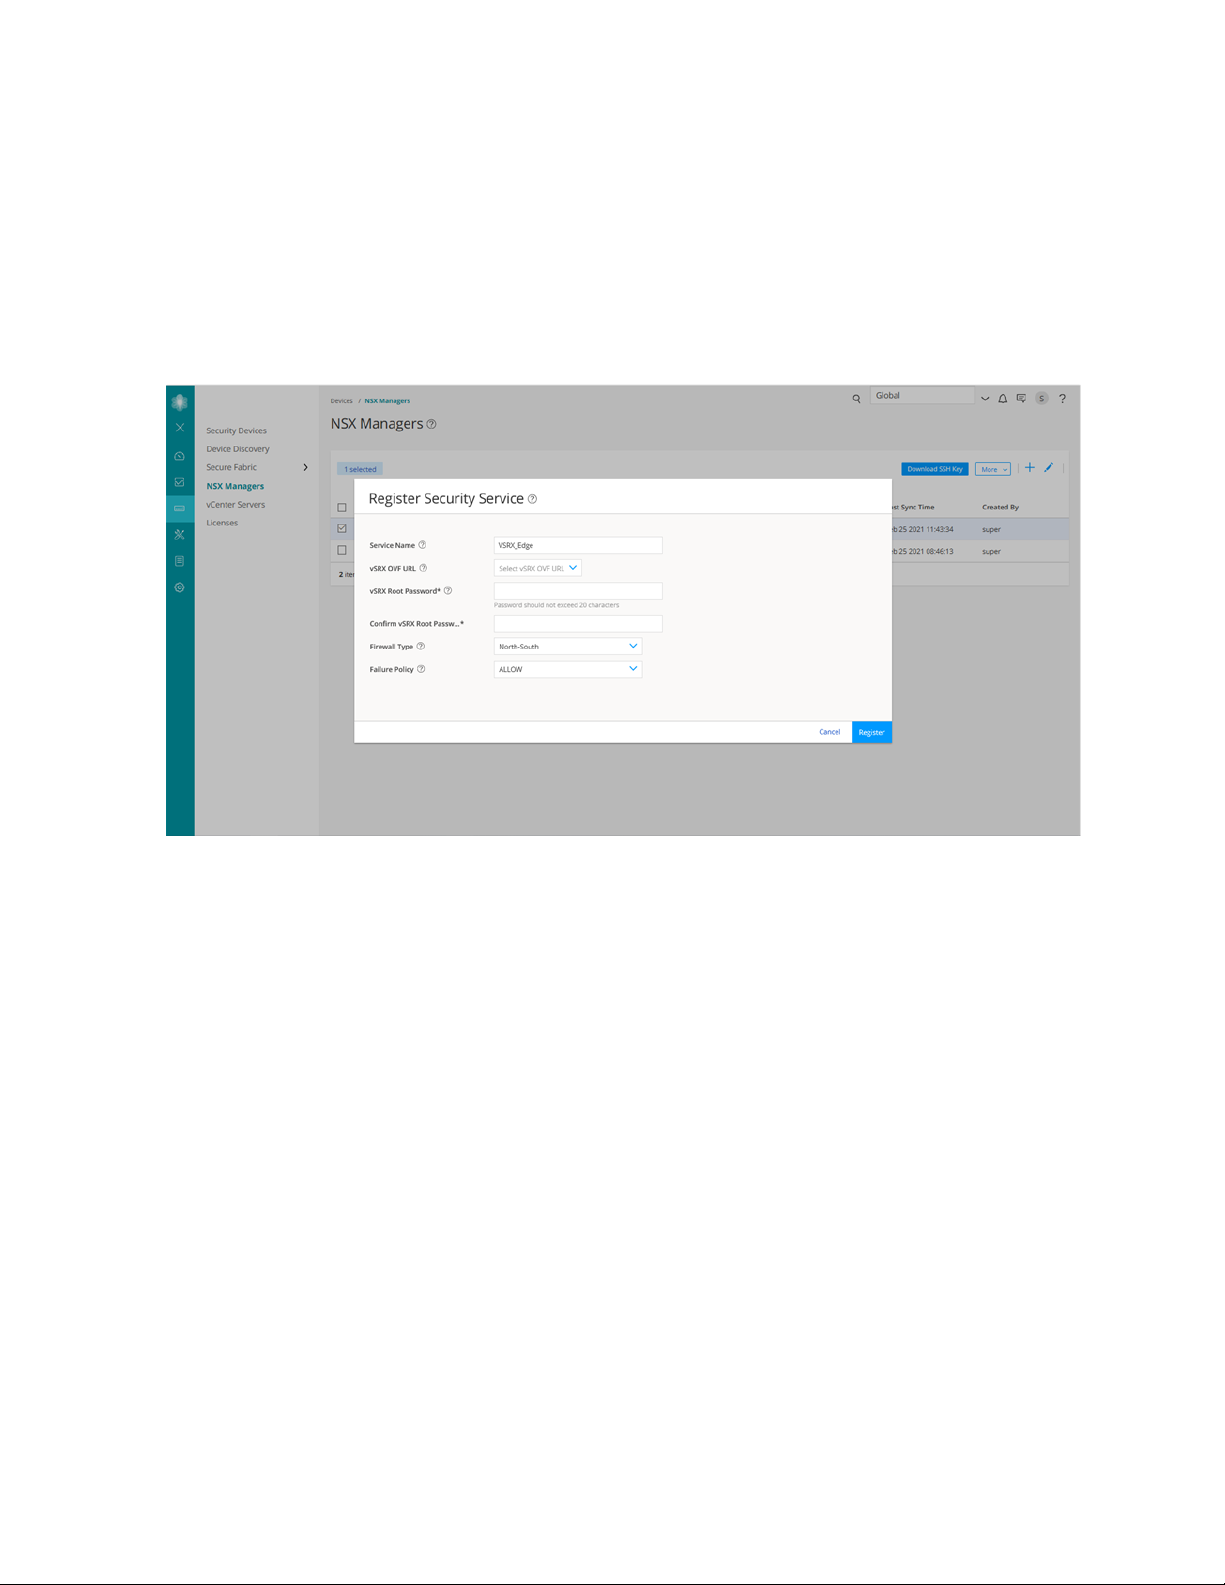
Registering Security Services
Use the Register Security Service page in Security Director to register a Juniper security service on a
specific NSX Manager. After registering the security service from Security Director, log in to the vCenter
server and deploy the service from NSX.
To register the Juniper security service:
1. Select Devices > NSX Managers.
The NSX Managers page appears.
2. Select the NSX Manager for which service needs to be registered.
3. From the More list or right-click menu, select Register Security Service.
The Register Security Service page appears.
4. Complete the configuration by using the guidelines in Table 6 on page 14.
5. Click Register to complete the registration.
A confirmation message appears to indicate if registration is successful or not.
Page 23

Table 6: Fields on the Register Security Service Page
DescriptionField
Enter the name for the Juniper Security Service.Service Name
14
vSRX OVF URL
vSRX Root Password
Firewall Type
RELATED DOCUMENTATION
About the NSX Managers Page | 7
The vSRX OVF image that you have copied to the Policy Enforcer VM is listed here.
Select the vSRX OVF image from the list.
Enter the root password of the vSRX instance.
The same root password is set for all the vSRX VMs deployed in NSX.
Enter the root password of the vSRX instance for confirmation.Confirm vSRX Root Password
The default firewall type is North-South. It is the perimeter firewall for the north-south
traffic. This provides a consistent north-south security for members of the security
groups, if the members move across datacenters.
The Firewall Type field is applicable only if the NSX Manager type is NSX-T.
Deploy the vSRX as an Advanced Security Service in a VMware NSX-T Environment
IN THIS SECTION
Create a Security Group | 15
Discover the NSX-T Manager and Register vSRX as a Security Service | 16
Deploy vSRX as a Security Service | 19
Verify vSRX Agent VM Deployment in Security Director | 20
Automatic Creation of Security Policy in the NSX-T Environment to Direct Traffic Through the vSRX Agent
VMs | 21
Page 24

Use the following procedures to deploy the vSRX as an advanced security service virtual machine (VM) in
the VMware NSX-T environment. The vSRX VM is deployed in conjunction with Juniper Networks Junos
Space Security Director and VMware NSX-T Manager.
Create a Security Group
You can create a security group by using the VMware NSX-T Manager. Each security group is a logical
collection of objects which include VMs that you want to be members in the same security group and to
which you will apply the vSRX as a Juniper security service. You can apply an advanced security service
policy to all the objects contained in a security group.
To create a security group:
1. Log in to the VMware NSX-T Manager.
2. Select Inventory > Groups.
3. Click ADD GROUP icon to create a new security group that contains the specific VMs you want as
members of the same group, as shown in Figure 2 on page 15.
15
Figure 2: Add Groups Page
4. Type a group name and then click Set members.
5. On the Select Members page, define the criteria that an object must meet for it to be added to the
security group you are creating. You can define a dynamic group membership criteria for the VMs that
are to be part of each security group. For example, VM membership in a security group can be tagged
by name. You define the exact membership criteria that you want to use to group VMs. Group
membership is associated dynamically at runtime.
6. Click Apply to complete creating the security group.
Page 25

Discover the NSX-T Manager and Register vSRX as a Security Service
The NSX-T Manager is added as a device in Security Director, and its inventory is synchronized with
Security Director.
NOTE: Ensure that SNMP is disabled in Security Director while performing device discovery for
the vSRX agent VM. If SNMP is enabled in Security Director, the vSRX agent VM discovery
operation fails.
To discover the NSX-T Manager from Security Director:
1. Select Security Director > Devices > NSX Managers.
The NSX Managers page appears.
2. Click the Add icon (+) to add the NSX Manager to Security Director.
16
The Add NSX Manager page appears, as shown in Figure 3 on page 16.
Figure 3: Add NSX Manager Page
3. In the NSX Manager section, enter the following information:
Name—Enter the name of the NSX Manager.
•
Host—Enter the IP address of the NSX Manager.
•
Page 26

Port—Enter the port number of the NSX Manager. The NSX Manager and Security Director use SSL
•
to communicate on TCP port 443.
Username, Password—Enter the username and password of the NSX Manager that are required for
•
communication to be authenticated by the Security Director.
Description—Enter a description for the NSX Manager you are to add to the Security Director.
•
Type—Select NSX-T.
•
NSX-T is the successor to the NSX-V product. VMware NSX-T is the latest generation of VMware’s
network virtualization product series.
4. Click Next.
5. In the Service Manager Registration section, enter the following details about the Security Director:
SD Username, SD Password—Enter the username and password of Security Director to allow the
•
NSX-T Manager to authenticate communication to the Security Director.
License Key—Enter the license key for the previously procured Juniper SDSN for NSX license (see
•
Juniper SDSN for VMware NSX Licensing for details).
17
6. Click Next.
7. In the vCenter Server section, click the + icon to add vCenter servers. Provide the following details on
the Associate vCenter page:
Host—Enter the IP address of the VMWare vCenter Server.
•
Port—Enter the port number of the VMWare vCenter Server. By default, 443 is used.
•
Username, Password—Enter the username and password of the VMware vCenter Server. Security
•
Director uses these credentials to discover the vCenter Server and fetch the VM inventory details.
8. Click Finish.
The Summary page of configuration changes appears. Click OK to add the NSX-T Manager. When you
return to the NSX Managers page, you will see the discovered NSX-T Manager listed.
After adding the NSX-T Manager, you must register the vSRX VM as a Juniper security service with the
NSX-T Manager.
Page 27
To register the vSRX instance as a Juniper security service:
1. Select the NSX-T Manager for which service needs to be registered, right-click or from the More list,
select Register Security Service.
The Register Security Service page appears, as shown in Figure 4 on page 18.
Figure 4: Register Security Service Page
18
2. In the Service Name field, enter the name of the Juniper security service.
3. From the vSRX OVF URL list, select the available vSRX OVF image that you copied to the Policy Enforcer
machine.
4. In the vSRX Root Password field, enter the root password of the vSRX instance. The same root password
will be set for all the vSRX instances deployed in NSX.
5. By default, the firewall type is North-South. This is the perimeter firewall for the north-south traffic.
This provides a consistent north-south security for members of the security groups, if the members
move across datacenters.
6. Select a failure policy.
Select Allow to send traffic to the destination VM when the service VM fails. Select Block to not send
traffic to the destination VM when the service VM fails.
7. Click Register.
Page 28
A confirmation message indicates whether the registration is successful or not.
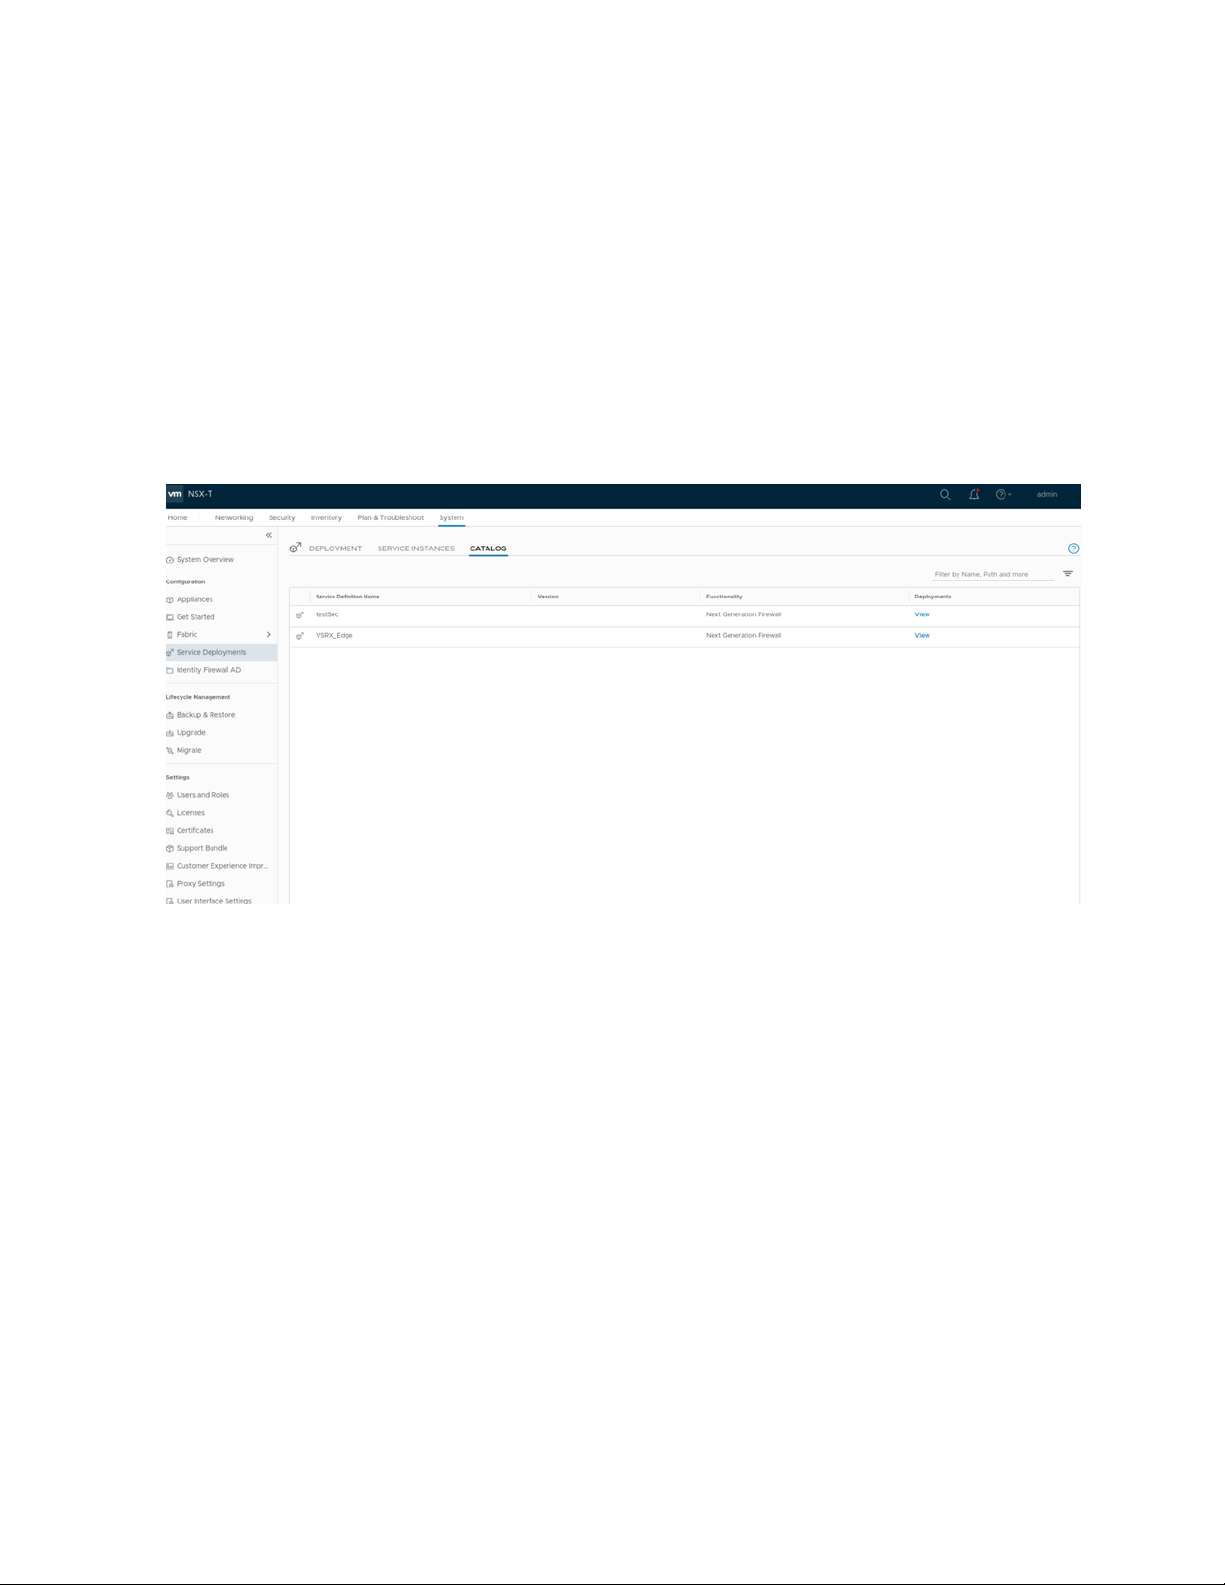
The vSRX is added as a network service that can be deployed by the NSX-T Manager.
In the VMware NSX-T Manager, verify the following:
Select System > Service Deployments and then select the CATALOG tab. Verify that the service name
•
provided while registering the Security Service is listed in the table (the newly registered vSRX VM) as
shown in Figure 5 on page 19.
Figure 5: Service Definition
19
The NSX-T Manager and its inventory are now synchronized with the Security Director. All shared objects
(such as security groups) are synchronized between the NSX-T Manager and Security Director. The shared
objects include the IP addresses of all VMs, including the vSRX agent VMs. Security Director creates a
dynamic address group(DAG) for each security group synchronized from the NSX-T Manager, along with
the addresses of each member of the security group.
After you register a Juniper security service in the NSX-T Manager, the NSX-T Manager uses the vSRX
agent VM to communicate the service status. The NSX-T Manager transmits messages to Security Director
when any changes or activities are happening in the NSX-T Manager that are related to the Juniper security
service.
Deploy vSRX as a Security Service
The next step is to deploy the Juniper security service.
To deploy the vSRX agent VM as a security service:
1. Select System > Service Deployments and then click the DEPLOYMENT tab.
Page 29

2. Select the partner service as the registered service and then click Deploy Service.
a. Enter the service deployment name.
b. Select the attachment point as Tier1 gateway or Tier 0 gateway.
c. Select the Compute Manager as vCenter.
d. Select the Cluster on which the vSRX agent VM is to be deployed.
e. Select the datastore on which to allocate shared storage for the vSRX agent VM.
f. Click Set and then provide the network details such as, primary interface network, primary interface
IP, primary gateway address, primary subnet mask and click Save.
3. Click SAVE to deploy the vSRX agent VM as a security service.
The Security Director automatically discovers all the deployed vSRX VM agents by using the
device-initiated discovery. A new firewall and IPS group policies are created and all devices are assigned
to these group policies.
20
NOTE:
The Security Director creates predefined IPS policies with a single IPS template. You can
•
either add more IPS templates or convert the predefined IPS policies to custom IPS policies.
You must register different service for each service deployment.
•
Verify vSRX Agent VM Deployment in Security Director
In Security Director, based on the NSX Manager discovery, NSX security groups are automatically
synchronized with Security Director. For each service group in NSX Manager, Security Director creates a
corresponding dynamic address group.
To verify that the vSRX agent VMs have been deployed:
1. Select Security Director > Devices > NSX Managers.
The NSX Managers page appears with the discovered NSX Manager and the vSRX instance registered
as a new service.
2. Select Security Director > Monitor > NSX Inventory > Security Groups.
Page 30

The Security Groups page appears listing all the security groups obtained from NSX and the
corresponding dynamic address groups created by the Security Director.
3. Select Security Director > Monitor > vCenter Server Inventory > Virtual Machines.
The Virtual Machines page appears, listing the VMs that are dynamically fetched by the associated
vCenter, as shown in Figure 6 on page 21. You can view the security groups associated with each VM.
Also, you can view security groups associated with each VM.
Figure 6: Virtual Machines Page
21
Automatic Creation of Security Policy in the NSX-T Environment to Direct Traffic Through the vSRX Agent VMs
After you deploy vSRX agent VM security services, security policies are automatically created to redirect
any network traffic originating from the VMs in a specific security group to the Juniper security service
vSRX agent VM for further analysis.
To direct the traffic to the vSRX agent VMs by using the automatically created security policies:
1. In Security Director, install the IPS signature to all the vSRX VM agents.
2. On the Firewall and IPS Policies page, add new rules to the automatically created firewall or IPS policies
with respective dynamic address groups. You can also use the application firewalls in the firewall rules.
Page 31

3. After creating policy rules, publish and update the firewall and IPS policies.
4. After the firewall and IPS policies are successfully updated in the Security Director, log in to the VMware
NSX-T Manager to verify the security policies.
Select Security > Network Introspection (N-S). The security policies are automatically created from
Security Director, as shown Figure 7 on page 22.
Figure 7: Network Introspection (N-S)
22
When you return to Security Director > Devices > Security Devices, you can view the active configuration
for the vSRX agent VMs, as shown in Figure 8 on page 22.
Figure 8: Security Devices Page
Page 32

The NSX-T Manager is aware of the security groups that the Juniper security service monitors. If any
changes occur in the security group, the NSX-T Manager notifies Security Director about those changes.
If membership changes, NSX-T Manager notifies Security Director of the changes and Security Director
updates its database based on the new membership.
Delete the NSX-T Manager
You can delete the NSX-T Manager and its associated vCenter server from the Security Director inventory.
Before You Begin
Before you delete the NSX-T Manager, perform the following steps:
1. Unbind all bindings of network object from a service profile.
Log in to the VMware NSX-T Manager.
•
23
Select System > Service Deployment.
•
In the Deployment tab, select the deployed partner service that you want to delete.
•
The corresponding service details are displayed.
From the Actions list, select Delete.
•
The delete deployment service confirmation page appears.
Click DELETE to delete the deployed service.
•
If the action is successful, the deployed service is deleted.
To delete the NSX-T Manager from Security Director:
1. Select Devices > NSX Managers.
The NSX Manager page appears.
2. Select the NSX-T Manager that you want to delete.
3. From the More list, or right-click menu, select Delete NSX Manager.
A confirmation message appears to confirm the deletion.
Page 33

NOTE: You cannot delete NSX-T Manager from Security Director if the security service is
already deployed in the NSX-T Manager.
4. Click Yes to confirm the deletion.
The NSX-T Manager and its associated vCenter server are deleted from the Security Director inventory.
NOTE: You cannot delete NSX-T Manager if there is a NSX Secure Fabric. You must first delete
the Secure Fabric. See Editing or Deleting a Secure Fabric.
24
RELATED DOCUMENTATION
About the NSX Managers Page | 7
Delete NSX-T Manager Services
You can delete NSX-T Manager services from Security Director. Before deleting a service, you must ensure
that the service is not deployed in VMware NSX-T Manager. If the service that you are trying to delete is
already deployed in the VMware NSX-T Manager, you will see an error message. To delete the registered
security service, you must first delete the deployed service.
To delete a NSX-T Manager service from Security Director:
1. Select Security Director>Devices>NSX Managers.
The NSX Managers page appears.
2. Select the NSX-T Manager for which you want to delete the service definition, and in the Services
column click View.
The Services Definition page appears listing the registered security services.
3. Select the service that you want to delete, right click and select Delete Service.
If the selected service is already deployed in NSX-T Manager, an error message is shown to delete the
registered security service.
Page 34

To delete the deployed service from the NSX-T Manager:
a. Log in to the NSX-T Manager.
b. Select System > Service Deployment.
c. In the Deployment tab, select the deployed partner service that you want to delete.
The corresponding service details are displayed.
d. From the Actions list, select Delete.
The delete deployment service confirmation page appears.
e. Click DELETE to delete the deployed service.
If the action is successful, the deployed service is deleted.
f. Go to Security Director and repeat the procedure from Step 1.
4. If the selected service is not deployed in NSX-T Manager, Security Director deletes the service
successfully.
25
RELATED DOCUMENTATION
About the NSX Managers Page | 7
About the vCenter Servers Page
To access this page, select Security Director > Devices > vCenter Servers.
VMWare NSX Manager is always associated to a vCenter Server. Based on the NSX Manager discovered
by Security Director, the NSX service automatically fetches the associated vCenter server hostname. The
NSX service uses the specific vCenter credentials provided by the user at the time of adding the NSX
Manager, to connect to vCenter and obtain any required inventory from it.
Use the vCenter Servers page to view details of an associated vCenter Server.
Page 35

Tasks You Can Perform
You can perform the following task from this page:
Synchronize any changes to the inventory objects in vCenter with the vCenter database.
•
Field Descriptions
Table 7 on page 26 provides guidelines on using the fields on the vCenter Servers page.
Table 7: Fields on the vCenter Servers Page
DescriptionField
Specifies the hostname of the associated vCenter Server.Host Name
Specifies the port number of the vCenter server.Port
26
Specifies the connection status of NSX Manager and associated vCenter server.Connection Status
RELATED DOCUMENTATION
About the NSX Managers Page | 7
Add the NSX Manager | 11
Registering Security Services | 13
About the Security Groups Page
To access this page, select Security Director > Monitor > NSX Inventory > Security Groups.
Use the Security Groups page to view a list of security groups obtained from NSX and the corresponding
dynamic address groups created by Security Director.
The security groups updates are automatically synchronized by Security Director.
Page 36

Tasks You Can Perform
You can perform the following task from this page:
View members of the security group.
•
Field Descriptions
Table 8 on page 27 provides guidelines on using the fields on the Security Groups page.
Table 8: Fields on the Security Groups Page
DescriptionField
27
NSX Manager
Members
DAG Name
Specifies the name of the NSX Manager from which the corresponding security group is
obtained.
Specifies the name of the security group.Name
Click View to view the list of VMs belonging to a security group.
If the vCenter is associated with the NSX Manager, the members list shows the VM names
with IPv4 and IPv6 addresses.
Specifies the name of a dynamic address group created for each security group.
The dynamic address group name is created in the format <NSX Manager name>-<security
group name>.
Specifies the definition of a security group.Definition
RELATED DOCUMENTATION
About the NSX Managers Page | 7
View Members of a Security Group
Use the View Members page to view the list of VMs belonging to a security group.
To view the list of virtual machines:
1. Select Monitor > NSX Inventory > Security Groups.
Page 37

The Security Groups page appears.
2. In the Members column, click View.
The View Members page appears. Table 9 on page 28 describes the fields on this page.
Table 9: Fields on the View Members Page
DescriptionField
Specifies the name of the security group.Security Group
Specifies the name of the VM that belongs to the security group.VM Name
Specifies the IPv4 address of the VM.IP Address
Specifies the IPv6 address of the VM.IPv6 Address
28
RELATED DOCUMENTATION
About the NSX Managers Page | 7
About the Virtual Machines Page
To access this page, select Security Director > Monitor > vCenter Server Inventory > Virtual Machines.
Use the Virtual Machines page to view the complete list of VMs that are dynamically fetched by the
associated vCenter.
Tasks You Can Perform
You can perform the following tasks from this page:
View security groups associated with each VM.
•
View a list of vNICs for each VM and the network that each of vNIC is linked to.
•
Field Descriptions
Table 10 on page 29 provides guidelines on using the fields on the Virtual Machines page.
Page 38

Table 10: Fields on the Virtual Machines Page
DescriptionField
Specifies the name of the VM.VM Name
Specifies the vCenter details.vCenter
29
OS on VM
Network Details
Specifies the operating system on each VM. For example: Red Hat, CentOS, and
so on.
Click View to view a list of security groups associated with each VM.Security Groups
Click View to view a list of vNICs for each VM with their corresponding IPv4 and
IPv6 addresses.
Specifies whether the VM is switched on or off.State
Specifies whether the VM is connected to the ESXi host or not.Status
RELATED DOCUMENTATION
About the NSX Managers Page | 7
View Network Details of a Virtual Machine
Use the View Network Details page to view the network details of a virtual machine(VM) such as name
of the virtual Network Interface Card (NIC) or the network adapter and the IPv4 and IPv6 addresses of
each NIC.
To view the network details:
1. Select Monitor > vCenter Server Inventory > Virtual Machines.
The Virtual Machines page appears.
2. In the Network Details column, click View.
The View Network Details page appears. Table 11 on page 30 provides the guidelines on using the
fields on this page.
Page 39

Table 11: Fields on the View Networks Details Page
DescriptionField
Specifies the IP address of the VM.Virtual Machine
Specifies the name of a vNIC or network adapter.vNIC
Specifies the IPv4 address of a vNIC.IPv4
Specifies the IPv6 address of a vNIC.IPv6
RELATED DOCUMENTATION
About the NSX Managers Page | 7
30
View Security Groups of a Virtual Machine
Use the Security Groups page to view the list of security groups assigned to a virtual machine (VM).
To view the list of security groups:
1. Select Monitor > vCenter Server Inventory > Virtual Machines.
The Virtual Machines page appears.
2. In the Security Groups column, click View.
The Security Groups page appears. Table 12 on page 30 describes fields on this page.
Table 12: Fields on the Security Groups Page
DescriptionField
Specifies the IP address of the VM.Virtual Machine
Specifies the name of the security group to which a VM belongs.Security Group
RELATED DOCUMENTATION
Page 40
About the NSX Managers Page | 7
Implement Threat Policy on VMWare NSX-T
IN THIS SECTION
VMWare NSX-T Integration with Policy Enforcer and Sky ATP Overview | 31
Before You Begin | 33
Configure VMware NSX-T with Policy Enforcer | 36
Example: Create a Firewall Rule in VMware NSX-T Using SDSN_BLOCK Tag | 38
31
VMWare NSX-T Integration with Policy Enforcer and Sky ATP Overview
Juniper Networks Sky Advanced Threat Prevention (Sky ATP) identifies the infected virtual machines(VMs)
running on VMWare NSX-T and tags these VMs as infected. This is based on a malware file exchange from
the infected VMs and/or based on the Command and Control communication with known botnet sites on
the internet.
Based on this identification of infected or compromised hosts, you can take one of the following actions:
Enable additional security features such as Layer-7 Application Firewall and Intrusion Prevention (IPS)
•
leveraging vSRX
Enforce Layer-2 to Layer-4 controls using NSX Distributed Firewall
•
Leverage NSX integration with Host-Based security vendors
•
(https://www.vmware.com/products/nsx/technology-partners.html) to take host-based security actions
such as running antivirus or anti malware features on the infected VMs.
Policy Enforcer provides a set of Connector APIs for the third-party adaptors. The NSX Connector integrates
with the Policy Enforcer using these APIs to enable enforcement of the infected hosts policy on Secure
Fabric. For NSX connectors, the NSX-T Manager, its associated vCenter, and an edge firewall form the
Secure Fabric.
The following topology shows how NSX Manager and the edge firewall create a Secure Fabric with Policy
Enforcer.
Page 41
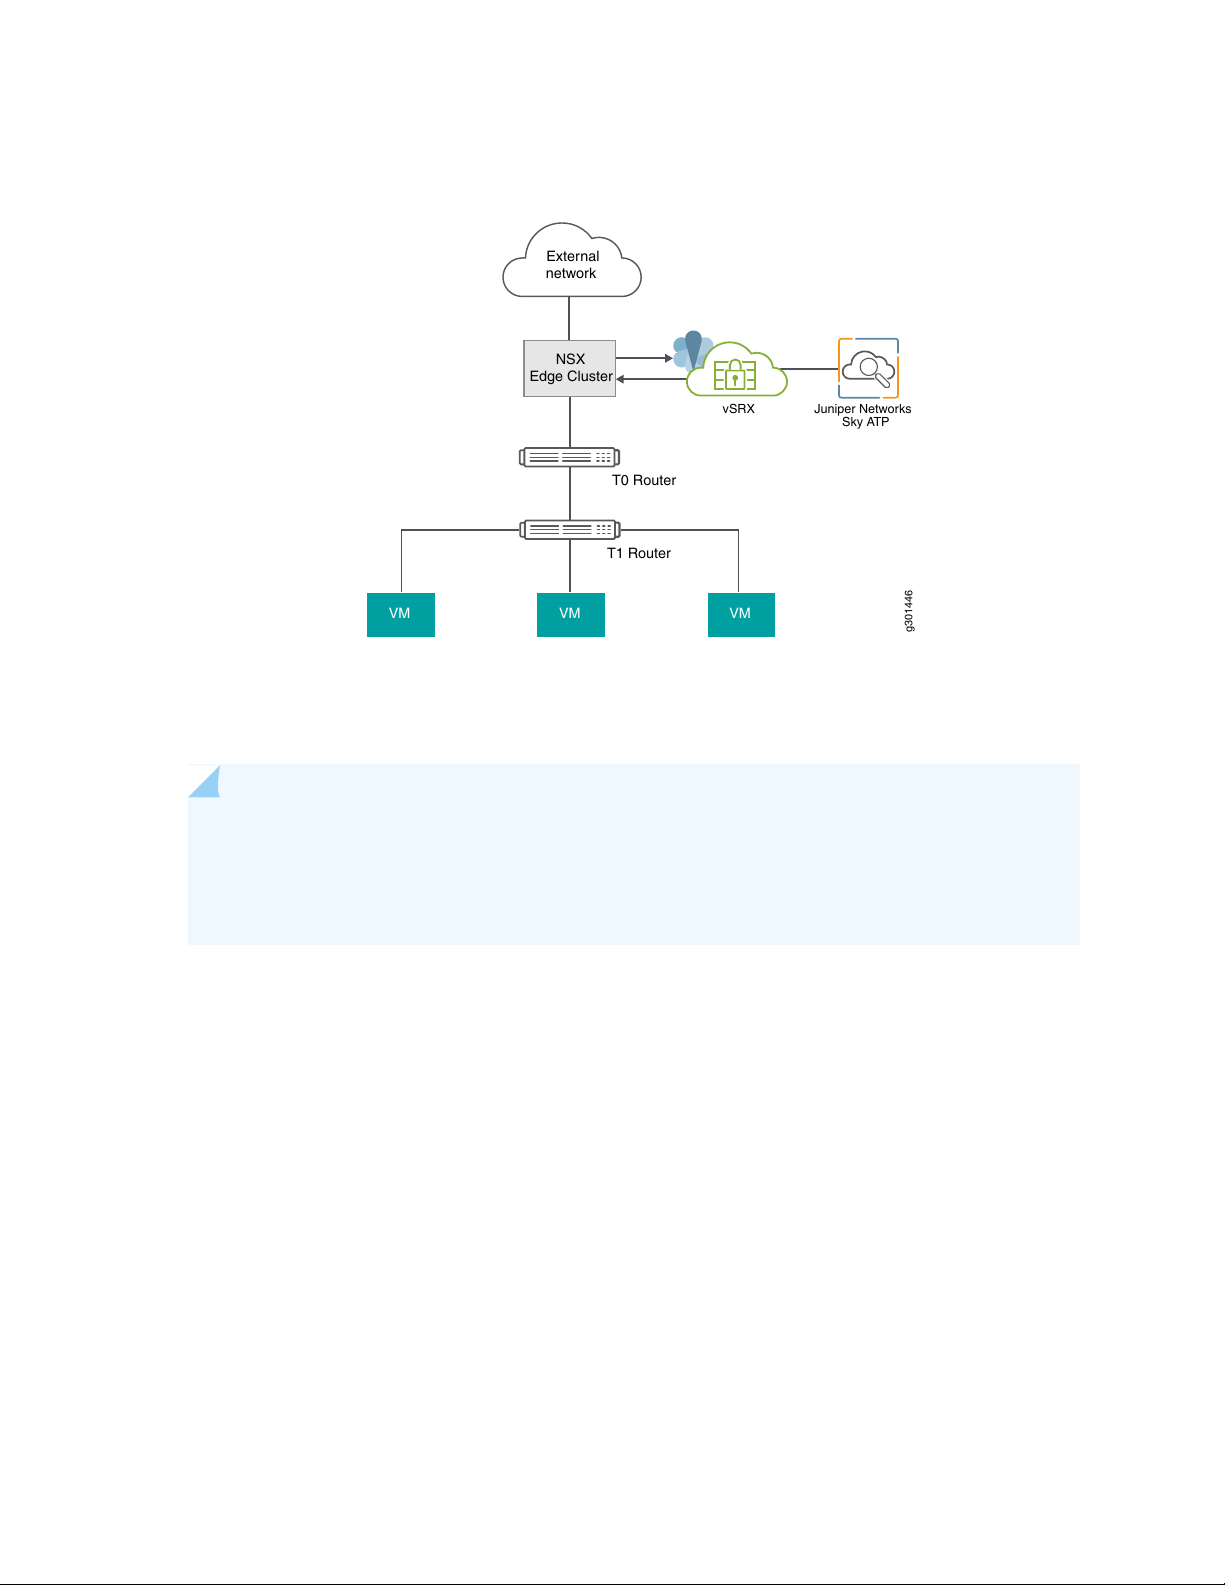
Figure 9: Topology of NSX-T Integration with Policy Enforcer
External
network
NSX
Edge Cluster
Juniper Networks
Sky ATP
T0 Router
T1 Router
VM VM VM
g301446
vSRX
32
The service which is deployed in Tier 0 gateway in VMware NSX-T is enrolled into SKY ATP and acts as
an edge firewall.
NOTE: You can register the NSX-T Manager with Security Director only when the Policy Enforcer
is configured. The NSX micro service is bundled with the Policy Enforcer VM. However, the NSX
micro service is packaged as a standalone rpm, so that the NSX micro service upgrade and patches
can be performed independent of the Policy Enforcer VM.
Implementation of Infected Hosts Policy Overview
The vSRX or SRX Series devices running as an edge firewall is enrolled to send all the suspected traffic to
Sky ATP.
The following steps explain the high-level workflow:
If an infection is detected, Sky ATP notifies the Policy Enforcer about the infected IP addresses
•
If the infected IP address belongs to Secure Fabric associated with the NSX domain, Policy Enforcer
•
calls the NSX plugin APIs to notify the NSX Connector about the list of infected IP addresses
NSX service will then retrieve the VM corresponding to the IP addresses sent and then calls the NSX
•
API to tag to an appropriate VM with a security tag, SDSN_BLOCK.
You can then create a policy to block the infected hosts using the SDSN_BLOCK tag by creating gateway
specific rules. The block policy consists of two rules for ingress block and egress block. The ingress block
rule applies to any traffic originating from a security group composed of VMs tagged with a block tag to
Page 42

any destination. Similarly, the egress block rule applies to any traffic destined to security group composed
of VMs tagged with block tag from any source.
The creation of security groups associated with the SDSN_BLOCK tag, creation of ingress and egress block
rules, and the action to take on the matching packets must be configured by the VMWare administrators.
The NSX Connector will simply apply the SDSN_BLOCK tag on the infected VM.
Register NSX Micro Service as Policy Enforcer Connector Instance Overview
The integration of each NSX-T Manager discovered in Security Director with Policy Enforcer is triggered
automatically.
The automatic registration of a connector instance involves the following steps:
1. Discovering the NSX-T Manager in Security Director. This triggers an auto creation of the Policy Enforcer
connector instance.
2. Secure Fabric is created to manage the discovered NSX-T Manager.
33
3. Creation of threat prevention policy requires the knowledge of Sky ATP realm and the edge firewall
device. These are taken as inputs from the user.
Before You Begin
IN THIS SECTION
Infected Hosts Workflow in VMware NSX-T | 33
Before you begin to configure NSX with Policy Enforcer, configure the infected hosts workflow in VMWare
NSX-T Manager.
Infected Hosts Workflow in VMware NSX-T
To block the infected hosts:
1. Log in to VMware NSX-T Manager.
2. Select Inventory > Tags.
The Tags page is displayed.
3. Click ADD TAG and enter the tag name as SDSN_BLOCK.
Page 43

4. Click Set Virtual Machines to select Virtual Machines where the tag should be applied.
The Select Virtual Machines page is displayed.
5. Select the virtual machine and click Apply.
6. Click SAVE to add the tag.
On successful creation of the tag, it will be displayed on the Tags page as shown in Figure 10 on page 34.
Figure 10: Tags Page
34
7. Select Inventory > Groups and then click ADD GROUP.
The security administrator can create the security group based on the security tag.
8. Enter a name of the security group.
9. Click Set Members.
The Select Members page is displayed, where you can define or add members for the security group.
10. On the Membership Criteria tab, click ADD CRITERIA.
11. Define the criteria that an object must meet for it to be added to the security group you are creating.
In the Criteria row, select the Virtual Machine and select the tag from the list and then select the
SDSN_BLOCK tag name, as shown in Figure 11 on page 35.
Page 44

Figure 11: Membership Criteria
35
Click Apply.
12. On the Groups page, click SAVE to add the group.
You can see that the security group has been created and the Virtual Machine with the security tag is
assigned to the security group.
Page 45

Configure VMware NSX-T with Policy Enforcer
The following steps explain configuring VMWare NSX-T with Policy Enforcer:
1. Add the NSX-T Manager to the Security Director database, as shown in Figure 3 on page 16. To know
more about adding a NSX Manager, see “Add the NSX Manager” on page 11.
Figure 12: Add NSX Manager Page
36
2. After discovering the NSX-T Manager in Security Director, use the Guided Setup workflow to configure
the following parameters:
Secure Fabric
•
Policy Enforcement Group (PEG)
•
Sky ATP Realm
•
Threat policies for the following threat types:
•
Command and Control (C&C) Server
•
Infected Hosts
•
Malware
•
3. Select Configuration > Guided Setup > Threat Prevention.
The Threat Prevention Policy Setup page appears.
4. Click Stat Setup.
Page 46
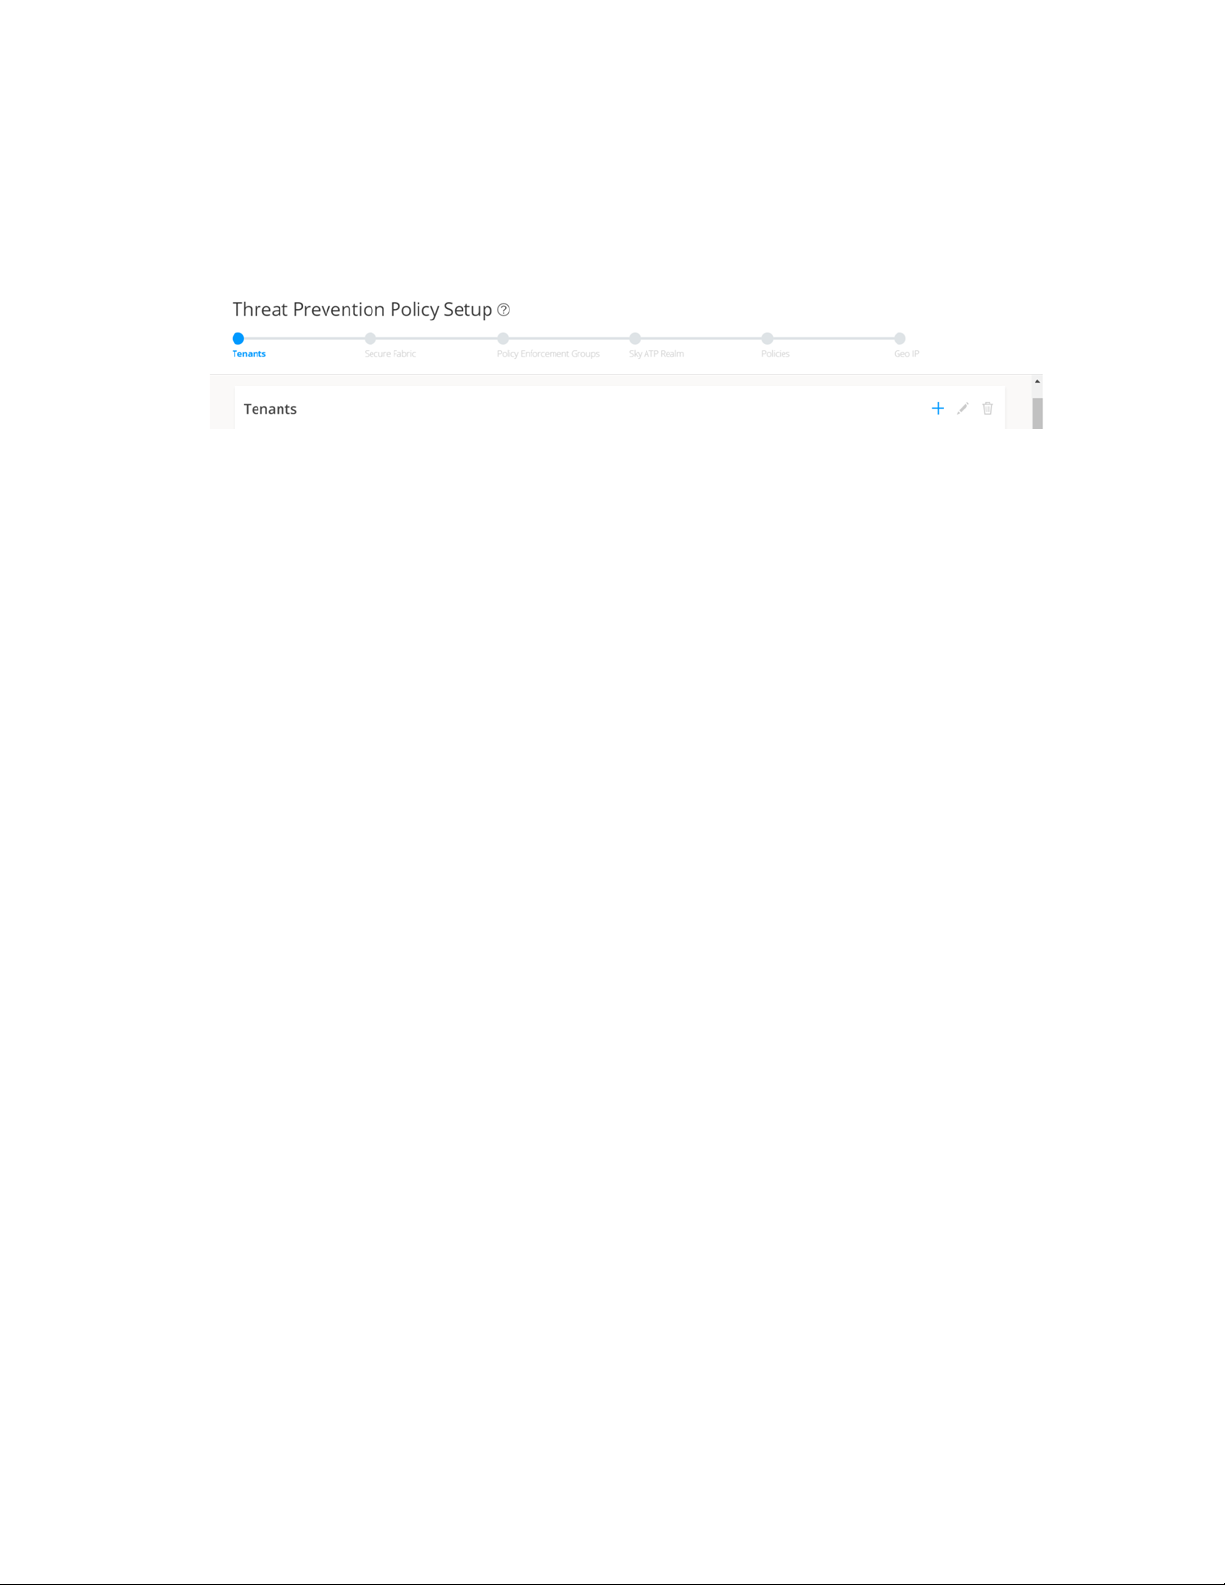
The Threat Prevention Policy Setup page appears, as shown in Figure 13 on page 37. Some of the
resources are already configured as you discover the NSX-T Manager.
Figure 13: Threat Prevention Policy Setup Page
5. In the Secure Fabric page, the site is already created. For that site, one enforcement point is also added.
To create a secure fabric site in Policy Enforcer for NSX based environment, you require two parts :
NSX Manager and edge firewall. In the Add Enforcement Points page, add vSRX, as shown in the
topology, as a edge firewall. Select the vSRX device listed under the Available column and move it to
the Selected column. You now have two enforcement points within the Secure Fabric.
37
Click Next.
6. In the Policy Enforcement Groups page, the policy enforcement group is already created based on the
Location Group Type. The location points to the Secure Fabric site created for NSX.
Click. Next.
7. In the Sky ATP Realm page, associate the Secure Fabric with a Sky ATP realm.
If the Sky ATP realm is already created, click Assign Sites in the Sites Assigned column and chose the
Secure Fabric site. The Sky ATP realm and Secure Fabric are now associated.
Click. Next.
8. In the Policies page, create a threat prevention policy by choosing the profile types depending on the
type of threat prevention this policy provides (C&C Server, Infected Host, Malware) and an action for
the profile. The DDoS profile is not supported by the NSX Connector. Once configured, you apply
policies to PEGs.
Click Assign groups in the Policy Enforcement Group column to associate the policy enforcement group
with the policy.
Security Director takes the snapshot of the firewall by performing the rule analysis and threat remediation
rules are pushed into the edge firewall.
Click Finish.
Page 47

NOTE: The GeoIP feeds are not used with the NSX Connectors.
9. The last page is a summary of the items you have configured using quick setup. Click OK to be taken
to the Policies page under Configure > Threat Prevention > Policies and your policy is listed there.
Example: Create a Firewall Rule in VMware NSX-T Using SDSN_BLOCK Tag
The following example shows the firewall rule creation using the SDSN_BLOCK security tag:
1. Log in to VMware NSX-T Manager.
2. Select Security > Gateway Firewall.
The GATEWAY FIREWALL page appears. Gateway firewall represents rules applied at the perimeter
firewall.
38
3. Select GATEWAY SPECIFIC RULES tab and then select a gateway.
4. Click Add Policy.
5. Enter the policy name for the new security policy.
6. Select a policy and then select Add Rule to create a new firewall rule and then enter the firewall rule
name.
7. Select the source as the security group with SDSN_BLOCK tag and click Apply.
8. In the Applied To column, select the interface to which the rule should be applied.
9. In the Action field, select the Drop option.
10. In the Destination field, select Any.
Page 48
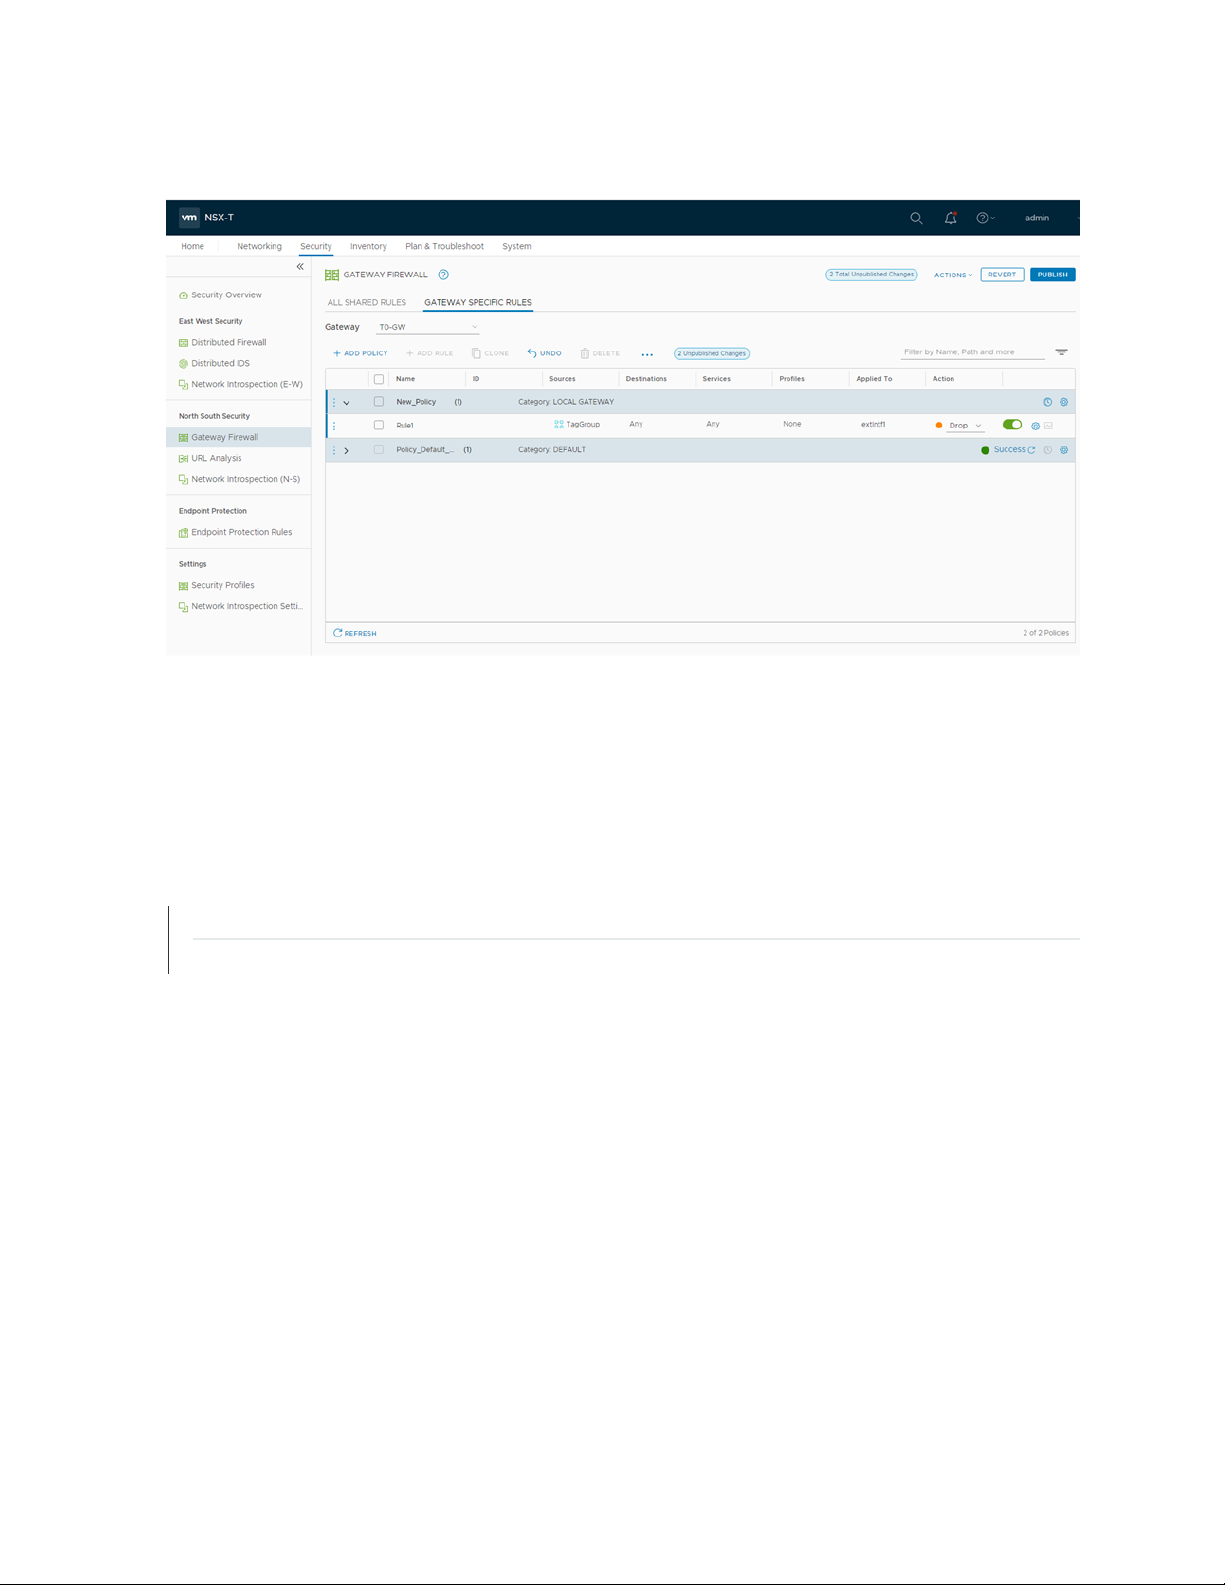
Figure 14: Gateway Firewall
39
11. Click PUBLISH.
Now security administrator can block the traffic coming from the infected hosts.
RELATED DOCUMENTATION
VMware NSX Data Sheet
vSRX
 Loading...