

Juniper NETWORK AND SECURITY MANAGER 2010.4 - CONFIGURING SECURE ACCESS DEVICES GUIDE REV 01, Network and Security Manager User Manual
Page 1

Network and Security
Manager
Configuring Secure Access Devices Guide
Release
2010.4
Published: 2010-11-17
Revision 01
Copyright © 2010, Juniper Networks, Inc.
Page 2

Juniper Networks, Inc.
1194 North Mathilda Avenue
Sunnyvale, California 94089
USA
408-745-2000
www.juniper.net
This product includes the EnvoySNMP Engine, developed by Epilogue Technology, an Integrated Systems Company. Copyright © 1986-1997,
Epilogue Technology Corporation. All rights reserved. This program and its documentation were developed at private expense, and no part
of them is in the public domain.
This product includes memory allocation software developed by Mark Moraes, copyright © 1988, 1989, 1993, University of Toronto.
This product includes FreeBSD software developed by the University of California, Berkeley, and its contributors. All of the documentation
and software included in the 4.4BSD and 4.4BSD-Lite Releases is copyrighted by the Regents of the University of California. Copyright ©
1979, 1980, 1983, 1986, 1988, 1989, 1991, 1992, 1993, 1994. The Regents of the University of California. All rights reserved.
GateD software copyright © 1995, the Regents of the University. All rights reserved. Gate Daemon was originated and developed through
release 3.0 by Cornell University and its collaborators. Gated is based on Kirton’s EGP, UC Berkeley’s routing daemon (routed), and DCN’s
HELLO routing protocol. Development of Gated has been supported in part by the National Science Foundation. Portions of the GateD
software copyright © 1988, Regents of the University of California. All rights reserved. Portions of the GateD software copyright © 1991, D.
L. S. Associates.
This product includes software developed by Maker Communications, Inc., copyright © 1996, 1997, Maker Communications, Inc.
Juniper Networks, Junos, Steel-Belted Radius, NetScreen, and ScreenOS are registered trademarks of Juniper Networks, Inc. in the United
States and other countries. The Juniper Networks Logo, the Junos logo, and JunosE are trademarks of Juniper Networks, Inc. All other
trademarks, service marks, registered trademarks, or registered service marks are the property of their respective owners.
Juniper Networks assumes no responsibility for any inaccuracies in this document. Juniper Networks reserves the right to change, modify,
transfer, or otherwise revise this publication without notice.
Products made or sold by Juniper Networks or components thereof might be covered by one or more of the following patents that are
owned by or licensed to Juniper Networks: U.S. Patent Nos. 5,473,599, 5,905,725, 5,909,440, 6,192,051, 6,333,650, 6,359,479, 6,406,312,
6,429,706, 6,459,579, 6,493,347, 6,538,518, 6,538,899, 6,552,918, 6,567,902, 6,578,186, and 6,590,785.
Network and Security Manager Configuring Secure Access Devices Guide
Release 2010.4
Copyright © 2010, Juniper Networks, Inc.
All rights reserved. Printed in USA.
Revision History
18 November 2010 —01
The information in this document is current as of the date listed in the revision history.
YEAR 2000 NOTICE
Juniper Networks hardware and software products are Year 2000 compliant. The Junos OS has no known time-related limitations through
the year 2038. However, the NTP application is known to have some difficulty in the year 2036.
Copyright © 2010, Juniper Networks, Inc.ii
Page 3

END USER LICENSE AGREEMENT
READ THIS END USER LICENSE AGREEMENT (“AGREEMENT”) BEFORE DOWNLOADING, INSTALLING, OR USING THE SOFTWARE.
BY DOWNLOADING, INSTALLING, OR USING THE SOFTWARE OR OTHERWISE EXPRESSING YOUR AGREEMENT TO THE TERMS
CONTAINED HEREIN, YOU (AS CUSTOMER OR IF YOU ARE NOT THE CUSTOMER, AS A REPRESENTATIVE/AGENT AUTHORIZED TO
BIND THE CUSTOMER) CONSENT TO BE BOUND BY THIS AGREEMENT. IF YOU DO NOT OR CANNOT AGREE TO THE TERMS CONTAINED
HEREIN, THEN (A) DO NOT DOWNLOAD, INSTALL, OR USE THE SOFTWARE, AND (B) YOU MAY CONTACT JUNIPER NETWORKS
REGARDING LICENSE TERMS.
1. The Parties. The parties to this Agreement are (i) Juniper Networks, Inc. (if the Customer’s principal office is located in the Americas) or
Juniper Networks (Cayman) Limited (if the Customer’sprincipal office is locatedoutside the Americas) (such applicable entity being referred
to herein as “Juniper”), and (ii) the person or organization that originally purchased from Juniper or an authorized Juniper reseller the applicable
license(s) for use of the Software (“Customer”) (collectively, the “Parties”).
2. The Software. In this Agreement, “Software” means the program modules and features of the Juniper or Juniper-supplied software, for
which Customer has paid the applicable license or support fees to Juniper or an authorized Juniper reseller, or which was embedded by
Juniper in equipment which Customer purchased from Juniper or an authorized Juniper reseller. “Software” also includes updates, upgrades
and new releases of such software. “Embedded Software” means Software which Juniper has embedded in or loaded onto the Juniper
equipment and any updates, upgrades, additions or replacements which are subsequently embedded in or loaded onto the equipment.
3. License Grant. Subject to payment of the applicable fees and the limitations and restrictions set forth herein, Juniper grants to Customer
a non-exclusive and non-transferable license, without right to sublicense, to use the Software, in executable form only, subject to the
following use restrictions:
a. Customer shall use Embedded Software solely as embedded in, and for execution on, Juniper equipment originally purchased by
Customer from Juniper or an authorized Juniper reseller.
b. Customer shall use the Software on a single hardware chassis having a single processing unit, or as many chassis or processing units
for which Customer has paid the applicable license fees; provided, however, with respect to the Steel-Belted Radius or Odyssey Access
Client software only, Customer shall use such Software on a single computer containing a single physical random access memory space
and containing any number of processors. Use of the Steel-Belted Radius or IMS AAA software on multiple computers or virtual machines
(e.g., Solaris zones) requires multiple licenses, regardless of whether such computers or virtualizations are physically contained on a single
chassis.
c. Product purchase documents, paper or electronic user documentation, and/or the particular licenses purchased by Customer may
specify limits to Customer’s use of the Software. Such limits may restrict use to a maximum number of seats,registeredendpoints, concurrent
users, sessions, calls, connections, subscribers, clusters, nodes, realms, devices, links, ports or transactions, or require the purchase of
separate licenses to use particular features, functionalities, services, applications, operations, or capabilities, or provide throughput,
performance, configuration, bandwidth, interface, processing, temporal, or geographical limits. In addition, such limits may restrict the use
of the Software to managing certain kinds of networks or require the Software to be used only in conjunction with other specific Software.
Customer’s use of the Software shall be subject to all such limitations and purchase of all applicable licenses.
d. For any trial copy of the Software, Customer’s right to use the Software expires 30 days after download, installation or use of the
Software. Customer may operate the Software after the 30-day trial period only if Customer pays for a license to do so. Customer may not
extend or create an additional trial period by re-installing the Software after the 30-day trial period.
e. The Global Enterprise Edition of the Steel-Belted Radius software may be used by Customer only to manage access to Customer’s
enterprise network. Specifically, service provider customers are expressly prohibited from using the Global Enterprise Edition of the
Steel-Belted Radius software to support any commercial network access services.
The foregoing license is not transferable or assignable by Customer. No license is granted herein to any user who did not originally purchase
the applicable license(s) for the Software from Juniper or an authorized Juniper reseller.
4. Use Prohibitions. Notwithstanding the foregoing, the license provided herein does not permit the Customer to, and Customer agrees
not to and shall not: (a) modify, unbundle, reverse engineer, or create derivative works based on the Software; (b) make unauthorized
copies of the Software (except as necessary for backup purposes); (c) rent, sell, transfer, or grant any rights in and to any copy of the
Software,in any form, to any third party; (d) remove any proprietary notices, labels, or marks on or in any copy of the Software or any product
in which the Software is embedded; (e) distribute any copy of the Software to any third party, including as may be embedded in Juniper
equipment sold in the secondhand market; (f) use any ‘locked’or key-restricted feature,function, service, application, operation,or capability
without first purchasing the applicable license(s) and obtaining a valid key from Juniper, even if such feature, function, service, application,
operation, or capability is enabled without a key; (g) distribute any key for the Software provided by Juniper to any third party; (h) use the
iiiCopyright © 2010, Juniper Networks, Inc.
Page 4

Software in any manner that extends or is broader than the uses purchased by Customer from Juniper or an authorized Juniper reseller; (i)
use Embedded Software on non-Juniper equipment; (j) use Embedded Software (or make it available for use) on Juniper equipment that
the Customer did not originally purchase from Juniper or an authorized Juniper reseller; (k) disclose the results of testing or benchmarking
of the Software to any third party without the prior written consent of Juniper; or (l) use the Software in any manner other than as expressly
provided herein.
5. Audit. Customer shall maintain accurate records as necessary to verify compliance with this Agreement. Upon request by Juniper,
Customer shall furnish such records to Juniper and certify its compliance with this Agreement.
6. Confidentiality. The Parties agree that aspects of the Software and associated documentation are the confidential property of Juniper.
As such, Customer shall exercise all reasonable commercial efforts to maintain the Software and associated documentation in confidence,
which at a minimum includes restricting access to the Software to Customer employees and contractors having a need to use the Software
for Customer’s internal business purposes.
7. Ownership. Juniper and Juniper’s licensors, respectively, retain ownership of all right, title, and interest (including copyright) in and to
the Software, associated documentation, and all copies of the Software. Nothing in this Agreement constitutes a transfer or conveyance
of any right, title, or interest in the Software or associated documentation, or a sale of the Software, associated documentation, or copies
of the Software.
8. Warranty, Limitation of Liability, Disclaimer of Warranty. The warranty applicable to the Software shall be as set forth in the warranty
statementthat accompanies the Software(the “Warranty Statement”). Nothing in this Agreement shall give rise to any obligationto support
the Software. Support services may be purchased separately. Any such support shall be governed by a separate, written support services
agreement. TO THE MAXIMUM EXTENT PERMITTED BY LAW, JUNIPER SHALL NOT BE LIABLE FOR ANY LOST PROFITS, LOSS OF DATA,
OR COSTSOR PROCUREMENT OF SUBSTITUTE GOODS OR SERVICES,OR FOR ANY SPECIAL, INDIRECT,OR CONSEQUENTIALDAMAGES
ARISING OUT OF THIS AGREEMENT, THE SOFTWARE,OR ANY JUNIPER OR JUNIPER-SUPPLIED SOFTWARE.IN NO EVENT SHALL JUNIPER
BE LIABLE FOR DAMAGES ARISING FROM UNAUTHORIZED OR IMPROPER USE OF ANY JUNIPER OR JUNIPER-SUPPLIED SOFTWARE.
EXCEPT AS EXPRESSLY PROVIDED IN THE WARRANTY STATEMENT TO THE EXTENT PERMITTED BY LAW, JUNIPER DISCLAIMS ANY
AND ALL WARRANTIES IN AND TO THE SOFTWARE (WHETHER EXPRESS, IMPLIED, STATUTORY, OR OTHERWISE), INCLUDING ANY
IMPLIED WARRANTY OF MERCHANTABILITY, FITNESS FOR A PARTICULAR PURPOSE, OR NONINFRINGEMENT. IN NO EVENT DOES
JUNIPER WARRANT THAT THE SOFTWARE, OR ANY EQUIPMENT OR NETWORK RUNNING THE SOFTWARE, WILL OPERATE WITHOUT
ERROR OR INTERRUPTION, OR WILL BE FREE OF VULNERABILITY TO INTRUSION OR ATTACK. In no event shall Juniper’s or its suppliers’
or licensors’ liability to Customer, whether in contract, tort (including negligence), breach of warranty, or otherwise, exceed the price paid
by Customer for the Software that gave rise to the claim, or if the Software is embedded in another Juniper product, the price paid by
Customer for such other product. Customer acknowledges and agrees that Juniper has set its prices and entered into this Agreement in
reliance upon the disclaimers of warranty and the limitations of liability set forth herein, that the same reflect an allocation of risk between
the Parties (including the risk that a contract remedy may fail of its essential purpose and cause consequential loss), and that the same
form an essential basis of the bargain between the Parties.
9. Termination. Any breach of this Agreement or failure by Customer to pay any applicable fees due shall result in automatic termination
of the license granted herein. Upon such termination, Customer shall destroy or return to Juniper all copies of the Software and related
documentation in Customer’s possession or control.
10. Taxes. All license fees payable under this agreement are exclusive of tax. Customer shall be responsible for paying Taxes arising from
the purchase of the license, or importation or use of the Software. If applicable, valid exemption documentation for each taxing jurisdiction
shall be provided to Juniper prior to invoicing, and Customer shall promptly notify Juniper if their exemption is revoked or modified. All
payments made by Customer shall be net of any applicable withholding tax. Customer will provide reasonable assistance to Juniper in
connection with such withholding taxes by promptly: providing Juniper with valid tax receipts and other required documentation showing
Customer’s payment of any withholding taxes; completing appropriate applications that would reduce the amount of withholding tax to
be paid; and notifying and assisting Juniper in any audit or tax proceeding related to transactions hereunder. Customer shall comply with
all applicable tax laws and regulations, and Customer will promptly pay or reimburse Juniper for all costs and damages related to any
liability incurred by Juniper as a result of Customer’s non-compliance or delay with its responsibilities herein. Customer’s obligations under
this Section shall survive termination or expiration of this Agreement.
11. Export. Customer agrees to comply with all applicable export laws and restrictions and regulations of any United States and any
applicable foreign agency or authority, and not to export or re-export the Software or any direct product thereof in violation of any such
restrictions, laws or regulations, or without all necessary approvals. Customer shall be liable for any such violations. The version of the
Software supplied to Customer may contain encryption or other capabilities restricting Customer’s ability to export the Software without
an export license.
Copyright © 2010, Juniper Networks, Inc.iv
Page 5

12. Commercial Computer Software. The Software is “commercial computer software” and is provided with restricted rights. Use,
duplication, or disclosure by the United States government is subject to restrictions set forth in this Agreement and as provided in DFARS
227.7201 through 227.7202-4, FAR 12.212, FAR 27.405(b)(2), FAR 52.227-19, or FAR 52.227-14(ALT III) as applicable.
13. Interface Information. To the extent required by applicable law, and at Customer's written request, Juniper shall provide Customer
with the interface information needed to achieve interoperability between the Software and another independently created program, on
payment of applicable fee, if any. Customer shall observe strict obligations of confidentiality with respect to such information and shall use
such information in compliance with any applicable terms and conditions upon which Juniper makes such information available.
14. Third Party Software. Any licensor of Juniper whose software is embedded in the Software and any supplier of Juniper whose products
or technology are embedded in (or services are accessed by) the Software shall be a third party beneficiary with respect to this Agreement,
and such licensor or vendor shall have the right to enforce this Agreement in its own name as if it were Juniper. In addition, certain third party
software may be provided with the Software and is subject to the accompanying license(s), if any, of its respective owner(s). To the extent
portions of the Software are distributed under and subject to open source licenses obligating Juniper to make the source code for such
portions publicly available (such as the GNU General Public License (“GPL”) or the GNU Library General Public License (“LGPL”)), Juniper
will make such source code portions (including Juniper modifications, as appropriate) available upon request for a period of up to three
years from the date of distribution. Such request can be made in writing to Juniper Networks, Inc., 1194 N. Mathilda Ave., Sunnyvale, CA
94089, ATTN: General Counsel. You may obtain a copy of the GPL at http://www.gnu.org/licenses/gpl.html, and a copy of the LGPL
at http://www.gnu.org/licenses/lgpl.html .
15. Miscellaneous. This Agreement shall be governed by the laws of the State of California without reference to its conflicts of laws
principles. The provisions of the U.N. Convention for the International Sale of Goods shall not apply to this Agreement. For any disputes
arising under this Agreement, the Parties hereby consent to the personal and exclusive jurisdiction of, and venue in, the state and federal
courts within Santa Clara County, California. This Agreement constitutes the entire and sole agreement between Juniper and the Customer
with respect to the Software, and supersedes all prior and contemporaneous agreements relating to the Software, whether oral or written
(including any inconsistent terms contained in a purchase order), except that the terms of a separate written agreement executed by an
authorized Juniper representative and Customer shall govern to the extent such terms are inconsistent or conflict with terms contained
herein. No modification to this Agreement nor any waiver of any rights hereunder shall be effective unless expressly assented to in writing
by the party to be charged. If any portion of this Agreement is held invalid, the Parties agree that such invalidity shall not affect the validity
of the remainder of this Agreement. This Agreement and associated documentation has been written in the English language, and the
Parties agree that the English version will govern. (For Canada: Les parties aux présentés confirment leur volonté que cette convention de
même que tous les documents y compris tout avis qui s'y rattaché, soient redigés en langue anglaise. (Translation: The parties confirm that
this Agreement and all related documentation is and will be in the English language)).
vCopyright © 2010, Juniper Networks, Inc.
Page 6

Copyright © 2010, Juniper Networks, Inc.vi
Page 7

Table of Contents
About This Guide . . . . . . . . . . . . . . . . . . . . . . . . . . . . . . . . . . . . . . . . . . . . . . . . . xiii
Objectives . . . . . . . . . . . . . . . . . . . . . . . . . . . . . . . . . . . . . . . . . . . . . . . . . . . . . . . . . xiii
Audience . . . . . . . . . . . . . . . . . . . . . . . . . . . . . . . . . . . . . . . . . . . . . . . . . . . . . . . . . . xiii
Document Conventions . . . . . . . . . . . . . . . . . . . . . . . . . . . . . . . . . . . . . . . . . . . . . . xiii
List of Technical Publications . . . . . . . . . . . . . . . . . . . . . . . . . . . . . . . . . . . . . . . . . . xv
Requesting Technical Support . . . . . . . . . . . . . . . . . . . . . . . . . . . . . . . . . . . . . . . . xvi
Self-Help Online Tools and Resources . . . . . . . . . . . . . . . . . . . . . . . . . . . . . . xvi
Opening a Case with JTAC . . . . . . . . . . . . . . . . . . . . . . . . . . . . . . . . . . . . . . . . xvi
Part 1 Getting Started
Chapter 1 Understanding Secure Access Device Configuration . . . . . . . . . . . . . . . . . . . . 3
NSM and Secure Access Device Management Overview . . . . . . . . . . . . . . . . . . . . . 3
Communication Between a Secure Access Device and NSM Overview . . . . . . . . . 3
Secure Access Device Services and Device Configurations Supported in NSM . . . . 5
Chapter 2 Secure Access Device and NSM Installation Overview . . . . . . . . . . . . . . . . . . . 7
Secure Access Device Installation Overview . . . . . . . . . . . . . . . . . . . . . . . . . . . . . . . 7
NSM Installation Overview . . . . . . . . . . . . . . . . . . . . . . . . . . . . . . . . . . . . . . . . . . . . . 7
Part 2 Integrating Secure Access Devices
Chapter 3 Adding Secure Access Devices . . . . . . . . . . . . . . . . . . . . . . . . . . . . . . . . . . . . . . . 11
Importing a Secure Access Device . . . . . . . . . . . . . . . . . . . . . . . . . . . . . . . . . . . . . . 11
Installing and Configuring a Secure Access Device . . . . . . . . . . . . . . . . . . . . . . 11
Adding a Secure Access Device Through NSM . . . . . . . . . . . . . . . . . . . . . . . . . 12
Configuring and Activating the NSM agent on the Secure Access Device . . . . 13
Confirming Connectivity and Importing the Secure Access Device
Configuration . . . . . . . . . . . . . . . . . . . . . . . . . . . . . . . . . . . . . . . . . . . . . . . 14
Requirements for Importing a Secure Access Device into NSM Through a
Reachable Workflow . . . . . . . . . . . . . . . . . . . . . . . . . . . . . . . . . . . . . . . . . . . . . 14
Adding a Secure Access Device Through a Reachable Workflow . . . . . . . . . . . . . . 15
Importing Multiple Secure Access Devices . . . . . . . . . . . . . . . . . . . . . . . . . . . . . . . 16
Creating the CSV File . . . . . . . . . . . . . . . . . . . . . . . . . . . . . . . . . . . . . . . . . . . . . 16
Validating the CSV File . . . . . . . . . . . . . . . . . . . . . . . . . . . . . . . . . . . . . . . . . . . . 17
Adding and Importing Multiple Secure Access Devices . . . . . . . . . . . . . . . . . . 18
Verifying Imported Device Configurations . . . . . . . . . . . . . . . . . . . . . . . . . . . . . . . . 19
Using Device Monitor . . . . . . . . . . . . . . . . . . . . . . . . . . . . . . . . . . . . . . . . . . . . . 19
Using Device Manager . . . . . . . . . . . . . . . . . . . . . . . . . . . . . . . . . . . . . . . . . . . . 19
Using Job Manager . . . . . . . . . . . . . . . . . . . . . . . . . . . . . . . . . . . . . . . . . . . . . . 20
Using Configuration Summaries . . . . . . . . . . . . . . . . . . . . . . . . . . . . . . . . . . . 20
viiCopyright © 2010, Juniper Networks, Inc.
Page 8

Configuring Secure Access Devices Guide
Chapter 4 Adding Secure Access Clusters . . . . . . . . . . . . . . . . . . . . . . . . . . . . . . . . . . . . . 23
Adding a Secure Access Cluster Overview . . . . . . . . . . . . . . . . . . . . . . . . . . . . . . . 23
Adding a Secure Access Cluster with Imported Cluster Members . . . . . . . . . . . . . 24
Chapter 5 Working with Secure Access Templates . . . . . . . . . . . . . . . . . . . . . . . . . . . . . . 29
Creating and Applying a Secure Access Device Template . . . . . . . . . . . . . . . . . . . 29
Promoting a Secure Access Device Configuration to a Template . . . . . . . . . . . . . . 31
Part 3 Configuring Secure Access Devices
Chapter 6 Configuring User Roles and Administrator Roles . . . . . . . . . . . . . . . . . . . . . . 35
Configuring Secure Access Device User Roles (NSM Procedure) . . . . . . . . . . . . . 35
Creating Secure Access Role-Based Source IP Alias (NSM Procedure) . . . . . . . . 38
Configuring Secure Access General Session Options (NSM Procedure) . . . . . . . . 39
Creating and Configuring Secure Access Device Administrator Roles (NSM
Chapter 7 Configuring Terminal Services Using Remote Access Mechanism . . . . . . . . 51
Terminal Services Overview . . . . . . . . . . . . . . . . . . . . . . . . . . . . . . . . . . . . . . . . . . . 51
Configuring Terminal Services on a Secure Access Device User Role (NSM
Terminal Services User Experience . . . . . . . . . . . . . . . . . . . . . . . . . . . . . . . . . . . . . 61
Terminal Services Execution . . . . . . . . . . . . . . . . . . . . . . . . . . . . . . . . . . . . . . . . . . 62
Chapter 8 Configuring Access Options using Remote Access Mechanisms . . . . . . . . 65
Configuring Access Options using Remote Access Mechanisms Overview . . . . . 65
Configuring File Rewriting on a Secure Access Device User Role (NSM
Configuring Network Connect on a Secure Access Device User Role (NSM
Configuring Secure Application Manager on a Secure Access Device User Role
Configuring Secure Meeting on a Secure Access Device User Role (NSM
Configuring Web Rewriting on a Secure Access Device User Role (NSM
Configuring Telnet/SSH on a Secure Access Device User Role (NSM
Chapter 9 Configuring Secure Access Resource Profiles . . . . . . . . . . . . . . . . . . . . . . . . . 93
Configuring a JSAM Resource Profile (NSM Procedure) . . . . . . . . . . . . . . . . . . . . . 93
Configuring a Citrix Terminal Services (Custom ICA) Resource Profile (NSM
Installing and Configuring the Cluster . . . . . . . . . . . . . . . . . . . . . . . . . . . . . . . 25
Adding the Cluster in NSM . . . . . . . . . . . . . . . . . . . . . . . . . . . . . . . . . . . . . . . . 25
Adding the Cluster Members in NSM . . . . . . . . . . . . . . . . . . . . . . . . . . . . . . . . 25
Configuring and Activating the DMI Agent on the Cluster . . . . . . . . . . . . . . . . 27
Importing Cluster Configuration . . . . . . . . . . . . . . . . . . . . . . . . . . . . . . . . . . . . 27
Creating the Template . . . . . . . . . . . . . . . . . . . . . . . . . . . . . . . . . . . . . . . . . . . 29
Applying the Template . . . . . . . . . . . . . . . . . . . . . . . . . . . . . . . . . . . . . . . . . . . 30
Procedure) . . . . . . . . . . . . . . . . . . . . . . . . . . . . . . . . . . . . . . . . . . . . . . . . . . . . 43
Procedure) . . . . . . . . . . . . . . . . . . . . . . . . . . . . . . . . . . . . . . . . . . . . . . . . . . . . . 52
Procedure) . . . . . . . . . . . . . . . . . . . . . . . . . . . . . . . . . . . . . . . . . . . . . . . . . . . . 66
Procedure) . . . . . . . . . . . . . . . . . . . . . . . . . . . . . . . . . . . . . . . . . . . . . . . . . . . . 69
(NSM Procedure) . . . . . . . . . . . . . . . . . . . . . . . . . . . . . . . . . . . . . . . . . . . . . . . 74
Procedure) . . . . . . . . . . . . . . . . . . . . . . . . . . . . . . . . . . . . . . . . . . . . . . . . . . . . . 79
Procedure) . . . . . . . . . . . . . . . . . . . . . . . . . . . . . . . . . . . . . . . . . . . . . . . . . . . . 84
Procedure) . . . . . . . . . . . . . . . . . . . . . . . . . . . . . . . . . . . . . . . . . . . . . . . . . . . . 90
Procedure) . . . . . . . . . . . . . . . . . . . . . . . . . . . . . . . . . . . . . . . . . . . . . . . . . . . . 95
Copyright © 2010, Juniper Networks, Inc.viii
Page 9

Table of Contents
Configuring a Citrix Terminal Services (Default ICA) Resource Profile (NSM
Procedure) . . . . . . . . . . . . . . . . . . . . . . . . . . . . . . . . . . . . . . . . . . . . . . . . . . . . 99
Configuring a Citrix Listed Application Resource Profile (NSM Procedure) . . . . . 104
Configuring Citrix Web Applications Resource Profile (NSM Procedure) . . . . . . . 110
Configuring Custom Web Applications Resource Profile (NSM Procedure) . . . . . 112
Configuring File Rewriting Resource Profiles (NSM Procedure) . . . . . . . . . . . . . . 120
Configuring Windows Terminal Services (NSM Procedure) . . . . . . . . . . . . . . . . . 124
Configuring a Telnet/SSH Resource Profile (NSM Procedure) . . . . . . . . . . . . . . . 129
Configuring WSAM Resource Profile (NSM Procedure) . . . . . . . . . . . . . . . . . . . . . 131
Configuring Bookmarks for Virtual Desktop Resource Profiles (NSM
Procedure) . . . . . . . . . . . . . . . . . . . . . . . . . . . . . . . . . . . . . . . . . . . . . . . . . . . . 134
Chapter 10 Configuring Secure Access Resource Policies . . . . . . . . . . . . . . . . . . . . . . . . 137
Configuring a File Rewriting Resource Policy (NSM Procedure) . . . . . . . . . . . . . . 137
Configuring a Secure Application Manager Resource Policy (NSM
Procedure) . . . . . . . . . . . . . . . . . . . . . . . . . . . . . . . . . . . . . . . . . . . . . . . . . . . . 144
Configuring a Telnet and Secure Shell Resource Policy (NSM Procedure) . . . . . 146
Configuring a Terminal Service Resource Policy (NSM Procedure) . . . . . . . . . . . 149
Configuring Web Rewriting Resource Policies (NSM Procedure) . . . . . . . . . . . . . 151
Configuring a Network Connect Connection Profile Resource Policy (NSM
Procedure) . . . . . . . . . . . . . . . . . . . . . . . . . . . . . . . . . . . . . . . . . . . . . . . . . . . . 155
Defining Network Connect Split Tunneling Policies (NSM Procedure) . . . . . . . . 159
Chapter 11 Configuring Authentication and Directory Servers . . . . . . . . . . . . . . . . . . . . . 161
Configuring a Secure Access ACE Server Instance (NSM Procedure) . . . . . . . . . . 161
Creating a Custom Expression for an Authentication Server (NSM
Procedure) . . . . . . . . . . . . . . . . . . . . . . . . . . . . . . . . . . . . . . . . . . . . . . . . . . . . 163
Configuring a Secure Access Local Authentication Server Instance (NSM
Procedure) . . . . . . . . . . . . . . . . . . . . . . . . . . . . . . . . . . . . . . . . . . . . . . . . . . . . 164
Configuring a Secure Access LDAP Server Instance (NSM Procedure) . . . . . . . . 167
Configuring a Secure Access RADIUS Server Instance (NSM Procedure) . . . . . . . 171
Configuring a Secure Access Anonymous Server Instance (NSM Procedure) . . . 174
Configuring a Secure Access eTrust SiteMinder Server Instance (NSM
Procedure) . . . . . . . . . . . . . . . . . . . . . . . . . . . . . . . . . . . . . . . . . . . . . . . . . . . . 174
Configuring a Secure Access Certificate Server Instance (NSM Procedure) . . . . 184
Configuring a Secure Access Manual CA Certificate (NSM Procedure) . . . . . . . . 185
Configuring a Secure Access SAML Server Instance (NSM Procedure) . . . . . . . . 188
Configuring a Secure Access Active Directory or NT Domain Instance (NSM
Procedure) . . . . . . . . . . . . . . . . . . . . . . . . . . . . . . . . . . . . . . . . . . . . . . . . . . . . 190
Configuring a Secure Access NIS Server Instance (NSM Procedure) . . . . . . . . . . 193
Chapter 12 Configuring Authentication Realms . . . . . . . . . . . . . . . . . . . . . . . . . . . . . . . . . 195
Configuring Secure Access Authentication Realms (NSM Procedure) . . . . . . . . 195
Configuring Secure Access Authentication Policies (NSM Procedure) . . . . . . . . 198
Configuring Secure Access Role Mapping Rules (NSM Procedure) . . . . . . . . . . . 203
Chapter 13 Configuring Sign-in Policies and Sign-in Pages . . . . . . . . . . . . . . . . . . . . . . 207
Configuring Secure Access Sign-In Policies (NSM Procedure) . . . . . . . . . . . . . . 207
Creating Authorization-Only Policies . . . . . . . . . . . . . . . . . . . . . . . . . . . . . . . 207
Creating User or Administrator URLs . . . . . . . . . . . . . . . . . . . . . . . . . . . . . . . 209
ixCopyright © 2010, Juniper Networks, Inc.
Page 10

Configuring Secure Access Devices Guide
Configuring Secure Access Sign-In Pages (NSM Procedure) . . . . . . . . . . . . . . . . . 211
Chapter 14 Configuring Single Sign-On . . . . . . . . . . . . . . . . . . . . . . . . . . . . . . . . . . . . . . . . 217
Defining Basic, NTLM, and Kerberos Resources . . . . . . . . . . . . . . . . . . . . . . . . . . . 217
Configuring Basic, NTLM, and Kerberos Resources (NSM Procedure) . . . . . . . . . 218
Defining a Basic Authentication, NTLM, or Kerberos Intermediation Resource
Configuring a SAML Access Control Resource Policy (NSM Procedure) . . . . . . . 223
Configuring SAML SSO Artifact Profile Resource Policy (NSM Procedure) . . . . . 226
Chapter 15 Configuring Secure Access Host Checker Policies . . . . . . . . . . . . . . . . . . . . . 231
Setting Up Secure Access Device Host Checker Options (NSM Procedure) . . . . 231
Configuring General Host Checker Remediation (NSM Procedure) . . . . . . . . . . . 233
Configuring Host Checker Third-PartyApplications Using Predefined Rules (NSM
Configuring the Remote Integrity Measurement Verifier Server (NSM
Configuring Host Checker Customized Requirements Using Custom Rules (NSM
Enabling Advanced Endpoint Defense (NSM Procedure) . . . . . . . . . . . . . . . . . . 246
Enabling Predefined Client-Side Policies for Windows Only (NSM
Configuring Virus Signature Version Monitoring (NSM Procedure) . . . . . . . . . . . 248
Importing Virus Signature Version Monitoring or Patch Management Version
Assigning a Proxy Server an Auto-Update Server (NSM Procedure) . . . . . . . . . . 250
Chapter 16 Configuring Secure Access Cache Cleaner . . . . . . . . . . . . . . . . . . . . . . . . . . . 251
Configuring Global Cache Cleaner Options (NSM Procedure) . . . . . . . . . . . . . . . 251
Configuring Cache Cleaner Restrictions (NSM Procedure) . . . . . . . . . . . . . . . . . 254
Chapter 17 Configuring Secure Access System Management Features . . . . . . . . . . . . 257
Configuring the Network Communications Protocol (NSM Procedure) . . . . . . . 257
Configuring Secure Meetings (NSM Procedure) . . . . . . . . . . . . . . . . . . . . . . . . . . 259
Configuring Global Security (NSM Procedure) . . . . . . . . . . . . . . . . . . . . . . . . . . . 261
Configuring Sensors (NSM Procedure) . . . . . . . . . . . . . . . . . . . . . . . . . . . . . . . . . 265
Creating a Custom Expression for Sensor Settings (NSM Procedure) . . . . . . . . 268
Chapter 18 Configuring Network Settings . . . . . . . . . . . . . . . . . . . . . . . . . . . . . . . . . . . . . . 271
Configuring General Network Settings (NSM Procedure) . . . . . . . . . . . . . . . . . . . 271
Configuring Internal Ports (NSM Procedure) . . . . . . . . . . . . . . . . . . . . . . . . . . . . 273
Configuring Hosts (NSM Procedure) . . . . . . . . . . . . . . . . . . . . . . . . . . . . . . . . . . . 275
Configuring Internet Protocol Filters (NSM Procedure) . . . . . . . . . . . . . . . . . . . . 276
Chapter 19 Synchronizing User Records . . . . . . . . . . . . . . . . . . . . . . . . . . . . . . . . . . . . . . . 277
Enabling User Record Synchronization (NSM Procedure) . . . . . . . . . . . . . . . . . . 278
Configuring the Authentication Server (NSM Procedure) . . . . . . . . . . . . . . . . . . 279
Creating Meeting URLs . . . . . . . . . . . . . . . . . . . . . . . . . . . . . . . . . . . . . . . . . . 210
Creating Users/Administrator Sign-in Pages . . . . . . . . . . . . . . . . . . . . . . . . . . 211
Creating Meeting Sign-in Pages . . . . . . . . . . . . . . . . . . . . . . . . . . . . . . . . . . . 213
Policy (NSM Procedure) . . . . . . . . . . . . . . . . . . . . . . . . . . . . . . . . . . . . . . . . . 221
Procedure) . . . . . . . . . . . . . . . . . . . . . . . . . . . . . . . . . . . . . . . . . . . . . . . . . . . 234
Procedure) . . . . . . . . . . . . . . . . . . . . . . . . . . . . . . . . . . . . . . . . . . . . . . . . . . . 240
Procedure) . . . . . . . . . . . . . . . . . . . . . . . . . . . . . . . . . . . . . . . . . . . . . . . . . . . . 241
Procedure) . . . . . . . . . . . . . . . . . . . . . . . . . . . . . . . . . . . . . . . . . . . . . . . . . . . . 247
Enabling Connection Control Policies . . . . . . . . . . . . . . . . . . . . . . . . . . . . . . 247
Monitoring List (NSM Procedure) . . . . . . . . . . . . . . . . . . . . . . . . . . . . . . . . . 249
Copyright © 2010, Juniper Networks, Inc.x
Page 11

Table of Contents
Configuring the User Record Synchronization Server (NSM Procedure) . . . . . . . 279
Configuring the Client (NSM Procedure) . . . . . . . . . . . . . . . . . . . . . . . . . . . . . . . 280
Configuring the Database (NSM Procedure) . . . . . . . . . . . . . . . . . . . . . . . . . . . . . 281
Chapter 20 Configuring IF-MAP Federation Settings . . . . . . . . . . . . . . . . . . . . . . . . . . . . 283
Configuring IF-MAP Servers (NSM Procedure) . . . . . . . . . . . . . . . . . . . . . . . . . . . 283
Configuring IF-MAP Client Settings on the Secure Access Device (NSM
Procedure) . . . . . . . . . . . . . . . . . . . . . . . . . . . . . . . . . . . . . . . . . . . . . . . . . . . 284
Configuring IF-MAP Session Export Policy on the Secure Access Device (NSM
Procedure) . . . . . . . . . . . . . . . . . . . . . . . . . . . . . . . . . . . . . . . . . . . . . . . . . . . 285
Configuring IF-MAP Session Import Policy on the Secure Access Device (NSM
Procedure) . . . . . . . . . . . . . . . . . . . . . . . . . . . . . . . . . . . . . . . . . . . . . . . . . . . 288
Configuring IF-MAP Server Replicas (NSM Procedure) . . . . . . . . . . . . . . . . . . . . 290
Part 4 Managing Secure Access Devices
Chapter 21 Managing Secure Access Devices . . . . . . . . . . . . . . . . . . . . . . . . . . . . . . . . . . 295
Managing Large Binary Data Files (NSM Procedure) . . . . . . . . . . . . . . . . . . . . . . 295
Removing a Secure Access Device from NSM Management (NSM
Procedure) . . . . . . . . . . . . . . . . . . . . . . . . . . . . . . . . . . . . . . . . . . . . . . . . . . . 296
Archiving Secure Meetings (NSM Procedure) . . . . . . . . . . . . . . . . . . . . . . . . . . . . 297
Managing Secure Access Node from a Cluster . . . . . . . . . . . . . . . . . . . . . . . . . . . 298
Chapter 22 Troubleshooting Secure Access Device Federated Networks . . . . . . . . . . . 301
Troubleshooting the IF-MAP Federation Network (NSM Procedure) . . . . . . . . . . 301
Part 5 Monitoring Secure Access Devices
Chapter 23 Configuring Logs in Secure Access Devices . . . . . . . . . . . . . . . . . . . . . . . . . . 305
Configuring User Access, Admin Access, Events and Sensors (NSM
Procedure) . . . . . . . . . . . . . . . . . . . . . . . . . . . . . . . . . . . . . . . . . . . . . . . . . . . 305
Configuring Custom Filters and Formats for Log Files (NSM Procedure) . . . . . . 308
Configuring Client-Side Logs (NSM Procedure) . . . . . . . . . . . . . . . . . . . . . . . . . . 310
Configuring Custom Log Filters (NSM Procedure) . . . . . . . . . . . . . . . . . . . . . . . . . 311
Chapter 24 Viewing Logs in Secure Access Devices . . . . . . . . . . . . . . . . . . . . . . . . . . . . . . 313
Viewing Device Status . . . . . . . . . . . . . . . . . . . . . . . . . . . . . . . . . . . . . . . . . . . . . . 313
Viewing Device Monitor Alarm Status . . . . . . . . . . . . . . . . . . . . . . . . . . . . . . . . . . 316
Monitoring the Secure Access as an SNMP Agent (NSM Procedure) . . . . . . . . . . 317
Part 6 Index
Index . . . . . . . . . . . . . . . . . . . . . . . . . . . . . . . . . . . . . . . . . . . . . . . . . . . . . . . . . . . . 321
xiCopyright © 2010, Juniper Networks, Inc.
Page 12

Configuring Secure Access Devices Guide
Copyright © 2010, Juniper Networks, Inc.xii
Page 13

About This Guide
•
Objectives on page xiii
•
Audience on page xiii
•
Document Conventions on page xiii
•
List of Technical Publications on page xv
•
Requesting Technical Support on page xvi
Objectives
Network and Security Manager (NSM) is a software application that centralizes control
and management of your Juniper Networks devices. With NSM, Juniper Networks delivers
integrated, policy-based security and network management for all security devices.
Secure Access (SA) device is the next generation Secure Access SSL VPN appliances in
its leading market. It enables a solution tailoring to meet the remote and extranet access
requirements.
This guide provides the various steps to configure and manage Secure Access using NSM.
This guide also helps in understanding of how to configure basic and advanced NSM
functionality, including adding new devices, deploying new device configurations, updating
device firmware, viewing log information, and monitoring the status of Secure Access.
Audience
This guide is intended for the system administrators who are responsible for configuring
Secure Access and Secure Access Federal Information Processing Standards (FIPS).
Document Conventions
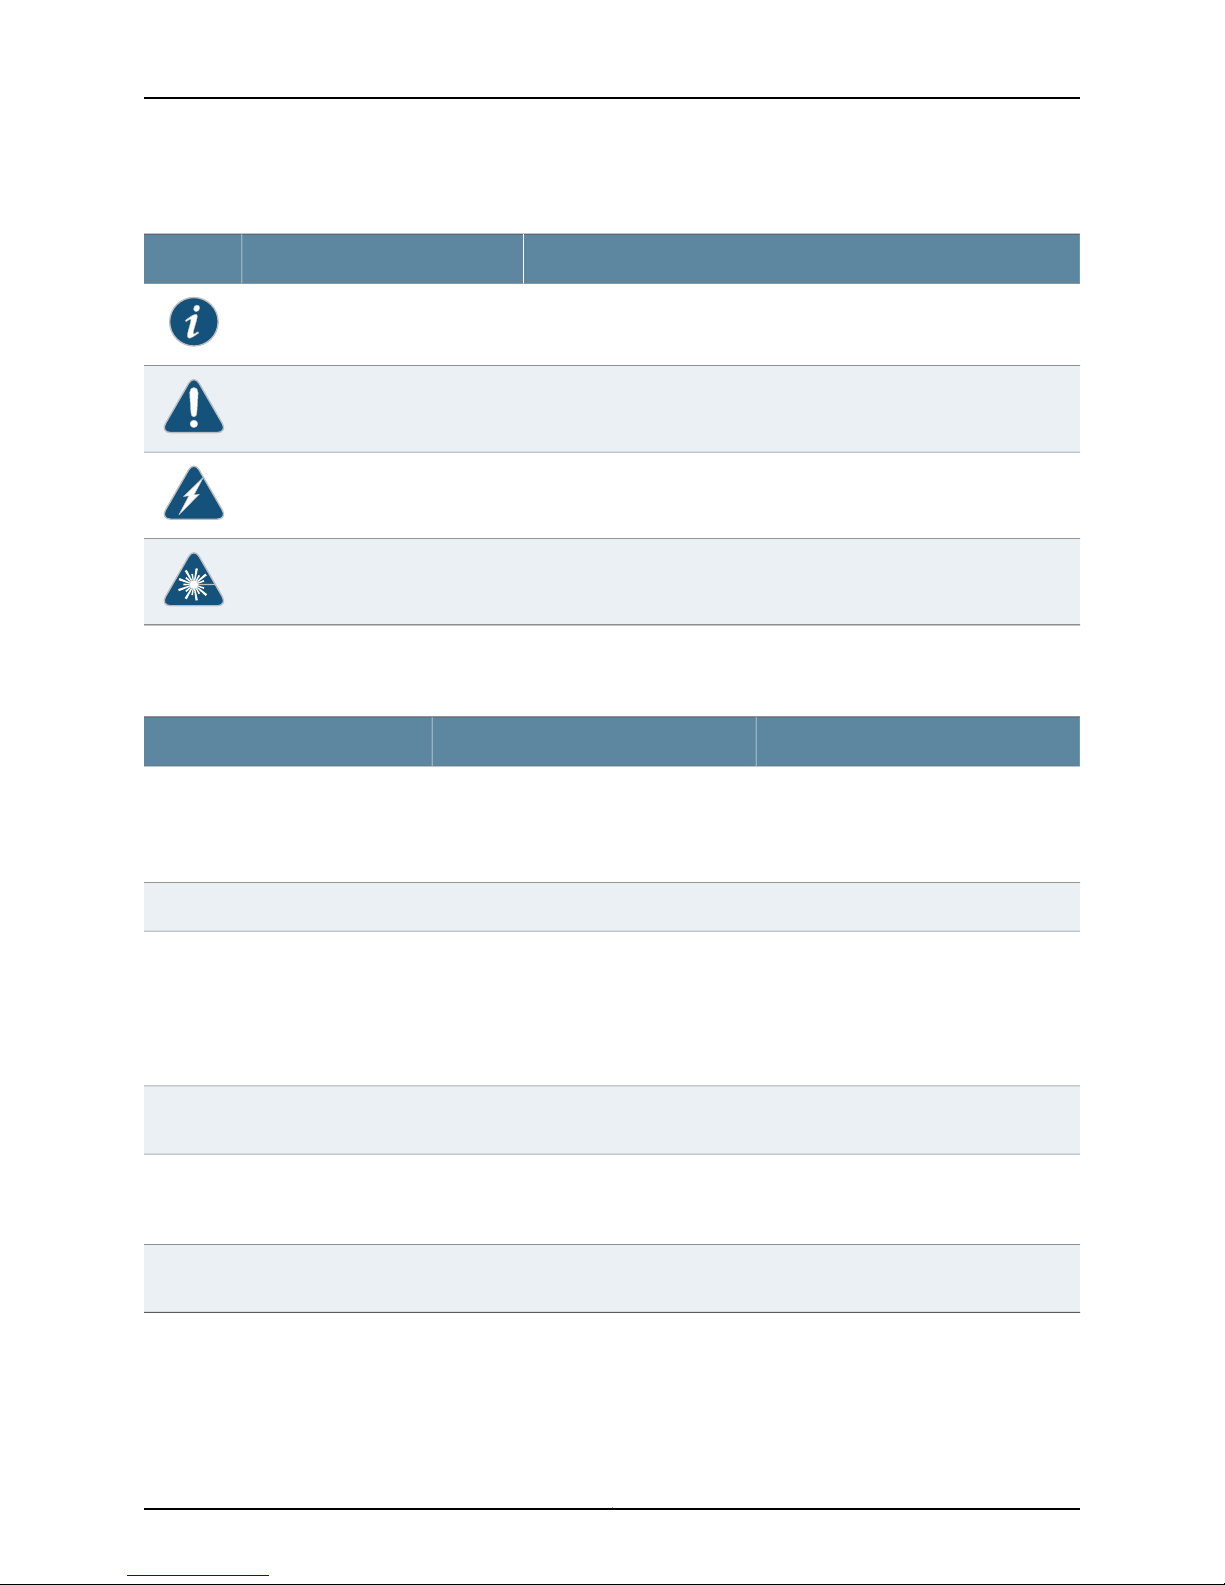
Table 1 on page xiv defines notice icons used in this guide.
xiiiCopyright © 2010, Juniper Networks, Inc.
Page 14
Configuring Secure Access Devices Guide
Table 1: Notice Icons
Table 2 on page xiv defines text conventions used in this guide.
DescriptionMeaningIcon
Indicates important features or instructions.Informational note
Indicates a situation that might result in loss of data or hardware damage.Caution
Alerts you to the risk of personal injury or death.Warning
Alerts you to the risk of personal injury from a laser.Laser warning
Table 2: Text Conventions
Bold typeface like this
fixed-width font
Keynames linked with a plus (+) sign
Italics
The angle bracket (>)
•
Represents commands and keywords
in text.
•
Represents keywords
•
Represents UI elements
Represents information as displayed on
the terminal screen.
keys simultaneously.
•
Emphasizes words
•
Identifies variables
Indicates navigation paths through the UI
by clicking menu options and links.
ExamplesDescriptionConvention
•
Issue the clock source command.
•
Specify the keyword exp-msg.
•
Click User Objects
user inputRepresents text that the user must type.Bold typeface like this
host1#
show ip ospf
Routing Process OSPF 2 with Router
ID 5.5.0.250
Router is an area Border Router
(ABR)
Ctrl + dIndicates that you must press two or more
•
The product supports two levels of
access, user and privileged.
•
clusterID, ipAddress.
Object Manager > User Objects > Local
Objects
Table 3 on page xv defines syntax conventions used in this guide.
Copyright © 2010, Juniper Networks, Inc.xiv
Page 15

Table 3: Syntax Conventions
About This Guide
ExamplesDescriptionConvention
terminal lengthRepresent keywordsWords in plain text
mask, accessListNameRepresent variablesWords in italics
Words separated by the pipe ( | )
symbol
Words enclosed in brackets followed
by and asterisk ( [ ]*)
variable to the left or right of this symbol. The
keywordor variable can be optional or required.
can be entered more than once.
Represent required keywords or variables.Words enclosed in braces ( { } )
diagnostic | lineRepresent a choice to select one keyword or
[ internal | external ]Represent optional keywords or variables.Words enclosed in brackets ( [ ] )
[ level1 | level2 | 11 ]*Represent optional keywords or variables that
{ permit | deny } { in | out } { clusterId
| ipAddress }
List of Technical Publications
This section provides the list of the documentations required for any additional
information.
Table 4: Network and Security Manager and Secure Access Device Publications
Network and Security Manager
Installation Guide
Network and Security Manager
Administration Guide
Details the steps to install the NSM management system on a single server or on separate
servers. It also includes information on how to install and run the NSM user interface.
This guide is intended for IT administrators responsible for the installation and/orupgrade
to NSM.
Describes how to use and configure key management features in the NSM. It provides
conceptual information, suggested workflows, and examples where applicable. This
guide is best used in conjunction with the NSM Online Help, which provides step-by-step
instructions for performing management tasks in the NSM UI.
Network and Security Manager
Configuring Firewall/VPN Devices
Guide
Network and Security Manager
Online Help
This guide is intended for application administrators or those individuals responsible for
owning the server and security infrastructure and configuring the product for multi-user
systems. It is also intended for device configuration administrators, firewall and VPN
administrators, and network security operation center administrators.
Describes NSM features that relate to device configuration and management. It also
explains how to configure basic and advanced NSM functionality, including deploying
new device configurations, managing Security Policies and VPNs, and general device
administration.
Provides task-oriented procedures describing how to perform basic tasks in the NSM
user interface. It also includes a brief overview of the NSM system and a description of
the GUI elements.
Provides comprehensive information about configuring the Secure Access appliances.SecureAccessAdministrationGuide
xvCopyright © 2010, Juniper Networks, Inc.
Page 16

Configuring Secure Access Devices Guide
Table 4: Network and Security Manager and Secure Access Device Publications (continued)
Secure Access Quick Start Guide
Provides procedures to install Secure Access appliances on your network and begin
configuration.
Requesting Technical Support
Technicalproduct support is available through the Juniper Networks Technical Assistance
Center (JTAC). If you are a customer with an active J-Care or JNASC support contract,
or are covered under warranty, and need post-sales technical support, you can access
our tools and resources online or open a case with JTAC.
•
JTAC policies—For a complete understanding of our JTAC procedures and policies,
review the JTAC User Guide located at
http://www.juniper.net/us/en/local/pdf/resource-guides/7100059-en.pdf .
•
Product warranties—For product warranty information, visit
http://www.juniper.net/support/warranty/ .
•
JTAC hours of operation—The JTAC centers have resources available 24 hours a day,
7 days a week, 365 days a year.
Self-Help Online Tools and Resources
For quick and easy problem resolution, Juniper Networks has designed an online
self-service portal called the Customer Support Center (CSC) that provides you with the
following features:
•
Find CSC offerings: http://www.juniper.net/customers/support/
•
Search for known bugs: http://www2.juniper.net/kb/
•
Find product documentation: http://www.juniper.net/techpubs/
•
Find solutions and answer questions using our Knowledge Base: http://kb.juniper.net/
•
Download the latest versions of software and review release notes:
http://www.juniper.net/customers/csc/software/
•
Search technical bulletins for relevant hardware and software notifications:
https://www.juniper.net/alerts/
•
Join and participate in the Juniper Networks Community Forum:
http://www.juniper.net/company/communities/
•
Open a case online in the CSC Case Management tool: http://www.juniper.net/cm/
To verify service entitlement by product serial number,use our Serial Number Entitlement
(SNE) Tool: https://tools.juniper.net/SerialNumberEntitlementSearch/
Opening a Case with JTAC
You can open a case with JTAC on the Web or by telephone.
•
Use the Case Management tool in the CSC at http://www.juniper.net/cm/ .
Copyright © 2010, Juniper Networks, Inc.xvi
Page 17

About This Guide
•
Call 1-888-314-JTAC (1-888-314-5822 toll-free in the USA, Canada, and Mexico).
For international or direct-dial options in countries without toll-free numbers, see
http://www.juniper.net/support/requesting-support.html .
xviiCopyright © 2010, Juniper Networks, Inc.
Page 18

Configuring Secure Access Devices Guide
Copyright © 2010, Juniper Networks, Inc.xviii
Page 19

PART 1
Getting Started
•
Understanding Secure Access Device Configuration on page 3
•
Secure Access Device and NSM Installation Overview on page 7
1Copyright © 2010, Juniper Networks, Inc.
Page 20

Configuring Secure Access Devices Guide
Copyright © 2010, Juniper Networks, Inc.2
Page 21

CHAPTER 1
Understanding Secure Access Device
Configuration
•
NSM and Secure Access Device Management Overview on page 3
•
Communication Between a Secure Access Device and NSM Overview on page 3
•
Secure Access Device Services and Device Configurations Supported in NSM on page 5
NSM and Secure Access Device Management Overview
NSM is the Juniper Networks network management tool that allows distributed
administration of network appliances. You can use the NSM application to centralize
status monitoring, logging, and reporting, and to administer Secure Access device
configurations.
With NSM, you can manage most of the parameters that you can configure through the
Secure Access admin console. The configuration screens rendered through NSM are
similar to the screens in the Secure Access device admin console. NSM incorporates a
broad configuration management framework that allows co-management using other
methods.
Related
Documentation
Communication Between a Secure Access Device and NSM Overview on page 3•
• Secure Access Device Services and Device ConfigurationsSupported in NSM on page 5
• Importing a Secure Access Device on page 11
Communication Between a Secure Access Device and NSM Overview
The Secure Access device and the NSM application communicate through the Device
Management Interface (DMI). DMI is a collection of schema-driven protocols that run
on a common transport (that is, TCP). DMI is designed to work with Juniper Networks
platforms to make device management consistent across all administrative realms.
Supported DMI protocols include:
3Copyright © 2010, Juniper Networks, Inc.
Page 22

Configuring Secure Access Devices Guide
•
NetConf (for inventory management, XML-based configuration, text-based
configuration, alarm monitoring, and device specific commands).
•
Structured syslog.
•
Threat flow for network profiling.
DMI supports third-party network management systems that incorporate the DMI
standard; however, only one DMI-based agent per device is supported.
The Secure Access device configuration is represented as a hierarchical tree of
configuration items. This structure is expressed in XML and can be manipulated with
NetConf. NetConf is a network management protocol that uses XML. DMI uses NetConf’s
generic configuration management capability to allow remote configuration of the device.
To allow NSM to manage the Secure Access device using the DMI protocol, NSM must
import the schema and metadata files from the Juniper Networks Schema Repository,
a publicly accessible resource that is updated with each device release. In addition to
downloading the Secure Access device current schema, NSM may also download
upgraded software.
The Schema Repository enables access to XSD and XML files defined for each device,
model, and software version.
Before attempting to communicate with NSM, you must first complete the initial
configurationof the Secure Accessdevice. Initial configuration includes network interface
settings, DNS settings, licensing, and password administration.
If you have several Secure Access devices that will be configured in a clustering
environment, the cluster abstraction must first be created in the NSM Cluster Manager.
Then you can add individual nodes.
After you have completed the initial network configuration, you can configure the Secure
Access device to communicate with NSM using the appropriate network information.
Once the Secure Access device has been configured to communicate with NSM, the
Secure Access device contacts NSM and establishes a DMI session through an initial TCP
handshake.
All communications between the Secure Access device and NSM occur over SSH to
ensure data integrity.
After the Secure Access device initially contacts NSM and a TCP session is established,
interactionbetween the Secure Access device and NSM is driven from NSM, which issues
commands to get hardware, software, and license details of the Secure Access device.
NSM connects to the Schema Repository to download the configuration schema that is
specific to the Secure Access device.
NSM then issues a command to retrieveconfigurationinformation from the Secure Access
device. If NSM is contacted by more than one Secure Access device as a member of a
cluster, information from only one of the cluster devices is gathered. NSM attempts to
validate the configuration received from the Secure Access device against the schema
from Juniper Networks.
Copyright © 2010, Juniper Networks, Inc.4
Page 23

Chapter 1: Understanding Secure Access Device Configuration
Once the Secure Access device and NSM are communicating, the Secure Access device
delivers syslog and event information to NSM.
After NSM and the Secure Access device are connected, you can make any configuration
changes directly on the Secure Accessdevice, bypassing NSM. NSM automatically detects
these changes and imports the new configurationdata. Changes to Secure Accesscluster
members will similarly be detected by NSM.
When you make changes to the Secure Access device configuration through NSM you
must push the changes to the device by performing an Update Device operation.
When you double-click the Secure Access device icon in the Device Manager and select
the Configurationtab, the configurationtree appears in the main display area in the same
orientation as items appear on the Secure Access device admin console.
Related
Documentation
Secure Access Device Services and Device Configurations Supported in NSM on page 5•
• Importing a Secure Access Device on page 11
• NSM and Secure Access Device Management Overview on page 3
Secure Access Device Services and Device Configurations Supported in NSM
The Secure Access device supports the following services in NSM:
•
Inventorymanagement service — Enables management of the Secure Access software,
hardware,and licensing details. Adding or deleting licenses or upgrading or downgrading
software are not supported.
•
Status monitoring service — Allows the Secure Access device’s status to be obtained,
including name, domain, OS version, synchronization status, connection details, and
current alarms.
•
Logging service — Allows the Secure Access device’s logs to be obtained in a
time-generated order. Logging configuration details that are set on the Secure Access
device will apply to NSM.
•
XML-based configuration management service — Enables NSM to manage the
configuration of the Secure Access device. NSM uses the same XML schema as the
Secure Access device, so you can troubleshoot NSM using XML files downloaded from
the Secure Access device.
The following device configurations are not supported:
•
Editing licensing information, although licenses can be viewed
•
Creating clusters, joining nodes to clusters, or enabling or disabling cluster nodes
•
Packaging log files or debug files for remote analysis
•
Rebooting the Secure Access device
Related
• Communication Between a Secure Access Device and NSM Overview on page 3
Documentation
5Copyright © 2010, Juniper Networks, Inc.
Page 24

Configuring Secure Access Devices Guide
• NSM and Secure Access Device Management Overview on page 3
Copyright © 2010, Juniper Networks, Inc.6
Page 25

CHAPTER 2
Secure Access Device and NSM
Installation Overview
•
Secure Access Device Installation Overview on page 7
•
NSM Installation Overview on page 7
Secure Access Device Installation Overview
Before beginning, see the Juniper Networks Security Products Safety Guide for important
safety information.
You can install the Secure Access device and start configuring your system using the
following steps:
1. Rack mount the Secure Access device.
2. Install the hardware.
3. Perform basic setup.
4. License and configure your Secure Access device.
See the Quick Start Guide for Secure Access 2500, 4500 and 6500 Guide to install and
configure a Secure Access device.
Related
Documentation
NSM Installation Overview on page 7•
• Communication Between a Secure Access Device and NSM Overview on page 3
NSM Installation Overview
NSM is a software application that enables you to integrate and centralize management
of your Juniper Networks environment. Youneed to install two main software components
to run NSM: the NSM management system and the NSM user interface (UI).
See the Network Security Manager Installation Guide for the steps to install the NSM
management system on a single server or on separateservers. It also includes information
on how to install and run the NSM user interface. The Network Security Manager Installation
Guide is intended for IT administrators responsible for installing or upgrading to the NSM.
7Copyright © 2010, Juniper Networks, Inc.
Page 26

Configuring Secure Access Devices Guide
Related
Documentation
• Communication Between a Secure Access Device and NSM Overview on page 3
• Secure Access Device Installation Overview on page 7
Copyright © 2010, Juniper Networks, Inc.8
Page 27

PART 2
Integrating Secure Access Devices
•
Adding Secure Access Devices on page 11
•
Adding Secure Access Clusters on page 23
•
Working with Secure Access Templates on page 29
9Copyright © 2010, Juniper Networks, Inc.
Page 28

Configuring Secure Access Devices Guide
Copyright © 2010, Juniper Networks, Inc.10
Page 29

CHAPTER 3
Adding Secure Access Devices
This chapter provides information on how to add a Secure Access device through the
import workflowand also how to verify the imported configuration. This chapter contains
the following procedures:
•
Importing a Secure Access Device on page 11
•
Requirements for Importing a Secure Access Device into NSM Through a Reachable
Workflow on page 14
•
Adding a Secure Access Device Through a Reachable Workflow on page 15
•
Importing Multiple Secure Access Devices on page 16
•
Verifying Imported Device Configurations on page 19
Importing a Secure Access Device
You can add a Secure Accessdevice to your existing network by using NSM and importing
its configurations. Using the Add Device Wizard, you can configure a connection between
the management system and the physical device, and then import all device parameters,
policies, objects, VPNs, and so on.
Import a Secure Access device by following these procedures:
1.
Installing and Configuring a Secure Access Device on page 11
2.
Adding a Secure Access Device Through NSM on page 12
3.
Configuring and Activating the NSM agent on the Secure Access Device on page 13
4.
Confirming Connectivity and Importing the Secure Access Device
Configuration on page 14
Installing and Configuring a Secure Access Device
Before you add the Secure Access device to NSM, you must install and configure the
Secure Access device to have logon credentials for an NSM administrator.
11Copyright © 2010, Juniper Networks, Inc.
Page 30

Configuring Secure Access Devices Guide
To install and configure a Secure Access device:
1. Select System > Network > Overview in the device’s admin console and ensure that
basic connection information such as the following are configured on the Secure
Access device:
•
Network interface settings
•
DNS settings
•
Password
2. Select Authentication > Auth Servers and enter the username and password of the
NSM administrator in the applicable authentication server.
3. Select Administrators > Admin Roles and create an NSM agent role.
NOTE: Only password-based authentication serverscan be used. One-time
password authentication is not supported.
4. Select Administrators> Admin Realms and create an NSM agent administratorrealm
for the DMI agent on the Secure Access device and use role mapping to associate the
NSM agent role and realm. Do not apply any role or realm restrictions for the NSM
agent role or realm.
For complete details on installing and configuring Secure Access devices, see the Juniper
Networks Secure Access Administration Guide.
Adding a Secure Access Device Through NSM
To add the Secure Access device through the NSM UI:
1. From the left pane of the NSM UI, click Configure.
2. Expand Device Manager and Select Devices. The Devices workspace appears on the
right side of the screen.
3. Click the Device Tree tab, click the New button, and select Device. The New-Device
dialog box appears.
4. Select Device is Not Reachable and click Next.
5. Enter the device name, and select the required color, OS name (SA), and platform
and managed OS version from the drop-down lists.
6. From the Choose Device Server Connection Parameter area, select:
•
Use Default Device Server IP Address and Port — Connects the device to the NSM
Device Server IP address and port.
•
Use Device Server Through MIP — Connects the NSM device server through a
mapped IP address and port.
7. Click Next, and a unique external ID gets generated automatically. This ID represents
the device within the management system.
Copyright © 2010, Juniper Networks, Inc.12
Page 31

Chapter 3: Adding Secure Access Devices
8. Enter an admin username for the device admin.
9. Set the Admin User Password and the First Connection One-Time Password:
•
Select Set Password and enter a new password.
•
Confirm your new password and click OK.
NOTE:
•
Make a note of the unique external ID. The device administrator will
need it to configure connectivity with NSM. The wizard automatically
enters this value for the device. This ID number represents the device
within the management system.
•
Specify the administrator username and password for the SSH
connection. This name and password must match the name and
password already configured on the device.
•
Specify the First Connection One Time Password (OTP) that
authenticates the device. Make a note of this password. The device
administrator will need it to configure the connectivity with NSM.
10. Click Finish to add the device to the NSM UI. The newly added Secure Access device
appears in the Devices workspace.
Configuring and Activating the NSM agent on the Secure Access Device
You must configure and activate the NSM agent on the Secure Access device. It
establishes the SSH communications with the NSM application and controls the Secure
Access device from the NSM application.
To configure and activate the NSM agent:
1. Select System> Configuration > DMI Agent to add the NSM management application.
2. Under DMI settings for outbound connections, enter the device server’s IP address in
the Primary Server box.
3. Enter 7804 in the Primary Port box.
4. Fill in the Backup Server and Backup Port boxes, if a device server is configured for
high availability.
5. Enter the unique external ID provided by the NSM administrator in the Device ID box.
6. Enter the first connection one-time password provided by the NSM administrator in
the HMAC box.
7. Click Enable to activate the NSM agent.
8. Click Save Changes, and the device attempts to establish a session with the NSM
application.
The device software initiates the TCP connection to NSM and identifies itself using the
specified device ID and HMAC. Both sides then engage in SSH TransportLayer interactions
13Copyright © 2010, Juniper Networks, Inc.
Page 32

Configuring Secure Access Devices Guide
to set up an encrypted tunnel. The Inbound and Outbound DMI connections enabled
facilitates the DMI connection. The DMI uses the specified admin realm to login to the
device. The NSM application authenticates itself to the Secure Access device based on
username and password.
Confirming Connectivity and Importing the Secure Access Device Configuration
To confirm connectivity:
1. From the Devices workspace, select the Device List tab.
2. Check the newly added device in the Connection Status column. The connection
status must change from Never Connected to Up.
If the connection status appears as Device Platform Mismatch or Device Firmware
Mismatch, delete the device from the application and add it back using the correct device
platform and managed OS, respectively.
To import the device configuration:
1. From the Devices workspace, select the Device List tab.
2. Right-click the newly added Secure Access device and select Import Device. The Save
Changes dialog box appears.
3. Click Yes to save policy or VPN changes. The Device Import Option dialog box appears.
4. Select Run Summarize Delta Config, click OK and Yes. The Job Information dialog
box displays the progress of the delta config summary. You can also monitor the
progress in the Job Manager.
The next step is to verify the imported configuration using either the Device Monitor or
the Device Manager in NSM. See “Verifying Imported Device Configurations” for details.
Related
Documentation
Importing Multiple Secure Access Devices on page 16•
• Verifying Imported Device Configurations on page 19
• Creating and Applying a Secure Access Device Template on page 29
Requirements for Importing a Secure Access Device into NSM Through a Reachable
Workflow
Adhere to the following requirements to import a Secure Access device into NSM through
a reachable workflow:
•
The inbound DMI connection must be enabled in the Secure Access device.
•
SSH port must be configured in the Secure Access device. The default SSH port is 22.
•
The DMI agent admin realms must be configured and an admin user must be mapped
to a role with full admin privileges.
Copyright © 2010, Juniper Networks, Inc.14
Page 33

Chapter 3: Adding Secure Access Devices
Related
Documentation
Adding a Secure Access Device Through a Reachable Workflow on page 15•
• Verifying Imported Device Configurations on page 19
Adding a Secure Access Device Through a Reachable Workflow
To import a Secure Access device through a reachable workflow into NSM:
1. From the left pane of the NSM UI, click Configure.
2. Expand Device Manager and select Devices. The Devices workspace appears on the
right side of the screen.
3. Click the Device Tree tab, click the New button, and select Device. The New Device
dialog box appears.
4. Select Device is Reachable and click Next.
5. Enter the following connection information:
•
Enter the IP address of the device.
•
Enter the username of the device administrator.
•
Enter the password for the device administrator.
•
Select SSH V2 as the connection method.
Related
Documentation
•
Ensure that the TCP port number is 22.
6. Click Next. The Verify Device Authenticity dialog box opens. The Add Device wizard
displays the RSA Key FingerPrint information. To prevent man-in-the-middle attacks,
you should verify the fingerprint using an out-of-band method.
7. Click Next to accept the fingerprint. The Detecting Device dialog box opens.
8. After the wizard displays the autodetected device information, verify that the device
type, OS version, and the device serial number are correct. The wizard also detects
the hostname configured on the device. You can either use the hostname as the NSM
device name or you can enter a new name in the text box provided.
9. Click Next after verifying the auto detected device information.
10. Click Finish to add the device to the NSM UI. The Secure Access device appears in the
Devices workspace.
Requirements for Importing a Secure Access Device into NSM Through a Reachable
•
Workflow on page 14
• Importing a Secure Access Device on page 11
15Copyright © 2010, Juniper Networks, Inc.
Page 34

Configuring Secure Access Devices Guide
Importing Multiple Secure Access Devices
If your network includes a large number of devices, you can save time by adding multiple
devices in a single workflow.Youcan add up to 4000 devices at a time to a single domain
(but you cannot add multiple devices to different domains at one time).
Add multiple Secure Access devices by following these procedures:
1.
Creating the CSV File on page 16
2.
Validating the CSV File on page 17
3.
Adding and Importing Multiple Secure Access Devices on page 18
Creating the CSV File
The CSV file defines all the required and optional values for each Secure Access device.
Within a .csv file, you define the Secure Access device configuration values that you want
to add. The required and optional values depend not only on how the Secure Access
devices are deployed on your network but also on the device family.
Juniper Networks provides CSV templates in Microsoft Excel format for each type of CSV
file. These templates are located in the utils subdirectory where you have stored the
program files for the UI client. For example:
C:\Program Files\Network and Security Manager\utils
For each CSV file, each row defines a single Secure Access device’s values for each
parameter. For text files, columns are separated by commas.
Creating Secure Access Device Parameters in CSV File
For a Secure Access device, Table 5 on page 16 lists the parameters to be set in the CSV
file:
Table 5: CSV File Information for Secure Access Devices
Acceptable ValuesRequiredTypeField
yesStringName
yesStringColor
sa-6500(FIPS),sa-6500, sa-6000(FIPS),
sa-6000, sa-4500(FIPS), sa-4500,
sa-4000(FIPS), sa-4000, sa-2500,
sa-2000
blue, red, green, yellow, cyan, magenta,
orange, pink
SAyesStringOS Name
yesStringPlatform
SA-2000, SA-2500, SA-4000,
SA-4000(FIPS), SA-4500,
SA-4500(FIPS), SA-6000,
SA-6000(FIPS), SA-6500,
SA-6500(FIPS)
Copyright © 2010, Juniper Networks, Inc.16
Page 35

Chapter 3: Adding Secure Access Devices
Table 5: CSV File Information for Secure Access Devices (continued)
Set to “none”yesStringDevice Subtype
6.3yesStringManaged OS Version
yesStringDevice Admin Name
Must be a minimum of nine charactersyesStringDevice Admin
Password
Using an Excel File to Add Multiple Secure Access Devices
To edit the Excel file to add multiple Secure Access devices:
1. Copy and open either the bulkadd_nonreachable-sample.csv file or the
bulkadd_nonreachable-DMI-sample.csv file located in C:/Program Files/Network and
Security Manager/utils.
2. Using one row for each Secure Access device you want to add, enter the required
values for each parameter that you wish to set for them. You can also provide optional
values, if desired.
Validating the CSV File
3. Save the file to a location on your local drive.
Using a Text File to Add Multiple Secure Access Devices
To add multiple Secure Access devices, create a text file with the following text:
1. Open a Text file and add the Secure Access devices and its parameters as follows.
SA-4000, blue, SA, SA-4000, none, root, 6.3, netscreen
SA-4500, pink, SA, SA-4500, none, root, 6.3, netscreen
SA-6000, cyan, SA, SA-6000, none, root, 6.3, netscreen
SA-6500, pink, SA, SA-6500, none, root, 6.3, netscreen
2. Save the file as a .csv file.
When you add the Secure Access devices, NSM validates the configuration information
in the .csv file and creates a validation report. The report lists any incorrect or duplicate
configurations, and indicates the exact line that contains invalid data.
NOTE: The validation report displays only the first error in the line. If the line
contains additional errors, those errors do not appear in the validation report.
SelectCancel to quit adding multiple Secure Access devices, or select Add Valid Devices
to begin adding the Secure Access devices for which you have provided valid device
configurations.
17Copyright © 2010, Juniper Networks, Inc.
Page 36

Configuring Secure Access Devices Guide
If the validation report listed incorrect configurations, you can still select Add Valid
Devices; however, only the devices with correct configurations are added. If the .csv file
contains duplicate configurations, NSM ignores the duplicates.
After you have added multiple Secure Access devices, you cannot roll back or undo your
changes. To edit or delete Secure Access devices, select the Secure Access device in the
UI and make the necessary changes.
Adding and Importing Multiple Secure Access Devices
To add and import multiple Secure Access devices in the NSM UI:
1. From the left pane of the NSM UI, click Configure.
2. Expand Device Manager and select Devices. The Devices workspace appears on the
right side of the screen.
3. Click the Device Tree tab, click the New button, and select Many Devices. The New
- Device dialog box appears
4. In the New-Device dialog box:
•
Select Device is Not Reachable.
•
Specify the location of the CSV file.
•
Specify the output directory for the .cli file. For each valid device configuration that
uses a dynamic IP address, NSM creates a .cli output file. By default, the .cli file is
saved to the following GUI server directory:
/usr/netscreen/GuiSvr/var/ManyDevicesOutput/<inputFile_YYYYMMDDHHMM>/
Before the Secure Access devices can be managed by NSM, you must enter the CLI
commands in the .cli file on the physical security device.
5. Click Next. The Add Device wizard validates the CSV file and provides a validation
report.
•
Select Cancel to quit the Add Many Devices process.
•
Select Add Valid Devices to begin adding the devices for which you have provided
valid device configurations.
6. From the Choose Device Server Connections Parameter area, enter information as
required.Use the defaultsettings to configure the device to connect to the NSM device
server IP address and port. Use an MIP to configure the device to connect to the NSM
device server through a mapped IP address and port.
7. Click Finish to add the Secure Access devices.
The time it takes for NSM to activate and import the Secure Access devices depends on
the number of Secure Access devices and the management system configuration.
Related
Documentation
Verifying Imported Device Configurations on page 19•
• Adding a Secure Access Cluster Overview on page 23
• Adding a Secure Access Cluster with Imported Cluster Members on page 24
Copyright © 2010, Juniper Networks, Inc.18
Page 37

• Importing a Secure Access Device on page 11
• Creating and Applying a Secure Access Device Template on page 29
Verifying Imported Device Configurations
After importing a Secure Access device, you should verify whether all device information
has been imported.
The imported device configurations can be verified in any of the following ways:
•
Using Device Monitor on page 19
•
Using Device Manager on page 19
•
Using Job Manager on page 20
•
Using Configuration Summaries on page 20
Using Device Monitor
Chapter 3: Adding Secure Access Devices
Using Device Manager
The Device Monitor in NSM tracks the status of individual devices, systems, and their
processes. To check the status of the imported device in the Device Monitor, from the
left pane click Investigate, expand Realtime Monitor, and select Device Monitor. From
the Device Monitor workspace, check the following parameters for your imported device:
•
The Config Status must be Managed.
•
The Conn. Status must be Up.
Using the Device Manager in NSM you can verify the configurationsettings of the imported
device. To verify the configuration settings, click Configure, expand Device Manager, and
select Devices List tab.
Ensure that the following parameters are indicated:
•
Imported device serial number matches the serial number on the physical device.
•
Imported device IP address matches the IP address for the physical device.
•
Imported device administrator name and password are correct for the physical device.
NOTE: All passwords handled by NSM are case-sensitive.
•
Imported device interfaces are correct for the physical device.
•
Management system successfully imported all device configuration information,
including zones, virtual routers, and routes.
19Copyright © 2010, Juniper Networks, Inc.
Page 38

Configuring Secure Access Devices Guide
Using Job Manager
Job Manager tracks the status of major administrativetasks, such as importing or updating
a device. After you import a device, view the report for the import task to ensure that the
management system imported the device configuration as you expected. To track the
statusof the imported Secure Access devicesin NSM, from the left pane, click Administer
and select Job Manager.
NOTE: Job Manager configuration summaries and job information details do
not display passwords in the list of CLI commands for administrators who
do not have the assigned activity "View Device Passwords." By default, only
the super administrator has this assigned activity.
Job Manager also tracks the status of configuration summaries, described in the Using
Configuration Summaries section.
Using Configuration Summaries
NSM provides three configuration summaries to help you manage device configurations
and prevent accidental misconfigurations. Use configuration summaries afteryou import
a device to ensure that the management system imported the physical device
configuration as you expected.
Configuration summaries help with ongoing device maintenance, particularly for devices
on which a local device administrator has been troubleshooting using CLI commands or
the Web UI. Because the device object configuration in the NSM UI can overwrite the
physical device configuration, you should always confirm the commands that are sent
to the device.
The three configuration summaries that help you to manage device configurations are:
•
Configuration Summary
•
Delta Configuration Summary
•
Running Configuration Summary
Configuration Summary
A configuration summary shows you the exact CLI commands that will be sent to the
managed device during the next device update. To get a configuration summary in NSM,
from the Devices menu, click Configuration and select Summarize Config. The Summarize
Config dialog box appears. You see a list of security devices to which you have access.
Select the device you just imported and click OK. NSM analyzes the UI device object
configuration and generates a summary report that lists the CLI commands or XML
messages to send to the physical device during the next device update.
For a just-imported device, the configuration summary report displays the device
configuration that matches the configuration currently running on the physical device.
Delta Configuration Summary
Copyright © 2010, Juniper Networks, Inc.20
Page 39

Chapter 3: Adding Secure Access Devices
A delta configuration summary shows you the differences between the configuration
you see in the NSM UI and the configuration on the physical device. To get a delta
configuration summary in NSM, from the Devices menu click Configuration and select
Summarize Delta Config. The Get Delta Config Summary dialog box appears with a list
of devices to which you have access. Select the device you just imported and click OK.
NSM queries the physical device to obtain a list of all CLI commands or XML messages
used in the device configuration, compares that list with the UI device configuration, and
generates a summary report of all differences, or deltas, discovered.
For a just-imported device, the delta config summary displays minimal deltas, meaning
that very few differences exist between the configuration on the physical device and the
configuration in the UI. NSM automatically imports your VPNs and displays the VPN
policies; however, NSM does not create VPN abstractions for your VPN policies.
Get Running Configuration
A running configuration summary shows you the exact CLI commands or XML messages
that were used to create the current device configuration on the physical device. To get
the running config summary in the NSM application, from the Devices menu click
Configurationand selectGet Running Config. The Get Running Config dialog box appears.
You see a list of devices to which you have access. Select the device you just imported
and click OK.
Related
Documentation
NSM queries the physical device to obtain a list of all CLI commands used in the device
configuration and generates a summary report that lists those commands. For a
just-imported device, the get running config summary report displays the device
configuration currently running on the physical device.
• Adding a Secure Access Cluster Overview on page 23
• Adding a Secure Access Cluster with Imported Cluster Members on page 24
• Creating and Applying a Secure Access Device Template on page 29
• Importing Multiple Secure Access Devices on page 16
21Copyright © 2010, Juniper Networks, Inc.
Page 40

Configuring Secure Access Devices Guide
Copyright © 2010, Juniper Networks, Inc.22
Page 41

CHAPTER 4
Adding Secure Access Clusters
•
Adding a Secure Access Cluster Overview on page 23
•
Adding a Secure Access Cluster with Imported Cluster Members on page 24
Adding a Secure Access Cluster Overview
When you add a Secure Access cluster in NSM, you first add the cluster and then add
each member. Adding a member is similar to adding a standalone device.
Secure Access clusters can be configured by the device administrator to operate in
active/passive mode or in active/active mode. Clusters in active/passive mode are made
up of a primary member and a secondary member. All traffic flows through the primary
member. If the primary member fails, then the secondary member takes over.
In active/active mode, traffic is load-balanced across all cluster members. If one member
fails, then load balancing takes place among the surviving members.
In active/active Network Connect (NC) deployments, we recommend that you do the
following:
•
Split the NC IP pool into node-specific subpools.
•
Performstatic route configuration on the backend router infrastructure in a coordinated
fashion, with static routes to each subpool pointing to the internal IP address of the
hosting cluster node as the next-hop gateway.
NOTE: The Secure Access device does not support a common IP address
pool for NC for an active/active cluster.
The number of members permitted in a cluster depends on whether the cluster is
configured in active/active mode or in active/passive mode. You can have no more than
two cluster members in active/passive mode. In active/active mode you can have up to
eight members.
Before you can activate a cluster member in NSM, the device administrator must have
already created the cluster and added, configured, and enabled the physical cluster
member. See the Juniper Network Secure Access Administration Guide for details on
creating and configuring clusters.
23Copyright © 2010, Juniper Networks, Inc.
Page 42

Configuring Secure Access Devices Guide
Secure Access devices configured in a cluster must have a cluster object and member
objects defined in the NSM before the Secure Access cluster nodes can be recognized
by NSM. Nodes from this cluster that subsequently contact NSM will be represented by
fully functional member icons in the Cluster Manager.Cluster members whose DMI agents
do not contact NSM will be displayedin the NSM Device Monitor as unconnected devices.
Secure Access devices use member IDs to identify each cluster member object. When
importing cluster members, the member ID is imported as part of the cluster.
To add a Secure Access cluster to NSM, first add the cluster object, and then add its
members. You add cluster members one at a time, in a similar manner to adding
standalone devices.
Once a Secure Access cluster is managed by NSM, subsequent changes applied to the
cluster by NSM will be synchronized by the cluster across all cluster members. Similarly,
changes to a Secure Access cluster membership that occur through administrator action
on the native device UI will be reflected back to NSM, and NSM will display the modified
cluster.
NOTE: Adding a cluster and adding a cluster member have no effect on the
cluster itself. The cluster and cluster members must already exist.
You can add a Secure Access cluster from your existing network into NSM and import
their configurations. Using the Add Device Wizard, you configure a connection between
the management system and the physical device, and then import all device parameters.
Related
Documentation
Adding a Secure Access Cluster with Imported Cluster Members on page 24•
• Creating and Applying a Secure Access Device Template on page 29
• Promoting a Secure Access Device Configuration to a Template on page 31
Adding a Secure Access Cluster with Imported Cluster Members
Add and import a Secure Access cluster in NSM by following these procedures:
1.
Installing and Configuring the Cluster on page 25
2.
Adding the Cluster in NSM on page 25
3.
Adding the Cluster Members in NSM on page 25
4.
Configuring and Activating the DMI Agent on the Cluster on page 27
5.
Importing Cluster Configuration on page 27
Copyright © 2010, Juniper Networks, Inc.24
Page 43

Installing and Configuring the Cluster
You must install and configure the Cluster to have logon credentials for an NSM
administrator before you can add the cluster to NSM.
Adding the Cluster in NSM
Before you can add a Secure Access device cluster to NSM, you must first add the cluster
object, and then add its members.
To add new cluster to NSM:
1. From the left pane of the NSM UI, click Configure.
2. Expand Device Manager and select Devices. The Devices workspace appears on the
right side of the screen.
3. Click the Device Tree tab, click the New button, and select Cluster. The New - Cluster
dialog box appears.
4. Enter the cluster name and select the required color, OS name (SA), and platform
and managed OS version from the drop-down lists.
Chapter 4: Adding Secure Access Clusters
5. Click OK, The new cluster appears in the Device Manager.
Adding the Cluster Members in NSM
You add cluster members one at a time, in a similar manner to adding standalone devices.
Adding Cluster Members through Not Reachable Workflow
To add a cluster member through the non-reachable workflow:
1. From the left pane of the NSM UI, click Configure.
2. Expand Device Manager and select Devices. The Devices workspace appears on the
right side of the screen.
3. Click the Device Tree tab, and select the cluster to which you want to add the members.
4. Click the New button and select Cluster Member. The New–Cluster Member dialog
box appears.
5. Enter the cluster member name, select Device Is Not Reachable, and click Next.
6. From the Choose Device Server Connections Parameter area, select:
•
Use Default Device Server IP Address and Port—Connects the device to the NSM
device server IP address and port.
•
Use Device Server Through MIP—Connects to the NSM device server through a
mapped IP address and port.
7. Click Next, and a unique external ID gets generated automatically. This ID represents
the device within the management system.
8. Enter an admin username for the device admin.
25Copyright © 2010, Juniper Networks, Inc.
Page 44

Configuring Secure Access Devices Guide
9. Set the admin user password and the first connection one-time password:
a. Enter a new password in the Set Password box.
b. Confirm the new password and click OK.
NOTE:
•
Make a note of the unique external ID. The device administrator will
need it to configure connectivity with NSM. The wizard automatically
enters this value for the device. This ID number represents the device
within the management system.
•
Specify the administrator username and password for the SSH
connection. This name and password must match the name and
password already configured on the device.
•
Specify the first connection one time password(OTP)that authenticates
the device. Make a note of this password. The device administrator will
need it to configure the connectivity with NSM.
10. Click Finish to add the cluster member to the NSM GUI. The cluster member appears
in the Devices workspace.
Adding Cluster Members through Reachable Workflow
To add a cluster member:
1. From the left pane of the NSM UI, click Configure.
2. Expand Device Manager and select Devices. The Devices workspace appears on the
right side of the screen.
3. Click the Device Tree tab, and select the cluster to which you want to add the members.
4. Click the New button and select Cluster Member. The New–Cluster Member dialog
box appears.
5. Enter the cluster member name, select Device Is Reachable and click Next.
6. Specify the device connection settings:
•
IP Address—IP address of the Secure Access device.
•
Admin User Name—Administrator user name created for the Secure Access device.
•
Password—Administrator password created for the Secure Access device.
7. Click Next, The Secure Access device is detected and the device details are displayed.
8. Enter a new name for the Secure Access device in Device Name to change the host
name of the device.
9. Click Finish to add the cluster member to the NSM GUI. The cluster member as a child
of the Secure Access cluster in the Devices workspace.
Copyright © 2010, Juniper Networks, Inc.26
Page 45

Configuring and Activating the DMI Agent on the Cluster
On each cluster member device, configure and activate the DMI agent and establish an
SSH session with NSM.
Importing Cluster Configuration
After adding the cluster members, you must import the cluster configurations. You do
this only once and for the entire cluster because the configurationis identical for all cluster
members.
To import the cluster configuration:
1. From the left pane of the NSM UI, click Configure.
2. Expand Device Manager and select Devices. The Devices workspace appears on the
right side of the screen.
3. Click the Device Tree tab. Right-click the cluster to which you want to import the
configurations, and select Import Device.
Chapter 4: Adding Secure Access Clusters
Related
Documentation
NSM starts to import the configuration and a job window reports the progress of the job.
When the job finishes, the configuration status for each cluster member in the Device
List tab changes from Import Needed to Managed.
After importing, the configuration appears at the cluster level in NSM. To edit the
configuration, open the cluster icon, not the individual cluster members.
• Creating and Applying a Secure Access Device Template on page 29
• Promoting a Secure Access Device Configuration to a Template on page 31
• Adding a Secure Access Cluster Overview on page 23
27Copyright © 2010, Juniper Networks, Inc.
Page 46

Configuring Secure Access Devices Guide
Copyright © 2010, Juniper Networks, Inc.28
Page 47

CHAPTER 5
Working with Secure Access Templates
•
Creating and Applying a Secure Access Device Template on page 29
•
Promoting a Secure Access Device Configuration to a Template on page 31
Creating and Applying a Secure Access Device Template
You can create and apply configuration templates for setting up new Secure access
devices through NSM.
Create and apply templates by following these procedures:
1.
Creating the Template on page 29
2.
Applying the Template on page 30
Creating the Template
To create a Secure Access template:
1. From the left pane of the NSM UI, click Configure.
2. Expand Device Manager and select Device Templates. The Device Templates
workspace appears on the right side of the screen.
3. Click the Device Template Tree tab, click the New button, and select SA Template.
The New Device Template dialog box appears.
4. Name the Secure Access device template, and select a color for the template.
5. Enter the following basic information:
•
Device description
•
IP address
•
Admin username
•
Admin user password
6. Click OK to save the template. The newly created templates will appear under the
Device Template Tree.
7. Double-click the newly created template to enter the configuration information. The
Device Template screen appears.
29Copyright © 2010, Juniper Networks, Inc.
Page 48

Configuring Secure Access Devices Guide
8. Click the Configuration tab; select the required parameters on the left pane and
specify the appropriate values.
9. Click OK to create a Secure Access device template.
You can now use this template when configuring Secure Access devices.
Applying the Template
To apply a template to a Secure Access device:
1. From the left pane of the NSM UI, click Configure.
2. Expand Device Manager and select Devices. The Devices workspace appears on the
right side of the screen.
NOTE: You can create a custom expression in a device template, but you
cannot validate the custom expression. The Validate button is not enabled
in the Custom Expressions editor for device templates.
3. Double-click the Secure Access device to open the device editor.
4. From the Device Info tab, select Templates. The templates configuration screen
appears.
5. Click the Edit icon. The Edit Templates dialog box appears.
6. Select the required template from the list, and click OK in the Edit Templates dialog
box.
7. In the templates configuration screen, select Retain template values on removal to
retain template values if a template is removed from the device.
8. Select the required template from the list and apply the required settings as explained
in Table 6 on page 30 and click OK.
Table 6: Template Operations Settings
FunctionOption
Adds the templates with the least priority.Add templates with lowest priority
Adds the templates with the highest priority.Add templates with highest priority
Removes the templates.Remove templates
Does not accept modifications to the templates.Don’t change templates
Does not add device values that conflict.Remove conflicting device values
Reports irrelevant template values.Report irrelevant template values
Reports conflicts with other templates.Report conflicts with other templates
Copyright © 2010, Juniper Networks, Inc.30
Page 49

Chapter 5: Working with Secure Access Templates
Table 6: Template Operations Settings (continued)
Validates the templates.Validate
To apply the settings to the device itself, run the Update Device directive to push the
configuration to the device.
Related
Documentation
Promoting a Secure Access Device Configuration to a Template on page 31•
• Configuring Secure Access Device User Roles (NSM Procedure) on page 35
• Verifying Imported Device Configurations on page 19
Promoting a Secure Access Device Configuration to a Template
NSM allows you to import a Secure Access device configuration and then convert, or
promote,it to a template. You can then use that template to make identical configurations
on other Secure Access devices.
To promote a Secure Access device configuration to a template:
1. From the Devices workspace in NSM, double-click the Secure Access device whose
configuration settings you want to promote to a template. The Secure Access device
dialog box appears.
2. Select the Configuration node. The device editor appears.
3. From the left pane of the device editor, right-click the Configuration node that you
want to promote to a template and select Promote Template. The Select templates
dialog box appears.
4. Select the template to which you want to apply the configuration settings and click
OK. The Secure Access device configuration is promoted to the selected template.
Related
Documentation
• Verifying Imported Device Configurations on page 19
• Creating and Applying a Secure Access Device Template on page 29
31Copyright © 2010, Juniper Networks, Inc.
Page 50

Configuring Secure Access Devices Guide
Copyright © 2010, Juniper Networks, Inc.32
Page 51

PART 3
Configuring Secure Access Devices
•
Configuring User Roles and Administrator Roles on page 35
•
Configuring Terminal Services Using Remote Access Mechanism on page 51
•
Configuring Access Options using Remote Access Mechanisms on page 65
•
Configuring Secure Access Resource Profiles on page 93
•
Configuring Secure Access Resource Policies on page 137
•
Configuring Authentication and Directory Servers on page 161
•
Configuring Authentication Realms on page 195
•
Configuring Sign-in Policies and Sign-in Pages on page 207
•
Configuring Single Sign-On on page 217
•
Configuring Secure Access Host Checker Policies on page 231
•
Configuring Secure Access Cache Cleaner on page 251
•
Configuring Secure Access System Management Features on page 257
•
Configuring Network Settings on page 271
•
Synchronizing User Records on page 277
•
Configuring IF-MAP Federation Settings on page 283
33Copyright © 2010, Juniper Networks, Inc.
Page 52

Configuring Secure Access Devices Guide
Copyright © 2010, Juniper Networks, Inc.34
Page 53

CHAPTER 6
Configuring User Roles and Administrator
Roles
•
Configuring Secure Access Device User Roles (NSM Procedure) on page 35
•
Creating Secure Access Role-Based Source IP Alias (NSM Procedure) on page 38
•
Configuring Secure Access General Session Options (NSM Procedure) on page 39
•
Creating and Configuring Secure Access Device Administrator Roles (NSM
Procedure) on page 43
Configuring Secure Access Device User Roles (NSM Procedure)
A user role is an entity that defines user session parameters, personalization settings,
and enabled access features. You can customize a user role by enabling specific Secure
Access device access features, defining Web, application, and session bookmarks, and
configuring session settings for the enabled access features. You can create and configure
user roles through the User Roles page from the Secure Access device configuration tree.
To configure a user role:
1. In the NSM navigation tree, select Device Manager > Devices. Click the Device Tree
tab and then, double-click the Secure Access device for which you want to configure
user roles.
2. Click the Configurationtab, select Users > User Roles. The corresponding workspace
appears.
3. Click the New button and the New dialog box appears.
4. Add or modify settings on the General tab page as specified in Table 7 on page 36.
5. Add or modify global role options on the Global Role Options tab page as specified
in Table 8 on page 37.
6. Click one:
•
OK—Saves the changes.
•
Cancel—Cancels the modifications.
35Copyright © 2010, Juniper Networks, Inc.
Page 54

Configuring Secure Access Devices Guide
Table 7: User Role Configuration Details
General tab
Name
General > Overview tab
the user role.
Describes the user role.Description
Your ActionFunctionOption
Enter a name.Specifies a unique name for
Enter a brief description for the
user role.
VLAN/Source IP
Session Options
UI Options
Web
Windows Files
Specifies role-based source IP
aliases.
Specifies the session time
limits, roaming capabilities,
session and password
persistency, request
follow-through options, and
idle timeout application
activity.
Specifies customized settings
for the Secure Access device
welcome page and the
browsing toolbar for users
mapped to this role.
Enables you to intermediate
Web URLs through the
Content Intermediation
Engine.
Controls access to resources
on Windows server shares.
Select General >
VLAN/Source IP to apply
settings for the role.
Select General > Session
Options to apply settings for
the role.
SelectGeneral > UI Options to
apply custom settings for the
role; otherwise, the Secure
Access device uses the default
settings.
Select General > Web to
enable this access feature for
the role.
Select General > Windows
Files to enable this access
feature.
NFS Files
Secure Application Manager
Telnet/SSH
Controls access to resources
on UNIX/NFS servers.
Provides secure,
application-level remote
access to enterprise servers
from client applications.
Enables users to connect to
internal server hosts in the
clear using Telnet protocols or
to communicate over an
encryptedSecure Shell (SSH)
session through a Web-based
terminal session emulation.
Copyright © 2010, Juniper Networks, Inc.36
Select General > NFS Files to
enable this access feature.
Select General >Secure
ApplicationManager to enable
this access feature.
Select General > Telnet/SSH
to enable this access feature.
Page 55

Chapter 6: Configuring User Roles and Administrator Roles
Table 7: User Role Configuration Details (continued)
Your ActionFunctionOption
Terminal Services
Meeting
Email
Network Connect
Enables terminal emulation
sessions on a Windows
terminal server, Citrix NFuse
server, or Citrix Metaframe
server.
Allows users to securely
schedule and hold online
meetings between both
Secure Access devices and
non-Secure Access devices.
Enables users to use
standards-based e-mail
clients to access corporate
e-mail securely from remote
locationswithout the need for
any additional software, such
as a VPN client.
The Network Connect option
provides secure, SSL-based
network-level remote access
to all enterprise application
resources using the Secure
Access device over port 443.
Select General > Terminal
Services to enable this access
feature.
Select General > Meeting to
enable this access feature.
Select General > Email to
enable this access feature.
Select General >Network
Connect to enable this access
feature.
Table 8: Global User Role Configuration Details
Global Role Options > Global Terminal Services Role Options tab
Citrix Client CAB File
Name
File Name
Allows you to specify a shared binary
data object.
NOTE: The name, color, comment, file
name fields are displayed only when you
click the plus button in the right side of
the Citrix Client CAB File list.
Specifies the color of the object.Color
Allows you to upload the shared binary
data object.
Your ActionFunctionOption
Select the plus button to
specify the name, color,
comment and file name for
the object.
Enter the name.Specifies the name of the object.
Select a color from Color drop
down list.
Enter the comment.Allows you to specify a comment.Comment`
Click Browse and select the
file.
37Copyright © 2010, Juniper Networks, Inc.
Page 56

Configuring Secure Access Devices Guide
Table 8: Global User Role Configuration Details (continued)
Global Role Options > Global Terminal Services Role Options tab
Your ActionFunctionOption
Enter the file name.Specifies the custom Citrix client file
Enter the version.Specifies the custom Citrix version.Citrix Client CAB File
Related
Documentation
Citrix Client CAB File
Name
Version
name.
Creating Secure Access Role-Based Source IP Alias (NSM Procedure) on page 38•
• Configuring Secure Access General Session Options (NSM Procedure) on page 39
• Creating and Applying a Secure Access Device Template on page 29
• Verifying Imported Device Configurations on page 19
Creating Secure Access Role-Based Source IP Alias (NSM Procedure)
To direct traffic to specific sites based on roles, you can define a source IP alias for each
role. You use these aliases to configure virtual ports you define for the internal interface
source IP address. A back-end device can then direct end-user traffic based on these
aliases, as long as you configure the back-end device, such as a firewall, to expect the
aliases in place of the internal interface source IP address. This capability enables you
to direct various end users to defined sites based on their roles, even though all of the
end-user traffic has the same internal interface source IP address.
NOTE: You must define virtual ports to take advantage of the role-based
source IP aliases.
To specify a source IP alias for the role:
1. In the NSM navigation tree, select Device Manager > Devices. Click the Device Tree
tab, and then double-click the Secure Access device for which you want to configure
user roles.
2. Click the Configuration tab, and select Users > User Roles. The corresponding
workspace appears.
3. Click the New button and the New dialog box appears.
4. Add or modify settings on the General > VLAN/Source IP as specified in Table 9 on
page 39.
5. Click one:
•
OK—Saves the changes.
•
Cancel—Cancels the modifications.
Copyright © 2010, Juniper Networks, Inc.38
Page 57

Chapter 6: Configuring User Roles and Administrator Roles
Table 9: IP Alias Configuration Details
Your ActionFunctionOption
Select the VLAN you want to use from the VLAN
list, if you have defined VLAN ports on your
system.
NOTE: If an end user is mapped to multiple roles
and the Secure Access device merges roles, the
Secure Access device associates the source IP
address configured for the first role in the list with
the merged role.
Select a source IP address from the list.
NOTE: You can specify the same source IP
address for multiple roles. You cannot specify
multiple source IP addresses for one role.
Related
Documentation
VLAN
Select
Source IP
Specifies role-based source IP
aliases. If you want to direct
traffic to specific sites based on
roles, you can define a source IP
alias for each role.
Configures virtual ports you
define for the internal interface
source IP address.
Configuring Secure Access General Session Options (NSM Procedure) on page 39•
• Creating and Configuring Secure Access Device Administrator Roles (NSM Procedure)
on page 43
• Creating and Applying a Secure Access Device Template on page 29
• Verifying Imported Device Configurations on page 19
Configuring Secure Access General Session Options (NSM Procedure)
To specify session time limits, roaming capabilities, session and password persistency,
request follow-through options, and idle timeout application activity, follow these steps:
1. In the NSM navigation tree, select Device Manager > Devices. Click the Device Tree
tab, and then double-click the Secure Access device for which you want to configure
user roles.
2. Click the Configuration tab, and select Users > User Roles. The corresponding
workspace appears.
3. Click the New button and the New dialog box appears.
4. Click General > Session Options to add or modify settings as specified in Table 10 on
page 40.
5. Click one:
•
OK—Saves the changes.
•
Cancel—Cancels the modification.
39Copyright © 2010, Juniper Networks, Inc.
Page 58

Configuring Secure Access Devices Guide
Table 10: Session Options Configuration details
General > Session Options tab
Idle Timeout
Specifies the number of
minutes a nonadministrative
user session may remain idle
before ending. The minimum
is five minutes. The default idle
session limit is 10 minutes,
which means that if a user’s
session is inactive for 10
minutes, the Secure Access
device ends the user session
and logs the event in the
system log (unless you enable
session timeout warnings
described later).
Your ActionFunctionOption
Enter the session length in
minutes.
Max. Session Length
Reminder Time
Specifies the number of
minutes an active
nonadministrativeuser session
may remain open before
ending. The minimum is six
minutes. The defaulttime limit
for a user session is 60
minutes, after which the
SecureAccessdevice ends the
user session and logs the
event in the system log. During
an end-user session, prior to
the expiration of the maximum
session length, the Secure
Access device prompts the
user to reenter authentication
credentials, which avoids the
problem of terminating the
user session without warning.
Specifies when the Secure
Access device should prompt
nonadministrative users,
warning them of an impending
session or idle timeout. Specify
in number of minutes before
the timeout is reached.
Enter the heartbeat interval in
seconds.
Enter the Reminder Time in
minutes.
Copyright © 2010, Juniper Networks, Inc.40
Page 59

Chapter 6: Configuring User Roles and Administrator Roles
Table 10: Session Options Configuration details (continued)
Your ActionFunctionOption
Enable session timeout
warning
Display sign-in page on max
session time out
Roaming session
Enables users to take the
appropriate action when they
are close to exceeding their
session limits or idle timeouts,
helping them to save any
in-progress form data that
wouldotherwise be lost. Users
approaching the idle timeout
limit are prompted to
reactivate their session. Users
approaching the session time
limit are prompted to save
data.
Displaysa new browser sign-in
page to the end user when
their session times out.
This option appears only when
you select Enable session
timeout warning.
Allows users to enable, limit,
or disable the roaming session.
A roaming user session works
across source IP addresses,
which allows mobile users
(laptop users) with dynamic
IP addresses to sign in to the
Secure Access device from
one location and continue
working from another. Disable
this feature to prevent users
from accessing a previously
established session from a
new source IP address. This
helps protect against an
attack spoofing a user’s
session, provided the hacker
was able to obtain a valid
user's session cookie.
SelectEnable session timeout
warning to notify
nonadministrative users when
they are about to reach a
session or idle timeout limit.
Select Display sign-in page on
max session time out.
Select a roaming session
option from the drop-downlist:
•
Enabled—Enables roaming
user sessions for users
mapped to this role.
•
Limit to subnet—Limits the
roaming session to the local
subnet specified in the
Netmask box.
•
Disabled—Disablesroaming
user sessions for users
mapped to this role.
Users may sign in from one IP
address and continue using
their sessions with another IP
address as long as the new IP
address is within the same
subnet.
Users who sign in from one IP
address may not continue an
active Secure Access device
session from another IP
address; user sessions are tied
to the initial source IP address.
41Copyright © 2010, Juniper Networks, Inc.
Page 60

Configuring Secure Access Devices Guide
Table 10: Session Options Configuration details (continued)
Your ActionFunctionOption
Roaming netmask
Persistent session
Persistent password caching
Specifies the roaming
netmask.
Enables users to write the
Secure Access device session
cookie to the client hard disk
so that the user’s Secure
Access device credentials are
saved for the duration of the
Secure Access device session.
Enables users to allow cached
passwords to persist across
sessions for a role.
The Secure Access device
supports the NT LAN Manager
(NTLM) authentication
protocol and HTTP Basic
Authentication and supports
servers that are set up to
accept both NTLM and
anonymous sign-in. The
Secure Access device caches
NTLM and HTTP Basic
Authentication passwords
provided by users so that the
users are not repeatedly
prompted to enter the same
credentials used to sign in to
the Secure Access device
server or another resource in
the NT domain. By default, the
Secure Access device server
flushes cached passwords
when a user signs out.
Enter a roaming netmask
address.
Select Enabled from the
drop-down list.
Select Enabled from the
drop-down list.
You can delete cached
passwords through the
Advanced Preferences page.
After the end user logs in to the
Secure Access device, click
Preferences and then click
Preferences and then click the
Advanced tab.
Browser request
follow-through
Idle timeout application
activity
Enable Upload Logs
Enables users to allow the
Secure Access device to
completea user request made
after an expired user session
afterthe user reauthenticates.
Enables users to ignore
activities initiated by Web
applications (such as polling
for e-mails) when determining
whether a session is active.
Enables users to transmit
(upload) client logs to the
Secure Access device.
Copyright © 2010, Juniper Networks, Inc.42
Select Enabled form the
drop-down list.
Select Enabled form the
drop-down list.
If you disable this option,
periodic pinging or other
application activity may
prevent an idle timeout.
Select the Enable Upload
Logs.
Page 61

Chapter 6: Configuring User Roles and Administrator Roles
Related
Documentation
Creating and Configuring Secure Access Device Administrator Roles (NSM Procedure)
•
on page 43
• Creating Secure Access Role-Based Source IP Alias (NSM Procedure) on page 38
• Verifying Imported Device Configurations on page 19
• Creating and Applying a Secure Access Device Template on page 29
Creating and Configuring Secure Access Device Administrator Roles (NSM Procedure)
An administrator role specifies SecureAccessdevice managementfunctions and session
properties for administrators who map to the role. You can customize an administrator
role by selecting the Secure Access device feature sets and user roles that members of
the administrator role are allowed to view and manage. You can create and configure
administrator roles through the Delegated Admin Roles page.
NOTE: To create individual administrator accounts, you must add the users
through the appropriate authentication server (not the role). For example,
to create an individual administrator account, you may use settings in the
Authentication > Auth. Servers > Administrators > Users page of the admin
console.
To create an administrator role:
1. In the NSM navigation tree, select Device Manager > Devices. Click the Device Tree
tab, and then double-click the Secure Access device for which you want to configure
administrator role.
2. Click the Configuration tree tab, and select Administrators > Admin Roles.
3. Click the New button and the New dialog box appears.
4. Click General > Overview to add or modify settings as specified in Table11 on page 43.
5. Click one:
•
OK—Saves the changes.
•
Cancel—Cancels the modifications.
Table 11: Administrator Role Configuration Details
Your ActionFunctionOption
General > Overview tab
Name
Description
the administrator role.
Describes the administrator
role.
Enter a name.Specifies a unique name for
Enter a brief description for the
administrator role.
43Copyright © 2010, Juniper Networks, Inc.
Page 62

Configuring Secure Access Devices Guide
Table 11: Administrator Role Configuration Details (continued)
Your ActionFunctionOption
Session Options
UI Options
Specifies the maximum
session length, roaming
capabilities, and session
persistence.
Specifies customized settings
for the Secure Access device
welcome page for Odyssey
Access Client users mapped
to this role.
Delegated Users Settings > Roles > Delegate User Roles
Administrators can manage
ALL roles
Access
Specifies whether the
administratorcan manage all
roles.
Specifies which user role
pages the delegated
administrator can manage.
Select General > Session
Options to apply the settings to
the role.
Select General > UI Options to
apply the settings to the role.
Select the user roles in the
Non-members list and click Add
if you only want to allow the
administrator role to manage
selected user roles
Select an access option from
the drop-down list.
•
Select Write All to specify
that members of the
administratorrole can modify
all user role pages.
•
Select Custom Settings to
allow you to pick and choose
administrator privileges
(Deny, Read, or Write) for the
individual user role pages.
Delegated Users Settings > Roles > Delegate As Read-Only Role
Administrator can view (but
not modify) ALL roles
Allows the administrator to
view the user roles, but not
manage.
Select the user role that you
want to allow the administrator
to view.
NOTE: If you specify both write
access and read-only access for
a feature, the Secure Access
device grants the most
permissive access.
Delegated Users Settings > Realms > Delegate User Realms
Administrator can manage
ALL realms
Specifies whether the
administratorcan manage all
user authentication realms.
Selectthe user realm. If you only
want to allow the administrator
role to manage selected realms,
select those realms in the
Members list and click Add.
Copyright © 2010, Juniper Networks, Inc.44
Page 63

Chapter 6: Configuring User Roles and Administrator Roles
Table 11: Administrator Role Configuration Details (continued)
Your ActionFunctionOption
Access
Specifies which user
authentication realms pages
that the delegated
administrator can manage.
Select an access option from
drop-down list.
•
Select Write All to specify
that members of the
administratorrole can modify
all user authentication realm
pages.
•
Select Custom Settings to
allow you to pick and choose
administrator privileges
(Deny, Read, or Write) for the
individual user authentication
realm pages.
Delegated Users Settings > Realms > Delegate As Read-Only Realms
Administrator can view (but
not modify) ALL realms
Allows the administrator to
view the user authentication
realms, but not modify.
Select the user authentication
realms that you want to allow
the administrator to view.
NOTE: If you specify both write
access and read-only access for
an authentication realm page,
the Secure Accessdevice grants
the most permissive access.
Delegated Administrator Settings > Management of Admin roles
Manages all admin roles.Manage ALL admin roles
SelectDelegatedAdministrator
Settings > Management of
Admin roles > Manage ALL
admin rolesto manage all the
admin roles.
AllowAdd/Deleteadmin roles
Allows the security
administrator to create
administrator roles, even if
the security administrator is
not part of the Administrators
role.
NOTE: This option appears
only when you enable the
Manage All admin roles
option.
Select to allow the security
administrator to add and delete
admin roles.
45Copyright © 2010, Juniper Networks, Inc.
Page 64

Configuring Secure Access Devices Guide
Table 11: Administrator Role Configuration Details (continued)
Your ActionFunctionOption
Access
Indicates the level of access
Select an access option:
that you want to allow the
•
security administrator role to
set for systemadministrators.
Deny All—Specifies that
members of the security
administratorrole cannot see
NOTE: This option appears
only when you enable the
Manage All admin roles
option.
or modify any settings in the
category.
•
Read All—Specifies that
members of the security
administrator role can view,
but not modify, all settings in
the category.
•
Write All—Specifies that
members of the security
administratorrole can modify
all settings in the category.
•
CustomSettings—Allowsyou
to pick and choose security
administrator privileges
(Deny, Read, or Write) for the
individual features within the
category.
Delegated Administrator Settings > Management of Admin realms
Manages all admin realms.Manage ALL admin realms
SelectDelegatedAdministrator
Settings > Management of
Admin realms > Manage ALL
admin realms.
Allow Add/Delete admin
realms
Allows the security
administrator to create and
delete administrator realms,
even if the security
administrator is not part of
the administrators role.
NOTE: This option only
appears when you choose to
enablethe Manage All admin
realms.
Select to allow the security
administrator to add and delete
admin realms.
Copyright © 2010, Juniper Networks, Inc.46
Page 65

Chapter 6: Configuring User Roles and Administrator Roles
Table 11: Administrator Role Configuration Details (continued)
Your ActionFunctionOption
Access
Indicates the level of realm
access that you want to
allow the security
administrator role to set for
system administrators for
each major set of admin
console pages.
NOTE: This option appears
only when you enable the
Manage All admin realm
option.
Delegated Resource Policies > All tab
Access
Indicates the level of access
that you want to allow the
administrator role for each
Resource Policies submenu.
Select an access option:
•
Deny All—Specifies that
members of the security
administratorrole cannot see
or modify any settings in the
category.
•
Read All—Specifies that
members of the security
administrator role can view,
but not modify, all settings in
the category.
•
Select Write All—Specifies
that members of the security
administratorrole can modify
all settings in the category.
•
Select Custom
Settings—Allows you to pick
and choose security
administrator privileges
(Deny, Read, or Write) for the
individual features within the
category.
Select an access option:
•
Deny All—Specifies that
members of the administrator
role cannot see or modify any
resource policies.
•
Read All—Specifies that
members of the administrator
role can view, but not modify,
all resource policies.
•
Write All—Specifies that
members of the administrator
role can modify all resource
policies.
•
CustomSettings—Allowsyou
to pick and choose
administrator privileges
(Deny, Read, or Write) for
each type of resource policy
or for individual resource
policies.
NOTE: The Web, File, SAM,
Telnet SSH, Terminal Services,
Network Connect, and Email
Client tabs are enabled only
when you select Custom
Settings from the drop down
list.
47Copyright © 2010, Juniper Networks, Inc.
Page 66

Configuring Secure Access Devices Guide
Table 11: Administrator Role Configuration Details (continued)
Delegated Resource Policies > Web > File > SAM > Telnet SSH > Terminal Services >
Network Connect
Access
Allows you to pick and
choose administrator
privileges for each type of
resource policy.
Your ActionFunctionOption
Select Deny or Read or Write
access level for the type of
resource.
Additional Access Policies
level to individual policy (For
example, if you want to
control access to a resource
policy that controlsaccess to
www.google.com)
Access
Allows you to pick and
choose administrator
privileges for each individual
resource policy.
Delegated Resource Policies > Email Client
Access
Allows you to pick and
choose administrator
privileges (Deny, Read, or
Write) for the policy.
Delegated Resource Profiles > All tab
Select a resource policy.Allows you to specify access
Select Read or Write access
level for the policy.
Select Deny or Read or Write
access level for the.
Copyright © 2010, Juniper Networks, Inc.48
Page 67

Chapter 6: Configuring User Roles and Administrator Roles
Table 11: Administrator Role Configuration Details (continued)
Your ActionFunctionOption
Access
Indicate the level of access
that you want to allow the
administrator role for each
Resource Profiles.
Select an access option:
•
Deny All—Specifies that
members of the security
administratorrole cannot see
or modify any settings in the
category.
•
Read All—Specifies that
members of the security
administrator role can view,
but not modify, all settings in
the category.
•
Write All—Specifies that
members of the security
administratorrole can modify
all settings in the category.
•
CustomSettings—Allowsyou
to pick and choose security
administrator privileges
(Deny, Read, or Write) for the
individual features within the
category.
NOTE: The Web, File, SAM,
Telnet SSH, and Terminal
Services tabs are enabled only
when you select Custom
Settings from the drop down
list.
Related
Documentation
Delegated Resource Profiles > Web > File > SAM > Telnet SSH > Terminal Services
Access
Allows you to pick and
choose administrator
privileges for each type of
Select Deny or Read or Write
access level for the type of
resource.
resource profiles.
Additional Access Profiles
Allows you to specify access
level to individual profiles
(For example, if you want to
control access to a resource
Select the resource profile for
which you want to provide a
custom access level, and click
Add.
profiles that controls access
to www.google.com).
Access
Allows you to pick and
choose administrator
Select Read or Write access
level for the profiles.
privileges (Deny, Read, or
Write) for the profiles.
• Configuring Access Options using Remote Access Mechanisms Overview on page 65
• Configuring Secure Access General Session Options (NSM Procedure) on page 39
• Creating and Applying a Secure Access Device Template on page 29
49Copyright © 2010, Juniper Networks, Inc.
Page 68

Configuring Secure Access Devices Guide
• Verifying Imported Device Configurations on page 19
Copyright © 2010, Juniper Networks, Inc.50
Page 69

CHAPTER 7
Configuring Terminal Services Using
Remote Access Mechanism
•
Terminal Services Overview on page 51
•
Configuring Terminal Services on a Secure Access Device User Role (NSM
Procedure) on page 52
•
Terminal Services User Experience on page 61
•
Terminal Services Execution on page 62
Terminal Services Overview
You can use the Terminal Services feature to enable a terminal emulation session on a
Windows terminal server, Citrix NFuse server, or Citrix Metaframe server. You can also
use this feature to deliver the terminal services through the Secure Access device,
eliminating the need to use another Web server to host the clients.
Related
Documentation
NOTE: The device supports several mechanisms for intermediating traffic
between a Citrix server and client, including the Terminal Services, JSAM,
WSAM, Network Connect, and hosted Java applets features.
Terminal Services User Experience on page 61•
• Terminal Services Execution on page 62
• Configuring Terminal Services on a Secure Access Device User Role (NSM Procedure)
on page 52
51Copyright © 2010, Juniper Networks, Inc.
Page 70

Configuring Secure Access Devices Guide
Configuring Terminal Services on a Secure Access Device User Role (NSM Procedure)
Use the Terminal Services feature to enable terminal emulation sessions on a Windows
terminal server, Citrix NFuse server, or Citrix Metaframe server.
To configure terminal services on a user role:
1. In the navigation tree, select Device Manager > Devices. Click the Device Tree tab,
and then double-click the Secure Access device for which you want to configure a
terminal services option.
2. Click the Configuration tab. Select Users > User Roles.
3. Click the New button. The New dialog box appears.
4. Add or modify settings as specified in Table 12 on page 52.
5. Click one:
•
OK—Saves the changes.
•
Cancel—Cancels the modifications.
Table 12: User Role Terminal Services Configuration Details
Your ActionFunctionOption
Terminal Services > Terminal Services Sessions tab
Name
Description
Auto-launch
terminal services session
bookmark.
the terminal services session
bookmark.
Enables the Secure Access
device to automatically launch
the resourcefor the user when
the user signs into the Secure
Access device.
Enter the name.Specifies the name for the
Enter the description.Specifies the description for
Select the Auto Launch check
box to enable this feature.
Copyright © 2010, Juniper Networks, Inc.52
Page 71

Chapter 7: Configuring Terminal Services Using Remote Access Mechanism
Table 12: User Role Terminal Services Configuration Details (continued)
Your ActionFunctionOption
Type
Allows you to specify the type
of user session you want to
create.
Terminal Services > Terminal Services Sessions tab > Type > Windows Terminal Services
> Settings tab
Username
Specifies the username that
the Secure Access device
should pass to the terminal
server.
Select one of the following
session type:
•
Windows Terminal
Services—Enables a
terminal session to a
Windows Terminal Server.
•
Citrix using default
ICA—Enables a terminal
services session to a Citrix
Metaframe server.
•
Citrix using custom ICA
file—Enables a terminal
services session to a Citrix
Metaframe or NFuse server
governing a Citrix server
farm.
You can enter a static
username or a variable.
NOTE: Enter the <username>
variable to pass the username
stored in the Secure Access
device’sprimary authentication
server. Or use the following
syntax to submit the username
for the secondary
authentication server:
<username@Secondary
ServerName> or
<username[2]>.
Password Type
Variable Password
Explicit Password
Allows you to specify a static
password or select a variable
password if you want to use
the password stored in the
Secure Access device’s
primary or secondary
authentication server.
password that the Secure
Accessdevice uses to validate
sign-in credentials.
password that the Secure
Accessdevice uses to validate
sign-in credentials.
Select either Variable
Password or Explicit
Password.
Enter the variable password.Specifies the SSO variable
Enter the explicit password.Specifies the explicit SSO
53Copyright © 2010, Juniper Networks, Inc.
Page 72

Configuring Secure Access Devices Guide
Table 12: User Role Terminal Services Configuration Details (continued)
Terminal Services > Terminal Services Sessions > Type > Windows Terminal Services >
Start Application
Launch Seamless Window
Allows you to have the
Windows application server
manage the display of the
application.
Your ActionFunctionOption
Select the Launch Seamless
Window check box to enable
this feature.
Path to application
application’s executable file
resides on the terminal server
in the Path to application box
(visible only when you clear
Launch seamless window).
Working directory
server should place working
files for the application in the
Working directory box.
Specify the path.Specifies where the
Specify the directory.Specifies where the terminal
Terminal Services > Terminal Services Sessions > Type > Windows Terminal Services >
Connect Devices tab
Connect drives
Connect printers
Allows you to connect the
user’s local drive to the
terminal server, enabling the
user to copy information from
the terminal server to his local
client directories.
Allows you to connect the
user’s local printers to the
terminal server, enabling the
user to print information from
the terminal server to his local
printer.
Select the Connect drives
check box to enable this
feature.
Select the Connect printers
check box to enable this
feature.
Connect COM Ports
Allow Clibboard Sharing
Connect smart cards
Allows you to connect the
user’s COM ports to the
terminal server, allowing
communication between the
terminal server and the
devices on his serial ports.
Enables you to allow the
contentsof the clipboard to be
shared between the user’s
host computer and the
terminal server.
Enables you to allow users to
use smart cards to
authenticate their remote
desktop sessions.
Copyright © 2010, Juniper Networks, Inc.54
Selectthe Connect COM Ports
check box to enable this
feature.
Select the Allow Clibboart
Sharing check box to enable
this feature.
Select the Connect smart
cards check box to enable this
feature.
Page 73

Chapter 7: Configuring Terminal Services Using Remote Access Mechanism
Table 12: User Role Terminal Services Configuration Details (continued)
Your ActionFunctionOption
Sound Options
Allows you to specify the
sound options.
Terminal Services > Terminal Services Sessions > Type > Windows Terminal Services >
Connection tab
Host
Specifies the hostname or IP
address of the Windows
terminal server.
Select one of the following
options from drop-down list:
•
Disable Sound
Options—Allows you to
disable the sound option.
•
Bring to this
computer—Allows you to
redirect audio to the local
computer.
•
Leave at remote
computer—Allows you to
play the audio only at the
server.
Enter the hostname or IP
address.
Client Port
Server Port
Screen Size
Color Depth
port on which the user client
communicates to the terminal
server.
server port on which terminal
server listens to the user client.
Allows you to change the size
of the terminal services
window on the user’s
workstation. (By default, the
Secure Access device sets the
window size to full screen.)
Allows you to change the
color-depth of the terminal
session data. (By default, the
Secure Access device sets the
color depth to 8-bit.)
Enter the client port.Allowsyou to specify the client
Enter the server port.Allows you to specify the
Select Full Screen, 800x600,
1024x768, or 1280x1024 from
the drop–down list.
Select 8-bit, 15-bit, 16-bit,
24-bit, or 32-bit (True color)
from the drop–down list.
Terminal Services > Terminal Services Sessions > Type > Windows Terminal Services >
Experience Options tab
Desktop background
Allows you to display a
wallpaper background to
users.
Select the Desktop
background check box to
enable this option.
Menu and window animation
Enables you to animate the
movement of windows,
menus, and lists.
Select the Menu and window
animation check box to enable
this option.
55Copyright © 2010, Juniper Networks, Inc.
Page 74

Configuring Secure Access Devices Guide
Table 12: User Role Terminal Services Configuration Details (continued)
Bitmap Caching
Allows you to improve
performanceby minimizing the
amount of display information
that is passed over a
connection.
Your ActionFunctionOption
Select the Bitmap Caching
check box to enable this
option.
Desktop Composition (RDP
6.0 onwards)
Show contents of window
while dragging
Themes
Font smoothing (RDP 6.0
onwards)
Allows you to make text
smoother and easier to read.
This option only works on
Windows Vista computers
running RDP clients that are
version 6.0 or later.
Specifies the contents of the
Internet Explorer window while
users move the windows on
their desktops.
Allows users to set Windows
themes in their terminal server
windows.
Allows users to make text
smoother and easier to read.
This option only works on
Windows Vista computers
running RDP clients that are
version 6.0 or later.
Select the Desktop
Composition (RDP 6.0
onwards) check box to enable
this option.
Select the Show contents of
window while dragging check
box to enable this option.
Select the Show contents of
window while dragging check
box to enable this option.
Select the Font smoothing
(RDP 6.0 onwards) check box
`to enable this option.
Terminal Services > Terminal Services Sessions > Type > Citrix using default ICA file >
Settings tab
Username
Specifies the username that
the Secure Access device
should pass to the terminal
server.
Enter a static username or a
variable.
Password Type
Variable Password
Explicit Password
Terminal Services > Terminal Services Sessions > Type > Citrix using default ICA file >
Connection tab
Allows you to specify a static
password or select a variable
password.
password that the Secure
Accessdevice uses to validate
sign-in credentials.
password that the Secure
Accessdevice uses to validate
sign-in credentials.
Copyright © 2010, Juniper Networks, Inc.56
Select either Variable
Password or Explicit
Password.
Enter the variable password.Specifies the SSO variable
Enter the static password.Specifies the static SSO
Page 75

Chapter 7: Configuring Terminal Services Using Remote Access Mechanism
Table 12: User Role Terminal Services Configuration Details (continued)
Your ActionFunctionOption
Host
Specifies the hostname or IP
address of the Metaframe
terminal server.
Enter the hostname or IP
address.
Client Port
Server Port
Screen Size
Color Depth
which the user client
communicates to the terminal
server.
which the terminal server
listens to the user client.
Allows you to change the size
of the terminal services
window on the user’s
workstation. (By default, the
Secure Access device sets the
window size to full screen.)
Allows you to change the
color-depth of the terminal
session data. (By default, the
Secure Access device sets the
color depth to 8-bit.)
Enter the client port.Specify the client port on
Enter the server port.Specifies the server port on
Select Full Screen, 800x600,
1024x768, or 1280x1024 from
the drop–down list.
Select 8-bit, 15-bit, 16-bit,
24-bit, or 32-bit (True Color)
from the drop–down list.
Terminal Services > Terminal Services Sessions > Type > Citrix using default ICA file >
Start Application tab
Path to application
application’s executable file
resides on the terminal server.
Enter the path.Specifies where the
Working directory
Terminal Services > Terminal Services Sessions > Type > Citrix using default ICA file >
Session Reliability tab > Connect Devices tab
Connect drives
Connect printers
Connect COM Ports
Terminal Services > Terminal Services Sessions > Type > Citrix using default ICA file >
Session Reliability tab
server should place working
files for the application.
Allows user to access local
drives through the terminal
session.
Allows user to access local
printers through the terminal
session.
Allows user to access local
COM ports through the
terminal session.
Enter the path.Specifies where the terminal
Select the Connect drives
check box to enable this
feature.
Select the Connect printers
check box to enable this
feature.
Selectthe Connect COM Ports
check box to enable this
feature.
57Copyright © 2010, Juniper Networks, Inc.
Page 76

Configuring Secure Access Devices Guide
Table 12: User Role Terminal Services Configuration Details (continued)
Session Reliability and
Auto-client reconnect
Allows active ICA sessions to
remain on the user's screen
when network connectivity is
interrupted.
Your ActionFunctionOption
Select the Session Reliability
and Auto-client reconnect
check box to enable this
feature.
Port to be enabled
use.
Enter the port number.Allows you to enter the port to
Terminal Services > Terminal Services Sessions tab > Type > Citrix using custom ICA file
Username
Password Type
Variable Password
Explicit Password
Custom ICA File
the resource profile. (This
name becomes the default
session bookmark’s name.)
Allows you to specify a static
password or select a variable
password.
password that the Secure
Accessdevice uses to validate
sign-in credentials.
password that the Secure
Accessdevice uses to validate
sign-in credentials.
Allows you to specify the ICA
file that contains the session
parameters that you want use
in the Custom ICA File box.
Note that you may download
and customize the following
ICA files from the Secure
Access device.
Enter the username.Specifies a unique name for
Select either Variable
Password or Explicit
Password.
Enter the variable password.Specifies the SSO variable
Enter the static password.Specifies the explicit SSO
Enter the ICA file or Click
Browseand selectthe ICA File.
Terminal Services > Options > Citrix Delivery tab
Enter a name.Specifies the ICA filename.Custom ICA Filename
Copyright © 2010, Juniper Networks, Inc.58
Page 77

Chapter 7: Configuring Terminal Services Using Remote Access Mechanism
Table 12: User Role Terminal Services Configuration Details (continued)
Your ActionFunctionOption
Citrix Client Delivery Method
Enables you to specify where
the Secure Access device
should obtain the ICA client to
download to users’ systems.
Select one of the following
from the drop-down list:
•
Downloadedfrom the Citrix
web site— The Secure
Access device installs the
latest version of the ICA
client from the Citrix Web
site.
•
Downloaded from the
Secure Gateway—Use the
Browse button to browse to
the ICA client on your local
network.
•
Downloaded from a
URL—The Secure Access
device installs the ICA client
of your choice from the
specified Web site. You
must also specify the exact
version number of the ICA
client.
Citrix Client Download URL
fetch the Citrix Client.
NOTE: The Citrix Client
Download and Citrix Client
Download Version boxes are
displayedonly when you select
Downloaded from a URL
option from the Citrix Client
Delivery Method drop-down
list.
Citrix Client Download Version
download.
Terminal Services > Options > User Permissions tab
User can add sessions
Enables users to define their
own terminal session
bookmarks and to enable
users to access terminal
servers through the Secure
Access device browse bar on
the Secure Access device
home page.
Users can connect drives
Enables user to create
bookmarks that connect their
local drives to the terminal
server, enabling users to copy
information from the terminal
server to their local client
directories.
Enter the URL.Specifies the URL used to
Enter the version.Specifies the version to
Select the User can add
sessions check box to enable
this option.
Select the Users can connect
drives check box to enable this
option.
59Copyright © 2010, Juniper Networks, Inc.
Page 78

Configuring Secure Access Devices Guide
Table 12: User Role Terminal Services Configuration Details (continued)
User can connect COM ports
Enables users to create
bookmarks that connect their
COM ports to the terminal
server, allowing
communication between the
terminal server and the
devices on their serial ports.
Your ActionFunctionOption
Select the User can connect
COM ports check box to
enable this option.
User can connect printers
Allow clipboard Sharing
User can connect smart cards
User can connect sound
devices
Enables users to create
bookmarks that connect their
local printers to the terminal
server, enabling users to print
information from the terminal
server to their printers.
Enables users to create
bookmarks that share the
contents of the clipboard
between the user’s host
computer and the terminal
server.
Allowsusers to use smart card
readers connected to their
systemfor authenticating their
remote desktop session.
Allows users to redirect audio
from the remote desktop
session to their local system.
Terminal Services > Options > Experience Options tab
Desktop background
Displays your current
wallpaper setting.
Select the User can connect
printers check box to enable
this option.
Select the Allow Clipboard
Sharing check box to enable
this option.
Select the User can connect
smart cards check box to
enable this option.
Select the User can connect
sound devices check box to
enable this option.
Select the Desktop
background check box to
enable this option.
Menu and window animation
Bitmap Caching
Desktop Composition (RDP
6.0 onwards)
Allows you to animate the
movement of windows,
menus, and lists.
Allows you to Improve the
performanceby minimizing the
amount of display information
that must be passed over a
connection.
Specifies that the drawing is
redirected to video memory,
which is then rendered into a
desktop image.
Copyright © 2010, Juniper Networks, Inc.60
Select the Menu and window
animation check box to enable
this option.
Select the Bitmap Caching
check box to enable this
option.
Select the Desktop
Composition (RDP 6.0
onwards) check box to enable
this option.
Page 79

Chapter 7: Configuring Terminal Services Using Remote Access Mechanism
Table 12: User Role Terminal Services Configuration Details (continued)
Your ActionFunctionOption
Show contents of window
while dragging
Specifies the contents of the
Internet Explorer window while
moving the window around
your desktop.
Select the Show contents of
window while dragging check
box to enable this option.
Themes
Font smoothing (RDP 6.0
onwards)
Related
Documentation
Terminal Services User Experience on page 61•
• Terminal Services Execution on page 62
Terminal Services User Experience
From an enduser perspective, accessing secured terminal services resources through the
Secure Access device is simple. When you enable the Terminal Services feature for a
user role, the enduser needs to perform the following tasks as described in Table 13 on
page 61.
Table 13: Terminal Services User Experience
Your ActionOptions
Specify the resource that
the user wants to access
Click a link to enter the required resource or enter the resource in the device browse bar. Or,
Alternatively, enable auto-launch for a bookmark and the device automatically launches the
resource when you sign in to the device.
AllowsWindowsthemes to be
set in the terminal server
window.
Allows you to read the text
smoother and easier. This
option only works on Windows
Vista computers running RDP
clients that are version 6.0 or
later.
Select the Themes check box
to enable this option.
Select the Font Smoothing
(RDP 6.0 onwards) check box
to enable this option.
Enter credentials for the
resource
Access a resource so that the device prompts to enter the username and password (if required
by the resource). Alternatively, enable SSO and the device automatically sends this information
to the resource without prompting for username and password. Once the resource verifies the
credentials, the device launches the resource.
61Copyright © 2010, Juniper Networks, Inc.
Page 80

Configuring Secure Access Devices Guide
NOTE: The following options in the New Terminal Services Sessions window
do not apply to remote desktops launched in the following order:
•
Client port
•
Authentication settings
•
Start application settings
•
Connect Devices settings
•
Display Settings
Related
Documentation
Terminal Services Execution on page 62•
• Configuring Terminal Services on a Secure Access Device User Role (NSM Procedure)
on page 52
Terminal Services Execution
When a user tries to access a terminal services resource, the device completes the steps
in the page to initiate and intermediate the terminal services session as described in
Table 14 on page 62.
Table 14: Terminal Services User Experience
Your ActionOptions
The device checks for a Java
client
If necessary, the device
checks for a Windows client
(Citrix only)
Ensure that you have an RDP client on the system (to access a Windows terminal server) or an
ICA client (to access a Citrix Metaframe server or server farm). This enables a terminal service
session. The RDP clients come in both Windows and Java versions and enables you to run an
application on the server while only transmitting keyboard, mouse, and display information over
the network.
The device enables to upload a Java version of the RDP or ICA client through a terminal service
resource profile (but not role). If you have uploaded a client to the device and specified that the
device always use it to run your users’ terminal sessions, the device launches the specified Java
client.
Ensure that you have uploaded a Java client to the device, else the device checks for a Windows
version of the ICA client. If the device cannot find a Windows ICA client, it installs the version you
specified in the Users > User Roles > Role >Terminal Services > Options page.
The device checks for the
terminal services proxy
The proxy tries to invoke the
Windows client
Ensure that you have a Juniper Windows Terminal Services proxy on your system or a Juniper
Networks Citrix Terminal Services proxy, to intermediate a Windows or Citrix session. The device
checks for the appropriate proxyon the user’s computer,and if it cannot find it, the system installs
a new one. Depending on the user’s rights, the device either uses an ActiveX component or Java
component to install the proxy.
Ensure that the device has confirmed that a proxyis installed on the user’s computer. This enables
the proxy to attempt to invoke the Windows RDP or ICA client. If successful, the client initiates
the user’s terminal services session and the proxy intermediates the session traffic.
Copyright © 2010, Juniper Networks, Inc.62
Page 81

Chapter 7: Configuring Terminal Services Using Remote Access Mechanism
Table 14: Terminal Services User Experience (continued)
Your ActionOptions
The proxy tries to invoke the
Java client
Ensure that you have uploaded a Windows client to the device through the terminal services
resource profile. If the Windows client is not present on the user’s machine (for instance, because
it was deleted or because the user does not have the proper privileges to install it), the device
uses the uploaded Java applet to launch the session.
As part of the installation, the device prompts you whether if the you want to always use the Java
client or only for this session. The device then stores the user’s preference as a persistent cookie.
Once the Java client is installed, the client initiates the user’s terminal services session and the
proxy intermediates the session traffic.
NOTE: The following options in the New Terminal Services Sessions window
do not apply to remote desktops launched in the following order:
•
Client port
•
Authentication settings
Related
Documentation
•
Start application settings
•
Connect Devices settings
•
Display Settings
• Terminal Services User Experience on page 61
• Configuring Terminal Services on a Secure Access Device User Role (NSM Procedure)
on page 52
63Copyright © 2010, Juniper Networks, Inc.
Page 82

Configuring Secure Access Devices Guide
Copyright © 2010, Juniper Networks, Inc.64
Page 83

CHAPTER 8
Configuring Access Options using Remote
Access Mechanisms
•
Configuring Access Options using Remote Access Mechanisms Overview on page 65
•
Configuring File Rewriting on a Secure Access Device User Role (NSM
Procedure) on page 66
•
Configuring Network Connect on a Secure Access Device User Role (NSM
Procedure) on page 69
•
Configuring Secure Application Manager on a Secure Access Device User Role (NSM
Procedure) on page 74
•
Configuring Secure Meeting on a Secure Access Device User Role (NSM
Procedure) on page 79
•
Configuring Web Rewriting on a Secure Access Device User Role (NSM
Procedure) on page 84
•
Configuring Telnet/SSH on a Secure Access Device User Role (NSM
Procedure) on page 90
Configuring Access Options using Remote Access Mechanisms Overview
This chapter contains the following information about configuring access in NSM to
various applications, servers, and other resources using remote access mechanisms..
When you enable an access feature, make sure to createcorresponding resource policies.
To enable access features See “Configuring Secure Access Device User Roles (NSM
Procedure).”
For instance, if you want to secure access to Microsoft Outlook, you can use the Secure
Application Manager (SAM). The Secure Application Manager intermediates traffic to
client/server applications including Microsoft Outlook, Lotus Notes, and Citrix. Or, if you
want to secure access to your company Intranet, you can use the Web rewriting feature.
This feature uses the Secure Access devices Content Intermediation Engine to
intermediate traffic to Web-based applications and Web pages.
However, you can only access features through a user role if you are licensed for the
feature. For instance, if you are using an SA-700 appliance and have not purchased a
Core Clientless Access upgrade license, you cannot enable Web rewriting for a user role.
65Copyright © 2010, Juniper Networks, Inc.
Page 84

Configuring Secure Access Devices Guide
This chapter contains the following information about the access options using remote
mechanisms in NSM:
•
Configuring File Rewriting on a Secure Access Device User Role (NSM Procedure) on
page 66
•
Configuring Network Connect on a Secure Access Device User Role (NSM Procedure)
on page 69
•
Configuring Secure Application Manager on a Secure Access Device User Role (NSM
Procedure) on page 74
•
Configuring Secure Meeting on a Secure Access Device User Role (NSM Procedure)
on page 79
•
Configuring Web Rewriting on a Secure Access Device User Role (NSM Procedure) on
page 84
•
Configuring Telnet/SSH on a Secure Access Device User Role (NSM Procedure) on
page 90
Related
Documentation
Configuring File Rewriting on a Secure Access Device User Role (NSM Procedure) on
•
page 66
• Configuring Network Connect on a Secure Access Device User Role (NSM Procedure)
on page 69
Configuring File Rewriting on a Secure Access Device User Role (NSM Procedure)
A file resource profile controls access to resources on Windows server shares or UNIX
servers.
To configure file rewriting on a user role:
1. In the navigation tree, select Device Manager > Devices. Click the Device Tree tab,
and then double-click the Secure Access device for which you want to configure a file
rewriting option.
2. Click the Configuration tab. Select Users > User Roles.
3. Click the New button. The New dialog box appears.
4. Add or modify settings as specified in Table 15 on page 66.
5. Click one:
•
OK—Saves the changes.
•
Cancel—Cancels the modifications.
Table 15: User Role File Rewriting Configuration Details
Files > File Bookmarks > Windows Bookmarks tab
Your ActionFunctionOption
Copyright © 2010, Juniper Networks, Inc.66
Page 85

Chapter 8: Configuring Access Options using Remote Access Mechanisms
Table 15: User Role File Rewriting Configuration Details (continued)
Your ActionFunctionOption
Name
for the device's home page.
Enter a name.Specifies the bookmark name
Description
Server
Share
Path
Appearance
the device's home page
bookmark.
Specifies the server name for
the bookmark.
the bookmark.
restricting access.
Specifies the bookmark on a
user’s welcome page and
when browsing network files.
Enter a description.Specifies the description for
Enter the server hostname or
IP address.
Enter the share name.Specifies the share name for
Enter the path.Specifies the path for
Select an appearance option
from the drop–down list:
•
Appear as bookmark on
home and file
browsing—The bookmark
appears both on a user’s
welcome page and when
browsing network files.
•
Appear in file browsing
only—The bookmark
appears only when browsing
network files.
Files > File Bookmarks > Unix Bookmarks tab
Name
page name of the bookmark.
Description
page description of the
bookmark.
Server
Path
Specifies the server name for
the bookmark.
Specifies the path for the
restricting access.
Enter a name.Specifies the device home
Enter a description.Specifies the device home
Enter the server hostname or
IP address.
Enter the path to further
restrict access.
67Copyright © 2010, Juniper Networks, Inc.
Page 86

Configuring Secure Access Devices Guide
Table 15: User Role File Rewriting Configuration Details (continued)
Appearance
Files > Windows network files options tab
User can browse network file
shares
Specifies the bookmark on a
user’s welcome page and
when browsing network files.
Allows users to browse
network file shares.
Your ActionFunctionOption
Select an appearance option
from the drop–down list:
•
Appear as bookmark on
home and file
browsing—The bookmark
appears both on a user’s
welcome page and when
browsing network files.
•
Appear in file browsing
only—The bookmark
appears only when browsing
network files.
Select the User can browse
network file shares check box
to enable this feature.
Related
Documentation
Users can add bookmarks
Allows users to view and
createbookmarks to resources
on available Windows file
shares.
Select the Users can add
bookmarks check box to
enable this feature.
Files > Unix network files options tab
User can browse network file
shares
User can add bookmarks
Allow automount shares
Configuring Network Connect on a Secure Access Device User Role (NSM Procedure)
•
Allows users to view and
createbookmarks to resources
on available UNIX file shares.
Allowsusers to add and create
bookmarks to resources on
available UNIX file shares.
Allows users access to
automount shares specified
on an NIS server.
Select the User can browse
network file shares check box
to enable this feature.
Select the User can add
bookmarks check box to
enable this feature.
Select the Allow automount
shares check box to enable
this feature.
on page 69
• Configuring Secure Application Manager on a Secure Access Device User Role (NSM
Procedure) on page 74
Copyright © 2010, Juniper Networks, Inc.68
Page 87

Chapter 8: Configuring Access Options using Remote Access Mechanisms
Configuring Network Connect on a Secure Access Device User Role (NSM Procedure)
The Network Connect option provides secure, SSL-based network-level remote access
to all enterprise application resources using the Secure Access device over port 443.
To configure network connect on a user role:
1. In the navigation tree, select Device Manager > Devices. Click the Device Tree tab,
and then double-click the Secure Access device for which you want to configure a
user-role access option.
2. Click the Configuration tab. Select Users > User Roles.
3. Click the New button. The New dialog box appears.
4. Add or modify settings as specified in Table 16 on page 69.
5. Click one:
•
OK—Saves the changes.
•
Cancel—Cancels the modifications.
Table 16: User Role Network Connect Configuration Details
Your ActionFunctionOption
Network Connect tab
69Copyright © 2010, Juniper Networks, Inc.
Page 88

Configuring Secure Access Devices Guide
Table 16: User Role Network Connect Configuration Details (continued)
Split Tunneling Modes
Your ActionFunctionOption
Allows you to enable split
tunneling.
Copyright © 2010, Juniper Networks, Inc.70
Page 89

Chapter 8: Configuring Access Options using Remote Access Mechanisms
Table 16: User Role Network Connect Configuration Details (continued)
Your ActionFunctionOption
Select one of the following
options from the drop-down
list:
•
Disable Split
Tunneling—When Network
Connect successfully
establishes a connection to
the Secure Access device,
the device removes any
predefined local (client)
subnet and host-to-host
routes that might cause
split-tunneling behavior. If
any changes are made to
the client’s route table
during an active Network
Connectsession, the Secure
Access device terminates
the session.
•
Allow access to local
subnet—The Secure Access
device preserves the route
on the client, retaining
access to local resources
such as printers. If needed,
you can add entries to the
client’s route table during
the Network Connect
session. The Secure Access
device does not terminate
the session. This is the
default option.
•
Enable Split
Tunneling—This option
activatessplit-tunneling and
requires you to specify the
network IP
address/netmask
combinations. For the
specified network IP
address/netmask
combinations, the Secure
Access device handles
traffic passed between the
remote client and the
corporate intranet.
•
Enable Split Tunnelingwith
route change monitor—
This option retains access
to local resources such as
printers.
•
Enable Split Tunnelingwith
allowed access to local
subnet—This option
activatessplit-tunneling and
71Copyright © 2010, Juniper Networks, Inc.
Page 90

Configuring Secure Access Devices Guide
Table 16: User Role Network Connect Configuration Details (continued)
Your ActionFunctionOption
preserves the route on the
client, retaining access to
local resources such as
printers.
Auto-launchNetworkConnect
Auto-Uninstall Network
Connect
Enable TOS Bits Copy
Multicast
Install GINA with Network
Connect
Specifies whether or not
Network Connect
automatically launches when
an authenticated usermaps to
one or more roles that enable
Network Connect sessions.
Specifies whether or not
Network Connect uninstalls
itself from the remote client
when a user signs-out of the
Network Connect session.
Specifies that Network
Connect to copy IP TOS bits
from the inner IP packet
header to the outer IP packet
header.
Specifies whether or not you
want Network Connect to
operate in multicast mode.
Additionally installs GINA on a
client system when you install
Network Connect.
Select the Auto-Launch
Network Connect check box
to enable this feature.
Select the Auto-Uninstall
Network Connect check box
to enable this feature.
Select the Enable TOS Bits
Copy check box to enable this
feature.
Selectthe Multicast check box
to enable this feature.
Select the Install GINA with
Network Connect check box
to enable this feature.
GINA Options
Specifies whether or not to
enable GINA installation for a
role and specifies the GINA
sign-in behavior.
Select one of the following
options from the drop-down
list:
•
Require NC to start when
logging into Windows
(Note that this may require
a reboot when NC is
installed)—Automatically
launches the Network
Connect sign-in function at
every Windows user sign-in.
•
Allow user to decide
whether to start NC when
logging into
Windows—Allows the user
to determine, at each
Windows startup, whether
or not to launch Network
Connect after GINA
installation.
Copyright © 2010, Juniper Networks, Inc.72
Page 91

Chapter 8: Configuring Access Options using Remote Access Mechanisms
Table 16: User Role Network Connect Configuration Details (continued)
Your ActionFunctionOption
Windows: Session start script
location
Network Connect start scripts
for Windows.
Enter the start script location.Specifies the location of
Windows: Session end script
location
Skip if GINA Enabled
Linux: Session start script
location
Linux: Session end script
location
Mac: Session start script
location
Mac: Session end script
location
Network Connect end scripts
for Windows.
Bypasses the specified
Windows session start script.
The sign-in script may be
identical to the specified
Network Connect start script.
This feature avoids executing
the same script twice.
Network Connect start scripts
for Linux.
Network Connect end scripts
for Linux.
Network Connect start scripts
for Macintosh.
Network Connect end scripts
for Macintosh.
Enter the end script location.Specifies the location of
Select the Skip if GINA
enabled check box to enable
this feature.
Enter the start script location.Specifies the location of
Enter the end script location.Specifies the location of
Enter the start script location.Specifies the location of
Enter the end script location.Specifies the location of
Related
Documentation
Configuring Secure Application Manager on a Secure Access Device User Role (NSM
•
Procedure) on page 74
• Configuring Secure Meeting on a Secure Access Device User Role (NSM Procedure)
on page 79
73Copyright © 2010, Juniper Networks, Inc.
Page 92

Configuring Secure Access Devices Guide
Configuring Secure Application Manager on a Secure Access Device User Role (NSM
Procedure)
The Secure Application Manager (SAM) option provides secure,application-levelremote
access to enterprise servers from client applications.
To configure SAM option on the user role:
1. In the navigation tree, select Device Manager > Devices. Click the Device Tree tab,
and then double-click the Secure Access device for which you want to configure a
Secure Application Manager on a user-role access option.
2. Click the configuration tab. Select Users > User Roles.
3. Click the New button. The New Dialog box appears.
4. Add or modify settings as specified in Table 17 on page 74.
5. Click one:
•
OK—Saves the changes.
•
Cancel—Cancels the modifications.
Table 17: User Role SAM Configuration Details
SAM > JSAM Applications tab
Name
Description
Type
Type > Custom
Server Hostname or IP
Displaysthe application name
in the Client Application
Sessions area of the Secure
Access device end-user home
page.
Client Application Sessions
area of the Secure Access
device end-user home page.
Specifies the applications for
which JSAM secures traffic.
Specifies the DNS name of the
server or the server IP address.
Your ActionFunctionOption
Enter the name of the
application.
Enter the description.Displays the description in the
Select one of the following
option Custom, Citrix NFuse,
Lotus Notes, Microsoft
Outlook/Exchange, NetBIOS
file browsing from the
drop–down list.
Enter the DNS name or the IP
address.
Server Port
Enter the port number.Specifies the port on which the
remote server listens for client
connections.
Copyright © 2010, Juniper Networks, Inc.74
Page 93

Chapter 8: Configuring Access Options using Remote Access Mechanisms
Table 17: User Role SAM Configuration Details (continued)
Your ActionFunctionOption
Localhost IP
Specifies a static address for
JSAM to listen on loopback
address for client requests to
network application servers.
Enter a static loopback
address.
Client Port
JSAM should listen for client
application connections.
Allow Secure Application
Manager to dynamically select
an available port if the
specified client port is taken
Allows JSAM to select an
available port when the client
port you specify is taken.
Type > Citrix NFuse
Maximum Citrix Sessions
number of client sessions.
New Allowed Citrix Ports
the Metaframe servers listen.
Type > Microsoft Outlook/Exchange
New Application Servers
servers for client application
connections.
Type > NetBIOS file browsing
New Application Servers
servers for client application
connections.
Enter the port number.Specifies the port on which
Select the Allow Secure
Application Manager to
dynamically select an
available port if the specified
client port is taken check box
to enable this feature.
Enter the number.Specifies the maximum
Enter the port number.Specifies the ports on which
Enter the server name.Specifies the application
Enter the server name.Specifies the application
SAM > WSAM Applications tab
Name
Description
Applications
Displaysthe application name
in the Client Application
Sessions area of the Secure
Access device end-user home
page.
Client Application Sessions
area of the Secure Access
device end-user home page.
Specifies the applications for
which WSAM secures traffic.
Enter the name of the
application.
Enter the description.Displays the description in the
Select one of the following
option Citrix, Lotus Notes,
Microsoft Outlook/Exchange,
NetBIOS file browsing or
Customfrom the Applications
drop–down list.
75Copyright © 2010, Juniper Networks, Inc.
Page 94

Configuring Secure Access Devices Guide
Table 17: User Role SAM Configuration Details (continued)
SAM > WSAM Allowed Servers tab
Name
Displaysthe application name
in the Client Application
Sessions area of the Secure
Access device end-user home
page.
Your ActionFunctionOption
Enter the name of the
application.
Description
Client Application Sessions
area of the Secure Access
device end-user home page.
Server
server’s hostname (the wild
cards '*' or '?' are accepted)
or an IP/netmask pair.
Ports
ports for a host as separate
entries.
SAM > WSAM Bypass Applications tab
Name
Description
Displaysthe application name
in the Client Application
Sessions area of the Secure
Access device in the end-user
home page.
Client Application Sessions
area of the Secure Access
device in the end-user home
page.
Enter the description.Displays the description in the
Enter the server’s hostname.Allows you to specify the
Enter the port numbers.Allows you to specify multiple
Enter the name of the
application.
Enter the description.Displays the description in the
Application
Path
SAM tab > Options tab
Enter the application name.Specifies the application for
which WSAM client does not
secure traffic.
Enter the path.Allows you to provide an
absolute path to the
application.
Copyright © 2010, Juniper Networks, Inc.76
Page 95

Chapter 8: Configuring Access Options using Remote Access Mechanisms
Table 17: User Role SAM Configuration Details (continued)
Your ActionFunctionOption
Auto-launch Secure
Application Manager
Enables the Secure Access
device to automatically launch
the Secure Application
Manager when a user signs in.
If you do not select this option,
users must manually start the
Secure Application Manager
from the Client Applications
Sessions Area of the Secure
Access device end-user home
page.
Selectthe Auto-launch Secure
Application Manager check
box to enable this feature.
Auto-uninstall Secure
Application Manager
Prompt for username and
password for intranet sites
Auto-upgrade Secure
Application Manager
Enables the Secure Access
device to automatically
uninstall the Secure
ApplicationManager after user
signs off.
Allows the Secure Access
device to prompt users to
enter their sign-in credentials
before connecting to sites on
their internal network. This
option changes Internet
Explorer’sintranet zone setting
so that Internet Explorer
prompts the user for network
sign-in credentials whenever
the user wants to access an
intranet site.
Enables the Secure Access
device to automatically
download the Secure
Application Manager to a
client machine when the
version of Secure Application
Manager on the Secure Access
device is newer than the
version installed on the client.
Select the Auto-uninstall
Secure Application Manager
check box to enable this
feature.
Select the Prompt for
username and password for
intranet sites check box to
enable this feature.
Select the Auto-upgrade
Secure Application Manager
check box to enable this
feature.
Session start script
Session end script
Enables the Secure Access
device to run a batch,
application, or Win32 service
file when the WSAM session
starts.
Enables the Secure Access
device to run a batch,
application, or Win32 service
file when the WSAM session
ends.
Enter the name and path for
the file.
Enter the name and path for
the file.
77Copyright © 2010, Juniper Networks, Inc.
Page 96

Configuring Secure Access Devices Guide
Table 17: User Role SAM Configuration Details (continued)
User can add applications
Enables user to add
applications.
Your ActionFunctionOption
Select the User can add
applications check box to
enable this feature.
Automatic host-mapping
Skip web-proxy registry check
Auto-close JSAM window on
sign-out
Allows the Secure Application
Manager to edit the Windows
PC hosts file and replaces
entries of Windowsapplication
servers with localhost. These
entries are changed back to
the original data when a user
closes the Secure Application
Manager.
Does not have JSAM check a
user's registry for a Web proxy.
Some users do not have
permissions to look at their
registries. If JSAM tries to look
at their registries, then users
see an error that they do not
have permission. This option
ensures that users do not see
this message.
Enables JSAM to
automatically close when a
user signs out of the Secure
Access device by clicking Sign
Out in the Secure Access
device browser window. JSAM
continues to run if the user
simply closes the browser
window.
Select the Automatic
host-mapping check box to
enable this feature.
Select the Skip web-proxy
registry check check box to
enable this feature.
Select the Auto-close JSAM
window on sign-out check box
to enable this feature.
Related
Documentation
Configuring Secure Meeting on a Secure Access Device User Role (NSM Procedure)
•
on page 79
• Configuring Terminal Services on a Secure Access Device User Role (NSM Procedure)
on page 52
• Configuring WSAM Resource Profile (NSM Procedure) on page 131
Copyright © 2010, Juniper Networks, Inc.78
Page 97

Chapter 8: Configuring Access Options using Remote Access Mechanisms
Configuring Secure Meeting on a Secure Access Device User Role (NSM Procedure)
Secure Meeting allows Secure Access device users to securely schedule and hold online
meetings among Secure Access device users and non-Secure Access device users. In
meetings, users can share their desktops and applications with one another over a secure
connection, allowing everyone in the meeting to instantaneously share electronic data
onscreen. Meeting attendees can also securely collaborate online by remote-controlling
one another's desktops and through text chatting using a separate application window
that does not interfere with the presentation.
To configure secure meeting on a user role:
1. In the navigation tree, select Device Manager > Devices. Click the Device Tree tab,
and then double-click the Secure Access device for which you want to configure secure
meeting on a user role.
2. Click the Configuration tab. Select Users > User Roles.
3. Click the New button. The New dialog box appears.
4. Add or modify settings as specified in Table 18 on page 79.
5. Click one:
•
OK—Saves the changes.
•
Cancel—Cancels the modifications.
Table 18: User Role Secure Meeting Configuration Details
Your ActionFunctionOption
Meetings > Options > Meeting Types tab
User cannot create meetings
Meeting Types
Disablesmeeting creation and
scheduling.
NOTE: User can join the
invited meetings even if you
enable this option.
Specifies the type of meeting
you want to provide users.
Select the User cannot create
meetings check box to enable
this feature.
Select one of the following
options from the drop-down
list:
•
MySecureMeeting (users
have a personal meeting
URL)—Allows users to
create personal meetings
without having to schedule
them ahead of time.
•
Standard meetings (users
can create scheduled
meetings)— Allows users to
create scheduled meetings
through the Meetings tab.
79Copyright © 2010, Juniper Networks, Inc.
Page 98

Configuring Secure Access Devices Guide
Table 18: User Role Secure Meeting Configuration Details (continued)
Users can create Scheduled
meetings
Allows users to create
scheduled meetings.
Your ActionFunctionOption
Select the Users can create
Scheduled meetings check
box to enable this feature.
Users can create Instant
meetings
Users can create Support
meetings
Users can create additional
meeting URLs under their
Allows users to create instant
meetings.
Allows users to create
two-personsupport meetings.
Allows users to create an
additional meetingID.
personal URL
Meetings > Options > Meeting Options tab
Authentication Requirements
Specifies the authentication
restrictions that you want
users to apply to the meetings
that they create.
Selectthe Meetings > Options
> Meeting Types > Users can
createInstant meetings check
box to enable this feature.
Selectthe Meetings > Options
> Meeting Types > Users can
create Support meetings
check box to enable this
feature.
Selectthe Meetings > Options
> Meeting Types > Users can
create additional meeting
URLs under their personal
URL check box to enable this
feature.
Select one of the following
types from the drop-down list:
•
Meeting password optional
(more accessible)—Allows
the meeting creator to
decide whether or not the
meeting requires a
password to join.
•
Require meeting password
(more secure)—Requires
the meeting creatorto either
create a meeting password
or use the one generated by
Secure Meeting.
•
Require server-generated
password (even more
secure)—Requires the
meeting creator to use the
password generated by
Secure Meeting.
•
Require secure gateway
authentication (most
secure)—Allows only invited
users authenticated against
the Secure Access device
secure gateway to attend
the meetings.
Copyright © 2010, Juniper Networks, Inc.80
Page 99

Chapter 8: Configuring Access Options using Remote Access Mechanisms
Table 18: User Role Secure Meeting Configuration Details (continued)
Your ActionFunctionOption
Password Distribution
Specifies the distribution
method that you want
meeting creators to employ.
Select one of the following
options from the drop-down
list:
•
Do not display the
passwordin the notification
email (more
secure)—Requires that
meeting creators manually
distribute the meeting
password to invitees.
•
Displaythe passwordin the
notification email (more
accessible)—Automatically
distributes the meeting
password in the e-mail
notification sent by Secure
Meeting and displays the
Secure Meeting tab in
Microsoft Outlook calendar
entries.
•
Allow the meeting creator
to decide—Allows meeting
creator to determine
whether or not Secure
Meeting and Microsoft
Outlook should
automatically distribute the
meeting password to
meeting invitees.
Attendee Names
Specifies whether you want
Secure Meeting to display the
names of attendees during a
meeting.
Select one of the following
options from the drop-down
list:
•
Do not allow hiding of
attendee names—Always
displays the names of
meeting attendees.
•
Allow meeting creator to
hide attendee
names—Allows the meeting
creatorto decide whether or
not to display the names of
meeting attendees.
•
Hide attendee
names—Always hides the
names of meeting
attendees.
NOTE: When you select this
option, Secure Meeting still
exposes the names of the
meeting conductor and
presenter to other meeting
attendees.
81Copyright © 2010, Juniper Networks, Inc.
Page 100

Configuring Secure Access Devices Guide
Table 18: User Role Secure Meeting Configuration Details (continued)
Secure Chat
Specifies whether or not you
want to allow users to chat
during their meetings.
Your ActionFunctionOption
Select one of the following
options from the drop-down
list:
•
Allow secure chat (more
functional)—Enables
chatting in the meetings that
are created by users who
map to this role.
•
Disable secure chat (more
secure)—Disables chatting
in the meetings that are
created by users who map
to this role.
NOTE: If you change this
setting while a meeting is in
progress (that is, after any user
has joined the meeting),
SecureMeeting does not apply
the modified setting to the
in-progress meeting.
Allow users to download
Secure Meeting for Outlook
Plugin
Minimum length (characters)
Maximum length (character)
Password must have one or
more digits
Password must have one or
more letters
Password must have mix of
UPPERCASE and lowercase
letters
Password must be different
from username
Allows users to schedule
secure meetings through
Microsoft Outlook.
Allowsyou to set the minimum
character length for
passwords.
Allows you to set the
maximum character length for
passwords.
Requires passwords to have
at least one digit.
Requires passwords to have
at least one letter.
Requires all passwords to
contain a mixture of upperand lowercase letters.
Requires that the password
cannot equal the username.
Select the Allow users to
download Secure Meeting for
Outlook Plugin check box to
enable this feature.
Set the minimum character
length for passwords.
Set the maximum character
length for passwords.
Select the Password must
have one or more digits check
box to enable this feature.
Select the Password must
haveone or more letters check
box to enable this feature.
Select the Password must
have mix of UPPERCASE and
lowercase letters check box
to enable this feature.
Select the Password must be
different from username
check box to enable this
feature.
Copyright © 2010, Juniper Networks, Inc.82
 Loading...