

NETWORK AND SECURITY MANAGER 2010.4 - CONFIGURING INTRUSION DETECTION PREVENTION DEVICES GUIDE REV 01
Juniper NETWORK AND SECURITY MANAGER 2010.4 - CONFIGURING INTRUSION DETECTION PREVENTION DEVICES GUIDE REV 01 User Manual
Page 1

Network and Security
Manager
Configuring Intrusion Detection and Prevention
Devices Guide
Release
2010.4
Published: 2010-11-17
Revision 01
Copyright © 2010, Juniper Networks, Inc.
Page 2

Juniper Networks, Inc.
1194 North Mathilda Avenue
Sunnyvale, California 94089
USA
408-745-2000
www.juniper.net
This product includes the EnvoySNMP Engine, developed by Epilogue Technology, an Integrated Systems Company. Copyright © 1986-1997,
Epilogue Technology Corporation. All rights reserved. This program and its documentation were developed at private expense, and no part
of them is in the public domain.
This product includes memory allocation software developed by Mark Moraes, copyright © 1988, 1989, 1993, University of Toronto.
This product includes FreeBSD software developed by the University of California, Berkeley, and its contributors. All of the documentation
and software included in the 4.4BSD and 4.4BSD-Lite Releases is copyrighted by the Regents of the University of California. Copyright ©
1979, 1980, 1983, 1986, 1988, 1989, 1991, 1992, 1993, 1994. The Regents of the University of California. All rights reserved.
GateD software copyright © 1995, the Regents of the University. All rights reserved. Gate Daemon was originated and developed through
release 3.0 by Cornell University and its collaborators. Gated is based on Kirton’s EGP, UC Berkeley’s routing daemon (routed), and DCN’s
HELLO routing protocol. Development of Gated has been supported in part by the National Science Foundation. Portions of the GateD
software copyright © 1988, Regents of the University of California. All rights reserved. Portions of the GateD software copyright © 1991, D.
L. S. Associates.
This product includes software developed by Maker Communications, Inc., copyright © 1996, 1997, Maker Communications, Inc.
Juniper Networks, Junos, Steel-Belted Radius, NetScreen, and ScreenOS are registered trademarks of Juniper Networks, Inc. in the United
States and other countries. The Juniper Networks Logo, the Junos logo, and JunosE are trademarks of Juniper Networks, Inc. All other
trademarks, service marks, registered trademarks, or registered service marks are the property of their respective owners.
Juniper Networks assumes no responsibility for any inaccuracies in this document. Juniper Networks reserves the right to change, modify,
transfer, or otherwise revise this publication without notice.
Products made or sold by Juniper Networks or components thereof might be covered by one or more of the following patents that are
owned by or licensed to Juniper Networks: U.S. Patent Nos. 5,473,599, 5,905,725, 5,909,440, 6,192,051, 6,333,650, 6,359,479, 6,406,312,
6,429,706, 6,459,579, 6,493,347, 6,538,518, 6,538,899, 6,552,918, 6,567,902, 6,578,186, and 6,590,785.
Network and Security Manager Configuring Intrusion Detection and Prevention Devices Guide
Release 2010.4
Copyright © 2010, Juniper Networks, Inc.
All rights reserved. Printed in USA.
Revision History
18 November 2010—01
The information in this document is current as of the date listed in the revision history.
YEAR 2000 NOTICE
Juniper Networks hardware and software products are Year 2000 compliant. The Junos OS has no known time-related limitations through
the year 2038. However, the NTP application is known to have some difficulty in the year 2036.
Copyright © 2010, Juniper Networks, Inc.ii
Page 3

END USER LICENSE AGREEMENT
READ THIS END USER LICENSE AGREEMENT (“AGREEMENT”) BEFORE DOWNLOADING, INSTALLING, OR USING THE SOFTWARE.
BY DOWNLOADING, INSTALLING, OR USING THE SOFTWARE OR OTHERWISE EXPRESSING YOUR AGREEMENT TO THE TERMS
CONTAINED HEREIN, YOU (AS CUSTOMER OR IF YOU ARE NOT THE CUSTOMER, AS A REPRESENTATIVE/AGENT AUTHORIZED TO
BIND THE CUSTOMER) CONSENT TO BE BOUND BY THIS AGREEMENT. IF YOU DO NOT OR CANNOT AGREE TO THE TERMS CONTAINED
HEREIN, THEN (A) DO NOT DOWNLOAD, INSTALL, OR USE THE SOFTWARE, AND (B) YOU MAY CONTACT JUNIPER NETWORKS
REGARDING LICENSE TERMS.
1. The Parties. The parties to this Agreement are (i) Juniper Networks, Inc. (if the Customer’s principal office is located in the Americas) or
Juniper Networks (Cayman) Limited (if the Customer’sprincipal office is locatedoutside the Americas) (such applicable entity being referred
to herein as “Juniper”), and (ii) the person or organization that originally purchased from Juniper or an authorized Juniper reseller the applicable
license(s) for use of the Software (“Customer”) (collectively, the “Parties”).
2. The Software. In this Agreement, “Software” means the program modules and features of the Juniper or Juniper-supplied software, for
which Customer has paid the applicable license or support fees to Juniper or an authorized Juniper reseller, or which was embedded by
Juniper in equipment which Customer purchased from Juniper or an authorized Juniper reseller. “Software” also includes updates, upgrades
and new releases of such software. “Embedded Software” means Software which Juniper has embedded in or loaded onto the Juniper
equipment and any updates, upgrades, additions or replacements which are subsequently embedded in or loaded onto the equipment.
3. License Grant. Subject to payment of the applicable fees and the limitations and restrictions set forth herein, Juniper grants to Customer
a non-exclusive and non-transferable license, without right to sublicense, to use the Software, in executable form only, subject to the
following use restrictions:
a. Customer shall use Embedded Software solely as embedded in, and for execution on, Juniper equipment originally purchased by
Customer from Juniper or an authorized Juniper reseller.
b. Customer shall use the Software on a single hardware chassis having a single processing unit, or as many chassis or processing units
for which Customer has paid the applicable license fees; provided, however, with respect to the Steel-Belted Radius or Odyssey Access
Client software only, Customer shall use such Software on a single computer containing a single physical random access memory space
and containing any number of processors. Use of the Steel-Belted Radius or IMS AAA software on multiple computers or virtual machines
(e.g., Solaris zones) requires multiple licenses, regardless of whether such computers or virtualizations are physically contained on a single
chassis.
c. Product purchase documents, paper or electronic user documentation, and/or the particular licenses purchased by Customer may
specify limits to Customer’s use of the Software. Such limits may restrict use to a maximum number of seats,registeredendpoints, concurrent
users, sessions, calls, connections, subscribers, clusters, nodes, realms, devices, links, ports or transactions, or require the purchase of
separate licenses to use particular features, functionalities, services, applications, operations, or capabilities, or provide throughput,
performance, configuration, bandwidth, interface, processing, temporal, or geographical limits. In addition, such limits may restrict the use
of the Software to managing certain kinds of networks or require the Software to be used only in conjunction with other specific Software.
Customer’s use of the Software shall be subject to all such limitations and purchase of all applicable licenses.
d. For any trial copy of the Software, Customer’s right to use the Software expires 30 days after download, installation or use of the
Software. Customer may operate the Software after the 30-day trial period only if Customer pays for a license to do so. Customer may not
extend or create an additional trial period by re-installing the Software after the 30-day trial period.
e. The Global Enterprise Edition of the Steel-Belted Radius software may be used by Customer only to manage access to Customer’s
enterprise network. Specifically, service provider customers are expressly prohibited from using the Global Enterprise Edition of the
Steel-Belted Radius software to support any commercial network access services.
The foregoing license is not transferable or assignable by Customer. No license is granted herein to any user who did not originally purchase
the applicable license(s) for the Software from Juniper or an authorized Juniper reseller.
4. Use Prohibitions. Notwithstanding the foregoing, the license provided herein does not permit the Customer to, and Customer agrees
not to and shall not: (a) modify, unbundle, reverse engineer, or create derivative works based on the Software; (b) make unauthorized
copies of the Software (except as necessary for backup purposes); (c) rent, sell, transfer, or grant any rights in and to any copy of the
Software,in any form, to any third party; (d) remove any proprietary notices, labels, or marks on or in any copy of the Software or any product
in which the Software is embedded; (e) distribute any copy of the Software to any third party, including as may be embedded in Juniper
equipment sold in the secondhand market; (f) use any ‘locked’or key-restricted feature,function, service, application, operation,or capability
without first purchasing the applicable license(s) and obtaining a valid key from Juniper, even if such feature, function, service, application,
operation, or capability is enabled without a key; (g) distribute any key for the Software provided by Juniper to any third party; (h) use the
iiiCopyright © 2010, Juniper Networks, Inc.
Page 4

Software in any manner that extends or is broader than the uses purchased by Customer from Juniper or an authorized Juniper reseller; (i)
use Embedded Software on non-Juniper equipment; (j) use Embedded Software (or make it available for use) on Juniper equipment that
the Customer did not originally purchase from Juniper or an authorized Juniper reseller; (k) disclose the results of testing or benchmarking
of the Software to any third party without the prior written consent of Juniper; or (l) use the Software in any manner other than as expressly
provided herein.
5. Audit. Customer shall maintain accurate records as necessary to verify compliance with this Agreement. Upon request by Juniper,
Customer shall furnish such records to Juniper and certify its compliance with this Agreement.
6. Confidentiality. The Parties agree that aspects of the Software and associated documentation are the confidential property of Juniper.
As such, Customer shall exercise all reasonable commercial efforts to maintain the Software and associated documentation in confidence,
which at a minimum includes restricting access to the Software to Customer employees and contractors having a need to use the Software
for Customer’s internal business purposes.
7. Ownership. Juniper and Juniper’s licensors, respectively, retain ownership of all right, title, and interest (including copyright) in and to
the Software, associated documentation, and all copies of the Software. Nothing in this Agreement constitutes a transfer or conveyance
of any right, title, or interest in the Software or associated documentation, or a sale of the Software, associated documentation, or copies
of the Software.
8. Warranty, Limitation of Liability, Disclaimer of Warranty. The warranty applicable to the Software shall be as set forth in the warranty
statementthat accompanies the Software(the “Warranty Statement”). Nothing in this Agreement shall give rise to any obligationto support
the Software. Support services may be purchased separately. Any such support shall be governed by a separate, written support services
agreement. TO THE MAXIMUM EXTENT PERMITTED BY LAW, JUNIPER SHALL NOT BE LIABLE FOR ANY LOST PROFITS, LOSS OF DATA,
OR COSTSOR PROCUREMENT OF SUBSTITUTE GOODS OR SERVICES,OR FOR ANY SPECIAL, INDIRECT,OR CONSEQUENTIALDAMAGES
ARISING OUT OF THIS AGREEMENT, THE SOFTWARE,OR ANY JUNIPER OR JUNIPER-SUPPLIED SOFTWARE.IN NO EVENT SHALL JUNIPER
BE LIABLE FOR DAMAGES ARISING FROM UNAUTHORIZED OR IMPROPER USE OF ANY JUNIPER OR JUNIPER-SUPPLIED SOFTWARE.
EXCEPT AS EXPRESSLY PROVIDED IN THE WARRANTY STATEMENT TO THE EXTENT PERMITTED BY LAW, JUNIPER DISCLAIMS ANY
AND ALL WARRANTIES IN AND TO THE SOFTWARE (WHETHER EXPRESS, IMPLIED, STATUTORY, OR OTHERWISE), INCLUDING ANY
IMPLIED WARRANTY OF MERCHANTABILITY, FITNESS FOR A PARTICULAR PURPOSE, OR NONINFRINGEMENT. IN NO EVENT DOES
JUNIPER WARRANT THAT THE SOFTWARE, OR ANY EQUIPMENT OR NETWORK RUNNING THE SOFTWARE, WILL OPERATE WITHOUT
ERROR OR INTERRUPTION, OR WILL BE FREE OF VULNERABILITY TO INTRUSION OR ATTACK. In no event shall Juniper’s or its suppliers’
or licensors’ liability to Customer, whether in contract, tort (including negligence), breach of warranty, or otherwise, exceed the price paid
by Customer for the Software that gave rise to the claim, or if the Software is embedded in another Juniper product, the price paid by
Customer for such other product. Customer acknowledges and agrees that Juniper has set its prices and entered into this Agreement in
reliance upon the disclaimers of warranty and the limitations of liability set forth herein, that the same reflect an allocation of risk between
the Parties (including the risk that a contract remedy may fail of its essential purpose and cause consequential loss), and that the same
form an essential basis of the bargain between the Parties.
9. Termination. Any breach of this Agreement or failure by Customer to pay any applicable fees due shall result in automatic termination
of the license granted herein. Upon such termination, Customer shall destroy or return to Juniper all copies of the Software and related
documentation in Customer’s possession or control.
10. Taxes. All license fees payable under this agreement are exclusive of tax. Customer shall be responsible for paying Taxes arising from
the purchase of the license, or importation or use of the Software. If applicable, valid exemption documentation for each taxing jurisdiction
shall be provided to Juniper prior to invoicing, and Customer shall promptly notify Juniper if their exemption is revoked or modified. All
payments made by Customer shall be net of any applicable withholding tax. Customer will provide reasonable assistance to Juniper in
connection with such withholding taxes by promptly: providing Juniper with valid tax receipts and other required documentation showing
Customer’s payment of any withholding taxes; completing appropriate applications that would reduce the amount of withholding tax to
be paid; and notifying and assisting Juniper in any audit or tax proceeding related to transactions hereunder. Customer shall comply with
all applicable tax laws and regulations, and Customer will promptly pay or reimburse Juniper for all costs and damages related to any
liability incurred by Juniper as a result of Customer’s non-compliance or delay with its responsibilities herein. Customer’s obligations under
this Section shall survive termination or expiration of this Agreement.
11. Export. Customer agrees to comply with all applicable export laws and restrictions and regulations of any United States and any
applicable foreign agency or authority, and not to export or re-export the Software or any direct product thereof in violation of any such
restrictions, laws or regulations, or without all necessary approvals. Customer shall be liable for any such violations. The version of the
Software supplied to Customer may contain encryption or other capabilities restricting Customer’s ability to export the Software without
an export license.
Copyright © 2010, Juniper Networks, Inc.iv
Page 5

12. Commercial Computer Software. The Software is “commercial computer software” and is provided with restricted rights. Use,
duplication, or disclosure by the United States government is subject to restrictions set forth in this Agreement and as provided in DFARS
227.7201 through 227.7202-4, FAR 12.212, FAR 27.405(b)(2), FAR 52.227-19, or FAR 52.227-14(ALT III) as applicable.
13. Interface Information. To the extent required by applicable law, and at Customer's written request, Juniper shall provide Customer
with the interface information needed to achieve interoperability between the Software and another independently created program, on
payment of applicable fee, if any. Customer shall observe strict obligations of confidentiality with respect to such information and shall use
such information in compliance with any applicable terms and conditions upon which Juniper makes such information available.
14. Third Party Software. Any licensor of Juniper whose software is embedded in the Software and any supplier of Juniper whose products
or technology are embedded in (or services are accessed by) the Software shall be a third party beneficiary with respect to this Agreement,
and such licensor or vendor shall have the right to enforce this Agreement in its own name as if it were Juniper. In addition, certain third party
software may be provided with the Software and is subject to the accompanying license(s), if any, of its respective owner(s). To the extent
portions of the Software are distributed under and subject to open source licenses obligating Juniper to make the source code for such
portions publicly available (such as the GNU General Public License (“GPL”) or the GNU Library General Public License (“LGPL”)), Juniper
will make such source code portions (including Juniper modifications, as appropriate) available upon request for a period of up to three
years from the date of distribution. Such request can be made in writing to Juniper Networks, Inc., 1194 N. Mathilda Ave., Sunnyvale, CA
94089, ATTN: General Counsel. You may obtain a copy of the GPL at http://www.gnu.org/licenses/gpl.html, and a copy of the LGPL
at http://www.gnu.org/licenses/lgpl.html .
15. Miscellaneous. This Agreement shall be governed by the laws of the State of California without reference to its conflicts of laws
principles. The provisions of the U.N. Convention for the International Sale of Goods shall not apply to this Agreement. For any disputes
arising under this Agreement, the Parties hereby consent to the personal and exclusive jurisdiction of, and venue in, the state and federal
courts within Santa Clara County, California. This Agreement constitutes the entire and sole agreement between Juniper and the Customer
with respect to the Software, and supersedes all prior and contemporaneous agreements relating to the Software, whether oral or written
(including any inconsistent terms contained in a purchase order), except that the terms of a separate written agreement executed by an
authorized Juniper representative and Customer shall govern to the extent such terms are inconsistent or conflict with terms contained
herein. No modification to this Agreement nor any waiver of any rights hereunder shall be effective unless expressly assented to in writing
by the party to be charged. If any portion of this Agreement is held invalid, the Parties agree that such invalidity shall not affect the validity
of the remainder of this Agreement. This Agreement and associated documentation has been written in the English language, and the
Parties agree that the English version will govern. (For Canada: Les parties aux présentés confirment leur volonté que cette convention de
même que tous les documents y compris tout avis qui s'y rattaché, soient redigés en langue anglaise. (Translation: The parties confirm that
this Agreement and all related documentation is and will be in the English language)).
vCopyright © 2010, Juniper Networks, Inc.
Page 6

Copyright © 2010, Juniper Networks, Inc.vi
Page 7

Table of Contents
About This Guide . . . . . . . . . . . . . . . . . . . . . . . . . . . . . . . . . . . . . . . . . . . . . . . . . . xi
Objectives . . . . . . . . . . . . . . . . . . . . . . . . . . . . . . . . . . . . . . . . . . . . . . . . . . . . . . . . . xi
Audience . . . . . . . . . . . . . . . . . . . . . . . . . . . . . . . . . . . . . . . . . . . . . . . . . . . . . . . . . . xi
Conventions . . . . . . . . . . . . . . . . . . . . . . . . . . . . . . . . . . . . . . . . . . . . . . . . . . . . . . . . xi
List of Technical Publications . . . . . . . . . . . . . . . . . . . . . . . . . . . . . . . . . . . . . . . . . xiii
Requesting Technical Support . . . . . . . . . . . . . . . . . . . . . . . . . . . . . . . . . . . . . . . . xiv
Self-Help Online Tools and Resources . . . . . . . . . . . . . . . . . . . . . . . . . . . . . . xiv
Opening a Case with JTAC . . . . . . . . . . . . . . . . . . . . . . . . . . . . . . . . . . . . . . . . . xv
Part 1 Getting Started
Chapter 1 Intrusion Detection and Prevention Device and NSM Installation
Overview . . . . . . . . . . . . . . . . . . . . . . . . . . . . . . . . . . . . . . . . . . . . . . . . . . . . . . . . . . 3
Intrusion Detection and Prevention Device Installation Overview . . . . . . . . . . . . . . 3
NSM Installation Overview . . . . . . . . . . . . . . . . . . . . . . . . . . . . . . . . . . . . . . . . . . . . . 3
Chapter 2 Understanding Intrusion Detection and Prevention Device Configuration
and Integration Overview . . . . . . . . . . . . . . . . . . . . . . . . . . . . . . . . . . . . . . . . . . . . 5
NSM and Intrusion Detection and Prevention Device Management Overview . . . . 5
Intrusion Detectionand PreventionServices and Device ConfigurationsSupported
in NSM . . . . . . . . . . . . . . . . . . . . . . . . . . . . . . . . . . . . . . . . . . . . . . . . . . . . . . . . . 6
Adding Intrusion Detection and Prevention Devices in NSM Overview . . . . . . . . . . 8
Adding Intrusion Detection and Prevention Clusters in NSM Overview . . . . . . . . . . 8
Using Templates and Configuration Groups in NSM Overview . . . . . . . . . . . . . . . . 8
Part 2 Configuring Intrusion Detection and Prevention Devices
Chapter 3 Configuring Profiler Settings . . . . . . . . . . . . . . . . . . . . . . . . . . . . . . . . . . . . . . . . 13
Configuring Profiler Options (NSM Procedure) . . . . . . . . . . . . . . . . . . . . . . . . . . . . 13
Viewing Profiler Logs (NSM Procedure) . . . . . . . . . . . . . . . . . . . . . . . . . . . . . . . . . 20
Specifying General Options . . . . . . . . . . . . . . . . . . . . . . . . . . . . . . . . . . . . . . . . 14
Specifying Tracked Hosts . . . . . . . . . . . . . . . . . . . . . . . . . . . . . . . . . . . . . . . . . 16
Specifying Context Targets . . . . . . . . . . . . . . . . . . . . . . . . . . . . . . . . . . . . . . . . 17
Specifying Alert Options . . . . . . . . . . . . . . . . . . . . . . . . . . . . . . . . . . . . . . . . . . 18
Application Profiler . . . . . . . . . . . . . . . . . . . . . . . . . . . . . . . . . . . . . . . . . . . . . . 20
Protocol Profiler . . . . . . . . . . . . . . . . . . . . . . . . . . . . . . . . . . . . . . . . . . . . . . . . . 22
Network Profiler . . . . . . . . . . . . . . . . . . . . . . . . . . . . . . . . . . . . . . . . . . . . . . . . 23
viiCopyright © 2010, Juniper Networks, Inc.
Page 8

Configuring Intrusion Detection and Prevention Devices Guide
Violation Viewer . . . . . . . . . . . . . . . . . . . . . . . . . . . . . . . . . . . . . . . . . . . . . . . . 25
Modifying Profiler Settings (NSM Procedure) . . . . . . . . . . . . . . . . . . . . . . . . . . . . . 25
Configuring Profiler Database Preferences (NSM Procedure) . . . . . . . . . . . . . . . . 26
Displaying Profiler Database Information (NSM Procedure) . . . . . . . . . . . . . . . . . 28
Querying the Profiler Database (NSM Procedure) . . . . . . . . . . . . . . . . . . . . . . . . . 28
Purging the Profiler Database (NSM Procedure) . . . . . . . . . . . . . . . . . . . . . . . . . . 28
Chapter 4 Configuring Security Policies . . . . . . . . . . . . . . . . . . . . . . . . . . . . . . . . . . . . . . . . 31
Intrusion Detection and Prevention Devices and Security Policies Overview . . . . . 31
Configuring Predefined Security Policies (NSM Procedure) . . . . . . . . . . . . . . . . . . 33
Creating a New Security Policy (NSM Procedure) . . . . . . . . . . . . . . . . . . . . . . . . . 34
Modifying IDP Rulebase Rules (NSM Procedure) . . . . . . . . . . . . . . . . . . . . . . . . . . 36
Specifying Rule Match Conditions . . . . . . . . . . . . . . . . . . . . . . . . . . . . . . . . . . 37
Specifying IDP Rulebase Attack Objects . . . . . . . . . . . . . . . . . . . . . . . . . . . . . 38
Specifying Rule Session Action . . . . . . . . . . . . . . . . . . . . . . . . . . . . . . . . . . . . 39
Specifying Rule IP Action . . . . . . . . . . . . . . . . . . . . . . . . . . . . . . . . . . . . . . . . . . 41
Specifying Rule Notification Options . . . . . . . . . . . . . . . . . . . . . . . . . . . . . . . . 42
Specifying Rule VLAN Matches . . . . . . . . . . . . . . . . . . . . . . . . . . . . . . . . . . . . 42
Specifying Rule Targets . . . . . . . . . . . . . . . . . . . . . . . . . . . . . . . . . . . . . . . . . . 43
Specifying Rule Severity . . . . . . . . . . . . . . . . . . . . . . . . . . . . . . . . . . . . . . . . . . 43
Specifying Rule Optional Fields . . . . . . . . . . . . . . . . . . . . . . . . . . . . . . . . . . . . 44
Specifying Rule Comments . . . . . . . . . . . . . . . . . . . . . . . . . . . . . . . . . . . . . . . 44
Configuring Exempt Rulebase Rules (NSM Procedure) . . . . . . . . . . . . . . . . . . . . . 45
Configuring Backdoor Rulebase Rules (NSM Procedure) . . . . . . . . . . . . . . . . . . . . 47
Configuring SYN Protector Rulebase Rules (NSM Procedure) . . . . . . . . . . . . . . . 49
Configuring Traffic Anomalies Rulebase Rules (NSM Procedure) . . . . . . . . . . . . . 52
Configuring Network Honeypot Rulebase Rules (NSM Procedure) . . . . . . . . . . . . 54
Configuring Application Rulebase Rules (NSM Procedure) . . . . . . . . . . . . . . . . . . 58
Chapter 5 Working with Attack Objects . . . . . . . . . . . . . . . . . . . . . . . . . . . . . . . . . . . . . . . 63
Attack Objects in Intrusion Detection and Prevention Security Policies
Overview . . . . . . . . . . . . . . . . . . . . . . . . . . . . . . . . . . . . . . . . . . . . . . . . . . . . . . 63
Loading J-Security-Center Updates (NSM Procedure) . . . . . . . . . . . . . . . . . . . . . 64
Viewing Predefined Attack Objects (NSM Procedure) . . . . . . . . . . . . . . . . . . . . . . 65
Working with Attack Groups (NSM Procedure) . . . . . . . . . . . . . . . . . . . . . . . . . . . 66
Creating Dynamic Groups . . . . . . . . . . . . . . . . . . . . . . . . . . . . . . . . . . . . . . . . . 67
Creating Static Groups . . . . . . . . . . . . . . . . . . . . . . . . . . . . . . . . . . . . . . . . . . . 68
Creating Custom Attack Objects (NSM Procedure) . . . . . . . . . . . . . . . . . . . . . . . . 69
Configuring General Properties for Attack Objects . . . . . . . . . . . . . . . . . . . . . 69
Creating a Signature Attack Object . . . . . . . . . . . . . . . . . . . . . . . . . . . . . . . . . . 71
Verifying the Attack Object Database Version (NSM Procedure) . . . . . . . . . . . . . . 77
Updating the IDP Detector Engine (NSM Procedure) . . . . . . . . . . . . . . . . . . . . . . . 78
Chapter 6 Configuring SNMP and Syslog Settings . . . . . . . . . . . . . . . . . . . . . . . . . . . . . . 81
Configuring an SNMP Agent (NSM Procedure) . . . . . . . . . . . . . . . . . . . . . . . . . . . . 81
Configuring Syslog Collection (NSM Procedure) . . . . . . . . . . . . . . . . . . . . . . . . . . 82
Copyright © 2010, Juniper Networks, Inc.viii
Page 9

Table of Contents
Chapter 7 Configuring Anti-Spoof Settings . . . . . . . . . . . . . . . . . . . . . . . . . . . . . . . . . . . . 85
Configuring Antispoof Settings in Intrusion Detection and Prevention Devices
(NSM Procedure) . . . . . . . . . . . . . . . . . . . . . . . . . . . . . . . . . . . . . . . . . . . . . . . 85
Example: Applying Antispoof to a Web Server and Database Server (NSM
Procedure) . . . . . . . . . . . . . . . . . . . . . . . . . . . . . . . . . . . . . . . . . . . . . . . . . . . . 86
Chapter 8 Configuring Intrusion Detection and Prevention Device Settings . . . . . . . . 89
Configuring Load-Time Parameters (NSM Procedure) . . . . . . . . . . . . . . . . . . . . . 89
Configuring Run-Time Parameters (NSM Procedure) . . . . . . . . . . . . . . . . . . . . . . 91
Configuring Router Parameters (NSM Procedure) . . . . . . . . . . . . . . . . . . . . . . . . . 96
Configuring Protocol Handling (NSM Procedure) . . . . . . . . . . . . . . . . . . . . . . . . . . 97
Chapter 9 Configuring Additional Intrusion Detection and Prevention Features . . . . 113
Configuring Additional Intrusion Detection and Prevention Features
Overview . . . . . . . . . . . . . . . . . . . . . . . . . . . . . . . . . . . . . . . . . . . . . . . . . . . . . . 113
Enabling Intrusion Detection and Prevention Processing of Encrypted and
Encapsulated Traffic (NSM Procedure) . . . . . . . . . . . . . . . . . . . . . . . . . . . . . . 113
Enabling SSL Decryption . . . . . . . . . . . . . . . . . . . . . . . . . . . . . . . . . . . . . . . . . 114
Enabling GRE Decapsulation . . . . . . . . . . . . . . . . . . . . . . . . . . . . . . . . . . . . . . 114
Enabling GTP Decapsulation . . . . . . . . . . . . . . . . . . . . . . . . . . . . . . . . . . . . . . 115
Part 3 Managing Intrusion Detection and Prevention Devices
Chapter 10 Managing Security Policies in Intrusion Detection and Prevention
Devices . . . . . . . . . . . . . . . . . . . . . . . . . . . . . . . . . . . . . . . . . . . . . . . . . . . . . . . . . . 119
Assigning a Security Policy in an Intrusion Detection and Prevention Device (NSM
Procedure) . . . . . . . . . . . . . . . . . . . . . . . . . . . . . . . . . . . . . . . . . . . . . . . . . . . . 119
Validating a Security Policy (NSM Procedure) . . . . . . . . . . . . . . . . . . . . . . . . . . . 120
Troubleshooting Security Policy Validation Errors (NSM Procedure) . . . . . . . . . . 120
Pushing Security Policy Updates to an IDP Device (NSM Procedure) . . . . . . . . . . 121
Troubleshooting Configuration Push Errors (NSM Procedure) . . . . . . . . . . . . . . . 123
Disabling Rules (NSM Procedure) . . . . . . . . . . . . . . . . . . . . . . . . . . . . . . . . . . . . . 124
Exporting Security Policies (NSM Procedure) . . . . . . . . . . . . . . . . . . . . . . . . . . . . 124
Chapter 11 Managing Profiler Settings in Intrusion Detection and Prevention
Devices . . . . . . . . . . . . . . . . . . . . . . . . . . . . . . . . . . . . . . . . . . . . . . . . . . . . . . . . . 125
Managing Profiler Settings . . . . . . . . . . . . . . . . . . . . . . . . . . . . . . . . . . . . . . . . . . . 125
Updating Profiler Settings . . . . . . . . . . . . . . . . . . . . . . . . . . . . . . . . . . . . . . . . 125
Starting the Profiler . . . . . . . . . . . . . . . . . . . . . . . . . . . . . . . . . . . . . . . . . . . . . 125
Stopping the Profiler . . . . . . . . . . . . . . . . . . . . . . . . . . . . . . . . . . . . . . . . . . . . 125
ixCopyright © 2010, Juniper Networks, Inc.
Page 10

Configuring Intrusion Detection and Prevention Devices Guide
Part 4 Monitoring Intrusion Detection and Prevention Devices
Chapter 12 Working with NSM Logs and Reports . . . . . . . . . . . . . . . . . . . . . . . . . . . . . . . 129
NSM Logs and Reports Overview . . . . . . . . . . . . . . . . . . . . . . . . . . . . . . . . . . . . . . 129
Viewing Logs . . . . . . . . . . . . . . . . . . . . . . . . . . . . . . . . . . . . . . . . . . . . . . . . . . . . . . 129
IDP Logs . . . . . . . . . . . . . . . . . . . . . . . . . . . . . . . . . . . . . . . . . . . . . . . . . . . . . . 130
Using NSM Log Investigator . . . . . . . . . . . . . . . . . . . . . . . . . . . . . . . . . . . . . . 130
Using NSM Audit Log Viewer . . . . . . . . . . . . . . . . . . . . . . . . . . . . . . . . . . . . . 130
Viewing Device Status . . . . . . . . . . . . . . . . . . . . . . . . . . . . . . . . . . . . . . . . . . . . . . 132
Viewing NSM Predefined Reports . . . . . . . . . . . . . . . . . . . . . . . . . . . . . . . . . . . . . 135
Creating NSM Custom Reports . . . . . . . . . . . . . . . . . . . . . . . . . . . . . . . . . . . . . . . . 137
Configuring Log Suppression . . . . . . . . . . . . . . . . . . . . . . . . . . . . . . . . . . . . . . . . . 139
Chapter 13 Working with Intrusion Detection and Prevention Reporter Reports . . . . . 141
Intrusion Detection and Prevention Reporter Overview . . . . . . . . . . . . . . . . . . . . . 141
Part 5 Index
Index . . . . . . . . . . . . . . . . . . . . . . . . . . . . . . . . . . . . . . . . . . . . . . . . . . . . . . . . . . . . 145
Copyright © 2010, Juniper Networks, Inc.x
Page 11

About This Guide
•
Objectives on page xi
•
Audience on page xi
•
Conventions on page xi
•
List of Technical Publications on page xiii
•
Requesting Technical Support on page xiv
Objectives
Network and Security Manager (NSM) is a software application that centralizes control
and management of your Juniper Networks devices. With NSM, Juniper Networks delivers
integrated, policy-based security and network management for all security devices.
Intrusion Detection and Prevention (IDP) series uses eight detection methods to detect
malicious network traffic. It is able to drop attacks to prevent damage to your network
and can operate inline as a forwarding gateway, directly in the path of traffic coming and
going on your network.
This guide provides the various steps to configure and manage IDP devices using NSM.
This guide also helps in understanding of how to configure basic and advanced NSM
functionality, including adding new devices, deploying new device configurations, updating
device firmware, viewing log information, and monitoring the status of IDP devices.
Audience
This guide is intended for the system administrators who are responsible for configuring
IDP devices.
Conventions
This section provides all the documentation conventions that are followed in this guide.
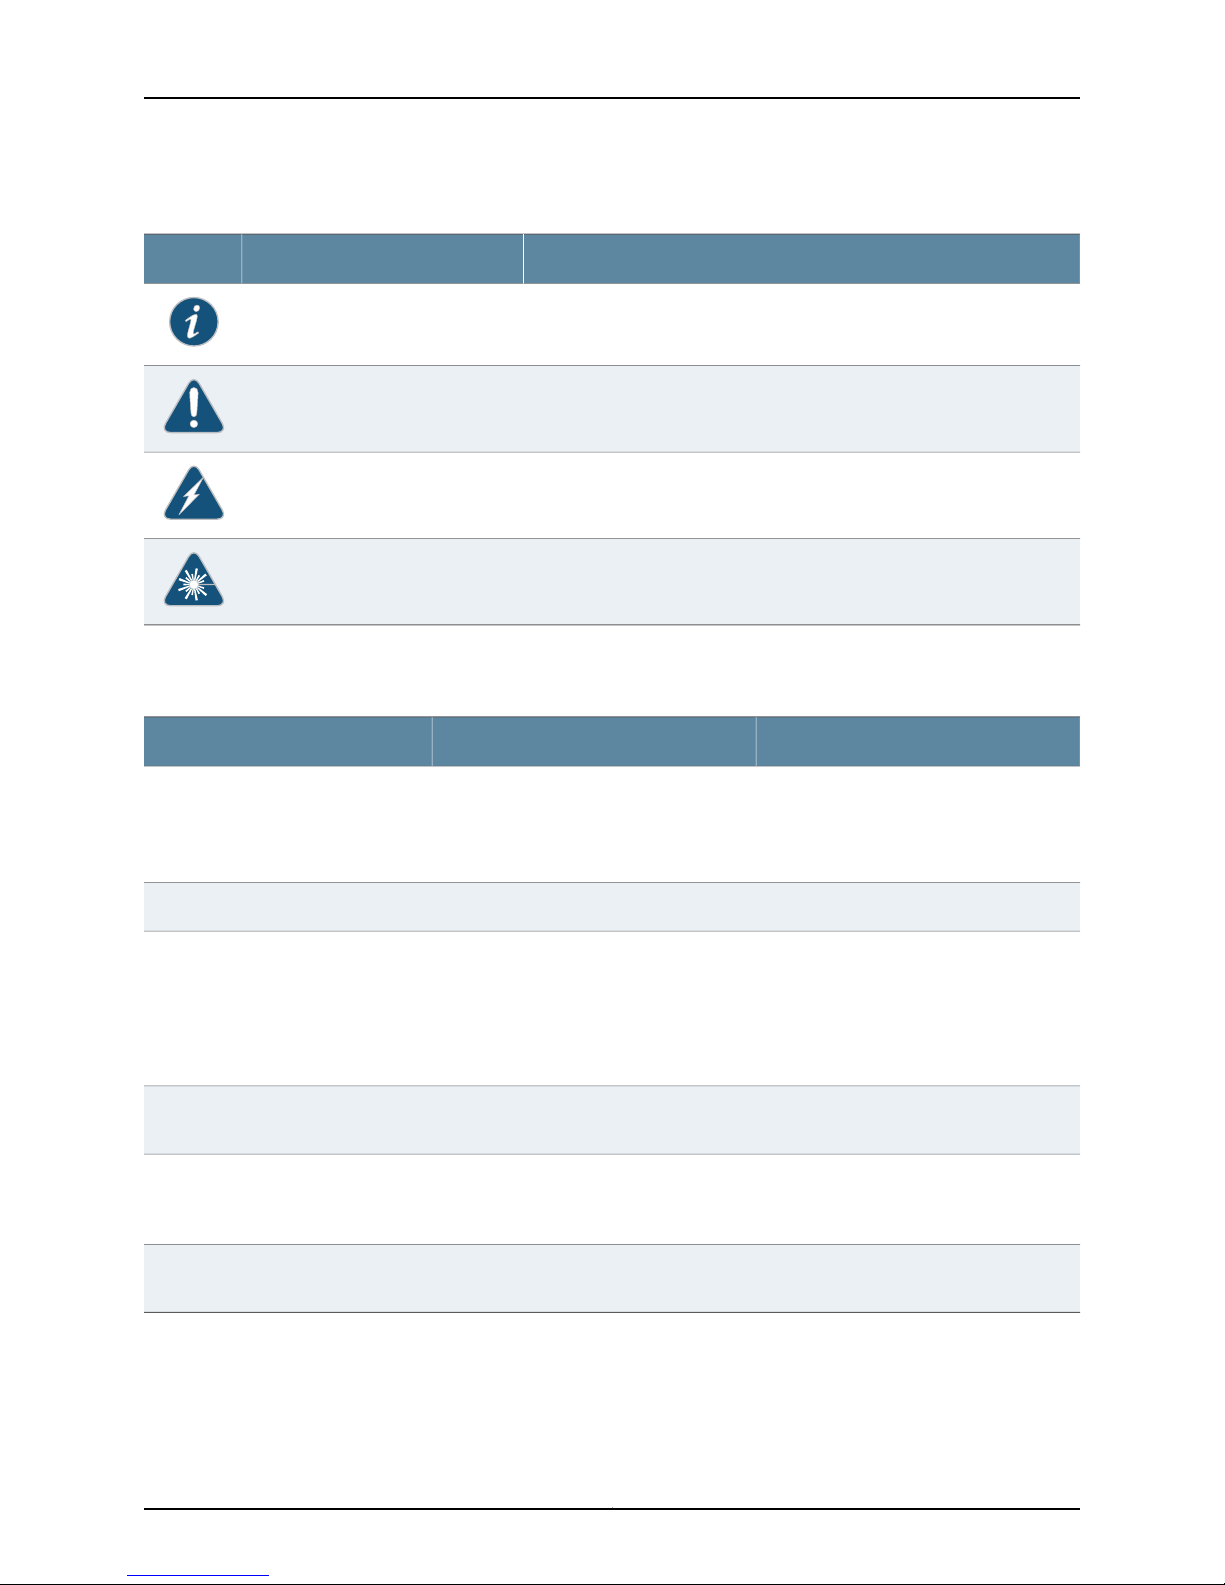
Table 1 on page xiidefines notice icons used in this guide.
xiCopyright © 2010, Juniper Networks, Inc.
Page 12
Configuring Intrusion Detection and Prevention Devices Guide
Table 1: Notice Icons
DescriptionMeaningIcon
Indicates important features or instructions.Informational note
Indicates a situation that might result in loss of data or hardware damage.Caution
Alerts you to the risk of personal injury or death.Warning
Alerts you to the risk of personal injury from a laser.Laser warning
Table 2 on page xii defines text conventions used in this guide.
Table 2: Text Conventions
Bold typeface like this
fixed-width font
Keynames linked with a plus (+) sign
Italics
The angle bracket (>)
•
Represents commands and keywords
in text.
•
Represents keywords
•
Represents UI elements
Represents information as displayed on
the terminal screen.
keys simultaneously.
•
Emphasizes words
•
Identifies variables
Indicates navigation paths through the UI
by clicking menu options and links.
ExamplesDescriptionConvention
•
Issue the clock source command.
•
Specify the keyword exp-msg.
•
Click User Objects
user inputRepresents text that the user must type.Bold typeface like this
host1#
show ip ospf
Routing Process OSPF 2 with Router
ID 5.5.0.250
Router is an area Border Router
(ABR)
Ctrl + dIndicates that you must press two or more
•
The product supports two levels of
access, user and privileged.
•
clusterID, ipAddress.
Object Manager > User Objects > Local
Objects
Table 3 on page xiii defines syntax conventions used in this guide.
Copyright © 2010, Juniper Networks, Inc.xii
Page 13

Table 3: Syntax Conventions
About This Guide
ExamplesDescriptionConvention
terminal lengthRepresent keywordsWords in plain text
mask, accessListNameRepresent variablesWords in italics
Words separated by the pipe ( | )
symbol
Words enclosed in brackets followed
by and asterisk ( [ ]*)
variable to the left or right of this symbol. The
keywordor variable can be optional or required.
can be entered more than once.
Represent required keywords or variables.Words enclosed in braces ( { } )
diagnostic | lineRepresent a choice to select one keyword or
[ internal | external ]Represent optional keywords or variables.Words enclosed in brackets ( [ ] )
[ level1 | level2 | 11 ]*Represent optional keywords or variables that
{ permit | deny } { in | out } { clusterId
| ipAddress }
List of Technical Publications
This section provides the list of the documentations required for any additional
information.
Table 4: Network and Security Manager and IDP Device Publications
Network and Security Manager
Installation Guide
Network and Security Manager
Administration Guide
Details the steps to install the NSM management system on a single server or on separate
servers. It also includes information on how to install and run the NSM user interface. This
guide is intended for IT administrators responsible for the installation and/or upgrade to
NSM.
Describes how to use and configure key management features in the NSM. It provides
conceptual information, suggested workflows, and examples where applicable. This guide
is best used in conjunction with the NSM Online Help, which provides step-by-step
instructions for performing management tasks in the NSM UI.
Network and Security Manager
Configuring Firewall/VPN Devices
Guide
Network and Security Manager
Online Help
IDP Installation Guide
This guide is intended for application administrators or those individuals responsible for
owning the server and security infrastructure and configuring the product for multi-user
systems. It is also intended for device configuration administrators, firewall and VPN
administrators, and network security operation center administrators.
Describes NSM featuresthat relate to device configurationand management. It also explains
how to configure basic and advanced NSM functionality, including deploying new device
configurations, managing Security Policies and VPNs, and general device administration.
Provides task-oriented procedures describing how to perform basic tasks in the NSM user
interface. It also includes a brief overview of the NSM system and a description of the GUI
elements.
Details the physical features of Juniper Networks Intrusion Detection and Prevention (IDP)
series. It also explains how to install, configure, update/reimage, and service the IDP system.
xiiiCopyright © 2010, Juniper Networks, Inc.
Page 14
Configuring Intrusion Detection and Prevention Devices Guide
Table 4: Network and Security Manager and IDP Device Publications (continued)
IDP Concepts & Examples Guide
IDP Reporter User's Guide
IDP ACM Online Help
IDP Detector Engine Release
Notes
Details about the Juniper Networks Intrusion Detection and Prevention (IDP) series that
uses multiple methods to detect and prevent network attacks. IDP is designed to reduce
false positives to ensure that only actual malicious traffic is detected and stopped.
Details about the IDP Reporter that enables you to analyze your enterprise network
thoroughly so you can assess attacks, attackers, and resource utilization.
Details about how to complete the IDP QuickStart and ACM Wizard which is available
through the IDP Appliance Configuration Manager (ACM) as context-sensitive online help.
Details about IDP Detector Engine features and resolved issues in the recent releases. It
also helps you to decide to update the IDP Detector Engine version in your deployment.
Requesting Technical Support
Technicalproduct support is available through the Juniper Networks Technical Assistance
Center (JTAC). If you are a customer with an active J-Care or JNASC support contract,
or are covered under warranty, and need post-sales technical support, you can access
our tools and resources online or open a case with JTAC.
•
JTAC policies—For a complete understanding of our JTAC procedures and policies,
review the JTAC User Guide located at
http://www.juniper.net/us/en/local/pdf/resource-guides/7100059-en.pdf .
•
Product warranties—For product warranty information, visit
http://www.juniper.net/support/warranty/ .
•
JTAC hours of operation—The JTAC centers have resources available 24 hours a day,
7 days a week, 365 days a year.
Self-Help Online Tools and Resources
For quick and easy problem resolution, Juniper Networks has designed an online
self-service portal called the Customer Support Center (CSC) that provides you with the
following features:
•
Find CSC offerings: http://www.juniper.net/customers/support/
•
Search for known bugs: http://www2.juniper.net/kb/
•
Find product documentation: http://www.juniper.net/techpubs/
•
Find solutions and answer questions using our Knowledge Base: http://kb.juniper.net/
•
Download the latest versions of software and review release notes:
http://www.juniper.net/customers/csc/software/
•
Search technical bulletins for relevant hardware and software notifications:
https://www.juniper.net/alerts/
Copyright © 2010, Juniper Networks, Inc.xiv
Page 15

•
Join and participate in the Juniper Networks Community Forum:
http://www.juniper.net/company/communities/
•
Open a case online in the CSC Case Management tool: http://www.juniper.net/cm/
To verify service entitlement by product serial number,use our Serial Number Entitlement
(SNE) Tool: https://tools.juniper.net/SerialNumberEntitlementSearch/
Opening a Case with JTAC
You can open a case with JTAC on the Web or by telephone.
•
Use the Case Management tool in the CSC at http://www.juniper.net/cm/ .
•
Call 1-888-314-JTAC (1-888-314-5822 toll-free in the USA, Canada, and Mexico).
For international or direct-dial options in countries without toll-free numbers, see
http://www.juniper.net/support/requesting-support.html .
About This Guide
xvCopyright © 2010, Juniper Networks, Inc.
Page 16

Configuring Intrusion Detection and Prevention Devices Guide
Copyright © 2010, Juniper Networks, Inc.xvi
Page 17

PART 1
Getting Started
•
Intrusion Detection and Prevention Device and NSM Installation Overview on page 3
•
Understanding Intrusion Detection and PreventionDevice Configuration and Integration
Overview on page 5
1Copyright © 2010, Juniper Networks, Inc.
Page 18

Configuring Intrusion Detection and Prevention Devices Guide
Copyright © 2010, Juniper Networks, Inc.2
Page 19

CHAPTER 1
Intrusion Detection and Prevention Device
and NSM Installation Overview
•
Intrusion Detection and Prevention Device Installation Overview on page 3
•
NSM Installation Overview on page 3
Intrusion Detection and Prevention Device Installation Overview
The Intrusion Detection and Prevention (IDP) series consists of hardware and software
components. You can install the IDP device and start configuring your system using the
following steps:
1. Decide on the physical location of the device.
2. Install the device into your equipment rack.
3. Connect power cables and power on.
4. Perform some initial configuration steps.
5. Install the device license key.
See the installation documentation for your IDP model to install, configure, update, and
service a Juniper Networks IDP device.
Related
Documentation
NSM Installation Overview on page 3•
• NSM and Intrusion Detection and Prevention Device Management Overview on page 5
NSM Installation Overview
NSM is a software application that enables you to integrate and centralize management
of your Juniper Networks environment. Youneed to install two main software components
to run NSM: the NSM management system and the NSM user interface (UI).
See the Network Security Manager Installation Guide for the steps to install the NSM
management system on a single server or on separateservers. It also includes information
on how to install and run the NSM user interface. The Network Security Manager Installation
Guide is intended for IT administrators responsible for installing or upgrading to the NSM.
3Copyright © 2010, Juniper Networks, Inc.
Page 20

Configuring Intrusion Detection and Prevention Devices Guide
Related
Documentation
• Intrusion Detection and Prevention Device Installation Overview on page 3
• NSM and Intrusion Detection and Prevention Device Management Overview on page 5
Copyright © 2010, Juniper Networks, Inc.4
Page 21

CHAPTER 2
Understanding Intrusion Detection and
Prevention Device Configuration and
Integration Overview
•
NSM and Intrusion Detection and Prevention Device Management Overview on page 5
•
Intrusion Detection and Prevention Services and Device Configurations Supported in
NSM on page 6
•
Adding Intrusion Detection and Prevention Devices in NSM Overview on page 8
•
Adding Intrusion Detection and Prevention Clusters in NSM Overview on page 8
•
Using Templates and Configuration Groups in NSM Overview on page 8
NSM and Intrusion Detection and Prevention Device Management Overview
NSM is the Juniper Networks network management tool that allows distributed
administration of network appliances. You can use the NSM application to centralize
status monitoring, logging, and reporting, and to administer IDP Series configurations.
IDP technology detects and stops attacks when deployed inline to your network. Unlike
intrusion detection service (IDS),, IDP uses multiple methods to detect attacks against
your network and to prevent attackers from gaining access and damaging your system.
IDP drops malicious packets or connections before the attacks enter your network. IDP
is designed to reduce false positives and ensure that only actual malicious traffic is
detectedand stopped. Youcan also deployIDP as a passive sniffer, similar to a traditional
IDS, but with greater accuracy and manageability.
NSM is the sole means for configuring and managing IDP on the ISG1000, ISG2000, and
standalone IDP Sensors running IDP 4.x. Standalone IDP sensors running IDP 3.x and
earlier are managed using the IDP management server and UI.
The ISG1000 and ISG2000 security modules have an optional component installed that
provides IDP functionality. If you have purchased an ISG1000 or ISG2000 device that
does not have IDP capability, you can upgrade the device to be an IDP-capable system
by replacing the memory chip in the CPU. You install up to three security modules and
instal the Advanced and IDP license keys for IDP.
5Copyright © 2010, Juniper Networks, Inc.
Page 22

Configuring Intrusion Detection and Prevention Devices Guide
With NSM, you can manage most of the parameters that you can configure through the
IDP admin console. The configuration screens rendered through NSM are similar to the
screens in the IDP admin console. NSM incorporates a broad configuration management
framework that allows co-management using other methods.
After you have completed installation, follow these steps to get started with managing
an IDP device with NSM:
1. Add the IDP device to NSM. When you first add the IDP device to NSM in first instance,
NSM pushes the policy named Recommended to the device.
2. Update the IDP detector engine and attack object database.
3. Update software version (if necessary).
4. Run the Profiler.
5. Examine the logs.
6. Create address objects for IDP rulebase rules.
7. Optionally, configure additional rulebases.
8. If adding this device changes your plan to distribute administrative responsibility,
create NSM users with the access privileges.
An administrator(a user of NSM or IDP) has a specific level of permission. You can create
multipleadministratorswith specific roles to control access to the devices in each domain.
Related
Documentation
Intrusion Detection and Prevention Services and Device Configurations Supported in
•
NSM on page 6
• Adding Intrusion Detection and Prevention Devices in NSM Overview on page 8
Intrusion Detection and Prevention Services and Device Configurations Supported in
NSM
The Intrusion Detection and Prevention (IDP) device supports the following services in
NSM:
•
Inventory management service—NSM enables upgrading license and management of
the IDP hardware details. Adding or deleting licenses or upgrading or downgrading
software are not supported.
•
Status monitoring service—Allows the IDP device’s status to be obtained, including
name, domain, OS version, synchronization status, connection details, current alarms,
CPU, memory, and swap.
•
Logging service—Allows the IDP device’s logs to be obtained in a time-generated order.
Logging configuration details that are set on the IDP device will apply to NSM.
•
Packaging log files or debug files for remote analysis
•
Managing interface settings such as setting IP addresses, settings IDP device host and
network information, interoperability with NSM, Infranet Controllers, Secure Access
Copyright © 2010, Juniper Networks, Inc.6
Page 23

Chapter 2: Understanding Intrusion Detection and Prevention Device Configuration and Integration Overview
devices, settings deployment mode, enabling layer 2 processing, and so on. For more
information see the ACM online Help.
The following device configurations are not supported:
•
Editing licensing information, although licenses can be viewed
•
Rebooting the IDP device
On standalone IDP sensors and ISG security module settings inspects the following
protocols using Table 5 on page 7 .
Table 5: Intrusion Detection and Prevention: Supported Protocols
SMTPOracleHTTPAIM
SNMP/TrapPOP3ICMPCHARGEN
SQL MonPortMapperIDENTDHCP
SSHRADIUSIKEDISCARD
SSLRexecIMAPDNS
SyslogrloginIRCECHO
TELNETSunRPCLDAPFINGER
TFTPRshLPRFTP
VNCRTSPMSNGNUTELLA
WHOISNBNAMEMSRPCGOPHER
Yahoo MessengerNFSMS-SQLGRE*
NNTOPGTPH.225**
RusersNTP
SMB
* GRE inspection are supported only for IP (protocol 0x0800) and PPP for CDMA A10
channel (protocol 0x8881). PPP is a Layer 2 protocol, which can carry any Layer 3
protocols. Within PPP, IDP inspects IP and Van Jacobson compressed TCP.
** Standalone IDP only.
Related
Documentation
Adding Intrusion Detection and Prevention Clusters in NSM Overview on page 8•
• Using Templates and Configuration Groups in NSM Overview on page 8
• NSM and Intrusion Detection and Prevention Device Management Overview on page 5
7Copyright © 2010, Juniper Networks, Inc.
Page 24

Configuring Intrusion Detection and Prevention Devices Guide
Adding Intrusion Detection and Prevention Devices in NSM Overview
Before NSM can manage IDP devices, you must first add the IDP devices to the
management system using the NSM UI. To add an IDP device, you create an object in
the UI that represents the physical device, and then create a connection between the UI
object and the device so that their information is linked. When you make a change to the
UI device object, you can push that information to the real device so the two remain
synchronized. You can add a single IDP device at a time or add multiple IDP devices all
at once.
For complete details on adding IDP devices, see the Network and Security Manager
Administration Guide.
Related
Documentation
Adding Intrusion Detection and Prevention Clusters in NSM Overview on page 8•
• Using Templates and Configuration Groups in NSM Overview on page 8
Adding Intrusion Detection and Prevention Clusters in NSM Overview
In IDP, maximum of two clusters join together to ensure continued network uptime. The
device configurations are synchronized, meaning all cluster members share the same
configuration settings, enabling an IDP device to handle traffic for another if one device
fails.
Adding a cluster is a two-stage process:
•
Add the cluster device object.
•
Add the members of the cluster to the cluster device object.
For complete details on adding IDP clusters, see the Network and Security Manager
Administration Guide.
Related
Documentation
Using Templates and Configuration Groups in NSM Overview on page 8•
• NSM and Intrusion Detection and Prevention Device Management Overview on page 5
Using Templates and Configuration Groups in NSM Overview
Use templates to define an IDP device configuration and then reuse that configuration
information across multiple IDP devices. In a template, you need to define only those
configuration parameters that you want to set; you do not need to specify a complete
device configuration.
Templates provide these benefits:
•
You can configure parameter values for an IDP device by referring to one or more
templates when configuring the device.
Copyright © 2010, Juniper Networks, Inc.8
Page 25

Chapter 2: Understanding Intrusion Detection and Prevention Device Configuration and Integration Overview
•
When you change a parameter value in a template and save the template, the value
also changes for all the IDP device configurations that refer to that template, unless
specifically overridden in the device object.
For complete details on using device templates and configuration groups, see the Network
and Security Manager Administration Guide.
Related
Documentation
• NSM and Intrusion Detection and Prevention Device Management Overview on page 5
• Intrusion Detection and Prevention Services and Device Configurations Supported in
NSM on page 6
9Copyright © 2010, Juniper Networks, Inc.
Page 26

Configuring Intrusion Detection and Prevention Devices Guide
Copyright © 2010, Juniper Networks, Inc.10
Page 27

PART 2
Configuring Intrusion Detection and
Prevention Devices
•
Configuring Profiler Settings on page 13
•
Configuring Security Policies on page 31
•
Working with Attack Objects on page 63
•
Configuring SNMP and Syslog Settings on page 81
•
Configuring Anti-Spoof Settings on page 85
•
Configuring Intrusion Detection and Prevention Device Settings on page 89
•
Configuring Additional Intrusion Detection and Prevention Features on page 113
11Copyright © 2010, Juniper Networks, Inc.
Page 28

Configuring Intrusion Detection and Prevention Devices Guide
Copyright © 2010, Juniper Networks, Inc.12
Page 29

CHAPTER 3
Configuring Profiler Settings
Before configuring security, you must first enable and set up the Profiler. The Profiler is
a network analysis tool that helps you learn about your internal network, enabling you
to create effective security policies and minimize unnecessary log records. After you
configurethe Profiler, it automatically learns about your internal network and the elements
that comprise it, including hosts, peers (communication between two hosts), ports
(non-IP protocols, TCP/UDP ports, RPC programs), and Layer-7 data that uniquely
identifies hosts, applications, commands, users, and filenames.
The Profiler is supported in all IDP modes and HA configurations, and also queries and
correlates information from multiple devices. For details on analyzing your network, see
the Network and Security Manager Administration Guide. This chapter providesinformation
on setting up the Profiler and configuring antivirus settings, including antispam and Web
filtering.
•
Configuring Profiler Options (NSM Procedure) on page 13
•
Viewing Profiler Logs (NSM Procedure) on page 20
•
Modifying Profiler Settings (NSM Procedure) on page 25
•
Configuring Profiler Database Preferences (NSM Procedure) on page 26
•
Displaying Profiler Database Information (NSM Procedure) on page 28
•
Querying the Profiler Database (NSM Procedure) on page 28
•
Purging the Profiler Database (NSM Procedure) on page 28
Configuring Profiler Options (NSM Procedure)
Profiler option settings are valid for standalone IDP sensors only. For more information,
see the NSM online Help.
To configure the Profiler on a given IDP sensor, open the Device window and select Profiler
Settings.
You configure Profiler options to enable Profiler features, set network addresses and
applications subject to profiling, and set alerts.
Setting Up the Profiler
Using the Profiler involves the following steps:
13Copyright © 2010, Juniper Networks, Inc.
Page 30

Configuring Intrusion Detection and Prevention Devices Guide
•
Collecting specific information about your internal network
•
Starting the Profiler to enable your device to begin collecting data
•
Customizing Profiler preferences
You configure your device to collect specific information and compile it into the Profiler
database.
Configuring the Profiler
You can configure the Profiler using the Profiler settings available on the device settings
in the Device Manager. Using the Device Manager, double-click to access a device
managed in NSM, and click Profiler Settings.
The Profile Configuration dialog box appears with the General tab selected. Once you
select the device for profiling, you can configure the options for the device to collect data
from your internal network.
The following topics describe the steps to configure Profiler options:
•
Specifying General Options on page 14
•
Specifying Tracked Hosts on page 16
•
Specifying Context Targets on page 17
•
Specifying Alert Options on page 18
Specifying General Options
In this tab, indicate whether you want to enable Application Profiling and Probe and
Attemptand whether Non-tracked IP Profiles will be included in the profiling. Also indicate
the size of the Profiler database and whether to enable OS fingerprinting.
You configure Profiler general options to enable Profiler features.
OS fingerprinting passively detects the operating system of an end-host by analyzing
TCP handshake packets. To ensure that this works, you need to verify that OS
fingerprinting is first enabled on the profiled device. After you have configured the Profiler
with the tracked hosts and contexts, you must update the device.
OS fingerprinting works only for packets that contain a full-fledged TCP connection, that
is the TCP connection should have a SYN, SYN/ACK, and a FIN connection. OS
fingerprinting only works for operating systems that are supported on the device. A list
of the supported operating systems is available on the device in a file called
fingerprints.set at the following location:
/usr/idp/device/cfg/fingerprints.set
Configuring Network Objects
The first part of configuring the Profiler is to inform the device which network objects you
want the device to profile. When you start the Profiler, the device begins collecting data
from the selected hosts.
Copyright © 2010, Juniper Networks, Inc.14
Page 31

To specify Profiler general options:
1. From Device Manager, double-click a device and then click Profiler Settings.
2. Click the General tab.
3. Configure Profiler general options using Table 6 on page 15.
4. Click Apply.
Table 6: Profiler Settings: General Tab
DescriptionSetting
Enables the Profiler.Enable Profiling
Chapter 3: Configuring Profiler Settings
Enable Application
Profiling
Volume Tracking
Attempt
Profiles
db limit (in MB)
Enable OS fingerprinting
Enables the Profiler to collect and track application data.
This setting can be started when you disable it in the profiler setting.
Enables the Profiler to perform application volume tracking.Enable Application
Enables the Profiler to collect and track specific probes and attempts.Include Probe and
Enables the Profiler to collect and track data from external hosts.Include Non-tracked IP
Specifies maximum databasesize for the Profileron each device. By default, the maximum database
size is set to 3GB.
Enables the Profiler to perform passive OS fingerprinting to determine the operating system of an
end host.
OS fingerprinting detects the operating system of an end host by analyzing TCP handshake packets.
The OS fingerprinting process depends on an established TCP connection (one that has a SYN and
a SYN/ACK).
The OS fingerprinting process is capable of detecting the operating systems listed in
/usr/idp/device/cfg/fingerprints.set.
Refresh Interval(in secs)
Specifies the time interval (in seconds) that the Profiler refreshes OS fingerprinting. By default, the
Profiler refreshes OS fingerprinting data every 3600 seconds (60 minutes).
NOTE: If you change Profiler settings, you must push a configuration update
to the device before the new settings take effect. From the Device Manager,
right-click the device, select Update Device, select the Restart IDP Profiler
After Device Update checkbox, and click OK.
15Copyright © 2010, Juniper Networks, Inc.
Page 32

Configuring Intrusion Detection and Prevention Devices Guide
Specifying Tracked Hosts
Selectthe known hosts you want to track in the Tracked Hosts tab. SelectObject Manager
> Address Objects to add entries to the hosts list.
In the Tracked Hosts tab, select the Network Objects that represent your internal hosts.
The device collects detailed informationabout traffic that passes between internal hosts,
and then groups traffic that does not match an internal host in a special IP: 73.78.69.84.
Communication between an internal host and an external host is recorded only once.
For example, the device records internal host A communicating to www.yahoo.com and
www.cnn.com as one entry in the Profiler database. You can select unlimited internal
network objects. You can also use the Exclude List tab to select the Network Objects
that represent internal hosts that you do not want to include in IDP profiling. You might
want to exclude a host from the Profiler if you select a group of network objects in the
Tracked Host tab. Also, you might want to exclude specific members of that group.
You configure Profiler tracked host and excluded host settings to determine the network
segments where the Profiler gathers data.
To configure the tracked host and exclude lists:
1. From Device Manager, double-click a device and then click Profiler Settings.
2. Click the Tracked Hosts tab.
3. Click the + icon and then select Add Host > Add Network or Add Group. A dialog box
appears where you create your tracked hosts list.
4. Configure Profiler tracked host settings using Table 7 on page 16.
Table 7: Profiler Tracked Hosts/Exclude List Dialog Boxes
DescriptionSetting
Name—Enter the name of the host.Add Host
Color—Select any color from the drop-down list.
Comment—Enter any additional comments.
IP/IP Address—Enter the IP address when you select IP.
Domain/Domain name—Enter the domain name when you select domain name.
Resolve—Resolve the domain name with the IP and vice versa.
Copyright © 2010, Juniper Networks, Inc.16
Page 33

Chapter 3: Configuring Profiler Settings
Table 7: Profiler Tracked Hosts/Exclude List Dialog Boxes (continued)
DescriptionSetting
Name—Enter the name of the host.Add Network
IP Address—Enter the IP address of the network.
Use Wildcard Mask—Enable this feature if you want to use wildcard mask.
Netmask—Enter the netmask for the IP.
Color—Select any color from the drop-down list.
Comment—Enter any additional comments.
Name—Enter the name of the group.Add Group
Color—Select any color from the drop-down list.
Comment—Enter any additional comments.
Member List—Add or remove the members from the non-members list.
5. Click the Exclude List tab.
6. Click the + icon and then select Add Host > Add Network or Add Group. A dialog box
appears where you create your exclude list.
Table 7 on page 16 describes these dialog box settings.
7. Configure Profiler settings using Table 7 on page 16.
8. Click Apply.
Specifying Context Targets
Select the contexts you want to profile in the Context Targets tab. Next, determine which
contexts you want the device to record. In the Contexts to Profile tab, the context list
includes only the contexts that can clearly identify a host, a user, and/or an application.
When you start the Profiler, the device begins collecting data on traffic that matches the
selected contexts. For example, To track FTP logins, usernames, and commands, select
the FTP contexts in the Contexts to Profile tab. After the Profiler is started, the device
begins collecting information about FTP logins, usernames, and commands, enabling
NOTE: If you change Profiler settings, you must push a configuration update
to the device before the new settings take effect. From the Device Manager,
right-click the device, select Update Device, select the Restart IDP Profiler
After Device Update check box, and click OK.
17Copyright © 2010, Juniper Networks, Inc.
Page 34

Configuring Intrusion Detection and Prevention Devices Guide
you to quickly identify the users using FTP on your network and the actions they perform
over that protocol.
When you first configure the Profiler, select all contexts. This enables the device to collect
data about every context on your network, giving you a complete view of your network
traffic. Later, when you have analyzed your traffic, you can eliminate contexts that you
know will not be used on your network.
Select Profile Context to include context information. If you clear Profile Context, IDP
profile data only includes high-level traffic data such as source, destination, and service.
If you want Profiler information to include context values and network probes (for
example, port scans), also configure the Profiler to include probes and attempts.
You configure Profiler context settings to determine whether Profiler logs include not
only host and application data but also data pulled from application contexts. For
example, if you specify context targets for FTP usernames, the Profiler logs will include
the username specified for the FTP connection in addition to the hostname and service
(FTP).
To specify Profiler context targets:
1. From Device Manager, double-click a device and then click Profiler Settings.
2. Click the Contexts To Profile tab.
3. Browse and select from the predefined list of contexts.
4. Click Apply.
Specifying Alert Options
Indicate which profiler events you want to generate alerts for in the Alert Options tab.
Use this tab to configure the Profiler to indicate the appearance of a new host, protocol,
or port on your internal network. When you select New Host Detected, New Protocol
Detected, or New Port Detected, the device generates a specific log record, such as
PROFILER_NEW_HOST, in the Profiler Logs section of the Log Viewer when the device
discovers a new host, protocol, or port.
If you are configuring the Profiler for the first time, do not enable the new host, protocol,
or port alerts. As the Profilerruns, the device views all network components as new,which
can generate unnecessary log records. After the Profiler has learned about your network
and has established a baseline of network activity, you should reconfigure the device to
record new hosts, protocols, or ports discovered on your internal network. For details,
see the Network and Security Manager Administration Guide.
NOTE: If you change Profiler settings, you must push a configuration update
to the device before the new settings take effect. From the Device Manager,
right-click the device, select Update Device, check Restart IDP Profiler After
Device Update, and click OK.
Copyright © 2010, Juniper Networks, Inc.18
Page 35

Chapter 3: Configuring Profiler Settings
Select the Database Limit Exceeded alert to indicate when you have reached the
maximum limit of the database size. You can configure the maximum limit of the Profiler
database using the dbLimit parameter in the General tab of the Profiler Configuration
dialog box. The default is 500 MB; the minimum-maximum range is 0 to 500 MB. After
a device reaches this limit, it begins purging the database. For example, a network host
performs the normal connections required for Internet connectivity (SMTP, POP3, HTTP,
and so on). If the host is infected by a worm, it begins making outbound connections on
an arbitrary port. The device logs the unique event and generatesPROFILER_NEW_PROTO
and PROFILER_NEW_PORT log records. The system immediately e-mails these log
records to the security administrator, who can investigate the worm and take action to
contain it.
Repeat the configuration process for each device in your network. When you have
configured all devices on your network, you are ready to start the Profiler.
You configure Profiler alert options to determine whether you receive alerts when Profiler
detects new hosts, protocols, or ports in use.
If you are configuring the Profiler for the first time, do not enable the new host, protocol,
or port alerts. As the Profilerruns, the device views all network components as new,which
can generate unnecessary log records. After the Profiler has learned about your network
and has established a baseline of network activity, you should reconfigure the device to
record new hosts, protocols, or ports discovered on your internal network.
To specify Profiler alert options:
1. From Device Manager, double-click a device and then click Profiler Settings.
2. Click the Alert tab.
3. Configure alert settings using Table 8 on page 19.
4. Click Apply.
5. Click OK.
Table 8: Profiler Alert Tab
DescriptionSetting
Sends an alert when Profiler detects a new host.New Host Detected
New Protocol Detected
Database Limit Exceeded
Sends an alert when Profiler detects a new protocol. New Protocol detection alerts are used only
for Layer 3 protocols.
Sends an alert when Profiler detects a new port.New Port Detected
Sends an alert to indicate the maximum database size has been reached. After a device reaches
this limit, it begins purging the database.
19Copyright © 2010, Juniper Networks, Inc.
Page 36

Configuring Intrusion Detection and Prevention Devices Guide
NOTE: If you change Profiler settings, you must push a configuration update
to the device before the new settings take effect. From the Device Manager,
right-click the device, select Update Device, select the Restart IDP Profiler
After Device Update checkbox, and click OK.
Related
Documentation
Configuring Profiler Database Preferences (NSM Procedure) on page 26•
• Querying the Profiler Database (NSM Procedure) on page 28
• Purging the Profiler Database (NSM Procedure) on page 28
• Viewing Profiler Logs (NSM Procedure) on page 20
Viewing Profiler Logs (NSM Procedure)
The Profiler Viewer contains multiple tabs with different views of Profiler data. The
following topics describe these views:
•
Application Profiler on page 20
•
Protocol Profiler on page 22
•
Network Profiler on page 23
•
Violation Viewer on page 25
Application Profiler
The Application Profiler tab displays Application Volume Tracking (AVT) data. The
Application Profiler tab is a table of information such as the NSM Log Viewer which
enables you to view and analyze dynamic application (Layer-7) traffic within a specific
context.
The Application Profiler view is divided into two sections:
•
In the left pane, the Application Profiler tab displays a hierarchical tree of application
categories. Applications are grouped by common functionality. For example,
Peer-to-Peer applications include Chat and File Sharing applications. Under Chat, you
can display Yahoomessenger, MSN, and AIM; under File Sharing, you can display Kazaa,
Bittorrent, and Gnutella.
The left pane also displays aggregate statistics for volume (bytes) and packet count
for the application category, application group, or application you select in the tree.
•
In the right pane, the Application Profiler tab displays tables of session logs related to
the application category or application you select in the left pane.
Table 9 on page 21 describes Application Profiler session table.
Copyright © 2010, Juniper Networks, Inc.20
Page 37

Table 9: Application Profiler Session
DescriptionColumn
Source IP address of the traffic profiled.Src IP
Destination IP address of the traffic profiled.Dst IP
The user associated with the traffic profiled.User
The role group to which the user that is associated with the traffic profiled belongs.Role
All contexts of traffic that the devices selected in the Device table recorded.Context
When you select a context, the values that your devices recorded for a selected context.Value
Source MAC addresses of traffic profiled.Src MAC
Destination MAC addresses of traffic profiled.Dst MAC
Chapter 3: Configuring Profiler Settings
Src OUI
Source OUIs of traffic profiled.
NOTE: The Organizationally Unique Identifier (OUI) value is a mapping of the first three bytes of the
MAC address and the organization that owns the block of MACs. You can obtain a list of OUIs at
http://standards.ieee.org/regauth/oui/oui.txt.
Destination OUIs of traffic profiled.Dst OUI
Operating-system version running on the source IP of the traffic profiled.Src OS Name
Operating-system version running on the destination IP of the traffic profiled.Dst OS Name
Number of occurrences that match the traffic profiled.Hits
Timestamp for the first time the device logged the event (within the specified time interval).First Time
Timestamp for the last time the device logged the event (within the specified time interval).Last Time
Domain in which the device is managed in NSM.Domain
Device that profiled the data displayed.Device
By default, the Application Profiler view contains only the data collected during the
configured time interval.
To display the Application Profiler view:
1. Navigate to Investigate > Security Monitor > Profiler.
2. Click the Application Profiler tab.
21Copyright © 2010, Juniper Networks, Inc.
Page 38

Configuring Intrusion Detection and Prevention Devices Guide
TIP: You can jump from the Application Profilertab to the APE rulebase editor
by right-clicking an application in the left pane and selecting a policy editor
option. For information about using NSM featuresto sort, filter,and drill down
on records, see the NSM online help.
Protocol Profiler
The Protocol Profiler tab displays information about applications that are running on
your network.
Table 10 on page 22 describes the protocol profiler data.
Table 10: Protocol Profiler Data
DescriptionColumn
Src IP
Dst IP
Src OUI
Source IP address of the session.
NOTE: Profiler tracks all traffic through the IDP appliance, including traffic for hosts not in your
tracked hosts list. It records a value of 73.78.69.84 for the IP address for hosts not defined in the
Tracked Hosts tab, such as external hosts you would not know and therefore could not configure.
Destination IP address.
NOTE: Communication between an internal host and an external host is recorded only once. For
example, the device records internal host A communicating to http://ca.yahoo.com and
http://edition.cnn.com as one entry in the Profiler DB.
The user associated with the session.User
The role to which the user belongs.Role
Matching contexts.Context
Value retrieved from matching context.Value
Source MAC addresses.Src MAC
Destination MAC addresses.Dst MAC
Source OUI.
NOTE: The Organizationally Unique Identifier (OUI) value is a mapping of the first three bytes
of the MAC address and the organization that owns the block of MACs. You can obtain a list of
OUIs at http://standards.ieee.org/regauth/oui/oui.txt.
Destination OUI.Dst OUI
Operating-system version running on the source IP.Src OS Name
Operating-system version running on the destination IP.Dst OS Name
Copyright © 2010, Juniper Networks, Inc.22
Page 39

Table 10: Protocol Profiler Data (continued)
DescriptionColumn
Number of occurrences that match the session.Hits
Timestamp for the first time the device logged the event (within the specified time interval).First Time
Timestamp for the last time the device logged the event (within the specified time interval).Last Time
NSM domain.Domain
Device through which the session was forwarded.Device
By default,the ProtocolProfiler tab contains only the data collected during the configured
time interval.
To display the Protocol Profiler tab:
Chapter 3: Configuring Profiler Settings
1. In the NSM navigation tree, select Investigate > Security Monitor > Profiler.
2. Click the Protocol Profiler tab.
Network Profiler
The Network Profiler view is a table of information such as the NSM Log Viewer which
enables you to view and analyze data related to static traffic (Layer-3, Layer-4, and RPC
protocols, ports, and program numbers) within the context of data corresponding to
peer, host, and operating system.
Table 11 on page 23 describes Network Profiler data.
Table 11: Network Profiler Data
DescriptionColumn
Source IP address of the traffic profiled.Src IP
Destination IP address of the traffic profiled.Dst IP
TIP: For information about using NSM features to sort, filter, and drill down
in records, see the NSM online Help.
The user associated with the traffic profiled.User
The role group to which the user that is associated with the traffic profiled belongs.Role
All services of traffic profiled.Service
23Copyright © 2010, Juniper Networks, Inc.
Page 40

Configuring Intrusion Detection and Prevention Devices Guide
Table 11: Network Profiler Data (continued)
DescriptionColumn
Access Type
Src OUI
Type of the traffic profiled:
•
Access indicates a successful connection, during which the device recorded valid requests and
responses from the server to a client.
•
Attempt indicates a request that did not receive a reply. The device recorded a packet from a client
to a server, but never saw a reply.
•
Probe indicates a request that does not expect a reply. For non-TCP sessions, the device recorded
an ICMP error; for TCP sessions, the device recorded a SYN packet from the client followed by a
RST from the server.
Source MAC addresses of traffic profiled.Src MAC
Destination MAC addresses of traffic profiled.Dst MAC
Source OUIs of traffic profiled.
NOTE: OUI stands for Organizationally Unique Identifier. This value is a mapping of the first three
bytes of the MAC address and the organization that owns the block of MACs. You can obtain a list of
OUIs at http://standards.ieee.org/regauth/oui/oui.txt.
Destination OUIs of traffic profiled.Dst OUI
Operating-system version running on the source IP of the traffic profiled.Src OS Name
Operating-system version running on the destination IP of the traffic profiled.Dst OS Name
Number of occurrences that match the traffic profiled.Hits
Timestamp for the first time the device logged the event (within the specified time interval).First Time
Timestamp for the last time the device logged the event (within the specified time interval).Last Time
Domain in which the device is managed in NSM.Domain
Device that profiled the data displayed.Device
To display the Network Profiler view:
1. Navigate to Investigate > Security Monitor > Profiler.
2. Click the Network Profiler tab.
TIP: For information about using NSM features to sort, filter, and drill down
on records, see the NSM online Help.
Copyright © 2010, Juniper Networks, Inc.24
Page 41

Violation Viewer
Chapter 3: Configuring Profiler Settings
The Violation Viewer is a filtered view of the Network Profiler view. In the Violation Viewer,
you configure permitted objects. Permitted objects are filtered from the display, allowing
you to focus on unpermitted traffic.
To configure permitted objects:
1. Navigate to Investigate > Security Monitor > Profiler.
2. Click the Violation Viewer tab.
3. Click on the + icon that appears on the top of the right-hand window to display the
New Permitted Object dialog box.
4. Type a name for the permitted object.
5. Within the New Permitted Object dialog box, click the + icon to add a rule to match
source, destination, and services values for the permitted object.
6. To change the source, destination, or service value from Any, right-click the value and
select Add Source, Add Destination, or Add Service.
7. Use the selection controls to select the desired address objects or service objects and
click OK.
8. Click OK to save the permitted object.
The object appears in the filters windows within the Violation Viewer tab.
9. Select the object and click Apply to hide all matching objects from the Violation
Viewer.
TIP: For information about using additional NSM features to sort, filter, and
drill down on records, see the NSM online Help.
Related
Documentation
Configuring Profiler Options (NSM Procedure) on page 13•
• Displaying Profiler Database Information (NSM Procedure) on page 28
• Querying the Profiler Database (NSM Procedure) on page 28
Modifying Profiler Settings (NSM Procedure)
You can use the Profiler Settings dialog box to modify Profiler database settings and
default settings for application volume tracking reports.
To modify profiler database and application volume tracking settings:
1. From the NSM main menu, select Tools > Preferences. The New Preferences dialog
box is displayed.
2. Click Profiler Settings.
25Copyright © 2010, Juniper Networks, Inc.
Page 42

Configuring Intrusion Detection and Prevention Devices Guide
3. Modify settings as described in Table 12 on page 26.
4. Click OK.
Table 12: Profiler Settings
DescriptionSetting
Purge profiler database if size exceeds (in
MB)
Max profiler database size after purging (in
MB)
Hour of day to perform db optimization
(local time)
Number of sessions to display per
application
Hours of session data to display from
present time
Related
Documentation
Configuring Profiler Options (NSM Procedure) on page 13•
• Querying the Profiler Database (NSM Procedure) on page 28
Removes the profiler database for the selected size in MB. The default value is
1000 MB.
Specifies the maximum size of the purged profiler database. The default value is
750 MB.
Specifies the timeout entry for a profiler query. The default value is 120 seconds.Profiler query timeout (in seconds)
Specifies the time to perform the database optimization. The default value is
00:00 GMT.
Determines the number of sessions displayedin the Application Profiler application
volume tracking session tables.
The default value is 10 sessions. You can specify from 5 to 10,000 sessions.
Determines the hours of application volume tracking data displayed in the
Application Profiler tab session tables.
The default value is 1 hour. You can specify from 1 to 24 hours.
This setting is also a data retention policy. By default, data older than 1 hour is
deleted. If your change to 12 hours, data older than 12 hours is deleted.
Configuring Profiler Database Preferences (NSM Procedure)
ScreenOS 6.2 supports application volume tracking (AVT), a feature that enables NSM
to track network bandwidth usage on a per-application basis. The security device sends
the NSM server periodic update messages containing details about port activity. NSM
listens and processes these periodic update messages and maintains a cumulative count
for each port. NSM displays this count on the console. NSM provides reports about
application volume tracking. The AVT feature has the following limitations:
•
Periodic updates maintained per port for each active session can slightly affect CPU
performance.
•
Accuracy of AVT data is dependent on communication with the NSM server. NSM,
however, lacks a mechanism to ensure that periodic updates sent by AVT from
ScreenOSare received, which may result in a lag between traffic instances and reporting
of those instances. NSM maintains a cumulative count for all traffic on each port
regardless of session, node, or protocol. The count displayed is a total across all
Copyright © 2010, Juniper Networks, Inc.26
Page 43

Chapter 3: Configuring Profiler Settings
sessions. Because updates are periodic, the currently displayed number of bytes in
NSM may be inaccurate until the next update.
•
You must use NSM to view the enhanced logging provided by AVT.
For more details on AVT, see the Network and Security Manager Administration Guide.
Use the Profiler Settings under the Tools menu to configure the Profiler preferences
mentioned in Table 12 on page 26. You can use the Profiler Settings dialog box to modify
Profiler database settings and default settings for application volume tracking reports.
Data discovered by Profiler is stored in a database located on the NSM GUI server.
To modify profiler database preferences and application volume tracking settings:
1. From the NSM main menu, select Tools > Preferences. The New Preferences dialog
box is displayed.
2. Click Profiler Settings.
3. Modify settings as described in Table 12 on page 26.
4. Click OK.
Table 13: Profiler Database Preferences
DescriptionSetting
NSM purges the profiler database size if it exceeds 4GB (4000 MB) by default.Purge profiler database if size exceeds (in
MB)
Max profiler database size after purging (in
MB)
Hour of day to perform db optimization
(local time)
Number of sessions to display per
application
Hours of session data to display from
present time
If the database size exceeds its maximum limit, NSM purges the Profiler database
size until the size reaches 3 GB (3000 MB) by default.
Specifies the timeout entry for a profiler query. The default value is 120 seconds.Profiler query timeout (in seconds)
Specifies the time to perform the database optimization. The default value is
00:00 GMT.
Determines the number of application volume tracking sessions displayed in the
Application Profiler tab session tables.
The default value is 10 sessions. You can specify from 5 to 10,000 sessions.
Determines the hours of application volume tracking data displayed in the
Application Profiler tab session tables.
The default value is 1 hour. You can specify from 1 to 24 hours.
Related
Documentation
Configuring Profiler Options (NSM Procedure) on page 13•
• Displaying Profiler Database Information (NSM Procedure) on page 28
This setting is also a data retention policy. By default, data older than 1 hour is
deleted. If your change to 12 hours, data older than 12 hours is deleted.
27Copyright © 2010, Juniper Networks, Inc.
Page 44

Configuring Intrusion Detection and Prevention Devices Guide
• Viewing Profiler Logs (NSM Procedure) on page 20
Displaying Profiler Database Information (NSM Procedure)
Purpose Data discovered by Profiler is stored in a database located on the NSM GUI server. Use
the steps in this procedure to display information about the Profiler database.
Action To display Profiler database information:
1. In the NSM Navigation tree select Investigate > Security Monitor > Profiler.
2. Click the Show DB Information icon in the upper right corner to view specific details
about the Profiler database, including the database size.
Related
Documentation
Configuring Profiler Options (NSM Procedure) on page 13•
• Configuring Profiler Database Preferences (NSM Procedure) on page 26
• Querying the Profiler Database (NSM Procedure) on page 28
Querying the Profiler Database (NSM Procedure)
Purpose Data discovered by Profiler is stored in a database located on the NSM GUI server. Use
the steps in this procedure to query the Profiler database.
Action To query records in the database:
1. Log into the NSM GUI server as the Postgres SQL user. By default, the Postgres SQL
user is netscreen.
2. Navigate to the directory where the Profiler DB is located: /usr/local/nsmpsql/bin.
3. Run any Postgres SQL command. For example, you can type the following command:
./psql -d profilerDb
Related
Documentation
Configuring Profiler Database Preferences (NSM Procedure) on page 26•
• Configuring Profiler Options (NSM Procedure) on page 13
• Displaying Profiler Database Information (NSM Procedure) on page 28
• Purging the Profiler Database (NSM Procedure) on page 28
Purging the Profiler Database (NSM Procedure)
Data discovered by Profiler is stored in a database located on the NSM GUI server. When
the databasereachesa maximum size (4 GB by default), it begins purging records (oldest
first) automatically. The Profiler stops purging records when it reaches a certain set
minimum size (3 GB by default).
Use the steps in this procedure to purge the Profiler database, if needed.
Copyright © 2010, Juniper Networks, Inc.28
Page 45

Chapter 3: Configuring Profiler Settings
To change automaticpurge settings, from the NSM main menu select Tools > Preferences
and modify the Profiler database settings.
To manually purge the database:
1. In the NSM Navigation tree, select Investigate > Security Monitor > Profiler.
2. Click the Clear All DB icon in the upper right corner.
Related
Documentation
• Configuring Profiler Options (NSM Procedure) on page 13
• Configuring Profiler Database Preferences (NSM Procedure) on page 26
• Displaying Profiler Database Information (NSM Procedure) on page 28
• Querying the Profiler Database (NSM Procedure) on page 28
29Copyright © 2010, Juniper Networks, Inc.
Page 46

Configuring Intrusion Detection and Prevention Devices Guide
Copyright © 2010, Juniper Networks, Inc.30
Page 47

CHAPTER 4
Configuring Security Policies
•
Intrusion Detection and Prevention Devices and Security Policies Overview on page 31
•
Configuring Predefined Security Policies (NSM Procedure) on page 33
•
Creating a New Security Policy (NSM Procedure) on page 34
•
Modifying IDP Rulebase Rules (NSM Procedure) on page 36
•
Configuring Exempt Rulebase Rules (NSM Procedure) on page 45
•
Configuring Backdoor Rulebase Rules (NSM Procedure) on page 47
•
Configuring SYN Protector Rulebase Rules (NSM Procedure) on page 49
•
Configuring Traffic Anomalies Rulebase Rules (NSM Procedure) on page 52
•
Configuring Network Honeypot Rulebase Rules (NSM Procedure) on page 54
•
Configuring Application Rulebase Rules (NSM Procedure) on page 58
Intrusion Detection and Prevention Devices and Security Policies Overview
An IDP security policy defines how the IDP device handles network traffic. It allows you
to enforce various attack detection and prevention techniques on traffic that traverses
your network.
For a detailed explanation of security policy features and components, and for examples,
see the IDP Concepts & Examples Guide.
To create an effective security policy, follow these basic steps:
1. Run the New Policy wizard to create a new security policy object. The new security
policy can be based on a predefined template.
2. Use the Security Policy editor to add one or more rulebases.
A rulebase is an ordered set of rules that use a particular detection method to identify
and prevent attacks.
Table 14 on page 32 describes the IDP security policy rulebases. A security policy can
contain only one instance of any rulebase type.
31Copyright © 2010, Juniper Networks, Inc.
Page 48

Configuring Intrusion Detection and Prevention Devices Guide
Table 14: IDP Security Policy Rulebases
DescriptionRulebase
Application Rulebase
IDP Rulebase
Exempt Rulebase
Backdoor Rulebase
SYN Protector Rulebase
Traffic Anomalies
Rulebase
Network Honeypot
Rulebase
Enables you to limit bandwidth for specified users and applications and thus helps to manage
network traffic. APE rules do not use attack objects..
Protects your network from attacks by using attack objects to detect known and unknown attacks.
Juniper Networks provides predefined attack objects that you can use in IDP rules. You can also
configure your own custom attack objects.
You configure rules in this rulebase to exclude known false positives or to exclude a specific source,
destination, or source/destination pair from matching an IDP rule. If traffic matches a rule in the
IDP rulebase, IDP attempts to match the traffic against the Exempt rulebase before performing
the action specified.
Protectsyour network from mechanisms installed on a host computer that facilitatesunauthorized
accessto the system. Attackers who have already compromised a system typicallyinstall backdoors
(such as Trojans) to make future attacks easier. When attackers send and retrieve information to
and from the backdoor program (as when typing commands), they generateinteractive traffic that
IDP can detect.
Protects your network from SYN-floods by ensuring that the three-way handshake is performed
successfully for specified TCP traffic. If you know that your network is vulnerable to a SYN-flood,
use the SYN-Protector rulebase to prevent it.
Protects your network from attacks by using traffic flow analysis to identify attacks that occur over
multiple connections and sessions (such as scans).
Protects your network by impersonating open ports on existing servers on your network, alerting
you to attackers performing port scans and other information-gathering activities.
Related
Documentation
3. Within rulebases, configure rules.
Rules are instructions that provide context to detection methods. Rules specify:
•
A source/destination/service match condition that determines which traffic to
inspect
•
Attack objects that determine what to look for (IDP rulebase and Exempt rulebase)
•
Actions that determine what to do when an attack is detected
•
Notification options, including logs, alerts, and packet captures
Each rulebase can contain up to 40,000 rules.
4. Fine-tune your security policy as you learn more about your network and security
requirements and IDP capabilities.
Configuring Predefined Security Policies (NSM Procedure) on page 33•
• Creating a New Security Policy (NSM Procedure) on page 34
• Assigning a Security Policy in an Intrusion Detection and Prevention Device (NSM
Procedure) on page 119
Copyright © 2010, Juniper Networks, Inc.32
Page 49

• Troubleshooting Security Policy Validation Errors (NSM Procedure) on page 120
Configuring Predefined Security Policies (NSM Procedure)
The highly respected Juniper Networks Security Center team (J-Security Center) provides
the defaultIDP security policy—named Recommended.We advise that you use this policy
to protect your network from the likeliest and most dangerous attacks.
Table 15 on page 33 summarizes the properties of the Recommended security policy.
Table 15: Recommended Security Policy Definition
ValueProperty
IDP RulebaseRulebase
9 rules, distinguished by attack objectRules
AnyTraffic source
Chapter 4: Configuring Security Policies
Service
Attacks
Default, meaning the matching property is based on the service bindings of the attack object
specified by the rule
AnyDestination
Recommended IP, Recommended TCP, Recommended ICMP, Recommended HTTP,
Recommended SMTP, Recommended DNS, Recommended FTP, Recommended POP3,
Recommended IMAP, Recommended Trojan, Recommended Virus, Recommended Worm
Recommended, meaning the action is specified by the attack objectAction
LoggingNotification
If you prefer, you can copy this security policy and use it as a template for a custom
security policy tailored for your network.
Table 16 on page 33 describes other IDP security policy templates.
Table 16: IDP Security Policy Templates
DescriptionTemplate
Includes all attack objects and enables packet logging for all rules.all_with_logging
Includes all attack objects but does not enable packet logging.all_without_logging
Protects a typical DMZ environment.dmz_services
Protects DNS services.dns_server
Protects file sharing services, such as SMB, NFS, FTP, and others.file_server
33Copyright © 2010, Juniper Networks, Inc.
Page 50

Configuring Intrusion Detection and Prevention Devices Guide
Table 16: IDP Security Policy Templates (continued)
DescriptionTemplate
getting_started
Contains very open rules. Useful in controlled lab environments, but should not be deployed on
heavy traffic live networks.
Contains a good blend of security and performance.idp_default
Protects HTTP servers from remote attacks.web_server
If you use these templates, we advise you customize them for your deployment. At a
minimum, you should change the destination IP setting from Any to the IP addresses for
specific servers you want to protect. For more information, see the IDP Concepts &
Examples guide.
Related
Documentation
Intrusion Detection and Prevention Devices and Security Policies Overview on page 31•
• Creating a New Security Policy (NSM Procedure) on page 34
• Assigning a Security Policy in an Intrusion Detection and Prevention Device (NSM
Procedure) on page 119
• Modifying IDP Rulebase Rules (NSM Procedure) on page 36
Creating a New Security Policy (NSM Procedure)
You use the security policy wizard to create a new security policy. The security policies
you create with the wizard must have a new name but can be based on existing policies
or templates.
To create a new security policy:
1. In the NSM navigation tree, select Policy Manager > Security Policies.
2. Select File > New Policy to display the New Policy wizard.
3. On the first page, complete the settings and then click Next. Table 17 on page 34
describes page one fields.
Table 17: New Policy Wizard: Page One
DescriptionSetting
A string to identify the policy.Name
Text to further identify the policy. In the security policy list, you can sort on comments.Comments
4. On the second page, complete the settings and then click Next. Table 18 on page 35
describes page two settings.
Copyright © 2010, Juniper Networks, Inc.34
Page 51

Table 18: New Policy Wizard: Page Two
DescriptionSetting
Chapter 4: Configuring Security Policies
Create new Policy for
Use Existing Policy
Select this option to create a new security policy.
If you select this option, the wizard displays the following set of device types:
•
Firewall/VPN
•
Firewall/VPN with IDP
•
Standalone IDP
Select Standalone IDP.
Use this option to assign an existing policy to one or more IDP devices.
If you select this option, the wizard displays a drop-down list of existing policies.
Select a policy from the list.
NOTE: This procedure involves creating a new policy. For this procedure, do not select Use Existing
Policy.
5. On the next pages, complete pre-configuration options. Table 19 on page 35 describes
your choices. Click Next to advance through the pages.
Table 19: New Policy Wizard: Pre-configuration Options
DescriptionSetting
Use Predefined Policy
Template
Select this option to create a new security policy based on a predefined template.
If you select this option, the wizard displays a drop-down list of predefined templates.
Configure IDP Policy
Select one and click Next.
Select this option and complete the rule properties on the next page to generate a policy with the
following features:
•
IDP rulebase
•
Multiple rules matching any source, any destination, and default services
•
Multiple rules are distinguished by the attack object severity group, action, and notification option
you configure in the next wizard page.
Select this option to create an empty policy that you can later modify.Empty Policy
6. On the next to last page, select IDP devices for which you are designing this policy.
Then click Next.
7. Click Finish to save the policy.
The new policy appears in the security policy list. After you have created a security policy,
you can add rules to the new policy. Rules include IPv6, VPN, and also VPN link. For more
information, see the IDP Concepts & Examples guide
35Copyright © 2010, Juniper Networks, Inc.
Page 52

Configuring Intrusion Detection and Prevention Devices Guide
Related
Documentation
Intrusion Detection and Prevention Devices and Security Policies Overview on page 31•
• Configuring Predefined Security Policies (NSM Procedure) on page 33
• Modifying IDP Rulebase Rules (NSM Procedure) on page 36
• Assigning a Security Policy in an Intrusion Detection and Prevention Device (NSM
Procedure) on page 119
Modifying IDP Rulebase Rules (NSM Procedure)
This procedure assumes you have used the New Policy wizard to create a basic policy
that you can modify.
The primary IDP security policy rulebase is the IDP rulebase. The IDP rulebase enables
the IDP process engine to inspect matching traffic for signs of an attack.
For background on and examples of IDP rulebase rules, see the IDP Concepts & Examples
Guide.
To modify IDP rulebase rules:
1. In the NSM navigation tree, select Configure > Policy Manager > Security Policies.
2. Select the security policy you want to edit.
3. In the security policy pane, select IDP tab to display the IDP rulebase table.
4. To add, delete, copy, or reorder rules, right-click the table cell for the rule number and
make your selection.
5. To modify the property of a rule, right-click the table cell for the property and make
your selection. Table 20 on page 36 lists the rule properties you can modify and
provides references documentation for these properties.
Table 20: IDP Rulebase Rule Properties
ReferenceProperty
Identification number of the IDP rules that you add.ID
You can select the zone from which the source sends traffic to the destination zone.Match
You can select the attacks that you want add IDP to match in the monitored traffic.Look For
Specifies the action you want IDP to perform against the current connection.Action
IP Action
Notification
Specifies the action you want IDP to perform against future connections that use the same IP
address.
You can choose none, or enable logging and select the logging options that are appropriate for your
network.
Specifies the VLAN tags you want to match in applying the rule.VLAN Tag
Copyright © 2010, Juniper Networks, Inc.36
Page 53

Table 20: IDP Rulebase Rule Properties (continued)
ReferenceProperty
Chapter 4: Configuring Security Policies
Severity
You can use the default severity settings of the selectedattack objects, or you can choose a specific
severity for your rule.
Specifies the selected source and destination zone that are available on the security device.Install On
Specifies the optional fields that you can configure in the rule.Optional Fields
Describes any additional comments about the rule.Comments
Following are the updates that you can perform on an IDP rulebase rule:
•
Specifying Rule Match Conditions on page 37
•
Specifying IDP Rulebase Attack Objects on page 38
•
Specifying Rule Session Action on page 39
•
Specifying Rule IP Action on page 41
•
Specifying Rule Notification Options on page 42
•
Specifying Rule VLAN Matches on page 42
•
Specifying Rule Targets on page 43
•
Specifying Rule Severity on page 43
•
Specifying Rule Optional Fields on page 44
•
Specifying Rule Comments on page 44
Specifying Rule Match Conditions
To specify rule match conditions, right-click the table cell and select your setting.
Table 21 on page 37 describes match condition columns for IDP rulebase rules.
Table 21: IDP Rulebase Match Condition Settings
DescriptionColumn
Not applicable for standalone IDP devices.From zone / To zone
Source
Select Address–Display the Select Address dialog box where you can select address objects for
traffic sources.
Any–Matches any source of traffic. To guard against incoming attacks, you typically specify Any.
Negate–Matches any except those specified.
To use address negation:
1. Add the address object.
2. Right-click the address object and select Negate.
37Copyright © 2010, Juniper Networks, Inc.
Page 54

Configuring Intrusion Detection and Prevention Devices Guide
Table 21: IDP Rulebase Match Condition Settings (continued)
DescriptionColumn
User Role
Destination
Service
Select User Role–Displays the Select User Role dialog box where you can select or configure user
role matches.
If a value for User Role matches, the Source parameter is not consulted.
User role-based rules are evaluated before IP source rules. If a user role matches, and if the other
match criteria are met, the rule is applied and IP address-based rules are not consulted.
NOTE: Matching based on user role depends on integration with Juniper Networks Infranet
Controllers.
Select Address–Display the Select Address dialog box where you can select address objects for
destination servers.
Any–Matches any destination address.
Negate–Specifies any except those specified.
To use address negation:
1. Add the address object.
2. Right-click the address object and select Negate.
Default–Matches the service(s) specified in the rule attack object(s).
If you have enabled the Application Identification (AI) feature, the IDP process engine identifies
services even if they are running on nonstandard ports.
If you have not enabled AI and specify Default, the IDP process engine assumes that standard ports
are used for the service.
NOTE: If you do not enable AI and your service uses nonstandard ports, you must create a custom
service objects.
Any–Matches any service.
Select Service–Display the Select Service dialog box where you can select predefined or custom
service objects.
Terminate
Enable or Disable–Marks the rule a terminal rule (or clears the mark). If a session matchesa terminal
rule, the IDP process engine does not load any subsequent rules. It takes action, if any, according
to the terminal rule.
Specifying IDP Rulebase Attack Objects
To add attack objects:
1. Right-click the table cell for attacks and select Select Attacks.
2. In the All Attacks/Groups box, expand Attack Groups.
Copyright © 2010, Juniper Networks, Inc.38
Page 55

3. To add attack objects recommended by Juniper Networks Security Center (J-Security
Center), expand Recommended Attacks, browse groups, and select groups or
individual attack objects.
4. Toadd other predefined attackobjects, expand All Attacks,browse groups, and select
groups or individual attack objects.
5. To add attack objects that belong to custom groups, expand the node for the custom
group, browse subgroups, and select groups or individual attack objects.
6. To add custom attack objects that do not belong to groups, expand Attack List and
select from custom attack objects.
7. Click OK.
Table 22 on page 39 describes the attack object group hierarchy for recommended and
predefined attack objects provided by J-Security Center.
Table 22: Attack Object Group Hierarchy
ContentsGroup
Chapter 4: Configuring Security Policies
Attack Type
Operating System
Severity
Web Services
Contains two subgroups: anomaly and signature. Within each subgroup, attack objects are grouped
by severity.
Contains subgroups based on category.Within each category,attack objects are grouped by severity.Category
Contains the following subgroups: BSD, Linux, Solaris, and Windows. Within each operating system,
attack objects are grouped by services and severity.
Contains the following subgroups: Critical, Major, Minor, Warning, Info. Within each severity, attack
objects are grouped by category.
NOTE: Our severity rating is not based on CVSS (Common Vulnerability Scoring System). We do
include data from Bugtraq (Symantec) and CVE (Common Vulnerabilities and Exposures).
Contains subgroups based on Web services. Within services, attacked objects are grouped by
severity.
Contains attack objects that have a significant affect on IDP performance.Miscellaneous
Specifying Rule Session Action
Actions are responses to sessions that match the source/destination condition and attack
object pattern. Actions protects your network from attacks.
If a packet triggers multiple rule actions, the IDP device takes the most severe action. For
example,if the rules dictate that a packet will receive a DiffServ marking and be dropped,
and then the packet will be dropped.
To specify a rule action, right-click the table cell and select your setting.
Table 23 on page 40 describes the actions you can set for IDP rulebase rules.
39Copyright © 2010, Juniper Networks, Inc.
Page 56

Configuring Intrusion Detection and Prevention Devices Guide
Table 23: IDP Rulebase Actions
DescriptionAction
Recommended
Diffserv Marking
Drop Packet
Drop Connection
Close Client and Server
Predefined attack objects include a recommended action. The recommended action is related to
severity. Table 24 on page 40 lists the recommended actions by severity.
IDP inspects for attacks but takes no action against the connection if an attack is found.None
IDP does not inspect for attacks and ignores the connection.Ignore
IDP assigns the indicated service-differentiation value to the packet, and then passes it on normally.
Set the service-differentiation value in the dialog box that appears when you select this action in
the rulebase.
NOTE: The marking has no effect in sniffer mode.
IDP drops a matching packet before it can reach its destination but does not close the connection.
Use this action to drop packets for attacks in traffic that is prone to spoofing, such as UDP traffic.
Dropping a connection for such traffic could result in a DoS that prevents you from receiving traffic
from a legitimate source address.
IDP drops the connection without sending an RST packet to the sender, preventing the traffic from
reaching its destination. Use this action to drop connections for traffic that is not prone to spoofing.
IDP closes the connection and sends an RST packet to both the client and the server. If IDP is in
sniffer mode, IDP sends an RST packet to both the client and server but does not close the
connection.
IDP closes the connection to the client but not to the server.Close Client
IDP closes the connection to the server but not to the client.Close Server
Table 24 on page 40 describes the logic applied to the value Recommended, a setting
coded in predefined attack objects provided by Juniper Networks Security Center.
Table 24: IDP Rulebase Actions: Recommended Actions by Severity
Recommended ActionDescriptionSeverity
Critical
or gain system-level privileges.
Major
denial of service, install or use a Trojan, or gain
user-level access to a host.
Minor
through directory traversal or information leaks.
Warning
or scan the network. They can also be obsolete
attacks (but probably harmless) traffic.
Drop Packet, Drop ConnectionAttacksattempt to evade an IPS,crash a machine,
Drop Packet, Drop ConnectionAttacks attempt to crash a service, perform a
NoneAttacks attempt to obtain critical information
NoneAttacks attempt to obtain noncritical information
Copyright © 2010, Juniper Networks, Inc.40
Page 57

Chapter 4: Configuring Security Policies
Table 24: IDP Rulebase Actions: Recommended Actions by Severity (continued)
Recommended ActionDescriptionSeverity
Info
URLs, DNS lookup failures, and SNMP public
community strings. You can use informational
attack objects to obtain information about your
network.
NOTE: Our severity rating is not based on CVSS (Common Vulnerability
Scoring System). We do include data from Bugtraq (Symantec) and CVE
(Common Vulnerabilities and Exposures).
Specifying Rule IP Action
If the IDP device matches an attack, it can take action not only against the current session
but also against future network traffic that uses the same IP address. Such actions are
called IP actions. By default, the specified IP action is permanent (timeout = 0). If you
prefer, you can set a timeout.
To specify an IP action, right-click the table cell and configure options.
Table 25 on page 41 describes IDP rulebase IP actions.
Table 25: IDP Rulebase IP Actions
DescriptionIP Action
NoneAttacks are normal, harmless traffic containing
IP Block
IP Close
IDP blocks the matching connection and future connections that matchcombinations of the following
properties you specify:
•
Source IP address
•
Source subnet
•
Protocol
•
Destination IP Address
•
Destination Subnet
•
Destination Port
•
From Zone
IDP closes the matching connection and future connections that match combinations of the following
properties you specify:
•
Source IP address
•
Source subnet
•
Protocol
•
Destination IP Address
•
Destination Subnet
•
Destination Port
•
From Zone
41Copyright © 2010, Juniper Networks, Inc.
Page 58

Configuring Intrusion Detection and Prevention Devices Guide
Table 25: IDP Rulebase IP Actions (continued)
DescriptionIP Action
IDP does not take any action against future traffic but logs the event or sends an alert.IP Notify
Specifying Rule Notification Options
Notification options determine how events that match the rule are logged.
To specify notification options, right-click the table cell and configure options.
Table 26 on page 42 describes IDP rulebase notification options.
Table 26: IDP Rulebase Notification Options
DescriptionOption
Event logs and alerts
Packet captures
You can enable the following delivery and handling options for logs:
•
Send to NSM Log Viewer
•
Send to NSM Log Viewer and flag as an alert
•
Send to an e-mail address list
•
Send to syslog
•
Send to SNMP trap
•
Save in XML format
•
Save in CVS format
•
Process with a script
Viewing the packets used in an attack on your network can help you determine the extent of the
attempted attack, its purpose, whether or not the attack was successful, and any possible damage
to your network.
If multiple rules with packet capture enabled match the same attack, IDP captures the maximum
specified number of packets. For example, you configure rule 1 to capture 10 packets before and after
the attack, and you configure rule 2 to capture 5 packets before and after the attack. If both rules
match the same attack, IDP attempts to capture 10 packets before and after the attack.
You can capture up to 256 packets before the event and 256 packets after the event.
NOTE: If necessary, you can improve performance by logging only the packets received after the
attack.
Specifying Rule VLAN Matches
If you deploy an IDP device in a virtual local area network (VLAN), you can specify VLAN
tags for traffic in IDP rulebase rules.
Normally, rules match source, destination, and service. If your rule specifies a VLAN tag,
then the rule must also match the VLAN tag.
To specify that rules match a VLAN tag, right-click the table cell and configure your
setting.
Table 27 on page 43 describes VLAN tag settings.
Copyright © 2010, Juniper Networks, Inc.42
Page 59

Table 27: IDP Rulebase VLAN Tag Settings
DescriptionOption
Matches only traffic that has no VLAN tag.None
Matches traffic with any or no VLAN tag (default).Any
Chapter 4: Configuring Security Policies
Select VLAN Tags
Displays the Select VLAN Tags dialog box where you can set a single VLAN tag or a range of VLAN
tags.
Displays a dialog box that prompts you to confirm you want to delete the VLAN tag match setting.Delete VLAN Tags
Specifying Rule Targets
By default, IDP security policy rules can be applied to any IDP device. If you desire, you
can specify that the rule applies to only specified IDP devices.
To specify that the rule only applies to specified devices, right-click the table cell and
select Select Target to display the Select Targeted Devices dialog box, where you can
select the specify devices on which the rule is to be applied.
Specifying Rule Severity
Severity is a rating of the danger posed by the threat the rule is designed to prevent.
To specify a rule severity, right-click the table cell and select a severity.
Table 28 on page 43 describes rule severity settings.
Table 28: IDP Rulebase Severity
DescriptionSeverity
Critical
Major
Minor
Warning
Select Default to inherit severity from that specified in the attack object.Default
Attacks that attempt to evade an IPS, crash a machine, or gain system-level privileges.
We recommend that you drop the packets or drop the connection for such attacks.
Attacks that attempt to crash a service, perform a denial of service, install or use a Trojan, or gain
user-level access to a host.
We recommend that you drop the packets or drop the connection for such attacks.
Attacks that attempt to obtain critical information through directory traversal or information leaks.
We recommend that you log such attacks.
Attacksthat attempt to obtain noncritical information or scan the network. They can also be obsolete
attacks (but probably harmless) traffic.
We recommend that you log such attacks.
43Copyright © 2010, Juniper Networks, Inc.
Page 60

Configuring Intrusion Detection and Prevention Devices Guide
Table 28: IDP Rulebase Severity (continued)
DescriptionSeverity
Info
Attacks that are normal, harmless traffic containing URLs, DNS lookup failures, and SNMP public
community strings. You can use informational attack objects to obtain informationabout your network.
We recommend that you log such attacks.
Specifying Rule Optional Fields
Optional fields are user-defined name-value pairs you can configure if you want to be
able to sort rules based on these fields. Optional fields do not affect the functionality of
the security policy rule.
To specify optional fields, right-click the table cell and select Edit Options to display the
Select Policy Custom Options dialog box, where you can configure name-value pairs.
Specifying Rule Comments
Comments are notations about the rule. Comments do not affect the functionality of
the security policy rule.
To specify comments, right-click the table cell and select Edit Comments to display the
Edit Comments dialog box, where you can enter a comment up to 1024 characters in
length.
NOTE: Our severity rating is not based on CVSS (Common Vulnerability
Scoring System). We do include data from Bugtraq (Symantec) and CVE
(Common Vulnerabilities and Exposures).
Related
Documentation
Intrusion Detection and Prevention Devices and Security Policies Overview on page 31•
• Configuring Predefined Security Policies (NSM Procedure) on page 33
• Configuring Exempt Rulebase Rules (NSM Procedure) on page 45
• Assigning a Security Policy in an Intrusion Detection and Prevention Device (NSM
Procedure) on page 119
Copyright © 2010, Juniper Networks, Inc.44
Page 61

Configuring Exempt Rulebase Rules (NSM Procedure)
The exempt rulebase contains rules that prevent rules in the Intrusion Detection and
Prevention (IDP) rulebase from matching specific source or destination pairs for specific
attack objects.
The exempt rulebase works in conjunction with the IDP rulebase. Before you can create
exempt rules, you must first create rules in the IDP rulebase. If traffic matches a rule in
the IDP rulebase, the IDP sensor attempts to match the trafficagainst the exempt rulebase
before performing the specified action or creating a log record for the event.
NOTE: The exempt rulebase is a non-terminal rulebase.The IDP device checks
all rules in the exempt rulebase and executes all matches.
To configure an exempt rulebase rule:
1. In the NSM navigation tree, select Policy Manager > Security Policies.
Chapter 4: Configuring Security Policies
2. Select and double-click the security policy for which you want to add an exempt
rulebase rule.
3. Click New in the upper right corner of the policy viewer and select Add Exempt
Rulebase.
4. Click the New button within the rules viewer to add a rule.
5. Modify the property of the rule by right-clicking the table cell for the property and
making your modifications.
6. Configure or modify the rule using the settings described in Table 29 on page 45.
Table 29: Exempt Rulebase Rule Properties
Your ActionFunctionOption
No
Match > From Zone
Specifies if you want to add,
delete, copy, or reorder rules.
Specifies the zone from where
the source sends traffic.
Right-click the table cell for the
rule number and make your
required modifications.
Select one or more zones for the
source zone, or you can specify any
for all source zones.
NOTE: The selectedzone must be
available on the security device
specified in the Install On column.
45Copyright © 2010, Juniper Networks, Inc.
Page 62

Configuring Intrusion Detection and Prevention Devices Guide
Table 29: Exempt Rulebase Rule Properties (continued)
Match > Source
Specifies the address object
that is the source of the
traffic.
Your ActionFunctionOption
Select any to monitor network
traffic originating from any IP
address.
NOTE: You can also negate one
or more address objects to specify
all sources except the excluded
object.
Match > To Zone
Match > Destination
Attacks
VLAN Tag
zone.
Specifies the address object
that is the destination of the
traffic, typically a server or
other device on your network.
Specifies the attack(s) you
want the IDP to exempt for
the specified source or
destination addresses.
Specifies that you can
configure a rule to only apply
to messages in certain VLANs.
Select the destination zone.Specifies the destination
Select the destination object.
NOTE: You can also negate one
or more address objects to specify
all destinations except the
excluded object.
Select the attack objects or
groups.
NOTE: You must include at least
one attack object in an exempt
rule.
Set a value by selecting any of the
following options:
•
Any—This rule is applied to
messages in any VLAN and to
messages without a VLAN tag.
•
None—This rule is applied only
to messages that do not have a
VLAN tag.
•
Select VLAN Tags—This rule
pecifies which VLAN tags the
rule applies to.
Install On
Comments
For more information, see the IDP Concepts & Examples guide.
Related
Documentation
Intrusion Detection and Prevention Devices and Security Policies Overview on page 31•
• Creating a New Security Policy (NSM Procedure) on page 34
Specifies the security devices
or templates that receive and
use this rule.
Specifies any miscellaneous
comment about the rule's
purpose.
Select the target security device.
NOTE: You can also select
multiplesecurity devices on which
to install the rule.
Enter any additional comments
about the rule.
Copyright © 2010, Juniper Networks, Inc.46
Page 63

• Assigning a Security Policy in an Intrusion Detection and Prevention Device (NSM
Procedure) on page 119
• Configuring Backdoor Rulebase Rules (NSM Procedure) on page 47
Configuring Backdoor Rulebase Rules (NSM Procedure)
The backdoor rulebase detects if there exists any interactive traffic introduced during
backdoor attacks.
To configure a backdoor rulebase rule:
1. In the NSM navigation tree, select Policy Manager > Security Policies.
2. Select and double-click the security policy to which you want to add the backdoor
rulebase rule.
3. Click New in the upper right corner of the policy viewer and select Add Backdoor
Rulebase.
Chapter 4: Configuring Security Policies
4. Click the New button within the rules viewer to add a rule.
5. Modify the property of the rule by right-clicking the table cell for the property and
making your modifications.
6. Configure or modify the rule using the settings described in Table 30 on page 47.
Table 30: Backdoor Rulebase Rule Properties
Your ActionFunctionOption
No
Match > Source
Match > Destination
Specifies if you want to add,
delete, copy, or reorder rules.
Specifies the address object
that is the source of the
traffic.
Specifies the address object
that is the destination of the
traffic, typically a server or
other device on your network.
Right-click the table cell for the
rule number and make your
required modifications.
Select any to monitor network
traffic originating from any IP
address.
NOTE: You can also negate one
or more address objects to specify
all sources except the excluded
object.
Select the destination object.
NOTE: You can also negate one
or more address objects to specify
all destinations except the
excluded object.
47Copyright © 2010, Juniper Networks, Inc.
Page 64

Configuring Intrusion Detection and Prevention Devices Guide
Table 30: Backdoor Rulebase Rule Properties (continued)
Match > Service
Specifies service objects in
rules to service an attack to
access your network.
Your ActionFunctionOption
Set a service by selecting any of
the following options:
•
Any—Sets any service.
•
Default—Accepts the service
specified by the attack object.
•
Select Service—Chooses
specific services from the list of
defined service objects.
Operation
Action
Notification
VLAN Tag
Severity
or ignore the backdoor traffic.
to detect any interactive
traffic.
Allows you to create log
records with attack
informationthat you can view
real-time in the Log Viewer.
Specifies that you can
configure a rule to only apply
to messages in certain VLANs.
Specifies if you can override
the inherent attack severity
on a per-rule basis within the
IDP rulebase.
Select either Detect or Ignore.Specifies whether to detect
Select any type of action.Specifies an action of the IDP
Select Configure to create log
records.
Set a value by selecting any of the
following options:
•
Any—This rule is applied to
messages in any VLAN and to
messages without a VLAN tag.
•
None—This rule is applied only
to messages that do not have a
VLAN tag.
•
Select VLAN Tags—This rule
specifies which VLAN tags the
rule applies to.
Set the severity to Default, Info,
Warning, Minor, Major, or Critical.
NOTE: This column only appears
when you view the Security Policy
in Expanded Mode.
Install On
Comments
For more information, see the IDP Concepts & Examples guide.
Specifies the security devices
or templates that receive and
use this rule.
Specifies any miscellaneous
comment about the rule's
purpose.
Select the target security device.
NOTE: You can also select
multiplesecurity devices on which
to install the rule.
Enter any additional comments
about the rule.
Copyright © 2010, Juniper Networks, Inc.48
Page 65

Chapter 4: Configuring Security Policies
Related
Documentation
Intrusion Detection and Prevention Devices and Security Policies Overview on page 31•
• Modifying IDP Rulebase Rules (NSM Procedure) on page 36
• Configuring SYN Protector Rulebase Rules (NSM Procedure) on page 49
• Assigning a Security Policy in an Intrusion Detection and Prevention Device (NSM
Procedure) on page 119
Configuring SYN Protector Rulebase Rules (NSM Procedure)
The SYN protector rulebase protects your network from malicious SYN-flood attacks.
To configure a SYN protector rulebase rule:
1. In the NSM navigation tree, select Policy Manager > Security Policies.
2. Select and double-click the security policy to which you want to add the SYN protector
rulebase rule.
3. Click New in the upper right corner of the policy viewer and select Add SYN Protector
Rulebase.
4. Click the New button within the rules viewer to add a rule.
5. Modify the property of the rule by right-clicking the table cell for the property and
making your modifications.
6. Configure or modify the rule using the settings described in Table 31 on page 49.
Table 31: SYN Protector Rulebase Rule Properties
Your ActionFunctionOption
No
Match > Source
Match > Destination
Specifies if you want to add,
delete, copy, or reorder rules.
Specifies the address object
that is the source of the
traffic.
Specifies the address object
that is the destination of the
traffic, typically a server or
other device on your network.
Right-click the table cell for the
rule number and make your
required modifications.
Select any to monitor network
traffic originating from any IP
address.
NOTE: You can also negate one
or more address objects to specify
all sources except the excluded
object.
Select the destination object.
NOTE: You can also negate one
or more address objects to specify
all destinations except the
excluded object.
49Copyright © 2010, Juniper Networks, Inc.
Page 66

Configuring Intrusion Detection and Prevention Devices Guide
Table 31: SYN Protector Rulebase Rule Properties (continued)
Match > Service
Specifies service objects in
rules to service an attack to
access your network.
Your ActionFunctionOption
Set a service by selecting any of
the available options.
NOTE: We recommend that you
do not change the default value,
TCP-ANY.
Mode
Specifies the mode that
indicates how IDP handles
TCP traffic.
Select any of the following
options:
•
None—Specifies that IDP takes
no action and does not
participate in the three-way
handshake.
•
Relay—Specifies that IDP acts
as the middleman or relay, for
the connection establishment,
performing the three-way
handshake with the client host
on behalf of the server.
NOTE: Relay mode might note
work as expected for MPLS traffic.
When the IDP engine processes
MPLS traffic, it stores the MPLS
label information for traffic in each
direction. In the case of traffic that
matches SYN Protector rules in
relay mode, the IDP appliance is
programmed to send a SYN-ACK
before the traffic has reached the
server. In these cases, the IDP
engine does not have
server-to-client MPLS label
information. Therefore, the
SYN-ACKpacket does not include
an MPLS label. Some MPLS
routers can add packets without
a label to an existing MPLS tunnel;
others drop such packets.
•
Passive—Specifies that IDP
handles the transfer of packets
between the client host and the
server, but does not actively
prevent the connection from
being established.
Copyright © 2010, Juniper Networks, Inc.50
Page 67

Chapter 4: Configuring Security Policies
Table 31: SYN Protector Rulebase Rule Properties (continued)
Your ActionFunctionOption
Notification
Allows you to create log
records with attack
informationthat you can view
real-time in the Log Viewer.
NOTE: For more critical
attacks, you can also set an
alert flag to appear in the log
record.
Select Configure to create log
records.
NOTE: The Configuremenu option
does not appear if the Mode
column is set to None.
•
Select Logging to have a log
record created each time the
rule is matched.
•
SelectAlert to have an alert flag
placed in the Alert column of
the Log Viewer for the matching
log record.
•
In the Log Actions tab, select
desired log actions, if any.
VLAN Tag
Severity
Install On
Comments
Specifies that you can
configure a rule to only apply
to messages in certain VLANs.
Specifies if you can override
the inherent attack severity
on a per-rule basis within the
IDP rulebase.
Specifies the security devices
or templates that receive and
use this rule.
Specifies any miscellaneous
comment about the rule's
purpose.
Set a value by selecting any of the
following options:
•
Any—This rule is applied to
messages in any VLAN and to
messages without a VLAN tag.
•
None—This rule is applied only
to messages that do not have a
VLAN tag.
•
Select VLAN Tags—This rule
specifies which VLAN tags the
rule applies to.
Set the severity to Default, Info,
Warning, Minor, Major, or Critical.
NOTE: This column only appears
when you view the Security Policy
in Expanded Mode.
Select the target security device.
NOTE: You can also select
multiplesecurity devices on which
to install the rule.
Enter any additional comments
about the rule.
For more information, see the IDP Concepts & Examples guide.
Related
Documentation
Intrusion Detection and Prevention Devices and Security Policies Overview on page 31•
• Modifying IDP Rulebase Rules (NSM Procedure) on page 36
• Configuring Traffic Anomalies Rulebase Rules (NSM Procedure) on page 52
51Copyright © 2010, Juniper Networks, Inc.
Page 68

Configuring Intrusion Detection and Prevention Devices Guide
• Assigning a Security Policy in an Intrusion Detection and Prevention Device (NSM
Procedure) on page 119
Configuring Traffic Anomalies Rulebase Rules (NSM Procedure)
The traffic anomalies rulebase employs a traffic flow analysis method to detect attacks
that occur over multiple connections and sessions (such as scans).
To configure a traffic anomalies rulebase rule:
1. In the NSM navigation tree, select Policy Manager > Security Policies.
2. Select and double-click the security policy to which you want to add the traffic
anomalies rulebase rule.
3. Click New in the upper right corner of the policy viewer and select Add Traffic
Anomalies Rulebase.
4. Click the New button within the rules viewer to add a rule.
5. Modify the property of the rule by right-clicking the table cell for the property and
making your modifications.
6. Configure or modify the rule using the settings described in Table 32 on page 52.
Table 32: Traffic Anomalies Rulebase Rule Properties
Your ActionFunctionOption
No
Match > Source
Match > Destination
Specifies if you want to add,
delete, copy, or reorder rules.
Specifies the address object
that is the source of the
traffic.
Specifies the address object
that is the destination of the
traffic, typically a server or
other device on your network.
Right-click the table cell for the
rule number and make your
required modifications.
Select any to monitor network
traffic originating from any IP
address.
NOTE: You can also negate one
or more address objects to specify
all sources except the excluded
object.
Select the destination object.
NOTE: You can also negate one
or more address objects to specify
all destinations except the
excluded object.
Match > Service
Specifies service objects in
rules to service an attack to
access your network.
Set a service by selecting any of
the available options.
NOTE: We recommend that you
do not change the default value,
TCP-ANY.
Copyright © 2010, Juniper Networks, Inc.52
Page 69

Chapter 4: Configuring Security Policies
Table 32: Traffic Anomalies Rulebase Rule Properties (continued)
Your ActionFunctionOption
Traffic Anomaly
Specifies how IDP is to treat
the matching traffic.
Select any of the following
options:
•
Ignore—IDP ignores this traffic.
This option excludestraffic from
trusted sources that might be
falsely construed as a scan.
•
Detect—IDPmatches this traffic
and takes the IP action that you
have set.
When you select this option, the
Traffic Anomalies dialog box
appears. Select the scans or
sweep you want to detect and
enter values for Port Count and
Time Threshold (in seconds) or
Session Count.
IP Action
Notification
Allows you to log, drop, or
close the current connection
for each attack that matches
a rule.
Allows you to create log
records with attack
informationthat you can view
real-time in the Log Viewer.
NOTE: For more critical
attacks, you can also set an
alert flag to appear in the log
record.
Select Configure to do any one of
the following actions:
•
Enabled—Enables IP actions.
•
Action—Specifiesthe action you
want the IDP to take.
•
Block—Specifies which
parametersIDP will use to close
or block further connections
from the drop down list.
•
Logging—Specifies the log
action for a matching event.
•
Timeout (sec)—Specifies the
number of seconds that this
action remains in effect on IDP
after a traffic match.
Select Configure to create log
records.
NOTE: The Configuremenu option
does not appear if the Mode
column is set to None.
•
Select Logging to have a log
record created each time the
rule is matched.
•
SelectAlert to have an alert flag
placed in the Alert column of
the Log Viewer for the matching
log record.
•
In the Log Actions tab, select
desired log actions, if any.
53Copyright © 2010, Juniper Networks, Inc.
Page 70

Configuring Intrusion Detection and Prevention Devices Guide
Table 32: Traffic Anomalies Rulebase Rule Properties (continued)
VLAN Tag
Specifies that you can
configure a rule to only apply
to messages in certain VLANs.
Your ActionFunctionOption
Set a value by selecting any of the
following options:
•
Any—This rule is applied to
messages in any VLAN and to
messages without a VLAN tag.
•
None—This rule is applied only
to messages that do not have a
VLAN tag.
•
Select VLAN Tags—Specifies
which VLAN tags the rule
applies to.
Related
Documentation
Severity
Install On
Comments
Specifies if you can override
the inherent attack severity
on a per-rule basis within the
IDP rulebase.
Specifies the security devices
or templates that receive and
use this rule.
Specifies any miscellaneous
comment about the rule's
purpose.
Set the severity to Default, Info,
Warning, Minor, or Critical.
NOTE: This column only appears
when you view the Security Policy
in Expanded Mode.
Select the target security device.
NOTE: You can also select
multiplesecurity devices on which
to install the rule.
Enter any additional comments
about the rule.
For more information, see the IDP Concepts & Examples guide.
Intrusion Detection and Prevention Devices and Security Policies Overview on page 31•
• Modifying IDP Rulebase Rules (NSM Procedure) on page 36
• Configuring Network Honeypot Rulebase Rules (NSM Procedure) on page 54
• Assigning a Security Policy in an Intrusion Detection and Prevention Device (NSM
Procedure) on page 119
Configuring Network Honeypot Rulebase Rules (NSM Procedure)
The network honeypot rulebase is a method to detect investigation activities.
To configure a network honeypot rulebase rule:
1. In the NSM navigation tree, select Policy Manager > Security Policies.
2. Select and double-click the security policy to which you want to add the network
honeypot rulebase rule.
Copyright © 2010, Juniper Networks, Inc.54
Page 71

Chapter 4: Configuring Security Policies
3. Click New in the upper right corner of the policy viewer and select Add Network
Honeypot Rulebase.
4. Click the New button within the rules viewer to add a rule.
5. Modify the property of the rule by right-clicking the table cell for the property and
making your modifications.
6. Configure or modify the rule using the settings described in Table 33 on page 55.
Table 33: Network Honeypot Rulebase Rule Properties
Your ActionFunctionOption
No
Specifies if you want to add,
delete, copy, or reorder rules.
Right-click the table cell for the
rule number and make your
required modifications.
Source Address
Impersonate > Destination
Impersonate > Service
Operation
Specifies the address object
that is the source of the
traffic.
Specifies the address object
that is the destination of the
traffic, typically a server or
other device on your network.
Specifies the services running
on your network.
Specifies whether or not IDP
fakes open ports.
Select any source address or
group.
Select the destination object.
NOTE: You can also negate one
or more address objects to specify
all destinations except the
excluded object.
Select the services you want to
monitor.
Select any of the following
options:
•
Ignore—This option allows free
passage on your network when
creating rules for trusted traffic.
•
Impersonate—IDP creates a
fake port open to the public
based on the destination IP
addresses and service you
selected.
55Copyright © 2010, Juniper Networks, Inc.
Page 72

Configuring Intrusion Detection and Prevention Devices Guide
Table 33: Network Honeypot Rulebase Rule Properties (continued)
IP Action
Allows you to log, drop, or
close the current connection
for each attack that matches
a rule.
Your ActionFunctionOption
Select Configure to do any one of
the following actions:
•
Enabled—Enable IP actions.
•
Action—Specifiesthe action you
want the IDP to take.
•
Block—Specifies which
parametersIDP will use to close
or block further connections
from the drop-down list.
•
Logging—Specifies the log
action for a matching event.
•
Timeout (sec)—Specifies the
number of seconds that this
action remains in effect on IDP
after a traffic match.
Notification
VLAN Tag
Allows you to create log
records with attack
informationthat you can view
real-time in the Log Viewer.
NOTE: For more critical
attacks, you can also set an
alert flag to appear in the log
record.
Specifies that you can
configure a rule to only apply
to messages in certain VLANs.
Select Configure to create log
records.
NOTE: The Configuremenu option
does not appear if the Mode
column is set to None.
•
Select Logging to have a log
record created each time the
rule is matched.
•
SelectAlert to have an alert flag
placed in the Alert column of
the Log Viewer for the matching
log record.
•
In the Log Actions tab, select
desired log actions, if any.
Set a value by selecting any of the
following options:
•
Any—This rule is applied to
messages in any VLAN and to
messages without a VLAN tag.
•
None—This rule is applied only
to messages that do not have a
VLAN tag.
•
Select VLAN Tags—This rule
specifies which VLAN tags the
rule applies to.
Severity
Specifies if you can override
the inherent attack severity
on a per-rule basis within the
IDP rulebase.
Set the severity to Default, Info,
Warning, Minor, Major, or Critical.
NOTE: This column only appears
when you view the Security Policy
in Expanded Mode.
Copyright © 2010, Juniper Networks, Inc.56
Page 73

Chapter 4: Configuring Security Policies
Table 33: Network Honeypot Rulebase Rule Properties (continued)
Your ActionFunctionOption
Install On
Specifies the security devices
or templates that receive and
use this rule.
Select the target security device.
NOTE: You can also select
multiplesecurity devices on which
to install the rule.
Related
Documentation
Comments
Specifies any miscellaneous
comment about the rule's
purpose.
Enter any additional comments
about the rule.
NOTE: The IDP drops MPLS traffic that matches a Network Honeypot rule.
When the IDP engine processes MPLS traffic, it stores the MPLS label
information. It stores separate labels for client-to-server and server-to-client
communication. In the case of traffic that matches Network Honeypot rules,
there is no genuine server-to-client communication, so the IDP engine does
not have server-to-client MPLS label information. Therefore, the
impersonation operation is not supported.
For more information, see the IDP Concepts & Examples guide.
Intrusion Detection and Prevention Devices and Security Policies Overview on page 31•
• Modifying IDP Rulebase Rules (NSM Procedure) on page 36
• Assigning a Security Policy in an Intrusion Detection and Prevention Device (NSM
Procedure) on page 119
• Validating a Security Policy (NSM Procedure) on page 120
57Copyright © 2010, Juniper Networks, Inc.
Page 74

Configuring Intrusion Detection and Prevention Devices Guide
Configuring Application Rulebase Rules (NSM Procedure)
The Application Policy Enforcement (APE) rulebase enables you to limit bandwidth for
specified users and/or applications. Youcan configure APE rules to detect network traffic
based on application signatures. The APE rules are sent as part of the IDP rulebase, and
the attacks are mapped from the corresponding application. The user can define custom
application signatures to be used in the APE rules. The custom application is included
as part of the policy update for IDP 5.0 and later supported devices (devices that have
application identification support).
To configure an APE rulebase rule:
1. In the NSM navigation tree, select Policy Manager > Security Policies.
2. Select and double-click the security policy to which you want to add the APE rulebase
rule.
3. Click New in the upper right corner of the policy viewer and select Add Application
Rulebase.
4. Click the New button within the rules viewer to add a rule.
5. Modify the property of the rule by right-clicking the table cell for the property and
making your modifications.
6. Configure or modify the rule using the settings described in Table 34 on page 58.
7. Click OK to save your changes.
Table 34: APE Rulebase Rule Properties
No.
Match > Source
Match > User Role
Specifies if you want to add, delete, copy,
or reorder rules.
Specifies the address object that is the
source of the traffic.
session for the rule to be applied. If a value
for User Role matches, the Source
parameter is not consulted.
Matching based on user role depends on
integration with a compatible Juniper
Networks IC Series Unified Access Control
appliance.
Your ActionFunctionOption
Right-click the table cell for the rule number
and make your required modifications.
Select any to monitor network traffic
originating from any IP address.
NOTE: For guidelines on specifying match
parameters, see the IDP Concepts and
Examples Guide.
Right-click the table cell to select user roles.Specifies the user roles to match the
Copyright © 2010, Juniper Networks, Inc.58
Page 75

Table 34: APE Rulebase Rule Properties (continued)
Match > Destination
Specifies the address object that is the
destination of the traffic, typically a server
or other device on your network.
Chapter 4: Configuring Security Policies
Your ActionFunctionOption
Select the destination object.
NOTE: You can also negate one or more
address objects to specify all destinations
except the excluded object.
Match > Service
Match > Application
Requires one of the specified services to
match the session for the rule to be
applied. Services are Application Layer
protocols that define how data is
structured as it travels across the network.
The IDP engine can inspect services that
use TCP, UDP, RPC, and ICMP transport
layer protocols. If the application running
on the destination server uses standard
ports, you can select from predefined
services. If the application running on the
destination server uses nonstandard ports,
you must create a custom service object.
Requires one of the specified applications
to match the session for the rule to be
applied. The predefined list of applications
is populated by the application
identification feature. The application
identification feature identifies the
application regardless of port.
Port-independent application identification
simplifies rule configuration and ensures
that you do not miss applications running
on nonstandard ports. Hence it is
recommended to use the application
parameterinstead of the service parameter
whenever possible.
Right-click the table cell and select any one of
the required options.
If you specify named values for both service
and application, only the application value is
used.
It is recommended to specify Default for the
service parameter and configure the
application parameter instead.
Specify Any to not use service as a key to your
match.
NOTE: To apply an APE action to all traffic
matching source and destination parameters,
set both the service parameter and the
application parameter to Any..
Right-click the table cell and make your
required modifications.
If you specify named values for both service
and application, only the application value is
used.
Specify Any to not use application as a key to
your match.
NOTE: To apply an APE action to all traffic
matching source and destination parameters,
set both the service parameter and the
application parameter to Any.
59Copyright © 2010, Juniper Networks, Inc.
Page 76

Configuring Intrusion Detection and Prevention Devices Guide
Table 34: APE Rulebase Rule Properties (continued)
Action
Specifies which actions to perform against
attacks that match rules in your security
policy.
Your ActionFunctionOption
Right-click the table cell and select any one of
the following options:
•
None — IDP takes no action against the
connection.
•
Drop Packet — IDP drops a matchingpacket
before it can reach its destination but does
not close the connection.
•
Drop Connection — IDP drops the
connection without sending an RST packet
to the sender, preventing the traffic from
reaching its destination.
•
Close Client — IDP closes the connection to
the client and not to the server.
•
Close Server — IDP closes the connection
to the server and not to the client.
•
Close Client and Server — IDP closes the
connection and sends a RST packet to both
the client and the server.
•
Diffserv Marking — Assigns the service
differentiationvalue indicated to the packet,
then passes it on normally.
•
Rate Limiting — IDP enforces a rate limit for
all current sessions that match the rule
(separate limits for client-to-server and
server-to-client traffic). If the limit has not
been reached, IDP forwards the packets. If
the limit has been reached, IDP behaves as
if no bandwidth is available.
Notification
VLAN Tag
Install On
Comments
Specifies logging options. Packet capture
is not applicable for APE rulebase rules.
Right-click the table cell and select Configure
to display a dialog box where you can configure
logging options.
Specifies rules to traffic on certain VLANs.
Normally, for a rule to take effect, it must
match the packet source, destination,
Right-click the table cell to assign a VLAN
object to a rule or to set the VLAN tag value to
none.
service, and attackobjects. If the VLAN cell
is populated with a value other than any,
then the rule will also consider the packet’s
VLAN tag when determining a match.
Specifies target IDP devices for the rule. By
default, IDP security policy rules can be
applied to any IDP device.
Adds notations about the rule. This setting
is optional and does not affect the
functionality of the security policy rule.
Right-click the table cell and select Select
Target to display a dialog box to specify the
IDP devices to which the rule can be installed.
Right-click the table cell and select Edit
Comments to display a dialog box where you
can make notations about the rule.
You can verify the APE rulebase functionality in your lab and view APE related statistics
in the Command-Line Interface (CLI). It is recommended that you retain defaults for APE
rulebase. By default:
Copyright © 2010, Juniper Networks, Inc.60
Page 77

Chapter 4: Configuring Security Policies
•
IDP does not limit the rate of sessions that do not match APE rules. Rate limiting is
done by service based till application is identified in the session i.e. default services
running on the port.
•
When the application identification feature fails to identify the application, IDP does
not try to match the rule but instead applies the default rate limit (if any). You can
modify this so that in cases where application identification fails, IDP attempts to
match the session to the standard protocol and port for the application.
For more information, see the IDP Concepts & Examples guide.
Related
Documentation
• Intrusion Detection and Prevention Devices and Security Policies Overview on page 31
• Modifying IDP Rulebase Rules (NSM Procedure) on page 36
61Copyright © 2010, Juniper Networks, Inc.
Page 78

Configuring Intrusion Detection and Prevention Devices Guide
Copyright © 2010, Juniper Networks, Inc.62
Page 79

CHAPTER 5
Working with Attack Objects
•
Attack Objects in Intrusion Detection and Prevention Security Policies
Overview on page 63
•
Loading J-Security-Center Updates (NSM Procedure) on page 64
•
Viewing Predefined Attack Objects (NSM Procedure) on page 65
•
Working with Attack Groups (NSM Procedure) on page 66
•
Creating Custom Attack Objects (NSM Procedure) on page 69
•
Verifying the Attack Object Database Version (NSM Procedure) on page 77
•
Updating the IDP Detector Engine (NSM Procedure) on page 78
Attack Objects in Intrusion Detection and Prevention Security Policies Overview
You use the NSM Object Manager to manage NSM administrative objects, including the
attack objects used in IDP security policies.
For more explanation of attack objects and examples, see the Network and Security
Manager Administration Guide.
Related
Documentation
For details on how to use NSM Object Manager features to copy objects, find references
to objects, search for unused objects, or configure object versions, see the NSM online
Help.
IDP administration using attack objects can include the following tasks related to attack
objects:
•
Updating IDP detector engine and the NSM attack database
•
Viewing predefined attack object definitions
•
Viewing attack object groups
•
Creating custom attack objects
•
Updating predefined IDP attack objects and groups
Working with Attack Groups (NSM Procedure) on page 66•
• Viewing Predefined Attack Objects (NSM Procedure)
• Loading J-Security-Center Updates (NSM Procedure) on page 64
63Copyright © 2010, Juniper Networks, Inc.
Page 80

Configuring Intrusion Detection and Prevention Devices Guide
Loading J-Security-Center Updates (NSM Procedure)
The Juniper Networks Security Center (J-Security Center) routinely makes important
updatesavailableto IDP security policy components, including updates to the IDP detector
engine and NSM attack database.
The IDP detector engine is a dynamic protocol decoder that includes support for decoding
more than 60 protocols and more than 500 service contexts. You should update IDP
detectorengine when you first install the IDP device,whenever you upgrade, and whenever
alerted to do so by Juniper Networks.
The NSM attack database stores data definitions for the attack objects that are key
components of IDP security policies. Updates can include new attack objects, revised
severity settings, or removed attack objects. You should schedule daily updates to the
NSM attack database.
After you have completed the update, any new attack objects are available in the security
policy editor. If you use dynamic groups to your IDP rulebaserules and a new attackobject
belongs to the dynamic group, the rule automatically inherits the new attacks.
Table 35 on page 64 provides procedures for updating IDP detector engine and the NSM
attack database.
Table 35: IDP Detector Engine and NSM Attack Database Update Procedures
ProcedureTask
To download IDP
detectorengine and NSM
attackdatabaseupdates
to the NSM GUI server
To push an IDP detector
engine update from the
NSM GUI server to IDP
devices
From the NSM main menu, select Tools > View/Update NSM attack database and complete the
wizard steps.
NOTE: The default URL from which to obtain updates is
https://services.netscreen.com/restricted/sigupdates/nsm-updates/NSM-SecurityUpdateInfo.dat.
If you encounter connection errors, ensure this setting has not been inadvertently changed.
1. From the NSM main menu, select Tools > Preferences.
2. Click Attack Object.
3. Click Restore Defaults.
NSM restores the URL in the Download URL for ScreenOS Devices text box.
4. Click OK.
From the NSM main menu, select Devices > IDP Detector Engine > Load IDP Detector Engine for
ScreenOS and complete the wizard steps.
NOTE: Updating the IDP detector engine on a device does not require a reboot of the device.
Copyright © 2010, Juniper Networks, Inc.64
Page 81

Chapter 5: Working with Attack Objects
Table 35: IDP Detector Engine and NSM Attack Database Update Procedures (continued)
ProcedureTask
To push predefined
attack object updates
from the NSM GUI server
to IDP devices
To schedule regular
updates
1. From the NSM main menu, select Devices > Configuration > Update Device Config.
2. Select the devices that you want to push configuration updates to and to set update job options
on.
3. Click OK.
NOTE: Only the attack objects that are used in IDP rules for the device are pushed from the GUI
server to the device.
1. Log in to the NSM GUI server command line.
2.
Change directory to /usr/netscreen/GuiSvr/utils.
3. Create a shell script called attackupdates.sh with the following contents:
•
Set the NSMUSER environment variable with an NSM domain/user pair. The command for
setting environment variables depends on your OS. Example:
export NSMUSER=domain/user
•
Set the NSMPASSWD environment variable with an NSM password. The command for setting
environment variables depends on your OS and shell. Example:
export NSMPASSWD=password
•
Specify a guiSvrCli command string. Example:
/usr/netscreen/GuiSvr/utils/guiSvrCli.sh --update-attacks --post-action
--update-devices --skip
4. Make the script executable by the user associated with the cron job:
chmod 700 attackupdates.sh
5. Run the crontab editor:
crontab -e
6. Add an entry for the shell script:
minutes_after_hour
hour * * * /usr/netscreen/GuiSvr/utils/attackupdates.sh
During the update, the guiSvrCli utility updates the attack object database, then performs the post
actions. After updating and executing actions, the system generates an exit status code of 0 (no
errors) or 1 (errors).
Related
Documentation
Attack Objects in Intrusion Detection and Prevention Security Policies Overview on
•
page 63
• Viewing Predefined Attack Objects (NSM Procedure)
• Working with Attack Groups (NSM Procedure) on page 66
Viewing Predefined Attack Objects (NSM Procedure)
Purpose Juniper Networks Security Center (J-Security Center) developspredefined attack objects
and attack object groups for IDP rulebase rules.
65Copyright © 2010, Juniper Networks, Inc.
Page 82

Configuring Intrusion Detection and Prevention Devices Guide
In most cases, the predefined attack objects are the only attack objects you need to
protect your network.
The predefined attack object list in the NSM Object Manager provides the following
summary of each attack object:
• Name of the attack object
• Severity of the attack: critical, major, minor, warning, info
• Category
• Keywords
• Common Vulnerabilities and Exposures database (CVE) number
• Security Focus Bugtraq database number
Action To view predefined attack object details:
1. In the Object Manager, click Attack Objects > IDP Objects to display the IDP Objects
dialog box.
2. Click either the Predefined Attacks or Predefined Attack Groups tab to view the
predefined attack object list.
3. Double-click the table row entry for the attack object to display its details.
NOTE: You cannot create, edit, or delete predefined attack objects.
Related
Documentation
Attack Objects in Intrusion Detection and Prevention Security Policies Overview on
•
page 63
• Working with Attack Groups (NSM Procedure) on page 66
• Loading J-Security-Center Updates (NSM Procedure) on page 64
• Viewing Predefined Attack Objects (NSM Procedure)
Working with Attack Groups (NSM Procedure)
NSM groups are administrative objects that facilitate configuration and monitoring tasks.
You can add attack groups or individual attack objects to IDP rulebase rules and Exempt
rulebase rules.
•
Creating Dynamic Groups on page 67
•
Creating Static Groups on page 68
Copyright © 2010, Juniper Networks, Inc.66
Page 83

Creating Dynamic Groups
A dynamic group contains attack objects that are automatically added or deleted based
on specified criteria for the group. The NSM Object Manager includes predefined dynamic
groups that work with recommended attack objects, predefined attack objects, the
recommended security policy, and predefined policy templates.
When you run an NSM attack database update job, the process automatically performs
the following tasks:
•
For all new attack objects, compares the predefined attributes of each attack object
to each dynamic group criteria and adds the attack objects that match.
•
For all updated attack objects, removes attack objects that no longer meet their
dynamic group criteria.
•
Reviews updated attack objects to determine if they now meet any other dynamic
group criteria, and adds them to those groups if necessary.
•
For all deleted attack objects, removes the attack objects from their dynamic groups.
Chapter 5: Working with Attack Objects
Use of dynamic groups eliminates the need to review each new signature to determine
if you need to use it in your existing security policy.
A predefined or custom dynamic group can contain only attack objects and not attack
groups. Dynamic group members can be either predefined or custom attack objects.
To create a custom dynamic group:
1. In Object Manager, select Attack Objects > IDP Objects to display the IDP Objects
dialog box.
2. Click the Custom Attack Groups tab, then click the + icon and select Add Dynamic
Group to display the New Dynamic Group dialog box.
3. Enter a name and description for the static group. Select a color for the group icon.
4. In the Filters tab, click the + icon and add select filters that determine which attack
objects should be in the group using Table 36 on page 67.
2. Click the Members tab to view the attack objects now belonging to the group.
3. Click OK to save your settings.
Table 36: Dynamic Attack Group Filters
DescriptionFilter
Filters attack objects based on the application that is vulnerable to the attack.Add Products Filter
Add Severity Filter
Filters attack objects based on attack severity.
NOTE: All predefined attack objects are assigned a severity level by Juniper Networks. However,
you can edit this setting to match the needs of your network.
Filters attack objects based on category.Add Category Filter
67Copyright © 2010, Juniper Networks, Inc.
Page 84

Configuring Intrusion Detection and Prevention Devices Guide
Table 36: Dynamic Attack Group Filters (continued)
DescriptionFilter
Filters attack objects based on their last modification date.Add Last Modified Filter
Filters attack objects based on whether they have been marked Recommended.Add RecommendedFilter
Creating Static Groups
A static group contains a specific, finite set of attack objects or groups. There are two
types of static groups: predefined static groups and custom static groups.
A custom static group can include the same members as a predefined static group
(predefined attack objects, predefined static groups, and predefined dynamic groups),
plus the following members:
•
Custom attack objects
•
Custom dynamic groups
•
Other custom static groups
Use static groups to define a specific set of attacks to which you know your network is
vulnerable, or to group custom attack objects. For example, you might want to create a
group for a specific set of informational attack objects that keep you aware of what is
happening on your network.
Staticgroups requiremore maintenancethan dynamic groups because you must manually
add or remove attack objects in a static group to change the members. However, you
can include a dynamic group within a static group to automatically update some attack
objects. For example, the predefined attack object group Operating System is a static
group that contains four predefined static groups: BSD, Linux, Solaris, and Windows. The
BSD group contains the predefined dynamic group BSD-Services-Critical, to which attack
objects can be added during an attack database update.
To create a custom static group:
1. In Object Manager, select Attack Objects > IDP Objects to display the IDP Objects
dialog box.
2. Click the CustomAttack Groups tab, then click the + icon and select Add Static Group
to display the New Static Group dialog box.
3. Enter a name and description for the static group.
4. Select a color for the group icon.
5. Select the attack or group from the Attacks/Group list and click Add .
6. Click OK.
Related
Documentation
Attack Objects in Intrusion Detection and Prevention Security Policies Overview on
•
page 63
Copyright © 2010, Juniper Networks, Inc.68
Page 85

• Creating Custom Attack Objects (NSM Procedure) on page 69
• Viewing Predefined Attack Objects (NSM Procedure)
• Verifying the Attack Object Database Version (NSM Procedure) on page 77
Creating Custom Attack Objects (NSM Procedure)
This section includes the following:
•
Configuring General Properties for Attack Objects on page 69
•
Creating a Signature Attack Object on page 71
Configuring General Properties for Attack Objects
To create a custom attack object:
1. In the Object Manager, click Attack Objects > IDP Objects to display the IDP Objects
dialog box.
Chapter 5: Working with Attack Objects
2. Click the Custom Attacks tab.
3. Click the + icon to display the Custom Attack dialog box.
4. Configure general attack object settings using Table 37 on page 69 on the General
tab.
Table 37: Custom Attack Dialog Box: General Tab Settings
DescriptionSetting
Name
Description
Severity
Specifies the name to be displayed in the UI.
TIP: You might want to include the protocol the attack uses as part of the attack name.
Specifies details about the attack. Entering a description is optional when creating a new attack
object, but it can help you remember important information about the attack. View the attack
descriptions for predefined attacks for examples.
Specifies a severity rating: Info, Warning, Minor, Major, or Critical. Critical attacks are the most
dangerous—typically these attacks attempt to crash your server or gain control of your network.
Informational attacks are the least dangerous and typically are used by network administrators to
discover holes in their own security system.
Specifies a predefined category or defines a new category.Category
Specifies keywords—unique identifiers that can be used to search and sort log records.Keywords
Recommended
Specifies that this attack object is part of your highest risk set of attack objects. Later, when you
add this attack object to dynamic groups, you can specify whether only recommended attack
objects will be included.
Skip this for now.Attack Versions
Select High, Medium, Low, or Not Defined.Detection Performance
69Copyright © 2010, Juniper Networks, Inc.
Page 86

Configuring Intrusion Detection and Prevention Devices Guide
5. On the Extended tab, using Table 38 on page 70. Configure additional attack details.
Table 38: Custom Attack Dialog Box: Extended Tab Settings
DescriptionSetting
Primary URL
Secondary URL
Tertiary URL
CVE
Bugtraq
Impact
Tech Info
Patches
Enter up to three URLs (primary, secondary, tertiary) for external references you used when
researching the attack.
Common Vulnerabilities and Exposures (CVE) is a standardized list of vulnerabilities and other
information security exposures. The CVE number is an alphanumeric code, such as CVE-2209
A moderated mailing list that discusses and announces computer security vulnerabilities. The
BugTraq ID number is a three-digit code, such as 831 or 120.
Enter details about the impact of a successful attack, including information on system crashes and
access granted to the attacker.
Enter a description of the custom attacks.Description
Enter details on the vulnerability, the commands used to execute the attack, which files are attacked,
registry edits, and other low-level information.
List any patches available from the product vendor, as well as information on how to prevent the
attack.
6. Return to the General tab.
7. Under Attack Versions, click the + icon to display the New Attack wizard.
8. On the Target Platform and Type page, select a device platform (IDP 4.0,for example)
and attack type.
Table 39 on page 70 summarizes attack types and provides references to the next
steps required to implement the technical configuration of the attack objects for each
type.
Table 39: Attack Object Types
DescriptionType
Signature
Uses a stateful attack signature (a patternthat always exists within a specific section of the attack)
to detect known attacks.
Stateful signature attack objects also include the protocol or service used to perpetrate the attack
and the context in which the attack occurs.
If you know the exact attack signature, the protocol, and the attackcontextused for a known attack,
select this option.
Copyright © 2010, Juniper Networks, Inc.70
Page 87

Table 39: Attack Object Types (continued)
DescriptionType
Chapter 5: Working with Attack Objects
Protocol Anomaly
Compound Attack
Detects unknown or sophisticated attacks that violate protocol specifications (RFCs and common
RFC extensions).
You cannot create new protocol anomalies, but you can configure a new attack object that controls
how the security device handles a predefined protocol anomaly when detected.
If you do not know that exact attack signature, but you do know the protocol anomaly that detects
the attack, select this option.
Detects attacks that use multiple methods to exploit a vulnerability. This object combines multiple
signatures and/or protocol anomalies into a single attack object, forcing traffic to match all
combined signatures and/or anomalies within the compound attackobject before trafficis identified
as an attack.
By combining and even specifying the order in which signatures or anomalies must match, you can
be very specific about the events that need to take place before IDP identifies traffic as an attack.
If you need to detect an attack that uses several benign activities to attack your network, or if you
want to enforce a specific sequence of events to occur before the attack is considered malicious,
select this option
9. Click Ok.
Creating a Signature Attack Object
To configure a signature attack object:
1. Configure general attack object properties. For information, see “Configuring General
Properties for Attack Objects” on page 69.
On the Target Platform and Type page, select Signature and click Next.
2. On the Custom Attack–General Properties page, configure the settings described in
Table 40 on page 71.
Table 40: Custom Attack – General Properties
DescriptionProperty
False Positives
Select the frequency that the attack object produces a false positive on your network: Unknown,
Rarely, Occasionally, Frequently.
71Copyright © 2010, Juniper Networks, Inc.
Page 88

Configuring Intrusion Detection and Prevention Devices Guide
Table 40: Custom Attack – General Properties (continued)
DescriptionProperty
Service Binding
Any–If you are unsure of the correct service, select Any to match the signature in all services.
Because some attacks use multiple services to attack your network, you might want to select the
Any service binding to detect the attack regardless of which service the attack selects for a
connection.
NOTE: You must select a service binding other than Any if you want to select a context for the
attack.
IP–If you are not sure of the correct service, but know the IP protocol type, select IP protocol type
for the service binding.
Specify the protocol type number.
If you select this option, you should also specify an attack pattern and IP header values later in the
wizard. However, if you use a context binding of first packet, you must leave the attack pattern
empty.
TCP, UDP, or ICMP–Attacks that do not use a specific service might use a specific protocol to
attack your network. Some TCP and UDP attacks use standard ports to enter your network and
establish a connection.
For TCP and UDP protocol types, specify the port ranges.
RPC–The remote procedure call (RPC) protocol is used by distributed processing applications to
handle interaction between processes remotely. When a client makes a remote procedure call to
an RPC server, the server replies with a remote program; each remote program uses a different
program number.
To detect attacks that use RPC, configure the service binding as RPC and specify the RPC program
ID.
Time Binding
Service–Most attacks use a specific service to attack your network.
If you select Service, the wizard displays a second selection box where you specify the service used
for the attack.
If you select this option, you are restricted to general attack contexts (packet, first packet, stream,
stream 256, or line context).
Enable–Time attributes control how the attack object identifies attacks that repeat for a certain
number of times.
Scope–Select the scope within which the count occurs:
•
Source– Detects attacks from the source IP address for the specified number of times, regardless
of the destination IP address.
•
Destination–Detects attacks to the destination IP address for the specified number of times,
regardless of the source IP address.
•
Peer–Detects attacks between source and destination IP addresses of the sessions for the
specified number of times.
Count/Min–Enter the number of times per minute that the attack object must detect an attack
within the specified scope before the device considers the attack object to match the attack.
Copyright © 2010, Juniper Networks, Inc.72
Page 89

Click Next.
3. On the Custom Attack – Attack Patterns page, configure the settings described in
Table 41 on page 73.
Table 41: Custom Attack – Attack Patterns
DescriptionSetting
Chapter 5: Working with Attack Objects
For a direct binary match.\0 <octal_number>Pattern
For a direct binary match.\X<hexadecimal-number>\X
For case insensitive matches.\[<character-set>\]
To match any symbol..
To match 0 or more symbols.*
To match 1 or more symbols.+
To match 0 or 1 symbols.?
Grouping of expressions.()
Alternation. Typically used with ().|
Character range.[<start>-<end>]
Negation of character range.[^<start>-<end>]
Select this option to negate the attack pattern.Negate
73Copyright © 2010, Juniper Networks, Inc.
Page 90

Configuring Intrusion Detection and Prevention Devices Guide
Table 41: Custom Attack – Attack Patterns (continued)
DescriptionSetting
Context
Direction
Select the context used by the attack to enter your network.
If you know the service and the specific service context, select that service and then select the
appropriate service contexts.
If you know the service, but are unsure of the specific service context, select Other and then select
one of the following general contexts:
•
Packet–Detects the pattern at the packet level. When you select this option, you should also
specify the Service Binding (in the General tab) and define the service header options (in the
Header Match tab). Although not required, specifying these additional parameters helps to
improve the accuracy of the attack object.
•
First Packet–Inspects only the first packet of a stream. When the flow direction for the Attack
Object is set to any, IDP checks the first packet of both the server-to-client (STC) and
client-to-server (CTS) flows. If you know that the attack signature appears in the first packet of
a session, choosing first packet instead of packet reduces the amount of traffic the security
device needs to monitor, which improves performance.
•
Stream Select–Reassembles packets and extracts the data to search for a pattern match.
However, IDP does not recognize packet boundaries for stream contexts, so data for multiple
packets is combined. Select this option only when no other context option contains the attack.
•
Stream 256–Reassembles packets and searches for a pattern match within the first 256 bytes
of a traffic stream. When the flow direction is set to any, DI checks the first 256 bytes of both
the STC and CTS flows. If you know that the attack signature will appear in the first 256 bytes
of a session, choosing stream 256 instead of stream reduces the amount of traffic that the
security device must monitor and cache, improving performance.
•
Line–Detects a pattern match within a specific line within your network traffic.
Select the direction in which to detect the attack:
Flow
•
Client to Server–Detects the attack only in client-to-server traffic.
•
Server to Client –Detects the attack only in server-to-client traffic.
•
Any–Detects the attack in either direction.
Select the flow in which to detect the attack:
•
Control–Detects the attack in the initial connection that is established persistently to issue
commands, requests, and so on.
•
Auxiliary–Detects the attack in the response connection established intermittently to transfer
requested data.
•
Both–Detects the attack in the initial and response connections.
TIP: Using a single flow (instead of Both) improvesperformance and increases detection accuracy.
Click Next.
4. On the Custom Attack – IP Settings and Header Matches page, specify signature
settings as described in Table 42 on page 75.
Copyright © 2010, Juniper Networks, Inc.74
Page 91

NOTE: The IP tab specifies the contents of the IP header in a malicious
packet. You cannot specify IP header contents if you selected a line,
stream, stream 256, or a service context in the Attack Patterns tab.
TIP: If you are unsure of the IP flags and IP fields for the malicious packet,
leave all fields blank. If not values are set, IDP attempts to match the
signature for all IP header contents.
Table 42: Custom Attack: IP Settings and Header Matches
DescriptionSetting
Chapter 5: Working with Attack Objects
Type of Service
Time-to-live
RB
Enter the service type. Common service types are:
•
0000 Default
•
0001 Minimize Cost
•
0002 Maximize Reliability
•
0003 Maximize Throughput
•
0004 Minimize Delay
•
0005 Maximize Security
Enter the number of bytes in the packet, including all header fields and the data payload.Total Length
Enter the unique value used by the destination system to reassemble a fragmented packet.ID
Enter the time-to-live (TTL) value of the packet. This value represents the number of routers the
packet can pass through. Each router that processes the packet decrements the TTL by 1; when
the TTL reaches 0, the packet is discarded.
Enter the protocol used in the attack.Protocol
Specify the IP address of the attacking device.Source
Specify the IP address of the attack target.Destination
Reserved bit. Specifies that IDP looks for a pattern match whether or not the IP flag is set (none),
only if the flag is set (set), or only if the flag is not set (unset).
MF
DF
More fragments. Specifies that IDP looksfor a pattern match whether or not the IP flag is set (none),
only if the flag is set (set), or only if the flag is not set (unset).
Don’t fragment. Specifies that IDP looks for a patternmatch whether or not the IP flag is set (none),
only if the flag is set (set), or only if the flag is not set (unset).
5. If you selected TCP for Service Binding and packet or first-data-packet as the Context,
click the Protocols tab, select TCP packet header fields, and configure TCP Header
Match settings as described in Table 43 on page 76.
75Copyright © 2010, Juniper Networks, Inc.
Page 92

Configuring Intrusion Detection and Prevention Devices Guide
Table 43: TCP Header Match Settings
DescriptionSetting
The port number on the attacking device.Source Port
The port number of the attack target.Destination Port
Sequence Number
ACK Number
PSH Bit
FIN Bit
The sequence number of the packet. This number identifies the location of the data in relation to
the entire data sequence.
The ACK number of the packet. This number identifies the next sequence number; the ACK flag
must be set to activate this field.
The number of bytes in the TCP header.Header Length
The number of bytes in the TCP window size.Window Size
The number of bytes in the data payload. For SYN, ACK, and FIN packets, this field should be empty.Data Length
The data in the packet is urgent; the URG flag must be set to activate this field.Urgent Pointer
When set, the urgent flag indicates that the packet data is urgent.URG Bit
When set, the acknowledgment flag acknowledges receipt of a packet.ACK Bit
When set, the push flag indicates that the receiver should push all data in the current sequence to
the destination application (identified by the port number) without waiting for the remaining packets
in the sequence.
When set, the reset flag resets the TCP connection, discarding all packets in an existing sequence.RST Bit
When set, the final flag indicates that the packet transfer is complete and the connection can be
closed.
Reserved bit. Unused.R1 Bit, R2 Bit
6. If you selectedUDP for Service Binding and packetor first-data-packet as the Context,
click the Protocols tab, select UDP packet header fields, and configure UDP Header
Match settings as described in Table 44 on page 76.
Table 44: UDP Header Match Settings
DescriptionSetting
Enter the port number on the attacking device.Source Port
Enter the port number of the attack target.Destination Port
Enter the number of bytes in the data payload.Data Length
Copyright © 2010, Juniper Networks, Inc.76
Page 93

7. If you selected ICMP for Service Binding and packetor first-data-packetas the Context,
click the Protocols tab, select ICMP packet header fields, and configure ICMP Header
Match settings as described in Table 45 on page 77.
Table 45: ICMP Header Match Settings
DescriptionSetting
Enter the primary code that identifies the function of the request/reply.ICMP Type
Enter the secondary code that identifies the function of the request/reply within a given type.ICMP Code
Chapter 5: Working with Attack Objects
Sequence Number
ICMP ID
Related
Documentation
Enter the sequence number of the packet. This number identifies the location of the request/reply
in relation to the entire sequence.
Enter the identification number which is a unique value used by the destination system to associate
requests and replies.
8. Click Finish.
Attack Objects in Intrusion Detection and Prevention Security Policies Overview on
•
page 63
• Working with Attack Groups (NSM Procedure) on page 66
• Viewing Predefined Attack Objects (NSM Procedure)
• Updating the IDP Detector Engine (NSM Procedure) on page 78
Verifying the Attack Object Database Version (NSM Procedure)
Purpose New attack objects are added to the attack object database server frequently;
downloading these updates and installing them on your managed devices regularly
ensures that your network is protected against the latest threats. As new attack objects
are added to the attack object database server, the version number of the database
increments by 1. When you download a version of the attack object database from the
server, NSM stores the version number of that database.
Action Automatic Verification
The management system uses the database version number to detect and notify you
when the stored attack object database on the GUI server is:
• Older than the most recent database available from the attack object database server.
• Newer than the attack object database currently installed on your ScreenOS 5.1 and
later managed devices.
When NSM detects that the managed device contains an older attack object database
version than the one stored on the GUI server, the UI displays a warning for that device,
indicating that you should update the attack object database on the device.
Manual Verification
77Copyright © 2010, Juniper Networks, Inc.
Page 94

Configuring Intrusion Detection and Prevention Devices Guide
You can also check to see if the attack object database on the server is more recent than
the one on the security device.
To check the attack object database version:
1. From the Device Manager, select Security Updates > Check Attack Database Server
Version. The Check Attack Database Server Version dialog box appears.
2. Select the devices or group of devices to be checked.
3. Click OK. The Job Information window displays the status of the version check.
Related
Documentation
Attack Objects in Intrusion Detection and Prevention Security Policies Overview on
•
page 63
• Creating Custom Attack Objects (NSM Procedure) on page 69
• Loading J-Security-Center Updates (NSM Procedure) on page 64
• Viewing Predefined Attack Objects (NSM Procedure)
Updating the IDP Detector Engine (NSM Procedure)
The IDP detector engine is dynamically changeable firmware that runs on ISG security
devices running ScreenOS 5.0.0-IDP1, standalone IDP sensors, J-series devices, and
SRX-series devices. Automatic updates to the IDP detector engine occur when you:
•
Upgrade security device firmware.
•
Load a new detector engine—New detector engines may be downloaded with normal
attack object updates. You must load the new detector engine onto the device.
NOTE: You cannot downgrade the IDP detectorengine version on the device.
To update the IDP detector engine for an IDP device:
1. From the Device Manager, select Security Updates > Update ScreenOS/IDP Device
Detector. The Load IDP Detector Engine wizard starts.
2. Click Next, and then follow the instructions in the wizard to update the IDP detector
engine on the selected device.
For more information, see Network and Security Manager Administration Guide.
Related
Documentation
• Attack Objects in Intrusion Detection and Prevention Security Policies Overview on
page 63
NOTE: Updating the IDP detectorengine on a device does not require a reboot
of the device.
Copyright © 2010, Juniper Networks, Inc.78
Page 95

Chapter 5: Working with Attack Objects
• Working with Attack Groups (NSM Procedure) on page 66
• Loading J-Security-Center Updates (NSM Procedure) on page 64
• Viewing Predefined Attack Objects (NSM Procedure)
79Copyright © 2010, Juniper Networks, Inc.
Page 96

Configuring Intrusion Detection and Prevention Devices Guide
Copyright © 2010, Juniper Networks, Inc.80
Page 97

CHAPTER 6
Configuring SNMP and Syslog Settings
Use Global Settings to specify syslog and SNMP servers. In device templates, find these
settings under IDP Device Settings. In an individual device, find these settings under
Global Settings.
This chapter includes the following topics:
•
Configuring an SNMP Agent (NSM Procedure) on page 81
•
Configuring Syslog Collection (NSM Procedure) on page 82
Configuring an SNMP Agent (NSM Procedure)
The IDP sensor creates and sends a log entry whenever one of the following statistics
reaches 90%. It also sends a log when the value drops below 90%. Logs are sent no
more than once a minute. The log entry specifies the value of the setting at the time the
log is sent.
•
CPU Usage—Log entry generated when CPU usage reaches 90%.
•
Hard Disk Usage—Log entry generated when disk space reaches 90%.
•
Memory Usage—Log entry generated when memory usage reaches 90%.
•
Session Count—Log entry generated when session count reaches 90% of the total
possible session count. (Maximum total session count for each device is specified on
that device’s product sheet.)
These logs are generated and sent to NSM automatically. However, you can also set the
sensor to send the entries to your SNMP server. To do so, enable SNMP and specify the
server’s community and IP address, and then load the new configuration onto the sensor.
You configure an SNMP agent if you want to send device event logs to an SNMP server.
You have the option of configuring an SNMP agent for NSM (if you want to send the NSM
collection to SNMP) or configuring an SNMP agent for each IDP device.
To configure an SNMP agent for NSM, see the NSM online Help.
81Copyright © 2010, Juniper Networks, Inc.
Page 98

Configuring Intrusion Detection and Prevention Devices Guide
To configure an SNMP agent for a single IDP device:
1. In the NSM Device Manager, double-click the IDP device to display the device
configuration editor.
2. Click Report Settings.
3. Add or modify the settings in the SNMP Settings grid as described in the Table 46 on
page 82.
4. Click OK.
Table 46: IDP Configuration: SNMP Settings
DescriptionSetting
Enables forwarding to a network management system that reads SNMP.Enable SNMP
SNMP Read Only Community
SNMP Contact
Related
Documentation
Specifies a string. The SNMP read-only community string resembles a password used for the
exchange between the IDP device and the network management system.
Specifies the IP address of the SNMP server.SNMP Manager IP
Specifies an e-mail address for the IDP administrator contact to be included in SNMP
communications. If the network management system encounters a problem with the SNMP
communication, it can use the contact information to follow up.
Specifies a location of the IDP device to be included in SNMP communications.SNMP Location
Specifies the network/host IP address and the network/host netmask for the agent.New SNMP allowed hosts
Configuring Syslog Collection (NSM Procedure) on page 82•
• NSM Logs and Reports Overview on page 129
Configuring Syslog Collection (NSM Procedure)
You configure syslog settings if you want to forward a copy of IDP logs to a syslog server.
You have the option of configuring NSM to forward a copy of its log collection to a syslog
server or configuring syslog settings for each IDP device.
To have all IDP logs sent to a Syslog server, select the check box and specify the syslog
server IP address. Then load the new configuration onto the sensor.
To configure syslog forwarding for NSM, see the NSM online Help.
To configure syslog forwarding for a single IDP device:
1. In the NSM Device Manager, double-click the IDP device to display the device
configuration editor.
2. Click Report Settings.
Copyright © 2010, Juniper Networks, Inc.82
Page 99

Chapter 6: Configuring SNMP and Syslog Settings
3. Select Enable Syslog.
4. Specify the syslog server IP address.
5. Specify whether to forward packet logs to the syslog server.
6. Click OK.
Related
Documentation
• NSM Logs and Reports Overview on page 129
• Viewing Logs on page 129
• Configuring an SNMP Agent (NSM Procedure) on page 81
83Copyright © 2010, Juniper Networks, Inc.
Page 100

Configuring Intrusion Detection and Prevention Devices Guide
Copyright © 2010, Juniper Networks, Inc.84
 Loading...