

Page 1
Getting Started Guide
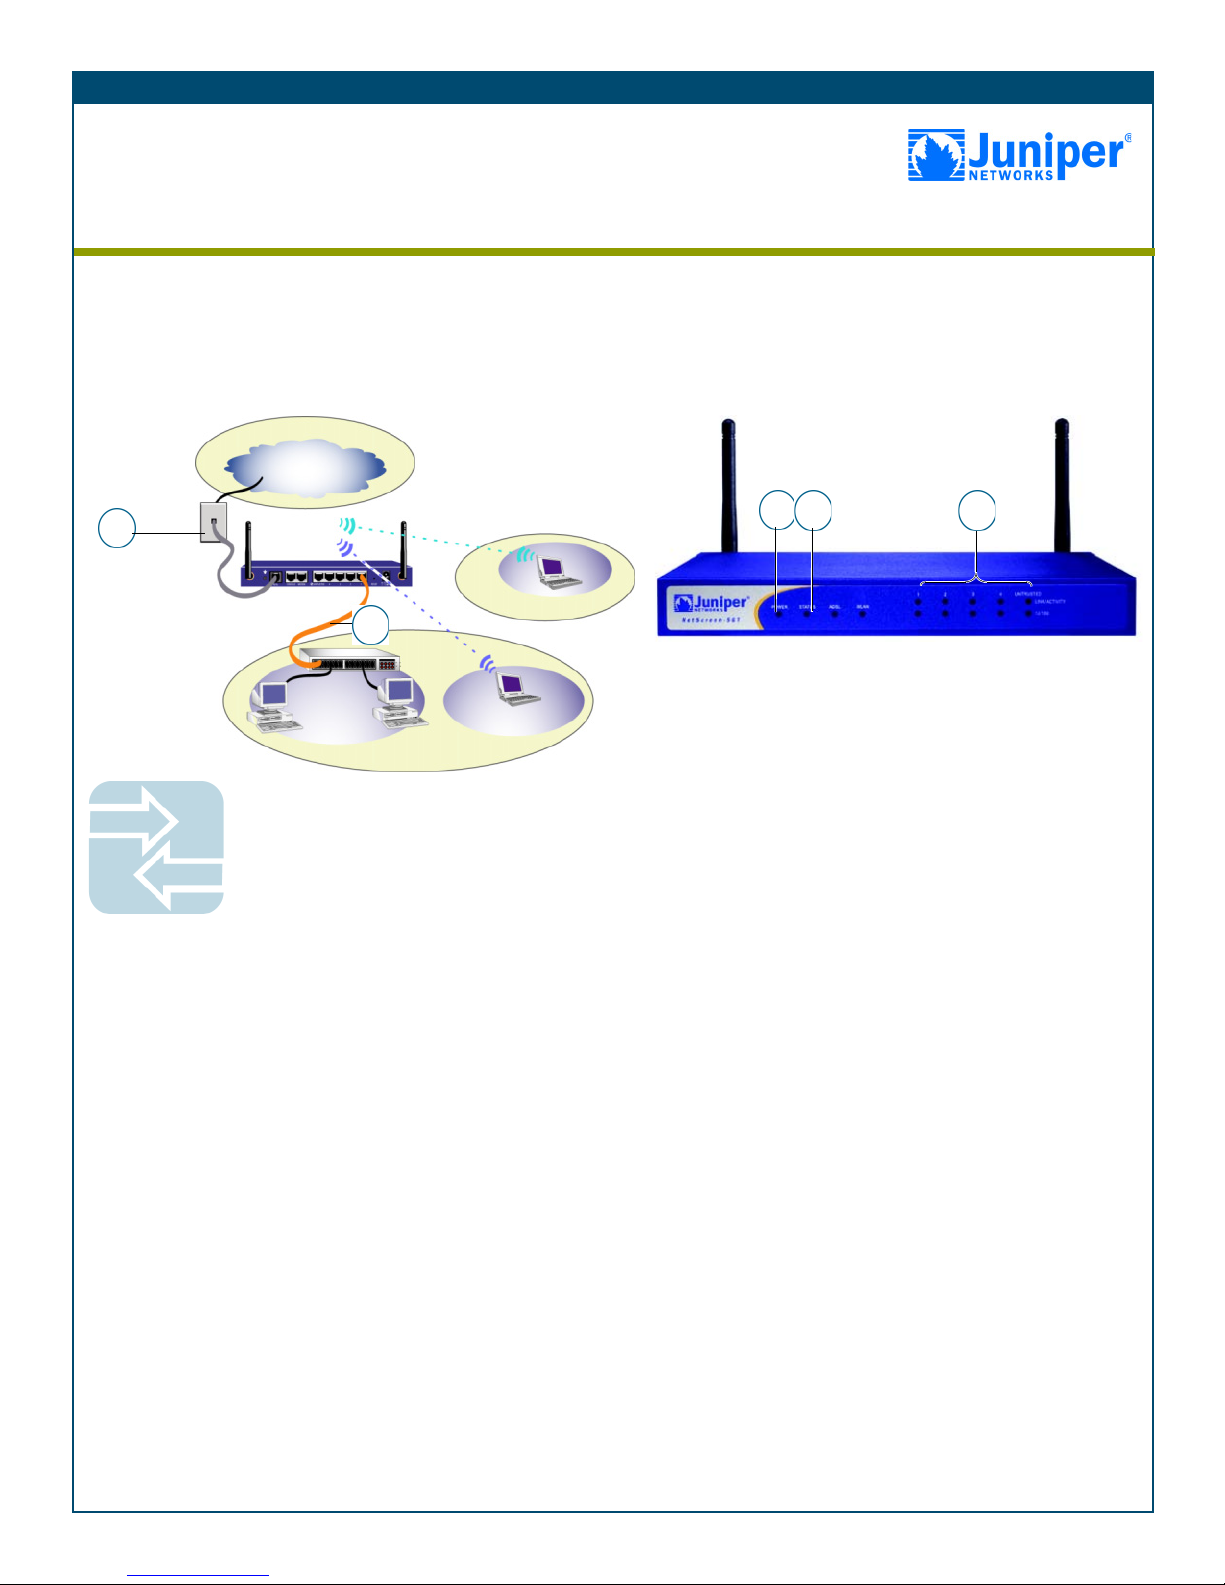
CONNECTING THE DEVICE
Use the instructions below to connect the NetScreen-5GT Wireless ADSL device and
prepare to configure it to protect your network. Use the LEDs on the front panel to help
you determine the device status.
Step 1
Connect the provided ADSL cable from the ADSL port of the
NetScreen device to the telephone outlet.
Note: You can obtain and install a signal splitter on the ADSL line.
The splitter divides the ADSL signal into low-frequency voice signals
for voice calls and high-frequency data signals for data traffic. You
can also install microfilters on telephones that share the ADSL line.
Step 2
Note: You can access the Initial Configuration Wizard (ICW) from
the Trust Ethernet interface.
• If the workstation is in a LAN (see diagram), connect an
Ethernet cable from the Trusted port to the internal switch or
hub.
• If the workstation is a single computer, connect an Ethernet
cable from the Trusted port directly to the Ethernet port on the
workstation. We recommend this connection method.
Step 3
Connect the power cable between the NetScreen device and a
power source. We recommend using a surge protector.
a. Ensure that the Power LED glows green. This indicates that the
device is receiving power.
b. After the device starts (about 30 seconds), ensure that the Status
LED blinks green. This indicates that the device is operating
normally.
c. Ensure that the Link Activity LEDs glow green for the connected
interfaces. This indicates that the device has network
connectivity.
Step 4
Configure the workstation to access the NetScreen device via a web
browser:
a. Ensure that your workstation is properly connected to your LAN
(use the diagram above).
b. Change the TCP/IP settings of your workstation to obtain its IP
address automatically from the NetScreen device via DHCP. For
help, see the operating system documentation for your
workstation.
Note: Ensure that your internal network does not already have a
DHCP server.
c. If necessary, restart your workstation to enable the changes to
take effect.
Getting Started
Use the instructions in this guide to help you connect and configure your NetScreen-5GT Wireless
ADSL device. For additional configuration information, see the NetScreen-5GT Wireless User’s Guide,
NetScreen Wireless Reference Guide, and NetScreen ADSL Reference Guide. For information on ADSL
line compatibility, see http://www.juniper.net/products/integrated/5GT-ADSL/.
1
2
Internet
Telephone
Outlet
LAN
The numbers on the diagram are paired with the
steps below.
Hub/Switch
wireless2
wireless1
Trust Zone
Wzone1 zone
3a
3b
3c
Juniper Networks
NetScreen-5GT Wireless ADSL
Page 2
Getting Started Guide
CONFIGURING THE DEVICE
Use the Initial Configuration Wizard (ICW) to configure the NetScreen-5GT Wireless
ADSL device. Before starting the Wizard, decide how you want to deploy your device.
(For additional information, see the NetScreen-5GT Wireless User’s Guide.)
Network Address Translation (NAT). You can deploy the NetScreen
device in Route mode with NAT enabled on the Trust and wireless2
interfaces (Trust zone interfaces) or in Route mode without NAT.
When using Route mode with NAT enabled, the NetScreen device
replaces the source IP address of the sending host with the IP address
of the Untrust zone interface. Route mode with NAT is the most
common way to configure the Trust zone interfaces on the NetScreen
device. Your network uses the Untrust zone interface to connect to
the Internet. This interface can have a static IP address or a dynamic
IP address assigned via DHCP, PPPoA, or PPPoE. When using Route
mode without NAT, an interface routes traffic without changing the
source address and port number in the IP packet header. You must
assign public IP addresses to hosts connected to the Trust zone
interfaces. To configure the Untrust zone interface, you need to
configure the IP address of the interface that is connected to the
service provider’s Digital Subscriber Line Access Multiplexer
(DSLAM).
Port Mode. A port mode binds interfaces to zones. The default port
mode, Trust-Untrust, binds the Trust Ethernet and wireless2 interfaces
to the Trust zone, the wireless1 interface to the Wzone1 zone, and
the ADSL interface to the Untrust zone.
Wireless Interfaces. By default, the wireless2 interface is bound to
the Trust zone. The default IP address and netmask for the wireless2
interface is 192.168.2.1/24. You can change this address to match
existing IP addresses on your network. The wireless1 interface is
bound to the Wzone1 zone and does not have an IP address
assigned to it.
ADSL Interface. By default, the ADSL interface is bound to the
Untrust zone and is the primary interface for traffic to the outside
network.
Trust Ethernet Interface IP Address. The default IP address and
netmask for the Trust interface is 192.168.1.1/24, which is located
in the Trust zone. You can change this address to match IP addresses
that exist on your network.
Assigning IP Addresses to Hosts in the Trust Zone (Enable DHCP
Server). You can choose to have the NetScreen device assign IP
addresses via DHCP to wired or wireless hosts in your network. If
you have the device assign IP addresses, you can define the range of
addresses to be assigned. You need to ensure that the range of
addresses is in the same subnetwork as the Trust Ethernet interface
or the wireless2 interface IP address.
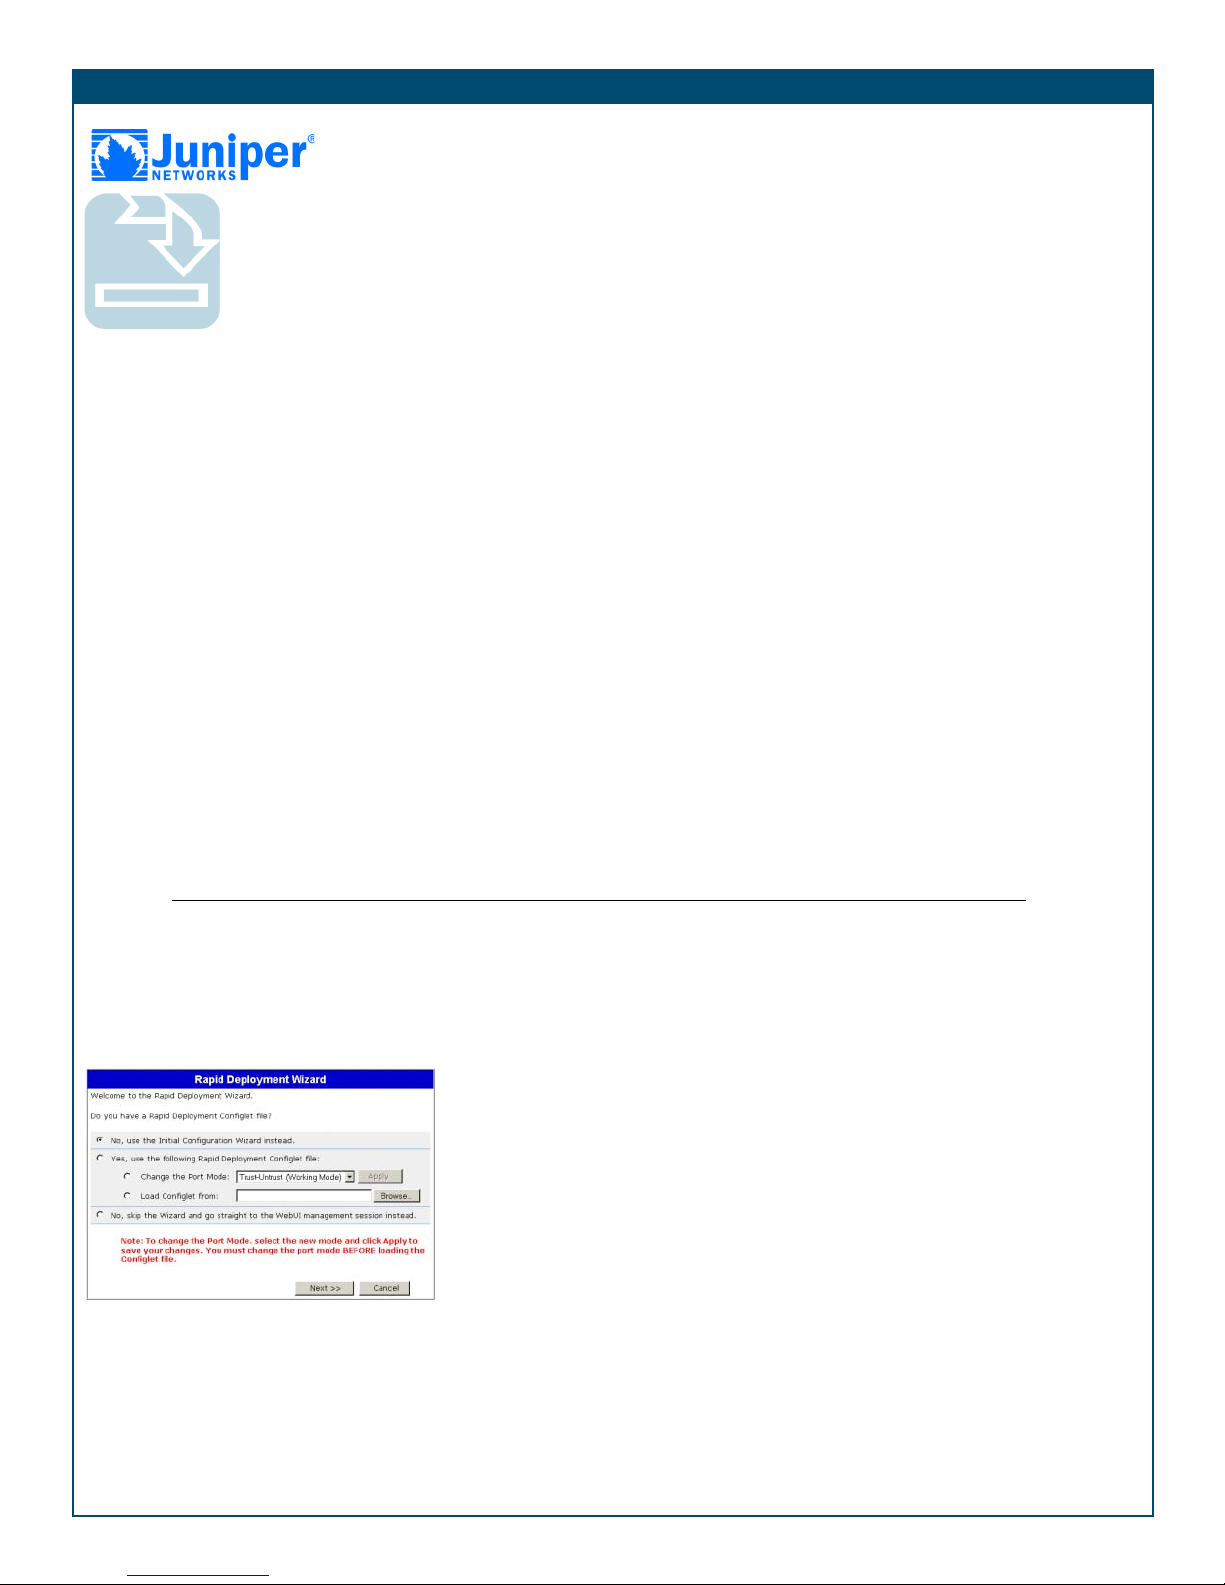
Step 1
Launch a Web browser. In the URL address field, enter
http://192.168.1.1. The Rapid Deployment Wizard window
appears.
Note: You can access the Initial Configuration Wizard (ICW) from
the Trust Ethernet interface.
Step 2
If your network uses Juniper Networks NetScreen-Security Manager,
you can use a Rapid Deployment configlet to automatically configure
the NetScreen device. Obtain a configlet from your Security
Manager administrator, select the Yes option, select the Load
Configlet from: option, browse to the file location, and click Next.
The configlet sets up the NetScreen device for you. If you use a
configlet, you can skip the remaining instructions in this guide.
If you need to change the port mode on the device, select the
Change the Port Mode option, select the port mode from the
drop-down menu, and click Apply before loading the configlet.
Note: Skip the ICW if you want to configure the Extended port
mode on the NetScreen-5GT Wireless ADSL device. You must use
the WebUI or CLI to configure this port mode.
If you want to bypass the configuration wizard and go directly to the
WebUI, select the last option, and click Next. (See the
NetScreen-5GT Wireless User’s Guide for information on using the
WebUI to configure the device.)
If you are not using a configlet to configure the NetScreen device
and want to use the configuration wizard, select the first option, and
click Next. The Initial Configuration Wizard welcome screen
appears. Click Next.
Step 3
Enter a new administrator login name and password, and click
Next.
Step 4
Check the Enable NAT check box if you want the NetScreen device
to be in Route mode with NAT enabled. Click Next.
Page 3

Getting Started Guide
Step 5
Port modes bind physical ports, logical interfaces, and zones.
• Trust-Untrust mode, the default, binds the Trusted Ethernet and
wireless2 interfaces to the Trust zone and the ADSL interface to
the Untrust zone.
•Home-Work mode binds interfaces to the Untrust, Home, and
Work zones.
Note: The Extended mode is only available with the Extended
version of the NetScreen-5GT Wireless ADSL device. You must use
the WebUI or CLI to configure this port mode.
The ADSL interface is the default interface to the Untrust zone. If you
do not want to use the ADSL interface, uncheck the box. If you want
to configure the default wireless2 interface for the wireless Trust
zone, check the box. Click Next.
Note: The remaining steps in this guide show the screens for the
default Trust-Untrust port mode with the ADSL interface as the default
Untrust zone interface and wireless2 interface as the default wireless
Trust zone interface. If you selected different options, you may see
different screens.
Step 6
Enter the following information from your service provider:
• VPI/VCI values to identify the permanent virtual circuit.
*
• ATM multiplexing method (LLC is the default).
• Protocol Mode settings.
• Operating mode for the physical line (auto is the default).
If you do not know what these settings are, please refer to the
Common Settings for Service Providers document that came with the
NetScreen device.
Note: (Annex B model only) Select Deutsche Telekom to connect to a
Deutsch Telecom ADSL line; otherwise select non-Deutsche Telekom.
Select Dynamic IP via DHCP to enable the NetScreen device to
receive an IP address for the Untrust zone interface from a DHCP
server.
Select Dynamic IP via PPPoA to enable the NetScreen device to act
as a PPPoA client. Enter the Username and Password assigned by
the service provider.
Select Dynamic IP via PPPoE to enable the NetScreen device to act
as a PPPoE client. Enter the Username and Password assigned by the
service provider.
(Optional) Select Static IP to assign a unique and fixed IP address to
the ADSL interface. Enter the interface IP address, Netmask, and
Gateway (the gateway address is the IP address of the router port
connected to the NetScreen device).
Click Next.
Step 7
Note: If you are configuring a NetScreen device that has the
Regulatory Domain WORLD setting, you must set the country code. If
you are configuring a NetScreen device that has the Regulatory
Domain FCC or TELEC setting, the country code is preset and cannot
be changed.
You must set a Service Set Identifier (SSID) before the wireless2
interface can be activated.
•Open authentication, the default, allows anyone to access the
device. There is no encryption for this authentication option.
• WPA Pre-Shared Key authentication sets the Pre-Shared Key
(PSK) or passphrase that must be entered when accessing
wireless connectivity. You can choose to enter a HEX or ASCII
value for the PSK. A HEX PSK must be a 256-bit (64 text
character) HEX value. An ASCII passphrase must be 8 to 63 text
characters. You must select Temporal Key Integrity Protocol
(TKIP) or Advanced Encryption Standard (AES) encryption type
for this option, or select Auto to allow either option.
•WPA permits authentication with an external RADIUS server.
Enter the RADIUS server IP address, the port number to which
the NetScreen device sends authentication requests, and the
shared secret (password) between the NetScreen device and the
RADIUS server. You must select TKIP or AES encryption type for
this option, or select Auto to allow either option.
*See http://www.juniper.net/products/integrated/5GT-ADSL/
Page 4

Getting Started Guide
BASIC SECURITY AND POLICY ADMINISTRATION
You must register your product at www.juniper.net/support/ to activate certain
ScreenOS services, such as the Deep Inspection Signature Service. After registering,
use the WebUI or CLI to obtain the subscription for the service.
Step 1
Using Policy Wizards. By default, the NetScreen device permits
workstations in your network to start sessions with outside
workstations, while outside workstations cannot start sessions with
your workstations. You can set up policies that tell the device what
kinds of sessions to restrict or permit.
To set up a policy to either restrict the kinds of traffic that can be
initiated from inside your network to go out to the Internet, or to
permit certain kinds of traffic that can be initiated from outside
workstations to your network, use the WebUI Policy Wizard. In the
WebUI menu column, click Wizards > Policy. Follow the directions
in the Wizard to configure a policy.
You can use the Wizards only when the device is in the default TrustUntrust port mode. For details on setting up policies, see the
NetScreen Concepts & Examples ScreenOS Reference Guide.
Step 2
Using Protection Options. The firewall attack protection (SCREEN)
menu enables you to tailor detection and threshold levels for a range
of potential attacks.
a. In the WebUI menu column, click Screening > Screen.
b. Select the zone for which you want to configure firewall
attack protection.
c. Select the appropriate protection options, and click Apply.
Remember these features must be configured on each zone
where they are required.
Step 3
Verifying Access. To verify that workstations in your network can
access resources on the Internet, start a Web browser from any
workstation in the network and enter the URL: www.juniper.net.
The options presented are the most common ways to secure a
wireless network. For information about all the security options, see
the NetScreen Wireless Reference Guide. To use a security method
that is not listed here, complete the ICW and then use the WebUI or
CLI to configure it.
To change the IP address of the wireless2 interface, enter a new IP
address and netmask. The default is 192.168.2.1/24.
Step 8
To change the IP address of the Trusted Ethernet interface, enter a
new IP address and netmask. If you change the IP address and
netmask of the Trust interface, your workstation and the Trust
interface of the NetScreen device might be on different subnetworks.
Click Next.
Note: If you selected the Home-Work mode in step 5, you are
prompted to provide the IP addresses and netmasks for the Home
and Work zone interfaces instead of the Trusted Ethernet interface.
You also have the option of choosing to receive an address via
DHCP.
Step 9
You can choose to have the NetScreen device assign IP addresses to
wired and wireless hosts in your network.
• Select Yes if the NetScreen device is to act as a DHCP server
and assign dynamic IP addresses to hosts in the Trust zone.
Enter a range for the assigned IP addresses or enter the
address(es) of the DNS server(s). If you specify an IP address
range that is in a different subnetwork than the Trust
subnetwork, your workstation and the Trust zone interface of
the NetScreen device might be in different subnetworks. To
manage the NetScreen device using the WebUI, ensure that
your workstation and the NetScreen interface are in the same
subnetwork.
• Select No if you do not want the NetScreen device to assign IP
addresses to hosts in the Trust zone.
Click Next.
Step 10
• Click Previous to modify configuration information.
• Click Next to enter the configuration.
The NetScreen device reboots after clicking Next.
Step 11
Click Finish in the final window and close the web browser.
Relaunch the web browser and enter one of the Trust or Work zone
interface IP addresses in the URL address field. (Your workstation
and the NetScreen interface must be in the same subnetwork.)
Copyright © 2005 Juniper Networks, Inc. All rights reserved. Juniper Networks, the Juniper Networks logo, NetScree n, NetScreen Technologi es, Giga Screen, NetS creen-Global PRO,
NetScreen-Remote, NetScreen ScreenOS and the NetScreen logo are trademarks and registered trademarks of Juniper Networks, Inc. in the United States and oth er countries. All other
trademarks and registered trademarks are the property of their respective companies. Information in this document is subject to change without notice. No part of this document may
be reproduced or transmitted in any form or by any means, electronic or mechanical, for any purpose, without receiving written permission from Juniper Networks, Inc.
P/N 093-1573-000 Rev. A
Page 5

Getting Started Guide
Regulamentação Anatel
 Loading...