

Page 1
mesa
OWNER’S MANUAL
3
Page 2

Copyright © January 2020, Juniper Systems, Inc. All rights
reserved. Information is subject to change without notice.
Juniper Systems® is a registered trademark of Juniper
Systems, Inc. Mesa 3™ is a recognized trademark of Juniper
Systems, Inc.
Android™ is a trademark of Google LLC.
The Android robot is reproduced or modied from work
created and shared by Google and used according to
terms described in the Creative Commons 3.0 Attribution
License.
The Bluetooth® word mark is owned by the Bluetooth SIG,
Inc. Any use of such marks by Juniper Systems, Inc. is under
license.
The names of other companies and products mentioned
herein may be the trademarks of their respective owners.
WARNING! This symbol indicates that failure to follow
!
directions could result in serious injury.
CAUTION: This symbol indicates that failure to follow
!
directions could result in damage to equipment or loss of
information.
Part Number 28375-00
tel: 435.753.1881
1132 W. 1700 N. Logan, UT 84321
ii Mesa 3 Rugged Tablet Powered by Android
web: www.junipersys.com
l
Page 3

CONTENTS
1
Getting Started 1
Perform Initial Tasks 4
Turn the Mesa 3 on and Off 7
2
Standard Features 9
Operating System 10
Keypad Features 11
Light Sensor 12
Power Management 12
Data Storage Options 15
Sensors 17
Bluetooth® Wireless Communication 17
Wi-Fi Wireless Networking 18
NFC Short-Range Wireless Technology 18
GPS/GNSS 18
Camera 19
4G LTE Data Modem 19
3
Optional Features and Accessories 21
Barcode Imager 22
RFID Reader 26
RS-232 Port 28
Ofce Docking Station 30
Mesa 3 Vehicle Dock 32
Battery Charger 34
A
Storage, Maintenance, and Recycling 35
Storing the Mesa 3 and Battery Pack 36
Protecting the Touchscreen 36
Recycling the Mesa 3 and Batteries 37
B
Warranty and Repair Information 39
Limited Product Warranty 40
Repairs 42
Contents iii
Page 4

C Warnings, Regulatory Information, Licensing 45
Product Warnings 46
Certications and Standards 47
Licensing Information 52
D
Specications 53
Index 61
iv Mesa 3 Rugged Tablet Powered by Android
Page 5

1
GETTING STARTED
Page 6
Getting Started
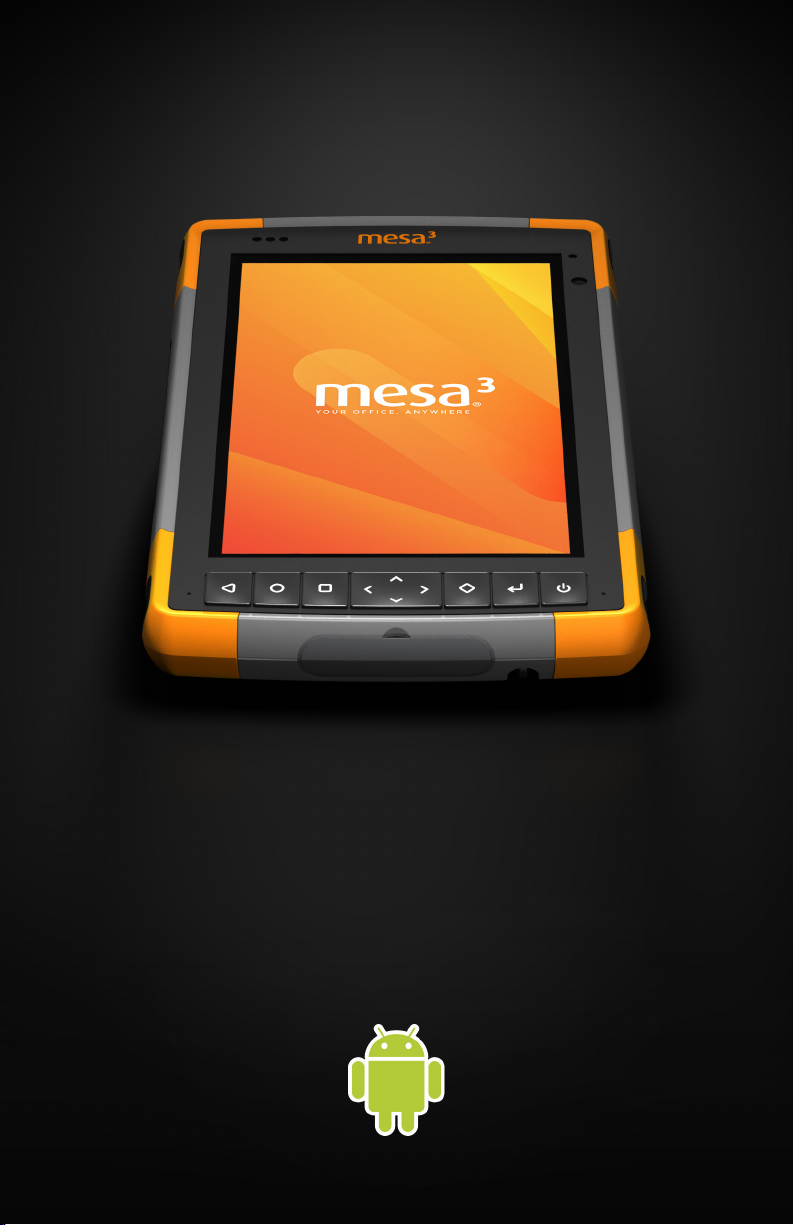
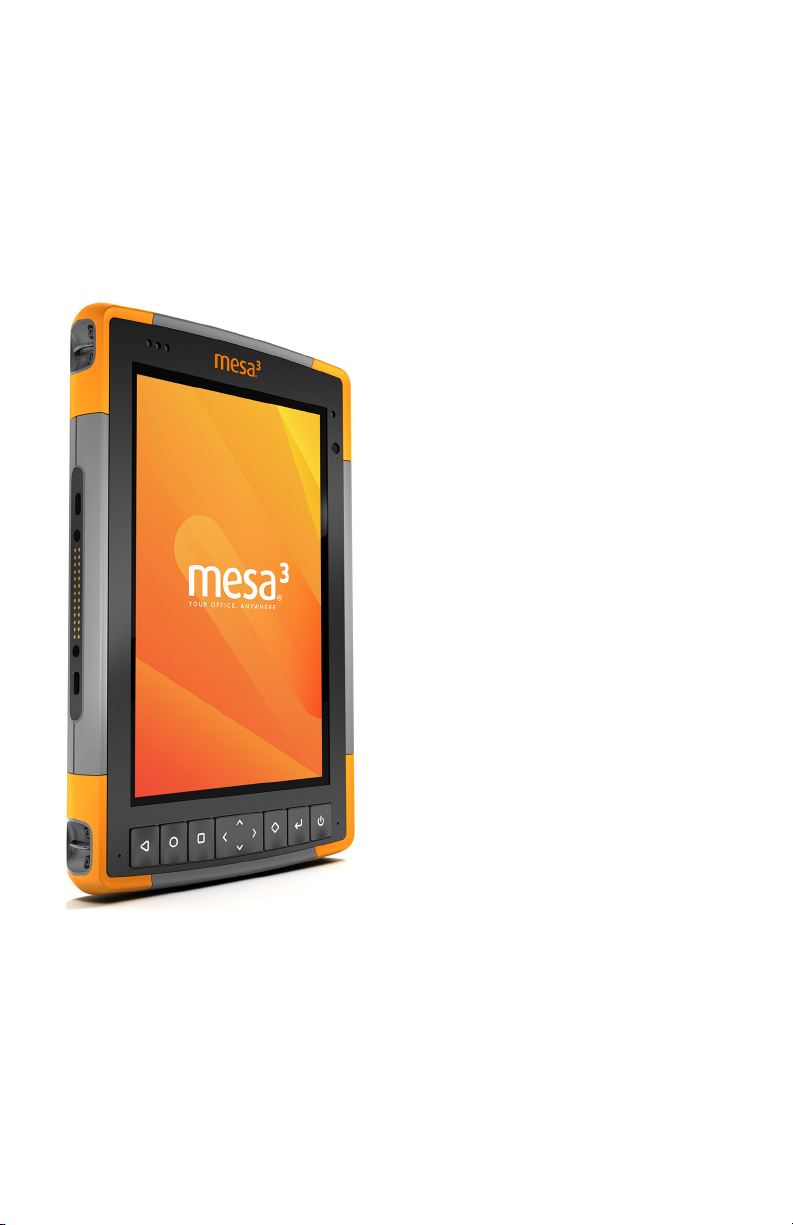
The standard features for the Mesa 3 Rugged Tablet™
powered by Android from Juniper Systems include a
7” display, capacitive touchscreen, keypad, Bluetooth
technology, Wi-Fi, NFC, GPS/GNSS, camera, and 4G LTE
data modem. Standard accessories include a removable
lithium-ion battery pack, AC wall charger, hand strap,
connector port cover, a ne tip capacitive stylus and tether,
and a foam tip stylus for use in wet conditions.
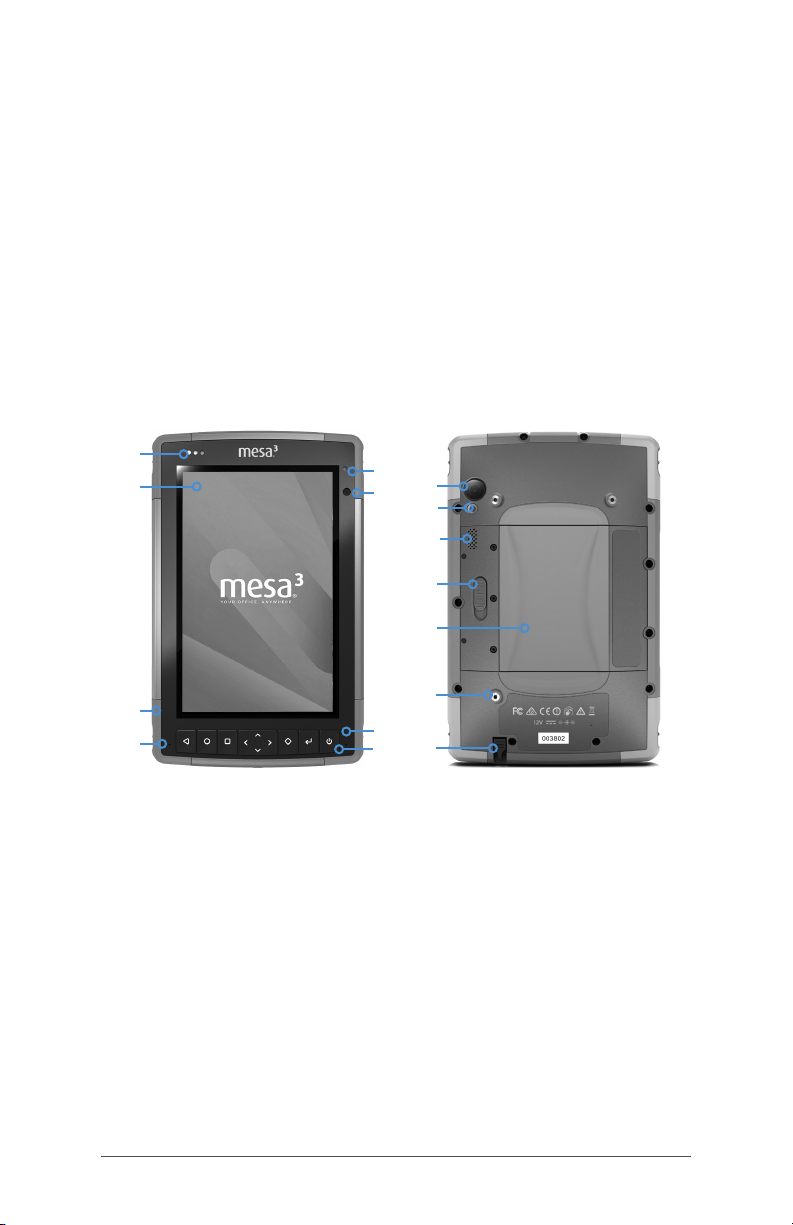
The Anatomy of the Mesa 3
Front and Back Features
1
2
3
4
1 Notication LEDs
2 Touchscreen and Display
3 Protective Over-molded Bumper
(all four edges)
4 Microphone (one on each side)
5 Ambient Light Sensor
6 Front Facing Camera Lens, 2 MP
7 Keypad
8 Power Key
5
9
6
10
11
12
13
14
7
15
8
9 Rear Facing Camera Lens, 16 MP
10 Camera Flash
11 Speaker
12 Battery Door Lock
13 Battery Compartment, SIM and
SD Card Slots
14 External Device Attachment
Point (1 of 3 on the back)
15 Storage Slot for Fine Tip Stylus
2 Mesa 3 Rugged Tablet Powered by Android
Page 7
Battery Compartment and Card Slots
1
3
4
5
6
2
1 Battery Pack, Removable
2 Battery Door
3 Micro SIM Card Slot and
Micro SD/SDHC Card Slot
(underneath card retainer)
Connector Ports
8
12
9 10 11
7
4 Flexible Card Retainer
5 Battery Compartment
6 Docking Port Connections
7 Hand Strap Attachment
Point (2 on each side)
8 USB-C, USB 3.1 OTG, 5V 1.5A Max
Output
9 USB 2.0 Host, Full Size A Connector,
5V 500mA Max Output
10 12 VDC Power Input Jack
11 Storage Slot for Fine Tip Stylus
12 Connector Port Protector
Chapter 1 Getting Started 3
Page 8

Perform Initial Tasks
When you receive your Mesa 3, perform the tasks outlined in
this section before rst use.
Review Documentation
Documents like release notes, quick start guides, manuals,
certication information, and accessory instructions are
available on our website at: www.junipersys.com/support/
mesa-3/documentation. View information on the Mesa 3 or
another computer with an internet connection.
Documents will be updated during the life of the Mesa
3. Compare version numbers to see if a document has
changed.
Install the Battery Pack, Micro SD Card, and Micro SIM
Card
The Mesa 3 comes with a rechargeable, removable LiIon battery pack. Install and charge the battery pack as
follows:
1. The battery compartment is accessed from the back of
the tablet. Push the battery lock switch in, slide it to the
unlocked position, and remove the door.
!
CAUTION: The Mesa 3 is not sealed against water and
dust when the battery door is not installed.
2. If you are using a micro SD card for additional memory
or a micro SIM card for cellular data, you can install
them now before you install the battery pack or at
another time. If you do this, make sure you replace the
exible card retainer before installation of the battery.
See Chapter 2, Standard Features, SD Cards for more
details.
4 Mesa 3 Rugged Tablet Powered by Android
Page 9
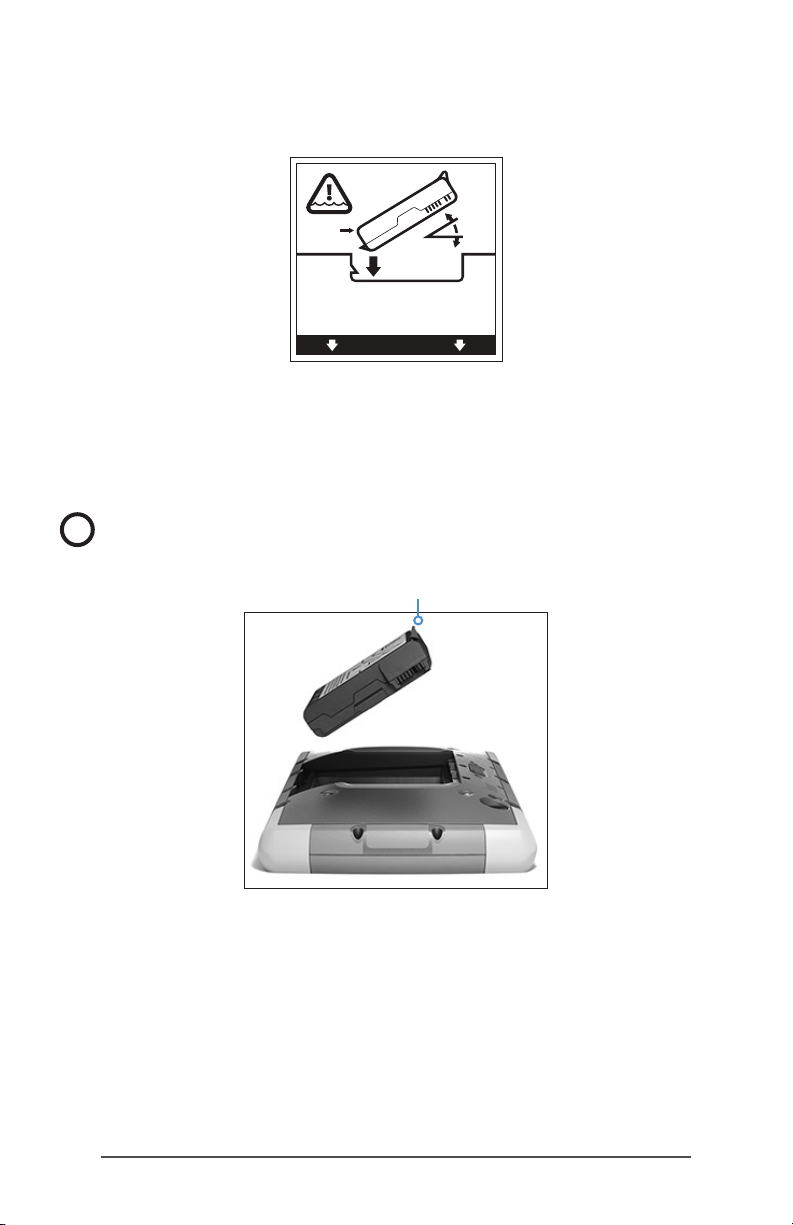
3. Follow the graphic on the battery label to insert the
TO ENSURE DOO R SEAL, IN SERT SIDE (A ) FIRST!
PARA VEDAR A P ORTA, INSIR A O LADO (A) PR IMEIRO!
PARA SELL AR LA PUERTA , INSERTE PRI MERO LADO ( A)
ERST SEITE ( A) EINLEGEN – S ICHERT TÜRD ICHTUNG!
P/ VEDAR A PORTA, IN SIRA O LAD O (A) PRIMEI RO!
(A)
(A)
battery pack properly.
Hold the battery so that the black tab on the front edge
of the battery is up and facing the door latch (this tab
helps you pull the battery out). Place the back edge
in rst, gently pushing it underneath the two battery
catches. Rotate the front edge down until it is in position.
!
CAUTION: Do not insert the battery pack straight down.
Damage to the unit could occur.
Black Tab
4. Replace the door and press down on it until the latch
pops into the locked position (from this view, the left side
of the door is inserted rst).
5. Attach the appropriate plug for your country into the
AC wall charger and plug it into a wall socket. Plug the
other end into the DC power jack on the Mesa 3.
Note: Use the AC wall charger that came with the Mesa
3 or an approved charger.
Chapter 1 Getting Started 5
Page 10
6. Charge the battery pack at room temperature (68°F or
20°C) for 6 hours (for the rst charge). While the battery
pack is charging, the red LED blinks. When it is fully
charged and external power is applied, the red LED is
solid. The battery charge level shown on the icon for
this battery (see the status bar at the top of the display)
shows the correct charge after the battery has been
fully charged for the rst time.
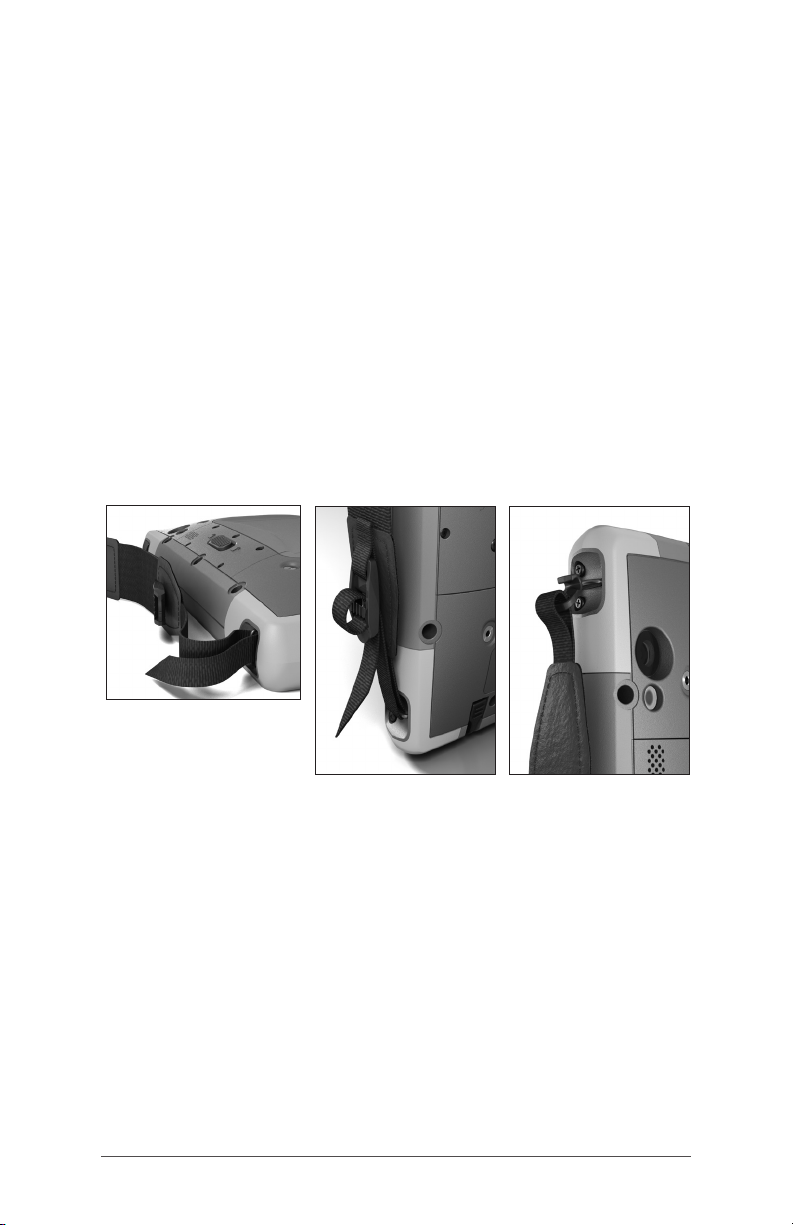
Attach the Hand Strap and Stylus Tether
A hand strap, ne tip capacitive stylus, and tether are
included with the Mesa 3.
Hand Strap
To attach the hand strap to the Mesa 3, follow the images
below. You can attach it to the right or left side of the tablet:
1
2
6 Mesa 3 Rugged Tablet Powered by Android
3
Page 11

Stylus Tether
Attach one end of the stylus tether to the stylus. To attach
the tether to the tablet, follow these steps:
1. Attach one end of the stylus tether to the stylus.
2. Push the free tether loop through one of the tether
attachment points located on the side of any of the four
corners.
3. Insert the stylus with the attached tether through this
loop and tighten the loop.
4. Place the stylus into the stylus storage slot located on
the bottom of the Mesa 3.
Turn the Mesa 3 on and Off
To turn the Mesa 3 on, press and release the power key .
The tablet powers on and begins the startup process. The
rst time you do this, you are asked to set up your device
and create or sign into a Google account.
When startup is complete, the Lock screen is shown. Swipe
up from the bottom of the screen to unlock it. The Home
screen is shown.
To power the Mesa 3 off, press the power key for a few
seconds until a menu is shown with these selections:
Power off
Restart
Screenshot
Select Power off.
Chapter 1 Getting Started 7
Page 12

8 Mesa 3 Rugged Tablet Powered by Android
Page 13
2
STANDARD FEATURES
Page 14

Standard Features
This chapter discusses the standard features included with
all Mesa 3 models with Android.
Operating System
The Mesa 3 Android has Android 9.0 Pie operating system.
Display and Touchscreen
The Mesa 3 has a bright color display and capacitive
touchscreen with a diagonal viewing area of 7 inches
(178 mm).
Accessing Information
When you turn the Mesa 3 on, a Lock screen is shown. Swipe
up from the bottom of the screen to unlock it. The Home
screen is shown. From the top of the Home screen, swipe
down once to see the Quick Settings menu with icons for
settings like the Flashlight, Wi-Fi, and Bluetooth technology
and to view any existing notications. Swipe down again
for access to more settings including Airplane mode, Touch
Settings, the screen brightness bar, and Settings (gear icon).
Tap on an icon to turn the feature on or off. You can hold
most icons down to see the full Settings screen. From the
white bar on the bottom of the Home screen, swipe up
once to see last screen accessed. Swipe up again to see a
complete list of apps.
Note: The display automatically goes to sleep after a set
amount of time passes. Press the power key and the lock
screen appears. You can adjust the sleep interval in Settings
> Display.
Auto-rotate the Screen
The default setting for the screen is portrait mode. To set the
screen up to automatically rotate between portrait and
landscape mode, swipe down from the Home screen to
Quick settings. Tap the Auto-rotate icon to turn it on.
Turning on screen rotation for the Home screen is a separate
process. Go to the Home screen. Tap and hold a nger
down in a blank area of the screen until a menu appears.
Select Home settings > Allow Home screen rotation.
10 Mesa 3 Rugged Tablet Powered by Android
Page 15

Touchscreen Touch Control Setting
You can select the prole you want the screen optimized
for based on the environment you are working in and your
personal preference. Proles choices include: Finger, Stylus
or Finger, Glove, Stylus, or Wet. You can try different proles
to see which one works best for the conditions the Mesa 3 is
being used in.
To adjust the Touch Control setting, swipe down from the
top twice to see all of the Quick Settings and tap and hold
Touch Settings. Make a selection from the list of options that
is shown. You can also go to Settings > Touch Control.
Wet Conditions
When using the Mesa 3 in wet conditions, you must use your
nger or the soft-tipped stylus that is included, even after
selecting the Wet Touch Control prole. The hard-tipped
stylus is not supported with this prole. Third party styli might
work with the Mesa 3 touchscreen. However, third party styli
performance may vary.
Touchscreen Enable/Disable
There are times when you might want to disable the
touchscreen (so selections are not inadvertently made,
for example). A keypad button can be set up to provide
this function. Go to Settings > Keypad. Select Advanced
to see all of the keys. Select the key you want to use. A list
of options is shown for that key (scroll up and down to see
them all). Select Touchscreen enable/disable.
Keypad Features
The Mesa 3 keys (buttons) are sealed and have backlight
illumination. They are programmable. The standard
functions are shown in the following chart:
Key Function
Back
Home
App Select
Volum e -
Chapter 2 Standard Features 11
Page 16
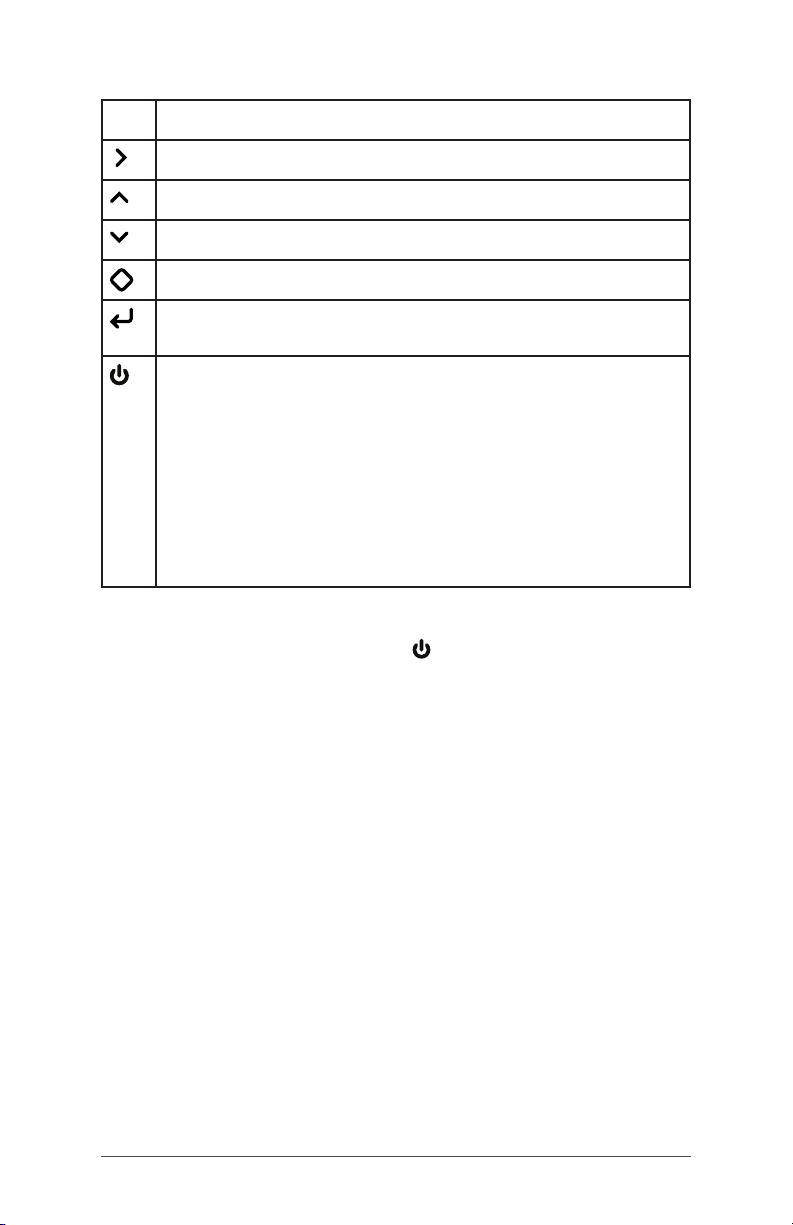
Key Function
Volum e +
Brightness +
Brightness -
Screenshot
Enter (for models with an RFID reader, read RFID tag
when the application is open)
Power
Press and release: On or sleep
Hold for 3 seconds: Select Power off, Restart, or
Screenshot
Hold for 10 seconds: Forced shut down
Hold for 20 seconds: Electrically disconnect the
battery pack(s); to reconnect the batteries, you
are required to plug in the charger or external 12
V power
Programmable Keys
All of the keys except for power are programmable.
Select Settings > Keypad. The keys and their current
assignments are shown. Select Advanced to see all of the
keys. Select individual keys and your preferred function
for specic keys from the drop down menus (scroll up and
down to see all of the functions).
Light Sensor
An ambient light sensor is located on the front of the Mesa
3 in the upper-right corner. The light sensor can dynamically
adjust the backlight on the display based on lighting
changes. You can enable this process by going to Settings >
Display > Adaptive brightness.
Power Management
The Mesa 3 runs on battery power, using a removable,
rechargeable, Li-Ion battery pack. A non-removable, internal
battery pack is an option. The tablet operates on either one
or both battery packs.
12 Mesa 3 Rugged Tablet Powered by Android
Page 17

Battery Status and Management
Battery icons on the Status bar shows the status of installed
batteries. The large battery icon represents the removable
battery while a smaller battery icon represents an optional
internal battery. The status of these icons follows:
If both the internal and the removable batteries are
installed, a bigger battery icon and a smaller battery
icon are shown.
If a removable battery is not present, both battery
icons are shown, but the larger battery icon has an
exclamation mark signifying that it is not present.
If only the removable battery is present, only the large
battery icon is shown.
Charging the Battery Pack(s)
For tablets that have both a removable battery pack and
an optional internal battery pack, the intelligent internal
battery charging circuit rst charges the battery pack with
the least amount of energy. When this battery pack comes
to the same level as the other battery pack, then both
battery packs are charged at the same time until they are
both fully charged.
Battery packs are charged most efciently at room
temperature (68°F or 20°C). They will not charge if it is too
hot or too cold.
Battery Life
Battery life on a full charge is about 12 hours for the
removable battery and an additional 5-6 hours for the
optional internal battery. Battery life varies depending on
the applications used, backlight usage, and radio usage.
The shelf life for battery packs is about one year. The battery
packs should be recharged at least once per year. This
prevents the battery packs from discharging to a level that
might damage the batteries. Battery packs that are not
recharged at least every year could fail to work or may
have reduced capacity. Battery packs typically last 1,000 to
3,000 charging cycles.
Chapter 2 Standard Features 13
Page 18

CAUTION: Only use batteries designed for the Mesa 3 from
!
an approved vendor. Use of non-approved batteries may
void your product warranty. The Mesa 3 must be returned to
the factory for replacement of the optional internal battery,
although the internal battery pack is designed to last the
life of the tablet.
CAUTION: The unit is not designed to run on external power
!
without a battery installed. Doing so can damage internal
components of your unit and void the warranty.
Powering Off the Mesa 3
Charge the Mesa 3 to 100% using the wall charger that
came with the device, then power it off.
1. Press and hold the power button for 2-3 seconds.
2. A menu appears with Power off, Restart, and Screenshot
options. Tap Power off.
Powering O for Long-Term Storage
To power off the Mesa 3 for long-term storage (two weeks or
more), follow these steps:
1. Power off the Mesa 3 as described in the previous
section, Short-term Storage.
2. Press and hold the power button for 20 seconds. This
disconnects the batteries from the system.
3. Take out the removable battery and store it in a cool,
dry location.
4. When you are ready to power on the Mesa 3, replace
the battery pack. Plug in the AC wall charger and
connect it to the Mesa 3 BEFORE you power it on.
How to Handle a Locked Up Unit
If the Mesa 3 is completely stuck and won’t respond, hold
the power key down for 2 to 3 seconds to see if the menu
with the “Power off” option appears, and select that
operation. If that doesn’t work, hold the power key down for
10 seconds. This causes a hardware shut off. Press the power
key again to power it on.
If 10 seconds doesn’t work, hold the power button down for
20 seconds. Batteries are forced to electrically disconnect
from the tablet, causing a complete shut down. The tablet
14 Mesa 3 Rugged Tablet Powered by Android
Page 19

cannot be powered on again until an external power
supply is attached. Keep this in mind if you are in the eld.
CAUTION: Forcing a shut-down while the unit is running can
!
cause damage to the device. NEVER do this to power off a
Mesa 3 in normal circumstances.
LED Activity Indicators
LED activity indicators are located on the front of the Mesa
3 in the upper-left corner.
Red LED, solid: The AC wall charger is plugged in and the
battery is full (not charging).
Red LED, blinking: The AC wall charger is plugged in and
the battery is in the process of charging.
Blue LED: Android notications.
Green LED: Custom programmable by applications.
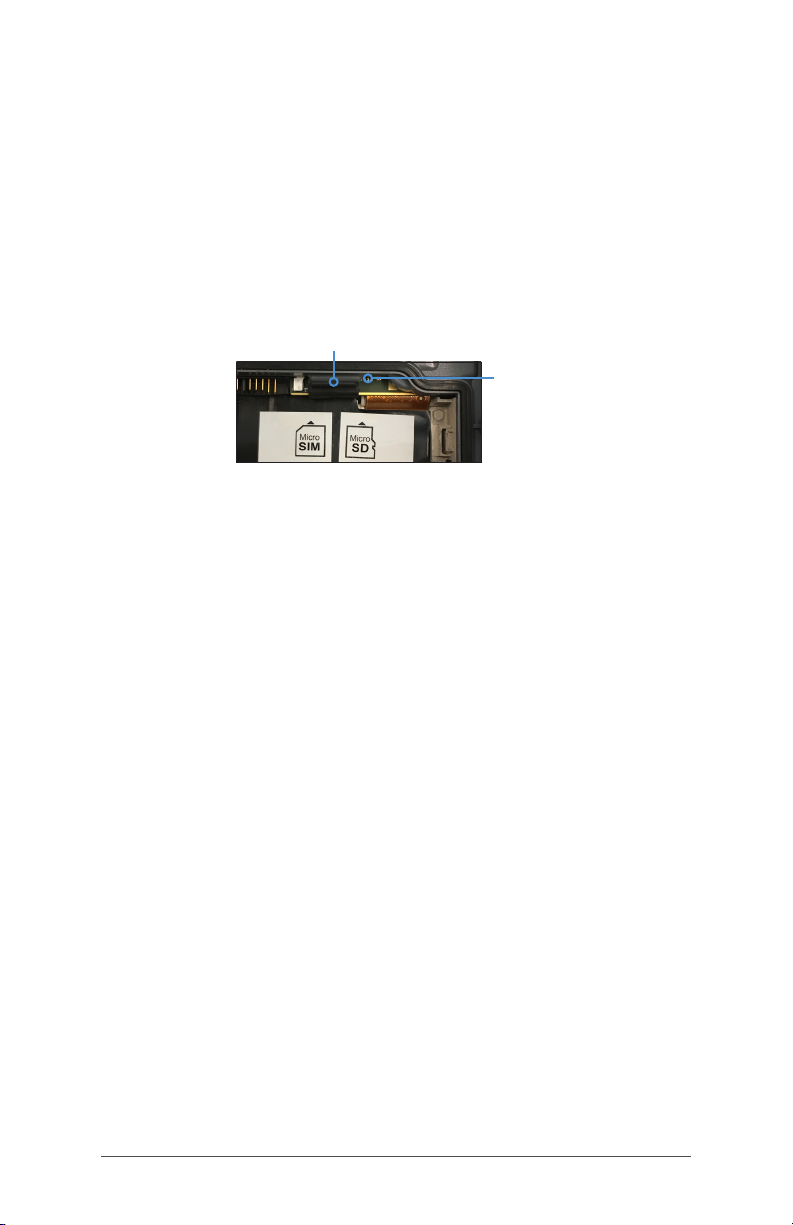
Data Storage Options
SD Cards
The Mesa 3 has a slot for a micro SD card located in the
battery compartment. The card slot and exible card
holder are designed to hold the card securely in place so it
will not come out or disconnect if the tablet is dropped.
To insert or remove a card, follow these steps:
1. If you are removing a card, go to Settings > Storage and
under SD card, tap the eject icon. You can also swipe
down to access the notication center and select EJECT
under the SD card notication. Otherwise, go to step 2.
2. Power off the tablet.
3. Remove the battery door as outlined in Chapter 1.
!
!
CAUTION: The Mesa 3 is not sealed against water and
dust when the battery pack and battery door are not
installed properly.
CAUTION: Always power off the tablet before removing
the battery. Failure to do so may cause loss of data or
damage to the tablet. EXCEPTION: If your tablet has a
charged internal battery, this caution does not apply.
You can safely remove the removable battery while the
unit is running.
Chapter 2 Standard Features 15
Page 20
4. Remove the battery pack by pulling up on the black tab
on the battery pack.
5. An image on the battery compartment label shows the
correct location and orientation for the SD card. Pull
the exible card holder back out of the way. To insert
a card, push the card into the slot. To remove a card,
pull it out. Use tape or an eraser if you have trouble
grabbing it.
Flexible
Card Holder
SD Card
Slot
6. Push the exible card holder back into place, covering
the card slots.
7. Replace the battery pack and attach the battery door
as explained in Chapter 1.
8. To view and manage an inserted card, power on the
Mesa 3 and go to Settings > Storage. Under SD card,
make sure the card has mounted so you can access the
les. You can manually mount it if necessary by tapping
Mount. To erase the contents, tap Erase. Before removal,
tap Eject. After a few seconds a message is shown that
says Removable storage will be ejected. Wait until it
disappears to remove the card. This ensures that any
ongoing activities with the USB Storage Device are
terminated properly.
USB Ports
The Mesa 3 is equipped with two USB ports:
USB 2.0 host port: Attach a USB storage device like a
thumb drive to transfer data to and from the Mesa 3. You
can also use this port to plug in a mouse or keyboard.
USB-C port: This port can be used to attach a computer
to the Mesa 3, allowing you to directly transfer les
between these devices. It can also be used with an OTG
adapter to plug in a mouse or keyboard. A multi-purpose
16 Mesa 3 Rugged Tablet Powered by Android
Page 21

USB-C hub can be plugged in, providing ethernet and
multiple USB 3 ports.
Note: The Mesa 3 does not charge through the USB-C
port.
Sensors
Compass, Gyroscope, and Accelerometer
The Mesa 3 has a built-in compass, gyroscope, and
accelerometer. The accelerometer assists the compass in
determining direction, even when the device is not resting
at. The gyroscope senses change in angular motion. The
compass, accelerometer, and gyroscope can also be used
by other user applications. The compass and gyroscope
have been factory calibrated.
Bluetooth® Wireless Communication
To create a partnership between the Mesa 3 and another
device with Bluetooth technology, follow these steps:
1. Turn both devices on.
2. Place them within a few feet of each other. (The Mesa
has long range Bluetooth technology, but the other
device might not.)
3. Make Bluetooth technology discoverable on both
devices. It is off on the Mesa 3 by default. You can
quickly check on the status by swiping down from
the top of the screen to view the Quick Settings. If the
Bluetooth icon is gray, it is off. Tap and release the icon
to turn it on. The icon turns green. (You can also toggle it
on and off in Settings).
4. Touch and hold the Bluetooth icon to open Connected
Devices in Settings. Select Connection preferences >
Bluetooth. Select Pair new device. A list of discoverable
devices is shown. Tap on the name of the device in the
list you want to pair with. A Bluetooth device pairing
request box is shown. If prompted, enter the PIN or pass
code of the device you want to pair with. The devices
should now be paired.
Chapter 2 Standard Features 17
Page 22

Note: If Bluetooth technology is on and the tablet enters
sleep or hibernate mode, Bluetooth technology turns off
to save battery power. The connection is resumed once it
powers back on.
Wi-Fi Wireless Networking
To use Wi-Fi, you need to be in range of a Wi-Fi access point
to make a connection. To set up Wi-Fi, follow these steps:
1. To activate Wi-Fi, swipe down from the top of the
screen to view the Quick Settings. Tap and hold the WiFi icon to turn Wi-Fi on and open Wi-Fi in Settings.
2. The Mesa 3 automatically starts scanning the area
for available Wi-Fi networks. A list is shown. Select
the network you want to use and enter the network
password (for locked networks). The Mesa 3 remembers
the Wi-Fi network connections created.
3. From Settings, tap the network you selected to view
information like Link speed. Additional networks can be
added and WiFi preferences can be selected.
NFC Short-Range Wireless Technology
NFC tags can be scanned by holding the tag against the
Mesa 3 NFC antenna located inside the back of the unit
under the regulatory symbols on the serial number label.
Note: NFC does not support secure transactions.
GPS/GNSS
The Mesa 3 has an integrated GPS/GNSS receiver with an
internal antenna to provide position information.
GPS/GNSS Support
The Android operating system provides built-in support
for GPS/GNSS devices. As part of that support, Android
18 Mesa 3 Rugged Tablet Powered by Android
Page 23

Location Services provides a standard way for GPS/GNSS
information to be made available to applications that
have been designed using the Android Location Services
application programming interfaces (APIs). GPS is always
on by default and cannot be turned off. To select your
desired conguration of GNSS satellite constellations, go to
Settings > GNSS Settings.
GPS/GNSS Accuracy
The GPS/GNSS antenna is located at the top of the Mesa
3 above the ambient light sensor when it is held in portrait
view. It is intended to work in both portrait view and
landscape view. Do not put your hand or another object
over this area. Accuracy could be reduced. The more items
between the antenna and the satellites, the lower the
accuracy.
Camera
The Mesa 3 has a front facing camera that is 2 MP and a
rear facing camera that is 16 MP.
By default the camera application can be accessed by
quickly pressing the hardware power button twice. It
can also be found in the apps list and can be placed on
the Home screen. Still images and videos can be captured
from the camera application. Other options such as timer,
ash, and switching between front and back cameras
are available. More options are shown in settings such as
location tagging, aspect ratio, and image resolution.
4G LTE Data Modem
The 4G LTE data modem provides Wireless Wide Area
Network data modem capability.
This modem supports service providers in North America,
Europe, and many other regions of the world. It is multicarrier capable. Refer to frequency bands and modes
supported by the Mesa 3 located in Appendix D,
Specications, and your service provider of choice for
compatibility.
Chapter 2 Standard Features 19
Page 24

Set up a Data Account with a Wireless Provider
Contact a wireless provider to set up data service for the
cellular data modem and obtain an account and micro SIM
card. Provide the following information:
1. Billing Information and business ID, such as your Federal
Tax ID or VAT number.
2. The wireless services required. You only need data
service. You do not need voice or messaging services.
3. You may be asked for the modem’s IMEI number. Go to
Settings > About Tablet to see the IMEI number.
Install the SIM Card
The card slot and exible card holder are designed to
hold the card securely in place so it will not come out or
disconnect if the tablet is dropped. To insert or remove a
card, follow these steps:
1. Power off the tablet.
2. Remove the battery door and battery pack as outlined
in Chapter 1.
CAUTION: The Mesa 3 is not sealed against water and
!
dust when the battery door is not installed properly.
3. An image on the battery compartment label shows the
correct location and orientation for the SIM card. Pull
the exible card holder back out of the way. Push the
card into the slot to insert it.
Flexible
Card Holder
SIM Card Slot
4. Push the exible card holder back into place, covering
the card slots.
5. Replace the battery pack, and attach the battery door.
To remove the SIM card, gently pull it out with tweezers or a
piece of tape.
20 Mesa 3 Rugged Tablet Powered by Android
Page 25

3
OPTIONAL FEATURES AND ACCESSORIES
Page 26

Optional Features and Accessories
This chapter discusses the optional features you can add to
the Mesa 3 Rugged Tablet and some optional accessories
you can order separately.
Note: The RS-232 connector is not available in combination
with the barcode imager or the RFID reader.
Barcode Imager
The Mesa 3 with a barcode imager allows you to read 1D
and 2D barcodes and easily import barcode data into
custom or standard programs running on the Mesa 3.
Barcode Connector Utility
The Barcode Connector™ utility is a barcode wedge
program provided with the barcode imager. Open it from
Apps > Barcode Connector.
Home Screen
When the Barcode Connector utility loads, the home screen
appears. From the home screen, you can do a Scan Test
right away. Aim the imager towards a barcode. Tap Scan
on the screen or press the scan button on the keypad.
When a red aiming LED appears, place it on or near the
barcode. After a successful scan, the Scan Symbology Type
and Scan Data are shown on the screen.
Barcode Menu
Select the menu symbol in the upper left hand corner of the
home screen or swipe the screen from left to right to see the
menu (you can do this from any screen in the application).
22 Mesa 3 Rugged Tablet Powered by Android
Page 27

This menu gives you access to several setting screens.
User Settings
From the menu, select User to open the User Settings screen.
From this screen, set up options like Barcode Scan Time and
which button to use to scan barcodes.
Data Format and Barcode Types
On the Data Format screen, you can set up a prex and
sufx. Use the rest of the menu options to set up different
types of barcodes, including 1D code types, composite
Codes, postal codes, and 2D code types.
Chapter 3 Optional Features and Accessories 23
Page 28

Reading a Tag
Once the Barcode Connector utility is set up, you can start
scanning barcodes.
1. Leave the Barcode Connector utility running in the
background.
2. Open an application or document to receive the
barcode data and tap in the text eld where you want
the data to be placed.
3. The barcode imager is located on the top of the Mesa 3
when in portrait mode. Aim the barcode imager at the
barcode.
4. The distance required between the barcode and Mesa
3 varies depending on the barcode being read. There
is a red aiming LED that helps you aim at the correct
barcode. Press the scan button ( by default any
time the application is opened). When the barcode is
successfully scanned, the barcode information is placed
in your application or document.
Troubleshooting the Barcode Imager
If the barcode imager is not functioning correctly, you can
use the following steps to set the imager to factory default
settings:
1. Launch the Barcode Connector utility.
2. Scan the Set Factory Default barcode shown here.
24 Mesa 3 Rugged Tablet Powered by Android
Page 29

3. Go to the User Settings screen and tap Reset Settings to
restore the settings to the default operating parameters.
4. Close the Barcode Connector utility.
5. Launch the Barcode Connector utility again and verify
that correct functionality has been restored.
Sample Barcodes
1D Barcodes
Code 39
Co de 12 8
UPC-A
Chapter 3 Optional Features and Accessories 25
Page 30

2D Barcodes
Aztec
Maxicode
MicroPDF417
QR Code
RFID Reader
The Mesa 3 Rugged Tablet with an RFID reader allows you
to read UHF RFID tags and easily import data into custom or
standard programs running on the Mesa 3.
RFID Connector Utility
The RFID Connector™ utility is a wedge program provided
with the RFID reader. Open it from Apps > RFID Connector.
Home Screen
When the RFID Connector utility loads, the home screen
appears. From the home screen, you can do a Scan Test
right away. Hold the Mesa 3 with the display facing you,
26 Mesa 3 Rugged Tablet Powered by Android
Page 31

and an RFID tag directly away from the back of the Mesa 3.
Tap Scan on the screen or press the scan button on the
keypad. After a tag is successfully read, the Scan Data is
shown on the screen.
RFID Connector Menu
Select the menu symbol in the upper left hand corner of the
home screen or swipe the screen from left to right to see the
menu (you can do this from any screen in the application).
This menu gives you access to User and Data Format setting
screens.
User Settings
From the menu, select User to open the User Settings screen.
From this screen, set up options like RFID Scan Time and
which button to use to scan RFID tags.
Chapter 3 Optional Features and Accessories 27
Page 32

Data Format
On the Data Format screen, you can set up a prex and
sufx.
Reading a Tag
Once the RFID Connector utility is set up, you can start
reading tags.
1. Leave the RFID Connector utility running in the
background.
2. Open an application or document to receive the RFID
data and tap in the text eld where you want the data
to be placed.
3. For best read performance, hold the Mesa 3 with the
display facing you, and the tag directly away from
the back of the Mesa 3. The RFID reader is internal and
roughly 2” to the right of the camera when looking at
the back of the Mesa 3. The best orientation is portrait or
landscape with Mesa 3 orthogonal or normal to the tag.
The distance required between the tag and Mesa 3
varies depending on the tag. This is not a long range
reader, so you may need to be as close as a few inches
and may be as far as 3 feet from the tag.
4. Press the scan button ( by default any time the
application is opened). When the tag is successfully
scanned, the RFID information is placed in your
application or document.
Antenna for RFID Reader
The antenna is a circularly polarized antenna. This has
reduced range, but allows the Mesa 3 to be held in any
orientation (linear antennas can have longer range if held
in the right orientation).
RS-232 Port
An RS-232 9-Pin D-Sub connector is an option for the Mesa 3.
It provides either 5 VDC or 12 VDC on pin 9. The behavior of
the port can be congured in Settings > RS-232.
When you open the RS-232 Settings Screen, the default
conguration is shown. The options can be edited to suit
your application:
28 Mesa 3 Rugged Tablet Powered by Android
Page 33

Enable RS-232 port: When this option is off, it powers
down. When it is on, it powers up the RS-232 hardware. It
then displays the assigned COM port number.
Note: If you do not have a device plugged into the RS232 port, the port pins corrode more quickly when left
powered up. Use the setting to power down when it is not
going to be used.
Congure pin 9 as input or 5 volt power supply: Pin 9 is the
Ring-In signal input. It is rarely used by devices anymore
and has become a popular pin to provide a power
source to an RS-232 device. Select Input if your device
uses Ring-In signal or if it does not need to be powered
from the RS-232 port. Select 5 Volt Power Supply to make
pin 9 a power supply to be used by the RS-232 device.
The power supply is enabled automatically without
needing any interaction with the COM port. Depending
on the model, the power supply is either 5 or 12 VDC.
The 12 VDC output option on RS-232 is always on and not
controlled by settings.
Chapter 3 Optional Features and Accessories 29
Page 34

OfceDockingStation
The Ofce Docking Station enables you to perform the
following functions:
Charge your Mesa 3 Rugged Tablet
Use your Mesa 3 as a desktop computer
Transfer data to or from another computer or network via
the Ethernet connection
Dock Features
1
4
32
1 Lock Latch (2)
2 Alignment Pin (2)
3 Back Rest
4 Release Button
5
5 Docking Pins
6 USB Ports, Host (3)
7 HDMI Port
8 Ethernet Port
9 Power Input Jack
6
7 8 9
Ports
The USB ports are for attaching devices to the Mesa 3
such as a mouse, keyboard, or external storage device.
The HDMI port is for connecting a 1920 x 1080 resolution
60Hz video monitor to the Mesa 3, giving you a second
monitor.
The Ethernet port is used for networking (an Ethernet
cable is not included).
30 Mesa 3 Rugged Tablet Powered by Android
Page 35

How to Use the Dock
1. On the Mesa 3, make sure Auto-rotate is turned on (see
Chapter 2, Auto-rotate the Screen).
2. Provide power to the dock using the 30 W AC wall
charger provided with your Mesa 3 (the ports require
external power). A 45 W charger is available as an
option, and we recommend this charger if you are using
the dock as an ofce computer with several peripheral
functions. The 30 W AC wall charger might not provide
enough power to charge the batteries and run the
Mesa 3.
3. Plug in the cables for your desired setup.
4. If a hand strap is covering the pin contacts on the Mesa
3, unhook one end or remove it.
5. Hold the Mesa 3 in portrait mode with the docking pin
contacts facing down. Place it over the dock alignment
pins and press down until you feel and hear the lock
engage.
6. To remove the Mesa 3 from the dock, press on the
release button and pull the Mesa 3 up.
Adding a Video Monitor or Projector
To connect a 1920 x 1080 resolution 60Hz video monitor to
the Mesa 3, plug the device into the HDMI port.
Mounting the Dock to a Surface
The Ofce Docking Station is freestanding. It can also be
mounted to a surface like a desk or shelf. There are keyhole
slots on the bottom for this purpose.
4” (101.5 mm)
.175” (4.445 mm)
.125” (3.175 mm)
.350” (8.89 mm)
Chapter 3 Optional Features and Accessories 31
Page 36

EthernetSpecications
10/100/10 0 0 Mbps twisted-pair Ethernet
IEEE802.3/802.3u/802.3ab 10BASE-T, 100BASE-TX, and
1000BASE-T
Manages twisted pair crossover detection and correction
Full-duplex and half-duplex capability (only full-duplex
operation at 1000 Mbps)
Maintenance and Environmental Issues
The dock is intended for indoor use only.
Temperatures should be between 0°C to 50°C.
Avoid using the dock in situations where water can enter
the connector ports. It is not sealed against water and
must be kept dry.
Do not touch the docking pins with conductive items
when power is applied to the dock.
Do not drop items on the dock that can damage the
docking pins.
Keep debris off of the docking pins.
The Mesa 3 docking pin contacts are always powered
on when it is docked. If you are using the Mesa 3 in a
potentially corrosive location when it is not docked, the
pin contacts can be turned off in Settings > Doc Control.
Mesa 3 Vehicle Dock
The Vehicle Dock is part of a mounting system that provides
the Mesa 3 with a method to be secured in a vehicle or
other mobile mounting application.
32 Mesa 3 Rugged Tablet Powered by Android
Page 37

Vehicle Dock Features:
A locking mechanism with a unique key (duplicates can
be made for eets)
Powered dock: 12 VDC power port, vehicle charger, and
USB 2.0 port (host)
Non-powered dock option
Four holes and screws for attachment to a mounting
system
1 Power Input Jack
2 USB Port, Host
3 Lock Bar with Key
1
2
3
Mounting System
The Vehicle Dock does not attach directly to a vehicle.
The dock attaches to any 30mm x 38mm AMPS mounting
system that suits your application (sold separately). We
recommend products from RAM Mounts (rammount.com) or
ProClip (proclipusa.com).
How to Use the Dock
1. Attach the mounting system to the vehicle. For a
powered dock, plug the 12 V charging cable into the
vehicle power port, and then into the dock.
2. If a hand strap is covering the pin contacts on the Mesa
3, unhook one end or remove it.
3. Hold the Mesa 3 horizontally with the docking pin
contacts facing down. Place it over the dock alignment
pins and press down until you feel and hear the lock
engage.
4. Press the lock bar down until it engages the Mesa 3.
5. Push the lock button in. The Mesa 3 is now locked in the
dock and cannot be accidentally removed.
6. To remove the Mesa 3, turn the key until the lock button
pops out. Lift the lock bar, and remove the Mesa 3.
Chapter 3 Optional Features and Accessories 33
Page 38

Maintenance and Environmental Issues
Temperatures should be between 0°C to 50°C.
Avoid using the dock in situations where water can enter
the connector ports. It is not sealed against water and
must be kept dry.
Do not touch the docking pins (spring loaded contacts)
with conductive items when power is applied to the
dock.
Do not drop items on the dock that can damage the
pins.
Keep debris off of the docking pins.
The Mesa 3 docking pin contacts are always powered
on when it is docked. If you are using the Mesa 3 in a
potentially corrosive location when it is not docked, the
pin contacts can be turned off in Settings > Dock Control.
Battery Charger
The Battery Charger is an optional accessory, allowing you
to charge spare battery packs for the Mesa 3.
How to Use the Battery Charger
Batteries charge best at room temperature (about 68°F or
20°C). Batteries will not charge (or might charge slowly) at
temperatures below 32°F (0°C) or above 122°F (50°C).
Power the Battery Charger by using the AC wall charger
provided with your battery charger kit or your Mesa 3. Slide
the battery pack into the battery charger, orienting it so
that the battery contacts meet the charging contacts in the
battery charger. The red LED ashes slowly, indicating that
the battery pack is charging.
LED Indicator for Battery Pack
The LED indicates the charging status:
Solid, on: The battery pack is fully charged.
Blinking (slow): The battery pack is charging.
Off: There is no power. The battery is not charging.
34 Mesa 3 Rugged Tablet Powered by Android
Page 39

A
STORAGE, MAINTENANCE, AND RECYCLING
Page 40

Storage, Maintenance, and Recycling
Follow the instructions in this chapter to properly maintain
and recycle the Mesa 3.
Storing the Mesa 3 and Battery Pack
When the tablet is not being charged and is in a sleep state,
it draws a small amount of power. This power draw is used to
maintain the memory (RAM) of the tablet in the same state it
was in when it was awake. We recommend charging the tablet
each night or weekend when it is in a sleep state.
Note: Data and programs are secure as long as they have
been saved, even if the battery pack becomes discharged.
The tablet does not depend on the battery to store the data
for extended periods.
Storing the Mesa 3 for More than Two Weeks
To store the tablet for two weeks or more, complete the
following steps:
1. Charge the battery pack 30 to 50 percent.
2. Close all running programs, and turn off the tablet.
3. Remove the battery pack.
4. If you have an internal battery pack, press and hold the
power button for 20 seconds to disconnect it.
5. Place the battery pack in a cool, dry location.
CAUTION: Read the battery warnings in Appendix C.
!
6. The AC wall charger must be plugged in and
connected to the Mesa 3 in order to turn it on after
storage.
Protecting the Touchscreen
Protect the touchscreen from impact, pressure, or abrasive
substances that could damage it. To further protect the
touchscreen, apply a screen protector (optional accessory)
using the directions that come with it in the package.
CAUTION: Be sure to replace the screen protector as often
!
as the screen protector instructions recommend.
36 Mesa 2 Rugged Tablet Powered by Android Owner’s Manual
Page 41

Cleaning the Mesa 3
Make sure the battery door is securely installed. Remove
the screen protector if you want to clean underneath it.
Use warm water, a mild cleaning solution, and a soft bristle
brush to gently clean the Mesa 3.
CAUTION: Do not direct a high-pressure stream of water
!
at the device to clean it. This action could break the seal,
causing water to get inside the device and voiding the
wa r ra nty.
CAUTION: Exposure to some cleaning solutions may
!
damage your device, including automotive brake cleaner,
isopropyl alcohol, carburetor cleaner, and similar solutions.
If you are uncertain about the strength or effect of a
cleaner, apply a small amount to a less visible location as a
test. If any visual change becomes apparent, promptly rinse
and wash with a known mild cleaning solution or with water.
Recycling the Mesa 3 and Batteries
When the Mesa 3 and Li-Ion battery packs for your Mesa
3 reach the end of their service life, they must not be
disposed of with municipal waste. It is your responsibility to
dispose of your waste equipment by handing it over to a
designated collection point for the recycling of electrical
and electronic equipment.
Appendix A Storage, Maintenance, and Recycling 37
Page 42

38 Mesa 3 Rugged Tablet Powered by Android
Page 43

B
WARRANTY AND REPAIR INFORMATION
Page 44

Warranty and Repair Information
Limited Product Warranty
Two Year Warranty
Juniper Systems, Inc. (“JS”) warrants that the Mesa 3
Rugged Tablet and optional internal battery shall be free
from defects in materials and workmanship, under normal
intended use, for a period of 24 months from the date of
shipment.
Ninety Day Warranty
JS warrants that the following items shall be free from
defects in materials and workmanship, under normal
intended use, for a period of ninety (90) days from the date
of shipment:
User replaceable battery packs
User documentation
Accessories
Warranty Exclusions
This warranty shall not apply if:
(i) the product has been set up improperly or has been
improperly installed or calibrated,
(ii) the product is operated in a manner that is not in
accordance with the user documentation,
(iii) the product is used for a purpose other than for which it
was designed,
(iv) the product has been used in environmental conditions
outside of those specied for the product,
(v) the product has been subject to any modication,
alteration, or change by or on behalf of customer
(except and unless modied, changed or altered by JS
or under direct supervision of JS),
(vi) the defect or malfunction results from misuse or
accident,
(vii) the serial number on the product has been tampered
with or removed, or
40 Mesa 2 Rugged Tablet Powered by Android Owner’s Manual
Page 45

(viii) the product has been opened or tampered with in any
way (such as the tamper evident VOID label indicating
certied IP [Ingress Protection] seal area has been
tampered with or removed).
Parts that are excessively worn are not covered under
warranty. These may include, but are not limited to, the
keyboard elastomer and switch matrix, hand straps, and
the touch screen (if applicable).
This warranty is exclusive and JS will not assume and hereby
expressly disclaims any further warranties, whether express
or implied, including, without limitation, any warranty as
to merchantability, tness for a particular purpose, non-
infringement or any warranties arising from the course of
performance, dealing, or usage of trade. JS specically
makes no warranties as to the suitability of its products for
any particular application. JS makes no warranties that
its products will meet your requirements or will work in
combination with any hardware or applications software
products provided by third parties,
the operation of its products will be uninterrupted or error
free, or
all defects in the product will be corrected.
JS shall not be responsible for software, rmware, information,
or memory data contained in, stored on, or integrated with
any products returned to JS for repair, whether under warranty
or not.
Remedy
In the event a defect in materials or workmanship is
discovered and reported to JS within the specied warranty
period, after evaluation by a technician at a certied repair
center, JS will, at its option, repair the defect or replace the
defective part or product. Replacement products may be
new or reconditioned. JS warrants any replaced or repaired
product for a period of ninety (90) days from the date of
return shipment, or through the end of the original warranty
period, whichever is longer.
Appendix B Warranty and Repair Information 41
Page 46

Limitation of Liability
To the fullest extent allowed by law, the obligation of JS
shall be limited to the repair or replacement of the product.
JS shall in no event be liable for special, incidental, or
consequential, indirect, special or punitive damages of any
kind, or for loss of revenue or prots, loss of business, loss of
information or data, or other nancial loss arising out of or
in connection with the sale, installation, maintenance, use,
performance, failure, or interruption of any product. Any
responsibility and/or liability of JS shall, in connection with a
warranted product, be limited in the maximum amount to
the original purchase price.
Governing Law
This warranty is governed by the laws of Utah, U.S.A. and
excludes the United Nations Convention on Contracts for
the International Sale of Goods. The courts of Utah shall
have exclusive personal jurisdiction in case of any disputes
arising out of or in connection with this warranty.
Repairs
CAUTION: Do not attempt to repair the Mesa 3 yourself. This
!
action voids the warranty.
Information about warranties, repairs, and Complete Care
service plans is located on our website at www.junipersys.
com/support/mesa-3/my-product. You can review repair
policies, locate a repair center, submit a repair order, check
warranty and repair status, view terms and conditions, get
shipping instructions, and check lead times.
Warranty Repairs
Standard repair orders and 3-Day Expedite Service repair
orders are valid for 30 days from the date issued. 1-Day
Expedite Service repair orders are valid for 7 days from the
date issued. If you will not be sending the product to us
immediately, please wait to request a repair until closer to
the time when you are ready to send us the product.
42 Mesa 2 Rugged Tablet Powered by Android Owner’s Manual
Page 47

Services and Materials Provided Under Warranty
Analysis of problem by service technician
Labor and materials required to x defective parts
Functional analysis performed after repair
Shipping costs to return device to customer
JS strives to provide continued full repair services for our
products for 3 to 5 years from the end of life announcement
of a product model. However, in some rare cases
(depending on the repair need), it may not be possible
to perform a repair due to an unforeseen discontinuation
or lack of supplied parts from third-party vendors. Repair
support for a product may continue beyond ve years if
obtaining replacement parts or tools remains economically
feasible. Our policy is that we will do what is best and most
benecial for our customers and company.
Submitting a Repair Order
Before returning a unit, please get permission by submitting
a repair order from our website and waiting for conrmation
or by contacting a repair center directly. Be prepared to
provide the following information:
The product serial number. Information about your Mesa
3 is shown when you go to Settings > About tablet. The
serial number is located on the back of the unit as well.
Note: Before opening the battery door and removing the
battery, see the proper procedure in Chapter 2, Power
Management.
Name and shipping address of company/university/
agen cy.
Best contact method (phone, email, cell/mobile).
Clear, highly-detailed description of the repair or
upgrade.
Credit card/purchase order number and billing address
(for a repair or upgrade that is not covered by the
standard warranty or an extended warranty policy).
Appendix B Warranty and Repair Information 43
Page 48

System Information for your Mesa 3
You might be asked to provide additional information about
your Mesa 3 when you contact a repair center. To view
information like the operating system edition, OS build and
serial number, go to Settings > About Tablet.
Complete Care Service Plans
We offer optional service plan options that provide
additional benets through participating repair centers. For
more information about our Complete Care service plans,
go to our website at www.junipersys.com/support/mesa-3/
my-product.
44 Mesa 2 Rugged Tablet Powered by Android Owner’s Manual
Page 49

C
WARNINGS, REGULATORY INFORMATION, LICENSING
Page 50

Warnings, Regulatory Information,
Licensing
Product Warnings
Follow the warnings listed below to use the Mesa 3 batteries
and AC wall charger.
Battery Warnings
WARNING! This device comes with a lithium-ion
!
rechargeable battery pack. To reduce the risk of re or
burns, do not disassemble, crush, puncture, short external
contacts, or expose the battery pack to re.
Do not disassemble or open, crush, bend or deform,
puncture or shred.
Do not modify or remanufacture, attempt to insert foreign
objects into the battery, immerse or expose to water or
other liquids, expose to re, explosion or other hazard.
Only use the battery for the system for which it is specied.
Only use the battery with a charging system that has
been qualied with the system per this standard. Use of an
unqualied battery or charger may present a risk of re,
explosion, leakage, or other hazard.
Do not short circuit a battery or allow metallic conductive
objects to contact battery terminals.
Replace the battery only with another battery that has
been qualied with the system.
Use of an unqualied battery may present a risk of re,
explosion, leakage, or other hazard.
Promptly dispose of used batteries in accordance with local
regulations.
Battery usage by children should be supervised.
Avoid dropping the battery. If the battery is dropped,
especially on a hard surface, and the user suspects
damage, take it to a service center for inspection.
46 Mesa 2 Rugged Tablet Powered by Android Owner’s Manual
Page 51

Improper battery use may result in a re, explosion or other
hazard.
Keep the battery away from excessive heat and direct
sunlight. Do not place it on heating devices such as
microwave ovens, stoves, or radiators.
Battery may explode if overheated.
This product could contain a built-in battery that must be
removed by a specialist.
CAUTION: Risk of explosion if the battery is replaced by an
!
incorrect type.
Wall Charger Warnings
WARNING! To reduce the risk of personal injury, electrical
!
shock, re or damage to the equipment:
Plug the wall charger into an electrical outlet that is easily
accessible at all times.
Do not place anything on the wall charger cord or any
of the other cables. Arrange them so that no one may
accidentally step on or trip over them.
Do not pull on a cord or cable. When unplugging the wall
charger from the electrical outlet, pull on the plug, not the
cord.
The AC wall charger must be approved by Juniper Systems,
have an output rating of 12 VDC and a minimum 2.5 A,
and be certied or listed by a nationally recognized testing
laboratory. The AC wall charger provided with the Mesa 3
meets these criteria. Using any other external power source
can damage your product and void your warranty.
CerticationsandStandards
There are North American and European Union versions of
the Mesa 3, with different certications and standards.
Note: Optional accessories like the Ofce Docking Station
do not go through certication testing and are ordered
separately.
Appendix C Warnings, Regulatory Information, Licensing 47
Page 52

United States
In compliance with the FCC rules 47 CFR 15.19(a)(3), the
statements that follow must appear on the device or in the
user documentation.
This device complies with Part 15 of the FCC Rules.
Operation is subject to the following two conditions:
1. The device may not cause harmful interference.
2. This device must accept any interference received,
including interference that may cause undesired
operation.
In compliance with the FCC rules, 47 CFR 15.105(b), the
user must be notied that this equipment has been tested
and found to comply with the limits for a Class B digital
device, pursuant to part 15 of the FCC Rules. These limits are
designed to provide reasonable protection against harmful
interference in a residential installation. This equipment
generates, uses and can radiate radio frequency energy
and, if not installed and used in accordance with the
instructions, may cause harmful interference to radio
communications. However, there is no guarantee that
interference will not occur in a particular installation. If this
equipment does cause harmful interference to radio or
television reception, which can be determined by turning
the equipment off and on, the user is encouraged to try to
correct the interference by one or more of the following
measures:
Reorient or relocate the receiving antenna.
Increase the separation between the equipment and
receiver.
Connect the equipment into an outlet on a circuit
different from that to which the receiver is connected.
Consult the dealer or an experienced radio/TV
technician for help.
In compliance with the FCC rules, 47 CFR 15.21, the user
must be notied that changes or modications to the
Rugged Tablet that are not expressly approved by the
manufacturer could void the user’s authority to operate the
equipment.
48 Mesa 2 Rugged Tablet Powered by Android Owner’s Manual
Page 53

Only approved accessories may be used with this
equipment. In general, all cables must be high quality,
shielded, correctly terminated, and normally restricted
to two meters in length. Wall chargers approved for
this product employ special provisions to avoid radio
interference and should not be altered or substituted.
This device complies with FCC SAR exposure limits set forth
for an uncontrolled environment. The equipment can be
used in close proximity to the human body without any
restrictions.
Canada
In compliance with Industry Canada rules, the following
statement must appear on the device or in the user
documentation:
This Class B digital apparatus complies with
Canadian ICES-003.
This device complies with Industry Canada licence-exempt
RSS standard(s). Operation is subject to the following two
conditions: (1) this device may not cause interference, and
(2) this device must accept any interference, including
interference that may cause undesired operation of the
device.
Canadian regulations restrict the use of channels in the
band 5150 MHz to 5250 MHz to indoor use only. When this
product is connected with an access point that is operating
in this frequency range, or when using ad-hoc mode, the
use of this product is restricted to indoor use only.
Le présent appareil est conforme aux CNR d’Industrie
Canada applicables aux appareils radio exempts de
licence. L’exploitation est autorisée aux deux conditions
suivantes: (1) l’appareil ne doit pas produire de brouillage,
et (2) l’utilisateur de l’appareil doit accepter tout brouillage
radioélectrique subi, même si le brouillage est susceptible
d’en compromettre le fonctionnement.
La réglementation canadienne restreignent l’utilisation
des canaux dans la bande 5150 MHz à 5250 MHz pour une
Appendix C Warnings, Regulatory Information, Licensing 49
Page 54

utilisation en intérieur. Lorsque ce produit est connecté
à un point d’accès qui fonctionne dans cette gamme
de fréquences, ou lorsque vous utilisez le mode ad-hoc,
l’utilisation de ce produit est limitée à une utilisation en
inté r ieur.
This transmitter must not be co-located or operating in
conjunction with any other antenna or transmitter. This
equipment should be installed and operated with a
minimum distance of 0mm between the radiator and your
body.
Cet émetteur ne doit pas être Co-placé ou ne fonctionnant
en méme temps qu’aucune autre antenne ou émetteur.
Cet équipement devrait être installé et actionné avec une
distance minimum de 0mm entre le radiateur et votre corps.
Radio Frequency Safety
This equipment complies with radiation exposure limits set
forth for an uncontrolled environment. This equipment is
in direct contact with the body of the user under normal
operating conditions. This transmitter must not be colocated or operating in conjunction with any other antenna
or transmitter.
Cet équipement est conforme aux limites d’exposition
aux radiations dans un environnement non contrôlé.
Cet équipement est en contact direct avec le corps
de l’utilisateur dans des conditions de fonctionnement
normales. Cet émetteur ne doit pas être co-localisées
ou opérant en conjonction avec tout autre antenne ou
transmetteur.
CE Marking (European Union)
Products bearing the CE marking comply with the EU
Directive 2014/53/EU.
CE compliance of this device is valid only if powered
with/by a CE-marked wall charger provided by the
manufacturer. Cables connecting to the USB host port must
use a ferrite core/bead on the cable. The ferrite core must
be placed on the cable near the end that connects to the
Mesa 3.
50 Mesa 2 Rugged Tablet Powered by Android Owner’s Manual
Page 55

Declaration of Conformity
The Declaration of Conformity for CE Marking is available
at: www.junipersys.com/doc
European Radio Power
BAND LOWER BAND
EDGE (MHz)
UPPER BAND
EDGE (MHz)
CONDUCTED
POWE R (dBm)
4G Data
Modem
GSM900 880 915 23
GSM180 0 1710 1785 21
UMT S B1 1920 198 0 21
UMTS B8 880 915 22
LTE B1 1920 1965 22
LTE B3 1710 1785 23
LTE B7 2500 2570 21
LTE B8 880 915 22
LTE B20 832 865 23
LTE B28 703 74 8 22
Bluetooth 2400 2483.5 9
Wi-Fi
2.4 GHz
2400 2483.5 17
WLAN
*5.2 & 5.3
5150 5350 16
GHz WLAN
5.6 GHz
5470 5725 15
WLAN
5.8 GHz
5725 2850 12
WLAN
RFID
Micro 865.6 8 6 7.6 27
Nano 865.6 8 67. 6 14
*This device may contain radios capable of transmitting in
the 5150-5350MHz frequency range, for example on 5G Wi-
Fi networks. This frequency is restricted to indoor use only.
Appendix C Warnings, Regulatory Information, Licensing 51
Page 56

Licensing Information
This Product is licensed under the AVC, the VC-1 and the
MPEG-4 Part 2 Visual patent portfolio licenses for the
personal and non-commercial use of a consumer to (i)
encode video in compliance with the above standards
(“Video Standards”) and/or (ii) decode AVC, VC-1 and
MPEG-4 Part 2 Visual that was encoded by a consumer
engaged in personal and non-commercial activity or was
obtained from a video provider licensed to provide such
video. None of the licenses extend to any other product
regardless of whether such product is included with this
product in a single article. No license is granted or will be
implied for any other use. Additional information may be
obtained from MPEG LA, LLC. See www.mpegla.com.
No rights are given for Dolby patents used in the Dolby
portion of this product. A list of relevant patents may
be obtained from Dolby Laboratories, Inc. No rights are
granted to any Dolby copyrights, including the right to
reproduce or distribute any portions of this product that
includes Dolby intellectual property. Licenses for these
activities may be obtained from Dolby.
Any use of this product in any manner other than personal
use that complies with the MPEG-2 standard for encoding
video information for packaged media is expressly
prohibited without a license under applicable patents in
the MPEG-2 patent portfolio, which license is available from
MPEG LA, LLC, 6312 S. Fiddlers Green Circle, Suite 400E,
Greenwood Village, Colorado 80111 U.S.A.
52 Mesa 3 Rugged Tablet Powered by Android
Page 57

D
SPECIFICATIONS
Page 58

Mesa3RuggedTabletSpecications
Note: Specications are subject to change without notice.
FEATURE SPECIFICATION
Standard
Conguration
Operating
System
Processor Octa-core Kryo™ 260 CPU,
Memory 6 GB RAM (LPDDR4x)
Primary Data
Storage
Micro SD/SDXC
Card Slot
Physical
Features
Keyboard Programmable keys
Geo/Cell unit with Wi-Fi, Bluetooth
technology, NFC, 6 GB RAM, 64 ash
storage, front and rear cameras, GNSS
receiver, and 4G LTE modem
Optional features that can be
integrated with the Mesa 3:
Internal battery pack
Barcode 1D/2D imager
UHF RFID reader, antenna
Barcode imager and RFID reader
RS-232 port with 5 V supply
Android™ 9.0 by Google
Qualcomm® Snapdragon™ SDM660
platform
64 GB ash storage
SD/SDXC slot, user accessible
Dimensions, standard: 5.4” wide x
8.48” long x 1.36” thick (137 mm x 215
mm x 35 mm)
Weight: 1.5 to 2.2 lb (680-907 g)
depending on battery conguration
and internal options installed
Durable, chemical- and shock-
resistant design
Easy-to-grip, impact-absorbing,
overmolded bumpers
Backlit keys
54 Mesa 2 Rugged Tablet Powered by Android Owner’s Manual
Page 59

FEATURE SPECIFICATION
Display Active viewing area: 7” (178 mm)
WXGA 800 x 1280 pixel resolution
Backlit LCD
Outdoor viewable
Portrait or landscape orientation
Touchscreen Capacitive multi-touch interface for
use with gloves, small tip stylus, and in
wet conditions
Chemically-strengthened
Dragontrail™ High Ion-Exchange
(HIE™) coverglass for impact and
scratch resistance
Touchscreen prole options
Batteries Removable Li-Ion battery pack:
-7.2 V, 6 Ah, 43.2 Wh
-Run time of up to 20 hours
-Charging time 4 to 6 hours
-Built-in battery intelligence
-User-replaceable
Optional internal battery pack:
7.2 V, 3 Ah, 21.6 Wh battery provides
an additional 50% of runtime and
hot-swap capability (not user
replaceable)
Connector Ports USB-C:
-USB 3.1 OTG (no battery charging)
-5V 1.5A max output
USB 2.0:
-Host (full size A connector)
-5V 500mA max output
Power input is 10 V - 16 V, nominal 12
VDC
Wireless
Connectivity
Long-range Bluetooth
technology, v5.0 +EDR, Class 1.5, BLE
®
wireless
support
Wi-Fi
®
802.11 a/b/g/n/ac, 2.4 GHz and
5 GHz, 2x2 MIMO
4G LTE, multi carrier capable
NFC Short-Range Wireless Technology
Appendix D Specications 55
Page 60

FEATURE SPECIFICATION
Audio Mono speaker, loud and clear
Microphone, low noise
LED Activity
Indicators
Red: power applied/charging status
Green: Custom programmable by
customer applications
Blue: Android notications
Standard
Sensors/
Features
Temperature
Specications
Ambient light sensor
Compass
Accelerometer
Gyroscope
Operating Temperature: -4°F to 122°F
(-20°C to 50°C).
Storage Temperature: -22°F to 158°F
(-30°C to 70°C)
Battery Charging Temperature: 32°F
to 122 °F (0°C to 50°C)
Shock
Resistance
Environmental
Ratings and
Standards
Withstands multiple 4 foot drops to
concrete
IP68 rating (1.4 meters for 2 hours),
waterproof and dustproof
Designed to MIL-STD810G.
Tests:
ME-60: Sand & dust
ME-51,53,& 54: X,Y,& Z -axis helicopter
vibe
ME-55, 56, & 57: X, Y, & Z -axis general
vibe
ME-52: Water immersion, 1 meter
ME-59: Aggravated temperaturehumidity cycle
ME-67: Temperature cycle
ME-62: Temperature shock
ME-66: Altitude
56 Mesa 2 Rugged Tablet Powered by Android Owner’s Manual
Page 61

FEATURE SPECIFICATION
Certications
and Standards
FCC Class B
CE Marking
Industry Canada
Australia (ACMA)
IEC/EN 62368 safety
Bluetooth SIG qualication
IP68 waterproof and dustproof
Designed to MIL-STD 810G
RoHS 2 compliant
Camera Resolution: 16 MP rear, 2 MP front
Auto focus (rear camera)
Video capture
JPEG image format
Flash (rear camera)
4G LTE Data
Modem
Qualcomm Snapdragon X12 LTE
modem
Supports micro-SIM card only. Micro-
SIM card header inside battery
compartment with card detect
feature and card retainer.
Does not support voice calls or SMS
Multi carrier capable
See more details at the end of this
chapter
GPS/GNSS 2 to 5 meter typical accuracy
Qualcomm SDR660 GNSS receiver
and integrated antenna
Integrated real-time SBAS receiver
(WAAS, EGNOS, etc.)
Supports GPS, GLONASS, Galileo
worldwide plus BeiDou, QZSS outside
of U.S.
Appendix D Specications 57
Page 62

FEATURE SPECIFICATION
UHF RFID
(Option)
Optional built-in UHF RFID module
and antenna
Region-specic frequency
congurations (859–873 MHz & 915–
930 MHz)
EPCglobal Gen 2 (ISO 18000-6C)
protocol support
Wide output range (0 dBm to +27
dBm)
Barcode 1D/2D
Imager (Option)
Imager and Decoder: Motorola/
Symbol SE4710 imager and PL3307C
400 MHz decoder
Sensor Resolution: 1280 x 800
Field of View: Horizontal 42°, vertical
28°
Reading Angles: Skew & pitch ±60°,
roll 360°
Read Range: 1” to 24” depending on
code type, size, and density
Aiming dot: Visible with low light
illumination
Symbologies: All common 1D, 2D
(PDF417, MicroPDF417, Composite, RSS,
TLC-39, Data matrix, QR code, Micro
QR code, Aztec, MaxiCode, Postal
codes, etc.)
Trigger Buttons: Programmable
Barcode Connector™ Utility: Wedge
and conguration
Power: 1.49 W active, 0.54 W standby,
8 mW sleep; by default device returns
to sleep after 1 second of inactivity
RS-232 (Option) RS-232C 9-pin D-sub connector
Hardware option for either 5 V @ 600
mA or 12 V @ 390 mA available on
pin 9 (ring in)
58 Mesa 2 Rugged Tablet Powered by Android Owner’s Manual
Page 63

FEATURE SPECIFICATION
Standard
Accessories
Removable Li-Ion battery
Adjustable hand strap
AC wall charger with international
plug kit
- In put: 10 0 -240 VAC, 50/60 Hz, 0.5 A
- Output: 12 VDC, 1.67 A
Capacitive ne tip stylus with tether
Quick Start Guide
Owner’s Manual (on our website)
Two year warranty on Mesa 3
Optional
Accessories
Survey/GPS pole clamp and mount
Vehicle charger cable, 12 V vehicle
power port, 6 ft.
Vehicle Dock with power and
communications.
Vehicle Dock/Pole mount - dock
attachment
Ofce Docking Station with power/
charge input, HDMI 1920 x 1080
resolution 60Hz output, 3 USB 2.0 (full
size A), Ethernet
AC wall charger, 45 W with U.S. plug
- Input: 120-240 VAC, 50/60 Hz
- Output: 12 VDC, 3.75 A
Travel charger
Shoulder strap
Serial cable
Holster carrying case
Flip cover tted case
4-point harness
SD cards in various sizes
Screen protector (anti-glare, ultra-
clear, or polarized)
Integrated 7.2 V, 3 Ah, 21.6 Wh internal
battery provides an additional 50% of
runtime and hot-swap capability (not
user replaceable)
Appendix D Specications 59
Page 64

FEATURE SPECIFICATION
War ranties 24 months for Mesa 3
90 days for accessories
Extended service and maintenance
plans are available
* 4G LTE Data Modem - Additional Information
Mode Frequency Bands
LTE B1, B2, B3, B4, B5, B6, B7, B8, B12, B13, B14, B17, B20, B28
UMTS/HSPA+ B1, B2, B4, B5, B8
GSM GSM 850, EGSM 900, DCS 1800, PCS 1900
60 Mesa 2 Rugged Tablet Powered by Android Owner’s Manual
Page 65

INDEX
Page 66

Index
Symbols
4G Data Modem
Install the SIM Card 20
Set up a Data Account 20
A
Accessories
Optional 59
Standard 59
AC Wall Charger 5, 47
Anatomy of the Mesa 3 2–3
Audio Features 17
B
Barcode Connector Utility 22
Barcode Imager 22
Barcode Connector Utility 22
Barcode Setup 22
Sample Barcodes 25–26
Battery Charger 34
Battery Compartment 3
Battery Door 2–3
Battery Pack, Internal 13 –14
Battery Pack, Removable 3–5, 13 –15
Battery Packs 12
Battery Life 13
Battery Status Icons 13
Charge 6, 13, 47
Install 4–5
Internal 13–14
Removable 3, 4, 12–13
Specications 55
Status 13
Storage 36
Warnings 46
Bluetooth Wireless Communication 17, 55
62 Mesa 3 Rugged Tablet Powered by Android
Page 67

C
Camera 19
Specications 57
Care and Maintenance
Cleaning 37
Storage 36
Cautions 15, 20, 36, 37, 42, 47
Certications and Standards 47
Canada 49
CE Marking, European Union 50
European Radio Power 51
Licensing Information 52
Radio Frequency Safety 50
United States 48
Cleaning 37
Compass 17
Complete Care Service Plans 44
Conguration, Standard 54
Connector Ports 3, 12
D
Data Modem 19
Set up a Data Account 20
Install the SIM Card 20
Data Storage 15, 54
Declaration of Conformity 51
Display 10
Auto-rotate 10
Dock. See Ofce Docking Station or Vehicle Dock
Documentation 4
E
Environmental Ratings and Standards 56
Equipment Warnings 47
Excell Battery Company Charge Instructions 47
F
Features
Optional 22
Standard 10
Index 63
Page 68

G
GPS/GNSS 18, 57
H
Hand Strap 6
K
Keypad
Programmable Buttons 12
L
LED Activity Indicators 15
Limitation of Liability 42
M
Memory 54
SD Cards 15
Microphone 56
N
NFC Short Range Wireless Technology 18, 55
O
Ofce Docking Station 30
Operating System 10
P
Physical Features 54
Powering Off and On 14
Product Warnings 46
R
Recycling the Mesa 3 and Batteries 37
Removable Battery Pack 3–5, 12–13
Repairs 43
RFID Reader 26–28
RS-232C Port 28, 55
64 Mesa 3 Rugged Tablet Powered by Android
Page 69

S
Screen Protector 59
SD Card 4, 15
Sensors 17
Accelerometer 17
Compass 17
Service Plans 44
Set up Tasks, Initial 4
SIM Card 3, 4, 20
Speaker 2
Specications 54–61
Storing the Mesa 2 14, 36
Stylus 3, 6
Stylus Storage Slot 2
Tether 6
System Information 44
44
T
Temperature Specications 56
Touchscreen 10–12
Auto-rotate the Screen 10
Enable/Disable 11
Protecting the Touchscreen 36
Settings 10
Specications 55
Touch Control Setting 11
U
USB Storage Device 16
V
Vehicle Dock 32
Index 65
Page 70

W
Wall Charger 5, 13, 47
Warnings 46–47
Battery Warnings 46–47
Wall Charger Warnings 47
War rant y 40–43
Exclusions 40
Limitation of Liability 42
Remedy 41
Repairs 42
Services 43
Warranty Exclusions 40
Wi-Fi Wireless Communication 18
Connecting to a Wi-Fi Network 18
66 Mesa 2 Rugged Tablet Owner’s Manual
 Loading...