

Page 1
Mesa 2 Oce Docking Station
The Ofce Docking Station enables you to perform
the following functions:
Charge your Mesa 2 Rugged Tablet
Use your Mesa 2 as a desktop computer
Transfer data to or from another computer or
network via the ethernet connection
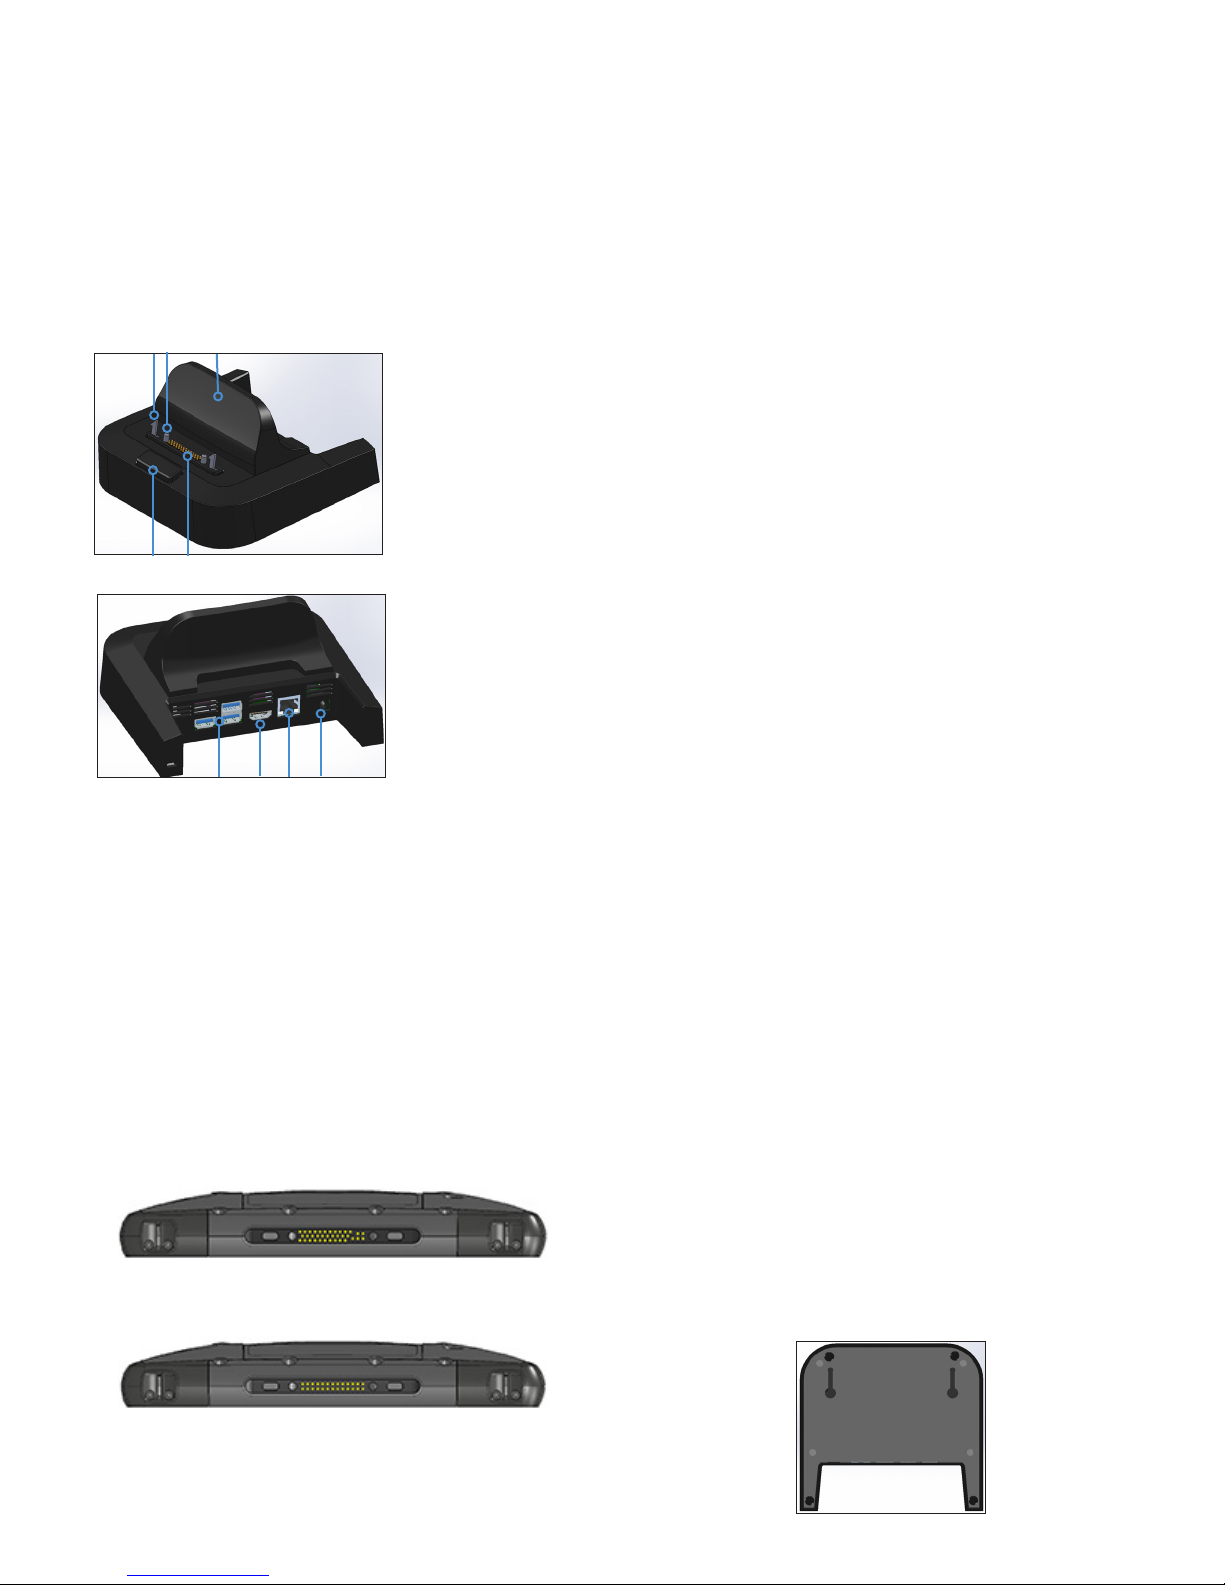
Dock Features
1
4
Ports
The USB ports are for attaching devices to the
Mesa 2 such as a mouse, keyboard, or external
storage device.
The HDMI port is for connecting a video monitor
to the Mesa 2, giving you a second monitor.
The ethernet port is used for networking (an
ethernet cable is not included).
HDMI Port
Some early Mesa 2 models require the use of a USB
to HDMI dongle in order to use the HDMI feature.
The HDMI port on the dock can be used if the
Mesa 2 has three rows of docking pin contacts.
32
1 Lock Latch (2)
2 Alignment Pin (2)
3 Back Rest
4 Release Button
5
6
7 8 9
5 Pogo Pins
6 USB Ports, Host (3)
7 HDMI Port
8 Ethernet Port
9 Power Input Jack
How to Use the Dock
1. Provide power to the dock using the 20 W AC
wall charger provided with your Mesa 2 (the
ports require external power). A 45 W charger
is available as an option. We recommend this
charger if you are using the dock as an ofce
computer with several peripheral functions.
There might not be enough power to charge
the batteries and run the Mesa 2.
2. Plug in the cables for your desired setup.
3. If a hand strap is covering the pin contacts on
the Mesa 2, unhook one end or remove it.
4. Hold the Mesa 2 horizontally with the docking
pin contacts facing down. Place it over the
dock alignment pins and press down until you
feel and hear the lock engage.
5. Some devices require drivers. If prompted,
follow the instructions on the screen and wait
for drivers to install. If you have a model of the
dock that uses a USB to HDMI dongle, you may
need to download and install a driver for the
dongle. The newest version of the driver can be
found here: http://www.displaylink.com/downloads/
le?id=675. A disk with the driver on it is also
provided with some dongles.
6. The Mesa 2 charges more quickly if the power
settings are set up to allow the Mesa 2 to enter
a low power mode when it is not in use, but is
plugged in. To adjust this setting, go to the Start
menu, then Settings > System > Power & sleep.
7. To remove the Mesa 2 from the dock, press on
the release button and pull the Mesa 2 up.
Adding a Video Monitor
To connect to a video monitor to the Mesa 2, plug
the device into the HDMI port (directly or through a
USB to HDMI dongle). Go to the Action Center and
select Project, then Extend or the option that you
prefer. You can have the start bar appear on either
one or both displays, or set the external monitor
to be the main display. This can be helpful in an
ofce environment. To set up additional features
like orientation, go to the Start menu, then Settings
> System > Display.
A dongle is required for HDMI if the Mesa 2 has two
rows of docking pin contacts.
Plug the USB connector on the dongle into a USB
port on the dock, then plug the HDMI cable into
the dongle. (Some dock models come with a
dongle. They are also sold separately.)
Mounting the Dock to a Surface
The Ofce Docking Station is freestanding. It can
be mounted to a surface like a desk or shelf. There
are keyhole slots on the bottom for this purpose.
The spacing between the holes is 4” (101.5 mm).
Page 2
Ethernet Specications
10/100/1000 Mbps twisted-pair ethernet
IEEE802.3/802.3u/802.3ab 10BASE-T, 100BASE-TX,
and 1000BASE-T
Manages twisted pair crossover detection and
correction
Full-duplex and half-duplex capability (only full-
duplex operation at 1000 Mbps)
Maintenance and Environmental Issues
The dock is intended for indoor use only.
Temperatures should be between 0° C to 50° C.
Avoid using the dock in situations where water
can enter the connector ports. It is not sealed
against water and must be kept dry.
Do not touch the docking pins (spring loaded
contacts) with conductive items when power is
applied to the dock.
Do not drop items on the dock that can
damage the pins.
Keep debris off of the docking pins.
Wall Charger Warnings
WARNING! To reduce the risk of personal injury,
!
electrical shock, re or damage to the equipment:
Plug the wall charger into an electrical outlet that is
easily accessible at all times.
Disconnect power from the equipment by
unplugging the wall charger from the electrical
outlet.
Do not place anything on the wall charger cord or
any of the other cables. Arrange them so that no
one may accidentally step on or trip over them.
pursuant to Part 15 of the FCC Rules. These limits
are designed to provide reasonable protection
against harmful interference when the equipment
is operated in a commercial environment. This
equipment generates, uses, and can radiate
radio frequency energy and, if not installed
and used in accordance with the instruction
manual, may cause harmful interference to radio
communications. Operation of this equipment
in a residential area is likely to cause harmful
interference in which case the user will be required
to correct the interference at his own expense.
CAUTION: Only approved accessories may
!
be used with this equipment. In general, all
cables must be high quality, shielded, correctly
terminated, and normally restricted to two
meters in length. Wall chargers approved for
this product employ special provisions to avoid
radio interference and should not be altered or
substituted.
CAUTION: Changes or modications to the
!
handheld or dock that are not expressly approved
by the manufacturer could void the user’s authority
to operate the equipment.
Industry Canada
This Class A digital apparatus complies with
Canadian ICES-003. Cet appareil numérique de
la classe A est conforme à la norme NMB-003 du
Canada.
This device complies with RSS-210 of Industry
Canada. Operation is subject to the following
two conditions: (1) this device may not cause
interference, and (2) this device must accept
any interference, including interference that may
cause undesired operation of the device.
Do not pull on a cord or cable. When unplugging
the wall charger from the electrical outlet, pull on
the plug, not the cord.
Use only wall chargers intended for the handheld.
Using any other external power source can
damage your product and void your warranty.
Regulatory Information
United States (FCC)
This device complies with Part 15 of the FCC Rules.
Operation of this equipment is subject to the
following two conditions:
1. The device may not cause harmful interference.
2. This device must accept any interference
received, even if the interference may cause
undesired operation.
This equipment has been tested and found to
comply with the limits for a Class A digital device,
CE Marking
Products bearing the CE marking comply
with the 2014/30/EU (EMC Directive) issued
by the Commission of the European
Co m m unit y.
tel: 435.753.1881
1132 W. 1700 N. Logan, UT 84321
P/N 26370-00. Copyright August 2016 Juniper Systems, Inc. Mesa 2 Rugged
Tablet is a trademark of Juniper Systems, Inc. Information is subject to
change without notice.
web: www.junipersys.com
l
 Loading...